Contents at a Glance
About the Author ...
xxxiii
About the Technical Reviewers ...
xxxv
Acknowledgments ...
xxxvii
Introduction ...
xxxix
Chapter 1: Installing the Oracle Binaries
■
...
1
Chapter 2: Implementing a Database
■
...
25
Chapter 3: Configuring an Efficient Environment
■
...
55
Chapter 4: Tablespaces and Data Files
■
...
77
Chapter 5: Managing Control Files, Online Redo Logs, and Archiving
■
...
99
Chapter 6: Users and Basic Security
■
...
127
Chapter 7: Tables and Constraints
■
...
153
Chapter 8: Indexes
■
...
205
Chapter 9: Views, Synonyms, and Sequences
■
...
237
Chapter 10: Data Dictionary Fundamentals
■
...
259
Chapter 11: Large Objects
■
...
277
Chapter 12: Partitioning: Divide and Conquer
■
...
303
Chapter 13: Data Pump
■
...
343
Chapter 14: External Tables
■
...
387
Chapter 15: Materialized Views
■
...
403
Chapter 17: Configuring RMAN
■
...
483
Chapter 18: RMAN Backups and Reporting
■
...
511
Chapter 19: RMAN Restore and Recovery
■
...
539
Chapter 20: Oracle Secure Backup
■
...
585
Chapter 21: Automating Jobs
■
...
613
Chapter 22: Database Troubleshooting
■
...
637
Chapter 23: Pluggable Databases
■
...
667
Introduction
Many companies, large and small, use Oracle products. At the heart of this technology is an Oracle database. Businesses use the technology to store and manage mission critical data. This information is the basis for making smart business decisions. Companies that effectively transform data into business intelligence quickly gain a competitive edge in the marketplace.
Oracle database administrators (DBAs) play a pivotal role in implementing and leveraging Oracle database technology. DBAs add value by ensuring that databases are created in an efficient manner and optimally maintained. DBAs are often queried for architectural advice on features, implementation, data migration, replication, SQL coding, tuning, and so on. DBAs fill the role of the go-to person for anything related to Oracle.
The job of an Oracle DBA is frequently complex and challenging. This book focuses on practical examples and techniques for providing a smoothly operating database environment. The content is drawn from years of experience working with Oracle technology. The book shows you from the ground up how a senior DBA manages a multifaceted database environment. I try to focus on demonstrating how to correctly implement features, with scalability and maintainability in mind.
I hope you find the material in this book useful. The goal is to elevate you to a professional level as a DBA. Being a DBA doesn’t have to be constantly painful. The key is to correctly implement the technology the first time, not paint yourself into a corner with a badly implemented feature, and proactively manage your surroundings.
This book doesn’t show you the most complex and sophisticated techniques used in database administration. I try to keep my techniques as simple as possible, yet robust enough to manage any level of chaos and complexity. You should be able to take the concepts elucidated in this book and build on them to help you manage any type of database environment.
Who This Book Is For
This book is for DBAs who want real-world guidance on how to efficiently configure and maintain complex database environments. Whether you are a novice or an expert, this book contains practical examples of how to implement Oracle database technology. This book is for those who want advice from a real DBA on how Oracle database technology is effectively implemented and maintained.
How This Book Is Structured
The book is divided into several sections, each covering a logical group of database administration topics, as follows:
Part 1 concentrates on creating a working environment. This includes installing the Oracle software and creating databases.
Part 2 deals with managing critical database files. Topics explored are tablespaces, data files, control files, and online redo log files.
Part 4 details how to create and maintain large database objects and partitioned tables and indexes.
Part 5 shows how DBAs use tools such as Data Pump, external tables, and materialized views to manage and distribute large amounts of data.
Part 6 takes a deep dive into backup-and-recovery (B&R) concepts. Both user-managed backups and Oracle Recovery Manager (RMAN) B&R are presented in detail.
Part 7 focuses on techniques used to automate database jobs and how to troubleshoot typical problems that DBAs encounter.
Part 8 describes how to implement and manage container and pluggable databases.
Conventions
The following typographical conventions are used in this book:
$ is used to denote Linux/Unix commands that can be run by the operating system (OS) owner
•
of the Oracle binaries (usually named oracle).
# is used to denote Linux/Unix commands that should be run as the root OS user.
•
SQL > is used to denote one-line SQL*Plus statements.
•
• Monospaced font is used for code examples, utility names, file names, URLs, and directory paths.
• Italic is used to highlight a new concept or term.
• UPPERCASE indicates names of database objects, such as views, tables, and corresponding column names.
< > is used where you need to provide input, such as a file name or password.
•
Downloading the Code
The code for the examples shown in this book is available on the Apress web site (www.apress.com). A link can be found on the book’s information page, under the Source Code/Downloads tab. This tab is located beneath the Related Titles section of the page.
Contacting the Author
If you have any questions regarding the book, please feel free to contact me directly at the following e-mail address:
Installing the Oracle Binaries
Oracle installations can be large, complex, and cumbersome. This is one reason you usually ask an Oracle database administrator (DBA) to install the software. You want someone who has previously performed installations and who knows how to troubleshoot when problems arise. Accordingly, installing the Oracle software (binaries) is a task at which every DBA must be proficient.
Tip
■
If you’re fairly new to Oracle, this chapter may seem like an overwhelming way to start a book on database
administration. Don’t worry too much about this. If you’re already working in an Oracle environment, chances are that
another DBA has probably already installed the Oracle binaries. If you don’t need to install the Oracle binaries, make sure
you read the following section, “Understanding the Optimal Flexible Architecture,” and then feel free to proceed
to Chapter 2.
Many DBAs don’t use techniques for automating installations. Some are unaware of these methods; others perceive them as unreliable. Therefore, most DBAs typically use the graphical mode of the Oracle Universal Installer (OUI). Although the graphical installer is a good tool, it doesn’t lend itself to repeatability and automation. Running the graphical installer is a manual process during which you’re presented with options to choose from on multiple screens. Even if you know which options to select, you may still inadvertently click an undesired choice.
The graphical installer can also be problematic when you’re performing remote installations, and the network bandwidth is insufficient. In these situations you can find yourself waiting for dozens of minutes for a screen to repaint itself on your local screen. You need a different technique for efficient installation on remote servers.
This chapter focuses on techniques for installing Oracle in an efficient and repeatable manner. This includes silent installations, which rely on a response file. A response file is a text file in which you assign values to variables that govern the installation. DBAs often don’t realize the powerful repeatability and efficiency that can be achieved by using response files.
Note
■
This chapter only covers installing the Oracle software. The task of creating a database is covered in Chapter 2.
Understanding the OFA
Note
■
One irony of this ubiquitous OFA “standard” is that almost every DBA, in some manner, customizes it to fit the
unique requirements of his or her environment.
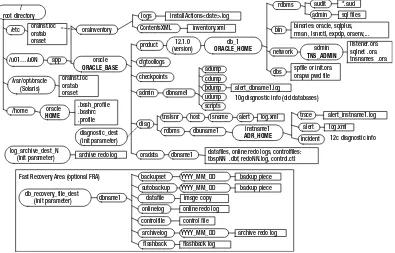
Because most shops implement a form of the OFA standard, understanding this structure is critical. Figure 1-1
shows the directory structure and file names used with the OFA standard. Not all the directories and files found in an Oracle environment appear in this figure (there isn’t enough room). However, the critical and most frequently used directories and files are displayed.
Figure 1-1. Oracle’s OFA standard
The OFA standard includes several directories that you should be familiar with:
Oracle inventory directory
Oracle Inventory Directory
The Oracle inventory directory stores the inventory of Oracle software installed on the server. This directory is required and is shared among all installations of Oracle software on a server. When you first install Oracle, the installer checks to see whether there is an existing OFA-compliant directory structure in the format /u[01–09]/app. If such a directory exists, then the installer creates an Oracle inventory directory, such as
/u01/app/oraInventory
If the ORACLE_BASE variable is defined for the oracle operating system (OS) user, then the installer creates a directory for the location of Oracle inventory, as follows:
ORACLE_BASE/../oraInventory
For example, if ORACLE_BASE is defined as /ora01/app/oracle, then the installer defines the location of Oracle inventory as
/ora01/app/oraInventory
If the installer doesn’t find a recognizable OFA-compliant directory structure or an ORACLE_BASE variable, then the location for Oracle inventory is created under the HOME directory of the oracle user. For instance, if the HOME directory is /home/oracle, then the location of Oracle inventory is
/home/oracle/oraInventory
Oracle Base Directory
The Oracle base directory is the topmost directory for Oracle software installation. You can install one or more versions of the Oracle software beneath this directory. The OFA standard for the Oracle base directory is as follows:
/<mount_point>/app/<software_owner>
Typical names for the mount point include /u01, /ora01, /oracle, and /oracle01. You can name the mount point according to whatever your standard is for your environment. I prefer to use a mount-point name such as /ora01. It’s short, and when I look at the mount points on a database server, I can immediately tell which are used for the Oracle database. Also, a short mount-point name is easier to use when you’re querying the data dictionary to report on the physical aspects of your database. Additionally, a shorter mount-point name makes for less typing when you’re navigating through directories via OS commands.
The software owner is typically named oracle. This is the OS user you use to install the Oracle software (binaries). Listed next is an example of a fully formed Oracle base directory path:
/u01/app/oracle
Oracle Home Directory
The Oracle home directory defines the installation location of software for a particular product, such as Oracle Database 12c or Oracle Database 11g. You must install different products or different releases of a product in separate Oracle homes. The recommended OFA-compliant Oracle home directory is as follows:
In the previous line of code, possible versions include 12.1.0.1 and 11.2.0.3. Possible install_name values include db_1, devdb1, test2, and prod1. Here is an example of an Oracle home name for a 12.1 database:
/u01/app/oracle/product/12.1.0.1/db_1
Note
■
Some DBAs dislike the db_1 string on the end of the ORACLE_HOME directory and see no need for it. The reason
for the db_1 is that you may have two separate installations of binaries: a development installation and a test installation.
If you don’t require that configuration in your environment, feel free to drop the extra string (db_1).
Oracle Network Files Directory
Some Oracle utilities use the value TNS_ADMIN to locate network configuration files. This directory is defined as ORACLE_HOME/network/admin. It typically contains the tnsnames.ora and listener.ora Oracle Net files.
Tip
■
Sometimes DBAs will set TNS_ADMIN to point at one central directory location (such as /etc or /var/opt/oracle).
This allows them to maintain one set of Oracle network files (instead of one for each ORACLE_HOME). This approach also
has the advantage of not requiring the copying or moving of files when a database upgrade occurs, potentially changing
the location of ORACLE_HOME.
Automatic Diagnostic Repository
Starting with Oracle Database 11g, the ADR_HOME directory specifies the location of the diagnostic files related to Oracle. These files are crucial for troubleshooting problems with the Oracle database. This directory is defined as ORACLE_BASE/diag/rdbms/lower(db_unique_name)/instance_name. You can query the V$PARAMETER view to get the values of db_unique_name and instance_name.
For example, in the next line, the lowercase database unique name is o12c, and the instance name is O12C:
/u01/app/oracle/diag/rdbms/o12c/O12C
You can verify the location of the ADR_HOME directory via this query:
SQL> select value from v$diag_info where name='ADR Home';
Here is some sample output:
VALUE
---/u01/app/oracle/diag/rdbms/o12c/O12C
Tip
■
See the
Oracle Database Installation Guide
for full details on OFA. This document can be freely downloaded from
the Technology Network area of the Oracle web site (
http://otn.oracle.com).
Installing Oracle
Suppose you’re new on the job, and your manager asks you how long it will take to install a new set of Oracle Database 12c software on a server. You reply that it will take less than an hour. Your boss is incredulous and states that previous DBAs always estimated at least a day to install the Oracle binaries on a new server. You reply, “Actually, it’s not that complicated, but DBAs do tend to overestimate installations, because it’s hard to predict everything that could go wrong.”
When you’re handed a new server and are given the task of installing the Oracle binaries, this usually refers to the process of downloading and installing the software required before you can create an Oracle database. This process involves several steps:
1. Create the appropriate OS groups. In Oracle Database 12c there are several OS groups that you can form and use to manage the level of granularity of SYSDBA permissions. Minimally, you’ll need to create an OS dba group and the OS oracle user.
2. Ensure that the OS is configured adequately for an Oracle database.
3. Obtain the database installation software from Oracle.
4. Unzip the database installation software.
5. If using the silent installer when first installing Oracle software on the box, create an oraInst.loc file. This step only needs to be done once per server. Subsequent installations do not require this step to be performed.
6. Configure the response file, and run the Oracle silent installer.
7. Troubleshoot any issues.
These steps are detailed in the following sections.
Note
■
Any version of the database that Oracle designates as a base release (10.1.0.2, 10.2.0.1, 11.1.0.6,
11.2.0.1, 12.1.0.1, and so on) can be freely downloaded from the Technology Network area of the Oracle web site
(
http://otn.oracle.com). However, be aware that any subsequent patch downloads require a purchased license.
In other words, downloading base software requires an Oracle Technology Network (OTN) login (free), whereas
downloading a patch set requires a My Oracle Support account (for fee).
Step 1. Create the OS Groups and User
If you work in a shop with a system administrator (SA), then steps 1 and 2 usually are performed by the SA. If you don’t have an SA, then you have to perform these steps yourself (this is often the case in small shops, where you may be required to perform many different job functions). You need root access to accomplish these steps.
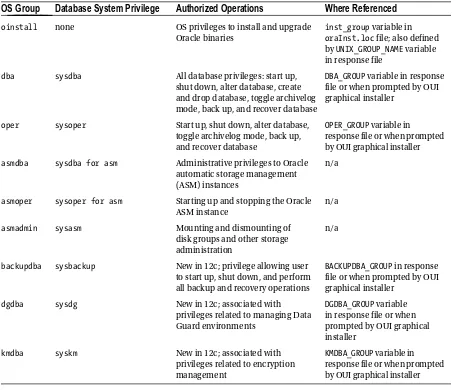
Nowadays, there are multiple OS groups that Oracle recommends you create—the idea being that you can add different OS users and assign them to groups on an as-needed basis, depending on the job function. When an OS user is assigned to a group, that assignment provides the user with specific database privileges. Table 1-1 documents the OS groups and how each group maps to corresponding database privileges. For example, if you have a user that is only responsible for monitoring database and that only needs privileges to start up and shut down the database, then that user would be assigned the oper group (which ensures that subsequent connections to the database can be done with sysoper privileges).
Table 1-1. Mapping of OS Groups to Privileges Related to Backup and Recovery
OS Group
Database System Privilege
Authorized Operations
Where Referenced
oinstall none OS privileges to install and upgrade Oracle binaries
inst_group variable in oraInst.loc file; also defined by UNIX_GROUP_NAME variable in response file
dba sysdba All database privileges: start up, shut down, alter database, create and drop database, toggle archivelog mode, back up, and recover database
DBA_GROUP variable in response file or when prompted by OUI graphical installer
oper sysoper Start up, shut down, alter database, toggle archivelog mode, back up, and recover database
OPER_GROUP variable in
response file or when prompted by OUI graphical installer
asmdba sysdba for asm Administrative privileges to Oracle automatic storage management (ASM) instances
n/a
asmoper sysoper for asm Starting up and stopping the Oracle ASM instance
n/a
asmadmin sysasm Mounting and dismounting of disk groups and other storage administration
n/a
backupdba sysbackup New in 12c; privilege allowing user to start up, shut down, and perform all backup and recovery operations
BACKUPDBA_GROUP in response file or when prompted by OUI graphical installer
dgdba sysdg New in 12c; associated with
privileges related to managing Data Guard environments
DGDBA_GROUP variable in response file or when prompted by OUI graphical installer
kmdba syskm New in 12c; associated with
privileges related to encryption management
KMDBA_GROUP variable in response file or when prompted by OUI graphical installer
of Oracle binaries managed with a group named dbatest. Each group would have permissions to manipulate only its set of binaries. Or, as mentioned earlier, you may decide to use just one group (dba) for everything. It all depends on your environment.
Once you decide which groups you need, then you need access to the root user to run the groupadd command. As root, add the OS groups that you need. Here, I add the three groups that I foresee will be needed:
# groupadd oinstall # groupadd dba # groupadd oper
If you don’t have access to the root account, then you need to get your SA to run the previous commands. You can verify that each group was added successfully by inspecting the contents of the /etc/group file. Here are typical entries created in the /etc/group file:
oinstall:x:500: dba:x:501: oper:x:502:
Now, create the oracle OS user. The following example explicitly sets the group ID to 500 (your company may require use of the same group ID for all installations), establishes the primary group as oinstall, and assigns the dba and oper groups to the newly created oracle user:
# useradd -u 500 -g oinstall -G dba,oper oracle
You can verify user account information by viewing the /etc/passwd file. Here is what you can expect to see for the oracle user:
oracle:x:500:500::/home/oracle:/bin/bash
If you need to modify a group, as root, use the groupmod command. If, for any reason, you need to remove a group (as root) use the groupdel command.
If you need to modify a user, as root, use the usermod command. If you need to remove an OS user, use the userdel command. You need root privileges to run the userdel command. This example removes the oracle user from the server:
# userdel oracle
Step 2. Ensure That the OS Is Adequately Configured
The tasks associated with this step vary somewhat for each database release and OS. You must refer to the Oracle installation manual for the database release and OS vendor to get the exact requirements. To perform this step, you’re required to verify and configure OS components such as these:
Memory and swap space
•
System architecture (processor)
•
Free disk space (Oracle now takes almost 5GB of space to install)
•
Operating system version and kernel
•
Operating system software (required packages and patches)
Run the following command to confirm the memory size on a Linux server:
$ grep MemTotal /proc/meminfo
To verify the amount of memory and swap space, run the following command:
$ free -t
To verify the amount of space in the /tmp directory, enter this command:
$ df -h /tmp
To display the amount of free disk space, execute this command:
$ df -h
To verify the OS version, enter this command:
$ cat /proc/version
To verify kernel information, run the following command:
$ uname -r
To determine whether the required packages are installed, execute this query, and provide the required package name:
$ rpm -q <package_name>
Again, database server requirements vary quite a bit by OS and database version. You can download the specific installation manual from the Documentation page of the Oracle web site (www.oracle.com/documentation).
Note
■
The OUI displays any deficiencies in OS software and hardware. Running the installer is covered in step 6.
Step 3. Obtain the Oracle Installation Software
Usually, the easiest way to obtain the Oracle software is to download it from the Oracle web site. Navigate to the software download page (www.oracle.com/technology/software), and download the Oracle database version that is appropriate for the type of OS and hardware on which you want to install it (Linux, Solaris, Windows, and so on).
Step 4. Unzip the Files
Before you unzip the files, I recommend that you create a standard directory where you can place the Oracle installation media. You should do this for a couple of reasons:
When you come back to a box a week, month, or year later, you’ll want to be able to easily find
•
the installation media.
Standard directory structures help you organize and understand quickly what has or hasn’t
•
Create a standard set of directories to contain the files used to install the Oracle software. I like to store the installation media in a directory such as /home/oracle/orainst and then create a subdirectory there for each version of the Oracle software that is installed on the box:
$ mkdir -p /home/oracle/orainst/11.2.0.2 $ mkdir -p /home/oracle/orainst/12.1.0.1
Now, move the installation files to the appropriate directory, and unzip them there:
$ mv linux_12c_database_1of2.zip /home/oracle/orainst/12.1.0.1 $ mv linux_12c_database_2of2.zip /home/oracle/orainst/12.1.0.1
Use the unzip command for unbundling zipped files. The Oracle Database 11g Release 2 software is unzipped, as shown:
$ unzip linux_12cR1_database_1of2.zip $ unzip linux_12cR1_database_2of2.zip
Tip
■
On some installations of Oracle, you may find that the distribution file is provided as a compressed cpio file. You can
uncompress and unbundle the file with one command, as follows: $ cat 10gr2_db_sol.cpio.gz | gunzip | cpio -idvm.
Step 5: Creating oraInst.loc File
If an oraInst.loc file already exists on your server, then you can skip this step. Creating the oraInst.loc file only needs to be performed the first time you install binaries on a server, using the silent install method. If you’re using the OUI graphical installer, then the oraInst.loc file is created automatically for you.
On Linux servers the oraInst.loc file is usually located in the /etc directory. On other Unix systems (such as Solaris) this file is located in the /var/opt/oracle directory. The oraInst.loc file contains the following information:
Oracle inventory directory path
•
Name of OS group that has permissions for installing and upgrading Oracle software
•
The Oracle inventory directory path is the location of files associated with managing Oracle installations and upgrades. Typically, there is one Oracle inventory per host. Within this directory structure is the inventory.xml file, which contains a record of where various versions of Oracle have been installed on the server.
The Oracle inventory OS group has the OS permissions required for installing and upgrading Oracle software. Oracle recommends that you name this group oinstall. You’ll find that sometimes DBAs assign the inventory group to the dba group. If your environment doesn’t require a separate group (such as oinstall), then using the dba group is fine.
You can create the oraInst.loc file with a utility such as vi. Here are some sample entries in the file:
inventory_loc=/u01/app/oraInventory inst_group=oinstall
As root, ensure that the response file is owned by the oracle OS user and that it has the proper file access privileges:
Step 6. Configure the Response File, and Run the Installer
You can run the OUI in one of two modes: graphical or silent. Typically, DBAs use the graphical installer. However, I strongly prefer using the silent install option for the following reasons:
Silent installs don’t require the availability of X Window System software.
•
You avoid performance issues with remote graphical installs, which can be extremely slow
•
when trying to paint screens locally.
Silent installs can be scripted and automated. This means that every install can be performed
•
with the same, consistent standards, regardless of which team member is performing the install (I even have the SA install the Oracle binaries this way).
The key to performing a silent install is to use a response file.
After unzipping the Oracle software, navigate to the database directory (which was created when you unzipped the Oracle zip files previously, in step 4); for example,
$ cd /home/oracle/orainst/12.1.0.1/database
Next, find the sample response files that Oracle provides:
$ find . -name "*.rsp"
Depending on the version of Oracle and the OS platform, the names and number of response files that you find may be quite different. The next two sections show two scenarios: an Oracle Database 11g Release 2 silent install and an Oracle Database 12c Release 1 silent install.
Oracle Database 11g Release 2 Scenario
Navigate to the database directory, and issue the find command to locate sample response files. Here are the response files provided with an Oracle Database 11g Release 2 on a Linux server:
$ find . -name "*.rsp" ./response/db_install.rsp ./response/dbca.rsp ./response/netca.rsp
Copy one of the response files so that you can modify it. This example copies the db_install.rsp file to the current working directory and names the file inst.rsp:
$ cp response/db_install.rsp inst.rsp
Keep in mind that the format of response files can differ quite a bit, depending on the Oracle database version. For example, there are major differences between Oracle Database 11g Release 1 and Oracle Database 11g Release 2. When you install a new release, you have to inspect the response file and determine which parameters must be set. Here is a partial listing of an Oracle Database 11g Release 2 response file (the first two lines are actually a single line of code but have been placed on two lines in order to fit on the page). The lines of code are the only variables that I modified. I removed the comments so that you could more clearly see which variables were modified:
oracle.install.responseFileVersion=
ORACLE_HOSTNAME=ora03 UNIX_GROUP_NAME=dba
oracle.install.db.DBA_GROUP=dba oracle.install.db.OPER_GROUP=dba
INVENTORY_LOCATION=/ora01/orainst/11.2.0.1/database/stage/products.xml SELECTED_LANGUAGES=en
ORACLE_HOME=/oracle/app/oracle/product/11.2.0/db_1 ORACLE_BASE=/oracle/app/oracle
DECLINE_SECURITY_UPDATES=true oracle.install.db.InstallEdition=EE oracle.install.db.isCustomInstall=true
Be sure to modify the appropriate parameters for your environment. If you’re unsure what to set the ORACLE_HOME and ORACLE_BASE values to, see the section “Understanding the Optimal Flexible Architecture,” earlier in this chapter, for a description of the OFA standard directories.
There are sometimes idiosyncrasies to these parameters that are specific to a release. For instance, in Oracle Database 11g Release 2, if you don’t want to specify your My Oracle Support (MOS) login information, then you need to set the following parameter as follows:
DECLINE_SECURITY_UPDATES=true
If you don’t set DECLINE_SECURITY_UPDATES to TRUE, then you will be expected to provide your MOS login information. Failure to do so will cause the installation to fail.
After you’ve configured your response file, you can run the Oracle installer in silent mode. Note that you have to enter the entire directory path for the location of your response file:
$ ./runInstaller -ignoreSysPrereqs -force -silent -responseFile \ /ora01/orainst/11.2.0.1/database/inst.rsp
The previous command is entered on two lines. The first line is continued to the second line via the backward slash (\).
Note
■
On Windows the setup.exe command is equivalent to the Linux/Unix runInstaller command.
If you encounter errors with the installation process, you can view the associated log file. Each time you attempt to run the installer, it creates a log file with a unique name that includes a timestamp. The log file is located in the oraInventory/logs directory. You can stream the output to your screen as the OUI writes to it:
$ tail -f <logfile name>
Here is an example of a log file name:
installActions2012-04-33 11-42-52AM.log
If everything runs successfully, in the output you’re notified that you need to run the root.sh script as the root user:
#Root scripts to run
Run the root.sh script as the root OS user. Then, you should be able to create an Oracle database (database creation is covered in Chapter 2).
Note
■
On Linux/Unix platforms, the root.sh script contains commands that must be run as the root user. This script
needs to modify the owner and permissions of some of the Oracle executables (such as the nmo executable). Some
versions of root.sh prompt you as to whether you want to accept the default values. Usually, it’s suitable to do so.
Oracle Database 12c Release 1 Scenario
Navigate to the database directory, and issue the find command to locate sample response files. Here are the response files provided with an Oracle Database 12c Release 1 on a Linux server:
$ find . -name "*.rsp" ./response/db_install.rsp ./response/netca.rsp ./response/dbca.rsp
Copy one of the response files so that you can modify it. This example copies the db_install.rsp file to the current working directory and names the file inst.rsp:
$ cp response/db_install.rsp inst.rsp
Modify the inst.rsp file. Here is a partial listing of an Oracle Database 12c Release 1 response file (the first two lines are actually a single line of code but have been placed on two lines in order to fit on the page). The lines of code are the only variables that I modified. I removed the comments so that you could more clearly see which variables were modified:
oracle.install.responseFileVersion=/oracle/install/rspfmt_dbinstall_response_schema_v12.1.0 oracle.install.option=INSTALL_DB_SWONLY
ORACLE_HOSTNAME=oraserv1 UNIX_GROUP_NAME=oinstall
INVENTORY_LOCATION=/home/oracle/orainst/12.1.0.1/database/stage/products.xml SELECTED_LANGUAGES=en
ORACLE_HOME=/u01/app/oracle/product/12.1.0.1/db_1 ORACLE_BASE=/u01/app/oracle
oracle.install.db.InstallEdition=EE oracle.install.db.DBA_GROUP=dba oracle.install.db.OPER_GROUP=oper oracle.install.db.BACKUPDBA_GROUP=dba oracle.install.db.DGDBA_GROUP=dba oracle.install.db.KMDBA_GROUP=dba DECLINE_SECURITY_UPDATES=true
After you’ve configured your response file, you can run the Oracle installer in silent mode. Note that you have to enter the entire directory path for the location of your response file:
$ ./runInstaller -ignoreSysPrereqs -force -silent -responseFile \ /home/oracle/orainst/12.1.0.1/database/inst.rsp
The previous command is entered on two lines. The first line is continued to the second line via the backward slash (\).
If you encounter errors with the installation process, you can view the associated log file. Each time you attempt to run the installer, it creates a log file with a unique name that includes a timestamp. The log file is created in the oraInventory/logs directory. You can stream the output to your screen as the OUI writes to it:
$ tail -f <logfile name>
Here is an example of a log file name:
installActions2012-11-04_02-57-29PM.log
If everything runs successfully, in the output you’re notified that you need to run the root.sh script as the root user:
/u01/app/oracle/product/12.1.0.1/db_1/root.sh
Run the root.sh script as the root OS user. Then, you should be able to create an Oracle database (database creation is covered in Chapter 2).
Step 7. Troubleshoot Any Issues
If you encounter an error, using a response file, 90 percent of the time it’s due to an issue with how you set the variables in the file. Inspect those variables carefully, and ensure that they’re set correctly. Also, if you don’t fully specify the command-line path to the response file, you receive errors such as this:
OUI-10203: The specified response file ... is not found.
Here is another common error when the path or name of the response file is incorrectly specified:
OUI-10202: No response file is specified for this session.
Listed next is the error message you receive if you enter a wrong path to your products.xml file within the response file’s FROM_LOCATION variable:
OUI-10133: Invalid staging area
Problems can also occur when you specify an ORACLE_HOME, and the silent installation “thinks” the given home already exists:
Check complete: Failed <<<<
Recommendation: Choose a new Oracle Home for installing this product.
Check your inventory.xml file (in the oraInventory/ContentsXML directory), and make sure there isn’t a conflict with an already existing Oracle home name.
When you’re troubleshooting issues with Oracle installations, remember that the installer uses two key files to keep track of what software has been installed, and where: oraInst.loc and inventory.xml. Table 1-2 describes the files used by the Oracle installer.
Table 1-2. Useful Files for Troubleshooting Oracle Installation Issues
File name
Directory Location
Contents
oraInst.loc The location of this file varies by OS. On Linux the file is in /etc; on Solaris, it’s in /var/opt/oracle.
oraInventory directory location and installation OS group
inst.loc \\HKEY_LOCAL_MACHINE\\Software\Oracle (Windows registry)
Inventory information
inventory.xml oraInventory/ContentsXML/inventory.xml Oracle home names and corresponding directory location
.log files oraInventory/logs Installation log files, which are
extremely useful for troubleshooting
Installing with a Copy of an Existing Installation
DBAs sometimes install Oracle software by using a utility such as tar to copy an existing installation of the Oracle binaries to a different server (or a different location on the same server). This approach is fast and simple (especially compared with downloading and running the Oracle installer). This technique allows DBAs to easily install the Oracle software on multiple servers, while ensuring that each installation is identical.
Installing Oracle with an existing copy of the binaries is a two-part process:
1. Copy the binaries, using an OS utility.
2. Attach the Oracle home.
These steps are detailed in the next two sections.
Tip
Step 1. Copy the Binaries, Using an OS Utility
You can use any OS copy utility to perform this step. The Linux/Unix tar, scp, and rsync utilities are commonly used by DBAs to copy files. This example shows how to use the Linux/Unix tar utility to replicate an existing set of Oracle binaries to a different server. First, locate the target Oracle home binaries that you want to copy:
$ echo $ORACLE_HOME
/ora01/app/oracle/product/12.1.0.1/db_1
In this example the tar utility copies every file and subdirectory in or below the db_1 directory:
$ cd $ORACLE_HOME $ cd ..
$ tar -cvf orahome.tar db_1
Now, copy the orahome.tar file to the server on which you want to install the Oracle software. In this example the tar file is copied to the /u01/app/oracle/product/12.1.0.1 directory on a different server. The tar file is extracted there and creates a db_1 directory as part of the extract:
$ cd /u01/app/oracle/product/12.1.0.1
Make sure you have plenty of disk space available to extract the files. A typical Oracle installation can consume at least 3–4GB of space. Use the Linux/Unix df command to verify that you have enough space:
$ df -h | sort
Next, extract the files:
$ tar -xvf orahome.tar
When the tar command completes, there should be a db_1 directory beneath the /u01/app/oracle/ product/12.1.0.1 directory.
Tip
■
Use the tar -tvf <tarfile_name> command to preview which directories and files are restored without
actually restoring them.
Listed next is a powerful one-line combination of commands that allows you to bundle the Oracle files, copy them to a remote server, and have them extracted remotely:
$ tar -cvf - <locDir> | ssh <remoteNode> "cd <remoteDir>; tar -xvf -"
For instance, the following command copies everything in the dev_1 directory to the remote ora03 server /home/oracle directory:
ABSOLUTE PATHS VS. RELATIVE PATHS
Some older, non-GNU versions of tar use absolute paths when extracting files. The next line of code shows an
example of specifying the absolute path when creating an archive file:
$ tar -cvf orahome.tar /home/oracle
Specifying an absolute path with non-GNU versions of tar can be dangerous. These older versions of tar
restore the contents with the same directories and file names from which they were copied. This means that any
directories and file names that previously existed on disk are overwritten.
When using older versions of tar, it’s much safer to use a relative pathname. This example first changes to the
/home directory and then creates an archive of the oracle directory (relative to the current working directory):$ cd /home
$ tar -cvf orahome.tar oracle
The previous example uses the relative pathname.
You don’t have to worry about absolute vs. relative paths on most Linux systems. This is because these systems
use the GNU version of tar. This version strips off the forward slash (/) and restores files relative to where your
current working directory is located.
Use the man tar command if you’re not sure whether you have a GNU version of the tar utility. You can also use
the tar -tvf <tarfile name> command to preview which directories and files are restored to what locations.
Step 2. Attach the Oracle Home
One issue with using a copy of an existing installation to install the Oracle software is that if you later attempt to upgrade the software, the upgrade process will throw an error and abort. This is because a copied installation isn’t registered in oraInventory. Before you upgrade a set of binaries installed via a copy, you must first register the Oracle home so that it appears in the inventory.xml file. This is called attaching an Oracle home.
To attach an Oracle home, you need to know the location of your oraInst.loc file on your server. On Linux servers this file is usually located in the /etc directory. On Solaris this file can generally be found in the /var/opt/ oracle directory.
After you’ve located your oraInst.loc file, navigate to the ORACLE_HOME/oui/bin directory (on the server on which you installed the Oracle binaries from a copy):
$ cd $ORACLE_HOME/oui/bin
Now, attach the Oracle home by running the runInstaller utility, as shown:
$ ./runInstaller -silent -attachHome -invPtrLoc /etc/oraInst.loc \
ORACLE_HOME="/u01/app/oracle/product/12.1.0.1/db_1" ORACLE_HOME_NAME="ONEW"
You should see this as the last message in the output, if successful:
You can also examine the contents of your oraInventory/ContentsXML/inventory.xml file. Here is a snippet of the line inserted into the inventory.xml file as a result of running the runInstaller utility with the attachHome option:
<HOME NAME="ONEW" LOC="/u01/app/oracle/product/12.1.0.1/db_1" TYPE="O" IDX="2"/>
Upgrading Oracle Software
You can also upgrade a version of the Oracle software, using the silent installation method. Begin by downloading the upgrade version from the MOS web site (http://support.oracle.com) (you need a valid support contract to do this). Read the upgrade documentation that comes with the new software. The upgrade procedure can vary quite a bit, depending on what version of Oracle you’re using.
For the most recent upgrades that I’ve performed, the procedure was much like installing a new set of Oracle binaries. You can use the OUI in either graphical or silent mode to install the software. See the section “Installing Oracle,” earlier in this chapter, for information on using the silent mode installation method.
Note
■
Upgrading the Oracle software isn’t the same as upgrading an Oracle database. This section only deals with
using the silent install method for upgrading the Oracle software. Additional steps are involved for upgrading a database.
See MOS note 730365.1 for instructions on how to upgrade a database.
Depending on the version being upgraded, you may be presented with two different scenarios. Here is scenario A:
1. Shut down any databases using the Oracle home to be upgraded.
2. Upgrade the Oracle home binaries.
3. Start up the database, and run any required upgrade scripts.
Here are the steps for the scenario B approach to an upgrade:
1. Leave the existing Oracle home as it is—don’t upgrade it.
2. Install a new Oracle home that is the same version as the old Oracle home.
3. Upgrade the new Oracle home to the desired version.
4. When you’re ready, shut down the database using the old Oracle home; set the OS variables to point to the new, upgraded Oracle home; start up the database; and run any required upgrade scripts.
Which of the two previous scenarios is better? Scenario B has the advantage of leaving the old Oracle home as it is; therefore, if, for any reason, you need to switch back to the old Oracle home, you have those binaries available. Scenario B has the disadvantage of requiring extra disk space to contain two installations of Oracle home. This usually isn’t an issue, because after the upgrade is complete, you can delete the old Oracle home when it’s convenient.
Tip
Reinstalling After Failed Installation
You may run into a situation in which you’re attempting to install Oracle, and for some reason the installation fails. You correct the issue and attempt to rerun the Oracle installer. However, you receive this message:
CAUSE: The chosen installation conflicted with software already installed in the given Oracle home.
ACTION: Install into a different Oracle home.
In this situation, Oracle thinks that the software has already been installed, for a couple of reasons:
Files in the
• ORACLE_HOME directory are specified in the response file. An existing Oracle home and location in your
• oraInventory/ContentsXML/inventory.xml file
match what you have specified in the response file.
Oracle doesn’t allow you to install a new set of binaries over an existing Oracle home. If you’re sure you don’t need any of the files in the ORACLE_HOME directory, you can remove them (be very careful—ensure that you absolutely want to do this). This example navigates to ORACLE_HOME and then removes the db_1 directory and its contents:
$ cd $ORACLE_HOME $ cd ..
$ rm -rf db_1
Also, even if there are no files in the ORACLE_HOME directory, the installer inspects the inventory.xml file for previous Oracle home names and locations. In the inventory.xml file you must remove the entry corresponding to the Oracle home location that matches the Oracle home you’re trying to install to. To remove the entry, first, locate your oraInst.loc file, which contains the directory of your oraInventory. Next, navigate to the oraInventory/ ContentsXML directory. Make a copy of inventory.xml before you modify it:
$ cp inventory.xml inventory.xml.old
Then, edit the inventory.xml file with an OS utility (such as vi), and remove the line that contains the Oracle home information of your previously failed installation. You can now attempt to execute the runInstaller utility again.
Applying Interim Patches
Sometimes, you’re required to apply a patch to resolve a database issue or eradicate a bug. You can usually obtain patches from the MOS web site and install them with the opatch utility. Here are the basic steps for applying a patch:
1. Obtain the patch from MOS (requires a valid support contract).
2. Unzip the patch file.
3. Carefully read the README.txt file for special instructions.
4. Shut down any databases and processes using the Oracle home to which the patch is being applied.
5. Apply the patch.
A brief example will help illustrate the process of applying a patch. Here, the patch number 14390252 is applied to an 11.2.0.3 database on a Solaris box. First, download the p14390252_112030_SOLARIS64.zip file from MOS (https://support.oracle.com). Next, unzip the file on the server to which the patch is being applied: $ unzip p14390252_112030_SOLARIS64.zip
The README.txt instructs you to change the directory, as follows:
$ cd 14390252
Make sure you follow the instructions included in the README.txt, such as shutting down any databases that use the Oracle home to which the patch is being applied:
$ sqlplus / as sysdba SQL> shutdown immediate;
Next, apply the patch. Ensure that you perform this step as the owner of the Oracle software (usually the oracle OS account). Also make sure your ORACLE_HOME variable is set to point to the Oracle home to which you’re applying the patch. In this example, because the opatch utility isn’t in a path included in the PATH directory, you specify the entire path:
$ $ORACLE_HOME/OPatch/opatch napply -skip_subset -skip_duplicate
Finally, verify that the patch was applied by listing the inventory of patches:
$ $ORACLE_HOME/OPatch/opatch lsinventory
Here is some sample output for this example:
Patch 13742433 : applied on Sun Nov 04 13:49:07 MST 2012 Unique Patch ID: 15427576
Tip
■
See MOS note 242993.1 for more information regarding the opatch utility.
Installing Remotely with the Graphical Installer
In today’s global environment, DBAs often find themselves tasked with installing Oracle software on remote Linux/Unix servers. In these situations I strongly suggest that you use the silent installation mode with a response file (as mentioned earlier). However, if you want to install Oracle on a remote server via the graphical installer, this section of the chapter describes the required steps.
Note
One issue that frequently arises is how to run the Oracle installer on a remote server and have the graphical output displayed to your local computer. Figure 1-2 shows the basic components and utilities required to run the Oracle graphical installer remotely.
Listed next are the steps for setting up your environment to display the graphical screens on your local computer while remotely running the Oracle installer:
1. Install software on the local computer that allows for X Window System emulation and secure networking.
2. Start an X session on the local computer, and issue the startx command.
3. Copy the Oracle installation files to the remote server.
4. Run the xhost command.
5. Log in to the remote computer from an X terminal.
6. Ensure that the DISPLAY variable is set correctly on the remote computer.
7. Execute the runInstaller utility on the remote server.
8. Troubleshoot.
These steps are explained in the following sections.
Step 1. Install X Software and Networking Utilities on the Local PC
If you’re installing Oracle on a remote server, and you’re using your home personal computer (PC), then you first need to install software on your PC that allows you to run X Window System software and to run commands such as ssh (secure shell) and scp (secure copy). Several free tools are available that provide this functionality. One such tool is Cygwin, which you can download from the Cygwin web site (http://x.cygwin.com). Be sure to install the packages that provide the X emulation and secure networking utilities, such as ssh and scp.
1. Install X software 2. startx
3. Copy over files 4. xhost +
5. ssh -Y-l oracle <remote_server>
6. Verify DISPLAY variable 7. ./runisntaller 8. Troubleshoot
Step 2. Start an X Session on the Local Computer
After you install on your local computer the software that allows you to run X Window System software, you can open an X terminal window and start the X server via the startx command:
$ startx
Here is a snippet of the output:
xauth: creating new authority file /home/test/.serverauth.3012 waiting for X server to begin accepting connections.
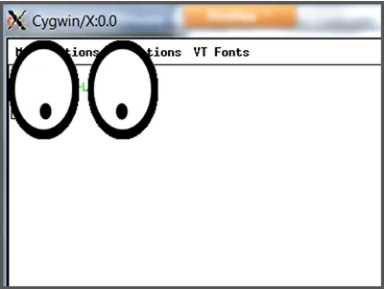
When the X software has started, run a utility such as xeyes to determine whether X is working properly:
$ xeyes
Figure 1-3 shows what a local terminal session looks like, using the Cygwin X terminal session tool.
If you can’t get a utility such as xeyes to execute, stop at this step until you get it working. You must have correctly functioning X software before you can remotely install Oracle, using the graphical installer.
Step 3. Copy the Oracle Installation Media to the Remote Server
From the X terminal, run the scp command to copy the Oracle installation media to the remote server. Here is the basic syntax for using scp:
$ scp <localfile> <username>@<remote_server>:<remote_directory>
The next line of code copies the Oracle installation media to a remote Oracle OS user on a remote server in the home directory oracle:
$ scp linux_11gR2_database_1of2.zip oracle@shrek2:.
Step 4. Run the xhost Command
From the X screen, enable access to the remote host via the xhost command. This command must be run from your local computer:
$ xhost +
access control disabled, clients can connect from any host.
The prior command allows any client to connect to the local X server. If you want to enable remote access specifically for the remote computer on which you’re installing the software, provide an Internet protocol (IP) address or hostname (of the remote server). In this example the remote hostname is tst-z1.central.sun.com
$ xhost +tst-z1.central.sun.com
tst-z1.central.sun.com being added to access control list
Step 5. Log In to the Remote Computer from X
From your local X terminal, use the ssh utility to log in to the remote server on which you want to install the Oracle software:
$ ssh -Y -l oracle <hostname>
Step 6. Ensure that the DISPLAY Variable Is Set Correctly
on the Remote Computer
When you’ve logged in to the remote box, verify that your DISPLAY variable has been set:
$ echo $DISPLAY
You should see something similar to this:
localhost:10.0
If your DISPLAY variable is set to localhost:10.0, then proceed to the next step. Otherwise, follow the next set of recommendations.
If your DISPLAY variable isn’t set, you must ensure that it’s set to a value that reflects your local home computer location. From your local home computer, you can use the ping or arp utility to determine the IP address that identifies your local computer. Run the following command on your home computer:
C:\> ping <local_computer>
Tip
Now, from the remote server, execute this command to set the DISPLAY variable to contain the IP address of the local computer:
$ export DISPLAY=129.151.31.147:0.0
Note that you must append the :0.0 to the end of the IP address. If you’re using the C shell, use the setenv command to set the DISPLAY variable:
$ setenv DISPLAY 129.151.31.147:0.0
If you’re unsure which shell you’re using, use the echo command to display the SHELL variable:
$ echo $SHELL
Step 7. Execute the runInstaller Utility
Navigate to the directory where you copied and unzipped the Oracle software on the remote server. Locate the runInstaller utility, and run it, as shown:
$ ./runInstaller
If everything goes well, you should see a screen such as the one in Figure 1-4.
From here, you can point and click your way through an Oracle installation of the software. Many DBAs are more comfortable installing the software through a graphical screen. This is a particularly good method if you aren’t familiar with Oracle’s installation process and want to be prompted for input and presented with reasonable default values.
Step 8. Troubleshoot
Most issues with remote installations occur in steps 4, 5, and 6. Make sure you’ve properly enabled remote-client access to your local X server (running on your home computer) via the xhost command. The xhost command must be run on the local computer on which you want the graphical display presented. Using the + (plus sign) with the remote hostname adds a host to the local access list. This enables the remote server to display an X window on the local host. If you type the xhost command by itself (with no parameters), it displays all remote hosts that can display X sessions on the local computer:
$ xhost
access control disabled, clients can connect from any host
Setting the DISPLAY OS variable on the remote server is also crucial. This allows you to log in to another host remotely and display an X application back to your local computer. The DISPLAY variable must be set on the remote database server, to contain information that points it to the local computer on which you want the graphical screen displayed.
Summary
This chapter detailed techniques for efficiently installing the Oracle binaries. These methods are especially useful if you work in environments in which you are geographically separated from the database servers. The Oracle silent installation method is efficient because it doesn’t require graphical software and uses a response file that helps enforce consistency from one installation to the next. When working in chaotic and constantly changing environments, you should benefit from the installation tips and procedures described here.
Many DBAs feel more comfortable using Oracle’s graphical installer for installing the database software. However, the graphical installer can be troublesome when the server is in a remote location or embedded deeply within a secure network. A slow network or a security feature can greatly impede the graphical installation process. In these situations, make sure you correctly configure the required X software and OS variables (such as DISPLAY).
Implementing a Database
Chapter 1 detailed how to efficiently install the Oracle binaries. After you’ve installed the Oracle software, the next logical task is creating a database. There are two standard ways for creating Oracle databases:
Use the Database Configuration Assistant (
• dbca) utility
Run a
• CREATE DATABASE statement from SQL*Plus
Oracle’s dbca utility has a graphical interface from which you can configure and create databases. This visual tool is easy to use and has a very intuitive interface. If you need to create a development database and get going quickly, then this tool is more than adequate. Having said that, I normally don’t use the dbca utility to create databases. In Linux/Unix environments the dbca tool depends on X software and an appropriate setting for the OS DISPLAY variable. The dbca utility therefore requires some setup and can perform poorly if you’re installing on remote servers when the network throughput is slow.
The dbca utility also allows you to create a database in silent mode, without the graphical component. Using dbca in silent mode with a response file is an efficient way to create databases in a consistent and repeatable manner. This approach also works well when you’re installing on remote servers, which could have a slow network connection or not have the appropriate X software installed.
When you’re creating databases on remote servers, it’s usually easier and more efficient to use SQL*Plus. The SQL*Plus approach is simple and inherently scriptable. In addition, SQL*Plus works no matter how slow the network connection is, and it isn’t dependent on a graphical component. Therefore, I almost always use the SQL*Plus technique to create databases.
This chapter starts by showing you how to quickly create a database using SQL*Plus, and also how to make your database remotely available by enabling a listener process. Later, the chapter demonstrates how to use the dbca utility in silent mode with a response file to create a database.
Setting OS Variables
Before creating a database, you need to know a bit about OS variables, often called environment variables. Before you run SQL*Plus (or any other Oracle utility), you must set several OS variables:
• ORACLE_HOME
• ORACLE_SID
• LD_LIBRARY_PATH
• PATH
The ORACLE_HOME variable is also important because it defines the starting point directory for locating the Oracle binary files (such as sqlplus, dbca, netca, rman, and so on) that are in ORACLE_HOME/bin.
The ORACLE_SID variable defines the default name of the database you’re attempting to create. ORACLE_SID is also used as the default name for the parameter file, which is init<ORACLE_SID>.ora or spfile<ORACLE_SID>.ora.
The LD_LIBRARY_PATH variable is important because it specifies where to search for libraries on Linux/Unix boxes. The value of this variable is typically set to include ORACLE_HOME/lib.
The PATH variable specifies which directories are looked in by default when you type a command from the OS prompt. In almost all situations, ORACLE_HOME/bin (the location of the Oracle binaries) must be included in your PATH variable.
You can take several different approaches to setting the prior variables. This chapter discusses three, beginning with a hard-coded manual approach and ending with the approach that I personally prefer.
A Manually Intensive Approach
In Linux/Unix, when you’re using the Bourne, Bash, or Korn shell, you can set OS variables manually from the OS command line with the export command::
$ export ORACLE_HOME=/u01/app/oracle/product/12.1.0.1/db_1 $ export ORACLE_SID=o12c
$ export LD_LIBRARY_PATH=/usr/lib:$ORACLE_HOME/lib $ export PATH=$ORACLE_HOME/bin:$PATH
For the C or tcsh shell, use the setenv command to set variables:
$ setenv ORACLE_HOME <path> $ setenv ORACLE_SID <sid> $ setenv LD_LIBRARY_PATH <path> $ setenv PATH <path>
Another way that DBAs set these variables is by placing the previous export or setenv commands into a Linux/Unix startup file, such as .bash_profile, .bashrc, or .profile. That way, the variables are automatically set upon login.
However, manually setting OS variables (either from the command line or by hard-coding values into a startup file) isn’t the optimal way to instantiate these variables. For example, if you have multiple databases with multiple Oracle homes on a box, manually setting these variables quickly becomes unwieldy and not very maintainable.
Oracle’s Approach to Setting OS Variables
A much better method for setting OS variables is use of a script that uses a file that contains the names of all Oracle databases on a server and their associated Oracle homes. This approach is flexible and maintainable. For instance, if a database’s Oracle home changes (e.g., after an upgrade), you only have to modify one file on the server and not hunt down where the Oracle home variables may be hard-coded into scripts.
Oracle provides a mechanism for automatically setting the required OS variables. Oracle’s approach relies on two files: oratab and oraenv.
Understanding oratab
in the /var/opt/oracle directory. If, for some reason, the oratab file isn’t automatically created, you can manually create the directory and file.
The oratab file is used in Linux/Unix environments for the following purposes:
Automating the sourcing of required OS variables
•
Automating the start and stop of Oracle databases on the server
•
The oratab file has three columns with this format:
<database_sid>:<oracle_home_dir>:Y|N
The Y or N indicates whether you want Oracle to restart automatically on reboot of the box; Y indicates yes, and N indicates no. Automating the startup and shutdown of your database is covered in detail in Chapter 21.
Comments in the oratab file start with a pound sign (#). Here is a typical oratab file entry:
o12c:/u01/app/oracle/product/12.1.0.1/db_1:N rcat:/u01/app/oracle/product/12.1.0.1/db_1:N
The names of the databases on the previous lines are o12c and rcat. The path of each database’s Oracle home directory is next on the line (separated from the database name by a colon [:]).
Several Oracle-supplied utilities use the oratab file:
• oraenv uses oratab to set the OS variables.
• dbstart uses it to start the database automatically on server reboots (if the third field in oratab is Y).
• dbshut uses it to stop the database automatically on server reboots (if the third field in oratab is Y).
The oraenv tool is discussed in the following section.
Using oraenv
If you don’t properly set the required OS variables for an Oracle environment, then utilities such as SQL*Plus, Oracle Recovery Manager (RMAN), Data Pump, and so on won’t work correctly. The oraenv utility automates the setting of required OS variables (such as ORACLE_HOME, ORACLE_SID, and PATH) on an Oracle database server. This utility is used in Bash, Korn, and Bourne shell environments (if you’re in a C shell environment, there is a corresponding coraenv utility).
The oraenv utility is located in the ORACLE_HOME/bin directory. You can run it manually, like this:
$ . oraenv
Note that the syntax to run this from the command line requires a space between the dot (.) and the oraenv tool. You’re prompted for ORACLE_SID and ORACLE_HOME values:
ORACLE_SID = [oracle] ? ORACLE_HOME = [/home/oracle] ?
You can also run the oraenv utility in a noninteractive way by setting OS variables before you run it. This is useful for scripting when you don’t want to be prompted for input:
Keep in mind that if you set your ORACLE_SID to a value that isn’t found with the oratab file, then you may be prompted for values such as ORACLE_HOME.
My Approach to Setting OS Variables
I don’t use Oracle’s oraenv file to set the OS variables (see the previous section, “Using oraenv,” for details of Oracle’s approach). Instead, I use a script named oraset. The oraset script depends on the oratab file’s being in the correct directory and expected format:
<database_sid>:<oracle_home_dir>:Y|N
As mentioned in the previous section, the Oracle installer should create an oratab file for you in the correct directory. If it doesn’t, then you can manually create and populate the file. In Linux the oratab file is usually created in the /etc directory. On Solaris servers the oratab file is located in the /var/opt/oracle directory.
Next, use a script that reads the oratab file and sets the OS variables. Here is an example of an oraset script that reads the oratab file and presents a menu of choices (based on the database names in the oratab file):
#!/bin/bash
# Sets Oracle environment variables.
# Setup: 1. Put oraset file in /etc (Linux), in /var/opt/oracle (Solaris) # 2. Ensure /etc or /var/opt/oracle is in $PATH
# Usage: batch mode: . oraset <SID> # menu mode: . oraset
#==================================================== if [ −f /etc/oratab ]; then
OTAB=/etc/oratab
elif [ −f /var/opt/oracle/oratab ]; then OTAB=/var/opt/oracle/oratab
fi #
export ORACLE_SID=$HOLD_SID
export ORACLE_HOME=$(egrep -v '#|\*' $OTAB|grep -w $ORACLE_SID:|cut -f2 -d:) export ORACLE_BASE=${ORACLE_HOME%%/product*}
export TNS_ADMIN=$ORACLE_HOME/network/admin export ADR_BASE=$ORACLE_BASE/diag
export PATH=$ORACLE_HOME/bin:/usr/ccs/bin:/opt/SENSsshc/bin/\ :/bin:/usr/bin:.:/var/opt/oracle:/usr/sbin
export LD_LIBRARY_PATH=/usr/lib:$ORACLE_HOME/lib
You can run the oraset script either from the command line or from a startup file (such as .profile, .bash_profile, or .bashrc). To run oraset from the command line, place the oraset file in a standard location, such as /var/opt/oracle (Solaris) or /etc (Linux), and run, as follows:
$ . /etc/oraset
Note that the syntax to run this from the command line requires a space between the dot (.) and the rest of the command. When you run oraset from the command line, you should be presented with a menu such as this:
1) o12c 2) rcat SID?
In this example you can now enter 1 or 2 to set the OS variables required for whichever database you want to use. This allows you to set up OS variables interactively, regardless of the number of database installations on the server.
You can also call the oraset file from an OS startup file. Here is a sample entry in the .bashrc file:
. /etc/oraset
Now, every time you log in to the server, you’re presented with a menu of choices that you can use to indicate the database for which you want the OS variables set. If you want the OS variables automatically set to a particular database, then put an entry such as this in the .bashrc file:
. /etc/oraset o12c
The prior line will run the oraset file for the o12c database and set the OS variables appropriately.
Creating a Database
This section explains how to create an Oracle database manually with the SQL*Plus CREATE DATABASE statement. These are the steps required to create a database:
1. Set the OS variables.
2. Configure the initialization file.
3. Create the required directories.
4. Create the database.
Step 1. Set the OS Variables
As mentioned previously, before you run SQL*Plus (or any other Oracle utility), you must set several OS variables. You can either manually set these variables or use a combination of files and scripts to set the variables. Here’s an example of setting these variables manually:
$ export ORACLE_HOME=/u01/app/oracle/product/12.1.0.1/db_1 $ export ORACLE_SID=o12c
$ export LD_LIBRARY_PATH=/usr/lib:$ORACLE_HOME/lib $ export PATH=$ORACLE_HOME/bin:$PATH
See the section “Setting OS Variables,” earlier in this chapter, for a complete description of these variables and techniques for setting them.
Step 2: Configure the Initialization File
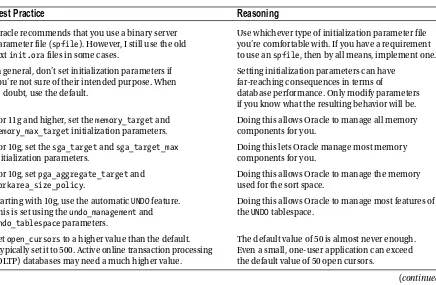
Oracle requires that you have an initialization file in place before you attempt to start the instance. The initialization file is used to configure features such as memory and to control file locations. You can use two types of initialization files:
Server parameter binary file (
• spfile)
• init.ora text file
Oracle recommends that you use an spfile for reasons such as these:
You can modify the contents of the
• spfile with the SQL ALTER SYSTEM statement.
You can use remote-client SQL sessions to start the database without requiring a local (client)
•
initialization file.
These are good reasons to use an spfile. However, some shops still use the traditional init.ora file. The init.ora file also has advantages:
You can directly edit it with an OS text editor.
•
You can place comments in it that detail a history of modifications.
•
When I first create a database, I find it easier to use an init.ora file. This file can be easily converted later to an spfile if required (via the CREATE SPFILE FROM PFILE statement). In this example my database name is o12c, so I place the following contents in a file named inito12c.ora and put the file in the ORACLE_HOME/dbs directory:
db_name=o12c db_block_size=8192 memory_target=300M memory_max_target=300M processes=200
control_files=(/u01/dbfile/o12c/control01.ctl,/u02/dbfile/o12c/control02.ctl) job_queue_processes=10
open_cursors=500
fast_start_mttr_target=500 undo_management=AUTO undo_tablespace=UNDOTBS1