v
Contents at a Glance
About the Author ...
xiii
About the Technical Reviewer ...
xv
Acknowledgments ...
xvii
Introduction ...
xix
Chapter 1: Getting Started with Hibernate OGM
■
...
1
Chapter 2: Hibernate OGM and MongoDB
■
...
23
Chapter 3: Bootstrapping Hibernate OGM
■
...
37
Chapter 4: Hibernate OGM at Work
■
...
51
Chapter 5: Hibernate OGM and JPA 2.0 Annotations
■
...
121
Chapter 6: Hibernate OGM Querying MongoDB
■
...
205
Chapter 7: MongoDB e-Commerce Database Model
■
...
241
Chapter 8: MongoDB e-Commerce Database Querying
■
...
269
Chapter 9: Migrate MongoDB Database to Cloud
■
...
283
Chapter 10: Migrating RafaEShop Application on OpenShift
■
...
297
Introduction
This book covers all the important aspects of developing Hibernate OGM-MongoDB applications. It provides clear instructions for getting the most out of the Hibernate OGM-MongoDB duo and offers many examples of integrating Hibernate OGM by means of both the Hibernate Native API and the Java Persistence API. You will learn how to develop desktop, web, and enterprise applications for the most popular web and enterprise servers, such as Tomcat, JBoss AS, and Glassfish AS. You’ll see how to take advantage of Hibernate OGM-MongoDB together with many common technologies, such as JSF, Spring, Seam, EJB, and more. Finally, you’ll learn how to migrate to the cloud—MongoHQ, MongoLab, and OpenShift.
Who This Book Is For
This book is for experienced Java developers who are interested in exploring Hibernate solutions for NoSQL databases. For the opening chapters (Chapters 1–3), it’s enough to be familiar with the main aspects of the ORM paradigm, the Hibernate Native API, and JPA. The book provides brief overviews of these concepts. Starting with Chapter 4, you should have some knowledge about developing web applications (using NetBeans or Eclipse) deployed under the Tomcat, JBoss AS, or GlassFish AS servers. Moreover, you need to be familiar with the Java technologies and frameworks that are commonly used in web applications, such as servlets, EJB, JSF, JSP, Seam, Spring, and so on.
How This Book Is Structured
Here’s the main focus of each chapter:Chapter 1: Getting Started with Hibernate OGM
This chapter provides a brief introduction to the Hibernate OGM world. In the first part of the chapter, I discuss the Hibernate OGM architecture, its current features, and what we can expect in terms of future support. I then offer several alternatives for downloading, installing, and configuring Hibernate OGM and MongoDB.
Chapter 2: Hibernate OGM and MongoDB
In this chapter, I define more clearly the relationship between Hibernate OGM and MongoDB by focusing on how Hibernate OGM works with MongoDB. You learn how data is stored, how primary keys and associations are mapped, and how to deal with transactions and queries.
Chapter 3: Bootstrapping Hibernate OGM
xx
Chapter 4: Hibernate OGM at Work
This is one of the most important chapters. You learn how to integrate Hibernate OGM and MongoDB in the most common web and enterprise Java applications deployed on different servers. Here is the entire list of applications:
• Java SE and Mongo DB—a “Hello world” example
• Hibernate OGM (via Hibernate Native API) in a non-JTA environment (JDBC Transactions,
Tomcat 7)
• Hibernate OGM (via Hibernate Native API) in a standalone JTA environment (JBoss JTA,
Tomcat 7)
• Hibernate OGM (via Hibernate Native API) in a built-in JTA environment (no EJB, GlassFish 3) • Hibernate OGM (via Hibernate Native API) in a built-in JTA environment (EJB/BMT, GlassFish 3) • Hibernate OGM (via Hibernate Native API) in a built-in JTA environment (EJB/CMT, GlassFish 3) • Hibernate OGM (via JPA) in a built-in JTA environment (GlassFish AS 3)
• Hibernate OGM (via JPA) in a built-in JTA environment (JBoss AS 7)
• Hibernate OGM (via JPA) in a built-in JTA environment (JBoss AS 7 and Seam application) • Hibernate OGM (via JPA) in a built-in JTA environment (GlassFish and Spring application) • Hibernate OGM (via JPA) JPA/JTA in a standalone JTA environment (Tomcat)
• Hibernate OGM in a non- JTA environment (RESOURCE_LOCAL, Apache Tomcat 7)
Chapter 5: Hibernate OGM and JPA 2.0 Annotations
Mapping Java entities in Hibernate OGM can be divided into supported and non-supported annotations. In this chapter, I show the supported annotations, as well as how much of each annotation is supported.
Chapter 6: Hibernate OGM Querying MongoDB
This chapter explores the querying capabilities of Hibernate OGM. I start with a MongoDB native query and progress to complex queries written with Hibernate Search and Apache Lucene.
Chapter 7: MongoDB e-Commerce Database Model
At this point in the book, you will have acquired sufficent expertise to develop a real application that involves Hibernate OGM and MongoDB. An e-commerce web site is a good start and an interesting study case, so in this chapter I adapt a classic SQL database model to the Hibernate OGM and MongoDB style. I also examine aspects of e-commerce database architecture.
Chapter 8: MongoDB e-Commerce Database Querying
Chapter 9: Migrate MongoDB Database to Cloud
In this chapter, you learn how to migrate the MongoDB e-commerce database developed in Chapter 7 into two clouds: MongoHQ and MongoLab.
Chapter 10: Migrating RafaEShop Application on OpenShift
This final chapter is a detailed guide for migrating the e-commerce RafaEShop application to the OpenShift cloud on two enterprise servers: JBoss AS and GlassFish AS.
Downloading the Code
The code for the examples shown in this book is available on the Apress web site, www.apress.com. You’ll find the link
on the book’s information page under the Source Code/Downloads tab. This tab is located underneath the Related
Titles section of the page.
Contacting the Author
1
Getting Started with Hibernate OGM
Chances are, you’re familiar with Hibernate ORM, a powerful, robust tool for converting data between relational databases (RDBMS) and object-oriented programming languages. As an object-relational mapping (ORM) framework, Hibernate ORM works with SQL stores. In recent years, however, developers have become interested in NoSQL databases, which are optimized for storing and retrieving enormous quantities of data. NoSQL databases tend to be non-relational, open-source, horizontally scalable, distributed, and schema-free.
There are a number of ways to describe NoSQL stores, but they are generally classified by data model, particularly the following:
Document stores (Mongo DB, RavenDB, CouchDB and more) •
Wide column stores (Hypertable, Cassandra, HBase and more) •
Key value/tuple stores (DynamoDB, LevelDB, Redis, Ryak and more) •
Graph databases (Neo4J, GraphBase, InfoGrid and more) •
These are also common:
Multimodel databases (OrientDB, ArangoDB and more) •
Object databases (db4o, Versant and more) •
Grid and cloud databases (GigaSpaces, Infinispan and more) •
XML databases (eXist, Sedna and more) •
Clearly, NoSQL stores are complex and very diverse. Some have significant user bases, while others are barely known. And each has its own strong points and weaknesses. You could even say that NoSQL is such a keenly disputed topic that programmers talk about it more than they actually use it.
Features and Expectations
As this book is written, the latest Hibernate OGM distribution is 4.0.0 Beta2, which already successfully provides a common interface for different NoSQL approaches; rapid scaling of a data store up or down; independence from the underlying store technology; and Hibernate Search. Here’s what Hibernate OGM supports so far:
Storing data in document stores (MongoDB) •
storing data in key/value stores (Infinispan's data grid and Ehcache) •
Create, Read, Update and Delete (CRUD) operations for JPA entities •
Polymorphic entities (support for superclasses, subclasses, and so forth) •
Embeddable objects (for example, embeddable classes, annotated in JPA with
• @Embeddable;
collections of instances of embeddable classes, annotated in JPA with @ElementCollection) Basic types (such as numbers,
• String, URL, Date, enums)
Associations (
• @ManyToOne, @OneToOne, @OneToMany and @ManyToMany) Bidirectional associations
JPA and native Hibernate ORM API (Hibernate OGM can be bootstrapped via JPA or via •
Hibernate Session, as I’ll show you in Chapter 3.)
In the future, Hibernate OGM will support:
Other key/value pair systems
Complex JP-QL queries, including to-many joins and aggregation •
Fronting existing JPA applications •
Note
■
Denormalization is a database technique for speeding up the read process. The idea is to reduce the number of
joins in queries as much as possible; joins slow read performance because data must be picked up from multiple tables
without disrupting their associations. While normalization promotes splitting related data into multiple associated tables,
denormalization encourages adding a small number of redundancies to limit joins. Even if some data gets duplicated,
performance generally improves.
Hibernate OGM Architecture
3
Hibernate OGM is meant to accomplish the same goals, but using NoSQL stores. Thus, Hibernate OGM doesn't need the JDBC layer anymore and instead comes with two new elements: a datastore provider and a datastore dialect, as shown in Figure 1-2. Both of these act as adaptors between Hibernate OGM Core and the NoSQL store. (A datastore is an adaptor that connects the core mapping engine with the specific NoSQL technology.)Figure 1-1. Hibernate ORM Architecture
Figure 1-2. Hibernate OGM datastore provider and datastore dialect
The datastore provider is responsible for managing connections to NoSQL stores, while the datastore dialect manages communications with NoSQL storage engines. Practically, these notions are materialized in two interfaces, org.hibernate.ogm.datastore.spi.DatastoreProvider and org.hibernate.ogm.dialect.GridDialect. The DatastoreProvider interface is responsible for starting, maintaining, and stopping a store connection, while the GridDialect interface deals with data persistence in NoSQL stores. Moreover, the Persisters and Loaders interfaces were rewritten to support NoSQL store features.
There are five implementations of GridDialect for abstracting Hibernate OGM from a particular grid implementation:
• EhcacheDialect (for EhCache) • InfinispanDialect (for Infinispan) • MongoDBDialect (for MongoDB) • HashMapDialect (for testing)
• GridDialectLogger (for logging calls performed on the real dialect)
Note
■
If you decide to write a new datastore, you have to implement a
DatastoreProviderand a
GridDialect.
Find more details about this at
https://community.jboss.org/wiki/HowToWriteADatastoreInHibernateOGM.
Persisting Data
Through the modified Loaders and Persisters interfaces, Hibernate OGM is capable of saving data to NoSQL stores. Before doing so, however, OGM needs to represent and store the data internally. For this purpose, Hibernate OGM retains as much as it can of the relational database concepts, and adapts these notions according to its needs. Some concepts, like storing entities, follow the relational model fairly completely, while others, like storing associations, do so partially. Data, therefore, is stored as basic types (entities are stored as tuples); the notions of primary key and foreign key are still employed; and the application data model and the store data model relationships are abstractly maintained through notions like table and column.
OGM uses the tuple to represent the basic unit of data. Tuples are meant to conceptually store entities as a Map<String, Object>. The key is the column name (the entity property/field or the @Column annotation value) and the value is the column value as a primitive type (see Figure 1-3).
5
Note
■
Java collections are represented as a list of tuples. The specific key is composed of the name of the table
containing the collection, and column names and column values representing the foreign key.
Figure 1-5 shows the relational database model of a many-to-many association.
Figure 1-4. Hibernate OGM storing an entity instance
Associations in Hibernate OGM, in contrast, are stored as sets of tuples of type Map<String, Object>. For example, for a many-to-many association, each tuple stores a pair of foreign keys. Hibernate OGM stores the information necessary to navigate from an entity to its associations in a specific key composed of the table name and the column name(s) and value(s) representing the foreign key to the entity we come from. This @ManyToMany association is stored internally by Hibernate OGM as shown in Figure 1-6. (You can see the association tuples starting with row 8.) This approach fosters reachable data via key lookups, but it has disadvantages: that data may be redundant since the information has to be stored for both sides of the association.
7
Figure 1-6. Hibernate OGM data grid of a many-to-many relationship
Hibernate OGM stores JPA entities as tuples instead of serializable blobs. This is much closer to the relational model. There are a few disadvantages in serializing entities:
Entities that are in associations with other entities must be also be stored, very possibly •
resulting in a big graph.
It’s hard to guarantee object identity or even consistency among duplicated objects. •
It’s hard to add or remove a property or include a superclass and deal with deserialization •
issues.
Note
■
Hibernate OGM stores seeds (when identifiers requires seeds) in the value whose key is composed of the table
name and the column name and column value representing the segment.
Obviously, this representation is not common to all NoSQL stores. It’s different, for instance, for MongoDB, which is a document-oriented store. In such cases, GridDialect is used, and its main task consists of converting this representation into the expected representation for the NoSQL store. For MongoDB, the MongoDBDialect converts it into MongoDB documents.
Note
Querying Data
Of course, Hibernate OGM needs to offer a powerful querying data engine and, at the time of this writing, this is implemented in a number of different ways depending on the nature of the query and the NoSQL querying support.
CRUD operations are the responsibility of the Hibernate ORM engine and they follow a straightforward process. Independently of JPA or the Hibernate Native API, Hibernate ORM delegates persistence and load queries to the OGM engine, which delegates CRUD operations to DatastoreProvider/GridDialect, which interacts with the NoSQL store. Figure 1-7 depicts this process.
Figure 1-7. Hibernate OGM and CRUD operations
Figure 1-8. Hibernate OGM and JP-QL simple queries (NoSQL with query support)
Because Hibernate OGM wants to offer the entire JPA, it needs to support JP-QL queries. This implies a sophisticated query engine (QE) that should be sensitive to the particular NoSQL store querying capabilities and to JP-QL query complexity. The most optimistic instance is NoSQL with query capabilities and simple JP-QL queries. In this case, the query is delegated to the NoSQL-specific query translator, and the results are managed by Hibernate OGM to compose the specific objects (see Figure 1-8).
9
The worst case is a NoSQL store that has little or no query support. Since this is a hard case, it requires heavy artillery, like Hibernate Search, an enterprise full-text search tool based on Hibernate Core and Apache Lucene. Basically, the Hibernate Search Indexing Engine receives events from the Hibernate ORM Core and keeps the entity indexing process up to date, while the JP-QL Query Parser delegates query translation to the Hibernate Search Query Engine (for simple queries) or to Teiid (for intermediate to complex queries), and executes them using Lucene indexes (see Figure 1-10). In addition, Hibernate Search provides clustering support and an object-oriented abstraction that includes a query domain-specific language (DSL).Figure 1-9. Hibernate OGM and JP-QL complex queries
Figure 1-10. Hibernate OGM and JP-QL queries (little or no NoSQL support)
Get the Hibernate OGM Distribution
At the time of writing, the Hibernate OGM distribution was 4.0.0.Beta2. The best way to get it with full documentation, sources, and dependencies is to access www.hibernate.org/subprojects/ogm.html and download the corresponding ZIP/TGZ archive.
Unfortunately, this isn’t as simple as it might seem. Since the focus of this book is Hibernate OGM and MongoDB, you’ll want to locate the JARs dedicated to “connecting” OGM with MongoDB: hibernate-ogm-mongodb-x.jar and mongo-java-driver-x.jar. (MongoDB has client support for most programming languages; this is the MongoDB Java driver developed by MongoDB team and used by Hibernate OGM to interact with MongoDB). In Hibernate
This means you can still use hibernate-ogm-mongodb-4.0.0.Beta1.jar and mongo-java-driver-2.8.0.jar with Hibernate OGM 4.0.0.Beta2, or you can compile the source code of Hibernate OGM 4.0.0.Beta2 to obtain the newest snapshots. For compiling the code, visit www.sourceforge.net/projects/hibernate/files/hibernate-ogm/4.0.0.Beta2/. I have compiled the code and obtained the MongoDB JAR, named hibernate-ogm-mongodb-4.0.0-SNAPSHOT.
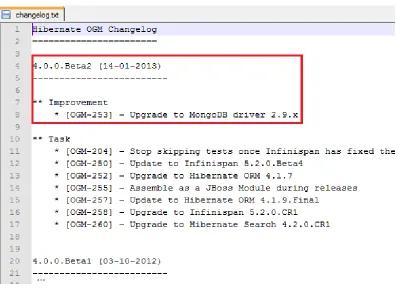
If you take a look at the Hibernate OGM change log shown in Figure 1-11, you’ll see that Hibernate OGM 4.0.0.Beta2 has been upgraded to support MongoDB Java Driver 2.9.x. This means that if you decide to compile the code and use the resulting snapshot of the MongoDB profile, you can also add a 2.9.x MongoDB Java driver, instead of 2.8.x.
Figure 1-11. Hibernate OGM change log
For this book, I chose to use the Hibernate OGM 4.0.0.Beta2 with Hibernate OGM for MongoDB 4.0.0.Beta1.
Getting Hibernate OGM from the Maven Central Repository
11
As you can see, it’s very easy to dowload the Hibernate OGM core and profiles, including the MongoDB profile. You can download the JARs or the POMs (Project Object Model) files.Getting Hibernate OGM from the Maven Command Line
Hibernate OGM is also available from the Apache Maven command line. Obviously, Maven must be installed and configured on your computer. First, you have to modify your settings.xml document, which is stored in the Maven local repository .m2 folder (the default location). For Unix/Mac OS X users, this folder should be ~/.m2; for Windows users, it’s C:\Documents and Settings\{your username}\.m2 or C:\Users\{your username}\.m2. If the settings.xml file doesn’t already exist, you should create it in this folder, as shown in Listing 1-1. (If you already have this file, just modify its contents accordingly.)
Note
■
If it seems too complicated to create or modify
settings.xmlsince it’s so verbose, you can simply use
<repository>and
<dependency>tags in your
pom.xml.
Listing 1-1. Settings.xml
<?xml version="1.0" encoding="UTF-8"?>
<settings xmlns="http://maven.apache.org/SETTINGS/1.0.0" xmlns:xsi="http://www.w3.org/2001/XMLSchema-instance"
xsi:schemaLocation="http://maven.apache.org/SETTINGS/1.0.0
http://maven.apache.org/xsd/settings-1.0.0.xsd"> <!-- jboss.org config start -->
<profiles> <profile>
<id>jboss-public-repository</id> <repositories>
<repository>
<id>jboss-public-repository-group</id>
<name>JBoss Public Maven Repository Group</name>
<url>https://repository.jboss.org/nexus/content/groups/public-jboss/</url> <pluginRepositories> <pluginRepository>
<id>jboss-public-repository-group</id>
<name>JBoss Public Maven Repository Group</name>
<url>https://repository.jboss.org/nexus/content/groups/public-jboss/</url> <layout>default</layout> </pluginRepositories> </profile>
<profile>
<id>jboss-deprecated-repository</id> <repositories>
<repository>
<id>jboss-deprecated-repository</id>
<name>JBoss Deprecated Maven Repository</name>
13
<!-- jboss.org config start --><activeProfiles>
<activeProfile>jboss-public-repository</activeProfile> </activeProfiles>
<!-- jboss.org config end --> </settings>
Note
■
You can modify the default location of the Maven local repository by adding into
settings.xmlthe tag
localRepository, like this:
<localRepository>new_repository_path</localRepository>.
Next, you need to create a pom.xml file. Obviously, this file’s content depends on what you want to obtain from the Hibernate OGM repository. For example, the pom.xml in Listing 1-2 will download the Hibernate OGM Core distribution (including dependencies) and store it locally in D:/Hibernate_OGM (you can also use the default ./m2 folder, but this makes it much clearer and easier to navigate).
Listing 1-2. Pom.xml <artifactId>hibernate-ogm-core</artifactId> <version>4.0.0.Beta2</version>
</dependency> </dependencies> <build>
<directory>D:/Hibernate_OGM</directory>
<defaultGoal>dependency:copy-dependencies</defaultGoal> </build>
</project>
Adding MongoDB Artifacts
Now you know how to obtain the Hibernate OGM 4.0.0.Beta2 Core (and dependencies), but without any NoSQL data store artifacts. Currently, you can add artifacts for the following NoSQL stores: Ehcache, Infinispan, and MongoDB. Since our focus is Hibernate OGM and MongoDB, you’ll need to add MongoDB artifacts by placing the following dependency into the pom.xml file:
...
<dependency>
<groupId>org.hibernate.ogm</groupId>
<artifactId>hibernate-ogm-mongodb</artifactId> <version>4.0.0.Beta1</version>
</dependency> ...
15
Note
■
For Infinispan, just replace the artifact id with
hibernate-ogm-infinispan, and for Ehcache with
hibernate-ogm-ehcache.
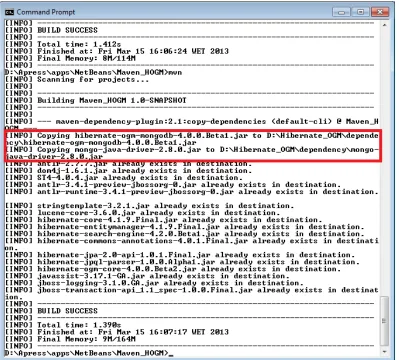
Now, running the mvn command again will add two more JARs, hibernate-ogm-mongodb-4.0.0.Beta1.jar and mongo-java-driver-2.8.0.jar, as shown in Figure 1-14. The MongoDB drivers are also available for download as JARs at www.mongodb.org/display/DOCS/Drivers address.
Getting a Hibernate OGM Distribution Using the NetBeans IDE
If you’re a NetBeans fan, it’s much simpler to use Maven from a NetBeans Maven project. This section describes the main steps in creating such a project to obtain the Hibernate OGM distribution as a NetBeans Library ready to be used in other projects. Launch NetBeans (I tested on NetBeans 7.2.1) and follow these steps:
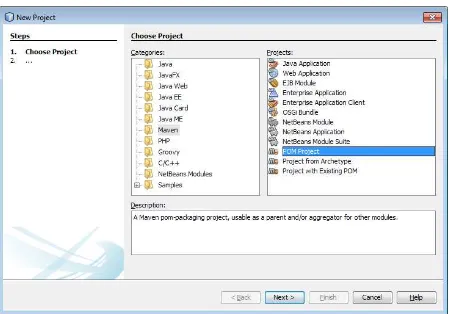
1. From the File menu, select the New Project option. In the New Project wizard, select Maven in the Categories list and POM Project in the Projects list, as shown in Figure 1-15.
Figure 1-15. Creating a POM project with NetBeans 7
Note
■
If Maven isn’t available in your NetBeans distribution, you can install it by following the tutorial about third-party
plug-in installations at
http://wiki.netbeans.org/InstallingAPlugin.
17
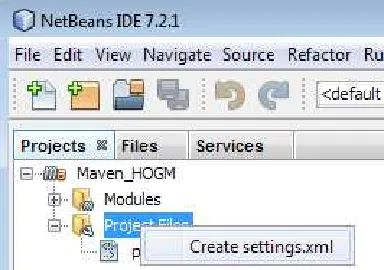
3. Expand the Maven_HOGM | Project Files node and locate pom.xml and settings.xml.If settings.xml isn’t listed, right-click on the Project Files node, select Create settings.xml (as shown in Figure 1-17), and fill the file with the appropriate content.
Figure 1-16. Setting the project name and location
Figure 1-17. Creating the settings.xml file from NetBeans 7
4. Edit pom.xml according to your needs. At this point, both files should be ready to be processed by Maven.
6. Now you can create a NetBeans library. (I recommend that you create this library because the applications developed with NetBeans, in later chapters, refer to it.) From the NetBeans main menu, select Tools | Ant Libraries. In the Ant Library Manager, click the New Library button, provide a name for the library, such as Hibernate OGM Core and MongoDB, and click OK. Next, click on the Add JAR/Folder button and navigate to the JARs (if you followed my example path, you’ll find them in D:\Hibernate_OGM\ dependency, as shown in Figure 1-18). Select all of the JARs and add them to this library. Click OK to finish creating the library.
Figure 1-18. Creating a user library for Hibernate OGM and MongoDB
Now you can easily integrate the Hibernate OGM/MongoDB distribution into any of your NetBeans projects by adding Hibernate OGM Core/Hibernate OGM Core and MongoDB library into your project libraries.
19
Getting the Hibernate OGM Distribution Using the Eclipse IDE
If you’re an Eclipse fan, it’s much simpler to use Maven from an Eclipse Maven project. This section describes the main steps for creating such a project to obtain the Hibernate OGM distribution as an Eclipse library ready to be used in other projects. So launch Eclipse (we tested on Eclipse JUNO) and follow these steps:
1. From the File menu, select New | Other. In the New wizard, expand the Maven node and select Maven Project as shown in Figure 1-19. Click Next.
Figure 1-19. Creating a new Maven project with Eclipse JUNO
2. Check the box labeled Create a simple project (skip archetype selection). You can choose the default workspace and click Next.
3. Type the group id (maven.hibernate.ogm) and artifact id (Maven_HOGM). Click he Finish button and wait until the project has been successfully created and is listed in the Package Explorer panel.
4. Manually update or create the settings.xml file in the maven local repository. 5. Locate pom.xml in the Maven_HOGM project and double-click it.
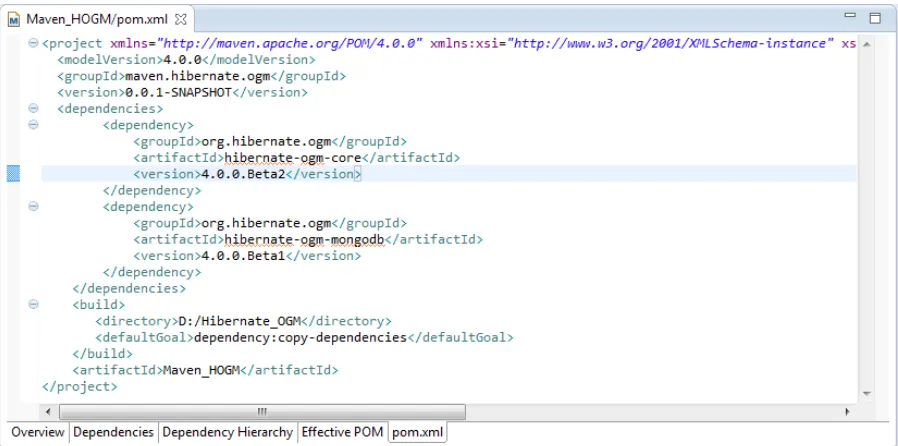
6. Next, in the editor, switch to the pom.xml tab where you’ll see a pom.xml skeleton. Add to it the missing parts from your pom.xml and save the project (see Figure 1-21).
21
7. In the Package Explorer panel, right-click the project name and select Run As | Maven build.When the process ends successfully, you should see the Hibernate OGM distribution (including dependencies) under the path defined by the <directory> tag in pom.xml. 8. Select Preferences in the Window menu. In the tree on the left, expand the Java | Build
Path node and select User Libraries.
9. Click the New button to create a new library. Type a name for the new library, such as Hibernate OGM Core and MongoDB, and click the OK.
10. Click the Add External JARs button and navigate to the folder where the Hibernate OGM distribution was downloaded. Select all of the JARs and add them to the library. Click OK.
Now you can easily integrate Hibernate OGM/MongoDB distribution into any of your Eclipse projects by adding Hibernate OGM Core/Hibernate OGM Core and MongoDB library into your project build path.
Note
■
If you’d prefer to create the entire project with Maven, just add the Hibernate OGM dependencies accordingly.
All you have to do is add the corresponding
<repository>and
<dependency>tags.
The complete application is available in the Apress repository. It’s an Eclipse project named Maven_HOGM.
Obtain the MongoDB Distribution
When this book was written, the recommended MongoDB distribution was version 2.2.2 (I chose this version because is “preferred” by Hibernate OGM and OpenShift). You can easily download it from the official web site at
http://www.mongodb.org/. You’ll find the installation steps at http://docs.mongodb.org/manual/installation/.
The examples in this book were developed and tested under the 64-bit versions of Windows 7 and 8, for which the installation is straightforward.
After downloading and installing the MongoDB distribution, you’re ready to see if the MongoDB server starts and responds to commands. Open a command prompt, navigate to the {MONGODB_HOME}/bin folder and type mongod --dbpath ../ command to start the server (the --dbpath option indicates the location of the /data/db folder you manually created in the {MONGODB_HOME} folder, following installation guide). If there are no errors, open another command prompt, navigate to the same folder, and type mongo. If you see something similar to what’s shown in Figure 1-22, MongoDB was successfully installed.
Figure 1-22. Checking MongoDB server availability
To test more thoroughly, try the commands from the Getting Started tutorial at http://docs.mongodb.org/ manual/tutorial/getting-started/. You can easily shut down the MongoDB server by pressing CTRL-C.
Summary
In this introductory chapter we took the first steps toward understanding and using Hibernate OGM. We looked at Hibernate OGM concepts, features and aims, as well as giving a brief overview of the Hibernate OGM architecture. (It’s important to know how things are managed internally if you want to understand the next chapter).
23
Hibernate OGM and MongoDB
By now, you should have some idea of the general scope and architecture of Hibernate OGM. In Chapter 1, I discussed how Hibernate OGM works with generic NoSQL stores, and I spoke about its general focus and how you represent, persist, and query data. In addition, you learned how to obtain a Hibernate OGM distribution, and you’ve installed a MongoDB NoSQL store and performed a simple command-line test to verify that the MongoDB server responds correctly.
In this chapter, I’ll define more clearly the relationship between Hibernate OGM and MongoDB. Instead of generic possibilities, I’ll focus on how Hibernate OGM works with the MongoDB store, and you’ll see how much of MongoDB can be “swallowed” by Hibernate OGM and some MongoDB drawbacks that force Hibernate OGM to work overtime to manage them.
Configuring MongoDB-Hibernate OGM Properties
Hibernate OGM becomes aware of MongoDB when you provide a bundle of configuration properties. If you’ve worked before with Hibernate ORM, you’re already familiar with these kinds of properties. In particular, there are three ways of setting these properties, as you’ll see in the next chapters:
declarative, through the
• hibernate.cfg.xml configuration file
programmatically, through Hibernate native APIs •
declarative, through the
• persistence.xml configuration file in JPA context
Note
■
Remember, we’re using Hibernate OGM 4.0.0.Beta.2 with Hibernate OGM for MongoDB 4.0.0.Beta1 and the
Java driver for MongoDB 2.8.0.
Let’s take look at the properties that enable Hibernate OGM to work with MongoDB.
hibernate.ogm.datastore.provider
As you know from Chapter 1, Hibernate OGM currently supports several NoSQL stores, including MongoDB. This property value is how you let Hibernate OGM know which NoSQL store you want to use. For MongoDB, the value of this property must be set to mongodb.
Next, Hibernate OGM needs to locate the MongoDB server instance. First, it must locate the hostname, which is represented by the IP address of the machine that hosts the MongoDB instance. By default, the value of this property is 127.0.0.1, which equivalent to localhost, and it can be set through the MongoDB driver as well:
Mongo mongo = new Mongo("127.0.0.1");
Mongo mongo = new Mongo(new ServerAddress( "127.0.0.1"));
hibernate.ogm.mongodb.port
And what is a hostname without a port? By default, the MongoDB instance runs on port number 27017, but you can use any other MongoDB port as long as you specify it as the value of this property. If you are using the MongoDB driver directly, the port is typically set like this:
Mongo mongo = new Mongo("127.0.0.1", 27017);
Mongo mongo = new Mongo( new ServerAddress("127.0.0.1", 27017));
hibernate.ogm.mongodb.database
Now Hibernate OGM can locate MongoDB through its host and port. You also have to specify the database to connect to. If you indicate a database name that doesn’t exist, a new database with that name will be automatically created (there’s no default value for this property). You can also connect using the MongoDB driver, like this:
DB db = mongo.getDB("database_name");
Mongo db = new Mongo( new DBAddress( "127.0.0.1", 27017, "database_name" ));
hibernate.ogm.mongodb.username hibernate.ogm.mongodb.password
These two properties represent authentication credentials. They have no default values and usually appear together to authenticate a user against the MongoDB server (though if you set the password without setting the username, Hibernate OGM will ignore the hibernate.ogm.mongodb.password property). You can also use the MongoDB driver to set authentication credentials, like so:
boolean auth = db.authenticate("username", "password".toCharArray());
hibernate.ogm.mongodb.safe
Note that this property is a little tricky. MongoDB isn’t adept at transactions; it doesn’t do rollback and can’t guarantee that the inserted data is, in fact, in the database since the driver doesn’t wait for the write operation to be applied before returning. Behind the great speed advantage—resulting from the fact that the driver performs a write behind to the MongoDB server—lurks a dangerous trap that can lose data.
The MongoDB team knew of this drawback, so it developed a new feature called Write Concerns to tell
MongoDB how important a piece of data is. This is also used to indicate the initial state of the data, the default write, (WriteConcern.NORMAL).
MongoDB defines several levels of data importance, but Hibernate OGM lets you switch between the default write and write safe write concerns.
25
Here’s how to use the MongoDB driver directly to set write safe:DB db = mongo.getDB("database_name");
DBCollection dbCollection = db.getCollection("collection_name"); dbCollection.setWriteConcern(WriteConcern.SAFE);
dbCollection.insert(piece_of_data); //or, shortly
dbCollection.insert(piece_of_data, WriteConcern.SAFE);
Note
■
Currently, Hibernate OGM only lets you enable the write safe MongoDB write concern (
WriteConcern.SAFE).
Strategies like Write FSYNC_SAFE (
WriteConcern.FSYNC_SAFE), Write JOURNAL_SAFE (
WriteConcern.JOURNAL_SAFE),
and Write Majority (
WriteConcern.MAJORITY) are thus controllable only through MongoDB driver.
hibernate.ogm.mongodb.connection_timeout
MongoDB supports a few timeout options for different kinds of time-consuming operations. Currently, Hibernate OGM exposes through this property the MongoDB option connectTimeout (see com.mongodb.MongoOptions). This is expressed in milliseconds and represents the timeout used by the driver when the connection to the MongoDB instance is initiated. By default, Hibernate OGM sets it to 5000 milliseconds to override the driver default of 0 (which means no timeout). You can set this property as follows:
mongo.getMongoOptions().connectTimeout=n_miliseconds;
hibernate.ogm.mongodb.associations.store
This property defines the way Hibernate OGM stores information relating to associations. The accepted values are: IN_ENTITY, COLLECTION, and GLOBAL_COLLECTION. I’ll discuss these three strategies a little later in this chapter.
hibernate.ogm.datastore.grid_dialect
This is an optional property that’s usually ignored because the datastore provider chooses the best grid dialect automatically. But if you want to override the recommended value, you have to specify the fully qualified class name of the GridDialect implementation. For MongoDB, the correct value is org.hibernate.ogm.dialect.mongodb. MongoDBDialect.
This is the set of properties that Hibernate OGM uses for configuring a connection to MongoDB server. At this point, you have access to the essential settings for creating decent communications with the MongoDB server. In future OGM releases, we can hope to be able to access many more settings for the MongoDB driver.
Data Storing Representation
records, it uses documents (collections contain documents). MongoDB documents are BSON (Binary JSON—binary-encoded serialization of JSON-like documents) objects and have the following structure:
{
field1: value1, field2: value2, field3: value3, ...
fieldN: valueN }
Storing Entities
OK, but we are still storing and retrieving Java entities, right? Yes, the answer is definitely yes! If Hibernate ORM provides complete support for transforming Java entities into relational tables, Hibernate OGM provides complete support for transforming Java entities into MongoDB collections. Each entity represents a MongoDB collection; each entity instance represents a MongoDB document; and each entity property will be translated into a document field (see Figure 2-1).
Figure 2-1. Storing a Java object in a MongoDB document
The Hibernate OGM team worked hard to store data as naturally as possible for MongoDB so that third-party applications can exploit this data without Hibernate OGM assistance. For example, let’s suppose we have a POJO class like the one in Listing 2-1. (I’m sure you’ve stored tons of Java objects like this into relational databases, so I’m providing no details about this simple class.)
Listing 2-1. A POJO Class
import java.util.Date;
public class Players {
27
public void setName(String name) { this.name = name;
}
public String getSurname() { return surname;
}
public void setSurname(String surname) { this.surname = surname;
public void setBirth(Date birth) { this.birth = birth;
} }
Now, suppose an instance of this POJO is stored into the MongoDB players collection using Hibernate OGM, like this:
{
"_id": 1, "age": 26,
"birth": ISODate("1986-06-03T15:43:37.763Z"), "name": "Nadal",
This is exactly what you obtain if you manually store via the MongoDB shell with the following command:
>db.players.insert( {
_id: 1, age: 26,
birth: new ISODate("1986-06-03T15:43:37.763Z"), name: "Nadal",
surname: "Rafael" }
)
Practically, there’s no difference in the result. You can’t tell if the document was generated by Hibernate OGM or inserted through the MongoDB shell. That’s great! Moreover, Hibernate OGM knows how to transform this result back into an instance of the POJO. That’s even greater! And you won’t feel any programmatic discomfort, since Hibernate OGM doesn’t require you write any underlying MongoDB code. That’s the greatest!
Storing Primary Keys
A MongoDB document or collection has a very flexible structure. It supports simple objects: the embedding of objects and arrays within other objects and arrays; different kinds of documents in the same collection; and more, but it also contains a document field especially reserved for storing primary keys. This field is named _id and its value can be any information as long as it’s unique. If you don’t set _id to anything, the value will be set automatically to “MongoDB Id Object”.
Hibernate OGM recognizes these specifications when storing identifiers into a MongoDB database; it lets you use identifiers of any Java type, even composite identifiers, and it always stores them into the reserved _id field.
Figure 2-2 shows some identifiers of different Java types and how they look in MongoDB.
29
Storing Associations
Probably the most powerful feature of relational databases relies on associations. Any database of any meaningful capability take advantages of associations: one-to-one, one-to-many, many-to-one, and many-to-many.
In the relational model, associations require storing additional information, known as navigation information for associations.
For example, in a bidirectional many-to-many association, the relational model usually uses three tables, two tables for data and an additional table, known as a junction table. The junction table holds a composite key that consists of the two foreign key fields that refer to the primary keys of both data tables (see Figure 2-3). Note that the same pair of foreign keys can only occur once.
Figure 2-3. A bidirectional many-to-many association, shown in a relational model representation
In a MongoDB many-to-many association, you store the junction table as a document. Hibernate OGM provides three solutions to accomplish this: IN_ENTITY, COLLECTION, and GLOBAL_COLLECTION. To better understand these strategies, let’s improvise a simple scenario—two relational tables (Players and Tournaments) populated respectively with three players, two tournaments, and a many-to-many association as shown in Figure 2-4. (The first and second players, P1 and P2, participate in both tournaments, T1 and T2, and the third player (P3) participates only in the second tournament, T2. Or, from the other side of the association, the first tournament, T1, includes the first and second players, P1 and P2, and the second tournament,T2, includes the first, second, and third players, P1, P2, and P3.)
Now, let’s look at the Hibernate OGM strategies for storing associations, using this test case. We want to observe how the junction table is stored in MongoDB based on the selected strategy. We’ll begin with the default strategy, IN_ENTITY, and continue with GLOBAL_COLLECTION, and finally COLLECTION.
In JPA terms, the main ways to represent this relational model are: the Players entity defines a primary key field named idPlayers and is the owner of the association; the Tournaments entity defines a primary key named idTournaments and is the non-owner side of the association—it contains the mappedBy element. Moreover,
the Players entity defines a Java collection of Tournaments, named tournaments, and the Tournaments entity defines a Java collection of Players, named players.
IN_ENTITY
The default strategy for storing navigation information for associations is named IN_ENTITY. In this case, Hibernate OGM stores the primary key of the other side of the association (the foreign key) into:
a field if the mapping concerns a single object. •
an embedded collection if the mapping concerns a collection. •
Running the relational scenario for MongoDB using the IN_ENTITY strategy reveals the results shown in Figure 2-5 and Figure 2-6.
31
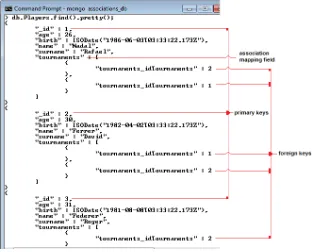
Figure 2-5 shows the MongoDB Players collection corresponding to the Players relational table; as you can see, each collection’s document contains part of the association as an embedded collection. (The Players collection contains the part of the junction table that references the Tournaments collection.)Note
■
The simplest way to explore a MongoDB collection from the shell is to call the
findmethod, which returns all
documents from the specified collection. In addition, calling the
prettymethod results in the output being nicely
format-ted. When a collection contains more documents than fit in a shell window, you need to type the
itcommand, which
supports document pagination.
The Players collection shows three main documents with the _id set as 1, 2, and 3, and each document encapsulates the corresponding foreign keys in a field named like the Java collection declared by the owner side (tournaments). Each document in the embedded collection contains a foreign key value stored in a field whose name is composed of the Java collection name declared by the owner side (tournaments) concatenated with an underscore and the non-owner side primary key field name (idTournaments).
The Tournaments collection, which corresponds to the Tournaments relational table, is like a reflection of the Players collection—the Players primary keys become Tournaments foreign keys (the Tournaments collection contains the part of the junction table that references the Players collection). Figure 2-6 shows the contents of the Tournaments collections.
The Tournaments collection includes two main documents with the _id set as 1 and 2. Each one encapsulates the corresponding foreign keys in a field named like the Java collection declared by the non-owner side (players). Each document of the embedded collection contains a foreign key value stored in a field whose name is composed of the Java collection name declared by non-owner side (players) concatenated with an underscore and the owner side primary key field name (idPlayers).
In the unidirectional case, only the collection representing the owner side will contain navigation information for the association.
You can use this strategy of storing navigation information for associations by setting the hibernate.ogm. mongodb.associations.store configuration property to the value IN_ENTITY. Actually, this is the default value of this property.
GLOBAL_COLLECTION
When you don’t want to store the navigation information for associations into an entity’s collections, you can choose the GLOBAL_COLLECTION strategy (or COLLECTION, as you’ll see in the next section). In this case, Hibernate OGM creates an extra collection named Associations, especially designed to store all navigation information. The documents of this collection have a particular structure composed of two parts. The first part contains a composite identifier, _id, made up of two fields whose values represent the primary key of the association owner and the name of the association table; the second part contains a field, named rows, which stores foreign keys in an embedded collection. For bidirectional associations, another document is created where the ids are reversed.
Running our relational scenario for MongoDB and the GLOBAL_COLLECTION strategy reveals the results shown in Figure 2-7 and Figure 2-8.
33
In Figure 2-7, you can see that the Players and Tournaments collections contain only pure information, no navigation information.The extra, unique collection that contains the navigation association is named Associations and is listed in Figure 2-8.
This is a bidirectional association. The owner side (Players) is mapped on the left side of Figure 2-8 and the non-owner side (Tournaments) is mapped on the right side of Figure 2-8. In a unidirectional association, only the owner side exists.
Now, focus on the nested document under the first _id field (Figure 2-8, left side). The first field name, players_idPlayers, is composed from the corresponding Java collection name defined in the non-owner side (players), or, for unidirectional associations, the collection name representing the owner side (Players) concatenated with an underscore and the name of the field representing the primary key of the owner side (idPlayers). The second field name is table; its value is composed of the collection name representing the the owner side concatenated with an underscore and the collection name representing the non-owner side (Players_Tournaments). The rows nested collection contains one document per foreign key. Each foreign key is stored in a field whose name is composed of the corresponding Java collection name defined in the owner side (tournaments) concatenated with an underscore and the primary key field name of the non-owner side (idTournaments). As a consequence of bidirectionality, things get reversed, as shown on the right side of Figure 2-8.
You can use this strategy for storing navigation information for associations by setting the hibernate.ogm. mongodb.associations.store configuration property to the value GLOBAL_COLLECTION.
COLLECTION
If GLOBAL_COLLECTION stores all the navigation information in one global collection, the COLLECTION strategy is less global and creates one MongoDB collection per association. For example, in our scenario, there will be one extra collection named associations_Players_Tournaments. In this strategy, each collection is prefixed with the word associations followed by the name of the association table. Using this convention makes it easy to differentiate the associations collections from the other collections.
The documents of this collection have a particular structure composed of two parts. The first part contains the primary key of the association owner and the second part contains a field, named rows, which stores all foreign keys in an embedded collection. For each foreign key there’s a document in the embedded collection. For bidirectional cases, another document is created where the ids are reversed.
If you’re familiar with the relational model this strategy should seem closer to your experience. In Figure 2-9, you can see the partial content of associations_Players_Tournaments collection—the navigation information for the owner side (Players).
Figure 2-9. Hibernate OGM-COLLECTION strategy result (associations_Players_Tournaments collection)
You can easily see that the collection structure is the same as in the GLOBAL_COLLECTION case. The only difference is that the _id field no longer contains the association table name in a field named table, which is logical since the association table name is a part of the collection name (associations_Players_Tournaments).
You can use this strategy of storing navigation information for associations by setting the hibernate.ogm. mongodb.associations.store configuration property to the value COLLECTION.
Note
■
Based on this example, you can easily intuit how the associations are represented in one-to-one, one-to-many,
and many-to-one cases. Keep in mind that collections and field names can be altered by JPA annotations, like
@Column, @Table, @JoinTableand so on. The example I presented doesn’t use such annotations.
From the JPA perspective, when a bidirectional association doesn’t define the owning side (using the
mappedByelement),
Hibernate OGM considers each side to be an individual association. In other words, you’ll obtain two
associations instead of one in such cases. For example, the
COLLECTIONstrategy will produce two collections for storing
two associations.
35
Managing Transactions
Before switching from a relational model system to a NoSQL platform like Mongo DB, it’s important to understand the differences between them, and the advantages and drawbacks of each in the context of your application needs. Knowing only that MongoDB doesn’t support SQL, while relational models don’t support collections and documents, can lead to serious problems in application implementation. This is actually the fundamental difference between the two, but there are many others, including the amount of space consumed and the time necessary to perform statements, caching, indexing, and, probably the most painful, managing transactions.
Many pioneer projects with MongoDB fail miserably when the developers realize that data transactional integrity is a must, because MongoDB doesn’t support transactions. MongoDB follows this directive: “write operations are atomic on the level of a single document: no single write operation can atomically affect more than one document or more than one collection.” It also provides the two-phase commit mechanism for simulating transactions over multiple documents. You’ll find more details at www.docs.mongodb.org/manual/tutorial/perform-two-phase-commits/. But both mechanisms omit the most powerful feature of transactional systems—the rollback operation.
Thus, if you need transactions, using MongoDB can be a delicate or even inappropriate choice. MongoDB is not an alternative to SQL as a “fashion” choice and should be used only if it satisfies your application needs better than an RDBMS. You should choose MongoDB when your database model doesn’t imply transactions or when you can shape your database model not to need transactions.
Hibernate OGM can’t provide the rollback facility, but it does diminish the transactions issue by querying all changes before applying them during flush. For this, OGM recommends using transaction demarcations to trigger the flush operation on commit.
Managing Queries
Hibernate OGM provides three solutions for executing queries against a MongoDB database:
Partial JP-QL support •
Hibernate Search •
Native MongoDB queries •
Each of these will be discussed and demonstrated in Chapter 6.
Summary
Bootstrapping Hibernate OGM
Since Hibernate OGM acts as a JPA implementation for NoSQL data stores, it’s obvious we can bootstrap it through JPA. Moreover, it can be bootstrapped through the Hibernate Native APIs as well. No matter which way you choose to bootstrap Hibernate OGM, it’s strongly recommended you use it in a Java Transaction API (JTA) environment, even if you’re not using Java EE.
Before getting into the actual bootstrapping process, let’s take a brief look at these specifications. You’ll want to keep the main features of these technologies in mind over the course of the next sections and chapters. Of course, if you’re already a guru, you can skip ahead.
Brief Overview of JPA
The Java Persistence API aims to provide support for operations that store, update, and map data from relational databases to Java objects and vice versa. You could say that JPA is the perfect tool for developers who have decided to work directly with objects rather than with SQL statements (the ORM paradigm).
Note
■
Object-relational mapping is a programming technique that provides a virtual object layer between relational
databases and object-oriented programming languages. Programming languages read from and write to relational
databases through this layer. Instead of writing SQL statements to interact with your database, you use objects. Moreover,
the code is much cleaner and easier to read, since it is not
“
plumbed
”
with SQL statements. As this book is written, the
JPA specification has several implementations or
persistence providers.
Some are popular, tested, and stable (EclipseLink,
Hibernate and Apache OpenJPA), while others may be less common but have very high benchmark performances
(BatooJPA). EclipseLink is the reference implementation of JPA and it works, as every JPA implementation should, in
both Java EE environments and standalone Java applications.
JPA is easy to use, thanks to persistence metadata that defines the relationships between Java objects and database tables. You are probably familiar with persistence metadata as JDK 5.0 annotations or XDoclet-style annotations at the language level, which are type safe and checked at compile time. It could be said that JPA annotations are actually plain JDK 5.0 annotations. Some hide complex tasks. One such annotation is
javax.persistence.Entity (@Entity annotation), which is used to mark a POJO Java class that should be persisted in a database—each class annotated with @Entity is stored into a table and each table row is an entity class instance. Entities must define primary keys (a simple or complex primary key, explicitly specified or auto-generated if the @GeneratedValue annotation is present). Entities must not be final and must define a constructor with no arguments. The table name can reflect the class name or it can be explicitly provided through @Table annotation, like
38
An entity class defines a set of fields and each field defaults to a table’s column that has the same name as the field; you can alter this using the @Column annotation, such as @Column(name="my_column_name"). JPA can access fields through getter and setter methods. Fields annotated with @Transient won’t be persisted while the other fields are persisted by default.
Entity classes are where you define relationships between and among classes (tables). Classes can have one-to-one (@OneToOne), one-to-many (@OneToMany), many-to-one (@ManyToOne), and many-to-many (@ManyToMany) relationships with other classes. When two classes store references to each other, the relationship is bidirectional and you must specify the owning side of the relationship in the other class with the element mappedBy. When the reference is only from one class to another and not vice versa, the relationship is unidirectional and the mappedBy element isn’t necessary.
Once you have the entities that reflect the database tables, you need an entity manager (an interface between the application and the persistence context, what the Hibernate documentation describes as a “set of entity instances in which for any persistent entity identity there is a unique entity instance,” or, more succinctly, all the entities of one entity manager capable of providing methods for storing, retrieving, merging, and finding objects in the database. In practice, this is the javax.persistence.EntityManager, which is automatically provided in Java EE environments, such GlassFish or JBoss. If you’re in a non-Java EE environment, such as Tomcat or Java SE, you have to manage the EntityManager lifecycle on your own.
The set of entities (usually logically related) that can be managed by a given EntityManager instance is defined as a persistence unit, each of which has a unique name and resides in an XML document named persistence.xml. Persistence.xml is a standard configuration file for JPA. It contains the JPA provider, the JTA or non-JTA data source, the database connection information, such as driver, user, password, DDL generation, and more. (In a Java SE application, this file is usually saved in the source directory in a folder named META-INF, while in a web application it’s typically stored in the /src/conf folder, but, depending on application architecture, it can be located in other places). A persistence.xml file may contain multiple persistence units; based on the one your application uses, the server will know against which database to execute queries. In other words, through a persistence unit the EntityManagerFactory, used by the application to obtain an application-managed entity manager, is configured for a set of entities. You can look at this as a portable way to instantiate an EntityManagerFactory in JPA.
Figure 3-1 shows the relationships among the main components of the JPA architecture.
Figure 3-1. Relationships among the main components of the JPA architecture
Brief Overview of JTA
The Java Transaction API (JTA) enables distributed transactions. Basically, a transaction consists of a set of tasks (for example, SQL statements) that must be processed as an inseparable unit. This is an atomic operation and, in fact, the rule of “one task for all and all tasks for one” is a transaction’s overriding principle. Transactions are characterized by ACID properties, as follows:
• Atomicity requires that if any of the tasks fail then the transaction fails and it is rolled back. If all tasks are successfully executed, the transaction is committed. In other words, a transaction is an all-or-nothing proposition.
• Consistency ensures that any committed transaction will leave the database in a valid state (written data must be valid according to all defined rules).
• Isolation means that your transaction is yours and yours alone; no other transaction can touch it because the database uses a locking mechanism to protect the transaction until it ends, successfully or otherwise. There are four levels of isolation:
• Read Uncommitted: your transaction can read the uncommitted data of other transactions (never recommended in a multi-threaded environment).
• Read Committed: your transaction can never read uncommitted data of other transactions.
• Repeatable: your transaction will get the same data on multiple reads of the same rows until it ends.
• Serializable: this level of isolation guarantees that everything you touch (all tables) remains unchanged during a transaction. It’s the strictest isolation level and, with the most overhead, it causes the most performance bottlenecks.
• Durability guarantees that any committed transactions are safe, after system crashes. These concepts are very important since transactions typically modify shared resources. Generally, there are two ways of managing transactions:
Container Managed Transactions (CMT) use deployment descriptors or annotations •
(transaction attributes). In this case, the container is responsible for starting, committing, and rolling back a transaction. This is the declarative technique of demarcating transactions. In EJB containers, you can explicitly indicate a container-managed transaction using the annotation @TransactionManagement, like this:
@TransactionManagement(TransactionManagementType.CONTAINER)
Moreover, you can tell the EJB container how to handle the transaction via the •
@TransactionAttribute annotation, which supports six values: REQUIRED (default), REQUIRES_NEW, SUPPORTS, MANDATORY, NOT_SUPPORTED, NEVER. For example, you can set MANDATORY like this:
@TransactionAttribute(TransactionAttributeType.MANDATORY)
Bean Managed Transactions (BMT) require you to explicitly (programmatically) start, commit, •
and roll back transactions. This is the programmatic technique of demarcating transactions. In EJB containers, you can explicitly indicate a bean-managed transaction via the annotation @TransactionManagement, like this:
40
And there are two types of transactions:
• local transactions access and update data on a single networked resource (one database). • distributed transactions access and update data on two or more networked resources
(multiple databases).
Programmatically speaking, JTA is a high-level API for accessing transactions based on three main interfaces:
• UserTransaction: The javax.transaction.UserTransaction interface allows developers to control transaction boundaries programmatically. To demarcate a JTA transaction, you invoke the begin, commit, and rollback methods of this interface.
• TransactionManager: The javax.transaction.TransactionManager allows the application server to control transaction boundaries.
• XAResource: The javax.transaction.xa.XAResource is a Java mapping of the standard XA interface based on the X/Open CAE Specification. You can find more details about XA at
www.en.wikipedia.org/wiki/X/Open_XA and about XAResource and at
www.docs.oracle.com/javaee/6/api/javax/transaction/xa/XAResource.html.
And that was a quick look at JTA.
MongoDB and Transactions
MongoDB does not support transactions, and this might seem like a limitation that cancels any potential benefit. MongoDB supports atomicity only when the changes affect a single document or multiple subdocuments of a single document. When changes (such as write operations) affect multiple documents, they are not applied atomically, which may lead to inconsistent data, other operations that interleave, and so on. Obviously, since the changes to multiple documents are not atomic, rollback is not applicable.
MongoDB does better with regard to consistency and durability. MongoDB write operations can be made consistent across connections. Moreover, MongoDB supports near-real-time replication, so it’s possible to ensure an operation has been replicated before returning.
Hibernate OGM mitigates MongoDB’s lack of support for transactions by queuing all changes before applying them during flush time. Even though MongoDB doesn’t support transactions, Hibernate OGM recommends using transaction demarcations to trigger the flush operation transparently (on commit). But, as the official documentation indicates, rollback is not an option. Therefore, the applications developed in this book will use JTA, as Hibernate OGM recommends.
Note
■
Based on the limitations I’ve noted, it’s easy to conclude that MongoDB can’t meet our application’s needs. But, let’s
consider why we might jump to that conclusion. Are we too addicted to complex database schema designs, with many joins and
tables that require transactions, and queries that are hard to write and manage? It’s far from my aim to debate such questions
here, but maybe you’ll take a little time to think about them and find the correct answers for your applications.
Brief Overview of Hibernate Native API
Applications that use the Hibernate API directly are known as native Hibernate applications. Developing a native Hibernate application consists of a few straightforward steps in which you:
define persistence classes •
specify properties and mapping documents •
based on this configuration, create a session factory •
obtain (open) sessions from the session factory •
execute queries and transactions •
The starting point and core of the Native API is the org.hibernate.cfg.Configuration class, which uses the
properties and mapping documents (.properties, .cfg.xml and hbm.xml files) to create org.hibernate.SessionFactory, a thread-safe object that’s instantiated once and provides a factory for obtaining sessions (org.hibernate.Session). Session instances are used to execute transactions (JTA) and/or queries.
Figure 3-2 represents the Hibernate Native API architecture.
Figure 3-2. Hibernate Native API architecture
Bootstrapping Hibernate OGM Using JPA
Bootstrapping Hibernate OGM using JPA is the simplest case, since Hibernate OGM acts as a persistence provider. As noted earlier, the persistence provider is specified in the persistence.xml file within a persistence unit. The contents of persistence.xml may differ depending on how certain variables are defined, such as environment (Java EE, Java SE); JTA or non-JTA; database-specific requirements; server configurations; and so on. I tried to write a persistence.xml file for Hibernate OGM that contains the minimum mandatory settings.
1. The first step is to write a persistence.xml skeleton, which (in a Java SE/EE application) generally looks like this:
<?xml version="1.0" encoding="UTF-8"?>
<persistence version="2.0" xmlns="http://java.sun.com/xml/ns/persistence" xmlns:xsi="http://www.w3.org/2001/XMLSchema-instance"
xsi:schemaLocation="http://java.sun.com/xml/ns/persistence http://java.sun.com/xml/ns/persistence/persistence_2_0.xsd"> ...
</persistence>