INTRODUCTION
Welcome to General Ledger Software-Windows, an interactive program developed by Gary Lubin for Financial Accounting, Second Edition by Weygandt, Kieso, and Kimmel. This program can be used with both Windows® 3.1 and Windows® 95.
This program allows you to work more than 50 problems selected from the textbook. You will enter journal entries, post journal entries, generate trial balances, income statements, and balance sheets as well as a variety of other reports which can be displayed on-screen and in print. The program contains a menu item to close the books. Options in the software provide you with the opportunity to go beyond the textbook questions, to practice and experiment with accounting on your own. In fact, for any problem, after you have closed the period described in the textbook, you can continue to make entries, post, and print reports for subsequent periods.
In addition, two special problems, the Student Proprietorship (S-Prop) and Student Corporation (S-Corp), allow you to create your own scenarios from scratch, naming new accounts and providing opening account balances.
When you load a listed problem, the software enters the opening balances for you. You do not need to enter the opening balances as directed in your
textbook. You can view the opening balances by selecting from the Main Menu,
Reports| General Ledger|Current|Specific or All.
A depreciation option gives you the means to compare depreciation expenses calculated according to four different methods.
The Make Eval File(s) option processes your disk so that your instructor can review the results of your work at his/her discretion.
A Main Menu and drop-down submenus provide access to all options. The options can be selected by clicking the left mouse button once, pressing the Alt key and the underlined letter (Alt+F) or highlighting the item and pressing the Enter key. On-screen messages guide you through procedures, and additional Help is available throughout the program from the Help option of the Main Menu, the Help button available on most screens, or by pressing the <F1> key.
If you have difficulty using any portion of the program, consult your instructor.
Remember, in order to enter any transactions or generate reports, you must first load a problem. To load a problem, start at the Main Menu, select
Problems|Select|P2-1 (or the appropriate problem).
USING THE SOFTWARE
Minimum System Requirements
Ÿ
IBM® or 100% fully compatible 386 computer (486 or higher works much faster)Ÿ
Microsoft® Windows® 3.1 or Microsoft® Windows® 95Ÿ
At least 5MB of free hard disk spaceŸ
At least 2MB RAMSetting Up the Software
The General Ledger Software-Windows must be installed on a network or on the hard disk of a stand alone computer. The program cannot be used from the diskettes.
The Student Data Disk is portable. It is preprogrammed to allow you to work your accounting problems in the computer lab at your college, or on your own computer. The computer lab at your college may be set up on a network or with stand-alone computers. The program will work on either system as long as the minimum system requirements are met. You may start an accounting problem using one computer and because you have saved the data to your Student Data Disk you may load the saved data onto a different computer (that has the program loaded on the hard drive) and continue working on the problem. You may even wish to take the problem back to the original computer (or different one) to complete. Example:
Using the program in a lab setting
If you are using the program at your college, skip to ‘Starting the Program’ on Page 12.
Installing the program on the hard disk of your own
computer
Make a working copy of the program disks. Using the working copies, follow the installation instructions below to transfer the software to your hard disk drive. Consult your instructor or lab assistant for help in copying the disks.
Using Windows
®3.1
1. Load the Windows® program as usual.
2. Place the original General Ledger Software-Windows Disk 1 into your 3.5” disk drive.
3. At the Program Manager screen, from the File menu select Run.
4. In the Run dialog box, type a:install and click OK (assuming you are using Drive A).
5. Follow the instructions on screen to install the software. 6. At the Welcome screen click OK.
7. At the Select Destination Directory read the instructions and click OK unless you wish to change the Drive/Directory. Follow the on-screen instructions and change disks when requested.
You may see a dialog box headed “Borland Database Engine Location” on your screen. If so click on OK to accept the directory.
Click on OK to restart the computer.
Using Windows
®95
1. Load Windows® 95 as usual 2. Click on Start
4. Click on Run
5. In the Run dialog box, type a:install and click on OK (assuming you are using Drive A).
6. Follow the instructions on-screen to install the software. 7. At the Welcome screen click on OK.
8. At the Select Destination Directory read the instructions and click on OK unless you wish to change the Drive/Directory. Follow the on-screen instructions and change disks when requested.
You may see a dialog box headed “Borland Database Engine Location” on your screen. If so click on OK to accept the directory.
9. Click yes to add Financial Accounting 2 icons. 10. Click on OK to accept the group name.
11. Choose whether or not you want to add a shortcut on the Start Menu. 12. Remove the installation disk before restarting the computer
Click on OK to restart the computer. After the computer has restarted click on the X in the upper right corner of the Finac2 group to close the window. See instructions on Page 12 to start the program.
To Uninstall the Program
Should you need to free-up hard disk space on your computer this program can be uninstalled. Be careful not to perform this task until you are sure you have no further use for the program.
Using Windows
®3.1
1. Start at the Program Manager screen.
2. Double click the Uninstall Icon next to the Financial Accounting 2 Icon.
Using Windows
®95
Starting the Program the First Time
Using Windows 3.1
1. Double click the Financial Accounting Icon.
[image:6.612.190.419.462.530.2]
Figure 1: Financial Accounting 2 Icon
2. Insert your Student Data Disk in Drive A.
3. From the Financial Accounting 2 copyright screen, click on Continue. 4. Identify the drive that contains your Student Data Disk. (Usually drive A)
Click on OK. (See Figure 3)
Using Windows 95
1. Click on Start 2. Highlight Programs
3. Highlight Financial Accounting 2
4. Highlight and click on Financial Accounting 2.
Figure 2: Windows®95 Desktop
5. Insert your Student Data Disk in Drive A
Figure 3: Drive screen
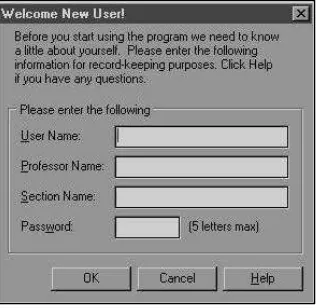
Entering User Information
User Identification Screen
To enter information into the User Identification screen:
Figure 4: User Identification scre e n
[image:7.612.232.390.350.504.2]2. Type a password of your choice, consisting of 1 to 5 characters (letters and/or numerals) in the password field. Click on OK.
3. To verify your password, retype it and click on OK.
4. When the program determines that the Password and Password Verification match the computer will transfer the data from your Student Data Disk, creating temporary files on the hard drive.
5. You will be advanced to the Program Information screens. The information on these screens provide you with an overview of the General Ledger Software-Windows program. Use the down arrow on the right of the dialog box to scroll through the pages.
6. When you are finished, click the left mouse button once on OK to advance to the Main Menu of the program where you can begin working through an accounting problem.
IMPORTANT NOTE:
Remember Your Password!!! The General Ledger Software-Windows is password protected; this means that in the future, you will only be able to use the program by entering your chosen password on the password screen. Since the password is essential for your use of the program, you may want to write it down in the space provided below._______ ______________________________
Your Password
To Start the Program After the Initial Start-up
Using Windows 3.1
1. Access the screen that contains the General Ledger Software-Windows icon. 2. Insert your Student Data Disk in Drive A.
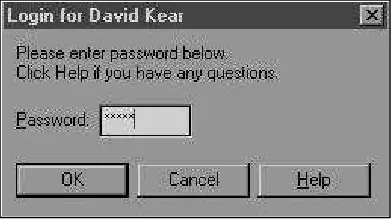
6. Type your password exactly as you did on the identification screen. (See Figure 4) For security purposes you will see a series of asterisks on the screen instead of your password. (See Figure 5)
Using Windows 95
1. Access the Windows 95 Desktop. 2. Insert your Student Data Disk in Drive A. 3. Highlight Programs.
4. Highlight Financial Accounting 2
5. Highlight and click on Financial Accounting 2
6. From the Financial Accounting 2 copyright screen, click on Continue. 7. Identify the drive that contains your Student Data Disk (Usually Drive A)
(See Figure 3).
[image:9.612.201.397.360.470.2]8. Type your password exactly as you did on the identification screen. For security purposes you will see a series of asterisks on the screen instead of your password.
USING THE MENUS
Using the Main Menu
The General Ledger Software-Windows system is easy to use. Select a problem, make entries in the appropriate journals, post the entries, close the books, and generate reports. On-screen help is available from many parts of the program by clicking Help or pressing <F1>.
Using the Main Menu pull-down menus
[image:10.612.141.470.394.447.2]A pull-down menu is displayed by clicking the menu name from the Main Menu bar (located at the top of the screen). For example, to access the Problem menu, click Problems (for this program ‘click’ means click the left mouse button once and ‘double-click’ means click the left mouse button rapidly twice). You can also hold down Alt and press the highlighted or underlined letters (such as Alt+P for the Problems menu) or you can arrow to the desired location and press the Enter key.
Figure 6: Main Menu
Basic Steps to Load an Accounting Problem
Load a Problem
[image:10.612.141.469.544.600.2]2. From the Problems menu select Select.
[image:11.612.219.388.178.338.2]3. From the Select menu select the problem you wish to work and double click the mouse or click on OK at the bottom of the dialog box.
Figure 8: Problem Selection
4. The basic structure of the problem--the names of the accounts, beginning balances etc.--will be loaded by the program. You will be returned to the Main Menu, ready to make entries or generate reports.
NOTE: The problems included in the General Ledger Software are shown on the last two pages of this manual.
Make Journal Entries
1. From the main Menu select Entries.
2. From the Entries menu select Make and the appropriate journal.
[image:11.612.143.470.520.574.2]3. Click on the <? F1-Help> button located at the bottom of the Journal screen (or press the function key F1) for help to guide you through the process of entering data on each journal entry form.
To view or print a preliminary report of the current journal select F10-Exit (located at the bottom of the screen) or press F10. This will return you to the Main Menu where you can select Reports| Journals| General (or the journal you want to review). It is a good idea to use this option to review all transactions before posting them.
Post Entries
After you have entered and saved the journal entries: 1. Select F10-Exit to return to the Main Menu.
2. Select Entries| Post| General (or the journal from which you wish to post) 3. Select F4-Post and then F10-Exit to return to the Main Menu.
4. Once entries are posted they cannot be changed (although they can be voided from the Journal Entry Form screen).
5. Entries that have not been posted will be saved by the program, but only posted entries are used by the program to create the full range of reports.
Once entries have been posted, you can view and print the posted journals and other reports from the Reports menu. You can also return to any Journal Entry Form screen and make additional entries. Many problems require that you make and post entries in two stages, reflecting initial and subsequent transactions.
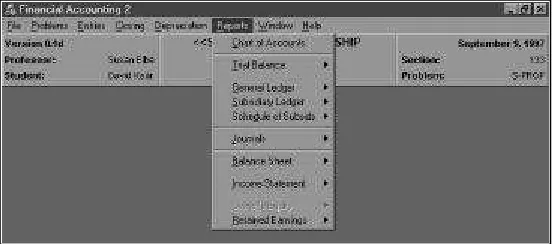
View or Print Reports
[image:13.612.165.442.216.338.2]Choose Reports from the Main Menu and select any of a wide range of reports to view or print. Reports, other than the journal reports, will be generated using only posted entries in the current problem.
Figure 10: Report Menu
Close Books
OTHER OPTIONS
AVAILABLE FROM THE
MAIN MENU
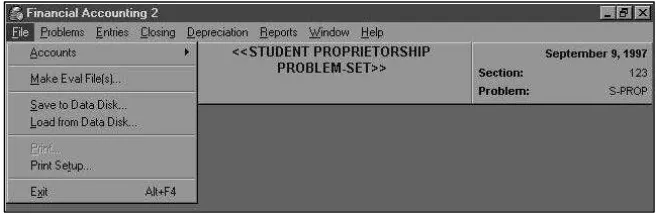
File
[image:14.612.141.469.302.409.2]This menu’s eight separate functions are explained below.
Figure 11: File Menu
Accounts
Provides for setup for the special students problems, S-Prop or S-Corp. (See Figure 11) The two options on this sub-menu are explained in Setting up the Student Problems section, on Page 41.
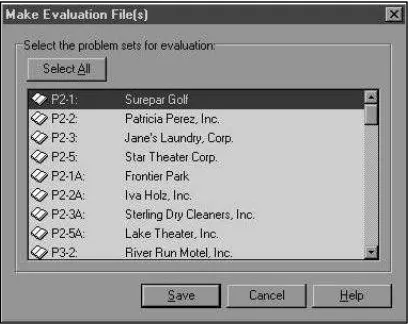
Make Eval File(s)...
1. The problem(s) you want to prepare for evaluation has (have) to have been closed before you can prepare a disk to be evaluated.
2. Remove your data disk and replace it with a blank formatted disk. 3. Click on File (See Figure 6).
4. Click on Make Eval File(s)... (See Figure 11).
5. From the Make Eval File(s) screen highlight the problem(s) you wish to have evaluated (See Figure 12). To select 2 or more problems to be evaluated at the same time highlight the first problem, then move the cursor to the next problem you want to select and while holding down the Ctrl key click on the left mouse button. Repeat this step until all of the problems you want to be evaluated at this time have been selected.
6. Click on Save (See Figure 12).
7. When you see the message “Evaluation files successfully written to A” click on OK.
8. Every time you run this procedure, it will create a new evaluation, based on whatever figures are current in your problems.
9. Remove the disk you saved the evaluation data on from drive A and give the disk to your instructor. Place your data disk in drive A and either start working on another problem or exit the program.
[image:15.612.215.419.404.566.2]Remember--you must have your data disk inserted in drive A to exit the program.
Save to Data Disk...
Use this option to save the current problem to your data disk. You will be prompted to save your data when you exit the program but you can save at any time while working on a problem. You might want to save periodically to avoid losing data in case of a system or power failure.
Load from Data Disk...
This option is used to load data from your data disk to the program. Select this option and follow the instructions on the screen. Use this option to retrieve a problem you saved on your disk (but have not closed) and want to complete, alter, or print reports.
Use this option to print saved journal entries, trial balances, and statements.
Print Setup
This option may be used to: change from the default printer to a different printer; choose the orientation of your report (choices are Portrait or Landscape) and verify the paper size and source.
Exit Alt +F4
Always use the Exit option when leaving the General Ledger Software-Windows program.
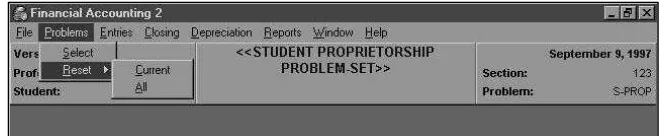
Problems
This menu choice is used to select a problem for use or to clear all the entries you have made in the current problem or in all problems. (See Figure 6)
Select
Reset
[image:17.612.139.471.241.309.2]You may wish to delete the data you have entered into a specific problem, or into all problems. (Remember that once the Closing procedure has been used on a problem, it cannot be changed.) This option is particularly useful in allowing you to use the software to work through problems you have already worked as a review.
Figure 13: Resetting Problems
Current
This option allows you to erase all entries and reset beginning balances for the current problem. You will be given a chance to change your mind. Once you click OK all transactions you have recorded on that problem will be deleted.
All
This option allows you to reset all transactions in all problems, including the current problem. You will be given a chance to change your mind. Once you click OK, all transactions will be deleted and all beginning balances will be reset.
Entries
Use this menu to enter transactions into a journal and to post saved journal entries. (See Figure 6)
Make
Post
This menu is used to post saved journal entries. (See Figure 9)
Closing
[image:18.612.193.416.367.453.2]When all transactions for the current problem have been entered and posted you can close the books by choosing Closing (See Figure 6) and following the instructions on the screen. (See Figure 14) The closing process generates final reports for that period. (The program gives you the opportunity to identify which statements you want printed. Check with your instructor as to what statements she/he wants you to print) The program closes all temporary accounts and transfers those balances to the designated capital account(s). Be sure you have printed copies of all journal reports and Trial Balance reports needed prior to closing. Once the books are closed for a problem no further entries can be made and no transactions can be made void; however, the entire problem can be reset from the Problems menu option. (See Figure 6)
Figure 14: Closing En tries
Depreciation
Reports
The Report menu (see Figure 10) is used to view/print the Chart of Accounts, Trial Balances, General Ledger accounts, Subsidiary accounts, Schedule of Subsidiary accounts, and Journals. It can also be used to view/print the Balance Sheet, Income Statement, Owner’s Equity Statement, and Retained Earnings if the problem does not require the books to be closed. If closing is part of the problem then these reports will be printed as part of the closing process. This menu’s ten functions are explained below.
You can change the size of the display screen for the various reports by clicking on the size button (three squares are on the button) shown at the bottom of the page. Clicking once displays a very small screen. Clicking a second time displays a large screen and a third click returns the display to the original size.
When the scroll bars (right side and bottom of your screen) are present you can scroll up and down or to the side of the displayed screen.
Chart of Accounts
Displays/prints a list of account numbers and names for the problem you have selected. This report can be displayed on the screen or as a printout anytime after a problem has been selected.
Trial Balance
Displays/prints the Current Trial Balance anytime after entries have been posted or the Prior Trial Balance after the books have been closed.
General Ledger
Subsidiary Ledger
Displays/prints the Current Accounts Receivable, Accounts Payable, or All subsidiaries at any time after the entries have been posted or the Prior subsidiary ledgers may be displayed/printed after the books have been closed.
Schedule of Subsids
Displays/prints the schedule of Receivables, Payables, or All after entries have been posted.
Journals
Displays/prints the General, Purchases, Sales, Receipts, Disbursements, All journals at any time after the entries have been saved. It is a good idea to display a journal prior to posting the entries.
Balance Sheet
Displays/prints the Balance Sheet for the Current period and is used when you do not close the books using the closing process. Displays/prints the Balance Sheet for the Prior period after the books have been closed.
Income Statement
Displays/prints the Income Statement for the Current period and is used when you do not close the books using the closing process. Displays/prints the Income Statement for the Prior period after the books have been closed.
Owner’s Equity
Retained Earnings
Displays/prints the Retained Earnings Statement for the Current period and is used with a corporation when you do not close the books using the closing process. Displays/prints the Retained Earnings Statement for the Prior period after the books have been closed.
Help
MANAGING THE
JOURNALS
Journal Entries
There are five journals in the General Ledger Software-Windows: General Journal, Purchases Journal, Sales Journal, Cash Receipts Journal, and Cash Disbursements Journal. All five allow you to add and change or void entries. Since the procedure for adding entries depends on the journal, they are explained in the description of each journal. The procedure for changing or voiding entries is identical regardless of which journal you are using, so the instructions for changing or voiding entries are given below. (See Figures 15 through 19)
General Ledger Software-Windows numbers entries sequentially. To view, edit,
or void a saved entry, the entry you want to retrieve must be active on your screen.
From any one of the journal screens you may click on F10-Exit to return to the Main Menu, from which you may select Entries|Post to post saved entries or Report|Journals|named journal to create a report of the journal.
Changing or Voiding Journal Entries
After entering information for a journal entry, you can make changes to the entry under the following conditions:
If the entry is still on-screen and has not been saved, you may make changes in a specific field by clicking on the field and keying in the data. (If you have
transposed an account number you will need to delete both account numbers before you can make the correction. An account number can be entered only once within a transaction.) All fields may be cleared by clicking on F3-Clear.
1. Get an Entry
If the entry you wish to edit or void is not on screen, move your mouse cursor to the Get Entry field (located top left of your screen), type the number of the entry you want to retrieve, and click on F2-Get (bottom of the screen). If you do not know the entry number, click on F10-Exit to go to the Main Menu and click on Reports|Journal|General (or the Journal of your choice) to view the entries. Return to General Journal screen and restart this step.
2. Change an Entry
Tab forward or back (Shift+Tab) to the field you wish to edit, or click on the field, and type in the correct data. Click F4-Save to save your changes; you will be advanced to a new blank entry screen.
3. Clear the data from the screen
Click on F3-Clear to remove all of the data you have entered into the current screen.
4. Void an Entry
A posted entry may be voided by clicking F6-Void. The entry will keep its number but will contain no data. You may create a new entry with correct data to replace this voided entry. Be sure to save and post the new entry. If you wish to clear ALL entries for the current problem, you may do so from the Problems|Reset|Current menu.
General Journal
Figure 15: General Journal
1. Enter Date
Type the transaction date in "mm/dd" format.
2. Enter Description
Type a brief description of your entry.
3. Enter Account Number and Name
Click F8-Accts to display the list of accounts. Highlight the appropriate account and double click or press OK. The number and name of the account will be entered automatically and the cursor will be advanced to the next field.
If you wish, you may instead type the account number in the Acct-No field and press Tab. The account name will be entered automatically and the cursor will be advanced to the next field.
4. Enter Debit or Credit Amount
5. Save Entry
Click F4-Save to save the entry and advance to a new blank entry screen. The program will provide screen messages regarding an unbalanced entry, and allow you to correct the problem. When you click on F4-Save and the entry balances you will see a message indicating the entry has saved successfully. Click on OK. Be sure to save after each transaction.
6. Return to the Menus
After saving your last entry (clicking F4-Save), click F10-Exit to leave the entry screen. You will be returned to the Main Menu. At this point you may view or print a Report of the journal, or Post your saved entries.
Purchases Journal
[image:25.612.180.434.348.496.2]To add entries to the Purchases Journal follow the steps below. To move between fields use Tab and Shift+Tab.
Figure 16: Purchases Journal
1. Enter Date
2. Enter Description
Type a brief description of your entry.
3. Enter Purchase Control Total and Purchase Order Number
In the Purchases Journal, amounts debited to the Purchases account, #510, are entered here rather than as line entries.
Type the amount to be debited to the Purchases account (Account #510) in the Purchase Control Total field. Type the Purchase Order number in the Purchase Order Number field (if the problem provides a purchase order number).
4. Enter Account Number and Name
Use the lines here to enter all transactions other than those involving the Purchases account. Click F8-Accts to display the list of accounts. Highlight the appropriate account and double click or click on OK. The number and name of the account will be entered automatically and the cursor will be advanced to the next field.
If you wish, you may type the account number in the Acct-No field and press Tab. The account name will be entered automatically and the cursor will be advanced to the next field.
5. Enter Debit or Credit Amount
Type in the dollar amount in the appropriate field. Use Tab and Shift+Tab to move between fields.
Repeat Steps 4 and 5 as needed. Total debits and credits within an entry must balance.
6. Save Entry
7. Return to the Menus
After saving your last entry (clicking F4-Save), click F10-Exit to leave the entry screen. You will be returned to the Main Menu. You may at this point view or print a Report of the journal, or Post your saved entries.
Sales Journal
[image:27.612.179.433.265.416.2]To add entries to the Sales Journal follow the steps below. To move between fields use Tab and Shift+Tab.
Figure 17: Sales Journal
1. Enter Date
Type the transaction date in "mm/dd" format.
2. Enter Description
Type a brief description of your entry.
3. Enter Sales Revenue Control Total and Sales Invoice Number
In the Sales Journal, amounts credited to the Sales account, #401, are entered here rather than as line entries.
4. Enter Account Number and Name
Use the lines here to enter all transactions other than those involving the Sales account. Click F8-Accts to display the list of accounts. Highlight the appropriate account and double click or click on OK. The number and name of the account will be entered automatically and the cursor will be advanced to the next field.
If you wish, you can type the account number in the Acct-No field and press Tab. The account name will be entered automatically and the cursor will be advanced to the next field.
5. Enter Debit or Credit Amount
Type in the dollar amount in the appropriate field. Use Tab and Shift+Tab to move between fields.
Repeat Steps 4 and 5 as needed. Total debits and credits within an entry must balance.
6. Save Entry
Click F4-Save to save the entry and advance to a new blank entry screen. The program provides a screen message regarding unbalanced entries, and allow you to correct the problem. When you click on F4-Save with a balanced entry, you will see a message that the entry has saved. Click on OK. Be sure to save after each transaction.
7. Return to the Menus
Receipts Journal
[image:29.612.179.434.201.348.2]To add entries to the Receipts Journal (the journal used to record cash receipts) follow the steps below. To move between fields use Tab and Shift+Tab.
Figure 18: Receipts Journal
1. Enter Date
Type in the transaction date in "mm/dd" format.
2. Enter Description
Type a brief description of your entry.
3. Enter Cash Receipts Control Total
In the Receipts Journal, amounts debited to the Cash account, #101, are entered here rather than as line entries. Type the cash receipts control total, which is the amount debited to account #101 (Cash), and press Tab to advance to the Account Number field.
4. Enter Account Number and Name
If you wish, you can type the account number in the Acct-No field and press Tab. The account name will be entered automatically and the cursor will be advanced to the next field.
5. Enter Debit or Credit Amount
Type in the dollar amount in the appropriate field. Use Tab and Shift+Tab to move between fields.
Repeat Steps 4 and 5 as needed. Total debits and credits within an entry must balance.
6. Save Entry
Click F4-Save to save the entry and advance to a new blank entry screen. The program will provide screen messages regarding an unbalanced entry, and allow you to correct the problem. When you click on F4-Save and the entry balances you will see a message indicating the entry has saved successfully. Click on OK. Be sure to save after each transaction.
7. Return to the Menus
Disbursements Journal
[image:32.612.177.434.205.354.2]To add entries to the Disbursements Journal (the journal used to record cash disbursements) follow the steps below. To move between fields use Tab and Shift+Tab.
Figure 19: Disbursements Journal
1. Enter Date
Type the transaction date in "mm/dd" format.
2. Enter Description
Type a brief description of your entry.
3. Enter Cash Disbursement Control Total
In the Disbursements Journal, amounts credited to the Cash account, #101, are entered here rather than as line entries.
Type the cash disbursement control total, which is the amount credited to account #101 (Cash), and press Tab to advance to the Check # field (if the problem provides a check number).
4. Enter Account Number and Name
of the account will be entered automatically and the cursor will be advanced to the next field.
If you wish, you can type the account number in the Acct-No field and press Tab. The account name will be entered automatically and the cursor will be advanced to the next field.
5. Enter Debit and Credit Amount
Type in the dollar amount in the appropriate field. Use Tab and Shift+Tab to move between fields.
Repeat Steps 4 and 5 as needed. Total debits and credits within an entry must balance.
6. Save Entry
Click F4-Save to save the entry and advance to a new blank entry screen. The program will provide screen messages regarding an unbalanced entry, and allow you to correct the problem. When you click on F4-Save and the entry balances you will see a message indicating the entry has saved successfully. Click on OK. Be sure to save after each transaction.
7. Return to the Menus
POSTING
[image:34.612.171.450.220.358.2]After entries are created and saved, they must be posted in order for the program to recognize them. The General Ledger program can then use them in creating reports using the Reports menu. (See Figure 20)
Figure 20: Posting
Before posting, it is a good idea to review entries for the current journal (using Report|Journals|General [or the journal from which you wish to post]). Once posted, entries cannot be changed.
If you find that you need to correct an entry that has already been posted, you can void it and create a new, correct entry. To do this, return to the
Entries|Make|General (or journal of your choice).
CALCULATING DEPRECIATION
[image:35.612.194.406.222.348.2]The depreciation routine allows you to calculate depreciation expense using stright-line, sum-of-the-years'-digits, double declining-balance, and units-of-activity methods. (See Figure 21)
Figure 21: Depreciation
Enter Basic Data
Enter basic data (company, asset description, cost, salvage value, date acquired, useful life, and total units of activity) regarding the asset. As you complete a field, click on the next field or press Tab to advance to the next field. (use Shift+Tab to move to a previous field.) An on-screen message will indicate if you have made an invalid entry (for example, a letter in a numeric field).
Select Depreciation Method
Click the tab button (located at the bottom of the screen) or press the function key for the method you with to use:
F2--Straight Line
F4--Double Declining Balance F6--Sum-of-the-years'-digits F7--Set Units
Print a Schedule
To print a schedule, at the Depreciation screen click the Print tab.
Setting up the Student Problems
Ordinarily, when you choose a problem to work on in this program, the General Ledger Software-Windows automatically loads start-up data that corresponds to the information in the textbook, including the list of accounts and starting balances. These are procedures that you would have to do from scratch if you were actually setting up accounting ledgers.
[image:36.612.205.398.394.571.2]The two student problems, S-Prop and S-Corp, give you the opportunity to create and work through problems from scratch. When you choose one of these problems, the program provides you with a list of accounts, as it does for other problems. The balances in all accounts are set to 0. To add other accounts, to define your own accounts, and to create opening balances, use the following options. Remember that you must first select S-Prop or S-Corp from the Problems menu. The accounts you add here will only be added to the problem that is currently active.
Add/Activate Acct:
[image:37.612.193.418.211.374.2]To add new accounts or activate default accounts select File| Accounts| Add/Activate.
Figure 23: Add/Activate Screen
Use this option to activate accounts that are not yet part of General Ledger Software's default set for the problem, or to add accounts of your own naming. Once you add or activate an account, it will be available on the list of accounts for the problem on the Journal Entry Form screen and the Beginning Balance screen.
1. The accounts are grouped according to category, such as Current Assets or Property, Plant and Equipment.
2. All accounts that are already part of the problem (because they were part of the program's default set or because you previously activated them) have an X in the box ON/OFF. You may choose any account by placing an X in the box. If you wish to name an account of your own, choose an UNDEFINED account number.
3. If you have chosen an UNDEFINED account, you will then be able to enter its name under Account Name. You may not change the name of any defined account.
Beginning Balance:
[image:38.612.208.405.229.417.2]All accounts for S-Prop and S-Corp start out with a balance of 0. Select this option to change balances for any active accounts. Remember that first you must select S-Prop or S-Corp from the Problems menu. The beginning credits and debits for each problem must balance.
Figure 24: Beginning Balance Screen
1. Select File|Accounts|Beginning Balances. Highlight the account whose balance you wish to add to and press Enter.
2. Type in the beginning balance. The 0's will be replaced with the amount you entered for the beginning account balance.
3. Repeat steps 1 and 2 as often as necessary. You may change an amount for any account that you have already entered by choosing that account and entering a new beginning balance.
TUTORIAL
Step-by-step instructions for two of the problems from the text (P2-1 and P2-2) are shown below. Even if your professor does not assign either of these
problems you will find it helpful to work through both of them to get an idea as to how the program works.
Note: To save your data on your data disk you must exit the program properly (select File|Exit from the Main Menu). Exiting a problem any other way will cause loss of data. If computer or electrical problems cause untimely termination of a problem you will lose your data and will need to start the problem from the beginning.
Tutorial for P2-1
Starting the Problem
1. Refer to the instructions for the General Ledger Software-Windows and the type of computer system you are using on Pages 12-15 to start the program 2. Enter your password and click on OK (See Figure 5)
3. The General Ledger Software Main Menu will appear (See Figure 6) 4. Select Problems
5. Select the Select option (See Figure 7)
6. Select P2-1 Surepar Golf by either highlighting and double-clicking or highlighting and clicking on OK (See Figure 8)
7. Read the Problem Information screen and click on OK 8. Click on Entries (See Figure 6)
9. Click on Make (See Figure 9)
10. Select the General tab (located at the top of the screen). The cursor will be in the date field (See Figure 15)
11. In the Date field type 03 the computer moves to the next field, type 01 press Enter or tab to move to the next field
12. Type a brief explanation such as “Invested cash for Common Stock” and press tab
14. Select 101 Cash (you may double-click or click on OK after highlighting the account)
15. Type 50000 in the Dr-Amt field (do not type a dollar sign ($) or a comma (,), press tab twice
16. Click on F8-Accts
17. Select 311-Common Stock
18. Tab once and type 50000 in the Cr-Amt field
19. Check the data on your screen for accuracy. Errors may be corrected by clicking on the incorrect field, deleting the content and typing in the correct information or if you entered the wrong transaction click on F3-Clear to remove all of the data from the screen and start the transaction again. 20. Click on F4-Save to save the entry. If the entry balances, a message will
appear stating the entry was successfully saved. Click on OK to accept this message. If the debits and credits do not balance a message will appear telling you the entry does not balance, click OK, correct the error and save again.
21. You are ready to enter the second transaction 22. In the Dates field type 03 then 03
23. Follow steps 12 and 13 above 24. Select 140-Land
25. Type 2300 in the Dr-Amt field, press tab twice 26. Click on F8-Accts
27. Select 145-Building
28. Type 9000 in the Dr-Amt Field, press tab twice 29. Click on F8-Accts
30. Select 157-Equipment
31. Type 6000 in the Dr-Amt Field, press tab twice 32. Click on F8-Accts
33. Select 101-Cash
34. Type 3800 in the Cr-Amt Field
35. Verify the accuracy of the screen (correct any errors) click on F4-Save 36. Click OK to accept the saved message
Check with your professor to determine whether you need to go beyond
journalizing the entries. If your professor wants to evaluate this problem using the evaluator program you will need to post the entries and close the books. Just follow the yellow brick road..oh, I’m sorry, follow the instructions below.
For those of you who are stopping at journalizing the March transactions:
1. After saving the March 31 entries click F10-Exit to return to the Main Menu 2. Select Reports|Journal|General|Current to display the entries. Read through
the entries (you may enlarge the screen by clicking on the three-boxed button, lower portion of the screen or by clicking on the enlarge button in the upper right corner of the screen) and verify that you entered what you intended to enter. If you have errors you will need to correct them (follow the instructions in this manual for correcting entries). If you want to print the contents of the screen click on the picture of the printer at the bottom of the screen
3. Click on the X in the upper right corner to exit the screen and return to the Main Menu
4. Click on File|Exit (make sure your data disk is in drive A)
If your professor wants you to prepare your disk for evaluation using the evaluator program you need to post the journal entries and close the books:
1. After saving the March 31 entries click F10-Exit to return to the Main Menu 2. Select Reports|Journal|General|Current to display the entries. Read through
the entries (you may enlarge the screen by clicking on the three-boxed button, lower portion of the screen or by clicking on the enlarge button in the upper right corner of the screen) and verify that you entered what you intended to enter. If you have errors you will need to correct them (follow the instructions in this manual for correcting entries). If you want to print the contents of the screen click on the picture of the printer at the bottom of the screen
3. Click on the X in the upper right corner to exit the screen and return to the Main Menu
5. Confirmation of posting will appear at the bottom of the screen 6. Click F10-Exit to return to the Main Menu
7. Select Closing from the Main Menu and follow the on-screen instructions, accepting the default options, except remove the x by all print options. You do not need a print out of statements when a proble m is going to be evaluated using the eval program. When you see the message that the problem has been successfully closed click on OK and return to the Main Menu. To prepare an eval disk refer to the instructions in this manual. 8. To exit the program click on File|Exit (make sure your data disk is in drive A).
Tutorial for P2-2
Starting the Problem
1. Refer to the instructions for the General Ledger Software-Windows and the type of computer system you are using on Pages 12-15 to start the program 2. Type your password and click on OK (See Figure 5)
3. The General Ledger Software Main Menu will appear (See Figure 6) 4. Select Problems
5. Select the Select option (See Figure 7)
6. Select P2-2 Patricia Perez, Inc. by either highlighting and double-clicking or highlighting and clicking on OK (See Figure 8)
7. Read the Problem Information screen and click on OK 8. Click on Entries (See Figure 6)
9. Click on Make (See Figure 9)
10. Select the General tab (located at the top of the screen). The cursor will be in the date field (See Figure 15)
11. Type 04 then 01 to enter the date, press the tab key to advance to the next field
12. Type a brief explanation such as “Invested cash for Common Stock” and press tab
13. Click on F8-Accts
14. Select 101 C ash (you may double-click or click on OK after highlighting the account)
16. Click on F8-Accts
17. Select 311-Common Stock
18. Tab once and type 13000 in the Cr-Amt field
19. Check the data on your screen for accuracy. Errors may be corrected by clicking on the incorrect field, deleting the content and typing in the correct information or if you entered the wrong transaction click on F3-Clear to remove all of the data from the screen and start the transaction again. 20. Click on F4-Save to save the entry. If the entry balances, a message will
appear stating the entry was successfully saved. Click on OK to accept this message. If the debits and credits do not balance a message will appear telling you the entry does not balance, click OK, correct the error and save again.
21. Since the second transaction (April 1) does not involve an economic activity an entry is not necessary
22. You are ready to enter the third transaction 23. In the Dates field type 04 then 02
24. Follow steps 12 and 13 above 25. Select 729-Rent Expense
26. Type 800 in the Dr-Amt field, press tab twice 27. Click on F8-Accts
28. Select 101-Cash
29. Type 800 in the Cr-Amt Field
30. Verify the accuracy of the screen, if you find errors correct them and click on F4-Save
31. Click OK to accept the saved message
32. Follow the steps above to enter the remaining transactions
33. After saving the April 30 entry click F10-Exit to return to the Main Menu 34. Select Reports|Journal|General|Current to display the entries. Posted entries
will show a P in the Posted column. Read through the entries (you may enlarge the screen by clicking on the three-boxed button, lower portion of the screen or by clicking on the enlarge button in the upper right corner of the screen) and verify that you entered what you intended to enter. If you want to print the contents of the screen click on the picture of the printer at the bottom of the screen
35. Click on the X in the upper right corner to exit the screen and return to the Main Menu
39. Select Reports|Trial Balance|Current
40. If your totals equal 17,400 press the X in the upper right corner to exit to the Main Menu
41. If your totals do not equal 17,400 you need to review your entries against the transactions in the text, find and correct your error(s) (follow the instructions in this manual for correcting entries after posting) and display another trial balance
Check with your professor to determine whether you need to go beyond the Trial Balance. If our professor wants to evaluate this problem using the evaluator program you will need to close the books as instructed below.
For those of you who are stopping at the Trial Balance:
1. Exit the program by clicking on File|Exit (make sure your data disk is in drive A)
If your professor wants you to prepare your disk for evaluation using the evaluator program you need to close the books:
1. Click on Closing and follow the on-screen instructions, accepting the default options, except remove the x by all print options. It is not necessary to print out statements when a problem is going to be evaluated using the eval program. When you see the message that the problem has be successfully closed click on OK and return to the Main Menu. To prepare an eval disk refer to the instructions in this manual.
COMMON TECHNICAL
QUESTIONS
If I install the General Ledger Software-Windows on my home computer and it is installed on the network (or on a stand-alone computer) at school can I work between the two systems?
Yes, you can save the data on your Student Data Disk either at home or at school and bring up the information on the other computer.
I forgot my password or my password isn’t working correctly.
If you have trouble with your password, speak with your instructor for assistance. (Your instructor may need to contact technical support.)
I cannot get the eval program to work.
Remember, you must close the problem (the program closes out all of the temporary accounts, transferring the Retained Earnings account).
I was working on a problem and my computer booted me off. (This could be caused by an electrical problem or some malfunction of the computer.) Have I lost all of the work I did on this problem?
If you saved after entering each transaction the data should be on your data disk, but you should check to be sure. You can check entries under the Reports Menu.
What is the purpose of the Depreciation Module?
The Depreciation Module provides an opportunity for you to compute the dollar amount of depreciation for each year of life of the asset under varying