Please click the advert
Contents
Introduction 7
To see Section 1-5 download Word 2007 Introduction: Part I
Section 1 The Basics Part I
Windows concepts Part I
Smart Tags Part I
Section 2 Entering & Editing Information Part I
Entering and editing information Part I
Editing text Part I
File operations Part I
Section 3 Navigation Part I
Section 4 Editing Tools Part I
Selecting text Part I
Move & copy Part I
Section 5 Formatting Part I
Please click the advert
Font dialog Part I
Paragraph formats Part I
Borders Part I
Bulleted and numbered lists Part I
Bullets And Numbering With The Shortcut Menu Part I
Section 6 Tabs & Tables 10
Tabs 11
Tables 15
Section 7 Proofing Tools 32
Spell checker & Thesaurus 33
Section 8 Page Layout 41
Page Setup 42
Section 9 Viewing and Printing 56
Viewing your document 57
Printing 64
Appendix One Keyboard Shortcuts 74
Movement keys 74
Selection keys 75
360°
thinking
.
Please click the advert
Keyboard shortcuts for character formatting 75
Keyboard shortcuts for paragraph formatting 76
Shortcuts keys for table navigation 76
Shortcut keys for selecting in a table 77
Free online Magazines
Click here to download
Introduction
Word 2007 is a powerful word processing application that allows users to produce typed documents. These can range from simple letters through to fax cover sheets, reference manuals and sophisticated reports incorporating numbered headings, figures and graphics.
How To Use This Guide
This manual should be used as a point of reference following attendance of the introductory level Word 2007 training course. It covers all the topics taught and aims to act as a support aid for any tasks carried out by the user after the course.
The manual is divided into sections, each section covering an aspect of the introductory course. The table of contents lists the page numbers of each section and the table of figures indicates the pages containing tables and diagrams.
Instructions
Those who have already used a spreadsheet before may not need to read explanations on what each command does, but would rather skip straight to the instructions to find out how to do it. Look out for the arrow icon which precedes a list of instructions.
Appendices
The Appendices list the Ribbons mentioned within the manual with a breakdown of their functions and tables of shortcut keys.
Keyboard
Keys are referred to throughout the manual in the following way:
ENTER – Denotes the return or enter key, DELETE – denotes the Delete key and so on. Where a command requires two keys to be pressed, the manual displays this as follows:
CTRLP – this means press the letter “p” while holding down the Control key.
Commands
When a command is referred to in the manual, the following distinctions have been made:
When dialog box options are referred to, the following style has been used for the text – “In the PAGE RANGE section of the PRINT dialog, click the CURRENT PAGE option”
Dialog box buttons are shaded and boxed – “Click OK to close the PRINT dialog and launch the print.”
Within each section, any items that need further explanation or extra attention devoted to them are denoted by shading. For example:
Section 6 Tabs & Tables
By the end of this section you will be able to:
• Understand tabs
• Use tabs to create a list
• Set leader tabs within a document
• Insert a table
• Enter and format text on tables
• Navigate and select text
• Change the table layout
Tabs
Tabs allow you to create simple tables of data that line up along a particular vertical position. You can also use advanced tab settings to create paper forms for print outs, or basic tables of contents. Generally, these items contain dotted or solid lines for you to sign on or to indicate a page number for a topic - these lines can be generated with leader tabs.
Basic tabs with alignment
There are several different kinds of alignments with tabs we will explore some of them here.
A LEFT TAB stop sets the start position of text that will then run to the right as you type.
A CENTER TAB stop sets the position of the middle of the text. The text centers on this position as you type.
A RIGHT TAB stop sets the right end of the text. As you type, the text moves to the left.
A DECIMAL TAB stop aligns numbers around a decimal point. Independent of the number of digits, the decimal point will be in the same position. (You can align numbers around a decimal character only; you cannot use the decimal tab to align numbers around a different character, such as a hyphen or an ampersand symbol.)
A BAR TAB stop doesn’t position text. It inserts a vertical bar at the tab position.
Default Tab stop
ӹ
To change default tab stop
Mouse
1. On the PAGE LAYOUT Ribbon, click the PARAGRAPHDIALOG BOX LAUNCHER.
2. In the PARAGRAPH dialog box, click TABS.
3. In the DEFAULT TAB STOPS box, enter the amount of spacing that you want between the default tab stops.
When you press the TAB key, your tab will stop across the page at the distance that you specified.
Set manual tab stops with ruler
You might want to use the ruler to set manual tab stops at the left side, middle, and right side of your document. If you don’t see the horizontal ruler that runs along the top of the document, click the VIEW RULER button at the top of the vertical scroll bar.
You can quickly set tabs by clicking the tab selector at the left end of the ruler until it displays the type of tab that you want and then clicking the ruler at the location you want.
ӹ
To use the horizontal ruler to set tab stops
1. By default, there are no tab stops on the ruler when you open a new blank document.
to position the indents, rather than sliding the indent markers along the ruler. Click FIRST LINE INDENT , and then click the upper half of the horizontal ruler where you want the first line of a paragraph to begin. Click HANGING INDENT, and then click the lower half of the horizontal ruler where you want the second and all following lines of a paragraph to begin.
3. When you set a BAR TAB STOP, a vertical bar line appears where you set the tab stop (you don’t need to press the TAB key). A bar tab is similar to strikethrough formatting, but it runs vertically through your paragraph at the location of the bar tab stop. Like other types of tabs, you can set a bar tab stop before or after you type the text of your paragraph.
4. You can remove a tab stop by dragging it (up or down) off the ruler. When you release the mouse button, the tab stop disappears.
5. You can also drag existing tab stops left or right along the ruler to a different position.
When multiple paragraphs are selected, only the tabs from the first paragraph show on the ruler. If you set manual tab stops, the default tab stops are interrupted by the manual tab stops that you set. Manual tab stops that are set on the ruler override the default tab stop settings.
Set manual tab stops with dialog
Please click the advert
ӹ
To set manual tab stops
Mouse
1. On the PAGE LAYOUT Ribbon, click the PARAGRAPHDIALOG BOX LAUNCHER.
2. In the PARAGRAPH dialog box, click the TABS button. The following dialog appears.
3. In the DEFAULT TAB STOPS box, enter the amount of spacing that you want between the default tab stops.
When you press the TAB key, your tab will stop across the page at the distance that you specified.
Tab stop position
Type the position on the ruler where you want to create a new tab stop, or select an existing tab stop from the list to modify its properties.
Default tab stops
Specifies amount of spacing that is applied each time you press the TAB key.
Tab stops to be cleared
Displays tab stops that have been marked for deletion from the TAB STOP POSITION list. Cleared tabs are deleted from the list when you click OK.
Increase your impact with MSM Executive Education
For more information, visit www.msm.nl or contact us at +31 43 38 70 808
the globally networked management school
For more information, visit www.msm.nl or contact us at +31 43 38 70 808 or via [email protected] For almost 60 years Maastricht School of Management has been enhancing the management capacity of professionals and organizations around the world through state-of-the-art management education.
Our broad range of Open Enrollment Executive Programs offers you a unique interactive, stimulating and multicultural learning experience.
Alignment
LEFT Sets a left start position of text that will then run to the right as you type.
CENTER Sets the position of the middle of the text. The text centers on this position as you type.
RIGHT Sets a right start position of text that will then run to the left as you type.
DECIMAL Aligns numbers around a decimal point. Independent of the number of digits, the decimal point will be in the same position. (You can align numbers around a decimal character only; you cannot use the decimal tab to align numbers around a different character, such as a hyphen or an ampersand symbol.)
BAR Inserts a vertical bar at the tab position. Not used for positioning text.
Creating Leader Tabs
Use this feature to fill the empty space before a tab stop with dotted, dashed or solid lines. This effect is most commonly seen in a table of contents. The right aligned tab for the numbers in the example below has a dotted leader tab.
Chapter 1 1
Chapter 2 12
Chapter 3 20
TO CREATE A LEADER FROM AN EXISTING TAB:
1. On the PAGE LAYOUT Ribbon, click the PARAGRAPHDIALOG BOX LAUNCHER. 2. In the PARAGRAPH dialog box, click the TABS button. The TABS dialog appears. 3. Select the tab stop in the TAB STOP POSITION: list.
4. Choose one of the 4 Leader types. 5. Click on the SET button to save the tab. 6. Click on OK to return to the document.
You can also create the Tab from scratch in the Tab dialog box
ӹ
To create a new tab and assign a leader:
Mouse
1. On the PAGE LAYOUT Ribbon, click the PARAGRAPHDIALOG BOX LAUNCHER.
2. In the PARAGRAPH dialog box, click the TABS button. Type in the new tab position in the TAB STOP POSITION: field
3. Choose the ALIGNMENT and optionally choose the LEADER (the default is None). 4. Click on the SET button to save the tab.
5. Choose OK.
The Clear button removes the selected tab, whilst Clear All removes all the tabs in the selected paragraph(s). Note tabs are a paragraph format and as such will display differently when you click in different paragraphs
Tables
ITEM ACTION
Word 2007 manual was discussed – deadline has now been set for end of next week.
AM to complete manual and give a draft copy to HB for proof reading and revisions.
Tables give you the ability to lay information out in columns and rows. An example of a table is shown below:
Create Tables
Please click the advert
ӹ
To create a table:
Mouse
...
BrowserTextingSMS from your computer
...Sync'd with your Android phone & number
SMS from your computer
...Sync'd with your Android phone & number
SMS from your computer
...Sync'd with your Android phone & number
SMS from your computer
...Sync'd with your Android phone & number
Go to
BrowserTexting.com
and start texting from
your computer!
FREE
1. Position the cursor where you want to insert the table. 2. Click the table button on the INSERT ribbon, TABLES group.
3. Do not click but move your mouse over the grid that appears, to highlight the number of columns and rows that you want your table to have. These will appear in your document and will continually adjust until you have all the rows and columns you need.
4. Click the mouse. The table will appear in your document at the cursor position. 5. Enter text into your table.
Or
1. Position the cursor where you want to insert the table.
Click the table button on the INSERT ribbon, TABLES group and click on INSERT TABLE from the menu.
2. Under TABLE SIZE, select the number of columns and rows. 3. Under AUTOFIT BEHAVIOR, choose options to adjust table size.
4. If you will use this table size regularly then tick the REMEMBER DIMENSIONS FOR NEW TABLES
checkbox 5. Click OK.
6. Enter text into your table.
Table Navigation
When you are entering data into your table, you can simply click into different cells with your mouse to move your cursor around. This will allow you to enter text into different cells.
However, you may find it faster to move around using the keyboard. The table below outlines some keyboard techniques for moving in a table:
To Press
Move to the next cell TAB (If the insertion point is in the last cell of a table, pressing TAB adds a new row.)
Move to the preceding cell SHIFTTAB
Move to the preceding or next row Á or  Add text before a table at the beginning of a
document
ENTER at the beginning of the first cell
Enter Data In A Table
You can enter text into each cell in your table – your text can even run to multiple lines within one cell. Working within a cell is almost like working on a very small page your text will wrap you can insert objects, set indents and numbering and the text can be formatted as usual.
ӹ
To enter data in a table:
Keyboard
1. Position the cursor in the cell where you want the information, and type it in.
2. Press ENTER to start a new paragraph within the same cell or SHIFT ENTER to start a new line.
Or
Please click the advert
Select Items In A Table
The table below outlines some methods for selecting table components:
Mouse
To Do this
Select a cell Click the left edge of the cell.
Select a row Click to the left of the row.
Select a column Click the column’s top gridline or border.
Select multiple cells, rows, or columns Drag across the cell, row, or column; or select a single cell, row, or column, and then hold down SHIFT while you click another cell, row, or column.
Select text in the next cell Press TAB
Select text in the previous cell Press SHIFTTAB
Get “Bookboon’s Free Media Advice” Email [email protected]
See the light!
The sooner you realize we are right,
the sooner your life will get better!
A bit over the top? Yes we know!
Or
1. You can also select rows, columns, or the entire table by clicking on the table and then using the Select commands from the SELECT button on the LAYOUT ribbon, TABLE group
Keyboard
To Press
Select the next cell’s contents TAB
Select the preceding cell’s contents SHIFTTAB
Extend a selection to adjacent cells Hold down SHIFT and press an arrow key repeatedly Select a column Click in the column’s top or bottom cell. Hold down
SHIFT and press Á or  repeatedly
Extend a selection (or block) CTRLSHIFTF8, and then use the arrow keys; press
ESC to cancel selection mode Reduce the selection size SHIFTF8
Select an entire table ALT5 on the numeric keypad (with NUM LOCK off )
Format Table Data
You can apply the same character and paragraph formats to table data as to standard text.
ӹ
To format data in a table:
Mouse
1. Select the data to format.
2. Click the buttons to apply formatting from the HOME ribbon as discussed in earlier sections
Change Column And Row Size
The initial width of the columns and height of your rows for your table will depend upon the page orientation and how many columns or rows you selected to insert. The standard widths that Word applies can be easily altered.
ӹ
To change column widths and row height
Mouse
1. Ensure that nothing in your table is highlighted (click away from any highlighting to remove it).
2. Move the mouse over the right edge of the column whose width you want to change – the mouse pointer will change shape (see below).
3. Click and drag the column edge to make the column wider or narrower as required. A vertical guide appears as soon as you start dragging allowing you to preview the new position of the column edge and its width.
4. Release the mouse. The column will “jump” to its new width.
Or
1. In the CELL SIZE group on the layout ribbon enter the row and column sizes you wish for the selected rows
Add Rows And Columns
Please click the advert
ӹ
To add a row or column:
Mouse
1. Select the row above or below where you want to insert the new row left or right of where you would want a new column.
2. Select from the ROWS & COLUMNS GROUP on the LAYOUT ribbon where you would want to insert a row or column.
3. A new column or row will appear. Repeat for more.
Find your next education here!
Click here
Remove Rows And Columns
You can delete selected rows and columns from your table if they are no longer needed.
ӹ
To remove rows:
Menu
1. Select the cells, rows or columns that you want to delete.
2. Select the Delete button from the ROWS & COLUMNS GROUP on the layout ribbon. Choose one of the options.
Text Alignment
Because your rows and columns may have different quantities of data in them it may be necessary to align certain textual elements to various parts of the cell. I.E. you may have a one word tile in a tall cell and wish to align it to the very centre of the cell.
ӹ
To align text
Mouse
1. Select the cell or cells you wish to align the text for.
2. Choose an alignment from the ALIGNMENT group on the LAYOUT tab. Or
1. Select cell margins from the ALIGNMENT group on the LAYOUT tab a dialog will appear. 2. Enter required margin sizes for selected cells.
3. Click OK to apply
Table Borders And Shading
When you insert a table, Word automatically borders the outline and all the gridlines within – these will appear on a print out. You may want to change the border style and colour or even remove the borders altogether. You can also shade in parts of your table to emphasise them.
Please click the advert
ӹ
To choose the bordered edges:
Mouse
1. Select the cell(s), row(s) or column(s) where you want to change which edges are bordered, or select the whole table.
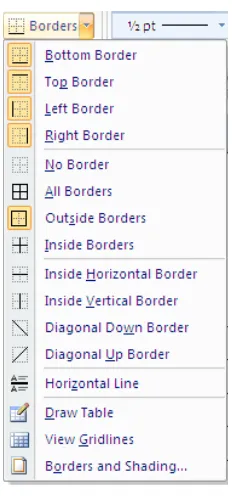
2. Click the drop down arrow on the right of the BORDERS button on the TABLE STYLES group on the design ribbon.
3. From the palette that displays, click the button that displays the required option to control which edges of the selection will have borders and which will not.
GOT-THE-ENERGY-TO-LEAD.COM
Border Style
You can change the line style, thickness and colour that Word uses to border the elements that make up your table. We do this in Word 2007 by drawing the border around the cells.
ӹ
To draw border
Mouse
1. Click within your table 2. Click on the DESIGN ribbon.
3. On the DRAW BORDERS group select a line style from the topleft box (use drop down arrow) the DRAW TABLE button will be enabled
4. Select a thickness for your border from the box beneath using the drop down arrow 5. Finally choose a pen colour from the button marked.
6. Click on the border of a cell and drag along the border of a cell ansd release. A border will be applied with your selections.
7. Repeat step around cell or table to apply your border formatting
ӹ
To apply border
Mouse
1. Select the drop down arrow to the right of the border tool button in the PARAGRAPH group and select BORDERS AND SHADING
2. Click on the BORDERS tab and choose the required border style 3. Select a thickness or colour for the border
4. Select an option from the left on where to apply the border.
Or
Please click the advert
Table Shading
You can apply shading to tables using an option on the TABLE STYLES group on the DESIGN ribbon.
Contact us to hear more [email protected]
Who is your target group?
And how can we reach them?
At Bookboon, you can segment the exact right audience for your advertising campaign.
ӹ
To apply shading:
Mouse
1. Select the cell(s), row(s) or column(s) where you want to apply shading or select the whole table if you want to shade the whole table.
2. Click the drop down arrow to the right of the Shading colour button on the TABLE STYLES group on the DESIGN ribbon. to display a list of different colours.
3. Click the required colour to apply it to your selection.
You can remove shading by selecting the items that are shaded, clicking the Shading Colour button and choosing the No colour option
Table Styles
There are many predefined styles available to enable you to create a consistently formatted table quickly and easily that looks professional.
ӹ
To apply a table style
Mouse
1. Click within the table you wish to format.
Merging And Splitting
When you have inseted your table there may be times in a number of cells that you would want them as one cell and not several and similarly you may wish for one cell to be split into several. In 2007 this feature is easy to do. Not only can you split cells but you can split a whole table into multiple tables if the need arises
ӹ
To split cells
Mouse
1. Select the cell(s) you wish to split
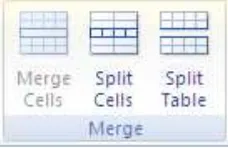
2. Go to the MERGE group on the LAYOUT ribbon and click the SPLIT CELLS button.
ӹ
To merge cells
Mouse
1. Select the cells you wish to merge.
2. Go to the MERGE group on the LAYOUT ribbon and click the MERGE CELLS button.
To split Table
Mouse
1. Click in the row that you wish to be the first row of the split table.
2. Go to the MERGE group on the LAYOUT ribbon and click the SPLIT TABLE button. 3. The table will split above the row your cursor is in.
Repeating Table Headings
Please click the advert
ӹ
To repeat table headings:
Mouse
1. Select the rows that you want to repeat at the top of each page the table prints on.
2. Go to the DATA group on the LAYOUT ribbon and click the REPEAT HEADER ROWS button You will only see the repeating headings when you are in Print Layout or Print preview
THE BEST MASTER
Section 7 Proofing Tools
By the end of this session you will be able to:
• Spell check documents
• Grammar check documents
Spell checker & Thesaurus
Auto Spelling /Grammar Check
The proofing tools in Word are very useful in ensuring that the documents you print and distribute are as error-free as possible.
Word 2007 automatically checks spelling and grammar as you type provided the options have been set in the Word Options. Spelling mistakes are flagged by a wavy red line under the error whilst grammatical faults show with a wavy green line. You can correct these mistakes as they are flagged by moving the mouse over the error and clicking the right mouse button – a shortcut menu will appear offering suggestions.
ӹ
To correct a flagged mistake:
Mouse
1. Click the right mouse button over the flagged mistake (e.g. a miss-spelt word).
2. Click on a suggestion from the top section of the short cut menu to replace the flagged word or phrase with the one offered by the spell/grammar checker.
Or
Choose IGNORE ALL to prevent Word from flagging any other occurrences of the word or phrase (useful with proper nouns, peoples’ names etc.) within the current document.
Or
1. Select ADD to add a copy of the flagged item to your custom dictionary – this will ensure that the word/ phrase remains unflagged when you use it in the future. And if it is misspelt in the future it will flag you to let you know it is misspelt.
Manual Spelling/Grammar Check
You can check the spelling and grammar of your document in one go by launching the spell/grammar checker. There are several ways you can do this, but as Word will start checking from wherever your cursor is down the document; it makes sense to first move the cursor to the very beginning (use CTRLHOME) before you commence the check).
ӹ
To launch the spelling/grammar checker:
Mouse
1. Click the SPELLING & GRAMMAR button from the REVIEW ribbon in the PROOFING TOOLS group. 2. Word will launch the Spelling and Grammar dialog shown below:
3. The “error” shows in red in the box marked NOT IN DICTIONARY while any suggestions are listed in the box below. Down the right-hand side of the dialog are a series of buttons allowing you to carry out different commands and these are described below:
ӹ
To ignore the mistake:
Mouse
Please click the advert
Or
1. Click IGNORE ALL to ignore all occurrences of the highlighted item throughout the current document and move to the next item.
ӹ
To add a word to the custom dictionary:
Mouse
1. Clicking ADD TO DICTIONARY appends the highlighted word to your custom dictionary, ensuring that it will never be flagged as an error again. The spelling/grammar check will move on to the next item.
ӹ
To change the mistake:
Mouse
1. Select the suggestion you want to replace the highlighted item with by clicking it with the mouse.
2. Click the CHANGE button, to substitute the suggestion for the flagged word and move you to the next item. Or
1. If you have made the same mistake throughout a document, when the spell/grammar check hits the first one you can correct them all by clicking the CHANGE ALL button. The check will move on to the next item.
Distance Learning
Getting ahead in your
management career
Our expertise in flexible and accessible education and your passion to succeed will enable you to get ahead.
A world-class research university, Leicester offers flexible, innovative courses because we understand that you’ve got other responsibilities. In fact, we’re committed to making sure that everyone in our vibrant community gets the very best experience at Leicester, whether you’re on campus or on the other side of the world.
ӹ
To use Autocorrect:
Mouse
1. Click AUTOCORRECT to allow Word to make a decision about the error for you using its AutoCorrect feature (described later in this manual).
ӹ
To undo a command:
Mouse
1. If you don’t like the replacement you can click the UNDO button which will become available at the bottom of the dialog to go back one step.
ӹ
To alter options:
Mouse
1. To alter any Spelling or Grammar checker settings, click the OPTIONS button. The following dialog box will appear:
2. You can enable or disable an option by checking or unchecking its box. Click OK to save the new settings and return to the spell/grammar check.
Pausing The Spell/Grammar Check
When a check is launched, you can see the highlighted items that Word considers to be errors behind the dialog box that it supplies to correct them. If none of the options in the dialog box are suitable you can follow the instructions below to make changes.
ӹ
To pause the spelling/grammar checker:
Mouse
1. Click outside the box, in the document itself and make manual corrections. This will pause the spell/ grammar check (the dialog box options will appear “dimmed”).
2. Once you have finished editing, click the RESUME button to reactivate the spell/grammar check.
End The Check
When Word can find no further errors it will display the following dialog box:
Keyboard
1. You can launch the spell/grammar check using the keyboard by pressing F7.
2. Word displays fewer buttons in the Spelling & Grammar dialog box if it is checking a grammatical error and you will see a NEXT SENTENCE button which you can use to move to the next item.
Check Item By Item
You can make use of this feature if Auto spell or grammar is enabled.
ӹ
To check item by item:
Mouse
1. Click the book icon on the status bar – Word will highlight the first “mistake” and offer you a shortcut menu of alternatives.
2. Pick your choice from the menu.
3. Click the book icon again to move to the next error.
Disable/Enable Auto Spelling And Grammar Check
Word 2007 settings are found by clicking the OFFICE BUTTON within Word Options. The dialog box that appears has multiple buttons on the left, which aim to group options of a similar type.
ӹ
To disable the automatic spell/grammar check:
Mouse
Click on the OFFICE BUTTON and then WORD OPTIONS at the bottom of the menu.
Click the button marked PROOFING on the left
Click the check boxes marked CHECK SPELLING AS YOU TYPE and CHECK GRAMMAR AS YOU TYPE so that
Please click the advert
ӹ
To switch back on:
Mouse
Simply follow the instructions above but click the check boxes so that the tick reappears.
When disabled, the spell checker and grammar checker can be run manually whenever you wish, by clicking the Spelling and Grammar button.
With us you can
shape the future.
Every single day.
For more information go to: www.eon-career.com
Thesaurus
Word’s Thesaurus can be used to look up alternatives to words you have typed in a document. Whilst it mainly helps to find synonyms to words, in some instances it will also look up antonyms. You can then click buttons in the dialog box to replace the looked up word with your chosen synonym.
ӹ
To launch the Thesaurus:
Mouse
1. Select the word you want to look up.
2. Click the THESAURUS button from the REVIEW ribbon in the PROOFING TOOLS group.
Keyboard
1. Hold down SHIFT press F7 key. 2. The Thesaurus task pane is shown right.
3. The SEARCH FORboxholds the word you selected before launching the thesaurus. In the main area
underneath you will see bold words with a minus to one side to expand or collapse that definition. Multiply definitions may be there as many words hold a different definition in different contexts
Choosing A Meaning:
If the synonyms offered don’t match the context in which you are using the word you are looking up, you can select a different meaning.
ӹ
To choose a meaning:
Mouse
1. Move your mouse over the most appropriate word, a drop down arrow will appear.
2. Select an option if you choose to look up then the thesaurus will look for other synonyms of that word. 3. Choosing insert will replace selected word in document.
4. Choosing copy will allow you to paste the word later in an appropriate place in your document.
You may leave the thesaurus TaskPane open and type other words directly into the search for text box and pressing enter or you may elect to close the TaskPane by clicking on the cross in the top left hand corner
Searching Other Sources
Please click the advert
Section 8 Page Layout
By the end of this session you will be able to:
• Insert page breaks
• Change margins and page orientation
• Create headers and footers
• Number pages
Contact us to hear more [email protected]
Do your employees receive
the right training?
Page Setup
There are some settings that apply themselves to documents as a whole rather than just the selected portions. These include margins, paper size and orientation and some others. There are many easy ways for changing the page setup in Word 2007 they can be found on the page layout ribbon but all the options and more are in the page setup dialog box.
Page Setup Group
The PAGE SETUP group can be found on the PAGE LAYOUT ribbon and contains many of the basic settings to apply to your page such as margins, paper size and orientation. Other useful tools are found here as well (covered in other sections) they are easy to use and are easier to access than using the PAGE SETUP dialog
ӹ
To apply margins
Mouse
1. Click on the MARGINS button on the PAGE LAYOUT ribbon in the PAGE SETUP group the menu right – will be displayed
2. Make a selection to apply margin sizes to document.
ӹ
To change orientation
Mouse
1. Click on the ORIENTATION button on the PAGE LAYOUT ribbon in the PAGE SETUP group the menu right – will be displayed
2. Choose either landscape or portrait to change the layout of your document.
ӹ
To change paper size
Mouse
1. Click on the SIZE button on the PAGE LAYOUT ribbon in the PAGE SETUP group the menu right – will be displayed
2. Select a size from the most popular sizes present.
Page Setup Dialog
ӹ
To access the Page Setup dialog:
Mouse
To access the dialog go to the PAGE LAYOUT ribbon and click on the DIALOG BOX LAUNCHER on the PAGE SETUP group. (The dialog below appears)
There are three tabs within the dialog box, each relating to a different page setting.
Margins Tab
The margin measurements control the amount of white space that shows around the four edges of your page.
ӹ
To change Margins:
Mouse
1. Click the up and down arrows (spin buttons) in the boxes labelled Top, Bottom, Left and Right to increase and decrease the margin measurements. Or type in the measurements you require.
Please click the advert
Gutter
3. When a document needs to be bound, you can reserve the amount of space needed for the binding by setting the gutter measurement. This will ensure that the binding will not “eat” into the left margin (the left margin measurement is unaffected by the gutter).
4. Click the up and down arrows in the GUTTER box to change the gutter settings – the PREVIEW will show you the effects of your new settings.
Orientation
5. Click the option button for either PORTRAIT or LANDSCAPE. Portrait is the default orientation. The Preview will show you what the page will look like if you confirm the settings.
Paper Tab
This tab contains settings to control the size and print options for your pages.
Paper Size
ӹ
To change paper size:
Mouse
1. Click the Paper Size drop-down list to pick out the standard paper size or envelope size that you want to print the document on.
2. If you are printing on a piece of paper of a non-standard size, you can choose the Custom size option and then use the Width and Height boxes below to set the exact of your page. The Preview will display the chosen size.
Paper Source
ӹ
To set the Paper Source:
Mouse
1. Click the tray in the First page list that you want to print the first page of your document on. 2. Click the tray in the Other pages list that you want to print all other pages of your document on.
You can also specify manual feed when the paper you wish to use is not pre-loaded. This will allow you to load paper into the printer and then press the On-line button to commence printing.
Layout Tab
This tab contains settings that relate primarily to sections within a document. This topic is not discussed in this manual. However, you can use the layout tab to set various options relating to your headers and footers.
Headers and Footers
Please click the advert
ӹ
Set the From edge amount:
Mouse
1. Change the measurements by clicking the up and down arrows in the Header and Footer From edge boxes – a higher number will move the header or footer further away from the edge of your paper (i.e. further into your document), while 0 represents the edge of the paper.
You won’t see these settings change on the page preview within the dialog, but you will notice in the views that display the header and footer.
It is important that the header and footer margins are never larger than the margins for the page.
Headers And Footers
Headers and footers are used for items that you want to appear on every page of your document. The header appears in the top margin and the footer in the bottom margin. Examples of the types of things you might want as your header would include, a logo the current file name or the current date and time. The most common footer item is page numbers.
Contact us to hear more [email protected]
Is your recruitment website
still missing a piece?
When you are adding header or footer items, Word automatically sets the view to Print Layout as this is the only working view where you can see the header and footer area. (there is print preview mentioned later. While you are in the header or footer, the rest of the document appears dimmed to show that it is currently unavailable for editing. As soon as you close the header or footer, your document comes back “online”.
ӹ
To insert headers and footers:
Mouse
1. Go to the HEADER & FOOTER group on the INSERT ribbon and click the HEADER or FOOTER
button.
2. Select a choice from the displayed selection to apply it to your document.
Or
1. Click on EDIT HEADER (or footer) to open them up for editing.
3. Format the items as you would document text.
4. If you want to set up a footer, click the GO TO HEADER or GO TO FOOTER button in the
NAVIGATION group on the DESIGN ribbon – Word will display the footer section which also contains pre-set centre and right tabs.
5. Enter the items to appear at the bottom of each page in the footer.
6. When you have finished, click the Close button on the far right of the design ribbon
Insert Header And Footer Basic Field Codes
Please click the advert
ӹ
To insert Date
Mouse
1. Go to the HEADER & FOOTER group on the INSERT ribbon and click the HEADER or FOOTER
button click on EDIT HEADER or footer. 2. Position the cursor where you want the information. 3. Click the DATE & TIME button from the DESIGN ribbon 4. Select and format it as though it were text
5. Click the CLOSE button on the design ribbon to close the header and footer.
Field codes display grey shading when you click on them. You can delete them by dragging over them with the mouse to select them and pressing the DELETE key.
It all starts at Boot Camp. It’s 48 hours that will stimulate your mind and enhance your career prospects. You’ll spend time with other students, top Accenture Consultants and special guests. An inspirational two days
packed with intellectual challenges and activities designed to let you discover what it really means to be a high performer in business. We can’t tell you everything about Boot Camp, but expect a fast-paced, exhilarating
and intense learning experience. It could be your toughest test yet, which is exactly what will make it your biggest opportunity.
Find out more and apply online.
Choose Accenture for a career where the variety of opportunities and challenges allows you to make a difference every day. A place where you can develop your potential and grow professionally, working alongside talented colleagues. The only place where you can learn from our unrivalled experience, while helping our global clients achieve high performance. If this is your idea of a typical working day, then Accenture is the place to be.
Turning a challenge into a learning curve.
Just another day at the office for a high performer.
Accenture Boot Camp – your toughest test yet
ӹ
To enter page numbers
Mouse
1. Go to the HEADER & FOOTER group on the INSERT ribbon and click the HEADER or FOOTER
button click on EDIT HEADER or footer. 2. Position the cursor where you want the information.
3. Click the PAGE NUMBER button from the DESIGN ribbon and make a selection choosing any one of the first four options opens a side bar allowing you to place the number left, centre or right. If these are not what you want then click on current position to insert the numbering where your mouse cursor has been placed.
ӹ
To format page numbers
Mouse
1. Go to the HEADER & FOOTER group on the INSERT ribbon and click the HEADER or FOOTER
button click on EDIT HEADER or footer.
1. Double click on the header or footer in page layout view. (if one has previously been inserted) 2. Click on the field containing the page numbers.
3. Click the PAGE NUMBER button from the DESIGN ribbon and select FORMAT PAGE NUMBERS from the options the following dialog will appear.
4. Select the number format from the drop down box at the top 5. Click OK.
ӹ
To remove page numbers
Mouse
1. Go to the HEADER & FOOTER group on the INSERT ribbon and click the HEADER or FOOTER
button click on EDIT HEADER or footer.
Or
1. Double click on the header or footer in page layout view. 2. Click on the field containing the page numbers.
3. Either Click the PAGE NUMBER button from the DESIGN ribbon and select FORMAT PAGE NUMBERS
OR press the DELETE key.
Suppress Page Numbers
Word gives you an option not to print a number on the first page of your document. This may be useful if you have included a title page at the beginning of your file where you don’t want a number.
ӹ
To suppress numbers on the first page:
Mouse
1. Open the page layout dialog by clicking on the DIALOG BOX LAUNCHER from PAGE SETUP group on the PAGE LAYOUT ribbon
2. Go to the LAYOUT tab
3. Check the box marked DIFFERENT FIRST PAGE. 4. Click OK to save the settings and close the dialog box.
5. You now have a different section in your header called FIRST PAGE HEADER which you can employ a completely different header and footer including no numbering.
Different Odd Even Page Numbering
ӹ
To apply different numbering for odd/even pages:
Mouse
1. Open the page layout dialog by clicking on the DIALOG BOX LAUNCHER from PAGE SETUP group on the PAGE LAYOUT ribbon and go to the LAYOUT tab
2. Check the box marked DIFFERENT ODD AND EVEN. 3. Click OK to save the settings and close the dialog box.
4. You now have a different sections in your header or footer called ODD PAGE HEADER and EVEN PAGE
header where you can employ completely different headers and footers including numbering in different locations
Using Pictures In Headers And Footers
If you need a picture to appear on every page of your document, you can put it in the header or footer. Because pictures are graphics, they aren’t confined to the margin areas like text in headers or footers, so you can place them on the middle of the page if you like. This can be very useful for company logos. (just like this manual)
ӹ
To insert a picture in a header/footer:
Mouse
1. Go to the HEADER & FOOTER group on the INSERT ribbon and click the HEADER or FOOTER
Please click the advert
Or
2. Double click on the header or footer in page layout view. (if one has previously been inserted) 3. Ensure your mouse cursor is in the correct position within the header or footer.
4. Click the PICTURE button on the DESIGN ribbon a dialog box will appear. 5. Browse to locate the picture you wish to insert and click on insert.
6. Resize the picture as necessary by using the corner handles to click and drag.
7. With the picture selected, you can format it by choosing options from the FORMAT ribbon. (Covered in advanced)
8. Drag the picture around the header or footer until it is in the correct position. Click CLOSE from the design ribbon to close the header and footer.
The picture can only be seen in PAGE LAYOUT view or PRINT PREVIEW
6JGFGUKIPQHGEQHTKGPFN[OCTKPGRQYGTCPFRTQRWNUKQPUQNWVKQPUKUETWEKCNHQT/#0&KGUGN6WTDQ 2QYGTEQORGVGPEKGUCTGQHHGTGFYKVJVJGYQTNFoUNCTIGUVGPIKPGRTQITCOOGsJCXKPIQWVRWVUURCPPKPI HTQOVQM9RGTGPIKPG)GVWRHTQPV
(KPFQWVOQTGCVYYYOCPFKGUGNVWTDQEQO
.QYURGGF'PIKPGU/GFKWOURGGF'PIKPGU6WTDQEJCTIGTU2TQRGNNGTU2TQRWNUKQP2CEMCIGU2TKOG5GTX
The Wake
Section 9 Viewing and Printing
By the end of this section you will be able to:
• Use different views
• View multiple documents
• Preview documents
Viewing your document
This section concentrates on the different ways a Word document can be viewed.
Word provides several different ways a document can be viewed on screen. The view that you choose depends on the type of document that you are creating, and whether speedy performance or exact layout is important to you.
You can switch between different views using the view buttons at the bottom left corner of your screen (seen below) or by choosing the VIEW ribbon and then selecting the appropriate view from the displayed choices in the DOCUMENT VIEWS group.
Draft View
This view shows the document being viewed or edited as a scrolling list. Page breaks are represented as dotted lines across the screen. Draft view doesn’t display graphics or inserted objects but it is the quickest view for editing and review purposes as it uses less memory. It is therefore a good view to use when working on long documents. (in earlier versions of word called normal view)
ӹ
To switch to draft View:
Mouse
1. Click on the fifth view selector button (draft view). Or
1. Click on the DRAFT option on the VIEW ribbon.
Print Layout View
Please click the advert
ӹ
To switch to Print Layout View:
Mouse
1. Click the first view selector button (Print Layout). Or
2. Click on the PRINT LAYOUT option on the VIEW ribbon.
Web Layout View
Web Layout View shows your document as it would look if you published it to the Web or an intranet. In this view, you can see backgrounds, AutoShapes, and other effects that are commonly used in Web documents or documents that you view on the screen.
ӹ
To switch to Web layout view:
Mouse
1. Click on the third view selector button (Web Layout). Or
2. Click on the WEB LAYOUT option on the VIEW ribbon
By 2020, wind could provide one-tenth of our planet’s electricity needs. Already today, SKF’s innovative know-how is crucial to running a large proportion of the world’s wind turbines.
Up to 25 % of the generating costs relate to mainte-nance. These can be reduced dramatically thanks to our systems for on-line condition monitoring and automatic lubrication. We help make it more economical to create cleaner, cheaper energy out of thin air.
By sharing our experience, expertise, and creativity, industries can boost performance beyond expectations.
Therefore we need the best employees who can meet this challenge!
The Power of Knowledge Engineering
Brain power
Outline View
In Outline View, Microsoft Word simplifies the text formatting to help you focus on the structure of your document. Outline view looks very different from other views. The text appears with symbols down the left-hand edge and an extra toolbar is displayed.
Word indents each heading according to its level. The indentations appear only in outline view; Word removes the indentations when you switch to another view.
When reorganising long documents, outline view gives the user tools for quickly repositioning large blocks of text and promoting and demoting heading levels where appropriate. You can also view a document fully expanded, showing headings and their detail text, or collapsed (headings only).
The structure of the document seen in Outline View is controlled by heading styles used in the document. The use of heading styles is covered in later Word courses and is therefore not dealt with in this manual.
ӹ
To switch to Outline view:
Mouse
1. Click the fourth View Selector button. Or
2. Click on the OUTLINE option on the VIEW ribbon.
Full Screen Reading
is a useful view to employ as it allows you to just read through your document in two page style as though it was a book. It does not allow edition of the material shown but it designed for reviewing documents and allows the insertion of comments and the highlighting of text with the highlight tool (mentioned earlier)
ӹ
Turn on Full Screen Reading view
1. On the VIEW ribbon, in the DOCUMENT VIEWS group, click FULL SCREEN READING.
ӹ
Exit Full Screen Reading view
1. Click CLOSE, or press ESC.
When you receive a Microsoft Office Word document in e-mail, it may automatically open in Full Screen Reading view. To prevent this, do the following:
ӹ
Prevent documents from automatically opening in Full Screen Reading view
1. In FULL SCREEN READING view, click VIEW OPTIONS.
2. Click OPEN ATTACHMENTS IN FULL SCREEN to turn off the feature, and then click CLOSE to return to PRINT LAYOUT view.
Document Map
ӹ
To switch to the Document Map:
Mouse
1. Click the check box for DOCUMENT MAP on the VIEW ribbon in the SHOW/HIDE group.
ӹ
To use document map
1. Collapse or expand headings with the PLUS signs or MINUS signs.
ӹ
To view thumbnails
1. to allow you to navigate in a different way. Click on drop down arrow to the right of where it says DOCUMENT MAP in the pane and select THUMBNAILS.
2. Navigate by page instead (see following picture)
Viewing Multiple Documents
In Word, you can view all open documents on the screen at the same time by arranging them top to bottom on the screen.
ӹ
To view more than one document:
Mouse
1. If the Microsoft Word documents you want to arrange are minimized, restore the minimized documents first.
2. On the VIEW ribbon, WINDOW group, click ARRANGE ALL.
Please click the advert
Viewing Single Document In Multiple Windows
Viewing a single document in more than one window is useful if you want to compare or check information in two parts of a long document on screen.
ӹ
To split a window
1. On the VIEW ribbon, WINDOW group, click SPLIT a line will appear across the screen attached to your mouse click where you want to split the document
2. Treat each part as separate as far as scrolling is concerned but remember it is the SAME DOCUMENT you are working with to add or delete in one it is done in the other. This is only two views of the same document.
3. To remove the split and view just one window click REMOVE SPLIT. 4. The split is removed
Or
Printing
The open document can be printed in its entirety, or alternatively you can print individual pages or ranges of pages. Word gives you the ability to choose which pages you want to print, or if you need to be even more specific, you can print only the selected items. Before sending any document through to the printer, it is always a good idea to preview what the hard copy will look like so that you can rectify any problems before printing it.
PrintPreview
ӹ
To access print preview:
Mouse
1. Click on the MICROSOFT OFFICE BUTTON and select PRINT select PRINT PREVIEW
from the menu
2. Click the NEXT PAGE or PREVIOUS PAGE buttons to scroll backwards and forwards through your document’s pages.
Please click the advert
The Print Preview Ribbon
The PRINT PREVIEW toolbar only appears when you are in Print preview. It gives you useful tools for changing such things as magnification and how many pages you can see on one screen. The button functions are described in detail below
ӹ
To close the Print Preview:
Mouse
1. Click the button marked CLOSE from the PRINT PREVIEW Ribbon. 2. OR Press ESC on the keyboard.
Magnification
ӹ
To change magnification:
Mouse
1. Check the MAGNIFIER check box on the PRINT PREVIEW ribbon
2. In the PRINT PREVIEW screen position your mouse over the area that you want to zoom in on and click. 3. To zoom out, click the mouse a second time.
ӹ
To go back to edit mode
Mouse
1. Uncheck the MAGNIFIER check box on the PRINT PREVIEW ribbon
Pages Per Screen
You can preview your document page by page in the Print preview screen or you can see several pages at once.
ӹ
Change the number of pages viewed:
Mouse
1. From the PRINT PREVIEW ribbon, click the ZOOM button a dialog will appear
2. Click the many pages drop down button. Drag your mouse over the grid to select the number of pages you want to see and click. Your Print Preview screen will change to reflect your choice.
Or
1. Click the One page button to show only a single page in the Print preview.
Zoom
ӹ
To change the Zoom:
Mouse
1. From the PRINT PREVIEW ribbon, click the ZOOM button to access the ZOOM dialog
2. Select the required option by clicking it and then click OK. Word will change the preview according to your choice.
View Ruler
The ruler is useful if you are editing in the Print preview screen as it allows you to change the position of tabs and indent markers. However, it does use up space so if you want to maximise the scale of the page within the preview window, you would have more room if you switched the ruler off.
ӹ
To toggle the ruler on and off:
Mouse
3. Tick or untick the SHOW RULER checkbox on the PRINT PREVIEW ribbon
Or
1. From the PRINT PREVIEW screen go to the top of the vertical scroll bar on the right and click the VIEW RULER button to switch the ruler on or off.
2. Each time you click the button, the ruler will toggle on or off.
Shrink To Fit
Please click the advert
ӹ
To shrink to fit:
Mouse
1. From the PRINT PREVIEW screen, click the SHRINK ONE PAGE button.
You can undo a Shrink to Fit operation by clicking Undo Tools Shrink to Fit on the Edit menu. However, after you save the document and close it, there is no quick way to restore the original font size.
Quick Print A Document
You can print a document directly from whatever view you are using. Word will send the document to your default printer.
360°
thinking
.
ӹ
To print the document:
Mouse
1. Click on the MICROSOFT OFFICE BUTTON and select PRINT select QUICK PRINT from
the menu
PRINT OPTIONS
The options from the PRINT group allow you to determine what aspects of your document should be printed such as document properties, hidden text etc.
ӹ
To set print options
Mouse
2. Select which options you wish to apply to your print 3. Click OK.
Print Part Of A Document
The print button from the toolbar will always open the print dialog to allow you to allow you to choose what is printed such as print to pages 1 and 2, or you may want to be even more specific and print just one paragraph. To do any of these, you need to access the Print dialog.
ӹ
To print a specific page or range of pages:
Mouse
1. Click on PRINT on the PRINT PREVIEW ribbon to access the PRINT dialog.
Keyboard
1. Press CTRLP.
2. The following dialog box will appear:
3. In the Page Range section of the dialog, click in the text box next to pages. Type in the page number that you want to print, or tell Word the range of pages (e.g. 1-6). If your pages are not consecutive, you can enter them separated by commas (e.g. 1,10,13).
4. Click the OK button to launch the print.
ӹ
To print the current page:
Mouse
1. Locate the page you wish to print and click on that page so you see the flashing cursor anywhere on that page
2. Click on PRINT on the PRINT PREVIEW ribbon OR Press CTRLP to access PRINT dialog. 3. Click the CURRENT PAGE option button in the PAGE RANGE section of the dialog.
4. Click OK to launch the print.
ӹ
To print the selection:
Mouse
1. Select the text you want to print.
2. Click on PRINT on the PRINT PREVIEW ribbon OR Press CTRLP to access PRINT dialog. 3. Click the SELECTION option button in the PAGE RANGE section of the dialog.
Copies
By default, Word will print one copy of the item you have sent to print. You can print multiple copies by changing the Print dialog settings. When you print multiple copies of a document, Word lets you choose whether the copies are collated (Word prints each whole document before it starts on the next copy) or uncollated (Word prints however many copies you have requested of each page).
ӹ
To print multiple copies:
Mouse
1. Click on PRINT on the PRINT PREVIEW ribbon OR Press CTRLP to access PRINT dialog. 2. In the COPIES section of the dialog, use the up and down arrows to the right of the NUMBER OF
COPIES text box to set the number of copies you require.
3. Set the COLLATE check box by clicking in it to change the current setting. 4. Click OK to launch the print.
Cancel A Print
Please click the advert
Appendix One Keyboard Shortcuts
Movement keys
Move the cursor one character to the right
Move the cursor one character to the left
Move the cursor up one line
Move the cursor down one line
CTRL Move the cursor right one word at a time
CTRL Move the cursor left one word at a time
CTRL Move the cursor up one paragraph at a time
CTRL Move the cursor down one paragraph at a time
HOME Move the cursor to the beginning of the current line
END Move the cursor to the end of the current line
PAGE UP Move up a screenful of lines
PAGE DOWN Move down a screenful of lines
CTRL HOME Move to the beginning of the document
CTRL END Move to the end of the document
Free online Magazines
Click here to download
Selection keys
Action Result
SHIFT Select one character to the left
SHIFT Select from the cursor up one line
SHIFT Select from the cursor down one line
SHIFT CTRL Select right word by word
SHIFT CTRL Select left word by word
SHIFT CTRL Select up one paragraph at a time
SHIFT CTRL Select down one paragraph at a time
SHIFT HOME Select from the cursor to the beginning of the current line
SHIFT END Select from the cursor to the end of the current line
SHIFT CTRL HOME Select to the beginning of the document
SHIFT CTRL END Select to the end of the document
CTRL A Select the entire document
Keyboard shortcuts for character formatting
Increase the font size CTRL SHIFT >
Decrease the font size CTRL SHIFT <
Increase the font size by 1 point CTRL
Decrease the font size by 1 point CTRL
Display the Format, Font dialog CTRL D
Change the case of letters SHIFT F3
Format letters as all capitals CTRL SHIFT A
Apply bold formatting CTRL B
Apply an underline CTRL U
Underline words but not spaces CTRL SHIFT W
Double-underline text CTRL SHIFT D
Apply hidden text formatting CTRL SHIFT H
Apply italic formatting CTRL I
Format letters as small capitals CTRL SHIFT K
Apply subscript formatting (automatic spacing) CTRL =
Apply superscript formatting (automatic spacing) CTRL SHIFT +
Keyboard shortcuts for paragraph formatting
Single-space lines CTRL 1
Double-space lines CTRL 2
Set 1.5-line spacing CTRL 5
Add or remove one line space preceding a paragraph
CTRL 0
Centre a paragraph CTRL E
Justify a paragraph CTRL J
Left align a paragraph CTRL L
Right align a paragraph CTRL R
Indent a paragraph from the left CTRL M
Remove a paragraph indent from the left CTRL SHIFT M
Create a hanging indent CTRL T
Reduce a hanging indent CTRL SHIFT T
Remove paragraph formatting CTRL Q
Shortcuts keys for table navigation
To Press
Move to the next cell TAB (If the insertion point is in the last cell of a table, pressing
TAB adds a new row.) Move to the preceding cell SHIFT TAB
Move to the preceding or next row or Add text before a table at the beginning of
a document
Please click the advert
Shortcut keys for selecting in a table
To Press
Select the next cell’s contents TAB
Select the preceding cell’s contents SHIFTTAB
Extend a selection to adjacent cells Hold down SHIFT and press an arrow key repeatedly
Select a column Click in the column’s top or bottom cell. Hold down SHIFT and press Á or  repeatedly
Extend a selection (or block) CTRL SHIFT F8, and then use the arrow keys; press ESC to cancel selection mode
Reduce the selection size SHIFT F8
Select an entire table ALT 5 on the numeric keypad (with NUM LOCK off )
Prepared by Stephen Moffat on the 15th October 2007
Increase your impact with MSM Executive Education
For more information, visit www.msm.nl or contact us at +31 43 38 70 808
the globally networked management school
For more information, visit www.msm.nl or contact us at +31 43 38 70 808 or via [email protected] For almost 60 years Maastricht School of Management has been enhancing the management capacity of professionals and organizations around the world through state-of-the-art management education.
Our broad range of Open Enrollment Executive Programs offers you a unique interactive, stimulating and multicultural learning experience.