Conquer
the
AutoCAD learning
curve and create
top-quality drawings
Master
3D
modeling, AutoLISP
programming, and
other advanced
techniques
Harness
the new
Web publishing and
collaboration features
A
utoCAD 2002
Ellen Finkelstein
Worldwide Learning Strategies, Autodesk, Inc.BONUS
CD-ROM!
• AutoCAD 2002 trial version
• 160+ sample drawings files
C O M P R E H E N S I V E A U T H O R I T A T I V E W H A T Y O U N E E D
O N E H U N D R E D P E R C E N T
A
utoCAD 2002
ible
®
AutoCAD
2002
Bible
Ellen Finkelstein
Copyright © 2002 Hungry Minds, Inc. All rights reserved. No part of this book, including interior design, cover design, and icons, may be reproduced or transmitted in any form, by any means (electronic, photocopying, recording, or otherwise) without the prior written permission of the publisher.
Library of Congress Control Number: 2001092890 ISBN: 0-7645-3611-7
Printed in the United States of America 10 9 8 7 6 5 4 3 2 1
1B/QR/RQ/QR/IN
Distributed in the United States by Hungry Minds, Inc.
Distributed by CDG Books Canada Inc. for Canada; by Transworld Publishers Limited in the United Kingdom; by IDG Norge Books for Norway; by IDG Sweden Books for Sweden; by IDG Books Australia Publishing Corporation Pty. Ltd. for Australia and New Zealand; by TransQuest Publishers Pte Ltd. for Singapore, Malaysia, Thailand, Indonesia, and Hong Kong; by Gotop Information Inc. for Taiwan; by ICG Muse, Inc. for Japan; by Intersoft for South Africa; by Eyrolles for France; by International Thomson Publishing for Germany, Austria, and Switzerland; by Distribuidora Cuspide for Argentina; by LR
International for Brazil; by Galileo Libros for Chile; by Ediciones ZETA S.C.R. Ltda. for Peru; by WS
Norma de Panama S.A. for Panama; by American Bookshops for Finland.
For general information on Hungry Minds’ products and services please contact our Customer Care department within the U.S. at 800-762-2974, outside the U.S. at 317-572-3993 or fax 317-572-4002.
For sales inquiries and reseller information, including discounts, premium and bulk quantity sales, and foreign-language translations, please contact our Customer Care department at 800-434-3422, fax 317-572-4002 or write to Hungry Minds, Inc., Attn: Customer Care Department, 10475 Crosspoint Boulevard, Indianapolis, IN 46256.
For information on licensing foreign or domestic rights, please contact our Sub-Rights Customer Care department at 212-884-5000.
For information on using Hungry Minds’ products and services in the classroom or for ordering examination copies, please contact our Educational Sales department at 800-434-2086 or fax 317-572-4005. For press review copies, author interviews, or other publicity information, please contact our Public Relations department at 317-572-3168 or fax 317-572-4168.
For authorization to photocopy items for corporate, personal, or educational use, please contact Copyright Clearance Center, 222 Rosewood Drive, Danvers, MA 01923, or fax 978-750-4470.
LIMIT OF LIABILITY/DISCLAIMER OF WARRANTY: THE PUBLISHER AND AUTHOR HAVE USED THEIR BEST EFFORTS IN PREPARING THIS BOOK. THE PUBLISHER AND AUTHOR MAKE NO REPRESENTATIONS OR WARRANTIES WITH RESPECT TO THE ACCURACY OR COMPLETENESS OF THE CONTENTS OF THIS BOOK AND SPECIFICALLY DISCLAIM ANY IMPLIED WARRANTIES OF MERCHANTABILITY OR FITNESS FOR A PARTICULAR PURPOSE. THERE ARE NO WARRANTIES WHICH EXTEND BEYOND THE DESCRIPTIONS CONTAINED IN THIS PARAGRAPH. NO WARRANTY MAY BE CREATED OR EXTENDED BY SALES REPRESENTATIVES OR WRITTEN SALES MATERIALS. THE ACCURACY AND COMPLETENESS OF THE INFORMATION PROVIDED HEREIN AND THE OPINIONS STATED HEREIN ARE NOT GUARANTEED OR WARRANTED TO PRODUCE ANY PARTICULAR RESULTS, AND THE ADVICE AND STRATEGIES CONTAINED HEREIN MAY NOT BE SUITABLE FOR EVERY INDIVIDUAL. NEITHER THE PUBLISHER NOR AUTHOR SHALL BE LIABLE FOR ANY LOSS OF PROFIT OR ANY OTHER COMMERCIAL DAMAGES, INCLUDING BUT NOT LIMITED TO SPECIAL, INCIDENTAL, CONSEQUENTIAL, OR OTHER DAMAGES.
Trademarks:All other trademarks are property of their respective owners. Hungry Minds, Inc., is not associated with any product or vendor mentioned in this book.
manual because she was the only one who could read it in English. After returning to the United States, she started consulting and teaching AutoCAD as well as other computer programs, including Microsoft Word, Excel, and PowerPoint. Ellen has written books on Word, PowerPoint, and Flash (Flash 5 For Dummies,published by Hungry Minds, Inc.). Her first book was AutoCAD For Dummies Quick Reference. She was a contributing author to AutoCAD 13 Secrets, also published by Hungry Minds, Inc. Previous editions of this book were AutoCAD 14 Bible, appearing in 1997, and AutoCAD 2000 Bible, which was published in 1999.
Project Editor
Melba Hopper
Technical Editor
Darren Young
Copy Editor
Roxane Marini
Editorial Manager
Rev Mengle
Permissions Editor
Carmen Krikorian
Media Development Specialist
Angie Denny
Media Development Coordinator
Marisa Pearman
Graphics and Production Specialists
Joyce Haughey LeAndra Johnson Betty Schulte Brian Torwelle Julie Trippetti Erin Zeltner
Quality Control Technicians
David Faust Susan Moritz
Proofreading and Indexing
TECHBOOKS Production Services
Cover Image
Foreword
W
e at Autodesk understand better each day that while we are obviously a software developer and publisher, we are really in the “Customer Performance Improvement” business. This is the value proposition that you, our customer, ultimately seek. Don’t we all? Delivering on this proposition requires that we provide two key deliverables to you:1.Great software technology with the right features.
2.The support you need so you can use Autodesk software effectively in your job with improved performance and productivity.
Our product designs have always been user-centric and driven by what you need to continuously improve productivity. AutoCAD 2002 sets a new standard for user pro-ductivity. This is the AutoCAD that users and managers alike asked for — and more. Most of the new features and enhancements came from the ultimate source, cus-tomer requests, and for the ultimate purpose: improving the performance and pro-ductivity of you and your team.
But creating great software based solely on your feedback is not enough. Autodesk’s commitment to increasing productivity requires that we go beyond what our customers ask. We’re always searching for new performance-enhancing innovations — even if they fall outside the scope of current software features, and even if you haven’t thought to ask for them. Our focus, like yours, is on results. If it works, if it enables you to be more successful and achieve better results, we’ll go there. So in addition to specific software enhancements, we are focusing more on supporting the entire process of collaborative design. We are “digitizing the design process” and enabling more effective use of the Web in order to simplify the com-plexities of collaborative design.
Yet, introducing these innovations also poses new challenges, namely learning how to use and effectively apply these enhancements. We have done much to address these challenges both within AutoCAD 2002 and with new offerings such as AutoCAD Today and Autodesk Point A Web resources. However, the real solution must be more than what Autodesk alone can provide, hence the critical role of the Autodesk virtual community. We are therefore particularly grateful to Ellen
At Autodesk we prefer to think of more than just software, but rather the whole environment of an AutoCAD 2002 user. The AutoCAD 2002 Bibleshould be part of every user’s immediate environment. Work with it. Refer to it each time you have a question. Use it to augment the digital learning resources that come with AutoCAD 2002: AutoCAD Learning Assistance, AutoCAD Today, the Help system, and the online resources of Autodesk Point A, which is seamlessly integrated into AutoCAD 2002. Keep the AutoCAD 2002 Biblehandy and browse through it whenever you need a break or have some spare time. You’ll discover myriad capabilities to AutoCAD 2002 you probably weren’t aware even existed. You’ll learn new and better ways to accomplish tasks, and continuously improve your overall performance using AutoCAD 2002.
Wayne Hodgins
Strategic Futurist
Preface
W
elcome to the AutoCAD 2002 Bible. AutoCAD 2002 is the most powerful CAD software product available for PCs today. It can perform nearly any drawing task you can give it. This book is designed to be your comprehensive guide to the entire AutoCAD program.AutoCAD 2002 is the fastest, smoothest AutoCAD yet. Certain features have been added that are not even mentioned in this book because you never see them — you just notice that fewer regenerations occur, drawings load faster, and you spend less time waiting while drawing and editing. In addition to these refinements, of course, are the many new features covered in this book that will make your drawing easier and faster. The new features include both those introduced with 2000i, an interim release, and 2002.
This book covers every major AutoCAD feature. If you’re a beginning AutoCAD user, you’ll find everything you need to start out; if you’re already using AutoCAD regu-larly, the book covers advanced material as well. It provides a solid reference base to come back to again and again, as well as short tutorials to get you drawing. Sidebar profiles show how companies out in the real world use AutoCAD. Finally, the CD-ROM is chock full of drawings, a trial version of AutoCAD 2002, and AutoLISP programs. This book should be all you need to make full use of that expensive pro-gram called AutoCAD.
Is This Book for You?
The AutoCAD 2002 Biblecovers all the essential features of AutoCAD and includes clear, real-life examples and tutorials that you can adapt to your needs.
Although I fully cover AutoCAD basics, I have also included material on the many advanced features, such as external database connectivity, AutoLISP, Visual Basic for Applications (VBA), 3D modeling, rendering, and customization. The following categories should help you decide if this book is for you.
If you are a new AutoCAD user
If you are upgrading to AutoCAD 2002
This book highlights all the new features of AutoCAD 2002 and helps you make the upgrade transition as seamless as possible.
If you are switching from another CAD program
You already know what CAD is all about. This book clearly explains the AutoCAD way of drawing the models you have already been drawing. In addition, you’ll find a great deal of essential information about transferring information from other for-mats.How This Book Is Organized
This book is divided into seven parts and five appendixes.
Part I: AutoCAD Basics
Part I provides the background information you need to start drawing. It starts with a “quick tour” that gets you drawing right away, and then covers how to start a drawing, use commands, specify coordinates, and set up a drawing.
Part II: Drawing in Two Dimensions
Part II covers all the commands and procedures for drawing and editing in two dimensions. In addition, I discuss how to control the drawing process with layers, zooming, and panning. Also included in this part is information about dimensioning, plotting, and printing.
Part III: Working with Data
Part III covers the many ways to organize and share data, including blocks, attributes, external references, and external databases.
Part IV: Drawing in Three Dimensions
Part IV explains everything you need to know to draw in three dimensions. It also discusses how to present 3D drawings using hiding, shading, and rendering tech-niques.
Part V: Organizing and Managing Drawings
Part VI: Customizing AutoCAD
Part VI introduces the tools you need to customize commands, toolbars, linetypes, hatch patterns, shapes, fonts, and menus. You’ll also find a chapter on script files, which you can use to create macros.
Part VII: Programming AutoCAD
Part VII introduces you to programming AutoCAD. It includes three chapters on AutoLISP and Visual LISP and one chapter on Visual Basic for Applications.
Appendixes
Appendix A gives instructions for installing and configuring AutoCAD. Appendix B covers all the ways to get help on AutoCAD, and Appendix C explains what you’ll find on the CD-ROM.
The CD-ROM contains a complete copy of this book in PDF format. The book in that format includes two bonus appendixes. Appendix D displays all the menus and submenus as well as the toolbars and their flyouts. Appendix E lists new, changed, and discontinued commands and system variables as well as a list of system variables often used on the command line.
How to Use This Book
You can use this book in two ways: as a reference or as a learning tool or tutorial.
As a reference
The AutoCAD 2002 Bibleis organized as a reference that you can refer to whenever you get stuck or when you try to do something for the first time. Each chapter cov-ers a topic completely, making it easy to find what you’re looking for. Each Step-by-Step exercise (with a few exceptions) can be done on its own without doing the other exercises in the chapter. You can easily look up a topic and complete a related exercise without having to go through the entire chapter. A complete index at the back of the book can also help you look up features and topics.
As a tutorial
The overall organization of the book goes from simple to complex, and each chap-ter has several Step-by-Step sections. This enables you to use the book as a
tutorial — from beginning to end. You can then go back and redo any exercise when you need to refresh your memory on a particular feature.
For newcomers to AutoCAD, Parts I and II are essential. After that, you can refer to chapters that interest you. Parts III and V are also useful for beginners. Intermediate users will probably be familiar with most of the material in Part I and will be more likely to skip around looking for the specific topics they need. However, don’t forget that many of the new features for AutoCAD 2002 are introduced in Part I. Enough material appears in this book to bring intermediate users up to a fairly advanced level.
I have designed this book to be comprehensive and to include every significant fea-ture of AutoCAD. Therefore, do not be concerned if some of the material seems too advanced. It will be there when you are ready for it.
Doing the Exercises
AutoCAD is a very customizable program. This book assumes that you are working with the default setup. However, a number of changes may have been made to your system that could result in menus, toolbars, and drawings appearing differently from those shown in this book. If you installed AutoCAD yourself and made some adjustments, you know what changes you made. However, if you are using a com-puter that was set up by someone else, it may help to talk to that person first, to see what changes were made.
In addition, as you work through some of the exercises in this book, you will make certain changes in AutoCAD’s setup. Most of these are minor changes that any user would make while drawing. Cautions and Tips accompany all changes that could have serious consequences, such as customizing the menu, for safety. For example, when customizing the menu, you will be instructed to copy the menu template file under a new name, and you will then work with the new menu file, not the original one. Nevertheless, if you are working on a network or sharing AutoCAD with some-one else, it is proper computer etiquette to consult with others who may be affected by the changes you make.
If you do the exercises, I recommend that you do them from the beginning. Important instructions are given during earlier exercises that may affect your sys-tem later. For example, one of the first exercises is to create a new folder to hold your drawings from the exercises. This folder keeps your exercise drawings sepa-rate from other drawings created in your office. However, each exercise stands on its own so you can go back and do only the exercise you need.
You can create your own AutoCAD configuration that helps ensure that changes you make will not affect others. Instructions for doing this appear in Appendix A under the heading “Creating Multiple Configurations.”
The exercises in the AutoCAD 2002 Biblehave been carefully checked by a technical editor to ensure accuracy. However, we cannot anticipate all situations, either due
to varying hardware/software configurations or customization within AutoCAD. If you have a problem with an exercise, contact me at the e-mail address listed at the end of this Preface so I can correct the problem in the book’s next edition.
Conventions Used in This Book
Given all the ways in which you can execute a command in AutoCAD, you’ll find it useful to read through this section, which describes this book’s typographical con-ventions. You will find this section helpful for doing the Step-by-Step exercises as well.
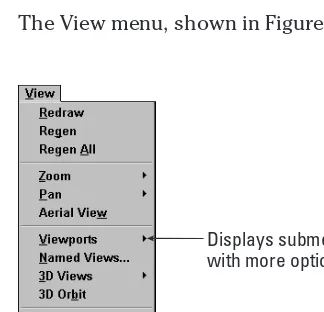
AutoCAD commands
AutoCAD uses standard Windows conventions for menus and toolbars. To indicate that you should choose a command from the menu, for example, I say, “Choose View➪Viewports,” which means that you should click the View menu with your
mouse or puck/stylus and then click the Viewports menu item. Some of AutoCAD’s toolbar buttons have flyouts, which are equivalent to submenus. They are called flyouts because they fly out when you click and hold the button on the main tool-bar, displaying even more buttons. Therefore, to indicate which button to choose, I may need to tell you to choose (or click) Zoom Extents from the Zoom flyout of the Standard toolbar. Although I haven’t found a good alternative, this is not completely satisfactory for two reasons. First, it’s a mouthful! Second, the flyout names do not appear, making it hard to know which is the Zoom flyout. However, you can check Appendix D, which is on the CD-ROM. It shows each toolbar and flyout along with its name. Also, in most cases it will be obvious which flyout I’m talking about.
AutoCAD is unique in that every command also has a command name that you can type on the command line, which appears at the bottom of your screen. Command names are shown in capital letters, as in CIRCLE. AutoLISP functions are shown in small capital letters, as in COMMAND.
AutoCAD prompts, your input, and instructions
In the Step-by-Step exercises, most instructions are presented in the same font and style you are reading now. However, when I reproduce the AutoCAD command line, AutoCAD’s prompts appear in a nonproportional font and the input you should type in appears in bold. Other instructions (such as “Type in the first coordinate”) are shown in italic.
1.With your left mouse button (also called the pick button), choose Line from the Draw toolbar. Notice that the command name is repeated on the com-mand line.
Command: _line Specify first point: 0,0 ↵ (This arrow means
to press Enter)
Specify next point or [Undo]: 10,0 ↵
Specify next point or [Undo]: 10,7 ↵
Specify next point or [Close/Undo]: 0,7 ↵
Specify next point or [Close/Undo]: 0,0 ↵
Specify next point or [Close/Undo]: ↵
Often I make references to specific elements in a drawing. References to these ele-ments appear in the text as numbers in circles, such as 1, 2, 3, and so on. You’ll find the corresponding number in the figure to which the text refers.
Mouse and keyboard terms
You can draw in AutoCAD using a mouse or a puck. The mouse is familiar to all users. A puck (or sometimes a stylus) is used with a digitizing tablet. Because most AutoCAD users do not have a digitizing tablet, I do not directly refer to it in this book. If you have one, follow the instructions for using the mouse in the same way, using your puck.
A mouse can have two or more buttons. Many AutoCAD users like using a mouse with at least three buttons because you can customize the buttons to suit your needs. However, because many mice have only two buttons, I assume only two. The left mouse button is used to choose commands and toolbar buttons and to pick points in your drawing. For this reason, it is sometimes called the pick button. The right button usually opens a shortcut menu.
If I say one of the following
✦Choose Tools➪Options ✦Click Line on the Draw toolbar ✦Select the circle in your drawing
it means to use the left button of your mouse.
When I say to press Enter, it means to press the key that is marked Enter, Return, or ↵on your keyboard. Often I use the bent arrow symbol (↵) to indicate that you should press Enter.
AutoCAD Mouse Terms
Term Description
Cursor The shape on your screen that shows you where the mouse is pointed. It can take a number of shapes, such as crosshairs, pickbox, or arrow. Also known as the mouse pointer.
Pickbox A type of cursor consisting of a small box, used to select drawing objects.
Crosshairs A type of cursor consisting of intersecting lines.
Pick Point to a drawing object and click the left mouse button.
Click Press the left mouse button once and release it.
Double-click Press the left mouse button twice in rapid succession.
Click and drag Click the left mouse button and hold it down while you move the mouse, dragging an object on your screen with it.
Choose Click a menu item, toolbar button, or dialog box item. You can sometimes choose an item using the keyboard as well.
Right-click Press the right mouse button once and release it.
Shift and click While holding down the Shift key, press the left mouse button once and release it.
Select Highlight an object in a drawing by picking it or using another object selection method, or highlight text in a dialog box or text document.
What the Icons Mean
The AutoCAD 2002 Bibleis liberally sprinkled with icons — small symbols in the left margin that call your attention to noteworthy points.
The New Feature icon means that a feature is new to AutoCAD 2000i or 2002, or features that existed in Release 2000 but have been significantly changed.
A Note icon alerts you to some important point that requires special attention or additional information that may be helpful.
A Tip shows you a way to accomplish a task more efficiently or quickly. You’ll find plenty of practical advice here.
Cross-References refer you to a related topic elsewhere in the book. Because you may not read this book straight through from cover to cover, use cross-references to quickly find just the information you need.
The On the CD-ROM icon highlights references to related material on the CD-ROM.
The Caution icon means you should pay special attention to the information or instructions because a possibility exists that you could cause a problem otherwise.
About the CD-ROM
The CD-ROM contains all the drawings you need to do the exercises in this book. These drawings save you time as you learn AutoCAD’s features. In addition, the CD-ROM includes the drawings that result once you finish an exercise or tutorial. In this way, you can check what you have done if you wish.
The CD-ROM is also chock-full of resource material that I hope you will find useful for many years to come. Appendix C lists the contents of the CD-ROM. I am espe-cially pleased to include a 15-day trial version of AutoCAD 2002 on the CD-ROM as well as the entire book in PDF format.
Other Information
If you are an advanced AutoCAD user but need tips and secrets for getting the most out of AutoCAD, this book will probably not add too much to your already great store of knowledge.
If you want to learn about Windows, look for a book that focuses on Windows. This book assumes that you know the basics of Windows, although the instructions you’ll read here are usually detailed enough to get you through any task. For more information about Windows, try Windows 98 For Dummies orMicrosoft Windows Me For Dummiesby Andy Rathbone; or try Alan Simpson’s Windows 98 BibleorAlan Simpson’s Microsoft Windows Me Millennium Edition Bible (all published by Hungry Minds, Inc.). For Windows NT, try Teach Yourself Windows NT 4 VISUALLY or Teach Yourself Windows 2000 Professional VISUALLY, both by Ruth Maran; or Windows NT 4 Caution
On the CD-ROM Cross-Reference
For Dummies or Windows 2000 Professional For Dummiesby Andy Rathbone and Sharon Crawford (all also published by Hungry Minds, Inc.).
If you want just the basics, AutoCAD LT might serve your needs better. However, if you do have AutoCAD and want a more basic book, I recommend AutoCAD 2002 For Dummies, by Bud Smith and Mark Middlebrook. The AutoCAD 2002 Biblecovers AutoCAD 2000i and 2002. However, most of the information also applies to Release 2000. I have used AutoCAD in Windows 98, but almost everything also applies to Windows ME and NT (4 and 2000), although some of the screens may look slightly different.
Contacting the Author
Acknowledgments
I
would like to offer special thanks to Tom Heine, my acquisitions editor, who was very supportive throughout the writing of this book.Special thanks go to Melba Hopper, whose infinite organizing power kept the book on track. Melba kept up with seemingly infinite number of versions of text docu-ments, and images, coordinating the writing editing, and production of the enire book. Also, thanks to Darren Young for his extremely knowledgeable and thorough technical editing. Darren’s comments improved the book throughout.
I also thank Roxane Marini for her precise and careful editing and all the people at Hungry Minds who helped with the production of this book and its CD-ROM.
Bill Plante, an AutoCAD and AutoPLANT consultant, spent many hours helping me connect over the Internet via the MeetNow feature. Leonid Nemirovsky created two AutoLISP routines for managing single-line text (on the CD-ROM) at my request. Alan Praysman sent me an AutoLISP routine to break an object at an object snap point (also on the CD-ROM).
Thanks to Wayne Hodgins, Autodesk’s strategic director for worldwide learning and training, for writing the Foreword for this book. I also want to express my great appreciation to the members of Autodesk’s beta team who were very supportive throughout the alpha and beta period.
Many people contributed drawings for this book. I’d like to thank all of them. They have helped make this book the most comprehensive book on AutoCAD available.
Contents
Foreword. . . v
Preface . . . vii
Acknowledgments . . . xvii
Part I: AutoCAD Basics
1
Chapter 1: Starting to Draw . . . 3
Getting Acquainted with AutoCAD . . . 3
Starting AutoCAD . . . 4
Creating a New Drawing . . . 5
Working with AutoCAD Today . . . 5
Using AutoCAD Today to create a new drawing . . . 6
Using the AutoCAD Interface . . . 7
The drawing area . . . 8
The menus and toolbars . . . 9
The command line . . . 10
The status bar . . . 10
Creating Your First Drawing . . . 10
Toolbars . . . 10
Drawing a rectangle . . . 11
Saving a Drawing . . . 13
Closing a Drawing and Exiting from AutoCAD . . . 16
Chapter 2: Opening a Drawing . . . 19
Creating a New Drawing from a Template . . . 19
Working with Templates . . . 20
Customizing the default template . . . 21
Creating your own templates . . . 24
Opening a Drawing with Default Settings . . . 24
Opening an Existing Drawing . . . 25
Opening a drawing from AutoCAD Today . . . 25
Opening an existing drawing within AutoCAD . . . 26
Using dialog boxes to open drawings . . . 27
Using an Existing Drawing as a Prototype . . . 27
Chapter 5: Setting Up a Drawing . . . 93
Part II: Drawing in Two Dimensions
113
Chapter 10: Editing Your Drawing: Advanced Tools . . . 215
Chapter 11: Organizing Drawings with Layers,
Chapter 17: Plotting and Printing Your Drawing . . . 511
Part III: Working with Data
555
Using the Query Building tab . . . 664
Part IV: Drawing in Three Dimensions
673
Aligning in 3D . . . 824
Part V: Organizing and Managing Drawings
887
Publishing Drawings on the World Wide Web . . . 961
Part VI: Customizing AutoCAD
973
Chapter 29: Customizing Commands and Toolbars . . . 975
Chapter 30: Creating Macros and Slide Shows with Script Files . . 995
Creating Macros with Script Files . . . 995Chapter 33: Customizing Menus . . . 1033
Part VII: Programming AutoCAD
1075
Working with Lists . . . 1106
Appendix A: Installing and Configuring AutoCAD . . . 1181
Installing AutoCAD . . . 1181 Preparing to install AutoCAD . . . 1181 Starting installation . . . 1182 Adding items to an installation . . . 1185 Authorizing AutoCAD . . . 1186 Configuring AutoCAD . . . 1186 Starting AutoCAD your way . . . 1200 Understanding configuration files . . . 1202 Creating multiple configurations . . . 1203 Configuring a Plotter . . . 1204 Using the Plotter Manager . . . 1204 Editing a plotter configuration . . . 1205 Configuring AutoCAD Today . . . 1206Appendix B: AutoCAD Resources . . . 1207
Discovering AutoCAD . . . 1207 Learning from your AutoCAD dealer . . . 1207 Taking a course . . . 1208 Learning from other users . . . 1208 Reading the magazines . . . 1208 Getting Technical Support . . . 1208 AutoCAD Users Groups . . . 1209 Internet Resources . . . 1210Appendix C: What's on the CD-ROM . . . 1215
How the CD-ROM Is Structured . . . 1215 Using the Results folder . . . 1216 Using the Book PDF folder . . . 1217 Using the Reader folder . . . 1217 Using the Links folder . . . 1217 Using the Software folder . . . 1217 A List of Software . . . 1219Index. . . 1223
AutoCAD Basics
T
he five chapters in Part I provide all the basics you need to start drawing in AutoCAD. These chapters are essen-tial for the beginner, but even current users will find some new tips and pointers, especially related to features that are new for AutoCAD 2002. If you feel you know enough to skip to Part II, skim this part first for New Feature icons to bring your-self up to date. Some of the major new features of AutoCAD 2002 are introduced here.✦ ✦ ✦ ✦
In This Part
Chapter 1 Starting to Draw
Chapter 2
Opening a Drawing
Chapter 3 Using Commands
Chapter 4 Specifying Coordinates
Chapter 5
Setting Up a Drawing
✦ ✦ ✦ ✦
I
Starting to Draw
L
earning AutoCAD is a bit like trying to decide which came first — the chicken or the egg. On one hand, you need to know many basics before you can start drawing. On the other hand, it can be very difficult to understand those basics if you haven’t had the experience of drawing something using a computer. In this chapter, you resolve this problem by drawing a simple rectangle in AutoCAD. The next few chapters then fill you in on basic information you need to move on to more complex drawings. By experiencing the drawing process first, the initial learning curve will be easier and smoother.Getting Acquainted with AutoCAD
AutoCAD, created by Autodesk, is the most widely used tech-nical drawing program anywhere, with more than 2.6 million registered users. According to Autodesk, CAD stands for computer-aided design, but can also stand for computer-aided drafting or drawing.
The first version of AutoCAD came out in 1982 running under DOS. AutoCAD was the first significant CAD program to run on a desktop computer. At the time, most other technical draw-ing programs ran on high-end workstations or even main-frames. AutoCAD’s success has been attributed to its famous open architecture — many source code files in plain text (ASCII) files that you can easily customize and programming languages (such as AutoLISP and Visual Basic for
Applications) designed especially so that the end user can program AutoCAD.
As a result, AutoCAD is the most flexible drafting program available, applicable to all fields. AutoCAD’s support for lan-guages other than English, including those using other alpha-bets, is unparalleled, making AutoCAD virtually without serious competition abroad. As a result, AutoCAD is used in all fields and in more than 150 countries.
Through a high level of technical innovation and expertise, Autodesk has created a program with unequaled features and capabilities, including 3D surface and solid modeling and visualization, access to external databases, intelligent dimensioning, importing and exporting of other file formats, Internet support, and much more.
Autodesk has developed what it calls a virtual corporation. This “corporation” includes programmers who create software designed to work with AutoCAD (called third-party software), dealers (also called resellers) who provide technical support and training specific to a user’s field, and an education network that provides train-ing and courses to more than one million users each year. This setup provides a strong network of support to users throughout the world.
The major disciplines that use AutoCAD are:
✦Architectural (also called AEC for architectural, engineering, and construction) ✦Mechanical
✦GIS (Geographic Information Systems) ✦Facilities management
✦Electrical/electronic ✦Multimedia
However, AutoCAD has many other lesser-known uses, such as pattern making in the garment industry, sign making, and so on.
In this book, I try to provide examples from many fields. The world of AutoCAD is very broad, and it is worthwhile to see the many approaches that AutoCAD makes possible.
Starting AutoCAD
This section starts the quick tour of AutoCAD, designed to make AutoCAD look easy and simple. The first step is to start AutoCAD.
The CD-ROM contains a 15-day trial version of AutoCAD 2002. Look in \Software\AutoCAD 2002 Trial\Setup.EXE.
This book covers AutoCAD 2002 running on Windows 98, Windows ME, Windows 2000, or Windows NT 4.0. Every computer is set up somewhat differently, so you may need to adjust the following steps slightly. If you didn’t install AutoCAD your-self and are unfamiliar with the folders (once called directories) on your computer, you should get help from someone who is familiar with your computer system. On the
If you need help installing AutoCAD, turn to Appendix A.
By default, installing AutoCAD places a shortcut on your desktop, as shown in Figure 1-1. You can double-click this shortcut to launch AutoCAD. Of course, you can also choose Start➪Programs➪AutoCAD 2002. If a submenu opens, choose
AutoCAD 2002 again.
Figure 1-1: An AutoCAD shortcut on the desktop provides a quick way to open AutoCAD.
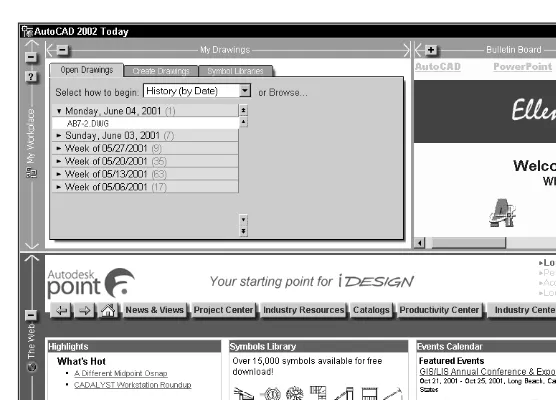
Creating a New Drawing
When you launch AutoCAD, AutoCAD Today, shown in Figure 1-2, appears as a cover page on top of your AutoCAD drawing window. AutoCAD Today enables you to easily take advantage of your Internet and intranet connec-tions from within AutoCAD.
Working with AutoCAD Today
AutoCAD Today has three sections:✦The top-left area (My Drawings) enables you to create new drawings or open
existing drawings. You can also access symbol libraries (sets of small draw-ings that you can insert into your active drawing).
✦The top-right area, called the Bulletin Board, displays a Web page from the
Internet or an intranet. This section is designed to be used by an AutoCAD Manager to communicate with AutoCAD users.
✦The bottom area is a window into Point A, Autodesk’s Internet portal.
These three areas are described in the next few sections of this chapter and in Chapter 2.
To get right to work on your drawing, you can close AutoCAD Today by click-ing its Close button (the X at the top right of the window). You can always reopen it by clicking the new Today button on the Standard toolbar. AutoCAD Today opens in a smaller window than AutoCAD itself so you can also simply click anywhere visible on the AutoCAD screen to hide AutoCAD Today. You can then dis-play AutoCAD Today at any time by clicking its button on the Windows task bar.
If you don’t like AutoCAD Today, you can make it go away. Choose Tools➪Options
and click the System tab. In the General Options section, click the Startup drop-down list and choose either “Show traditional startup dialog” or “Do not show a startup dialog.” The Startup dialog box offers similar options to AutoCAD Today. Tip
Figure 1-2: AutoCAD Today connects you with your manager, Autodesk’s Point A site, and makes it easy to create or open a drawing.
You can collapse either the top or bottom section of AutoCAD Today by clicking the plus sign at the left of the section you want to collapse. Then click the minus sign to redisplay its section. You can also expand or contract the Bulletin Board by clicking its plus or minus sign.
For more information on how managers can configure AutoCAD Today, see Appendix A.
Using AutoCAD Today to create a new drawing
At the top left of AutoCAD Today is the My Drawings section, where you can create a new drawing or open any existing drawing. You can also access symbol libraries (collections of blocks that you can add to your drawings).
To create a new drawing, click the Create Drawings tab of the My Drawings section of AutoCAD Today. From the Select how to begin drop-down list, choose one of three options:
✦Templateenables you to open a drawing using a template. Templates contain
settings that control how your drawing functions. The first group is Recent Templates (if you have previously used a template). After that, templates are grouped alphabetically. Click the arrow next to a letter to display the tem-plates that start with that letter. You can also click Browse to open the Select File dialog box and choose a template from the Template subfolder of your AutoCAD 2002 folder.
✦Start from Scratchenables you to choose English or Metric and create a
drawing with just the minimum default settings.
✦Wizardsenables you to choose either Quick or Advanced Setup to guide you
through the process of setting up a drawing before you start.
You can also create a new drawing from within AutoCAD. Choose File➪New or
click the New button on the Standard toolbar. AutoCAD displays AutoCAD Today (unless you have changed the settings in the Tools dialog box as described earlier) with the Create Drawings tab on top.
Step-by-Step: Starting AutoCAD and Creating a Drawing
1.Click Start on the task bar at the bottom of your screen.
2.Choose Programs.
3.Choose AutoCAD 2002.
4.If a submenu opens, choose AutoCAD 2002 again.
AutoCAD opens and displays AutoCAD Today.
5.Click the Create Drawings tab in the My Drawings section. From the Select how to begin drop-down list, choose Start from Scratch.
6.Choose English (feet and inches). AutoCAD creates a blank drawing ready for you to start drawing.
7.Click anywhere in the AutoCAD window that shows behind AutoCAD Today (but outside AutoCAD Today) to see the blank drawing.
8.Click the Close button (the X at the very top right of your screen) to close AutoCAD.
Exiting from AutoCAD is covered later in this chapter.
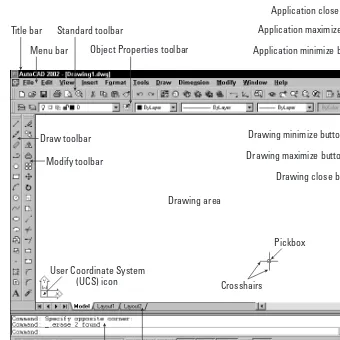
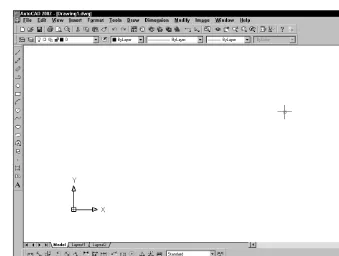
Using the AutoCAD Interface
You are probably impatient to start drawing. First, though, it helps to get the lay of the land.
Figure 1-3 shows the screen when you first open AutoCAD. Your screen may look somewhat different — remember that AutoCAD can be customized in many ways — but the general features will be the same.
Figure 1-3: The AutoCAD screen
The drawing area
The blank area in the middle of the screen, the graphics window, is where you draw. You can think of this as a sheet of drafting paper, except that this piece of paper can be any size — even the size of a huge factory!
At the bottom of the drawing area is a tab labeled Model. You draw on this tab. You use the layout tabs to lay out your drawing for plotting.
To specify a point, the universally accepted convention is to put the X coordinate first, then a comma, and then the Y coordinate. Figure 1-4 shows some coordinates on X and Y axes.
Title bar
Menu bar
Command line Layout tabs Status bar
Drawing minimize button
Drawing close button Drawing maximize button Standard toolbar
Object Properties toolbar Application minimize button Application maximize button
Application close button
Draw toolbar
Modify toolbar
Drawing area
User Coordinate System
(UCS) icon Crosshairs
Figure 1-4: Some X,Y coordinates
Chapter 4 is devoted to explaining how to specify coordinates. To create three-dimensional models, you need to add a Z coordinate when specifying a point. Chapter 21 discusses three-dimensional coordinates.
The UCS icon
Notice the symbol with two arrows at the bottom-left corner of the drawing area in Figure 1-3. This symbol is called the UCS (User Coordinate System) icon. The arrows point to the positive directions of the X and Y axes to help you keep your bearings.
You can change the look of this icon. (See Chapter 8.)
The crosshairs
In the drawing area of Figure 1-3, notice the two intersecting lines with a small box at their intersection. The small box is called the pickboxbecause it helps you to pick objects. The lines are called crosshairs. They show you the location of the mouse cursor in relation to other objects in your drawing.
As you move your mouse around, the pickbox and crosshairs move with your mouse. At the bottom of your screen, at the left end of the status bar (described later), you can see the X,Y coordinates changing as you move the mouse.
The menus and toolbars
At the top of your screen is the title bar, and directly beneath the title bar is a menu bar. Below that are two rows of toolbars. In addition, your screen has two more
Cross-Reference Cross-Reference
-3,5
0,0
-1,-1
Y axis
3,2
X axis
toolbars, the Draw and Modify toolbars, which are probably docked at the left side of the screen, as shown in Figure 1-3. Use the menus and toolbars together to give AutoCAD commands to draw, edit, get information, and so on.
Because you can customize the menus and toolbars to suit your needs, your screen may appear somewhat differently. AutoCAD provides many more toolbars that you can display when you need them. Some examples of the toolbars are Dimension, Solids, Render, and Web. You learn about all these and more in this book.
The command line
At the bottom of the screen, you see a separate window showing approximately three lines of text. (It can be changed to show as many lines as you like.) Notice the word Command:. This is the command line. All commands can be executed by typing them on the command line.
Even if you use a menu item or toolbar button to execute a command, you may need to look at the command line to see how AutoCAD responds. Often, AutoCAD provides options that must be typed in from the keyboard. Also, anything you type appears on the command line. For example, when you type in coordinates specify-ing points, they appear on the command line. To see more of the command line, press F2 to open the AutoCAD Text window. You can scroll back through previous commands. Press F2 again to close the window.
The status bar
At the very bottom of the screen is the status bar, as shown in Figure 1-3. At the left are the X,Y coordinates. As you move your mouse around, these coordinates change. (If they don’t change, click them and move your mouse again.) The status bar also sports several buttons that you will learn about later.
Creating Your First Drawing
You are now almost ready to draw your first lines. It is worthwhile first to take a minute to get accustomed to using the toolbars to give AutoCAD a command.
Toolbars
Figure 1-5: Moving the cursor over the Line button displays a Tooltip.
If you inadvertently execute a command that you don’t want, press Esc. The com-mand-line prompt (Command:) returns.
Drawing a rectangle
For this exercise, simply follow the instructions exactly. When you type the X and Y coordinates (shown in bold), type the first number, a comma, and then the second number, with no spaces between them. If you haven’t read the Preface, now is a good time to go back and read the part that explains how to follow the exercises. Don’t worry if you don’t understand everything you are doing. It will all become clear as you progress through this book.
Follow the prompts shown next. As explained in the Preface, what you type appears in bold. Instructions to you in command sections appear in italics.
Step-by-Step: Drawing a Rectangle
1.Start AutoCAD. On the Create Drawings tab of AutoCAD Today, choose Start from Scratch from the Select how to begin drop-down list. Choose English.
AutoCAD displays the new drawing.
2. With your left mouse button (also called the pick button), choose Line from the Draw toolbar. Notice that the command name is repeated on the command line.
Tip
Line button
Command: _line Specify first point: 0,0 (This arrow means to press Enter)
Specify next point or [Undo]: 10,0 ↵
Specify next point or [Undo]: 10,7 ↵
Specify next point or [Close/Undo]: 0,7 ↵
Specify next point or [Close/Undo]: 0,0 ↵
Specify next point or [Close/Undo]: ↵
The command-line prompt appears again, ready for a new command.
3.To make the rectangle fill up the screen, type the following, shown in bold:
Command: zoom ↵
Specify corner of window, enter a scale factor (nX or nXP), or [All/Center/Dynamic/Extents/Previous/Scale/Window] <real time>: e ↵
The rectangle is centered and fills most of the screen, leaving a small space at the edges of the drawing area. The ZOOM command with the Extents (e) option brings the outer extents of the drawing to the edges of your screen. You learn more about the ZOOM command in Chapter 8.
4.Keep your drawing open. You will save it later in this chapter. It should look like the image shown in Figure 1-6.
You may be wondering what units the coordinates you typed refer to. For now, you can think of them as inches, although they can actually be whatever you want. As a result, you could print out your drawing as a rectangle of 10 inches by 7 inches.
Cross-Reference
Help! My drawing doesn’t look like the figure
If your drawing doesn’t look like the image shown in Figure 1-6, there could be several rea-sons. To fix the problem, try one of the following options:
✦You may have made a mistake. If you think that’s the case, choose File➪New to
start a second new drawing, choose the Creating Drawings tab, choose Start from Scratch in AutoCAD Today, and choose English. Then follow the prompts again.
✦You may have started AutoCAD based on a template instead of choosing Start from Scratch. Choose File➪New, choose the Creating Drawings tab, choose Start from
Scratch in AutoCAD Today, and choose English. Then follow the prompts again.
✦If your drawing still seems wrong, put the CD-ROM that accompanies this book in your CD-ROM drive. Choose File➪Open and use the Open dialog box to find ab-acad.dwg on the CD-ROM. Choose ab-acad.dwgand click Open. Then follow the prompts again.
Figure 1-6: Your first drawing
You have learned several things — how to start a command using the toolbar (the LINE command), how to type in X,Y coordinates on the command line, and how to end the LINE command (by pressing Enter without typing any coordinates). You also used the ZOOM command by typing it on the command line. Most of AutoCAD builds on these basic skills.
Saving a Drawing
Saving a drawing is similar to saving any other file in Windows. You should get in the habit of saving your work every 10 to 15 minutes to avoid losing your work in case your computer system crashes.
For your work with this book, you should create a new folder so that you can save your exercise drawings where they will not get mixed up with other drawings. Although saving is a standard Windows function, I review the steps here because they are so important.
Step-by-Step: Creating a New Folder
1.Move the mouse cursor down to the task bar at the bottom of your screen and right-click Start. (That means, click the Start button with your right mouse button.)
2.Choose Explore.
3.On the left pane of Windows Explorer, click the drive where you want to create the new folder. If you don’t know where to create the folder, choose the drive where AutoCAD is installed. If you are on a network, choose the drive that rep-resents your computer.
4.If you want to make a subfolder (a folder within a folder), choose the folder where you want to create the subfolder.
5.From the Explorer menu, choose File➪New➪Folder.
A new, highlighted folder, called New Folder, appears in the right pane. You may have to scroll down to see it.
6.Type AutoCAD Biblefor the folder name and press Enter. (If you did the exer-cises from the previous edition of this book, AutoCAD 2000 Bible, and already have a folder named AutoCAD Bible, first rename the original folder to some-thing like ACAD2000Bible.)
Now you are ready to save your drawing. Saving a drawing for the first time is differ-ent from saving it subsequdiffer-ently because you have to name the drawing the first time you save it. The important point is to save the drawing in the right drive and folder. You should save this drawing (and all drawings you create using this book) in the special folder you created in the exercise just completed.
It is essential to create a folder for your drawings as described in the previous steps before you go on to exercises in the rest of this book.
To save a drawing, click Save on the Standard toolbar. If you are saving a drawing for the first time, the Save Drawing As dialog box appears, as shown in Figure 1-7.
Down the left side of the dialog box are several buttons to help you find a location to save drawings more quickly. Together, these buttons are called the Places list. Use the Places list as follows:
✦My Documentslists drawings and folders in the My Documents folder. Some
people store files in this folder. (Your system may call this the Personal folder.)
✦Favoriteslists files and folders in the C:\Windows\Favorites folder. (This is the
Usually, this folder contains only shortcuts to files saved elsewhere. To put a shortcut to an already saved drawing in Favorites, choose File➪Save As and
click the Tools drop-down list; then click Add to Favorites. Then you can later open the file from the Favorites folder.
✦Desktopshows drawings on your desktop. Some of the Windows icons also
appear on this list.
Figure 1-7: The Save Drawing As dialog box
✦Buzzsawsends you to www.buzzsaw.com, Autodesk’s business-to-business
portal for the building design and construction industry. You can set up a new account or access existing projects.
✦RedSparksends you to www.redspark.com, Autodesk’s business-to-business
portal for the manufacturing industry. You can set up a new account or access existing projects.
✦Point Asends you to http://pointa01.autodesk.com/portal, Autodesk’s
industry-specific Internet portal. (You may have to scroll down to see it and the following button.)
✦FTPsites are locations on the Internet for transferring files. When you choose
FTP, you see FTP sites that you have added to the list. To add FTP locations, choose Tools➪Add/Modify FTP Locations from the menu of the Save Drawing
In a nice touch, you can reorder the buttons in the Places list. Just drag any button to a new location.
Of course, you can also choose a location from the Save In drop-down list to save the file to. Then type a file name in the File Name text box and click Save to save the file.
Use the Views drop-down list of the dialog box to specify how you want to display files in this dialog box. List just displays the name; Details adds the file size, type, and date modified; and Preview adds a preview of the drawing.
Step-by-Step: Saving a Drawing for the First Time
1. The rectangle you created earlier in this chapter should still be on your screen. Click Save on the Standard toolbar.
The Save Drawing As dialog box opens.
2.Click the Save In drop-down list box. If necessary, choose the drive where you created your AutoCAD Bible folder.
3.Double-click the AutoCAD Bible folder you created for this book. You may need to scroll down to display the folder name.
4.In the File Name box, select the file name. Type ab1-1and press Enter (or click Save).
AutoCAD saves your drawing under the name ab1-1.dwg. You can use a different name if you like, but this will help you organize your drawings from this book. It just means that this is the first drawing from Chapter 1 of the AutoCAD 2002 Bible.
The CD-ROM includes a small program, savea.lsp, that automatically backs up your drawing to the floppy drive after you have saved it on your hard drive. If you like to back up to a diskette regularly for safety, this program can be useful. Look in \Software\Chap01\Savea.
Closing a Drawing and Exiting from AutoCAD
You can close your drawing and keep AutoCAD open. The simplest way is to use the drawing Close button just under the application Close button. You can also choose File➪Close.
Since AutoCAD 2000i, you can choose Window➪Close All to close all open
draw-ings. If any have unsaved changes, AutoCAD prompts you to save the changes. New
Feature On the CD-ROM
To exit AutoCAD, click the Close (X) box at the top-right corner of your screen. You can also exit out of AutoCAD by typing quiton the command line and pressing Enter. Another method is to choose File➪Exit.
If you have made any changes to your drawing since last saving it, AutoCAD asks you if you want to save your changes. Choose Yes or No as your situation requires. Choosing Cancel returns you to your drawing. If you have more than one drawing open to which you have made changes, AutoCAD asks you about each drawing in turn so that you will not exit AutoCAD without saving all the changes you have made in your open drawings.
Step-by-Step: Closing Your Drawing and Exiting AutoCAD
1.The rectangle of ab1-1.dwg should still be on your screen. Choose File➪Close.
You now see a gray screen with no drawing. (Repeat this process if you have other drawings open. Save or cancel the changes to these extra open draw-ings as you like.)
2.Click the Close button in the upper-right corner to exit AutoCAD. AutoCAD closes immediately.
Summary
In this chapter, you explored the AutoCAD screen and started to draw. You created a folder for your drawings for this book, saved your drawing in that folder, closed the drawing, and exited from AutoCAD.
You may have several questions at this point, but “well begun is half done.” The next chapter explains all the ways to start a new drawing as well as how to open an existing drawing.
Opening a
Drawing
A
utoCAD offers a number of options for opening new and existing drawings. These options create a great deal of flexibility and save you time as well. You can create complex templates to avoid doing the same basic setup and drawing over and over.Creating a New Drawing
from a Template
A templateis a special file that contains settings and possibly objects (such as a title block). When you use a template as the basis for a new drawing, the drawing takes on all the set-tings and objects contained in the template. Use templates to avoid re-creating settings and redrawing objects for new draw-ings. AutoCAD comes with many templates that you can use as is or customize. You can also create your own templates.
To create a new drawing based on a template, click the Create Drawings tab in AutoCAD Today. From the Select how to begin drop-down box, choose Template. AutoCAD lists all the avail-able templates, as shown in Figure 2-1. The list first displays recently used templates and then templates in alphabetical order. Click the arrows at the left of the listing to open and close the listings. Note that the number next to each heading indicates the number of files in that category. The first tem-plate in the list under the letter A is ACAD -Named Plot Styles.dwt. The second is acad.dwt. Acad is an abbreviation for AutoCAD. Pass your mouse cursor over any template to see its preview, if available. Click a template to create a new drawing based on that template. Because AutoCAD opens with
Drawing1.dwg, the new drawing is named Drawing2.dwg. Subsequent drawings that you open are named Drawing3.dwgand so on. When you save and name your draw-ing, the original template file is unaffected.
Figure 2-1: Using the Template option to create a drawing
The first template name, ACAD -Named Plot Styles.dwt, refers to named plot styles, which are covered in Chapter 17. Although many of the exercises in this book use this template, for the exercises until that chapter, you can also use acad.dwt.
Step-by-Step: Opening a Drawing Based on
ACAD -Named
Plot Styles.dwt
1.Start AutoCAD.
2.From the AutoCAD Today window, click the Create Drawings tab.
3.From the Select how to begin drop-down list, choose Template.
4.If necessary, click A to expand the list of templates beginning with the letter a.
5.Choose ACAD -Named Plot Styles.dwt from the list.
You now have a blank drawing called Drawing2.dwg, as shown in Figure 2-2.
Working with Templates
A template contains ready-made settings to get you started drawing quickly. These settings include the size of the drawing (called limits), the unit type (such as deci-mal or feet and inches), and others. An important part of setting standards in an office where people work together on drawings is the creation of a template so that all users work with an identical setup.
A template may contain more than just settings — it often contains a complete title block, for example, and may include boilerplate (standardized) text as well.
Figure 2-2: When you create a drawing based on a template, AutoCAD opens a drawing called Drawing2.dwg.
Customizing the default template
To customize ACAD -Named Plot Styles.dwtor acad.dwt, follow these steps:
1.Open a drawing based on the template as described in the previous section.
2.Make any changes you wish.
3.Click Save on the Standard toolbar.
4.In the Save Drawing As dialog box, click the Files of type drop-down list box. Choose AutoCAD Drawing Template File (*.dwt). In the list of template files, choose the template you want to customize. Click Save.
5.When asked if you want to replace it, click Yes.
6.In the Template Description dialog box, revise the description as you like and click OK.
Spotlight on AutoCAD users:
Creative Edge in Fairfield, Iowa
Creative Edge has carved out its own niche in CAD/CAM (computer-aided design and com-puter-aided manufacturing). This company uses AutoCAD to create drawings that are then used to cut out shapes of almost any material imaginable. Creative Edge provides services to architects, interior designers, and even individual homeowners.
Here’s how the process works. Creative Edge accepts anything from a completed drawing to a sketch on a napkin as the front-end input. An example of the company’s work is a floor design for the Radisson Hotel in Rapid City, South Dakota. In this case, Creative Edge’s in-house artist and vice president Harri Aalto created the design. Once the design was final-ized, an AutoCAD drawing was created from the design. Often, the design is digitized by putting the artwork on a large digitizer and picking points with the puck (Chapter 3 describes pucks in more detail). Here you see a close-up of the central part of the drawing, showing Mount Rushmore.
Then the company’s programmers use NC Polaris by NC Microproducts, Inc. (http://www.ncmicro.com) to convert the drawing into numerical code. This program determines a cutting path for every section of the drawing. Here you see the first few lines of the code created from the Radisson Hotel AutoCAD drawing.
%
;INW12.OUT
Don’t change acad.dwt or ACAD -Named Plot Styles.dwtif you are using someone else’s computer and copy of AutoCAD without first checking with that person. It can be a frustrating experience to start a drawing based on the default template and find that all the settings have been changed.
Caution
G91 G41 H1 N1177A
G0X2.0787Y4.2481;_RAPID_TO_PIERCE /P200;_CUTTER_ON
G91
G3X.1764Y.0121I.0821J.0942 G3X.3383Y.3909I-56.3796J49.1335
This code is entered into one of Creative Edge’s 16 high-pressure water-jet cutters, which cuts out the pieces in the chosen material. In this case, the pieces were cut out of marble, granite, limestone, and brass. Other common materials are vinyl, linoleum, ceramic tile, tita-nium, stainless steel, and composites such as bulletproof materials. Finally, the pieces of cut stone were set into the floor of the hotel’s lobby. As you can see, the results are stunning.
Creating your own templates
You may want several templates to choose from on a regular basis. For example, you may create drawings of several sizes. AutoCAD lets you create as many tem-plates as you wish. To create your own temtem-plates, either start a drawing based on ACAD -Named Plot Styles.dwt(or acad.dwt) and make the changes you want, or open an existing drawing that already has some of the settings you want and make any further changes you need. Follow these steps:
1.If you start a new drawing based on a template, choose Save from the Standard toolbar. If you open an existing drawing, choose File➪Save As from
the menu.
2.In the Save Drawing As dialog box, click the Files of type drop-down list box. Choose AutoCAD Drawing Template File (*.dwt) or acad.dwt.
3.In the File name text box, type a name for your template. Click Save.
4.In the Template Description dialog box, revise the description as you wish. Click OK.
Name your templates in a way that clearly differentiates them from regular draw-ings. You may want drawings set up for each of the standard paper sizes (A through E), with a title block in each. Useful names might be tb-a.dwt, tb-b.dwt(tb
meaning title block), and so on.
Most AutoCAD users take advantage of these techniques as a standard practice. You can usually make profitable use of a template as the basis for a new drawing.
Opening a Drawing with Default Settings
Occasionally, you want to open a drawing without any settings. It is actually impos-sible for a drawing to have no settings at all, but you can open a drawing with the minimum possible presets. You might want to do this if you are working on some-one else’s computer and don’t want to take the time to get rid of a large number of complex settings that are not helpful for your work.
To open a drawing with the fewest possible settings, choose Start from Scratch from the Select how to begin drop-down list on the Create Drawings tab of AutoCAD Today. Choose either English or Metric.
Opening an Existing Drawing
Often you need to open an existing drawing, either to complete it or make changes. You can open an existing drawing from AutoCAD Today or from within AutoCAD itself.
Opening a drawing from AutoCAD Today
To open an existing drawing when starting AutoCAD, choose the Open Drawings tab in AutoCAD Today, shown in Figure 2-3.
Figure 2-3: Use the Open Drawings tab of AutoCAD Today to open an existing drawing.
From the Select how to begin drop-down list, you can choose from four options that determine which drawings you see and how they are organized:
✦Most Recently Used: Recently used drawing listed in the reverse order in
which they were saved.
✦History (by Date): Recently used drawings organized by date.
✦History (by Filename):Recently used drawings organized alphabetically. ✦History (by Location): Recently used drawings organized by their location on
your computer system.
Choose the option that you think will help you find the file most easily. Pass your mouse cursor over the file name to see its preview on the right. To open one of these drawings, click it.
Figure 2-4: The Select File dialog box is equivalent to the Open dialog box in most Windows programs.
Drawings created and saved in Release 12 or earlier versions of AutoCAD do not show previews. Drawings created in Release 13 and later have previews unless this feature has been disabled.
To look for a file to open on the Web, click the Search the Web button in the dia-log box. You can also use the Places list at the left side of the diadia-log box to find drawings. The Places list was described in Chapter 1 for the Save As dialog box.
Opening an existing drawing within AutoCAD
To open an existing drawing once you have already started working in AutoCAD, choose Open from the Standard toolbar. The Select File dialog box appears. Choose a drawing as explained previously and click Open.
You can also open a drawing by dragging it from Windows Explorer into AutoCAD. However, you must drag the drawing anywhere but into the main drawing area — for example, into the command line or any blank area next to a toolbar. You can also double-click a drawing in Windows Explorer to open it. If AutoCAD is not run-ning, Windows loads AutoCAD and the drawing as well. If AutoCAD is running and a drawing is active, the drawing opens as a second drawing within AutoCAD.
You can also open a drawing from the AutoCAD DesignCenter — a feature for managing both drawing files and many of their components. First, choose AutoCAD DesignCenter from the Standard toolbar. AutoCAD opens the