Powerful PowerPoint
for Educators: Using
Visual Basic for
Applications to Make
PowerPoint Interactive
David M. Marcovitz
Pow er ful PowerPoint
for Ed u ca tors
Us ing Vi sual Ba sic for Ap plications to Make
PowerPoint In ter ac tive
David M. Marcovitz
Li brary of Con gress Cat a log ing-in-Pub li ca tion Data
Marcovitz, Da vid M.
Pow er ful PowerPoint for ed u ca tors : us ing Vi sual Ba sic for ap pli ca tions to make PowerPoint interactive / by David M. Marcovitz
p. cm.
ISBN: 1–59158–095–1 (alk. pa per)
1. Com puter graphics. 2. Microsoft PowerPoint (Computer file) 3. Business pre sen ta tions—Graphic meth ods—Com puter pro grams. 4. Microsoft Vi sual Basic for ap plications. I. Ti tle.
T385.M36345 2004
006.6'8682—dc22 2003067183
Brit ish Li brary Cat a logu ing in Pub li ca tion Data is avail able.
Copyright © 2004 by Da vid M. Marcovitz
All rights re served. No por tion of this book may be reproduced, by any pro cess or technique, without the express written consent of the pub lisher.
Library of Congress Catalog Card Num ber: 2003067183 ISBN: 1–59158–095–1
First pub lished in 2004
Libraries Un limited, 88 Post Road West, Westport, CT 06881 A Member of the Greenwood Pub lishing Group, Inc.
www.lu.com
Printed in the United States of America
The paper used in this book complies with the Permanent Paper Standard issued by the Na tional In for ma tion Stan dards Or ga ni za tion (Z39.48–1984).
10 9 8 7 6 5 4 3 2 1
All terms mentioned in this book that are known as trademarks or ser vice marks have been appropriately capitalized. Use of a term in this book should not be re garded as affecting the va lidity of any trademark or service mark.
The pub lisher and the author of this book have no con nection to Microsoft.
Con tents
List of Figures. . . xi
Pref ace . . . xv
Chap ter 1: Mul ti me dia De sign. . . 1
In tro duc tion . . . 1
Vo cab u lary. . . 1
What Is Mul ti me dia? . . . 2
The Design Process . . . 3
Pro ject Or ga ni za tion . . . 5
Met a phors . . . 7
Storyboards and Flowcharts. . . 7
De sign ing As sign ments for Your Stu dents . . . 8
Con clu sion . . . 10
Chap ter 2: Tra di tional Mul ti me dia Fea tures of PowerPoint . . . 13
In tro duc tion . . . 13
Vo cab u lary. . . 13
Before You Be gin . . . 14
In sert ing Pic tures . . . 15
Sounds . . . 18
Link ing and Em bed ding Sounds . . . 20
Are My Sounds Linked or Embedded? . . . 21
Hy per text Links . . . 21
But tons . . . 25
Text for But tons . . . 27
Sound for Buttons . . . 28
Con trol ling Nav i ga tion with Ki osk Mode . . . 29
Saving As a PowerPoint Show . . . 30
Con clu sion . . . 31
Ex er cises to Try . . . 32
Chap ter 3: In tro duc ing Vi sual Ba sic for Ap pli ca tions. . . 33
In tro duc tion . . . 33
Vo cab u lary. . . 33
What Is Vi sual Ba sic for Ap plications? . . . 34
What Is an Object-Oriented Pro gramming Language? . . . 35
VBA and Vi ruses . . . 37
Con clu sion . . . 39
Chapter 4: Get ting Started with VBA. . . 41
In tro duc tion . . . 41
Vo cab u lary. . . 41
Ac cess ing the VBA Ed i tor. . . 41
Help! I’ve Lost My Windows . . . 43
Tying Your VBA Script to a PowerPoint Button . . . 43
Tying Your VBA Script to Any Ob ject . . . 45
Changing a Button . . . 46
Securing Your VBA Script from Pry ing Eyes. . . 47
Con clu sion . . . 48
Ex er cises to Try . . . 48
Chapter 5: Let’s Get Scripting. . . 49
In tro duc tion . . . 49
Vo cab u lary. . . 49
Variables and Getting In put . . . 50
Vari able Dec la ra tions. . . 51
Vari able Types . . . 53
Force the Student to Type Something . . . 55
What Else? A Personal Re sponse and a Short-Answer Question . . . 57
Running Your Scripts . . . 59
Call ing a Pro ce dure from An other Pro ce dure . . . 59
Con clu sion . . . 61
Ex er cises to Try . . . 61
Chapter 6: A Scripting Bag of Tricks . . . 63
In tro duc tion . . . 63
Vo cab u lary. . . 63
Com ments . . . 64
Navigation: Mov ing from Slide to Slide . . . 64
The Secrets of theMsgBox . . . 66
Hiding and Showing PowerPoint Objects. . . 68
Let’s Get Started: Initializing Your Pre sentation . . . 69
Ref er enc ing Ob jects by Num ber . . . 71
Ref er enc ing Ob jects by Name . . . 73
This Slide or Another Slide. . . 74
Adding PowerPoint Objects. . . 75
Putting the Student’s In put into a Box. . . 77
Ma nip u lat ing Text in Ob jects . . . 79
Ma nip u lat ing Text: The Mys tery Ex am ple . . . 85
Con clu sion . . . 89
Chapter 7: Quizzes and Tests. . . 91
In tro duc tion . . . 91
Vo cab u lary. . . 91
Sim ple Mul ti ple-Choice Tests . . . 92
Keep ing Score . . . 93
Try Again: An swer Un til It’s Right . . . 95
Try Again and Again: Answer Again Af ter It’s Right . . . 96
Short-Answer Quiz Questions . . . 99
Do Spelling and Spacing Count? . . . 100
How Did You Do: Re porting Results to the Teacher. . . 102
Learn First, Ask Questions Later: The Tu torial and Quiz . . . 109
Con clu sion . . . 115
Ex er cises to Try . . . 116
Chapter 8: More Tricks for Your Scripting Bag . . . 117
In tro duc tion . . . 117
Vo cab u lary. . . 117
Con di tion als: TheIf State ment . . . 118
Loop ing . . . 120
Pa ram e ters . . . 124
Timed Func tions . . . 125
Saving and Quitting . . . 127
What’s in a Name? Finding and Changing Ob ject and Slide Names . . . 130
Ar rays . . . 134
I Don’t Know How Many Questions:ReDim to the Res cue . . . 136
Which Button Did I Press? . . . 138
Ran dom Num bers . . . 143
Choose Questions Randomly from a Pool . . . 146
Con clu sion . . . 150
Ex er cises to Try . . . 151
Chap ter 9: De bug ging Tips. . . 153
In tro duc tion . . . 153
Vo cab u lary. . . 153
My Scripts Al ways Work the First Time. . . 153
Testing for Bugs. . . 154
No News Is Bad News . . . 155
The Er ror in Red . . . 155
I’m Not Seeing Red, But I’m Seeing Red . . . 158
Com ment ing Out . . . 160
Com pil ing Your Code . . . 161
Debugger . . . 162
An Ounce of Prevention . . . 162
Chapter 9: Debugging Tips (cont.)
VBA Help . . . 168
Com mon Bugs . . . 168
Final Word on De bugging and Error Prevention. . . 170
Con clu sion . . . 170
Ex er cises to Try . . . 171
Chapter 10: Templates . . . 173
In tro duc tion . . . 173
Vo cab u lary. . . 173
What Are Tem plates? . . . 173
Saving Your Template . . . 175
The Pick-A-Partner Tem plate Project . . . 176
Con clu sion . . . 183
Ex er cises to Try . . . 183
Ep i logue . . . 185
Ref er ences . . . 187
List of Fig ures
1.1 Lin ear Or ga ni za tion . . . 5
1.2 Menu Or ga ni za tion . . . 6
2.1 No Check Next to “Allow fast saves” . . . 14
2.2 Choos ing In sert Picture From File from the Menu . . . 16
2.3 In sert Clip Art in PowerPoint 2002 . . . 17
2.4 Right Click the Mouse . . . 18
2.5 Flyout Menu to Copy a Pic ture from a Browser . . . 19
2.6 Re cord Sound Dialog Box . . . 19
2.7 In sert Hyperlink . . . 22
2.8 In sert Hyperlink Dialog in PowerPoint 2001 . . . 23
2.9 In sert Hyperlink Dialog in PowerPoint 2002 . . . 23
2.10 The Twelve Types of But tons . . . 25
2.11 Ac tion Settings for a Button . . . 26
2.12 But ton with Ac tion Settings for the Text. . . 28
2.13 Se lect ing Ki osk Mode . . . 30
2.14 Sav ing a File As a PowerPoint Show . . . 31
2.15 Slides for Tutorial with Menu . . . 32
3.1 Do You Want to Enable Macros? . . . 38
3.2 Se curity Tab Un der Options . . . 38
3.3 Macro Se cu rity Di a log Box . . . 39
3.4 Ex ample Chart of the Parts of a PowerPoint Presentation. . . 40
4.1 In sert Module1. . . 42
4.2 MsgBox Says “Hello” . . . 42
4.3 Pro ject Win dow with Module1 . . . 43
4.5 Ac tion Set tings Di a log Box . . . 45
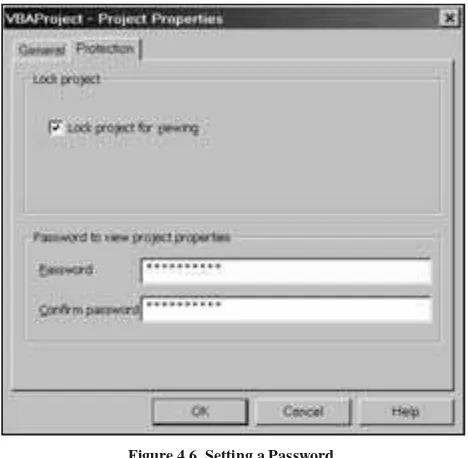
4.6 Set ting a Password . . . 47
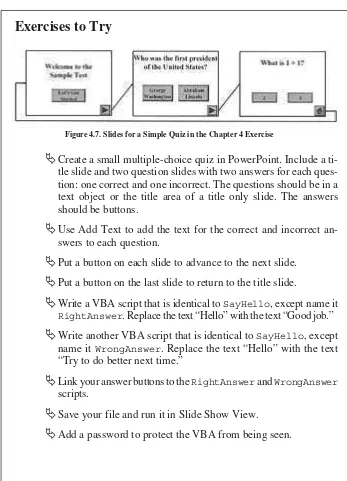
4.7 Slides for a Sim ple Quiz in the Chapter 4 Exercise. . . 48
5.1 A Box CalleduserName. . . 52
5.2 Variable Type Pop-Up Box . . . 53
5.3 Simple Quiz . . . 55
5.4 Ask For and Require a Name. . . 56
5.5 YourNameWithPraise Calls YourName and DoingWell. . . 60
6.1 MsgBox with Yes and No But tons . . . 67
6.2 Simple Quiz Showing Stars for Cor rect An swers . . . 70
6.3 Cus tom Animation to Find Shape Num bers . . . 71
6.4 Find ing the Object Number in PowerPoint 2002. . . 72
6.5 Shapes on a Slide, with Names in Quotations Below . . . 73
6.6 Signs of Spring Discussion Slide—Before and Af ter . . . 82
6.7 The Mys tery Pre sen ta tion Slides . . . 86
6.8 The Mystery Presentation VBA Code . . . 87
7.1 Mul tiple-Choice Test with Scorekeeping . . . 93
7.2 Question Slide with Next and Previous But tons . . . 97
7.3 Short-Answer Question Slide . . . 100
7.4 Ex ample of Printable Slide . . . 107
7.5 Ex ample Tu torial and Quiz PowerPoint Slides . . . 110
7.6 VBA Code for Menus with Feedback in Tu torial and Quiz . . . 111
7.7 VBA Code to Hide and Show the Quiz Button . . . 114
8.1 Run ning a Macro in Edit View . . . 132
8.2 VBA Code for Se lecting Five Questions from a Pool of Questions . . 147
9.1 Typ i cal Com pile Er ror . . . 156
9.2 Typ i cal Com pile Er ror . . . 157
9.4 VBA Ed i tor Sug gests Pa ram e ters for theGotoSlide Method . . . 166
9.5 VBA Ed i tor Sug gests Pa ram e ters for theAddShape Method . . . 167
10.1 Template for An imal Pro ject . . . 174
10.2 Choos ing Design Template As the File Type . . . 176
10.3 Slides for Pick-A-Partner Template. . . 177
10.4 Pick-A-Partner VBA Code . . . 179
10.5 Ex ample of Slide Created When Someone Has Cho sen to Work with You . . . 181
Pref ace
Most ed u ca tors have cre ated sim ple pre sen ta tions with PowerPoint®. PowerPoint is a fine tool for add ing me dia to a lec ture, but it falls flat when cre at-ing in teractive lessons for stu dents to use while sit tat-ing in front of the com puter. That is, it falls flat un less you use the built-in script ing fea tures of PowerPoint. Starting with PowerPoint version 97, every copy of PowerPoint comes with Visual Ba sic® for Applications (VBA). VBA can be used to add to the functional-ity of Microsoft Of fice® ap pli ca tions, in clud ing Microsoft PowerPoint. With the advent of PowerPoint 97, teachers can put lim ited interactivity into their pre-sentations using action settings, hyperlinks, and but tons. These features al low you to
• add but tons to control navigation (start your slide show with a menu, for ex ample, rather than requiring lin ear nav igation, from slide to slide to slide);
• jump to other PowerPoint pre sentations, other files, or Web pages; and
• cre ate ru di men tary mul ti ple-choice tests (click ing on a but ton with the correct an swer takes the student to a slide that says “cor rect,” for example).
While this interactivity is use ful, it is also very lim ited. VBA ex tends this to nearly un limited dimensions. With VBA, you can change the con tent and ap -pearance of slides based on student in put, ask for and process typed in put, add additional slides, hide and show graphics, and much more.
“Wait!” I hear you cry. VBA is a so phisticated pro gramming language. Can teachers be come programmers? Cer tainly, many teachers can become program-mers, but the goal is not to createpro gram mers but ratherscripters. A pro gram-mer learns all the sub tleties of a com puter lan guage in min ute de tail. A scripter might learn some of the details of the lan guage but, more im portant, learns a few easily mod ifiable scripts that can per form im portant tasks. Script ing is well within the reach of many teachers, and taking ad vantage of the power of authoring sys tems like PowerPoint is an important part of the In ternational So ci-ety for Technology in Ed ucation (2001) standards for programs in technology facilitation:
• Stan dard III.C.1—Use meth ods and fa cil i tate strat e gies for teach ing prob lem solv ing prin ci ples and skills us ing tech nol ogy resources.
• Standard V.C.7—Use examples of emerging pro gramming, authoring or prob lem solv ing en vironments that sup port personal and pro fes-sional de vel op ment
Scripting might not be a use ful technique when used with a stand-alone programming language, but the real power of us ing VBA with PowerPoint is not merely that VBA is an ac cessible script ing lan guage but that it is built into PowerPoint. One of my stu dents created a presentation about Ha waii. It included pictures, vid eos, re corded voices, and links to Web sites. All of this used tradi-tional PowerPoint technology (no scripting re quired). On top of that, it added an interactive menu and a quiz with feedback about how well the user did on the quiz. Building all of this from scratch with a pro gramming or authoring tool could be an overwhelming task, but 95 percent of the presentation was done with traditional PowerPoint tools (things most teachers al ready know how to do or can learn within a cou ple of hours). When a few scripts are added on top of the traditional PowerPoint tools, the re sults are rich not only with media but also with interactivity.
Remember, the more you know, the more you can do. With a few scripts, you can add short-answer questions (with feedback about right and wrong an-swers) and keep score. Add a few more scripts and you can have a menu that keeps track of which sections of your pre sentation have been visited and only shows the but ton to take the quiz when all sections have been vis ited. Add a few more scripts and you can have the user type things that change the slides in the pre sen ta tion. The pos si bil i ties are endless.
The more you know, the more you can do. And you can always add more traditional PowerPoint without know ing any more VBA.
I have been using this ma terial (be fore writing a book about it) with my stu-dents, who are mostly teachers, en rolled in a graduate course in multimedia de-sign for the classroom, for about four years. They have created pow erful pro jects for their students (like the Hawaii pro ject mentioned earlier). In addition, I have been speaking about this at con ferences and workshops. The overwhelming re -action I get is, “That’s great! I didn’t know you could do that.”
While this book is not accessible for com puter nov ices, teachers who are beyond the level of computer beginner can use this technology to create pow er-ful material for their students, material that goes be yond a simple page-turner.
For the pro fessional mul timedia designer, PowerPoint might not be the right choice. How ever, ex pensive and complicated tools are not common in schools. Using PowerPoint as a framework, teachers are able to add as much or as lit tle interactivity as their skills allow and their needs re quire. Thus, PowerPoint is an ap propriate mul timedia tool for teachers and a powerful ad di-tion to a multimedia design class.
This book can be used as a stand-alone book in a mul timedia design class for ed ucators or as a com panion for books like Ivers and Barron (2002) or Agnew, Kellerman, and Meyer (1996), which fo cus on multimedia design and using mul timedia pro jects in classrooms but do not deal with a specific technology for implementing the projects. It also stands by it self without a class. Any -one with ba sic PowerPoint skills can sit down with this book and be gin to create pow er ful ed u ca tional ma te rial for them selves, their col leagues, their students, or their own children.
Chapter 1 begins the book with some important principles of in structional design, including how to design your own pro jects and create as signments for your stu dents to de sign their pro jects. If this book is used in conjunction with a book about design, the first chapter will pro vide an over view of what you will find in the de sign books, but if this book is used by itself, this chap ter is very im -portant. Jump ing in and creating things is fine when you are play ing around, but serious pro jects require some planning and design work, and Chapter 1 will give you a foundation in that.
Chap ter 2 be gins to ex plore some of the tra di tional in ter ac tive mul ti me dia features of PowerPoint. Add ing pic tures, sounds, but tons, and hyperlinks is not difficult, but many PowerPoint users have never used those features before.
Chapter 3 introduces VBA. You’ll un derstand how VBA fits into the world of ob ject-oriented pro gramming and how that af fects you as a scripter. As a scripter, you won’t have to un derstand all of VBA and ob ject-oriented pro gramming, but un derstanding ob jects and how to manipulate them will help you un -derstand your scripts.
Chapter 4 begins the heart of the book as you start to learn about scripting with VBA. You’ll learn how VBA is connected to PowerPoint and how to write and run your first script. You’ll also learn about keeping your scripts pri vate so your stu dents can’t look for the an swers in your scripts.
Chapters 5 and 6 build your bag of scripting tricks. As a scripter, you will be in terested in taking scripts di rectly from these chapters and ap plying them to your own pur poses.
While each chap ter contains ex amples that you can use right away, Chapter 7 fo cuses on ex amples that you will be able to use to create quiz zes and tests.
Once you have completed Chap ter 7, you will have a large bag of tricks that you can use by copy ing scripts di rectly from the book and pos sibly creating some on your own. Chapter 8 describes some more tricks that you can use, par -ticularly if you are ready to modify some of the ideas in the book for your own purposes. It ends with a powerful ex ample that I use with my daugh ter as she is learning to read.
Once you have mastered a large bag of tricks, you might need some help cor -recting your mistakes. Whenever you write scripts, even if you just copy them from the book, you are likely to make a few mistakes. Fix ing mistakes is called debugging, and you will learn some of the secrets of debugging in Chapter 9.
By the time you fin ish Chapter 9, you will be ex cited to create things your-self, but you might want to share your knowledge with your colleagues and your students. Some of them will share your enthusiasm and bor row your copy of this book (or better yet, buy their own copy) and dive right into powerful PowerPoint. Others won’t be ready for the technical challenge. Chap ter 10 de-scribes how you can use templates, so your col leagues and stu dents can take full advantage of the power of VBA scripting without know ing any of it. You can use what you learn in Chapter 10 to pro vide a template for your colleagues or students with the scripting already done for them (by you).
When you have completed the book, you might not be an ex pert at us ing VBA to cre ate pow erful in teractive mul timedia pro jects, but you will have a large bag of tricks that can help you do more with technology to make you a better educator.
Writing this book has been a long pro cess. I began my journey when I at -tended a presentation at a con ference in which the speaker was talking about all the exciting ed ucational things that can be done with PowerPoint. I thought that he was talking about the things this book discusses, but I was wrong. I started ex -ploring, and I found that no one was talking about these things, at least not for educators. As I looked for books to help me, I found many (look in the References section at the end of the book), but none was geared to ed ucators or to us -ing PowerPoint interactively. I wanted to share this with my students, so I started creating my own hand outs. As the hand outs grew, I began speaking about this at conferences and giving work shops. Everyone was amazed at what PowerPoint could do. By the time the hand outs reached sev enty pages, I knew it was time to move from handouts to a book.
I would like to thank all the people who helped me along the way, but they are too nu merous to mention, so I will mention only a few. I would like to thank all my stu dents over the years in Mul timedia Design in the Classroom, particu-larly the first group, who had to en dure the course with a few pages of handouts that were be ing written dur ing the course, in most cases the night be fore each class. I also would like to thank Di ana Sucich, one of my stu dents who reviewed the manuscript as it was morphing from a seventy-page packet of handouts into a book. Her com ments were in valuable. I also would like to thank Luis Bango, a former stu dent who suf fered through Mul timedia Design in the Classroom while the handouts were not in the best shape and reviewed the fi nal manuscript. I also would like to thank the PowerPoint MVPs in the Microsoft PowerPoint newsgroup. Several PowerPoint experts give their time in that newsgroup to an-swer questions from beginners and ex perts alike with beginning PowerPoint questions and complex scripting questions.
help my chil dren and all children by making the computer a more ef fective tool for education.
You are about to embark on a great jour ney. At times you will be elated and at times frus trated. If you per severe, you will have the power to make the computer do what you want it to, so it can be a tool for you and your stu dents’ learn -ing. The com puter shouldn’t be everything in education, but when it is used, it should be used powerfully and effectively.
1
Mul ti me dia De sign
In tro duc tion
Welcome to the world of powerful PowerPoint. This book will help you use PowerPoint in ways you never thought were pos sible, with the ul timate goal of creating better learning en vironments for your stu dents. What ever you do as an educator requires some plan ning, whether it takes the form of de tailed lesson plans or a few notes jot ted on the back of a nap kin. When creating complex learn ing en vi ron ments, plan ning is very im por tant. This chap ter in tro duces some of the basics of planning and design to help you create better learning en vironments. You will be in troduced to the benefits of multimedia, the de sign pro -cess, benefits of hav ing your students de sign multimedia, and metaphors and organizations for multimedia projects.
Vo cab u lary
• De cide • Met a phor
• De sign • Or ga ni za tion
• De velop • Story board
• Eval u ate • Summative eval u a tion
What Is Mul ti me dia?
Mul ti me dia is a term that has been around for a long time. Be fore comput-ers, it referred to a com bination of slides (from a slide pro jector) and sounds (usually music from a tape player). It has been around for so long be cause peo ple have recognized that we can be en gaged through multiple senses. Some peo ple are pri mar ily vi sual learn ers, au di tory learn ers, or kin es thetic learn ers, but most of us are a com bination of all three. Us ing dif ferent senses in creases at tention, motivation, and, in many cases, learning. “The power of multimedia and hypermedia presentation soft ware co mes with changes in the ways teachers and learners have access to and dem onstrate their un derstanding of knowledge, mov -ing from a sin gle dom i nant pre sen ta tion and dem on stra tion style (ver bal/lin guis-tic, lin ear/se quen tial) to an in te grated, multisensory learn ing and dem on stra tion ‘microworld’ (Papert, 1992), where learners have more freedom of choice in the mode of learning and the or der in which learning takes place” (Male, 2003, p. 6). As this quote sug gests, multimedia involves multiple senses and a degree of learner control and choice.
Robinette suggests, “Multimedia is about combining sights, sounds, and in ter ac tive el e ments to cre ate an ex pe ri ence un like that which co mes from simply reading text or idly viewing a video” (1995, p. 10). Goldberg says, “Mul ti -media, as I use it to de fine the cool new medium that I’ve been go ing on about, is the com bination of au dio/visual me dia el ements with interactivity. . . . A typ ical mul ti me dia ti tle might in clude any com bi na tion of text, pic tures, com puter graphics, an i ma tion, au dio, and video” (1996, p. 14).
Multimedia is about in cluding a va riety of me dia with interactivity. Typ ical pre sen ta tions (us ing PowerPoint or other pre sen ta tion tools) em pha size the me-dia and not the interactivity. When enhancing a lecture to present to an au dience, interactivity is not al ways im portant. How ever, when creating pro jects that your students can control, picking and choosing where to go within the pro ject, well-designed interactivity is very important.
In ter ac tive mul ti me dia helps stu dents learn by in creas ing mo ti va tion, by giving them con trol over their learning, and by reaching them through different senses. As you design multimedia presentations for your students, you de cide what me dia are most appropriate. Sometimes a picture is worth a thou sand words; sometimes a few words are worth a thousand pictures; and sometimes, in the case of a struggling reader, for example, spoken words are more important than everything else. A few bells and whistles, used sparingly and appropriately, can increase mo tivation and hold your stu dents’ at tention, but a carefully de-signed pro ject with ap pro pri ate me dia el e ments can be a pow er ful ex pe ri ence for the learner. The key is to design your projects well.
The De sign Process
While play ing around on the computer is useful to help you un derstand the technology and brainstorm ideas for your pro ject, the best pro jects come from careful planning. When you first start a project, you might think that you are sav -ing time by jump-ing right in and creat-ing the project, but you are not. Agnew, Kellerman, and Meyer (1996) outline a twelve-step pro cess for designing and de vel op ing a multimedia project:
1. Understand the scope of the pro ject/assignment.
2. Brainstorm and do research.
3. Select pieces of in formation to in clude in the project.
4. Dis cuss sev eral over all or ga ni za tions.
5. Se lect an or ga ni za tion.
6. De cide on a met a phor for vi su al iz ing the body of in for ma tion.
7. Decide on one or more media to represent each piece of in formation.
8. Prepare scripts and storyboards as required.
9. Fill in the or ganization with me dia.
10. Provide links among pieces of in formation.
11. Test the result with typ ical members of the project’s intended au dience.
12. Revise the pro ject.
Ivers and Barron (2002) pro pose the DDD-E model: decide, de sign, de-velop, evaluate. Other in structional de sign models are more com plex, but these two models cap ture the important aspects of in structional design.
Don’t worry about fol lowing a specific step-by-step pro cess. Most of the steps overlap, and some steps, such as evaluation, are continuous and take place at every stage of the process. That doesn’t mean you should jump right to developing your pro ject be fore deciding and designing—there is a gen eral flow from step to step—but cre at ing a pro ject in volves con tin u ous eval u a tion and may in volve re-thinking and redesigning parts of the pro ject as the pro ject be gins to take shape.
Be fore be gin ning, you mustde cide what you want to do and what you want your stu dents to get out of the project. This in cludes un derstanding the scope of the pro ject and brainstorming ideas for the pro ject. Starting with a clear idea of what you want the pro ject to cover is very useful. If you have certain ob jectives (from your cur riculum or not), those ob jectives will help you determine what your pro ject should cover. Try to limit the scope of the project, keeping in mind the limits of your stu dents’ at tention span. Cre ate a pro ject that is small or build in features that allow students to quit in the middle and come back to explore other parts of the project.
Don’t be afraid to brainstorm ideas. That means that you can come up with ideas for what you want to in clude that will be re jected later. This is part of the power of plan ning. If you create half your pro ject first, you have ei ther locked yourself into something that might not be what you want, or you have wasted a great deal of time creating something that you will throw away. By playing with ideas in the early stages of the design pro cess, you can narrow down what you want to do without throwing away large amounts of work.
While you arede cid ing what the pro ject should include, re search your sub-ject. Be sure you un derstand the subject so you can create something that will help oth ers learn it. As you research, you shouldde cidewhat in for ma tion you want to in clude and be gin to collect the media you will use to represent that information.
As you de cide, keep in mind that your decisions are not set in stone. You should complete the de cide phase hav ing a good idea of what you want to do, but you should un derstand that the de tails can and will change as you move forward with your project.
Once you have an idea about what your project will en tail, you should be-gin to de sign it. You will de sign the or ganization and metaphor for the pro ject (more about this in the next sections), you will create a storyboard for the pro ject to help you un derstand the flow and interaction of the pro ject, and you will de-sign the in dividual slides, fig uring out what con tent and me dia go on each slide. Now your pro ject is taking shape, and you should have a fairly clear picture of what the fi nal pro ject will look like. But again, this is not set in stone. The de tails can and will change, but they should change within the over all framework you havede signed.
Next, it is time to de velop your pro ject. This in volves fill ing in the pieces: creating or acquiring any media elements you need, creating your slides, placing your media elements and buttons on your slides, and linking it all to gether. This is much easier when you know what you want to do, hav ingde cided on the pro -ject and havingde signed the pro ject first. The hard est part will be writ ing your scripts to make the pro ject do what you want it to do, and you will learn how to do that beginning in Chapter 3.
The final phase is not really the fi nal phase:eval u ate.Eval u a tion is a con-tin u ous and on go ing pro cess. You will con duct for ma tiveeval u a tion, in which you check your work to make sure that everything seems to be do ing what you want, and you enlist oth ers to check your work as well. This can happen at many different points in the pro cess, and it can be done by many dif ferent people, in-cluding: you, your colleagues, your stu dents, and other members of the intended audience for the pro ject. This for mative eval u a tion will pro vide you with feedback to improve the project.
or not you want to use the pro ject again, and it can pro vide feedback for things you might want to change about the project for next time.
Pro ject Or ga ni za tion
As part of the de sign pro cess, you must think about how your pro ject will be or ganized. Chap ter 2 describes how to create hyperlinks in PowerPoint, and Chapter 6 describes how to use VBA to move from any slide to any other. How -ever, just be cause you can make links from any slide to any other doesn’t mean that you want to. A pro ject with a clear or ganization will help your stu dents find their way around the project.
There are sev eral ways to organize a project. The sim plest organization is linear, in which the user goes from one slide to the next to the next to the next (see Fig ure 1.1). This works very well for projects in which knowledge is be ing built from prerequisite knowl edge or in which spe cific steps are followed in a specific order.
Fig ure 1.1. Lin ear Or ga ni za tion
However, many pro jects don’t re quire a lin ear or ganization and would ben -efit from some other or ganization. Fortunately, hypermedia allows us to link any slide to any slide that we want. We could fol low a menu organization (see Figure 1.2, page 6). This or ganization allows the user to study the topics in whatever or -der he or she wants and even allows the user to skip topics.
Some topics lend them selves better to a hi erarchical menu struc ture in which each subtopic has its own menu. Other pro jects might do better with a completely hyperlinked or ganization in which any slide can lead to any other slide.
The or ganization you choose should match the ob jectives of the project. If it is not ap propriate for students to skip sections, don’t al low it. You pro vide links where you want your stu dents to go (and in Chap ter 2, you’ll learn about Kiosk mode so you can make sure they only go where you want).
There are many po tential structural or ganizations, but it is help ful to pick something that will al low the user to nav igate easily through your in formation. If the structure is not easy to nav igate, when a user goes through your presentation, it is easy to get lost in hyperspace.
Met a phors
A metaphor is the way the user will think about the pro ject. For example, a geography pro ject might choose a map metaphor where users click on certain lo-cations on a map to visit the lo cation. You might choose a book metaphor, start-ing with a cover and a ta ble of contents and referrstart-ing to each slide as a page (complete with page num bers and graphics that make the slides look like pages). Metaphors can be complex or simple, with more complex metaphors pro viding somewhat of an illusion that the user is ac tually in the metaphor. For example, a travel metaphor might in clude an imations of planes taking off and land ing to give the il lusion that the user is actually going someplace.
Metaphors can be particularly help ful when you are not creating a pro ject but are as signing your students to create a pro ject. This helps stu dents to “un-leash their cre ativ ity by find ing new met a phors for in for ma tion. Met a phors stim u late vi su al iza tions” (Agnew, Kellerman, and Meyer, 1996, p. 121). Meta-phors are a pow erful tool to help users nav igate a pro ject and to help de signers think creatively about a project.
Storyboards and Flowcharts
Once you have chosen an or ganization and a metaphor for your pro ject, you need to fig ure out how the entire pro ject will work. The more complex the pro -ject, the more this step is needed. At a min imum, you should sketch in ad vance your en tire pro ject, not necessarily with all the details, but with enough details so you can see how the pro ject holds together. In dicate how each slide will be linked to any other slides and the kinds of (if not the exact) in formation that will be on each slide.
Although you can do this with a computer drawing pro gram, a small screen size is lim iting. You might want to map out your pro ject on a large poster board or a gi ant piece of newsprint. Index cards can represent each slide in your pro -ject. You can use for mal flowcharting sym bols (see, for ex ample, Ivers and Barron, 2002, pp. 64–65), or you can use a less formal sys tem, but you must un -derstand and map out the project.
If you are not creating the project your self but assigning it to your stu dents, this step becomes even more im portant. Your students are un likely to do any planning un less you specifically re quire it and require them to hand in their de -signs. When they don’t plan, the qual ity of their work will suf fer, and the time it takes for them to com plete their work will increase.
This will help you ad just your de sign as you need to. It is much easier to move a card or add a card or de lete a card than it is to take a half-finished project, includ-ing VBA scripts, and move ev erythinclud-ing around, re writinclud-ing the scripts to match the redesign.
This does not mean that your design is fixed once you start developing your project. But with a good idea of how the pro ject works and most of the de tails in place, you will find it eas ier to cre ate the project and make changes as needed.
De sign ing As sign ments for Your Stu dents
As pow erful as it is to cre ate mul timedia pro jects for your stu dents, it is more pow erful to have them create their own multimedia pro jects. While the project you create can increase mo tivation and tap into different learning styles, having stu dents create their own pro jects is an out standing ve hicle for creating a stu dent-cen tered and constructivist learn ing en vi ron ment, for tak ing a multidisciplinary ap proach to ed ucation, and for helping students understand information and media.
Projects you assign can be simple or complex, involving a few dif ferent types of media or several, us ing a simple design structure that you assign or a complex structure and metaphor that your stu dents choose. As you continue through this book, you will learn ad vanced techniques for making PowerPoint do what you want it to do. You might share these techniques with your stu dents, or you might let them cre ate less com plex projects. Another al ternative is to cre ate templates for your stu dents in which you create the basic structure of the pro ject, using simple or advanced PowerPoint techniques, and have your students fill in the template with con tent and me dia. Templates are discussed in Chapter 10.
Student pro jects need to follow a similar design pro cess to any other multi-media pro jects. However, as a teacher, you must de cide (1) how much you want to pro vide for your stu dents and (2) how much help you want to give your stu -dents at each step.
First, you must create an assignment in a way that stu dents can un derstand. Agnew, Kellerman, and Meyer (1996, pp. 120–121) out line four keys to help stu dents cre ate a well-or ga nized mul ti me dia project:
1. “[A]rticulate a well-thought-out assignment.”
2. “[D]emonstrate excellent examples of projects that others have cre -ated.”
3. “[E]ncourage stu dents to un leash their creativity by find ing new meta-phors for in for ma tion.”
4. Help “stu dents ex e cute an ef fec tive pro cess.”
help students un derstand what they are supposed to do and help them meet and exceed your ex pectations. Be sure to match the pro ject you assign to your cur ric-ular goals and the technical skills of your students. If you plan to have stu dents create sev eral multimedia projects, you can make the first project sim ple to help them un derstand the technology. As their technology skills grow, the projects can be more complex.
Many students need concrete examples. The more multimedia you do (for yourself or your students), the more ex amples you will have to show students.
You also want to en courage creative think ing, in cluding brainstorming ideas for metaphors. A metaphor helps a user nav igate through a project by giv -ing the user someth-ing from the real world to relate to what the controls (such as buttons and hy pertext links) do. Met aphors can be closely re lated to the project or can be an un related nav igation and visualization tools. You can pro vide your students with a metaphor (this might be ap propriate for early pro jects), you can brainstorm dif ferent metaphors for dif ferent pro jects as a class, you can brain-storm with groups about metaphors for a specific pro ject, or you can have groups brainstorm on their own.
Finally, you will want to help your stu dents with the de sign pro cess. Stu -dents might need help with all the de sign steps. You can give your stu-dents help with all of the fol lowing:
• The Idea—A good assignment will have a clear set of ob jectives, but it might allow students a great deal of latitude in picking a topic. You might need to work with students to help them generate ideas for their topic.
• The Re search—Since one pur pose of mul timedia pro jects is to en -hance learning in curricular areas, you will have to de cide how much of the research you will pro vide for the students. You could pro vide all the in formation that will be used in the pro ject. You could pro -vide specific resources for stu dents. You could help students find materials (in the li brary or on the Internet, for example). You could brainstorm ideas with stu dents about where they might find the information they need.
• Se lect ing In for ma tion—Many students have trouble finding enough in formation, and many have trou ble selecting the informa-tion to in clude. You might need to help students nar row down the appropriate in formation to in clude; they might not be able to in clude everything they find.
• The Or ga ni za tion and the Met a phor—You might pick an or gani-zation and a metaphor for your stu dents or help them find an appro-pri ate or ga ni za tion and metaphor.
• The Me dia—Students might need help se lecting and preparing the media representations of their in formation. You might help them de -cide what me dium to use for each kind of in formation, and you might help them with the technical pro cess of creating or find ing the media representations. In the extreme case, you might give them prepared me dia to use in their projects.
• Tem plates—You might pro vide a template for your students. This can provide a metaphor, or ganization, and/or types of media.
In any of the above cases, you need to de cide what is appropriate for your students. Sometimes the best pol icy is to leave the stu dents alone. At other times, you will need to coach them through out the entire pro ject. At a min imum, your students will need to check in with you on a regular basis, show ing you the de-sign at var ious phases. It is of ten a good idea to set deadlines for various parts of the pro ject, requiring stu dents to turn in something to you at each of the twelve steps of the de sign pro cess (see “The Design Process” above) or at one or more points along the way.
Mul ti me dia pro jects are of ten an ex cel lent ve hi cle for group pro jects. But groups can be difficult. You may de cide whether you want to group stu dents by ability levels, in terests, skills, or their own choice. Once you have groups, gener-ally of be tween two and five stu dents, you need to help students work out the roles they will play in the group. Some pro jects have natural roles that students can play, di viding the project ei ther by subject matter or technical spe cialty (gath er ing in for ma tion, video pro duc tion, VBA script ing, etc.). Learn ing to work with a group can be an important ob jective of the pro ject, but group dy -namics can be dif ficult, and you will have to mon itor how well members of the groups are working together.
Be careful about se lecting the requirements for your pro ject. Make sure that they are suitable for your goals. Remember that part of the idea of learning mul -timedia is to see that great artwork or sounds do not necessarily mean great in for-mation. Make sure that, if your goal is to have worth while in formation, students are aware that that is important.
Finally, try to save time for reflection. A great deal of the learning (for you and your students) can come from look ing back at the pro jects and seeing what went right and what went wrong and what was learned.
Con clu sion
out Ivers and Barron (2002) or Agnew, Kellerman, and Meyer (1996), which provide more details about the design pro cess and using multimedia with students.
Now that you have a ba sic un derstanding of the de sign pro cess, you are ready to ap ply it to PowerPoint. The next chapter introduces some of the interactive and mul timedia features of PowerPoint and pre pares you to conquer the ad -vanced scripting features of PowerPoint in later chapters.
2
Tra di tional Mul ti me dia
Features of PowerPoint
In tro duc tion
Some peo ple, even long-time PowerPoint users, are not aware of many of the multimedia and in teractive features of PowerPoint. Most of this book de-scribes how you can use scripting features of PowerPoint to make pre sentations interactive. This chapter briefly de scribes some of the mul timedia and interac-tive features that do not re quire scripting. You will learn about media elements, such as pictures and sounds, and you will learn about in teractive elements such as hyperlinks and action but tons. In ad dition, you will learn about the important differences in Slide Show View and Edit View when ed iting your slides. Fi nally, you will learn about Kiosk mode and saving your pro ject as a PowerPoint Show to con trol how your students navigate through your presentation.
Vo cab u lary
• Ac tion but tons • Hyperlinks
• Clip art • Hy per text
• Copy right • Ki osk mode
• Edit View • Linked
• Em bed ded • PowerPoint Show (.pps)
Before You Be gin
This book assumes that you know the ba sics of PowerPoint. If you don’t, you should spend a couple of hours playing with PowerPoint and/or buy an in-troductory book about PowerPoint. Try to get one that is specific to the ver sion of PowerPoint that you own. While most features are iden tical from ver sion to version, there are a few subtle differences in each version.
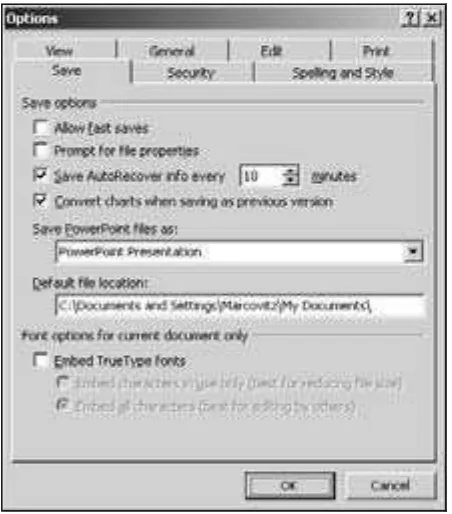
Before you begin, you should check a few of PowerPoint’s set tings. Start PowerPoint, and choose “Op tions” from the Tools menu if you are us ing a Win-dows computer, choose “Pref er ences” from the Edit menu if you are us ing a Macintosh with OS 9 or earlier, and choose “Pref er ences” from the PowerPoint menu if you are us ing a Macintosh with OS X. Regardless of which version you are us ing, you will have sev eral tabs at the top of the di alog box. These tabs in-clude View, General, Edit, and Save. The re maining tabs will vary by which version you have.
Click on the Save tab. The first item is a check box for “Allow fast saves” (see Fig ure 2.1). If this box is checked, click on it to remove the check mark. If you al low fast saves, PowerPoint will spend less time sav ing your work, but it will cre ate larger files and files that are more prone to problems. While you are unlikely to ever find that PowerPoint has corrupted your pro ject, you are less likely to have prob lems if you uncheck “Allow fast saves.”
Figure 2.1. No Check Next to “Allow fast saves”
Next, click on the Edit tab. Find the “Undo” section. Change the setting for “Max i mum num ber of undos” to 10. In many ap plications, when you make a mistake, if you don’t do any thing else, you can fix it by choosing “Undo” from the Edit menu. In PowerPoint, you can fix not only the last mistake but several mistakes be fore that. This setting tells PowerPoint how many things it has to re -member so you can undo them. In the ory, you might want to have as many as possible, but sev eral PowerPoint experts have no ticed that the higher this num -ber is the more likely you are to have prob lems with PowerPoint. Set ting it to 10 gives you enough ability to correct your mistakes while minimizing the likeli-hood that you will have a problem.
Another setting you might want to change can be found un der the Gen eral tab. You might want to change the setting for “Link sounds with file size greater than.” This set ting is dis cussed later in this chap ter.
Once you have changed the settings to not al low fast saves and to limit the number of undos, click OK to save the settings.
Next, choose “Cus tom ize” from the Tools menu. Click on the Toolbars tab and make sure there is a check next to “Draw ing.” The “Draw ing” toolbar will be very use ful for drawing your own shapes and mod ifying the appearance of shapes that are drawn for you.
Finally, be fore you start work ing on a PowerPoint pro ject, create a folder on your disk for your pro ject and save your pre sentation to that folder. This will be important when you start including hyperlinks and mul timedia ob jects in your pre sentation. Most el ements of your presentation will be embedded in your presentation. That is, they will be part of the PowerPoint file. Other el ements will be stored in other files, and your presentation will link to those other files. If you save your pre sentation first and you save any linked files to the same place you save your pre sentation (that is, the same folder on the same disk), your links will con tinue to work when you move the presentation (along with all the linked files) to another place, such as another folder, an other disk, or another computer. If you don’t save your files first, the links are likely to stop working.
In sert ing Pic tures
You can in sert pic tures into a PowerPoint presentation in several dif ferent ways, in cluding by in serting from the clip art li brary, by in serting from an ex ist-ing file, and by copyist-ing and pastist-ing from an other place, in cludist-ing the World Wide Web. In ad dition, if you are ar tistically in clined, you can use the drawing tools to draw your own pictures. Gen erally pictures are em bedded in your PowerPoint presentation. That is, once you insert them, they become part of the presentation, regardless of what happens to the original picture.
presentation and PowerPoint gives you an error or asks you how to con vert it, you will need to find a program (such as GraphicConverter™ or Adobe Photoshop™) that can read that file type and cre ate files of one of the types that PowerPoint can read.
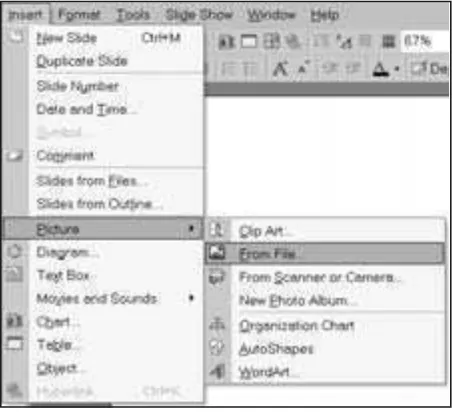
To in sert a picture from a file, choose “Pic ture” from the In sert menu and choose “From File . . . ” from the flyout menu (see Fig ure 2.2).
Figure 2.2. Choosing In sert Pic ture From File from the Menu
Although the dialog box you see will vary slightly de pending upon which ver -sion of PowerPoint you are using, it should look similar to the di alog box you see whenever you try to open a file on your computer. From this point, lo cate the file with the picture you want to insert and click on the “In sert” button.
While in serting a pic ture from a file has remained fairly con sistent from version to version of PowerPoint, in serting clip art has changed quite a bit. You start by choosing “Clip Art . . . ” from the flyout menu in stead of “From File . . . ” (see Fig ure 2.2). In PowerPoint 2002, you can search for clip art us ing the dialog shown in Fig ure 2.3, use the Clip Or ganizer, or search Microsoft’s fairly ex ten-sive col lection of clip art on the Web. From Microsoft’s Web col lection, you can download clip art into your own col lection so you can use it later without going to the Web.
Figure 2.3. In sert Clip Art in PowerPoint 2002
Another way to add graphics to your presentation is to copy and paste. Gen-erally, if you can see it on your computer you can copy it into your presentation. However, you must be careful; although you might be able to copy a picture into your pre sentation, you might not have the right to copy it into your pre sentation. Be sure to follow copyright law and guidelines, not ing that just because you don’t see a copyright symbol © does not mean that the picture or Web page is not copyrighted. While the fair use as pects of copyright law give you a great deal of free dom to use copy righted ma te rial for ed u ca tional pur poses, many re stric tions apply as to what you can use, how much you can use, and for how long you can use it. Your best bet is to use ma terial you have cre ated yourself, ma terial that is in the pub lic do main (see for example, http://www.pics4learning.com/), or material for which you have ob tained per mission to use. But if you must use copy -righted ma terial with out per mission, you should pay close at tention to the Fair Use Guide lines for Ed u ca tional Mul ti me dia (see http://www.utsystem.edu/ogc/ intellectualproperty/ccmcguid.htm). While these guide lines are not the law, they are a good guide for your fair-use rights to use copyrighted material.
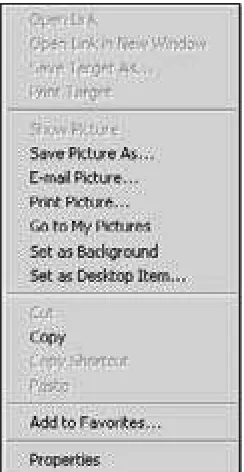
menu that pops up. If you are on a Win dows computer, point your mouse to the picture and right click (that is, click the right mouse but ton; see Figure 2.4).
Figure 2.4. Right Click the Mouse
The flyout menu that you see should look something like the menu in Fig-ure 2.5. It will vary from browser to browser, but you should see “Copy” as one of your choices. Choose “Copy” (by clicking or left clicking on the choice in the menu). Now, when you switch back to your PowerPoint presentation, you can choose “Paste” from the Edit menu to put the pic ture in your presentation.
Once a picture is in PowerPoint, it is an ob ject, and you can move it around, resize it, or even as sign it ac tions. Pic tures are al ways em bedded in the pre sentation, so you don’t need the orig inal picture file to see the picture within PowerPoint.
Sounds
PowerPoint presentations can in clude sounds in a wide range of formats. Like pictures, the sounds can be in serted from clip art or from a file. Sounds can also re fer to a CD track or be recorded, assuming you have a microphone con -nected to your computer. You can make the appropriate se lection by choosing “Movies and Sounds” from the Insert menu.
If you choose to use a CD track for your sound, then the CD must be in the computer when you are in serting the sound and whenever you are run ning the presentation. This works well if you are presenting something to an au dience, but it works poorly if you are putt ing the presentation on several computers for your stu dents. A better alternative might be to im port the CD track into your computer, but you must be careful about copy right guidelines, which limit the amount of a song you may use to 10 percent of the song or thirty seconds, whichever is less.
Figure 2.5. Flyout Menu to Copy a Pic ture from a Browser
Recording your own sounds is a good op tion be cause, in an ed ucational set-ting, much of the sound that is valuable is text that is read. If you teach students who are still learning to read or students with special needs, pro viding a but ton to have text read can be very use ful. If you teach pro ficient readers, al lowing new or dif ficult vo cabulary to be read can be very help ful. When you choose “Re cord Sound” from the “Movies and Sounds” flyout menu of the In sert menu, you will get a di alog box like the one in Fig ure 2.6. (Note that this di alog box will look a little different depending upon which ver sion of PowerPoint you are using.) Be sure that you give your sound a specific name so all your sounds are not named “Re corded Sound.” Click on the circle to be gin re cording your sound and click on the square to stop recording. Click on the triangle to listen to the sound.
The big gest prob lem with sounds is in serting them into your presentation on one computer only to find that they don’t play on another computer. This usu-ally has to do with whether the sounds are linked or embedded.
Figure 2.6. Re cord Sound Di alog Box
Link ing and Em bed ding Sounds
When you in clude some el ements in PowerPoint, they are em bedded in your PowerPoint presentation. That means that the el ement be comes part of the PowerPoint file. Other el ements are in serted as links to other files. Pic tures are generally embedded in the pre sentation. Mov ies are links to other files. This means that if you in sert a picture into a PowerPoint pre sentation, you no lon ger need the orig inal picture. The PowerPoint pre sentation has the picture inside it, so you can move the pre sentation to another disk or delete the original picture, and the presentation will still show the pic ture. If you in sert a movie into a PowerPoint presentation, the movie is not part of the PowerPoint file. The PowerPoint pre sen-tation con tains a pointer to the file. If you move the PowerPoint presensen-tation to another disk or de lete the original movie, your pre sentation will no lon ger play the movie.
Sometimes sounds are em bedded, and sometimes they are linked. Two things affect whether they are embedded or linked: the type of sound and the size of the sound. Sounds of type Audio For mat (.au), Au dio In terchange File For mat (.aif or .aiff), and Musical In strument Dig ital In terface (.midi or .mid) are al ways linked. Sounds of type Waveform Au dio (.wav) can be linked or embedded de -pending on the size of the sound. Waveform Au dio sounds that are greater than the size of the “Link sounds with file size greater than” set ting will be linked. Waveform Au dio sounds that are smaller than that setting are embedded. You can change this setting by go ing to the “Gen eral” tab of your “Pref er ences” or “Op tions” (the place you made many of the changes to settings in the “Be fore You Begin” section of this chapter). Look for the num ber next to “Link sounds with file size greater than.” This number is in ki lobytes and usu ally starts at 100. Most clip sounds (such as boings and beeps and ap plause) are far less than 100kB, but lon ger sounds can be larger. I gen erally set this setting to 999kB to ensure that most of the sounds I use will be embedded.
In the “Before You Be gin” section of this chapter, I sug gested that you cre-ate a folder for your PowerPoint pro ject and save your pre sentation there before you do any thing. This is to pre vent prob lems with linked files. It is fine to have linked files in your PowerPoint pre sentation, whether they are sounds or mov ies or other files. The key is to make sure that the links work when you move your presentation to another disk or another computer. If you have saved your PowerPoint presentation to a folder, and you have saved any linked files to that same folder be fore linking to those files, your pre sentation should be por table as long as you move all the files to gether (i.e., move the whole folder).
sound is linked, there is a good chance that the sound will not play on other com-puters. To alleviate this, you should find out where the sound is lo cated on your computer and copy the sound you in tend to use into your folder with the presen-tation. On my Win dows computer, many of the standard clip sounds can be found in the folder: “C:\Pro gram Files\Microsoft Of fice\me dia\CntCD1\ Sounds,” but that is un likely to be where they are on your com puter. On my Macintosh, the standard clip sounds can be found in “Macintosh HD:Ap pli ca-tions:Microsoft Office X:Office:Sounds.”
Are My Sounds Linked or Embedded?
If you have in serted a sound and it is embedded, you do not need to worry about where the sound file is. If it is linked, you do need to worry about it. While knowing the size of the sound, the size of your setting for “Link sounds with file size greater than,” and the type of sound will help you predict whether the sound will be linked or embedded, you will want to check to be sure.
Once you have inserted a sound, click on the sound icon and choose “Sound Ob ject” from the Edit menu. At the bot tom of the di alog box, you will see “File:” and either “[Con tained in pre sen ta tion]” or a path to the file. The former in di-cates an em bedded file, and the lat ter indidi-cates a linked file. While the path to the file might help you lo cate the file (so you can copy it to your project folder), the dialog box is generally too small to show the entire path.
Hy per text Links
Before version 97, PowerPoint was simply a tool to present material. Pre-senters would stand up in front of an au dience and go through slide after slide. PowerPoint’s ad vantage was that media (text, graphics, sounds, vid eos, etc.) could be in corporated into the pre sentation to add bells and whistles and to pres-ent in formation in a va riety of formats. PowerPoint 97 changed all that. OK, PowerPoint 97 changed very lit tle of that because most peo ple still use PowerPoint for lin ear pre sentations. How ever, PowerPoint 97 allows you to use it in different ways.
One tool that was added to PowerPoint was hyperlinks. Hyperlinks allow you to create pre sentations that are non linear. With the pop ularity of the World Wide Web, ev eryone is used to clicking on text to jump somewhere, and PowerPoint gives you that capability. You can create hy pertext links to other places in your presentation, to Web pages, and to other files.
Link ing Within Your Pre sen ta tion
the next to the next to the next. You can make them go any where. If you are giv -ing a presentation, you might want to link to slides with the answers to questions you an ticipate be ing asked. If you are creating something for your stu dents, you might use a menu structure in which stu dents choose a topic from a menu and when finished with that topic, jump back to the menu.
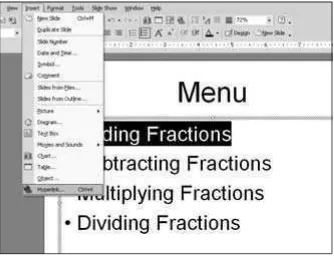
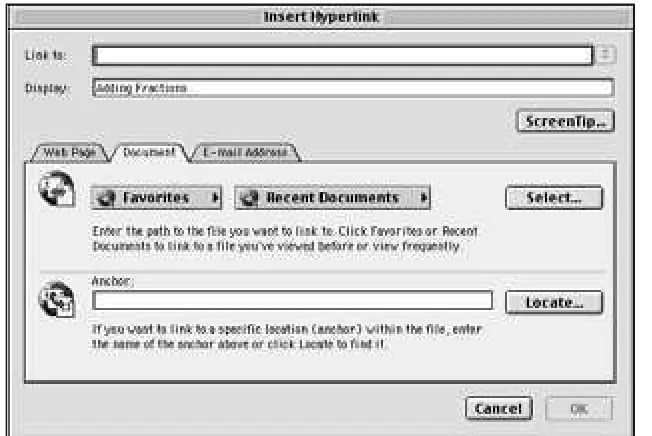
To link to another place within your PowerPoint presentation, create a few slides first, per haps cre ating a menu slide that will link to the other slides. High -light the text you want to link and choose “Hyperlink” from the In sert menu. Be sure to high light the text; if you don’t, PowerPoint will make a sin gle word the link. See Fig ure 2.7.
Figure 2.7. In sert Hyperlink
The exact for mat of the dialog box that you see will vary based on which version of PowerPoint you use, but it should look very similar to Fig ure 2.8 or Fig ure 2.9.
Figure 2.8. In sert Hyperlink Di alog in PowerPoint 2001
Figure 2.9. In sert Hyperlink Di alog in PowerPoint 2002
Slide,” “Last Slide,” “Next Slide,” “Pre vi ous Slide,” “Slide Ti tles,” and “Cus-tom Shows.” If you don’t have any choices for slides un der “Slide Ti tles,” click on the triangle or plus sign next to “Slide Ti tles” and the names of all your slides should appear. This is where you can choose a particular slide to link to. Click on the slide title to which you want to link and click OK. The high lighted text should become un derlined and change color (based on the colors in the template you are using).
Some of you tried to click on your text, and it didn’t take you any where. That’s OK. As you know, PowerPoint has dif ferent views or modes in which you can see your slides. We can edit our slides in Edit View (sometimes called Normal View), but we run our presentation in Slide Show View. Our links will only work in Slide Show View. Choose “View Show” from the Slide Show menu to take you into Slide Show View (that’s the view where you only see your slide on the screen with no menus or toolbars). Now you should be able to click on your hy pertext link to take you to another slide. You’ll no tice that when you point to a hy pertext link (or any el ement of PowerPoint on which you can click), your cur sor changes from an arrow to a hand. Watch for that change in Slide Show View so you can see what is clickable and what is not.
Once you have linked one part of a menu, it is easy to fol low the same steps to link the rest of the items in the menu: High light the text you want linked, choose “Hyperlink . . . ” from the In sert menu, choose “Doc u ment” or “Place in This Doc u ment,” click on the plus sign or triangle if nec essary to see the ti tles of your slides, click the ap propriate slide ti tle, and click OK.
Link ing Out side Your Pre sen ta tion:
Web Pages and Other Doc uments
While link ing within your presentation allows your presentation to be in ter-active, link ing out side your pre sentation allows the interactivity to ex tend be-yond PowerPoint and al lows your PowerPoint document to serve as a springboard to other resources. Dur ing a lecture, you can jump to a rel evant Web site via a link in your presentation or jump to any other doc ument on your com-puter. An in teractive project can in clude some of the content within the PowerPoint pro ject and use hyperlinks to con nect to Web pages with more de -tails, Word documents with ex tensive ru brics for matted as tables, mov ies or sounds in formats that PowerPoint cannot recognize, etc.
will have to copy the URL and paste it into PowerPoint. Note that if you have to paste and your Edit menu isn’t active, you usu ally can use the keyboard shortcut (control-V in Win dows or command-V on a Macintosh) to paste.
To link to another document, choose the “Doc u ment” tab in Figure 2.8 or “Existing File or Web Page” in Fig ure 2.9. Click on the “Locate . . . ” but ton or the “Browse for File” icon (it looks like an open folder with an arrow opening it) to get the standard Open File di alog box. In Windows, you might have to pick files of type “All Files” to be sure you can see doc uments that PowerPoint does not recognize.
Note that when you are choosing a file, you are creating a link. Just like linked sounds, if you want PowerPoint to be able to open the doc ument when the presentation is moved to an other computer, you should put the file in the folder with your PowerPoint file before linking to it.
But tons
Sometimes you want your us ers to click on text to fol low a hyperlink, and sometimes you want them to click on a button. PowerPoint provides but tons with a few dif ferent icons for different pur poses. Choose “Ac tion But tons” from the Slide Show menu, and a flyout menu will ap pear with either icons for but tons or names of but tons. Figure 2.10 shows the twelve dif ferent kinds of but tons: Custom, Home, Help, In formation, Previous Slide, Next Slide, First Slide, Last Slide, Last Slide Viewed, Document, Sound, and Movie.
Figure 2.10. The Twelve Types of Buttons
The but ton icons do not have to cor respond to the ac tion the but ton will per -form, but good rules of design dictate that the icon should make sense for what is going to hap pen when the but ton is pressed.
any size you like. Don’t worry if the size isn’t per fect; you can al ways click on the but ton and drag it from the handles to change the size.
Once you create the but ton, you will be prompted with the di alog box shown in Fig ure 2.11.
Figure 2.11. Ac tion Set tings for a But ton
This dialog box al lows you to have your but ton do many of the same things you could do with a hyperlink. Unfortunately, the same things are done in a slightly dif fer ent way.
To link to another slide, you will choose “Hyperlink to” and pick from the dropdown menu. If you chose an icon for your button, “Hyperlink to” might al -ready be cho sen with PowerPoint’s best guess for what you want to do. If PowerPoint guessed cor rectly, just click OK; oth erwise pick something else.
Like the hyperlinks for text, you can choose “Next Slide,” “Pre vi ous Slide,” “First Slide,” “Last Slide,” and “Cus tom Show.” You can also choose a specific slide by choosing “Slide . . . ,” which will prompt you for the slide to link to.
incorrect an swer was cho sen) on it. The “Wrong” slide can contain a but ton that returns to the last slide viewed, so it al ways re turns to the ques tion that was just answered, no matter which question that is. An other additional op tion is “End Show,” which will quit out of Slide Show View.
The “URL . . . ” choice will allow you to type in a Web address, but it does not give you the op tion to browse for a Web ad dress. “Other PowerPoint Presen-ta tion” not only lets you choose another PowerPoint file, but it also lets you pick which slide in that pre sentation the but ton will go to. Fi nally, “Other File . . . ” is just like browsing for a file when choosing “Existing File or Web Page” or “Doc u ment” with a hypertext link.
Once you have chosen where to “Hyperlink to,” click OK. If you ever want to change what the button does, click on the but ton to select it and choose “Ac-tion Set tings” from the Slide Show menu.
Remember that but tons, like hyperlinks, only work in Slide Show View. If you click on them in Edit View, you will se lect them. Clicking on them in Slide Show View will do whatever ac tion you set the button to do.
Now that you have seen a few things that buttons can do that hyperlinks can-not, I’ll let you in on a little secret: Any PowerPoint ob ject, in cluding text, can have the same ac tion settings as a button. If you click on a pic ture or a shape drawn with the Draw tools, or you high light text, you can choose “Action Settings” from the Slide Show menu and get all the same op tions described in this section for but tons.
Text for Buttons
In some cases, an icon is enough to let the user know what the but ton does, but words are of ten clearer. Sometimes the best choice for a but ton is a “Cus-tom” but ton (that’s the blank one with no icon) and some text. To add text to a button, right-click on the but ton (con trol click on a Macintosh) and choose “Add Text.” If the but ton al ready has text in it, you will have the op tion to “Edit Text” instead. You should see the cur sor flashing in side your but ton waiting for you to type whatever text you want to appear in the button. This text can be formatted for font, size, style, and color, just like any text object.
If the text is too big to fit in the but ton, you can change the font size, or you can change the size of the but ton by drag ging from the handles.
When a but ton has text, it is easy to change the ac tion set-tings for the text in stead of the en tire but ton. Your clue that you have done this is that the text will change color and be underlined if it has ac tion set tings as sociated with it. Fig ure 2.12 (page 28) shows a menu but ton that has the link associ-ated with the text, not the en tire but ton.
Text for Buttons 27
Figure 2.12. But ton with Ac tion Set tings for the Text
The prob lem with this is that if a user clicks any place on the but ton ex cept the text, the but ton will not work. This situation can be even worse, if the but ton itself has ac tion settings to do one thing, and the text of the but ton has ac tion set-tings to do something else. If this hap pens, high light the text in the but ton, choose “Ac tion Set tings” from the Slide Show menu, and click “None” for the action.
To be sure that you are setting your settings for the button it self and not just the text, click once on the but ton. If you see a flashing cur sor in the text, click on the but ton again, but be sure to click somewhere out side of the text. Watch the shape of the cursor for the mouse. If it is the text cursor (known as the “I bar” be -cause it looks like a capital I), then you are clicking in the text. Oth erwise you are clicking out side of the text. Once you have selected the but ton, and not the text, you can choose “Ac tion Set tings” from the Slide Show menu.
Sound for Buttons
In Fig ure 2.11 (page 26), you will no tice that you can check “Play Sound” at the bot tom of the Action Settings dialog box. From the dropdown menu be -low that, you can choose from a few of the canned sounds that come with PowerPoint. You can also pick a sound file by choosing “Other Sound . . . ” from the bot tom of the list.
You might no tice, how ever, that there is no op tion for recording your own sound. Because this is the most use ful op tion for sounds for educational pur -poses, it is im portant to be able to do this. You might want a but ton to say where you are go ing when you click on it, you might want a but ton to read the text on a slide, or you might want to pro nounce a vo cabulary word when the word is clicked. This is all pos sible in PowerPoint.
Earlier in this chap ter you learned how to re cord