Google+
™ FORDUMmIES
‰Google+
™ FORDUMmIES
‰PORTABLE EDITION
111 River Street Hoboken, NJ 07030-5774
www.wiley.com
Copyright © 2012 by John Wiley & Sons, Inc., Hoboken, New Jersey
Published by John Wiley & Sons, Inc., Hoboken, New Jersey
Published simultaneously in Canada
No part of this publication may be reproduced, stored in a retrieval system or transmitted in any form or by any means, electronic, mechanical, photocopying, recording, scanning or otherwise, except as permitted under Sections 107 or 108 of the 1976 United States Copyright Act, without either the prior written permission of the Publisher, or authorization through payment of the appro-priate per-copy fee to the Copyright Clearance Center, 222 Rosewood Drive, Danvers, MA 01923, (978) 750-8400, fax (978) 646-8600. Requests to the Publisher for permission should be addressed to the Permissions Department, John Wiley & Sons, Inc., 111 River Street, Hoboken, NJ 07030, (201) 748-6011, fax (201) 748-6008, or online at http://www.wiley.com/go/permissions.
Trademarks: Wiley, the Wiley logo, For Dummies, the Dummies Man logo, A Reference for the Rest of Us!, The Dummies Way, Dummies Daily, The Fun and Easy Way, Dummies.com, Making Everything Easier, and related trade dress are trademarks or registered trademarks of John Wiley & Sons, Inc. and/or its affiliates in the United States and other countries, and may not be used without written permission. Google+ is a trademark of Google, Inc. All other trademarks are the property of their respective owners. John Wiley & Sons, Inc. is not associated with any product or vendor mentioned in this book.
LIMIT OF LIABILITY/DISCLAIMER OF WARRANTY: THE PUBLISHER AND THE AUTHOR MAKE NO REPRESENTATIONS OR WARRANTIES WITH RESPECT TO THE ACCURACY OR COMPLETENESS OF THE CONTENTS OF THIS WORK AND SPECIFICALLY DISCLAIM ALL WARRANTIES, INCLUDING WITHOUT LIMITATION WARRANTIES OF FITNESS FOR A PARTICULAR PURPOSE. NO WARRANTY MAY BE CREATED OR EXTENDED BY SALES OR PROMOTIONAL MATERIALS. THE ADVICE AND STRATEGIES CONTAINED HEREIN MAY NOT BE SUITABLE FOR EVERY SITUATION. THIS WORK IS SOLD WITH THE UNDERSTANDING THAT THE PUBLISHER IS NOT ENGAGED IN RENDERING LEGAL, ACCOUNTING, OR OTHER PROFESSIONAL SERVICES. IF PROFESSIONAL ASSISTANCE IS REQUIRED, THE SERVICES OF A COMPETENT PROFESSIONAL PERSON SHOULD BE SOUGHT. NEITHER THE PUBLISHER NOR THE AUTHOR SHALL BE LIABLE FOR DAMAGES ARISING HEREFROM. THE FACT THAT AN ORGANIZATION OR WEBSITE IS REFERRED TO IN THIS WORK AS A CITATION AND/OR A POTENTIAL SOURCE OF FURTHER INFORMATION DOES NOT MEAN THAT THE AUTHOR OR THE PUBLISHER ENDORSES THE INFORMATION THE ORGANIZATION OR WEBSITE MAY PROVIDE OR RECOMMENDATIONS IT MAY MAKE. FURTHER, READERS SHOULD BE AWARE THAT INTERNET WEBSITES LISTED IN THIS WORK MAY HAVE CHANGED OR DISAPPEARED BETWEEN WHEN THIS WORK WAS WRITTEN AND WHEN IT IS READ.
For general information on our other products and services, please contact our Customer Care Department within the U.S. at 877-762-2974, outside the U.S. at 317-572-3993, or fax 317-572-4002.
For technical support, please visit www.wiley.com/techsupport.
Wiley also publishes its books in a variety of electronic formats and by print-on-demand. Not all content that is available in standard print versions of this book may appear or be packaged in all book formats. If you have purchased a version of this book that did not include media that is referenced by or accompanies a standard print version, you may request this media by visiting http://book support.wiley.com. For more information about Wiley products, visit us www.wiley.com. Library of Congress Control Number: 2011940390
ISBN 978-1-118-18129-4 (pbk); ISBN 978-1-118-18132-4 (ebk); ISBN 978-1-118-18131-7 (ebk); ISBN 978-1-118-18130-0 (ebk)
Manufactured in the United States of America
About the Author
Jesse Stay began his career as a software developer, where in an era of social media he quickly became immersed in the world of marketing technologies. An entrepreneur at heart, he has consulted with industry players both large and small to create some of the most social technologies on the web.
Author of three other books on social media, Jesse has also helped write documentation for blogs such as AllFacebook. com, has contributed to InsideFacebook.com, and has even helped document, as clients, some of the major social net-works themselves. Jesse was named by both Mashable and Entrepreneur magazine as one of 20 developers to follow on Twitter and by Mashable as one of 10 entrepreneurs to follow on Twitter. This inside knowledge of the industry has enabled Jesse to understand the ins and outs of how social networks work and set the stage for documenting an emerging network like Google+.
Jesse is currently employed as a social strategist for The Church of Jesus Christ of Latter-day Saints. In his spare time he runs his current entrepreneurial endeavor, SocialToo.com, and is also working on a simple new service for parents to monitor their kids’ social network activity called SocialDirt. com. Jesse also consults for businesses large and small as he gets time.
Dedication
To Rebecca, Elizabeth, Thomas, Joseph, JJ, and Alex.
Author’s Acknowledgements
Of course, any of my books would not be complete without thanking my beautiful wife and kids for their patience as I spent two long weeks writing one of the best and fastest-to-production books of my life. And, as always, I am forever grate-ful to my parents for raising me with computers in the home and always encouraging me to explore my learnings.. For other comments, please contact our Customer Care Department within the U.S. at 877-762-2974, outside the U.S. at 317-572-3993, or fax 317-572-4002. Some of the people who helped bring this book to market include the following:
Acquisitions, Editorial, and Vertical Websites
Project Editor and Technical Editor:
James H. Russell
Acquisitions Editor: Amy Fandrei
Copy Editor: Melba Hopper
Editorial Manager: Jodi Jensen
Vertical Websites: Rich Graves
Editorial Assistant: Amanda Graham
Sr. Editorial Assistant: Cherie Case
Cover Photo: © iStock / Kamruzzaman Ratan
Composition Services
Project Coordinator: Kristie Rees
Layout and Graphics: Samantha K. Cherolis
Proofreader: Christine Sabooni
Indexer: BIM Indexing & Proofreading Services
Publishing and Editorial for Technology Dummies
Richard Swadley, Vice President and Executive Group Publisher
Andy Cummings, Vice President and Publisher
Mary Bednarek, Executive Acquisitions Director
Mary C. Corder, Editorial Director
Publishing for Consumer Dummies
Kathleen Nebenhaus, Vice President and Executive Publisher
Composition Services
Table of Contents
Introduction ... 1
Chapter 1: Leaping into Google+ . . . .5
Creating Your Account ... 5
Getting an invite ... 6
Filling out your information ... 6
Setting Up Your Profile — the Basics ... 8
Setting Up Your Profile — Advanced ... 11
Filling out your About page ... 11
Setting your circle settings (say that five times fast!) ... 14
Setting other privacy options ... 16
Understanding the +1 ... 18
Following Others on Google+ ... 19
Picking whom to follow ... 19
Organizing your followers ... 20
Using the Sandbar on Other Google Products ... 21
Making Your First Post ... 22
Choosing your message ... 22
Choosing your destination ... 23
Notifying friends who haven’t circled you ... 25
Chapter 2: Boggling Over Circles and Privacy . . . .27
Understanding Circles ... 27
Creating Circles ... 29
Dragging people into the “Drop Here to Create a New Circle” circle ... 29
Clicking the “Drop Here to Create a New Circle” circle ... 31
Mousing over people’s names to configure circles ... 31
Adding People to Your Circles ... 32
Consuming the Content for Each Circle ... 33
Inviting New People to Google+ ... 36
Chapter 3: Posting to Google+ . . . .43
Knowing What to Post ... 43
Sharing posts with only close friends and family ... 44
Posting to journal your life ... 46
Posting to communicate with specific groups ... 46
Posting to increase the number of people circling you ... 47
Picking Your Audience ... 48
Posting to circles ... 48
Posting to individuals... 49
Posting to e-mail addresses ... 50
Knowing who will see your posts and how they’ll see the posts ... 50
Sharing, Resharing, and Commenting on Posts ... 51
Resharing others’ posts ... 51
Getting people to comment on your posts ... 53
Mentioning others in posts and comments ... 53
Moderating Your Posts ... 54
Editing your posts ... 54
Deleting your posts ... 55
Muting posts ... 55
Deleting comments ... 55
Disabling comments or reshares ... 56
Dealing with Trolls ... 57
Handling trolls short of blocking them ... 57
Ignoring trolls when you just want a little peace and quiet ... 58
Blocking trolls when you’ve just had enough ... 60
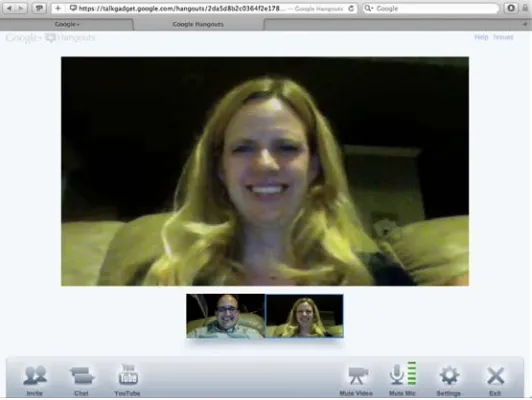
Chapter 4: Hanging Out with Friends . . . .63
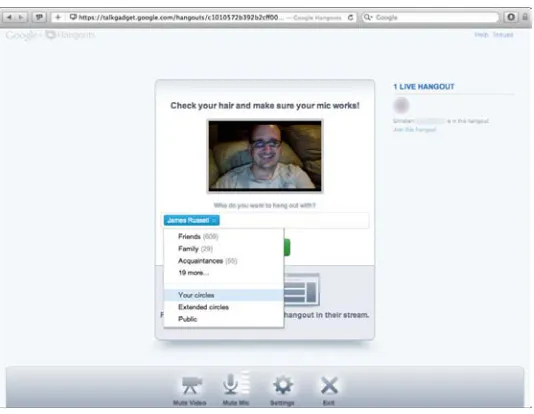
Starting Your First Hangout ... 64
Getting your video “just right” ... 64
Picking whom to hangout with ... 64
Administering Your Hangout ... 66
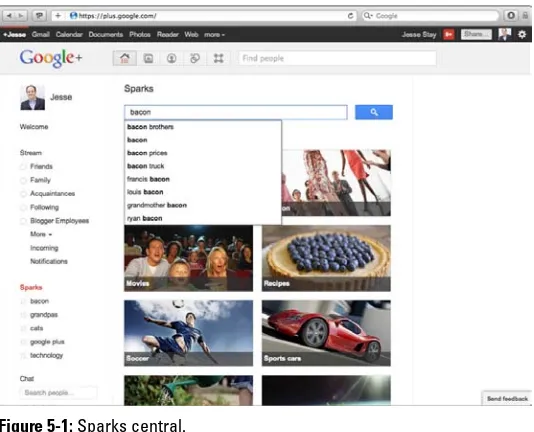
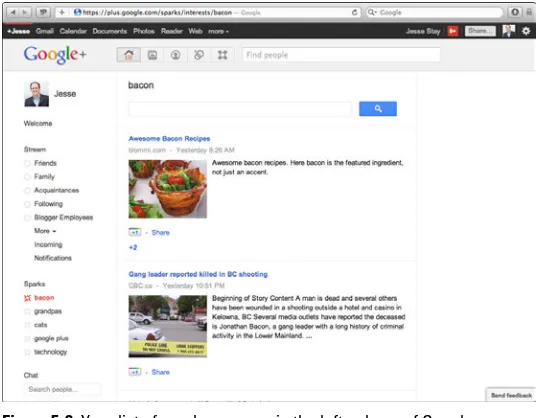
Chapter 5: Finding Content with Sparks . . . .69
Picking Your Sparks ... 69
Table of Contents
xi
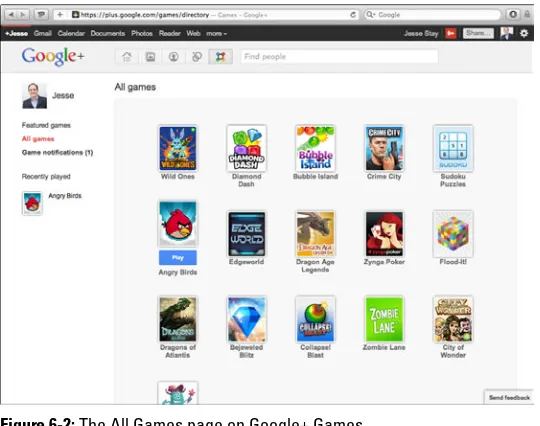
Chapter 6: Gaming with Google+ . . . .73
Finding Games to Play ... 73
Reading the Games Stream ... 76
Challenging Your Friends ... 77
Chapter 7: Abiding by Social Network Etiquette . . . . .79
Deciding What to Post ... 80
Guidelines for posting ... 81
Commenting on others’ posts ... 82
Knowing When to Tag Other People ... 83
E-mailing Others and Knowing When You Should ... 85
Knowing When to Back Away (And How to Avoid Trolling) ... 86
Chapter 8: Using Google+ on Mobile Devices . . . .89
Understanding the Google+ Mobile App Experience ... 89
Using Google+ on an iOS or Android device ... 90
Using Google+ features only on Android devices ... 91
Using Google+ on the mobile web ... 95
Posting to Google+ on a Mobile Device ... 96
Uploading photos on a mobile device ... 98
Checking in ... 100
Viewing the “Nearby” Stream ... 101
Using Huddles to Chat with Groups ... 102
Chapter 9: Using Google+ Photos . . . .105
Viewing Your Photos ... 105
Viewing photos taken of you ... 106
Viewing photos taken on your phone ... 107
Viewing photos you’ve uploaded ... 108
Viewing Photos from Your Circles ... 110
Uploading New Photos ... 111
Tagging Others in Photos ... 113
Configuring Privacy Settings for Your Photos ... 114
Sharing Your Photos ... 115
Chapter 10: Liberating (Exporting and
Backing Up) Your G+ Data . . . .117
Knowing What You Can Back Up ... 117
Chapter 11: Ten Third-Party Applications
You Can Use Right Now . . . .123
Klout ... 124
Reader to Plus ... 124
Extended Share for Google+ ... 124
Google+ Hangout Check ... 125
Replies and More for Google+ ... 125
Plus Minus ... 125
Surplus ... 126
+Photo Zoom ... 126
SocialStatistics.com ... 126
G+ Stream Pause ... 127
Go for More! ... 127
Introduction
C
hances are you’re one of the 750 million or so users of Facebook, or maybe you’ve tried Twitter or another social network. Google has responded to the lively interest in social networking with one of its own called Google+ (also known as “Google Plus” or even just “g+”), and Google+ is quickly becoming a serious alternative for those looking for a new environment to play in.At an estimated 30 million or so users in just one month, Google+ is clearly a force to be reckoned with. Google has figured out a way to integrate the network with all of its major products, which becomes evident the minute you sign up for the service!
Why the “plus,” you might ask? Rumor has it, Google needed a place to bring all of its apps into one place, making every piece of Google part of a social experience. Now, instead of just a bunch of web apps, Google is becoming one large social network — Google+ ties everything together right at the heart of Google. This spirit of cohesion between all things Google will become even more evident as Google+ grows, I’m quite sure, and my hope is that this book will make the transition easy so that you can enjoy this network as much as I do.
About This Book
Because Google+ is less than six months old, in writing this book I want to document the service and provide a way for new users coming from other social networks to become accustomed to the parts of Google+ that may not seem familiar.
At the same time, because Google+ is a new service, I fully expect it to change quickly. For that reason I’ve created this portable edition to cover just enough and yet allow for some flexibility for when the service does change.
Spend some time perusing Google+, and feel free to use this book as you like. My intention is that by reading this book you will get past the “weirdness” of the new network and past any concerns you may have with it. Consider this book your friend as you explore this new social network.
Foolish Assumptions
I don’t assume that you know much about social media or the Internet to use this book. Previous experience with Facebook or Twitter or another social network may help, but for the most part I’ve written this book so that all readers can easily understand and use it.
There are some things I do assume you know, however. For instance, you should have at least some basic knowledge of using a computer. Ideally, for parts like Chapter 4 on hang-outs, you should have a working webcam attached to your computer. If you read Chapter 8, you should have a mobile device and know how to use it.
Introduction
3
Icons Used in This Book
You’ll see little icons scattered throughout the book. These icons flag additional, helpful information.
Tips provide beneficial information and advice that I’ve picked up using Google+. I share these tidbits with you in case they can enhance your experience, too.
Pay close attention to these icons! This information may help keep you out of trouble!
When I have a piece of information that I want you to keep in the back of your head or bring back to your attention, I use this icon to remind you of that fact. Tie a string around your finger, write it down, or do what you need to not forget these things!
These icons flag technical information that a typical web user may not care about and can skip at will. Not that it isn’t inter-esting, but it’s not necessary for getting the basics of Google+ down. Read these to find out about the inner nuts and bolts of the features of Google+.
Where to Go from Here
Although, in general, I suggest beginning with the first chap-ter and reading the book sequentially, it’s organized so that you can pick and choose which pieces of Google+ you want to find out about first. So, please feel free to skip around as you like!
Keep this book with you as you use Google+ for the first time. As you come upon parts that you’re not so sure about, refer to this book and let it guide you through the process.
Or, if you haven’t created a Google+ account yet and still need a way to contact me, you can go to my Facebook Page for this book at http://facebook.com/googleplusportable. Don’t hesitate to ask questions! I love to meet my readers, and I love to help where I can. Go to both places now, circle me, and like the Facebook Page!
If you still can’t get enough of noisy Google+ folks to follow, check out this book’s editor’s page, too. His name is James Russell and the shortened URL for his Google+ profile is http://goo.gl/Ci8jb (the real URL is https://plus. google.com/103903198087988193655 — obviously totally obnoxious — because Google+ hasn’t shortened his profile URL yet).
Chapter 1
Leaping into Google+
In This Chapter
▶ Figuring out how to use Google+
▶ Getting familiar with the Google+ interface
▶ Registering for Google+
▶ Understanding your Google+ profile
Y
ou’ve probably gotten the invitation by now—“so and so has invited you to Google+.” Or maybe you’ve seen your friends on Facebook asking if anyone wants a Google+ invite, and you’re curious about this new-fangled social network by Google. Whatever your reasoning, your interest is piqued — now what?The best way to learn about any social network is to just dive in and use it. Just like driving a car, anyone can tell you how to get in, turn the keys, and step on the gas, but until you get in and start driving and run over a few curbs and bushes, you’ll never really learn what driving a car is all about.
The first step to beginning your quest to use Google+ is to, like the car example, just dive in, create an account, and start using it! In this chapter, I show you how to do just that, from creating your account, to finding and organizing contacts, to posting your first post.
Creating Your Account
just need to log in with an existing account to access your new Google+ profile. Then you just enter some basic informa-tion about yourself to get started.
Signing Up
When Google+ was first released to the public it was
invitation-only, but luckily that’s no longer the case. As of this writing, Google+ is in open beta and anyone can join. You still may get invited, though; if you do get an invitation in your e-mail you’ll just need to click on the link in the e-mail to get started creating your account.
If you want to be invited by e-mail, go ahead and ask for an invite at http://facebook.com/googleplusportable! Yes, even though this book is about Google+, it has a Facebook Page so that users like you or your friends who haven’t yet joined Google+ can come and find out more about Google+, ask for invites, and get started with the service. Also, because it’s so new, Google+ doesn’t yet have a way for business pro-files to exist on the service, so a Facebook Page is the next-best thing in lieu of a dedicated Google+ page to provide a social media home for this book.
Filling out your information
Now that you have access to the service, it’s time to create your account and start filling out some basic information.
If you know you have an invite but can’t find the e-mail, just go to http://plus.google.com. If you’ve already received an invite, going to that URL will accomplish the same thing.
Just follow these steps to get going:
1. Log in to your e-mail account and click the Join Google+ or the Learn More About Google+ link in your invite e-mail.
Chapter 1: Leaping Into Google+
7
The name of the link in this step depends on whether you were invited specifically or by someone who is a member sharing a post with you on Google+ via e-mail (you’ll learn more about how to do this later in the book).
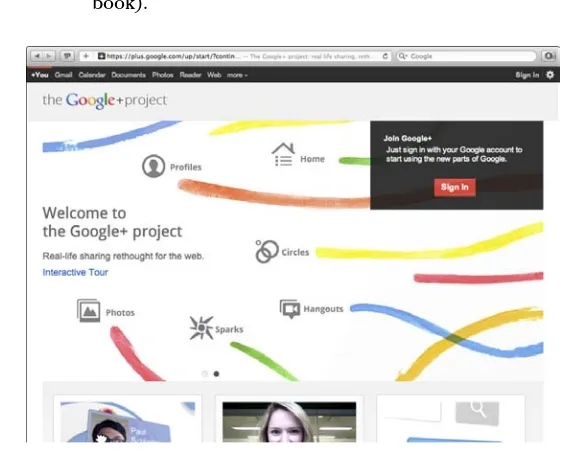
Figure 1-1: Signing in with Google account information.
2. Click Sign In.
You are whisked off to a login form where you enter your Google account credentials.
3. Sign in with your Google account by entering your Google username and password.
Don’t have a Google account? You can create one on this page by clicking the “Create an account now” link below the login box. Just follow the steps to create your Google account; then start this list again with Step 1.
4. Enter your name (this will likely be filled in for you).
Make sure you enter your real name! Google+ is about real people. Even if people recognize you by a pseudonym, your account can get blocked if you don’t use your real name here. In many ways, Google is even pickier than Facebook in this regard, but it’s to encourage real interactions with people.
Google is rumored to be working on better ways to allow other types of personas on the system, so if this isn’t good enough for you, keep watching and an option that works well for you may likely appear in the future.
5. Indicate your gender. 6. Select a profile photo.
Google+ asks you to size your photo.
7. Select the area you want for your profile photo and choose Set as Profile Photo.
8. When prompted, decide if you want Google to use your information to personalize content and ads on non-Google websites by checking or leaving the box unchecked.
This enables more personalized ads and content on the Google sites you visit, but it is optional if you feel uncomfortable selecting this option.
9. Click Join.
You’re done! You can now start using Google+.
Setting Up Your Profile —
the Basics
Chapter 1: Leaping Into Google+
9
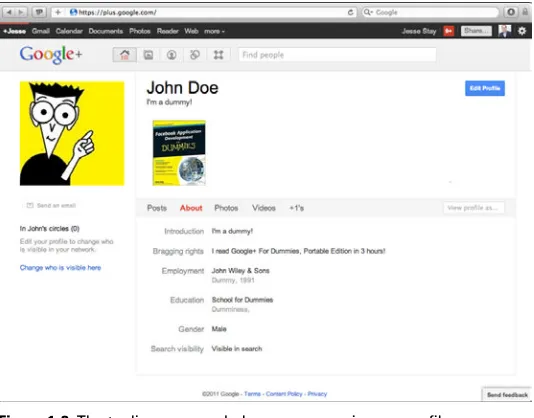
Figure 1-2. If you’re really in a rush, just click Continue to My Profile and you can get started, but it might be to your benefit to enter at least a little bit about yourself to ensure that you get the best recommendations about people to follow — and perhaps more importantly because people with blank profiles generally are ignored by people trying to find great people to circle (the follow of Google+). If you want to know more about what circles are, skip to Chapter 2 where I cover them in-depth.
Figure 1-2: Enter even more information about yourself.
Here are the basic pieces of information that appear:
✓ Tagline: This is a simple tagline that appears below your name, telling people in a sentence or two who you are (see Figure 1-3).
Figure 1-3: The tagline appears below your name in your profile.
✓ Education: This is another item that seems to get fed into the Google+ recommendation engine. If you fill out your educational background, others who attended the schools you did will show up in the recommendations that Google+ provides.
✓Scrapbook: Add as many images as you like here. This is a great place to show what you look like and even reveal your personality. Feel free to be creative here. These images appear at the top of your profile below your name. These images can decorate your profile and show off your creativity!
For each option you fill out, be sure to choose the circles you want to see that information. If you don’t want everyone seeing the schools you attended or have some embarrassing pictures (probably best to just leave those out, but who am I to tell you what to do?), you can adjust which circles and people will see each section you fill out in your profile.
Chapter 1: Leaping Into Google+
11
Setting Up Your Profile —
Advanced
After you’ve set up your basic profile settings, you should probably go in and fill out a little more about yourself. The basic areas you’ll want to fill out include your About page, your Circle settings, and the privacy options on the other tabs on your profile. I’ll start by taking you through the About page.
These settings and options are likely to change over time, so be sure to check back with the Facebook Page for this book or follow me on Google+ at http://profiles.google.com/ jessestay to be sure you’re updated as things change on Google+.
Filling out your About page
Your About page is the tab on your profile that people first see when they’re visiting your profile. This tab tells people more about who you are, where you’re from, and anything else you feel like sharing. The options on this page are, of course, all optional, but remember that the more Google knows about you, the better recommendations Google+ can provide for you. To edit this page, go to the About page and click Edit Profile. Then click on the text you’d like to edit and it will magically turn into an edit box!
You will see two modes on your profile: Edit mode and View mode. Clicking Edit Profile takes you into Edit mode, which allows you to edit anything you click on in your profile. When you go from tab to tab in Edit mode, you can edit anything under the tabs. Click Done Editing when you want to go back to View mode.
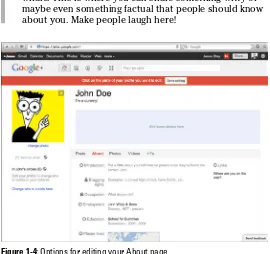
Here are the options available to you (see Figure 1-4):
✓ Bragging Rights: What is your claim to fame? Maybe you invented the Internet. Maybe you kissed Shamu the whale. This is where you can share something witty or maybe even something factual that people should know about you. Make people laugh here!
Figure 1-4: Options for editing your About page.
✓ Occupation: Because you filled this out before, you shouldn’t need to fill it out again. If you need to add more work or perhaps you didn’t complete it, now is the time to add more jobs.
✓ Employment: You filled this out earlier, but this is the list of jobs you have worked for in the past.
✓ Education: If you didn’t fill this out before, add the schools you attended here so Google+ knows to recom-mend others who attended the same schools.
Chapter 1: Leaping Into Google+
13
✓ Home: This is a great way to use your circles. Set this to a Friends and Family circle and now your close friends and family can easily find out how to contact you at home. You can add a phone number, e-mail address, postal address, fax number, and a few other options to help your friends find and contact you.
If you limit it to a specific circle, only the people in that circle will see it.
✓ Work: You may want this to be a little more public than your Home information so that your clients or coworkers can find you (or maybe that’s a bad idea). Here you can enter a different set of information about how people can contact you at work if they need to. Just like the Home information, you can also leave this option blank if you don’t want to share it with anyone (or set it to the Self circle).
✓ Relationship: Who knows? Maybe that special someone is on Google+ and just might find your profile and notice you’re single. Or maybe you’re married and it would be a bad idea to give anyone the impression that you’re “on the market.” Here you can choose your marital status. Google, being as diverse as it is, has a plethora of options to choose from.
✓ Looking For: Similar to Facebook and other social net-works, here is where you can say what you’re trying to get from Google+. Maybe you’re using it for dating. Maybe you just want to network with others. Or you can just leave it blank and let people guess — you choose.
✓ Gender: This is pretty simple: male, female, or other. Some people take issue with the lack of choices in today’s environment, but for now at least those are your options.
✓ Nickname: What do you go by? This is where you can specify what everyone calls you. This item will likely become more useful as well, as Google+ begins to adapt personas and ways you can represent yourself differently to different people.
✓ Search Visibility: Don’t want anyone to know you’re on Google+? Uncheck this box and you’ll remain incognito to people searching for your name. Want to keep your old high school buddies from finding you? This may be a good way to prevent that from happening.
Just as when setting up a basic profile earlier in the chapter, you can choose who sees any of the preceding options by selecting the circles to which you want those options visible. That means if you want only your closest friends and family to see your Introduction, you can do so. If you want to know more about what circles are, skip to Chapter 2 where I cover circles in more depth.
Setting your circle settings
(say that five times fast!)
Under the About tab, you will find your circles in the left-hand column. These are the people you circled as well as the people who have circled you. To set who can see the people that you have circled, follow these steps:
1. Go to the main Google+ page and click Profile; then click Edit Profile.
Google+ puts you in Edit mode.
2. Click one of the lists on the left (“in Jesse’s circles” or “Have Jesse in circles.”)
Chapter 1: Leaping Into Google+
15
Figure 1-5: Editing Circle settings.
If you haven’t circled anyone or no one has circled you, you may not see anyone in the left column! If this section seems confusing, skip to the section “Picking Whom to Follow” later in this chapter to discover how to find some people and get others to start following you. Then come back here and this section will make much more sense.
3. Click the down arrow next to All Circles and specify which circles you want visible to those who visit your profile.
You can stop here if you want, or you can take it one step further though and specify who can see the cir-cles you just chose.
4. Click the radio button next to Your Circles and choose the circles you want the list of people you circled to be visible to.
See how granular you can get? Keep this in mind as you get used to Google+ — you can always fine-tune your settings later.
You can also turn off the list of people who have cir-cled you — maybe you just don’t want to show off the number of people who have circled you. To turn that option off, just uncheck the Show People Who Have Added You to Circles box and that list won’t be visible on your profile anymore.
5. Click Save; then click Done Editing.
Your changes are reflected in the left column of your profile.
Setting other privacy options
While in Edit mode, you will also find options on each tab of your profile. (Click Profile from your main Google+ page, click Edit Profile to get into Edit mode, and then click the name of the tab.) Here are some of the options available for each tab:
✓ Photos: In the Edit mode of the Photos tab (see Figure 1-6), you can do the following:
• Opt to turn off the tab by unchecking “Show this
tab on your profile” so that it isn’t visible on your profile. Doing so will keep others from seeing your Google+ Photos, for example (turn to Chapter 9 to learn more about the Google+ Photos integration in Google+).
• Choose who can tag photos of you — you can
choose individual people or individual circles of people. This is a great way to prevent spam tagging of you in photos.
• Turn off the geo location option so people can’t
tell where you took the photos you store in your profile.
Chapter 1: Leaping Into Google+
17
Figure 1-6: Editing your photo visibility.
✓ +1s: These are the things you’ve “+1d” around the web. For example, if you go to my blog StayNAlive.com (nudge, nudge), you’ll see a big +1 button next to each article. Every time you click one of those +1 buttons, the website you +1d will appear on this tab. You can also click +1 next to each Google search results on Google search — every time you click, the URL you +1d will appear here. See the next section for more information on +1s.
You can opt to have these +1s appear to your friends when they visit your profile. I just leave this option checked, but you decide what you want others to see.
To see your profile in its final form, click Done Editing, which takes you back to your profile. To go back to your stream, click the Google+ logo at the left of the sandbar. (Briefly, the sandbar is the narrow black bar at the top of Google+. For more on the sandbar, see the “Using the Sandbar on Other Google Products” section later in this chapter.)
Understanding the +1
There are two types of +1 buttons on Google+: +1s for web-sites and +1s for individual posts inside Google+. On posts inside Google+, it’s like giving a person a “high five,” letting them know you liked their posts. It helps search results appear more relevant on the web and Google search results (by showing you results your friends have shown interest in) and they also appear in your Google+ profile. Beyond that the +1 doesn’t do a whole lot yet, but Google+ could expand the feature in the future.
The +1 is similar to a Facebook Like button, but there are two major differences at this point, including:
✓ On Facebook, a like subscribes you to a post’s content and you get notifications for every new comment on that post. On Google+, you don’t get notifications for the posts you +1.
✓ On Facebook like buttons for websites, while liking the website adds it to your interests in a similar manner to how Google+ adds it to your +1s tab in your profile, Facebook also allows website owners to publish content to the Facebook streams of those that have liked their website. On Google+, at least at the moment, website owners can’t publish to the streams of those that have +1d their website.
Chapter 1: Leaping Into Google+
19
I’m asked all the time when Google+ will have a −1 button or link. If history serves right, they won’t. Just like Facebook does not have a Dislike button, Google will likely not have a −1 button because −1 is, well, negative. Both Google and Facebook seem to agree that it’s much better to give users a positive experience than it is to encourage a negative, and a −1 button could definitely bring negative feelings to the service.
Following Others on Google+
On Google+ a follower is someone who circles you. I cover this in detail in Chapter 2, so I won’t go into too much detail here. However, you don’t just follow every person you “follow.” Instead, you circle them, which means you choose which circles they belong to.
Before you can get anything from the Google+ experience, you need to follow some people by adding them to your circles. In the following sections I’ll show you some tips on how to get this process going.
Picking whom to follow
Now that you have your profile complete, you’re ready to find some people to follow, which you can do in a few different ways:
✓ Follow the recommendations. You can start by just following the recommendations on the right side of the page (to find out how to add people to circles, see Chapter 2). Google+ chooses these based on the informa-tion you filled out in your profile, as well as those people whom you already circled and those who circled you, along with the information they filled out in their profiles.
✓ Import your contacts. You can go to your circles page via the circles icon at the top of Google+ (see Figure 1-7), and by giving Google+ some more information about your contact list (by uploading from a site like Yahoo or Hotmail) Google+ can provide more suggestions. To do so, click the little circles icon at the top of Google+, click Find People, and choose from the options provided (Yahoo, Hotmail, Upload Your Address Book, and so on). Or go with one of the people it already suggests.
Figure 1-7: Finding new friends to circle.
Organizing your followers
Chapter 1: Leaping Into Google+
21
Using the Sandbar on Other
Google Products
The minute you start using Google+, you’ll notice some new options in the upper right corner of the bar that appears across the Google products you use. In Google+, you’ll see your name, followed by a red bubble with a number in it, a Share button, and an icon with your picture in it. This bar at the top of all Google products has become known as the sandbar. This is where you’ll be notified across any Google product that there are new updates (comments, new follow-ers, shares) to your Google+ feed. Check out Figure 1-8 to see what I’m talking about.
Figure 1-8: The Google sandbar.
✓ The notification bubble: If you don’t have any notifica-tions, your bubble is gray, but as soon as you get new notifications that bubble changes to red with an anima-tion of a white number dropping into the red box, show-ing the number of new notifications you have. Click this bubble, and you’ll see notifications about all the new comments, shares, and new people circling you in your Google+ feed. It’s addictive!
You can click the bubble even if it’s gray to see old notifications.
✓ The Share button: You can also post to Google+, without even being in Google+! To do so, in any Google product with the sandbar installed, just click the Share button and you’re presented with an option to post to Google+.
Making Your First Post
That brings me to the final, and most important, step for getting you started in Google+: your first post! Posting on Google+ is actually quite easy. However, you need to become familiar with a few things that are a bit different than social networks such as Facebook, Twitter, and others. One element you will be familiar with is posting a status update for your friends to see. I’ll cover that next.
Choosing your message
If you’re used to using other social networks, you should already be familiar with posting messages to your friends. Just click the Share What’s New box and start entering text in the box. I recommend a message that engages your audience. Think of questions that people will want to answer or some-thing that will get people debating. Maybe you want to share a funny graphic or video. Here are the types of things you can share:
Chapter 1: Leaping Into Google+
23
✓ Graphics: You can easily upload images from your hard drive to include in your Google+ posts. You can include static images, and Google+ also supports animated gifs as well (which you should use sparingly, depending on what your audience is interested in).
✓ Videos: You can either upload your own videos or link to a YouTube video. The video will be embedded right alongside your text. Google owns YouTube, so the inte-gration is seamless.
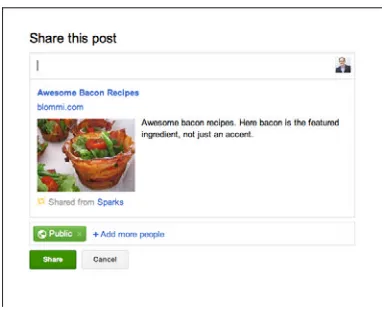
✓ Links: You can attach links, and the first graphic and description for the page you linked to will automatically attach itself to your post. Google hasn’t been clear on how these images and descriptions are chosen, unfortunately.
✓ Share your location: If your browser supports it, you can also attach the location of where you are posting along-side the status update you shared. If you include the location with your update, a little map will be attached to your post, showing where you are.
You can bold, italicize, and strikethrough text in Google+ if you know the syntax. To bold text, surround your text with an asterisk (*) on either side, *like this*. To italicize, surround your text with an underscore (_) on either side, _like this_. To strikethrough, surround your text with a hyphen on either side, -like this-.
Choosing your destination
The most difficult part of posting is choosing whom you want to see your post. On Facebook, you do so with a little-used (or little-known) feature called friend lists. Google+ uses circles to determine who can see your posts; circles are a little simpler than lists because they are in your face every step of the way and are required to choose and set up before you can even post your first status update. You may have to understand what it’s doing for it to seem simpler, though.
✓ Public: When you choose public, anyone in the world can see your post, and Google can also index it. If you’re doing this for business reasons, the posts that you want to keep and remain visible to anyone should be marked as Public. Just keep in mind that everyone, even those not in your circles or even on Google+, can see it.
✓ Your Circles: By choosing Your Circles, only those people in the circles you have assigned people to are able to see your post. This is a great way to limit your content to just your own network.
✓ Extended Circles: Choosing this option makes your post visible to everyone in your own circles, in addition to everyone in those people’s circles. This means the post is not quite Public, but it’s getting closer!
✓ Custom circles you created: You can also limit your posts to just the circles you’ve created. For example, if I just want my post to be seen by my family members, I can select my Family circle and only my family will see my update.
✓ Specific users or e-mail addresses: You can also limit your post to specific users or e-mail addresses. This is a great way to choose a quick list of people to start a conversation with, or maybe to just have a one-on-one conversation with another person.
Because you can post to specific e-mail addresses, you can try a couple of different things with the updates you post. One option is to add their e-mail address to posts so that when you share to that address your post is archived in your e-mail inbox (like Gmail, for instance). Another option is to create a blank circle titled Notes, post your update to that circle, and now you have a unique way to go back and review notes you’ve shared!
Chapter 1: Leaping Into Google+
25
Notifying friends who
haven’t circled you
By default, only those who have circled you will see your post in their stream. You’ll want to use this notification feature sparingly (it could be construed as spam), but you can choose to notify people in your circles who have not circled you back and they will see your updates. To do so, select the custom circle you want to post to and then mouse over the name of the circle. A dialog box will pop up with an option to Notify About This Post. If you check that box, all those who haven’t circled you will receive a notification with your post in the notification.
Be very careful forcing notifications on people! Doing so may be perceived by others as spam and will not serve you well, particularly if you do it a lot. Use this feature sparingly, unless you know your friends are okay with it!
Chapter 2
Boggling Over Circles
and Privacy
In This Chapter
▶ Acclimating to circles
▶ Reading content from your circles
▶ Creating your own circles
N
ow that you’ve submitted your first post, you may want to know a little more about who is seeing that post and how much they can actually see about you on Google+. To do this you’ll need to understand more about what circles are, the various ways to create them, and how you can use them to customize who sees just about anything you can share on Google+.In this chapter, I show you how to create and add people to circles; how to find new, interesting people to circle; and how to invite those that aren’t yet on Google+ to the service. I’ll also show you who can see particular circles, when notifica-tion e-mails are sent, and how to customize who sees your profile and what they can see about you.
Understanding Circles
to “friends lists,” although few people know that you can do the same things with friends lists on Facebook as you can with circles (friends lists are pretty hard to find on Facebook).
To try out Facebook friends lists, click the little drop-down arrow right next to the Post button below your status update before you post; from there you can customize the lists of people who see your post. To create new friends lists and add people to them, you’ll need to click on Friends in the left column and then Manage Friend List at the top of the next page. Check out this link at Facebook’s Help Center for more information about friends lists:
http://www.facebook.com/help/?faq=200538509990389
Circles play two distinct roles in Google+:
✓ They help you decide whom you want to share content with. With circles, you can choose who sees your posts. You can also use circles to target who can see certain elements of your profile as well as who can see your name in search results. Expect this to expand even fur-ther in the future as Google+ expands so that ofur-ther web-sites can integrate circles.
✓ They help you decide whose content you want to see.
You can view customized content from your circles just by clicking the circle name on the left column.
Where are all the people you’re circling? You may have joined Google+ and circled a bunch of people, but notice that you’re still not seeing updates in your stream. Probably this is because those people haven’t circled you yet, and they post their updates to only specific circles. Unless the people you are circling post to their Public circle, you will not see any of their content unless they add you to one of the circles they’re posting content to.
Chapter 2: Boggling Over Circles and Privacy
29
Creating Circles
Now that you know what circles are, you’ll probably want to dig in and start creating some! You can create circles on Google+ in a few different ways and I delve into each way in the following sections.
Dragging people into the
“Drop Here to Create
a New Circle” circle
To start, go to your Circles page (you can get there by click-ing the little Circles button at the top of Google+ — see Figure 2-1). The Drop Here to Create a New Circle circle appears in the lower left part of your circles. Follow these steps to add someone to this circle:
The Circles button
1. Click any individual you see and drag that person to the Drop Here to Create a New Circle circle.
The person is added to that circle and a new link appears with the words Create Circle (see Figure 2-2).
2. Add as many more people as you like to that circle.
To add more people, drag them just like you did the first person.
3. Click “Create circle.”
A new pop-up box appears with the option to name your new circle and add even more people if you choose. Then do the following to create your circle:
A. Name your circle
B. Add the other people.
C. Click Create Circle with x People. Your circle now appears with all the other circles!
Create Circle link
Chapter 2: Boggling Over Circles and Privacy
31
Clicking the “Drop Here to Create
a New Circle” circle
When you mouse over that circle, notice that the text changes to Create Circle. If you click Create Circle, a dialog box
appears. Follow the instructions in the dialog box to create your new circle.
Mousing over people’s names
to configure circles
In your stream, just about anywhere you see someone’s name you can mouse over it and configure circles the individual belongs to (see Figure 2-3). In the pop-up dialog box that appears when you mouse over the name, you can also add new circles to assign to that individual. Just follow these steps to create a circle using this method:
1. Mouse over the name of the individual you want to create a circle for.
A new pop-up box appears next to the name (see Figure 2-3). In the pop-up box, you will see either a green, rectangular box with the name of one of the circles that individual is in or the text “Add to Circles.”
2. Mouse over the green box.
A new pop-up box appears next to the green box.
You can also follow steps 2 and 3 here on the profile page of any user. Look for the green box in the upper right, mouse over, and you can create a new circle there as well.
3. Click Create Circle.
4. In the text field that appears, name your circle and click Create.
That person is added to the new circle. Now whenever you mouse over the name and the green box you’ll see a check mark next to your new circle. You can now add other people to that circle.
Figure 2-3: Mousing over the name to configure someone’s circles.
Adding People to Your Circles
Now that you’ve created some circles, it’s time to add people to those circles. You can do so exactly like you do to create your circles (as discussed in the last section):1. Drag your friends to the circle on the Circles page. 2. Mouse over each name and check the box next to
Chapter 2: Boggling Over Circles and Privacy
33
3. Visit the user’s profile, mouse over the green circles button in the upper right, and check the boxes next to the circles you want to add them to.
Figure 2-4: Checking the boxes next to the circles you want.
Consuming the Content for
Each Circle
At this point I will assume you’ve created some circles, found some people to make your stream more interesting, and circled those people. If so, you’re ready start consuming their content.
though — adding a boisterous poster like me will very quickly take over the posts of anyone who posts less frequently! You may want to put me in your “noisy” circle.
In Google+, you can choose to take the default route and con-sume everything in every one of your circles, or concon-sume that of a single circle. To choose a specific circle, click one of the circle links on the left (see Figure 2-5) and your stream will change to the content from that particular circle. As you can see from the figure, clicking the Wiley Editors circle on my page produces a list of Wiley editors (well, one of them — the one editing this book).
Wiley Editors circle stream
Figure 2-5: Clicking my Wiley Editors circle produces this book’s Wiley editor.
Chapter 2: Boggling Over Circles and Privacy
35
Regardless, using the circles list makes reading your stream of such a diverse group of people much easier.
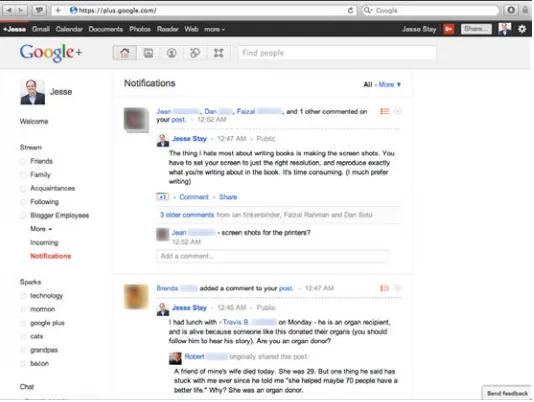
In Figure 2-5, under Wiley Editors, notice the Incoming and Notifications links. The Incoming link takes you to another stream view that shows updates of all the people that have circled you but that you have not circled back. This approach could be a great way not to follow everyone back while stay-ing up with the updates of the people who have circled you. I find this stream view one of the most interesting views on Google+ because it introduces me to new people who are circling me (see Figure 2-6). The Notifications link is just the list of notifications you have received on Google+. This list includes comments, shares, and new people who have circled you, among other things. If you miss a notification from your sandbar notification, just come here and you can catch up on everything (see Figure 2-7).
Figure 2-7: The Notifications stream.
Inviting New People to Google+
Google+ initially launched as an invite-only beta environment, which meant that your friends could use Google+ only if you invited them. Google seems to change their rules on inviting people frequently though, and lo and behold after about nine weeks in closed beta they released Google+ to the masses, dubbing the new service in “open beta,” which is where it is at the time of this writing.Chapter 2: Boggling Over Circles and Privacy
37
Figure 2-8: Click Invite Friends to invite them to Google+.
You can invite friends one of two ways: invite them by e-mail or share a link that they can click. Here’s how you invite them by e-mail:
1. In the right column of your stream view, click Invite Friends.
A new pop-up box appears, prompting you to invite your friends.
2. Click Add More People to Invite.
3. Click the input box and type the next e-mail address. 4. When you’re done, click Send Email.
The people you invited will receive an invitation to join Google+ via an e-mail from you.
Here’s how you invite them with just a link:
1. In the right column of your stream view, click Invite Friends.
When you click this button, a new pop-up box appears prompting you to invite your friends.
2. Copy and paste the link in the pop-up box.
At the bottom of the pop-up box, you’ll be given a link. Just copy that link and paste it into a Facebook status update, Twitter post, or e-mail to share it with your friends. With the link, it’s first come, first served until your number is up, so tell your friends to act fast!
Setting Who Can
See Your Profile
Chapter 2: Boggling Over Circles and Privacy
39
As an example, do just that. Assume that you created a Family circle (currently, that is actually already created for new users of Google+). To set it so your phone number is only vis-ible to family, do this:
1. Click the Profile button at the top of Google+ (see Figure 2-9). You can also just click your name on your stream view.
This takes you to your profile page.
Profile button
Figure 2-9: The profile button at the top of Google+.
2. Click the Edit Profile button in the upper right of your profile.
3. Go down to Home (it highlights a purplish color) and click on it.
A new pop-up box appears (see Figure 2-10), allowing you to add or edit a home phone number and other information.
Figure 2-10: Adding a phone number in Google+.
4. Add your phone number.
Make sure Phone is selected in the drop-down box and enter your phone number in the text box provided.
5. Set the circles you want to see that number.
By default, this is set to Anyone on the Web. You’ll want to do the following:
A. Click the drop-down box and select Custom.
A new dialog box appears that looks a lot like the circles dialog box you encountered when you were creating and adding people to circles ear-lier in this chapter.
B. Click the “X” next to Public.
C. Click the Add More People link and check the box next to your Family circle.
D. Click the “Save” button in the dialog box and you’re done!
6. Click “Done editing.”
Chapter 2: Boggling Over Circles and Privacy
41
Chapter 3
Posting to Google+
In This Chapter
▶ Deciding what to post and who to post to
▶ Knowing who to share to
▶ Knowing what you can share
▶ Moderating your posts
▶ Getting comments on your posts
I
n Chapter 1, you create your first post on Google+. You also find out how to post to Google+ and get the post out to the circles you choose.In this chapter, you dive deeper into posting, using tips I sug-gest to post things that are engaging, that will get comments, and that will target the audiences you’re looking for. I also give you some tips on how you can further target your audi-ence and determine the best methods to write good content that meets the needs of that audience. Lastly, I cover how you can moderate your posts, remove comments, block users, ignore users, and even how to deal with nagging users and trolls.
Knowing What to Post
When you +1 a post on Google+, it’s like “high-fiving” the indi-vidual that wrote the post, and the person who wrote the post can see that you +1d it. It’s a compliment to the person writ-ing to have someone +1 their post. Beyond that, +1writ-ing a post really doesn’t do much else on Google+ at the time I write this.
Sharing posts with only close
friends and family
Believe it or not, this is one of the most common uses of social networking sites such as Facebook. I have an idea that this is why you came to try out Google+. If so, you’ll need to do a few things to ensure that you’re getting what you want from Google+:
✓ Make sure your close friends and family have Google+ accounts and are using them. This should be your first task. If you can’t convince your close friends and family to use Google+, you may be sorely disappointed! Try inviting them by sending them personalized invite e-mails (which you do by sending them an e-mail with the invite link I mention in Chapter 2). You can also refer them to this book so they can find out why they might want to use Google+.
In the end, if you are on Google+ because you want to share better with your close friends and family and your close friends and family simply won’t join, you may end up deciding Google+ isn’t for you. That’s okay! You can find just as much benefit from other tools, such as Facebook.
Chapter 3: Posting to Google+
45
If you want to involve a personal audience, post personal updates!
Be careful posting anything too personal on Google+! If you want to share more personal updates, you may want to consider posting them just to a Close Friends or Family circle. If it’s really personal, consider not post-ing at all — remember, even with circles, anyone can still share what you post to their circles and extended circles!
✓ Create circles specifically for these groups if you will be posting other types of content. You may want to con-sider creating a Family circle or Close Friends circle just for targeting updates to your close friends and family. For example, whenever I post pictures of my children, I always post them to my Close Friends circle and not to the public or other circles. This ensures the privacy and safety of my children, but also keeps my close friends and family receiving a more targeted stream than my normal stream.
✓ Post less frequently to these circles of friends and family. I’ve found that my close friends and family don’t like to see too many updates. I’ve had close friends and family uncircle me (I never take it personally) just because my stream is typically noisy. If you are on Google+ mostly for friends and family, consider their streams — do you want to be the only one dominating their stream, or do you want to leave room for others?
Posting to journal your life
This is one way to post that actually got me started in social media; Google+, Facebook, and other social media sites are great places to keep a running journal of your life, what you’re doing, and how you’re succeeding. Follow these tips if you want to use Google+ to journal:
✓ Focus on accomplishments, not everyday tasks (like what you ate for lunch).
✓ Be sure that if you’re sharing to the world and remain focused on things in your life that people might find interesting.
✓ Consider posting journal-type entries you don’t want the world to see to a circle (maybe name it, well, Journal) with just your e-mail address in it. This way you get a copy sent to your e-mail. You can also go back to that circle on the left of your stream and review your accom-plishments.
Posting to communicate
with specific groups
If you have a user group — let’s say you’re a photographer — you might consider creating a circle (named Photographers) for that group. Share the members of the photographers circle with your Google+ stream so they can also add your photographer friends to their own similar circles. Then, you can keep a tight-knit relationship with those photographers you associate with.
Chapter 3: Posting to Google+
47
Posting to increase the number
of people circling you
Popular marketer and blogger Guy Kawasaki, author of the book Enchantment: The Art of Changing Hearts, Minds, and Actions (Portfolio, 2011) said, “There are only two kinds of Twitter users: those that want more followers and those that lie.” (Check out http://blog.guykawasaki. com/2008/12/how-to-use-twit.html for more.)
Truth be told, we all care about numbers. Having lots of people care about you feels good. There’s a good chance you’re trying to figure out how to get more people reading your posts. Here are some tips to help increase their number:
✓ Post content about things you’re passionate about. Don’t post content you’re not passionate about. What you write about will attract an audience that shares your particular interests. You’ll attract an even larger audi-ence if people believe you really care about the things you’re writing about and if they think they are learning something.
✓ Consider posts with questions or a call to action. If you’re asking your audience a question, there’s a good likelihood that they’ll answer. They’ll also share it with their friends, perhaps causing them to answer and circle you.
✓ Post interesting stuff. I’ve found that funny pictures and videos tend to be shared a lot. Try thought-provoking statements that intrigue people. The more you get them to think, the more they’ll comment and circle you.
Be careful that you don’t tag people too much! Tagging (I cover this in Chapter 7 if you want to skip there for a quick primer) on occasion, especially if your topic is relevant to the people you’re tagging, is okay. However, if you tag them too much, they may block you and be much less likely to circle you and follow your content in the future. Always think about whether tagging an individual in your post is truly something of interest to the individual.
If you’re trying to build an audience, consider always post-ing to the public and uspost-ing specific circles as the excep-tion. If you post only to specific circles, people viewing your profile to see what you post won’t see updates if you haven’t circled them because they are only allowed to see content designated for the circles they are in. If you post to the public, anyone who wants to circle you can see your updates and can have further reason to circle you because you didn’t limit your content to any one audience. Posting to your Public circle will also help you build relationships with people you haven’t met, extending the potential circles you’re in.
Picking Your Audience
Now that you know what to post, it’s time to figure out whom to post to. You can post to different types of people and groups to ensure that your content is shared exactly the way you want.
Posting to circles
I’ve covered this pretty thoroughly in Chapter 2, which explains how to create and add people to circles. When you choose a circle, your post is visible only to that circle.
Chapter 3: Posting to Google+
49
sure that everyone you’re targeting in the circle sees your post, mouse over the circle name after you enter it in the Add More People box, and a new pop-up dialog box will appear (see Figure 3-1). Just check the box next to Notify About This Post, and now everyone in that circle will receive a notifica-tion about your post. Be sure you’re not spamming them when you do this, though! If people believe you’re spamming, they may very well block your posts.
Figure 3-1: Checking Notify About This Post to notify everyone in a circle.
Posting to individuals
In addition to circles, you can post to individual members of Google+. To post to an individual, type the person’s name rather than the name of a circle. To send to multiple individu-als, add more individual names just like you do when posting to multiple circles (see Figure 3-2).
To enter a name, always start by entering a plus (+) sign. This is a good habit — with this method, you can also tag people in posts.
Posting to e-mail addresses
What if the individual isn’t on Google+? Or what if you can’t find them? Just type an e-mail address in place of the individ-ual’s name or a circle name and an e-mail will be sent to that e-mail address with the content of your post.
Knowing who will see your posts
and how they’ll see the posts
You can check any time to see how others will view your posts and your profile information. To see how others can see your profile and posts, follow these steps:
1. Go to your profile page.
To get there you can either click on your name in the upper left or click on the profile icon at the top.
2. Click View Profile As.
You’ll see this link in the upper right in the grayish bar with links to your About page, Buzz, Photos, and so on. After you click it a text box appears.
3. Enter the name of a specific individual or a circle.
A drop-down menu . . . drops down.
4. Select the same individual or circle as you did in Step 3.
5. Click through each part of your profile to see how that individual or circle is seeing your profile and click on Posts to see which of your posts they’re seeing.
Chapter 3: Posting to Google+
51
Sharing, Resharing, and
Commenting on Posts
To share a link, click the link icon in the post box. You can also paste the link inside your post to automatically attach a link to your post (see Figure 3-3).
Figure 3-3: Sharing a link on Google+.
To share an image, click the image icon in the post box. You can then choose to upload a new image, or if you’re on a phone, upload from your phone’s camera (see Figure 3-4).
Resharing others’ posts
Figure 3-4: Sharing an image on Google+.
Chapter 3: Posting to Google+
53
To get to the original post of a person that is being reshared, there is no permalink (a unique link) back to the original post. Instead, you have to click on the original poster’s name and find the post in their stream. Daunting, I know, but until Google+ fixes this (maybe by the time you read this they will), this is the only way to do it!
Getting people to comment
on your posts
This brings me to a question I often hear: “How can I get people commenting on my posts?” If someone joins Google+, and it’s quiet, usually it’s because they’re not circling the right people or posting the right content. Other times it’s because they’re not getting people to circle you (refer to the “Posting to increase the number of people circling you” sec-tion earlier in the chapter). Here are some quick tips for get-ting more comments:
✓ Create engaging, thought-provoking posts that entice people to comment (questions are always great).
✓ Comment, and comment often, on others’ posts. They’ll remember you and start to respond (assuming your com-ments are engaging).
✓ Follow interesting people and share their content. Tag them with your thoughts on the content and end with a question.
Mentioning others in
posts and comments
Moderating Your Posts
It won’t be long before you get a spammer or troll comment-ing on your posts. The bigger Google+ gets, the more spam-mers you’ll start to see. This is especially true on public posts — spammers see this as an opportunity to generate links back to their websites, increasing search engine optimi-zation rankings.
Search engine optimization (or SEO) is the process of ranking your website high in search engines, and there are all kinds of techniques for doing so. One of the most prominent ways is to get as many links as you can throughout the web back to your website (which I don’t recommend, unless it’s others, not you, linking back to your website).
Moderation is the process of managing these spammers or trolls on your posts. In the following sections, I cover some common ways you can moderate your posts if they ever get out of hand.
Editing your posts
Make a mistake? Here’s how you can edit your posts:
1. Click the triangle located in the upper right corner of your post (see Figure 3-6).
A drop-down menu appears.
2. Choose Edit This Post and edit the post as you want. 3. Click Save.
Chapter 3: Posting to Google+
55
Figure 3-6: Selecting the triangle in the upper right corner to edit the post.
Deleting your posts
Deleting your post is easy. Just click the little triangle in the upper right corner of the post and select Delete This Post. You may be prompted to confirm your choice. Once you con-firm, the post is gone!
Muting posts
You may have a post you don’t want to see anymore. Maybe it’s offensive. Maybe you’re just not interested. Maybe the com-ments notifications are getting irritating. Whatever the case, to mute a post, click the little triangle in the upper right corner of the post and select Mute This Post and it disappears from your stream never to be seen again (unless you unmute the post, which you can do by just clicking “unmute” at any time).
Deleting comments
Figure 3-7: Deleting your own comment.
Deleting someone else’s comment is a little more complicated. Follow these steps:
1. Click the little arrow in the upper right corner of the post with the comment you want to delete (see Figure 3-8).
2. Click Report or Remove Comments.
Little “x” buttons and flag buttons appear next to each