Set up
workflows for
teams or freelancers
Manage
color across
all CS5 applications
Get
more productive
and
more creative
Ted Padova, Kelly L. Murdock
Adobe
®Creative Suite
®10475 Crosspoint Boulevard Indianapolis, IN 46256
www.wiley.com
Copyright © 2010 by Wiley Publishing, Inc., Indianapolis, Indiana Published by Wiley Publishing, Inc., Indianapolis, Indiana Published simultaneously in Canada
ISBN: 978-0-470-58476-7
Manufactured in the United States of America 10 9 8 7 6 5 4 3 2 1
No part of this publication may be reproduced, stored in a retrieval system or transmitted in any form or by any means, electronic, mechanical, photocopying, recording, scanning or otherwise, except as permitted under Sections 107 or 108 of the 1976 United States Copyright Act, without either the prior written permission of the Publisher, or authorization through payment of the appropriate per-copy fee to the Copyright Clearance Center, 222 Rosewood Drive, Danvers, MA 01923, (978) 750-8400, fax (978) 646-8600. Requests to the Publisher for permission should be addressed to the Permissions Department, John Wiley & Sons, Inc., 111 River Street, Hoboken, NJ 07030, 6011, fax 201-748-6008, or online at http://www.wiley.com/go/permissions.
LIMIT OF LIABILITY/DISCLAIMER OF WARRANTY: THE PUBLISHER AND THE AUTHOR MAKE NO REPRESENTATIONS OR WARRANTIES WITH RESPECT TO THE ACCURACY OR COMPLETENESS OF THE CONTENTS OF THIS WORK AND SPECIFICALLY DISCLAIM ALL WARRANTIES, INCLUDING WITHOUT LIMITATION WARRANTIES OF FITNESS FOR A PARTICULAR PURPOSE. NO WARRANTY MAY BE CREATED OR EXTENDED BY SALES OR PROMOTIONAL MATERIALS. THE ADVICE AND STRATEGIES CONTAINED HEREIN MAY NOT BE SUITABLE FOR EVERY SITUATION. THIS WORK IS SOLD WITH THE UNDERSTANDING THAT THE PUBLISHER IS NOT ENGAGED IN RENDERING LEGAL, ACCOUNTING, OR OTHER PROFESSIONAL SERVICES. IF PROFESSIONAL ASSISTANCE IS REQUIRED, THE SERVICES OF A COMPETENT PROFESSIONAL PERSON SHOULD BE SOUGHT. NEITHER THE PUBLISHER NOR THE AUTHOR SHALL BE LIABLE FOR DAMAGES ARISING HEREFROM. THE FACT THAT AN ORGANIZATION OR WEBSITE IS REFERRED TO IN THIS WORK AS A CITATION AND/OR A POTENTIAL SOURCE OF FURTHER INFORMATION DOES NOT MEAN THAT THE AUTHOR OR THE PUBLISHER ENDORSES THE INFORMATION THE ORGANIZATION OR WEBSITE MAY PROVIDE OR RECOMMENDATIONS IT MAY MAKE. FURTHER, READERS SHOULD BE AWARE THAT INTERNET WEBSITES LISTED IN THIS WORK MAY HAVE CHANGED OR DISAPPEARED BETWEEN WHEN THIS WORK WAS WRITTEN AND WHEN IT IS READ.
For general information on our other products and services or to obtain technical support, please contact our Customer Care Department within the U.S. at (877) 762-2974, outside the U.S. at (317) 572-3993 or fax (317) 572-4002. Library of Congress Control Number: 2010928465
From Kelly Murdock:
There are doctors of medicine and doctors of law
And doctors who specialize in the muscles of the jaw.
There are doctors of history and doctors of prose
And doctors who can identify forty-seven kinds of rose.
Some doctors give shots, and some give out pills,
And most recommend rest for a case of the chills.
Some doctors are kind, and most are quite smart,
But often they speak while focused on your chart.
But the best kind of doctors have one common goal:
versions 4, 5, 6, 7, 8, and 9; PDF Forms Using Acrobat and LiveCycle Designer Bible; Color Management for Digital Photographers Only; Color Management for Digital Photographers For Dummies; Photoshop Elements 8 For Dummies; PowerPoint 2007 Just the Steps For Dummies; Illustrator Illuminated; and Adobe Reader 7 Revealed.
Ted was involved in PostScript imaging for more than a decade and started a computer service bureau in 1990 in Ventura, California. He retired as CEO and managing partner of The Image Source Digital Imaging and Photo Finishing Centers of Thousand Oaks and Ventura, California, in 2004.
He currently is involved in helping third-world nations develop electronic workflows for automat-ing online government forms processautomat-ing. He continues to spend additional time writautomat-ing and speak-ing nationally and internationally on Acrobat PDF forms, eGovernment, and digital imagspeak-ing.
Kelly L. Murdock has been authoring computer books for several years and still gets immense enjoyment from the completed work. His book credits include various Web, graphics, and
multi-media titles, including multiple editions of 3ds Max Bible. Other major accomplishments include
Master VISUALLY HTMLandXHTML, Maya Revealed, Poser Revealed, Edgeloop Character Modeling, JavaScript Visual Blueprint,Adobe Atmosphere Bible,3D Game Animation For Dummies, and
coauthor-ing duties on two editions of the Illustrator Bible.
Senior Acquisitions Editor Stephanie McComb
Project Editor Martin V. Minner
Technical Editor Lisa Sihvonen-Binder
Copy Editor Gwenette Gaddis
Editorial Director Robyn Siesky
Business Manager Amy Knies
Senior Marketing Manager Sandy Smith
Vice President and Executive Group Publisher
Richard Swadley
Vice President and Executive Publisher Barry Pruett
Project Coordinator Katie Crocker
Graphics and Production Specialist Andrea Hornberger
Quality Control Technicians Laura Albert
Melissa Cossell
Part I: Getting Started with Workflow Solutions
1
Chapter 1: Introducing the Adobe Creative Suite . . . .3
Understanding the Creative Suite ...3
Adobe Photoshop CS5 ...4
Adobe Illustrator CS5 ...5
Adobe InDesign CS5 ...6
Adobe Flash CS5 Professional ...7
Adobe Dreamweaver CS5 ...8
Adobe Fireworks CS5...9
Adobe Acrobat Professional 9 ...10
Adobe Bridge and Mini-Bridge ...11
CS Live ...12
Device Central CS5 ...12
Why Creative Suite? ...13
Native file support ...13
Consistent user interface ...14
Consistent color management ...14
Dynamic object and image editing ...15
Visual file exchanges ...15
Support for PDF ...15
Design for screen devices ...16
Summary ...16
Chapter 2: Taking a Tour of the Creative Suite . . . . 17
Starting with a Sketch in Acrobat ...17
Scanning a sketch into Acrobat ...18
Submitting a sketch for e-mail review ...19
Adding comments to the PDF ...20
Editing Images in Photoshop ...23
Creating a Layout in InDesign ...35
Setting layout properties...35
Importing content into InDesign ...35
Importing from Adobe Flash ...37
Creating Master pages in InDesign ...37
Threading text ...39
Reviewing with CS Live ...42
Preparing a Layout for Print ...44
Previewing separations ...44
Exporting to PDF for printing ...46
Soft-Proofing in Adobe Acrobat...46
Checking color in Acrobat ...47
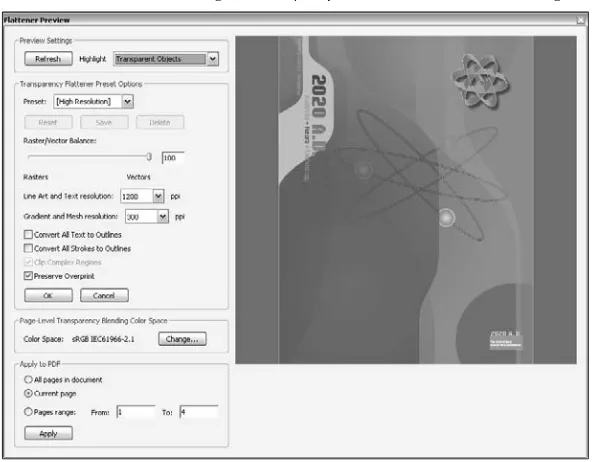
Flattening transparency ...47
Creating a PDF/X file ...48
Repurposing a Document for Web Hosting ...51
Prototyping Web Pages in Fireworks ...51
Exporting to Dreamweaver ...52
Enhancing Web pages with Flash ...55
Summary ...57
Chapter 3: Understanding User Interfaces . . . . 59
Accessing Tools ...59
Common tools for Illustrator, InDesign, Photoshop, Flash, and Fireworks ...63
Common tools for Illustrator and InDesign ...64
Common tools for Illustrator, Photoshop, Flash, and Fireworks ...65
Adobe Bridge tools ...65
Using Panels and Workspaces ...82
Managing panels ...83
Illustrator, Photoshop, InDesign, Fireworks, Dreamweaver, and Flash panels .... 84
Acrobat panels ...86
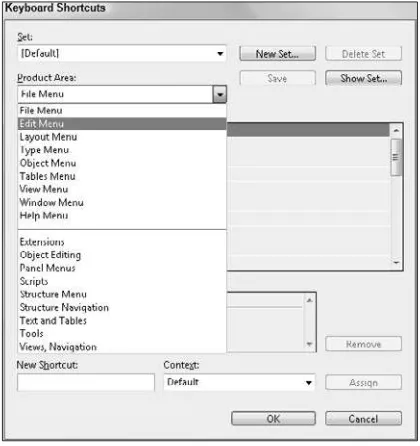
Customizing keyboard shortcuts in Illustrator ...94
Customizing keyboard shortcuts in Photoshop ...97
Customizing keyboard shortcuts in InDesign ...98
Customizing keyboard shortcuts in Flash, Fireworks, and Dreamweaver ...101
Working with keyboard shortcuts in Acrobat ...102
Summary ...102
Part II: Getting Started with Design Workflows
103
Chapter 4: Creating Production Workflows . . . . 105
Understanding Workflows ...105
Workflows for Independent Artists ...107
Modifying designs ...109
Extending the workflow ...109
Workflows for Studios and Production Houses ...110
Document Repurposing ...111
Setting Workflow Standards ...113
Set standards for the tools used in your workflow ...113
Use vendors who support the tools you use ...113
Devote time to ongoing training ...114
Develop a paradigm for managing your projects ...114
Summary ...116
Chapter 5: Creating Color Managed Workflows . . . . 117
Color Management in the CS5 Applications ...124
Chapter 6: Using Adobe Bridge . . . . 131
Getting Familiar with the Bridge Workspace ...131
Using the Bridge interface ...133
Working with Keywords and Metadata ...156
Using Keywords ...156
Using the Camera Raw plug-in ...173
Applying settings in Bridge ...181
Saving camera raw files ...182
Synchronizing Color across the CS5 Programs ...183
Enabling Application Commands from the Bridge ...186
Chapter 7: Managing Adobe PDF Files . . . . 195
Using the Organizer Tool in Acrobat ...196
Using the Categories pane ...197
Viewing PDF Files ...199
Using the Pages pane ...201
Summary ...201
Part III: Working with Objects and Images
203
Chapter 8: Creating, Selecting, and Editing Objects and Images . . . . 205
Creating Objects in Illustrator ...205
Using the Pen tool ...206
Using the Type tool ...209
Creating lines and shapes ...210
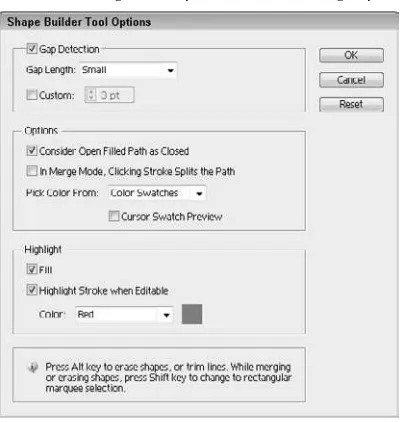
Using the Shape Builder tool ...211
Using the Paintbrush and Pencil tools ...212
Using the Blob Brush and Eraser tools ...214
Creating Objects in InDesign ...216
Creating and Editing Objects in Acrobat ...224
Working with images in the other CS5 applications ...231
Rasterizing objects ...232
Using Live Trace ...235
Selecting Objects ...239
Using Illustrator and InDesign’s Toolbox selection tools ...240
Using Illustrator’s other selection tools ...241
Using Photoshop’s other selection tools ...241
Selecting objects with Illustrator’s Layers palette ...242
Using Illustrator’s Select menu ...242
Selecting Pixels in Photoshop ...243
Using the Selection tools ...243
Using the Marquee selection tools ...244
Using the Lasso selection tools ...246
Using the Quick Selection and Magic Wand tools ...246
Using the Selection menu ...248
Selecting a color range ...248
Modifying a selection ...249
Transforming selections ...249
Converting drawn paths into selections ...250
Organizing Objects ...250
Adding objects to layers ...250
Grouping objects ...251
Hiding and locking objects ...251
Filling and Stroking Objects ...252
Applying fill and stroke colors to objects in Illustrator and InDesign ...252
Applying other stroke attributes ...254
Using Illustrator’s Width tool ...256
Using Illustrator’s Live Paint ...259
Converting objects to Live Paint ...259
Using the Live Paint tools ...260
Adding paths to a Live Paint object...261
Editing Live Paint paths ...261
Releasing and expanding a Live Paint group ...262
Managing fill gaps ...262
Filling and stroking a pixel selection ...263
Filling and stroking a Photoshop path ...266
Assigning Color ...266
Learning the various color modes ...267
Using the Eyedropper tool...274
Using Photoshop’s Eyedropper tool ...275
Using Illustrator’s Eyedropper tool ...275
Using InDesign’s Eyedropper tool ...275
Using Live Color ...276
Using the Color Guide palette ...279
Mixing colors in Photoshop ...279
Managing color profiles and settings ...280
Working with Gradients ...281
Using the Gradient palette ...281
Using the Gradient tool ...283
Creating gradient meshes in Illustrator ...286
Using Transparency ...287
Applying transparency to objects and images ...288
Using blending modes ...288
Creating an opacity mask ...290
Editing Objects ...292
Editing paths in Illustrator ...292
Using the Smooth and Path Erase tools...292
Using the Reshape tool ...294
Other methods to editing paths ...295
Simplifying and cleaning up paths ...295
Splitting objects into grids ...296
Cutting objects ...297
Creating compound paths and shapes in Illustrator ...297
Creating compound paths ...297
Using Pathfinder features ...298
Using InDesign’s Pathfinder tools ...298
Blending objects in Illustrator...299
Creating a clipping mask in Illustrator ...301
Distorting objects in Illustrator ...301
Using the Liquify tools ...301
Using the Envelope Distort command in Illustrator ...303
Editing Images ...304
Cropping images in Photoshop ...304
Summary ...305
Chapter 9: Using Patterns, Symbols, and Styles . . . . 307
Working with Patterns ...307
Using patterns in Illustrator ...307
Using patterns in Photoshop ...309
Using Symbols ...310
Working with symbols in Illustrator ...310
Accessing symbol libraries ...311
Inserting, editing, and creating symbols ...312
Using Graphic Styles and Swatches ...314
Working with object styles in InDesign ...315
Working with graphic styles in Illustrator and Photoshop ...316
Creating new styles ...317
Working with swatches ...317
Using the Swatches palette ...317
Creating Custom Swatch libraries ...317
Sharing swatches between CS5 applications ...318
Using the Library palette in InDesign ...318
Exporting snippets ...320
Using Photoshop’s Preset Manager ...320
Summary ...321
Chapter 10: Acquiring and Correcting Images . . . . 323
Scanning Images in Photoshop ...323
Acquiring Digital Camera Images ...326
Using camera raw ...326
Understanding Digital Negative specification ...327
Correcting red eye ...327
Using the Lens Correction filter ...327
Correcting Images ...330
Using Levels ...330
Using Curves ...331
Using Auto adjustments ...332
Using Photoshop’s Adjustments Panel ...334
Editing 32-bit High Dynamic Range Images ...336
Retouching images in Photoshop ...338
Using the Stamp tools ...338
Using the Healing Brush and Patch tools ...339
Using the Spot Healing Brush ...341
Using the Color Replacement tool ...341
Using the Eraser tools ...342
Distorting images ...342
Summary ...343
Chapter 11: Transforming Objects and Images . . . . 345
Using the Shear tool ...354
Using the Free Transform tool ...356
Using the Transform menu ...359
Using Transform Again ...360
Using Transform Again in InDesign ...363
Using the Transform Each dialog box ...363
Rotating and flipping InDesign objects ...366
Rotating and flipping in Photoshop ...367
Using the Transform palette ...367
Using the Transform palette in Illustrator and InDesign ...367
Transforming Patterns and Fills ...369
Controlling stacking order using layers ...380
Changing stacking order with the Arrange menu ...381
Changing stacking order with the Clipboard ...381
Changing stacking order within a group ...381
Stacking order in Photoshop and Flash ...381
Changing Z-Index in Dreamweaver ...382
Aligning and Distributing Objects ...382
Aligning objects...383
Distributing objects ...383
Distributing spacing ...383
Aligning and Distributing Image Layers in Photoshop ...385
Aligning image layers ...386
Distributing image layers ...386
Using Smart Guides...386
Summary ...387
Chapter 12: Applying Effects to Objects and Images . . . . 389
Using Photoshop Filters ...389
Accessing the Filter Gallery ...390
Using the Preview pane ...391
Using the Filter pane ...391
Using other filters ...394
Blurring an image ...395
Distorting an image ...400
Adding noise to an image ...402
Removing noise and JPEG artifacts ...402
Using the Pixelate filters ...403
Using the Render filters ...405
Using the Lighting Effects filter ...406
Sharpening an image ...410
Using Photoshop effects in Illustrator ...422
Using Smart Filters ...422
Using Filters in Flash ...423
Using Illustrator Effects ...423
Rasterizing effects ...425
Using the Convert to Shapes effects ...425
Using the Distort & Transform effects ...426
Using the Stylize effects ...428
Using the Warp effects ...429
Using Photoshop’s Layer Effects and Styles ...431
Applying Effects in InDesign ...432
Adding drop shadows ...433
Feathering objects ...434
Using Live Corner Effects ...434
Summary ...436
Chapter 13: Working with 3D Objects . . . . 437
Working with 3D Objects in Photoshop ...437
Loading and Exporting 3D Objects ...437
Transforming 3D Objects ...438
Creating 3D Objects in Photoshop ...441
Painting 3D Objects ...444
Managing 3D Scenes ...446
Applying Materials ...447
Using Lights and Shadows...448
Rendering 3D Objects ...448
Using 3D and video layers ...450
Creating 3D Objects in Illustrator ...451
Revolving objects ...455
Rotating objects ...456
Summary ...456
Part IV: Working with Type
457
Chapter 14: Working with Fonts . . . . 459
Understanding Fonts ...459
Font formats...459
Advantages of OpenType fonts ...461
Font licenses ...462
Managing Fonts ...462
Installing fonts in Mac OS X ...463
Installing fonts in Windows ...463
Organizing your fonts ...464
Using font-management tools ...465
Using Font Book (Macintosh) ...465
Using FontAgent Pro ...466
Creating Type Outlines and Special Effects ...468
Converting type to outlines in Illustrator ...469
Creating type effects in Illustrator ...469
Creating type masks in Illustrator ...470
Converting raster type to vector type ...470
Converting type to outlines in Photoshop ...473
Converting type to outlines in InDesign ...476
Creating type effects in InDesign ...476
Creating type masks in InDesign ...476
Summary ...480
Chapter 15: Working with Styles . . . . 481
Setting Type ...482
Setting type in Illustrator ...482
Creating point type ...482
Creating area type ...486
Using OpenType ...489
Combining point type and area type ...490
Using placeholder text ...505 Using character styles in InDesign ...516 Creating new character styles ...516 Applying character styles ...517 Creating Paragraph Styles ...518 Using paragraph styles in Illustrator ...518 Creating new paragraph styles ...518 Applying paragraph styles ...520 About overrides ...520 Using paragraph styles in InDesign ...520 Creating new paragraph styles ...520 Applying paragraph styles ...521 Creating Nested Styles ...521 Creating Cell and Table Styles ...527 Creating a table style ...527 Creating cell styles...528 Applying table styles ...529 Using Graphic and Object Styles ...532 Using graphic styles in Illustrator ...532 Using graphic styles in Photoshop ...536 Using object styles in InDesign ...538 Summary ...542
Creating Text Wraps ...561 Importing text wraps into InDesign ...566 Using InDesign text-wrap options ...568 Summary ...572
Chapter 17: Working with Special Characters . . . . 573
Working with Glyphs Palettes ...573Part V: Using Creative Suite and Microsoft Office
583
Using Adobe Buzzword ...605 Accessing Adobe Buzzword ...606 Using Adobe Buzzword ...606 Importing Buzzword Documents in InDesign ...608 Summary ...609
Chapter 19: Exporting Text to Microsoft Word . . . . 611
Exporting Text ...611 Recognizing the advantages of Word ...612 Identifying exporting methods ...613 Selecting text ...613 Exporting formatting ...613 Using the Clipboard ...614 Moving Illustrator, Photoshop, Flash, and Dreamweaver text into Word ...615 Moving InDesign text to Word ...616 Moving Acrobat text to Word ...616 Using Export Menu Commands ...617 Exporting Illustrator text ...617 Exporting text from InDesign ...618 Exporting text from Acrobat ...618 Exporting comments from Acrobat (Windows only) ...621 Dynamic Text Editing ...622 Summary ...627Deleting rows and columns ...645 Changing row and column dimensions ...649 Evenly distributing rows and columns ...650 Aligning cell content ...650 Altering cell strokes and fills ...650 Using Cell Styles ...651 Using the Story Editor ...651 Exporting tagged tables from InDesign ...651 Summary ...652
Part VI: Integrating Creative Suite Documents
653
Using SWF Files in Acrobat ...682 Converting Web pages to PDF ...682 Importing SWF files in PDF documents ...684 Summary ...687
Setting the display quality ...724
Adding pages to a site...816 Updating pages ...817 Creating Web Pages in Dreamweaver ...818 Building Web pages and using views ...818 Using the Web page tools ...819 Changing object properties ...821 Adding Web page text ...821 Linking Web pages ...822 Working with Basic Objects and images ...822 Cascading Style Sheets ...826 Using the CSS Editor ...827 Defining styles ...828 Applying styles ...828 Creating an external style sheet ...828 Designing for Mobile Devices ...829 Creating new Dreamweaver documents for Mobile Devices ...829 Previewing mobile pages in Device Central ...830 Converting existing documents to XHTML Mobile ...831 Preparing to Publish a Web Site ...831 Setting up Internet access ...831 Publishing a Web Site Using Dreamweaver ...836 Connecting to a server ...836 Uploading, downloading, and synchronizing files ...837 Importing a Web site ...837 Exporting a Web Site ...837 Summary ...838
Part VII: Preparing Documents for Deployment
839
Securing Files with Attachments ...853 Creating security policies ...854 Using Security Envelope ...858 Summary...861
Chapter 26: Adding Interactivity to Documents . . . . 863
Creating Hyperlinks ...863 Creating links and buttons in InDesign ...864 Specifying a hyperlink destination ...866 Creating a new hyperlink ...867 Testing hyperlinks ...868 Creating buttons ...868 Setting button options and behavior ...868 Setting button states ...871 Creating links and buttons in Acrobat ...871 Creating icon appearances ...871 Using Preview and Trim settings ...893 Using Compatibility settings ...894Automating PDF Form Creation ...916 Using the Form Wizard ...917 Authoring form designs ...919 Preparing files for auto field detection ...919 Understanding Form Fields ...922 Assigning Form Field Properties ...925 Using the mini Properties window ...925 Using the Properties window...925
Creating Presentations Online ...982 Creating interactivity in Full Screen mode ...989 Creating links and buttons for cross-document linking ...989 Using interactive devices ...990 Summary ...990
Chapter 29: Redacting Documents . . . . 991
Using the Redaction Tools ...994 Redacting PDF Files ...998 Summary ...1002Part VIII: Deploying Documents
1003
Chapter 30: Getting to Know Acrobat.com . . . 1005
Obtaining an Adobe ID ...1005 Knowing the Acrobat.com Services ...1007 Logging onto Acrobat.com ...1009 Summary ...1011Using Index Files ...1034 Customizing the appearance of a portfolio ...1050 Securing portfolios ...1050 Sharing Files via E-mail ...1051 Using Acrobat as your e-mail client ...1052 Sharing Files via Acrobat.com ...1054 Understanding the Comment and Markup Tools ...1060 Creating an Attach for Email Review ...1062 Initiating an Attach for Email Review ...1062 Participating in a review ...1067 Recipient participation ...1067 Author participation ...1068 Using the Tracker ...1068 Viewing documents in the Tracker ...1069 Forms Tracker ...1070 RSS (Subscriptions) ...1070 Working with Shared Reviews ...1071 Using network folders ...1072 Setting up shared reviews on Acrobat.com ...1075 Working offline ...1078 Summary ...1079
Hosting a Session ...1089 Summary ...1092
Part IX: Printing and Digital Prepress
1093
PostScript options ...1134 Color Management ...1135 Printing PDF files to PostScript devices ...1136 Summary ...1136
Chapter 36: Commercial Printing . . . 1137
Soft-Proofing Documents in the CS Programs ...1137 Soft-proofing files in InDesign ...1138 Proofing and Printing in Acrobat Pro ...1145 Soft-proofing menu commands ...1145 Preflighting a file in Acrobat ...1158 Producing a PDF/X-compliant file ...1159 Creating new preflight profiles ...1160 Creating a preflight droplet ...1161 Packaging Documents for Commercial Printing ...1162 PDF creation in Illustrator ...1162 PDF creation in InDesign ...1163 Summary ...1164T
Gaddis, and the many other editors at Wiley who are always a pleasure to work with. Additionally, we would like to thank the many individuals at Adobe Systems, far too numerous to mention, who have worked passionately on a terrific suite of programs to bring all of us the most advanced soft-ware applications developed to date for the creative professional.
From Ted Padova: I’d like to thank my coauthor Kelly Murdock for his hard work and dedication to this project. This is the fifth edition Kelly and I have worked on together, and it’s continually a pleasure to work with him. Without Kelly, I’d be lost when it comes to 3D imagery, Adobe Flash, and Adobe Dreamweaver. Kelly’s coverage of these areas is a special bonus for this book in addi-tion to so many other areas he worked on.
I’d also like to thank some of the people who are continually helpful in working with the Adobe User Group in Davao City, Philippines. There are many. Some very generous assistance has been provided by Chris Cubos, Blogie Robillo, and MiGs™.
And for those who have been great assistance in advancing eForms for government in the Philippines through more extended use of the Creative Suite products, I’d like to thank Director General of the National Computer Center and Commissioner for Information and Communications Technology, Tim Diaz de Rivera; Undersecretary for the Department of Trade and Industry, Mirasol Cruz; CEO of Lane Systems, Rodney Jao; Area Regional Director, Doris Delima; attorney Lucky Balleque, engineer Edwin Banquerigo; Maria Socorro Hernandez, Ike Serenes, Robert Mark O. Lauzon, Pete Malvicini, and many other friends at Asian Development Bank.
A special thank you goes to a great fan, Malou Pelletier.
W
available from all the Creative Suite 5 (CS5) programs and how the documents you create from the individual applications work together to help you publish content for print, screen, Web hosting, and CD-ROM replication.
Much has changed from the earlier Creative Suite programs to the newest incarnation of the Creative Suite. Adobe has made a large investment in supporting interactive features in the CS5 products — particularly with Adobe InDesign CS5. In an effort to keep traditional users interested in new product features, Adobe has devoted equal investment for print professionals.
So why would we spend time covering subjects that are individually treated in other Wiley Bible publications? That’s a good question, and the answer should be clear to you before you walk out of your local bookstore with this sizeable volume. It’s true that there is a Wiley Bible covering each of the individual programs mentioned in this book. These other works are comprehensive and teach you about almost every tool and feature related to the specific programs.
This book is much different from the other Bibles. Our primary focus is to cover workflow solu-tions for independent designers and members of design teams working in agencies, publication houses, and any firm related to publishing for screen, print, or Web. Therefore, we don’t go into minute detail on each program, and often we point you to one of the other fine Wiley publications to amplify your learning.
We assume you have some experience in at least one of the programs covered in this book. You may be a designer who works religiously with Adobe Photoshop, QuarkXPress, or a non-Adobe program. Or you may work with Adobe Illustrator and Adobe Photoshop, but know little about page-layout programs. You need to know essential methods for integrating application documents among the CS5 programs. Perhaps you don’t need to know every aspect of Adobe InDesign, but you want to create sophisticated layouts using many outstanding type features and want to know how to import images in your designs, prepare interactive documents, or import Adobe Flash files.
If you’re switching from another program or you want to add one of the CS5 applications to your design toolbox, this book helps you understand the relationships among programs and how to seamlessly integrate files among the most sophisticated suite of software applications ever devel-oped for creative professionals.
productivity without having to master every feature in a program. The tools and tasks related to office workers and business professionals have been left out. Rather, the emphasis is on complete coverage of tools and workflows to help creative professionals get up to speed fast.
How to Read This Book
The Adobe Creative Suite 5 Bible is made up of 36 chapters in nine parts. Unlike other comprehen-sive computer publications that target beginning users, this volume assumes you have some basic knowledge of at least one imaging program like Photoshop, an illustration program, or a layout program. We further assume you know something about user interfaces common to imaging pro-grams that use palettes, menus, and tools. And we make the assumption that you know some aspects of the professional printing market for commercial prepress and printing.
Because you have some knowledge of computer programs similar to those found in the Creative Suite, you can jump in anywhere and learn about any feature set. In most chapters, we include a discussion concerning the integration of the CS5 programs. Therefore, a chapter dealing with text includes text handling not only in InDesign, but also in Illustrator, Photoshop, Dreamweaver, and Acrobat. Rather than think of the programs you want to learn about, search more for the tech-niques and features you want to learn.
To give you a broad idea of how the programs work together, we recommend you look over Chapter 2, where we provide steps you can replicate to produce a design piece using the CS5 pro-grams. Chapter 3 helps you understand the interoperability of the CS5 propro-grams.
Apart from Chapter 2 and the specific features you want to learn, keep in mind that this book, like other Wiley Bible publications, is a reference work. Keep it handy as you work in the CS5 applica-tions, and refer to the index and contents when you need help working on a task or trying to fur-ther understand one of the programs.
Icons
What would a Bible be without icons? The use of icons throughout the book offers you an at-a-glance hint of what content is being addressed. You can jump to the text adjacent to these symbols to help you get a little more information, warn you of a potential problem, or amplify the concept being addressed in the text. In this book, you’ll find the following icons:
Caution
A caution icon alerts you to a potential problem in using one of the CS applications, any tools or menus, or any issues related to exchanging files between programs. Pay close attention to these caution messages to avoid some problems. n
Note
Tip
Tips help you find shortcuts to produce results or work through a series of steps to complete a task. Some tips provide you with information that may not be documented in the Help files accompanying each of the CS programs. n
Cross-Ref
Walking you through steps and techniques in a linear fashion is almost impossible for a suite of programs. The applications have so many interrelated features that covering all aspects of a single feature in one part of a book just doesn’t work. Therefore, some common features for commands, tools, actions, or tasks may be spread out and discussed in different chapters. When the information is divided among different parts of the book, you’ll find a Cross-Ref icon that refers you to another part of the book covering related information. n
The Book’s Contents
To simplify your journey through the Creative Suite applications, the book is broken up into nine separate parts. The 36 chapters address features common to creative production workflows. These parts are covered in the following sections.
Part I: Getting Started with Workflow Solutions
To begin, we offer some basic information related to the Creative Suite Premium Edition. We give you a tour of the programs in the form of steps to produce design pieces and teach you how these applications work together to help you publish your content. You learn how to set up the work environments in all the programs and understand the different user interfaces both common and unique to each program.
Part II: Getting Started with Design Workflows
Design workflow is a broad term and may mean different things to different people. This part clari-fies the meaning of workflow solutions as they apply to creative professionals and the CS applica-tions, as well as introduces you to tools for versioning documents and creating consistent color across the CS programs.
Part III: Working with Objects and Images
Part IV: Working with Type
Setting type and working with type as text and objects are standard design practices everyone uses. With many features for setting type in the CS5 applications, this part offers you a glimpse into how you can use the programs to implement these impressive features.
Part V: Using Creative Suite and Microsoft Office
Whether Microsoft Office is part of your design toolbox or you acquire files from clients who pro-vide you with Office documents, it’s hard to talk about layout and design without introducing Office files. This part covers working with files that originate in Office programs and end up in one or more of the CS5 applications.
Part VI: Integrating Creative Suite Documents
The CS5 applications offer you tools to create artwork. Bringing together the documents created in each of the individual programs into single files and portfolios is what you’ll find in the chapters in Part VI.
Part VII: Preparing Documents for Deployment
Among other things, you’ll want to know what options you have for securing your files and for optimizing files for efficient distribution and what sources are available to you for sharing files. This part covers many issues related to preparing files for deployment.
Part VIII: Deploying Documents
After you prepare files for deployment, it’s time to exchange, review, and share files. With many new options for sharing, you’ll want to carefully look over the Web conferencing and sharing opportunities available with Acrobat.com that we cover in this part.
Part IX: Printing and Digital Prepress
Printing files is still a major function of every creative professional’s workflow. This part covers printing to composite printers and preparing files for commercial printing.
Staying Connected
Internet connection
With newer releases of computer software, it’s essential that you have an Internet connection. The CS5 programs routinely prompt you to check for updates over the Internet. To optimize your performance with all the programs, you should run the software on a computer that has an Internet connection.
Contact Adobe Systems
Adobe Systems maintains a comprehensive Web site where you can find information on product upgrades, conferences and seminars, aftermarket books, help and technical support, as well as tips
and techniques. Visit Adobe’s Web site at www.adobe.com for the latest news related to all the
CS5 applications. Be certain to look over Chapter 6 where you can find easy access to Adobe’s Web pages carrying tips and techniques from within Adobe Bridge.
Registration
Regardless of whether you purchase the Creative Suite or individual applications, Adobe Systems has made it possible to register the product. You can register on the Web or mail a registration form to Adobe. You’ll find great advantages in being a registered user. First, update information will be sent to you, so you’ll know when a product revision occurs. Second, information can be distributed to help you achieve the most out of using all the Creative Suite programs. By all means, complete the registration. It will be to your benefit.
Contacting Us
If, after reviewing this publication, you feel some important information was overlooked or you have any questions concerning the Creative Suite programs, you can contact us and let us know your views, opinions, hoorahs, complaints, or provide information that might get included in the next revision. If it’s good enough, you might even get a credit line in the acknowledgments. By all means, send a note. E-mail inquiries can be sent to:
Ted at [email protected]
Kelly at [email protected]
You also can find us on Facebook.
Part I
Getting Started with
Workfl ow Solutions
IN THIS PART
Chapter 1
Introducing the Adobe Creative Suite
Chapter 2
Taking a Tour of the Creative Suite
Chapter 3
Understanding User Interfaces
T
his part begins with an overview of the AdobeAdobe Creative
IN THIS CHAPTER
Understanding why Adobe developed the Creative Suite Knowing the Creative Suite
applications
T
he Adobe Creative Suite 5 Design Premium package is composed ofseveral programs designed to work together to accomplish all your publishing needs for output to print, screen viewing, and Web hosting. Instead of marketing the individual program components of the Creative Suite, Adobe Systems has spent much of its marketing effort targeting the entire Creative Suite to design professionals.
This chapter offers a description of the Creative Suite programs and gives you an idea of how they work together. In this chapter, you learn about the purpose of each program and the relationship each program has with other members of the Creative Suite team.
Understanding the Creative Suite
The Adobe Creative Suite 5 comes in two design-oriented versions:l Adobe Creative Suite 5 Design Standard: This includes Adobe Photoshop CS5, Adobe Illustrator CS5, Adobe InDesign CS5, and Adobe Acrobat 9 Pro.
l Adobe Creative Suite 5 Design Premium: This includes the same programs with the addition of Adobe Flash CS5 Professional, Fireworks CS5, and Adobe Dreamweaver CS5. Also, Adobe Photoshop CS5 is replaced with Adobe Photoshop CS5 Extended.
Both design suites also include Adobe Bridge CS5 and Device Central CS5.
l Adobe Creative Suite 5 Web Standard: This includes Adobe Dreamweaver CS5, Adobe Flash CS5 Professional, Adobe Fireworks CS5, and Adobe Contribute CS5.
l Adobe Creative Suite 5 Web Premium: This includes the same programs with the addition of Adobe Photoshop CS5 Extended, Adobe Illustrator CS5, Soundbooth CS5, and Adobe Acrobat 9 Professional.
Both Web design suites also include Adobe Bridge CS5, and Device Central CS5.
For video professionals, the available suite includes:
l Adobe Creative Suite 5 Production Premium: This includes Adobe After Effects CS5 Professional, Adobe Premiere Pro CS5, Adobe Soundbooth CS5, and Adobe Encore CS5, along with the other design packages.
The Adobe Creative Suite 5 Master Collection includes just about everything, except the kitchen sink.
We cover all the programs found in the Design Premium version throughout this book, but although we get a little into Web development, we don’t cover the video products at all.
Each of the programs is an upgrade from previous CS4 versions of the software along with the new version of Adobe Bridge. Adobe Systems intends to upgrade the products in tandem for future versions. Therefore, you can be confident that the next upgrade of a program like Photoshop CS5 will appear along with upgrades to Illustrator CS5, InDesign CS5, and Dreamweaver CS5.
The one exception in CS5 is that Adobe Acrobat Professional has not been upgraded and still includes version 9.
Adobe Photoshop CS5
If you’re a creative professional, chances are good that you’re no stranger to Adobe Photoshop. Adobe’s flagship image-editing program is now in version 12 with the CS5 upgrade. Photoshop lets you work with pixel-based files. Whether scanned from a printed page or uploaded directly from a digital camera using the Camera Raw features, Photoshop has all the tools you need to adjust, edit and output bitmap images.
Photoshop also includes powerful painting tools if you want to create a pixel-based masterpiece from scratch. Among the painting tools are several bristle brushes that give you complete control over the paint you apply digitally.
In addition to its powerful image editing and painting features, Photoshop includes the ability to work with some basic objects including paths, shapes, and type. Photoshop Extended also can work with 3D objects and lets you manipulate and paint directly on 3D objects without leaving the program.
Photoshop comes in two flavors depending on whether you are using the standard or the premium Creative Suite. The Extended version adds the 3D features along with features for working with video and animations.
The Photoshop interface, shown in Figure 1.1, is common among all applications in the Creative Suite using palettes and workspaces.
Adobe Illustrator CS5
Tried and true Adobe Illustrator is the premier illustration program for designers and artists. Illustrator is a robust drawing package that works with vector-based objects. The advantage of vector-based files over pixel-based files is that vector-based files are resolution independent. Because all the lines that make up a vector-based drawing are mathematically computed, you can easily resize them as large or as small are you want without changing their shape. Pixel-based images gradually become more and more pixilated as you increase their size. Another key advantage of using vector-based documents is that they are generally much smaller in size, which makes them a good choice to use for bandwidth-limited uses like the Web.
FIGURE 1.1
Illustrator has a large variety of tools and features for drawing, editing, coloring, and blending lines and shapes. It includes a Live Trace feature for converting pixel-based bitmaps into vector-based objects. Illustrator can include and work with pixel-based images without any trouble. Figure 1.2 shows the Illustrator interface. Notice how similar it is to Photoshop.
Adobe InDesign CS5
InDesign is the hub of your creative workflow. This is where you bring together the images and objects that you create in Adobe Photoshop CS5 and Adobe Illustrator CS5. You can import type created in a word-processing program, import from Adobe’s InCopy, or set type in the InDesign Story Editor or in other ways. With InDesign’s free-form ease of page layout, you can lay out a design for publication. You can then export the InDesign document as a PDF file suited for print, Web hosting, electronic file exchanges, or CD/DVD-ROM replication.
If you want to include your design as an HTML file for Web hosting, you can export the document for Dreamweaver CS5. InDesign’s role among the Creative Suite programs is as the anchor where files are imported to assemble a design and ultimately export for final output.
FIGURE 1.2
InDesign works with object frames. These frames are placed to define the layout and can then be filled with text, images, or interactive elements. By working with the frames, you can quickly design a complex layout without having to worry about the content until the layout is complete. InDesign’s interface, shown in Figure 1.3, is familiar to Photoshop and Illustrator.
Adobe Flash CS5 Professional
Flash works with vectors much like Illustrator, but unlike Illustrator, Flash is key at creating ani-mated and interactive elements that are common on the Web and for CD authoring projects.
It is great to see the inclusion of Flash into Creative Suite, bringing with it the ability to add motion graphics to Web and online projects. Many of Flash’s tools work in a similar manner to
Illustrator’s, and much has been done to make the two products work well together. Files in Illustrator can be moved to Flash and back without losing any work.
Although Flash is a newer inclusion in the Adobe product line, the Flash interface has slowly evolved to become similar to the other Adobe products, as shown in Figure 1.4.
Cross-Ref
For more information on using the new features in Flash CS5 Professional, look at Chapter 21. n
FIGURE 1.3
FIGURE 1.4
In many ways, the Flash interface has become similar to other Adobe products.
Adobe Dreamweaver CS5
Adobe Dreamweaver CS5 is a Web-authoring and site-management program. It has been tightly integrated with the CS5 applications and works well with them. With Dreamweaver, you can create, publish, and manage Web sites.
Dreamweaver includes all the standard Web creation tools, along with tools to define and use cascading style sheets and scripting languages. The Dreamweaver interface, shown in Figure 1.5, includes panels for working directly with code and seeing the resulting design.
Cross-Ref
FIGURE 1.5
Dreamweaver is used to create and manage Web sites.
Adobe Fireworks CS5
Adobe Fireworks CS5 is an excellent package for creating, processing, and optimizing graphics for the Web. It is also very helpful in creating user interfaces. Fireworks works with both pixel-based and vector-based objects and is an excellent tool for prototyping new Web sites. Figure 1.6 shows the Fireworks interface.
Note
FIGURE 1.6
Fireworks is another newer inclusion in Creative Suite.
Adobe Acrobat Professional 9
Whereas Adobe InDesign CS5 is the hub of your creative satellite, PDF is at the center of the file-format universe. All the print-oriented CS5 programs export and import PDF documents, and the expansion for PDF support is found in the new product upgrades. For design workflows, Adobe Acrobat Professional in version 9 offers you many tools to facilitate collaboration with colleagues, clients, and prepress technicians. You can do these things:
l Set up e-mail–based reviews for markup and approval of design concepts and proofs
l Enable PDF documents with special usage rights so users of the free Adobe Reader
program can participate in comment and review sessions
l Export comments and corrections directly to Microsoft Word text documents (on
Windows XP with Office XP only)
l PDF portfolios
l Prepare files for digital prepress and printing, including the ability to convert composite
l Authenticate and secure documents
l Develop media shows and slide presentations for kiosks, meetings, and presentations
l Review sessions and forms hosted by Acrobat.com
l Organize your design environment and catalog design campaigns embedding native files
in PDFs for an organized storage system
l Search for content on CDs, DVDs, network servers, and Web sites
Acrobat 9 Pro has a significant place in your design workflow.
Acrobat 9 Pro was released several months earlier than the other CS5 programs and is not on the same development cycle as the other CS5 programs. Part of the reason for the early release of Acrobat was the necessity to develop the PDF specifications used by all the other CS5 programs.
Adobe Acrobat is unlike the other CS5 programs in that the application is designed to serve many different office professionals. Acrobat might be used by engineers, legal professionals, business office workers, government workers, school districts, and just about anyone in any industry working on a computer today. Therefore, Acrobat provides a number of tools that you, as a creative professional, may not use just because those tools may not serve your needs.
Adobe Bridge and Mini-Bridge
Adobe Bridge, shown in Figure 1.7, is an updated executable application introduced in the Creative Suite version 2. With Adobe Bridge, you can view document thumbnail previews for all Adobe applications as well as many non-Adobe applications.
Cross-Ref
For information on using Adobe Bridge, see Chapter 6. n
You can use Adobe Bridge, which is your central navigation tool, to manage document assets and attributes. For example, using Adobe Bridge, you can assign common color management settings to all the print-oriented CS5 applications, as well as add metadata to all your documents and run keyword searches on that metadata. These features are available with Adobe Bridge:
Note
Adobe Bridge CS5 includes a preference option to Start Bridge at Login that makes Bridge available when you start your computer. n
FIGURE 1.7
The Adobe Bridge is the central navigation tool for all CS5 applications.
CS Live
At the top of the each of the CS5 applications is a link for accessing CS Live. CS Live is a collaboration tool that lets you log in and share your workspace with other users over the Internet. By creating a review session, you can get immediate feedback from other users on your current work. Other users who are logged in can make comments on your project, and all the comments are saved for later review. CS Live also offers access to Acrobat.com, where you can post and share your work with a global group of users.
Device Central CS5
Why Creative Suite?
Each program in the Creative Suite version 5 is an upgrade from the CS4 applications, and each is available for upgrades individually. So why is Adobe Systems spending so much marketing effort informing users about the benefits of the Creative Suite? And why talk about the Creative Suite as a single entity when users are likely to upgrade the individual software programs in their design studios? These may be the first questions on your mind as you see the advertising for Adobe imaging product upgrades.
The answer is that Creative Suite is a single design solution where the whole is greater than its parts. For years, Adobe Systems built several different applications like Adobe Illustrator and Adobe InDesign with similar core technologies like PDF. These programs evolved with common elements so that you, the creative professional, could easily exchange files among Adobe programs.
Rather than rely on a single program to perform tasks such as illustration, layout, and printing, Adobe offers you several applications, each a tool designed for a specific purpose to help you become more efficient in your creative process. These tools seamlessly integrate into the greater toolbox called Adobe Creative Suite. After working in individual programs, you can collect the creative elements together using Adobe Bridge and Adobe InDesign CS5 as the tool to perform layout assembly. You can then travel to output by exporting files to PDF documents in Adobe Acrobat, or you can host parts of your layout on a Web site using Adobe Dreamweaver CS5.
Note
Adobe Bridge is a separate executable application introduced in the Creative Suite version 2. Adobe Bridge is included when you purchase any of the CS5 standalone products but is not available for purchase as a separate product. For more information on Adobe Bridge, see the section “Adobe Bridge,” later in this chapter. n
As standalone programs, Adobe Creative Suite 5 offers many new marvelous tools with enhanced features to create, design, and express your ideas. Collectively, these tools build upon the integration and interoperability introduced in the first version of the Creative Suite.
Native file support
Cross-Ref
For information on importing native file formats across programs, see Part III. n
Consistent user interface
Programs that creative professionals use today are sophisticated and complicated. One of the major problems facing many designers is the large learning curve necessary to become productive in a computer program. When you use programs from several different software manufacturers, your learning curve increases. Application-software companies develop software according to standards each company sets forth in the design of the user interface. One company may make extensive use of context-sensitive menus, while another company may avoid them. One company may use palettes and panes liberally, while another company relies on menu commands and dialog boxes. Add to these differences the extended use of keyboard shortcuts; program differences require you to spend lots of time learning shortcuts. Additionally, the key sequence in one program may invoke a different command than the same key sequence in another program, and that can cause you lots of confusion.
In workflow environments, consistency is crucial. Time is money, and the time required to train your staff cuts into your productivity and your profits. When tools are developed by a single software manufacturer, the result is a more consistent design of the user interface and the keyboard shortcuts that access menus, tools, and commands. Adobe has taken the user interface design one step further by offering customizable keyboard shortcuts and custom workspaces in all CS5 programs.
Having a consistent look and feel in the user interface enables you to develop an intuitive sense for how to use a particular program to create a design project. The more you learn about a manufacturer’s products, the faster you can become productive. In some cases, you can jump into a new program, poke around, and understand many features without reading exhaustive manuals and books.
Cross-Ref
For information on customizing workspaces and keyboard shortcuts, see Chapter 3. n
Consistent color management
Have you ever created an illustration, dropped it into a layout program, and seen a completely different color rendered in the layout? How about scanned images appearing with one color in Adobe Photoshop and different color values in the layout program? With the Adobe Creative Suite, you can access the same color engine and color-management policies among the design programs and Adobe Acrobat. In Creative Suite 5, you can manage color across all the print-oriented programs including Photoshop, Illustrator, InDesign, and Acrobat using Adobe Bridge. You assign color profiles in Photoshop, Illustrator, or InDesign, and these applications all can conform to the same color management settings.
Note
Cross-Ref
For more information on managing color across the Creative Suite programs, see Chapter 5. For more information on using Adobe Bridge, see Chapter 6. n
Dynamic object and image editing
Ever have last-minute changes that you need to make before the last FedEx pickup of the day? A layout is complete, but you must quickly change an illustration or a photo image. In programs like Adobe InDesign CS5, a double-click of the mouse button or the selection of a menu command launches the editing program that created the object or image and opens the file in a document window. You make your edits and save the file, and the edited version is dynamically updated. This kind of quick editing saves a number of steps and streamlines your workflow.
Cross-Ref
For more information on dynamic object and image editing, see Chapter 22. n
Visual file exchanges
Let’s face it; creative people are more visual and often work best in situations where they can first see a document before importing it into another program. More than ever before, Adobe has created a visually friendly workplace for you. You can easily drag and drop objects and images between document windows from one program to another, drag files from the desktop to open document windows, and copy and paste objects and images between documents.
Note
With Adobe Bridge, you can see all your files with thumbnail previews and drag and drop files into different application documents. You also can drag and drop Microsoft Word and Excel files into Adobe InDesign CS5 directly from the Bridge window. n
Cross-Ref
For more information on importing and exchanging documents among programs, see Part III. For information on using Adobe Bridge, see Chapter 6. n
Support for PDF
within InDesign. You also can apply the same layer views to layered Photoshop and Illustrator CS5 documents. InDesign CS5 also supports multipage PDF file imports. Additionally, you can import media such as movie clips and sound files in InDesign CS5 and export them to PDF. Because PDF is the reliable standard for onscreen document viewing and output to professional printing devices, the CS5 programs take advantage of core PDF architecture. Finally, Fireworks CS5 can also author PDF. This allows a Web site to be shared and commented upon using standard Acrobat tools and techniques.
Cross-Ref
For more information on PDF/X and commercial printing, see Chapter 36. For more information on PDFs and multimedia, see Chapter 26. n
Design for screen devices
The pervasive Web provides another opportunity for displaying creative projects, but this medium comes with its share of difficulties. Creative Suite meets these needs with several solutions. Dreamweaver CS5 provides a package for piecing together Web sites that leverage the existing graphics used in other mediums. Dreamweaver export is built into other CS5 applications such as InDesign.
If your Web site needs interactive elements, you can use Flash to add the extra zing that helps get your site noticed; for Web graphics, Fireworks is the answer. It includes a subset of tools found in both Photoshop and Illustrator, allowing you to work with pixel-based and vector-based graphics.
With Web-enabled phones and PDAs covering the globe, creative projects commonly end up on these multi-function devices. Creative Suite includes options to save files tailored to these devices, and with Device Central, you can look at the results in an emulated device. This takes the guesswork out of the export and lets you see the project as it will actually look on the device.
Summary
l The Creative Suite is a collection of applications offering professional designers complete
integration for print, Web design, and screen viewing.
l Programs from a single software vendor provide consistent user interfaces and similar
menu and tool functions, which reduce learning curves for new hires.
l Adobe Bridge is a central navigation tool offering features for viewing, editing, and
Creative Suite
IN THIS CHAPTER
Starting with a sketch in Acrobat
T
he best way to understand the possibilities that the various CreativeSuite applications offer is to walk through an example workflow that takes a project through each of the various applications. This tour starts out with Acrobat, where you can create a PDF file of an initial sketch that you can e-mail to all members of the creative team for review. The reviewers’ feedback return is in the form of comments compiled within a single PDF file. This cycle continues until all members of the creative team approve the design.
With an approved design, you can use Photoshop and Illustrator to create and edit images and objects for the project. You can then import all this content into InDesign, where you lay them out with text. The final layout is then exported back to Acrobat, where you can print it or repurpose it for use on the Web using Dreamweaver and Flash.
Starting with a Sketch in Acrobat
When a project first starts, you typically want to get input from several individuals on the creative team before the design is approved. Calling a meeting where all members of the creative team meet to discuss the design would accomplish the goal, but Acrobat makes another solution possible.Cross-Ref
You can find complete coverage on e-mail review sessions in Chapter 33. n
Scanning a sketch into Acrobat
Projects always start with an idea, but to share these ideas with others, you usually sketch them out roughly. You may then scan these rough sketches into a digital format where you can more easily distribute them. Using a scanner or a digital camera, you can directly import sketches or scan images into Acrobat.
STEPS: Scanning a Sketch into Acrobat
1. Initiate a scan in Acrobat. Within Acrobat, choose File ➪ Create PDF ➪ From
Scanner ➪ Black and White. This command opens the Acrobat Scan dialog box, shown in
Figure 2.1. You also can disable the Make Searchable and Add Metadata options, and click Ok.
FIGURE 2.1
The Acrobat Scan dialog box
3. Save the PDF file. After the scanned file is loaded into Acrobat, as shown in Figure 2.2, you need to save the file before you redistribute it. To save the scanned image, choose
File ➪ Save As. This command opens a file dialog box where you can name the file and
specify a folder where you want to save the file.
Submitting a sketch for e-mail review
With a sketch scanned into Acrobat, you can send the PDF file out for review using e-mail or using a browser. These steps walk you through an e-mail review cycle. In actual projects, this review cycle may be repeated many times as needed.
STEPS: Submitting a Sketch for E-mail Review
1. Send a PDF file for e-mail review. To send the selected PDF file out for e-mail review,
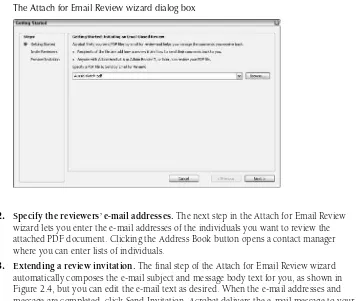
choose Comments ➪ Attach for Email Review. The Attach for Email Review wizard starts,
and the first page of the wizard opens, as shown in Figure 2.3. Here, you specify the PDF file to send out for review. The default file is the current open file. You can edit your current profile and e-mail address at a future time using the Identity panel of the
Preferences dialog box (Acrobat/Edit ➪ Preferences).
FIGURE 2.2
FIGURE 2.3
The Attach for Email Review wizard dialog box
2. Specify the reviewers’ e-mail addresses. The next step in the Attach for Email Review wizard lets you enter the e-mail addresses of the individuals you want to review the attached PDF document. Clicking the Address Book button opens a contact manager where you can enter lists of individuals.
3. Extending a review invitation. The final step of the Attach for Email Review wizard automatically composes the e-mail subject and message body text for you, as shown in Figure 2.4, but you can edit the e-mail text as desired. When the e-mail addresses and message are completed, click Send Invitation. Acrobat delivers the e-mail message to your system’s default e-mail application. If your e-mail system is set to automatically send out e-mails, the e-mail is sent automatically. But if not, you need to send out the e-mails manually.
Adding comments to the PDF
When a reviewer receives an e-mail requesting feedback, he can double-click the attached file to open it in Acrobat. Within Acrobat, the Commenting toolbar may be used to add notes and comments to the sketch.
STEPS: Adding Comments to an E-mail PDF File
1. Open an e-mail that you have received and want to review. Using your system e-mail client, the review request is sent out with the PDF file attached.
Note
2. Open the attached PDF in Acrobat. If you double-click the attached PDF file, it opens within Acrobat. Comments are added to the document using the Commenting toolbar, which opens automatically when a review-enabled PDF is opened. The Commenting
toolbar also may be accessed by choosing Tools ➪ Comment & Markup ➪ Show
Comment & Markup Toolbar.
3. Add review comments to the PDF. Click the Note Tool button in the Commenting toolbar. Click in the document where you want the note to be positioned. A note text area appears where you can type your message. Figure 2.5 shows the sketch document with some review comments added.
FIGURE 2.4
The third step lets you compose the e-mail that is sent to the reviewers.
4. Return comments. After you’ve finished making comments, choose Comments ➪ Send for Shared Review or click the Send Comments button in the Commenting toolbar. The PDF with its comments is sent back to the original sender.
Collecting review comments
When the reviewed documents are returned to the original sender, the comments are merged into the original document. These comments may then be summarized and printed.
STEPS: Collecting Review Comments
FIGURE 2.5
A sketch with comments attached
2. View and print a list of comments. After a reviewed document is merged into the original PDF file, you open the list of comments by clicking the Comments tab to the left. All comments in the PDF file appear at the bottom of the document, as shown in Figure 2.6.
3. Sort comments. The buttons along the top of the comments list let you set the status of comments and sort them by type, page, author, date, color, or check mark status.
4. Print comments. To print the comments, click the Print button at the top of the
Comments list or choose File ➪ Print and click the Summarize Comments button. This
FIGURE 2.6
The Comments tab opens comments on the document.
Editing Images in Photoshop
When you have a good idea of the content that needs to be in the final document, you can use Photoshop to edit and prepare the images to be included. These edits can include altering the image properties to adjust the image levels, color balance, brightness, and contrast. Another common way to edit images is to crop the image to the relevant portion. For images that aren’t rectangular, you may need to extract a portion of an image. For images that appear on top of other page elements, you’ll want to add transparency. All these tasks may be completed in Photoshop.
Cross-Ref
Many Photoshop editing features are covered in Chapter 9. n
Adjusting image properties
STEPS: Adjusting Image Levels and Contrast
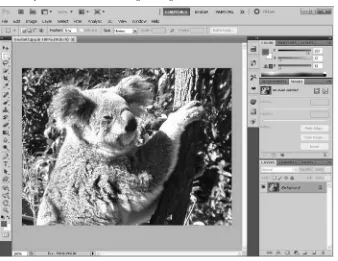
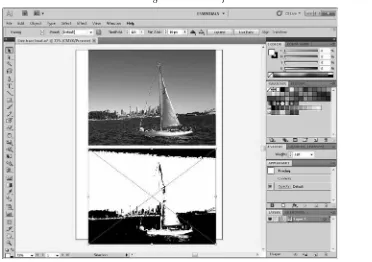
1. Open an image in Photoshop. Within Photoshop, choose File ➪ Open and select an image to load. Because these images are to be used within a brochure, the levels and contrast need to be adjusted in order for the text that comes on top of the images to be legible. Figure 2.7 shows the original image.
FIGURE 2.7
This figure shows the original image before any adjustments.
2. Auto-adjust the image levels. With the image selected, open the Adjustments panel
with Window ➪ Adjustments. Within the Adjustments panel, select the Levels button.
The Levels settings appear, as shown in Figure 2.8. This panel shows the Shadows, Midtones, and Highlights of the image. To auto-correct the balance of these levels, click Auto. The levels are evenly spaced, and the image is adjusted.
3. Adjust the brightness and contrast. To change the brightness and contrast of the image, click the Return button in the Adjustments panel and then choose the Brightness/
Contrast button. This opens settings with sliders for the Brightness and Contrast values. Set the Brightness value to –35 and the Contrast value to –30. A preview of the settings is shown on the image. This provides ample contrast for the image. Figure 2.9 shows the resulting image.
4. Save the image. Choose File ➪ Save to save the image with its changes.
Cropping images
FIGURE 2.8
The Levels settings in the Adjustments panel
FIGURE 2.9
The image has sufficient contrast.
STEPS: Cropping an Image
1. Open an image in Photoshop. Within Photoshop, choose File ➪ Open and select an image that you want to crop.