Enhancing Adobe
Acrobat DC Forms
with JavaScript
—
Enhancing Adobe
Acrobat DC Forms
Delta, British Columbia, Canada
ISBN-13 (pbk): 978-1-4842-2892-0 ISBN-13 (electronic): 978-1-4842-2893-7 DOI 10.1007/978-1-4842-2893-7
Library of Congress Control Number: 2017954339 Copyright © 2017 by Jennifer Harder
This work is subject to copyright. All rights are reserved by the Publisher, whether the whole or part of the material is concerned, specifically the rights of translation, reprinting, reuse of illustrations, recitation, broadcasting, reproduction on microfilms or in any other physical way, and transmission or information storage and retrieval, electronic adaptation, computer software, or by similar or dissimilar methodology now known or hereafter developed. Trademarked names, logos, and images may appear in this book. Rather than use a trademark symbol with every occurrence of a trademarked name, logo, or image we use the names, logos, and images only in an editorial fashion and to the benefit of the trademark owner, with no intention of infringement of the trademark.
The use in this publication of trade names, trademarks, service marks, and similar terms, even if they are not identified as such, is not to be taken as an expression of opinion as to whether or not they are subject to proprietary rights.
While the advice and information in this book are believed to be true and accurate at the date of publication, neither the authors nor the editors nor the publisher can accept any legal responsibility for any errors or omissions that may be made. The publisher makes no warranty, express or implied, with respect to the material contained herein.
Cover image designed by Freepik Managing Director: Welmoed Spahr
Distributed to the book trade worldwide by Springer Science+Business Media New York, 233 Spring Street, 6th Floor, New York, NY 10013. Phone 1-800-SPRINGER, fax (201) 348-4505, e-mail [email protected], or visit www.springeronline.com. Apress Media, LLC is a California LLC and the sole member (owner) is Springer Science + Business Media Finance Inc (SSBM Finance Inc). SSBM Finance Inc is a Delaware corporation.
For information on translations, please e-mail [email protected], or visit www.apress.com/ rights-permissions.
Apress titles may be purchased in bulk for academic, corporate, or promotional use. eBook versions and licenses are also available for most titles. For more information, reference our Print and eBook Bulk Sales web page at www.apress.com/bulk-sales.
Contents at a Glance
About the Author ...
xv
About the Technical Reviewer ...
xvii
Acknowledgments ...
xix
Introduction ...
xxi
■
Part 1: Basic Form Improvements ...
1
■
Chapter 1: A Fundamental Forms Primer ...
3
■
Chapter 2: Introduction to Actions ...
27
■
Chapter 3: Creating a QR Code Custom Stamp ...
45
■
Chapter 4: Buttons, Navigation, Form and Non-Form Actions ...
55
■
Part 2: Simplified Field Notation and
Basic JavaScript ...
91
■
Chapter 5: Introduction to Simplified Field Notation
and JavaScript ...
93
■
Chapter 6: Basic and Complex Calculations ...
111
■
Chapter 7: Format Calculations ...
123
■
Part 3: Working with More Complex Forms ...
193
■
Chapter 11: Validation with Text Boxes, Alerts, and
Radio Buttons ...
195
■
Chapter 12: Working with Dropdown Menus ...
217
■
Chapter 13: Working with List Boxes ...
239
■
Chapter 14: Advanced Navigation: The Popup Menu ...
265
■
Part 4: Beyond the Basics...
273
■
Chapter 15: Action Wizard and JavaScript ...
275
■
Chapter 16: Multi-State Check Boxes ...
285
■
Chapter 17: Importing an Image into a Button ...
295
■
Chapter 18: Multiple Formatting ...
299
■
Chapter 19: Digital Signatures and Barcodes ...
311
■
Part 5: Putting It into Practice ...
325
■
Chapter 20: Homework Assignments ...
327
Contents
About the Author ...
xv
About the Technical Reviewer ...
xvii
Acknowledgments ...
xix
Introduction ...
xxi
■
Part 1: Basic Form Improvements ...
1
■
Chapter 1: A Fundamental Forms Primer ...
3
Forms Review...
3
Fields Refresher ...
8
Properties Refresher ...
9
Text Box Field Properties and New Date Field Properties ...
11
Dropdown Properties ...
12
List Box Properties...
13
Check Box Properties ...
14
Radio Button Properties ...
15
Button Properties and Image Properties...
16
Digital Signature Properties ...
17
Barcode Properties ...
18
■
Chapter 2: Introduction to Actions ...
27
Getting Started ...
27
Rating Forms Value Averaging and Sum: Working with Text Fields ...
28
The Validate Tab ...30
Page 2 of Project: The Calculate Tab for the Grand Total Using Sum ...
33
Sum and Averaging Using Check Boxes or Radio Buttons
with Text Fields...
35
Using Radio Buttons on Page 3 of the Project ...36
Using Check Boxes on Page 3 of the Project ...38
Basic Action Button Triggers for Reset Buttons and Printing Buttons ...40
Reset Button ...41
Print Form Button ...42
Summary ...
44
■
Chapter 3: Creating a QR Code Custom Stamp ...
45
Customizing Your QR Code Stamp ...
46
QR Code Creation ...
47
Using the Stamp Tool ...
50
Final Thoughts: QR Code for Professional Printing ...
53
Summary ...
53
■
Chapter 4: Buttons, Navigation, Form and Non-Form Actions ...
55
Creating a Button Icon ...
56
Example of a Button as a Label Only ...57
Non-Form Properties Actions ...
59
Pages ...60
Bookmarks ...61
Web Hyperlinks ...63
Rich Media Non-Form Navigation Buttons ...64
Triggers for Actions ...
67
Choose an Action That Requires No Code ...
68
Newsletter Navigation with Buttons ...
72
Form Navigation with a Button as Helpful Hint ...
77
Adding a Comb of Characters ...
80
Before Comb and After Comb ...
80
More Action Triggers to Show and Hide ...
82
Hide and Clear Fields Button ...
84
Set Layer Visibility ...
86
Using Bookmarks...
87
Using Buttons ...
88
Summary ...
90
■
Part 2: Simplified Field Notation and
Basic JavaScript ...
91
■
Chapter 5: Introduction to Simplified Field Notation
and JavaScript ...
93
Getting Started ...
93
Text Field, Date, and Dropdown Menu Properties ...
94
Action Tab ...
94
Format Tab ...
95
Validate Tab ...
97
Calculate Tab ...
97
Web Links and References ...107
Regular Forms vs. E-Sign Forms ...107
JavaScript and Acrobat on the Document Level ...
108
Summary ...
109
■
Chapter 6: Basic and Complex Calculations ...
111
Getting Started ...
112
Sum Value ...
112
Simplified Field Notation ...
113
JavaScript Custom Calculation Script ...
115
Final Thoughts ...
117
The Final Line of Code ...119
Dropdown Alternatives ...120
Summary ...
121
■
Chapter 7: Format Calculations ...
123
Number Formatting ...
125
Formatting with a Percentage ...
126
A Workaround for the Percentage ...126
Date Formatting ...
129
Time Formatting ...
133
Final Thoughts ...
137
Dropdown Alternatives ...137
Summary ...
137
■
Chapter 8: Various JavaScript Alerts, Notes, and
Time Stamps ...
139
Alert Types ...
140
Create a Document JavaScript ...
141
Document Actions ...
145
Document Will Close ...
146
Document Will Print ...
147
Alerts Working with Buttons ...
147
Adding a Comment Note, Signature, and Time Stamp ...
149
Summary ...
154
■
Chapter 9: Create Help for Clients with Rollover Text
and Alerts ...
155
The Rollover Method ...
156
Mouse Enter ...
159
Mouse Exit ...
160
Extra Non-Custom JavaScript Check Box Example ...
160
The Default Text Method ...
160
The Alert Method ...
162
Customer’s Full Name ...
163
Date ...
165
Customer Order Code ...
167
Customer’s Company Name ...
169
Final Thoughts ...
170
Summary ...
171
■
Chapter 10: Various Types of Formatting with JavaScript ...
173
Adding Global Formatting to Text Fields ...
173
Silent Printing ...
189
Final Thoughts ...
191
Summary ...
192
■
Part 3: Working with More Complex Forms ...
193
■
Chapter 11: Validation with Text Boxes, Alerts, and
Radio Buttons ...
195
Money Transfer Example ...
195
Changing the Shipping Price Using Radio Buttons ...
201
Text Field Validation with Regular Expressions ...
204
Telephone Validation ...206
Name Validation ...208
Account Number Validation ...210
Email and URL Validation ...210
Another Phone and Date Example with Two Variables ...211
Final Thoughts ...
212
Summary ...
215
■
Chapter 12: Working with Dropdown Menus ...
217
Current Skills Request Form ...
217
Parts Order Form ...
223
Final Thoughts ...
237
Load a Lengthy Single Dropdown or List Menu ...237
Summary ...
238
■
Chapter 13: Working with List Boxes ...
239
List Box Priority List with Control Buttons ...
240
The Add Button ...244
The Delete Button ...244
The Up Button ...
245
The Down Button ...
246
Check Box, Dropdown, and List Box Example 1 ...
247
Check Box, List Box, and Multi-Dropdown Example 2 ...
252
Button Slide Show Variation ...
258
Extra Example Priority List Improved ...
258
Final Thoughts ...
262
Hidden Fields ...
262
Using List Boxes for Number Rating ...
263
Summary ...
264
■
Chapter 14: Advanced Navigation: The Popup Menu ...
265
The Popup Menu Example ...
266
Final Thoughts ...
270
Summary ...
271
■
Part 4: Beyond the Basics...
273
■
Chapter 15: Action Wizard and JavaScript ...
275
Working with Action Wizard...
275
Reuse JavaScript from Chapter 8 ...
282
Is It a Custom Action or a Custom Command? ...
283
Create and Manage Custom Commands ...
283
Summary ...
283
■
Chapter 17: Importing an Image into a Button ...
295
Creating the Button ...
296
Summary ...
298
■
Chapter 18: Multiple Formatting ...
299
The Problem of Multiple Formatting ...
299
Option 1: Do It Yourself ...
301
Price Script ...302
No Price Script ...303
Option 2: Call a Professional...
308
Summary ...
310
■
Chapter 19: Digital Signatures and Barcodes ...
311
Digital Signatures and Security ...
311
Barcodes ...
321
Summary ...
323
■
Part 5: Putting It into Practice ...
325
■
Chapter 20: Homework Assignments ...
327
Homework Assignment 1: Show and Hide ...
327
Homework Assignment 2: Working with JavaScript to
Create Formulas ...
339
Area of a Circle
A
= π
r
2...
341
Field: CircumferenceRow1 Circumference of a Circle
C = 2
π
r ...
341
Field: VolumeRow1 Volume of a Sphere
V = 4/3
π
r
3...342
Field: FahrenheitRow1 Celsius to Fahrenheit to Formula.
(°C x 9/5) + 32 = °F. ...342
Homework Assignment 3: Custom Validation and
Regular Expressions ...
344
Homework Assignment 4: Personal Dropdown Menu and
Definitions Text Box ...
350
Summary ...
356
About the Author
About the Technical
Reviewer
Dan Carr is a veteran software developer and UX designer specializing in vanilla
Acknowledgments
For their patience and advice, I would like to thank the following people, for without them I could never have written this book:
• My parents, for encouraging me to read large computer textbooks that would one day inspire me to write my own book.
• My Dad, for reviewing the first draft before I sent a proposal.
• My program coordinator, Raymond Chow, at Langara College, who gave me the chance to teach evening courses when others would not give me that opportunity or believe that I had anything worthy to contribute.
• My printing boss, Eddie, at Pender Copy Ltd., who knows how much work it is to put together a large document and how much effort I put into working with Adobe software.
Introduction
Welcome to the first step in an exciting journey I call Enhancing Adobe Acrobat DC Forms with JavaScript.
My journey into learning about Adobe software began 17 years ago when I started college. I took a two-year Graphic Communications course in Vancouver, BC. While learning about how to set up documents for print layout using QuarkXPress and later Adobe InDesign, I created PDF files. At that point, I only saw the PDF as a transition from one file format to the next production step, from layout to the printing press. It never crossed my mind what else could be done with PDF files in Adobe Acrobat.
Several years after graduating, while doing freelance work for one of my clients, I began to investigate the features of Acrobat to discover what else the program had to offer. In 2008, I decided to learn more about web design and improve my layout skills in Adobe software. After finishing three certificates in Web Design at Langara College Continuing Studies, I realized that I wanted to help students learn more about Adobe software. There were times through the journey when I read different computer books and felt, “OK I’ve finished this tutorial or project, but how does this relate to the real world and what I’m trying to accomplish?” In 2011, I became a Teaching Assistant at Langara College and this gave me the opportunity to write my own course on introducing students to Adobe Acrobat. While writing it, I realized there was a lot more that could be said about Acrobat than what I could present in three-evening course. At that point, I was looking at one icon in the Acrobat menu that perplexed me. It was called JavaScript.
JavaScript in Acrobat? What is this doing here? The only JavaScript that I knew about at that point was through building websites. I had built a few basic template forms using LiveCycle Designer, MS Word, and Acrobat, but I had never used JavaScript in the Acrobat program. So I began to wonder how JavaScript could improve my forms.
So, this is when and how the idea began for developing a book for students on the topic of Acrobat and JavaScript. After years of research, looking at Adobe and Acrobat forums, and studying the questions and concerns users had when trying to add JavaScript to Acrobat, I came to the following conclusions:
• At some point, it’s important to share with others what you have learned about Acrobat and JavaScript and not keep your thoughts to yourself. That’s what leads to innovative ideas. However, these thoughts need to be organized so that the user can find the solution quickly and be able to comprehend it.
Shortly after compiling my notes, Adobe introduced the latest version Acrobat DC. I saw that the layout of the program had changed and now there was no book to show the user how to add JavaScript in this new format. I completed the first draft of my Advanced Adobe course and had it approved by my Program Coordinator at the college. In 2016, I realized I could reach a wider audience if the book was published and so I approached Apress. They saw my vision, and that is how this book came to be in your possession.
Understanding How Acrobat DC and Its Forms
Work with JavaScript
If you are currently using Adobe Acrobat Pro XI or older, it’s time to upgrade to the new Acrobat DC Pro. You can either acquire Adobe Acrobat DC as a stand-alone program through Adobe or get a Creative Cloud subscription and enjoy all the exciting Adobe programs for a monthly fee. Refer to these links and check if your computer’s operating system meets the system requirements needed for the upgrade:
https://helpx.adobe.com/creative-cloud/system-requirements.html https://helpx.adobe.com/acrobat/system-requirements.html
Make sure to follow the online instructions and tutorials for installing and working with Acrobat and Creative Cloud.
If you are new to Adobe Acrobat DC, I encourage you to first read the book Adobe Acrobat DC Classroom in a Book by Brie Gyncild and Lisa Fridsma. This book will give you a basic overview of the new Acrobat DC features as well as form basics in Chapter 10. However, that book does not go into detail regarding forms when working with JavaScript. I consider my book to be the part 2 for intermediate and advanced users to take their forms to the next level.
Adobe Acrobat DC will allow you to add form fields to any PDF file, as I will explain further in Chapter 1. It can even work with pre-existing form fields that were created in Adobe InDesign CC when the file was exported as an interactive PDF. However, it’s important that your client views and interacts with the forms in Acrobat DC Pro, Standard, or Acrobat Reader. Other PDF readers, like Mac Preview, have been known to corrupt the JavaScript programing, so keep this in mind when you email the forms.
See Figure I-1 for how your JavaScript preferences should appear.
The following is an explanation from the Adobe website on some of the settings. See https://helpx.adobe.com/acrobat/using/javascripts-pdfs-security-risk.html for more information.
• Enable global object security policy: Allows JavaScript globally through APIs, or trusts specific documents containing JavaScripts.
The debugger and the JavaScript Editor options will be looked more closely in Chapter 5.
Note that you will not be working with any JavaScript that could create a security risk so you can leave this area at the default settings for these chapters as you work with the files you download.
In most cases, Adobe Acrobat DC will auto-detect in a PDF where form fields can be added in a form, but it’s not a perfect science. It’s up to you as the author to edit and test your forms for errors as you build them and add your JavaScript code.
What to Expect from this Book
Enhancing Adobe Acrobat DC Forms with JavaScript covers up-to-date, real working examples that you can easily download, practice with, and edit to suit your own projects. Using screenshots from Adobe Acrobat DC, users of previous versions will also be able to utilize these techniques. This book also shows work-arounds and solutions to various form issues you might encounter. JavaScript does not need to be scary. Feel empowered by it and improve your PDF documents!
What You’ll Learn
You’ll learn the following from this book:
• How to create calculations, rating forms, and QR code stamps using the form elements
• Simplified field notation and basic JavaScript for Acrobat
• How to use buttons for navigation
• How to create complex forms that include dropdown and list boxes in combination with other form fields
• Action Wizard and JavaScript
• Improved form navigation and printing of forms
A Fundamental Forms
Primer
Creating the right form before you add JavaScript to your PDF fields takes time and careful planning. Therefore, it’s important that you become familiar with each of the form tools and the properties that are associated with them. This chapter provides a quick overview of forms, fields, properties, and tabs that will serve as the basis for future chapters. If you are already comfortable with these topics, feel free to jump ahead to Chapter 2.
Forms Review
Each form field has within it properties that can be accessed by right-clicking on the form field. The properties of that form field are organized by a use of tabs. Each form field has slightly different properties and therefore different tabs.
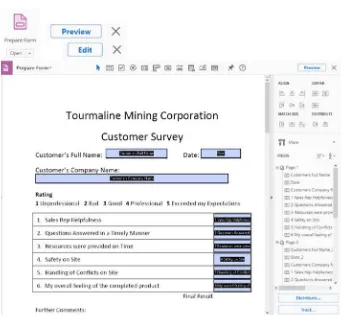
Throughout this book you will be working on lessons with a variety of different PDF forms and documents for a fictitious company called The Tourmaline Mining Corporation.
Each chapter (except for Chapters 1 and 5) comes with JavaScript in a .txt file and PDF files that you can open and compare. You can either view the final PDF file or use the start PDF file and follow along with the notes in these chapters. You can find the files at www.apress.com/9781484228920.
■
Note
Please be aware that the PDF files used with this book should only be opened
in Adobe Acrobat Pro or Acrobat Reader XI or DC and not in Mac Preview or any other PDF
creation/reader program. Other PDF readers have been known to corrupt the JavaScript
code within the Acrobat PDF files and then the calculations fail to work.
The book assumes that you are familiar with filling in basic forms or have used PDF forms in the past. If you are unsure of how to use the Prepare Form tool (shown in Figure 1-2) and its auto-detection of fields in Acrobat DC, this section provides a refresher.
Draw out your form either by hand or create it in MS Word, Adobe Illustrator, or Adobe InDesign, and decide what steps you want the form to do and accomplish. Then plan how to execute your goals. Is what you want the form to do possible? Do you need to simplify the form? Or do you need to learn more about the topic of forms to create what you want?
Except for the program of Adobe InDesign, you cannot assemble the form’s interactive fields outside of Acrobat, so you need to make a PDF to do that. Until you are ready to make the PDF, continue to assemble the form in your layout program until it looks the way it should. Then create the PDF. Once you have the final PDF, open it in Acrobat DC and follow these steps to add interactivity:
1. Click Tools ➤ Prepare Form Tool.
3. Click Start. Acrobat will scan the file for fields; if it detects any, it will create the field. However, it is not perfect in its detection, so you may have to add, delete, or edit some fields afterward.
You can now begin adding your formatting and actions to the properties of each field. Test it, and ask others to try it on their computer, before you send it to your clients. Always keep a backup on a disk or USB drive in case something happens to your main computer. Also make a printout of the PDF and all code in case you need to refer to it later for another project.
Once the fields are in the form, you can open the fields any time with the Prepare Form tool; you do not need to run the auto-detection again for that form.
You can exit the Prepare Form area partially by toggling the Preview/Edit button in the upper right (Figure 1-4). To exit the Prepare Form tool completely, you must click the X in the upper right (Figure 1-4).
For more information on basic forms or basic form creation, check out the following links before you proceed any further in this book:
•
https://helpx.adobe.com/acrobat/using/pdf-form-field-properties.html
• https://helpx.adobe.com/acrobat/using/pdf-forms-basics.
html#pdf_forms_basics
•
https://helpx.adobe.com/acrobat/using/creating-distributing-pdf-forms.html#creating_and_distributing_ pdf_forms
•
https://helpx.adobe.com/acrobat/using/pdf-form-field-basics.html#pdf_form_field_basics
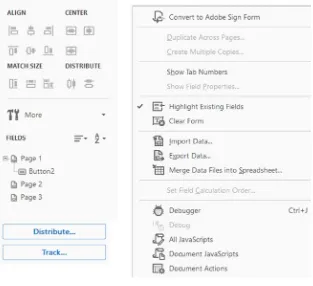
Other form tools, such as the Align and Distribute options, are found in the pane on the right-hand side and in the More dropdown menu (Figure 1-5). I will go into more detail about the JavaScript area in later in the book. Refer to the previous web links for more details.
Fields Refresher
• Radio button: Select one option from a group: yes or no.
• List box: Select one or multiple items in a list.
• Dropdown list: Select an option from a list.
• Button: Initiates an action like reset or submit.
• Image field (new): Same as button, only with some JavaScript added (more on this topic later).
• Date field (new): Same as text field, but pre-formatted to date. It can operate as a date picker.
• Digital signature: Electronically sign with your signature.
• Barcode: For a product barcode reader.
These items are also shown in Figure 1-6. To access them, select Tools ➤ Prepare Form and then choose a document. The icons will then appear at the bottom.
■
Note
If you require a custom QR Code, you can create one in InDesign CC 2014 or
higher. QR Codes are like barcodes, and we will look at them more closely in Chapter
3
.
Properties Refresher
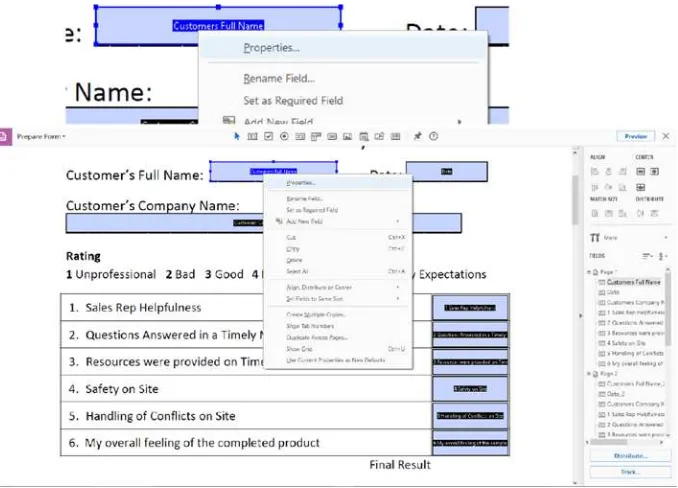
Each form field contains properties that can be easily accessed while you are in form editing mode. Simply right-click the field you want to edit and choose Properties (Figure 1-7). Then select the property you want to work with in the various tabs that will appear in the dialog box.
Various properties can be set for each field depending upon which field is chosen because the amount of properties varies. The properties are organized into sections using tabs. Refer here to Figures 1-8 through 1-15. Properties can be typed in, checked, or unchecked. The settings are applied as soon as you exit the field and move to another field in the Properties dialog box or by clicking the Close button. However, the settings are not fully saved until you save the PDF file.
To review, to work with the form fields, you must be in the Prepare Forms tool in Edit mode. You will know you are in Edit mode because the Preview button toggle is in the upper-right and the name of each field will appear. You can now either edit one field at a time or multiple fields.
Use the Selection tool and either click one field or mark several and then right-click and choose Properties from the menu.
You will now be inside the form’s properties dialog box. Now you can change properties within each tab; when you are done, click the Close button to close the dialog box and save your PDF file to confirm the changes.
The following sections provide a cursory look at the properties associated with the form fields listed earlier in the chapter.
Text Box Field Properties and New Date Field Properties
The text field and date field have eight tabs to organize their properties. The only difference between a text field and a date field is that the format category for a date field is preset to Date while the format category for a text field is preset to None. Note that the heading of the dialog box for both is “Text Field Properties.” Refer to Figure 1-8.Dropdown Properties
The Dropdown Properties dialog box also has eight tabs to organize the properties. The tabs have the same names as the text field properties and contain many equivalent properties; however, if you compare the Options tab on the Text Field Properties dialog box to the Options tab on the Dropdown Properties dialog box, it will look different because dropdown menus are meant to hold multiple export values while a text field can only hold one default value.
Figure 1-10. List Box Properties dialog box
List Box Properties
Figure 1-11. Check Box Properties dialog box
Check Box Properties
Radio Button Properties
The Radio Button Properties dialog box, like the check box dialog box, has five tabs to organize the properties. A radio button must come in pairs that can either be checked on or off. While one is on, the other is off. You cannot enter text into a radio button; however, you can give it a word or number value. Like all other properties, you can alter its appearance and color (Appearance and Option tabs). You can have more than one group of radio buttons, but there must always be at least two in the group. Refer to Figure 1-12.
Figure 1-13. Button Properties dialog box
Button Properties and Image Properties
Digital Signature Properties
Digital signatures are used for signing electronic PDF forms with a client’s digital signature, which is stored on their computer. The digital signature field appears like the text field; however, it only has five tabs to organize its properties and is specifically designated for signature only. Chapter 19 offers more details on digital signatures. Refer here to Figure 1-14.
Tabs Refresher
Barcode Properties
The barcode field properties are organized under five tabs. A barcode’s main purpose is to create a scannable barcode that relates to the information that is entered into the various fields around it. Chapter 19 offers more details on barcodes. Refer here to Figure 1-15.
• Common properties: Form field whether visible, hidden, or printable visible or hidden. Not available to barcodes.
• Orientation: Adjusts the angle of the field. Not available to barcodes.
• Read only: You can read the text within but not alter it. Not available to barcodes.
• Required: This field is required to complete the form. Not available to buttons, image fields, and barcodes.
In the Appearance tab (not available to barcodes),
• Border and colors:
• Border color: Color of the border surrounding the field.
• Line thickness: The thickness of the border: thin, medium, or thick.
• Fill color: The fill color of the field.
• Line style: The style of the line going around the field: solid, dashed, beveled, inset, underline.
• Text: Font size (not available to signatures), text color, and font (not available to check boxes or radio buttons).
In the Position tab,
• Units: Units of measurement of the size and position of the field(s): Points, picas, millimeters, centimeters, inches.
• Position units: Left, right, top, bottom, width, and height.
• Check “Do not change height and with when changing position.” if you do not want the size of the box to alter during movement with the Selection tool. Unchecking it may cause the form field to scale.
In the Options tab (not available to digital signatures and only for text and date fields),
• Alignment: Aligns text left, center, or right.
• Default value: Temporary or default text for field.
• Field for file selection: Used to select a file’s text link info. Not available for the date field.
• Password: Creates *** to mask the actual text. Not available for the date field.
• Multi-line: Allows you to enter more than one line of text in the field. Not available for the date field.
• Scroll long text: If there is more text than the field can handle, a scroll bar appears.
• Allow rich text formatting: Allows users to make the text bold or italic. Not available for the date field.
• Limit of characters: The amount characters allowed in a field.
• Comb of characters: Creates a divider between characters so they are easier to read later and compare (see Chapter 4).
For list boxes and dropdown menus only:
• Item: Enter the item name.
• Export value: Enter its export value letter or numbers.
• List item: Lists all the items.
• Add, Delete, Up, Down buttons: Add, remove, or alter an item's order in the list.
• Sort items: Sort alphabetically.
• Allow user to enter custom text: Allow the user to enter their own text. Not available for list boxes.
• Check spelling: Indicates if there is a spelling error when checked. Not available for list boxes.
• Commit selected value immediately: When selected, the value may interact with another field’s value.
• Multiple selection: Lets you select multiple items in a list box only.
For check boxes and radio buttons only:
• Style: Check, circle, cross, diamond, square, Star.
• Export value: Value of field. For check box only.
• Radio button choice: Same as export value.
For buttons and image fields:
• Layout: Adds a layout for the icon and label (see Chapter 4).
• Advanced button: Creates a more advanced layout for the Icon button (see Chapter 4).
• Behavior alters the states of the button: None push, outline, invert (see Chapter 4).
• Icon and label state:
• State: How the button appears in up, down, and rollover states.
• Label: The text name on the button.
• Icon: A thumbnail of the chosen icon.
• Choose icon: Allows you to choose an icon.
• Clear: Clears the icon from the field.
For barcodes only:
• Symbiology: Distinct types of barcodes available.
• Compress data encoding barcode
• Decode condition: Custom and manage barcode parameters, such as how the barcode will be decoded by some device.
• Settings: Setting of that barcode.
In the Action tab (for all form fields; more info in Chapters 4 and 5),
• Add an action: Select what triggers the action when the field is entered.
• Select action: What kind of action is triggered.
• Add button: Adds the action.
• Up button: Moves the action in its order.
• Down button: Moves the action in its order.
• Edit button: Edits the action in the JavaScript Editor.
• Delete button: Deletes the action.
In the Format tab (the Text, Date Field, and Dropdown menus; refer to Chapters 6 and 7 for a detailed explanation),
• None: For text and numbers with no true numeric value.
• Percentage: Formats the percentage.
• Date: Formats the type of date.
• Time: Formats the type time.
• Special: ZIP code, phone number, social security number, and arbitrary mask.
• Custom: Create custom scripts called Format and Key Stroke.
In the Validate tab (Text, Date Field, and Dropdown menus),
• Field value is not validated: Does not require validation.
• Field value is in range: Numbers 1-5.
• Run a custom validation script.
In the Calculate tab (Text, Date Field, and Dropdown menus),
• Value is not calculated.
• Value is the (sum, product, average, minimum, maximum) for the following fields: Pick a button to choose the fields.
• Simplified field notation: Edit allows you to enter a script in the JavaScript Editor.
• Custom calculation script: Edit allows you to enter it in the JavaScript Editor.
In the Selection Change tab (list box only),
• Do nothing (if no action is required).
• Execute this script: Add a custom script. Edit allows you to enter it in the JavaScript Editor.
In the Signed tab (Digital Signature field only; refer to Chapter 19),
• Nothing happens when signed.
• Mark as read-only: All fields or only certain ones. Pick button to choose the fields.
Found with all tabs and fields:
• Locked: When selected, prevents any further changes to any form field properties until unlocked.
• Close: This button closes the form field’s Properties dialog box. If you are changing the properties of multiple fields, you can leave the Properties dialog box open. Click each field to change its properties. And then click the Close button.
The following are the tabs you’ll find in most of the fields. Figure 1-16 shows the tabs found in the Text Field Properties dialog box.
Bear in mind that the properties can differ depending upon the type of field chosen. For example, the Options tab properties are different for a text field versus a barcode or a radio button (Figure 1-17).
Summary
Introduction to Actions
Now that you have reviewed the basic form properties, you will begin your study of JavaScript by taking a closer look at several types of automatic or preprogramed actions that can be applied within various tabs within each field. In this chapter, you’ll be working with forms and you’ll discover how actions can be applied.
Getting Started
If you want to work along in this lesson or review the final result, download the Chapter 2 files from www.apress.com/9781484228920. The file with the label “Start” is the file without the code and the file with the label “End” is the final result. You will also find folders with original MS Word and PDF files if you would like to edit them plus a folder containing the original scripts if you would like to add them to your own PDF forms.
■
Note To view the properties of a field, you must select the Prepare Form tool. Only then
can you right-click or double-click on a field to review its properties. If you are creating your
form from an original PDF that contains no form fields, refer to the “Forms Review” section
in Chapter 1.
You can apply actions to all form fields. Actions, as you will see in more detail in Chapter 4 and later chapters, can trigger off various events such as alert boxes or cause a field to display a final calculation or a button to reset fields in a form. However, some actions work better with certain form fields than others.
For instance, applying an action to a radio button might give you some very select calculations but if you want to add up those values, using check boxes or text fields would probably be a better option.
Here you can see one of the many areas where you can add actions and a trigger, which I will discuss in more detail shortly.
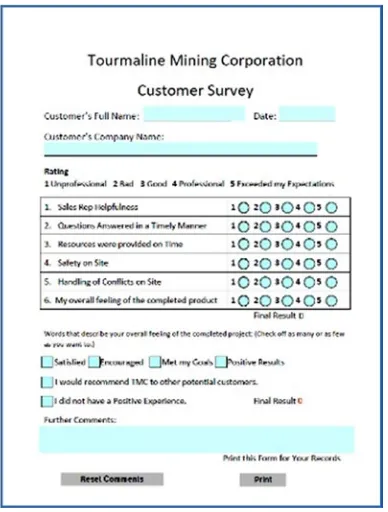
Rating Forms Value Averaging and Sum: Working
with Text Fields
Let’s look at several ways to use a combination of text boxes, radio buttons, and check boxes to do averaging and summing.
To insure a client puts the correct information into a field, it is important to limit their options. You can change the formatting by selecting from the “Select format category” dropdown menu.
Figure 2-3 provides an example of the formatting used in the Format tab of the Text Fields Properties dialog box.
The Validate Tab
You can limit the client’s options even further by setting a range of numbers in the same field under the Validate tab. Now the client can only enter numbers that range from 1 to 5. If they enter a 6 or higher, a warning will occur. Figure 2-4 shows the warning.
Figure 2-5. The Calculate tab for the final result
To access other fields and their data for this final field, click the Pick button to access field selection. Select only the fields you want to calculate. When done, click OK. You can also select or deselect all fields. This will allow you to make your selections faster, rather than checking off or on all the fields one at a time.
■
Tip If you have trouble selecting the check box, you can highlight it and press the
space bar on your keyboard. This toggles the check box on or off.
The Final Result text field is set to read-only in the General tab so that a client cannot alter the final result.
■
Note I selected only fields on page 2. If I need fields from other pages to complete the
calculation, such as page 1 or 3, I would pick these fields as well. Form calculations can be
on as many pages within the PDF document as required.
On Page 4 you can see how by choosing a word that has a numeric value applied to it, the Final Result field takes that information and adds it to what is already calculated. Figure 2-9. One of the dropdown fields extended
Using Radio Buttons on Page 3 of the Project
A text field is then used to calculate the sum of the radio group, as in Figure 2-13. To operate correctly, radio buttons must always be in groups of two or more.
Figure 2-13. Text field properties in the Calculate tab on page 3 of the customer survey
The Final Result text box is used to calculate the average rating of the other text boxes linked to the radio button groups.
Using Check Boxes on Page 3 of the Project
Check boxes can be used in a comparable way in the Options tab and given an export value of 1, 2, 3… or even negative numbers for a negative rating.
■
Note The check boxes can operate independently and don’t need to be grouped.
Basic Action Button Triggers for Reset Buttons
and Printing Buttons
There are many basic actions that can be added to buttons, as you’ll see in Chapter 4 and later. However, for this lesson let’s focus on two that are used quite frequently in forms: the Reset and Print actions.
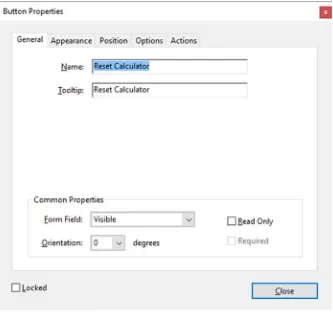
Reset Button
If a client makes a mistake in several fields or wants to clear the entire form rather than highlight and press the Delete or Backspace key for each field, it is helpful to add a Delete button to your form. Figure 2-16 displays what this action looks like in the Action tab.
Figure 2-16. Button properties in the Actions tab
All fields or only the comments can be reset by a button; it’s your choice. 1. Make sure the select trigger is set to Mouse Up.
2. Select the action of “Reset a Form” from the Select Action menu. 3. Click the Add button to add the action.
Figure 2-17. The Reset a Form options in the Actions tab
Print Form Button
However, if you need only a specific page to print, you need to add a JavaScript instead. To see a preview of this, refer to pages 2 and 4 of the PDF file and to Figure 2-19. I’ll discuss this more in later chapters.
When you are done viewing the form, click the X in the upper right-hand corner of the preview to close the Prepare Form tool.
Summary
Creating a QR Code Custom
Stamp
You’ve all probably opened and viewed a PDF file. And the program that made that possible was most likely Adobe Acrobat Reader or Acrobat Pro DC. For many computer users, Reader has become the industry standard simply because it is a freeware program that anyone can download for Mac or PC platforms.
When you are reviewing the file with your client, Acrobat DC allows you to view and add comments to a PDF document.
Acrobat also allows you to create barcodes and QR codes with the Prepare Form tool. However, the information generated in the barcode and QR code only applies to the surrounding form fields and not to specific text elsewhere in the document (see Figure 3-1). Currently, with the Comment tool you cannot generate a custom QR code, so this chapter shows you a way to get around this situation.
■
Note
If you want to work along in this lesson or review the final result, download the
Chapter 3 files from
www.apress.com/9781484228920. You will find the original Adobe
InDesign, QR image, and PDF files if you would like to edit them.
Customizing Your QR Code Stamp
It’s become popular to place a QR code on business cards, resumes, and newsletters; these codes can be read by smartphones. However, Acrobat only allows you to create a QR code that applies to forms. For your resume or letterhead, you might want a QR code to only contain the URL of your company website or just some text. The solution is to build your own custom QR code stamp that you can place in your online PDFs for clients to view. The following exercise will show you how.
QR Code Creation
Either create a QR code using InDesign CC 2014 or later, software that allows you to generate a QR code, or ask a graphic designer in your company to create one for you. Copy the image into a program like Adobe Photoshop and save the file as a greyscale JPEG 200px by 200px with a 72ppi being an appropriate size. Test it with your smartphone app to make sure it works correctly. See Figure 3-2.
Open the PDF file in which you plan to add the QR code in Acrobat Reader or Pro DC via File ➤ Open. Refer to Figure 3-3.
Select the PDF file you want to open.
Select the Stamp button in the Tools menu. Refer to Figure 3-4.
Figure 3-2. A generated QR code
Create the custom stamp. When you choose this option, you will be presented with the Select Image for Custom Stamp dialog box. Click the Browse button to locate your file. Refer to Figure 3-6.
In Acrobat Pro DC, you can browse and use several different file formats including JPEG, TIFF, GIF, and PNG. Refer to Figure 3-7.
Figure 3-5. The Stamp Tool menu
Figure 3-6. The Select Image for Custom Stamp dialog box
In this case, choose a JPEG graphic of the QR code that you or your graphic designer have already created.
Click the Open button and you will be returned to the previous dialog box. Refer here to Figure 3-8.
If you like how the image looks, click OK. Otherwise, browse for another image. You may need to make minor adjustments in a program like Photoshop for spacing needs to reduce or increase the size. If you do, make sure to keep the shape square and don’t distort the QR code. Click OK to proceed to the next dialog box.
Before you can use the custom stamp, Acrobat wants you to choose a folder category for your stamp and give it a name. You can either create a new folder by typing a name in or choose from current folders that are available in the Category dropdown menu. Refer here to Figure 3-9.
You have the option to down-sample the stamp to reduce the file size. In the case of the QR, I might uncheck this to preserve quality. In this case, the file is only 45KB, which is not large. When you are done, click OK.
Using the Stamp Tool
The stamp is created. You can go to your file folder in the Stamp dropdown menu and choose your new custom stamp. Refer to Figure 3-10.
At this point, a dialog box may appear that will request an initial identity setup. This is so the client will know who made this approval stamp for security reason. You do not have to fill in all the boxes. When you’re done, click the Complete button. You should only do this identity setup once for your new stamp. If you do not see this box, it may mean that you or someone else already set this area up. Refer to Figure 3-11. You can check this under Edit ➤ Preferences ➤ Categories: Identity and adjust your information there.
Figure 3-9. The Create Custom Stamp dialog box
The mouse cursor will now turn into the stamp. You can move it around on the page until you find where you want to place the stamp. Click the mouse button and the stamp will be set. If you don’t like where it is set, you can move it around. The mouse turns into four arrows. If you hold down the mouse icon on the stamp, you can move the stamp around, twist, or scale it.
If for some reason you need to delete the stamp later, you can go to the Custom Stamps ➤ Manage box and remove it from your custom list. Refer here to Figure 3-12.
Custom QR stamps as in Figure 3-13 can also have comments attached. You can attach a comment in the Comment tool section.
Figure 3-13. The Comment tool
Now your comments list has a stamp comment. In here you can add further information about the stamp by double-clicking it to add to a comment. If you need to delete the QR code stamp, just select it and press the Delete button on the keyboard or right-click and select Delete.
You can add this QR code stamp to as many places in the document as required. When you’re done, save the file and email to a client or post it on your website.
Final Thoughts: QR Code for Professional Printing
If you plan to send your resume or a newsletter to a company and you want to ensure that the QR code will print out regardless of the print document settings, I recommend typing your resume/newsletter in a program like MS Word, and then choosing the location where you want to place your QR code. Then in the above menu, choose Insert ➤ Picture. Refer here to Figure 3-15.
Figure 3-15. Insert an image in MS Word
Figure 3-14. Print settings for stamps. Choosing “Document and Stamps” will insure that the QR code stamp prints.
Locate your JPEG image and then click the Insert button. The image will be inserted. Finally, click Save as or print your file as a PDF. This will ensure that the QR code is embedded in the document and will print with the rest of your resume.
Summary
Buttons, Navigation, Form
and Non-Form Actions
In Chapter 2, you saw a few simple examples of actions you could create with buttons. Now you will focus on a few more. This chapter will cover
• A review of the Action tab’s properties in various fields and
non-form items
• Looking at built-in triggers and actions that require no coding • Applying what you discover to buttons for page navigation • How to use button icons rather than just text
• How a button can become a help icon to show or hide
information in an order form
• How a check box can show or hide information in combination
with a reset button
■
Note
If you want to work along in this lesson or review the final result, download the
Chapter
4
files from www.apress.com/9781484228920. The file with the label “Start” is
the file without the code and the file with the label “End” is the final result. You will also
find folders with original MS Word and PDF files if you would like to edit them and a folder
containing the original images if you would like to add them to your own PDF forms.
To view the properties of a field you must select the Prepare Form tool. Only then can you
right-click or double-click a field to review its properties.
Creating a Button Icon
Not all buttons have to be just text; you can also have text and an image or just an image that you created in a program like Adobe Photoshop or GIMP. As in the QR code stamp example in Chapter 3, the file can be many formats including a JPEG, GIF, or PNG.
The icon for the button is placed in the Options tab when you click the Choose Icon button (Figure 4-1).
Choose the layout setting of the icon only or have the icon on top or in another location if you want to use the icon in combination with text (known as a label).
The layout options are
• Label only (this setting will not allow you to add an icon) • Icon only
• Icon top, label bottom • Label top, icon bottom • Icon left, label right • Label left, icon right
Example of a Button as a Label Only
Figure 4-3 is an example of a button with only a label applied, as found in the Newsletter file. This button’s label says Next Page because you want the user to go to the next page when they click the button. The label is a helpful hint so that the user will know what will happen when the button is clicked. These types of buttons can be used in any document that contains three or more pages.
Figure 4-2. Clicking the Advanced button in the Options tab opens the Icon Placement dialog box
Figure 4-3. Label-only button
■
Note
The current state is Up based on the behavior of the button.
Figure 4-5 shows an example of a three-button group that has an icon image and some actions applied to them. Without actions, these buttons would function independently and not interact with each other.
If you enter each of the buttons properties, you will see, as in Figure 4-6, various hide and show actions.
Figure 4-4. Example of various behaviors and states applied to a button
All actions can be
• Added using the Add button
• Rearranged using the Up and Down buttons • Edited using the Edit button
• Deleted using the Delete button
■
Note
With the Show/Hide action you need to apply the action to each field one at a
time. Some actions, like Reset, allow you to apply the actions to more than one field or
collectively. Refer to Figure
2-17
of Chapter
2
.
Non-Form Properties Actions
The following sections take a quick look at the kinds of properties you can apply actions to that are not part of forms.
Pages
For this example, refer to the Newsletter Navigation PDF file and see Figure 4-7.
Under View ➤ Show/Hide ➤ Navigation Panes ➤ Page Thumbnails you will find on the left-hand side of Acrobat all the page thumbnails of your current document.
Select one of the pages in the Thumbnail section and from the dropdown choose Page Properties at the bottom of the options list to access this dialog box
(refer to Figure 4-8).
Pages can have actions applied for improved navigation. Remember that you can access this area on the left side of Acrobat in the Page Thumbnail section. Alternately, you can right-click on a thumbnail and choose Page Properties from the list.
Bookmarks
For this example, refer to the Newsletter Navigation PDF file.
Under View ➤ Show/Hide ➤ Navigation Panes ➤ Bookmarks you will find on the left-hand side of Acrobat all the bookmarks of your current document (refer to Figure 4-9).
Figure 4-8. The Page Properties option in the Action tab
Remember that you can access this area on the left side of Acrobat in the Bookmark Thumbnail section. Alternately, you can right-click on a bookmark and choose Properties from the list.
Web Hyperlinks
For this example, refer to the Newsletter Navigation PDF file.
You can access this area under Tools ➤ Edit PDF ➤ Link ➤ Add or Edit Web or Document Link if a link already exists. Then right-click the link and choose Properties from the list. (refer to Figure 4-11).
Alternately, outside of the Edit PDF tool, you can Select the link by right-clicking the link and choosing Edit Link from the list (refer to Figure 4-12).
Rich Media Non-Form Navigation Buttons
For this example, refer to the Floor Plan Layout PDF file.Buttons can be added either via the Forms tool or the Rich Media tool (refer to Figure 4-13).
Non-form button actions can be used for video media, 3D models, navigation, or later for forms while working with the Rich Media tool. However, after you close the file and open it again, to access the buttons properties, you will need to go into the Prepare Form tool to edit the button actions because you lose access after exiting the Rich Media tool.
Layers Basic Actions
For this example, refer to the Floor Plan Layout PDF file.
Under View ➤ Show/Hide ➤ Navigation Panes ➤ Layers you will find on the left-hand side of Acrobat all the layers of your current document (refer to Figure 4-14).
Figure 4-14. Access to the layers in the Navigation Panes area
• Layer actions have some similarities to Acrobat page transitions. • Layers can have a default state of on or off.
• Layers are good for use as overlays to show, for example, optional
layouts of a room or floor. The layers can be separated and exported out of program such as Adobe InDesign when you create an interactive PDF.
• Unlike other actions, they can be tricky to set up and are best kept
to one or two layers.
As you can see, most of these non-form properties can be accessed in the navigation pane/thumbnail area in Acrobat. The same is true for layers.
Triggers for Actions
Before you choose an action, it is important to select a trigger. Trigger + Select Action = Result You Want
The most common trigger to use in digital forms is Mouse Up, as seen in Figure 4-16.
The following describes this and a few other actions you may encounter:
Mouse Up: When the mouse button is released after a click. This is the most common button trigger because it gives the user one last chance to drag the pointer off the button and not activate the action.
Mouse Down: When the mouse button is clicked (without being released). In most cases, Mouse Up is the preferred trigger.
Mouse Enter: When the pointer enters the field or play area.
Mouse Exit: When the pointer exits the field or play area.
On Receive Focus (media clips only): When the link area receives focus, either through a mouse action or tabbing. Also called On Focus.
On Lose Focus (media clips only): When the focus moves to a different link area. Also called On Blur.
The exceptions to properties not having an available trigger are bookmarks and hyperlinks. It is assumed that you will click the link with your mouse or finger and that the action of going to that page or URL will be executed.
Refer to the following Adobe link for more details: https://helpx.adobe.com/ acrobat/using/applying-actions-scripts-pdfs.html.
Choose an Action That Requires No Code
There are many actions you can choose from. As you can see in Figure 4-17, once you choose a trigger you can add an action to a button that will allow you to move to another page or print all the pages in the document.
Go to a page view: Jumps to the specified destination in the current document.
Import form data: Brings in form data from another file, and places it in the active form.
Multimedia operation (Acrobat 9 and later): Executes a specified action for a multimedia object in the file (such as playing a sound file). The multimedia object must be added to the file before you can specify an action for it.
Open a file: Launches and opens a file. If you are distributing a PDF file with a link to another file, the reader needs the native application of that linked file to open it successfully. (You may need to add opening preferences for the target file).
Open a web link: Jumps to the specified destination on the Internet. You can use HTTP, FTP, and mailto protocols to define your link.
Play a sound: Plays the specified sound file. The sound is embedded into the PDF document in a cross-platform format.
Play media (Acrobat 5, or Acrobat 6 and later compatible): Plays the specified QuickTime or AVI movie that was created as Acrobat 5 or 6-compatible. The specified movie must be embedded in a PDF document.
Read an article: Follows an article thread in the active document.
Reset a form: Clears previously entered data in a form. You can control the fields that are reset with the Select Fields dialog box.
Run a JavaScript: Runs the specified JavaScript. This requires JavaScript to do some custom action.
Set layer visibility: Determines which layer settings are active. Before you add this action, specify the appropriate layer settings.
Show/hide a field: Toggles between showing and hiding a field in a PDF document. This option is especially useful in form fields. For example, if you want an object to pop up whenever the pointer is over a button, you can set an action that shows a field on the Mouse Enter trigger and hides a field on Mouse Exit.
It is important to note, in the case of the “Execute a menu item,” additional possible variations to the action will appear when the Add button is clicked, such as assorted options for page and document navigation. Figures 4-19 and 4-20 illustrate what options are available.
In the Actions tab, more than one action can be added using the Add button. One example is to show and hide items on a form; refer to Figure 4-21. It shows some fields and then hides others.
Newsletter Navigation with Buttons
Open the Newsletter Navigation End file in the Chapter 4 folder. Test the buttons. You can use labels with or without images to enhance the navigation experience. See Figure 4-22 for the buttons with an example of an action applied.
Choose an action of “Execute a menu item” and apply one of the following types of navigation to your button:
View ➤ Page Navigation ➤
• First Page
As shown back in Figure 4-20, other types of viewing include
• Page Display • Zoom • Portfolio
• Show/Hide of Panes • Full Screen Mode
The Next Page button and the right-pointing arrow icon button in the Newsletter Document have had the action View ➤ Page Navigation ➤ Next Page applied. The Previous Page button and the left-pointing arrow button have had the action View ➤ Page Navigation ➤ Previous Page applied.
With the Go To Form button created, you could do one of the following to open the form:
• Open a file.
• Execute a menu item ➤ View ➤ Show/Hide ➤ Navigation Pane ➤
Attachments.
As mentioned earlier, navigation can be a link or even a bookmark.
In the Newsletter Navigation PDF, you can alter the URL link called “New finds in China.” This link can either go to a website or it additionally can have a bookmark that will anchor or jump to that to when clicked. If your bookmark name is no longer the same as the section title because you altered the link action, you can rename the bookmark, as you can see in Figure 4-24. The bookmark has now been renamed and matches the URL or section it is jumping to.
Figure 4-25. Show and hide example
Form Navigation with a Button as Helpful Hint
If a client is unsure what to enter in a field, a hint can be created to give information. Open the TMC Order Form End example to see how this is done.This example uses “Show/hide a field” to accomplish this. Refer to the button next to the Customer Order Code and Figure 4-25.
Here is a breakdown of each of the buttons:
• Info button: Show-Close, Show-Info Window, Hide-Info
• Close button: Hide-Close, Hide-Info Window, Show-Info
(Figure 4-27).
• Info Window button: No actions applied. Leave Action tabs blank
(Figure 4-28).
Adding a Comb of Characters
A comb of characters spreads the user-entered text evenly across the width of the text field. If a border color is specified in the Appearance tab, each character entered in the field is separated by lines of that color. This option is available only when no other check box is selected; refer to Figure 4-29.
■
Note
When entering a code, it can helpful to add a comb of characters properties so
that the client knows they have entered the correct amount of letters or numbers.
Before Comb and After Comb
Figure 4-30 shows how a text field in the Option tab properties appears before you apply
Figure 4-28. The Info Window button appears below the Close button