HTML5
Notes for Professionals
HTML5
Notes for Professionals
GoalKicker.com
Free Programming Books
Disclaimer This is an unocial free book created for educational purposes and is not aliated with ocial HTML5 group(s) or company(s).
100+ pages
Contents
Section 5.4: Inserted, Deleted, or Stricken ... 9
Section 5.5: Superscript and Subscript ... 9
Chapter 6: Anchors and Hyperlinks
... 11Section 6.1: Link to another site ... 11
Section 6.2: Link to an anchor ... 12
Section 6.3: Link to a page on the same site ... 12
Section 6.4: Link that dials a number ... 12
Section 6.5: Open link in new tab/window ... 13
Section 6.6: Link that runs JavaScript ... 13
Section 6.7: Link that runs email client ... 14
Section 8.4: Table with thead, tbody, tfoot, and caption ... 21
Chapter 12: Linking Resources
... 31Section 12.1: JavaScript ... 31
Section 12.2: External CSS Stylesheet ... 32
Section 12.3: Favicon ... 32
Section 12.4: Alternative CSS ... 32
Section 12.5: Resource Hint: dns-prefetch, prefetch, prerender ... 33
Section 12.6: Link 'media' attribute ... 33
Section 12.7: Prev and Next ... 33
Section 12.8: Web Feed ... 33
Chapter 13: Include JavaScript Code in HTML
... 35Section 13.1: Handling disabled Javascript ... 35
Section 13.2: Linking to an external JavaScript file ... 35
Section 13.3: Directly including JavaScript code ... 35
Section 13.4: Including a JavaScript file executing asynchronously ... 35
Chapter 14: Using HTML with CSS
... 36Section 14.1: External Stylesheet Use ... 36
Section 14.2: Internal Stylesheet ... 36
Section 14.3: Inline Style ... 37
Section 14.4: Multiple Stylesheets ... 37
Chapter 15: Images
... 38Section 15.1: Creating an image ... 38
Section 15.2: Choosing alt text ... 38
Section 15.3: Responsive image using the srcset attribute ... 39
Section 15.4: Responsive image using picture element ... 40
Chapter 16: Image Maps
... 41Section 16.1: Introduction to Image Maps ... 41
Chapter 17: Input Control Elements
... 43Section 17.1: Text ... 43
Section 17.2: Checkbox and Radio Buttons ... 44
Section 17.3: Input Validation ... 46
Section 17.4: Color ... 47
Section 17.19: DateTime-Local ... 52
Section 17.20: Month ... 52
Section 17.21: Time ... 52
Section 17.22: DateTime (Global) ... 53
Chapter 18: Forms
... 54Section 18.1: Submitting ... 54
Section 18.2: Target attribute in form tag ... 55
Section 18.3: Uploading Files ... 55
Section 18.4: Grouping a few input fields ... 55
Chapter 19: Div Element
... 57Section 19.1: Basic usage ... 57
Section 19.2: Nesting ... 57
Chapter 20: Sectioning Elements
... 59Section 20.1: Nav Element ... 59
Section 21.1: Basic Navigation Bar ... 64
Section 21.2: HTML5 Navigation Bar ... 64
Chapter 22: Label Element
... 65Section 22.1: About Label ... 65
Section 22.2: Basic Use ... 65
Chapter 23: Output Element
... 67Section 23.1: Output Element Using For and Form Attributes ... 67
Section 23.2: Output Element with Attributes ... 67
Chapter 24: Void Elements
... 68Section 24.1: Void elements ... 68
Chapter 25: Media Elements
... 69Section 25.1: Audio ... 69
Section 25.2: Video ... 69
Section 25.3: Using `<video>` and `<audio>` element to display audio/video content ... 69
Section 25.4: Video header or background ... 70
Chapter 26: Progress Element
... 71Section 26.1: Progress ... 71
Section 26.2: Changing the color of a progress bar ... 71
Section 26.3: HTML Fallback ... 72
Chapter 27: Selection Menu Controls
... 73Section 27.1: Select Menu ... 73
Section 29.5: Using Anchors with IFrames ... 78
Chapter 30: Content Languages
... 79Section 30.1: Base Document Language ... 79
Section 30.2: Element Language ... 79
Section 30.3: Elements with Multiple Languages ... 79
Section 30.4: Regional URLs ... 79
Section 30.5: Handling Attributes with Dierent Languages ... 79
Chapter 31: SVG
... 81Section 31.1: Inline SVG ... 81
Section 31.2: Embedding external SVG files in HTML ... 81
Section 31.3: Embedding SVG using CSS ... 82
Chapter 32: Canvas
... 83Section 32.1: Basic Example ... 83
Section 32.2: Drawing two rectangles on a <canvas> ... 83
Chapter 33: Meta Information
... 85Section 33.1: Page Information ... 85
Section 33.2: Character Encoding ... 85
Section 33.3: Robots ... 86
Section 33.4: Social Media ... 86
Section 33.5: Mobile Layout Control ... 87
Section 33.6: Automatic Refresh ... 88
Section 33.7: Phone Number Recognition ... 88
Section 33.8: Automatic redirect ... 88
Section 33.9: Web App ... 89
Chapter 34: Marking up computer code
... 90Section 34.1: Block with <pre> and <code> ... 90
Section 34.2: Inline with <code> ... 90
Chapter 35: Marking-up Quotes
... 91Section 35.1: Inline with <q> ... 91
Section 35.2: Block with <blockquote> ... 91
Chapter 36: Tabindex
... 93Section 36.1: Add an element to the tabbing order ... 93
Section 36.2: Remove an element from the tabbing order ... 93
Section 36.3: Define a custom tabbing order (not recommended) ... 93
Chapter 37: Global Attributes
... 94Section 37.1: Contenteditable Attribute ... 94
Chapter 38: HTML 5 Cache
... 95Section 38.1: Basic Example of HTML5 cache ... 95
Chapter 39: HTML Event Attributes
... 96Section 39.1: HTML Form Events ... 96
Section 39.2: Keyboard Events ... 96
Chapter 40: Character Entities
... 97Section 40.1: Character Entities in HTML ... 97
Section 40.2: Common Special Characters ... 97
Chapter 41: ARIA
... 98Section 41.1: role="presentation" ... 98
Section 41.2: role="alert" ... 98
Section 41.4: role="application" ... 98
Section 41.5: role="article" ... 98
Section 41.6: role="banner" ... 99
Section 41.7: role="button" ... 99
Section 41.8: role="cell" ... 99
Section 41.9: role="checkbox" ... 99
Section 41.10: role="columnheader" ... 100
Section 41.11: role="combobox" ... 100
Section 41.12: role="complementary" ... 100
Section 41.13: role="contentinfo" ... 100
Section 41.14: role="definition" ... 100
Section 41.15: role="dialog" ... 101
Section 41.16: role="directory" ... 101
Section 41.17: role="document" ... 101
Section 41.18: role="form" ... 101
Section 41.19: role="grid" ... 102
Section 41.20: role="gridcell" ... 102
Section 41.21: role="group" ... 102
Section 41.22: role="heading" ... 102
Section 41.23: role="img" ... 103
Section 41.24: role="link" ... 103
Section 41.25: role="list" ... 103
Section 41.26: role="listbox" ... 103
Section 41.27: role="listitem" ... 103
Section 41.28: role="log" ... 104
Section 41.29: role="main" ... 104
Section 41.30: role="marquee" ... 104
Section 41.31: role="math" ... 104
Section 41.32: role="menu" ... 104
Section 41.33: role="menubar" ... 104
Section 41.34: role="menuitem" ... 105
Section 41.35: role="menuitemcheckbox" ... 105
Section 41.36: role="menuitemradio" ... 105
Section 41.37: role="navigation" ... 105
Section 41.38: role="note" ... 105
Section 41.39: role="option" ... 105
Section 41.40: role="progressbar" ... 106
Section 41.41: role="radio" ... 106
Section 41.42: role="region" ... 106
Section 41.55: role="tab" ... 109
Section 41.56: role="table" ... 109
Section 41.57: role="tablist" ... 109
Section 41.58: role="tabpanel" ... 109
Section 41.59: role="textbox" ... 109
Section 41.60: role="timer" ... 110
Section 41.61: role="toolbar" ... 110
Section 41.62: role="tooltip" ... 110
Section 41.63: role="tree" ... 110
Section 41.64: role="treegrid" ... 111
Section 41.65: role="treeitem" ... 111
Credits
... 112About
Please feel free to share this PDF with anyone for free, latest version of this book can be downloaded from:
This HTML5 Notes for Professionals book is compiled from Stack Overflow Documentation, the content is written by the beautiful people at Stack Overflow.
Text content is released under Creative Commons BY-SA, see credits at the end of this book whom contributed to the various chapters. Images may be copyright
of their respective owners unless otherwise specified
This is an unofficial free book created for educational purposes and is not affiliated with official HTML5 group(s) or company(s) nor Stack Overflow. All
trademarks and registered trademarks are the property of their respective company owners
The information presented in this book is not guaranteed to be correct nor accurate, use at your own risk
Chapter 1: Getting started with HTML
Version Specification Release Date
1.0 N/A 1994-01-01
2.0 RFC 1866 1995-11-24
3.2 W3C: HTML 3.2 Specification 1997-01-14 4.0 W3C: HTML 4.0 Specification 1998-04-24 4.01 W3C: HTML 4.01 Specification 1999-12-24 5 WHATWG: HTML Living Standard2014-10-28 5.1 W3C: HTML 5.1 Specification 2016-11-01
Section 1.1: Hello World
Introduction
HTML (Hypertext Markup Language) uses a markup system composed of elements which represent specific content. Markup means that with HTML you declare what is presented to a viewer, not how it is presented. Visual representations are defined by Cascading Style Sheets (CSS) and realized by browsers. Still existing elements that allow for such, like e.g. font, "are entirely obsolete, and must not be used by authors"[1].
HTML is sometimes called a programming language but it has no logic, so is a markup language. HTML tags provide semantic meaning and machine-readability to the content in the page.
An element usually consists of an opening tag (<element_name>), a closing tag (</element_name>), which contain the element's name surrounded by angle brackets, and the content in between:
<element_name>...content...</element_name>
There are some HTML elements that don't have a closing tag or any contents. These are called void elements. Void elements include <img>, <meta>, <link> and <input>.
Element names can be thought of as descriptive keywords for the content they contain, such as video, audio, table, footer.
A HTML page may consist of potentially hundreds of elements which are then read by a web browser, interpreted and rendered into human readable or audible content on the screen.
For this document it is important to note the difference between elements and tags:
Elements: video, audio, table, footer
Tags:<video>, <audio>, <table>, <footer>, </html>, </body>
Element insight
Let's break down a tag...
The <p> tag represents a common paragraph.
brackets (<p>). The closing tag is identical to the opening tag with the addition of a forward slash (/) between the opening bracket and the element's name (</p>).
Content can then go between these two tags: <p>This is a simple paragraph.</p>.
Creating a simple page
The following HTML example creates a simple "Hello World" web page.
HTML files can be created using any text editor. The files must be saved with a .html or .htm[2] extension in order to be recognized as HTML files.
Once created, this file can be opened in any web browser.
<!DOCTYPE html>
<html lang="en">
<head>
<meta charset="UTF-8">
<title>Hello!</title>
</head>
<body>
<h1>Hello World!</h1>
<p>This is a simple paragraph.</p>
</body>
</html>
Simple page break down
These are the tags used in the example:
Tag Meaning
<!DOCTYPE>Defines the HTML version used in the document. In this case it is HTML5.
See the doctypes topic for more information.
<h1> A level 1 heading for the page.See headings for more information.
<p> Represents a common paragraph of text.
1. ↑HTML5, 11.2 Non-conforming features
Chapter 2: Doctypes
Doctypes - short for 'document type' - help browsers to understand the version of HTML the document is written in for better interpretability. Doctype declarations are not HTML tags and belong at the very top of a document. This topic explains the structure and declaration of various doctypes in HTML.
Section 2.1: Adding the Doctype
The <!DOCTYPE> declaration should always be included at the top of the HTML document, before the <html> tag.
Version ≥ 5
See HTML 5 Doctype for details on the HTML 5 Doctype.
<!DOCTYPE html>
Section 2.2: HTML 5 Doctype
HTML5 is not based on SGML (Standard Generalized Markup Language), and therefore does not require a reference to a DTD (Document Type Definition).
HTML 5 Doctype declaration:
<!DOCTYPE html> Case Insensitivity
Per the W3.org HTML 5 DOCTYPE Spec:
A DOCTYPE must consist of the following components, in this order:
A string that is an ASCII case-insensitive match for the string "<!DOCTYPE". 1.
therefore the following DOCTYPEs are also valid:
<!doctype html>
<!dOCtyPe html>
<!DocTYpe html>
Chapter 3: Headings
HTML provides not only plain paragraph tags, but six separate header tags to indicate headings of various sizes and thicknesses. Enumerated as heading 1 through heading 6, heading 1 has the largest and thickest text while heading 6 is the smallest and thinnest, down to the paragraph level. This topic details proper usage of these tags.
Section 3.1: Using Headings
Headings can be used to describe the topic they precede and they are defined with the <h1> to <h6> tags. Headings support all the global attributes.
<h1> defines the most important heading.
<h6> defines the least important heading.
Defining a heading:
<h1>Heading 1</h1> <h2>Heading 2</h2> <h3>Heading 3</h3> <h4>Heading 4</h4> <h5>Heading 5</h5> <h6>Heading 6</h6>
Correct structure matters
Search engines and other user agents usually index page content based on heading elements, for example to create a table of contents, so using the correct structure for headings is important.
In general, an article should have one h1 element for the main title followed by h2 subtitles – going down a layer if necessary. If there are h1 elements on a higher level they shoudn't be used to describe any lower level content.
Example document (extra intendation to illustrate hierarchy):
<h1>Main title</h1> <p>Introduction</p>
<h2>Reasons</h2>
<h3>Reason 1</h3>
<p>Paragraph</p>
<h3>Reason 2</h3>
<p>Paragraph</p>
<h2>In conclusion</h2>
Chapter 4: Paragraphs
Column Column
<p> Defines a paragraph
<br> Inserts a single line break
<pre> Defines pre-formatted text
Paragraphs are the most basic HTML element. This topic explains and demonstrates the usage of the paragraph element in HTML.
Section 4.1: HTML Paragraphs
The HTML <p> element defines a paragraph:<p>This is a paragraph.</p> <p>This is another paragraph.</p>
Display-You cannot be sure how HTML will be displayed.
Large or small screens, and resized windows will create different results.
With HTML, you cannot change the output by adding extra spaces or extra lines in your HTML code.
The browser will remove any extra spaces and extra lines when the page is displayed:
Chapter 5: Text Formatting
While most HTML tags are used to create elements, HTML also provides in-text formatting tags to apply specific text-related styles to portions of text. This topic includes examples of HTML text formatting such as highlighting, bolding, underlining, subscript, and stricken text.
Section 5.1: Highlighting
The <mark> element is new in HTML5 and is used to mark or highlight text in a document "due to its relevance in another context".1
The most common example would be in the results of a search were the user has entered a search query and results are shown highlighting the desired query.
<p>Here is some content from an article that contains the <mark>searched query</mark>
that we are looking for. Highlighting the text will make it easier for the user to find what they are looking for.</p>
Output:
A common standard formatting is black text on a yellow background, but this can be changed with CSS.
Section 5.2: Bold, Italic, and Underline
Bold TextTo bold text, use the <strong> or <b> tags:
<strong>Bold Text Here</strong>
or
<b>Bold Text Here</b>
What’s the difference? Semantics. <strong> is used to indicate that the text is fundamentally or semantically important to the surrounding text, while <b> indicates no such importance and simply represents text that should be bolded.
If you were to use <b> a text-to-speech program would not say the word(s) any differently than any of the other words around it - you are simply drawing attention to them without adding any additional importance. By using
<strong>, though, the same program would want to speak those word(s) with a different tone of voice to convey that the text is important in some way.
Italic Text
<em>Italicized Text Here</em>
or
<i>Italicized Text Here</i>
What’s the difference? Semantics. <em> is used to indicate that the text should have extra emphasis that should be stressed, while <i> simply represents text which should be set off from the normal text around it.
For example, if you wanted to stress the action inside a sentence, one might do so by emphasizing it in italics via
<em>: "Would you just submit the edit already?"
But if you were identifying a book or newspaper that you would normally italicize stylistically, you would simply use
<i>: "I was forced to read Romeo and Juliet in high school.
Underlined Text
While the <u> element itself was deprecated in HTMl 4, it was reintroduced with alternate semantic meaning in HTML 5 - to represent an unarticulated, non-textual annotation. You might use such a rendering to indicate misspelled text on the page, or for a Chinese proper name mark.
<p>This paragraph contains some <u>mispelled</u> text.</p>
Section 5.3: Abbreviation
To mark some expression as an abbreviation, use <abbr> tag:
<p>I like to write <abbr title="Hypertext Markup Language">HTML</abbr>!</p>
If present, the title attribute is used to present the full description of such abbreviation.
Section 5.4: Inserted, Deleted, or Stricken
To mark text as inserted, use the <ins> tag:<ins>New Text</ins>
To mark text as deleted, use the <del> tag:
To create subscript:
Chapter 6: Anchors and Hyperlinks
Parameter Details
href
Specifies the destination address. It can be an absolute or relative URL, or the name of an anchor. An absolute URL is the complete URL of a website like http://example.com/. A relative URL points to another directory and/or document inside the same website, e.g. /about-us/ points to the directory “about-us” inside the root directory (/). When pointing to another directory without explicitly specifying the document, web servers typically return the document “index.html” inside that directory.
hreflang Specifies the language of the resource linked by the href attribute (which must be present with this one). Use language values from BCP 47 for HTML5 and RFC 1766 for HTML 4.
rel Specifies the relationship between the current document and the linked document. For HTML5, the values must be defined in the specification or registered in the Microformats wiki.
target Specifies where to open the link, e.g. in a new tab or window. Possible values are _blank, _self,_parent, _top, and framename (deprecated). Forcing such behaviour is not recommended since it violates the control of the user over a website.
title Specifies extra information about a link. The information is most often shown as a tooltip text whenthe cursor moves over the link. This attribute is not restricted to links, it can be used on almost all HTML tags.
download
Specifies that the target will be downloaded when a user clicks on the hyperlink. The value of the attribute will be the name of the downloaded file. There are no restrictions on allowed values, and the browser will automatically detect the correct file extension and add it to the file (.img, .pdf, etc.). If the value is omitted, the original filename is used.
Anchor tags are commonly used to link separate webpages, but they can also be used to link between different places in a single document, often within table of contents or even launch external applications. This topic explains the implementation and application of HTML anchor tags in various roles.
Section 6.1: Link to another site
This is the basic use of the <a> (anchor element) element:<a href="http://example.com/">Link to example.com</a>
It creates a hyperlink, to the URL http://example.com/ as specified by the href (hypertext reference) attribute, with the anchor text "Link to example.com". It would look something like the following:
Link to example.com
To denote that this link leads to an external website, you can use the external link type:
Section 6.2: Link to an anchor
Anchors can be used to jump to specific tags on an HTML page. The <a> tag can point to any element that has an id attribute. To learn more about IDs, visit the documentation about Classes and IDs. Anchors are mostly used to jump to a subsection of a page and are used in conjunction with header tags.
Suppose you've created a page (page1.html) on many topics:
<h2>First topic</h2>
<p>Content about the first topic</p> <h2>Second topic</h2>
<p>Content about the second topic</p>
Once you have several sections, you may want to create a Table of Contents at the top of the page with quick-links (or bookmarks) to specific sections.
If you gave an id attribute to your topics, you could then link to them
<h2 id="Topic1">First topic</h2> <p>Content about the first topic</p> <h2 id="Topic2">Second topic</h2> <p>Content about the second topic</p>
Now you can use the anchor in your table of contents:
<h1>Table of Contents</h1>
<a href='#Topic1'>Click to jump to the First Topic</a>
<a href='#Topic2'>Click to jump to the Second Topic</a>
These anchors are also attached to the web page they're on (page1.html). So you can link across the site from one page to the other by referencing the page and anchor name.
Remember, you can always <a href="page1.html#Topic1">look back in the First Topic</a> for supporting information.
Section 6.3: Link to a page on the same site
You can use a relative path to link to pages on the same website.<a href="/example">Text Here</a>
The above example would go to the file example at the root directory (/) of the server.
If this link was on http://example.com, the following two links would bring the user to the same location
<a href="/page">Text Here</a>
<a href="http://example.com/page">Text Here</a>
Both of the above would go to the page file at the root directory of example.com.
Section 6.4: Link that dials a number
<a href="tel:11234567890">Call us</a>
Most devices and programs will prompt the user in some way to confirm the number they are about to dial.
Section 6.5: Open link in new tab/window
<a href="example.com" target="_blank">Text Here</a>
The target attribute specifies where to open the link. By setting it to _blank, you tell the browser to open it in a new tab or window (per user preference).
SECURITY VULNERABILITY WARNING!
Using target="_blank" gives the opening site partial access to the window.opener object via JavaScript, which allows that page to then access and change the window.opener.location of your page and potentially redirect users to malware or phishing sites.
Whenever using this for pages you do not control, add rel="noopener" to your link to prevent the window.opener object from being sent with the request.
Currently, Firefox does not support noopener, so you will need to use rel="noopener noreferrer" for maximum effect.
Section 6.6: Link that runs JavaScript
Simply use the javascript: protocol to run the text as JavaScript instead of opening it as a normal link:
<a href="javascript:myFunction();">Run Code</a>
You can also achieve the same thing using the onclick attribute:
<a href="#" onclick="myFunction(); return false;">Run Code</a>
The return false; is necessary to prevent your page from scrolling to the top when the link to # is clicked. Make sure to include all code you'd like to run before it, as returning will stop execution of further code.
Section 6.7: Link that runs email client
Basic usageIf the value of the href-attribute begins with mailto: it will try to open an email client on click:
<a href="mailto:[email protected]">Send email</a>
This will put the email address [email protected] as the recipient for the newly created email.
Cc and Bcc
You can also add addresses for cc- or bcc-recipients using the following syntax:
<a href="mailto:[email protected][email protected]&[email protected]">Send email</a>
Subject and body text
You can populate the subject and body for the new email as well:
<a href="mailto:[email protected]?subject=Example+subject&body=Message+text">Send email</a>
Those values must be URL encoded.
Chapter 7: Lists
HTML offers three ways for specifying lists: ordered lists, unordered lists, and description lists. Ordered lists use ordinal sequences to indicate the order of list elements, unordered lists use a defined symbol such as a bullet to list elements in no designated order, and description lists use indents to list elements with their children. This topic explains the implementation and combination of these lists in HTML markup.
Section 7.1: Ordered List
An ordered list can be created with the <ol> tag and each list item can be created with the <li> tag as in the example below:
<ol>
<li>Item</li>
<li>Another Item</li>
<li>Yet Another Item</li> </ol>
This will produce a numbered list (which is the default style):
Item 1.
Another Item 2.
Yet Another Item 3.
Manually changing the numbers
There are a couple of ways you can play with which numbers appear on the list items in an ordered list. The first way is to set a starting number, using the start attribute. The list will start at this defined number, and continue incrementing by one as usual.
<ol start="3">
<li>Item</li>
<li>Some Other Item</li>
<li>Yet Another Item</li> </ol>
This will produce a numbered list (which is the default style):
from that point again.
<ol start="5">
<li>Item</li>
<li>Some Other Item</li>
<li value="4">A Reset Item</li>
<li>Another Item</li>
<li>Yet Another Item</li> </ol>
So the example above will produce a list that follows the numbering pattern of 5, 6, 4, 5, 6 - starting again at a number lower than the previous and duplicating the number 6 in the list.
Note: The start and value attributes only accept a number - even if the ordered list is set to display as Roman numerals or letters.
Version ≥ 5
You can reverse the numbering by adding reversed in your ol element:
<ol reversed>
<li>Item</li>
<li>Some Other Item</li>
<li value="4">A Reset Item</li>
<li>Another Item</li>
<li>Yet Another Item</li> </ol>
Reverse numbering is helpful if you're continually adding to a list, such as with new podcast episodes or presentations, and you want the most recent items to appear first.
Changing the type of numeral
You can easily change the type of numeral shown in the list item marker by using the type attribute
<ol type="1|a|A|i|I">
Type Description Examples
1Default value - Decimal numbers 1,2,3,4 aAlphabetically ordered (lowercase) a,b,c,d AAlphabetically ordered (uppercase) A,B,C,D iRoman Numerals (lowercase) i,ii,iii,iv IRoman Numerals (uppercase) I,II,III,IV
You should use ol to display a list of items, where the items have been intentionally ordered and order should be emphasized. If changing the order of the items does NOT make the list incorrect, you should use <ul>.
Section 7.2: Unordered List
<ul>
<li>Item</li>
<li>Another Item</li>
<li>Yet Another Item</li> </ul>
This will produce a bulleted list (which is the default style):
Item
Another Item Yet Another Item
You should use ul to display a list of items, where the order of the items is not important. If changing the order of the items makes the list incorrect, you should use <ol>.
Section 7.3: Nested lists
You can nest lists to represent sub-items of a list item.
<ul>
<li>item 1</li>
<li>item 2 <ul>
<li>sub-item 2.1</li>
<li>sub-item 2.2</li>
</ul>
</li>
<li>item 3</li> </ul>
item 1 item 2
sub-item 2.1 sub-item 2.2 item 3
The nested list has to be a child of the li element.
name-value groups, where the name is given in the dt element, and the value is given in the dd element.
<dl>
<dt>name 1</dt>
<dd>value for 1</dd>
<dt>name 2</dt>
<dd>value for 2</dd> </dl>
Live demo
A name-value group can have more than one name and/or more than one value (which represent alternatives):
<dl>
<dt>name 1</dt>
<dt>name 2</dt>
<dd>value for 1 and 2</dd>
<dt>name 3</dt>
<dd>value for 3</dd>
<dd>value for 3</dd>
</dl>
Chapter 8: Tables
The HTML <table> element allows web authors to display tabular data (such as text, images, links, other tables, etc.) in a two dimensional table with rows and columns of cells.
Section 8.1: Simple Table
This will render a <table> consisting of three total rows (<tr>): one row of header cells (<th>) and two rows of content cells (<td>). <th> elements are tabular headers and <td> elements are tabular data. You can put whatever you want inside a <td> or <th>.
Heading 1/Column 1 Heading 2/Column 2 Row 1 Data Column 1 Row 1 Data Column 2 Row 2 Data Column 1 Row 2 Data Column 2
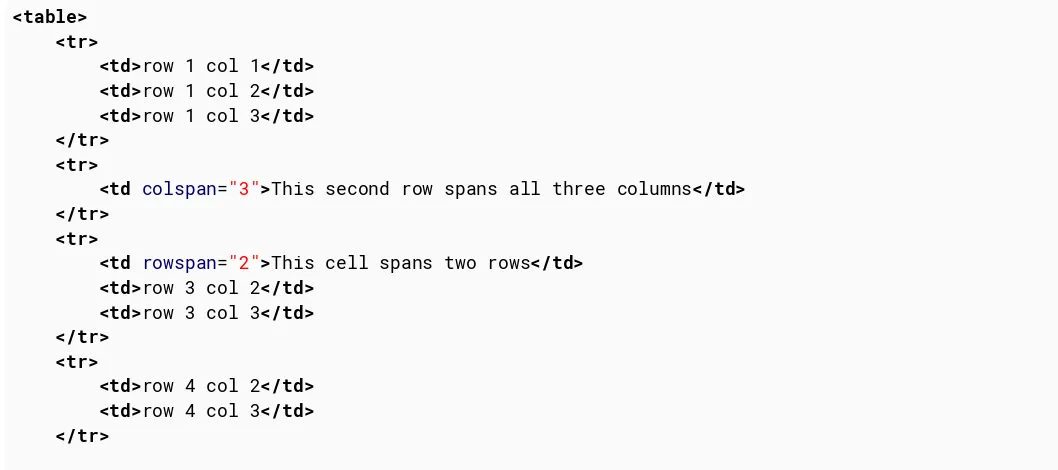
Section 8.2: Spanning columns or rows
Table cells can span multiple columns or rows using the colspan and rowspan attributes. These attributes can be applied to <th> and <td> elements.
Will result in
Note that you should not design a table where both rows and columns overlap as this is invalid HTML and the result is handled differently by different web browsers.
rowspan = A non-negative integer that specifies the number of rows spanned by a cell. The default value of this attribute is one (1). A value of zero (0) means that the cell will extend from the current row until the last row of the table (<thead>, <tbody>, or <tfoot>).
colspan = A non-negative integer that specifies the number of columns spanned by the current cell. The default value of this attribute is one (1). A value of zero (0) means that the cell will extend from the current to the last column of the column group <colgroup> in which the cell is defined.
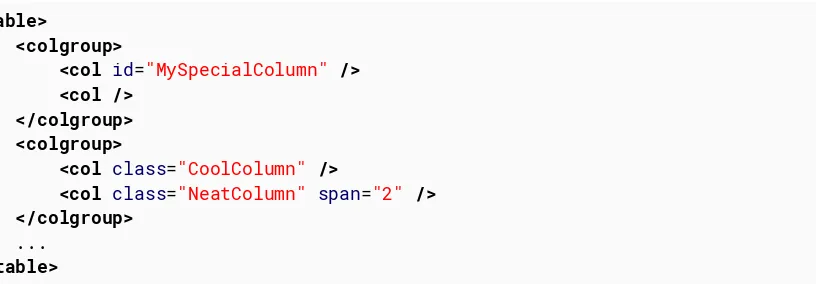
Section 8.3: Column Groups
Sometimes you may want to apply styling to a column or group of columns. Or for semantic purposes, you may want to group columns together. To do this, use <colgroup> and <col> elements.
The optional <colgroup> tag allows you to group columns together. <colgroup> elements must be child elements of a <table> and must come after any <caption> elements and before any table content (e.g., <tr>, <thead>,
<tbody>, etc.).
<table>
<colgroup span="2"></colgroup>
<colgroup span="2"></colgroup>
...
</table>
The optional <col> tag allows you to reference individual columns or a range of columns without applying a logical grouping. <col> elements are optional, but if present, they must be inside a <colgroup> element.
<table>
The following CSS styles can be applied to <colgroup> and <col> elements:
border
width
visibility
display (as in display: none)
display: none; will actually remove the columns from the display, causing the table to render as if those cells don't exist
For more information, see HTML5 Tabular data.
Section 8.4: Table with thead, tbody, tfoot, and caption
HTML also provides the tables with the <thead>, <tbody>, <tfoot>, and <caption> elements. These additional elements are useful for adding semantic value to your tables and for providing a place for separate CSS styling.When printing out a table that doesn't fit onto one (paper) page, most browsers repeat the contents of <thead> on every page.
There's a specific order that must be adhered to, and we should be aware that not every element falls into place as one would expect. The following example demonstrates how our 4 elements should be placed.
<table>
<caption>Table Title</caption> <!--| caption is the first child of table |-->
Element Styles Applies
<caption>Yellow text on black background.
<thead> Bold text on purple background.
<tbody> Text on blue background.
<tfoot> Text on green background.
<th> Orange borders.
<td> Red borders.
Section 8.5: Heading scope
th elements are very commonly used to indicate headings for table rows and columns, like so:
<table>
</tr>
</thead>
<tbody>
<tr>
<th scope="row">Row Heading 1</th>
<td></td>
<td></td>
</tr>
<tr>
<th scope="row">Row Heading 1</th>
<td></td>
<td></td>
</tr>
</tbody> </table>
scope is known as an enumerated attribute, meaning that it can have a value from a specific set of possible values. This set includes:
col row colgroup rowgroup
References:
Chapter 9: Comments
Similar to other programming, markup, and markdown languages, comments in HTML provide other developers with development specific information without affecting the user interface. Unlike other languages however, HTML comments can be used to specify HTML elements for Internet Explorer only. This topic explains how to write HTML comments, and their functional applications.
Section 9.1: Creating comments
HTML comments can be used to leave notes to yourself or other developers about a specific point in code. They can be initiated with <!-- and concluded with -->, like so:
<!-- I'm an HTML comment! -->
They can be incorporated inline within other content:
<h1>This part will be displayed <!-- while this will not be displayed -->.</h1>
They can also span multiple lines to provide more information:
<!-- This is a multiline HTML comment.
Whatever is in here will not be rendered by the browser. You can "comment out" entire sections of HTML code. -->
However, they cannot appear within another HTML tag, like this:
<h1 <!-- testAttribute="something" -->>This will not work</h1>
This produces invalid HTML as the entire <h1 <!-- testAttribute="something" --> block would be considered a single start tag h1 with some other invalid information contained within it, followed by a single > closing bracket that does nothing.
For compatibility with tools that try to parse HTML as XML or SGML, the body of your comment should not contain two dashes --.
Section 9.2: Commenting out whitespace between inline
elements
Inline display elements, usually such as span or a, will include up to one white-space character before and after them in the document. In order to avoid very long lines in the markup (that are hard to read) and unintentional white-space (which affects formatting), the white-space can be commented out.
<!-- Use an HTML comment to nullify the newline character below: --> <a href="#">I hope there will be no extra whitespace after this!</a> <!----><button>Foo</button>
Try it without a comment between the inline elements, and there will be one space between them. Sometimes picking up the space character is desired.
Example code:
<a href="#">I hope there will be no extra whitespace after this!</a> <!----><button>Foo</button>
<hr>
<!-- Without it, you can notice a small formatting difference: --> <a href="#">I hope there will be no extra whitespace after this!</a> <button>Foo</button>
Chapter 10: Classes and IDs
Parameter Details
class Indicates the Class of the element (non-unique)
id Indicates the ID of the element (unique in the same context)
Classes and IDs make referencing HTML elements from scripts and stylesheets easier. The class attribute can be used on one or more tags and is used by CSS for styling. IDs however are intended to refer to a single element, meaning the same ID should never be used twice. IDs are generally used with JavaScript and internal document links, and are discouraged in CSS. This topic contains helpful explanations and examples regarding proper usage of class and ID attributes in HTML.
Section 10.1: Giving an element a class
Classes are identifiers for the elements that they are assigned to. Use the class attribute to assign a class to an element.
<div class="example-class"></div>
To assign multiple classes to an element, separate the class names with spaces.
<div class="class1 class2"></div> Using classes in CSS
Classes can be used for styling certain elements without changing all elements of that kind. For example, these two span elements can have completely different stylings:
<span></span>
<span class="special"></span>
Classes of the same name can be given to any number of elements on a page and they will all receive the styling associated with that class. This will always be true unless you specify the element within the CSS.
For example, we have two elements, both with the class highlight:
<div class="highlight">Lorem ipsum</div> <span class="highlight">Lorem ipsum</span>
If our CSS is as below, then the color green will be applied to the text within both elements:
.highlight { color: green; }
However, if we only want to target div's with the class highlight then we can add specificity like below:
div.highlight { color: green; }
Nevertheless, when styling with CSS, it is generally recommended that only classes (e.g. .highlight) be used rather than elements with classes (e.g. div.highlight).
As with any other selector, classes can can be nested:
.footer > .highlight { color: blue; } /* Child combinator */
You can also chain the class selector to only select elements that have a combination of several classes. For example, if this is our HTML:
<div class="special left menu">This text will be pink</div>
And we want to colour this specific piece of text pink, we can do the following in our CSS:
.special.left.menu { color: pink; }
Section 10.2: Giving an element an ID
The ID attribute of an element is an identifier which must be unique in the whole document. Its purpose is to uniquely identify the element when linking (using an anchor), scripting, or styling (with CSS).
<div id="example-id"></div>
You should not have two elements with the same ID in the same document, even if the attributes are attached to two different kinds of elements. For example, the following code is incorrect:
<div id="example-id"></div> <span id="example-id"></span>
Browsers will do their best to render this code, but unexpected behavior may occur when styling with CSS or adding functionality with JavaScript.
To reference elements by their ID in CSS, prefix the ID with #.
#example-id { color: green; }
To jump to an element with an ID on a given page, append # with the element name in the URL.
http://example.com/about#example-id
This feature is supported in most browsers and does not require additional JavaScript or CSS to work.
Section 10.3: Acceptable Values
For an ID<div id="999"> ... </div>
This is also invalid, when included in the same document:
<div id="results"> ... </div> <div id="results"> ... </div>
Version ≤ 4.01
An id value must begin with a letter, which can then be followed only by:
letters (A-Z/a-z)
Referring to the first group of examples in the HTML5 section above, only one is valid:
<div id="container"> ... </div>
These are also valid:
<div id="sampletext"> ... </div> <div id="sample-text"> ... </div> <div id="sample_text"> ... </div> <div id="sample:text"> ... </div> <div id="sample.text"> ... </div>
Again, if it doesn't start with a letter (uppercase or lowercase), it's not valid.
For a Class
The rules for classes are essentially the same as for an id. The difference is that class values do not need to be unique in the document.
Referring to the examples above, although this is not valid in the same document:
<div id="results"> ... </div> <div id="results"> ... </div>
This is perfectly okay:
<div class="results"> ... </div>
Important Note: How ID and Class values are treated outside of HTML
Keep in mind that the rules and examples above apply within the context of HTML.
Using numbers, punctuation or special characters in the value of an id or a class may cause trouble in other contexts, such as CSS, JavaScript and regular expressions.
For example, although the following id is valid in HTML5:
<div id="9lions"> ... </div>
... it is invalid in CSS:
4.1.3 Characters and case
In CSS, identifiers (including element names, classes, and IDs in selectors) can contain only the characters [a-zA-Z0-9] and ISO 10646 characters U+00A0 and higher, plus the hyphen (-) and the underscore (_); they cannot start with a digit, two hyphens, or a hyphen followed by a digit. (emphasis added)
In most cases you may be able to escape characters in contexts where they have restrictions or special meaning.
W3C References
3.2.5.1 The id attribute 3.2.5.7 The class attribute 6.2 SGML basic types
Section 10.4: Problems related to duplicated IDs
Having more than one element with the same ID is a hard to troubleshoot problem. The HTML parser will usually try to render the page in any case. Usually no error occurs. But the pace could end up in a mis-behaving web page.
In this example:
<div id="aDiv">a</div> <div id="aDiv">b</div>
Chapter 11: Data Attributes
Value Description
somevalue Specifies the value of the attribute (as a string)
Section 11.1: Older browsers support
Data attributes were introduced in HTML5 which is supported by all modern browsers, but older browsers before HTML5 don't recognize the data attributes.
However, in HTML specifications, attributes that are not recognized by the browser must be left alone and the browser will simply ignore them when rendering the page.
Web developers have utilized this fact to create non-standard attributes which are any attributes not part of the HTML specifications. For example, the value attribute in the line bellow is considered a non-standard attribute because the specifications for the <img> tag don't have a value attribute and it is not a global attribute:
<img src="sample.jpg" value="test" />
This means that although data attributes are not supported in older browsers, they still work and you can set and retrieve them using the same generic JavaScript setAttribute and getAttribute methods, but you cannot use the new dataset property which is only supported in modern browsers.
Section 11.2: Data Attribute Use
HTML5 data-* attributes provide a convenient way to store data in HTML elements. The stored data can be read or modified using JavaScript
<div data-submitted="yes" class="user_profile">
… some content …
</div>
Data attribute structure is data-*, i.e. the name of the data attribute comes after the data- part. Using this name, the attribute can be accessed.
Chapter 12: Linking Resources
Attribute Details
charset Specifies the character encoding of the linked document crossoriginSpecifies how the element handles cross origin requests href Specifies the location of the linked document
hreflang Specifies the language of the text in the linked document
media Specifies on what device the linked document will be displayed, often used with selecting stylesheets based on the device in question
rel Required. Specifies the relationship between the current document and the linked document rev Specifies the relationship between the linked document and the current document
sizes Specifies the size of the linked resource. Only when rel="icon" target Specifies where the linked document is to be loaded
type Specifies the media type of the linked document
integrity Specifies a base64 encoded hash (sha256, sha384, or sha512) of the linked resource allowing the browser to verify its legitimacy.
While many scripts, icons, and stylesheets can be written straight into HTML markup, it is best practice and more efficient to include these resources in their own file and link them to your document. This topic covers linking external resources such as stylesheets and scripts into an HTML document.
Section 12.1: JavaScript
Synchronous<script src="path/to.js"></script>
Standard practice is to place JavaScript <script> tags just before the closing </body> tag. Loading your scripts last allows your site's visuals to show up more quickly and discourages your JavaScript from trying to interact with elements that haven't loaded yet.
Asynchronous
<script src="path/to.js" async></script>
Another alternative, when the Javascript code being loaded is not necessary for page initialization, it can be loaded asynchronously, speeding up the page load. Using async the browser will load the contents of the script in parallel and, once it is fully downloaded, will interrupt the HTML parsing in order to parse the Javascript file.
Deferred
Section 12.2: External CSS Stylesheet
<link rel="stylesheet" href="path/to.css" type="text/css">
The standard practice is to place CSS <link> tags inside the <head> tag at the top of your HTML. This way the CSS will be loaded first and will apply to your page as it is loading, rather than showing unstyled HTML until the CSS is loaded. The typeattribute is not necessary in HTML5, because HTML5 usually supports CSS.
<link rel="stylesheet" href="path/to.css" type="text/css">
and
<link rel="stylesheet" href="path/to.css">
... do the same thing in HTML5.
Another, though less common practice, is to use an @import statement inside direct CSS. Like this:
<style type="text/css">
@import("path/to.css")
</style>
<style>
@import("path/to.css")
</style>
Section 12.3: Favicon
<link rel="icon" type="image/png" href="/favicon.png">
<link rel="shortcut icon" type="image/x-icon" href="/favicon.ico">
Use the mime-type image/png for PNG files and image/x-icon for icon (*.ico) files. For the difference, see this SO question.
A file named favicon.ico at the root of your website will typically be loaded and applied automatically, without the need for a <link> tag. If this file ever changes, browsers can be slow and stubborn about updating their cache.
Section 12.4: Alternative CSS
<link rel="alternate stylesheet" href="path/to/style.css" title="yourTitle">
Some browsers allow alternate style sheets to apply if they are offered. By default they will not be applied, but usually they can be changed through the browser settings:
Firefox lets the user select the stylesheet using the View > Page Style submenu, Internet Explorer also supports this feature (beginning with IE 8), also accessed from View > Page Style (at least as of IE 11), but Chrome requires an extension to use the feature (as of version 48). The web page can also provide its own user interface to let the user switch styles.
Section 12.5: Resource Hint: dns-prefetch, prefetch, prerender
PreconnectThe preconnect relationship is similar to dns-prefetch in that it will resolve the DNS. However, it will also make the TCP handshake, and optional TLS negotiation. This is an experimental feature.
<link rel="preconnect" href="URL"> DNS-Prefetch
Informs browsers to resolve the DNS for a URL, so that all assets from that URL load faster.
<link rel="dns-prefetch" href="URL"> Prefetch
Informs the browsers that a given resource should be prefetched so it can be loaded more quickly.
<link rel="prefetch" href="URL">
DNS-Prefetch resolves only the domain name whereas prefetch downloads/stores the specified resources.
Prerender
Informs browsers to fetch and render the URL in the background, so that they can be delivered to the user instantaneously as the user navigates to that URL. This is an experimental feature.
<link rel="prerender" href="URL">
Section 12.6: Link 'media' attribute
<link rel="stylesheet" href="test.css" media="print">
Media specifies what style sheet should be used for what type of media. Using the print value would only display that style sheet for print pages.
The value of this attribute can be any of the mediatype values (similar to a CSS media query).
Section 12.7: Prev and Next
Chapter 13: Include JavaScript Code in
HTML
Attribute Details
src Specifies the path to a JavaScript file. Either a relative or absolute URL.
type Specifies the MIME type. This attribute is required in HTML4, but optional in HTML5.
async Specifies that the script shall be executed asynchronously (only for external scripts). This attribute does not require any value (except of XHTML).
defer Specifies that the script shall be executed when the page has finished parsing (only for external scripts). This attribute does not require any value (except of XHTML).
charset Specifies the character encoding used in an external script file, e.g. UTF-8 crossoriginHow the element handles crossorigin requests
nonce Cryptographic nonce used in Content Security Policy checks CSP3
Section 13.1: Handling disabled Javascript
It is possible that the client browser does not support Javascript or have Javascript execution disabled, perhaps due to security reasons. To be able to tell users that a script is supposed to execute in the page, the <noscript> tag can be used. The content of <noscript> is displayed whenever Javascript is disabled for the current page.
<script>
document.write("Hello, world!");
</script>
<noscript>This browser does not support Javascript.</noscript>
Section 13.2: Linking to an external JavaScript file
<script src="example.js"></script>
The src attribute works like the href attribute on anchors: you can either specify an absolute or relative URL. The example above links to a file inside the same directory of the HTML document. This is typically added inside the
<head> tags at the top of the html document
Section 13.3: Directly including JavaScript code
Instead of linking to an external file, you can also include the JS code as-is in your HTML:<script>
Chapter 14: Using HTML with CSS
CSS provides styles to HTML elements on the page. Inline styling involves usage of the style attribute in tags, and is highly discouraged. Internal stylesheets use the <style> tag and are used to declare rules for directed portions of the page. External stylesheets may be used through a <link> tag which takes an external file of CSS and applies the rules to the document. This topic covers usage of all three methods of attachment.
Section 14.1: External Stylesheet Use
Use the link attribute in the document's head:<head>
<link rel="stylesheet" type="text/css" href="stylesheet.css"> </head>
You can also use stylesheets provided from websites via a content delivery network, or CDN for short. (for example, Bootstrap):
<head>
<link rel="stylesheet"
href="https://maxcdn.bootstrapcdn.com/bootstrap/3.3.7/css/bootstrap.min.css" integrity= "sha384-BVYiiSIFeK1dGmJRAkycuHAHRg32OmUcww7on3RYdg4Va+PmSTsz/K68vbdEjh4u" crossorigin="anonymous"> </head>
Generally, you can find CDN support for a framework on its website.
Section 14.2: Internal Stylesheet
You can also include CSS elements internally by using the <style> tag:
<head>
Multiple internal stylesheets can be included in a program as well.
Section 14.3: Inline Style
You can style a specific element by using the style attribute:
<span style="color: red">This text will appear in red.</span>
Note: Try to avoid this -- the point of CSS is to separate content from presentation.
Section 14.4: Multiple Stylesheets
It's possible to load multiple stylesheets:<head>
<link rel="stylesheet" type="text/css" href="general.css">
<link rel="stylesheet" type="text/css" href="specific.css"> </head>
Note that later files and declarations will override earlier ones. So if general.css contains:
body {
background-color: red; }
and specific.css contains:
body {
background-color: blue; }
Chapter 15: Images
Parameters Details
src Specifies the URL of the image
srcset Images to use in different situations (e.g., high-resolution displays, small monitors, etc) sizes Image sizes between breakpoints
crossoriginHow the element handles crossorigin requests
usemap Name of image map to use
ismap Whether the image is a server-side image map
alt Alternative text that should be displayed if for some reason the image could not be displayed width Specifies the width of the image (optional)
height Specifies the height of the image (optional)
Section 15.1: Creating an image
To add an image to a page, use the image tag.Image tags (img) do not have closing tags. The two main attributes you give to the img tag are src, the image source and alt, which is alternative text describing the image.
<img src="images/hello.png" alt="Hello World">
You can also get images from a web URL:
<img src="https://i.stack.imgur.com/ALgZi.jpg?s=48&g=1" alt="StackOverflow user Caleb Kleveter">
Note: Images are not technically inserted into an HTML page, images are linked to HTML pages. The <img> tag creates a holding space for the referenced image.
It is also possible to embed images directly inside the page using base64:
<img src="data:image/png;base64,iVBOR..." alt="Hello World">
Tip: To link an image to another document, simply nest the <img> tag inside <a> tags.
Section 15.2: Choosing alt text
Alt-text is used by screen readers for visually impaired users and by search engines. It's therefore important to write good alt-text for your images.
The text should look correct even if you replace the image with its alt attribute. For example:
<!-- Incorrect -->
<img src="anonymous.png" alt="Anonymous user avatar"/> An anonymous user wrote:
<blockquote>Lorem ipsum dolor sed.</blockquote>
<a href="https://google.com/"><img src="edit.png" alt="Edit icon"/></a> /
<a href="https://google.com/"><img src="delete.png" alt="Delete icon"/></a>
Without the images, this would look like:
Lorem ipsum dolor sed.
Edit icon / Delete icon
To correct this:
Remove the alt-text for the avatar. This image adds information for sighted users (an easily identifiable icon to show that the user is anonymous) but this information is already available in the text.1
Remove the "icon" from the alt-text for the icons. Knowing that this would be an icon if it were there does not help to convey its actual purpose.
<!-- Correct -->
<img src="anonymous.png" alt=""/> An anonymous user wrote:
<blockquote>Lorem ipsum dolor sed.</blockquote>
<a href="https://google.com/"><img src="edit.png" alt="Edit"/></a> /
<a href="https://google.com/"><img src="delete.png" alt="Delete"/></a>
An anonymous user wrote:
Lorem ipsum dolor sed.
Edit / Delete
Footnotes
1 There is a semantic difference between including an empty alt attribute and excluding it altogether. An empty alt attribute indicates that the image is not a key part of the content (as is true in this case - it's just an additive image that is not necessary to understand the rest) and thus may be omitted from rendering. However, the lack of an alt attribute indicates that the image is a key part of the content and that there simply is no textual equivalent available for rendering.
Section 15.3: Responsive image using the srcset attribute
Using srcset with sizes<img sizes="(min-width: 1200px) 580px, (min-width: 640px) 48vw,
98vw"
srcset="img/hello-300.jpg 300w, img/hello-600.jpg 600w, img/hello-900.jpg 900w, img/hello-1200.jpg 1200w"
img/hello-300.jpg is 300px wide, img/hello-600.jpg is 600px wide, img/hello-900.jpg is 900px wide, img/hello-1200.jpg is 1200px wide
src is always mandatory image source. In case of using with srcset, src will serve fallback image in case browser is not supporting srcset.
Using srcset without sizes
<img src="img/hello-300.jpg" alt="hello" srcset="img/hello-300.jpg 1x,
img/hello-600.jpg 2x, img/hello-1200.jpg 3x">
srcset provides list of available images, with device-pixel ratio x descriptor.
if device-pixel ratio is 1, use img/hello-300.jpg if device-pixel ratio is 2, use img/hello-600.jpg if device-pixel ratio is 3, use img/hello-1200.jpg
src is always mandatory image source. In case of using with srcset, src will serve fallback image in case browser is not supporting srcset.
Section 15.4: Responsive image using picture element
Code<picture>
<source media="(min-width: 600px)" srcset="large_image.jpg">
<source media="(min-width: 450px)" srcset="small_image.jpg">
<img src="default_image.jpg" style="width:auto;"> </picture>
Usage
To display different images under different screen width, you must include all images using the source tag in a picture tag as shown in the above example.
Result
Chapter 16: Image Maps
Tag/Attribute Value
<img> Below are the image map-specific attributes to use with <img>. Regular <img> attributes apply.
usemap The name of the map with a hash symbol prepended to it. For example, for a map with name="map", the image should have usemap="#map".
<map>
name The name of the map to identify it. To be used with the image's usemap attribute.
<area> Below are supports all of the attributes of the anchor tag (<area>-specific attributes. When href is specified, making the <area> a link, <area> also <a>) except ping. See them at the MDN docs.
alt The alternate text to display if images are not supported. This is only necessary if href is also set on the <area>.
coords
The coordinates outlining the selectable area. When shape="polygon", this should be set to a list of "x, y" pairs separated by commas (i.e., shape="polygon" coords="x1, y1, x2, y2, x3, y3, ..."). When shape="rectangle", this should be set to left, top, right, bottom. When
shape="circle", this should be set to centerX, centerY, radius.
href The URL of the hyperlink, if specified. If it is omitted, then the <area> will not represent a hyperlink.
shape The shape of the necessary), circle or circ for a circle, rectangle or rect for a rectangle, and polygon or poly for a<area>. Can be set to default to select the entire image (no coords attribute polygonal area specified by corner points.
Section 16.1: Introduction to Image Maps
DescriptionAn image maps is an image with clickable areas that usually act as hyperlinks.
The image is defined by the <img> tag, and the map is defined by a <map> tag with <area> tags to denote each clickable area. Use the usemap and name attributes to bind the image and the map.
Basic Example
</map>