•Optimizetheuseofmemoryandstorage •Monitorperformanceandtroubleshootproblems •IdentifyandimprovepoorlyperformingSQLstatements
•Adjustthemostimportantoptimizerparameterstoyouradvantage
•Createindexesthatgetusedandmakeapositiveimpactuponperformance •AutomateandstabilizeperformanceusingkeyfeaturessuchasSQLTuning AdvisorandSQLPlanBaselines
Contents at a Glance
About the Authors ... xvi
About the Technical Reviewer ... xvii
Acknowledgments ... xviii
■
Chapter 1: Optimizing Table Performance ... 1
■
Chapter 2: Choosing and Optimizing Indexes ... 43
■
Chapter 3: Optimizing Instance Memory ... 83
■
Chapter 4: Monitoring System Performance ... 113
■
Chapter 5: Minimizing System Contention ... 147
■
Chapter 6: Analyzing Operating System Performance ... 185
■
Chapter 7: Troubleshooting the Database ... 209
■
Chapter 8: Creating Efficient SQL ... 253
■
Chapter 9: Manually Tuning SQL ... 299
■
Chapter 10: Tracing SQL Execution ... 327
■
Chapter 11: Automated SQL Tuning ... 367
■
Chapter 12: Execution Plan Optimization and Consistency ... 409
■
Chapter 13: Configuring the Optimizer ... 447
■
Chapter 14: Implementing Query Hints ... 491
■
Chapter 15: Executing SQL in Parallel ... 525
C H A P T E R 1
Optimizing Table Performance
This chapter details database features that impact the performance of storing and retrieving data within a table. Table performance is partially determined by database characteristics implemented prior to creating tables. For example, the physical storage features implemented when first creating a database and associated tablespaces subsequently influence the performance of tables. Similarly, performance is also impacted by your choice of initial physical features such as table types and data types. Therefore implementing practical database, tablespace, and table creation standards (with performance in mind) forms the foundation for optimizing data availability and scalability.
An Oracle database is comprised of the physical structures used to store, manage, secure, and retrieve data. When first building a database, there are several performance-related features that you can implement at the time of database creation. For example, the initial layout of the datafiles and the type of tablespace management are specified upon creation. Architectural decisions instantiated at this point often have long-lasting implications.
A tablespace is the logical structure that allows you to manage a group of datafiles. Datafiles are the physical datafiles on disk. When configuring tablespaces, there are several features to be aware of that can have far-reaching performance implications, namely locally managed tablespaces and automatic segment storage–managed tablespaces. When you reasonably implement these features, you maximize your ability to obtain acceptable future table performance.
The table is the object that stores data in a database. Database performance is a measure of the speed at which an application is able to insert, update, delete, and select data. Therefore it’s appropriate that we begin this book with recipes that provide solutions regarding problems related to table
performance.
CHAPTER 1 ■ OPTIMIZING TABLE PERFORMANCE
1-1. Building a Database That Maximizes Performance
Problem
You realize when initially creating a database that some features (when enabled) have long-lasting ramifications for table performance and availability. Specifically, when creating the database, you want to do the following:
• Enforce that every tablespace ever created in the database must be locally
managed. Locally managed tablespaces deliver better performance than the deprecated dictionary-managed technology.
• Ensure users are automatically assigned a default permanent tablespace. This
guarantees that when users are created they are assigned a default tablespace other than SYSTEM. You don’t want users ever creating objects in the SYSTEM tablespace, as this can adversely affect performance and availability.
• Ensure users are automatically assigned a default temporary tablespace. This
guarantees that when users are created they are assigned a temporary tablespace other than SYSTEM. You don’t ever want users using the SYSTEM tablespace for a temporary sorting space, as this can adversely affect performance and availability.
Solution
Use a script such as the following to create a database that adheres to reasonable standards that set the foundation for a well-performing database:
CREATE DATABASE O11R2 MAXLOGFILES 16 MAXLOGMEMBERS 4 MAXDATAFILES 1024 MAXINSTANCES 1 MAXLOGHISTORY 680 CHARACTER SET AL32UTF8 DATAFILE
'/ora01/dbfile/O11R2/system01.dbf' SIZE 500M REUSE
EXTENT MANAGEMENT LOCAL UNDO TABLESPACE undotbs1 DATAFILE '/ora02/dbfile/O11R2/undotbs01.dbf' SIZE 800M
SYSAUX DATAFILE
'/ora03/dbfile/O11R2/sysaux01.dbf' SIZE 500M
DEFAULT TEMPORARY TABLESPACE TEMP TEMPFILE '/ora02/dbfile/O11R2/temp01.dbf'
CHAPTER 1 ■ OPTIMIZING TABLE PERFORMANCE
DEFAULT TABLESPACE USERS DATAFILE '/ora01/dbfile/O11R2/users01.dbf' SIZE 50M
LOGFILE GROUP 1
('/ora01/oraredo/O11R2/redo01a.rdo',
'/ora02/oraredo/O11R2/redo01b.rdo') SIZE 200M, GROUP 2
('/ora01/oraredo/O11R2/redo02a.rdo',
'/ora02/oraredo/O11R2/redo02b.rdo') SIZE 200M, GROUP 3
('/ora01/oraredo/O11R2/redo03a.rdo',
'/ora02/oraredo/O11R2/redo03b.rdo') SIZE 200M USER sys IDENTIFIED BY topfoo
USER system IDENTIFIED BY topsecrectfoo;
The prior CREATE DATABASE script helps establish a good foundation for performance by enabling features such as the following:
• Defines the SYSTEM tablespace as locally managed via the EXTENT MANAGEMENT LOCAL
clause; this ensures that all tablespaces ever created in database are locally managed. If you are using Oracle Database 11g R2 or higher, the EXTENT MANAGEMENT DICTIONARY clause has been deprecated.
• Defines a default tablespace named USERS for any user created without an
explicitly defined default tablespace; this helps prevent users from being assigned the SYSTEM tablespace as the default. Users created with a default tablespace of SYSTEM can have an adverse impact on performance.
• Defines a default temporary tablespace named TEMP for all users; this helps
prevent users from being assigned the SYSTEM tablespace as the default temporary tablespace. Users created with a default temporary tablespace of SYSTEM can have an adverse impact on performance, as this will cause contention for resources in the SYSTEM tablespace.
Solid performance starts with a correctly configured database. The prior recommendations help you create a reliable infrastructure for your table data.
How It Works
A properly configured and created database will help ensure that your database performs well. It is true that you can modify features after the database is created. However, oftentimes a poorly crafted CREATE DATABASE script leads to a permanent handicap on performance. In production database environments, it’s sometimes difficult to get the downtime that might be required to reconfigure an improperly configured database. If possible, think about performance at every step in creating an environment, starting with how you create the database.
CHAPTER 1 ■ OPTIMIZING TABLE PERFORMANCE
• Creates an automatic UNDO tablespace (automatic undo management is enabled by
setting the UNDO_MANAGEMENT and UNDO_TABLESPACE initialization parameters); this allows Oracle to automatically manage the rollback segments. This relieves you of having to regularly monitor and tweak.
• Places datafiles in directories that follow standards for the environment; this helps
with maintenance and manageability, which results in better long-term availability and thus better performance.
• Sets passwords to non-default values for DBA-related users; this ensures the
database is more secure, which in the long run can also affect performance (for example, if a malcontent hacks into the database and deletes data, then performance will suffer).
• Establishes three groups of online redo logs, with two members each, sized
appropriately for the transaction load; the size of the redo log directly affects the rate at which they switch. When redo logs switch too often, this can degrade performance.
You should take the time to ensure that each database you build adheres to commonly accepted standards that help ensure you start on a firm performance foundation.
If you’ve inherited a database and want to verify the default permanent tablespace setting, use a query such as this:
SELECT *
FROM database_properties
WHERE property_name = 'DEFAULT_PERMANENT_TABLESPACE';
If you need to modify the default permanent tablespace, do so as follows: SQL> alter database default tablespace users;
To verify the setting of the default temporary tablespace, use this query: SELECT *
FROM database_properties
WHERE property_name = 'DEFAULT_TEMP_TABLESPACE';
To change the setting of the temporary tablespace, you can do so as follows: SQL> alter database default temporary tablespace temp;
You can verify the UNDO tablespace settings via this query: select name, value
from v$parameter
where name in ('undo_management','undo_tablespace');
CHAPTER 1 ■ OPTIMIZING TABLE PERFORMANCE
1-2. Creating Tablespaces to Maximize Performance
Problem
You realize that tablespaces are the logical containers for database objects such as tables and indexes. Furthermore, you’re aware that if you don’t specify storage attributes when creating objects, then the tables and indexes automatically inherit the storage characteristics of the tablespaces (that the tables and indexes are created within). Therefore you want to create tablespaces in a manner that maximizes table performance and maintainability.
Solution
When you have the choice, tablespaces should always be created with the following two features enabled:
• Locally managed
• Automatic segment space management (ASSM)
Here’s an example of creating a tablespace that enables the prior two features: create tablespace tools
datafile '/ora01/dbfile/INVREP/tools01.dbf'
size 100m -- Fixed datafile size extent management local -- Locally managed
uniform size 128k -- Uniform extent size segment space management auto -- ASSM
/
■
Note
As of Oracle Database 11g R2, the
EXTENT MANAGEMENT DICTIONARYclause has been deprecated.
Locally managed tablespaces are more efficient than dictionary-managed tablespaces. This feature is enabled via the EXTENT MANAGEMENT LOCAL clause. Furthermore, if you created your database with the SYSTEM tablespace as locally managed, you will not be permitted to later create a dictionary-managed tablespace. This is the desired behavior.
The ASSM feature allows for Oracle to manage many of the storage characteristics that formerly had to be manually adjusted by the DBA on a table-by-table basis. ASSM is enabled via the SEGMENT SPACE MANAGEMENT AUTO clause. Using ASSM relieves you of these manual tweaking activities. Furthermore, some of Oracle’s space management features (such as shrinking a table and SecureFile LOBs) are allowed only when using ASSM tablespaces. If you want to take advantage of these features, then you must create your tablespaces using ASSM.
You can choose to have the extent size be consistently the same for every extent within the
CHAPTER 1 ■ OPTIMIZING TABLE PERFORMANCE
How It Works
Prior to Oracle Database 11g R2, you had the option of creating a tablespace as dictionary-managed. This architecture uses structures in Oracle’s data dictionary to manage an object’s extent allocation and free space. Dictionary-managed tablespaces tend to experience poor performance as the number of extents for a table or index reaches the thousands.
You should never use dictionary-managed tablespaces; instead use locally managed tablespaces. Locally managed tablespaces use a bitmap in each datafile to manage the object extents and free space and are much more efficient than the deprecated dictionary-managed architecture.
In prior versions of Oracle, DBAs would spend endless hours monitoring and modifying the physical space management aspects of a table. The combination of locally managed and ASSM render many of these space settings obsolete. For example, the storage parameters are not valid parameters in locally managed tablespaces:
• NEXT • PCTINCREASE • MINEXTENTS • MAXEXTENTS • DEFAULT
The SEGMENT SPACE MANAGEMENT AUTO clause instructs Oracle to manage physical space within the block. When you use this clause, there is no need to specify parameters such as the following:
• PCTUSED • FREELISTS • FREELIST GROUPS
The alternative to AUTO space management is MANUAL space management. When you use MANUAL, you can adjust the previously mentioned parameters depending on the needs of your application. We recommend that you use AUTO (and do not use MANUAL). Using AUTO reduces the number of parameters you’d otherwise need to configure and manage. You can verify the use of locally managed and ASSM with the following query:
select
tablespace_name ,extent_management ,segment_space_management from dba_tablespaces;
Here is some sample output:
CHAPTER 1 ■ OPTIMIZING TABLE PERFORMANCE
■
Note
You cannot create the
SYSTEMtablespace with automatic segment space management. Also, the ASSM
feature is valid only for permanent, locally managed tablespaces.
You can also specify that a datafile automatically grow when it becomes full. This is set through the AUTOEXTEND ON clause. If you use this feature, we recommend that you set an overall maximum size for the datafile. This will prevent runaway or erroneous SQL from accidentally consuming all available disk space. Here’s an example clause:
SIZE 1G AUTOEXTEND ON MAXSIZE 10G
When you create a tablespace, you can also specify the tablespace type to be smallfile or bigfile. Prior to Oracle Database 10g, smallfile was your only choice. A smallfile tablespace allows you to create one or more datafiles to be associated with a single tablespace. This allows you to spread out the datafiles (associated with one tablespace) across many different mount points. For many environments, you’ll require this type of flexibility.
The bigfile tablespace can have only one datafile associated with it. The main advantage of the bigfile feature is that you can create very large datafiles, which in turn allows you to create very large databases. For example, with the 8 KB block size, you can create a datafile as large as 32 TB. With a 32 KB block size, you can create a datafile up to 128 TB. Also, when using bigfile, you will typically have fewer datafiles to manage and maintain. This behavior may be desirable in environments where you use Oracle’s Automatic Storage Management (ASM) feature. In ASM environments, you typically are presented with just one logical disk location from which you allocate space.
Here’s an example of creating a bigfile tablespace: create bigfile tablespace tools_bf
datafile '/ora01/dbfile/O11R2/tools_bf01.dbf' size 100m
extent management local uniform size 128k
segment space management auto /
You can verify the tablespace type via this query:
SQL> select tablespace_name, bigfile from dba_tablespaces;
CHAPTER 1 ■ OPTIMIZING TABLE PERFORMANCE
1-3. Matching Table Types to Business Requirements
Problem
You’re new to Oracle and have read about the various table types available. For example, you can choose between heap-organized tables, index-organized tables, and so forth. You want to build a database application and need to decide which table type to use.
Solution
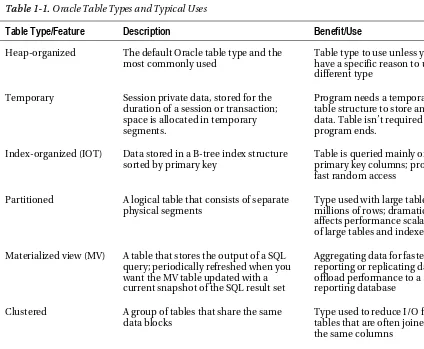
Oracle provides a wide variety of table types. The default table type is heap-organized. For most applications, a heap-organized table is an effective structure for storing and retrieving data. However, there are other table types that you should be aware of, and you should know the situations under which each table type should be implemented. Table 1-1 describes each table type and its appropriate use.
Table 1-1. Oracle Table Types and Typical Uses
Table Type/Feature
Description
Benefit/Use
Heap-organized The default Oracle table type and the most commonly used
Table type to use unless you have a specific reason to use a different type
Temporary Session private data, stored for the duration of a session or transaction; space is allocated in temporary segments.
Program needs a temporary table structure to store and sort data. Table isn’t required after program ends.
Index-organized (IOT) Data stored in a B-tree index structure sorted by primary key
Table is queried mainly on primary key columns; provides fast random access
Partitioned A logical table that consists of separate physical segments
Type used with large tables with millions of rows; dramatically affects performance scalability of large tables and indexes
Materialized view (MV) A table that stores the output of a SQL query; periodically refreshed when you want the MV table updated with a current snapshot of the SQL result set
Aggregating data for faster reporting or replicating data to offload performance to a reporting database
Clustered A group of tables that share the same data blocks
CHAPTER 1 ■ OPTIMIZING TABLE PERFORMANCE
Table Type/Feature
Description
Benefit/Use
External Tables that use data stored in operating system files outside of the database
This type lets you efficiently access data in a file outside of the database (like a CSV or text file). External tables provide an efficient mechanism for transporting data between databases.
Nested A table with a column with a data type that is another table
Seldom used
Object A table with a column with a data type that is an object type
Seldom used
How It Works
In most scenarios, a heap-organized table is sufficient to meet your requirements. This Oracle table type is a proven structure used in a wide variety of database environments. If you properly design your database (normalized structure) and combine that with the appropriate indexes and constraints, the result should be a well-performing and maintainable system.
Normally most of your tables will be heap-organized. However, if you need to take advantage of a non-heap feature (and are certain of its benefits), then certainly do so. For example, Oracle partitioning is a scalable way to build very large tables and indexes. Materialized views are a solid feature for aggregating and replicating data. Index-organized tables are efficient structures when most of the columns are part of the primary key (like an intersection table in a many-to-many relationship). And so forth.
■
Caution
You shouldn’t choose a table type simply because you think it’s a cool feature that you recently heard
about. Sometimes folks read about a feature and decide to implement it without first knowing what the
performance benefits or maintenance costs will be. You should first be able to test and prove that a feature has
solid performance benefits.
1-4. Choosing Table Features for Performance
Problem
CHAPTER 1 ■OPTIMIZING TABLE PERFORMANCE
Solution
There are several performance and sustainability issues that you should consider when creating tables. Table 1-2 describes features specific to table performance.
Table 1-2. Table Features That Impact Performance
Recommendation
Reasoning
If a column always contains numeric data, make it a number data type.
Enforces a business rule and allows for the greatest flexibility, performance, and consistent results when using Oracle SQL math functions (which may behave differently for a “01” character vs. a 1 number); correct data types prevent unnecessary conversion of data types.
If you have a business rule that defines the length and precision of a number field, then enforce it—for example, NUMBER(7,2). If you don’t have a business rule, make it NUMBER(38).
Enforces a business rule and keeps the data cleaner; numbers with a precision defined won’t unnecessarily store digits beyond the required precision. This can affect the row length, which in turn can have an impact on I/O performance.
For character data that is of variable length, use VARCHAR2 (and not VARCHAR).
Follows Oracle’s recommendation of using VARCHAR2 for character data (instead of VARCHAR); Oracle guarantees that the behavior of VARCHAR2 will be consistent and not tied to an ANSI standard. The Oracle documentation states in the future VARCHAR will be redefined as a separate data type.
Use DATE and TIMESTAMP data types appropriately.
Enforces a business rule, ensures that the data is of the appropriate format, and allows for the greatest flexibility and performance when using SQL date functions and date arithmetic
Consider setting the physical attribute PCTFREE to a value higher than the default of 10% if the table initially has rows inserted with null values that are later updated with large values.
Prevents row chaining, which can impact performance if a large percent of rows in a table are chained
Most tables should be created with a primary key.
Enforces a business rule and allows you to uniquely identify each row; ensures that an index is created on primary key column(s), which allows for efficient access to primary key values
Create a numeric surrogate key to be the primary key for each table. Populate the surrogate key from a sequence.
CHAPTER 1 ■ OPTIMIZING TABLE PERFORMANCE
Recommendation Reasoning
Create a unique key for the logical business key—a recognizable combination of columns that makes a row unique.
Enforces a business rule and keeps the data cleaner; allows for efficient retrieval of the logical key columns that may be frequently used in WHERE clauses
Define foreign keys where appropriate. Enforces a business rule and keeps the data cleaner; helps optimizer choose efficient paths to data; prevents
unnecessary table-level locks in certain DML operations
Consider special features such as virtual columns, read-only, parallel, compression, no logging, and so on.
Features such as parallel DML, compression, or no logging can have a performance impact on reading and writing of data.
How It Works
The “Solution” section describes aspects of tables that relate to performance. When creating a table, you should also consider features that enhance scalability and availability. Oftentimes DBAs and developers don’t think of these features as methods for improving performance. However, building a stable and supportable database goes hand in hand with good performance. Table 1-3 describes best practices features that promote ease of table management.
Table 1-3. Table Features That Impact Scalability and Maintainability
Recommendation Reasoning
Use standards when naming tables, columns, constraints, triggers, indexes, and so on.
Helps document the application and simplifies maintenance
If you have a business rule that specifies the maximum length of a column, then use that length, as opposed to making all columns VARCHAR2(4000).
Enforces a business rule and keeps the data cleaner
Specify a separate tablespace for the table and indexes.
Simplifies administration and maintenance
Let tables and indexes inherit storage attributes from the tablespaces.
Simplifies administration and maintenance
Create primary-key constraints out of line. Allows you more flexibility when creating the primary key, especially if you have a situation where the primary key consists of multiple columns
CHAPTER 1 ■ OPTIMIZING TABLE PERFORMANCE
Continued
Recommendation Reasoning
Avoid large object (LOB) data types if possible.
Prevents maintenance issues associated with LOB columns, like unexpected growth, performance issues when copying, and so on
If you use LOBs in Oracle Database 11g or higher, use the new SecureFiles architecture.
SecureFiles is the new LOB architecture going forward; provides new features such as compression,
encryption, and deduplication
If a column should always have a value, then enforce it with a NOT NULL constraint.
Enforces a business rule and keeps the data cleaner
Create audit-type columns, such as CREATE_DTT and UPDATE_DTT, that are automatically populated with default values and/or triggers.
Helps with maintenance and determining when data was inserted and/or updated; other types of audit columns to consider include the users who inserted and updated the row.
Use check constraints where appropriate. Enforces a business rule and keeps the data cleaner; use this to enforce fairly small and static lists of values.
1-5. Avoiding Extent Allocation Delays When Creating Tables
Problem
You’re installing an application that has thousands of tables and indexes. Each table and index are configured to initially allocate an initial extent of 10 MB. When deploying the installation DDL to your production environment, you want install the database objects as fast as possible. You realize it will take some time to deploy the DDL if each object allocates 10 MB of disk space as it is created. You wonder if you can somehow instruct Oracle to defer the initial extent allocation for each object until data is actually inserted into a table.
Solution
The only way to defer the initial segment generation is to use Oracle Database 11g R2. With this version of the database (or higher), by default the physical allocation of the extent for a table (and associated indexes) is deferred until a record is first inserted into the table. A small example will help illustrate this concept. First a table is created:
SQL> create table f_regs(reg_id number, reg_name varchar2(200));
Now query USER_SEGMENTS and USER_EXTENTS to verify that no physical space has been allocated: SQL> select count(*) from user_segments where segment_name='F_REGS';
CHAPTER 1 ■ OPTIMIZING TABLE PERFORMANCE
--- 0
SQL> select count(*) from user_extents where segment_name='F_REGS'; COUNT(*)
--- 0
Next a record is inserted, and the prior queries are run again: SQL> insert into f_regs values(1,'BRDSTN');
1 row created.
SQL>> select count(*) from user_segments where segment_name='F_REGS'; COUNT(*)
--- 1
SQL> select count(*) from user_extents where segment_name='F_REGS'; COUNT(*)
--- 1
The prior behavior is quite different from previous versions of Oracle. In prior versions, as soon as you create an object, the segment and associated extent are allocated.
■
Note
Deferred segment generation also applies to partitioned tables and indexes. An extent will not be
allocated until the initial record is inserted into a given extent.
How It Works
Starting with Oracle Database 11g R2, with non-partitioned heap-organized tables created in locally managed tablespaces, the initial segment creation is deferred until a record is inserted into the table. You need to be aware of Oracle’s deferred segment creation feature for several reasons:
• Allows for a faster installation of applications that have a large number of tables
and indexes; this improves installation speed, especially when you have thousands of objects.
• As a DBA, your space usage reports may initially confuse you when you notice that
there is no space allocated for objects.
• The creation of the first row will take a slightly longer time than in previous
CHAPTER 1 ■ OPTIMIZING TABLE PERFORMANCE
We realize that to take advantage of this feature the only “solution” is to upgrade to Oracle Database 11g R2, which is oftentimes not an option. However, we felt it was important to discuss this feature because you’ll eventually encounter the aforementioned characteristics (when you start using the latest release of Oracle).
You can disable the deferred segment creation feature by setting the database initialization parameter DEFERRED_SEGMENT_CREATION to FALSE. The default for this parameter is TRUE.
You can also control the deferred segment creation behavior when you create the table. The CREATE TABLE statement has two new clauses: SEGMENT CREATION IMMEDIATE and SEGMENT CREATION DEFERRED—for example:
create table f_regs( reg_id number
,reg_name varchar2(2000)) segment creation immediate;
■
Note
The
COMPATIBLEinitialization parameter needs to be 11.2.0.0.0 or greater before using the
SEGMENT CREATION DEFERREDclause.
1-6. Maximizing Data Loading Speeds
Problem
You’re loading a large amount of data into a table and want to insert new records as quickly as possible.
Solution
Use a combination of the following two features to maximize the speed of insert statements:
• Set the table’s logging attribute to NOLOGGING; this minimizes the generation redo
for direct path operations (this feature has no effect on regular DML operations).
• Use a direct path loading feature, such as the following:
• INSERT /*+ APPEND */ on queries that use a subquery for determining which
records are inserted
• INSERT /*+ APPEND_VALUES */ on queries that use a VALUES clause • CREATE TABLE…AS SELECT
CHAPTER 1 ■ OPTIMIZING TABLE PERFORMANCE
select table_name ,logging
from user_tables
where table_name = 'F_REGS';
Here is some sample output: TABLE_NAME LOG
--- --- F_REGS YES
The prior output verifies that the table was created with LOGGING enabled (the default). To enable NOLOGGING, use the ALTER TABLE statement as follows:
SQL> alter table f_regs nologging;
Now that NOLOGGING has been enabled, there should be a minimal amount of redo generated for direct path operations. The following example uses a direct path INSERT statement to load data into the table:
insert /*+APPEND */ into f_regs select * from reg_master;
The prior statement is an efficient method for loading data because direct path operations such as INSERT /*+APPEND */ combined with NOLOGGING generate a minimal amount of redo.
How It Works
Direct path inserts have two performance advantages over regular insert statements:
• If NOLOGGING is specified, then a minimal amount of redo is generated.
• The buffer cache is bypassed and data is loaded directly into the datafiles. This can
significantly improve the loading performance.
The NOLOGGING feature minimizes the generation of redo for direct path operations only. For direct path inserts, the NOLOGGING option can significantly increase the loading speed. One perception is that NOLOGGING eliminates redo generation for the table for all DML operations. That isn’t correct. The NOLOGGING feature never affects redo generation for regular INSERT, UPDATE, MERGE, and DELETE statements.
One downside to reducing redo generation is that you can’t recover the data created via NOLOGGING in the event a failure occurs after the data is loaded (and before you back up the table). If you can tolerate some risk of data loss, then use NOLOGGING but back up the table soon after the data is loaded. If your data is critical, then don’t use NOLOGGING. If your data can be easily re-created, then NOLOGGING is desirable when you’re trying to improve performance of large data loads.
CHAPTER 1 ■ OPTIMIZING TABLE PERFORMANCE
SQL> desc f_regs;
Name Null? Type
--- --- --- REG_ID NUMBER
REG_NAME VARCHAR2(2000)
However, when executing a query that scans every block in the table, an error is thrown. SQL> select * from f_regs;
This indicates that there is logical corruption in the datafile: ORA-01578: ORACLE data block corrupted (file # 10, block # 198) ORA-01110: data file 10: '/ora01/dbfile/O11R2/users201.dbf' ORA-26040: Data block was loaded using the NOLOGGING option
As the prior output indicates, the data in the table is unrecoverable. Use NOLOGGING only in situations where the data isn’t critical or in scenarios where you can back up the data soon after it was created.
■
Tip
If you’re using RMAN to back up your database, you can report on unrecoverable datafiles via the
REPORT UNRECOVERABLEcommand.
There are some quirks of NOLOGGING that need some explanation. You can specify logging
characteristics at the database, tablespace, and object levels. If your database has been enabled to force logging, then this overrides any NOLOGGING specified for a table. If you specify a logging clause at the tablespace level, it sets the default logging for any CREATE TABLE statements that don’t explicitly use a logging clause.
You can verify the logging mode of the database as follows: SQL> select name, log_mode, force_logging from v$database;
The next statement verifies the logging mode of a tablespace: SQL> select tablespace_name, logging from dba_tablespaces;
And this example verifies the logging mode of a table:
SQL> select owner, table_name, logging from dba_tables where logging = 'NO';
CHAPTER 1 ■ OPTIMIZING TABLE PERFORMANCE
1-7. Efficiently Removing Table Data
Problem
You’re experiencing performance issues when deleting data from a table. You want to remove data as efficiently as possible.
Solution
You can use either the TRUNCATE statement or the DELETE statement to remove records from a table. TRUNCATE is usually more efficient but has some side effects that you must be aware of. For example, TRUNCATE is a DDL statement. This means Oracle automatically commits the statement (and the current transaction) after it runs, so there is no way to roll back a TRUNCATE statement. Because a TRUNCATE statement is DDL, you can’t truncate two separate tables as one transaction.
This example uses a TRUNCATE statement to remove all data from the COMPUTER_SYSTEMS table: SQL> truncate table computer_systems;
When truncating a table, by default all space is de-allocated for the table except the space defined by the MINEXTENTS table-storage parameter. If you don’t want the TRUNCATE statement to de-allocate the currently allocated extents, then use the REUSE STORAGE clause:
SQL> truncate table computer_systems reuse storage;
You can query the DBA/ALL/USER_EXTENTS views to verify if the extents have been de-allocated (or not)—for example:
select count(*)
from user_extents where segment_name = 'COMPUTER_SYSTEMS';
How It Works
If you need the option of choosing to roll back (instead of committing) when removing data, then you should use the DELETE statement. However, the DELETE statement has the disadvantage that it generates a great deal of undo and redo information. Thus for large tables, a TRUNCATE statement is usually the most efficient way to remove data.
Another characteristic of the TRUNCATE statement is that it sets the high-water mark of a table back to zero. When you use a DELETE statement to remove data from a table, the high-water mark doesn’t change. One advantage of using a TRUNCATE statement and resetting the high-water mark is that full table scan queries search only for rows in blocks below the high-water mark. This can have significant
CHAPTER 1 ■ OPTIMIZING TABLE PERFORMANCE
Another side effect of the TRUNCATE statement is that you can’t truncate a parent table that has a primary key defined that is referenced by an enabled foreign-key constraint in a child table—even if the child table contains zero rows. In this scenario, Oracle will throw this error when attempting to truncate the parent table:
ORA-02266: unique/primary keys in table referenced by enabled foreign keys
Oracle prevents you from truncating the parent table because in a multiuser system, there is a possibility that another session can populate the child table with rows in between the time you truncate the child table and the time you subsequently truncate the parent table. In this situation, you must temporarily disable the child table–referenced foreign-key constraints, issue the TRUNCATE statement, and then re-enable the constraints.
Compare the TRUNCATE behavior to that of the DELETE statement. Oracle does allow you to use the DELETE statement to remove rows from a parent table while the constraints are enabled that reference a child table (assuming there are zero rows in the child table). This is because DELETE generates undo, is read-consistent, and can be rolled back. Table 1-4 summarizes the differences between DELETE and TRUNCATE.
If you need to use a DELETE statement, you must issue either a COMMIT or a ROLLBACK to complete the transaction. Committing a DELETE statement makes the data changes permanent:
SQL> delete from computer_systems; SQL> commit;
■
Note
Other (sometimes not so obvious) ways of committing a transaction include issuing a subsequent DDL
statement (which implicitly commits an active transaction for a session) or normally exiting out of the client tool
(such as SQL*Plus).
If you issue a ROLLBACK statement instead of COMMIT, the table contains data as it was before the DELETE was issued.
When working with DML statements, you can confirm the details of a transaction by querying from the V$TRANSACTION view. For example, say that you have just inserted data into a table; before you issue a COMMIT or ROLLBACK, you can view active transaction information for the currently connected session as follows:
SQL> insert into computer_systems(cs_id) values(1); SQL> select xidusn, xidsqn from v$transaction; XIDUSN XIDSQN
--- --- 3 12878 SQL> commit;
CHAPTER 1 ■ OPTIMIZING TABLE PERFORMANCE
Table 1-4. Comparison of DELETE and TRUNCATE
DELETE
TRUNCATE
Option of committing or rolling back changes YES NO (DDL statement is always committed after it runs.)
Generates undo YES NO
Resets the table high-water mark to zero NO YES
Affected by referenced and enabled foreign-key constraints
NO YES
Performs well with large amounts of data NO YES
■
Note
Another way to remove data from a table is to drop and re-create the table. However, this means you
also have to re-create any indexes, constraints, grants, and triggers that belong to the table. Additionally, when
you drop a table, it’s temporarily unavailable until you re-create it and re-issue any required grants. Usually,
dropping and re-creating a table is acceptable only in a development or test environment.
1-8. Displaying Automated Segment Advisor Advice
Problem
You have a poorly performing query accessing a table. Upon further investigation, you discover the table has only a few rows in it. You wonder why the query is taking so long when there are so few rows. You want to examine the output of the Segment Advisor to see if there are any space-related
recommendations that might help with performance in this situation.
Solution
CHAPTER 1 ■OPTIMIZING TABLE PERFORMANCE
This solution focuses on accessing the Segment Advisor’s advice via the DBMS_SPACE PL/SQL package. This package retrieves information generated by the Segment Advisor regarding segments that may be candidates for shrinking, moving, or compressing. One simple and effective way to use the DBMS_SPACE package (to obtain Segment Advisor advice) is via a SQL query—for example:
SELECT 'RECLAIMABLE_SPACE: ' || reclaimable_space || chr(10) || 'RECOMMENDATIONS : ' || recommendations || chr(10) ||
SEGMENT_OWNER : MV_MAINT SEGMENT_NAME : F_REGS ALLOCATED_SPACE : 20971520 RECLAIMABLE_SPACE: 18209960
RECOMMENDATIONS : Perform re-org on the object F_REGS, estimated savings is 182 09960 bytes.
SOLUTION 1 : Perform Reorg SOLUTION 2 :
SOLUTION 3 :
In the prior output, the F_REGS table is a candidate for the shrink operation. It is consuming 20 MB, and 18 MB can be reclaimed.
How It Works
In Oracle Database 10g R2 and later, Oracle automatically schedules and runs a Segment Advisor job. This job analyzes segments in the database and stores its findings in internal tables. The output of the Segment Advisor contains findings (issues that may need to be resolved) and recommendations (actions to resolve the findings). Findings from the Segment Advisor are of the following types:
• Segments that are good candidates for shrink operations • Segments that have significant row chaining
• Segments that might benefit from OLTP compression
CHAPTER 1 ■ OPTIMIZING TABLE PERFORMANCE
select
segments_processed ,end_time
from dba_auto_segadv_summary order by end_time;
Here is some sample output: SEGMENTS_PROCESSED END_TIME
--- --- 9 30-JAN-11 02.02.46.414424 PM 11 30-JAN-11 06.03.44.500178 PM 17 30-JAN-11 10.04.35.688915 PM
You can compare the END_TIME date to the current date to determine if the Segment Advisor is running on a regular basis.
■
Note
In addition to automatically generated segment advice, you have the option of manually executing the
Segment Advisor to generate advice on specific tablespaces, tables, and indexes (see Recipe 1-9 for details).
When the Segment Advisor executes, it uses the Automatic Workload Repository (AWR) for the source of information for its analysis. For example, the Segment Advisor examines usage and growth statistics in the AWR to generate segment advice. When the Segment Advisor runs, it generates advice and stores the output in internal database tables. The advice and recommendations can be viewed via data dictionary views such as the following:
• DBA_ADVISOR_EXECUTIONS • DBA_ADVISOR_FINDINGS • DBA_ADVISOR_OBJECTS
There are three different tools for retrieving the Segment Advisor’s output:
• Executing DBMS_SPACE.ASA_RECOMMENDATIONS • Manually querying DBA_ADVISOR_* views • Viewing Enterprise Manager’s graphical screens
CHAPTER 1 ■ OPTIMIZING TABLE PERFORMANCE
Table 1-5. Description of ASA_RECOMMENDATIONS Input Parameters
Parameter Meaning
all_runs TRUE instructs the procedure to return findings from all runs, whereas FALSE instructs the procedure to return only the latest run.
show_manual TRUE instructs the procedure to return results from manual executions of the Segment Advisor. FALSE instructs the procedure to return results from the automatic running of the Segment Advisor.
show_findings Shows only the findings and not the recommendations
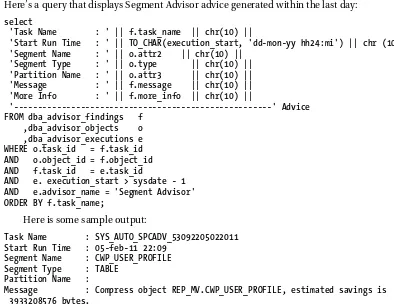
You can also directly query the data dictionary views to view the advice of the Segment Advisor. Here’s a query that displays Segment Advisor advice generated within the last day:
select
'Task Name : ' || f.task_name || chr(10) ||
'Start Run Time : ' || TO_CHAR(execution_start, 'dd-mon-yy hh24:mi') || chr (10) || 'Segment Name : ' || o.attr2 || chr(10) ||
'Segment Type : ' || o.type || chr(10) || 'Partition Name : ' || o.attr3 || chr(10) || 'Message : ' || f.message || chr(10) || 'More Info : ' || f.more_info || chr(10) ||
'---' Advice FROM dba_advisor_findings f
,dba_advisor_objects o ,dba_advisor_executions e WHERE o.task_id = f.task_id AND o.object_id = f.object_id AND f.task_id = e.task_id
AND e. execution_start > sysdate - 1 AND e.advisor_name = 'Segment Advisor' ORDER BY f.task_name;
Here is some sample output:
Task Name : SYS_AUTO_SPCADV_53092205022011 Start Run Time : 05-feb-11 22:09
Segment Name : CWP_USER_PROFILE Segment Type : TABLE
Partition Name :
Message : Compress object REP_MV.CWP_USER_PROFILE, estimated savings is 3933208576 bytes.
More Info : Allocated Space:3934257152: Used Space:10664: Reclaimable Spa ce :3933208576:
---
CHAPTER 1 ■ OPTIMIZING TABLE PERFORMANCE
You can also view Segment Advisor advice from Enterprise Manager. To view the advice, first navigate to the Advisor Central page. Next navigate to the Segment Advisor page. Then navigate to the Segment Advisor Recommendations. This page will display any recent Segment Advisor findings and recommendations.
1-9. Manually Generating Segment Advisor Advice
Problem
You have a table that experiences a large amount of updates. You have noticed that the query performance against this table has slowed down. You suspect the table may be experiencing poor performance due to row chaining. Therefore you want to manually confirm with the Segment Advisor that a table has issues with row chaining.
Solution
You can manually run the Segment Advisor and tell it to specifically analyze all segments in a tablespace or look at a specific object (such as a single table or index). You can manually generate advice for a specific segment using the DBMS_ADVISOR package by executing the following steps:
1. Create a task.
2. Assign an object to the task. 3. Set the task parameters. 4. Execute the task.
■
Note
The database user executing
DBMS_ADVISORneeds the
ADVISORsystem privilege. This privilege is
administered via the
GRANTstatement.
The following example executes the DBMS_ADVISOR package from an anonymous block of PL/SQL. The table being examined is the F_REGS table.
DECLARE
my_task_id number; obj_id number; my_task_name varchar2(100); my_task_desc varchar2(500); BEGIN
my_task_name := 'F_REGS Advice';
CHAPTER 1 ■ OPTIMIZING TABLE PERFORMANCE
--- -- Step 1 ---
dbms_advisor.create_task (
advisor_name => 'Segment Advisor', task_id => my_task_id,
Now you can view Segment Advisor advice regarding this table by executing the DBMS_SPACE package and instructing it to pull information from a manual execution of the Segment Advisor (via the input parameters—see Table 1-6 for details)—for example:
CHAPTER 1 ■ OPTIMIZING TABLE PERFORMANCE
Here is some sample output:
Segment Advice --- TABLESPACE_NAME : USERS
SEGMENT_OWNER : MV_MAINT SEGMENT_NAME : F_REGS ALLOCATED_SPACE : 20971520 RECLAIMABLE_SPACE: 18209960
RECOMMENDATIONS : Perform re-org on the object F_REGS, estimated savings is 182 09960 bytes.
SOLUTION 1 : Perform Reorg SOLUTION 2 :
SOLUTION 3 :
You can also retrieve Segment Advisor advice by querying data dictionary views—for example: SELECT
'Task Name : ' || f.task_name || chr(10) || 'Segment Name : ' || o.attr2 || chr(10) || 'Segment Type : ' || o.type || chr(10) || 'Partition Name : ' || o.attr3 || chr(10) || 'Message : ' || f.message || chr(10) || 'More Info : ' || f.more_info TASK_ADVICE FROM dba_advisor_findings f
,dba_advisor_objects o WHERE o.task_id = f.task_id AND o.object_id = f.object_id AND f.task_name like 'F_REGS Advice' ORDER BY f.task_name;
If the table has a potential issue with row chaining, then the advice output will indicate it as follows: TASK_ADVICE
--- Task Name : F_REGS Advice
Segment Name : F_REGS Segment Type : TABLE Partition Name :
Message : Perform re-org on the object F_REGS, estimated savings is 182 09960 bytes.
More Info : Allocated Space:20971520: Used Space:2761560: Reclaimable Spa ce :18209960:
How It Works
CHAPTER 1 ■ OPTIMIZING TABLE PERFORMANCE
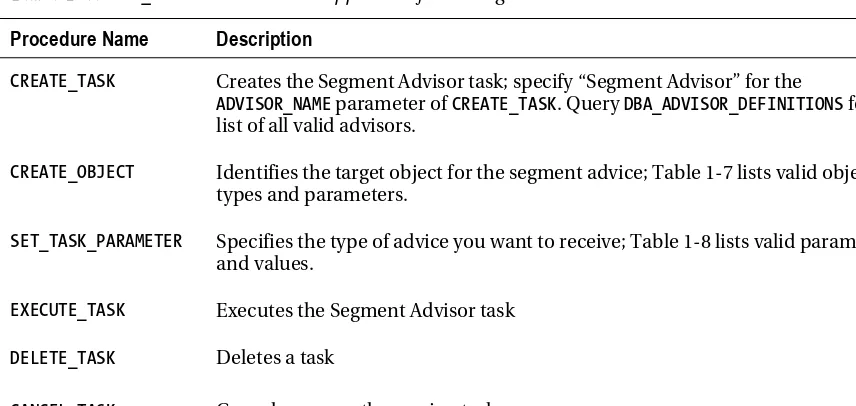
Table 1-6. DBMS_ADVISOR Procedures Applicable for the Segment Advisor
Procedure Name
Description
CREATE_TASK Creates the Segment Advisor task; specify “Segment Advisor” for the
ADVISOR_NAME parameter of CREATE_TASK. Query DBA_ADVISOR_DEFINITIONS for a list of all valid advisors.
CREATE_OBJECT Identifies the target object for the segment advice; Table 1-7 lists valid object types and parameters.
SET_TASK_PARAMETER Specifies the type of advice you want to receive; Table 1-8 lists valid parameters and values.
EXECUTE_TASK Executes the Segment Advisor task
DELETE_TASK Deletes a task
CANCEL_TASK Cancels a currently running task
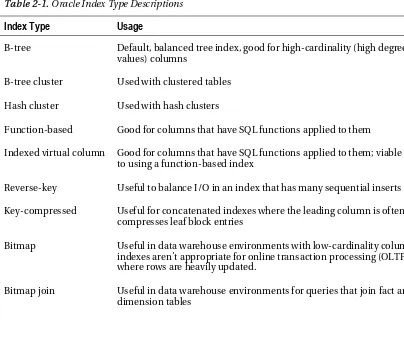
The Segment Advisor can be invoked with various degrees of granularity. For example, you can generate advice for all objects in a tablespace or advice for a specific table, index, or partition. Table 1-7 lists the object types for which Segment Advisor advice can be obtained via the
DBMS_ADVISOR.CREATE_TASK procedure.
Table 1-7. Valid Object Types for the DBMS_ADVISOR.CREATE_TASK Procedure
Object
Type
ATTR1 ATTR2
ATTR3 ATTR4
TABLESPACE tablespace name NULL NULL NULL
TABLE user name table name NULL NULL
INDEX user name index name NULL NULL
TABLE PARTITION user name table name partition name NULL
INDEX PARTITION user name index name partition name NULL
TABLE SUBPARTITION user name table name subpartition name NULL
INDEX SUBPARTITION user name index name subpartition name NULL
CHAPTER 1 ■ OPTIMIZING TABLE PERFORMANCE
Object
Type
ATTR1 ATTR2
ATTR3 ATTR4
LOB PARTITION user name segment name partition name NULL
LOB SUBPARTITION user name segment name subpartition name NULL
You can also specify a maximum amount of time that you want the Segment Advisor to run. This is controlled via the SET_TASK_PARAMETER procedure. This procedure also controls the type of advice that is generated. Table 1-8 describes valid inputs for this procedure.
Table 1-8. Input Parameters for the DBMS_ADVISOR.SET_TASK_PARAMETER Procedure
Parameter Description
Valid
Values
TIME_LIMIT Limit on time (in seconds) for advisor run N number of seconds or UNLIMITED (default)
RECOMMEND_ALL Generates advice for all types of advice or just space-related advice
TRUE (default) for all types of advice, or FALSE to generate only space-related advice
1-10. Automatically E-mailing Segment Advisor Output
Problem
You realize that the Segment Advisor automatically generates advice and want to automatically e-mail yourself Segment Advisor output.
Solution
First encapsulate the SQL that displays the Segment Advisor output in a shell script—for example: #!/bin/bash
if [ $# -ne 1 ]; then echo "Usage: $0 SID" exit 1
fi
# source oracle OS variables . /var/opt/oracle/oraset $1 #
BOX=`uname -a | awk '{print$2}'` #
sqlplus -s <<EOF mv_maint/foo
CHAPTER 1 ■ OPTIMIZING TABLE PERFORMANCE
set lines 80 set pages 100 SELECT
'Segment Advice ---'|| chr(10) || 'TABLESPACE_NAME : ' || tablespace_name || chr(10) || 'SEGMENT_OWNER : ' || segment_owner || chr(10) || 'SEGMENT_NAME : ' || segment_name || chr(10) || 'ALLOCATED_SPACE : ' || allocated_space || chr(10) || 'RECLAIMABLE_SPACE: ' || reclaimable_space || chr(10) || 'RECOMMENDATIONS : ' || recommendations || chr(10) || 'SOLUTION 1 : ' || c1 || chr(10) || 'SOLUTION 2 : ' || c2 || chr(10) || 'SOLUTION 3 : ' || c3 Advice
FROM
TABLE(dbms_space.asa_recommendations('FALSE', 'FALSE', 'FALSE')); EOF
cat $HOME/bin/log/seg.txt | mailx -s "Seg. rpt. on DB: $1 $BOX" dkuhn@oracle.com exit 0
The prior shell script can be regularly executed from a Linux/Unix utility such as cron. Here is a sample cron entry:
# Segment Advisor report
16 11 * * * /orahome/oracle/bin/seg.bsh DWREP
In this way, you automatically receive segment advice and proactively resolve issues before they become performance problems.
How It Works
The Segment Advisor automatically generates advice on a regular basis. Sometimes it’s handy to proactively send yourself the recommendations. This allows you to periodically review the output and implement suggestions that make sense.
The shell script in the “Solution” section contains a line near the top where the OS variables are established through running an oraset script. This is a custom script that is the equivalent of the oraset script provided by Oracle. You can use a script to set the OS variables or hard-code the required lines into the script. Calling a script to set the variables is more flexible and maintainable, as it allows you to use as input any database name that appears in the oratab file.
1-11. Rebuilding Rows Spanning Multiple Blocks
Problem
CHAPTER 1 ■ OPTIMIZING TABLE PERFORMANCE
For example, you’re running the following query, which displays Segment Advisor advice: SELECT
'Task Name : ' || f.task_name || chr(10) || 'Segment Name : ' || o.attr2 || chr(10) || 'Segment Type : ' || o.type || chr(10) || 'Partition Name : ' || o.attr3 || chr(10) || 'Message : ' || f.message || chr(10) || 'More Info : ' || f.more_info TASK_ADVICE FROM dba_advisor_findings f
,dba_advisor_objects o WHERE o.task_id = f.task_id AND o.object_id = f.object_id ORDER BY f.task_name;
Here is the output for this example: TASK_ADVICE
--- Task Name : EMP Advice
Segment Name : EMP Segment Type : TABLE Partition Name :
Message : The object has chained rows that can be removed by re-org. More Info : 47 percent chained rows can be removed by re-org.
From the prior output, the EMP table has a large percentage of rows affected by row chaining and is causing performance issues when retrieving data from the table. You want to eliminate the chained rows within the table.
Solution
One method for resolving the row chaining within a table is to use the MOVE statement. When you move a table, Oracle requires an exclusive lock on the table; therefore you should perform this operation when there are no active transactions associated with the table being moved.
Also, as part of a MOVE operation, all of the rows are assigned a new ROWID. This will invalidate any indexes that are associated with the table. Therefore, as part of the move operation, you should rebuild all indexes associated with the table being moved. This example moves the EMP table:
SQL> alter table emp move;
After the move operation completes, then rebuild any indexes associated with the table being moved. You can verify the status of the indexes by interrogating the DBA/ALL/USER_INDEXES view: select
owner ,index_name ,status
CHAPTER 1 ■OPTIMIZING TABLE PERFORMANCE
Here is some sample output:
OWNER INDEX_NAME STATUS --- --- --- MV_MAINT EMP_PK UNUSABLE
Rebuilding the index will make it usable again: SQL> alter index emp_pk rebuild;
You can now manually generate Segment Advisor advice (see Recipe 1-9) for the segment and run the query listed in the “Problem” section of this recipe to see if the row chaining has been resolved.
How It Works
A certain amount of space is reserved in the block to accommodate growth within the row. Usually a row will increase in size due to an UPDATE statement that increases the size of a column value. If there isn’t enough free room in the block to accommodate the increased size, then Oracle will create a pointer to a different block that does have enough space and store part of the row in this additional block. When a single row is stored in two or more blocks, this is called row chaining. This can cause potential
performance issues because Oracle will have to retrieve data from multiple blocks (instead of one) when retrieving a chained row.
A small number of chained rows won’t have much impact on performance. One rough guideline is that if more than 15% of a table’s rows are chained, then you should take corrective action (such as moving the table to re-organize it).
The amount of free space reserved in a block is determined by the table’s storage parameter of PCTFREE. The default value of PCTFREE is 10, meaning 10% of the block is reserved space to be used for updates that result in more space usage. If you have a table that has columns that are initially inserted as null and later updated to contain large values, then consider setting PCTFREE to a higher value, such as 40%. This will help prevent the row chaining.
Conversely, if you have a table that is never updated after rows are inserted, then consider setting PCTFREE to 0. This will result in more rows per block, which can lead to fewer disk reads (and thus better performance) when retrieving data.
You can view the setting for PCTFREE by querying the DBA/ALL/USER_TABLES view—for example: select table_name, pct_free
from user_tables;
The move operation removes each record from the block and re-inserts the record into a new block. For chained rows, the old chained rows are deleted and rebuilt as one physical row within the block. If the table being moved has a low setting for PCTFREE, consider resetting this parameter to a higher value (as part of the move operation)—for example:
SQL> alter table emp move pctfree 40;
Another method for verifying row chaining (besides the Segment Advisor) is to use the ANALYZE TABLE statement. First you must create a table to hold output of the ANALYZE TABLE statement:
CHAPTER 1 ■ OPTIMIZING TABLE PERFORMANCE
The prior script creates a table named CHAINED_ROWS. Now you can run the ANALYZE statement to populate the CHAINED_ROWS table:
SQL> analyze table emp list chained rows;
Now query the number of rows from the CHAINED_ROWS table: SQL> select count(*) from chained_rows where table_name='EMP';
If the issue with the chained rows has been resolved, the prior query will return zero rows. The advantage of identifying chained rows in this manner is that you can fix the rows that are chained without impacting the rest of the records in the table by doing the following:
1. Create a temporary holding table to store the chained rows. 2. Delete the chained rows from the original table.
3. Insert the rows from the temporary table into the original table.
Here’s a short example to demonstrate the prior steps. First create a temporary table that contains the rows in the EMP table that have corresponding records in the CHAINED_ROWS table:
create table temp_emp as select *
from emp where rowid in
(select head_rowid from chained_rows where table_name = 'EMP');
Now delete the records from EMP that have corresponding records in CHAINED_ROWS: delete from emp
where rowid in
(select head_rowid from chained_rows where table_name = 'EMP');
Now insert records in the temporary table into the EMP table: insert into emp select * from temp_emp;
If you re-analyze the table, there should be no chained rows now. You can drop the temporary table when you’re finished.
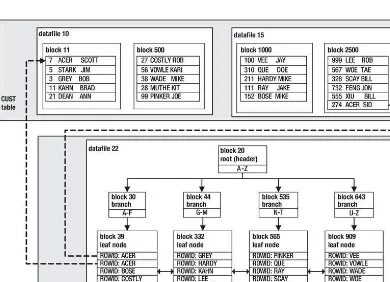
UNDERSTANDING THE ORACLE ROWID
Every row in every table has a physical address. The address of a row is determined from a combination of
the following:
•
Datafile number
•
Block number
•
Location of the row within the block
CHAPTER 1 ■ OPTIMIZING TABLE PERFORMANCE
You can display the address of a row in a table by querying the
ROWIDpseudo-column—for example:
SQL> select rowid, emp_id from emp;
Here’s some sample output:
ROWID EMP_ID --- --- AAAFWXAAFAAAAlWAAA 1
The
ROWIDpseudo-column value isn’t physically stored in the database. Oracle calculates its value when
you query it. The
ROWIDcontents are displayed as base-64 values that can contain the characters A–Z, a–
z, 0–9, +, and /. You can translate the
ROWIDvalue into meaningful information via the
DBMS_ROWIDpackage. For example, to display the file number, block number, and row number in which a row is stored,
issue this statement:
select emp_id
,dbms_rowid.rowid_relative_fno(rowid) file_num ,dbms_rowid.rowid_block_number(rowid) block_num ,dbms_rowid.rowid_row_number(rowid) row_num from emp;
Here’s some sample output:
EMP_ID FILE_NUM BLOCK_NUM ROW_NUM --- --- --- --- 2960 4 144 126 2961 4 144 127
You can use the
ROWIDvalue in the
SELECTand
WHEREclauses of a SQL statement. In most cases, the
ROWIDuniquely identifies a row. However, it’s possible to have rows in different tables that are stored in
the same cluster and so contain rows with the same
ROWID.
1-12. Freeing Unused Table Space
Problem
You’ve analyzed the output of the Segment Advisor and have identified a table that has a large amount of free space. You want to free up the unused space to improve the performance queries that perform full table scans of the table.
Solution
Do the following to shrink space and re-adjust the high-water mark for a table: 1. Enable row movement for the table.
CHAPTER 1 ■ OPTIMIZING TABLE PERFORMANCE
■
Note
The shrink table feature requires that the table’s tablespace use automatic space segment management.
See Recipe 1-2 for details on how to create an ASSM-enabled tablespace.
When you shrink a table, this requires that rows (if any) be moved. This means you must enable row movement. This example enables row movement for the INV table:
SQL> alter table inv enable row movement;
Next the table shrink operation is executed via an ALTER TABLE statement: SQL> alter table inv shrink space;
You can also shrink the space associated with any index segments via the CASCADE clause: SQL> alter table inv shrink space cascade;
How It Works
When you shrink a table, Oracle re-organizes the blocks in a manner that consumes the least amount of space. Oracle also re-adjusts the table’s high-water mark. This has performance implications for queries that result in full table scans. In these scenarios, Oracle will inspect every block below the high-water mark. If you notice that it takes a long time for a query to return results when there aren’t many rows in the table, this may be an indication that there are many unused blocks (because data was deleted) below the high-water mark.
You can instruct Oracle to not re-adjust the high-water mark when shrinking a table. This is done via the COMPACT clause—for example:
SQL> alter table inv shrink space compact;
When you use COMPACT, Oracle defragments the table but doesn’t alter the high-water mark. You will need to use the ALTER TABLE…SHRINK SPACE statement to reset the high-water mark. You might want to do this because you’re concerned about the time it takes to defragment and adjust the high-water mark. This allows you to shrink a table in two shorter steps instead of one longer operation.
1-13. Compressing Data for Direct Path Loading
Problem
You’re working with a decision support system (DSS)-type database and you want to improve the performance of an associated reporting application. This environment contains large tables that are loaded once and then frequently subjected to full table scans. You want to compress data as it is loaded because this will compact the data into fewer database blocks and thus will require less I/O for
CHAPTER 1 ■ OPTIMIZING TABLE PERFORMANCE
Solution
Use Oracle’s basic compression feature to compress direct path–loaded data into a heap-organized table. Basic compression is enabled as follows:
1. Use the COMPRESS clause to enable compression either when creating, altering, or moving an existing table.
2. Load data via a direct path mechanism such as CREATE TABLE…AS SELECT or INSERT /*+ APPEND */.
■
Note
Prior to Oracle Database 11g R2, basic compression was referred to as DSS compression and enabled
via the
COMPRESS FOR DIRECT_LOAD OPERATIONclause. This syntax is deprecated in Oracle Database 11g R2 and
higher.
Here’s an example that uses the CREATE TABLE…AS SELECT statement to create a basic compression-enabled table and direct path–load the data:
create table regs_dss compress
as select reg_id, reg_name from regs;
The prior statement creates a table with compressed data in it. Any subsequent direct path–load operations will also load the data in a compressed format.
■
Tip
You can use either the
COMPRESSclause or the
COMPRESS BASICclause to enable the basic table
compression feature. The
COMPRESSclause and
COMPRESS BASICclause are synonymous.
You can verify that compression has been enabled for a table by querying the appropriate
DBA/ALL/USER_TABLES view. This example assumes that you’re connected to the database as the owner of the table:
select table_name, compression, compress_for from user_tables