NETWORK
SECURITY
Other computer security resources from O’Reilly
Related titles Wireless Hacks BSD Hacks Knoppix Hacks Ubuntu Hacks Linux Desktop Hacks
Linux Server Hacks Linux Server Hacks,
Volume 2
Linux Multimedia Hacks Windows XP Hacks Windows Server Hacks
Hacks Series Home hacks.oreilly.comis a community site for developers and power users of all stripes. Readers learn from each other as they share their favorite tips and tools for Mac OS X, Linux, Google, Windows XP, and more.
Security Books Resource Center
security.oreilly.com is a complete catalog of O’Reilly’s books on security and related technologies, including sample chapters and code examples.
oreillynet.comis the essential portal for developers inter-ested in open and emerging technologies, including new platforms, programming languages, and operating systems.
Conferences O’Reilly brings diverse innovators together to nurture the ideas that spark revolutionary industries. We special-ize in documenting the latest tools and systems, translating the innovator’s knowledge into useful skills for those in the trenches. Visitconferences.oreilly.comfor our upcoming events.
NETWORK
SECURITY
HACKS
TMSECOND EDITION
Network Security Hacks™, Second Edition
by Andrew Lockhart
Copyright © 2007, 2004 O’Reilly Media, Inc. All rights reserved. Printed in the United States of America.
Published by O’Reilly Media, Inc., 1005 Gravenstein Highway North, Sebastopol, CA 95472.
O’Reilly books may be purchased for educational, business, or sales promotional use. Online editions are also available for most titles (safari.oreilly.com). For more information, contact our corporate/institutional sales department: (800) 998-9938 or[email protected].
Editor: Brian Sawyer
Production Editor: Philip Dangler Copyeditor: Rachel Wheeler Indexer: Ellen Troutman-Zaig
Cover Designer: Karen Montgomery Interior Designer: David Futato Illustrators: Robert Romano
and Jessamyn Read
Printing History:
April 2004: First Edition. November 2006: Second Edition.
Nutshell Handbook, the Nutshell Handbook logo, and the O’Reilly logo are registered trademarks of O’Reilly Media, Inc. TheHacksseries designations,Network Security Hacks, the image of barbed wire, and related trade dress are trademarks of O’Reilly Media, Inc.
Many of the designations used by manufacturers and sellers to distinguish their products are claimed as trademarks. Where those designations appear in this book, and O’Reilly Media, Inc. was aware of a trademark claim, the designations have been printed in caps or initial caps.
While every precaution has been taken in the preparation of this book, the publisher and author assume no responsibility for errors or omissions, or for damages resulting from the use of the information contained herein.
Small print:The technologies discussed in this publication, the limitations on these technologies that technology and content owners seek to impose, and the laws actually limiting the use of these technologies are constantly changing. Thus, some of the hacks described in this publication may not work, may cause unintended harm to systems on which they are used, or may not be consistent with applicable user agreements. Your use of these hacks is at your own risk, and O’Reilly Media, Inc. disclaims responsibility for any damage or expense resulting from their use. In any event, you should take care that your use of these hacks does not violate any applicable laws, including copyright laws.
Contents
Credits. . . .xi
Preface . . . xv
Chapter 1. Unix Host Security. . . 1
1. Secure Mount Points 2
2. Scan for SUID and SGID Programs 3
3. Scan for World- and Group-Writable Directories 5
4. Create Flexible Permissions Hierarchies with POSIX ACLs 5
5. Protect Your Logs from Tampering 9
6. Delegate Administrative Roles 11
7. Automate Cryptographic Signature Verification 13
8. Check for Listening Services 15
9. Prevent Services from Binding to an Interface 17
10. Restrict Services with Sandboxed Environments 19
11. Use proftpd with a MySQL Authentication Source 23
12. Prevent Stack-Smashing Attacks 26
13. Lock Down Your Kernel with grsecurity 28
14. Restrict Applications with grsecurity 33
15. Restrict System Calls with systrace 36
16. Create systrace Policies Automatically 39
17. Control Login Access with PAM 41
18. Restrict Users to SCP and SFTP 46
19. Use Single-Use Passwords for Authentication 49
21. Enforce User and Group Resource Limits 54
22. Automate System Updates 55
Chapter 2. Windows Host Security . . . 58
23. Check Servers for Applied Patches 59
24. Use Group Policy to Configure Automatic Updates 63
25. List Open Files and Their Owning Processes 66
26. List Running Services and Open Ports 68
27. Enable Auditing 69
28. Enumerate Automatically Executed Programs 71
29. Secure Your Event Logs 73
30. Change Your Maximum Log File Sizes 73
31. Back Up and Clear the Event Logs 75
32. Disable Default Shares 78
33. Encrypt Your Temp Folder 79
34. Back Up EFS 80
35. Clear the Paging File at Shutdown 86
36. Check for Passwords That Never Expire 88
Chapter 3. Privacy and Anonymity. . . 91
37. Evade Traffic Analysis 91
38. Tunnel SSH Through Tor 95
39. Encrypt Your Files Seamlessly 96
40. Guard Against Phishing 100
41. Use the Web with Fewer Passwords 105
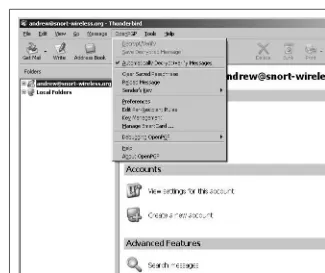
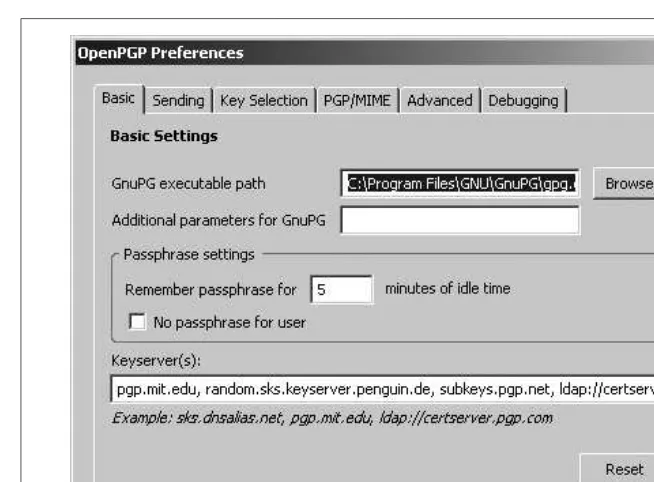
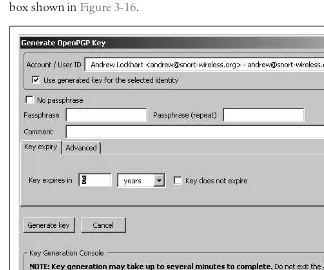
42. Encrypt Your Email with Thunderbird 107
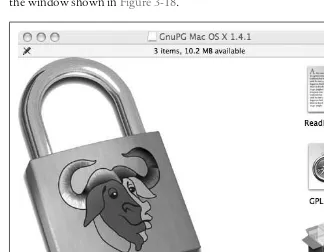
43. Encrypt Your Email in Mac OS X 112
Chapter 4. Firewalling . . . 117
44. Firewall with Netfilter 117
45. Firewall with OpenBSD’s PacketFilter 122
46. Protect Your Computer with the Windows Firewall 128
47. Close Down Open Ports and Block Protocols 137
48. Replace the Windows Firewall 139
49. Create an Authenticated Gateway 147
51. Test Your Firewall 151
52. MAC Filter with Netfilter 154
53. Block Tor 156
Chapter 5. Encrypting and Securing Services . . . 158
54. Encrypt IMAP and POP with SSL 158
55. Use TLS-Enabled SMTP with Sendmail 161
56. Use TLS-Enabled SMTP with Qmail 163
57. Install Apache with SSL and suEXEC 164
58. Secure BIND 169
59. Set Up a Minimal and Secure DNS Server 172
60. Secure MySQL 176
61. Share Files Securely in Unix 178
Chapter 6. Network Security . . . 183
62. Detect ARP Spoofing 184
63. Create a Static ARP Table 186
64. Protect Against SSH Brute-Force Attacks 188
65. Fool Remote Operating System Detection Software 190
66. Keep an Inventory of Your Network 194
67. Scan Your Network for Vulnerabilities 197
68. Keep Server Clocks Synchronized 207
69. Create Your Own Certificate Authority 209
70. Distribute Your CA to Clients 213
71. Back Up and Restore a Certificate Authority with Certificate
Services 214
72. Detect Ethernet Sniffers Remotely 221
73. Help Track Attackers 227
74. Scan for Viruses on Your Unix Servers 229
75. Track Vulnerabilities 233
Chapter 7. Wireless Security . . . 236
76. Turn Your Commodity Wireless Routers into a Sophisticated
Security Platform 236
77. Use Fine-Grained Authentication for Your Wireless Network 240
Chapter 8. Logging. . . 250
79. Run a Central Syslog Server 251
80. Steer Syslog 252
81. Integrate Windows into Your Syslog Infrastructure 254
82. Summarize Your Logs Automatically 262
83. Monitor Your Logs Automatically 263
84. Aggregate Logs from Remote Sites 266
85. Log User Activity with Process Accounting 272
86. Centrally Monitor the Security Posture of Your Servers 273
Chapter 9. Monitoring and Trending . . . 282
87. Monitor Availability 283
88. Graph Trends 291
89. Get Real-Time Network Stats 293
90. Collect Statistics with Firewall Rules 295
91. Sniff the Ether Remotely 297
Chapter 10. Secure Tunnels . . . 301
92. Set Up IPsec Under Linux 301
93. Set Up IPsec Under FreeBSD 306
94. Set Up IPsec in OpenBSD 309
95. Encrypt Traffic Automatically with Openswan 314
96. Forward and Encrypt Traffic with SSH 316
97. Automate Logins with SSH Client Keys 318
98. Use a Squid Proxy over SSH 320
99. Use SSH As a SOCKS Proxy 322
100. Encrypt and Tunnel Traffic with SSL 324
101. Tunnel Connections Inside HTTP 327
102. Tunnel with VTun and SSH 329
103. Generate VTun Configurations Automatically 334
104. Create a Cross-Platform VPN 339
Chapter 11. Network Intrusion Detection . . . 348
106. Detect Intrusions with Snort 349
107. Keep Track of Alerts 353
108. Monitor Your IDS in Real Time 356
109. Manage a Sensor Network 363
110. Write Your Own Snort Rules 370
111. Prevent and Contain Intrusions with Snort_inline 377
112. Automatically Firewall Attackers with SnortSam 380
113. Detect Anomalous Behavior 384
114. Automatically Update Snort’s Rules 385
115. Create a Distributed Stealth Sensor Network 388
116. Use Snort in High-Performance Environments with Barnyard 389
117. Detect and Prevent Web Application Intrusions 392
118. Scan Network Traffic for Viruses 397
119. Simulate a Network of Vulnerable Hosts 400
120. Record Honeypot Activity 407
Chapter 12. Recovery and Response. . . 413
121. Image Mounted Filesystems 413
122. Verify File Integrity and Find Compromised Files 415
123. Find Compromised Packages 420
124. Scan for Rootkits 422
125. Find the Owner of a Network 425
0
Credits
About the Author
AndrewLockhart is originally from South Carolina but currently resides in northern Colorado, where he spends his time trying to learn the black art of auditing disassembled binaries and trying to keep from freezing to death. He holds a BS in computer science from Colorado State University and has done security consulting for small businesses in the area. When he’s not writing books, he’s a senior security analyst with Network Chemistry, a leading pro-vider of wireless security solutions. Andrew is also a member of the Wireless Vulnerabilities and Exploits project’s (http://www.wirelessve.org) editorial board and regularly contributes to their wireless security column at Network-World (http://www.networkworld.com/topics/wireless-security.html). In his free time, he works on Snort-Wireless (http://snort-wireless.org), a project intended to add wireless intrusion detection to the popular open source IDS Snort.
Contributors
The following people contributed hacks, writing, and inspiration to this book:
• Oktay Altunergil is the founder of The Free Linux CD Project (http:// www.freelinuxcd.org) and one of the maintainers of Turk-PHP.com (a Turkish PHP portal). He also works full-time as a Unix system adminis-trator and PHP programmer.
• Schuyler Erle (http://nocat.net) is a Free Software developer and activist. His interests include collaborative cartography, wireless networking, software for social and political change, and the Semantic Web. Schuyler is the lead developer of NoCatAuth, the leading open source wireless captive portal.
• Bob Fleck (http://www.securesoftware.com) is Director of Security Ser-vices at Secure Software. He consults in the fields of secure develop-ment and wireless security and is a coauthor of O’Reilly’s 802.11 Security book. The results of his more recent investigations into Blue-tooth security can be found athttp://bluetooth.shmoo.com.
• Rob Flickenger (http://nocat.net) is a writer and editor for O’Reilly’s Hacks series. He currently spends his time hacking on various projects and promoting community wireless networking.
• Preston Gralla is the author of more than 30 books about computers and the Internet, which have been translated into 15 languages, includ-ingWindows XP Hacks(O’Reilly), Internet Annoyances(O’Reilly), and
Windows XP Power Hound (Pogue Press). He has been writing about technology since the dawn of the PC age, and he has been an editor and columnist for many national newspapers, magazines, and web sites. He was the founding editor of PC Week; a founding editor, then editor, then editorial director of PC/Computing; and executive editor for ZDNet/CNet. Preston has written about technology for numerous mag-azines and newspapers, including PC Magazine, Computerworld, CIO Magazine, Computer Shopper, the Los Angeles Times, USA Today, the
Dallas Morning News(where he was a technology columnist), and many others. He has been a columnist for ZDNet/CNet and is currently a col-umnist for TechTarget.com. His commentaries about technology have been featured on National Public Radio’s “All Things Considered,” and he has won the award for the Best Feature in a Computer Publication from the Computer Press Association. Under his editorship, PC/Com-puting was a finalist in the category of General Excellence for the National Magazine Awards. Preston is also the editor of O’Reilly’s Win-dowsDevCenter.com site. He lives in Cambridge, MA, with his wife and two children—although his daughter has recently fled the nest for col-lege. Between writing books, articles, and columns, he swims, plays ten-nis, goes to the opera, and contemplates the ram’s skull hanging on the wall of his office.
system administrator with the Great Lakes Technologies Group. Michael is the author of Absolute BSD, Absolute OpenBSD, andCisco Routers for the Desperate(all from No Starch Press), and he is currently preparing a book about NetBSD.
• Matt Messier (http://www.securesoftware.com) is Director of Engineer-ing at Secure Software and a security authority who has been program-ming for nearly two decades. In addition to coauthoring the O’Reilly booksSecure Programming Cookbook for C and C++andNetwork Secu-rity with OpenSSL, Matt coauthored the Safe C String Library (SafeStr), XXL, RATS, and EGADS.
• Ivan Ristic (http://www.modsecurity.org) is a web security specialist and the author ofmod_security, an open source intrusion detection and pre-vention engine for web applications. He is a member of the OASIS Web Application Security Technical Committee, where he works on the stan-dard for web application protection.
• Hans Schefske is a columnist on myITforum.com (http://www.myitforum. com) and has over eight years experience engineering and designing the architecture and implementation of Microsoft client/server-based net-work solutions. Consulting and leading projects in the IT industry, he has provided technical expertise in the areas of designing and implementing infrastructures for large enterprise-level companies such as Nabisco, Prudential, AIG, Simpson, Thatcher and Bartlett, Novartis, and Hoffman LaRoche Pharmaceuticals. In 2003, Hans was awarded a Microsoft Most Valuable Professional (MVP) Award for SMS for his outstanding cal skills and willingness to share knowledge with his peers. As a techni-cal author at myITforum.com, he provides technitechni-cal information, tools, scripts, and utilities for IT professionals and administrators to better assist them in managing their Microsoft-based solutions. Hans is currently a Senior Active Directory and SMS consultant at a large telecommunica-tions company based in Atlanta, GA.
• Rod Trent, manager at myITforum.com (http://www.myitforum.com), is the leading expert on Microsoft Systems Management Server (SMS). He has over 18 years of IT experience, 8 of which have been dedicated to SMS. He is the author of such books as Microsoft SMS Installer,
• Mitch Tulloch (http://www.mtit.com) is President of MTIT Enterprises, an IT content development company based in Winnipeg, Canada. Prior to starting his own company in 1998, Mitch worked as a Microsoft Cer-tified Trainer for Productivity Point International. Mitch is a widely rec-ognized expert on Windows administration, networking, and security and has been awarded Most Valuable Professional (MVP) status by Microsoft for his outstanding contributions in supporting users who deploy Microsoft platforms, products, and solutions. Mitch is also cur-rently a professor at Jones International University (JIU), where he teaches graduate-level courses in Information Security Management that he codeveloped with his wife, Ingrid Tulloch, for JIU’s MBA pro-gram. Mitch is the author of 14 books, includingWindows Server Hacks
(O’Reilly),Windows Server 2003 in a Nutshell(O’Reilly), theMicrosoft Encyclopedia of Networking(Microsoft Press), theMicrosoft Encyclope-dia of Security (Microsoft Press), and IIS 6 Administration (Osborne/ McGraw-Hill). Mitch has also written feature articles for industry maga-zines such as NetworkWorld and Microsoft Certified Professional Magazine, and he contributes articles regularly to O’Reilly’s Windows-DevCenter.com, ITWorld.com, and WindowsNetworking.com. Mitch’s articles have been widely syndicated on other IT sites, such as Comput-erworld.com, Smallbusiness.com, and even CNN.com.
• John Viega (http://www.securesoftware.com) is Chief Technology Officer and Founder of Secure Software. He is also the coauthor of several books on software security, including Secure Programming Cookbook for C and C++ (O’Reilly) and Building Secure Software (Addison-Wesley). John is responsible for numerous software security tools, and he is the original author of Mailman, the GNU mailing list manager.
Acknowledgments
Once again I have to thank Karen (a.k.a. DJ Jackalope for Defcon attend-ees) for her constant support and encouragement, and for putting up with the many hours spent in toil.
Also, thanks go out to Brian Sawyer for his patience throughout this whole process, and to all of the other wonderful people at O’Reilly who worked hard to make this book a tangible reality. I’d also like to thank John Hoopes for providing the technical reviewfor this edition. John’s advice was instru-mental in making this a better book.
0
Preface
Nowhere is the termhacker more misconstrued than in the network secu-rity field. This is understandable because the very same tools that network security professionals use to probe the robustness of their own networks also can be used to launch attacks on any machine on the Internet. The dif-ference between system administrators legitimately testing their own machines and system crackers attempting to gain unauthorized access isn’t so much a question of techniques or tools, but a matter of intent. After all, as with any powerful piece of technology, a security tool isn’t inherently good or bad—this determination depends entirely on howit is used. The same hammer can be used to either build a wall or knock it down.
The difference between “white hat” and “black hat” hackers lies not in the tools or techniques they use (or even the color of their hats), but in their intentions. The difference is subtle but important. White hat hackers find that building secure systems presents an interesting challenge, and the secu-rity of such systems can be truly tested only through a thorough knowledge of howto subvert them. Black hat hackers (more appropriately called crack-ers) pursue precisely the same knowledge, but without regard for the people who built the systems or the servers they attack. They use their knowledge to subvert these systems for their own personal gain, often to the detriment of the systems they infiltrate.
someone as being creative, i.e., having the technical chops to get things done. The Hacks series is an attempt to reclaim this word, document the ways people are hacking (in a good way), and pass the hacker ethic of cre-ative participation on to the uninitiated. Seeing howothers approach sys-tems and problems is often the quickest way to learn about a new technology. Only by openly discussing security flaws and implementations can we hope to build stronger systems.
Why Network Security Hacks?
This second edition ofNetwork Security Hacksis a grimoire of 125 powerful security techniques. This volume demonstrates effective methods for defending your servers and networks from a variety of devious and subtle attacks. Within this book are examples of howto detect the presence (and track every keystroke) of network intruders, methods for protecting your network and data using strong encryption, and even techniques for laying traps for would-be system crackers. Many important security tools are pre-sented, as well as clever methods for using them to reveal real, useful infor-mation about what is happening on your network.
How This Book Is Organized
Although each hack is designed to stand on its own, this book makes exten-sive use of cross-referencing between hacks. If you find a reference to some-thing you’re interested in while reading a particular hack, feel free to skip around and follow it (much as you might while browsing the Web). The book itself is divided into several chapters, organized by subject:
Chapter 1,Unix Host Security
As the old saying goes, Unix was designed to share information, not to protect it. This old sawis no longer true with modern operating sys-tems, where security is an integral component to any server. Many new programs and kernel features have been developed that provide a much higher degree of control over what Unix-like operating systems can do. Chapter 1 demonstrates advanced techniques for hardening your Linux, FreeBSD, or OpenBSD server.
Chapter 2,Windows Host Security
Chapter 3,Privacy and Anonymity
These days, controlling the information trail left online is more impor-tant than ever. As more of our lives are conducted online, our informa-tion becomes easier to access by both friend and foe. This chapter discusses several ways to protect oneself online by offering solutions for encrypting email, remaining anonymous, and managing passwords for web sites.
Chapter 4,Firewalling
Firewalls are a key technology in the realm of network security. With-out them, the world of network security would be quite different. This chapter shows how to set up firewalls under various operating systems, such as Linux, OpenBSD, FreeBSD, and Windows. Different filtering and firewall testing techniques are also covered in this chapter.
Chapter 5,Encrypting and Securing Services
Limiting howservices can affect the system on which they’re running is a key aspect of server security. It’s also vital that traffic between the ser-vice and the clients connecting to it remain confidential in order to pro-tect data and users’ authentication credentials. This chapter shows how to do that for several popular services, such as SMTP, IMAP, POP3, Apache, and MySQL.
Chapter 6,Network Security
Regardless of the operating system your servers use, if your network is connected to the Internet, it uses TCP/IP for communications. Net-working protocols can be subverted in a number of powerful and sur-prising ways, leading to attacks that can range from simple denial of service to unauthorized access with full privileges. This chapter demon-strates some tools and techniques used to attack servers using the net-work itself, as well as methods for preventing these attacks.
Chapter 7,Wireless Security
Wireless networks have become a common sight on the home network landscape and continue to gain traction in enterprise networks. How-ever, warding off unauthorized users and attackers poses a greater chal-lenge in a wireless network. While this chapter includes only a handful of hacks, what can be learned from them is invaluable. Whether you want to share your network with others (but still maintain a semblance of security) or lock down your wireless network with fine-grained authentication, this chapter has something for you.
Chapter 8,Logging
information. This chapter shows you how to balance the need for infor-mation with the need for brevity by automatically collecting, process-ing, and protecting your system logs.
Chapter 9,Monitoring and Trending
As useful as system logs and network scans can be, they represent only a single data point of information, relevant only to the instant that the events were recorded. Without a history of activity on your network, you have no way to establish a baseline for what is “normal,” nor any real way to determine if something fishy is going on. This chapter pre-sents a number of tools and methods for watching your network and services over time, allowing you to recognize trends that will aid in future planning and enable you to tell at a glance when something just isn’t right.
Chapter 10,Secure Tunnels
Howis it possible to maintain secure communications over networks as untrustworthy as the Internet? The answer nearly always involves pow-erful encryption and authentication techniques. Chapter 10 shows you howto implement powerful VPN technologies, including IPSec, PPTP, and OpenVPN. You will also find techniques for protecting services using SSL, SSH, and other strong encryption tools.
Chapter 11,Network Intrusion Detection
How do you know when your network is under attack? While logs and historical statistics can showyou if something is out of sorts, there are tools designed to notify you (or otherwise take action) immediately when common attacks are detected. This chapter centers on the tremen-dously popular NIDS tool Snort and presents many techniques and add-ons that unleash this powerful tool’s full potential. Also presented are methods for setting up your own “honeypot” network to attract and confuse would-be system crackers.
Chapter 12,Recovery and Response
Even the most competent and careful network administrator will even-tually have to deal with successful security incidents. This chapter con-tains suggestions on howto verify your system’s integrity, preserve evidence for later analysis, and track down the human being at the other end of undesirable network traffic.
Conventions Used in This Book
The following typographical conventions are used in this book:
Italic
Constant width
Indicates commands, options, switches, variables, attributes, keys, func-tions, types, classes, namespaces, methods, modules, properties, param-eters, values, objects, events, event handlers, XML tags, HTML tags, macros, the contents of files, and the output from commands
Constant width bold
Shows commands or other text that should be typed literally by the user
Constant width italic
Shows text that should be replaced with user-supplied values
Gray type
Used to indicate a cross-reference within the text
You should pay special attention to notes set apart from the text with the following icons:
This is a tip, suggestion, or general note. It contains useful supplementary information about the topic at hand.
This is a warning or note of caution, often indicating that your money or your privacy might be at risk.
The thermometer icons, found next to each hack, indicate the relative com-plexity of the hack:
Safari
®Enabled
When you see a Safari® Enabled icon on the cover of your favorite technology book, that means the book is available online through the O’Reilly Network Safari Bookshelf.
Safari offers a solution that’s better than e-books. It’s a virtual library that lets you easily search thousands of top tech books, cut and paste code sam-ples, download chapters, and find quick answers when you need the most accurate, current information. Try it for free athttp://safari.oreilly.com.
Using Code Examples
This book is here to help you get your job done. In general, you may use the code in this book in your programs and documentation. You do not need to
contact us for permission unless you’re reproducing a significant portion of the code. For example, writing a program that uses several chunks of code from this book does not require permission. Selling or distributing a CD-ROM of examples from O’Reilly booksdoesrequire permission. Answering a question by citing this book and quoting example code does not require permission. Incorporating a significant amount of example code from this book into your product’s documentationdoes require permission.
We appreciate, but do not require, attribution. An attribution usually includes the title, author, publisher, and ISBN. For example: “Network Security Hacks, Second Edition, by AndrewLockhart. Copyright 2007 O’Reilly Media, Inc., 978-0-596-52763-1.”
If you suspect your use of code examples falls outside fair use or the permis-sion given here, feel free to contact us at[email protected].
How to Contact Us
Please address comments and questions concerning this book to the pub-lisher:
O’Reilly Media, Inc.
1005 Gravenstein Highway North Sebastopol, CA 95472
800-998-9938 (in the United States or Canada) 707-829-0515 (international or local)
707-829-0104 (fax)
We have a web page for this book, where we list errata, examples, and any additional information. You can access this page at:
http://www.oreilly.com/catalog/netsechacks2/
To comment or ask technical questions about this book, send email to:
For more information about our books, conferences, Resource Centers, and the O’Reilly Network, see our web site at:
http://www.oreilly.com
Got a Hack?
To explore Hacks books online or to contribute a hack for future titles, visit:
Chapter 1
C H A P T E R O N E
Unix Host Security
Hacks 1–22
Networking is all about connecting computers together, so it follows that a computer network is no more secure than the machines that it connects. A single insecure host can make lots of trouble for your entire network, because it can act as a tool for reconnaissance or a strong base of attack if it is under the control of an adversary. Firewalls, intrusion detection mecha-nisms, and other advanced security measures are useless if your servers offer easily compromised services. Before delving into the network part of net-work security, you should first make sure that the machines you are respon-sible for are as secure as posrespon-sible.
This chapter offers many methods for reducing the risks involved in offering services on a Unix-based system. Even though each of these hacks can stand on its own, it is worth reading through this entire chapter. If you implement only one type of security measure, you run the risk of all your preparation being totally negated once an attacker figures out howto bypass it. Just as Fort Knox isn’t protected by a regular door with an ordinary dead bolt, no single security feature can ultimately protect your servers. And the security measures you may need to take increase proportionally to the value of what you’re protecting.
#1 Secure Mount Points HACK
H A C K
#1
Secure Mount Points
Hack #1Use mount options to help prevent intruders from further escalating a compromise.
The primary way of interacting with a Unix machine is through its filesys-tem. Thus, when an intruder has gained access to a system, it is desirable to limit what he can do with the files available to him. One way to accomplish this is with the use of restrictive mount options.
Amount optionis a flag that controls howthe filesystem may be accessed. It is passed to the operating system kernel’s code when the filesystem is brought online. Mount options can be used to prevent files from being inter-preted as device nodes, to disallowbinaries from being executed, and to dis-allowthe SUID bit from taking effect (by using thenodev,noexec, andnosuid
flags). Filesystems can also be mounted read-only with thero option. These options are specified from the command line by running mountwith the-oflag. For example, if you have a separate partition for/tmpthat is on the third partition of your first IDE hard disk, you can mount with the
nodev,noexec, andnosuidflags, which are enabled by running the following command:
# mount -o nodev,noexec,nosuid /dev/hda3 /tmp
An equivalent entry in your/etc/fstab would look something like this:
/dev/hda3 /tmp ext3 defaults,nodev,noexec,nosuid 1 2
By carefully considering your requirements and dividing up your storage into multiple filesystems, you can utilize these mount options to increase the work that an attacker will have to do in order to further compromise your system. A quick way to do this is to first categorize your directory tree into areas that need write access for the system to function and those that don’t. You should consider using the read-only flag on any part of the filesystem where the contents do not change regularly. A good candidate for this might be/usr, depending on how often updates are made to system software. Obviously, many directories (such as /home) will need to be mounted as read/write. However, it is unlikely that users on an average multiuser sys-tem will need to run SUID binaries or create device files within their home directories. Therefore, a separate filesystem, mounted with the nodev and
Scan for SUID and SGID Programs #2
HACK
binaries or access device files. This strategy would help prevent the possibil-ity of an attacker leaving a Trojan horse in a common directory such as/tmp
or a user’s home directory. The attacker may be able to install the program, but it will not be able to run, with or without the proper chmod bits.
Services running in a sandboxed environment [Hack #10]
might be broken if nodev is specified on the filesystem running in the sandbox. This is because device nodes such as /dev/logand/dev/nullmust be available within thechroot( )
environment.
There are a number of ways that an attacker can circumvent these mount restrictions. For example, the noexec option on Linux can be bypassed by using /lib/ld-linux.soto execute binaries residing on a filesystem mounted with this option. At first glance, you’d think that this problem could be rem-edied by making ld-linux.so nonexecutable, but this would render all dynamically linked binaries nonexecutable.
So, unless all of the programs you rely on are statically linked (they’re proba-bly not), thenoexecoption is of little use in Linux. In addition, an attacker who has already gained root privileges will not be significantly hampered by filesystems mounted with special options, since these can often be remounted with the-o remountoption. But by using mount flags, you can easily limit the possible attacks available to a hostile user before he gains root privileges.
H A C K
#2
Scan for SUID and SGID Programs
Hack #2 Quickly check for potential root-exploitable programs and backdoors.
One potential way for a user to escalate her privileges on a system is to exploit a vulnerability in an SUID or SGID program. SUID and SGID are legitimately used when programs need special permissions above and beyond those that are available to the user who is running them. One such program ispasswd. Simultaneously allowing a user to change her password while not allowing any user to modify the system password file means that thepasswdprogram must be run with root privileges. Thus, the program has its SUID bit set, which causes it to be executed with the privileges of the program file’s owner. Similarly, when the SGID bit is set, the program is executed with the privileges of the file’s group owner.
Runningls -l on a binary that has its SUID bit set should look like this:
-r-s--x--x 1 root root 16336 Feb 13 2003 /usr/bin/passwd
#2 Scan for SUID and SGID Programs HACK
Unfortunately, a poorly written SUID or SGID binary can be used to quickly and easily escalate a user’s privileges. Also, an attacker who has already gained root access might hide SUID binaries throughout your system in order to leave a backdoor for future access. This leads us to the need for scanning systems for SUID and SGID binaries. This is a simple process and can be done with the following command:
# find / \( -perm -4000 -o -perm -2000 \) -type f -exec ls -la {} \;
One important thing to consider is whether an SUID program is in fact a shell script rather than an executable, since it’s trivial for someone to change an otherwise innocuous script into a backdoor. Most operating systems ignore any SUID or SGID bits on a shell script, but if you want to find all SUID or SGID scripts on a system, change the argument to the-execoption in the last command and add a pipe so that the command reads:
# find / \( -perm -4000 -o -perm -2000 \) -type f \ -exec file {} \; | grep -v ELF
Now, every time an SUID or SGID file is encountered, thefilecommand will run and determine what type of file is being examined. If it’s an execut-able, grepwill filter it out; otherwise, it will be printed to the screen with some information about what kind of file it is.
Most operating systems use ELF-format executables, but if you’re running an operating system that doesn’t (older versions of Linux used a.out, and AIX uses XCOFF), you’ll need to replace the ELFin the previous grep com-mand with the binary format used by your operating system and architec-ture. If you’re unsure of what to look for, run the filecommand on any binary executable, and it will report the string you’re looking for.
For example, here’s an example of runningfile on a binary in Mac OS X:
$ file /bin/sh
/bin/sh: Mach-O executable ppc
To go one step further, you could even queue the command to run once a day usingcron and have it redirect the output to a file. For instance, this crontab entry would scan for files that have either the SUID or SGID bits set, compare the current list to the one from the day before, and then email the differences to the owner of the crontab (make sure this is all on one line):
0 4 * * * find / \( -perm -4000 -o -perm -2000 \) -type f \ > /var/log/sidlog.new && \
diff /var/log/sidlog.new /var/log/sidlog && \ mv /var/log/sidlog.new /var/log/sidlog
Create Flexible Permissions Hierarchies with POSIX ACLs #4
HACK
H A C K
#3
Scan for World- and Group-Writable Directories
Hack #3 Quickly scan for directories with loose permissions.World- and group-writable directories present a problem: if the users of a system have not set theirumasks properly, they will inadvertently create inse-cure files, completely unaware of the implications. With this in mind, it seems it would be good to scan for directories with loose permissions. As in
“Scan for SUID and SGID Programs”[Hack #2], this can be accomplished with afind command:
# find / -type d \( -perm -g+w -o -perm -o+w \) -exec ls -lad {} \;
Any directories that are listed in the output should have the sticky bit set, which is denoted by atin the directory’s permission bits. Setting the sticky bit on a world-writable directory ensures that even though anyone may cre-ate files in the directory, they may not delete or modify another user’s files. If you see a directory in the output that does not contain a sticky bit, con-sider whether it really needs to be world-writable or whether the use of
groups or ACLs[Hack #4]will work better for your situation. If you really do need the directory to be world-writable, set the sticky bit on it using chmod +t.
To get a list of directories that don’t have their sticky bit set, run this com-mand:
# find / -type d \( -perm -g+w -o -perm -o+w \) \ -not -perm -a+t -exec ls -lad {} \;
If you’re using a system that creates a unique group for each user (e.g., you create a userandrew, which in turn creates a group andrewas the primary group), you may want to modify the commands to not scan for group-writ-able directories. (Otherwise, you will get a lot of output that really isn’t per-tinent.) To do this, run the command without the-perm -g+w portion.
H A C K
#4
Create Flexible Permissions Hierarchies with POSIX
ACLs
Hack #4When Unix mode-based permissions just aren’t enough, use an ACL.
#4 Create Flexible Permissions Hierarchies with POSIX ACLs HACK
complexity of managing permissions. ACLs provide newways to apply file and directory permissions without resorting to the creation of unnecessary groups.
ACLs are stored as extended attributes within the filesystem metadata. As the name implies, they allowyou to define lists that either grant or deny access to a given file or directory based on the criteria you provide. How-ever, ACLs do not abandon the traditional permissions system completely. ACLs can be specified for both users and groups and are still separated into the realms of read, write, and execute access. In addition, a control list may be defined for any user or group that does not correspond to any of the other user or group ACLs, much like the “other” mode bits of a file.
Access control lists also have what is called an ACLmask, which acts as a permission mask for all ACLs that specifically mention a user and a group. This is similar to aumask, but not quite the same. For instance, if you set the ACL mask tor--, any ACLs that pertain to a specific user or group and are looser in permissions (e.g.,rw-) will effectively becomer--. Directories also may contain a default ACL, which specifies the initial ACLs of files and sub-directories created within them.
Enabling ACLs
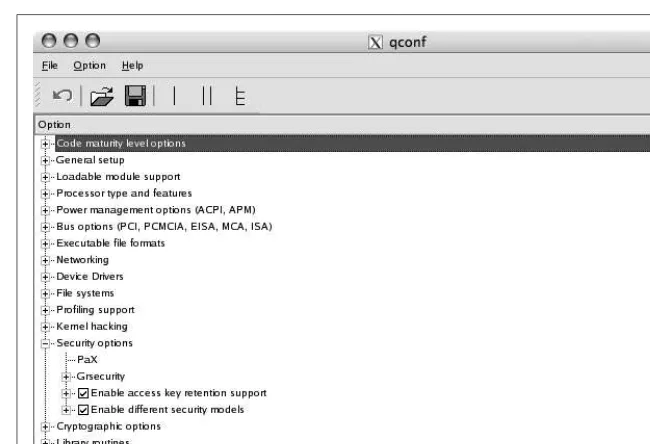
Most filesystems in common use today under Linux (Ext2/3, ReiserFS, JFS, and XFS) are capable of supporting ACLs. If you’re using Linux, make sure one of the following kernel configuration options is set, corresponding to the type of filesystem you’re using:
CONFIG_EXT2_FS_POSIX_ACL=y CONFIG_EXT3_FS_POSIX_ACL=y CONFIG_REISERFS_FS_POSIX_ACL=y CONFIG_JFS_POSIX_ACL=y CONFIG_FS_POSIX_ACL=y CONFIG_XFS_POSIX_ACL=y
To enable ACLs in FreeBSD, mount any filesystems you want to use them on with theacls mount option:
# mount -o acls -u /usr
# mount
/dev/ad0s1a on / (ufs, local) devfs on /dev (devfs, local)
/dev/ad0s1e on /tmp (ufs, local, soft-updates) /dev/ad0s1f on /usr (ufs, local, soft-updates, acls) /dev/ad0s1d on /var (ufs, local, soft-updates)
Create Flexible Permissions Hierarchies with POSIX ACLs #4
HACK
ACLs by using thenoaclsoption instead. To enable ACLs automatically at boot for a filesystem, modify the filesystem’s/etc/fstab entry to look like this:
/dev/ad0s1f /usr ufs rw,acls 2 2
Managing ACLs
Once they’ve been enabled, ACLs can be set, modified, and removed using thesetfaclcommand. To create or modify an ACL, use the-moption, fol-lowed by an ACL specification and a filename or list of filenames. You can delete an ACL by using the-x option and specifying an ACL or list of ACLs.
There are three general forms of an ACL: one for users, another for groups, and one for others. Let’s look at them here:
# User ACL u:[user]:<mode> # Group ACL g:[group]:<mode> # Other ACL o:<mode>
Notice that in user and group ACLs, the actual user and group names that the ACL applies to are optional. If these are omitted, it means that the ACL will apply to the base ACL, which is derived from the file’s mode bits. Thus, if you modify these, the mode bits will be modified, and vice versa.
See for yourself by creating a file and then modifying its base ACL:
$ touch myfile
$ ls -l myfile
-rw-rw-r-- 1 andrew andrew 0 Oct 13 15:57 myfile $ setfacl -m u::---,g::---,o:--- myfile
$ ls -l myfile
--- 1 andrew andrew 0 Oct 13 15:57 myfile
From this example, you can also see that multiple ACLs can be listed by sep-arating them with commas.
You can also specify ACLs for an arbitrary number of groups or users:
$ touch foo
$ setfacl -m u:jlope:rwx,g:wine:rwx,o:--- foo
$ getfacl foo
other::---#4 Create Flexible Permissions Hierarchies with POSIX ACLs HACK
Nowif you changed the mask to r--, the ACLs for jlopeand wine would effectively becomer-- as well:
$ setfacl -m m:r-- foo
$ getfacl foo
# file: foo # owner: andrew # group: andrew
user::rw-user:jlope:rwx #effective:r--
group::---group:wine:rwx #effective:r--
mask::r--
other::---As mentioned earlier, a directory can have a default ACL that will automati-cally be applied to files that are created within that directory. To designate an ACL as the default, prefix it with ad::
$ mkdir mydir
$ setfacl -m d:u:jlope:rwx mydir
$ getfacl mydir
# file: mydir # owner: andrew # group: andrew user::rwx group::--- other::---default:user::rwx default:user:jlope:rwx default:group::---default:mask::rwx default:other::---$ touch mydir/bar
$ getfacl mydir/bar
# file: mydir/bar # owner: andrew # group: andrew
user::rw-user:jlope:rwx #effective:rw-
group::--- mask::rw-
Protect Your Logs from Tampering #5
HACK
H A C K
#5
Protect Your Logs from Tampering
Hack #5Use file attributes to prevent intruders from removing traces of their break-ins.
In the course of an intrusion, an attacker will more than likely leave telltale signs of his actions in various system logs. This is a valuable audit trail that should be well protected. Without reliable logs, it can be very difficult to fig-ure out howthe attacker got in, or where the attack came from. This infor-mation is crucial in analyzing the incident and then responding to it by
contacting the appropriate parties involved[Hack #125]. However, if the break-in attempt is successful and the break-intruder gabreak-ins root privileges, what’s to stop him from removing the traces of his misbehavior?
This is where file attributes come in to save the day (or at least make it a lit-tle better). Both Linux and the BSDs have the ability to assign extra attributes to files and directories. This is different from the standard Unix permissions scheme in that the attributes set on a file apply universally to all users of the system, and they affect file accesses at a much deeper level than
file permissions or ACLs [Hack #4]. In Linux, you can see and modify the attributes that are set for a given file by using the lsattr andchattr com-mands, respectively. Under the BSDs, you can use ls -lo to viewthe attributes and usechflags to modify them.
One useful attribute for protecting log files is append-only. When this attribute is set, the file cannot be deleted, and writes are only allowed to append to the end of the file.
To set the append-only flag under Linux, run this command:
# chattr +a filename
Under the BSDs, use this:
# chflags sappnd filename
See howthe+aattribute works by creating a file and setting its append-only attribute:
# touch /var/log/logfile
# echo "append-only not set" > /var/log/logfile
# chattr +a /var/log/logfile
# echo "append-only set" > /var/log/logfile
bash: /var/log/logfile: Operation not permitted
The second write attempt failed, since it would overwrite the file. However, appending to the end of the file is still permitted:
# echo "appending to file" >> /var/log/logfile
# cat /var/log/logfile
#5 Protect Your Logs from Tampering HACK
Obviously, an intruder who has gained root privileges could realize that file attributes are being used and just remove the append-only flag from the logs by running chattr -a. To prevent this, you’ll need to disable the ability to remove the append-only attribute. To accomplish this under Linux, use its capabilities mechanism. Under the BSDs, use the securelevel facility.
The Linux capabilities model divides up the privileges given to the all-pow-erful root account and allows you to selectively disable them. To prevent a user from removing the append-only attribute from a file, you need to remove the CAP_LINUX_IMMUTABLE capability. When present in the running system, this capability allows the append-only attribute to be modified. To modify the set of capabilities available to the system, use a simple utility calledlcap (http://snort-wireless.org/other/lcap-0.0.6.tar.bz2.
To unpack and compile the tool, run this command:
# tar xvfj lcap-0.0.6.tar.bz2 && cd lcap-0.0.6 && make
Then, to disallow modification of the append-only flag, run:
# ./lcap CAP_LINUX_IMMUTABLE
# ./lcap CAP_SYS_RAWIO
The first command removes the ability to change the append-only flag, and the second command removes the ability to do rawI/O. This is needed so that the protected files cannot be modified by accessing the block device on which they reside. It also prevents access to/dev/memand/dev/kmem, which would provide a loophole for an intruder to reinstate the CAP_LINUX_ IMMUTABLE capability.
To remove these capabilities at boot, add the previous two commands to your system startup scripts (e.g.,/etc/rc.local). You should ensure that capa-bilities are removed late in the boot order, to prevent problems with other startup scripts. Once lcap has removed kernel capabilities, you can only reinstate them by rebooting the system.
The BSDs accomplish the same thing through the use of securelevels. The securelevel is a kernel variable that you can set to disallowcertain function-ality. Raising the securelevel to 1 is functionally the same as removing the two previously discussed Linux capabilities. Once the securelevel has been set to a value greater than 0, it cannot be lowered. By default, OpenBSD will raise the securelevel to 1 when in multiuser mode. In FreeBSD, the securelevel is –1 by default.
To change this behavior, add the following line to/etc/sysctl.conf:
Delegate Administrative Roles #6
HACK
Before doing this, you should be aware that adding append-only flags to your log files will most likely cause log rotation scripts to fail. However, doing this will greatly enhance the security of your audit trail, which will prove invaluable in the event of an incident.
H A C K
#6
Delegate Administrative Roles
Hack #6Let others do your work for you without giving away root privileges.
Thesudoutility can help you delegate some system responsibilities to other people, without having to grant full root access.sudois a setuid root binary that executes commands on an authorized user’s behalf, after she has entered her current password.
As root, run/usr/sbin/visudoto edit the list of users who can callsudo. The defaultsudolist looks something like this:
root ALL=(ALL) ALL
Unfortunately, many system administrators tend to use this entry as a tem-plate and grant unrestricted root access to all other admins unilaterally:
root ALL=(ALL) ALL rob ALL=(ALL) ALL jim ALL=(ALL) ALL david ALL=(ALL) ALL
While this may allow you to give out root access without giving away the root password, this method is truly useful only when all of thesudo users can be completely trusted. When properly configured, the sudoutility pro-vides tremendous flexibility for granting access to any number of com-mands, run as any arbitrary user ID (UID).
The syntax of thesudo line is:
user machine=(effective user) command
The first column specifies thesudouser. The next column defines the hosts in which thissudoentry is valid. This allows you to easily use a singlesudo
configuration across multiple machines.
For example, suppose you have a developer who needs root access on a development machine, but not on any other server:
peter beta.oreillynet.com=(ALL) ALL
The next column (in parentheses) specifies the effective user who may run the commands. This is very handy for allowing users to execute code as users other than root:
#6 Delegate Administrative Roles HACK
Finally, the last column specifies all of the commands that this user may run:
david ns.oreillynet.com=(bind) /usr/sbin/rndc,/usr/sbin/named
If you find yourself specifying large lists of commands (or, for that matter, users or machines), take advantage of sudo’s alias syntax. An alias can be used in place of its respective entry on any line of thesudoconfiguration:
User_Alias ADMINS=rob,jim,david User_Alias WEBMASTERS=peter,nancy Runas_Alias DAEMONS=bind,www,smmsp,ircd
Host_Alias WEBSERVERS=www.oreillynet.com,www.oreilly.com,www.perl.com Cmnd_Alias PROCS=/bin/kill,/bin/killall,/usr/bin/skill,/usr/bin/top Cmnd_Alias APACHE=/usr/local/apache/bin/apachectl
WEBMASTERS WEBSERVERS=(www) APACHE ADMINS ALL=(DAEMONS) ALL
It is also possible to specify a system group instead of a user, to allowany user who belongs to that group to execute commands. Just prefix the group name with a%, like this:
%wwwadmin WEBSERVERS=(www) APACHE
Nowany user who is part of thewwwadmingroup can executeapachectlas thewww user on any of the web server machines.
One very useful feature is theNOPASSWD:flag. When present, the user won’t have to enter a password before executing the command. For example, this will allow the userrobto executekill,killall,skill, andtopon any machine, as any user, without entering a password:
rob ALL=(ALL) NOPASSWD: PROCS
Finally,sudocan be a handy alternative tosufor running commands at star-tup out of the systemrc files:
(cd /usr/local/mysql; sudo -u mysql ./bin/safe_mysqld &) sudo -u www /usr/local/apache/bin/apachectl start
For that to work at boot time, the default lineroot ALL=(ALL)ALLmust be present.
Usesudowith the usual caveats that apply to setuid binaries. Particularly if you allowsudoto execute interactive commands (like editors) or any sort of compiler or interpreter, you should assume that it is possible that thesudo
user will be able to execute arbitrary commands as the effective user. Still, under most circumstances this isn’t a problem, and it’s certainly preferable to giving away undue access to root privileges.
Automate Cryptographic Signature Verification #7
HACK
H A C K
#7
Automate Cryptographic Signature Verification
Hack #7 Use scripting and key servers to automate the chore of checking software authenticity.One of the most important things you can do for the security of your system is to make yourself familiar with the software you are installing. You proba-bly will not have the time, knowledge, or resources to go through the source code for all of the software that you install. However, verifying that the soft-ware you are compiling and installing is what the authors intended can go a long way toward preventing the widespread distribution of Trojan horses. Recently, Trojaned versions of several pivotal pieces of software (such as
tcpdump,libpcap,sendmail, and OpenSSH) have been distributed. Since this is an increasingly popular attack vector, verifying your software is critically important.
Why does this need to be automated? It takes little effort to verify software before installing it, but either through laziness or ignorance, many system administrators overlook this critical step. This is a classic example of “false” laziness, since it will likely lead to more work for the sysadmin in the long run.
This problem is difficult to solve, because it relies on the programmers and distributors to get their acts together. Then there’s the laziness aspect. Soft-ware packages often don’t even come with a signature to use for verifying the legitimacy of what you’ve downloaded, and even when signatures are provided with the source code, to verify the code you must hunt through the software provider’s site for the public key that was used to create the signa-ture. After finding the public key, you have to download it, verify that the key is genuine, add it to your keyring, and finally check the signature of the code.
Here is what this would look like when checking the signature for Version 1.3.28 of the Apache web server using GnuPG (http://www.gnupg.org):
# gpg -import KEYS
# gpg -verify apache_1.3.28.tar.gz.asc apache_1.3.28.tar.gz
gpg: Signature made Wed Jul 16 13:42:54 2003 PDT using DSA key ID 08C975E5 gpg: Good signature from "Jim Jagielski <[email protected]>"
gpg: aka "Jim Jagielski <[email protected]>" gpg: aka "Jim Jagielski <[email protected]>" gpg: WARNING: This key is not certified with a trusted signature! gpg: There is no indication that the signature belongs to the owner.
#7 Automate Cryptographic Signature Verification HACK
As you can see, it’s not terribly difficult to do, but this step is often over-looked when people are in a hurry. This is where this hack comes to the res-cue. We’ll use a little bit of shell scripting and what are known askey servers
to reduce the number of steps required to perform the verification process.
Key servers are a part of a public-key cryptography infrastructure that allows you to retrieve keys from a trusted third party. A nice feature of GnuPG is its ability to query key servers for a key ID and to download the result into a local keyring. To figure out which key ID to ask for, we rely on the fact that the error message generated by GnuPG tells us which key ID it was unable to find locally when trying to verify the signature.
In the previous example, if the key that GnuPG was looking for had not been imported prior to verifying the signature, it would have generated an error like this:
gpg: Signature made Wed Jul 16 13:42:54 2003 PDT using DSA key ID 08C975E5 gpg: Can't check signature: public key not found
The following script takes advantage of that error:
#!/bin/sh
VENDOR_KEYRING=vendors.gpg KEYSERVER=search.keyserver.net
KEYID="0x`gpg --verify $1 $2 2>&1 | grep 'key ID' | awk '{print $NF}'`" gpg --no-default-keyring --keyring $VENDOR_KEYRING --recv-key \ --keyserver $KEYSERVER $KEYID
gpg --keyring $VENDOR_KEYRING --verify $1 $2
The first line of the script specifies the keyring in which the result from the key server query will be stored. You could use pubring.gpg (which is the default keyring for GnuGP), but using a separate file will make managing vendor public keys easier. The second line of the script specifies which key server to query (the script usessearch.keyserver.net; another good one ispgp. mit.edu). The third line attempts (and fails) to verify the signature without first consulting the key server. It then uses the key ID it sawin the error, prepending an0xin order to query the key server on the next line. Finally, GnuPG attempts to verify the signature and specifies the keyring in which the query result was stored.
This script has shortened the verification process by eliminating the need to search for and import the public key that was used to generate the signa-ture. Going back to the example of verifying the Apache 1.3.28 source code, you can see howmuch more convenient it is nowto verify the package’s authenticity:
# checksig apache_1.3.28.tar.gz.asc apache_1.3.28.tar.gz
gpg: requesting key 08C975E5 from HKP keyserver search.keyserver.net gpg: key 08C975E5: public key imported
Check for Listening Services #8
HACK
gpg: imported: 1 gpg: Warning: using insecure memory!
gpg: please see http://www.gnupg.org/faq.html for more information gpg: Signature made Wed Jul 16 13:42:54 2003 PDT using DSA key ID 08C975E5 gpg: Good signature from "Jim Jagielski <[email protected]>"
gpg: aka "Jim Jagielski <[email protected]>" gpg: aka "Jim Jagielski <[email protected]>" gpg: checking the trustdb
gpg: no ultimately trusted keys found
gpg: WARNING: This key is not certified with a trusted signature! gpg: There is no indication that the signature belongs to the owner.
Fingerprint: 8B39 757B 1D8A 994D F243 3ED5 8B3A 601F 08C9 75E5
This small, quick script has reduced both the number of steps and the amount of time needed to verify a source package. As with any good shell script, it should help you to be lazy in a good way: by doing more work properly, but with less effort on your part.
H A C K
#8
Check for Listening Services
Hack #8Find out whether unneeded services are listening and looking for possible backdoors.
One of the first things you should do after a fresh operating system install is see what services are running and remove any unneeded services from the system startup process. You could use a port scanner (such asNmap [Hack #66]) and run it against the host, but if one didn’t come with the operating system install, you’ll likely have to connect your fresh (and possibly inse-cure) machine to the network to download one.
Also, Nmap can be fooled if the system is using firewall rules. With proper firewall rules, a service can be completely invisible to Nmap unless certain criteria (such as the source IP address) also match. When you have shell access to the server itself, it is usually more efficient to find open ports using programs that were installed with the operating system. One option is
netstat, a program that will display various network-related information and statistics.
To get a list of listening ports and their owning processes under Linux, run this command:
# netstat -luntp
Active Internet connections (only servers)
Proto Recv-Q Send-Q Local Address Foreign Address State PID/Program name tcp 0 0 0.0.0.0:22 0.0.0.0:* LISTEN 1679/sshd udp 0 0 0.0.0.0:68 0.0.0.0:* 1766/dhclient
#8 Check for Listening Services HACK
remote access. The ports in use are listed after the colon in theLocal Address
column (22forsshdand68fordhclient). The absence of any other listening processes means that this is probably a workstation, not a network server. Unfortunately, the BSD version ofnetstatdoes not let us list the processes and the process IDs (PIDs) that own the listening port. Nevertheless, the BSDnetstat command is still useful for listing the listening ports on your system.
To get a list of listening ports under FreeBSD, run this command:
# netstat -a -n | egrep 'Proto|LISTEN'
Proto Recv-Q Send-Q Local Address Foreign Address (state) tcp4 0 0 *.587 *.* LISTEN tcp4 0 0 *.25 *.* LISTEN tcp4 0 0 *.22 *.* LISTEN tcp4 0 0 *.993 *.* LISTEN tcp4 0 0 *.143 *.* LISTEN tcp4 0 0 *.53 *.* LISTEN
Again, the ports in use are listed in theLocal Addresscolumn. Many sea-soned system administrators have memorized the common port numbers for popular services and will be able to see at a glance that this server is running SSHD, SMTP, DNS, IMAP, and IMAP+SSL services. If you are ever in doubt about which services typically run on a given port, either eliminate the-n
switch from thenetstatcommand (which tellsnetstatto use names but can take much longer to run when looking up DNS addresses) or manuallygrep
the/etc/services file:
# grep -w 993 /etc/services
imaps 993/udp # imap4 protocol over TLS/SSL imaps 993/tcp # imap4 protocol over TLS/SSL
The/etc/servicesfile should only be used as a guide. If a process is listening on a port listed in the file, it doesn’t necessarily mean that the service listed in/etc/servicesis what it is providing.
Also notice that, unlike in the output ofnetstaton Linux, with the BSD ver-sion you don’t get the PIDs of the daemons themselves. You might also notice that no UDP ports were listed for DNS. This is because UDP sockets do not have aLISTENstate in the same sense that TCP sockets do. In order to display UDP sockets, you must add udp4 to the argument for egrep, thus making it'Proto|LISTEN|udp4'. However, due to the way UDP works, not all UDP sockets will necessarily be associated with a daemon process.
Under FreeBSD, there is another command that will give us just what we want. Thesockstatcommand performs only a small subset of whatnetstat
Prevent Services from Binding to an Interface #9
HACK
To get a list of listening ports and their owning processes withsockstat, run this command:
# sockstat -4 -l
USER COMMAND PID FD PROTO LOCAL ADDRESS FOREIGN ADDRESS root sendmail 1141 4 tcp4 *:25 *:*
root sendmail 1141 5 tcp4 *:587 *:* root sshd 1138 3 tcp4 *:22 *:* root inetd 1133 4 tcp4 *:143 *:* root inetd 1133 5 tcp4 *:993 *:* named named 1127 20 tcp4 *:53 *:* named named 1127 21 udp4 *:53 *:* named named 1127 22 udp4 *:1351 *:*
Once again, you can see that SSHD, SMTP, DNS, IMAP, and IMAP+SSL services are running, but nowyou have the process that owns the socket plus its PID. You can nowsee that the IMAP services are being spawned frominetdinstead of standalone daemons, and thatsendmailandnamedare providing the SMTP and DNS services.
For most other Unix-like operating systems, you can use thelsofutility (http: //ftp.cerias.purdue.edu/pub/tools/unix/sysutils/lsof/).lsofis short for “list open files” and, as the name implies, it allows you to list files that are open on a system, in addition to the processes and PIDs that have them open. Since sockets and files work the same way under Unix,lsofcan also be used to list open sockets. This is done with the-i command-line option.
To get a list of listening ports and the processes that own them usinglsof, run this command:
# lsof -i -n | egrep 'COMMAND|LISTEN'
COMMAND PID USER FD TYPE DEVICE SIZE/OFF NODE NAME
named 1127 named 20u IPv4 0xeb401dc0 0t0 TCP *:domain (LISTEN) inetd 1133 root 4u IPv4 0xeb401ba0 0t0 TCP *:imap (LISTEN) inetd 1133 root 5u IPv4 0xeb401980 0t0 TCP *:imaps (LISTEN) sshd 1138 root 3u IPv4 0xeb401760 0t0 TCP *:ssh (LISTEN) sendmail 1141 root 4u IPv4 0xeb41b7e0 0t0 TCP *:smtp (LISTEN) sendmail 1141 root 5u IPv4 0xeb438fa0 0t0 TCP *:submission (LISTEN)
Again, you can change the argument toegrepto display UDP sockets. How-ever, this time use UDP instead of udp4, which makes the argument
'COMMAND|LISTEN|UDP'. As mentioned earlier, not all UDP sockets will neces-sarily be associated with a daemon process.
H A C K
#9
Prevent Services from Binding to an Interface
Hack #9 Keep services from listening on a port instead of firewalling them.#9 Prevent Services from Binding to an Interface HACK
specific interface as opposed to all available interfaces. You can do this by using the Listen directive in your configuration file and specifying the IP address of the interface:
Listen 192.168.0.23:80
If you useVirtualHostentries, you can specify interfaces to bind to on a per-virtual-host basis:
<VirtualHost 192.168.0.23> ...
</VirtualHost>
You might even have services that are listening on a TCP port but don’t need to be. Database servers such as MySQL are often used in conjunction with Apache and are frequently set up to coexist on the same server when used in this way. Connections that come from the same machine that MySQL is installed on use a domain socket in the filesystem for communica-tions. Therefore, MySQL doesn’t need to listen on a TCP socket. To keep it from listening, you can either use the --skip-networking command-line option when starting MySQL or specify it in the [mysqld] section of your
my.cnf file:
[mysqld] ...
skip-networking ...
Another program that you’ll often find listening on a port is your X11 server, which listens on TCP port 6000 by default. This port is traditionally used to enable remote clients to connect to your X11 server so they can drawtheir windows and accept keyboard and mouse input; however, with the advent of SSH and X11 forwarding, this really isn’t needed anymore. With X11 for-warding enabled inssh, any client that needs to connect to your X11 server will be tunneled through your SSH connection and will bypass the listening TCP port when connecting to your X11 server.
To get your X Windows server to stop listening on this port, all you need to do is add-nolisten tcpto the command that is used to start the server. This can be tricky, though—figuring out which file controls how the server is started can be a daunting task. Usually, you can find what you’re looking for in/etc/X11.
If you’re usinggdm, opengdm.conf and look for a line similar to this one:
command=/usr/X11R6/bin/X