v
Contents at a Glance
About the Author ...xi
About the Technical Reviewer ...xiii
Acknowledgments ... xv
Introduction ... xvii
Chapter 1: Introducing WinRT
■
...1
Chapter 2: Building WinRT Components
■
...11
Chapter 3: Building a .NET App with WinRT
■
...29
Chapter 4: Reaching Beyond the App
■
...47
Appendix: WinRT Resources
■
...69
Index
■
...71
Introduction
Windows 8 provides a new and exciting platform for developers. This coming version of Windows promises to run on new hardware, such as tablets, as well as existing laptops and desktops. Microsoft has developed a new layer for accessing and leveraging system resources, including the operating system services. The new Windows Runtime (WinRT) is this layer.
Who Is This Book For?
This book is an introduction to WinRT. With the Windows Runtime being so new, developers of all experience ranges can benefit from this introduction. This book demonstrates how to build Windows 8 Metro style apps, specifically focusing on WinRT.
How This Book Is Structured
There are only four chapters in this book, but each one is packed with information designed to get developers familiar with WinRT.
This short book begins with an overview of WinRT in the first chapter, which explains what WinRT is and answers common questions developers have about the Windows Runtime.
The following chapter demonstrates coding with WinRT. The first examples start simple and show how WinRT components are built.
The final two chapters focus on building Metro style apps. The developer builds apps that use WinRT components to interface with the user. They also extend their app to interact with other apps.
Downloading the Code
1
Introducing WinRT
The fact that you are reading this means you know that Windows 8 is coming, and that this is a big deal. Microsoft Windows is changing, and developers need to be ready. While Windows will continue to provide an environment for the current methods of development, Microsoft is introducing a new environment. This one is focused on apps rather than on programs, and on mobile devices with touch interfaces rather than on desktops and laptops.
With these changes in design and approach to development, Microsoft has also introduced a new way for software to access system resources. The OS will be running on new types of devices with new ways for the user to interact with the software. The industry’s entire approach to developing consumer-based software is changing. Microsoft recognized the need for a different way to expose the OS functionality to developers. Windows 8 needs a new layer for Metro apps. This layer is the Windows Runtime, or WinRT.
To introduce WinRT, the following topics will be addressed in this chapter: What WinRT is
•
What WinRT is not
•
How WinRT works
•
WinRT and the user experience
•
Asynchronous by nature
•
The WinRT API
•
What Is WinRT?
Search the Internet for “WinRT” and you will find that developers all over the Web are asking this very question. Many blogs and websites have attempted to answer this question. Several do a great job, but it can get confusing as answers begin to contradict each other. Is WinRT based on COM? Is WinRT just .NET? Does WinRT kill Silverlight? This book addresses the primary question, “What is WinRT?” In doing so, it answers these other questions as well. The purpose of this book is to help developers understand WinRT and how they leverage it for their development. How big is the “learning curve” for this thing? It is not as difficult as you may think. You will see some examples of coding with WinRT and can follow along yourself with the downloadable sample code. When you finish this book, WinRT will no longer be a mystery.
MSDN describes WinRT as “a straightforward set of APIs used to build Metro style apps.” It is a new framework or programming model for building Metro software. This is how Windows 8 exposes the system services to the apps installed and running on the machine. This includes the display. UI development uses Extensible Application Markup Language (XAML) components, which are part of WinRT. These APIs are available to developers in many supported languages:
C#
•
Visual Basic
•
C++
•
JavaScript
•
Figure 1-1 was shown at the 2011 Build conference, when Microsoft introduced Windows 8 development. The WinRT APIs are consumed directly from the various languages used to write Metro style apps. There are other layers that make this work, but the developer does not need to worry about them. Those layers are handled by Visual Studio or Windows 8. What those layers are and how they make this all work is discussed a little later in the chapter. From the perspective of writing code, Figure 1-1 shows how the multiple supported languages can directly interact with WinRT components.
Figure 1-1. Windows 8 Platform and Tools diagram
Tip
■
The Windows 8 Platform and Tools diagram has been widely discussed on the Internet. Many developers
feel it lacks certain details as an architectural diagram. For more discussion on this diagram, visit
http://dougseven.
com/2011/09/15/a-bad-picture-is-worth-a-thousand-long-discussions
.
As you can see in the diagram, all Metro style apps rely on WinRT for access to the system resources. This includes everything from interfaces to display, devices to storage. The reliance upon WinRT is direct. Developers in all languages can call WinRT components directly in a seamless manner. Developers will need to understand WinRT to successfully design and build Metro apps for Windows 8.
What WinRT Is Not
For general clarification, it may be helpful to provide an up-front explanation of what WinRT is not:
3
WinRT is not cross-platform: Windows uses the Windows Runtime to expose systemservices. When your app uses the WinRT APIs, it does so to access those Windows services. Therefore, WinRT is not used in any other context. It is used in Windows apps for Windows devices.
WinRT is not based on Win32: WinRT replaces Win32 for Metro development. This is a new execution layer, and the programming model is very different from Win32. Don’t worry, though, because Win32 is still included in Windows 8. Thus, legacy software will continue to work.
Note
■
WinRT is written in C++ and has been designed as object-oriented. The support of reflection provides
efficiency to dynamic languages such as JavaScript.
How Does WinRT Work?
To develop Windows 8 apps, you must move away from Win32. However, everything developed prior to now has been built on Win32. Developers have been investing in Windows Forms, Windows Presentation Foundation (WPF), and Silverlight, which are all based on Win32. Now developers have to change to WinRT? Yet, Microsoft says they can still use the skills they have learned? How is this possible? This section provides the answers.
Projections
The WinRT APIs are native, meaning they are written in C++ and compiled to binaries run against the core Windows services. There is no Common Language Runtime (CLR) or other type of interpreter in the middle. In the past, using native components has not been a pleasant experience for developers. Heavy use of COM was required to get to native components. With WinRT, Microsoft has changed this.
Microsoft supports multiple languages for app development in Windows 8. Microsoft also wanted to make accessing the core Windows services as simple as possible. For this purpose, Microsoft has provided language
projections.
Projections expose a WinRT component to a particular language in a way that fits that language. The syntax for accessing a WinRT component looks just like the syntax for accessing any other component written in that same language. For example, writing a C# app uses C# syntax to access WinRT components:
var picker = new Windows.Storage.Pickers.FileOpenPicker(); picker.FileTypeFilter.Add(".jpg");
await picker.PickSingleFileAsync();
Writing a JavaScript app uses JavaScript syntax to access WinRT components:
var picker = new Windows.Storage.Pickers.FileOpenPicker; picker.fileTypeFilter.append(".jpg");
picker.pickSingleFileAsync().then();
Even native apps use projections, and working with WinRT components feels just like working with any other C++ API:
auto picker = ref Windows::Storage::Pickers::FileOpenPicker(); picker->FileTypeFilter->Append(".jpg");
auto asyncObj = picker->PickSingleFileAsync(); asyncObj->Start();
Microsoft has provided the mapping to make this work. This allows developers to consume WinRT components in a natural way.
This level of accessibility remains true as you design and develop your own components based on WinRT. These custom components can be consumed in any of the supported languages.
Windows Metadata
By nature, native components do not include metadata in their files. Microsoft, however, needed metadata to make WinRT’s design work. Enter Windows Metadata (WinMD). Every WinRT component has a WinMD file associated with it. This file contains all of the information needed by the operating system and other software to access this component. Microsoft uses the same format (ECMA-335) for this new type of file that it uses in the .NET framework.
Note
■
When you build a Windows Runtime component, Visual Studio will generate a .winmd file that is created
and registered on the machine. WinRT component information is entered into the Windows Registry when it is
installed on the machine.
When these WinRT components are accessed by software of different languages, the Windows Metadata is what makes all of this work. First, Visual Studio uses the metadata to populate IntelliSense to enhance the development experience and provide the necessary details during design time. Second, the different languages access the WinMD file for the information they need to bind the component at the appropriate time.
Note
■
The WinMD files can be found in the Windows\System32\WinMetaData folder. They are all stored here by
Windows 8. These files can be inspected using the ILDASM tool.
Support Languages and WinMD
The WinMD files allow the supported languages to use the WinRT components. This involves projection, as described earlier, but how exactly does this work? WinRT works with native code, the CLR, and dynamic code. Figure 1-2 depicts how each language accesses the Windows Metadata.
WinRT Component
C++ App Compile Time
Projection
Projection
Projection
Compile Time
Runtime
Runtime
C#/VB App
HTML/JavaScript App Windows
Metadata
5
When building Metro style apps in C++, the compiler accesses Windows Metadata–based projections and builds the necessary binaries as part of the app. The metadata is not accessed again during runtime. The app has all of the information it needs for successful execution.
When building Metro style apps in C# or Visual Basic, the CLR accesses the Windows Metadata at compile time. Where .NET apps differ from native apps is in the fact that .NET apps also access the metadata at runtime. Microsoft claims these calls are negligible and will not affect performance.
JavaScript is a dynamic language, so everything is compiled and bound at runtime. The Chakra engine uses the Windows Metadata during this process, making the installed WinRT components available to the Metro style apps written in JavaScript.
Windows Metadata ensures that all WinRT components are accessible to all apps running in Windows 8, regardless of the language in which they were written. This accessibility is extended into design time as developers build their apps using these WinRT components.
Note
■
Windows 8 includes a runtime broker service that ensures that apps have the proper permissions to
access resources. Many calls will run directly against the Windows Kernel Services, but some, such as file pickers,
will be caught by the broker service and prompt the user for permission.
Building the User Experience
When it comes to developing the user experience for Windows 8 (see Figure 1-3), developers have two choices: XAML or HTML5. XAML is used by .NET and C++ developers, while HTML5 pairs with JavaScript.
Figure 1-3. Windows 8 Start screen
XAML
XAML controls are actually part of WinRT. Windows Forms and WPF controls are based on Win32, so they will not run in the Metro space. WinRT includes all new controls. Developers using C++ will now use XAML to build the UI for apps. Silverlight and WPF developers will carry forward their knowledge into a familiar design experience.
XAML is a nice markup language for developing the UI for an application. Many developers have certainly found themselves building the UI by writing the XAML by hand. Most developers prefer tools, and Microsoft delivers. Expression Blend has been around for many years as a designer tool for building the UI and generating the XAML for further development. Designers and developers will continue to have access to Blend for Windows 8 Metro development. The Visual Studio 11 Beta download includes the next version of Blend for this purpose.
HTML5
Windows 8 fully supports using HTML5/CSS3 for the presentation layer of your apps. That is an interesting thought. Maybe you are thinking of Windows 8 running on a tablet, similar to an iPad, and the thought of HTML rendering the UI is not a big deal. But Windows 8 runs on laptops and PCs as well. The thought of an HTML UI for a “desktop” experience is new and interesting. This is not web development. This is PC development.
Developers with HTML and CSS3 skills can bring what they already know to Windows app development. JavaScript directly uses WinRT, so no new syntax or language needs to be introduced. To make the jump to the Metro design a bit easier, Microsoft offers JavaScript and CSS for use in your projects.
WinRT apps using HTML will not run in a browser. They are meant for the Windows 8 experience only. While that is somewhat of a shift in thought, it can also be a freeing concept. The idea of using HTML and CSS3 together with JavaScript to build a clean and fast app without struggling against the issues introduced by the browser environment is a nice thought indeed.
Blend for HTML
Microsoft delivers the power of Expression Blend to the world of HTML. If you have used Blend in the past, you understand that this is no small deal. If you have not used Blend, you may be thinking you do not need another design editor. In fact, you may have long ago abandoned WYSIWYG editors for HTML and manually code your UI by hand. Believe this, Blend is not just an HTML editor.
Blend for HTML allows you to work with your application UI written in HTML together with your JavaScript controls and CSS styles. The design surface within Blend actually runs your JavaScript code. Even if you create some of the UI elements in code, your UI will be rendered properly on the screen.
You can even work with your app with an interactive mode. This allows you to “use” your app and bring the UI to the state you need to access.
Asynchronous by Nature
7
While Silverlight developers may be familiar with asynchronous design, the typical desktop programmer may not be. In the world of Windows 8, synchronous programming just will not work. The Metro style is not only a look, but a certain feel as well. Microsoft describes it as “fast and fluid.” Expectations are high.
WinRT ensures that apps remain responsive to the user at all times. In the past, synchronous programming was preferred because it was so much simpler. Writing async code meant more complexity in design and in programming. Now, however, languages like C# and VB support the await/async pattern. C++ uses lambdas; JavaScript uses promises and then(). Asynchronous programming is made simple. There is still a shift in one’s mindset that must occur, but the syntax and process handling has been simplified.
Note
■
Multithreading in WinRT is still available in the System.Threading namespace. The expectation, however, is
that most developers will use the asynchronous methods discussed here because they will be sufficient for most UI
and application needs.
Despite what you may be thinking, forcing developers into the asynchronous model is a good thing. You will explore this in more detail in later chapters.
Developers are content providers. You build the apps and websites that consumers desire to use. Developing
that content requires many specialized tools and functionality. Pure consumers are not like developers. The
needs they have from their machines are much simpler. Think of the machine you would build for yourself
versus the machine you would build for your grandparents or for your neighbor who simply wants to surf the
Internet a bit and check e-mail. Your consumer friends and family do not need much power. Their PCs are
not required to work hard, and most of the functionality from whatever operating system they use remains
unused.
Devices like tablets and smartphones take advantage of this difference. Check the specs of your
development machine against those of the iPad. In all likelihood, the machine you once used that is now
sitting in the corner has more processing power than the vastly popular iPad. However, the consumer simply
does not care. Websites load quickly, e-mail appears smoothly, and the touch interface blows everything else
out of the proverbial water.
It is with this understanding that Microsoft provides the development environment for consumer apps. The
full power of Windows Core Services is not needed for consumer apps. In fact, successful apps require
streamlining their foundation to maintain performance and usability over time. The desktop experience is
still available, and Windows 8 will run on powerful machines. Content providers can still take advantage of
Windows 8, but the Metro experience is designed for consumers.
When designing apps for Windows 8, you must keep this in mind as well. You will build apps for consumers
when using WinRT. Otherwise, you are most likely building software for providers or enterprise users. Metro
style development is not aimed at those scenarios. WinRT exposes only the services needed for a great
consumer experience.
the Consumer mindset
The WinRT API
Much of the functionality available in WinRT was previously available in .NET. For the Metro context, Microsoft moved that functionality into WinRT. The functionality has not actually been removed from .NET. For contexts outside of Metro development, the full range of .NET is available.
Some .NET developers will not agree with this move. The way they have been doing something for the past 10 years is now different. However, one benefit is that it can now be done from other languages outside of .NET. This is an attractive feature for Microsoft to offer.
Note
■
WinRT applications run in a sandbox. Each app is isolated and is only allowed to access what WinRT
allows. With this in mind, many of the changes Microsoft introduced in WinRT make sense.
So what is in WinRT? What exactly does it expose? Take a look at the top namespaces in the WinRT API: Windows.ApplicationModel
Windows.Data Windows.Devices Windows.Foundation Windows.Globalization Windows.Graphics Windows.Management Windows.Media Windows.Networking Windows.Security Windows.Storage Windows.System Windows.UI Windows.Web
The list is not long, but can you see the focus on the user experience here? WinRT provides exposure to the system services needed in consumer-based app development.
Tip
■
For more information regarding the full WinRT API, visit
http://msdn.microsoft.com/en-us/library/ windows/
apps/br211377.aspx
.
9
The functionality that was not moved is still mostly accessible in .NET. Metro development works similar to a .NET profile, exposing only those namespaces that are allowed and supported. This is similar to how Silverlight uses a specific .NET profile and only exposes what is allowed and supported for that context.
Summary
Windows 8 is designed with the consumer in mind. WinRT provides the access to the system resources to build great consumer-focused Metro apps. First-class support is given to .NET, HTML/JavaScript, and C++ for app development.
WinRT exposes the system resources in a way that is natural for the developer in their language of choice. Now it is time to get into some code. The rest of the chapters in this book focus on developing with WinRT, using example code to show how things work.
Get out your Windows 8 development machine, or at least start up Visual Studio 11 Beta, and get ready to dive into WinRT.
Building WinRT Components
Reading about WinRT can be very helpful. Watching online videos or attending conferences to learn about WinRT can also be helpful. However, there is nothing like working through code yourself to learn how it works
and figure out how to make it fit your needs. In this chapter you will
Build a simple WinRT component using C# •
Consume your simple WinRT component in your JavaScript app •
Note
■
The projects in this book were written using Visual Studio 11 Beta on a laptop with Windows 8 Consumer
Preview installed. All apps were tested by running them directly on the laptop, when possible. You may also choose
to run your apps in the emulator included in Visual Studio 11 Beta.
First, the Ground Rules
In this chapter, you will build a WinRT component using Visual C#. When using .NET to build WinRT components, there are four rules that must be followed:
1. API signatures must only use WinRT types.
2. Structs can only have public data fields.
3. All types must be sealed (except for XAML).
4. Only system-provided generic types are supported.
As discussed in Chapter 1, all WinRT components may be used by any of the supporting languages. This is not true for pure .NET components. So the preceding rules must be followed to develop a WinRT component using .NET. It is very surprising that there are only four of these rules. You will see how these rules apply in the sample code later in this chapter. However, WinRT type mapping needs some introduction.
Type Mapping
12
Most of the time, type mapping occurs automatically and the developer does not need to be concerned. However, when building a WinRT component and the return types can only be WinRT types, these type maps need to be considered.
Create a Simple JavaScript App
To demonstrate how WinRT components are built and used, you will create a simple JavaScript app that will consume a WinRT component written in Visual C#.
Create the Solution
You first need to create the project and solution.
1. Start Visual Studio 11 Beta on your Windows 8 development machine.
2. Create a new project and select the JavaScript Windows Metro style template, as shown in Figure 2-1.
3. Name the project Chapter02_WinRT_Components and choose a location on your machine.
4. Click OK.
Now the JavaScript project is created, along with the entire solution. While JavaScript apps are fascinating, they are not the focus of this book. So leave the JavaScript app alone for a bit.
Build a Simple WinRT Component
Now you will add a second project for the Visual C# WinRT component.
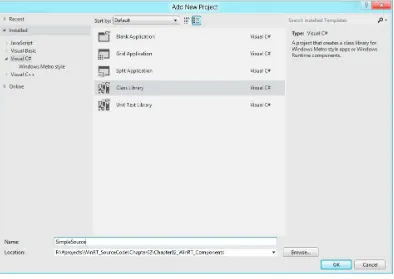
1. Right-click the solution and click Add ➤ New Project, as shown in Figure 2-2. Table 2-1. WinRT to .NET Type Mapping
.NET Framework
Windows Runtime
IEnumerable<T> IIterable<T>
IEnumerator<T> IIterator<T>
IList<T> IVector<T>
IReadOnlyList<T> IVectorView<T>
IDictionary<TKey, TValue> IMap<K, V>
IReadOnlyDictionary<TKey, TValue> IMapView<K, V>
IEnumerable IBindableIterable
IList IBindableVector
14
2. Select the Visual C# Class Library template and name the project SimpleSource. Click OK when your screen appears similar to Figure 2-3.
Figure 2-3. Adding a class library to the project for the WinRT component
3. Add a class named SimpleData and enter the code from Listing 2-1.
Listing 2-1. SimpleData.cs
using System;
using System.Collections.Generic; using System.Linq;
using System.Text;
using System.Threading.Tasks;
namespace SimpleSource {
public sealed class SimpleData {
public string appTitle { get { return "WinRT Revealed Sample app"; }} }
}
This is an extremely simple class. The single property returns the title of the app as a string. Even in this very simple example, there are a couple of important things to notice:
No Windows namespaces: The WinRT controls and components provided by
Microsoft are all found in the Windows namespace. For this component, no Windows namespaces were used. This simply means that this component does not consume other WinRT components, but it still is one itself.
Public sealed class: Every class must be a public sealed class to compile into a WinRT component.
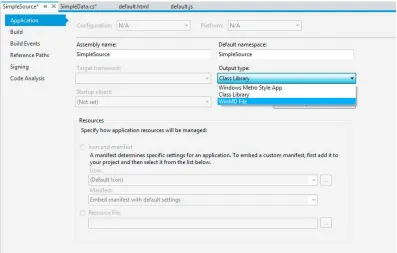
The code is written and the project will build successfully. However, the output will be a .dll file. For WinRT components, you need a .winmd file. You need to change the output type to WinMD File to accomplish this.
4. Right-click the SimpleSource project and click Properties. Select WinMD File from the Output type drop-down list, as shown in Figure 2-4.
Figure 2-4. Changing the project output type to WinMD
5. Right-click the SimpleSource project and click Build to ensure everything is ready for use in the app.
Finish the JavaScript App
Now the WinRT component is ready for use. First, you must add a reference to the JavaScript project to the SimpleSource project.
16
2. Select the SimpleSource reference from the Solution Projects list, as shown in Figure 2-6.
Figure 2-6. Adding a project reference to the JavaScript project Figure 2-5. Adding a reference to the JavaScript project
All of the changes for this app will be on the main HTML page. You will add the JavaScript code directly to this file for simplicity. In a production-level app, you would typically organize your code into .js files and reference them in your HTML. Projects later in this book will take this approach, but this is the first simple app with a simple focus.
3. Open the default.html file.
4. Add <div id="pageTitle"></div> to the body of the page. This will be where the string returned from the WinRT component is displayed.
5. Add the following changes to the default.css file:
body { margin-left: 40px; margin-top: 40px; } … #pageTitle { color: #000; font-size: 48px; }
6. Add the following script to the default.html file:
<script type="text/javascript"> function onload() {
var pageTitle = document.getElementById('pageTitle');
pageTitle.textContent = new SimpleSource.SimpleData().appTitle; }
</script>
This JavaScript function uses the WinRT component. Notice, the code simply looks like JavaScript. The
appTitle property value is passed to the textContext property for display. None of the complexity that is required to make this work is of concern to you as the developer. It simply works.
7. Add onload="onload();" to the <body> tag of default.html.
The default.html page should now be complete. Check your code against Listing 2-2.
Listing 2-2. default.html
<!DOCTYPE html> <html>
<head>
<meta charset="utf-8">
<title>Chapter02_WinRT_Components</title>
<!-- WinJS references -->
<link href="//Microsoft.WinJS.0.6/css/ui-light.css" rel="stylesheet"> <script src="//Microsoft.WinJS.0.6/js/base.js"></script>
<script src="//Microsoft.WinJS.0.6/js/ui.js"></script>
<!-- Chapter02_WinRT_Components references --> <link href="/css/default.css" rel="stylesheet"> <script src="/js/default.js"></script>
18
var pageTitle = document.getElementById('pageTitle');
pageTitle.textContent = new SimpleSource.SimpleData().appTitle; }
</script> </head>
<body onload="onload();"> <div id="pageTitle"></div> </body>
</html>
8. Press F5 to run to app. It should load and your screen should look similar to Figure 2-7.
Figure 2-7. Sample app running
Note
■
You may notice that a new tile has been added to the Windows 8 Start screen. The app has been installed
onto the machine, so a tile was created. Unfortunately, it is not a great looking one.
Enhance the App
So far, your JavaScript app simply demonstrates the mechanics of consuming a WinRT component. Now it is time to add some functionality and make your app a little more interesting.
You will add to the WinRT component a method that returns a list of dates based on a starting date and a number of days to add. The JavaScript app will add these dates to a drop-down list on the screen.
You will continue to work with the same solution as before. You will not need to create a new project.
Add a Method to the WinRT Component
You will start by enhancing the WinRT component. Start by adding the following method to the SimpleData class:
public IList<string> GetDates(string startDate, int days) {
List<string> dates = new List<string>();
for (int count = 0; count <= days; count++) { dates.Add(DateTime.Parse(startDate).AddDays( Convert.ToDouble(count)).ToString("d") ); } return dates; }
Notice that the method returns a collection of type IList<string>. Remember, WinRT components must use WinRT types. The implementation of the method uses List<string>, but an IList<string> must be returned.
This method simply accepts a date (as a string) and an integer. It then returns a list of date strings by using the startDate and adding the number of days passed in.
Modify the JavaScript App
Now you can prepare the app to use the new method you added to your WinRT component. First, you need to make some changes to the UI to accept the necessary values from the user.
1. Add the following markup to default.html just below the existing pageTitle div:
<div id="inputValues" style="border">
<div style="float: left;width: 200px;"> Enter Start Date:
</div> <div>
<input id="txtStartDate" type="text" /> </div>
<div style="float: left;width: 200px;"> Enter Number of Days:
</div> <div>
<input id="txtDayCount" type="text" /> </div>
<div style="float: left;width: 200px;"> </div> <div>
<button onclick="getDates();">submit</button> </div>
</div> <hr />
20
</div>
<select id="dateOptions" style="width: 200px;" /> </div>
This markup adds two text boxes for input and their labels. This code also includes the select control for displaying the output. A button allows the user to control the process, rather than simply loading some values when the page loads.
Note
■
Visual Studio 11 Beta only provides a Source view for these pages. Since this is not a web app, but a
Windows 8 Metro style app, there is no option to View in Browser, as you may be used to. However, you can view the
page in Expression Blend. This is a good way to view the design, even if you choose not to use Blend to make the
design changes.
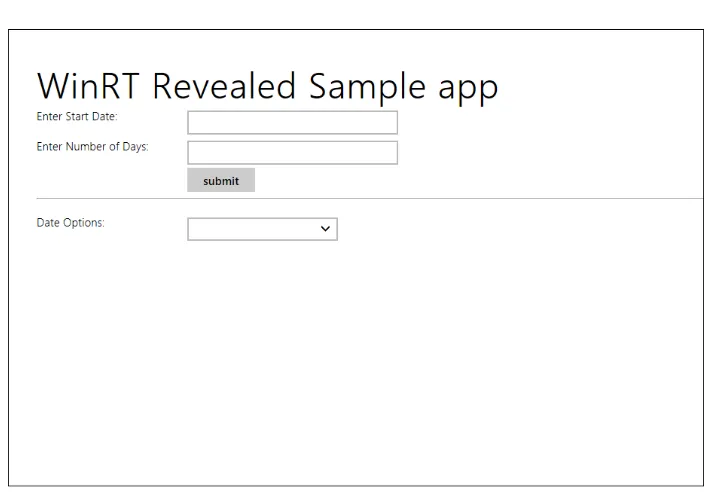
Once the changes are made, the screen should look similar to Figure 2-8.
Figure 2-8. Final default.html design
2. Add the following JavaScript function to populate the dateOptions control. This function is called when the button on the screen is clicked.
function getDates() {
var startDate = document.getElementById('txtStartDate').value; var dayCount = document.getElementById('txtDayCount').value;
var dayList = new SimpleSource.SimpleData().getDates( startDate, Number(dayCount)
);
var dateOptions = document.getElementById('dateOptions');
//clear options
dateOptions.options.length = 0;
//load new options
for (count = 0; count < dayList.length; count++) { dateOptions.options[dateOptions.options.length] = new Option(dayList[count]);
} }
The function begins by getting the values from the input controls. Then the WinRT component is used, specifically calling the new method, getDates(). This returns an IList<string> from the component, which is essentially an array in JavaScript. The function then iterates through the array, adding each item to the select
control.
To ensure that you didn’t miss anything, review Listing 2-3, which contains the code from the default.html file after these changes.
Listing 2-3. default.html (Including the UI Elements)
<!DOCTYPE html> <html>
<head>
<meta charset="utf-8">
<title>Chapter02_WinRT_Components</title>
<!-- WinJS references -->
<link href="//Microsoft.WinJS.0.6/css/ui-light.css" rel="stylesheet"> <script src="//Microsoft.WinJS.0.6/js/base.js"></script>
<script src="//Microsoft.WinJS.0.6/js/ui.js"></script>
<!-- Chapter02_WinRT_Components references --> <link href="/css/default.css" rel="stylesheet"> <script src="/js/default.js"></script>
<script type="text/javascript"> function onload() {
var pageTitle = document.getElementById('pageTitle');
pageTitle.textContent = new SimpleSource.SimpleData().appTitle; }
function getDates() {
var startDate = document.getElementById('txtStartDate').value; var dayCount = document.getElementById('txtDayCount').value;
var dayList = new SimpleSource.SimpleData().getFollowingDates( startDate, Number(dayCount)
22
var dateOptions = document.getElementById('dateOptions');
//clear options
dateOptions.options.length = 0;
//load new options
for (count = 0; count < dayList.length; count++) { dateOptions.options[dateOptions.options.length] = new Option(dayList[count]); } } </script> </head> <body onload="onload();"> <div id="pageTitle"></div>
<div id="inputValues" style="border"> <div style="float: left;width: 200px;"> Enter Start Date:
</div> <div>
<input id="txtStartDate" type="text" /> </div>
<div style="float: left;width: 200px;"> Enter Number of Days:
</div> <div>
<input id="txtDayCount" type="text" /> </div>
<div style="float: left;width: 200px;"> </div> <div>
<button onclick="getDates();">submit</button> </div>
</div> <hr />
<div id="main" style="margin-top: 20px;"> <div style="float: left;width: 200px;"> Date Options:
</div>
<select id="dateOptions" style="width: 200px;" /> </div>
</body> </html>
3. Press F5 to run the app. Enter some values into the input boxes and click the submit
button. Your screen should appear similar to Figure 2-9.
Access the Windows Namespace
You have seen that it is very simple to build a WinRT component and use it in an app. However, Microsoft designed WinRT to be used directly in your apps. Now you will add a simple control to your app to demonstrate this.
You will add a drop-down list that will show all of the devices on your machine. To get this list, you will access the Windows.Devices namespace.
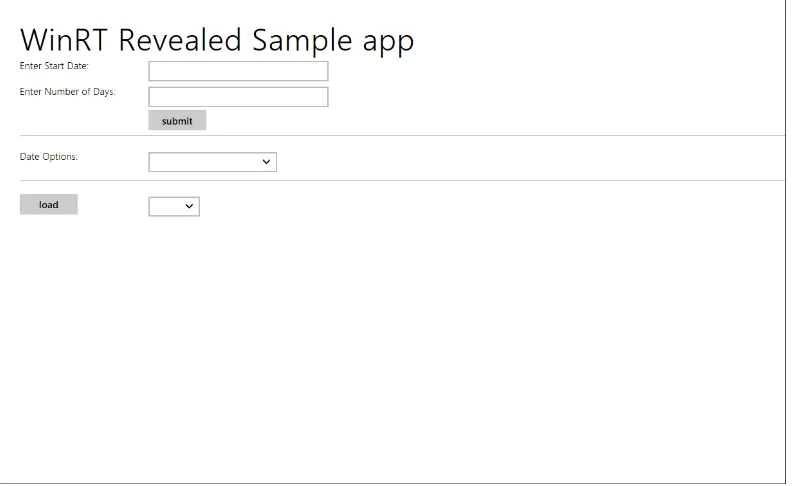
1. Modify the HTML markup to include the UI controls for displaying the list of devices. Add the following HTML to the default.html file, within the <body> tag, just after the existing code:
<hr />
<div id="deviceSection" style="margin-top: 20px;"> <div style="float: left;width: 200px;">
<button onclick="loadDevices();">load</button> </div>
<select id="deviceOptions"></select> </div>
This markup adds a button and a drop-down list to the screen. The button is used to simply control when the drop-down list is loaded. Now your screen should appear similar to Figure 2-10.
24
2. Add the following JavaScript function for loading the devices. This function is called when the button is clicked.
function loadDevices() { //add list of devices
var deviceList = Windows.Devices.Enumeration.DeviceInformation; deviceList.findAllAsync(
Windows.Devices.Enumeration.DeviceClass.all).then( onSuccess,
onError ); }
This function uses the Windows.Devices namespace to find all of the devices on your machine. The
findAllAsync() method returns the desired list. This method requires callback methods for success and failure.
3. Add the following functions to handle these events:
function onSuccess(deviceCollection) {
var numDevices = deviceCollection.length;
var options = document.getElementById('deviceOptions');
for (var count = 0; count < numDevices; count++) { var device = deviceCollection[count];
options.options[options.options.length] = new Option(device.name);
} }
Figure 2-10. Sample app design with added device list controls
function onError(e) { //do nothing }
The onSuccess() method loads the drop-down list with the items returned. A DeviceInformationCollection
object is returned by the findAllAsync() method. This function simply iterates through the collection and adds each item to the drop-down list.
The onError() method does nothing, as this app is simply for demonstration. Production-focused code would obviously take care of things like error handling.
4. Press F5 to run the app.
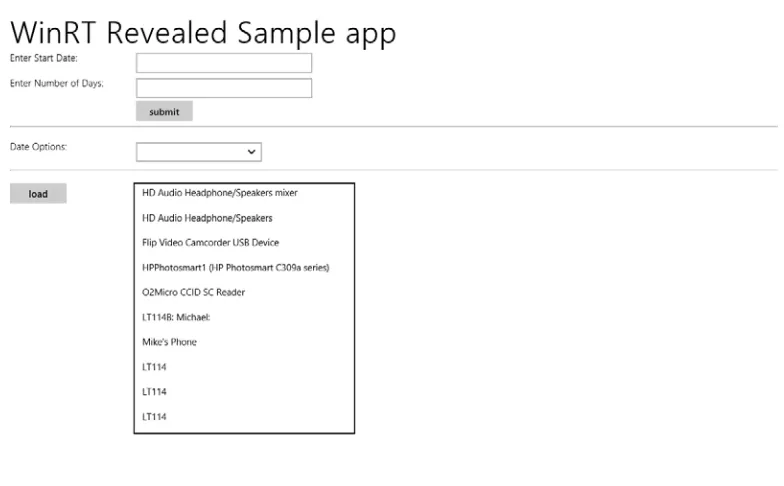
When you click the load button, you should see a long list of devices added to the drop-down list control. This list is not very useful, but again, this is simply for demonstration. Your screen should look similar to Figure 2-11.
Figure 2-11. Sample app running with devices loaded
Listing 2-4 contains the final version of default.html.
Listing 2-4. The Final Version of default.html
<!DOCTYPE html> <html>
<head>
<meta charset="utf-8">
26
<!-- WinJS references -->
<link href="//Microsoft.WinJS.0.6/css/ui-light.css" rel="stylesheet"> <script src="//Microsoft.WinJS.0.6/js/base.js"></script>
<script src="//Microsoft.WinJS.0.6/js/ui.js"></script>
<!-- Chapter02_WinRT_Components references --> <link href="/css/default.css" rel="stylesheet"> <script src="/js/default.js"></script>
<script type="text/javascript"> function onload() {
var pageTitle = document.getElementById('pageTitle'); pageTitle.textContent = new SimpleSource.SimpleData().appTitle; }
function getDates() {
var startDate = document.getElementById('txtStartDate').value; var dayCount = document.getElementById('txtDayCount').value;
var dayList = new SimpleSource.SimpleData().getDates(startDate, Number(dayCount));
var dateOptions = document.getElementById('dateOptions');
//clear options
dateOptions.options.length = 0;
//load new options
for (count = 0; count < dayList.length; count++) { dateOptions.options[dateOptions.options.length] = new Option(dayList[count]);
} }
function loadDevices() { //add list of devices
var deviceList = Windows.Devices.Enumeration.DeviceInformation; deviceList.findAllAsync( Windows.Devices.Enumeration.DeviceClass.all).then( onSuccess, onError ); }
function onSuccess(deviceCollection) { var numDevices = deviceCollection.length;
var options = document.getElementById('deviceOptions');
for (var count = 0; count < numDevices; count++) { var device = deviceCollection[count];
options.options[options.options.length] = new Option(device.name);
} }
function onError(e) { //do nothing }
</script>
</head>
<body onload="onload();"> <div>
<div id="pageTitle"></div>
<div id="inputValues" style="border"> <div style="float: left;width: 200px;"> Enter Start Date:
</div> <div>
<input id="txtStartDate" type="text" /> </div>
<div style="float: left;width: 200px;"> Enter Number of Days:
</div> <div>
<input id="txtDayCount" type="text" /> </div>
<div style="float: left;width: 200px;"> </div> <div>
<button onclick="getDates();">submit</button> </div>
</div> <hr />
<div id="output" style="margin-top: 20px;"> <div style="float: left;width: 200px;"> Date Options:
</div>
<select id="dateOptions" style="width: 200px;"></select> </div>
<hr />
<div id="deviceSection" style="margin-top: 20px;"> <div style="float: left;width: 200px;">
<button onclick="loadDevices();">load</button> </div> <select id="deviceOptions"></select> </div> </div> </body> </html>
Summary
You have seen how WinRT components can be built using the .NET language of Visual C#. You built your own component and used it in a Windows 8 Metro style app, written in HTML and JavaScript. This process is very simple and everything remains familiar when working with any of the languages.
29
Building a .NET App with WinRT
Chapter 2 focused on building components and accessing them across languages. For many scenarios, this will come in handy. However, the vast majority of development situations will use the controls and components included in Windows 8.
This chapter focuses on a few of the simpler controls and consumes them into a .NET app written in Visual C#. Developers with knowledge of WPF or Silverlight will find this chapter quite familiar.
In this chapter you will
Build a Visual C# Metro style app •
Consume Windows 8 WinRT controls and components •
Use data binding to populate WinRT controls •
Use templating to control the display of data •
Note
■
Visual C# was chosen for this chapter in order to utilize XAML controls and demonstrate .NET development
against WinRT. At the very least, it extends the range of exposure from the previous chapter, which focused on HTML
and JavaScript
A Simple Design
The app in this chapter is for demonstration purposes only, so the design is simple. The app will show a couple of different ways to access the photos on your machine. It will demonstrate data binding and control manipulation. The basic features and approaches shown in this chapter will work for nearly all WinRT controls.
There are many resources, online and in print, that focus on building Metro style apps. This chapter is not about the design aspects and other points of interest when building an app for the Windows Marketplace. The focus of this chapter is WinRT and showing you how to use it.
Note
■
You can find a list of resources for building Windows 8 Metro style apps in the appendix of this book.
Create the Solution
In this section, you will start with the Blank Application template and build an app that demonstrates some fundamental concepts of working with WinRT controls. You will add data binding and control manipulation.
1. Start Visual Studio 11 Beta on your Windows 8 development machine.
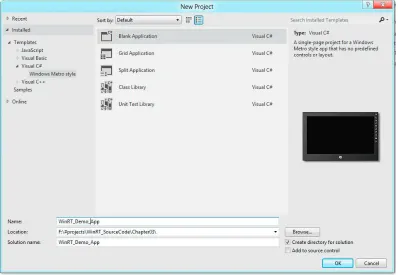
2. Create a new project and select the Blank Application template in the Visual C# Windows Metro style section.
3. Enter the name of your solution and the location for your code files. When your screen is similar to Figure 3-1, click OK.
Figure 3-1. Creating a new Visual C# Metro style project
Visual Studio creates the solution and necessary project files for your app. You will begin by building the UI, so look for the BlankPage.xaml file.
Build the UI
Every good app starts with the user experience.
31
<Grid Background="Silver"> <Grid.RowDefinitions> <RowDefinition /> <RowDefinition /> </Grid.RowDefinitions> <Grid.ColumnDefinitions> <ColumnDefinition /> <ColumnDefinition /> </Grid.ColumnDefinitions> </Grid>
This XAML simply sets up the structure of the page. It breaks up the screen into four even areas. Now you will add the controls for each area.
2. Add the following code just above the closing Grid tag to build the controls for the top left section of the screen:
<StackPanel Grid.Column="0" Grid.Row="0" VerticalAlignment="Center"> <TextBlock FontSize="40" HorizontalAlignment="Center"
VerticalAlignment="Top"> Test App
</TextBlock>
<ComboBox x:Name="cboOptions" Width="400" Margin="20" SelectionChanged="cboOptions_SelectionChanged_1"> </ComboBox>
<Button x:Name="btnPickImage" Width="200" Content="Change Image" HorizontalAlignment="Center" Click="btnPickImage_Click_1" /> </StackPanel>
The design view in Visual Studio should appear similar to Figure 3-2.
Figure 3-2. Design view of the first set of controls
This section arranges the controls on the top left using a StackPanel control. The values of Grid.Column and
Grid.Row specify where the controls display in the Grid control. The StackPanel control is in column “0” and row “0.” Within the StackPanel control, there is a TextBlock control to display the title for the app, a ComboBox
control to display a few options for interaction by the user, and a Button control for the user to click.
3. Add an Image control to the top right section. Add the following code just below the
StackPanel control:
<Image x:Name="imgPhoto" Grid.Column="1" Grid.Row="0" Source="images/image1.jpg" Height="300" Width="300"> </Image>
The Image control references a file in the Source attribute. This file needs to be added to the project to display on the screen.
4. Right click on the solution and click Add ➤ New Folder. Name the new folder “images”.
5. Add an image file from your machine by clicking the images folder and selecting Add ➤ Existing Item, as shown in Figure 3-3.
Figure 3-3. Adding an existing item to the images folder
6. Either rename the added file to image1.jpg or change the value of the Source
attribute to match your file name.
33
Make the App Work
The UI for the top half of the app is complete. Now you will focus on making this section actually work before you turn to concentrating on the rest of the app. You will start with the Combo Box control of options.
You will use data binding to populate the Combo Box control. For data binding, you need a data source.
1. Right-click the solution and click Add Class. Name the class DemoData.cs. Add the code from Listing 3-1 to this new file.
Listing 3-1. DemoData.cs
public static class DemoData {
public static List<string> GetSizeOptions() {
List<string> options = new List<string>();
options.Add("Small"); options.Add("Medium"); options.Add("Large"); return options; }
}
This class has one simple method, GetSizeOptions(). This method returns a List<> of string objects. This will be used as the options for the Combo Box control.
2. Open BlankPage.xaml.cs. Add the following using statements to the beginning of the class file:
using Windows.Storage.Pickers; using Windows.UI.Xaml.Media.Imaging; using Windows.Storage;
Figure 3-4. Design view after controls defined for both top sections
3. Add the following method to the class:
void BlankPage_Loaded(object sender, RoutedEventArgs e) {
//bind data to control
cboOptions.ItemsSource = DemoData.GetSizeOptions(); }
This method simply binds cboOptions to the List<> of strings that is returned by the SetSizeOptions()
method. Since the method returns a collection of strings, the combo box will use the value as the display and the value of each item.
Note
■
You can bind a collection of other types to a control like
Combo Box. However, you would need to set
the
DisplayMemberand
ValueMemberproperties to configure how to display and work with items bound to the
control.
The method needs to be called. In fact, the method BlankPage_Loaded() is actually an event handler, written to be called once the page is loaded.
4. Add the following line of code to the BlankPage() constructor, just after the this. InitializeComponent() line:
this.Loaded += BlankPage_Loaded;
5. Add the following code to handle the event when the selection in the Combo Box
control is changed:
private void cboOptions_SelectionChanged_1(object sender, SelectionChangedEventArgs e)
{
switch (e.AddedItems[0].ToString()) {
case "Small":
imgPhoto.Height = 100; imgPhoto.Width = 100; break;
case "Medium":
imgPhoto.Height = 300; imgPhoto.Width = 300; break;
case "Large":
imgPhoto.Height = 600; imgPhoto.Width = 600; break;
} }
35
6. Add the following code to handle the button click event for btnPickImage:async private void btnPickImage_Click_1(object sender, RoutedEventArgs e) {
var filePicker = new FileOpenPicker(); filePicker.FileTypeFilter.Add(".jpg");
filePicker.ViewMode = PickerViewMode.Thumbnail;
filePicker.SuggestedStartLocation = PickerLocationId.PicturesLibrary; filePicker.SettingsIdentifier = "imagePicker";
filePicker.CommitButtonText = "Choose an image to load";
var file = await filePicker.PickSingleFileAsync();
BitmapImage bitmap = new BitmapImage(); bitmap.SetSource(
await file.OpenAsync(Windows.Storage.FileAccessMode.Read) );
imgPhoto.Source = bitmap; }
This is the most complex section of code so far. This method uses the WinRT FilePicker control. When the button is clicked, a new instance of the FilePicker is instantiated. Settings are configured.
Note
■
The
FileTypeFilterproperty needs at least one value added, even if that value is
"".
The CommitButtonText property allows you to override the FilePicker button text.
Chapter 1 explained that WinRT was designed to run asynchronously most of the time. The FilePicker runs this way. The await keyword is used to allow the code to open the FilePicker and wait for the response without stopping the UI thread from working, as in the following line from this method:
var file = await filePicker.PickSingleFileAsync();
Adding an await statement into a method does require that method to run asynchronously as well. You can see that the async keyword has been added to the method definition to satisfy this requirement.
Once the file is chosen by the user, it is then read into a BitmapImage object for display on the screen. These are the last of the code changes for the top sections of this app. You can refer to Listing 3-3 toward the end of this chapter if you have questions regarding code placement in the files.
Run the First Test
Now you are ready to run the app.
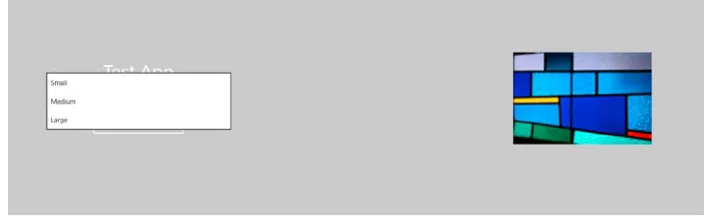
1. Press F5 to run the solution. Your screen should appear similar to Figure 3-5.
2. The Combo Box control should be populated with the options shown in Figure 3-6. Figure 3-5. WinRT_Demo_App running in first test
Figure 3-7. WinRT_Demo_App with image resized Figure 3-6. WinRT_Demo_App Combo Box options
37
4. Clicking the Change Image button should bring up the File Picker. Your screenshould look similar to Figure 3-8.
Figure 3-9. File Picker button
Figure 3-8. WinRT File Picker (images blurred intentionally)
5. Choose a file and click the Choose and image to load button, as shown in Figure 3-9.
The image you chose should appear on the right side of the screen. You can continue to resize this image with the Combo Box control, or you can choose other files to load in its place.
Note
■
This app uses the
FilePickerto gain access to files on the machine. This interaction involves the user,
so permission is granted. If the app were to load a file directly, without interaction from the user, the app would
need to be configured to do so. This is done by managing the Capabilities list in the
Package.appxmanifest
file.
Figure 3-10 shows this file and the options available.
Figure 3-10. Managing the capabilities of an app
Complete the UI
Now you will add the UI markup for the bottom sections of the screen.
1. Open BlankPage.xaml and add the following code just below the StackPanel control added earlier:
<Button Grid.Column="0" Grid.Row="1" x:Name="btnPickFolder" Width="200" Content="Load images from folder" HorizontalAlignment="Center"
Click="btnPickFolder_Click_1" />
<GridView x:Name="gvPhotos" Grid.Column="1" Grid.Row="1"
HorizontalAlignment="Stretch" Margin="0" VerticalAlignment="Stretch" ItemTemplate="{StaticResource Standard250x250ItemTemplate}">
</GridView>
39
Note
■
The
Standard250x250ItemTemplatetemplate is provided by the default Metro style files. It can be found
in the solution under the Common folder, in the
StandardStyles.xaml
file.
The UI is now complete. The design view in Visual Studio should appear similar to Figure 3-11. While the
GridView control is present, there is no visible element until the data is added. Therefore, it does not appear in the design view.
Figure 3-11. Complete UI design
Complete the App
The data template for the items in the GridView control requires an object with particular properties.
1. Add a new class file to the solution called ImageGroupItem.cs. The code for this class file is shown in Listing 3-2.
Listing 3-2. ImageGroupItem.cs
using System;
using System.Collections.Generic; using System.Linq;
using System.Text;
using System.Threading.Tasks;
using Windows.UI.Xaml.Media.Imaging;
namespace WinRT_Demo_App {
class ImageGroupItem
{
public BitmapImage Image { get; set; } public string Title { get; set; } public string Subtitle { get; set; } }
}
2. Add the following code to handle the button click event for btnPickFolder:
async private void btnPickFolder_Click_1(object sender, RoutedEventArgs e) {
var folderPicker = new FolderPicker(); folderPicker.FileTypeFilter.Add("*");
folderPicker.SettingsIdentifier = "imageFolderPicker";
folderPicker.SuggestedStartLocation = PickerLocationId.PicturesLibrary;
var folder = await folderPicker.PickSingleFolderAsync();
var files = await folder.GetFilesAsync();
List<ImageGroupItem> items = new List<ImageGroupItem>(); foreach (StorageFile file in files.Take(6))
{
BitmapImage photoBitmap = new BitmapImage();
photoBitmap.SetSource(await file.OpenAsync(FileAccessMode.Read));
ImageGroupItem item = new ImageGroupItem() {
Image = photoBitmap, Title = file.Name,
Subtitle = file.DateCreated.ToString() };
items.Add(item); }
gvPhotos.ItemsSource = items; }
This method uses the FolderPicker WinRT control. It works very similarly to the FilePicker used earlier. Once a folder is chosen, the code loops through the files and creates a list of ImageGroupItem objects and binds that list to the GridView control.
The asynchronous methods GetSingleFolderAsync() and GetFilesAsync() are used in this section. Prior to C# 4.5, a separate method would need to be implemented to handle the response from the asynchronous call. In C# 4.5, the await keyword is available. Asynchronous development has become straightforward and simple.
In this example, the files and folders will be retrieved without causing the UI layer to stop responding to the user. The async keyword is required on the method signature because the await keyword is used.
Note
41
Run Final Tests
The app is ready for complete functionality tests.
1. Press F5 to run the app. You should see something similar to Figure 3-12.
Figure 3-12. WinRT_Demo_App running for final tests
2. Click the Load images from folder button on the bottom of the screen to bring up the
FolderPicker, as shown in Figure 3-13.
Figure 3-13. WinRT FolderPicker
3. Choose a folder and click the Choose this folder button at the bottom, shown in Figure 3-14.
Figure 3-14. FolderPicker commit button
Six images from the chosen folder should load into the GridView control with their information, as shown in Figure 3-15.
43
The full code for BlankPage.xaml is included in Listing 3-3. If you are not familiar with XAML, it is helpful to see how the markup works. The Grid control includes column and row definitions to break up the screen into areas. StackPanel controls help to organize controls within an area. It is in the XAML that the UI layer is described.Listing 3-3. BlankPage.xaml
<Page x:Class="WinRT_Demo_App.BlankPage" xmlns="http://schemas.microsoft.com/winfx/2006/xaml/presentation" xmlns:x="http://schemas.microsoft.com/winfx/2006/xaml" xmlns:local="using:WinRT_Demo_App" xmlns:d="http://schemas.microsoft.com/expression/blend/2008" xmlns:mc="http://schemas.openxmlformats.org/markup-compatibility/2006" mc:Ignorable="d"> <Grid Background="Silver"> <Grid.RowDefinitions> <RowDefinition /> <RowDefinition /> </Grid.RowDefinitions> <Grid.ColumnDefinitions> <ColumnDefinition /> <ColumnDefinition /> </Grid.ColumnDefinitions>
<StackPanel Grid.Column="0" Grid.Row="0" VerticalAlignment="Center"> <TextBlock FontSize="40" HorizontalAlignment="Center"
VerticalAlignment="Top">Test App</TextBlock>
<ComboBox x:Name="cboOptions" Width="400" Margin="20"
SelectionChanged="cboOptions_SelectionChanged_1"></ComboBox> <Button x:Name="btnPickImage" Width="200" Content="Change image" HorizontalAlignment="Center" Click="btnPickImage_Click_1" /> </StackPanel>
<Image x:Name="imgPhoto" Grid.Column="1" Grid.Row="0"
Source="images/image1.jpg" Height="300" Width="300"></Image> <Button Grid.Column="0" Grid.Row="1" x:Name="btnPickFolder" Width="200" Content="Load images from folder"
HorizontalAlignment="Center" Click="btnPickFolder_Click_1" /> <GridView x:Name="gvPhotos" Grid.Column="1" Grid.Row="1" HorizontalAlignment="Stretch" Margin="0" VerticalAlignment="Stretch" ItemTemplate="{StaticResource Standard250x250ItemTemplate}"> </GridView> </Grid> </Page>
The full code for BlankPage.xaml.cs is included in Listing 3-4. If you run into any issues building the project, check here to ensure that your code is correct and is in the correct place. This code is straightforward. It is essentially a collection of event handlers. There are no real tricks here, but that is by design. Developing with WinRT is straightforward.
Listing 3-4. BlankPage.xaml.cs using System; using System.Collections.Generic; using System.IO; using System.Linq; using Windows.Foundation; using Windows.Foundation.Collections; using Windows.UI.Xaml; using Windows.UI.Xaml.Controls; using Windows.UI.Xaml.Controls.Primitives; using Windows.UI.Xaml.Data; using Windows.UI.Xaml.Input; using Windows.UI.Xaml.Media; using Windows.UI.Xaml.Navigation; using Windows.Storage.Pickers; using Windows.UI.Xaml.Media.Imaging; using Windows.Storage;
// The Blank Page item template is documented at http://go.microsoft.com/fwlink/?LinkId=234238
namespace WinRT_Demo_App {
/// <summary>
/// An empty page that can be used on its own or navigated to within a Frame. /// </summary>
public sealed partial class BlankPage : Page {
public BlankPage() {
this.InitializeComponent(); this.Loaded += BlankPage_Loaded; }
void BlankPage_Loaded(object sender, RoutedEventArgs e) {
//bind data to control
cboOptions.ItemsSource = DemoData.GetSizeOptions(); }
/// <summary>
/// Invoked when this page is about to be displayed in a Frame. /// </summary>
/// <param name="e">Event data that describes how this page was reached. The Parameter /// property is typically used to configure the page.</param>
protected override void OnNavigatedTo(NavigationEventArgs e) {
}
private void cboOptions_SelectionChanged_1(object sender, SelectionChangedEventArgs e) {
45
{
case "Small":
imgPhoto.Height = 100; imgPhoto.Width = 100; break;
case "Medium":
imgPhoto.Height = 300; imgPhoto.Width = 300; break;
case "Large":
imgPhoto.Height = 600; imgPhoto.Width = 600; break;
} }
async private void btnPickImage_Click_1(object sender, RoutedEventArgs e) {
var filePicker = new FileOpenPicker(); filePicker.FileTypeFilter.Add(".jpg");
filePicker.ViewMode = PickerViewMode.Thumbnail;
filePicker.SuggestedStartLocation = PickerLocationId.PicturesLibrary; filePicker.SettingsIdentifier = "imagePicker";
filePicker.CommitButtonText = "Choose an image to load";
var file = await filePicker.PickSingleFileAsync();
BitmapImage bitmap = new BitmapImage();
bitmap.SetSource(await file.OpenAsync(Windows.Storage.FileAccessMode.Read)); imgPhoto.Source = bitmap;
}
async private void btnPickFolder_Click_1(object sender, RoutedEventArgs e) {
var folderPicker = new FolderPicker(); folderPicker.FileTypeFilter.Add("*");
folderPicker.SettingsIdentifier = "imageFolderPicker";
folderPicker.SuggestedStartLocation = PickerLocationId.PicturesLibrary;
var folder = await folderPicker.PickSingleFolderAsync();
var files = await folder.GetFilesAsync();
List<ImageGroupItem> items = new List<ImageGroupItem>(); foreach (StorageFile file in files.Take(6))
{
BitmapImage photoBitmap = new BitmapImage();
photoBitmap.SetSource(await file.OpenAsync(FileAccessMode.Read));
ImageGroupItem item = new ImageGroupItem() {
Image = photoBitmap, Title = file.Name,
Subtitle = file.DateCreated.ToString() };
items.Add(item); }
gvPhotos.ItemsSource = items; }
} }
Summary
This chapter has introduced WinRT development in .NET. In building the app in this chapter, you have seen several XAML WinRT controls:
• TextBlock
• Button
• Image
• FilePicker
• GridView
• FolderPicker
You have also used data binding and data templating to control the user interface and display of data. These basic approaches to app development apply to nearly all WinRT UI elements.
Hopefully, you are getting excited about WinRT development. If you are already familiar with .NET development, you can see that building apps for Windows 8 is very natural.
47
Reaching Beyond the App
The world is highly connected. Most likely, the apps you build will need to be connected as well. They might need to connect to an Internet source for data, or they might need to connect to other apps or services on the machine where they are running. This chapter introduces you to concepts involved in extending Metro style apps and connecting with other apps.
This chapter covers:
Capabilities •
Implementing the Location capability •
Declarations (contracts) •
Implementing the Share declaration (as a source) •
Implementing the Share Target declaration •
Capabilities
All Metro style apps are sandboxed. They are isolated from one another and cannot directly access content on the machine where they are running. This provides a secure experience for the user.
However, consumers also expect certain apps to gain access to certain resources on their machine. For example, an app for editing photos would be expected to access the photos on the user’s machine. An app that plays videos should be capable of accessing the video library.