OS X
Mountain Lion
“Pogue, the New York Times computer columnist, is among the world’s best explainers.”
—KeVIN KeLLY, CO-FOUNDeR OF WIRED
Covers
OS X 10.8
and iCloud
THE MISSING MANUAL
OS X Mountain Lion
The book that
should have been
“Here’s to the crazy ones.
The rebels. The troublemakers. The ones who see things differently.
While some may see them as the crazy ones,
we see genius.”
David Pogue
OS X Mountain Lion: The Missing Manual
by David Pogue
Copyright © 2012 David Pogue. All rights reserved. Printed in the United States of America.
Published by O’Reilly Media, Inc.,
1005 Gravenstein Highway North, Sebastopol, CA 95472.
O’Reilly Media books may be purchased for educational, business, or sales promotional use. Online editions are also available for most titles: safari@oreilly. com. For more information, contact our corporate/institutional sales department: 800-998-9938 or [email protected].
July 2012: First Edition.
The Missing Manual is a registered trademark of O’Reilly Media, Inc. The Missing Manual logo, and “The book that should have been in the box” are trademarks of O’Reilly Media, Inc. Many of the designations used by manufacturers and sellers to distinguish their products are claimed as trademarks. Where those designations appear in this book, and O’Reilly Media is aware of a trademark claim, the designa-tions are capitalized.
Table of Contents
Introduction ... 1
The Mac Becomes an iPad ... 1
About This Book ... 3
The Very Basics ... 5
Part One: The OS X Desktop
Chapter 0: The Mountain Lion Landscape... 9
Launchpad ... 9
Full-Screen Mode, Safari ... 11
Full-Screen Apps, Mission Control ... 12
Chapter 1: Folders & Windows ... 15
Getting into OS X ... 15
Windows and How to Work Them ... 19
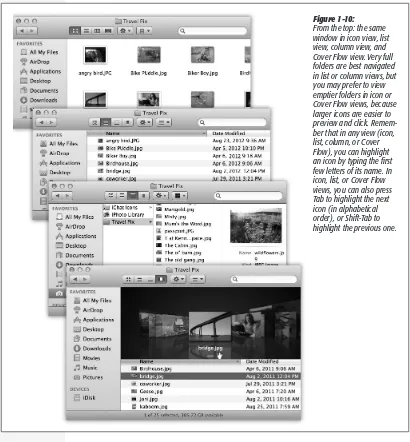
The Four Window Views ... 35
Icon View ... 37
List View ... 47
Column View ... 53
Cover Flow View ... 57
Quick Look ... 59
Logging Out, Shutting Down ... 64
Getting Help in OS X ... 66
Chapter 2: Organizing Your Stuff ... 71
The OS X Folder Structure ... 71
Icon Names ... 76
Selecting Icons ... 78
Moving and Copying Icons ... 81
Aliases: Icons in Two Places at Once ... 87
Color Labels ... 89
The Trash ... 92
Get Info ... 95
Chapter 3: Spotlight ... 101
The Spotlight Menu ... 101
The Spotlight Window ... 112
Customizing Spotlight ... 125
Smart Folders ... 128
Chapter 4: Dock, Desktop & Toolbars ... 131
The Dock ... 131
Setting Up the Dock ... 132
Using the Dock... 140
The Finder Toolbar ... 145
Designing Your Desktop ... 149
Menulets: The Missing Manual ... 151
Part Two: Programs in OS X
Chapter 5: Documents, Programs & Spaces ... 157
The Mac App Store ... 157
Other Ways to Get Mac Software... 160
Opening OS X Programs... 163
Launchpad ... 164
Windows that Auto-Reopen ... 168
The “Heads-Up” Program Switcher ... 172
Mission Control: Death to Window Clutter ... 173
Dashboard ... 182
Exposé ... 197
Hiding Programs the Old-Fashioned Way ... 203
How Documents Know Their Parents ... 205
Keyboard Control ... 210
The Save and Open Dialog Boxes ... 214
Auto Save and Versions ... 220
Documents in the Cloud ... 225
Cocoa and Carbon ... 227
Chapter 6: Data: Typing, Dictating, Sharing & Backing Up ... 233
The Macintosh Keyboard ... 233
Notes on Right-Clicking ... 237
Power Typing ... 239
Dictation ... 245
The Many Languages of OS X Text ... 251
Data Detectors ... 256
Moving Data Between Documents ... 258
Chapter 7: Automator, AppleScript & Services ... 283
Services ... 285
Automator ... 291
Building Your Own Workflow ... 302
Doing More with Automator ... 309
AppleScript ... 312
Chapter 8: Windows on Macintosh ... 317
Boot Camp ... 319
Windows in a Window ... 325
Life with Microsoft Exchange ... 327
Part Three: The Components of OS X
Chapter 9: System Preferences ... 333
The System Preferences Window... 333
Accessibility ... 336
Bluetooth ... 341
CDs & DVDs ... 344
Date & Time ... 345
Desktop & Screen Saver ... 347
Dictation & Speech ... 353
Displays... 353
Dock ... 355
Energy Saver ... 355
General ... 360
iCloud ... 362
Keyboard ... 362
Language & Text ... 363
Mail, Contacts & Calendars ... 364
Mission Control ... 364
Mouse ... 364
Network ... 365
Notifications ... 365
Parental Controls ... 366
Print & Scan ... 366
Security & Privacy ... 366
Sharing ... 366
Software Update ... 367
Sound ... 367
Spotlight ... 370
Startup Disk ... 370
Time Machine ... 370
Trackpad ... 370
Chapter 10: Reminders, Notes & Notification Center ... 375
Notification Center ... 376
Reminders ... 381
Notes ... 385
Chapter 11: The Other Free Programs ... 389
Your Free OS X Programs ... 389
Address Book ... 390
App Store ... 390
Automator ... 390
Calculator ... 390
Calendar ... 392
Chess ... 407
Contacts ... 409
Dashboard ... 409
Dictionary ... 409
DVD Player ... 411
FaceTime... 412
Font Book ... 415
Game Center ... 415
GarageBand ... 418
iChat ... 418
Image Capture ... 418
iMovie, iPhoto ... 423
iTunes ... 423
Launchpad ... 423
Mail... 423
Messages ... 424
Mission Control ... 424
Notes ... 424
Photo Booth ... 424
Preview ... 428
Reminders ... 438
QuickTime Player ... 439
Safari ... 439
Stickies ... 439
System Preferences ... 442
TextEdit ... 442
Time Machine ... 450
Chapter 12: CDs, DVDs, iTunes & AirPlay ... 471
Disks Today ... 471
Disks In, Disks Out... 472
Startup Disks ... 474
Erasing a Disk ... 475
Burning CDs and DVDs ... 476
iTunes: The Digital Jukebox ... 479
DVD Movies ... 490
AirPlay ... 494
Part Four: The Technologies of OS X
Chapter 13: Accounts, Security & Gatekeeper ... 499
Introducing Accounts ... 499
Creating an Account ... 501
Parental Controls ... 510
Editing Accounts ... 518
Setting Up the Login Process ... 519
Signing In, Logging Out ... 523
Sharing Across Accounts ... 525
Fast User Switching ... 527
Six OS X Security Shields ... 529
And Four Privacy Shields... 545
Chapter 14: Networking, File Sharing & AirDrop ... 547
Wiring the Network ... 547
File Sharing: Three Ways ... 551
Accessing Shared Files ... 561
Networking with Windows ... 569
Screen Sharing ... 576
More Dialing In from the Road ... 586
Chapter 15: Graphics, Fonts & Printing ... 587
Mac Meets Printer ... 587
Making the Printout ... 591
Managing Printouts ... 594
Printer Sharing ... 596
Faxing ... 597
PDF Files ... 597
Fonts—and Font Book ... 599
ColorSync ... 608
Graphics in OS X ... 609
Chapter 16: Sound, Movies & Speech ... 615
Playing Sounds ... 615
Recording Sounds ... 617
QuickTime Player ... 618
The Mac Reads to You ... 630
VoiceOver ... 634
Ink: Handwriting Recognition ... 634
Part Five: OS X Online
Chapter 17: Internet Setup & iCloud ... 637
The Best News You’ve Heard All Day ... 638
Network Central and Multihoming ... 638
Broadband Connections ... 640
Cellular Modems ... 646
Tethering ... 647
Dial-Up Modem Connections ... 648
Switching Locations ... 648
Internet Sharing ... 650
iCloud ... 653
Internet Location Files ... 663
Chapter 18: Mail & Contacts ... 665
Setting Up Mail ... 665
Checking Your Mail ... 669
Writing Messages ... 677
Stationery ... 683
Reading Email ... 685
VIPs ... 703
The Anti-Spam Toolkit ... 704
Contacts (Address Book) ... 705
Chapter 19: Safari ... 719
Browsing Basics ... 719
The New, Unified Address/Search Bar ... 720
Bookmarks ... 728
15 Tips for Better Surfing... 730
Chapter 20: Messages ... 747
Welcome to Messages ... 747
iMessages ... 748
The Traditional Chat Networks ... 751
Let the Chat Begin ... 756
Text Chatting... 758
Audio Chats ... 761
Video Chats ... 762
Juggling Chats and Windows ... 766
Sharing Your Screen ... 767
Messages Theater ... 769
Chapter 21: SSH, FTP, VPN & Web Sharing ... 773
FTP ... 773
Connecting from the Road ... 776
Remote Access with SSH ... 777
Virtual Private Networking ... 779
Part Six: Appendixes
Appendix A: Installing OS X Mountain Lion ... 787
Hardware Requirements ... 788
Psychological Requirements ... 789
The Standard Installation ... 790
The Setup Assistant ... 792
The Homemade Installer Disk ... 796
Appendix B: Troubleshooting ... 799
Minor Eccentric Behavior ... 799
Frozen Programs (Force Quitting) ... 801
Recovery Mode: Three Emergency Disks ... 802
Application Won’t Open ... 806
Startup Problems ... 806
Fixing the Disk ... 809
Where to Get Troubleshooting Help ... 812
Appendix C: The Windows-to-Mac Dictionary ... 813
Appendix D: The Master OS X Secret Keystroke List ... 827
The Missing Credits
About the Author
David Pogue (author) is the weekly tech columnist for The New York Times, host of NOVA ScienceNow on PBS, an Emmy-winning corre-spondent for CBS News Sunday Morning, and the creator of the Missing Manual series. He’s the author or coauthor of 60 books, including 25 in this series, six in the “For Dummies” line (including Macs, Magic, Op-era, and Classical Music), two novels, and The World According to Twit-ter. In his other life, David is a former Broadway show conductor, a piano player, and a magician. He lives in Connecticut with his three awesome children.
Links to his columns and weekly videos await at www.davidpogue.com. He welcomes feedback about his books by email at [email protected].
About the Creative Team
Julie Van Keuren (copy editor) quit her newspaper job in 2006 to move to Montana and live the freelancing dream. She and her husband, M.H. (who is living the novel-writing dream), have two sons, Dexter and Michael. Email:[email protected].
Kirill Voronin (technical editor) is the head of an IT consulting company, aptly called Shortcut, based in Moscow, Russia. He has worked with Macs since the ’90s, and he’s an Apple Certified System Administrator and Apple Certified Trainer for IT courses. He lives with his wife, Maria, and son, Nil. In his spare time, he enjoys backpacking. Email: [email protected].
Phil Simpson (design and layout) runs his graphic design business from Southbury, Connecticut. His work includes corporate branding, publication design, communica-tions support, and advertising. In his free time, he is a homebrewer, ice cream maker, wannabe woodworker, and is on a few tasting panels. He lives with his wife and three great felines. Email: [email protected].
Brian Jepson (technical consultant) is an O’Reilly editor and hacker, and co-organizer of Providence Geeks and the Rhode Island Mini Maker Faire. He’s also been involved in various ways over the years with AS220, a nonprofit arts center in Providence, Rhode Island. Email: [email protected].
Acknowledgments
In addition to the dream team members identified above, I owe debts of thanks to O’Reilly’s Missing Manuals editor-in-chief, Brian Sawyer; Apple’s Monica Sarker for going beyond the call of duty to chase down tweaky tech answers; Ben Waldie, who did a beautiful job updating the Automator/AppleScript material in Chapter 7; Philip Michaels, who wrote about Game Center for this book; my crack team of eleventh-hour proofreaders, Diana D’Abruzzo, Kellee Katagi, and Judy Le; the NOVA crew, who gracefully accommodated my nutty book schedule during our shoots; and my spectacular screenshotter/index-marathoner, the lovely Emma Hollister.
I’ve never met, or even spoken to, Kirill Voronin; he lives in Moscow. But he submit-ted so many corrections to the previous edition’s Errata page online that I wound up hiring him to be the tech editor for this book—and he knocked it out of the park.
I also wish I could send out an “I Made the Book Better!” T-shirt to every reader who ever took the time to write with corrections, suggestions, tips, and tricks. And thanks, as always, to David Rogelberg for believing in the idea.
Above all, this book owes its existence to the patience and affection of Kelly, Tia, and Jeffrey. They make these books—and everything else—possible.
—David Pogue
The Missing Manual Series
Missing Manuals are witty, superbly written guides to computer products that don’t come with printed manuals (which is just about all of them). Each book features a handcrafted index; cross-references to specific page numbers (not just “see Chapter 14”); and an ironclad promise never to put an apostrophe in the possessive pronoun its.
Here’s a list of current and upcoming titles:
•iPhone: The Missing Manual, 5th Edition by David Pogue •Droid X: The Missing Manual by Preston Gralla
•Droid 2: The Missing Manual by Preston Gralla
•iPad: The Missing Manual, 5th Edition by J.D. Biersdorfer •iPod: The Missing Manual, 9th Edition by J.D. Biersdorfer
•David Pogue’s Digital Photography: The Missing Manual by David Pogue •Photoshop CS5: The Missing Manual by Lesa Snider King
•eBay: The Missing Manual by Nancy Conner •Wikipedia: The Missing Manual by John Broughton
•Google: The Missing Manual by Sarah Milstein and Rael Dornfest •Google Apps: The Missing Manual by Nancy Conner
•Google Sketchup: The Missing Manual by Chris Grover •Palm Pre: The Missing Manual by Ed Baig
•Netbooks: The Missing Manual by J.D. Biersdorfer •Home Networking: The Missing Manual by Scott Lowe •Your Brain: The Missing Manual by Matthew MacDonald •Your Body: The Missing Manual by Matthew MacDonald •Living Green: The Missing Manual by Nancy Conner •Facebook: The Missing Manual by E.A. Vander Veer
For Macintosh:
•Photoshop Elements for Mac: The Missing Manual by Barbara Brundage •iMovie ’11 & iDVD: The Missing Manual by David Pogue and Aaron Miller •iPhoto ’11: The Missing Manual by David Pogue and Lesa Snider
•Switching to the Mac: The Missing Manual, Lion Edition by David Pogue •iWork ’09: The Missing Manual by Josh Clark
•AppleScript: The Missing Manual by Adam Goldstein
•Office 2011 for Macintosh: The Missing Manual by Chris Grover
•FileMaker Pro 10: The Missing Manual by Geoff Coffey and Susan Prosser
For Windows:
•Windows 7: The Missing Manual by David Pogue •Windows 8: The Missing Manual by David Pogue •FrontPage 2003: The Missing Manual by Jessica Mantaro
•Office2010:TheMissingManualby Chris Grover, Matthew MacDonald, and E. A. Vander Veer
•PCs: The Missing Manual by Andy Rathbone
•Photoshop Elements 9: The Missing Manual by Barbara Brundage •Premiere Elements 8: The Missing Manual by Chris Grover •Quicken 2009: The Missing Manual by Bonnie Biafore •QuickBooks 2011: The Missing Manual by Bonnie Biafore •QuickBase: The Missing Manual by Nancy Conner
•Windows XP Home Edition: The Missing Manual, 2nd Edition by David Pogue •Windows XP Pro: The Missing Manual, 2nd Edition by David Pogue, Craig Zacker,
and L.J. Zacker
Introduction
OS X is an impressive technical achievement; many experts call it the best personal-computer operating system on earth. But beware its name.
The X is meant to be a Roman numeral, pronounced “ten.” Don’t say “oh ess ex.” You’ll get funny looks in public.
In any case, OS X Mountain Lion is the ninth major version of Apple’s Unix-based operating system. It’s got very little in common with the original Mac operating system, the one that saw Apple through the 1980s and 1990s. Apple dumped that in 2001, when CEO Steve Jobs decided it was time for a change. Apple had just spent too many years piling new features onto a software foundation originally poured in 1984. Programmers and customers complained of the “spaghetti code” the Mac OS had become.
On the other hand, underneath OS X’s classy, translucent desktop is Unix, the industrial-strength, rock-solid OS that drives many a Web site and university. It’s not new by any means; in fact, it’s decades old and has been polished by generations of programmers.
Note: [[Apple no longer refers to its computer operating system as Mac OS X. Now it’s just “OS X,” without the “Mac.” Why? Apple says it’s to match up better with iOS, its operating system for the iPhone and iPad.]]
The Mac Becomes an iPad
The Mac Becomes an iPad
In this software, Apple has gone about as far as it could go in trying to turn the Mac into an iPad.
Two things made the iPad the fastest-selling electronic gadget in history. First, it’s so simple. No overlapping windows; every app runs full screen. No Save command; everything is autosaved. No files or folders. No menus. All your apps are in one place, the Home screen. To beginners, technophobes, and even old-timers, the iPad’s software represents a refreshing decluttering of the modern computer.
The second huge iPad sales point is that multitouch screen. You operate the whole thing by touching or dragging your fingers on the glass. For example, you cycle through screens by swiping. You zoom out on a map, photo, or Web page by pinching two fingers. You rotate a photo by twisting two fingers, and so on.
So Apple thought, if simplicity and touch gestures made the iPad a megahit, why can’t we do the same for the Mac?
And it set out to bring as many of the iPad’s features and as much of its personality to your Mac as possible. Today’s OS X features like Full Screen mode, Auto Save, and Launchpad are total iPad rip-offs; if Apple hadn’t stolen these features from itself, it would surely be suing for copyright infringement. [[In Mountain Lion, even the app names are the same as what’s on iOS: Reminders, Notes, Notification Center, Game Center, and so on.]]
What’s Missing
There are 200 new features in Mountain Lion, by Apple’s count. A lot of it is welcome new features. (Check out “what’s new in Mountain Lion” in this book’s index.)
But some of the changes aren’t additions; they’re subtrac-tions. A few traditional features didn’t make the cut. Here’s a list of the most notable excisions.
Some disappeared back in Lion: Front Row, the feature that turned your Mac into a living-room multimedia player; faxing; iSync; and FTP services, no doubt because FTP is not a very secure protocol.
The Sidebar icons in the Finder are no longer in color; they’re all sort of washed out and monochrome, a trend in the Mac OS these days. And the tiny list-view icon of an open folder no longer looks like a tiny open folder.
Some changes are really tiny. The Digital Color Meter utility no longer converts hex colors and can no longer copy color
data to the Clipboard. Image Capture has lost its ability to function as a remote-controlled Webcam or nannycam. iPhoto no longer has its own Time Machine mode for recovering lost photos. There’s no more To Do list in Mail. You can no longer zoom into a Quick Look preview.
[[In Mountain Lion, Web Sharing is gone. The ability to read RSS feeds in Mail and Safari is gone, too. All shreds of Notes and To Dos are gone from Mail (because you now get dedicated Notes and Reminders apps). Techies might mourn the loss of the X11 app and Xgrid support.
Lots of things have been renamed, too, so that they match the iPhone/iPad better: iCal, Address Book, and iChat are now Calendar, Contacts, and Messages.
Some of those losses might sting a little. But in the big Mountain Lion picture, you gain a lot more than you lose.]]
The Mac Becomes an iPad Apple even brought over the whole multitouch thing to the Mac. No, you don’t touch
the screen; you’d get screaming arm pain if you had to spend the day with your arm outstretched, manipulating tiny controls on a vertical surface three feet away. (The resulting ache actually has a name in the computer biz: gorilla arm.)
Instead, you use all those same iPad gestures and more, right on the surface of your laptop trackpad or (if you have Apple’s Magic Mouse) the top surface of the mouse.
All of Mountain Lion’s big-ticket features are intended to work together. For example, suppose you’re looking at a document in full-screen view (feature #1). How are you supposed to switch to the next app? By swiping across the trackpad in the “next app” gesture (feature #2). Then you might pinch four fingers together (feature #3) to open Launchpad so you can open another program.
It’s a new way to work, for sure. And it’s optional. If it doesn’t float your boat, you can ignore all of it (full-screen, gestures, Launchpad, Auto Save). But you should at least make an informed decision—and this book, especially Chapter 0, should come in handy that way.
[[Note: Truth is, Mountain Lion represents only a gentle continuation of the iPadization that began with OS X 10.7, known as Lion. Often in this book, you’ll read references to “Lion/Mountain Lion,” because they’re fundamentally the same software. Even so, there are enough nips, tucks, and improvements to justify the 20 bucks you just shelled out.]]
About This Book
You can’t get Mountain Lion on a disc or flash drive; it’s a download-only operating system. In other words, you don’t get a single page of printed instructions.
To find your way around, you’re expected to use Apple’s online help system. And as you’ll quickly discover, these help pages are tersely written, offer very little technical depth, lack useful examples, and provide no tutorials whatsoever. You can’t even mark your place, underline, or read them in the bathroom.
The purpose of this book, then, is to serve as the manual that should have accompanied OS X—version 10.8 in particular.
OS X Mountain Lion: The Missing Manual is designed to accommodate readers at every technical level. The primary discussions are written for advanced-beginner or intermediate Mac fans. But if you’re a Mac first-timer, miniature sidebar articles called Up To Speed provide the introductory information you need to understand the topic at hand. If you’re a Mac veteran, on the other hand, keep your eye out for similar shaded boxes called Power Users’ Clinic. They offer more technical tips, tricks, and shortcuts.
On the other hand, Apple keeps adding features and rarely takes them away. So this book isn’t getting any thinner.
Even so, some chapters come with free downloadable appendixes—PDF documents, available on this book’s “Missing CD” page at www.missingmanuals.com—that go into further detail on some of the tweakiest features. (You’ll see references to them sprinkled throughout the book.)
Maybe this idea will save a few trees—and a few back muscles when you try to pick this book up.
About the Outline
OS X Mountain Lion: The Missing Manual is divided into six parts, each containing several chapters:
•Part One: The OS X Desktop covers everything you see on the screen when you turn on an OS X computer: the Dock, the Sidebar, Spotlight, Dashboard, Spaces, Mission Control, Launchpad, Time Machine, icons, windows, menus, scroll bars, the Trash, aliases, the a menu, and so on.
•Part Two: Programs in OS X is dedicated to the proposition that an operating system is little more than a launchpad for programs—the actual applications you use in your everyday work, such as email programs, Web browsers, word proces-sors, graphics suites, and so on. These chapters describe how to work with ap-plications in OS X—how to open them, switch among them, swap data between them, use them to create and open files, and control them using the AppleScript and Automator automation tools.
•Part Three: The Components of OS X is an item-by-item discussion of the individ-ual software nuggets that make up this operating system—the 29 panels of System Preferences, and the 50-some programs in your Applications and Utilities folders.
•Part Four: The Technologies of OS X treads in more advanced territory. Network-ing, file sharNetwork-ing, and screen sharing are, of course, tasks OS X was born to do. These chapters cover all of the above, plus the prodigious visual talents of OS X (fonts, printing, graphics, handwriting recognition), and its multimedia gifts (sound, speech, movies).
•Part Five: OS X Online covers all the Internet features of OS X, including the Mail email program and the Safari Web browser; Messages for instant messaging and audio or video chats; Internet sharing; Apple’s free, online iCloud services; and connecting to, and controlling, your Mac from across the wires—FTP, SSH, VPN, and so on.
About
Æ
These
Æ
Arrows
Throughout this book, and throughout the Missing Manual series, you’ll find sentences like this one: “Open the System folderÆLibrariesÆFonts folder.” That’s shorthand for a much longer instruction that directs you to open three nested folders in sequence, like this: “On your hard drive, you’ll find a folder called System. Open that. Inside the System folder window is a folder called Libraries; double-click to open it. Inside that
folder is yet another one called Fonts. Double-click to open it, too.”
Similarly, this kind of arrow shorthand helps to simplify the business of choosing commands in menus, such as aÆDockÆPosition on Left.
About MissingManuals.com
To get the most out of this book, visit www.missingmanuals.com. Click the “Missing CD-ROM” link—and then this book’s title—to reveal a neat, organized, chapter-by-chapter list of the shareware and freeware mentioned in this book.
The Web site also offers corrections and updates to the book. (To see them, click the book’s title, and then click View/Submit Errata.) In fact, please submit such correc-tions and updates yourself! In an effort to keep the book as up to date and accurate as possible, each time O’Reilly prints more copies of this book, I’ll make any confirmed corrections you’ve suggested. I’ll also note such changes on the Web site so that you can mark important corrections into your own copy of the book, if you like. And I’ll keep the book current as Apple releases more Mac OS 10.8 updates.
The Very Basics
To use this book, and indeed to use a Macintosh computer, you need to know a few basics. This book assumes you’re familiar with a few terms and concepts:
•Clicking. To click means to point the arrow cursor at something on the screen and then—without moving the cursor—press and release the clicker button on the mouse or trackpad. To double-click, of course, means to click twice in rapid succession, again without moving the cursor at all. And to drag means to move the cursor while holding down the button.
When you’re told to c-click something, you click while pressing the c key (which is next to the space bar). Shift-clicking, Option-clicking, and Control-clicking work the same way—just click while pressing the corresponding key.
(There’s also right-clicking. That important topic is described in depth on page 236xx.)
•Menus. The menus are the words at the top of your screen: a, File, Edit, and so on. Click one to make a list of commands appear.
Some people click and release to open a menu and then, after reading the choices, click again on the one they want. Other people like to press the mouse button con-tinuously after the initial click on the menu title, drag down the list to the desired command, and only then release the mouse button. Either method works fine.
•Keyboard shortcuts. If you’re typing along in a burst of creative energy, it’s disrup-tive to have to grab the mouse to use a menu. That’s why many Mac fans prefer to trigger menu commands by pressing key combinations. For example, in word processors, you can press c-B to produce a boldface word. When you read an instruction like “press c-B,” start by pressing the c key, and then, while it’s down, type the letter B, and finally release both keys.
Tip: You know what’s really nice? The keystroke to open the Preferences dialog box in every Apple pro-gram—Mail, Safari, iMovie, iPhoto, TextEdit, Preview, and on and on—is always the same: c-comma. Better yet, that standard is catching on in other apps, too, like Word, Excel, and PowerPoint.
•Gestures. A gesture is a swipe across your trackpad (on your laptop, or on an exter-nal Apple trackpad) or across the top surface of the Apple Magic Mouse. Gestures have been given huge importance in Lion. Appendix E contains a handy chart of all Lion gestures, or you can get a tutorial of life with gestures in Chapter 0.
•Icons. The colorful inch-tall pictures that appear in your various desktop folders are the graphic symbols that represent each program, disk, and document on your computer. If you click an icon one time, it darkens, indicating that you’ve just
highlighted or selected it. Now you’re ready to manipulate it by using, for example, a menu command.
•Dialog boxes. See Figure I-1 for a tour of the onscreen elements you’ll frequently be asked to use, like checkboxes, radio buttons, tabs, and so on.
A few more tips on mastering the Mac keyboard appear at the beginning of Chapter 6. Otherwise, if you’ve mastered this much information, you have all the technical background you need to enjoy OS X Mountain Lion: The Missing Manual.
The Very Basics
Figure I-1:
Knowing what you’re doing on the Mac often requires knowing what things are called. Here are some of the most common onscreen elements. They include check-boxes (turn on as many as you like) and radio buttons (only one can be turned on in each grouping).
Pressing Return is usually the same as clicking the default button—the lower-right button that almost always means “OK, I’m done here.”
Part One:
The OS X Desktop
Chapter 0: The Mountain Lion Landscape
Chapter 1: Folders & Windows
Chapter 2: Organizing Your Stuff
Chapter 3: Spotlight
Chapter 4: Dock, Desktop & Toolbars
chapter
0
The Mountain Lion
Landscape
A
s noted in the Introduction, Apple’s overarching design philosophy in creat-ing its operatcreat-ing system lately has been “Make it more like an iPad.” But what does that mean? Do all the new iPaddish features really add up to a single, flowing, new way of working?The following pages are a tutorial. They walk you through a typical Mountain-ized working session the way Apple intended you to work. If you follow along, you’ll wind up with a good sense of how much you like (or don’t like) the iPaddified Mac.
Note: In this book, you’ll see touch gestures provided separately for trackpads (either the one on your laptop, or Apple’s external Magic Trackpad) and the Magic Mouse (Apple’s latest mouse, whose surface is touch sensitive).
Why aren’t the gestures identical? Because the Magic Mouse requires at least two fingers to hold, so some of the more multi-fingered gestures aren’t practical. And remember, on the trackpad you need a finger just to move the cursor—and on the Magic Mouse, moving the mouse moves the cursor.
Launchpad
All right. It’s Monday morning. Yawn, stretch, fluff your hair (if any).
You want to start with a quick Web check. And for that, you’ll need Safari, the Mac’s Web browser.
1. Put four fingers on the trackpad (thumb and three fingers), and pinch them inward toward the center.
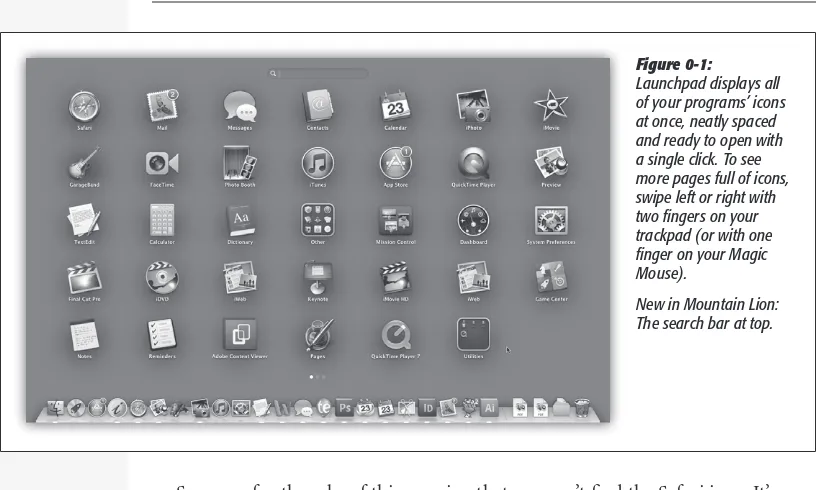
Launchpad Your screen goes dark and fills up with what looks like the Home screen on the iPhone or iPad. You’ve just opened the Launchpad. Here are the icons of all your Mac’s programs, evenly spaced, arrayed (if there are lots of them) on multiple “pages.” Figure 0-1 shows the idea.
Note: The four-finger pinch gesture opens Launchpad only on trackpads. If you don’t have one, click the Launchpad icon on the Dock instead. It looks like a rocket ship (¬).
Suppose, for the sake of this exercise, that you can’t find the Safari icon. It’s on a different page.
2. With two fingers on the trackpad, swipe left or right to change “pages.” Stop when you spot Safari.
If you have a Magic Mouse, swipe left or right with one finger.
Tip: This same gesture—swiping left or right—also works as Back or Forward in Safari.
You could, if you like, customize Launchpad just as you would on an iPhone or an iPad. You can drag the icons around, put them on different pages, combine them into folders, or delete them (see page 164xx). For now, you just want to open the Web browser.
3. Click the Safari icon once.
That’s one difference between opening a program in Launchpad (one click) and
Figure 0-1:
Launchpad displays all of your programs’ icons at once, neatly spaced and ready to open with a single click. To see more pages full of icons, swipe left or right with two fingers on your trackpad (or with one finger on your Magic Mouse).
Full-Screen Mode, Safari
Full-Screen Mode, Safari
Once Safari opens, you’re ready for your first full-screen experience.
1. Click the ƒ icon in the upper-right corner of the Safari window.
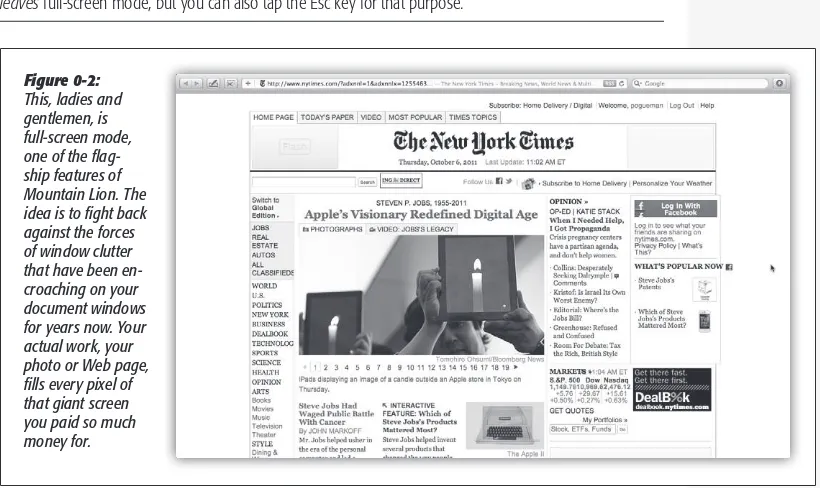
With a smooth animation, your Mac hides the menu bar and the bookmarks bar. The only thing remaining is the address bar. The window’s edges expand all the way to the edges of the screen (Figure 0-2).
Tip: You may as well learn the keyboard shortcut to enter full-screen mode: Control-c-F. The same keystroke leaves full-screen mode, but you can also tap the Esc key for that purpose.
You don’t have to panic, though. The menu bar is still available: Move the pointer to the top of the screen to make the menus reappear.
Tip: [[Wouldn’t it be nice if there were a keyboard shortcut for bringing the menu bar back—if nothing else, so that you can check your battery level and the time of day? There is—but not one that Apple intended. Just press c-space bar. That’s the keystroke for Spotlight, the Mac’s master search bar—but it also makes the menu bar appear. Press the same keystroke to hide the menu bar again.]]
For the next demonstration, call up an actual Web page, preferably one with a lot of text on it—www.nytimes.com, for example. Now suppose you want to scroll down the page.
2. With two fingers on the trackpad, drag upward.
If you have a Magic Mouse, drag up with one finger.
Figure 0-2:
If you just tried this, you’re no doubt frowning right now. You just scrolled down
the page by moving your fingers up. That’s backward, isn’t it?
For your entire computing career so far, you’ve always dragged the scroll bar down
to move the contents of the page up—and now, in Lion/Mountain Lion, Apple has swapped the directions. Why would Apple throw such a monkey wrench into your life?
The main reason is (what else?) to make the Mac match the iPad/iPhone, where you drag your finger up to move the page up.
Anyway, you have two choices: You can spend a couple of days getting used to the new arrangement—or you can put things back the way they’ve always been. (To do that, open System Preferences. For a trackpad: Click Trackpad, click Scroll & Zoom, and then turn off “Scroll direction: natural.” For a Magic Mouse: Click Mouse, click Point & Click, and then turn off “Scroll direction: natural.”)
Note: If you have a non-Apple mouse that has a scroll wheel, then the Mouse preference pane doesn’t offer this scroll-direction option. You can still reverse the scroll-direction logic, though, if you’re handy in Terminal (page 469).
Just open Terminal and type defaults write ~/Library/Preferences/.GlobalPreferences com.apple.swipescroll-direction -bool false. When you press Return and log out, you’ll find that the time-honored scroll com.apple.swipescroll-directions have been restored.
3. Find a photo or a block of text. With two fingers, lightly double-tap the trackpad.
These are taps, not full clicks. On the Magic Mouse, double-tap with one finger.
Safari neatly magnifies the photo or text block to fill the screen, just as on an iPhone or an iPad. Neat, huh?
4. Repeat the double-tap to restore the original size. Click a link to visit a different page.
For this demonstration, it doesn’t make any difference what other Web page you visit. The point is for you to see how cool it is when you swipe your trackpad instead of clicking the Back button.
5. Go back to the first page by swiping leftward with two fingers on the trackpad.
On a Magic Mouse, use one finger.
The previous page slides back into view as though it’s a tile sliding back into place. You can swipe the other way, too—to the right—to go forward a page.
Full-Screen Apps, Mission Control
You’re still in Safari, right? And it’s still full screen, right? Full-ScreenBut if Safari is full screen, how are you supposed to get to other open programs? That’s what you’ll find out in this exercise. You’ll get to see what it’s like to run multiple full-screen apps.
1. Pinch your trackpad with your thumb and three fingers.
Launchpad appears, at your service. (As you may recall, this doesn’t work on the Magic Mouse, so if you’re trackpadless, you’ll have to exit full-screen mode and then click Launchpad on the Dock.)
2. Find Calendar.
You may have to change Launchpad “pages” to find it. Swipe horizontally with two fingers (trackpad) or one finger (Magic Mouse) to change pages.
3. Click to open Calendar. Make the new window full screen by clicking the ƒ in the upper-right corner.
In theory, you now have two apps running at full screen: Safari and Calendar. Now comes the fun part.
4. With three fingers on the trackpad, swipe left or right.
(On the Magic Mouse, use two fingers.)
The full-screen apps slide into or out of view. If you keep three-finger swiping to the right, you’ll see that Dashboard is all the way at the left end of the “channels” that you’re changing. (If it doesn’t work, somebody might have changed the setting to require four fingers in System Preferences.)
You’ll also discover that any other programs—the ones that aren’t full screen—are gathered onto a single screen, as they have been for years. Each full-screen app is one “screen,” and the Finder and all your other apps huddle on another one. But it doesn’t have to be that way.
5. With three fingers on the trackpad, swipe upward.
If you have a Magic Mouse, double-tap (don’t fully click) with two fingers.
You now enter Mission Control, a special screen full of miniatures of all your other
screens; see Figure 0-3. (Again, if three fingers doesn’t work, someone might have changed your trackpad preferences to require four fingers.)
Mission Control has all kinds of cool features. It lets you jump to one window in a haystack. It lets you set up multiple virtual screens. It lets you reorganize the full-screen app full-screens you already have. For the full rundown, jump to page xx173.
In this miniature crash course, you’ve had a glimpse at the future that awaits you: a future of trackpad (or Magic Mouse) finger gestures, full-screen apps, and the new centralized organizing features like Launchpad and Mission Control.
If any of this seems intimidating (or unnecessary), here’s the point to remember: It’s all optional. If you think the Mac works just fine without them, you can ignore the
new features and forget about them completely; all the techniques you already know still work just fine.
But if you think you could get efficiency and pleasure out of adopting a couple of these features, then Mountain Lion is ready for you. Full speed ahead!
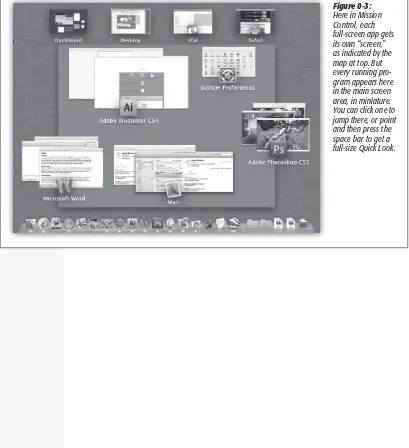
Figure 0-3:
Here in Mission Control, each full-screen app gets its own “screen,” as indicated by the map at top. But every running pro-gram appears here in the main screen area, in miniature. You can click one to jump there, or point and then press the space bar to get a full-size Quick Look. Full-Screen Apps,
chapter
1
Folders & Windows
Getting into OS X
When you first turn on a Mac running OS X 10.8, an Apple logo greets you, soon followed by an animated, rotating “Please wait” gear cursor—and then you’re in. No progress bar, no red tape.
Logging In
What happens next depends on whether you’re the Mac’s sole proprietor or have to share it with other people in an office, school, or household.
•If it’s your own Mac, and you’ve already been through the setup process described in Appendix A, no big deal. You arrive at the OS X desktop.
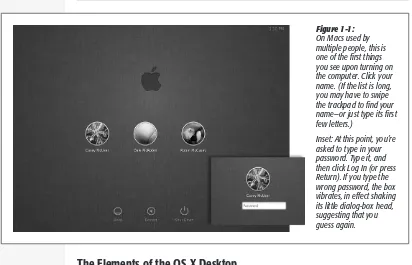
•If it’s a shared Mac, you may encounter the newly redesigned login screen, shown in Figure 1-1. It’s like a portrait gallery, set against a handsome piece of dark gray linen. Click your icon.
If the Mac asks for your password, type it and then click Log In (or press Return). You arrive at the desktop.
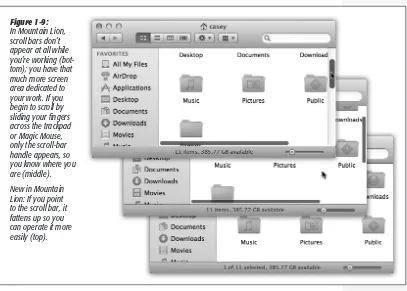
Note: The very first time you run Mountain Lion, you get a huge Scrolling in Mountain Lion warning win-dow. Apple wants to draw your attention to the new drag-up-to-scroll-up behavior of a fresh Mountain Lion installation, which freaks out a lot of baffled customers. For details on this whole reversed-scrolling business (and how to turn it off), see page 12.
Getting into
OS X Note: In certain especially paranoid workplaces, you may not see the rogue’s gallery shown in Figure 1-1. You may just get two text boxes, where you’re supposed to type in your name and password. Without even the icons of known account holders, an evil hacker’s job is that much more difficult.
The Elements of the OS X Desktop
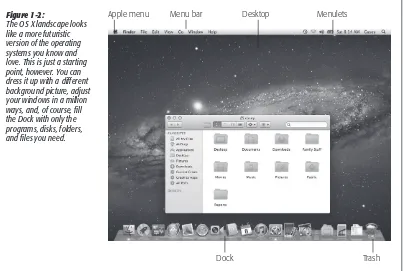
The desktop is the shimmering, three-dimensional OS X landscape shown in Figure 1-2. On a new Mac, it’s covered by a photo of a spectacular spiral galaxy; if you lean forward and squint, you might just be able to make out Apple’s headquarters. (If you upgraded from an earlier version of OS X, you keep whatever desktop picture you had before.)
If you’ve ever used a computer before, most of the objects on your screen are nothing more than updated versions of familiar elements. Here’s a quick tour.
Note: If your desktop looks even emptier than this—no menus, no icons, almost nothing on the Dock—then somebody in charge of your Mac has turned on Simple Finder mode for you. Details on page 512.
The Dock
This row of translucent, almost photographic icons is a launcher for the programs, files, folders, and disks you use often—and an indicator to let you know which pro-grams are already open. They appear to rest on a sheet of transparent smoked glass.
Figure 1-1:
On Macs used by multiple people, this is one of the first things you see upon turning on the computer. Click your name. (If the list is long, you may have to swipe the trackpad to find your name—or just type its first few letters.)
Getting into OS X •Programs go on the left side. Everything else goes on the right, including
docu-ments, folders, and disks. (Figure 1-2 shows the dividing line.)
•You can add a new icon to the Dock by dragging it there. Rearrange Dock icons by dragging them. Remove a Dock icon by dragging it away from the Dock—and enjoy the animated puff of smoke that appears when you release the mouse but-ton. (You can’t, however, remove the icon of a program that’s currently open.)
•Click something once to open it. When you click a program’s icon, a tiny, bright, micro-spotlight dot appears under it to let you know it’s open.
When you click a folder’s icon, you get a stack—an arcing row of icons, or a grid of them, that indicates what’s inside. See page 134 for more on stacks.
•Each Dock icon sprouts a pop-up menu. To see the menu, hold the mouse button down on a Dock icon—or Control-click it, or right-click it. A shortcut menu of useful commands pops right out.
•If you have a trackpad, you can view miniatures of all open windows in a program by pointing to its Dock icon and then swiping down with three fingers. Details on how to turn on this feature are on page 199.
Because the Dock is such a critical component of OS X, Apple has decked it out with enough customization controls to keep you busy experimenting for months. You can
Figure 1-2:
The OS X landscape looks like a more futuristic version of the operating systems you know and love. This is just a starting point, however. You can dress it up with a different background picture, adjust your windows in a million ways, and, of course, fill the Dock with only the programs, disks, folders, and files you need.
Dock Apple menu Menu bar
change its size, move it to the sides of your screen, hide it entirely, and so on. Chapter 4 contains complete instructions for using and understanding the Dock.
The a menu
The a menu houses important Mac-wide commands like Sleep, Restart, and Shut Down. They’re always available, no matter which program you’re using.
The menu bar
Every popular operating system saves space by concealing its most important com-mands in menus that drop down. OS X’s menus are especially refined:
•They stay down. OS X menus stay open until you click the mouse, trigger a com-mand from the keyboard, or buy a new computer, whichever comes first.
Tip: Actually, menus are even smarter than that. If you give the menu name a quick click, the menu opens and stays open. If you click the menu name and hold the mouse button down for a moment, the menu opens but closes again when you release the button. Apple figures that, in that case, you’re just exploring, reading, or hunting for a certain command.
•They’re logically arranged. The first menu in every program, which appears in bold lettering, tells you at a glance what program you’re in (Safari, Microsoft Word, whatever). The commands in this Application menu include About (which indicates what version of the program you’re using), Preferences, Quit, and com-mands like Hide Others and Show All (which help control window clutter, as described on page 204).
In short, all the Application menu’s commands actually pertain to the application you’re using.
The File and Edit menus come next. The File menu contains commands for open-ing, savopen-ing, and closing files. (See the logic?) The Edit menu contains the Cut, Copy, and Paste commands.
The last menu is almost always Help. It opens a miniature Web browser that lets you search the online Mac help files for explanatorytext.
•You can operate them from the keyboard. Once you’ve clicked open a menu, you can highlight any command in it just by typing the first letter (g for Get Info, for example). (It’s especially great for “Your country” pop-up menus on Web sites, where “United States” is about 200 countries down in the list. You can type united s to jump right to it.)
You can also press Tab to open the next menu, Shift-Tab to open the previous one, and Return or Enter to “click” the highlighted command.
Note: The menu bar is partly see-through, for no apparent reason. You can turn that off if you want; open Getting into
Disk icons on the desktop
For years, Apple has encouraged its flock to keep a clean desktop, to get rid of all the icons that many of us leave strewn around. Especially the hard drive icon, which had appeared in the upper-right corner of the screen since the original 1984 Mac.
Today, the Macintosh HD icon doesn’t appear on the screen. “Look,” Apple seems to be saying, “if you want access to your files and folders, just open them directly—from the Dock or from your Home folder (page 71). Most of the stuff on the hard drive is system files of no interest to you, so let’s just hide that icon, shall we?”
Note: If you’d prefer that the disk icons return to your desktop where they used to be, Mountain Lion can accommodate you. Choose FinderÆPreferences, click General, and turn on the checkboxes of the disks whose icons you want on the desktop: hard disks, external disks, CDs, and so on.
Windows and How to Work Them
In designing OS X, one of Apple’s key goals was to address the window-proliferation problem. As you create more files, stash them in more folders, and launch more pro-grams, it’s easy to wind up paralyzed before a screen awash with overlapping rectangles.
That’s the problem admirably addressed by Mission Control, described in detail on page 173. Some handy clutter and navigation controls are built into the windows themselves, too. For example:
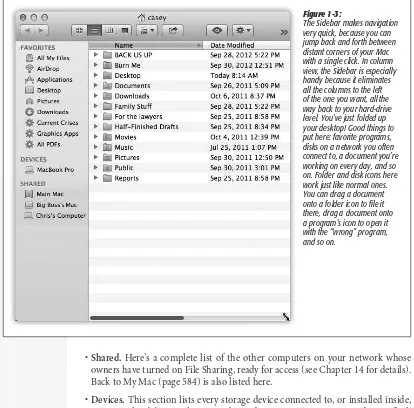
The Sidebar
The Sidebar (Figure 1-3) is the pane at the left side of every Finder window, unless you’ve hidden it. (It’s also at the left side of every Open dialog box and every full-sized Save dialog box.)
The Sidebar has as many as three sections, each preceded by a collapsible heading.
Note: The little flippy triangles that could collapse (hide) each Sidebar heading are gone. Instead, if you point to a heading without clicking, a tiny Hide or Show button appears. Click it to collapse or expand that heading’s contents.
Here are the headings you’ll soon know and love:
•Favorites. This primary section of the Sidebar is the place to stash things for easy access. You can stock this list with the icons of disks, files, programs, folders, and the virtual, self-updating folders called saved searches.
Each icon is a shortcut. For example, click the Applications icon to view the con-tents of your Applications folder in the main part of the window. And if you click the icon of a file or a program, it opens.
Here, too, you’ll find the icons for two recent Mac features: All My Files (see the box on the facing page) and AirDrop, the instant-file-sharing feature described on page 553.
•Shared. Here’s a complete list of the other computers on your network whose owners have turned on File Sharing, ready for access (see Chapter 14 for details). Back to My Mac (page 584) is also listed here.
•Devices. This section lists every storage device connected to, or installed inside, your Mac: hard drives, iPhones, iPads, iPods, CDs, DVDs, memory cards, USB flash drives, and so on. (Your main hard drive doesn’t usually appear here, but you can drag it here.) The removable ones (like CDs, DVDs, i-gadgets) bear a little gray ´ logo, which you can click to eject that disk.
Figure 1-3:
The Sidebar makes navigation very quick, because you can jump back and forth between distant corners of your Mac with a single click. In column view, the Sidebar is especially handy because it eliminates all the columns to the left of the one you want, all the way back to your hard-drive level. You’ve just folded up your desktop! Good things to put here: favorite programs, disks on a network you often connect to, a document you’re working on every day, and so on. Folder and disk icons here work just like normal ones. You can drag a document onto a folder icon to file it there, drag a document onto a program’s icon to open it with the “wrong” program, and so on.
Note: If you remove everything listed under one of these headings, the heading itself disappears to save space. The heading reappears the next time you put something in its category back into the Sidebar.
Fine-tuning the Sidebar
The beauty of this parking lot for containers is that it’s so easy to set up with your favorite places. For example:
•Remove an icon by c-dragging it out of the Sidebar entirely. It vanishes with a puff of smoke (and even a little whoof sound effect). You haven’t actually removed anything from your Mac; you’ve just unhitched its alias from the Sidebar.
All My Files
There it is, staring you in the face at the top of the Sidebar in every window: an icon called All My Files. What is this, some kind of geeked-out soap opera?
Nope. It’s a new Lion/Mountain Lion feature that Apple appear here in a single window. You can
sum-mon it whenever you want, just by clicking the All My Files icon in the Sidebar.
When you first open All My Files, it has your files grouped by type: Contacts, Events & To Dos, Images, PDF Documents, Music, Movies, Presentations, Spreadsheets, Developer (which lists HTML Web-site files and Xcode programming files), and Documents (meaning, “everything else”). In icon view—the factory setting—each class of icons appears in a single scrolling row. Use a two-finger scroll (trackpad) or
one-finger slide (Magic Mouse) to move through the horizontal list. (If you’d rather not have to scroll, click the tiny Show All button that appears at the right end of each row. Now you’re seeing all of the icons of this type; click Show Less to return to the single-row effect.) presentation, but you can’t remember what you called it or where you filed it. Open All My Files, make sure it’s arranged by Kind, and presto: You’re looking at a list of every presentation file on your Mac. Using Quick Look (page 59), you can breeze through them, inspect-ing them one at a time, until you find the one you want.
Apple thinks you’ll like All My Files as a starting point for standard file-fussing operations so much that All My Files is the window that appears automatically when you choose FileÆNew Finder Window (or press c-N). (Of course, you can change that in FinderÆPreferences.)
UP TO SPEED
Tip: You can’t drag items out of the Shared list. Also, if you drag a Devices item out of the list, you’ll have to choose FinderÆPreferencesÆSidebar and then turn on the appropriate checkbox to put it back in.
Note that the requirement to press the c key is relatively new. Evidently Apple tech support got one phone call too many from hapless customers who’d dragged stuff off of the Sidebar by accident.
•Rearrange the icons by dragging them up or down in the list. For example, in Mountain Lion, hard drives don’t appear at the top of the Sidebar anymore, but you’re free to drag them back into those coveted spots. (You’re not allowed to rearrange the computers listed in the Shared section, though.)
•Rearrange the sections by dragging them up or down—a new Mountain Lion feature. For example, you can drag Favorites to the bottom but promote the Shared category.
•Install a new icon by dragging it off your desktop (or out of a window) into any spot in the Favorites list of the Sidebar. Press the c key after beginning the drag. You can’t drag icons into any section of the Sidebar—just Favorites.
Tip: You can also highlight an icon wherever it happens to be and then choose FileÆAdd to Sidebar, or just press c-T.
•Adjust the width of the Sidebar by dragging its right edge—either the skinny divider line or the extreme right edge of the vertical scroll bar, if there is one. You “feel” a snap at the point when the line covers up about half of each icon’s name. Any covered-up names sprout ellipses (…) to let you know there’s more (as in “Secret Salaries Spreadsh…”).
•Hide the Sidebar by pressing c-Option-S, which is the shortcut for the ViewÆHide Sidebar command. Bring the Sidebar back into view by pressing the same key combination (or by using the Show Sidebar command).
Fixing the Sidebar
Anything you drag out of the Sidebar can be dragged back in again, including the big-ticket items like Applications and Pictures. That’s good to know if you drag something important out of the Sidebar and then change your mind.
Even so, there’s a quicker way to restore the Sidebar to its factory settings.
the checkboxes shown here. They let you put back the Apple-installed icons that you may have removed in haste. Just turn on a checkbox to restore its icon to your Sidebar. So if something you expect to see in your Sidebar isn’t there, check back here.
On the other hand, you may as well stream-line your computing life by turning off the checkboxes of icons you never want to see
UP TO SPEED Windows and How
Tip: Mountain Lion introduces a new way to hide and show the Sidebar: To hide it, drag its right edge all the way to the left edge of the window. Unhide it by dragging the left edge of the window to the right again.
Then again, why would you ever want to hide the Sidebar? It’s one of the handiest navigation aids since the invention of the steering wheel. For example:
•It takes a lot of pressure off the Dock. Instead of filling up your Dock with folder icons (all of which are frustratingly alike and unlabeled anyway), use the Sidebar to store them. You leave the Dock that much more room for programs and documents.
•It’s better than the Dock. In some ways, the Sidebar is a lot like the Dock, in that you can stash favorite icons of any sort there. But the Sidebar reveals the names of these icons, and the Dock doesn’t until you use the mouse to point there.
•It makes ejecting easy. Just click the ´ button next to any removable disk to make it pop out. (Other ways to eject disks are described in Chapter 12.)
•It makes burning easy. When you’ve inserted a blank CD or DVD and loaded it up with stuff you want to copy, click the X button next to its name to begin burning that disc. (Details on burning discs are in Chapter 12.)
•You can drag onto its folders and disks. That is, you can drag icons onto Side-bar icons, exactly as though they were the real disks, folders, and programs they represent.
•It simplifies connecting to networked disks. Park your other computers’ shared folder and disk icons here, as described in Chapter 14, to shave several steps off the usual connecting-via-network ritual.
Title Bar
The title bar (Figure 1-4) has several functions. First, when several windows are open, the darkened title bar, window name, mini-icon, and colored left-corner buttons tell you which window is active (in front); in background windows, these elements ap-pear dimmed and colorless. Second, the title bar acts as a handle that lets you move the window around on the screen.
You can also move a window by dragging the solid gray strip on the bottom, if there is one, like the Status bar that you can turn on in the Finder or the Safari Web browser.
Tip: Here’s a nifty keyboard shortcut: You can cycle through the different open windows in one program without using the mouse. Just press c-~ (that is, the tilde key, to the left of the number 1 key on U.S. keyboards). With each press, you bring a different window forward within the current program. It works both in the Finder and in your everyday programs, and it beats the pants off using the mouse to choose a name from the Window menu. (Note the difference from c-Tab, which cycles through different open programs.)
After you’ve opened one folder that’s inside another, the title bar’s secret folder hier-archy menu is an efficient way to backtrack—to return to the enclosing window. Get
in the habit of right-clicking (or Control-clicking, or c-clicking) the name of the window to access the menu shown in Figure 1-5. (You can release the Control or c key immediately after clicking.)
By choosing the name of a folder from this menu, you open the corresponding win-dow. When browsing the contents of the Users folder, for example, you can return to the main hard drive window by Control-clicking the folder name Users and then choosing Macintosh HD from the menu.
Tip: Keyboard lovers, take note. Instead of using the title bar menu, you can also jump to the enclosing window by pressing c-, (up arrow), which is the shortcut for the GoÆEnclosing Folder command.
Pressing c-. (down arrow) takes you back into the folder you started in, assuming that it’s still highlighted. (This makes more sense when you try it than when you read it.)
Once you’ve mastered dragging, you’re ready for these terrific title bar tips:
•Pressing the c key lets you drag the title bar of an inactive window—one that’s partly covered by a window in front—without bringing it to the front. (Drag any empty part of the title bar—not the title itself.)
Figure 1-4:
When Steve Jobs unveiled Mac OS X at Macworld Expo in 2000, he said his goal was to oversee the creation of an interface so attractive, “you just want to lick it.” Desktop windows, with their juicy, fruit-flavored controls, are a good starting point.
Close button Minimize button
Zoom button Toolbar proxy iconFolder
Icon-size slider Status bar
Sidebar
Search box Title bar
By the way, you can close, minimize, or zoom a background window without the help of the c key. Just click one of those three corresponding title-bar buttons normally, even if the window you’re working on is in front.
•By double-clicking the title bar, you minimize the window, making it collapse into the Dock exactly as though you had clicked the Minimize button (assuming you haven’t turned off this feature in System Preferences, of course).
•The Option key means, “Apply this action to all windows in the current program.” For example, Option-double-clicking any title bar minimizes all desktop windows, sending them flying to the Dock.
•Click the ≥ button in the title bar, if you see one, to open a menu full of commands that let you rewind a document to a previous state. This is part of the new Auto Save feature, and it works only in certain programs; see page 220.
Close Button
As the tip of your cursor crosses the three buttons at the upper-left corner of a window, tiny symbols appear inside them: *, -, and +. Ignore the gossip that these symbols were added to help color-blind people who can’t distinguish the colors red, yellow, and green. Color-blind people are perfectly capable of distinguishing the buttons by their positions, just as they do with traffic lights.
Figure 1-5:
Control-click (or right-click, or c-click) a Finder window’s title bar to summon the hidden folder hierarchy menu. This trick also works in most other OS X programs. For example, you can c-click a document window’s title to find out where the document is actually saved on your hard drive.
But for people who aren’t paying attention to button position, these cues distinguish the buttons when all three are identical shades of gray, as they are when you use Graphite mode (page 150). They also signal when it’s time to click. For example, as described in the previous section, you can use these three buttons even when the
The Go to Folder Command
Sometimes a Unix tentacle pokes through the friendly OS X interface and you find a place where you can use Unix shortcuts instead of the mouse.
One classic example is the GoÆGo to Folder command (Shift-c-G). It brings up a box like the one shown here.
The purpose of this box is to let you jump directly to a certain folder on your Mac by typing its Unix folder path.
Depending on your point of view, this special box is either a shortcut or a detour.
For example, if you want to see what’s in the Documents folder of your Home folder, you could choose GoÆGo to Folder and type this:
/Users/chris/Documents
Then click Go or press Return. (In this example, of course, chris is your short account name.)
In other words, you’re telling the Mac to open the Users folder in your main hard drive window, then your Home folder inside that, and then the Documents folder inside that. Each slash means, “and then open.” (You can leave off the name of your hard drive; that’s implied by the opening slash.) When you press Return, the folder you specified pops open immediately.
Of course, if you really wanted to jump to your Documents folder, you’d be wasting your time by typing all that. Unix (and therefore OS X) offers a handy shortcut that means “home folder.” It’s the tilde character (~) at the upper-left corner of the U.S. keyboard.
To see what’s in your Home folder, then, you could type just that ~ symbol into the Go to Folder box and then press
Return. Or you could add some slashes to it to specify a folder inside your Home folder, like this:
~/Documents
You can even jump to someone else’s Home folder by typing a name after the symbol, like this:
~chris
If you get into this sort of thing, here’s another shortcut worth noting: If you type nothing but a slash (/) and then press Re-turn, you jump immediately to the main hard drive window.
Note, too, that you don’t have to type out the full path—only the part that drills down from the window you’re in. If your Home folder window is already open, for example, then you can open the Pictures folder just by typing Pictures.
But the Go to Folder trick really turns into a high-octane timesaver if you use autocompletion. Here’s how it works: After each slash, you can type only enough letters of a folder’s name to give OS X the idea—de instead of desktop,
for example—and then wait a fraction of a second (or, if you’re late for a plane, press the Tab key). OS X instantly and automatically fills in the rest of the folder’s name. It even auto-capitalizes the folder names for you. (In Unix, capitalization matters.)
For example, instead of typing /Applications/Microsoft Of-fice/clipart/standard, you could type nothing more than /ap/ mi/cl/st, remembering to press Tab after each pair of letters. Now that’s a way to feel like a Unix programmer.
POWER USERS’ CLINIC Windows and How