Switching
to the
Mac
“Pogue, the New York Times computer columnist, is among the world’s best explainers.”
—KeVIN KeLLY, CO-FOUNDeR OF WIRED
What makes Windows refugees decide to get a Mac?
Enthusiastic friends? The Apple Stores? Great-looking laptops? A “halo effect” from the popularity of iPhones and iPads? The absence of viruses and spyware? The freedom to run Windows on a Mac? In any case, there’s never been a better time to switch to OS X—and there’s never been a better,
more authoritative book to help you do it.
n Transferring your stuff. Moving files from a PC to a Mac
by cable, network, or disk is the easy part. But how do you extract your email, address book, calendar, Web bookmarks, buddy list, desktop pictures, and MP3 files? Now you’ll know.
n Recreating your software suite. This book identifies the Mac equivalents of your favorite Windows programs.
n Learning Mountain Lion. Apple’s latest operating system
is faster, smarter, and more iPaddish—but you still have to learn it. Dictation. AirPlay. iCloud. Facebook and Twit-ter integration. Gestures. iMessages. AirDrop. If Apple wrote it, this book covers it. From the author of OS X Mountain Lion: The Missing Manual, the #1 bestselling Mac book on earth.
The important stuff
you need to know
People learn best when
information is engaging, clearly
written, and funny. Unfortunately,
most computer books read like
dry catalogs. That’s why I created
the Missing Manuals. They’re
entertaining, unafraid to state
when a feature is useless or
doesn’t work right, and—oh, by
the way—written by actual
writers. And on every page, we answer the simple question:
“What’s this feature for?”
David Pogue is the New York Times tech columnist, an Emmy-winning CBS News and NOVA host, and creator of the Missing Manual series.
missingmanuals.com ISBN: 978-1-449-33029-3
The book that should have been in the box®
Switching
to the
Mac
The book that should have been in the box®
David Pogue
Switching
to the
Mac
Switching to the Mac: The Missing Manual, Mountain Lion Edition
by David Pogue
Copyright © 2012 David Pogue. All rights reserved. Printed in the United States of America.
Published by O’Reilly Media, Inc.,
1005 Gravenstein Highway North, Sebastopol, CA 95472.
O’Reilly Media books may be purchased for educational, business, or sales promotional use. Online editions are also available for most titles: safari@oreilly. com. For more information, contact our corporate/institutional sales department: 800-998-9938 or [email protected].
September 2012: First Edition.
The Missing Manual is a registered trademark of O’Reilly Media, Inc. The Missing Manual logo, and “The book that should have been in the box” are trademarks of O’Reilly Media, Inc. Many of the designations used by manufacturers and sellers to distinguish their products are claimed as trademarks. Where those designations appear in this book, and O’Reilly Media is aware of a trademark claim, the designa-tions are capitalized.
While every precaution has been taken in the preparation of this book, the publisher assumes no responsibility for errors or omissions, or for damages resulting from the use of the information contained in it.
ISBN: 978-1449-33029-3
Table of Contents
Introduction ... 1
What OS X Gives You ... 3
What OS X Takes Away ... 5
About This Book ... 6
The Very Basics ... 8
The Mountain Lion Difference ... 9
Part One: Welcome to Macintosh
Chapter 1: How the Mac Is Different ... 19
Power On, Dude ... 19
Right-Clicking and Shortcut Menus ... 20
Logging Out, Shutting Down ... 22
The Menu Bar ... 24
Finder = Windows Explorer ... 25
Dock = Taskbar ... 25
Menulets = Tray ... 26
Keyboard Differences ... 28
Disk Differences ... 33
Where Your Stuff Is ... 34
Window Controls... 37
Terminology Differences ... 46
Chapter 2: Folders, Dock & Windows ... 47
Getting into OS X ... 47
The Four Window Views ... 51
Icon View ... 51
List View ... 62
Column View ... 68
Cover Flow View ... 71
Quick Look ... 73
The Dock ... 77
Setting Up the Dock ... 78
Using the Dock... 85
The Finder Toolbar ... 90
Chapter 3: Files, Icons & Spotlight ... 95
Renaming Icons ... 95
Selecting Icons ... 97
Moving and Copying Icons ... 100
Aliases: Icons in Two Places at Once ... 105
Color Labels ... 107
The Trash ... 109
Get Info ... 112
Shortcut Menus, Action Menus ... 115
The Spotlight Menu ... 118
The Spotlight Window ... 124
Customizing Spotlight ... 136
Smart Folders ... 139
Chapter 4: Documents, Programs & Mission Control ... 141
A Word About Apps ... 141
The Mac App Store ... 142
Other Ways to Get Mac Software... 144
Opening OS X Programs... 147
Launchpad ... 147
Windows that Auto-Reopen ... 151
The Application Menu ... 152
The “Heads-Up” Program Switcher ... 154
Mission Control: Death to Window Clutter ... 155
Dashboard ... 163
Exposé ... 169
Hiding Programs the Old-Fashioned Way ... 174
How Documents Know Their Parents ... 176
Keyboard Control ... 180
The Save and Open Dialog Boxes ... 186
Auto Save and Versions ... 190
Documents in the Cloud ... 195
Chapter 5: Entering, Moving & Backing up Data ... 199
Power Typing ... 199
Dictation ... 205
The Many Languages of OS X Text ... 210
Data Detectors ... 215
Moving Data Between Documents ... 216
Exchanging Data with Other Macs ... 220
Exchanging Data with Windows PCs ... 225
The Mountain Lion Share Button ... 226
Part Two: Making the Move
Chapter 6: Transferring Your Files to the Mac ... 243
Transfers by Apple Genius ... 244
The Windows Migration Assistant... 244
Manual Network Transfers ... 248
Transfers by Disk ... 248
Transfers by File-Sending Web Site ... 249
Transfers by Email ... 250
Where to Put Your Copied Files ... 250
Document Conversion Issues ... 254
Chapter 7: Special Software, Special Problems ... 255
ACDSee ... 255
Acrobat Reader ... 256
ACT ... 256
Ad Subtract (Pop-Up Stopper) ... 257
Adobe [your favorite program here] ... 258
AOL ... 258
AIM (AOL Instant Messenger) ... 258
Children’s Software ... 258
Chrome ... 258
Easy CD Creator... 258
Encarta ... 259
Eudora ... 259
Excel ... 259
Firefox ... 259
Games ... 260
Google Desktop Search ... 260
Google Earth ... 260
Google Chrome ... 260
ICQ ... 260
Internet Explorer ... 261
iTunes ... 261
McAfee VirusScan ... 261
Microsoft Access ... 261
Microsoft Money ... 262
Microsoft Office ... 264
Microsoft Publisher ... 264
Microsoft Visio ... 265
Minesweeper ... 266
MSN Messenger ... 266
NaturallySpeaking ... 266
Newsgroup Readers ... 266
Norton AntiVirus ... 267
Norton Utilities... 267
Notepad ... 267
Outlook/Outlook Express/Windows Mail ... 267
Paint Shop Pro ... 267
Palm Desktop ... 268
Picasa ... 268
PowerPoint ... 268
QuickBooks ... 268
Quicken ... 269
RealPlayer ... 269
RssReader ... 269
Skype ... 269
SnagIt (Screenshots) ... 270
Solitaire ... 271
Street Atlas USA ... 271
TaxCut, TurboTax ... 271
WinAmp, MusicMatch ... 271
Windows Media Player ... 271
WinZip ... 272
Word ... 272
WordPerfect ... 272
Yahoo Messenger ... 272
Chapter 8: Windows on Macintosh ... 273
Boot Camp ... 275
Windows in a Window ... 281
Life with Microsoft Exchange ... 283
Chapter 9: Hardware on the Mac ... 287
Mac Meets Printer ... 287
Making the Printout ... 290
Managing Printouts ... 293
Printer Sharing ... 295
Faxing ... 296
PDF Files ... 296
Fonts—and Font Book ... 298
Digital Cameras ... 306
Disks ... 306
Startup Disks ... 307
Erasing a Disk ... 308
Burning CDs and DVDs ... 309
iTunes: The Digital Jukebox ... 312
AirPlay ... 325
Keyboards ... 327
Mouse ... 328
Monitors ... 328
Scanners ... 329
Part Three: Making Connections
Chapter 10: Internet Setup & iCloud ... 335
Network Central and Multihoming ... 336
Broadband Connections ... 338
Cellular Modems ... 344
Tethering ... 345
Dial-Up Modem Connections ... 345
Switching Locations ... 346
Internet Sharing ... 348
iCloud ... 350
Internet Location Files ... 360
Chapter 11: Mail & Contacts ... 361
Checking Your Mail ... 361
Writing Messages ... 368
Stationery ... 374
Reading Email ... 377
VIPs ... 392
The Anti-Spam Toolkit ... 393
Contacts ... 395
Chapter 12: Safari & Messages ... 407
Browsing Basics ... 407
The Unified Address/Search Bar ... 407
Bookmarks ... 415
14 Tips for Better Surfing... 417
Tabbed Browsing ... 426
Privacy and Security Features ... 428
Messages ... 431
iMessages ... 433
The Traditional Chat Networks ... 436
Let the Chat Begin ... 440
Text Chatting... 441
Audio Chats ... 444
Video Chats ... 445
Juggling Chats and Windows ... 449
Sharing Your Screen ... 450
Part Four: Putting Down Roots
Chapter 13: Accounts, Parental Controls & Security ... 457
Introducing Accounts ... 457
Creating an Account ... 459
Parental Controls ... 468
Editing Accounts ... 475
Setting Up the Login Process ... 477
Signing In, Logging Out ... 479
Sharing Across Accounts ... 481
Fast User Switching ... 481
Six OS X Security Shields ... 484
And Four Privacy Shields... 499
Chapter 14: Networking, File Sharing & Screen Sharing ... 501
Wiring the Network ... 501
File Sharing: Three Ways ... 505
Accessing Shared Files ... 515
Networking with Windows ... 523
Screen Sharing ... 530
Chapter 15: System Preferences ... 539
The System Preferences Window... 539
Accessibility ... 541
Bluetooth ... 547
CDs & DVDs ... 549
Date & Time ... 550
Desktop & Screen Saver ... 553
Dictation & Speech ... 557
Displays... 557
Dock ... 560
Energy Saver ... 560
General ... 564
iCloud ... 566
Keyboard ... 566
Language & Text ... 568
Mail, Contacts & Calendars ... 568
Mission Control ... 568
Mouse ... 568
Network ... 569
Notifications ... 570
Parental Controls ... 570
Print & Scan ... 570
Sharing ... 570
Software Update ... 571
Sound ... 571
Spotlight ... 574
Startup Disk ... 574
Time Machine ... 574
Trackpad ... 574
Users & Groups ... 577
Chapter 16: The Freebie Programs ... 579
Your Free OS X Programs ... 579
App Store ... 579
Automator ... 580
Calculator ... 580
Calendar ... 582
Chess ... 596
Contacts ... 598
Dashboard ... 598
Dictionary ... 598
DVD Player ... 600
FaceTime... 601
Font Book ... 604
Game Center ... 604
GarageBand ... 607
Image Capture ... 607
iMovie, iPhoto ... 610
iTunes ... 610
Launchpad ... 610
Mail... 610
Messages ... 610
Mission Control ... 610
Notes ... 610
Notification Center ... 614
Photo Booth ... 619
Preview ... 623
QuickTime Player ... 633
Reminders ... 633
Safari ... 637
Stickies ... 637
System Preferences ... 639
TextEdit ... 639
Time Machine ... 645
Part Six: Appendixes
Appendix A: Installing OS X Mountain Lion ... 667
Hardware Requirements ... 668
Psychological Requirements ... 669
The Standard Installation ... 669
The Setup Assistant ... 672
The Homemade Installer Disk ... 674
Appendix B: Troubleshooting ... 677
Minor Eccentric Behavior ... 677
Frozen Programs (Force Quitting) ... 679
Recovery Mode: Three Emergency Disks ... 680
Application Won’t Open ... 684
Startup Problems ... 684
Fixing the Disk ... 687
Where to Get Troubleshooting Help ... 690
Appendix C: The Windows-to-Mac Dictionary ... 691
Appendix D: The Master OS X Secret Keystroke List ... 705
The Missing Credits
About the Author
David Pogue (author) is the weekly tech columnist for The New York Times, an Emmy-winning correspondent for CBS News Sunday Morn-ing, the host of “NOVA Science Now” on PBS, and the creator of the Missing Manual series. He’s the author or coauthor of 62 books, includ-ing 25 in this series, six in the “For Dummies” line (includinclud-ing Macs, Mag-ic, Opera, and Classical Music), two novels, and The World According to Twitter. In his other life, David is a former Broadway show conductor, a piano player, and a magician. He lives in Connecticut with his three awesome children.
Links to his columns and weekly videos await at www.davidpogue.com. He welcomes feedback about his books by email at [email protected].
About the Creative Team
Julie Van Keuren (copy editor) quit her newspaper job in 2006 to move to Montana and live the freelancing dream. She and her husband, M.H. (who is living the novel-writing dream), have two sons, Dexter and Michael. Email:[email protected].
Kirill Voronin (technical editor) is the head of an IT consulting company, aptly called Shortcut, based in Moscow, Russia. He has worked with Macs since the ’90s, and he’s an Apple Certified System Administrator and Apple Certified Trainer for IT courses. He lives with his wife, Maria, and son, Nil. In his spare time, he enjoys backpacking. Email: [email protected].
Phil Simpson (design and layout) runs his graphic design business from Southbury, Connecticut. His work includes corporate branding, publication design, communica-tions support, and advertising. In his free time he is a homebrewer, ice cream maker, wannabe woodworker, and is on a few tasting panels. He lives with his wife and three great felines. Email: [email protected].
Acknowledgments
Over the years, over the eight editions of this book, many friends and colleagues have contributed enthusiasm, expertise, and even prose to this book’s editions. They include Zachary Brass, Dan Pourhadi, Rich Koster, J.D. Biersdorfer, Teresa Noelle Roberts, and Lesa Snider.
hour proofreaders, Diana D’Abruzzo, Kellee Katagi, and Judy Le; the PBS NOVA crew, who gracefully accommodated my nutty book schedule during our shoots; my assistant Jan Carpenter, who fixed hundreds of captions and generally helped me survive; Brian Jepson, who wrote up OS X Server; and my spectacular screenshotter/ index-marathoner, my beautiful Nicki.
I’ve never met, or even spoken to, Kirill Voronin; he lives in Moscow. But he submit-ted so many corrections to the previous edition’s Errata page online that I wound up hiring him to be the tech editor for this book—and he knocked it out of the park.
I also wish I could send out an “I Made the Book Better!” T-shirt to every reader who ever took the time to write with corrections, suggestions, tips, and tricks. And thanks, as always, to David Rogelberg for believing in the idea.
Above all, this book owes its existence to the patience and affection of Kelly, Tia, and Jeffrey. They make these books—and everything else—possible.
—David Pogue
The Missing Manual Series
Missing Manuals are witty, superbly written guides to computer products that don’t come with printed manuals (which is just about all of them). Each book features a handcrafted index; cross-references to specific page numbers (not just “see Chapter 14”); and an ironclad promise never to put an apostrophe in the possessive pronoun its.
Here’s a list of current and upcoming titles:
For the Mac
•AppleScript: The Missing Manual by Adam Goldstein
•FileMaker Pro 12: The Missing Manual by Susan Prosser and Stuart Gripman
•iMovie ’11 & iDVD: The Missing Manual by David Pogue and Aaron Miller
•iPhoto ’11: The Missing Manual by David Pogue and Lesa Snider
•iWork ’09: The Missing Manual by Josh Clark
•Office 2011: The Missing Manual by Chris Grover
•Switching to the Mac: The Missing Manual, Lion Edition by David Pogue
•Photoshop CS6: The Missing Manual by Lesa Snider
For Windows
•Windows 7: The Missing Manual by David Pogue
•Windows 8: The Missing Manual by David Pogue
•Access 2010: The Missing Manual by Matthew MacDonald
•Excel 2010: The Missing Manual by Matthew MacDonald
•Office 2010: The Missing Manual by Chris Grover, Matthew MacDonald, and E. A. Vander Veer
•QuickBooks 2012: The Missing Manual by Bonnie Biafore
•Photoshop CS6: The Missing Manual by Lesa Snider
•Photoshop Elements 10: The Missing Manual by Barbara Brundage
Electronics
•David Pogue’s Digital Photography: The Missing Manual by David Pogue
•iPhone: The Missing Manual, Fifth Edition by David Pogue
•iPhone App Development: The Missing Manual by Craig Hockenberry
•iPad: The Missing Manual, Fourth Edition by J.D. Biersdorfer
•iPod: The Missing Manual, Tenth Edition by J.D. Biersdorfer
•Kindle Fire: The Missing Manual by Peter Meyers
•Motorola Xoom: The Missing Manual by Preston Gralla
•Netbooks: The Missing Manual by J.D. Biersdorfer
•NOOK Tablet: The Missing Manual by Preston Gralla
•Droid X: The Missing Manual by Preston Gralla
•Droid X2: The Missing Manual by Preston Gralla
•Galaxy S II: The Missing Manual by Preston Gralla
•Galaxy Tab: The Missing Manual by Preston Gralla
Web Technologies
•Adobe Edge Preview 7: The Missing Manual, Third Edition by Chris Grover
•Creating a Web Site: The Missing Manual, Third Edition by Matthew MacDonald
•CSS: The Missing Manual, Second Edition, by David Sawyer McFarland
•Dreamweaver CS6: The Missing Manual by David Sawyer McFarland
•Flash CS6: The Missing Manual by E. A. Vander Veer and Chris Grover
•Google+: The Missing Manual by Kevin Purdy
•HTML5: The Missing Manual by Matthew MacDonald
•JavaScript & jQuery: The Missing Manual, Second Edition by David Sawyer McFarland
Life
•Personal Investing: The Missing Manual by Bonnie Biafore
•Your Brain: The Missing Manual by Matthew MacDonald
•Your Body: The Missing Manual by Matthew MacDonald
What’s going on with the Mac these days?
Apple was the only computer company whose sales actually increased during the recession. The Mac’s market share has quadrupled since 2005—it’s now around 20 percent of computer sales in the U.S. And then there’s the most significant statistic of all: you, sitting there reading this book—because, obviously, you intend to switch to (or add on) a Mac.
What’s going on?
Maybe it’s the “halo effect”: the coolness of all those iPads and iPhones is rubbing off onto the rest of Apple’s product line. Maybe people have grown weary of boring beige and black boxes. Maybe it’s the convenience of the Apple Stores. Maybe potential switchers feel more confident to take the plunge, since more and more of life is moving online, where it makes no difference what kind of computer you have.
Or maybe people have just spent one Saturday too many dealing with viruses, worms, spyware, crapware, excessive startup processes, questionable firewalls, inefficient per-missions, and all the other land mines strewn across the Windows world.
In any case, there’s never been a better time to make the switch. Mac OS X version 10.8 (nicknamed Mountain Lion) is gorgeous, easy to understand, and virus-free. Apple’s computers are in top form, too, complete with features like built-in hi-def video cameras, built-in Ethernet, illuminated keyboards, and two different kinds of wireless connections. If you’re talking laptops, the story is even better: Apple’s laptops generally cost less than similarly outfitted Windows laptops, and weigh less, too. Plus, they look a lot cooler.
And then there’s that Intel processor that sizzles away inside today’s Macs. Yes, it lets you run Windows—and Windows programs—at blazing speed, right there on your Macintosh. (Hell really has frozen over.) Chapter 8 has the details.
That’s not to say, however, that switching to the Mac is all sunshine and bunnies. The Macintosh is a different machine, running a different operating system, and built by a company with a different philosophy—a fanatical control freak/perfectionist zeal. When it comes to their missions and ideals, Apple and Microsoft have about as much in common as a melon and a shoehorn.
In any case, you have three challenges before you. First, you’ll probably want to copy your Windows stuff over to the new Mac. Some of that is easy to transfer (photos, music, Microsoft Office documents), and some is trickier (email messages, address books, buddy lists).
Second, you have to assemble a suite of Macintosh programs that do what you’re used to doing in Windows. Most programs from Microsoft, Adobe, and other major players are available in nearly identical Mac and Windows formats. But occasionally, it’s more difficult: Many programs are available only for Windows, and it takes some research (or Chapter 7 of this book) to help you find Macintosh replacements.
Finally, you have to learn OS X itself; after all, it came preinstalled on your new Mac. In some respects, it resembles the latest versions of Windows: There’s a taskbar-like thing, a Control Panel–like thing, and, of course, a Trash can. At the same time, hun-dreds of features you thought you knew have been removed, replaced, or relocated. (If you ever find yourself groping for an old favorite feature, see Appendix C, The “Where’d It Go?” Dictionary.)
Note: In OS X, the X is meant to be a Roman numeral, pronounced “ten.” Unfortunately, many people see “OS X” and say “Oh Ess Sex.” That’s a sure way to get funny looks in public.
Introduction
All About “Mountain Lion”
What’s this business about big cats?
Most software companies develop their wares in secret, using code names for new products to throw outsiders off the scent. Apple’s code names for OS X and its descendants have been named after big cats: OS X was Cheetah, 10.1 was Puma, 10.2 was Jaguar, 10.3 was Panther, 10.4 was Tiger, 10.5 was Leopard, 10.6 was Snow Leopard, and 10.7 was Lion. You have 10.8 Mountain Lion.
(A mountain lion is actually the same thing as a cougar, which is the same thing as a puma. But let’s not quibble.)
Usually, the code name is dropped as soon as the product is complete, whereupon the marketing department gives it a new name. In OS X’s case, though, Apple thinks its cat names are cool enough to retain for the finished product.
You do have to wonder what Apple plans to call future ver-sions. Apple says that it has no problem using double-digit decimal points for future versions of OS X. There’ll be 10.9, 10.10, 10.11, and so on.
But what about the code names?
What OS X Gives You
These days, a key attraction of the Mac—at least as far as switchers are concerned—is security. Viruses and spyware are almost nonexistent on the Mac. (Even Microsoft Word macro viruses don’t run in OS X.) For many people, that’s a good enough reason to move to OS X right there.
Note: Apple no longer refers to its computer operating system as Mac OS X. Now it’s just “OS X,” without the “Mac.” Why? Apple says it’s to match up better with iOS, its operating system for the iPhone and iPad.
Along the same lines, Mail, Mac OS X’s built-in email program, deals surprisingly well with spam, the unsolicited junk email that’s become the scourge of the Internet.
If you ask average people why the Mac isn’t overrun by viruses and spyware, as Win-dows is, they’ll probably tell you, “Because the Mac’s market share is too small for the bad guys to write for.”
That may be true (although 65 million machines isn’t too shabby, as targets go). But there’s another reason, too: OS X is a very young operating system. It was created only in 2001, and with security in mind. (Contrast that with Windows, whose original ver-sions were written before the Internet even existed.) OS X is simply designed better. Its built-in firewall makes it virtually impossible for hackers to break into your Mac, and the system insists on getting your permission before anything gets installed on your Mac. Nothing can get installed behind your back.
But freedom from gunkware and viruses is only one big-ticket item. Here are a few other joys of becoming a Mac fan:
•Stability. Underneath the Mac’s shimmering, translucent desktop is Unix, the industrial strength, rock-solid OS that drives many a Web site and university. It’s not new by any means; in fact, it’s decades old, and has been polished by genera-tions of programmers. That’s precisely why Apple CEO Steve Jobs and his team chose it as the basis for the NeXT operating system, which Jobs worked on during his 12 years away from Apple and which Apple bought in 1997 to turn into Mac OS X.
•Nonagging.OS X isn’t copy-protected. You can install the same copy on your desktop and laptop Macs, if you have a permissive conscience. When you buy a new Mac, you’re never, ever asked to type in a code off a sticker. Nor must you “register,” “activate,” sign up for “.NET Passport,” or endure any other friendly sug-gestions unrelated to your work. And you won’t find any cheesy software demos from other companies clogging up your desktop when you buy a new Mac, either. In short, OS X leaves you alone.
•Greatsoftware.OS X comes with several dozen useful programs, from Mail (for email) to a 3-D, voice-activated Chess program. The most famous programs, though, are the famous Apple “iApps”: iTunes for working with audio files, iMovie for editing video, iPhoto for managing your digital photos, GarageBand for
Jabber-, and Google Talk-compatible instant messaging program that also offers videoconferencing) and Calendar, a calendar program.
•Simplereverything.Most applications on the Mac show up as a single icon. All the support files are hidden away inside, where you don’t have to look at them. There’s no Add/Remove Programs program on the Macintosh; in general, you can remove a program from your Mac simply by dragging that one application icon to the Trash, without having to worry that you’re leaving scraps behind.
•Desktopfeatures.OS X offers a long list of useful desktop features that will be new to you, the Windows refugee.
For example, spring-loaded folders let you drag an icon into a folder within a folder within a folder with a single drag, without leaving a wake of open windows. An optional second line under an icon’s name tells you how many items are in a folder, what the dimensions of a graphic are, and so on. And there’s a useful column view, which lets you view the contents of many nested folders at a glance. (You can think of it as a horizontal version of Windows Explorer’s folder tree.)
When your screen gets cluttered with windows, you can temporarily hide all of them with a single keystroke. If you want to see all the windows on your screen without any of them overlapping, OS X’s Mission Control feature is your best friend (page 155).
A speedy, system-wide Find command called Spotlight is accessible from any pro-gram. It searches not only the names of your files and folders, but also the words inside your documents, and can even search your email, calendar, address book, Web bookmarks, and about 100 other kinds of data, all at once.
Finally, OS X offers the Dashboard (which inspired the widgets in Windows Vista and Windows 7). It lets you summon dozens of miniprograms—a calculator, weather forecaster, dictionary, and so on—with a single keystroke, and dismiss them just as easily. You can download thousands more of these so-called widgets from the Internet, making it even easier to find TV listings, Google search results, local movie showtimes, and more, no matter what program you’re using at the moment.
•Advancedgraphics. Mac programmers get excited about the set of advanced graphics technologies called Quartz (for two-dimensional graphics) and OpenGL (for three-dimensional graphics). For the rest of us, these technologies translate into a beautiful, translucent look for the desktop, smooth-looking (antialiased) onscreen lettering, and the ability to turn any document on the screen into an Adobe Acrobat (PDF) file. And then there are the slick animations that permeate every aspect of OS X: the rotating-cube effect when you switch from one logged-in person to another, the “genie” effect when you minimize a window to the Dock, and so on.
•Advancednetworking.When it comes to hooking up your computer to others, including those on the Internet, few operating systems can touch OS X. It offers advanced features like multihoming, which lets your laptop switch automatically
from its cable modem settings to its wireless or dial-up modem settings when you take it on the road.
If you’re not so much a switcher as an adder (you’re getting a Mac but keeping the PC around), you’ll be happy to hear that Macs and Windows PCs can “see” each other on a network automatically, too. As a result, you can open, copy, and work on files on both types of machines as though the religious war between Macs and PCs had never even existed.
•Voicecontrol,keyboardcontrol.You can operate almost every aspect of every program entirely from the keyboard—or even by voice. These are terrific timesavers for efficiency freaks. In fact, the Mac can also read aloud any text in any program, including Web pages, email, your novel, you name it.
•Fullbuzzwordcompliance.You can’t read an article about OS X without hearing certain technical buzzwords that were once exclusively the domain of computer engineers: preemptive multitasking, multithreading, symmetrical multiprocessing, dynamic memory allocation, and memory protection, for example.
What it all adds up to is that OS X is very stable, that a crashing program can’t crash the whole machine, that the Macintosh can exploit multiple processors, and that the Mac can easily do more than one thing at once—downloading files, playing music, and opening a program, for example—all simultaneously.
•Acommand-lineinterface.In general, Apple has completely hidden from you every trace of the Unix operating system that lurks beneath OS X’s beautiful skin. For the benefit of programmers and other technically oriented fans, however, Apple left uncovered a tiny passageway into that far more complex realm: Terminal, a program in your ApplicationsÆUtilities folder.
If the idea of an all-text operating system gets you going, you can capitalize on the command-line interface of OS X by typing out commands in the Terminal window, which the Mac executes instantly and efficiently. Think DOS prompt, just faster and more useful. (Curious? There’s a free online PDF appendix to this book—called “Terminal Crash Course”—waiting for you. It’s on this book’s “Missing CD” at www.missingmanuals.com.)
What OS X Takes Away
Besides quirks like viruses, spyware, and the Start menu, there are some substantial things on a PC that you lose when you switch to the Mac:
•Programs. Certain programs are still Windows-only. You can always search for replacements—using Chapter 7 of this book as a guide, for example—but you may end up having to pay for them. And, of course, there are a few programs—like some proprietary accounting and laboratory software, and lots of games—where the Windows versions are simply irreplaceable. For those, you have to keep a PC around or run Windows on your Mac (Chapter 8).
•Peripherals.Most add-on devices nowadays work equally well on both Windows PCs and Macs. That includes printers, scanners, digital cameras (still- and video- varieties), and “multifunction” devices that incorporate several of those attributes into one machine.
Unfortunately, sometimes the Mac software for a gadget isn’t as full-featured as the Windows version. Sometimes some of the features on a multifunction printer/ scanner aren’t available on the Mac. If you have a device made by an obscure manufacturer—especially if the device is more than a few years old—it may not work with your Mac at all.
Still, all hope is not lost. Chapter 9 can get you out of most hardware ruts you may find yourself in while making the Big Switch.
About This Book
Switching to the Mac: The Missing Manual is divided into five parts, each containing several chapters:
•Part1,WelcometoMacintosh,covers the essentials of the Macintosh. It’s a crash course in everything you see onscreen when you turn on the machine: the Dock, Sidebar, icons, windows, menus, scroll bars, Trash, aliases, a menu, and so on.
•Part2,MakingtheMove,is dedicated to the actual process of hauling your software, settings, and even peripherals (like printers and monitors) across the chasm from the PC to the Mac. It covers both the easy parts (copying over your documents, pictures, and music files) and the harder ones (transferring your email, address books, buddy lists, and so on). It also covers the steps for running Windows on your Mac, which is an extremely attractive option.
•Part3,MakingConnections, walks you through the process of setting up an In-ternet connection on your Mac. It also covers Apple’s InIn-ternet software suite: Mail, Contacts, Safari, and Messages.
Note: Much of Parts 2 and 3 is adapted from Mac OS X Mountain Lion: The Missing Manual. That book is a fatter, more in-depth guide to OS X.
•Part4,PuttingDownRoots, deals with more advanced topics—and aims to turn you into a Macintosh power user. It teaches you how to set up private accounts for people who share a Mac, create a network for file sharing and screen sharing, navigate the System Preferences program (the Mac equivalent of the Windows Control Panel), and operate the 50 freebie bonus programs that come with OS X.
•Part5,Appendixes. At the end of the book, you’ll find four appendixes. The first two cover installation and troubleshooting. The third is the “Where’d It Go?” Dictionary—an essential reference for anyone who occasionally (or frequently)
flounders to find some familiar control in the new, alien Macintosh environment. The last is a master keyboard-shortcut list for the entire Mac universe.
About
Æ
These
Æ
Arrows
Throughout this book—and throughout the Missing Manual series—you’ll find sen-tences like this one: “Open the SystemÆLibrariesÆFonts folder.” That’s shorthand for a much longer instruction that directs you to open three nested folders in sequence, like this: “On your hard drive, you’ll find a folder called System. Open that. Inside the System folder window is a folder called Libraries; double-click it to open it. Inside that folder is yet another one called Fonts. Double-click to open it, too.”
Similarly, this kind of arrow shorthand helps to simplify the business of choosing commands in menus, as shown in Figure I-1.
About MissingManuals.com
If you visit www.missingmanuals.com, click the “Missing CD” link, and then click the title of this book, you’ll find a neat, organized, chapter-by-chapter list of the shareware and freeware mentioned in this book. (As noted on the inside back cover, having the software online instead of on a CD saved you $5 on the cost of the book.)
The Web site also offers corrections and updates to the book (to see them, click the book’s title, and then click Errata). In fact, you’re encouraged to submit such correc-tions and updates yourself. In an effort to keep the book as up to date and accurate as possible, each time we print more copies of this book, we’ll make any confirmed corrections you’ve suggested. We’ll also note such changes on the Web site, so that you can mark important corrections into your own copy of the book, if you like.
About This Book
Figure I-1:
In this book, arrow notations help to simplify folder and menu instructions. For example, “Choose aÆDockÆ
The Very Basics
To use this book, and indeed to use a Mac, you need to know a few basics. This book assumes you’re familiar with a few terms and concepts:
•Clicking.This book gives you three kinds of instructions that require you to use the Mac’s mouse. To click means to point the arrow cursor at something on the screen and then—without moving the cursor—press and release the clicker but-ton on the mouse (or your laptop trackpad).To double-click, of course, means to click twice in rapid succession, again without moving the cursor at all. And to drag means to move the cursor while holding down the button.
When you’re told to c-click something, you click while pressing the c key (which is next to the space bar). Shift-clicking, Option-clicking, and Control-clicking work the same way—just click while pressing the corresponding key.
•Menus. The menus are the words at the top of your screen: a, File, Edit, and so on. Click one to make a list of commands appear.
Some people click and release to open a menu and then, after reading the choices, click again on the one they want. Other people like to press the mouse button con-tinuously after the initial click on the menu title, drag down the list to the desired command, and only then release the mouse button. Either method works fine.
•Dialogboxes. See Figure I-2 for a tour of the onscreen elements you’ll frequently be asked to use, like checkboxes, radio buttons, tabs, and so on.
The Very Basics
Figure I-2:
Knowing what you’re doing on the Mac often requires knowing that things are called. Here are some of the most common onscreen elements. They include checkboxes (turn on as many as you like) and radio buttons (only one can be turned on in each grouping).
Pressing Return is usually the same as clicking the default button—the lower-right button that almost always means “OK, I’m done here.”
Toolbar Text box
Default button Radio buttons
Checkbox
•Keyboardshortcuts. If you’re typing along in a burst of creative energy, it’s disrup-tive to have to grab the mouse to use a menu. That’s why many computer fans prefer to trigger menu commands by pressing certain combinations on the keyboard. For example, in word processors, you can press c-B to produce a boldface word. When you read an instruction like “press c-B,” start by pressing the c key, and then, while it’s down, type the letter B, and finally release both keys.
Tip: You know what’s really nice? The keystroke to open the Preferences dialog box in every Apple pro-gram—Mail, Safari, iMovie, iPhoto, TextEdit, Preview, and on and on—is always the same: c-comma. Better yet, that standard is catching on with other software companies, too; Word, Excel, Outlook, and PowerPoint use the same keystroke, for example.
•Icons. The colorful inch-tall pictures that appear in your various desktop folders are the graphic symbols that represent each program, disk, and document on your computer. If you click an icon one time, it darkens, indicating that you’ve just highlighted or selected it. Now you’re ready to manipulate it by using, for example, a menu command.
A few more tips on mastering the Mac keyboard appear in Chapter 1. Otherwise, if you’ve digested this much information, you have all the technical background you need to enjoy Switching to the Mac: The Missing Manual.
The Mountain Lion Difference
If you could choose only one word to describe Apple’s overarching design goal in Lion and Mountain Lion, there’s no doubt about what it would be: iPad. That’s right. In this software, Apple has gone about as far as it could go in trying to turn the Mac into an iPad.
Two things made the iPad the fastest-selling electronic gadget in history. First, it’s so simple. No overlapping windows; every app runs full screen. No Save command; everything is autosaved. No files or folders. No menus. All your apps are in one place, the Home screen. To beginners, technophobes, and even old-timers, the iPad’s software represents a refreshing decluttering of the modern computer.
The second huge iPad sales point is that multitouch screen. You operate the whole thing by touching or dragging your fingers on the glass. For example, you cycle through screens by swiping. You zoom out on a map, photo, or Web page by pinching two fingers. You rotate a photo by twisting two fingers, and so on.
So Apple thought, if simplicity and touch gestures made the iPad a megahit, why can’t we do the same for the Mac?
And it set out to bring as many of the iPad’s features and as much of its personality to your Mac as possible. Today’s OS X features like Full Screen mode, Auto Save, and Launchpad are total iPad rip-offs; if Apple hadn’t stolen these features from itself, it would surely be suing for copyright infringement. In Mountain Lion, even the app
names are the same as what’s on iOS: Reminders, Notes, Notification Center, Game Center, and so on.
Apple even brought the whole multitouch thing over to the Mac. No, you don’t touch the screen; you’d get screaming arm pain if you had to spend the day with your arm outstretched, manipulating tiny controls on a vertical surface three feet away. (The resulting ache actually has a name in the computer biz: gorilla arm.)
Instead, you use all those same iPad gestures and more, right on the surface of your laptop trackpad or (if you have Apple’s Magic Mouse) the top surface of the mouse.
All of Mountain Lion’s big-ticket features are intended to work together. For example, suppose you’re looking at a document in full-screen view (feature #1). How are you supposed to switch to the next app? By swiping across the trackpad in the “next app” gesture (feature #2). Then you might pinch four fingers together (feature #3) to open Launchpad so you can open another program.
It’s a new way to work, for sure. And it’s optional. If it doesn’t float your boat, you can ignore all of it (full-screen, gestures, Launchpad, Auto Save).
But you should at least make an informed decision—and that’s the purpose of the next few pages. They’re a tutorial. They walk you through a typical Lionized working session the way Apple intended you to work. If you follow along, you’ll wind up with a good sense of how much you like (or don’t like) the iPaddified Mac.
Note: In this book, you’ll see touch gestures provided separately for trackpads (either the one on your laptop, or Apple’s external Magic Trackpad) and the Magic Mouse (Apple’s latest mouse, whose surface is touch sensitive).
Why aren’t the gestures identical? Because the Magic Mouse requires at least two fingers to hold, so some of the more multi-fingered gestures aren’t practical. And remember, on the trackpad you need a finger just to move the cursor—and on the Magic Mouse, moving the mouse moves the cursor.
Launchpad
All right. It’s Monday morning. Yawn, stretch, fluff your hair (if any).
You want to start with a quick Web check. And for that, you’ll need Safari, the Mac’s Web browser.
1.Putfourfingersonthetrackpad(thumbandthreefingers),andpinchtheminward towardthecenter.
If you have a Magic Mouse, just click Launchpad on the Dock.
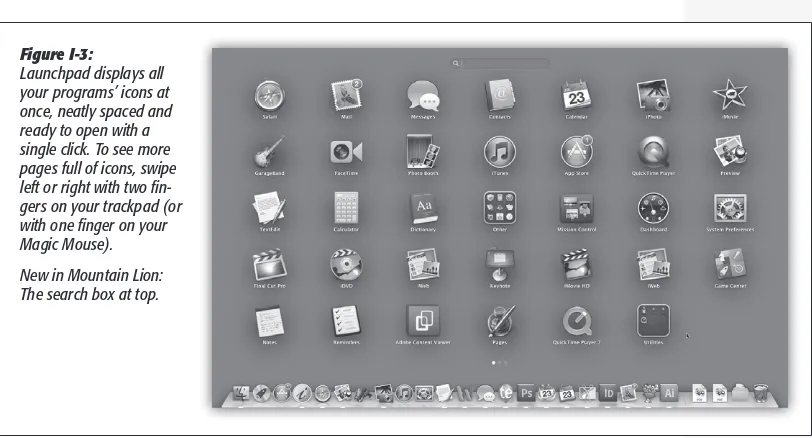
Your screen goes dark and fills up with what looks like the Home screen on the iPhone or iPad. You’ve just opened the Launchpad. Here are the icons of all your Mac’s programs, evenly spaced, arrayed (if there are lots of them) on multiple “pages.” Figure I-3 shows the idea.
Note: The four-finger pinch gesture opens Launchpad only on trackpads. If you don’t have one, click the Launchpad icon on the Dock instead. It looks like a rocket ship (¬).
Suppose, for the sake of this exercise, that you can’t find the Safari icon. It’s on a different page.
2.Withtwofingersonthetrackpad,swipeleftorrighttochange“pages.”Stopwhen youspotSafari.
If you have a Magic Mouse, swipe left or right with one finger.
Tip: This same gesture—swiping left or right—also works as Back or Forward in Safari.
You could, if you like, customize Launchpad just as you would on an iPhone or an iPad. You can drag the icons around, put them on different pages, combine them into folders, or delete them (see page 147). For now, you just want to open the Web browser.
3.ClicktheSafariicononce.
That’s one difference between opening a program in Launchpad (one click) and in your Applications folder (two clicks).
Full-Screen Mode, Safari
Once Safari opens, you’re ready for your first full-screen experience.
The Mountain Lion Difference
Figure I-3:
Launchpad displays all your programs’ icons at once, neatly spaced and ready to open with a single click. To see more pages full of icons, swipe left or right with two fin-gers on your trackpad (or with one finger on your Magic Mouse).
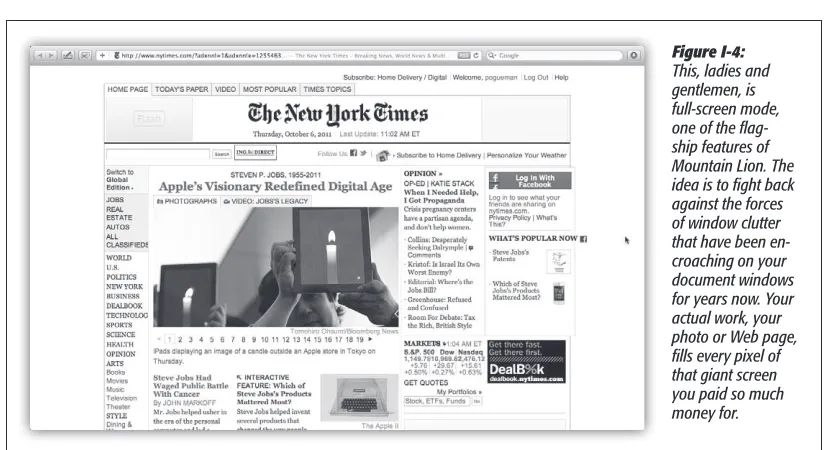
1.Clicktheƒiconintheupper-rightcorneroftheSafariwindow.
With a smooth animation, your Mac hides the menu bar and the bookmarks bar. The only thing remaining is the address bar. The window’s edges expand all the way to the edges of the screen (Figure I-4).
Tip: You may as well learn the keyboard shortcut to enter full-screen mode: Control-c-F. The same keystroke leaves full-screen mode, but you can also tap the Esc key for that purpose.
You don’t have to panic, though. The menu bar is still available: Move the pointer to the top of the screen to make the menus reappear.
Tip: Wouldn’t it be nice if there were a keyboard shortcut for bringing the menu bar back—if nothing else, so that you can check your battery level and the time of day? There is—but not one that Apple intended. Just press c-space bar. That’s the keystroke for Spotlight, the Mac’s master search bar—but it also makes the menu bar appear. Press the same keystroke to hide the menu bar again.
For the next demonstration, call up an actual Web page, preferably one with a lot of text on it—www.nytimes.com, for example. Now suppose you want to scroll down the page.
2.Withtwofingersonthetrackpad,dragupward.
If you have a Magic Mouse, drag up with one finger.
If you just tried this, you’re no doubt frowning right now. You just scrolled down the page by moving your fingers up. That’s backward, isn’t it?
The Mountain Lion Difference
For your entire computing career so far, you’ve always dragged the scroll bar down to move the contents of the page up—and now, in Lion/Mountain Lion, Apple has swapped the directions. Why would Apple throw such a monkey wrench into your life?
The main reason is (what else?) to make the Mac match the iPad/iPhone, where you drag your finger up to move the page up.
Anyway, you have two choices: You can spend a couple of days getting used to the new arrangement—or you can put things back the way they’ve always been. (To do that, open System Preferences. For a trackpad: Click Trackpad, click Scroll & Zoom, and then turn off “Scroll direction: natural.” For a Magic Mouse: Click Mouse, click Point & Click, and then turn off “Scroll direction: natural.”)
Note: If you have a non-Apple mouse that has a scroll wheel, then the Mouse preference pane doesn’t offer this scroll-direction option. You can still reverse the scroll-direction logic, though, if you’re handy in Terminal (page 664).
Just open Terminal and type defaults write ~/Library/Preferences/.GlobalPreferences com.apple.swipescroll-direction -bool false. When you press Return and log out, you’ll find that the time-honored scroll com.apple.swipescroll-directions have been restored.
3.Findaphotoorablockoftext.Withtwofingers,lightlydouble-tapthetrackpad.
These are taps, not full clicks. On the Magic Mouse, double-tap with one finger.
Safari neatly magnifies the photo or text block to fill the screen, just as on an iPhone or an iPad. Neat, huh?
4.Repeatthedouble-taptorestoretheoriginalsize.Clickalinktovisitadifferent page.
For this demonstration, it doesn’t make any difference what other Web page you visit. The point is for you to see how cool it is when you swipe your trackpad instead of clicking the Back button.
5.Gobacktothefirstpagebyswipingleftwardwithtwofingersonthetrackpad.
On a Magic Mouse, use one finger.
The previous page slides back into view as though it’s a tile sliding back into place. You can swipe the other way, too—to the right—to go forward a page.
Full-Screen Apps, Mission Control
You’re still in Safari, right? And it’s still full screen, right?
But if Safari is full screen, how are you supposed to get to other open programs? That’s what you’ll find out in this exercise. You’ll get to see what it’s like to run multiple full-screen apps.
1.Pinchyourtrackpadwithyourthumbandthreefingers.
Launchpad appears, at your service. (As you may recall, this doesn’t work on the Magic Mouse, so if you’re trackpadless, you’ll have to exit full-screen mode and then click Launchpad on the Dock.)
2.FindCalendar.
You may have to change Launchpad “pages” to find it. Swipe horizontally with two fingers (trackpad) or one finger (Magic Mouse) to change pages.
3.ClicktoopenCalendar.Makethenewwindowfullscreenbyclickingtheƒ in theupper-rightcorner.
In theory, you now have two apps running at full screen: Safari and Calendar. Now comes the fun part.
4.Withthreefingersonthetrackpad,swipeleftorright.
(On the Magic Mouse, use two fingers.)
The full-screen apps slide into or out of view. If you keep three-finger swiping to the right, you’ll see that Dashboard is all the way at the left end of the “channels” that you’re changing. (If it doesn’t work, somebody might have changed the setting to require four fingers in System Preferences.)
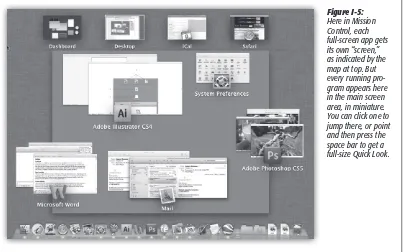
Figure I-5: Here in Mission Control, each full-screen app gets its own “screen,” as indicated by the map at top. But every running pro-gram appears here in the main screen area, in miniature. You can click one to jump there, or point and then press the space bar to get a full-size Quick Look. The Mountain Lion
You’ll also discover that any other programs—the ones that aren’t full screen—are gathered onto a single screen, as they have been for years. Each full-screen app is one “screen,” and the Finder and all your other apps huddle on another one. But it doesn’t have to be that way.
5.Withthreefingersonthetrackpad,swipeupward.
If you have a Magic Mouse, double-tap (don’t fully click) with two fingers.
You now enter Mission Control, a special screen full of miniatures of all your other screens; see Figure 1-5. (Again, if three fingers doesn’t work, someone might have changed your trackpad preferences to require four fingers.)
Mission Control has all kinds of cool features. It lets you jump to one window in a haystack. It lets you set up multiple virtual screens. It lets you reorganize the full-screen app screens you already have. For the full rundown, jump to page 155.
In this miniature crash course, you’ve had a glimpse at the future that awaits you: a future of trackpad (or Magic Mouse) finger gestures, full-screen apps, and the new centralized organizing features like Launchpad and Mission Control.
If any of this seems intimidating (or unnecessary), here’s the point to remember: It’s all optional. If you think the Mac works just fine without them, you can ignore the new features and forget about them completely; all the techniques you already know still work just fine.
But if you think you could get efficiency and pleasure out of adopting a couple of these features, then Mountain Lion is ready for you. Full speed ahead!
Part One:
Welcome to Macintosh
Chapter 1: How the Mac Is Different
Chapter 2: Folders, Dock & Windows
Chapter 3: Files, Icons & Spotlight
Chapter 4: Documents, Programs & Mission Control
Chapter 5: Data: Entering, Dictating & Backing Up
chapter
1
W
hen you get right down to it, the job description of every operating system is pretty much the same. Whether it’s Mac OS X, Windows 7, or Billy Bob’s System-Software Special, any OS must serve as the ambassador between the computer and you, its human operator. It must somehow represent your files and programs on the screen so you can open them; offer some method of organizing your files; present onscreen controls that affect your speaker volume, mouse speed, and so on; and communicate with your external gadgets, like disks, printers, and digital cameras.In other words, OS X offers roughly the same features as Windows. That’s the good news.
The bad news is that these features are called different things and parked in different spots. As you could have predicted, this rearrangement of features can mean a good deal of confusion for you, the Macintosh foreigner. For the first few days or weeks, you may instinctively reach for certain familiar features that simply aren’t where you expect to find them, the way your tongue keeps sticking itself into the socket of a newly extracted tooth.
To minimize the frustration, therefore, read this chapter first. It makes plain the most important and dramatic differences between the Windows method and the Macintosh way.
Power On, Dude
As a critic might say, Apple is always consistent with its placement of the power but-ton: It’s different on every model.
On iMacs and Mac Minis, the power button is on the back panel. On the Mac Pro, it’s on the front panel. And on laptop Macs, the button is either a key in the upper-right corner of the keyboard, or a round button near the upper-right of the keyboard. (Then again, if you have a laptop, you should get into the habit of just closing the lid when you’re done working and opening it to resume; the power button rarely plays a role in your life.)
In every case, though, the power button looks the same (Figure 1-1): It bears the π
logo.
Right-Clicking and Shortcut Menus
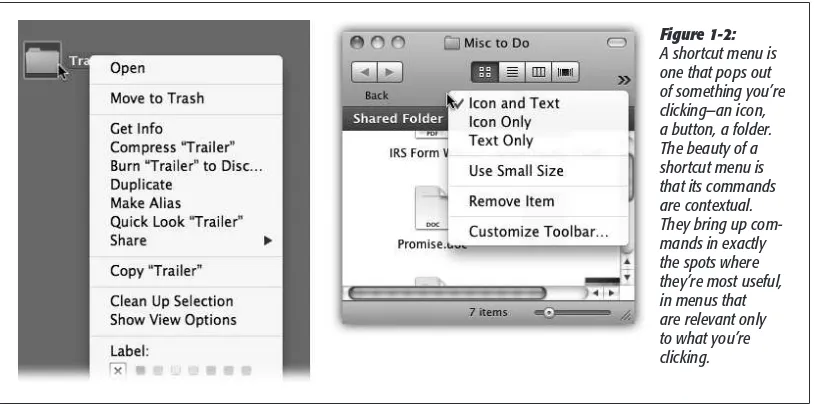
You can get terrific mileage out of shortcut menus on the Mac, just as in Windows (Figure 1-2).
Power On, Dude
Figure 1-1:
Every Mac’s power button looks like this, although it might be hard to find. The good news: Once you find it, it’ll pretty much stay in the same place.
They’re so important, in fact, that it’s worth these paragraphs to explain the different ways you can trigger a “right-click.” (Apple calls it a secondary click, because not all of these methods actually involve a second mouse button. Also, left-handed people can make the left mouse button trigger a right-click.)
•Control-click. You can open the shortcut menu of something on the Mac screen by Control-clicking it. That is, while pressing the Control key (bottom row), click the mouse on your target.
•Right-click. Experienced computer fans have always preferred the one-handed method: right-clicking. That is, clicking something by pressing the right mouse button on a two-button mouse.
“Ah, but that’s what’s always driven me nuts about Apple,” goes the common refrain. “Their refusal to get rid of their stupid one-button mouse!”
Well, not so fast.
First of all, you can attach any old $6 USB two-button mouse to the Mac, and it’ll work flawlessly. Recycle the one from your old PC, if you like.
Furthermore, if you have a desktop Mac, then you already have a two-button mouse—but you might not realize it. Take a look: Is it a white, shiny plastic capsule with a tiny, gray scrolling track-pea on the far end? Then you have a Mighty Mouse.
RIght-Clicking and Shortcut Menus
Is it a cordless, flattened capsule instead? Then it’s the newer Magic Mouse. Each has a secret right mouse button. It doesn’t work until you ask for it.
To do that, choose aÆSystem Preferences. Click Mouse. There, in all its splendor, is a diagram of the Mighty or Magic Mouse.
Your job is to choose Secondary Button from the pop-up menu that identifies the right side of the mouse.
From now on, even though there aren’t two visible mouse buttons, your mouse does, in fact, register a left-click or a right-click depending on which side of the mouse you push down. It works a lot more easily than it sounds like it would.
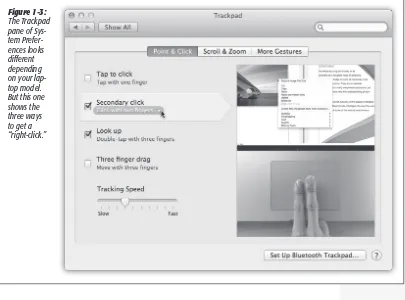
•Usethetrackpad. If you have a trackpad (a laptop, for example), you can trigger a right-click in all kinds of ways.
Out of the box, you do it by clicking the trackpad with two fingers. The shortcut menu pops right up.
Or you can use the pre-Lion method, which still works: Point to whatever you want to click. Rest two fingers on the trackpad—and then click with your thumb.
But even those aren’t the end of your options. In System PreferencesÆTrackpad, you can also turn on even more right-click methods (and watch little videos on how to do them; see Figure 1-3). For example, you can “right-click” by clicking either the lower-right or lower-left corner of the trackpad—one finger only.
Logging Out, Shutting Down
If you’re the only person who uses your Mac, finishing up a work session is simple. You can either turn off the machine or simply let it go to sleep, in any of several ways.
Sleep Mode
If you’re still shutting down your Mac after each use, you may be doing a lot more waiting than necessary. Sleep mode consumes very little power, keeps everything you were doing open and available, and wakes up almost immediately when you press a key or click the mouse.
To make your machine sleep, do one of the following:
•Closethelid. (Hint: This tip works primarily on laptops.)
•ChooseaÆSleep. Or press Option-c-´.
•PressControl-´. In the dialog box shown in Figure 1-4, click Sleep (or type S).
•Pressthepowerbutton (π)onyourmachine. On desktop models, doing so makes it sleep immediately; on laptops, you get the dialog box shown in Figure 1-4.
•Justwalkaway, confident that the Energy Saver setting in System Preferences will send the machine off to dreamland automatically at the specified time.
Tip: Ordinarily, closing your MacBook’s lid means putting it to sleep. And, ordinarily, putting it to sleep means cutting it off from the world. In Mountain Lion, though, a feature called Power Nap lets your Mac stay connected to your network and to the Internet, even while it’s otherwise sleeping. It can download email, back up your stuff, download software updates, and so on. For details, see page 562.
Restart
You shouldn’t have to restart the Mac very often—only in times of severe trouble-shooting mystification, in fact. Here are a few ways to do it:
•ChooseaÆRestart. A confirmation dialog box appears; click Restart (or press Return).
Tip: If you press Option as you release the mouse on the aÆRestart command, you won’t be bothered by an “Are you sure?” confirmation box.
•PressControl-c-´.
•PressControl-´ to summon the dialog box shown in Figure 1-4; click Restart (or type R).
Shut Down
To shut down your machine completely (when you don’t plan to use it for more than a couple of days, when you plan to transport it, and so on), do one of the following:
•ChooseaÆShutDown.A simple confirmation dialog box appears; click Shut Down (or press Return).
Tip: Once again, if you press Option as you release the mouse, no confirmation box appears.
•PressControl-Option-c-´. (It’s not as complex as it looks—the first three keys are all in a tidy row to the left of the space bar.)
•PressControl-´ to summon the dialog box shown in Figure 1-4. Click Shut Down (or press Return).
Logging Out, Shutting Down
Figure 1-4:
•Wait. If you’ve set up the Energy Saver preferences to shut down the Mac automati-cally at a specified time, then you don’t have to do anything.
The “Reopen windows” Option
In the Shut Down dialog box illustrated in Figure 1-4, you’ll notice a checkbox called “Reopen windows when logging back in.” That simple box does something very useful: The next time you start up your Mac, every running program, and every open window, will reopen exactly as they were at the moment you used the Restart or Shut Down command. The new option gives the Mac something like the old Hibernate feature in Windows—and saves you a lot of reopening the next time you sit down to work.
If you turn off that checkbox when you click Restart or Shut Down, then your next startup will take you to the desktop, with no programs running. And if you want the Mac to stop asking—if you never want your programs and windows to reopen—then open aÆSystem PreferencesÆGeneral and turn off “Restore windows when quitting and re-opening apps.”
Log Out
If you share your Mac with other people, then you should log out when you’re done. Doing so ensures that your stuff is safe from the evil and the clueless when you’re out of the room. To do it, choose aÆLog Out (or press Shift-c-Q). When the confirmation dialog box appears, click Log Out, press Return, or just wait for 2 minutes. The Mac hides your world from view and displays the login dialog box, ready for its next victim.
Another option is to use fast user switching—a feature that lets you switch from one user to another without actually logging out, just as in Windows. With fast user switching turned on, your Mac can have several people logged in at once, although only one person at a time actually sees his own desktop.
In either case, this whole accounts system is described in much more detail in Chap-ter 14.
Tip: If you press the Option key as you release the mouse when choosing the Restart, Shut Down, or Log Out commands, you eliminate the “Are you sure?” confirmation dialog box. The saved mouse clicks can really add up.
The Menu Bar
On the Mac, there’s only one menu bar. It’s always at the top of the screen. The names of these menus, and the commands inside them, change to suit the window you’re currently using. That’s different from Windows, where a separate menu bar appears at the top of every window.
Mac and Windows devotees can argue the relative merits of these two approaches until they’re blue in the face. All that matters, though, is that you know where to look when you want to reach for a menu command. On the Mac, you always look upward.
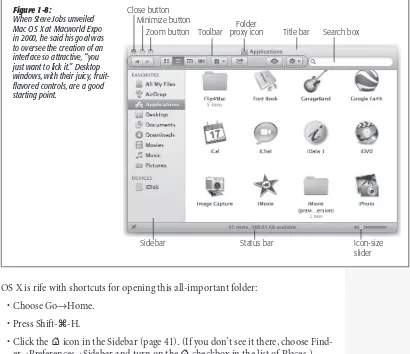
Finder = Windows Explorer
In OS X, the “home base” program—the one that appears when you first turn on the machine and shows you the icons of all your folders and files—is called the Finder. This is where you manage your folders and files, throw things away, manipulate disks, and so on. (You may also hear it called the desktop, since the items you find there mirror the files and folders you might find on a real-life desktop.)
Getting used to the term “Finder” is worthwhile, though, because it comes up so often. For example, the first icon on your Dock is labeled Finder, and clicking it always takes you back to your desktop.
Dock = Taskbar
At the bottom of almost every OS X screen sits a tiny row of photorealistic icons. This is the Dock, a close parallel to the Windows taskbar. (As in Windows, it may be hidden or placed on the left or the right edge of the screen instead—options that appeal primarily to power users and eccentrics.)
The Dock displays the icons of all your open windows and programs, which are denoted by small, glowing dots beneath their icons. Clicking these icons opens the corresponding files, folders, disks, documents, and programs. If you click and hold (or right-click) an open program’s icon, you’ll see a pop-up list of the open windows in that program, along with Quit and a few other commands.
When you close a program, its icon disappears from the Dock (unless you’ve secured it there for easy access, as described on page 87).
Tip: You can cycle through the various open programs on your Mac by holding down the c key and pressing Tab repeatedly. (Sound familiar? It’s just like Alt-Tabbing in Windows.) And if you just tap c-Tab, you bounce back and forth between the two programs you’ve used most recently.
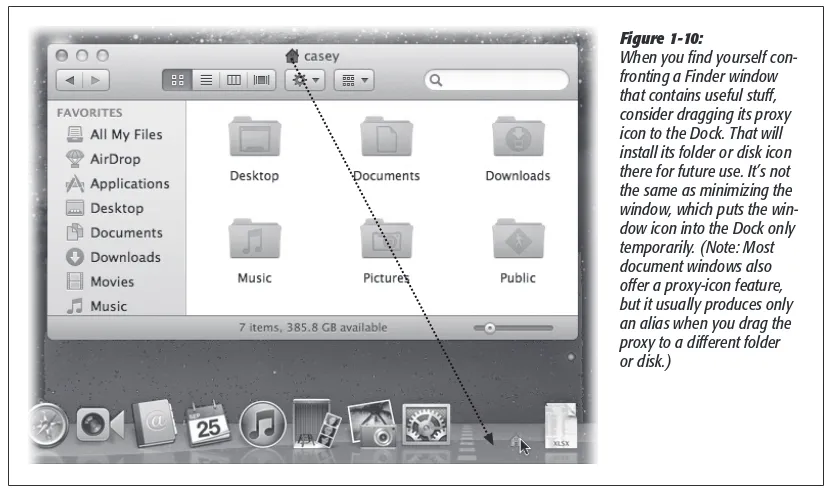
What you may find confusing at first, though, is that the Dock also performs one function of the Windows Start menu: It provides a “short list” of programs and files that you use often, for easy access. To add a new icon to the Dock, just drag it there (put programs to the left of the divider line; everything else goes on the right). To remove an icon from the Dock, just drag it away. As long as that item isn’t actually open at the moment, it disappears from the Dock with a little animated puff of smoke when you release the mouse button.
The bottom line: On the Mac, a single interface element—the Dock—exhibits charac-teristics of both the Start menu (it lists frequently used programs) and the taskbar (it lists currently open programs and files). (The Windows 7 taskbar does the same thing.)
If you’re still confused, Chapter 2 should help clear things up.
Menulets = Tray
Most Windows fans refer to the row of tiny status icons at the lower-right corner of the screen as the tray, even though Microsoft’s official term is the notification area. (Why use one syllable when eight will do?)
Macintosh fans wage a similar battle of terminology when it comes to the little menu-bar icons shown in Figure 1-5. Apple calls them Menu Extras, but Mac fans prefer to call them menulets.
In any case, these menu-bar icons are cousins of the Windows tray—each is both an indicator and a menu that provides direct access to certain settings. One menulet lets you adjust your Mac’s speaker volume, another lets you change the screen resolution, another shows you the remaining power in your laptop battery, and so on.
Making a menulet appear usually involves turning on a certain checkbox. These checkboxes lurk on the various panes of System Preferences (Chapter 15), which is the Mac equivalent of the Control Panel. (To open System Preferences, choose its name from the a menu or click the gears icon on the Dock.)
Here’s a rundown of the most useful Apple menulets, complete with instructions on where to find the magic on/off checkbox for each.
•AirPlay lets you send the Mac’s screen image to a TV, provided you have an Apple TV (details on page 325). To find the Show checkbox: Open System Preferen-cesÆDisplaysÆDisplay tab.
•AirPort lets you turn your WiFi (wireless networking) circuitry on or off, join existing wireless networks, and create your own private ones. To find the Show checkbox: Open System PreferencesÆNetwork. Click Wi-Fi.
Tip: Once you’ve installed this menulet, you can Option-click it to produce a secret menu full of details about the wireless network you’re on right now. You see its channel number, password-security method (WEP, WPA, None, whatever), speed, and such geeky details as the MCS Index and RSSI.
Menulets = Tray