The book that should have been in the box
®Switching
to the
Mac
—Kevin Kelly, co-founDer of Wired
What makes Windows refugees decide to get a Mac?
Enthusiastic friends? The Apple Stores? Those “I’m a
Mac” ads? A “halo effect” from the popularity of
iPods and iPhones? The absence of viruses and
spyware? The freedom to run Windows on a Mac? In
any case, there’s never been a better time to switch
to Mac OS X—and there’s never been a better,
funnier, or more authoritative book to help you do it.
n Transferring your stuff. Moving files from a PC to a Mac by cable, network, or disk is the easy part. But how do you extract your email, address book, calendar, Web bookmarks, buddy list, desktop pictures, and MP3 files? Now you’ll know.
n recreating your software suite. This book identifies the Mac equivalents of your favorite Windows programs.
n learning Mac oS X Snow leopard. Apple’s latest operating system is faster, smaller, and better than ever—but you still have to learn it. Fortunately, you’re in good hands with the author of Mac OS X Snow Leopard: The Missing Manual, the #1 bestselling Mac book on earth.
The important stuff
tion is engaging, clearly written,
and funny. Unfortunately, most
computer books read like dry
catalogs. That’s why I created
the Missing Manuals. They’re
entertaining, unafraid to state
when a feature is useless or
doesn’t work right, and—oh, by
the way—written by actual
writers. And on every page, we
answer the simple question:
“What’s this feature for?”
Switching
to the
Mac
Snow Leopard Edition
THE MISSING MANUAL
The book that
should have been
Switching
to the
Mac
Snow Leopard Edition
Switching to the Mac: The Missing Manual, Snow Leopard Edition
by David PogueCopyright © 2009 David Pogue. All rights reserved. Printed in the United States of America.
Published by O’Reilly Media, Inc., 1005 Gravenstein Highway North, Sebastopol, CA 95472.
O’Reilly Media books may be purchased for educational, business, or sales promotional use. Online editions are also available for most titles: safari.oreilly. com. For more information, contract our corporate/institutional sales department: 800-998-9938 or [email protected].
December 2009: First Edition.
The Missing Manual is a registered trademark of O’Reilly Media, Inc. The Missing Manual logo, and “The book that should have been in the box” are trademarks of O’Reilly Media, Inc. Many of the designations used by manufacturers and sellers to distinguish their products are claimed as trademarks. Where those designations appear in this book, and O’Reilly Media is aware of a trademark claim, the designations are capitalized.
While every precaution has been taken in the preparation of this book, the publisher assumes no responsibility for errors or omissions, or for damages resulting from the use of the information contained in it.
This book uses RepKover™, a durable and flexible lay-flat binding.
Table of Contents
Introduction ...
1
What Mac OS X Gives You ... 3
What Mac OS X Takes Away ... 5
About This Book ... 6
The Very Basics ... 8
Part One: Welcome to Macintosh
Chapter 1: How the Mac Is Different ... 11
Power On, Dude ... 11
That One-Button Mouse ... 12
On, Off, and Sleep ... 14
The Menu Bar ... 16
Finder = Windows Explorer ... 17
Dock = Taskbar ... 17
Menulets = Tray ... 18
Keyboard Differences ... 20
Disk Differences ... 26
Where Your Stuff Is ... 27
Window Controls... 29
Terminology Differences ... 37
Chapter 2: Folders, Dock, & Windows ... 39
Getting into Mac OS X... 39
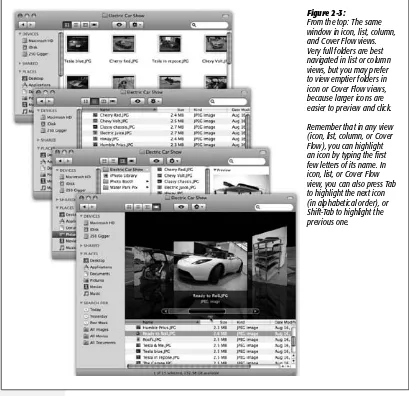
The Four Window Views ... 41
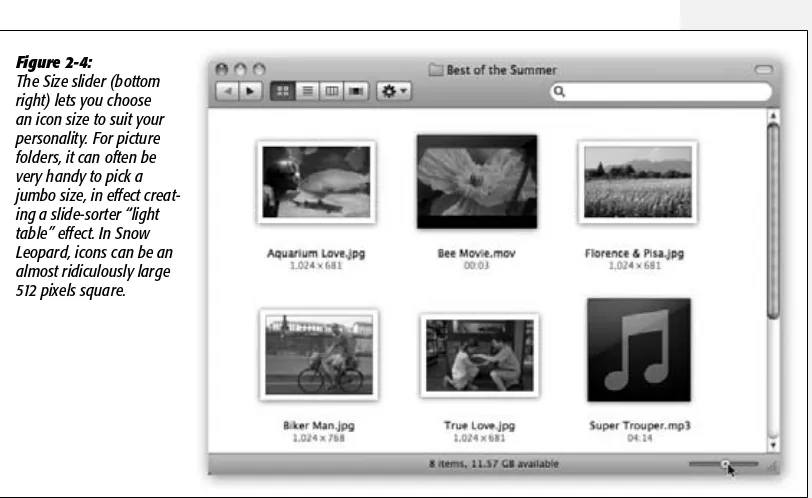
Icon View ... 43
List View ... 50
Column View ... 54
Cover Flow View ... 57
Quick Look ... 59
The Dock ... 62
The Finder Toolbar ... 73
Chapter 3: Files, Icons, & Spotlight ... 79
Renaming Icons ... 79
Selecting Icons ... 81
Moving and Copying Icons ... 83
Aliases: Icons in Two Places at Once ... 88
Color Labels ... 89
The Trash ... 92
Get Info ... 95
The Spotlight Menu ... 98
The Spotlight Window ... 104
Customizing Spotlight ... 113
Smart Folders ... 114
Chapter 4: Documents, Programs, & Spaces ... 117
Opening Mac OS X Programs ... 117
The New, Improved “Alt-Tab” ... 120
Exposé: Death to Window Clutter ... 121
Spaces: Your Free Quad-Display Mac ... 129
Hiding Programs the Old-Fashioned Way ... 134
How Documents Know Their Parents ... 136
Keyboard Control ... 141
The Save and Open Dialog Boxes ... 146
Universal Apps (Intel Macs) ... 149
Installing Mac OS X Programs ... 151
Dashboard ... 155
Web Clips: Make Your Own Widgets ... 160
Power Typing in Snow Leopard ... 162
The Many Languages of Mac OS X Text ... 166
Data Detectors ... 171
Part Two: Making the Move
Chapter 5: Seven Ways to Transfer Your Files ... 175
Transfers by Apple Genius ... 176
Transfers by Network ... 177
Transfers by Disk ... 177
Transfers by File-Sending Web Site ... 179
Transfers by Email ... 179
Transfers by iDisk ... 179
Transfers by Bluetooth ... 180
Where to Put Your Copied Files ... 180
Chapter 6: Transferring Email & Contacts ... 185
A Reminder That Could Save You Hours ... 186
Transferring Your Outlook Mail ... 187
Transferring Your Outlook Addresses ... 193
Transferring from Outlook Express (Windows Mail) ... 197
Email Settings ... 198
Life with Microsoft Exchange ... 200
Chapter 7: Special Software, Special Problems ... 205
ACDSee ... 205
Acrobat Reader ... 206
ACT ... 206
Ad Subtract (Pop-up Stopper) ... 207
Adobe [your favorite program here] ... 208
America Online ... 208
AIM (AOL Instant Messenger) ... 209
Children’s Software ... 209
Easy CD Creator... 209
Encarta ... 210
Eudora ... 210
Excel ... 210
Firefox ... 210
Games ... 211
Google Desktop Search ... 211
ICQ ... 211
Internet Explorer ... 211
iTunes ... 211
Limewire ... 212
McAfee VirusScan ... 212
Microsoft Access ... 212
Microsoft Money ... 213
Microsoft Office ... 215
Microsoft Publisher ... 215
Microsoft Visio ... 216
Minesweeper ... 216
MSN Messenger ... 217
NaturallySpeaking ... 217
Netscape ... 217
Newsgroup Readers ... 217
Norton AntiVirus ... 217
Norton Utilities... 217
Notepad ... 218
Outlook/Outlook Express/Windows Mail ... 218
Palm Desktop ... 218
Picasa ... 219
PowerPoint ... 219
QuickBooks ... 219
Quicken ... 219
RealPlayer ... 220
RssReader ... 220
Skype ... 220
SnagIt ... 221
Solitaire ... 221
Street Atlas USA ... 222
TaxCut, TurboTax ... 222
WinAmp, MusicMatch ... 222
Windows Media Player ... 222
WinZip ... 223
Word ... 223
WordPerfect ... 223
Yahoo Messenger ... 223
Chapter 8: Windows on Macintosh ... 225
Boot Camp ... 226
Windows in a Window ... 234
Chapter 9: Hardware on the Mac ... 237
Printers and Printing ... 237
When all your settings look good, click Print (or press Return) to send your printout to the printer. ... 244
Faxing ... 247
PDF Files ... 250
Fonts—and Font Book ... 252
Digital Cameras ... 256
Disks ... 256
Burning CDs and DVDs ... 259
iTunes: The Digital Jukebox ... 263
DVD Movies ... 273
Keyboard ... 276
Mouse ... 276
Monitors ... 277
Part Three: Making Connections
Chapter 10: Internet Setup & MobileMe... 291
Network Central—and Multihoming ... 292
Broadband Connections ... 294
Cellular Modems ... 299
Dial-up Modem Connections ... 300
Switching Locations ... 302
Internet Sharing ... 304
MobileMe ... 306
Internet Location Files ... 314
Chapter 11: Mail & Address Book ... 315
Checking Your Mail ... 315
Writing Messages ... 319
Stationery ... 325
Reading Email ... 328
The Anti-Spam Toolkit ... 342
RSS Feeds ... 343
Notes ... 345
To Dos ... 347
Address Book ... 349
Chapter 12: Safari & iChat ... 359
Safari ... 359
Tips for Better Surfing ... 368
Tabbed Browsing ... 375
RSS: The Missing Manual ... 378
iChat ... 381
Making a List ... 385
Let the Chat Begin ... 387
Text Chatting... 388
Audio Chats ... 392
Video Chats ... 392
iChat Tweaks ... 400
Part Four: Putting Down Roots
Chapter 13: Accounts, Parental Controls, & Security ... 405
Introducing Accounts ... 405
Creating an Account ... 407
Parental Controls ... 414
Editing Accounts ... 421
Signing In, Logging Out ... 424
Sharing Across Accounts ... 425
Fast User Switching ... 427
Five Mac OS X Security Shields ... 429
Chapter 14: Networking, File Sharing, & Screen Sharing ... 445
Wiring the Network ... 445
File Sharing ... 448
Accessing Shared Files ... 454
Networking with Windows ... 458
Screen Sharing ... 465
Chapter 15: System Preferences ... 471
The System Preferences Window... 471
Accounts ... 473
Appearance ... 473
Bluetooth ... 475
CDs & DVDs ... 477
Date & Time ... 478
Desktop & Screen Saver ... 480
Displays... 486
Dock ... 488
Energy Saver ... 488
Exposé & Spaces ... 491
Keyboard ... 491
Language & Text ... 492
MobileMe ... 492
Mouse ... 492
Network ... 493
Parental Controls ... 493
Print & Fax ... 494
Security ... 494
Sharing ... 494
Software Update ... 494
Sound ... 495
Speech ... 498
Spotlight ... 498
Startup Disk ... 498
Time Machine ... 498
Trackpad ... 498
Chapter 16: The Free Programs ... 505
Address Book ... 506
Automator ... 506
Calculator ... 506
Chess ... 508
Dashboard ... 509
Dictionary ... 509
DVD Player ... 511
Font Book ... 511
Front Row ... 511
GarageBand ... 513
iCal... 513
iChat ... 525
iDVD ... 525
Image Capture ... 525
iMovie, iPhoto ... 530
iTunes ... 531
Mail... 531
Photo Booth ... 531
Preview ... 534
QuickTime Player ... 540
Safari ... 548
Stickies ... 548
System Preferences ... 550
TextEdit ... 550
Time Machine ... 556
Utilities: Your Mac OS X Toolbox ... 556
Part Five: Appendixes
Appendix A: Installation & Troubleshooting ... 579
Getting Ready to Install ... 579
Two Kinds of Installation ... 580
The Automatic Installation ... 580
The Erase & Install Option ... 582
The Setup Assistant ... 583
Troubleshooting ... 586
Appendix B: The “Where’d It Go?” Dictionary ... 595
About the Author
David Pogue (author) is the weekly tech columnist for The New York Times, Emmy-winning correspondent for CBS News Sunday Morning, weekly CNBC contributor, and the creator of the Missing Manual series. He’s the author or coauthor of 50 books, including 25 in this series, six in the “For Dummies” line (including Macs, Magic, Opera, and Classical Music), two novels, and The World According to Twitter. In his other life, David is a former Broadway show conductor, a piano player, and a magician. He lives in Connecticut with his wife and three awesome children.
Links to his columns and funny weekly videos await at www.davidpogue.com. He welcomes feedback about his books by email at [email protected].
About the Creative Team
Julie Van Keuren (copy editor) is a freelance editor, writer, and desktop publisher who runs her “little media empire” from her home in Billings, Montana. In her spare time she enjoys swimming, biking, running, and (hey, why not?) triathlons. She and her husband, M.H., have two sons, Dexter and Michael. Email: [email protected].
Phil Simpson (design and layout) works out of his office in Southbury, Connecticut, where he has had his graphic design business since 1982. He is experienced in many facets of graphic design, including corporate identity/branding, publication design, and corporate and medical communications. Email: [email protected].
Brian Jepson (technical consultant) is a senior editor for O’Reilly Media. He cowrote Mac OS X for Unix Geeks and has written or edited a number of other tech books. He’s the cofounder of Providence Geeks and serves as an all-around geek for AS220, a nonprofit, unjuried, and uncensored arts center in Providence, R.I. Email: bjepson@ oreilly.com.
Acknowledgments
The Missing Manual series is a joint venture between the dream team introduced on this page and O’Reilly Media. I’m grateful to all of them, and also to a few people who did massive favors for this book. The prose of Joseph Schorr and Adam Goldstein, contributors to earlier editions, lives on in this one. Lesa Snider put in a gruelling week, brilliantly getting this puppy ready for the printer. And Kellee Katagi cheerfully proofed hundreds of pages on a tight deadline. Thanks also to David Rogelberg for believing in the idea, and above all, to Jennifer, Kelly, Tia, and Jeffrey, who make these books—and everything else—possible.
The Missing Manual Series
Missing Manuals are witty, superbly written guides to computer products that don’t come with printed manuals (which is just about all of them). Each book features a handcrafted index; cross-references to specific page numbers (not just “see Chapter 14”); and an ironclad promise never to put an apostrophe in the possessive word its.
Here’s a partial list of current and upcoming titles.
•iPhone: The Missing Manual, 3rd Edition by David Pogue •iPod: The Missing Manual, 8th Edition by J.D. Biersdorfer
•David Pogue’s Digital Photography: The Missing Manual by David Pogue •Photoshop CS4: The Missing Manual by Lesa Snider King
•JavaScript: The Missing Manual by David Sawyer McFarland •CSS: The Missing Manual, 2nd Edition, by David Sawyer McFarland •Dreamweaver 8: The Missing Manual by David Sawyer McFarland •Flash CS4: The Missing Manual by E. A. Vander Veer and Chris Grover •Netbooks: The Missing Manual by J.D. Biersdorfer
•Home Networking: The Missing Manual by Scott Lowe •Your Brain: The Missing Manual by Matthew MacDonald •Your Body: The Missing Manual by Matthew MacDonald •Facebook: The Missing Manual by E.A. Vander Veer
•Photoshop Elements for Mac: The Missing Manual by Barbara Brundage •iMovie ’09 & iDVD: The Missing Manual by David Pogue and Aaron Miller •iPhoto ’09: The Missing Manual by David Pogue and J.D. Biersdorfer •iWork ’09: The Missing Manual by Josh Clark
•Office 2008 for Macintosh: The Missing Manual by Jim Elferdink et al. •FileMaker Pro 10: The Missing Manual by Geoff Coffey and Susan Prosser •Windows 7: The Missing Manual by David Pogue
•Windows Vista: The Missing Manual by David Pogue
•Office2007:TheMissingManualby Chris Grover, Matthew MacDonald, and E. A. Vander Veer
What’s going on with the Mac these days?
Apple was the only computer company whose sales actually increased during the recession. The Mac’s market share has tripled since 2005. And Mac how-to book sales are up about 35 percent over two years ago (woo-hoo!).
And then there’s the most significant statistic of all: you, sitting there reading this book—because, obviously, you intend to switch to (or add on) a Mac.
What’s going on?
Maybe the coolness of all those iPods and iPhones is rubbing off onto the rest of Apple’s product line. Maybe people have grown weary of boring beige and black boxes. Maybe it was the “I’m a Mac/ I’m a PC” ads on TV, or the convenience of the Apple Stores. Maybe potential switchers feel more confident to take the plunge now that Macs (because they contain Intel chips) can run Windows programs.
Or maybe people have just spent one Saturday too many dealing with viruses, worms, spyware, crapware, excessive startup processes, questionable firewalls, inefficient per-missions, and all the other land mines strewn across the Windows world.
In any case, there’s never been a better time to make the switch. Mac OS X version 10.6 (Snow Leopard) is gorgeous, easy to understand, and virus-free. Apple’s comput-ers are in top form, too, complete with features like built-in video cameras, built-in Ethernet, DVD burners, illuminated keyboards, and two different kinds of wireless connections. If you’re talking laptops, the story is even better: Apple’s laptops gener-ally cost less than similarly outfitted Windows laptops, and weigh less, too. Plus, they look a lot cooler.
And then there’s that Intel processor that sizzles away inside today’s Macs. Yes, it lets you run Windows—and Windows programs—at blazing speed, right there on your Macintosh. (Hell really has frozen over.) Chapter 8 has the details.
That’s not to say, however, that switching to the Mac is all sunshine and bunnies. The Macintosh is a different machine, running a different operating system, and built by a company with a different philosophy—a fanatical perfectionist/artistic zeal. When it comes to their missions and ideals, Apple and Microsoft have about as much in common as a melon and a shoehorn.
In any case, you have three challenges before you. First, you’ll probably want to copy your Windows stuff over to the new Mac. Some of that is easy to transfer (photos, music, Microsoft Office documents), and some is trickier (email messages, address books, buddy lists).
Second, you have to assemble a suite of Macintosh programs that do what you’re used to doing in Windows. Most programs from Microsoft, Adobe, and other major players are available in nearly identical Mac and Windows formats. But occasionally, it’s more difficult: Many second-tier programs are available only for Windows, and it takes some research (or Chapter 7 of this book) to help you find Macintosh replacements.
Finally, you have to learn Mac OS X itself; after all, it came preinstalled on your new Mac. In some respects, it resembles the latest versions of Windows: There’s a taskbar-like thing, a Control Panel–taskbar-like thing, and, of course, a Trash can. At the same time, hundreds of features you thought you knew have been removed, replaced, or relocated. (If you ever find yourself groping for an old favorite feature, see Appendix B, The “Where’d It Go?” Dictionary.)
Note: In Mac OS X, the X is meant to be a Roman numeral, pronounced “ten.” Unfortunately, many people see “Mac OS X” and say “Mac Oh Ess Sex.” That’s a sure way to get funny looks in public.
Introduction
All About “Snow Leopard”
What’s this business about big cats?
Most software companies develop their wares in secret, us-ing code names for new products to throw outsiders off the scent. Apple’s code names for Mac OS X and its descendants have been named after big cats: Mac OS X was Cheetah, 10.1 was Puma, 10.2 was Jaguar, 10.3 was Panther, 10.4 was Tiger, and 10.5 was Leopard. Since 10.6 is considered “only” a refinement of the existing Leopard version, it’s called Snow Leopard.
(The real snow leopard is an endangered species, native to Central Asia. It has no larynx and so it can’t roar. It can kill
animals three times its size. Insert your own operating-system metaphor here.)
Usually, the code name is dropped as soon as the product is complete, whereupon the marketing department gives it a new name. In Mac OS X’s case, though, Apple thinks its cat names are cool enough to retain for the finished product.
You do have to wonder what Apple plans to call future versions. Apple increases only the decimal point with each major upgrade, which means it has four big cats to go before it hits Mac OS XI.
Let’s see: Bobcat, Cougar, Lion…um…Ocelot?
What Mac OS X Gives You
These days, a key attraction of the Mac—at least as far as switchers are concerned—is security. There isn’t yet a single widespread Mac OS X virus. (Even Microsoft Word macro viruses don’t run in Mac OS X.) For many people, that’s a good enough reason to move to Mac OS X right there.
Along the same lines, there have been no reported sightings of spyware (malicious soft-ware that tracks your computer use and reports it back to a shady company) for Mac OS X. Mail, Mac OS X’s built-in email program, deals surprisingly well with spam—the unsolicited junk email that’s become the scourge of the Internet.
If you ask average people why the Mac isn’t overrun by viruses and spyware, as Win-dows is, they’ll probably tell you, “Because the Mac’s market share is too small for the bad guys to write for.”
That may be true (although 50 million machines isn’t too shabby, as targets go). But there’s another reason, too: Mac OS X is a very young operating system. It was cre-ated only a few years ago, and with security in mind. (Contrast that with Windows, whose original versions were written before the Internet even existed.) Mac OS X is simply designed better. Its built-in firewall makes it virtually impossible for hackers to break into your Mac, and the system insists on getting your permission before anything gets installed on your Mac. Nothing can get installed behind your back, as it can in Windows.
But freedom from gunkware and viruses is only one big-ticket item. Here are a few other joys of becoming a Mac fan:
•Stability. Underneath the shimmering, translucent desktop of Mac OS X is Unix, the industrial strength, rock-solid OS that drives many a Web site and university. It’s not new by any means; in fact, it’s decades old, and has been polished by gen-erations of programmers. That’s precisely why Apple CEO Steve Jobs and his team chose it as the basis for the NeXT operating system, which Jobs worked on during his 12 years away from Apple and which Apple bought in 1997 to turn into Mac OS X.
•Nonagging.Unlike Windows, Mac OS X isn’t copy-protected. You can install the same copy on your desktop and laptop Macs, if you have a permissive conscience. When you buy a new Mac, you’re never, ever asked to type in a code off a sticker. Nor must you “register,” “activate,” sign up for “.NET Passport,” or endure any other friendly suggestions unrelated to your work. And you won’t find any cheesy software demos from other companies clogging up your desktop when you buy a new Mac, either. In short, Mac OS X leaves you alone.
•Sensationalsoftware.Mac OS X comes with several dozen useful programs, from Mail (for email) to a 3-D, voice-activated Chess program. The most famous pro-grams, though, are the famous Apple “iApps”: iTunes for working with audio files, iMovie for editing video, iPhoto for managing your digital photos, GarageBand for creating and editing digital music, and so on. You also get iChat (an AOL-,
Jabber-, and Google Talk-compatible instant messaging program that also offers videoconferencing) and iCal, a calendar program.
•Simplereverything.Most applications in Mac OS X show up as a single icon. All the support files are hidden away inside, where you don’t have to look at them. There’s no Add/Remove Programs program on the Macintosh; in general, you can remove a program from your Mac simply by dragging that one application icon to the Trash, without having to worry that you’re leaving scraps behind.
•Desktopfeatures.Microsoft is a neat freak. Windows XP, for example, is so opposed to your using the desktop as a parking lot for icons that it actually interrupts you every 60 days to sweep all your infrequently used icons into an “Unused” folder.
The Mac approach is different. Mac people often leave their desktops absolutely littered with icons. As a result, Mac OS X offers a long list of useful desktop features that will be new to you, the Windows refugee.
For example, spring-loaded folders let you drag an icon into a folder within a folder within a folder with a single drag, without leaving a wake of open windows. An optional second line under an icon’s name tells you how many items are in a folder, what the dimensions of a graphic are, and so on. And there’s a useful column view, which lets you view the contents of many nested folders at a glance. (You can think of it as a horizontal version of Windows Explorer’s folder tree.)
When your screen gets cluttered with windows, you can temporarily hide all of them with a single keystroke. If you want to see all the windows on your screen without any of them overlapping, Mac OS X’s Exposé feature is your best friend (page 127).
A speedy, system-wide Find command called Spotlight is accessible from any pro-gram. It searches not only the names of your files and folders, but also the words inside your documents, and can even search your email, calendar, address book, Web bookmarks, and about 100 other kinds of data, all at once.
Finally, Mac OS X offers the Dashboard (which inspired the Sidebar in Windows Vista and Windows 7). It lets you summon dozens of miniprograms—a calculator, weather forecaster, dictionary, and so on—with a single keystroke, and dismiss them just as easily. You can download thousands more of these so-called widgets from the Internet, making it even easier to find TV listings, Google search results, local movie showtimes, and more, no matter what program you’re using at the moment.
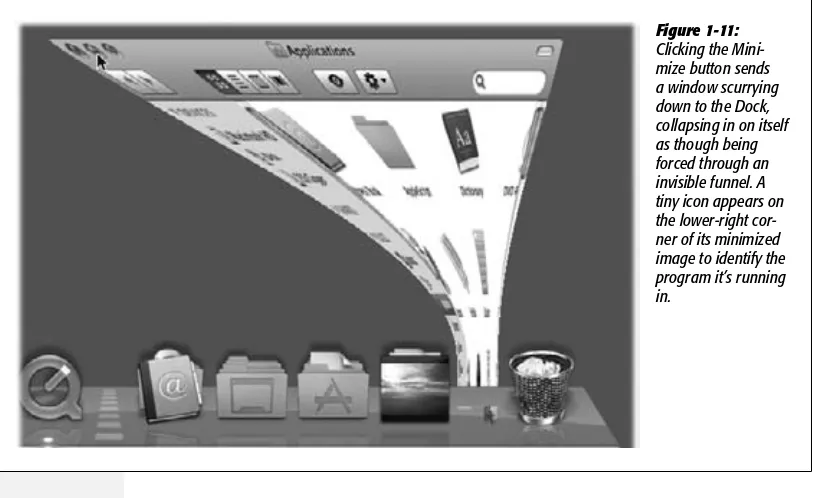
•Advancedgraphics. Mac programmers get excited about the set of advanced graphics technologies called Quartz (for two-dimensional graphics) and OpenGL (for three-dimensional graphics). For the rest of us, these technologies translate into a beautiful, translucent look for the desktop, smooth-looking (antialiased) onscreen lettering, and the ability to turn any document on the screen into an Adobe Acrobat (PDF) file. And then there are the slick animations that permeate every aspect of Mac OS X: the rotating-cube effect when you switch from one logged-in person to another, the “genie” effect when you minimize a window to the Dock, and so on.
•Advancednetworking.When it comes to hooking up your computer to others, including those on the Internet, few operating systems can touch Mac OS X. It offers advanced features like multihoming, which lets your laptop switch automatically from its cable modem settings to its wireless or dial-up modem settings when you take it on the road.
If you’re not so much a switcher as an adder (you’re getting a Mac but keeping the PC around), you’ll be happy to hear that Macs and Windows PCs can “see” each other on a network automatically, too. As a result, you can open, copy, and work on files on both types of machines as though the religious war between Macs and PCs had never even existed.
•Voicecontrol,keyboardcontrol.You can operate almost every aspect of every program entirely from the keyboard—or even by voice. These are terrific timesavers for efficiency freaks. In fact, the Mac can also read aloud any text in any program, including Web pages, email, your novel, you name it.
•Fullbuzzwordcompliance.You can’t read an article about Mac OS X without hear-ing certain technical buzzwords that were once exclusively the domain of computer engineers: preemptive multitasking, multithreading, symmetrical multiprocessing, dynamic memory allocation, and memory protection, for example.
What it all adds up to is that Mac OS X is very stable, that a crashing program can’t crash the whole machine, that the Macintosh can exploit multiple processors, and that the Mac can easily do more than one thing at once—downloading files, playing music, and opening a program, for example—all simultaneously.
•Acommand-lineinterface.In general, Apple has completely hidden from you every trace of the Unix operating system that lurks beneath Mac OS X’s beautiful skin. For the benefit of programmers and other technically oriented fans, however, Apple left uncovered a tiny passageway into that far more complex realm: Terminal, a program in your ApplicationsÆUtilities folder.
This isn’t a Unix book, so you’ll find only the basics of using Terminal here. Still, if the idea of an all-text operating system gets you going, you can capitalize on the command-line interface of Mac OS X by typing out commands in the Terminal window, which the Mac executes instantly and efficiently. Think DOS prompt, just faster and more useful.
What Mac OS X Takes Away
Besides quirks like viruses, spyware, and the Start menu, there are some substantial things on a PC that you lose when you switch to the Mac:
•Programs. As mentioned above, there are certain programs that are stubbornly Windows-only. You can always search for replacements—using Chapter 7 of this book as a guide, for example—but you may end up having to pay for them. And, of course, there are certain programs—like some proprietary accounting and laboratory software, and lots of games—where the Windows versions are simply
irreplaceable. For those, you have to keep a PC around or run Windows on your Mac (Chapter 8).
•Peripherals.Most add-on devices nowadays work equally well on both Windows PCs and Macs. That includes printers, scanners, digital cameras (still- and video- varieties), and “multifunction” devices that incorporate several of those attributes into one machine.
Unfortunately, not every company is that enlightened. Sometimes the Mac software for a gadget isn’t as full-featured as the Windows version. Sometimes some of the features on a multifunction printer/scanner aren’t available on the Mac. If you have a device made by an obscure manufacturer—especially if the device is more than a few years old—it may not work with your Mac at all.
Still, all hope is not lost. Chapter 9 can get you out of most hardware ruts you may find yourself in while making the Big Switch.
About This Book
Switching to the Mac: The Missing Manual is divided into five parts, each containing several chapters:
•Part1,WelcometoMacintosh,covers the essentials of the Macintosh. It’s a crash course in everything you see onscreen when you turn on the machine: the Dock, Sidebar, icons, windows, menus, scroll bars, Trash, aliases, a menu, and so on. •Part2,MovingIn,is dedicated to the actual process of hauling your software,
settings, and even peripherals (like printers and monitors) across the chasm from the PC to the Mac. It covers both the easy parts (copying over your documents, pictures, and music files) and the harder ones (transferring your email, address books, buddy lists, and so on). It also covers the steps for running Windows on your Mac, which is an extremely attractive option.
•Part3,TheMacOnline, walks you through the process of setting up an Internet connection on your Mac. It also covers Apple’s Internet software suite: Mail, Address Book, Safari, and iChat.
•Part4,PuttingDownRoots, deals with more advanced topics—and aims to turn you into a Macintosh power user. It teaches you how to set up private accounts for people who share a Mac, create a network for file sharing and screen sharing, navigate the System Preferences program (the Mac equivalent of the Windows Control Panel), and operate the 50 freebie bonus programs that come with Mac OS X.
Note: Some of the material in this book is adapted from the bestselling Mac OS X Snow Leopard: The Missing Manual. That book is a much fatter, more in-depth guide to Mac OS X (and a worthy investment if you grow into a true Macoholic).
•Part5.Attheendofthebook,you’llfindthreeappendixes.Thefirstcoversinstal-lation and troubleshooting. The second is the “Where’d It Go?” Dictionary—an essential reference for anyone who occasionally (or frequently) flounders to find some familiar control in the new, alien Macintosh environment. The last is a master keyboard-shortcut list for the entire Mac OS X universe.
About
Æ
These
Æ
Arrows
Throughout this book—and throughout the Missing Manual series—you’ll find sen-tences like this one: “Open the SystemÆLibrariesÆFonts folder.” That’s shorthand for a much longer instruction that directs you to open three nested folders in sequence, like this: “On your hard drive, you’ll find a folder called System. Open that. Inside the System folder window is a folder called Libraries; double-click it to open it. Inside that folder is yet another one called Fonts. Double-click to open it, too.”
Similarly, this kind of arrow shorthand helps to simplify the business of choosing commands in menus, as shown in Figure I-1.
About MissingManuals.com
If you visit www.missingmanuals.com, click the “Missing CD-ROM” link, and then click the title of this book, you’ll find a neat, organized, chapter-by-chapter list of the shareware and freeware mentioned in this book. (As noted on the inside back cover, having the software online instead of on a CD-ROM saved you $5 on the cost of the book.)
The Web site also offers corrections and updates to the book (to see them, click the book’s title, and then click Errata). In fact, you’re encouraged to submit such correc-tions and updates yourself. In an effort to keep the book as up-to-date and accurate
About This Book
Figure I-1:
In this book, arrow notations help to simplify folder and menu instructions. For example, “Choose aÆDockÆ
as possible, each time we print more copies of this book, we’ll make any confirmed corrections you’ve suggested. We’ll also note such changes on the Web site, so that you can mark important corrections into your own copy of the book, if you like.
The Very Basics
To use this book, and indeed to use a Macintosh, you need to know a few basics. This book assumes you’re familiar with a few terms and concepts:
•Clicking.This book gives you three kinds of instructions that require you to use the Mac’s mouse. To click means to point the arrow cursor at something on the screen and then—without moving the cursor—press and release the clicker but-ton on the mouse (or your laptop trackpad). To double-click, of course, means to click twice in rapid succession, again without moving the cursor at all. And to drag means to move the cursor while holding down the button.
When you’re told to c-click something, you click while pressing the c key (which is next to the space bar). Shift-clicking, Option-clicking, and Control-clicking work the same way—just click while pressing the corresponding key.
•Menus. The menus are the words at the top of your screen: a, File, Edit, and so on. Click one to make a list of commands appear.
Some people click and release to open a menu and then, after reading the choices, click again on the one they want. Other people like to press the mouse button con-tinuously after the initial click on the menu title, drag down the list to the desired command, and only then release the mouse button. Either method works fine.
•Keyboardshortcuts. If you’re typing along in a burst of creative energy, it’s disrup-tive to have to grab the mouse to use a menu. That’s why many computer fans prefer to trigger menu commands by pressing certain combinations on the keyboard. For example, in word processors, you can press c-B to produce a boldface word. When you read an instruction like “press c-B,” start by pressing the c key, then, while it’s down, type the letter B, and finally release both keys.
Tip: You know what’s really nice? The keystroke to open the Preferences dialog box in every Apple pro-gram—Mail, Safari, iMovie, iPhoto, TextEdit, Preview, and on and on—is always the same: c-comma. Better yet, that standard is catching on with other software companies, too; Word, Excel, Entourage, and PowerPoint use the same keystroke, for example.
•Icons. The colorful inch-tall pictures that appear in your various desktop folders are the graphic symbols that represent each program, disk, and document on your computer. If you click an icon one time, it darkens, indicating that you’ve just highlighted or selected it. Now you’re ready to manipulate it by using, for example, a menu command.
Part One:
Welcome to Macintosh
Chapter 1: How the Mac Is Different
Chapter 2: Folders, Dock, & Windows
Chapter 3: Files, Icons, & Spotlight
Chapter 4: Documents, Programs, & Spaces
chapter
1
W
hen you get right down to it, the job description of every operating system is pretty much the same. Whether it’s Mac OS X, Windows Vista, or Billy Bob’s System-Software Special, any OS must serve as the ambassador between the computer and you, its human operator. It must somehow represent your files and programs on the screen so you can open them; offer some method of organizing your files; present onscreen controls that affect your speaker volume, mouse speed, and so on; and communicate with your external gadgets, like disks, printers, and digital cameras.In other words, Mac OS X offers roughly the same features as recent versions of Windows. That’s the good news.
The bad news is that these features are called different things and parked in different spots. As you could have predicted, this rearrangement of features can mean a good deal of confusion for you, the Macintosh foreigner. For the first few days or weeks, you may instinctively reach for certain familiar features that simply aren’t where you expect to find them, the way your tongue keeps sticking itself into the socket of a newly extracted tooth.
To minimize the frustration, therefore, read this chapter first. It makes plain the most important and dramatic differences between the Windows method and the Macintosh way.
Power On, Dude
As a critic might say, Apple is always consistent with its placement of the power but-ton: It’s different on every model.
On iMacs and Mac Minis, the power button is on the back panel. On the Mac Pro, it’s on the front panel. And on laptop Macs, the button is near the upper-right corner of the keyboard. (Then again, if you have a laptop, you should get into the habit of just closing the lid when you’re done working and opening it to resume; the power button rarely plays a role in your life.)
In every case, though, the power button looks the same (Figure 1-1): it bears the π
logo.
That One-Button Mouse
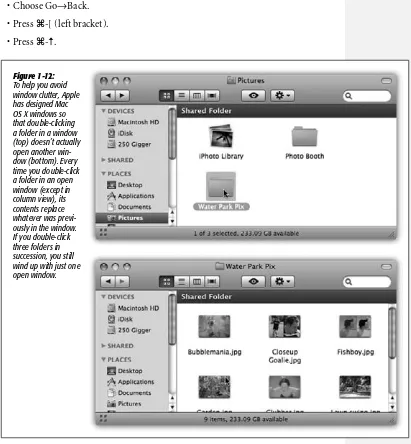
You can get terrific mileage out of shortcut menus on the Mac, just as in Windows (Figure 1-2).
Power On, Dude
Figure 1-1:
Every Mac’s power button looks like this, although it might be hard to find. The good news: Once you find it, it’ll pretty much stay in the same place.
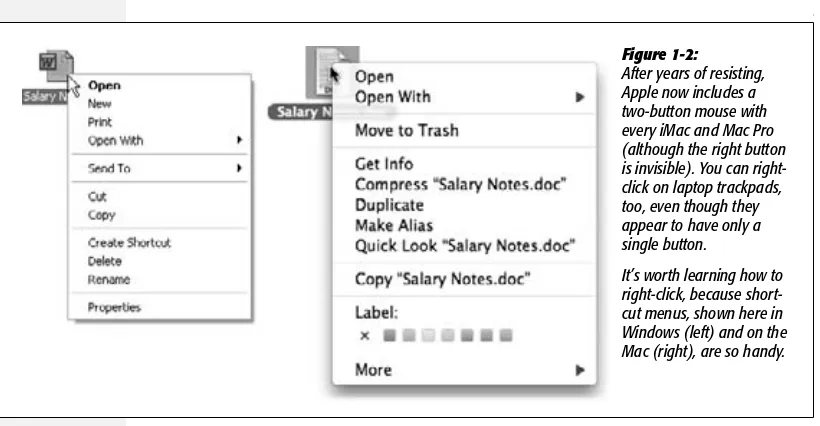
Figure 1-2:
After years of resisting, Apple now includes a two-button mouse with every iMac and Mac Pro (although the right button is invisible). You can right-click on laptop trackpads, too, even though they appear to have only a single button.
Shortcut menus are so important, in fact, that it’s worth this ink and this paper to explain the different ways you can trigger a right-click (or a secondary click, as Apple calls it, because not all these methods actually involve a second mouse button, and it doesn’t have to be the right-side one):
•Control-click. You can open the shortcut menu of something on the Mac screen by Control-clicking it. That is, while pressing the Control key (bottom row), click the mouse on your target.
•Right-click. Windows veterans have always used the one-handed method: right-clicking. That is, clicking something by pressing the right mouse button on a two-button mouse.
“Ah, but that’s what’s always driven me nuts about Apple,” goes the common refrain. “Their refusal to get rid of their stupid one-button mouse!”
Well, not so fast.
First of all, you can attach any old $6 USB two-button mouse to the Mac, and it’ll work flawlessly. Recycle the one from your old PC, if you like.
Furthermore, if you’ve bought a desktop Mac since late 2005, you probably already have a two-button mouse—but you might not realize it. Is your mouse a white shiny plastic capsule with tiny gray scrolling track-pea on the far end? That would be what Apple calls the Mighty Mouse. Or is it a sculpted, winglike, wireless mouse with a wide top surface? That would be the newer Magic Mouse.
Both of them have a secret: an invisible right mouse button. It doesn’t work until you ask for it.
To do that, choose aÆSystem Preferences. Click Mouse. There, in all its splendor, is a diagram of the mouse. (There’s a picture on page 493.)
Your job is to choose Secondary Button from the pop-up menu that identifies the right side of the mouse. (The reason it’s not called a “right button” is because left-handers might prefer to reverse the right and left functions.)
From now on, even though there aren’t two visible mouse buttons, your mouse does, in fact, register a left-click or a right-click depending on which side of the button you push down. It actually works a lot more easily than it sounds like it would.
•Usethetrackpad(oldway). If you have a Mac laptop, you can “right-click” right there on the trackpad.
To do that, point to whatever you want to click. Rest two fingers on the trackpad— and then click. (You turn this feature on and off in System PreferencesÆTrackpad, where you can also see a little video on how to do it.)
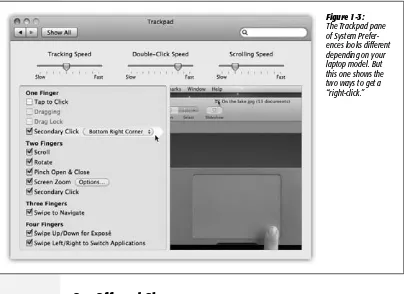
•Usethetrackpad(newway). Two fingers plus thumb? That is quite a lot of digits just to get a right-click, and Apple knows it. So on the latest Mac laptops, you can
“right-click” by clicking either the lower-right or lower-left corner of the track-pad—one finger only.
(Your laptop is eligible if it has no separate clicker button. Instead, the whole trackpad surface is a clicker. You turn on this clicking method in System Prefer-encesÆTrackpad, as shown in Figure 1-3.)
On, Off, and Sleep
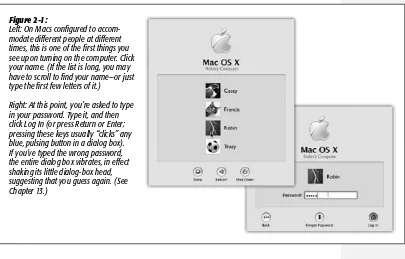
If you’re the only person who uses your Mac, finishing up a work session is simple. You can either turn off the machine or simply let it go to sleep, in any of several ways.
Sleep Mode
It’s clear that Apple expects its customers not to shut down their machines between sessions, because the company has gone to great lengths to make doing so inconve-nient. (For example, you have to save your work in all open programs before you can shut down.)
That’s OK. Sleep mode (called Standby on the PC) consumes very little power, keeps everything you were doing open and in memory, and wakes the Mac up almost im-mediately when you press a key or click the mouse. To make your machine sleep, use any of these techniques:
That One-Button Mouse
Figure 1-3:
•Closethelid. (Hint: This tip works primarily on laptops.)
•ChooseaÆSleep.Or press Option-c-´.
•PressControl-´ (or Control-F12, if you don’t have a ´ key). In the dialog box shown in Figure 1-4, click Sleep (or type S).
•Pressthepowerbutton(π)onyourmachine. On desktop models, doing so makes it sleep immediately; on laptops, you get the dialog box shown in Figure 1-4.
• HolddownthePlay/Pausebuttononyourremotefor3seconds. Many Mac models come, or used to come, with Apple’s tiny white remote control.
•Justwalkaway, confident that the Energy Saver setting described on page 488 will send the machine off to dreamland automatically at the specified time.
Restart
You shouldn’t have to restart the Mac very often—only in times of severe trouble-shooting mystification, in fact. Here are a few ways to do it:
•ChooseaÆRestart. A confirmation dialog box appears; click Restart (or press Return).
Tip: If you press Option as you release the mouse on the aÆRestart command, then you won’t be bothered by an “Are you sure?” confirmation box.
•PressControl-c-´. (If you don’t have that key, substitute F12.)
•PressControl-´ to summon the dialog box shown in Figure 1-4; click Restart (or type R).
Shut Down
To shut down your machine completely (when you don’t plan to use it for more than a couple of days, when you plan to transport it, and so on), do one of the following:
•ChooseaÆShutDown. A simple confirmation dialog box appears; click Shut Down (or press Return).
Figure 1-4:
Once the Shut Down dialog box appears, you can press the S key to choose Sleep, R for Restart, Esc for Cancel, or Return for Shut Down.
Tip: Once again, if you press Option as you release the mouse, no confirmation box appears.
•PressControl-Option-c-´. (It’s not as complex as it looks—the first three keys are all in a tidy row to the left of the space bar.)
•PressControl-´(orControl-F12) to summon the dialog box shown in Figure 1-4. Click Shut Down (or press Return).
•Wait. If you’ve set up the Energy Saver preferences (page 490) to shut down the Mac automatically at a specified time, then you don’t have to do anything.
Log Out
If you share your Mac with other people, then you should log out when you’re done. Doing so ensures that your stuff is safe from the evil and the clueless when you’re out of the room. To do it, choose aÆLog Out (or press Shift-c-Q). When the confirmation dialog box appears, click Log Out (or press Return), or just wait for 2 minutes. The Mac hides your world from view and displays the login dialog box, ready for the next victim.
Another option is to use fast user switching—a feature that lets you switch from one user to another without actually logging out, just as in Windows XP or Vista. With fast user switching turned on, your Mac can have several people logged in at once, although only one person at a time actually sees his own desktop.
In either case, this whole accounts system is described in much more detail in Chap-ter 13.
Tip: If you press the Option key as you release the mouse when choosing the Restart, Shut Down, or Log Out commands, you eliminate the “Are you sure?” confirmation dialog box. The mouse clicks you save each time can really add up.
The Menu Bar
It won’t take you long to discover that on the Macintosh, there’s only one menu bar. It’s always at the top of the screen. The names of these menus, and the commands inside them, change to suit the window you’re currently using. That’s different from Windows, where a separate menu bar appears at the top of every window.
Mac and Windows devotees can argue the relative merits of these two approaches until they’re blue in the face. All that matters, though, is that you know where to look when you want to reach for a menu command. On the Mac, you always look upward.
Finder = Windows Explorer
In Mac OS X, the “home base” program—the one that appears when you first turn on the machine and shows you the icons of all your folders and files—is called the Finder. This is where you manage your folders and files, throw things away, manipulate disks, and so on. (You may also hear it called the desktop, since the items you find there mirror the files and folders you might find on a real-life desktop.)
Getting used to the term “Finder” is worthwhile, though, because it comes up so often. For example, the first icon on your Dock is labeled Finder, and clicking it always takes you back to your desktop.
Dock = Taskbar
At the bottom of almost every Mac OS X screen sits a tiny row of photorealistic icons. This is the Dock, a close parallel to the Windows taskbar. (As in Windows, it may be hidden or placed on the left or right edge of the screen instead—but those are options primarily preferred by power users and eccentrics.)
The Dock displays the icons of all your open windows and programs, which are denoted by small, glowing dots beneath their icons. Clicking these icons opens the corresponding files, folders, disks, documents, and programs. If you click and hold (or right-click) an open program’s icon, you’ll see a pop-up list of the open windows in that program, along with Quit and a few other commands.
When you close a program, its icon disappears from the Dock (unless you’ve secured it there for easy access, as described on page 70).
Tip: You can cycle through the various open programs on your Mac by holding down the c key and pressing Tab repeatedly. (Sound familiar? It’s just like Alt-Tabbing in Windows.) And if you just tapc-Tab, you bounce back and forth between the two programs you’ve used most recently.
What you may find confusing at first, though, is that the Dock also performs one function of the Windows Start menu: It provides a “short list” of programs and files that you use often, for easy access. To add a new icon to the Dock, just drag it there (put programs to the left of the divider line; everything else goes on the right). To remove an icon from the Dock, just drag it away. As long as that item isn’t actually open at the moment, it disappears from the Dock with a little animated puff of smoke when you release the mouse button.
The bottom line: On the Mac, a single interface element—the Dock—exhibits charac-teristics of both the Start menu (it lists frequently used programs) and the taskbar (it lists currently open programs and files). (The Windows 7 taskbar does the same thing.)
If you’re still confused, Chapter 2 should help clear things up.
Menulets = Tray
Most Windows fans refer to the row of tiny status icons at the lower-right corner of the screen as the tray, even though Microsoft’s official term is the notification area. (Why use one syllable when eight will do?)
Macintosh fans wage a similar battle of terminology when it comes to the little menu-bar icons shown in Figure 1-5. Apple calls them Menu Extras, but Mac fans prefer to call them menulets.
In any case, these menu-bar icons are cousins of the Windows tray—that is, each is both an indicator and a menu that provides direct access to certain settings in System Preferences. One menulet lets you adjust your Mac’s speaker volume, another lets you change the screen resolution, another shows you the remaining power in your laptop battery, and so on.
Making a menulet appear usually involves turning on a certain checkbox. These checkboxes lurk on the various panes of System Preferences (Chapter 15), which is the Mac equivalent of the Control Panel. (To open System Preferences, choose its name from the a menu, or click the gears icon on the Dock.)
Here’s a rundown of the most useful Apple menulets, complete with instructions on where to find this magic on/off checkbox for each.
Tip: The following descriptions indicate the official, authorized steps for installing a menulet. There is, however, a folder on your hard drive that contains 25 of them in a single window, so that you can install any of them with a quick double-click. To find them, open your hard driveÆSystemÆLibraryÆCoreServicesÆMenu Extras folder.
•AirPortlets you turn your WiFi (wireless networking) circuitry on or off, join existing wireless networks, and create your own private ones. To find the “Show” checkbox: Open System PreferencesÆNetwork. Click AirPort.
Menulets = Tray
Figure 1-5:
Tip: Once you’ve installed this menulet, you can Option-click it to produce a secret menu full of details about the wireless network you’re on right now. You see its channel number, password-security method (WEP, WPA, None, whatever), speed, and such geeky details as the MCS Index and RSSI.
•Batteryshows how much power remains in your laptop’s battery, how much time is left to charge it, whether it’s plugged in, and more. Using the Show submenu, you can control whether the menulet appears as an hours-and-minutes-remaining display (2:13), a percentage-remaining readout (43%), or a simple battery-icon gauge that hollows out as the charge runs down. To find the “Show” checkbox: Open System PreferencesÆEnergy Saver.
•Bluetoothconnects to Bluetooth devices, “pairs” your Mac with a cellphone, lets you send or receive files wirelessly (without the hassle of setting up a wireless network), and so on. To find the “Show” checkbox: Open System PreferencesÆBluetooth.
•Clock is the menu-bar clock that’s been sitting at the upper-right corner of your screen from Day One. Click it to open a menu where you can check today’s date, convert the menu-bar display to a tiny analog clock, and so on. To find the “Show” checkbox: Open System PreferencesÆDate & Time. On the Clock tab, turn on “Show the date and time.” That’s where you can also opt to display the date and the day of the week.
•Displaysadjusts screen resolution. On Macs with a projector or second monitor attached, it lets you turn screen mirroring on or off—a tremendous convenience to anyone who gives PowerPoint-type presentations. To find the “Show” checkbox: Open System PreferencesÆDisplaysÆDisplay tab.
•iChatis a quick way to let the world know, via iChat and the Internet (Chapter 12), that you’re away from your keyboard, or available and ready to chat. Via the Buddy List command, it’s also a quick way to open iChat itself. To find the “Show” checkbox: Open iChat; it’s in your Applications folder. Choose iChatÆPreferencesÆ
General.
•Spacesties into Snow Leopard’s virtual-screens feature (called Spaces and described in Chapter 4). The menulet lets you choose which of your multiple virtual screens you want to see. To find the “Show” checkbox: Open System PreferencesÆ Spaces.
•Syncis useful only if you have a MobileMe account (Chapter 10)—but in that case, it’s very handy. It lets you start and stop the synchronization of your Mac’s Web bookmarks, Calendar, Address Book, Keychains, and email with your other Macs, Windows PCs, and iPhones across the Internet, and it always lets you know the date of your last sync. To find the “Show” checkbox: Open System Preferenc-esÆMobileMe, and then click Sync.
Tip: If you Option-click this menulet, you get a breakdown of data types—Calendar, Address Book, bookmarks, and so on—and a listing of when each was last synchronized with MobileMe.
•TextInput switches among different text input modes. For example, if your lan-guage uses a different alphabet, like Russian—or thousands of characters, like Chinese—this menulet summons and dismisses the alternative keyboards and input methods you need. Details are on page 166. To find the “Show” checkbox: Open System PreferencesÆLanguage & TextÆInput Sources.
•TimeMachine lets you start and stop Time Machine backups (see page 277). To find the “Show” checkbox: Open System PreferencesÆTime Machine.
•User identifies the account holder (Chapter 13) who’s logged in at the moment. To make this menulet appear (in bold, at the far-right end of the menu bar), turn on fast user switching, which is described on page 427.
•Volume,of course, adjusts your Mac’s speaker or headphone volume. To find the “Show” checkbox: Open System PreferencesÆSound.
•VPN stands for virtual private networking, which allows you to tap into a corpo-ration’s network so you can, for example, check your work email from home. You can use the menulet to connect and disconnect, for example. To find the “Show” checkbox: Open System PreferencesÆNetwork. Click the name of your VPN.
•WWANis useful only if you’ve equipped your Mac with one of those glorious cellular modems, sold by Verizon, Sprint, AT&T, or T-Mobile. These little USB sticks get you onto the Internet wirelessly at near-cable-modem speeds (in big cities, anyway), no WiFi required—for $60 a month. And this menulet lets you start and stop that connection. To find the “Show” checkbox: Open System Prefer-encesÆNetwork. Click the name of your cellular modem.
To remove a menulet, c-drag it off your menu bar, or turn off the corresponding checkbox in System Preferences. You can also rearrange menulets by c-dragging them horizontally.
These little guys are useful, good-looking, and respectful of your screen space. The world could use more inventions like menulets.
Keyboard Differences
Mac and PC keyboards are subtly different. Making the switch involves two big adjust-ments: Figuring out where the special Windows keys went (like Alt and Ctrl)—and figuring out what to do with the special Macintosh keys (like c and Option).
Where the Windows Keys Went
Here’s how to find the Macintosh equivalents of familiar PC keyboard keys:
•Ctrlkey. The Macintosh offers a key labeled Control (or, on laptops, “ctrl”), but it isn’t the equivalent of the PC’s Ctrl key. The Mac’s Control key is primarily for helping you “right-click” things, as described earlier.
Instead, the Macintosh equivalent of the Windows Ctrl key is the c key. It’s right next to the space bar. It’s pronounced “command,” although novices can often be heard calling it the “pretzel key,” “Apple key,” or “clover key.”
Most Windows Ctrl-key combos correspond perfectly to c key sequences on the Mac. The Save command is now c-S instead of Ctrl+S, Open is c-O instead of Ctrl+O, and so on.
Note: Mac keyboard shortcuts are listed at the right side of each open menu, just as in Windows. Unfor-tunately, they’re represented in the menu with goofy symbols instead of their true key names. Here’s your cheat sheet to the menu keyboard symbols: s represents the Shift key, o means the Option key, and C
refers to the Control key.
•Alt key. On North American Mac keyboards, a key on the bottom row of the Macintosh keyboard is labeled both Alt and Option. This is the closest thing the Mac offers to the Windows Alt key.
In many situations, keyboard shortcuts that involve the Alt key in Windows use the Option key on the Mac. For example, in Microsoft Word, the keyboard short-cut for the Split Document Window command is Alt+Ctrl+S in Windows, but Option-c-T on the Macintosh.
Still, these two keys aren’t exactly the same. Whereas the Alt key’s most popular function is to control the menus in Windows programs, the Option key on the Mac is a “miscellaneous” key that triggers secret functions and secret characters.
For example, when you hold down the Option key as you click the Close or Minimize button on a Macintosh window, you close or minimize all open desktop windows. And if you press the Option key while you type R, G, or 2, you get the ®, ©, and ™ symbols in your document, respectively. (See page 170 to find out how you can see which letters turn into which symbols when you press Option.)
•wkey. As you probably could have guessed, there is no Windows-logo key on the Macintosh. Then again, there’s no Start menu to open by pressing it, either.
Tip: Just about any USB keyboard works on the Mac, even if the keyboard was originally designed to work with a PC. Depending on the manufacturer of the keyboard, the Windows-logo key may work just like the Mac’s c key.
•BackspaceandDelete. On the Mac, the backspace key is labeled Delete, although it’s in exactly the same place as the Windows Backspace key.
The Delete key in Windows (technically, the forward delete key, because it deletes the character to the right of the insertion point) is a different story. On a desktop Macintosh, it’s labeled with Del and the D symbol.
On small Mac keyboards (like laptop keyboards), this key is missing. You can still perform a forward delete, however, by pressing the regular Delete key while press-ing the Fn key in the corner of the keyboard.
•Enter.Most full-size Windows keyboards have two Enter keys: one at the right side of the alphabet keyboard, and one in the lower-right corner of the number pad. They’re identical in function; pressing either one serves to “click” the OK button in a dialog box, for example.
On the Mac, the big key on the number pad still says Enter, but the key on the alphabet keyboard is labeled Return. Most of the time, their function is identi-cal—once again, either can “click” the OK button of a dialog box. Every now and then, though, you’ll run across a Mac program where Return and Enter do different things. In Microsoft Word for Mac OS X, for example, Shift-Return inserts a line break, but Shift-Enter creates a page break.
`
What the Special Mac Keys Do
So much for finding the Windows keys you’re used to. There’s another category of keys worth discussing: those on the modern Macintosh keyboard you’ve never seen before.
To make any attempt at an explanation even more complicated, Apple’s keyboards keep changing. The one you’re using right now, however, is probably one of these models:
•Thecurrentkeyboard, usually aluminum, where the keys are flat little jobbers that poke up through square holes in the keyboard (Figure 1-6). That’s what you get on current laptops, wired keyboards, and Bluetooth wireless keyboards.
•Theolder,plasticdesktopkeyboard, or the white or black plastic laptop one.
Tip: To see closeups of Apple’s current wired and wireless keyboards, visit www.apple.com/keyboard.
Keyboard Differences
Figure 1-6:
Here, then, is a guided tour of the non-typewriter keys on the modern Mac keyboard.
•Fn. How are you supposed to pronounce Fn? Not “function,” certainly; after all, the F-keys on the top row are already known as function keys. And not “fun”; goodness knows, the Fn key isn’t particularly hilarious to press.
What it does, though, is quite clear: It changes the purpose of certain keys. That’s a big deal on laptops, which don’t have nearly as many keys as desktop keyboards. So for some of the less commonly used functions, you’re supposed to press Fn and a regular key. (For example, Fn turns the , key into a Page Up key, which scrolls upward by one screenful.)
Note: On most Mac keyboards, the Fn key is in the lower-left corner. The exception is the full-size Apple desktop keyboard (the one with a numeric keypad); there, the Fn key is in the little block of keys between the letter keys and the number pad.
You’ll find many more Fn examples in the following paragraphs:
•Numerickeypad. The number-pad keys do exactly the same thing as the numbers at the top of the keyboard. But with practice, typing things like phone numbers and prices is much faster with the number pad, since you don’t have to look down at what you’re doing.
•ı, ∫ (F1,F2). These keys control the brightness of your screen. Usually, you can tone it down a bit when you’re in a dark room, or when you want to save laptop battery power; you’ll want to crank it up in the sun.
•≈(F3). This one fires up Exposé, the handy window-management feature de-scribed on page 121.
•∑(F4). Tap this key to open Dashboard, the archipelago of tiny, single-purpose widgets like Weather, Stocks, and Movies. Dashboard is described in detail begin-ning on page 148.
•|, } (F5,F6). Most recent Mac laptops have light-up keys, which is very handy indeed when you’re typing in the dark. The key lights are supposed to come on automatically when it’s dark out, but you can also control the illumination yourself by tapping these keys. (On most other Macs, the F5 and F6 keys aren’t assigned to anything. They’re free for you to use as you see fit.)
•¡, @, and ¢(F7,F8,F9).These keys work in the programs you’d expect: iTunes, QuickTime Player, DVD Player, and other programs where it’s handy to have Rewind, Play/Pause, and Fast-forward buttons.
Tip: Tap the ¡ or ¢ key to skip to the previous or next track or chapter. Hold it down to rewind or fast-forward.
Weirdly, the @ key is hard-wired to open the iTunes program. And no, you can’t change that assignment! (Fortunately, when you’re already in a playback program like DVD Player or QuickTime Player, the key resumes its duties as the Play/Pause control.)
•S, Í, ß(F10,F11,F12).These three keys control your speaker volume. The S key means Mute; tap it once to cut off the sound completely and again to restore its previous level. Tap the Í repeatedly to make the sound level lower, the ß key to make it louder.
With each tap, you see a big white version of each key’s symbol on your screen, and you hear a little audio pop—your Mac’s little nod to let you know it understands your efforts. (Press Shift to silence the pop sound.)
•´. This is the Eject key. When there’s a CD or DVD in your Mac, tap this key to make the computer spit it out. If your Mac has a DVD tray (rather than just a slot), then hold down this button for about a second to make the tray slide open.
•Home,End. “Home” and “End” mean “jump to the top or bottom of the window.” If you’re looking at a list of files, the Home and End keys jump to the top or bot-tom of the list. In iPhoto, they jump to the first or last photo in your collection. In iMovie, the Home key jumps your movie to the very beginning. In Safari, they take you to the top or bottom of the Web page.
(In Word, they jump to the beginning or end of the line. But then again, Microsoft has always had its own ways of doing things.)
On keyboards without a dedicated block of number keys, you get these functions by holding down Fn as you tap the < and > keys.
•PgUp,PgDown. These keys scroll up or down by one screenful. The idea is to let you scroll through word processing documents, Web pages, and lists without having to use the mouse.
On keyboards without a numeric keypad, you get these functions by pressing Fn plus the , and . keys.
•Clear. Clear (on the full-size desktop keyboard only) gets rid of whatever you’ve highlighted, but without putting a copy on the invisible Clipboard, as the Cut command would do.
•Esc. Esc stands for Escape, and it means “cancel.” It’s fantastically useful. It closes dialog boxes, closes menus, and exits special modes like Quick Look, Front Row, slideshows, screen savers, and so on. Get to know it.
•Delete. The backspace key.
•D. Many a Mac fan goes for years without discovering the handiness of this delight-ful little key: the Forward Delete key. Whereas Delete backspaces over whatever letter is just to the left of the insertion point, this one (labeled Del on older keyboards) deletes whatever is just to the right of the insertion point. It really comes in handy when, for example, you’ve clicked into some text to make an edit—but wound up planting your cursor in just the wrong place.
The full-size Apple keyboard has a dedicated key for this. On all other keyboards, you get this function by holding down Fn as you tap the regular Delete key.