iMovie HD & iDVD 5: The Missing Manual
By David Pogue
... Publisher: O'Reilly
Pub Date: April 2005
ISBN: 0-596-10033-7
Pages: 528
Table of Contents | Index
The latest versions of iMovie HD and iDVD 5 are, by far, the most robust moviemaking applications available to consumers today. But whether you're a professional or an
amateur moviemaker eager to take advantage of the full capabilities of these applications, don't count on Apple documentation to make the cut. You need iMovie HD & iDVD 5: The Missing Manual, the objective authority on iMovie HD and iDVD 5.
Even if you own a previous version of iMovie, the new feature-rich iMovie HD may well be impossible to resist. This video editing program now enables users to capture and edit widescreen High Definition Video (HDV) from the new generation of HDV camcorders, along with standard DV and the MPEG-4 video format. iMovie HD also includes "Magic iMovie" for making finished movies automatically. The feature does everything in one step--imports video into separate clips and adds titles, transitions, and music. The finished video is then ready for iDVD 5, which now includes 15 new themes with animated drop zones that can display video clips across DVD menus, just like the latest Hollywood DVDs. This witty and entertaining guide from celebrated author David Pogue not only details every step of iMovie HD video production--from choosing and using a digital camcorder to burning the finished work onto DVDs--but provides a firm grounding in basic film
technique so that the quality of a video won't rely entirely on magic.
iMovie HD & iDVD 5: The Missing Manual includes expert techniques and tricks for: Capturing quality footage (including tips on composition, lighting, and even special-event filming)
Building your movie track, incorporating transitions and special effects, and adding narration, music, and sound
Working with picture files and QuickTime movies
Reaching your intended audience by exporting to tape, transferring iMovie to
QuickTime, burning QuickTime-Movie CDs, and putting movies on the Web (and even on your cell phone!)
iMovie HD & iDVD 5: The Missing Manual
By David Pogue
... Publisher: O'Reilly
Pub Date: April 2005
ISBN: 0-596-10033-7
Pages: 528
Table of Contents | Index
Section 3.1. Interviews
Section 6.5. Downloading More Transition Choices
Section 6.6. The Effects Pane
Section 6.8. Installing More Effects
Section 11.2. Transferring Footage to the Camcorder or VCR
Section 18.6. Archiving Your Project
Section 18.7. Disk Images and External DVD Burners
Section 18.8. Professional Duplicating
Part V: Appendixes
Section B.2. General iMovie Troubleshooting
About the Authors
David Pogue is the weekly computer columnist for the New York Times, an Emmy award-winning correspondent for CBS News Sunday Morning, and the creator of the Missing Manual series. He's the author or co-author of 35 books, including thirteen in this series and six in the "For Dummies" line
(including Macs, Magic, Opera, and Classical Music). In his other life, David is a former Broadway show conductor, a magician, and a pianist. News and photos await at www.davidpogue.com.
He welcomes feedback about his books by email at
[email protected]. (If you're seeking technical help, however, please refer to the sources in Appendix B.)
Erica Sadun (iDVD chapters) holds a PhD in Computer Science from the Georgia Institute of Technology. She has written, co-written and contributed to almost two dozen books about
technology, particularly in the areas of programming, digital video, and digital photography. An unrepentant geek, Erica has never met a gadget she didn't need. Her checkered past
About the Creative Team
Rose Cassano (cover illustration) has worked as an
independent designer and illustrator for 20 years. Assignments have spanned everything from the nonprofit sector to corporate clientele. She lives in beautiful southern Oregon, grateful for the miracles of modern technology that make living and working there a reality. Email: [email protected]. Web:
www.rosecassano.com.
Dennis Cohen (technical reviewer, previous editions) has served as the technical reviewer for many bestselling Mac books, including several editions of Macworld Mac Secrets and most Missing Manual titles. He is the author or co-author of
FileMaker Pro 7 Bible, Mac Digital Photography, Teach Yourself Visually iLife '04, and numerous other books.
Email:[email protected].
Tim Geaney (still photos) has shot editorial photos for Self, GQ, Glamour, and Mademoiselle magazines, among others. His commercial photography clients include Victoria's Secret,
Nautica, J. Crew, Spiegel, Nordstrom, Neiman Marcus, and Saks Fifth Avenue. (The DV filmmaking bug has bit him. Check out his short films at www.timgeaney.com.)
Karl Petersen (technical reviewer, co-author Appendix B) lives with his wife, Joan, and a Collie on Bainbridge Island,
Washington, a 30-minute ferry ride from Seattle. (It's the ferry Michael Douglas runs onto in Disclosure.) A break between jobs (including a stint in the Peace Corps and a career in insurance) gave Karl the chance to explore the first Macs, and he never looked back. He also writes software.
graphic design, including corporate identity, publication design, and corporate and medical communications.
Acknowledgments
The Missing Manual series is a joint venture between Pogue Press (the dream team introduced on these pages) and O'Reilly & Associates (a dream publishing partner).
A special group did great favors for this project: Jim Kanter and Irene Lusztig were my video gurus and technical editors for the book's first edition, whose hearts beat on in this one. (Jim also wrote some terrific sidebars about video equipment.) Arwen O'Reilly, Doug Graham, Charles Petzold, Phil Lefebvre, Michael Krein, Charles Wiltgen, and the members of the Mac DV
discussion list (www.themacintoshguy.com) all pitched in with small favors and info-bits. Tim Franklin expertly drafted Chapter 13.
Glenn Reid, iMovie's lead programmer, agreed to serve as technical editor for the second and third editions of this book. For this edition, iMovie product manager Paul Towner and his team shared their expert advice, answers, andmost
importantlytheir enthusiasm for the project. I'm also grateful to Sohaila Abdulali, John Cacciatore, Kate Chase, Linley Dolby, and Dawn Mann for their copy editing and proofreading smarts; to the indispensable Lesa Snyder for her brilliant help in
reshooting the book's color graphics; and to David Rogelberg.
Finally, thanks to Kelly, Tia, and Jeffrey, my favorite iMovie
The Missing Manual Series
Missing Manuals are witty, superbly written guides to computer products that don't come with printed manuals (which is just about all of them). Each book features a handcrafted index; cross-references to specific page numbers (not just "see
Chapter 14"); and RepKover, a detached-spine binding that lets the book lie perfectly flat without the assistance of weights or cinder blocks.
Recent and upcoming titles include:
Mac OS X: The Missing Manual, Tiger Edition by David Pogue
iPhoto 5: The Missing Manual by David Pogue
GarageBand 2: The Missing Manual by David Pogue
iPod & iTunes: The Missing Manual, 3rd Edition by J.D. Biersdorfer
iLife '05: The Missing Manual by David Pogue et al.
AppleScript: The Missing Manual by Adam Goldstein
Office 2004 for Macintosh: The Missing Manual by Mark H. Walker, Franklin Tessler, and Paul Berkowitz
FileMaker Pro 7: The Missing Manual by Geoff Coffey
Excel: The Missing Manual by Matthew MacDonald
Photoshop Elements 3: The Missing Manual by Barbara Brundage
Google: The Missing Manual by Sarah Milstein and Rael Dornfest
Mac OS X Power Hound, Panther Edition by Rob Griffiths
Dreamweaver MX 2004: The Missing Manual by David Sawyer McFarland
AppleWorks 6: The Missing Manual by Jim Elferdink and David Reynolds
Windows XP Home Edition: The Missing Manual, 2nd Edition by David Pogue
Introduction
Over the years, home movies have developed a bad name, one that's not entirely undeserved. After all, you know what it's like watching other people's camcorder footage. You're held prisoner on some neighbor's couch after dessert to witness 60
excruciating, unedited minutes of their trip to Mexico, or maybe 25 too many minutes of the baby wearing the overturned
spaghetti bowl.
Deep down, most camcorder owners are aware that the viewing experience could be improved if the video were edited down to just the good parts. They just had no idea how to accomplish that. Until iMovie came along, editing camcorder footage on the computer required several thousand dollars' worth of digitizing cards, extremely complicated editing software, and the highest-horsepower computer equipment available.
Some clever souls tried to edit their videos by buying two VCRs, wiring them together, and copying parts of one tape onto
another. That worked greatif you didn't mind the bursts of distortion and static at each splice point and the massive generational quality loss.
You know what? Unless there was a paycheck involved, editing footage under those circumstances just wasn't worth it. The fast-forward button on the remote was a lot easier.
All of that changed when iMovie came along. It certainly wasn't the first digital video (DV) editing software. But it was the first DV-editing software for nonprofessionals, people who have a life outside of video editing. Within six months of its release in
Meet iMovie HD
iMovie is video-editing software. Over a special wire (a FireWire cable), iMovie grabs a copy of the raw footage from your digital camcorder. Then it lets you edit this video easily, quickly, and creatively.
iMovie is the world's least expensive version of what the Hollywood pros call nonlinear editing software for video, just like its much more powerful (and much more complex) rivals, like Final Cut Express ($300), Final Cut Pro ($1, 000), and Avid editing suites ($100,000). The "nonlinear" part is that not tape is involved while you're editing. There's no rewinding or fast-forwarding; you jump instantly to any piece of footage as you put your movie together.
Your interest in video may be inspired by any number of
ambitions. Maybe you want to create professional looking shows for your local cable station's public-access channel. Or you
aspire to create the next Blair Witch Project (which was created by nonprofessionals using a camcorder and nonlinear editing software) or the next Tarnation, an iMovie project that was a hit at the Sundance and Cannes Film Festivals.
On the other hand, maybe all you want to do is make better home moviesmuch, much better home movies. Either way, iMovie can accommodate you.
The world of video is exploding. People are giving each other tapes and DVDs instead of greeting cards. People are watching each other via video on their Web sites. People are quitting their daily-grind jobs to become videographers for hire, making
money filming weddings and creating living video scrapbooks. Video, in other words, is fast becoming a new standard
What's New in iMovie HD
iMovieHD (called iMovie 5 in certain dialog boxes and other spots) represents a deep overhaul of the program, one that will challenge the iMovie veteran with a good deal of unlearning and relearning.
Big-Ticket Features
Here's a summary of the really big improvements in iMovie HD, the ones that Apple either advertises or should:
HD video. iMovie can now edit
high-definition(HDTV)footage, as captured by so-called HDV camcorders. These are semi-professional cameras that record high-definition video onto an ordinary MiniDV tape, with spectacular widescreen results. Now, high-def video consumes three or four times the amount of disk space as regular video, so if you're lucky enough to have access to an HDV camcorder ($2,200 to $3,100), come prepared with lots of empty disk space and some understanding of the real-time conversion tricks described on page 103.
More formats. That's not the only new kind of video that iMovie HD welcomes. It can also work with MPEG-4 video, which is what you get with those super-mini "palmcorders" from Fisher and Panasonic that record onto memory cards instead of tape. iMovie is also compatible with widescreen (16:9) footage that many recent digital camcorders can capturevideo that's not high-definition, but still looks fantastic on a widescreen TV set.
extremely simple, automated method of importing an entire tape, slapping up an opening title, backing it up with music from your iTunes collection, and adding crossfades between scenesall without any intervention from you.
iDVD offers something similar called OneStep DVD, which slurps all of a tape's footage directly onto a blank DVD. Again, your editing options are very limited here, but the whole idea is to get your footage from tape to DVD without any effort on your part. After all, DVDs last longer than tape, cost less, are easier to show on TV, and are easier to send around to other interested parties.
More draggability. You can now drag individual video clips around in iMovie's timeline vieweven back up to the Clips pane. In fact, you can drag clips clear out of the iMovie
window and to the Finder (where they show up as individual clip icons) or into other programs, like iDVD or QuickTime Player.
Overhauled Trash. The Trash mechanism in iMovie HD is utterly unlike the Trash in any previous version. You can now open it to view, rescue, or delete individual trashed items, just as you can in the Finder. Emptying the Trash no longer means that you can't restore chopped-up clips to their pre-chop conditions. And emptying the Trash in mid-project is no longer an invitation to corrupting your entire movie project.
chop them up, delete pieces of themand recover them at any time, months or years later.
There is, alas, a dark side to the new Trash, Undo, and Save features. To provide these generous safety nets, iMovie
hangs onto a lot more of the footage you've imported from the camera. iMovie doesn't care that you've deleted 19 out of 20 minutes of a clip and then emptied the Trash; if
you've incorporated even a single frame of that clip into your movie, behind the scenes, iMovie holds onto all of those gigabytes. Emptying the Trash, in other words,
doesn't restore free space to your hard drive except when you're deleting an entire, untouched clip that you haven't used in the project.
Note, furthermore, that you lose your entire Undo trail
every time you use the Save command. As a result, hitting -S is both a step forward and a step backward in project safety.
Self-contained project icons. In the past, each iMovie movie you worked on took the form of a folder on your hard drive, not a document icon. But iMovie HD sews that folder up into a new, single, double-clickable "document" icon called a package.
Here again, the change is a blessing and a curse. The nice part is that having only one icon to deal with makes it so easy to name, copy, move, or back up. Unfortunately, the actual project documentthe text file that records which pieces of footage come whenis now sealed away inside the package icon, where it's no longer recognized by (for
example) iDVD.
Finer Points
Apple's most intriguing enhancements to iMovie HD, though, are the little nips and tucks that lie scattered
throughoutfeatures that go unmentioned on the iMovie Web site or on the "What's New" Help page, but taken together, will
make a big difference in your movie making career.
Burn Project to Disc. This new command preserves your entire project on a blank DVD (or a CD, if the project is tiny and short). This is strictly a backup feature, one that
creates a safety copy of your entire project so that you can edit it later; the resulting disc doesn't play in a DVD player.
Copyable clips. You can now copy or cut clips out of one project and paste them into anothera great way to re-use key scenes in other movies. (But note the important
caveats on page 478.)
Playhead pasting. Speaking of copying and pasting: When you paste copied footage, iMovie always deposits it at the location of the Playheadeven if that means splitting an existing clip in half to accommodate the pasted material.
Effect and transition improvements.Transitions between video clips (like crossfades) can last ten seconds now, up from four. Reverse, slow motion, and fast motion are now listed in the Effects panel, just like all the other effects. (So don't keep scouring the bottom of the Timeline Viewer
Quick access to audio features. You know the audio waveformsthe visual representation of the loud and soft parts in an audio clip? You used to have to pay a visit to the iMovie Preferences dialog box to turn them on and off; now you have both a menu command and a keystroke that can hide or show them.
Hiding or showing the horizontal, draggable volume-graph lines on audio clips is easier now, too; this feature, too, has a menu command and a keystroke.
Search your photos. A standard, iTunes-type Search box now appears underneath the Photos pane. You can pluck one of your photos out of thousands just by typing a few letters of its name.
Stills = videos. Still photos you've incorporated into your movie now behave like video clips in one useful regard: You can drag their edges horizontally to make them "play"
longer or shorter in the movie.
Speed. iMovie HD processes just about everything faster: effects, transitions, and emptying the Trash.
iDVD Changes
As you'll see in Chapters 15 through 18, iDVD 5 is loaded with enhancements that help you make your DVD look even more like a commercial Hollywood DVD.
More themes. Version 5 comes with 15 new themes
(ready-to-use menu screen designs complete with attractive backgrounds and coordinating typeface, background music, and graphics). The key attraction is moving drop zones (design elements that you can fill with your own photos or movies).
Drop zone editor. A new, special window lets you fill or rearrange the contents of all your drop zones at once. It's especially handy because in iDVD 5's new themes, all of the drop zones are rarely on the screen at once.
Editable Map view. As your menu and button layouts grow more complex, you can use the Map screen to help you keep track of your menu structure. In iDVD 4, the Map was just a frozen image. But in iDVD 5, you can
batch-change your transitions, themes, button settings, and music right in this schematic view.
Widescreen DVDs. If you've filmed and edited widescreen video (with an HDTV camcorder or a regular one) in iMovie, iDVD can burn it onto a widescreen DVD for you. On
About This Book
Don't let the rumors fool you. iMovie may be simple, but it isn't simplistic. It offers a wide range of special effects and flexible features for creating transitions between scenes, superimposing text on your video, layering multiple soundtracks together, and more. Unfortunately, many of the best techniques aren't
covered in the only "manual" you get with iMovieits electronic help screens.
This book was born to address three needs. First, it's designed to give you a grounding in professional filming and editing techniques. The camcorder and iMovie produce video of
stunning visual and audio quality, giving you the technical tools to produce amazing videos. But most people don't have much experience with the artistic side of shootinglighting, sound, and compositionor even how to use the dozens of buttons packed onto the modern camcorder. This book will tell you all you need to know.
Second, this book is designed to serve as the iMovie manual, as the book that should have been in the box. It explores each iMovie feature in depth, offers illustrated catalogs of the various title and transition effects, offers shortcuts and work arounds, and unearths features that the online help doesn't even
mention.
Finally, this book comes with a free bonus book: iDVD5: The Missing Manual, which constitutes Chapters 15, 16, 17, and 18.If your Mac has a DVD burner like Apple's SuperDrive, iDVD can preserve your movies on home-recorded DVDs that look and behave amazingly close to the commercial DVDs you rent from Netflix or Blockbuster.
iMovie HD & iDVD 5: The Missing Manual is divided into five parts, each containing several chapters:
Part 1, Capturing DV Footage, covers what happens
before you get to iMovie. It explains the DV format, helps you buy and learn to use a camcorder, and offers a crash course in professional film technique.
Part 2, Editing in iMovie, is the heart of the book. It leads you through transferring your footage into iMovie, editing your clips, placing them into a timeline, adding cross fades and titles, working with your soundtracks, and more.
Part 3, Finding Your Audience, helps you take the
cinematic masterpiece on your screen to the world. Even if you don't have the necessary gear to burn your work onto DVD, iMovie excels at exporting your work in two different ways: back to your camcorder (from which you can play it on TV, transfer it to your VCR, and so on) or to a QuickTime movie file (which you can burn onto a CD, post on a Web page, or send to friends by email). This part of the book offers step-by-step instructions for each of these methods, and also shows you how you can use QuickTime Player Pro to supplement the editing tools in iMovie.
Part 4, iDVD 5: The Missing Manual, is just what you'd expect: a bonus volume dedicated to the world's easiest-to-use DVD design and burning software, written by guest
author (and bestselling digital-video goddess) Erica Sadun. It goes way, way beyond the basics, as you'll see.
At the end of the book, three appendixes provide a menu-by-menu explanation of the iMovie menu-by-menu commands, a
About These Arrows
Throughout this book, and throughout the Missing Manual series, you'll find sentences like this one: "Open your Home Library Preferences folder." That's shorthand for a much longer instruction that directs you to open three nested folders in sequence, like this: "In the Finder, choose Go Home. In your Home folder, you'll find a folder called Library. Open that. Inside the Library window is a folder called Preferences. Double-click to open it, too."
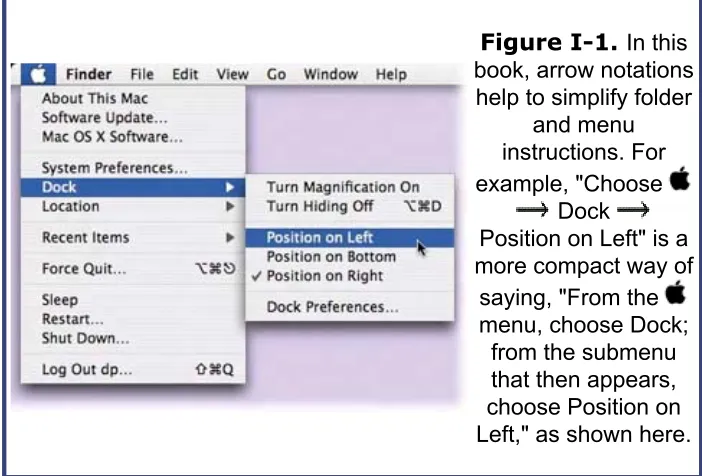
Similarly, this kind of arrow shorthand helps to simplify the business of choosing commands in menus, as shown in Figure I-1.
Figure I-1. In this
book, arrow notations help to simplify folder
and menu instructions. For example, "Choose
Dock
Position on Left" is a more compact way of
saying, "From the menu, choose Dock;
from the submenu that then appears, choose Position on Left," as shown here.
If you live in the Americas, Japan, or any of 30 other countries, your camcorder, VCR, and TV record and play back a video
signal in a format that's known as NTSC. Even if you've never heard the term, every camcorder, VCR, TV, and TV station in your country uses this same signal. (The following discussion doesn't apply to high-definition video, which is the same across continents.)
What it stands for is National Television Standards Committee, the gang who designed this format. What it means is
incompatibility with the second most popular format, which is called PAL (Phase Alternating Line, for the curious). In Europe, Africa, the Middle East, Australia, and China (among other places), everyone's equipment uses the PAL format. You can't play an American tape on a standard VCR in Swedenunless you're happy with black-and-white, sometimes jittery playback.
Tip:
France, the former Soviet Union countries, and a few
others use a third format, known as SECAM. iMovie doesn't
work with SECAM gear. To find out what kind of gear your
country uses, visit a Web site like
www.vidpro.org/standards.htm
.
Fortunately, iMovie converses fluently with both NTSC and PAL camcorders. When you launch the program, it automatically studies the camcorder you've attached and determines its format. (And if it detects wrong, you can tell it what kind of gear you have by choosing iMovie Preferences and clicking either NTSC or PAL.)
However, most of the discussions in this book use NTSC terminology. If you're a friend of PAL, use the following information to translate this book's discussions.
Whether you're aware of it or not, using the NTSC standard-definition format means that the picture you see is
characterized like this:
30 frames per second. A frame is one individual picture. Flashed before your eyes at this speed, the still images blend into what you perceive as smooth motion.
575 scan lines. The electron gun in a TV tube paints the screen with this number of fine horizontal lines.
The DV picture measures 720 x 480 pixels. This figure refers to the number of screen dots, or pixels, that compose one frame of image in the DV (digital video) version of the NTSC format. (But don't count on these specs if your
intention is to crop photos or graphics to just that size, thinking that they'll fit neatly. They won't, as described on page 249.)
The Tech Specs of PAL
When iMovie detects a PAL camcorder (or when you inform it that you're using one), it makes the necessary adjustments automatically, including:
25 frames per second. Video fans claim that the lower frame rate creates more flicker than the NTSC standard. On the other hand, this frame rate is very close to the frame rate of Hollywood films (24 frames per second). As a result, many independent filmmakers find PAL a better choice
when shooting movies they intend to convert to film.
large-screen TVs.
The DV picture measures 720 x 576 pixels. This information may affect you as you read Chapter 9 and prepare still images for use with iMovie.
About MissingManuals.com
At www.missingmanuals.com, you'll find news, articles, and updates to the books in this series.
But if you click the name of this book and then the Errata link, you'll find a unique resource: a list of corrections and updates that have been made in successive printings of this book. You can mark important corrections right into your own copy of the book, if you like.
In fact, the same page offers an invitation for you to submit such corrections and updates yourself. In an effort to keep the book as up to date and accurate as possible, each time we print more copies of this book, we'll make any confirmed corrections you've suggested. Thanks in advance for reporting any glitches you find!
In the meantime, we'd love to hear your suggestions for new books in the Missing Manual line. There's a place for that on the Web site, too, as well as a place to sign up for free email
The Very Basics
You'll find very little jargon or nerd terminology in this book. You will, however, encounter a few terms and concepts that you'll see frequently in your Macintosh life. They include:
Clicking. This book offers three kinds of instructions that require you to use the mouse or trackpad attached to your Mac. To click means to point the arrow cursor at something onscreen and thenwithout moving the cursor at allpress and release the clicker button on the mouse (or laptop
trackpad). To double-click, of course, means to click twice in rapid succession, again without moving the cursor at all. And to drag means to move the cursor while keeping the button continuously pressed.
When you're told to -click something, you click while pressing the key (next to the Space bar). Such related procedures as Shift-clicking, Option-clicking, and Control-clicking work the same wayjust click while pressing the corresponding key on the bottom row of your keyboard.
Menus. The menus are the words in the lightly striped bar at the top of your screen. You can either click one of these words to open a pull-down menu of commands (and then click again on a command), or click and hold the button as you drag down the menu to the desired command (and
release the button to activate the command). Either method works fine.
choices depend on the context of what you clickbut it's now
called a shortcut menu. That term not only matches what
it's called in Windows, but it's slightly more descriptive
about its function. Shortcut menu is the term you'll find in
this book.
Keyboard shortcuts. Every time you take your hand off the keyboard to move the mouse, you lose time and
potentially disrupt your creative flow. That's why many
experienced Mac fans use keystroke combinations instead of menu commands wherever possible. -P opens the Print dialog box, for example, and -M minimizes the current window to the Dock.
When you see a shortcut like -Q (which closes the current program), it's telling you to hold down the key, and, while it's down, type the letter Q, and then release both keys.
Part I: Capturing DV Footage
Chapter 1: The DV Camcorder
Chapter 2: Turning Home Video into Pro Video
1. The DV Camcorder
1.1. Meet Digital Video
Technically speaking, you don't need a camcorder to use iMovie.You can work with Quick Time movies you find on the Web, or use it to turn still photos into slideshows.
But to shoot your own videoand that is the real fun of iMovieyou need a digital camcorder. This is a relatively new camcorder format, one that's utterly incompatible with the tapes you may have filled using earlier camcorder types as described on the following pages (and shown in Figure 1-1):
VHS. These gigantic machines were the original
camcorders, circa 1980. Because they were nearly a foot and a half long, you had to rest the butt of these cameras on your shoulder. VHS camcorders accepted full-size VHS cassettes that, after filming, you could insert directly into your VCR for playback. Convenient, sure, but the size, weight, and bulk of these camcorders condemned them to an early grave. These days, the only place you can find VHS camcorders is on eBay.
S-VHS. This format, also known as Super VHS, accepts special, more expensive S-VHS tapes; requires a special, more expensive camcorder; and requires special, more
expensive jacks on your TV or VCR. The advantage: sharper video quality.
surpass the work of all of those long-suffering, pre-DV camcorder owners, no matter how much they spent on equipment.)
VHS-C. Here was Panasonic's attempt to solve the problems of the VHS camcorder's weight. This kind of
camcorder is much smaller than full-size VHS units because it takes much smaller cassettes. After filming, you can pop one of these C (for "compact") cassettes into a VHS-sized adapter cassette, which you then insert into a
standard VCR.
Clever, really, but still a nuisance. Now, when you want to play the video of the kids' birthday party, you have to find both the party cassette and the adapter cassette. Moreover, you can't send the tapes you make to friends or family
8mm. The 8-millimeter cassette is smaller even than VHS-C, which makes 8mm camcorders smaller stillnow not much bigger than a six-inch sub sandwich. Makers of these
camcorders make no apology for their tapes' inability to fit into a standard VCR. If you want to play back your footage, you run a cable from the camcorder to your TV or VCR, so that the camcorder itself becomes the VCR.
8mm camcorders are extremely in expensive these
daysunder $300. Among non-digital camcorders, 8mm is the most popular format, but even these are rapidly being discontinued by camcorder makers.
Hi-8. Hi-8 was the compact-camcorder equivalent of the S-VHS format described above: pricier camcorders, pricier tapes, better quality than regular 8mm. For several years, S-VHS and Hi-8 were popular prosumer camcordersa cute way of saying that they bridged the gap between
inexpensive consumer equipment and very expensive
professional equipment. Because S-VHS and Hi-8 footage doesn't deteriorate as much from copy to copy as regular VHS and 8mm tape, it was a popular format for recording wedding videos, legal depositions, and even low-budget cable TV commercials.
Today, of course, DV camcorders dominate these functions.
iMovie works only with digital camcorders, but that doesn't mean you can't use all your older footage; Chapter 4 offers several ways to transfer your older tapes into iMovie. But from this day forward, shoot all of your new footage with a DV
camcorder. At this writing, Mini DV camcorders cost about $400 for a basic model and prices continue to sink, month by month. (See the end of this chapter for a DV buying guide.)
buying a DV camcorder. Remember to transfer your old footage
into DV format before you do so, however.
1.1.1. Why a DV Camcorder Is Worth It
A DV camcorder offers enormous advantages over previous formats.
1.1.1.1 It's smaller
The size of the camcorder is primarily determined by the size of the tapes inside it. A MiniDV cassette (tape cartridge) is tiny, as shown in Figure 1-2, so the camcorders are also tiny. The
largest DV camcorder is about the size of the smallest 8mm camcorder, and the smallest DV camcorder is the size of a Sony Walkman.
Figure 1-2. The various sizes of tapes that today's
camcorders can accept differ in size,
picture quality, and cost. For both
home and prosumer filming, the standard-size
VHS cassette (back) is nearly extinct. 8mm and
Hi-8 cassettes (right) are extremely popular among people who
footage, and are very inexpensive. MiniDV tapes (left),
like the ones required by most
DV camcorders, are more expensivebut the enormous quality
improvement makes them worth
every penny.
The small size has lots of advantages. You can film
surreptitiously when necessary. DV camcorders don't make kids or interview subjects nervous like bulkier equipment. The
batteries last a long time, because they've got less equipment to power. And, of course, smaller means it's easier to take with you.
Still, DV cassettes aren't perfect. Most hold only 60 or 80 minutes of footage, and they're more expensive than analog tapes.
only the good stuff by dumping it onto DV tape #2, and then reuse DV cassette #1 for the next shooting session.
1.1.1.2 The quality is astounding
Video quality is measured in lines of resolution: the number of tiny horizontal stripes of color the playback uses to fill your TV screen. As you can see by this table, DV quality blows every previous tape format out of the water. (All camcorders, TVs, and VCRs have the same vertical resolution; this table
measures horizontal resolution.)
Table 1-1.
Tape Format Maximum Lines of Resolution
VHS, VHS-C 240
8mm 280
Live TV broadcast 300 S-VHS, Hi-8 400 Digital satellite broadcast 400
MiniDV 500
HDTV 720 or 1080
DV's 16-bit sound quality is dramatically better than previous formats, too. Infact, it's better than CD-quality sound, since DV camcorders record sound at 48 kHz instead of 44.1 kHz.
Tip:
Most DV camcorders offer you a choice of sound-quality
modes: 12-bit or 16-bit. The lower quality setting is designed to
leave "room" on the tape for adding music after you've recorded
your video. But avoid it like the plague! If you shoot your video
in 12-bit video, your picture will gradually drift out of sync with
your audio trackif you plan to save your movie to a DVD.
Consult your manual to find out how to switch the camcorder
into 16-bit audio mode. Do it
before
you shoot anything
important.
1.1.1.3 You can make copies of copies
This is a big one. You probably know already that every time you make a copy of VHS footage (or other non-DV material), you lose quality. The copy loses sharpness, color fidelity, and smoothness of color tone. Once you've made a copy of a copy, the quality is terrible. Skin appears to have a combination of bad acne and radiation burns, the edges of the picture wobble as though leaking off the glass, and video noise (jiggling static dots)fills the screen. If you've ever seen, on the news or
America's Funniest Home Videos, a tape submitted by an amateur camcorder fan, you've seen this problem in action.
Digital video is stored on the tape as computer codes, not as pulses of magnetic energy. You can copy this video from DV camcorder to DV camcorder, or from DV camcorder to Mac, dozens of times, making copies of copies of copies. The last generation of digital video will be utterly indistinguishable from the original footagewhich is to say, both will look fantastic.
you may start to see a few video
dropouts
(digital-looking
specks), depending on the quality of your tapes and duplicating
equipment. Still, few people have any reason to make that
many copies of copies. (Furthermore, making infinite copies of
a single original poses no such problem.)
1.1.1.4 A DV recording is forever
Depending on how much you read newspapers, you may have remembered the depressing story the New York Times broke in the late eighties: Because home video was such a recent
phenomenon at the time, nobody had ever bothered to check out how long videotapes last.
The answer, as it turns out, was: not very long. Depending on storage conditions, the signal on traditional videotapes may begin to fade in as little as ten years! The precious footage of that birth, wedding, or tornado, which you had hoped to
preserve forever, could in fact be more fleeting than the memory itself.
Your first instinct might be to rescue a fading video by copying it onto a fresh tape, but making a copy only further damages the footage. The bottom line, said the scientists: There is no way to preserve original video footage forever!
Fortunately, there is now. DV tapes may deteriorate over a decade or two, just as traditional tapes do. But you won't care. Long before the tape has crumbled, you'll have transferred the most important material to a new hard drive or a new DV tape or to a DVD. Because quality never degrades when you do so, you'll glow with the knowledge that your grandchildren and
"DV camcorders" in order to play it.
1.1.1.5 No fuzzy snow when rerecording
As on any camcorder, a DV unit lets your rerecord a scene on top of existing footage. But with DV, at the spot where the new footage begins or ends, you don't get five seconds of glitchy static, as you do with nondigital camcorders. Instead, you get a clean edit.
1.1.1.6 You can edit it
The fifth and best advantage of the DV format is, of course, iMovie itself. Once you've connected your DV camcorder up to your Mac (as described in Chapter 4), you can pour the footage from camcorder to computer and then chop it up, rearrange scenes, add special effects, cut out bad shots, and so on. For the first time in history, it's simple for anyone, even non-rich people, to edit home movies with professional results.(Doing so in 1990 required a $200,000 Avid editing suite; doing so in 1995 required a $4,000 computer with $4,000 worth of
digitizing cards and editing softwareand the quality wasn't great because it wasn't DV.)
Furthermore, for the first time in history, you won't have to press the fast-forward button when showing your footage to family, friends, co-workers, and clients. There won't be any dull footage worth skipping, because you'll have deleted it on the Mac.
can
make movies on iMovie that are as slickly produced as
commercial films; much of this book is dedicated to helping you
achieve that standard. But many people dump an entire DV
cassette's worth of footage onto the Mac, chop out the boring
bits, and dump it right back onto the camcorderonly about 20
minutes' worth of work after the transfer to the Mac.
1.1.2. What's It Good For?
If you're reading this book, you probably already have some ideas about what you could do if you could make professional-looking video. Here are a few possibilities that may not have occurred to you. All are natural projects for iMovie:
Home movies. Plain old homemoviescasual documentaries of your life, your kids' lives, your school life, your tripsare the single most popular creation of camcorder owners. Using the suggestions in the following chapters, you can improve the quality of your footage. Using a DV camcorder, you'll improve the quality of the picture and sound. And using iMovie, you can delete all but the best scenes (and edit out those humiliating parts where you walked for 20 minutes with the camcorder accidentally filming the ground bouncing beneath it).
FREQUENTLY ASKED QUESTION Three Camcorders Not to Buy
In their never-ending quest to come up with smaller and cooler camcorder designs, electronics manufacturers have already gone well beyond the
MiniDV format. Unfortunately, some of these alternative formats are incompatible with iMovie.
Here, then, are two camcorders not to buy:
footage on a tape the size of a matchbox. Too bad they record in a format that popular editing programs like iMovie don't recognize.
DVD camcorders. Sony, Panasonic, and Hitachi offer camcorders that use miniature DVD discs instead of tapes. Neat, but no FireWire jack. iMovie HD can now edit video from two camera categories that iMovie 4
couldn't: high-definition footage and palm-sized, USB-connectable "camcorders" that record onto a memory card instead of tape. Otherwise, though, stick to MiniDV camcorders. They're inexpensive, their
quality is spectacular, and you won't be left behind when the next camcorder-format fad passes.
Actual films. Don't scoff: iMovie is perfectly capable of creating professional video segments, or even plotted
movies. If the three kids who made The Blair Witch Project
could do it with their camcorder, you can certainly do it with yours. They didn't even have iMovie; they had to get
$60,000 in loans to do the editing and processing that you can do right on your Mac.
Moreover, new film festivals, Websites, and magazines are springing up everywhere, all dedicated to independent makers of short movies.(More on this topic is coming up in Chapter 13.)
Business videos. It's very easy to post video on the Internet or burn it onto a cheap, recordable CD-ROM, as described in Part 3. As a result, you should consider video a useful tool in whatever you do. If you're a realtor, blow
away your rivals (and save your clients time) by showing movies, not still photos, of the properties you represent. If you're an executive, quit boring your comrades with
Once-in-a-lifetime events. Your kid's school play, your speech, someone's wedding, someone's birthday or
anniversary party are all worth capturing, especially because now you know that your video can last forever.
Video photo albums. A video photo album can be much more exciting, accessible, and engaging than a paper one. Start by filming or scanning your photos (you can read tips for doing this in Chapter 3). Assemble them into a
sequence, add some crossfades, titles, and music. The result is a much more interesting display than a book of motionless images, thanks in part to iMovie's Ken Burns effect(page251). This emerging video form is becoming very popularvideographers are charging a lot of money to create such "living photo albums" for their clients.
FREQUENTLY ASKED QUESTION What's Digital About DV
I was a little surprised to find, when I bought my DV camcorder, that it requires tapes, just like my old nondigital one. If it still needs tapes, how
can they call it digital?
Your confusion is understandable. After all, digital cameras don't require film, and digital TV recorders (such as the tapeless TiVo and ReplayTV
"VCRs") don't use videotape.
Today's DV camcorders are really only half digital. They store their signal in digital form as a bunch of computer codes, but still record it on videotape just like the old camcorders. You still have to rewind and fast-forward to find
a particular spot in the footage. (Until you transfer the footage to iMovie, that is.)
Put another way, today's DV camcorders are a temporary technology, a halfway step toward the ultimate: a camcorder with a little iPod-like hard drive inside. (Already, JVC sells a camcorder that stores an hour of video on
Just-for-fun projects. Never again can anyone over the age of eight complain that there's "nothing to do. "Set them loose with a camcorder and the instruction to make a fake rock video, commercial, or documentary.
Training films. If there's a better use for video than providing how-to instruction, you'd be hard-pressed to
name it. Make a video for new employees to show them the ropes. Make a video that accompanies your product to give a humanizing touch to your company and help the customer make the most of her purchase. Make a tape that teaches newcomers how to play the banjo, grow a garden, kick a football, use a computer programand market it.
Interviews. You're lucky enough to live in an age where you can manipulate video just as easily as you do words in a word processor. Capitalize on this fact. Create family histories. Film relatives who still remember the War, the Birth, the Immigration. Or create a time-capsule, time-lapse film: Ask your kid or your parent the same four questions every year on his birthday (such as, "What's your greatest worry right now?" or "If you had one wish…?" or "Where do you want to be in five years?"). Then, after five or ten or twenty years, splice together the answers for an
enlightening fast-forward through a human life.
Broadcast segments. Want a taste of the real world? Call your cable TV company about its public-access channels. (As required by law, every cable company offers a channel or two for ordinary citizens to use for their own
programming.) Find out the time and format restraints, and then make a documentary, short film, or other piece for actual broadcast. Advertise the airing to everyone you know. It's a small-time start, but it's real broadcasting.
your golf swing, tennis form, musical performance, or public speaking style than to study footage of yourself. If you're a teacher, camp counselor, or coach, film your students,
campers, or players so that they can benefit from self-analysis, too.
1.2. Buying a DV Camcorder
If you already own a DV camcorder, you can safely skip to the next chapterunless you've always wondered what this or that button on your camcorder does. In that case, surveying the following pages may enlighten you.
1.2.1. DV Camcorder Features: Which Are
Worthwhile?
Like any hot new technology, DV camcorders started out
expensive($2, 500 in 1996) and continue to plummet in price. At this writing, basic models start at $350; prosumer models hover around $2,000; many TV crews are adopting $3,500 models like the Canon XL1 or Sony's high-definition FX1; and the fanciest, professional, commercial-filmmaking models go for $10, 000. All of these camcorders are teeming with features and require a thick brochure to list them all.
So how do you know which to buy? Here's a rundown of the most frequently advertised DV camcorder features, along with a frank assessment of their value to the quality-obsessed iMovie fan.
1.2.1.1 FireWire connector
If the camera you're considering doesn't have this feature, don't buy it; you can't use that camera with iMovie (or any other DV software).
1.2.1.2 Analog inputs
This single feature may be important enough to determine your camcorder choice by itself. Analog inputs are connectors on the camcorder (see Figure 1-3) into which you can connect older, pre-DV equipment, such as your VCR, your old 8mm camcorder, and so on. There's no easier, less expensive method of
transferring older footage into your DV camcorderor directly into iMovie.
This technique is described in more detail in Chapter 4. For now, note only that the alternative method of transferring pre-DV footage into pre-DV format is to buy a $200 converter boxan unnecessary purchase if your DV camcorder has analog inputs.
1-special cable with
RCA connectors on one end
and a miniplug on
the camcorder
end, like the one shown here. Don't
lose this cable! You also need it to play your camcorder footage on
TV.)
Tip:
Using analog inputs, you can fill a couple of DV cassettes
with, say, a movie you've rented. Then flip out the camcorder's
LCD screen, plug in your headphones, and enjoy the movie on
your cross-country flightin economy class. Smile: The people
up front in first class paid $1,000 more for the same privilege.
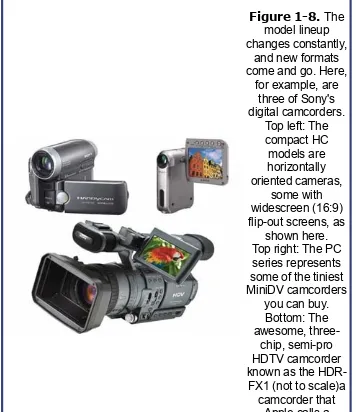
1.2.1.3 Three chips (three-CCDs)
chips or CCDs (charge-coupled devices electronic plates,
covered with thousands of individual light sensors, that convert light rays into a digital signal). The result is even more
spectacular picture quality, resolution, and color rendition than the less-expensive, one-CCD cameras.
Unfortunately, you'll pay extra for this breathtaking video quality. Most three-chip camcorders are larger and more
expensive than one-chip cams (see the photos in Figure 1-8)but they deliver much better color.
Not all three-chip models are big and pricey. Panasonic sells one for $600 that's no larger than a standard Mini DV camcorder. Note, however, that it contains three very small CCDs, so the quality improvement is visible primarily in bright, outdoor scenes.
1.2.1.4 LCD viewfinder
In the olden days, you'd set up your shots and monitor your filming by looking through a tiny glass eyepiece, exactly like those on today's 35mm still cameras. Today, virtually all camcorders offer an alternative to the eyepiece: a small TV screen known as an LCD.(LCD stands for liquid crystal display,
the technology used to produce the image. As you may have noticed, it's the same technology used in laptop screens.) In most cases, this LCD panel swings out from the side of the camera (see Figure 1-4).
an LCD screen, you'd have no idea whether or not you were centered in
the frame. You can usually flip
the LCD so far around, in fact, that you can press it flat
against the camcorder, screen
side out. That's a nice way to play back your footage
for a couple of onlookers.
The LCD means that when you're shooting, you can see what the camcorder sees without having to mash your face against the eyepiece. Better yet, after shooting, you can play back your footage. And thanks to the small, built-in speaker found on
every sub-$1, 500 camcorder, you can watch your work played back on the LCD screen while still "on location. "
It's worth noting, by the way, that what you see isn't exactly
what you get. For one thing, the LCD panel usually has its own brightness control, which, if not adjusted perfectly, may trick you into thinking a scene is better (or worse) lit than it actually is. The color and exposure revealed by the LCD screen may not exactly match what's going onto the tape, either.
When picture perfection counts, therefore, use your
filming, and when you're trying to save battery juice. The LCD display depletes your battery about 50 percent faster than when the LCD is turned off.
Tip:
The size of the LCD viewfinder is relative to two things: the
size of the camcorder and its price. A camcorder with a 2.5-inch
screen may cost hundreds of dollars less than one with a 4-inch
screen.
1.2.1.5 Electronic image stabilizer (EIS)
As you'll read in Chapter 2, certain film techniques scream "Amateur!" to audiences. One of them is the instability of
handheld filming. In a nutshell, professional video is shot using a camera on a tripod (Woody Allen's"handheld" period not with standing). Most home camcorder footage, in contrast, is shot from the palm of your hand.
A digital or electronic stabilizing feature (which may have a marketing name, such as Sony's SteadyShot) takes a half step toward solving that problem. As shown in Figure 1-5, this
feature neatly eliminates the tiny, jittery moves present in
handheld video. (It can't do anything about the bigger jerks and bumps, which are especially difficult to avoid when you're
zoomed in.) It also uses up your battery faster.
1.2.1.6 Optical image stabilizer
The images are clearer because optical stabilizers don't have to crop out part of the picture as a buffer, unlike the stabilizers illustrated in Figure 1-5.
1.2.1.7 Digital8 format
Here's another plan for getting your older footage into iMovie: Buy what Sony calls a Digital8 camcorder. This fascinating hybrid doesn't use the MiniDV videotapes used by all other DV camcorders. Instead, it accepts the less expensive 8mm or, as Sony recommends, Hi-8 tapes.
Onto these cassettes, Digital8 camcorders record the identical DV signal found on MiniDV camcorders. But they can play back
either digital video or traditional, analog video. (When recording digital video, however, the camera runs twice as fastyou still get only one hour of recording per tape, just as on MiniDV tapes.)
This kind of camcorder, in other words, is a good solution if you have a library of old 8mm tapes that you'd like to edit in iMovie. Your Mac can't tell which kind of tape the Digital8 camcorder is playing.
On the other hand, full-blown DV camcorders and tapes are no longer much more expensive than their 8mm predecessors, and Sony's Digital8 camcorder family has already begun to wind down.
Figure 1-5.
Digital stabilization features work by
"taking in" more image than you actually see in the
some buffer, its computer can compensate for small bumps and jitters by keeping
an "eye" on prominent features
of the image. On less expensive
camcorders, unfortunately, this buffer zone means
that your camcorder is absorbing less video information, to the detriment of
picture quality.
1.2.1.8 Manual override
Better DV camcorders let you turn off the automatic focus,
automatic exposure control, automatic white balance, and even automatic sound level. This feature can be useful in certain situations, as you'll find out in the next chapter. If you've
decided to pay extra for this feature, look for a model that lets you focus manually by turning a ring around the lens, which is much easier than using sliders.
1.2.1.9 Optical zoom
When you read the specs for a DV camcorderor read the logos painted on its bodyyou frequently encounter numbers like
many times the camera can magnify a distant image, much like a telescope. That number measures the optical zoom, which is the actual amount that the lenses themselves can zoom in. Such zooming, of course, is useful when you want to film
something that's far away. (As for the number after the slash, see "Digital zoom," on the following page.)
You should know, however, that the more you've zoomed in, the shakier your footage is likely to be, since every microscopic
wobble is magnified by, say, 12 times. You also have to be
much more careful about focusing. When you're zoomed out all the way, everything is in focusthings near you, and things far away. But when you're zoomed in, very near and very far
objects go out of focus. Put into photographic terms, the more you zoom in, the shorter the depth of field (the range of
distance from the camera that can be kept in focus simultaneously).
Finally, remember that magnifying the picture doesn't magnify the sound. If you're relying on the built-in microphone of your camcorder, always get as close as you can to the subject, both for the sound and for the wobble.
Tip:
As you'll discover in the next chapter, professional video
and film work includes very little zooming, unlike most amateur
video work. The best zooming is subtle zooming, such as when
you very slowly "move toward" the face of somebody you're
interviewing.For this reason, when shopping for camcorders,
test the zooming if at all possible. Find out if the camcorder has
variable-speed
zooming, where the zooming speed increases
as you press the Zoom button harder. Some camcorders offer
only two different speedsfast and fasterbut that's still better than
having no control at all. (Variable-speed zooming isn't
it does.)
1.2.1.10 Digital zoom
Much as computer owners mistakenly jockey for superiority by comparing the megahertz rating of their computers (higher megahertz ratings don't necessarily make faster computers), camcorder makers seem to think that what consumers want most in a camcorder is a powerful digital zoom. Your
camcorder's packaging may "boast" zoom ratings of "50X," "100X," or "500X!"
When a camcorder uses its digital zoomthe number after the slash on the camcorder boxit simply enlarges the individual dots that compose its image. Yes, the image gets bigger, but it
doesn't get any sharper. As the dots get larger, the image gets chunkier, coarser, and less recognizable, until it ends up looking like the blocky areas you see superimposed over criminals'
faces to conceal their identity on Cops. After your digital zoom feature has blown up the picture by 3X, the image falls to pieces. Greater digital zoom is not something worth paying extra for.
1.2.1.11 Minutes-remaining readout
Fortunately, the problems exhibited by camcorder batteries of oldsuch as the "memory effect"are a thing of the past. (When you halfway depleted a pre-DV camcorder battery's charge several times in a row, the battery would adopt that halfway-empty point as its new completely empty point, effectively halving its capacity.) Today's lithium-ion battery technology (used by DV camcorders) eliminates that problem.
camera how much juice it has remaining. A glance at the viewfinder or a small side-panel readout tells you how many minutes of recording or playback you've got lefta worthy feature.
Tip:
The number of minutes' recording time advertised for
camcorder batteries is
continuous
recording timethat is, the
time you'll get if you turn the camcorder on, press Record, and
go out to lunch. If you stop and start the camera to capture
shorter scenes, as almost everyone does, you'll get about half
the advertised amount of time out of each battery charge.
1.2.1.12 Built-in light
As you can read in the next chapter, insufficient lighting is one of the leading causes of "amateuritis," a telltale form of poor video quality that lets viewers know that the footage is
homemade. In the bestand most expensiveof all possible worlds, you'd get your scene correctly lit before filming, or
you'd attach a light to the "shoe"(light connector) on top of the camera. Those few cameras that have such a shoe, or even have a built-in light, give you a distinct advantage in filming accurate colors.
1.2.1.13 Preprogrammed exposure options
Most DV camcorders come with a number of canned
focus/shutter speed/aperture settings for different indoor and out door environments: Sports Lesson, Beach and Snow,
1.2.1.14 Remote control
Some DV camcorders come with a pocket-sized remote control. It serves two purposes: First, its Record and Stop buttons give you a means of recording yourself, with or with out other
people in the shot. Second, when you're playing back footage with the camcorder connected to your TV or VCR, the remote lets you control the playback without needing to have the camcorder on your lap. You may be surprised at the remote's usefulness.
1.2.1.15 Backlight mode
As you can read in the next chapter, modern camcorders take much of the guesswork out of shooting video. For example, they can focus automatically.
Although few consumers appreciate it, today's camcorders also set their aperture automatically. The aperture is the hole inside the barrel of your camcorder's snout that gets bigger or smaller to admit more or less light, preventing you from under or
overexposing your footage. (Inside the camera is an irisa circle of interlocking, sliding panels that move together to reduce or enlarge the opening, much like the one in a still camera.)
The automatic aperture circuitry works by analyzing the image. If it contains a lot of lightsuch as when you're filming against a snowy backdrop or aiming the camera toward the sunthe iris closes automatically, reducing the opening in the camera lens and thus reducing the amount of light admitted. The result: You avoid flooding the image with blinding white light.
Unfortunately, there may be times when you have no choice but to film somebody, or something, against a bright backdrop. In those cases, as you may have discovered through painful
dark, almost in silhouette (see Figure 1-6). Now the background is correctly exposed, but the subject winds up underexposed.
A Backlight button, then, is a valuable asset on a camcorder. Its purpose is to tell the camera, "OK, look, it's a bright scene; I can appreciate that. But I'm more interested in the subject that's coming out too dark at the moment. So do me a favor and open that aperture a couple of notches, will you?"
Figure 1-6.
Without the backlight mode, your camcorder is
likely to turn your subject into a silhouette (left).
The backlight button compensates by
brightening everything up
(right).
The camera obliges. Your subject no longer winds up too darkin fact, modern camcorders do a great job at making sure the subject turns out just right. But over-riding the automatic aperture control undoes the good the automatic iris originally did younow everything around your subject is several shades too bright. Alas, there's no in between; either your subject or the background can be correctly exposed in very bright
settingsbut not both.
auto-exposure feature off
completely.
True, they must now adjust the
exposure knob for every single new shot, but their footage is
then free from the bizarre and violent darkening or brightening
that auto-exposure electronics can create as you pan across a
scene.
1.2.1.16 FlexiZone or Push Focus
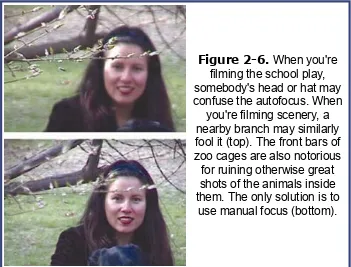
All camcorders offer automatic focus. Most work by focusing on the image in the center of your frame as you line up the shot.
That's fine if the subject of your shot is in the center of the frame. But if it's off-center, you have no choice but to turn off the autofocus feature and use the manual-focus ring. (Using the camcorder isn't like using a still camera, where you can point the camera directly at the subject for focusing purposes, and thenbefore taking the shotshift the angle so that the subject is no longer in the center. Camcorders continually refocus, so
pointing the camera slightly away from your subject makes you lose the off-center focus you've established.)
Some Canon, Sony, and Sharp camcorders let you point to a specific spot in the frame that you want to serve as the focus point, even if it's not the center of the picture. (This feature is called FlexiZone on the Canon models, or Push Focus on high-end Sony models. On Sony cams with touch-screen LCD panels, it's especially easy to indicate which spot in the frame should get the focus.) If the model you're eyeing has this feature, it's worth having.
1.2.1.17 Night-vision mode
like night-vision goggles. In this mode, you can actually film (and see, as you watch the LCD screen) in total darkness. The infrared transmitter on the front of the camcorder measures the heat given off by various objects in its path, letting you capture an eerie, greenish night scene. Rent The Silence of the Lambs
for an idea of how creepy night-vision filming can be. Or watch any episode of "Survivor."
The transmitter's range is only about 15 feet or so. Still, you may be surprised how often it comes in handy: on campouts, during sleepovers, on nighttime nature walks, and so on.
1.2.1.18 Still-camera mode
All DV camcorders offer a snapshot mode in which you can "snap" a still photo. The camcorder freezes one frame of what it's seeing, and records it either on the tape (for, say, a 7-second stretch) or on a memory card.
The still-image quality captured by most camcorders is pretty terrible. The resolution is OK on recent models (some
camcorders offer two- or even three-megapixel resolution), but the quality isn't anywhere near what you'd get using a
dedicated digital still camera. It turns out that the lenses and circuitry that best serve video are all wrong for stills.
If the camcorder you're considering offers this feature, fine. But it may be redundant for the iMovie owner. iMovie can grab one-megapixel still frames from any captured video, as described in Chapter 9.
1.2.1.19 Progressive-scan CCD
grabbed, not just one set of alternating, interlaced scan lines (the usual video signal). If you plan to catch still frames from your camcorder, a progressive-scan CCD will spare you some of the jagged lines that may appear. However, if your primary goal is to make movies, this expensive feature is not worth paying for, especially since you can buy a digital still camera, with much greater resolution, for about the same added cost.
1.2.1.20 Title generator
Some camcorders let you superimpose titles (that is, lettering) on your video as you film. In your case, dear iMovie owner, a title-generating feature is useless. Your Mac can add gorgeous, smooth-edged type, with a selection of sizes, fonts, colors, and even scrolling animations to your finished movies, with far more precision and power than the blocky text available to your
camcorder.(Chapter 7 shows you how.)
Tip:
A title generator on the camcorder is actually
worse
than
useless, because it permanently stamps your original footage
with something you may wish you could amend later.In fact, as
a general rule, you should avoid using (or paying for)
any
of the
in-camera editing features described in this chaptertitle
generator, fader, special effectsbecause you can do this kind of
editing much more effectively in iMovie. Not only are they
redundant, but they commit you to an editing choice in
advance, thus limiting how you can use your footage.
1.2.1.21 Fader
professional-looking fade-in from blackness. If you press it as
you're recording, and then press the Record button again to stop recording, you get a smooth dimming of the picture (and, usually, a fading of the sound), all the way to black (and
silence).
Even if your camcorder has a Fader button, don't use it, for several reasons:
Pressing the Fade button in order to trigger a fade-out is very difficult to do. You're forced to look away from your subject to hunt for the button, and it's almost impossible to keep the camera steady in the process.
iMovie offers much more graceful and controlled fade-ins and fade-outs. For example, you can specify exactly how many seconds long the fade should last, and you can even fade into a color other than black.
When you use your camcorder's Fade button, you risk chopping off one last great wisecrack from your kid as she rides into the sunset, or one last backflip by the seal at Sea World. In other words, once you've started the fade, you can't stop it.
If you need any more convincing, ask any camcorder owner about the embarrassment factor that comes from fading out on what he assumed would be the absolute perfect final shot, and then coming across another event that had to be included in the footage. When played back, the feeling of gentle, sighing finality created by the fade-out is jarringly shattered by the sudden appearance of that tacked-on scene.