13.3 Controlling Printouts
Between the moment when you click OK in the Print dialog box and the arrival of the first page in the printer's tray, there's a delay. When printing a complex document with lots of graphics, the delay can be considerable.
Fortunately, the waiting doesn't necessarily make you less productive, since you can return to work on your PC, or even quit the application and go watch TV. An invisible program called the print spooler supervises this background printing process. The spooler collects the document that's being sent to the printer, along with all the codes the printer expects to
receive, and then sends this information, little by little, to the printer.
NOTE
The spooler program creates huge temporary printer files, so a hard drive that's nearly full can wreak havoc with background printing.
To see the list of documents waiting to be printedthe ones that have been stored by the spooleropen the Printers and Faxes window, and then double-click your printer's icon to open its window.
NOTE
While the printer is printing, a printer icon appears in the
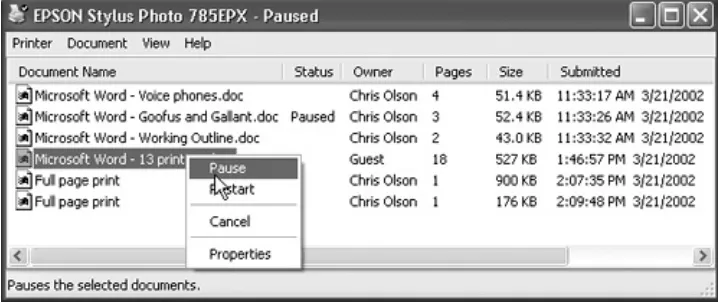
The printer's window lists the documents currently printing and waiting; this list is called the print queue (or just the queue), as shown in Figure 13-8. (Documents in the list print in top-to-bottom order.)
You can manipulate documents in a print queue in any of the following ways during printing:
Put one on hold. To pause a document (put it on hold), right-click its name and choose Pause from the shortcut menu. When you're ready to let the paused document
continue to print, right-click its listing and reselect Pause to turn off the checkmark.
Put them all on hold. To pause the printer, choose Printer Pause Printing from the printer window menu bar. You might do this when, for example, you need to change the paper in the printer's tray. (Choose Printer Pause Printing again when you want the printing to pick up from where it left off.)
NOTE
You can also pause the printer by right-clicking its icon in the Printers and Faxes window and choosing Pause Printing from the shortcut menu. (To undo this procedure, right-click the icon and choose Resume Printing.)
Add another one. As noted earlier, you can drag any document icon directly from its disk or folder window into the printer queue. Its name joins the list of printouts-in-waiting.
press the Delete keyor, alternatively, right-click its name and choose Cancel from the shortcut menu. Either way, if you click Yes in the confirmation box, the document
disappears from the queue; now it'll never print out.
Cancel all of them. To cancel the printing of all the documents in the queue, choose Printer Cancel All
Documents. (Alternatively, right-click the printer icon itself in the Printers and Faxes window and choose Cancel All Documents from the shortcut menu, as shown in Figure 13-4.)
NOTE
A page or so may still print after you've paused or canceled a printout. The explanation: Your printer has its own
memory (the buffer), which stores the printout as it's sent from your PC. If you pause or cancel printing, you're only stopping the spooler from sending more data to the printer.
Rearrange them. If you're used to, say, Windows Me, it may take you a momentor an afternoonto figure out why you can't simply drag documents up or down in the list of waiting printouts to rearrange their printing order. In
Windows XP, the procedure is slightly more involved.
13.2 Printing
Fortunately, the setup described so far in this chapter is a time-only task. Once it's over, printing is little more than a one-click operation.
13.2.1 Printing from Applications
After you've created a document you want to see on paper, choose File Print (or press Ctrl+P). The Print dialog box appears, as shown in Figure 13-5.
This box, too, changes depending on the program you're usingthe Print dialog box in Microsoft Word looks a lot more intimidating than the WordPad versionbut here are the basics:
Select Printer. If your PC is connected to several printers, or if you've created several differently configured icons for the same printer, choose the one you want from this drop-down list or scrolling panel of printer icons.
Preferences/Properties. Clicking this button opens a version of the printer's Properties dialog box, as shown in
Figure 13-6.
Figure 13-6. When you choose Properties from
the Print dialog box, you can specify the paper
size you're using, whether you want to print
sideways on the page ("Landscape"
orientation), what kind of photo paper you're
using, and so on. Here, you're making changes
changing any settings for the printer itself.
(The specific features of this dialog box
depend on the program you're using.)
Page range. These controls specify which pages of the document you want to print. If you want to print only some of the pages, click the Pages option and type in the page numbers you want (with a hyphen, like 3-6 to print pages 3 through 6).
NOTE
hyphens to the mix, like this: 1-3, 5-6, 13-18.
Click Current Page to print only the page that contains the blinking insertion point. Click Selection to print only the text you selected (highlighted) before opening the Print dialog box. (If this option button is dimmed, it's because you didn't highlight any textor because you're using a program that doesn't offer this feature.)
Number of copies. To print out several copies of the same thing, use this box to specify the exact amount. You'll get several copies of page 1, then several copies of page 2, and so onunless you also turn on the Collate checkbox, which produces complete sets of pages, in order.
Print. The Print drop-down list in the lower-left section of the dialog box offers three options: "All pages in range," "Odd pages," and "Even pages."
Use the Odd and Even pages options when you have to print on both sides of the paper, but your printer has no special feature for this purpose. You'll have to print all the odd pages, turn the stack of printouts over, and run the pages through the printer again to print even page sides.
Application-specific options. The particular program you're using may add a few extra options of its own to this dialog box. Figure 13-7 shows a few examples from
Internet Explorer's Print dialog box.
Figure 13-7.
The Web page about to be printed
uses
frames
(individual, independent,
you specify exactly which frame or frames you
want to print. If the page contains links to
other
Web pages (and these days, what Web
page doesn't?), you can print those Web
pages, too, or just print a table of the links (a
list of the URL addresses).
When you've finished making changes to the print job, click OK or Print, or press Enter. Thanks to the miracle of background printing, you don't have to wait for the document to emerge from the printer before returning to work on your PC. In fact, you can even exit the application while the printout is still under way, generally speaking.
NOTE
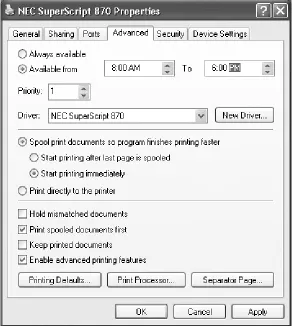
if you must for some technical reason, you'll find the on/off switch in the Advanced Properties dialog box for your printer (see Figure 13-10 for instructions on getting there). Select "Print directly to the printer" to turn off background printing.
Figure 13-10. Right-click your printer's icon in the
Printers and Faxes window. From the shortcut
menu, choose Properties, then click the Advanced
tab, shown here. Select "Available from," and use
the time setting controls to specify when your
underlings are allowed to use this printer from
POWER USERS' CLINIC
Printing from a DOS Program
Windows programs don't need any special setup steps to print. But if you want to print from a DOS application, you must first tell it which port your printer is connected to.
To do so, find the printing options menu. There you'll be able to tell the software the name of the port to which your printer is connected (usually LPT1).
Unfortunately, the commands required to print are unique to each DOS program; knowing them is up to you.
13.2.2 Printing from the Desktop
You don't necessarily have to print a document while it's open in front of you. You can, if you wish, print it directly from the
desktopvia an open disk or folder window, or Windows Explorer, for examplein any of three ways:
Right-click the document icon, and then choose Print from the shortcut menu. Windows launches the program that created itWord or Excel, for example. The Print dialog box appears, so that you can specify how many copies you want and which pages you want printed. When you click Print, your printer springs into action, and then the program quits automatically (if it wasn't already open).
If you've opened the Printers and Faxes window, you can drag a document's icon directly onto a printer icon.
(Figure 13-8) by double-clicking the Printers icon in your Printers and Faxes window, you can drag any document icon directly into the list of waiting printouts. Its name joins the others on the list.
Figure 13-8. The first document, called
"Microsoft WordVoice phones.doc," has begun
printing; the second one, you've put on hold.
Several other documents are waiting. By
right-clicking documents in this list, you can pause
or cancel any document in the queueor all of
them at once.
These last two methods bypass the Print dialog box, and
therefore give you no way to specify which pages you want to print, nor how many copies. You just get one copy of the entire document.
13.2.3 Printing from the Internet
13.1 Installing a Printer
A printer is designed to follow computer instructions called
printer codes from your PC. These codes tell the printer what fonts to use, how to set margins, which paper tray to use, and so on.
But the codes aren't identical for every printer. Therefore, every printer requires a piece of softwarethe printer driverthat tells the printer how to interpret what it "hears" from your computer.
Windows XP comes with hundreds of printer drivers built right in; your printer also came with a set of drivers on a CD or floppy. You can often find more recent driver software for your printer on the manufacturer's Web site, such as
http://www.epson.com or http://www.lexmark.com, or from a central driver repository like http://www.windrivers.com.
13.1.1 Existing Printers
Did you upgrade your PC to Windows XP from an earlier versionone that worked fine with your printer? In that case, Windows XP automatically notices and inherits your existing settings. If it's a fairly recent printer with a fairly recent driver, it'll probably work fine with Windows XP.
But if the printer is especially elderly, the printer software may be incompatible with Windows XP. In that case, your first
general, there's not much to it.
NOTE
Only people with Administrator accounts can install a new printer to a Windows XP machine (see Chapter 16).
13.1.2 USB Printers
If you're like most people at home these days, you use an inkjet printer that connects to your PC's USB (Universal Serial Bus) port. As a technology, USB has lots of advantages: USB gadgets are easy to connect and disconnect, are very fast, conserve space, can be plugged and unplugged while the PC is running, and so on.
Just the act of connecting a USB printer to your PC, for example, inspires Windows XP to dig into its own bag of
included driver modules to install the correct one (Figure 13-1). See Chapter 14 for more on this process.
Figure 13-1. You got lucky. Windows recognizes
your printer, has the appropriate driver, and has
13.1.3 Network Printers
If you work in an office where numerous people on the network share a single laser printer, the printer usually isn't connected directly to your computer. Instead, it's elsewhere on the
network; the Ethernet cable coming out of your PC connects you to it indirectly.
In general, there's very little involved in ensuring that your PC "sees" this printer. Its icon simply shows up in the Start
Control Panel Printers and Faxes folder. (If you don't see it, run the Add Printer Wizard described in the following section. On its second screen, you'll be offered the chance to look for "A network printer, or printer attached to another computer."
That's the one you want.)
13.1.4 Parallel, Serial, and Infrared Printers
Although USB printers are the world's most popular type today, there was, believe it or not, a time before USB. In those days, most home printers fell into one of these categories:
Parallel. Before USB changed the world, most printers
connected to PCs using a printer cable or parallel cable. The cable connects to your PC's parallel port, which Microsoft's help screens call the LPT1 porta 25-pin, D-shaped jack. (On many PCs, this connector is marked with a printer icon on the back panel.)
Serial. Other older printers use a cable connected to one of your computer's serial (or COM) ports, the connectors that often accommodate an external modem. The primary
advantage of a serial connection is the extended cable
while serial cables up to 50 feet long work fine.
NOTE
To protect its innards, turn off the PC before connecting or disconnecting a parallel or serial cable.
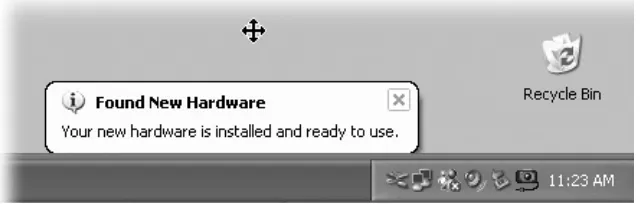
Infrared. Certain printers from HP, Canon, Citizen, and other companies print using infrared technologythat is, there's no cable at all. Instead, if your PC has an infrared lens (as many laptops do), it can communicate with the printer's similar lens wirelessly, as long as the printer and PC are within sight of, and relatively close to, each other.
If the technology gods are smiling, you can just connect the printer, turn on your Windows XP machine, and delight in the "Found new hardware" message that appears on your taskbar. You're ready to print.
But if Windows doesn't "know about" the printer model you've hooked up, it can't install its drivers automatically. In that case, the Add Printer Wizard appears (Figure 13-2)or you can always open it. (Choose Start Control Panel Printers and Faxes; click the Add Printer link.) Click Next to walk through the questions until you've correctly identified your printer and installed the appropriate software.
Figure 13-2. Top: As the note explains, use the
Add Printer Wizard only if your printer doesn't
connect to your USB or FireWire (IEEE 1394)
port. Bottom: In this window, try the
and model of the printer you've attached, return
to this screen and turn off this option. You'll wind
up in the dialog box shown in the next
illustration.
Here are the guidelines for using the next screen:
If the "Automatically detect" option didn't work, you'll be asked to specify which PC port your printer's connected to. You'll then be asked to indicate, from a gigantic scrolling list of every printer Microsoft has ever heard of, your exact
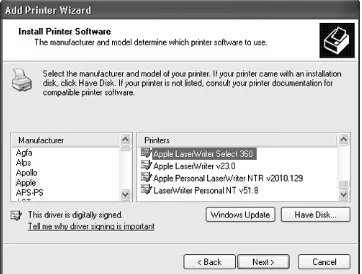
brand and model (Figure 13-3).
Figure 13-3. The left pane lists every printer
manufacturer Microsoft has ever heard of.
Once you've selected your printer's
manufacturer, a list of all the printer models
from that manufacturer (that Windows XP
knows about) appears in the right pane. Click
the Have Disk button if your printer's driver
software is on a disk supplied by the
manufacturer.
printer's driver software. On the Add Printer Wizard screen, select your printer from the list of printers. If Windows
doesn't list your printer there, or if its manufacturer
supplied the Windows XP driver on a disk, click the Have Disk button, and then navigate to the CD, floppy disk, or downloaded Internet installation file that contains the driver.
Either way, subsequent wizard screens will invite you to type a short name for your printer, in order to make it available to
other computers on the network (yes, Windows can even share, for example, a USB inkjet, even though it's not technically a network printer), to print a test page, and so on. (If the test page doesn't print out correctly, Windows XP launches its printer troubleshootera specialized wizard that offers you one troubleshooting suggestion after another until either you or Windows quits in frustration.)
13.1.5 The Printer Icon
If your driver-installation efforts are ultimately successful, you're rewarded by the appearance of an icon that represents your printer.
This icon appears in the Printers and Faxes windowan important window that you'll be reading about over and over again in this chapter. Exactly how you arrive there depends on how you've set up Windows XP:
If you've set up your Start menu to display a submenu for the Control Panel (Opening the Control Panel Window When You Can't), just choose Start Control Panel Printers and Faxes.
and Faxes icon.
If you view your Control Panel in Category view, choose Start Control Panel, click the Printers and Other Hardware link, and finally click the "View installed printers or fax
printers" link.
The Printers and Faxes window should be listed in your
Start menu, which saves you some burrowing if you use this feature a lot. If it's not there, for some reason, right-click the Start button. From the shortcut menu, choose
Properties. On the Start Menu tab, click Customize, then click the Advanced tab. Scroll down in the list of
TROUBLESHOOTING MOMENT If Your Printer Model Isn't Listed
If your printer model isn't in the list of printers (Figure 13-3), then Windows XP doesn't have a driver for it. Your printer model may be very new (more recent than Windows XP, that is) or very old. You have two choices for getting around this roadblock:
First, you can contact the manufacturer (or its Web site) to get the drivers. Then install the driver software as described in the previous section.
Second, you can use the printer emulation feature. As it turns out, many printers work with one of several standard drivers that come from other companies. For example, many laser printers work fine with the HP LaserJet driver. (These laser printers are not, in fact, HP LaserJets, but they emulate one.)
GEM IN THE ROUGH Installing Fake Printers
If your printer has two paper trays, switching to the secondary one is something of a hassle. You must spend time making the changes in the Print dialog box, as described later in this chapter. Similarly, switching the printout resolution from, say, 300 dpi to 600 dpi when printing important graphic documents is a multi-step procedure.
That's why you may find it useful to create several different icons for the same printer. The beauty of this stunt is that you can set up different settings for each of these icons. One might store canned settings for 600 dpi printouts from the top paper tray, another might represent 300 dpi printouts from the bottom one, and so on. When it comes time to print, you can switch between these virtual printers quickly and easily.
To create another icon, just run the Add Printer Wizard a second time, as described on the preceding pages. At the point in the installation where you name the printer, invent a name that describes this printer's alternate settings, like HP6-600 dpi or Lexmark-Legal Size.
When the installation process is complete, you'll see both printer iconsthe old and the newin the Printers and Faxes window. Right-click the new "printer" icon, choose Printing Preferences from the shortcut menu, and change the settings to match its role.
To specify which one you want as your default printerthe one you use most of the timeright-click the appropriate icon and choose Set as Default Printer from the shortcut menu.
But thereafter, whenever you want to switch to the other set of printer
settingswhen you need better graphics, a different paper tray, or other special options for a documentjust select the appropriate printer from the Printer Name drop-down list in the Print dialog box (see Figure 13-5 at top). You've just saved yourself a half-dozen additional mouse clicks and settings changes.
Figure 13-5. Top: The options in the Print dialog box are different on each printer model and each application, so your Print dialog box may look slightly different. For example, here
are the Print dialog boxes from Microsoft Word and WordPad. Most of the time, the factory settings shown here are what you
want (one copy, print all pages). Just click OK or Print (or press Enter) to close this dialog box and send the document to
the printer. Bottom: During printing, the tiny icon of a printer appears in your notification area. Pointing to it without clicking produces a pop-up tooltip like this that reveals the background
NOTE
If you're using your Start menu in Classic view (Section 9.1), you get to your Printers and Faxes window by clicking Start Settings Printers and Faxes.
different situations, as the rest of this chapter clarifies.
Figure 13-4. At first, the task pane in the Printers
and Faxes window offers only two commands. But
when you click a printer icon, a long list of useful
options appears, as shown here. Many of them
duplicate the options that appear when you
right-click a printer iconsomething you'd be wise to
remember the day your right mouse button
Chapter 11. Web, Chat, and
Videoconferencing
Microsoft has gone to great lengths to integrate the Internet into every nook and cranny of Windows XP. Links and buttons that spur your modem into a dialing frenzy are everywhere: on the Help screens, in the Search window, and even in the "Send error report to Microsoft?" dialog boxes that appear after
program crashes. Once you've got your Internet connection working (Chapter 10), you may find that it's easier to go online than it is not to.
The Internet offers dozens of different features, most of them graced with such unhelpful, invented-by-government-scientists-in-the-sixties names as FTP, Telnet, Gopher, and so on. But a few of the most popular Internet services are both easy to
understand and easy to use: the World Wide Web, email, online chatting, video¬conferencing, and free phone calls.
You can use whichever software you prefer for these functions. To connect to the Web, for example, use Netscape Navigator or any of several less-famous Web browsers. To check your email, use Eudora, Lotus Notes, and so on.
But most Windows XP users wind up using the Internet programs that are built right into the operating system:
Internet Explorer or MSN Explorer for Web browsing; Outlook Express for email; and Windows Messenger or NetMeeting for chatting, free long-distance "phone" calls, and teleconferencing. This chapter covers all of these programs except Outlook
Chapter 16. Maintenance, Backups, and
Troubleshooting
Chapter 14. Hardware
A PC contains several pounds of wires, slots, cards, and
chipsenough hardware to open a TruValue store. Fortunately, you don't have to worry about making all of your PC's
preinstalled components work together. In theory, at least, the PC maker did that part for you. (Unless you built the machine yourself, that is; in that case, best of luck.)
But adding new gear to your computer is another story. Hard drives, cameras, printers, scanners, network adapter cards, video cards, keyboards, monitors, game controllers, palmtop synchronization cradles, and other accessories can all make life worth living for the power user. When you introduce a new
piece of equipment to the PC, you must hook it up and install its
UP TO SPEED About Drivers
When a software program wants to communicate with your gear, Windows is the mediator. For example, when your word processor needs the printer, it says, "Yo, printer! Print this document, will ya?" Windows intercepts the message and gives the printer very specific instructions about printing, ejecting pages, making text bold, and so on. It speaks to the printer in "Printerese," a language it learns by consulting the printer's software driver.
Other hardware components work similarly, including sound cards, network interface cards (NICs), modems, scanners, and so on. All of them require specifically formatted instructions and driver software.
Fortunately, Microsoft has taken much of the headache out of such installation rituals by its invention of Plug and Play. This chapter guides you through using this featureand counsels you on what to do when Plug and Play doesn't work.
NOTE
2.16 Customizing the Start Menu
As millions of Windows users have demonstrated, it's perfectly possible to live a long and happy life without ever tampering with the Start menu. For many people, the idea of making it look or work differently comes dangerously close to nerd
territory. (It's true that listing your favorite files there gives you quicker access to thembut it's even easier to use the Quick
UP TO SPEED
The Not-My-Documents Folder
Whenever you log on, Windows XP provides a My Documents folder just for you. (It actually sits in the My Computer Local Disk (C:) Documents and
Settings [Your Name] folder.)
This feature can be confusing if you're not expecting it. For example, if you stop by the computer after somebody else has logged in, none of your stuff is where you expect to find itspecifically, in the My Documents folder. That's because the computer no longer opens your documents folder when you choose Start My Documents.
If this happens to you, check the name that appears at the top of the Start menu. It identifies who's currently logged onand whose documents are showing up in the My Documents window.
Still, knowing how to manipulate the Start menu listings may come in handy someday, and provides an interesting glimpse into the way Windows works.
NOTE
Thanks to the User Accounts feature described in Chapter 17, any changes you make to the Start menu apply only to you.
Each person with an account on this PC has an independent, customized Start menu. When you sign on to the machine using your name and password, Windows XP loads your customized Start menu.
2.16.1 Basic Start Menu Settings
selected by a scientific usability study or by a dartboard, but you're likely to find something that suits you.
To view and change the basic options, right-click the Start menu; choose Properties from the shortcut menu. Now the Taskbar and Start Menu Properties dialog box opens, as seen in
Figure 2-22.
Figure 2-22. Top: The only task you can perform
on this first screen is to turn off the new,
Windows XP double-column Start menu design to
return to the older, single-column Classic Start
menu design of Windows versions gone by. The
good stuff awaits when you click the Customize
button. Bottom: Here's the General tab of the
Customize Start Menu dialog box. (The Clear List
button refers to the lower-left section of the Start
menu, which lists the programs you use most
often. Click Clear List if you don't want to risk
your supervisor coming by while you're up for
coffee, and noticing that your most recently used
When you click the Customize button, you see the dialog box shown at right in Figure 2-22. Here you're offered a random assortment of Start menu tweaks:
Select an icon size for programs. Turning on "Small icons" gives you smaller icons next to the commands in the left column of the Start menu. (You always get small icons on the right side and in the All Programs menu.) As a result, the Start menu is more compact. Consider converting to small icons as your All Programs menu gets crowded.
Number of programs on Start menu. The number here refers to the lower-left column of the Start menu, the one that lists programs used most often. By increasing this
number, you make the Start menu tallerbut you ensure that more of your favorite programs are listed and ready to
launch.
Show on Start menu. Use these checkboxes and drop-down menus to specify whether or not you want your Web browser and email program listed at the top of the left-hand Start menu columnand if so, which ones.
2.16.1.2 The Advanced tab
Microsoft may call these options Advanced, but they affect the Start menu in some fairly simple and profound ways. Here, in fact, is where you'll find the on/off switches for every single command on the right side of the Start menu, among other things.
FREQUENTLY ASKED QUESTION
Opening the Control Panel Window When You Can't
OK, I'm with youI turned on "Display as a menu" for the Control Panel, so now I can open any Control Panel program directly from my Start menu. Trouble is, now I can't open the Control Panel window itself! Nothing happens when I click the Start Control Panel command. How do I open the Control Panel window?
Ah, there's a troublemaker in every class.
Click the Start button to open the menu, slide up to Control Panel, and then right-click Control Panel. Choose Open from the shortcut menu. You're back in business.
Highlight newly installed programs. Whenever you (or some techie in the building) install a new program into the Start menu, it shows up with orange highlighting for a few days. The idea, of course, is to grab your attention and make you aware of your expanded software suite. If you could do without this kind of reminder, then just turn off this checkbox.
Control Panel, My Computer, My Documents, My Music, My Pictures, Network Connections. Beneath
each of these headings, you'll find three options. The middle one, "Display as a menu," is extremely useful. It means that instead of simply listing the name of a folder (which is what "Display as a link" means), your Start menu sprouts a submenu listing the contents of that folder, as shown at bottom in Figure 2-23.
generations of Windows users before you,
can't open a particular Control Panel program
directly from the Start menu. Instead, you
must choose Start Control Panel, which
opens the Control Panel window; now it's up
to you to open the program you want. Bottom:
Turning on "Display as a menu" saves you a
step. You now get a submenu that lists each
program in the Control Panel folder. By
clicking one, you can open it directly. This
feature saves you the trouble of opening a
folder window (such as Control Panel or My
Documents), double-clicking an icon inside it,
("Don't display this item," of course, removes the folder in question from your Start menu altogether. That's a good point to remember if you ever set down your PC and discover that, for example, the Control Panel appears to have disappeared.)
Enable dragging and dropping. Turning on this checkbox has two benefits. First, it lets you customize your Start
items, which produces a useful shortcut menu containing commands like Rename, Properties, and Remove from This List. (If this checkbox is turned off, right-clicking Start
menu items has no effect.)
Favorites menu. This option adds a Favorites command to the Start menu that lists your favorite Web sites (see
Section 11.1.6.5) and icons (files, folders, and so on; see
Section B.4). Thereafter, you can use the Start menu to launch Internet Explorer and travel directly to the selected site.
Help and Support, Run command, Search. These checkboxes govern the appearance of the corresponding commands in the Start menu. For example, if you've
absorbed the fact that pressing the F1 key always opens the Windows help program, you may as well reclaim the screen space occupied by this command in the Start menu by
NOSTALGIA CORNER
Options for the Classic Start Menu
If you've turned on the Classic (single-column) Start menu as described in
NOSTALGIA CORNER: Options for the Classic Start Menu, clicking the corresponding Customize button shown in Figure 2-22 offers its own dialog box full of options.
Some are the same options described on these pages. The rest either control which commands are listed in the menu (checkboxes beginning with the word Display) or turn certain commands into sub¬menus (checkboxes beginning with the word Expand). This is a very handy feature when applied to the Control Panel, for example.
Finally, note the option called Use Personalized Menus. When this checkbox is turned on, Windows watches you and studies your behavior (that is, even more than usual). If it notices that you haven't been using certain Start menu commands, Windows hides them, making the menu listing shorter, as shown here at left.
The double-arrow button at the bottom of the All Programs menu indicates that there's more to the list than you're seeing; click it to see the full menu, as shown here at right.
Network Connections. If you find yourself switching between different methods of getting online (or onto a network)for example, switching your laptop between the cable modem when you're at home and its dial-up modem when you're on the roadturn on "Display as Connect to menu." From now on, you'll be able to switch network connections just by choosing from the submenu in your Start menu.
Printers and Faxes. Turn on this checkbox if you'd like your Start menu to provide direct access to the Printers and Faxes folder, or the icons that appear for each printer and virtual fax machine you've installed (see Chapter 13).
Scroll Programs. This option changes how the Start All Programs menu looks when there are too many programs listed to fit on the screen. Ordinarily when this situation arises, a second All Programs menu appears to the right of the first one, continuing the list. But if you turn on this checkbox, all your programs appear instead on one
massive, scrolling programs list. As you scroll down past the last visible name, the top of the All Programs menu scrolls off the screen.
2.16.2 Adding Icons to the Start Menu
Usually, when you install a new program, its installer
2.16.2.1 The "free" sections of the Start menu
In the following pages, you'll read several references to the "free" portions of the Start menu. These are the two areas that you, the lowly human, are allowed to modify freelyadding,
removing, renaming, or sorting as you see fit:
The top-left section of the Start menu. This little area lists what Microsoft calls pinned programs and filesthings you use often enough that you want a fairly permanent list of them at your fingertips.
The All Programs menu. This, of course, is the master list of programs (and anything elsedocuments, folders, disksyou want to see listed).
These two legal areas are highlighted back in Figure 2-4. In other words, most of the following techniques don't work when applied to the listings in the right column, nor the
lower-left quadrant of the Start menu, where Windows XP lists the programs you use most frequently.
2.16.2.2 Method 1: Drag an icon directly
Microsoft wouldn't be Microsoft if it didn't provide at least 437 different ways to do this job. Here are three of the world's favorites:
1. Locate the icon you want to add to your Start menu.
It can be an application (see Which One's the
Program?), a document you've created, a folder you frequently access, one of the programs in your
floppy-drive icon. (Adding disks and folders to the Start menu is especially handy, because it lets you dive directly into their contents without having to drill down through the My Computer window.)
NOTE
Adding an application name to your All Programs menu requires that you find the program file, as described in Which One's the Program?. To do so, either use the Search command described earlier in this chapter, or use the Windows Explorer window described in Chapter 3. You'll find your program files in the My Computer Local Disk (C:) Program Files folder.
Drag it directly onto the Start button.
If you release the mouse now, Windows adds the name of the icon you've just dragged to the bottom of the list at the top-left section of the menu (Figure 2-24, right).
Figure 2-24.
Top: You can add something to the
top of your Start menu by dragging it (from
whatever folder it's in) onto the Start button to
open the Start menu, and then dragging it
directly into position. (Once the Start menu is
open, you can also drag it onto the All Programs
buttonand once
that
menu is open, drag it
anywhere in
that
list.) Bottom: When you release
the mouse, you'll find that it's been happily
ensconced where you dropped it. Remember, too,
area shown here, and the All Programs list.
But if "Enable dragging and dropping" is turned on, as described in the previous section, you're free to drop it wherever you
want among the items listed in the top-left section of the menu (Figure 2-24, left).
it exactly where you want in the Start All Programs menu.
NOTE
After making a mess of your Start All Programs menu by dragging icons onto it, you may want to restore some
orderspecifically, alphabetical. That's easy: Just right-click anywhere on the open All Programs menu and choose Sort By Name from the shortcut menu.
2.16.2.3 Method 2: Use the Add Listing Wizard
If you've placed your Start menu into the single-column Classic mode, the same drag-and-drop routine works for adding new programs. But you can also use one of Microsoft's wizards for the same purpose. Right-click the Start button; choose
Properties from the shortcut menu; and click Customize to view the Add, Remove, and Sort buttons available to you there.
2.16.2.4 Method 3: Use the Start Menu folders
Windows XP builds the All Programs menu by consulting the contents of two critical folders:
FREQUENTLY ASKED QUESTION Which One's the Program?
I want to add a program to my Start menu like you said. But where is the program's icon?
To discover the program file name of a favorite program, open your My Computer Local Disk (C:) Program Files folder. Inside you'll find folders containing all of your applicationsand inside each of these folders, you'll find icons for each application's components. Right-click the window, choose View Details from the shortcut menu, and look for an icon whose Type column says "application."
OK, I did that. But in the program's folder, there are 15 million little files that all say they're applications. How do I know which is the actual application file?
First, you can usually recognize which application is the primary one both by its short-form name and by its icon. WinWord is probably a good hint that you've found Word for Windows, for example. Second, the instructions from the software company may tell you which file to click.
Documents and Settings [Your Name] Start Menu Programs folder. In this folder, you'll find shortcuts for the programs that you have added to the Start menuand they appear only when you have logged into the machine.
Figure 2-25 shows you these two locations in Windows Explorer.
Figure 2-25. Left: What you see in the Start All
Programs menu is a composed of the shortcuts in
two Start Menu folders, as shown circled here in
Windows Explorer. Note the two different Start
Menu folders, as indicated by the arrows: one for
folders (as opposed to inside the Programs
folder) appears above the horizontal line in the
Start All Programs menu.
In other words, instead of the fancy icon-adding wizards and drag-and-drop schemes described earlier, you may prefer to fine-tune your Start menu the low-tech way. Just open the relevant Start Menu folder. (Right-click the Start button; from the shortcut menu, choose either Open All Users [to view the list of programs for the masses] or Open [to see the list of your personal programs.]) You can add shortcut icons to, remove
them from, or rename them in your Start All Programs menu
just by manipulating the shortcuts in this folder.
2.16.3 Removing Icons from the Start Menu
The lower-left section. Right-click the item you've
targeted for extinction, and then choose "Remove from This List" from the shortcut menu.
The right-hand column. Right-click the Start button;
choose Properties from the shortcut menu; click Customize; click the Advanced tab, scroll down, and turn off the
checkboxes for the items you want expunged.
NOTE
If you're using the Classic Start menu view, right-click the Start button; choose Properties; click Customize; and then turn off the checkboxes in the "Advanced Start menu
options" list box.
The "free" areas. (This means the upper-left section and the All Programs list.) You can ditch items from these areas just by dragging them off the menuonto the desktop, for example, or even directly onto the Recycle Bin icon.
Or, if you prefer, just right-click the file, folder, program, or disk name in the All Programs menu, and then choose
Delete from the shortcut menu. It disappears instantly. To remove items from the upper-left section, right-click on the item, and then choose "Remove from This List" from the shortcut menu.
In both cases, you're only deleting the shortcut that
appears on the menu. Deleting items from the Start menu doesn't actually uninstall any software.
Not many people are aware that they can change the Fisher-Price naming conventions of Windows (My Documents, My Pictures, My First Operating System…).
In fact, you can rename anything you choose in the Start menuand not just in the free areas. Click the Start menu to open it, right-click the command you want to rename, and choose Rename from the shortcut menu. The name of the commandeven My Documents or My Computersprouts a little editing box. Type the new name and then press Enter.
2.16.5 Reorganizing the Start Menu
To change the order of listings in the "free" portions of the Start menu, just drag the commands up and down the lists as you see fit. As you drag an item, a black line appears to show you the resulting location of your dragging action. Release the
mouse when the black line is where you want the relocated icon to appear.
NOTE
If you change your mind while you're dragging, press the Esc key to leave everything as it was.
You can drag program names from the lower-left section of the Start menu, toobut only into one of the "free" areas.
2.16.5.1 Add folders to hold submenus
Start menu listings accompanied by a right-facing triangle arrow represent folders. For example, clicking Start All
that come with Windows (see Figure 2-26).
Figure 2-26.
Some Programs menu items have
submenu folders and
sub-
submenu folders. As
you move through the layers, you're performing
an action known as "drilling down." You'll see
this phrase often in manuals and computer
booksfor example, "Drill down to the Calculator to
crunch a few quick numbers."
you'd need one of those very expensive 95-inch monitors to see the entire list of applications. Fortunately, you can create
Programs menu folders of your own and stock them with
whatever icons you like. For instance, you may want to create a folder for CD-ROM-based games, eliminating those long lists from the All Programs menu.
To add a folder to the All Programs menu, follow these steps:
1. Open the Start menu. Right-click All Programs. From the shortcut menu, choose Explore.
The subfolders you are about to create in the All Programs menu will show up only when you are
logged on. (If you want to make a change that affects
everybody with an account on this computer, choose Explore All Users from the shortcut menu instead.)
In any case, the Start Menu Explorer window appears.
Click the Programs folder.
Its contents are listed in the right pane, as shown in Figure 2-27.
Figure 2-27.
The listings on the All Programs
menu appear in the right pane. Notice that some
of the items have folder icons; these are the
folders that hold submenus. If you click Programs
(in the left pane) before creating the new folder,
you'll create a folder within the body of the All
Programs list. To add a folder whose name will
appear
above the line
in the All Programs menu,
click Start Menu (in the left pane) before creating
Choose File New Folder.
Or, if your right mouse button hasn't been getting enough exercise, right-click a blank spot in the right pane, and then
choose New Folder from the shortcut menu.
When the new folder item appears, type a folder name and then press Enter.
Close the Start Menu window, if you like.
Your new folder appears at the bottom of the Start All
Programs menu. Feel free to drag your new folder up or down on the menu.
Now you can put your favorite file, folder, disk, or application icons into this new folder. To do so, drag an icon onto the Start
into your submenu. Then drag as many other icons as you like into this new folder.
9.1 Category View: The Big XP Change
To see your PC's collection of Control Panel programs, open the Control Panel window by choosing Start Control Panel.
The first time you see the XP Control Panel, you may be in for a shock. Instead of the list of two dozen programs that used to be there, there are now only nine gigantic icons under the
headline, "Pick a category" (Figure 9-1).
Figure 9-1. Top: This new design is Microsoft's
attempt to make the Control Panel look less
overwhelming to first-timers. This arrangement
groups the existing control panels into functional
categories. When you click one of these headings,
you're taken to another new screen. Bottom: The
next screen lists the corresponding control-panel
icons at the bottombut, perhaps more useful to
the novice, it also lists the useful tasks that those
Microsoft developed this new design to be friendlier to novices. First click the category heading that you think contains the settings you want to change, such as Appearance and Themes. Now you'll see a second screen (Figure 9-1, bottom) that lists a few common tasks in that category: "Change the desktop
background," "Choose a screen saver," and so on.
At this point, if you so desire, open the relevant Control Panel program by clicking its icon at the bottom of the screen
(Display, in this example). But by clicking the name of the task instead, you're spared a bit of hunting around, since Windows XP takes you directly to the appropriate tab of the appropriate program.
If you install software that comes with a Control Panel program of its own, it may not be smart enough to place itself into the correct category. In that case, you'll find it by clicking the link (in the task pane) called Other Control Panel Options (see
Figure 9-1).
9.1.1 Restoring the Old Control Panel
If you're a veteran Windows user, the new arrangement of the Control Panel may strike you as just another drag on your
efficiency. After all, it places another layer of red tape between you and familiar control panels.
Fortunately, it's easy enough to eliminate the "Pick a category" display forever: Just click "Switch to Classic View" in the task pane (Figure 9-1, top). Now your programs appear just as they always have, as a tidy collection of individual icons (Figure 9-2).
Figure 9-2. If you're used to the old way of
accessing the Control Panel programs, shown
here, a single click on "Switch to Classic View"
(
Figure 9-1
) does the trick. Even the standard
Control Panel list (shown here in Details view)
attempts to be helpful, thoughthe Comments
column describes the function of each program,
and tooltips appear when you point to programs
The rest of this chapter assumes that you're looking at the list in Classic viewthe one that presents an alphabetical
arrangement.
NOTE
If you're really a speed freak, even the Classic View method of accessing a particular Control Panel program is fairly inefficient. First you have to choose Start Control Panel and wait for the window to open, then you have to double-click the individual program you want.
To save time, turn on the feature that lets you choose a certain program's name directly from the Start menu, as described in
Chapter 10. Hooking Up to the Internet
Plenty of people buy a PC to crunch numbers, scan photos, or cultivate their kids' hand-eye coordination. But for millions of people, Reason One for using a PC is to access the Internet. Few computer features have the potential to change your life as profoundly as the World Wide Web and email.
To join the Internet party already in progress, you need three components: a connection, such as a modem, cable modem, DSL, or corporate network; an Internet account; and Internet
Chapter 12. Outlook Express 6
Email is a fast, cheap, convenient communication medium; these days, it's almost embarrassing to admit that you don't have an email address. To spare you that humiliation, Windows XP includes Outlook Express 6, a program that lets you receive and send email messages and read newsgroups (Internet
bulletin boards). (Incidentally, don't confuse Outlook Express with Outlook, a far bigger and more complex corporate email program that's sold as part of the Microsoft Office software suite.)
NOTE
Outlook Express doesn't work with online services like America Online or Prodigy. Instead, you're supposed to check and send your email using the software you got when you signed up for these services.
To use Outlook Express, you need several technical pieces of information: an email address, an email server address, and an Internet address for sending email. Your Internet service
Chapter 13. Printing, Fonts, and Faxing
Technologists got pretty excited about "the paperless office" in the eighties, but the PC explosion had exactly the opposite effect: Thanks to the proliferation of inexpensive, high-quality PC printers, we generate far more printouts than ever. There's not much to printing from Windows XP, so this is a short
3.4 The Taskbar
The permanent blue stripe across the bottom of your screen is the taskbar, one of the most prominent and important elements of the Windows interface (see Figure 3-11).
Figure 3-11. When you see nothing but
microscopic icons, point without clicking to view
an identifying tooltip.
The taskbar has several segments, each dedicated to an
important function. Its right end, the notification area, contains little status icons that display the time, whether or not you're online, whether or not your laptop's plugged in, and so on. The main portion of the taskbar, of course, helps you keep your open windows and programs under control. You can even dress up your taskbar with additional little segments called toolbars, as described in the following pages.
This section covers each of these features in turn.
3.4.1 The Notification Area
The purpose is much the same: to give you quick access to little status indicators and pop-up menus that control various
INFREQUENTLY ASKED QUESTION The Radio Toolbar
Didn't there used to be another toolbarthe radio toolbar? How am I supposed to tune in my favorite Internet radio stations?
It's gone from Windows XP. When you're in the mood for a little classical music as you crunch numbers, use the new Media Explorer bar panel instead (Section 3.1.2).
NOTE
To figure out what an icon represents, point to it without clicking so that a tooltip appears. To access the controls that accompany it, try both left-clicking and right-clicking the tiny icon. Often, each click produces a different pop-up menu filled with useful controls.
Despite the expansion of its name, you'll probably discover that this area is much smaller than it used to be. On a new PC, for example, you may find little more than the current time.
NOTE
By double-clicking the time display, you open the Date and Time Control Panel program. And if you point to the time without clicking, a tooltip appears to tell you the day of the week and today's date.
system. The designers of Windows had noticed that software companies large and small had been indiscriminately dumping little icons into this area, sometimes for prestige more than utility.
Therefore, Microsoft laid down two policies concerning this critical piece of screen real estate:
Even Microsoft's own usual junkthe speaker icon for volume control, the display icon for changing screen resolution, the battery icon for laptops, and so onis absent on a fresh XP installation. If you want to add these controls to the
notification area, you must do it yourself, using the corresponding Control Panel programs as described in
Chapter 9.
Notification area icons that you don't use often will be
summarily hidden after a couple of weeks. See Figure 3-12
for details.
Figure 3-12. If you see a < button, Windows is
telling you that it has hidden some of your
notification-area icons. Click this button to
expand the notification area, bringing all of
3.4.2 Window Buttons
Every time you open a window, whether at the desktop or in one of your programs, the taskbar sprouts a button bearing that window's name and icon. Buttons make it easy to switch
between open programs and windows: Just click one to bring its associated window into the foreground, even if it has been
minimized.
The taskbar is the antidote for COWS (Cluttered Overlapping Window Syndrome). In fact, if you work with a lot of windows, you'll run smack into one of the biggest and most visible
changes in Windows XP: taskbar button groups.
In the old days, opening a lot of windows might produce the relatively useless display of truncated buttons, as illustrated in
Figure 3-13. Not only are the buttons too narrow to read the names of the windows, but the buttons appear in chronological order, not software-program order.
Figure 3-13. Top: The old taskbar wasn't much
help in managing a bunch of windows. Middle:
Nowadays, a crowded taskbar combines its
buttons. Bottom left: Click one of these button
groups to see the list of windows it's concealing.
The new Windows taskbar does two things that no Windows taskbar has done before. First, when conditions become
crowded, it automatically groups the names of open windows into a single menu that sprouts from the corresponding
program button, as shown at bottom in Figure 3-13. Click the taskbar button bearing the program's name to produce a pop-up menu of the window names. Now you can jump directly to the one you want.
NOSTALGIA CORNER
Turning Off Notification Area Auto-Hiding
In general, the temporary removal of notification area icons you haven't used in a while is a noble ambition. Most of the time, you truly won't miss any invisible icons, and their absence will make the icons you do use stand out all the more.
Still, you can tell Windows to leave your tray aloneto leave every notification area icon in full view all the time. To do so, right-click a blank area of the taskbar; from the drop-down menu, choose Properties. At the bottom of the resulting dialog box, turn off the "Hide inactive icons" checkbox, and click OK. If that seems a little drastic, don't miss the Customize button just to the right of that checkbox. It opens a list of every tray icon that would normally appear, if it weren't for Windows XP's efforts. Click in the Behavior column to produce a pop-up menu for each item. Choose the status you want for each individual tray icon: "Hide when inactive," "Always hide," and "Always show." Finally, click OK.
To bring a window to the foreground, making it the active window, click its button on the taskbar. (If clicking a button doesn't bring a window forward, it's because Windows has combined several open windows into a single button. Just click the corresponding program's button as though it's a menu, and then choose the specific window you want from the resulting list, as shown in Figure 3-13.)
To hide an active window that's before you on the screen, click its taskbar buttona great feature that a lot of PC fans miss. (To hide a background window, click its taskbar button
twice: once to bring the window forward, again to hide it.)
To minimize, maximize, restore, or close a window, even if you can't see it on the screen, right-click its button on the taskbar and choose the appropriate command from the shortcut menu (Figure 3-13, bottom). It's a real timesaver to close a window without first bringing it into the
foreground. (You can still right-click a window's name when it appears in one of the consolidated taskbar menus
described earlier.)
To arrange all visible windows in an overlapping pattern as shown in Figure 3-14, right-click a blank spot on the
taskbar and choose Cascade Windows from the shortcut menu.
Figure 3-14.
When you've cascaded your
windows, click any title bar to bring its
window to the foreground. After you've clicked
a few title bars and worked in several
taskbar button, you can cascade only the
windows of one program. If you want to
cascade
all
windows of
all
programs,
right-click a blank part of the taskbar.)
To arrange all non-minimized windows in neat little boxes, each getting an equal rectangular chunk of your screen, right-click a blank spot on the taskbar and choose Tile Windows Vertically or Tile Windows Horizontally from the shortcut menu.
To minimize all the windows in one fell swoop, right-click a blank spot on the taskbar and choose Show the Desktop from the shortcut menuor just press the Windows logo key+D.
NOTE
easy to find a blank spot to click. Usually there's a little gap near the right end. You can make it easier to find some blank space by enlarging the taskbar, as described on the facing page.
If you change your mind, the taskbar shortcut menu always includes an Undo command for the last taskbar command you invoked. (Its wording changes to reflect your most recent action"Undo Minimize All," for example.)
To close the windows from different programs all at once, Ctrl-click their taskbar buttons to select them. Then right-click the last one you right-clicked, and choose Close Group from the shortcut menu.
3.4.3 The Quick Launch Toolbar
At the left end of the taskbarjust to the right of the Start buttonis a handful of tiny, unlabeled icons. This is the Quick
Launch toolbar, one of the most useful features in Windows. See
Section 3.5.1 for details on this and other toolbars.
3.4.4 Customizing the Taskbar
You're not stuck with the taskbar exactly as it came from
Microsoft. You can resize it, move it, or hide it completely. Most people don't bother, but it's always good to know what options you have.
You can move the taskbar to the top of your monitor, or, if you're a true rebel, to either side.
NOSTALGIA CORNER
Bringing Back the Old Taskbar
The new taskbar's tendency to consolidate the names of document windows into a single program button saves space, for sure.
Even so, it's not inconceivable that you might prefer the old system. For
example, once Windows stacks the names of your documents, you no longer can bring a certain application to the front just by clicking its taskbar button. (You must actually choose from its menu, which is a lot more effort.)
To make Windows XP display the taskbar the way it used to, right-click an empty area of the taskbar and choose Properties from the shortcut menu. Turn off the "Group similar taskbar buttons" checkbox and then click OK.
Now you can drag the taskbar to any edge of the screen, using any blank spot in the central section as a handle. Release the mouse when the taskbar leaps to the edge you've indicated with the cursor.
When the taskbar is on the left or right edge of the screen, Windows XP widens it automatically so that you can read the button names, which remain horizontal. (Ergonomic studies have indicated that keeping your neck bent at a 90 degree angle to read vertical buttons isn't so hot for your spine.)
NOTE
No matter which edge of the screen holds your taskbar, your programs are generally smart enough to adjust their own
3.4.4.2 Resizing the taskbar
Even with the new button-grouping feature, the taskbar can still accumulate a lot of buttons and icons. As a result, you may
want to enlarge the taskbar to see what's what.
Begin by making sure that the taskbar isn't locked, as described earlier. Then position your pointer on the inside edge of the
taskbar (the edge closest to the desktop). When the pointer turns into a double-headed arrow, drag toward the desktop (to enlarge the taskbar) or toward the edge of your monitor (to minimize it).
NOTE
If you're resizing a taskbar that's on the top or bottom of the screen, the taskbar automatically changes its size in full
taskbar-height increments. You can't fine-tune the height; you can only double or triple it, for example.
If it's on the left or right edge of your screen, however, you can resize the taskbar freely.
3.4.4.3 Hiding the taskbar
If you're working on a smallish monitor, you may wish that the taskbar would make itself scarce now and thenlike when you're working on a word processing or Web page document that
needs every pixel of space you can get.
options:
Keep the taskbar on top of other windows. This
optionthe factory settingpermits no other window to cover up the taskbar. Your program windows automatically shrink as necessary to accommodate the taskbar's screen bulk. (If you turn off this option, full-screen application windows overlap the taskbar.)
NOTE
To open the taskbar when it's not visible, just press
Ctrl+Esc, or press the Windows logo key on your keyboard.
Auto-hide the taskbar. This feature makes the taskbar disappear whenever you're not using ita clever way to devote your entire screen to application windows, and yet have the taskbar at your cursor tip when needed.
When this feature is turned on, the taskbar disappears whenever you click elsewhere, or whenever your cursor moves away from it. Only a thin blue line at the edge of the screen indicates that you have a taskbar at all. As soon as your pointer moves close to that line, the taskbar joyfully springs back into view.
3.4.4.4 Hiding the taskbar manually
the taskbar, so that your cursor becomes a double-headed arrow, before dragging down.
Chapter 17. Accounts, Permissions, and
Logging On
For years, teachers, parents, tech directors, and computer lab instructors struggled to answer a difficult question: How do you rig one PC so that several different people can use it throughout the day, without interfering with each others' files and settings? And how do you protect a PC from getting fouled up by
11.1 Internet Explorer 6
Internet Explorer (or IE, as it's often abbreviated) is the most famous Web browser on earth, thanks to several years of Justice-department scrutiny and newspaper headlines. The initial release of Windows XP comes with IE version 6, which you can open in a number of ways:
Choosing its name from the Start menu (either the left column or the All Programs menu).
Clicking its shortcut on the Quick Launch toolbar.
Choosing a Web site's name from your Start Favorites menu (that is, if you've put favorites there).
Typing a Web address sometimes called its URL (Uniform Resource Locator) into a window's Address bar. A Web page URL usually begins with the prefix http://, but you can
leave that part off when typing into the Address bar.
Clicking a blue, underlined link on a Windows Help screen.
…and so on.
As you can see in Figure 11-1, the Internet Explorer window is filled with tools that are designed to facilitate a smooth trip around the World Wide Web.
Figure 11-1. The Internet Explorer window offers
tools and features that let you navigate the Web
Chief among them: the Address bar, which
displays the address (URL) of the Web page
you're currently seeing, and the standard set of
buttons, which let you control the Web-page
loading process.
11.1.1 Browsing Basics and Toolbars
Navigating the Web requires little more than clicking buttons or those underlined blue phrases, as shown in Figure 11-1.