Windows
®
XP for
Power Users:
Power Pack
Windows
®
XP for
Power Users:
Power Pack
Published by
Wiley Publishing, Inc.
111 River Street Hoboken, NJ 07030-5774
www.wiley.com
Copyright © 2004 by Wiley Publishing, Inc., Indianapolis, Indiana. All rights reserved.
Library of Congress Control Number is available from the publisher.
ISBN: 0-7645-4998-7
Manufactured in the United States of America
10 9 8 7 6 5 4 3 2 1
1MA/RR/RS/QT/IN
Published by Wiley Publishing, Inc., Indianapolis, Indiana Published simultaneously in Canada
No part of this publication may be reproduced, stored in a retrieval system or transmitted in any form or by any means, electronic, mechanical, photocopying, recording, scanning or otherwise, except as permitted under Sections 107 or 108 of the 1976 United States Copyright Act, without either the prior written permission of the Publisher, or authorization through payment of the appropriate per-copy fee to the Copyright Clearance Center, 222 Rosewood Drive, Danvers, MA 01923, (978) 750-8400, fax (978) 646-8600. Requests to the Publisher for permission should be addressed to the Legal Department, Wiley Publishing, Inc., 10475 Crosspoint Blvd., Indianapolis, IN 46256, (317) 572-3447, fax (317) 572-4447, E-Mail: [email protected].
is a trademark of Wiley Publishing, Inc.
LIMIT OF LIABILITY/DISCLAIMER OF WARRANTY: WHILE THE PUBLISHER AND AUTHOR HAVE USED THEIR BEST EFFORTS IN PREPARING THIS BOOK, THEY MAKE NO REPRESENTATIONS OR WARRANTIES WITH RESPECT TO THE ACCURACY OR COMPLETENESS OF THE CONTENTS OF THIS BOOK AND SPECIFICALLY DISCLAIM ANY IMPLIED WARRANTIES OF MERCHANTABILITY OR FITNESS FOR A PARTICULAR PURPOSE. NO WARRANTY MAY BE CREATED OR EXTENDED BY SALES REPRESENTATIVES OR WRITTEN SALES MATERIALS. THE ADVICE AND STRATEGIES CONTAINED HEREIN MAY NOT BE SUITABLE FOR YOUR SITUATION. YOU SHOULD CONSULT WITH A PROFESSIONAL WHERE APPROPRIATE. NEITHER THE PUBLISHER NOR AUTHOR SHALL BE LIABLE FOR ANY LOSS OF PROFIT OR ANY OTHER COMMERCIAL DAMAGES, INCLUDING BUT NOT LIMITED TO SPECIAL, INCIDENTAL, CONSEQUENTIAL, OR OTHER DAMAGES.
For general information on our other products and services or to obtain technical support, please contact our Customer Care Department within the U.S. at 800-762-2974, outside the U.S. at 317-572-3993 or fax 317-572-4002.
Wiley also publishes its books in a variety of electronic formats. Some content that appears in print may not be available in electronic books.
About the Author
Curt Simmons, A+, MCSA, MCSE, CTT, is a technical trainer and freelance writer. The author of more than thirty books on various Microsoft and Internet technolo-gies, Curt most often writes about Microsoft Office products and operating systems. He also teaches several digital photography courses. Curt’s most recent books include Windows XP Networking Inside Out, The A+ Technician’s On-the-Job Guide to Networking, iPhoto 2 For Dummies, and How To Do Everything with Photoshop Album. Curt lives in Saint Jo, Texas, with his wife and children. Visit Curt on the Internet at www.curtsimmons.com.
Credits
ACQUISITIONS EDITOR
Katie Feltman
DEVELOPMENT EDITOR
Marcia Ellett
PRODUCTION EDITOR
Felicia Robinson
COPY EDITOR
Maggie Warren
PROJECT COORDINATORS
Maridee Ennis Regina Snyder
GRAPHICS AND PRODUCTION SPECIALISTS
Carrie Foster, Jennifer Heleine, Stephanie D. Jumper, Michael Kruzil, Heather Ryan
PROOFREADING AND INDEXING
Preface
Welcome to Windows XP for Power Users: Power Pack, the book for the power user like yourself. Since the early days of Windows XP’s release, the operating system has received a lot of praise, as well as a lot of complaints. No doubt, Windows XP is the best version of Windows that Microsoft has produced to date. It does more, works better, and is more versatile than any previous versions of Windows. With its millions of lines of code, however, Windows XP is certainly not perfect. It has its share of problems and aggravations, many of which have to do with hardware and application compatibility.
Overall, though, I believe Windows XP is a great operating system and it works great if you give it the right resources and hardware and/or software that are devel-oped for this new breed of operating system. As a power user, you want to do more with Windows XP. You want to get more from the operating system features and functions, and you want to be able to control the system and customize it to meet your needs. Look no further; this book is written specifically with you in mind.
In these pages, you’ll see how to do some helpful tasks as well as many lesser-known tasks that you will find useful as you work with Windows XP. You’ll see how to manage the interface, work with hardware and software, configure operat-ing system services, manage users, create a home network, manage security fea-tures, and much, much more. I don’t cover common, everyday tasks that you already know how to do, but I’ll show you how to use the features you want to learn about, and I’ll show you how to use them to the best of your advantage.
This book is written on a topic-by-topic basis. Each chapter stands on its own, so you can read the book from cover to cover, or you can skip around and find the information you need. The choice is completely up to you.
Along the way, you’ll find some sidebars and other icon material. The sidebars are extra items. You don’t have to read them, but they all contain good information you may find helpful, so I encourage you to check them out. Also, the icons you’ll see along the way show you how to do something more easily or how to avoid a common problem.
I hope you enjoy the book! Feel free to visit me on the Internet or drop me an e-mail. I look forward to hearing from you.
Curt Simmons
www.curtsimmons.com [email protected]
Icons to Watch For
The following icons indicate special information throughout each session:
These icons indicate special information relating to the current section that you may find useful.
These icons indicate information that tells you the best way to do some-thing or alert you to special considerations you should be aware of when performing a routine task.
This icon indicates a reference to related information in another session.
Acknowledgments
I would like to thank everyone at Wiley for the opportunity to write this book. A special thanks goes to Katie Feltman and Marcia Ellett for working with me on this project. I would also like to thank Felicia Robinson and Maggie Warren for their eagle eye and attention to detail. Finally, thanks to my family for their constant support.
Contents at a Glance
Chapter 1 Configuring the Windows XP Interface. . . 1
Chapter 2 Managing Users . . . 23
Chapter 3 Working with Applications. . . 53
Chapter 4 Using Digital Media on Windows XP . . . 71
Chapter 5 Startup, Shutdown, and Power Management . . . 107
Chapter 6 Managing Hardware on Windows XP . . . 119
Chapter 7 Managing the Hard Disk . . . 139
Chapter 8 Working with Folders and Files . . . 157
Chapter 9 Working with the Registry . . . 175
Chapter 10 Working with the Microsoft Management Console . . . 193
Chapter 11 Networking on a Workgroup . . . 209
Chapter 12 Networking in Windows Networks . . . 243
Chapter 13 Remote Networking . . . 259
Chapter 14 Internet Access, ICS, and ICF . . . 279
Chapter 15 Sharing and Security . . . 309
Chapter 16 Auditing and Disk Quotas . . . 333
Chapter 17 Backing Up and Restoring Data . . . 345
Chapter 18 Monitoring and Managing System Performance. . . 359
Chapter 19 System Failure and Recovery . . . 379
Chapter 20 Customizing with Windows XP PowerToys . . . 403
Chapter 21 Scripting with Windows XP . . . 419
Appendix A: Windows XP Installation Options . . . 439
Appendix B: Using the Command Console . . . 459
Appendix C: Helpful Windows XP Utilities . . . 467
Index . . . 473
Contents
Creating User Accounts with Computer Management . . . 29
Application Verifier . . . 60
Chapter 5 Startup, Shutdown, and Power Management . . . 107
Contents xi
Chapter 6 Managing Hardware on Windows XP . . . 119
Installing and Removing Hardware on Windows XP. . . 119
Using the Registry Editor . . . 180
Troubleshooting Connections . . . 239
Managing Dial-Up Connections . . . 285
Chapter 18 Monitoring and Managing System Performance. . . 359
Performance . . . 359
Getting to Know Performance . . . 360
Logging Data . . . 364
Chapter 20 Customizing with Windows XP PowerToys . . . 403
Chapter 21 Scripting with Windows XP . . . 419
Understanding Scripting . . . 419
Batch Scripting Overview . . . 420
JScript Overview . . . 421
VBScript Overview . . . 422
Batch Scripting Basics . . . 422
Using Batch Parameters . . . 423
Using Batch Redirection Operators . . . 424
Batch File Logic Commands . . . 424
Other Useful Operational Commands . . . 427
Batch-Compatible System Commands . . . 430
Using Net. . . 431
Using Xcopy . . . 432
Using Dir, CD, and Delete . . . 434
Using Netsh . . . 434
Gathering Information with ipconfig and netstat . . . 436
Sample Network Backup Script . . . 437
Appendix A: Windows XP Installation Options . . . 439
Appendix B: Using the Command Console . . . 459
Appendix C: Helpful Windows XP Utilities . . . 467
Chapter 1
Configuring the Windows
XP Interface
IN THIS CHAPTER
◆ Configuring the Start menu
◆ Configuring the taskbar
◆ Managing the Recycle Bin
◆ Managing the Control Panel appearance
◆ Managing the Display
AT FIRST GLANCE, THE Windows XP interface is radically different than the typical Windows interface used in the past. In fact, the first boot of Windows XP often leaves new users a bit shocked when they see a virtually empty desktop. The good news is the sleek Windows XP interface is easy to use, and it provides you with plenty of configuration options so that you can make Windows XP look just the way you want. This first chapter takes a look at the Windows XP interface. It shows you how to configure all of the interface items and features so that Windows XP meets your needs.
Configuring the Start Menu
The Windows XP Start menu is a bit different than the Start menu found in previ-ous versions of Windows. The Start menu still provides you with access to different programs and portions of Windows XP, and its goal has not changed. The purpose of the Start menu is to . . . well . . . start something. It provides you with access to documents and programs, but also operating system features and easy access to the things you use most of the time.
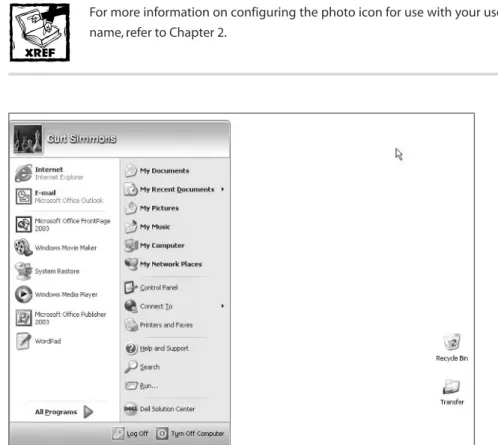
The Start menu in Windows XP provides you with a two-column design, shown in Figure 1-1. At the top of the Start menu, you see your username and photo icon configured for use with your username. In the left column, you see access to several programs, and the right column gives you access to files and other portions of the operating system.
For more information on configuring the photo icon for use with your user-name, refer to Chapter 2.
Figure 1-1: The Start menu gives you access to commonly used items.
The left side of the Start menu lists programs you commonly access. By default, Internet Explorer and your default e-mail client always appear in this list. The rest of the programs appear here according to your actions. For example, if you open Microsoft Word, the application icon is added to the Start menu for easy access. If you do not use Word again for a long period of time, it is dropped from the Start menu due to inactivity. So, the Windows XP Start menu is rather dynamic in that it tries to guess what programs you might need by keeping frequently used programs available on the Start menu for you.
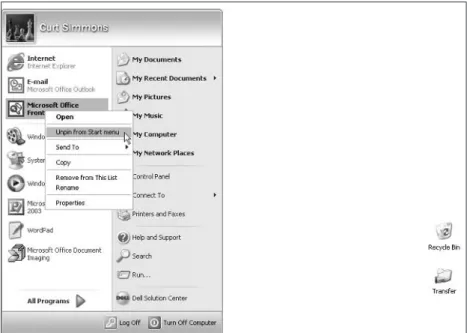
to remove them. You can pin any application or document to the Start menu so that it is always available to you. To pin an item to the Start menu, right-click the item in the left column and click Pin to Start menu. You can also remove a pinned appli-cation or document by right-clicking the icon on the Start menu and clicking Unpin from Start menu, as shown in Figure 1-2.
Figure 1-2: You can pin or unpin items simply by right-clicking.
Notice the small divider bar that appears on the left side of the Start menu, as shown in Figure 1-1. This bar divides pinned and unpinned Start menu items so you can easily keep track of what is pinned and what is not. Also, Internet Explorer and your default e-mail client have some quick access options when you right-click their icons.You can quickly browse the Internet or check e-mail this way.
On the right side of the Start menu, you see common Windows items that you will need to access, including the following:
◆ My Documents, My Pictures, and My Music— The My Documents folder is the default storage location for files of all kinds, including pictures, music, and movies. My Documents contains the following default subfolders:
■ My Music ■ My Pictures ■ My Videos ■ Remote Desktops
◆ My Computer— My Computer is the default folder that stores information about drives connected to your computer. You can quickly access System properties by right-clicking My Computer on the Start menu and clicking Properties.
◆ My Network Places— My Network Places contains information about other computers and shared folders on your network. You can learn more about My Network Places in Chapter 8.
◆ Control Panel— Control Panel is the default location for managing all kinds of programs and services on your XP computer. Control Panel con-figuration is explored later in this chapter.
◆ Network Connections/Connect To— Network Connections is a folder that contains your dial-up and/or broadband connections, as well as local area network (LAN) connections. If you have configured connections, you’ll see a Connect To option where you can quickly access and start a connection.
◆ Help and Support— Windows XP includes a help and support feature that can answer your questions and even locate answers on the Internet.
◆ Search— The Search feature enables you to find items on your computer or items on the Internet.
◆ Run— You can use the Run dialog box to quickly start programs or con-nect to network shares.
◆ Log Off/Turn Off Computer— These standard icons enable you to log off, shut down, or restart the computer.
Chapter 1: Configuring the Windows XP Interface 5
Figure 1-3: Taskbar and Start Menu Properties.
You have the option on the Start Menu Properties page to use either the current Start menu, or the Classic Start menu, which is simply the Start menu found in pre-vious versions of Windows. Because the two are different, the following two sec-tions explore the configuration of each.
XP Start Menu
To continue using the XP Start menu, click the Customize button. This takes you to a Customize Start Menu window where there is a General and Advanced tab. On the General tab, shown in Figure 1-4, there are three different customization options:
◆ Icon size— You can choose to use large or small icons in the Start menu. Small icons may be harder to see, but you can put more shortcut icons directly on the Start menu. Large icons are selected by default.
◆ Programs— By default, your Start menu will make five program shortcut icons appear in viewing range when you click Start. You can change this number by using the drop-down menu. The Start menu can display up to 30 shortcut icons. Basically, this customization option makes your Start menu larger to accommodate all of the 30 programs you can place on it.
Figure 1-4: General tab.
On the Advanced tab, you have some additional options that you may find use-ful, as shown in Figure 1-5.
Figure 1-5: Advanced tab.
◆ Open submenus when I pause on them with my mouse— By default, folders such as My Documents, My Computer, and so on are stored as a link on the Start menu. You can click them to open the folders in a differ-ent window. However, you can use a menu option so that a menu appears where you can choose subfolders. For example, say you have a folder called Work in the My Documents folder. Without using the menu option, you have to click My Documents, and then open Work. Using the menu option, if you point to My Documents on the Start menu, a pop-out menu appears showing your other folders, including Work, and you can just click on Work to directly open it. This check box simply asks you if you want the pop-out menu to appear when you put your mouse over the item, or if you want to have to click the item to see the pop-out menu.
◆ Highlight Newly Installed Programs— When applications are installed on your XP computer, they are highlighted until you use them for the first time. This serves as a simple reminder that you have new stuff you haven’t used. Just clear the check box if you don’t want to use the feature.
The second part of the Advanced tab gives you a scroll window where you can select the folder and Windows items that appear on the Start menu and choose how those items are displayed. For example, by default, Control Panel is shown on the Start menu as a link. You can change this behavior so that it is shown as a menu, or not all. Simply scroll through the list and click the desired check boxes and radio buttons to determine what Windows items you want to include and how those items are presented (link or menu). You may want to experiment with these settings until you find the combination that is right for you; remember, you can make changes to these settings as many times as you like.
The last part of this configuration window allows you to show recently used documents on the Start menu. For example, say that you’re writing your life story. Once you open the document and then close it, the Start menu will put it in Recent Documents, which is a folder that will now appear on the Start menu. You can eas-ily access the document from the Start menu the next time you need it.
Classic Start Menu
You can use the Classic Start Menu by selecting the Classic Start Menu option on the Start menu tab of Taskbar and Start Menu Properties. This option allows you to use the Start menu that was seen in previous versions of Windows. If you want to use the Classic Start Menu, select the Radio button and click the Advanced button, which gives you a single Customize Classic Start Menu interface, as seen in Figure 1-6.
Figure 1-6: Classic Start Menu option.
You’ll see that you have the same basic Start menu options, just in a different format. If you want to add items to the Classic Start Menu, click the Add button and a wizard will help you select items on your computer to add. Use the Remove but-ton to remove items, and use the Advanced butbut-ton to open Windows Explorer so you can manually add and remove items. You can also resort the items and clear recent documents, programs, Web sites, and so on. The Advanced window option that you see enables you to display a number of Windows items, use expandable (menu) folders, and so on. These items are self-explanatory; again, feel free to experiment and try new configurations.
Configuring the Taskbar
The taskbar is the handy bar that runs along the bottom of your screen. Minimized programs, along with the Notification Area and Quick Launch (if you choose to dis-play it) are found on the taskbar. You have a few quick customization options, which you can access by opening Taskbar and Start Menu Properties, then clicking the Taskbar tab, shown in Figure 1-7. In the Taskbar appearance area, you have a few check box options that enable certain features:
◆ Auto-hide the taskbar— This feature keeps the taskbar out of your way. When you are not using the taskbar, it disappears below your screen view. When you need it, just point your mouse to the location of the taskbar and it will reappear.
◆ Keep the taskbar on top of other windows— As you are using various windows, they may cover up portions of the taskbar. This setting always keeps the taskbar on top.
◆ Group similar taskbar buttons— This feature keeps similar items together. For example, if you open two Web pages, then minimize both, they will appear next to each other on the taskbar.
The Notification area, formerly called the System Tray, is the small icon area on the right side of your taskbar. It tells you a number of functions that are working on your computer and can notify you of certain application functions. You have two simple check box options here. You can choose to show the clock in the System Tray, and you can choose to hide inactive icons. The Hide inactive icons feature simply cleans up the System Tray area so that only active icons are seen. You can try both of these settings to see if you like them.
Figure 1-7: Taskbar properties.
You can make some additional changes to the interface using the Microsoft PowerToy — TweakUI — which is available for free download. See Chapter 20 for details.
Managing the Recycle Bin
By default, Windows XP provides you with only one desktop icon, the Recycle Bin. The Recycle Bin is the catch-all location for files, applications, and other items you no longer need. This primarily includes files, but you can also drag zipped files and other kinds of information into the Recycle Bin. The Recycle Bin doesn’t actually delete the items from your system until you choose to empty the Recycle Bin or the Recycle Bin starts to become full. Only then is the item deleted forever.
You can open the Recycle Bin and see what is inside by double-clicking the Recycle Bin icon on your desktop (you can also right-click the icon and click Explore). You can see the items in the Recycle Bin that are waiting to be deleted, as in Figure 1-8. In the View menu, you can select thumbnails, tiles, icons, list, or details. With these choices, you can see large icons, small icons, a list of files, or even a detailed list telling you the item’s original location and the date it was moved to the Recycle Bin.
Figure 1-8: Recycle Bin contents.
changes to a Restore this item icon. Click the icon and the file is put back in its original location. You can also move an item out of the Recycle Bin by just drag-ging it to the desktop. The item will now reside on your desktop.
You can’t open an item that is held in the Recycle Bin. For example, if you have a file named 05421.doc and you’re not sure what the file is, you’ll have to either restore it or drag it to the desktop before you can open and read it.
You can also change the Recycle Bin’s properties, which basically changes the way it behaves. Right-click the Recycle Bin on your desktop and click Properties on the contextual menu that appears. A Recycle Bin Properties window appears that has Global and Local Disk tabs, as shown in Figure 1-9.
Figure 1-9: Recycle Bin Properties.
You see two radio buttons that enable you to either configure your drives inde-pendently or use the same settings for all drives. This feature applies to you only if you have more than one hard disk in your computer. In most cases, the default set-ting that configures all of your drives the same way is all you need. Next, you see a check box that tells your computer to delete items immediately instead of moving them to the Recycle Bin. As you can guess, this feature automatically deletes items when you click Delete. This provides you with absolutely no protection in the event that you accidentally delete a file you want. I strongly recommend that you do not click this check box to enable this option. No matter how good your computing skills, you will make a mistake from time to time and accidentally delete something. The Recycle Bin is your safety net.
Next, you see a sliding bar that represents the maximum size the Recycle Bin can grow. Like everything else on your computer, the Recycle Bin stores items in a folder on your hard drive. The sliding bar enables you to set a limit for how big the Recycle Bin can grow before it forces you to empty the contents and permanently delete items from your system. By default, this setting is configured for 10 percent. This means that 10 percent of your hard drive’s space can be used before the Recycle Bin tells you to empty it. Under most circumstances, this 10 percent setting is all you need, but you can change it to a higher or lower percentage if you want. Keep in mind that you do not have to wait until your Recycle Bin is full to empty it. Some people empty it every time they put documents in it, while others empty it on a weekly basis after they have reviewed its contents to make sure nothing was accidentally deleted. There is no right or wrong approach; just find what works best for you.
Finally, you see a Display delete confirmation dialog check box at the bottom of the Global tab. This tells Windows to give you that aggravating Are You Sure? mes-sage every time you delete something. This option is selected by default, and although the configuration message is sometimes a pain, it is a good safety check.
Aside from the Global tab, you have a Local Disk tab — you may have several of these tabs if your computer has more than one hard drive. You can’t do anything on these tabs if you selected the Use one setting for all drives radio button on the Global tab. If you want each drive to have different settings and you selected this option on the Global tab, you can configure each drive independently. The tabs have the same options, such as the slider bar for the percentage of the hard drive you want to use for the Recycle Bin.
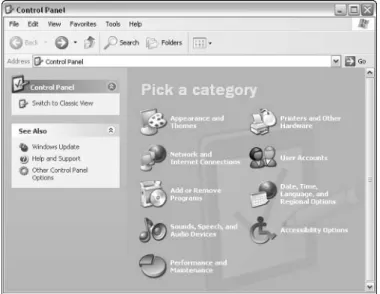
Figure 1-10: Category view Control Panel.
Managing the Display
If you access Display Properties in Control Panel (use Classic View) or simply right-click an empty area of your desktop and right-click Properties, you can access the prop-erties pages that determine the display settings and overall appearance you see on your monitor. A number of different options here allow you to configure Windows XP to look and feel the way you want; the following sections explore the configu-ration options available to you on each tab.
Themes
A theme is a group of settings that are applied to Windows XP under a single name. The settings usually relate to each other, creating a theme of some kind. Themes became very popular in Windows 98, and Windows XP now provides a Themes tab (shown in Figure 1-11) in Display Properties. The themes option is placed here in Windows XP because the default Windows XP interface is simply a theme.
You can use the XP interface, or you can change to a different theme, or even use a Windows Classic theme, which basically gives you the plain Windows inter-face you saw in Windows 9x, Me, and 2000. Simply use the drop-down menu to select a desired theme and click Apply to see all of the settings the theme has to offer. You can also modify any theme (including the default XP interface theme) by making changes to the other tabs available in Display Properties.
If you want to use additional Windows themes from previous versions of Windows, such as Aquarium, Space, and so forth, you can purchase and install the Plus! Pack for Windows XP, available at local and Internet computer stores.
Figure 1-11: Themes tab.
Desktop
The Desktop tab, shown in Figure 1-12, gives you the option to configure the Windows XP desktop area with pictures, graphics, background colors, and even dif-ferent texture appearances. Windows XP gives you several built-in options that you can choose for your background in the list on the Desktop tab. If you scroll through the list, you see that there are two kinds of files present. Some files give your desktop a pattern while others give your desktop a picture.
If you look in the provided list on the Desktop tab, you see that each file has a name and an icon picture next to it. Background patterns and pictures are simply JPEG, BMP, GIF, and related picture file formats that you commonly see on the Internet, as well as HyperText Markup Language (HTML) files. On the Desktop tab, you can select one of the files and it will appear in the test monitor window on the Background tab. By default, pictures are set up to stretch across your screen so that they take up the entire desktop area, and patterns are set to tile so that they repeat until the entire desktop area is used. This causes the pattern to fill the entire test screen so you can see how it looks before you decide to use it. You can also use the Center option in the drop-down menu to center the pattern in the middle of the test screen, which will give you a different look. If you like what you have selected, click the Apply button at the bottom of the window and the new pattern will be applied to your desktop. If you don’t like it, just pick something else on the Desktop tab. You can look at all of the patterns and even reapply different patterns until you find the one you want.
If you choose to center a picture or pattern, you’ll have an area of your desktop still showing. Windows XP enables you to alter the remaining desktop area to your preference by using a color. For example, say you choose a wallpaper from the list on the Background tab and you center the picture. You will have additional leftover background space. You can use the color drop-down menu and select a color for the remaining portion of the desktop area. After you have finished your back-ground pattern and selected anything else from the Backback-ground tab you want to use for the main pattern, just click Apply and click OK.
You can also find a Customize Desktop button toward the bottom of the Desktop tab. If you click this button, you are taken to the Desktop Items properties page, which contains General and Web tabs. On the General tab, shown in Figure 1-13, you can choose which desktop icons you want to display, such as My Documents, My Computer, My Network Places, and Internet Explorer. None of these items are selected by default, but you can add them to your desktop by selecting them if you like. You’ll also see a window showing the default icons that are used for each of these items. If you want to use different icons, just click the Change Icon button and select different icons from the provided list.
At the bottom of the tab is the option to use the Desktop Cleanup Wizard. The cleanup wizard is configured to run every 60 days by default, but you can run it at any other time by clicking the Clean Desktop Now button. This wizard simply removes old shortcuts and puts them in a folder called Unused Shortcuts. If you create a lot of shortcuts and don’t use them very often, this wizard can help keep your desktop free of clutter. Otherwise, it can remove items you intend to keep, so you may choose not to use it.
Figure 1-13: Desktop Items, General tab.
The Desktop Items Web tab, shown in Figure 1-14, allows you to place a com-plete Web page on your desktop. You can use the wallpaper feature to place an HTML file on your desktop, but if you choose the Web option, you can place an actual Web page there that can be synchronized with the real Web page on the Internet.
Figure 1-14: Desktop Items, Web tab.
Figure 1-15: Enter the URL.
After you click OK, a confirmation message appears. If the Web site requires you to enter a password, click the Customize button and enter it; otherwise, just click OK. When you choose the Web page option, the entire Web site is downloaded and stored on your computer so that you can use the site, just as if you are actually using a browser. If you later want to remove the Web page from your desktop, just return to the Web tab and clear the check box next to the Web page in the Web Pages dialog box.
Screen Saver
The Screen Saver tab provides two functions (see Figure 1-16): It enables you to configure a screen saver for your computer and to configure power management options. A screen saver is a simple program that runs after your computer has been idle for a certain period of time. In the past, the screen saver protected monitors from screen burn. When a monitor was left unattended for too long and one con-tinuous picture or window was displayed, the image could burn itself onto the monitor and always be sort of floating in the background. Monitors today aren’t really susceptible to this problem, so screen savers are more for decoration pur-poses. Use the Screen Saver drop-down menu to select the screen saver you want. You can see a preview in the test monitor on the tab, or click the Preview button to see a full-screen option. You can also click the Settings button (see Figure 1-17) to see what configurable options there are for the screen saver. Typically, you can use the Settings option to speed up a screen saver or slow it down.
To find out more about the Power configuration options, refer to Chapter 5.
Figure 1-16: Screen Saver tab.
Figure 1-17: Use the Settings option to customize your slideshow.
Appearance
Chapter 1: Configuring the Windows XP Interface 19
My Pictures Screen Saver
The My Pictures Screen Saver Options dialog box uses the photos found in the My Pictures folder to create a slideshow screen saver. This is a fun way to personalize Windows XP. You have some helpful customization options with the slideshow itself. If you select My Pictures from the screen saver drop-down menu, you can click the Settings button and configure how often the pictures should change, how big the pictures should be, as well as some additional options that allow you to stretch photos, use transitions, and so forth. Also, you can use the Browse button to select a desired folder to use, rather than My Pictures. This way, if you have photos stored in individual folders, you can simply use those folders for the screen saver slideshow, rather than having to move everything to My Pictures.
Figure 1-18: Appearance tab.
You have a few standard options here, which are explained in the following list:
◆ Windows and Buttons— You can use the drop-down menu to either choose XP style or Windows Classic style.
◆ Color Scheme— A number of color schemes are available. Use this drop-down menu to select one you like. You can experiment with this setting and change it at any time.
◆ Effects— Click the Effects button to open the Effects window, which gives you some basic check box options such as fade, shadows under menus, and so on.
◆ Advanced— If you click the Advanced button, you can make specific font and color changes to different Windows components, such as menus, but-tons, active title bar, and a host of others. Under most circumstances, you will not want to edit all of the settings, but if you want to change some-thing specific, just select it using the drop-down menu and configure the available options for it.
Settings
The final Display Properties tab is the Settings tab. You use this tab to manage the actual video card hardware that resides within your computer, and you have a few basic options, as shown in Figure 1-19. First, you see a Color quality drop-down menu. This menu enables you to select the number of colors Windows XP can use to generate all of the graphics and pictures that appear on your monitor. True Color (24-bit) is the highest color scheme that you can use, and, depending on the qual-ity of your video card, you may have only a few color options available. The higher resolution provides the best color performance.
Figure 1-19: Settings tab.
You also have an Advanced button. This option opens the properties pages for your video card. The default settings are generally all you need, but a few options can help solve particular problems. Click the button, and you will see a new win-dow with additional tabs.
On the General tab, you can change the Dots Per Inch (DPI) setting, which is typ-ically set around 96, by default. Increasing this value can increase the size of the items found on the screen. However, this setting increases all items. If you only want to change the font size, use the Appearance tab in the Display Properties dia-log box.
On the Monitor tab, you can adjust the screen refresh rate. If the screen seems to respond slowly to keyboard strokes, increasing this rate may improve performance, depending on the quality of your monitor. Again, as a general rule, the default set-ting is best.
On the Troubleshoot tab, you can change the rate of hardware acceleration for the video card. If you are having no problems, this setting should be left at Full. However, if you are experiencing performance problems, try reducing the accelera-tion value in slight increments to attempt to resolve the problem.
You can also configure the appearance of your folders, and some great cus-tomization options are available to you. See Chapter 8 for details.
Chapter 2
Managing Users
IN THIS CHAPTER
◆ Managing users
◆ Managing groups
◆ Using Group Policy
WINDOWS XP IS Atrue multiuser system, meaning different users can log on to the computer and run Windows, all the while keeping private documents and settings private. As such, you’ll need to manage user and group accounts in Windows XP and configure them in a manner that is effective for your multiuser environment. Along with user configuration, you might also want to use Group Policy, a feature that allows you to enforce a number of systemwide settings and features that apply to both the computer and the local user. This chapter explores all of these features and shows how to make the most of user management in Windows XP.
Managing Users in Windows XP
Windows XP is a multiuser system, from both a home and professional perspective. In the Windows 9xdays, multiple people could use the same computer, but all users could easily access others’ files and folders. In other words, there wasn’t much pro-tection; any user could basically make any configuration changes to the computer that he or she desired. This naturally caused a lot of problems for Windows 9xin work environments, and some home environments as well. (If you let your children use the computer, there was no way to control what they did to it.)
Windows XP leaves that legacy behind. With Windows XP, an administrator account can manage the entire computer, but limited accounts have restrictions. Regardless of the account, each user’s settings, files, and folders are kept separate from other users and are completely protected by passwords (if you so choose). Users log on to the local machine using a username and password, and each user’s private files stay that way.
You are probably also aware that user management can refer to a domain model, where Windows XP Professional computers are used in a larger networking envi-ronment. In this case, users do not (typically) log on to the local machine, but to a Windows server. The server identifies the user and enables the user to log on to the domain so that network resources can be used. Network administrators who work with Windows 2000/XP servers handle user management in this kind of environ-ment. In this chapter, user management and users always refer to local user man-agement on your machine.
Because of the need for solid user management, Windows XP organizes itself somewhat differently, based on the user. User accounts on your Windows XP com-puter have their own folder, found in Documents and Settings folder under the username. Using these profiles, Windows can easily store different configuration settings, files, Internet Explorer Favorites and History, and a number of other items. After a user logs on, he or she can access the information in his or her folders but cannot access information in other users’ folders, unless the user is an administrator. When you install Windows XP, there are two default accounts — administrator and guest. The administrator account is automatically created, and it cannot be deleted, disabled, or removed from the Local Administrators group (groups are cov-ered later in this chapter). The guest account, on the other hand, is designed for people who do not actually have a user account on the computer. A user can log on with the guest account, but he or she essentially has no rights to do anything. You can disable the guest account if you have no need for it, and in terms of security, it’s a good idea to do so unless you are actively using it.
Working with User Accounts
Windows XP gives you two tools that can be used to set up user accounts on your local computer — User Accounts in the Control Panel and Computer Management. For experienced users, Computer Management is faster and easier to use than the sometimes too friendly graphical user interface (GUI) of User Accounts, but some important options are found in User Accounts that are not present in Computer Management.
User Accounts in the Control Panel
Chapter 2: Managing Users 25
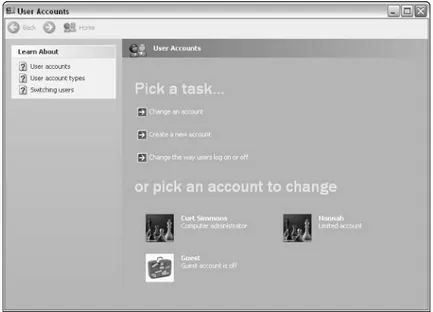
Figure 2-1: User Accounts in the Control Panel.
You can take three different actions from the User Accounts interface.
◆ Change an account.
◆ Create a new account.
◆ Change the way users log on or off.
The following sections explore these options.
CREATE A NEW ACCOUNT
The User Accounts feature enables you to easily create new accounts with the help of a miniature wizard that appears when you click Create an account option on the main page. The following steps walk you through an account creation:
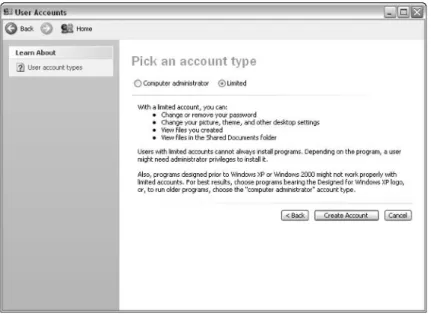
2. On the next window, shown in Figure 2-2, you are prompted to choose an account type, either Computer administrator or Limited. Select the desired radio button and click Create Account. Before doing so, you have to deter-mine the kind of account you are creating. The computer administrator account gives the user total control over the computer. The administrator can add and remove accounts, configure system components, install pro-grams, and format and reconfigure hard drives; the administrator can do anything — he or she has total control over the computer. You can have more than one computer administrator, but you should be very careful to whom you give this level of control. The limited account user can change his or her password and desktop settings, create and view files, and view items in the Shared Documents folder. Limited users may not be able to install programs, and it is important to note that some pre-Windows XP or Windows 2000 programs might not work well on limited accounts. Basically, the limited user can use the operating system, but can’t make any harmful configuration changes to it. When you have made your selection, click the Create Account button.
Figure 2-2: Pick an account type.
CHANGE AN ACCOUNT
A window appears with a list of tasks that you can perform, such as change the name, create a password (delete a password), and change the account type. You can change anything you configured when you created the account, and you can change the picture, create a password, and delete the account.
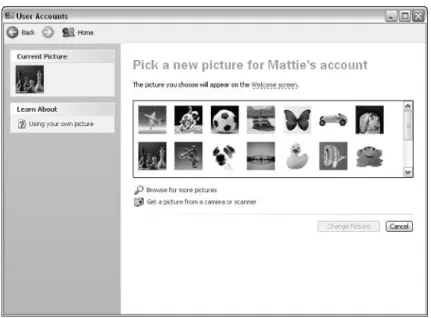
Windows XP’s theme uses pictures to represent user accounts, along with the account name. A default, unique picture is assigned to each user. If you click the Change Picture option, a window appears (shown in Figure 2-3) where you can select a new picture icon from the provided list, or you can browse your computer and locate another picture. You can use just about any kind of picture format (JPEG, GIF, BMP, and so on). You might want to use company icons, or in a home setting, you might actually use a photograph of the person to represent the user account. Simply choose a desired picture and click the Change Picture button.
Figure 2-3: Change Picture option.
The Create a Password option enables you to create a password for the user. Windows XP gives you the freedom to have users log on with passwords, or to not use them. A password ensures that only the person to whom the account belongs can log on to the computer, assuming the password is kept secret. Again, in a very small office or home situation, you may not want to use passwords, but if security for some accounts is a concern, you need to assign a password. To meet security standards, passwords should be at least seven characters long and use both letters and numbers. Common names, phone numbers, and related information should not be used. Keep in mind that if you do not use passwords, any user will be able to click any account on the Welcome screen and log on; so even in a home situation where you want to keep other family members out of your personal folders, use a password.
When you click the Create a password option, a window appears where you can enter the password, reenter it for confirmation, and type a word or phrase as a pass-word hint, as shown in Figure 2-4. The passpass-word hint is descriptive text that reminds you of the password, but the hint can be viewed by anyone, so you have to be careful.
Figure 2-4: Create password.
Finally, you can also delete an account. When you delete an account, Windows will save all of the user’s desktop contents and the My Documents folder to a folder named with the username on the desktop. This enables you to easily place the con-tents on a disk and give it to the user who will no longer be accessing the computer. If you want to use this option, click Keep Files — if not, click Delete Files.
CHANGE THE WAY USERS LOG ON OR OFF
The log on and off setting is a global setting that applies to all users. You have only two check box options here:
◆ Use Fast user switching— Fast user switching enables quickly changing users without closing any programs, which can be really helpful in a col-laborative situation where several people are working on a project together at one computer. The caveat here is that Fast user switching is not compatible with offline files.
Creating a Password Reset Disk
One thing that users can and should do is access the User Accounts option in the Control Panel and create a password reset disk. The password reset disk allows a user to reset his or her password should the password be forgotten, rather than the computer administrator having to take over and change it for the user. Once the user creates his or her password reset disk, he or she should keep it in a safe, secure place until it is needed. Follow these steps to create a password reset disk:
1. Open User Accounts in the Control Panel.
2. On the User Accounts window, click your user account icon.
3. On the next window, click the Prevent a Forgotten Password link option in the Related Tasks box.
4. A wizard begins. Click Next on the Welcome screen.
5. On the Create Reset Disk window, choose the drive where you want to save the password key, such as your computer’s floppy disk drive. Click Next.
6. On the next window, enter your current user account password and click Next.
7. The password key is recorded on your disk. Click Next, and then click Finish.
Creating User Accounts with
Computer Management
The Computer Management console also allows you to create and manage user accounts and group accounts. With a little experience under your belt, this will probably be the console you prefer to use. You can do everything here (and more) that you can do with the Users option in the Control Panel, except assign pictures to accounts and choose whether or not to use the Welcome screen and fast user switching. Beyond that, Computer Management is faster and gives you more options for user account configuration.
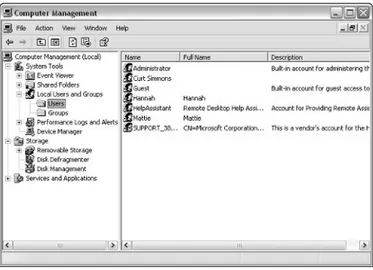
Computer Management is available in Administrative Tools in the Control Panel. If you open Computer Management→System Tools→Local Users and Groups, you
can click on Users and see a listing of the user accounts on your computer. You’ll notice in Figure 2-5 that some of the listed accounts, aside from Administrator and Guest, were not created by you. These accounts are used by Microsoft support, Internet Information Server (IIS) (if it is installed), and for Remote Desktop help assistance.
Figure 2-5: Computer Management.
Notice that you cannot assign new accounts as Administrator or Limited here, but you can configure the account properties, which will be discussed in the next section.
Using the Computer Management console, you can easily create new users and manage existing user accounts. The following steps show you how to create a new user with the Computer Management console.
1. Open Computer Management→System Tools→Local Users and Computers. Right-click the Users container and then click New User.
2. The New User window appears, as shown in Figure 2-6. Complete the information in the text boxes. If you want to assign a password, enter and confirm the password and choose one of the following check boxes:
■ User cannot change password— If you prefer to provide passwords instead of allowing the users to create them, choose this option.
■ Password never expires— If you have Group Policy configured to expire passwords after a certain length of time, you can check this box to override the expiration policy, if necessary. See the Group Policy section later in this chapter to learn more about Group Policy.
■ Account is disabled— You can disable an account here if you want to stop the user from logging on with the account, but you won’t delete the account.
3. When you are done, click the Create button. The new account appears in the Users container.
Figure 2-6: New user creation.
Managing User Accounts
Just as you can create a new user account with the Computer Management console, you can easily manage the accounts that you create. If you select Users in the left pane, a list of users configured on your computer appears in the right pane. If you select a user in the right pane and right-click the icon (or use the Action menu), you can choose to reset the account’s password, in which case a dialog box appears. This action is the same as using the User Accounts interface — if you have to reset an account’s password, all Effective Field Size (EFS) encrypted files, Web pass-words, and related settings are lost. Because of this, it is best for users to create their own password backup disks so that data isn’t lost when a user forgets his or her password.
You can also delete and rename the account, and you can click Properties to access the Properties sheets. On the Properties sheets, you see three tabs. On the General tab, you can make the same changes that were presented when you created the account. You can configure the password never to expire, choose an option so that the user must change the password at next logon, a combination of these, and so on. An additional check box you will see here is the Account is locked out option. Depending on the Group Policy settings, a user’s account may lock after so many unsuccessful password attempts. This is a security feature that keeps someone from trying to break the password by entering guesses over and over. In environ-ments where security is an issue, “three tries and you are locked” is often the pol-icy. You can’t lock the user’s account here; you can only unlock it if it is locked from failed password attempts.
The Member of tab provides a place to add the user to groups that are configured on your computer. Group membership determines what the user is able to do on the computer (or not do). To add a user to a group, click the Add button and select the desired group from the list that appears. You can learn more about the default groups and group usage in the next section.
Finally, you also see a Profile tab. If a profile or logon script is used with the user, you can point to the location of the profile or logon script here. Because you are dealing with local users, you probably will not use this tab, and most profile information is now configured in Group Policy, which is also explored later in this chapter.
Managing Groups
Windows XP configures several default group accounts for you. The purpose of groups is to organize users so that they have certain permissions. With local user configuration, groups are not such a big deal because your users are typically either administrators or those with limited accounts, which are provided by default. This group structure is the same as that used by network administrators to organize net-work users and assign permissions. Group configuration and assignment can get very complex if you are a server administrator, but for the local computer, you’ll spend little to no time worrying about groups. The important thing to realize is that each user account needs to be assigned to at least one group that has the permis-sions that you desire.
TABLE2-1 DEFAULT WINDOWS XP GROUPS
Group Explanation
Administrators Computer administrators have complete control
over the computer. Administrators can add and remove users and groups, configure the system, install and remove hardware, reconfigure hard drives, install applications, and perform any other action that is available under Windows XP.
Power Users Power Users can perform most actions that
administrators can perform, but they can only modify and delete accounts that they create. Also, they can only modify group memberships that they have created. They can remove users from Power Users, Users, and Guests groups. They cannot modify the administrators and backup operators groups, take ownership of files, or perform backup and/or restore functions. They cannot change device drivers or manage security or log and/or auditing.
Users This is the default limited user account. Users can
configure the desktop systems and create files, but they cannot make any configuration changes to the system, add or remove accounts, or access other users’ folders.
Backup Operators Backup Operators can back up and restore files on
the computer, regardless of which user owns those files. Backup operators cannot be changed.
Guests This enables a guest to log on to the computer.
Guests can perform basic computing actions, but do not have all of the abilities given to the limited user accounts.
Network Configuration Operators This provides some basic administrative privileges
for the configuration of Windows XP’s networking features. Typically, under local usage, the
administrator would handle these functions.
Remote Desktop Users If Remote Desktop is configured, this group is
provided for remote desktop users to access the remote access connection.
Continued
TABLE2-1 DEFAULT WINDOWS XP GROUPS (Continued)
Group Explanation
IIS Groups If IIS is installed, you’ll see additional groups, such
as administrators for the Web site, authors for the Web site, and so on.
Help Services Group This is provided for the Help and Support Center.
Along with the default groups, you can also create your own group. Just right-click the Groups container and right-click New Group. Then name the new group and add the desired users, as shown in Figure 2-7. Organizing a group this way enables you to add this new group to the default security groups, as provided. Of course, you can simply add individual users to the default security groups, and if only a few people use the Windows XP computer, this is probably your easiest choice. If you double-click a desired group in the console pane, you can see the current members of the group and adjust the members, as desired.
Figure 2-7: New Group.
Using Group Policy
Group Policy is used to invoke certain settings on computers and user accounts and control what users are able to do. On a network, network administrators can use Group Policy to automatically install and manage software on their users’ com-puters, enforce settings, and even automatically remove software when it is no longer needed.
If you have read anything about Group Policy, you may think of it as a network feature. While it is true that the main focus of Group Policy is the configuration of network clients by network administrators, you can also use it to administer your local computer so that settings you configure affect the users logging on to the computer. This is a powerful way to standardize settings for all users.
Group Policy is not available to you as a tool in any folder, but it is available as a Microsoft Management Console (MMC) snap-in. You can add the snap-in to a new or existing console and begin using Group Policy as a management tool on Windows XP. To use Group Policy, you must be using Windows XP Professional, and you must log on as an administrator. The following steps show you how to open the Group Policy console.
Refer to Chapter 10 for more information on the MMC.
1. Click Start→Run. Type MMCand click OK.
2. In the MMC console, click File→Add/Remove Snap-in.
3. In the Add/Remove Snap-in window, click Add.
4. In the Add Standalone Snap-in window, select Group Policy, as shown in Figure 2-8, and click Add.
Figure 2-8: The Add Standalone Snap-in window.
5. In the Welcome to the Group Policy Wizard window, shown in Figure 2-9, leave the default selection, Local Computer, selected, then click Finish.
Figure 2-9: Group Policy window.
6. Click Close on the Add Standalone Snap-in window and click OK on the Add/Remove Snap-in window.
7. The snap-in appears in the Console. Click File→Save As to save the con-sole. Name the console group policyand save it to a desired location. From now on, all you have to do is double-click the new console to open Group Policy.
Group Policy Features
If you expand each category, you see Software Settings, Windows Settings, and Administrative Templates. Each of these nodes then further expands into different categories of settings, which may also expand into different categories as shown in Figure 2-10. Once you expand into a category, the different available settings you can apply from within that category appear in the details pane.
Figure 2-10: Group Policy settings.
Configuring Group Policy Settings
Once you navigate through the policy options in the left-hand pane, you can locate the desired policy you want to implement in the right-hand pane. You can config-ure a desired setting by double-clicking it to open the category. This opens the set-ting window for the desired item. For example, you can see in Figure 2-11 that I have opened the Enable Active Desktop Properties window. At this point, I can use the Setting tab to enable the active desktop, disable it, or leave it unconfigured. If you click the Explain tab, you learn more about the particular entry. The large dialog box that appears in the middle of the window may become active, depend-ing on your selection and entry. If it does, another settdepend-ing becomes available for you to configure for your policy. What you see here all depends on the policy you are configuring.Figure 2-11: The Enable Active Desktop Properties window.
Before using Group Policy, it is important that you have a firm understanding of the Not Configured, Enabled, and Disabled options. To make sure you configure Group Policy to meet your needs, make sure you understand the following:
◆ Not Configured— The setting is simply not configured — in other words, no setting is written to the registry. Whatever the setting is by default, that is what is used.
◆ Enabled— The setting is enabled and written to the registry.
◆ Disabled— The setting is disabled and written to the registry.
Let’s return to the Active Desktop example I used earlier. Those settings would mean the following:
◆ Not Configured— Nothing is changed and the default setting is used. Active Desktop is not enabled by default, so it would not be enabled. The user can enable it if he or she wants, assuming he or she has proper permission to do so.
◆ Enabled— Active Desktop is turned on and functional. Users cannot turn it off.
The last two settings require registry entries while the first simply says, “Do nothing.” As you are configuring Group Policy, remember that you should not enable or disable any setting that doesn’t apply to you — leave the setting to Not Configured. Otherwise, you are creating unneeded registry entries that can bog down the computer’s loading time.
At the bottom of each policy window, you see the Supported on setting, which will tell you if the setting applies to at least Windows 2000 or Windows XP. In later revisions of Windows, this at-least setting will be more useful because more ver-sions will support Group Policy. You can also navigate through the settings in the category by simply using the Previous Setting and Next Setting buttons.
For the most part, the configuration windows you see within Group Policy look the same as the examples shown here. However, depending on the settings, some windows will have differences. For example, some of the security-setting dialog boxes do not use an Enabled/Disabled appearance, but they provide you with a configuration option, such as the logon attempt lockout setting, shown in Figure 2-12.
Figure 2-12: Account Lockout Group Policy.
Regardless, the configuration windows you see in Group Policy are easy and self-explanatory. Configuring Group Policy is as easy as locating the setting that you want to change, adjusting the setting as desired, and clicking OK. When users log on to the Windows XP computer, the setting in Group Policy will be applied.
To use Group Policy, you have to find the setting that you want to configure, and then choose an enforcement option to invoke that policy. Locating what you want can be a little challenging at times because you have so many potential set-tings to choose from. It is also important to remember that a number of setset-tings that are found in the Group Policy console do not apply to local computer uration. The Help files are also full of references to Windows 2000 domain config-urations and other networking issues that do not apply to the local computer. This
is because the Group Policy snap-in tool is a global tool used on both servers and workstations. The following section reviews the major settings found in the differ-ent nodes and points out the settings you are most likely to use. You can use this information when you sit down to work with Group Policy as a sort of filter to help you get to the settings you most likely need.
Computer Configuration
The following sections explore the containers found under the Computer Configuration node. Keep in mind that Computer Configuration and User Configuration, though useful, are designed for networked computers in a domain where users may log on to the network at different workstations. User Configuration enables the users to receive the same configuration regardless of the computer they are using, whether there is a computer policy applied or not. Because you are configuring a local com-puter with local users, most of your configuration is going to be focused in the Computer Configuration node.
Software Settings
The Software Settings container provides a place where network administrators can configure software packages that are delivered to computers on a network. It is a way to automatically roll out software and manage it from one central location. Because you are configuring a local computer, this setting does not apply to you.
Windows Settings
Windows settings contain Group Policy objects for startup and shutdown scripts, as well as a variety of security settings. If you want to use startup and shutdown scripts with users on your network, you can apply the scripts by opening the startup or shutdown properties window and adding a script to the policy. Then the script will be used each time the computer is started or shut down.
Under Security Settings, you see a number of additional containers. The follow-ing sections and tables point out settfollow-ing options on your computer that you might find useful.
ACCOUNT POLICIES
TABLE2-2 ACCOUNT POLICIES
Policy Explanation
Enforce password history When enabled, requires Windows XP to remember
passwords for users. You can choose the number of passwords that should be remembered.
Maximum password age The default setting is 42 days. You change it here.
Also, if you choose the “password never expires” setting on a user’s account properties, the maximum setting is overwritten so that it never expires.
Minimum password age When enabled, requires that a password be used for a
certain amount of time until it is changed. By default, 0 is the setting.
Minimum password length You can use this setting to enforce a minimum
password length, creating more secure user accounts. This setting is set to 0 by default.
Passwords must meet complexity Disabled by default, this setting requires both
requirements numbers and letters in the password.
Account lockout duration Specifies the amount of time that an account will
stay locked once it has been locked due to password failure. This is not configured by default.
Account lockout threshold Specifies the amount of time a user can attempt to
log on before the account is locked. This setting is 0 by default.
Reset account lockout counter Specifies the amount of time that passes before the
account lockout counter is reset.
LOCAL POLICIES
Local Policies include a section of settings concerning audit policy, user rights assignment, and security options. Audit Policy contains a number of individual set-tings, such as audit account logon events, audit account management, audit policy change, and so on. Some of these apply to the local computer, while some are spe-cific to networking. If you want to enforce auditing on your Windows XP Professional computer, these settings can be enabled so that auditing always occurs. The User Rights container contains a number of settings showing the groups that have permission to perform a certain action.
There are quite a few of these settings, and Table 2-3 points out the ones that you are likely to find helpful. The policy and the default settings are listed.
TABLE2-3 USER RIGHTS ASSIGNMENT
Policy Defaults
Back up files and directories Administrators/Backup operators
Change the System Time Administrators/Power Users
Create pagefile Administrators
Increase scheduling priority Administrators
Load and unload device drivers Administrators
Manage auditing and security logs Administrators
Modify firmware environment variables Administrators
Perform volume maintenance Administrators
Profile single processes Administrators, Power Users
Profile system performance Administrators
Restore files and directories Administrators, Backup Operator
Shut down the system All groups
Take ownership of files and other objects Administrators
The final container under Local Policies is Security Options. The Security Options container holds individual options for various security options, such as accounts, auditing, devices, and so on. Table 2-4 points out the options under each division.
TABLE2-4 SECURITY OPTIONS
Policy Options
Accounts Provides individual settings for Windows accounts.
Policy Options
Audit Provides individual settings for auditing permissions.
Configure audit access of global system objects, audit the use of Backup and Restore, and shut down the system immediately if unable to log security events.
Devices Provides individual settings for devices, such as allow
undock without logon, allow format and eject removable media, prevent users from installing print devices, restrict CD-ROM access to locally logged-on user only, restrict floppy access to locally logged-on user only, and unsigned driver installation behavior.
Domain Controller Settings apply to domain controllers; not applicable for
Windows XP Professional.
Domain Member Settings for domain members; not applicable for
Windows XP Professional.
Interactive Logon Provides interactive logon settings, such as do not display
user last name, do not require CTRL+ALT+Del, message text for users attempting to log on, and others.
Microsoft Network Client Provides machine configuration for networking, such as
digital signatures, and unencrypted password usage.
Microsoft Network Server Not applicable for Windows XP Professional.
Network Access Provides a number of network access settings, including
permissions and security models.
Recovery Console Provides settings for recovery console.
Shut Down Allows system shutdown without logon and clear virtual
memory pagefile options.
System Cryptography Provides encryption settings.
System Objects Provides default owner and internal system settings.
PUBLIC KEY POLICIES
This container holds the Encrypting File System container, which may not contain any settings on your Windows XP computer.