Making Everything Easier!
™Nancy Muir
Pick the task,
Find it fast,
Get it DONE!
What Do You Want to Do?
Try This Task
Find It Here
Work in Windows 7
Work with the Start Menu
7
Search for a File
29
Create a Formatted Document in WordPad
38
Master the Internet
Set Up a New ISP Internet Connection
58
Navigate
the
Web
66
Create and Send E-Mail
85
Set Up Hardware or a Network
Install a Printer
108
Upgrade a Graphics Card
113
Configure a Wireless Network
121
Customize Windows
Change the Desktop Background
131
Choose a Desktop Theme
132
Change Mouse Behavior
144
Maintain Your System Run
Windows
Update
163
Defragment a Hard Drive
167
Delete Temporary Internet Files
169
Fix Common Problems
Use the Hardware Troubleshooter
175
Update a Driver
176
Create a System Restore Point
182
Entertain Yourself Play
Solitaire
196
Play
Music
209
by Nancy Muir
Windows
®
7
Just the Steps
™
FOR
Windows® 7 Just the Steps™ For Dummies®
Copyright © 2009 by Wiley Publishing, Inc., Indianapolis, Indiana Published by Wiley Publishing, Inc., Indianapolis, Indiana Published simultaneously in Canada
No part of this publication may be reproduced, stored in a retrieval system or transmitted in any form or by any means, electronic, mechanical, photocopying, recording, scanning or otherwise, except as permitted under Sections 107 or 108 of the 1976 United States Copyright Act, without either the prior written permission of the Publisher, or authorization through payment of the appropriate per-copy fee to the Copyright Clearance Center, 222 Rosewood Drive, Danvers, MA 01923, (978) 750-8400, fax (978) 646-8600. Requests to the Publisher for permission should be addressed to the Permissions Department, John Wiley & Sons, Inc., 111 River Street, Hoboken, NJ 07030, (201) 748-6011, fax (201) 748-6008, or online at http://www.wiley.com/go/permissions.
Trademarks: Wiley, the Wiley Publishing logo, For Dummies, the Dummies Man logo, A Reference for the Rest of Us!, The Dummies Way, Dummies Daily, The Fun and Easy Way, Dummies.com, Just the Steps, Making Everything Easier, and related trade dress are trademarks or regis-tered trademarks of John Wiley & Sons, Inc. and/or its affiliates in the United States and other countries, and may not be used without written per-mission. Windows is a registered trademark of Microsoft Corporation in the United States and/or other countries. All other trademarks are the property of their respective owners. Wiley Publishing, Inc., is not associated with any product or vendor mentioned in this book.
LIMIT OF LIABILITY/DISCLAIMER OF WARRANTY: THE PUBLISHER AND THE AUTHOR MAKE NO REPRESENTATIONS OR WARRANTIES WITH RESPECT TO THE ACCURACY OR COMPLETENESS OF THE CONTENTS OF THIS WORK AND SPECIFICALLY DISCLAIM ALL WARRANTIES, INCLUDING WITHOUT LIMITATION WARRANTIES OF FITNESS FOR A PARTICULAR PURPOSE. NO WARRANTY MAY BE CREATED OR EXTENDED BY SALES OR PROMOTIONAL MATERIALS. THE ADVICE AND STRATEGIES CONTAINED HEREIN MAY NOT BE SUITABLE FOR EVERY SITUATION. THIS WORK IS SOLD WITH THE UNDERSTANDING THAT THE PUBLISHER IS NOT ENGAGED IN RENDERING LEGAL, ACCOUNTING, OR OTHER PROFESSIONAL SERVICES. IF PROFESSIONAL ASSISTANCE IS REQUIRED, THE SERVICES OF A COMPETENT PROFESSIONAL PERSON SHOULD BE SOUGHT. NEITHER THE PUBLISHER NOR THE AUTHOR SHALL BE LIABLE FOR DAMAGES ARISING HEREFROM. THE FACT THAT AN ORGANIZATION OR WEBSITE IS REFERRED TO IN THIS WORK AS A CITATION AND/OR A POTENTIAL SOURCE OF FURTHER INFORMATION DOES NOT MEAN THAT THE AUTHOR OR THE PUBLISHER ENDORSES THE INFORMATION THE ORGANIZATION OR WEBSITE MAY PROVIDE OR RECOMMENDATIONS IT MAY MAKE. FURTHER, READERS SHOULD BE AWARE THAT INTERNET WEBSITES LISTED IN THIS WORK MAY HAVE CHANGED OR DISAPPEARED BETWEEN WHEN THIS WORK WAS WRITTEN AND WHEN IT IS READ.
For general information on our other products and services, please contact our Customer Care Department within the U.S. at 877-762-2974, outside the U.S. at 317-572-3993, or fax 317-572-4002.
For technical support, please visit www.wiley.com/techsupport.
Wiley also publishes its books in a variety of electronic formats. Some content that appears in print may not be available in electronic books. Library of Congress Control Number: 2009932705
ISBN: 978-0-470-49981-8
About the Author
Nancy Muir is the author of over 50 books on tech-nology and business topics. She has worked as a manager in both the publishing and software indus-tries. Nancy holds a certificate in distance learning design and is the VP of Content and Curriculum for LOOKBOTHWAYS Foundation, an Internet safety company dedicated to developing free safety curricu-lums for children in grades K–12.
Dedication
To my fabulous husband, Earl Boysen, and my family and friends who make my tough deadlines and other writing stresses endurable.
Author’s Acknowledgments
Acquisitions and Editorial
Project Editor: Kim Darosett
Acquisitions Editor: Kyle Looper
Copy Editor: Jen Riggs
Technical Editor: Lee Musick
Editorial Manager: Leah Cameron
Sr. Editorial Assistant: Cherie Case
Cartoons: Rich Tennant (www.the5thwave.com)
Composition Services
Project Coordinator: Katherine Crocker
Layout and Graphics: Claudia Bell, Ana Carrillo, Melanee Habig, Joyce Haughey, Andrea Hornberger, Melissa K. Jester, Christin Swinford
Proofreaders: Dwight Ramsey, Mildred Rosenzweig
Indexer: Johnna VanHoose Dinse Publisher’s Acknowledgments
We’re proud of this book; please send us your comments through our online registration form located at http://dummies.custhelp.com. For other comments, please contact our Customer Care Department within the U.S. at 877-762-2974, outside the U.S. at 317-572-3993, or fax 317-572-4002.
Some of the people who helped bring this book to market include the following:
Publishing and Editorial for Technology Dummies
Richard Swadley, Vice President and Executive Group Publisher
Andy Cummings, Vice President and Publisher
Mary Bednarek, Executive Acquisitions Director
Mary C. Corder, Editorial Director
Publishing for Consumer Dummies
Diane Graves Steele, Vice President and Publisher
Composition Services
Introduction ...1
Part I: Working in Windows 7 ...3
Chapter 1: Exploring the Windows 7 Desktop ...5
Chapter 2: Controlling Applications with Windows 7 ...15
Chapter 3: Working with Files and Folders ...25
Chapter 4: Using Built-In Windows Applications ...37
Chapter 5: Using the Windows Gadget Gallery and Gadgets ....45
Part II: Getting on the Internet ...55
Chapter 6: Accessing the Internet ...57
Chapter 7: Browsing the Web with Internet Explorer ...65
Chapter 8: Exchanging E-Mail with Windows Live Mail...83
Chapter 9: Working Remotely ...97
Part III: Setting Up Hardware
and Networks ...105
Chapter 10: Setting Up New Hardware ...107
Chapter 11: Setting Up a Network ...117
Part IV: Customizing Windows ...127
Chapter 12: Setting Up Your Display ...129
Chapter 13: Customize Windows Ease of Access ...137
Part V: Using Security and
Maintenance Features ...147
Chapter 14: Setting Passwords and File Access ...149
Chapter 15: Protecting Windows ...157
Chapter 16: Maintaining Windows ...165
Part VI: Fixing Common Problems ...171
Chapter 17: Troubleshooting Hardware Problems ...173
Chapter 18: Troubleshooting Software Problems ...179
Chapter 19: Getting Help ...185
Part VII: Fun and Games ...193
Chapter 20: Playing Games in Windows 7 ...195
Chapter 21: Playing Music in Windows 7 ...203
Chapter 22: Working with Photos ...211
Index ...219
#
➟
Chapter
I
’m guessing you have a healthy dislike of computer books. You don’t want to wade through a long tome on Windows 7. Rather, you just want to get in, find out how to do something, and get out. You’re not alone. I was itching to write a book where I could get right to the details of how to do things — and move on. None of that telling you what I’m going to tell you, saying my piece, and then reviewing for you what I just said. That’s why I was delighted to tackle a Just the Steps For Dummies book on Windows 7.About This Book
Windows 7 is a very robust piece of software, with about as much function-ality as Einstein on a good day. If you own a Windows 7 computer (and I assume you do, or you should rush back to the bookstore for a refund, pronto!), you’re likely to spend a lot of time every day in the Windows 7 environment. Knowing how to harness the power of this operating system is what this book is all about. As the title suggests, I give you just the steps you need to do many of the most common Windows 7 tasks. This book is all about getting productive right away.
Why You Need This Book
You can’t wait weeks to master Windows 7. It’s where all your software lives as well as how you get to your e-mail and documents. You have to figure out Windows 7 quickly. You might need to poke around Windows and do work while learning. When you hit a bump in the road, you need a quick answer to get you moving again. This book is full of quick, clear steps that keep your learning in high gear.
Conventions used
in this book
➟
When you have to type something in a text box, I put it in bold type.➟
For menu commands, I use the ➪ symbol to separate menu items. For example, choose Tools➪Internet Options. The ➪ symbol is just my way of saying “Choose Internet Options from the Tools menu.”➟
Points of interest in some figures are circled. The text tells you what to look for, and the circle makes it easy to find.This icon points out insights or helpful suggestions related to tasks in the step list.
➟
2Windows 7 Just the Steps For Dummies
modify how features such as your mouse and keyboard work to help you if you have dexterity challenges, and set up the Windows Speech Recognition feature.
Part V: Using Security and Maintenance Features
Windows 7 provides lots of ways to keep your informa-tion safe, from passwords to protect your files to tools to prevent viruses and spyware from attacking your system. Several features also help keep your system up to date and trouble-free.
Part VI: Fixing Common Problems
Yes, I admit it, even Windows can have problems. Luckily, it also has tools to get you out of trouble. In this part, I explain how to deal with hardware and software problems as well as how to get help when you need it.
Part VII: Fun and Games
Finally, you’ve earned some fun. Go to these chapters to discover a world of games, music, photos, and video just waiting for you in Windows 7.
Get Ready To . . .
Whether you need to open a piece of software and get working, check your e-mail, or get online, just browse this book, pick a task, and jump in. Windows 7 can be your best friend if you know how to use it, and the tasks covered in this book will make you a Windows 7 master in no time.
How This Book Is Organized
This book is conveniently divided into several handy parts.
Part I: Working in Windows 7
Here’s where you get the basics of opening and closing soft-ware applications, working with files and folders to manage the documents you create, and using built-in Windows appli-cations like the Calculator and WordPad. You also discover how to use the cool tools offered in Windows Gadget Gallery.
Part II: Getting on the Internet
The whole world is online, and you can’t be left behind. Here’s where I show you how to connect, how to browse using the newest version of Internet Explorer, ways for using the Internet to stay in touch when you’re on the road, and how to do e-mail using Windows Live Mail.
Part III: Setting Up Hardware and Networks
In addition to software, Windows helps you work with hard-ware and connections between computers. You might have to make a little effort to set up new hardware or a home net-work. This part is where I show you how to do that, as well as how to make settings so displays and devices are easy to use and accessible if you have any vision, hearing, or other physical challenges.
Part IV: Customizing Windows
Part I
Chapter 1: Exploring the Windows 7 Desktop . . . .5
Log On and Off Windows 7 ... 6
Work with the Start Menu ... 7
Work with Frequently Used Programs ... 8
Set the Date and Time ... 9
Arrange Icons on the Desktop ... 10
Create a Desktop Shortcut ... 11
Empty the Recycle Bin ... 12
Shut Down Your Computer ... 13
Chapter 2: Controlling Applications with Windows 7 . . . .15
Launch an Application ... 16
Resize Application Windows ... 17
Switch between Running Applications ... 18
Move Information between Applications ... 19
Start an Application Automatically ... 20
Close an Application ... 21
Set Program Defaults ... 22
Remove an Application ... 23
Chapter 3: Working with Files and Folders. . . .25
Access Recently Used Items from the Start Menu ... 26
Locate Files and Folders in Your Computer ... 27
Locate Files and Folders in Windows Explorer ... 28
Search for a File ... 29
Move a File or Folder ... 30
Rename a File or Folder ... 31
Create a Shortcut to a File or Folder ... 31
Print a File... 32
Delete a File or Folder ... 33
Create a Compressed File or Folder ... 34
Add a File to Your Favorites List ... 35
Chapter 4: Using Built-In Windows Applications . . . . .37
Create a Formatted Document in WordPad ... 38
Edit a Picture in Paint ... 39
View a Digital Image in the Windows Photo Viewer ... 40
Clip with the Windows Snipping Tool ... 42
Add Sticky Notes ... 43
Track Numbers with Windows Calculator ... 44
Chapter 5: Using the Windows Gadget Gallery and Gadgets. . . .45
Open the Gadget Gallery and Add Gadgets to the Desktop ... 46
Check the Time ... 47
Display a Continuous Slide Show ... 48
Use the Windows Calendar ... 49
Play with Puzzles ... 50
Convert Currency ... 51
Use the Feed Headlines Gadget ... 52
Get the Latest Stock Quotes ... 53
#
➟
Chapter
Exploring the
Windows 7 Desktop
J
ust as your desk is the central area from which you do all kinds ofwork, the Windows 7 desktop is a command center for organizing your computer work. Here you find the Start menu, which you use to access information about your computer, files, folders, and applications. You’ll also find a taskbar that offers settings, such as your computer’s date and time, as well as shortcuts to your most frequently accessed programs or files.
In this chapter, you explore the desktop, which appears when you log on to Windows 7. Along the way, you discover the Recycle Bin, the area of the Windows 7 taskbar that lets you open frequently used programs, the notification area, and how to shut down your computer when you’re done for the day.
Here, then, are the procedures that you can use to take advantage of the desktop features of Windows 7.
1
Get ready to . . .
➟
Log On and Off Windows 7 ... 6➟
Work with the Start Menu ... 7➟
Work with Frequently Used Programs ... 8➟
Set the Date and Time ... 9➟
Arrange Icons on the Desktop ... 10➟
Create a Desktop Shortcut ... 11➟
Empty the Recycle Bin ... 12➟
Shut Down Your Computer ... 13➟
6Chapter 1: Exploring the Windows 7 Desktop
Figure 1-1: The Windows 7 desktop
After you set up more than one user, before you get to the password screen, you have to click the icon for the user you wish to log on as.
Log On and Off Windows 7
1. Turn on your computer to begin the Windows 7 start-up sequence.
2. In the resulting Windows 7 Welcome screen, enter your password, if you’ve set one, and click the arrow button (or click Switch User and choose another user to log on as). Windows 7 verifies your password and displays the Windows 7 desktop, as shown in Figure 1-1. (Note: If you haven’t set up the password protection feature or more than one user, you’re taken directly to the Windows 7 desktop. For more on adding and changing passwords, see Chapter 14.)
3. To change to another user account, first save any open documents, close any open applications, and then choose Start. Then click the arrow next to the Shut Down button in the bottom-right corner of the Start menu and choose Log Off. Windows 7 logs off and dis-plays a list of users. To log on again, click a user icon.
To create another user, choose Start➪Control Panel, and under the User Accounts and Family Safety heading, click Add or Remove User Accounts. Then click Create a New Account. Follow the instructions to enter a name for the account and set a password for it, if you like.
➟
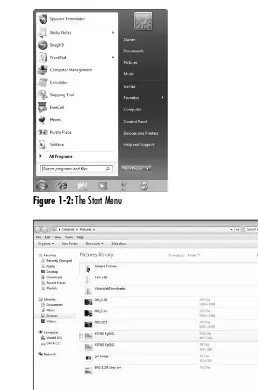
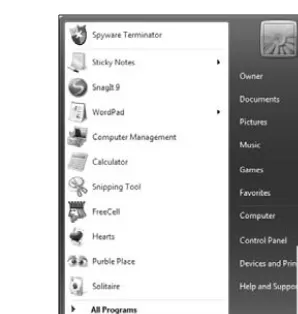
7Work with the Start Menu
Figure 1-2: The Start Menu
Figure 1-3: A Windows Explorer window
Work with the Start Menu
1. Press the Q key on your keyboard or click the Start
button on the desktop to display the Start menu (see Figure 1-2).
2. From the Start menu, you can do any of the following: • Click All Programs to display a list of all programs on
your computer. You can click any program in the list to open it.
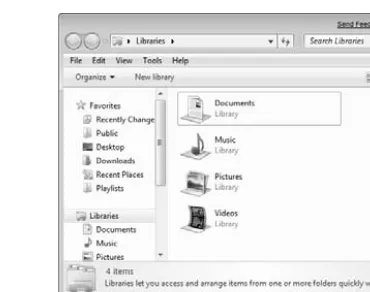
• Click any category on the right of the Start menu to display a Windows Explorer window with related folders and files (see Figure 1-3).
• Click either frequently used programs at the left of the Start menu, or click the arrow to the right of an application to display a list of recently used files and then click a file to open it in that application.
• Click the Power button icon to close all programs and turn off Windows.
• Click the arrow next to the Power button to display a menu of choices for putting your computer to sleep or using Hibernate mode (see the next Tip for more about these settings), restarting your computer, or for logging off or on as a different user.
3. When you move your cursor away from the Start menu, it disappears.
➟
8Chapter 1: Exploring the Windows 7 Desktop
Figure 1-4: The taskbar
Figure 1-5: Opening a program from the taskbar
You can add other functions to the taskbar. Right-click a blank area of the taskbar and choose Properties. Click the Toolbars tab to display it. Select the check box for any of the additional items listed there, such as a browser Address bar, or Links.
Work with Frequently
Used Programs
1. If there are programs you use frequently, you can pin them to the taskbar area just to the right of the Start button (see Figure 1-4). When you first open Windows, this area may include icons for programs, such as the Internet Explorer and Windows Media Player, or a shortcut to open Windows Explorer.
2. To open any of these items, click its icon, and the window for that program opens. See Figure 1-5.
3. To close an item you’ve opened, click the Close button in the top-right corner of the window (with an X on it).
➟
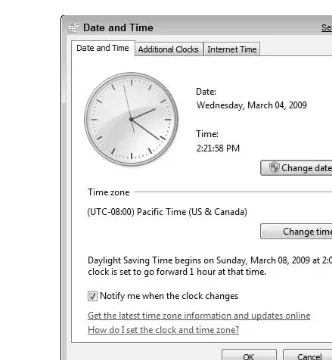
9Set the Date and Time
Figure 1-6: The Date and Time dialog box
If you don’t want your computer to adjust for Daylight Saving Time, click Change Time Zone and click the Automatically Adjust Clock for Daylight Saving Time check box to turn off this feature.
Another option for displaying the time or date is to add the Clock or Calendar gadgets to the Windows desktop. See Chapter 5 for more about using gadgets.
Set the Date and Time
1. Press the Q key on your keyboard to display the taskbar
if it isn’t visible. (By default the taskbar is not kept visi-ble at all times, though you can change that setting.)
2. Right-click the Date/Time display on the far right of the taskbar and then choose Adjust Date/Time from the shortcut menu that appears.
3. In the Date and Time dialog box that appears (see Figure 1-6), click the Change Date and Time button. In the Date and Time Settings dialog box that appears, enter a new time in the Time field or use the up and down arrows next to that field to change the time. Click OK.
4. To change the time zone, click the Change Time Zone button, choose another option from the Time Zone drop-down list, and click OK.
➟
10Chapter 1: Exploring the Windows 7 Desktop
Figure 1-7: The Desktop shortcut menu, View submenu
Figure 1-8: The Desktop shortcut menu, Sort By submenu
Arrange Icons on the Desktop
1. Right-click the desktop and choose View in the resulting shortcut menu; be sure that Auto Arrange Icons isn’t selected, as shown in Figure 1-7. (If it is selected, dese-lect it before proceeding to the next step.)
2. Right-click the Windows 7 desktop. In the resulting shortcut menu, choose Sort By and then click the crite-ria for sorting your desktop shortcuts (see Figure 1-8).
3. You can also click any icon and drag it to another loca-tion on the desktop — for example, to separate it from other desktop icons so you can find it easily.
If you’ve rearranged your desktop by moving items hither, thither, and yon and you want your icons in orderly rows along the left side of your desktop, snap them into place with the Auto Arrange feature. Right-click the desktop and then choose View➪
Auto Arrange Icons.
➟
11Create a Desktop Shortcut
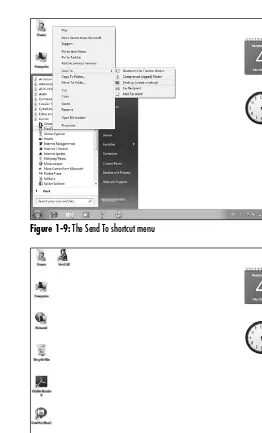
Figure 1-9: The Send To shortcut menu
Figure 1-10: A new shortcut on the desktop
Create a Desktop Shortcut
1. Choose Start➪All Programs and locate the program on the list of programs that appears.
2. Right-click an item, FreeCell for example, and choose Send To➪Desktop (Create Shortcut) (see Figure 1-9).
3. The shortcut appears on the desktop (see Figure 1-10). Double-click the icon to open the application.
Occasionally, Windows 7 offers to delete desktop icons that you haven’t used in a long time. Let it. The desktop should be reserved for frequently used programs, files, and folders. You can always re-create shortcuts easily if you need them again.
To clean up your desktop manually, right-click the desktop and choose Personalize. Click the Change Desktop Icons link to the left. In the Desktop Icon Setting dialog box that appears, click the Restore Default button, which returns to the original desktop short-cuts set up on your computer.
➟
12Chapter 1: Exploring the Windows 7 Desktop
Figure 1-11: The Recycle Bin shortcut menu
Figure 1-12: Confirming the Empty Recycle Bin command
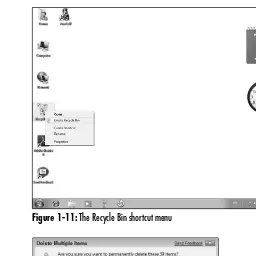
Empty the Recycle Bin
1. Right-click the Recycle Bin icon on the Windows 7 desk-top and choose Empty Recycle Bin from the menu that appears (see Figure 1-11).
2. In the confirmation dialog box that appears (see Figure 1-12), click Yes. A progress dialog box appears indicat-ing the contents are beindicat-ing deleted. Remember that after you empty the Recycle Bin, all the files in it are unavail-able to you.
Up until the moment you permanently delete items by performing the preceding steps, you can retrieve items in the Recycle Bin by right-clicking the desktop icon and choosing Open. Select the item you want to retrieve and then click the Restore This Item link near the top of the Recycle Bin window.
➟
13Shut Down Your Computer
Figure 1-13: The menu used to turn off or restart your computer
Don’t simply turn off your computer at the power source unless you have to because of a computer dysfunction. Windows might not start up properly the next time you turn it on if you don’t follow the proper shutdown procedure.
Shut Down Your Computer
1. Choose Start and then click the arrow to the right of the Shut Down button.
2. In the resulting shortcut menu, shown in Figure 1-13, choose Hibernate to shut down the computer com-pletely; if you want to reboot (turn off and turn back on) your computer, choose Restart.
If you’re going away for a while but don’t want to have to go through the whole booting up sequence complete with Windows 7 music when you return, you don’t have to turn off your computer. Just click the Sleep command instead (in Step 2) to put your com-puter into a kind of sleeping state where the screen goes black and the fan shuts down. When you get back, just click your mouse but-ton or press Enter, or in some cases (especially on some laptops), press the Power button; your computer springs to life, and whatever programs and documents you had open are still open.
➟
14#
➟
Chapter
Controlling
Applications
with Windows 7
Y
ou might think of Windows 7 as a set of useful accessories, such as games, a calculator, and a paint program for playing around with images, but Windows 7 is first and foremost an operating system. Windows 7’s main purpose is to enable you to run and manage other software applications, from programs that manage your finances to the latest 3-D computer action game. By using the best methods for accessing and running software with Windows 7, you save time; setting up Windows 7 in the way that works best for you can make your life easier.In this chapter, you explore several simple and very handy techniques for launching and moving between applications. You go through step-by-step procedures ranging from opening an application to resizing application windows to removing programs when you no longer need them.
This is where you explore all the procedures that you can use to launch, move among, and close applications with Windows 7.
2
Get ready to . . .
➟
Launch an Application ... 16➟
Resize Application Windows ... 17➟
Switch between Running Applications ... 18➟
Move Information between Applications ... 19➟
Start an Application Automatically ... 20➟
Close an Application ... 21➟
Set Program Defaults ... 22➟
Remove an Application ... 23➟
16Chapter 2: Controlling Applications with Windows 7
Figure 2-1: The All Programs menu
Figure 2-2: Desktop shortcuts and shortcuts on the taskbar
Launch an Application
1. Launch an application by using any of the following four methods:
• Choose Start➪All Programs. Locate the program name on the All Programs list that appears and click it. Clicking an item with a folder icon displays a list of programs within it; just click the program on that sublist to open it (as shown in Figure 2-1).
• Double-click a program shortcut icon on the desktop (see Figure 2-2).
• Click an item on the taskbar. The taskbar should dis-play by default; if it doesn’t, press the Q key (on your
keyboard) to display it and then click an icon on the taskbar (as shown in Figure 2-2), just to the right of the Start button. See Chapter 1 for more about work-ing with the taskbar.
• If you used the program recently and saved a docu-ment, choose it from the list of recently used programs displayed when you first open the Start menu. Then click a document created in that program from the list that displays. (See Chapter 1 for information about displaying recently used files on the Start menu.)
2. When the application opens, if it’s a game, play it; if it’s a spreadsheet, enter numbers into it; if it’s your e-mail program, start deleting junk mail. . . . You get the idea.
➟
17Resize Application Windows
Figure 2-3: A maximized FreeCell window
With a window maximized, you can’t move the window. If you reduce a window in size, you can then click and hold the title bar to drag the window around the desktop, which is one way to view more than one window on your screen at the same time. You can also click and drag the corners of a reduced window to resize it to any size you want.
Resize Application Windows
1. When you open an application window, it can be maxi-mized to fill the whole screen, restored down to a smaller window, or minimized to an icon on the task-bar. With an application open and maximized, click the Restore Down button (the icon showing two overlap-ping windows) in the top-right corner of the program window (see Figure 2-3). The window reduces in size.
2. To enlarge a window that’s been restored down to again fill the screen, click the Maximize button. (Note: This button is the same location as the Restore Down but-ton; this button changes its name to one or the other, depending on whether you have the screen reduced in size or maximized. A ScreenTip identifies the button when you pass your mouse over it.)
➟
18Chapter 2: Controlling Applications with Windows 7
Figure 2-4: The list of active programs
Switch between Running
Applications
1. Open two or more programs. The last program that you open is the active program.
2. Press Alt+Tab to move from one open application window to another.
3. Press and hold Alt+Tab to open a small box, as shown in Figure 2-4, revealing all opened programs.
4. Release the Tab key but keep the Alt key pressed down. Press the Tab key to cycle through the icons representing open programs.
5. Release the Alt key, and Windows 7 switches to which-ever program is selected. To switch back to the last program that was active, simply press Alt+Tab, and that program becomes the active program once again.
➟
19Move Information between Applications
Figure 2-5: Arranging windows
Figure 2-6: Dragging a selection between windows
Move Information between
Applications
1. Open documents in two applications (see the next task for more about opening applications). If their windows are maximized, click the Restore Down buttons in the upper-right corners to reduce their sizes.
2. Click the bottom-right corner of each program window and drag to change the size further until you can see both programs on the Windows desktop at once (see Figure 2-5).
3. Click and hold their title bars to drag the windows around your desktop, or right-click the taskbar and choose Cascade Windows, Show Windows Stacked, or Show Windows Side by Side to automatically arrange the windows on the desktop.
4. Select the information that you want to move (for example, text, numbers, or a graphical object in a docu-ment) and drag it to the other application document (see Figure 2-6).
5. Release your mouse, and the information is copied to the document in the destination window.
You can also use simple cut-and-paste or copy-and-paste operations to take information from one application and move it or place a copy of it into a document in another application. To do this, first click and drag over the information in a document and then press Ctrl+X to cut or Ctrl+C to copy the item. Click in the destination document where you want to place the item and press Ctrl+V.
➟
20Chapter 2: Controlling Applications with Windows 7
Figure 2-7: Opening the Startup folder
Figure 2-8: The Startup folder contents
Start an Application Automatically
1. Choose Start➪All Programs.
2. Right-click the Startup folder and choose Open (see Figure 2-7).
3. Right-click Start and choose Open Windows Explorer. In the window that appears, locate and open the folder where the application you want to start when you start Windows is located. Click to select it.
4. Drag the item to the Startup window you opened in Step 2. The program appears in the Startup folder (see Figure 2-8).
5. When you finish moving programs into the Startup folder, click the Close button in the upper-right corner of both windows. The programs you moved will now open every time you start Windows 7. You can remove an application from Startup folder by right-clicking it and choosing Delete.
If you place too many programs in Startup, it might take a minute or two before you can get to work because you have to wait for programs to load. Don’t overfill your Startup folder: Use it just for the programs you need most often.
➟
21Close an Application
Figure 2-9: Choosing the Exit command
Figure 2-10: Saving changes to open documents
You don’t have to close an application to open or switch to another. To switch between open applications, press Alt+Tab and use the arrow keys to move to the application (or document if multiple documents are open in an application) in which you want to work.
Close an Application
1. With an application open, first save any open documents (typically you can choose File➪Save to do this, though in recent Microsoft Office products, you click the appli-cation button and choose Save or Save As) and then close the application by using one of these methods:
• Click the Close button in the upper-right corner of the window.
• Press Alt+F4 to close an active open window.
• Choose File (or application button)➪Exit (see Figure 2-9).
2. The application closes. If you haven’t saved changes in any open documents before trying to close the applica-tion, you see a dialog box asking whether you want to save the document(s) (see Figure 2-10). Click Save or Don’t Save, depending on whether you want to save your changes.
To save a new document for the first time, before closing an appli-cation choose File➪Save and use settings in the Save dialog box (that appears) to name the file and also specify which folder to save it to.
➟
22Chapter 2: Controlling Applications with Windows 7
Figure 2-11: The Programs window
Figure 2-12: The Set Default Programs window
Set Program Defaults
1. Choose Start➪Control Panel➪Programs.
2. In the resulting Programs window, as shown in Figure 2-11, click the Set Your Default Programs link in the Default Programs section to see specifics about the programs that are set as defaults.
3. In the resulting Set Default Programs window, click a program in the list on the left (see Figure 2-12) and then click the Set This Program as Default option. You can also click Choose Defaults for This Program and select specific file types (such as the .jpeg graphics file format or the .docx Word 2007 file format) to open in this program; click Save after you’ve made these
selections.
4. Click OK to save your settings.
➟
23Remove an Application
Figure 2-13: The Uninstall or Change a Program window
Figure 2-14: The removal confirmation dialog box
If you used some earlier versions of Windows, note that the Add a Program command is gone. Because all software created today allows you to put a CD/DVD into your drive or download it from the Internet and then follow onscreen directions to install the program, Microsoft must have decided that its own Add a Program feature was obsolete!
Remove an Application
1. Choose Start➪Control Panel➪Uninstall a Program (under the Programs category).
2. In the resulting Uninstall or Change a Program window, as shown in Figure 2-13, click a program and then click the Uninstall (or sometimes this is labeled Uninstall/ Change) button. Although some programs will display their own uninstall screen, in most cases, a confirma-tion dialog box appears (see Figure 2-14).
3. If you’re sure that you want to remove the program, click Yes in the confirmation dialog box. A dialog box shows the progress of the procedure; it disappears when the program has been removed.
4. Click the Close button to close the Uninstall or Change a Program window.
With some programs that include multiple applications, such as Microsoft Office, you get both an Uninstall and a Change option in Step 2. That’s because you might want to remove only one program, not the whole shooting match. For example, you might decide that you have no earthly use for Access but can’t let a day go by without using Excel and Word — so why not free up some hard drive space and send Access packing? If you want to modify a program in this way, click the Change button in Step 2 of this task rather than the Uninstall button. The dialog box that appears allows you to select the programs that you want to install or uninstall or might open the original installation screen from your software program.
➟
24#
➟
Chapter
Working with Files
and Folders
J
oin me for a moment in the office of yesteryear. Notice all the metal fil-ing cabinets and manila file folders holdfil-ing paper rather than the sleek computer workstations and wireless Internet connections we use today.Fast forward: You still organize the work you do every day in files and fold-ers, but today, the metal and cardboard have been dropped in favor of elec-tronic bits and bytes. Files are the individual documents that you save from within applications, such as Word and Excel, and you use folders and sub-folders to organize several files into groups or categories, such as by project or by customer.
In this chapter, you find out how to organize and work with files and fold-ers, including
➟
Finding your way around files and folders: This includes tasks such as locating and opening files and folders.➟
Manipulating files and folders: These tasks cover moving, renaming, deleting, and printing a file.➟
Squeezing a file’s contents: This involves creating a compressed folder to reduce a large file to a more manageable creature.3
Get ready to . . .
➟
Access Recently Used Items fromthe Start Menu ... 26
➟
Locate Files and Foldersin Your Computer ... 27
➟
Locate Files and Foldersin Windows Explorer ... 28
➟
Search for a File ... 29➟
Create a Compressed File or Folder ... 34➟
Add a File to Your Favorites List ... 35➟
26Chapter 3: Working with Files and Folders
Figure 3-1: The Taskbar and Start Menu Properties dialog box
Figure 3-2: The Recent submenu accessed from the Start menu
Access Recently Used Items
from the Start Menu
1. Open the Start menu and right-click any blank area. From the resulting shortcut menu, choose Properties.
2. In the Taskbar and Start Menu Properties dialog box that appears, click the Start Menu tab (if that tab isn’t already displayed).
3. Make sure that the Store and Display Recently Opened Items in the Start Menu and the Taskbar check box is selected (see Figure 3-1) and then click OK.
4. Open the Start menu and hover your mouse over any recently opened program listed on the left side that has an arrow, and then a submenu of recently opened items appears to the right. Choose a file from the Recent sub-menu (see Figure 3-2) to open it.
➟
27Locate Files and Folders in Your Computer
Figure 3-3: The Computer window
Figure 3-4: The window for a hard drive
Locate Files and Folders
in Your Computer
1. Choose Start➪Computer.
2. In the resulting Computer window (see Figure 3-3), double-click an item, such as a USB drive, a CD-ROM drive, or your computer hard drive, to open it.
3. If the file or folder that you want is stored within another folder (see Figure 3-4 for an example of the resulting window), double-click the folder or a series of folders until you locate it.
4. When you find the file you want, double-click it to open it.
Note the buttons on the top of the window in Figure 3-4. Use the commands in this area to perform common file and folder tasks, such as organizing, sharing, or opening files.
➟
28Chapter 3: Working with Files and Folders
Figure 3-5: The Windows Explorer window
There are some shortcuts to commonly used folders in the Start menu, including Documents, Pictures, Music, and Games. Click one of these, and Windows Explorer opens that particular window.
Locate Files and Folders
in Windows Explorer
1. Right-click the Start menu and choose Open Windows Explorer, or click the Windows Explorer button on the taskbar (it looks like a set of folders).
2. In the resulting Windows Explorer window, as shown in Figure 3-5, double-click a folder in the main window or in the list along the left side to open the folder.
3. The folder’s contents are displayed. If necessary, open a series of folders in this manner until you locate the file you want.
4. When you find the file you want, double-click it to open it.
➟
29Search for a File
Figure 3-6: The Search field and results in the Start menu
Figure 3-7: The Search Results in Indexed Locations window
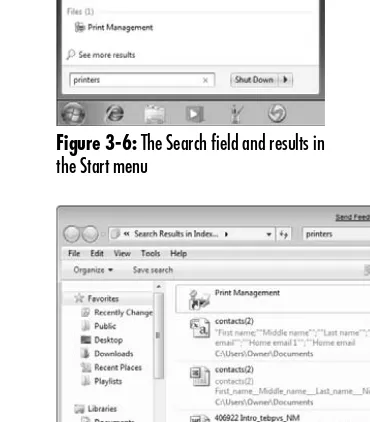
Search for a File
1. Open the Start menu and type a search term in the search field at the bottom.
2. A list of search results appears divided by the location of the results (see Figure 3-6).
3. Click the See More Results link.
4. In the Search Results in Indexed Locations window that appears (see Figure 3-7), click View to cycle through the options of various size icons or text listings.
5. When you locate the file you want, double-click it to open it.
Search Folders were a new feature in Windows Vista that has carried over to Windows 7. To save the results of a search, you can click the Save Search button. In the Save As dialog box that appears, provide a filename and type, set the location to save it to, and then click Save. The search results are saved as a search folder on your computer in your username folder.
➟
30Chapter 3: Working with Files and Folders
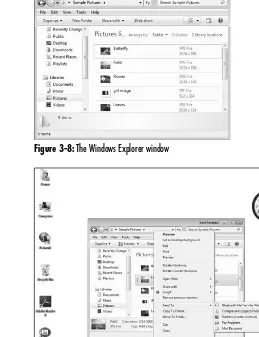
Figure 3-8: The Windows Explorer window
Figure 3-9: The Send To submenu
Move a File or Folder
1. Right-click the Start menu button and choose Open Windows Explorer.
2. In the resulting Windows Explorer window (see Figure 3-8), double-click a folder or series of folders to locate the file that you want to move.
3. Take one of the following actions:
• Click and drag the file to another folder in the Folders pane on the left side of the window. If you right-click and drag, you’re offered the options of moving, copying, or creating a shortcut to the item when you place it via a shortcut menu that appears.
• Right-click the file and choose Send To. Then choose from the options shown in the submenu that appears (as shown in Figure 3-9).
4. Click the Close button in the upper-right corner of the Windows Explorer window to close it.
If you change your mind about moving an item using the right-click-and-drag method, you can click Cancel on the shortcut menu that appears.
➟
31Create a Shortcut to a File or Folder
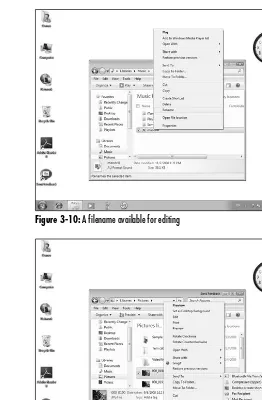
Figure 3-10: A filename available for editing
Figure 3-11: The Windows Explorer window displaying a shortcut menu
Rename a File or Folder
1. Locate the file that you want to rename by using Windows Explorer. (Right-click Start and choose Open Windows Explorer.)
2. Right-click the file and choose Rename (see Figure 3-10).
3. The filename is now available for editing. Type a new name and then click anywhere outside the filename to save the new name.
You can’t rename a file to have the same name as another file located in the same folder. To give a file the same name as another, cut it from its current location, paste it into another folder, and then follow the procedure in this task. Or, open the file and save it to a new location with the same name, which creates a copy. Be careful, though: Two files with the same name can cause confusion when you search for files. If at all possible, use unique filenames.
Create a Shortcut to a File or Folder
1. Locate the file or folder by using Windows Explorer. (Right-click Start and choose Open Windows Explorer.)
2. In the resulting Windows Explorer window (see Figure 3-11), right-click the file or folder that you want to create a shortcut for and then choose Send To➪Desktop (Create Shortcut).
3. A shortcut named Shortcut to File or Folder Name
appears above the original item. Click the shortcut and drag it to the desktop.
➟
32Chapter 3: Working with Files and Folders
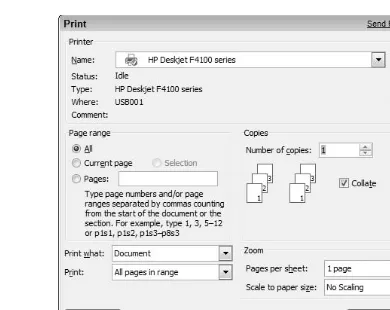
Figure 3-12: The Print dialog box
Here’s another method for printing: Locate the file by using Windows Explorer (right-click Start and choose Open Windows Explorer). Right-click the file and choose Print from the shortcut menu that appears. The file prints with your default printer settings.
Different applications might offer different options in the Print dialog box. For example, PowerPoint offers several options for what to print, including slides, handouts, or the presentation outline, and Outlook allows you to print e-mails in table or in memo style.
Print a File
1. Open the file in the application that it was created in.
2. Choose File➪Print (note that with more recent versions of Office programs, you click the Office button and then choose Print).
3. In the resulting Print dialog box (see Figure 3-12), select what to print; these options might vary but generally include the following
• All prints all pages in the document.
• Current Page prints whatever page your cursor is active in at the moment.
• Pages prints a page range or series of pages you enter in that field. For example, enter 3-11 to print pages 3 through 11; or enter 3, 7, 9-11 to print pages 3, 7, and 9 through 11.
• Selection prints any text or objects that you’ve selected within the file when you choose the Print command.
4. In the Number of Copies field, click the up or down arrow to set the number of copies to make; if you want multiple copies collated, select the Collate check box.
➟
33Delete a File or Folder
Figure 3-13: The Windows Explorer window displaying a shortcut menu
Figure 3-14: The Delete File confirmation dialog box
Delete a File or Folder
1. Locate the file or folder by using Windows Explorer. (Right-click Start and choose Open Windows Explorer.)
2. In the resulting Windows Explorer window, right-click the file or folder that you want to delete (see Figure 3-13) and then choose Delete.
3. In the resulting dialog box (see Figure 3-14), click Yes to delete the file.
When you delete a file or folder in Windows, it’s not really gone. It’s removed to the Recycle Bin. Windows periodically purges older files from this folder, but you might still be able to retrieve recently deleted files and folders from it. To try to restore a deleted file or folder, double-click the Recycle Bin icon on the desktop. Right-click the file or folder and choose Restore. Windows restores the file to wherever it was when you deleted it.
➟
34Chapter 3: Working with Files and Folders
Figure 3-15: A series of selected files and folders
Figure 3-16: The Send To submenu
Create a Compressed File or Folder
1. Locate the files or folders that you want to compress by using Windows Explorer. (Right-click Start and choose Open Windows Explorer.)
2. In the resulting Windows Explorer window, you can do the following (as shown in Figure 3-15):
• Select a series of files or folders: Click a file or folder, press and hold Shift to select a series of items listed consecutively in the folder, and click the final item.
• Select nonconsecutive items: Press the Ctrl key and click the items.
3. Right-click the selected items. In the resulting shortcut menu (see Figure 3-16), choose Send To➪Compressed (Zipped) Folder. A new compressed folder appears below the last selected file in the Windows Explorer list. The folder icon is named after the last file you selected in the series.
➟
35Add a File to Your Favorites List
Figure 3-17: The Favorites folders in Windows Explorer
Figure 3-18: The Favorites submenu on the Windows Start menu
Add a File to Your Favorites List
1. Locate the files or folders that you want to make Favorites by using Windows Explorer. (Right-click Start and choose Open Windows Explorer.)
2. In the resulting Windows Explorer window, click a file or folder and drag it to any of the Favorites folders in the Folders pane on the left (see Figure 3-17).
3. To see a list of your Favorites, choose Start➪Favorites.
4. In the resulting submenu (see Figure 3-18), click an item to open it.
➟
36#
➟
Chapter
Using Built-In
Windows Applications
W
indows 7 isn’t just a traffic cop for your computer’s hardware andother software programs; it has its own set of neat tools that you can use to get things done. What sorts of things? Well, by using various Windows Accessories (that is, built-in software programs), you can do everything from writing down great thoughts to working with beautiful pictures. Here’s what the Windows built-in applications help you do:
➟
Work with words. WordPad provides a virtual pad for jotting down ideas, making notes, creating small documents, or entering programming code. WordPad isn’t as robust as some mainstream word processors, but it’s just write (pun intended) for simple documents with a few formatting bells and whistles.➟
Play with images. Windows makes you an artist because you can view and edit graphics files in Paint and view digital images (you know, the photos you took at little Ricky’s birthday party?) in the Windows Photo Viewer. The new Snipping Tool is a way to grab little clippings of either words or images, annotate them, and then add them to a variety of documents.➟
Manage numbers and make notes. Windows Calculator is an electronic version of that little plastic calculator you carry around; it’s a great place to work with figures on the fly. Windows Sticky Notes are like virtual Post-It Notes. You can type a note and stick it on your desktop so you won’t forget that appointment or to-do item.4
Get ready to . . .
➟
Create a Formatted Documentin WordPad ... 38
➟
Edit a Picture in Paint ... 39➟
View a Digital Image in the Windows Photo Viewer ... 40➟
Clip with the Windows Snipping Tool ... 42➟
Add Sticky Notes ... 43➟
Track Numbers with Windows Calculator .... 44➟
38Chapter 4: Using Built-In Windows Applications
Figure 4-1: The Windows WordPad window
Figure 4-2: The WordPad Font tools
E-mailing a copy of your WordPad document is simplicity itself. Just click the WordPad button (located near the top-left corner and shaped like a little document with lines on it) and click Send E-mail. An e-mail form appears from your default e-mail program with the file already attached. Just enter a recipient and a message and click Send. It’s on its way!
Create a Formatted Document
in WordPad
1. Choose Start➪All Programs➪Accessories➪WordPad to open the WordPad window, as shown in Figure 4-1.
2. Enter text in the blank document. (Note: Press Enter to create blank lines between paragraphs.)
3. Click and drag to select the text; then click the Home tab to display font settings (if it’s not already displayed).
4. With the font settings shown in Figure 4-2, adjust the settings for Font, Font Style, or Size. You can apply sub-script or supersub-script effects by selecting those buttons. You can also modify the font color and change the font background color.
5. Click various other tools, such as the alignment buttons or the Bullets button on the Ribbon, to format selected text.
6. Click the Picture button in the Insert area of the Home tab on the Ribbon to insert a picture.
7. In the Select Picture dialog box that appears, click an image in your Picture folder (or search for an image stored elsewhere on your computer using the folder pane on the left) and then click Open. Modify the inserted object however you want (moving it or resizing it, for example).
➟
39Edit a Picture in Paint
Figure 4-3: The Open dialog box
Figure 4-4: A picture opened in Paint
Not happy with the colors that Paint shows you on its color palette? Do you want to use a particular shade of fire engine red for the hair on your drawing of a pop star? To change the colors available to you on the color palette, click the Edit Colors button. Click various colors to add to the palette and then click the Add to Custom Colors button and click OK to save the modified palette.
Edit a Picture in Paint
1. Choose Start➪All Programs➪Accessories➪Paint.
2. In the resulting Paint window, click the Paint button (near the top-left corner with a picture of a little docu-ment on it) and choose Open. Locate a picture file that you want to edit (see Figure 4-3), select it, and click Open. You see a pretty picture of my cats in the Paint window in Figure 4-4.
3. Now you can edit the picture in any number of ways:
• Edit colors. Choose a color from the color palette on the Home tab of the Paint window and use various tools (such as Brushes, Fill with Color, and the Pick Color dropper) to apply color to the image or selected drawn objects, such as rectangles.
• Select areas. Click the Select button and then choose a selection shape, either Rectangular or Free-Form. Click and drag on the image to select portions of the picture. You can then crop to only the selected ele-ments by clicking the crop tool.
• Add text. Click the Text button, and then click and drag the image to create a text box in which you can enter and format text.
• Draw objects. Click the Shapes button and choose shapes, such as Rectangle, Rounded Rectangle, Polygon, or Ellipse, and then click and drag on the image to draw that shape.
• Modify the image. Use the buttons on the Image sec-tion of the Ribbon to stretch out, flip around, or change the size of the image.
4. Click the Save button to save your masterpiece, or click the Paint button and choose Print to print it, or File➪
➟
40Chapter 4: Using Built-In Windows Applications
Figure 4-5: The Windows Photo Viewer
Figure 4-6: The tools you can use to manipulate images
Did you upload a photo from your camera but you don’t remember what you called it? If you want to find a photo you imported to the Pictures Library from a camera or scanner in the recent past, click the Recently Imported folder in the picture list on the left.
View a Digital Image in the
Windows Photo Viewer
1. Right-click the Start button and choose Open Windows Explorer.
2. In the resulting window, double-click the Pictures Library icon. Double-click any photo in the Pictures Library folder. In the Windows Photo Viewer window, as shown in Figure 4-5, you can use the tools at the bot-tom (see Figure 4-6) to do any of the following:
• The Next and Previous icons move to a previous or following image in the same folder.
• The Display Size icon in the shape of a magnifying glass displays a slider you can click and drag to change the size of the image thumbnails.
• The Delete button deletes the selected image.
• The Rotate Clockwise and Rotate Counterclockwise icons spin the image 90 degrees at a time.
➟
41View a Digital Image in the Windows Photo Viewer
Figure 4-7: Use these buttons and drop-down lists to work with your photos in a variety of ways
Figure 4-8: Close the Windows Photo Viewer
3. Use any of the buttons at the top of the window (see Figure 4-7) to do the following:
• File displays commands for working with the file, such as Delete and Rename.
• Print is the button to click to print the selected image.
• E-mail opens a dialog box to specify the image to be attached to an e-mail using your default mail program.
• Burn allows you to create a DVD, movie, or data disc using the image.
• Open allows you to open the image in another pro-gram, such as Paint, which you can use to edit the image.
4. When you finish viewing and working with images, click the Close button in the top right-hand corner to close the Photo Viewer (see Figure 4-8).
➟
42Chapter 4: Using Built-In Windows Applications
Figure 4-9: The Snipping Tool window
Figure 4-10: The mark-up window with a captured snip
Clip with the Windows Snipping Tool
1. Choose Start➪All Programs➪Accessories➪Snipping Tool.
2. In the Snipping Tool window that appears (see Figure 4-9), click the down-arrow on the New button and choose a snip mode from the drop-down list:
• Free Form Snip lets you draw any old kind of line you like, such as a triangle, to define what you want to snip.
• Rectangular Snip does what it says: When you click and drag over a region, it forms a rectangular snip.
• Windows Snip allows you to select an active window to snip.
• Full-Screen Snip takes the entire enchilada, capturing the whole screen in the wink of an eye.
3. If you chose Free Form or Rectangular in Step 2, click and drag on the desktop or in a document to form an area to snip. If you chose Windows, click the window you want to snip. If you chose Full-Screen, the snip hap-pens automatically.
4. In the mark-up window that appears (see Figure 4-10), use the Pen, Highlighter, and Eraser tools to mark up or modify the image.
➟
43Add Sticky Notes
Figure 4-11: A Sticky Note
Add Sticky Notes
1. Choose Start➪All Programs➪Accessories➪Sticky Notes.
2. In the Sticky Note that appears (see Figure 4-11), type a note or cut/copy and paste text into the note from another document. To add another note, click the New Note button (it has a plus sign on it).
3. With a Sticky Note on your desktop, you can click the title bar across the top of a note and drag it wherever you wish.
4. To delete a Sticky Note, click the Delete Note button (which sports an X) and choose Yes from the Delete Note dialog box that appears.
➟
44Chapter 4: Using Built-In Windows Applications
Figure 4-12: The Calculator window
Track Numbers with Windows
Calculator
1. Choose Start➪All Programs➪Accessories➪Calculator.
2. In the Calculator window, as shown in Figure 4-12, click numbers and use the calculation symbols to per-form a calculation. For example, click the 5, 8, and 9 buttons to enter 589; click the + button and then click the 9 button; click the = button to get the result of add-ing 589 to 9. (Note: Use the / symbol to divide, and the asterisk symbol to multiply.)
3. If you enter the wrong number, click the CE button to clear that entry. If you want to clear a calculation and begin a new one, click the C button.
4. Click the Mode menu to choose different types of calcu-lators, such as scientific or statistics.
5. Click the Close button to close the Calculator.
If you want to view a history of your calculations, much like an adding machine tape, choose Edit➪History.
#
➟
Chapter
Using the Windows
Gadget Gallery
and Gadgets
W
indows 7 has a Windows Gadget Gallery desktop feature. The Gallery contains tools, or gadgets, displayed as icons on the desktop. With gadgets, you can quickly access various handy features to check the weather, organize your calendar, feed online data directly to your desktop, and more. Here are some of the things you can do with the Windows gadgets that I cover in this chapter:➟
Work with images. The Slide Show gadget is a continuous slide show of the photos in your Pictures folder.➟
Organize your time. The Calendar gadget displayed on your desktop helps you keep track of the days, weeks, and months. The Clock gad-get displays the time with an old-style wall clock and allows you to make changes to your time zone.➟
Play with puzzles. A neat little Picture Puzzle gadget allows you to play a game that’s so tiny, even your boss won’t notice you’re not actually working.➟
Work with online data. The Feed Headlines gadget allows you to grab data from online RSS feeds (a format used for syndication of news and other content), such as the latest news or other useful information. Stocks and Currency Conversion gadgets provide up-to-the-minute data on stocks and currency values.➟
Keep an eye on your system performance. The CPU Meter gadget provides up-to-date information about your computer processor speed and available memory.5
Get ready to . . .
➟
Open the Gadget Gallery andAdd Gadgets to the Desktop ... 46
➟
Check the Time ... 47➟
Display a Continuous Slide Show ... 48➟
Use the Windows Calendar... 49➟
Play with Puzzles ... 50➟
Convert Currency ... 51➟
Use the Feed Headlines Gadget ... 52➟
Get the Latest Stock Quotes ... 53➟
Monitor Your CPU... 54➟
46Chapter 5: Using the Windows Gadget Gallery and Gadgets
Figure 5-1: The Gadget Gallery
Figure 5-2: Gadgets displayed on the desktop
Open the Gadget Gallery and
Add Gadgets to the Desktop
1. Right-click the desktop and choose Gadgets to open the Gadget Gallery window, as shown in Figure 5-1. Note that the gadgets that are included in your gallery may vary depending on your computer manufacturer.
2. Click any gadget and drag it to the desktop (see Figure 5-2).
3. Click the Close button to close the Gadget Gallery.
Gadgets are hot, and people are creating more all the time. Click the Get More Gadgets Online link in the Gadget Gallery to scope out the latest gadgets and then download them.
➟
47Check the Time
Figure 5-3: The Clock gadget settings dialog box
If you’re on the road and want to keep track of the local time and the time back home, you can display more than one clock by simply drag-ging the Clock gadget to the desktop from the Gadget Gallery again. Make changes to the time zone settings and even use two different clock styles to tell them apart at a glance.
Check the Time
1. Right-click the desktop and choose Gadgets.
2. In the Gadget Gallery that appears, click the clock and drag it to the desktop.
3. To make changes to the clock style or change the time zone, place your mouse over the clock and click the Settings button (it sports a little wrench symbol).
4. In the resulting Clock window (see Figure 5-3), click the Next or Previous buttons to move through the various available clock styles.
5. If you wish, you can enter a name for the clock in the Clock Name field. To change the time zone, click the arrow in the Time Zone field and choose your local time.
6. Click OK to save the clock settings.
➟
48Chapter 5: Using the Windows Gadget Gallery and Gadgets
Figure 5-4: The Slide Show toolbar
Figure 5-5: The Slide Show dialog box
Display a Continuous Slide Show
1. Add the Slide Show gadget to the desktop (see the ear-lier task, “Open the Gadget Gallery and Add Gadgets to the Desktop”).
2. Move your mouse over the Slide Show gadget and use the tools along the bottom of the slide show (see Figure 5-4) to do the following:
• Click the View button to display the current slide in the Windows Photo Viewer.
• Click Pause to stop the slide show at the current slide.
• Click Previous to go to the previous slide. • Click Next to go to the next slide.
3. Click the Settings button, which looks like a little wrench. In the resulting Slide Show dialog box (see Figure 5-5), select the picture folders to include in the slide show, or modify the number of seconds to display each slide or a transition effect to use between slides.
4. Click OK to close the dialog box.
➟
49Use the Windows Calendar
Figure 5-6: The Calendar gadget
Figure 5-7: The Calendar gadget larger view
Use the Windows Calendar
1. Add the Calendar gadget (see Figure 5-6) to the desktop. (See the earlier task, “Open the Gadget Gallery and Add Gadgets to the Desktop.”)
2. Move your mouse over the calendar and click the Size tool shown in Figure 5-7 to move between the large size, which displays both the monthly and daily sec-tions (as shown in Figure 5-7), and the smaller size, which displays only the daily display by default.
3. With the larger calendar displayed, click the Next or Previous arrows to move to another month; double-click a date to display it in the lower part of the calen-dar; and click the red tab in the lower-left corner to return to today’s date in the lower area.
If you prefer to use the smaller size calendar but want it to display the monthly rather than daily calendar, just double-click the small display, and it toggles between month and day.
➟
50Chapter 5: Using the Windows Gadget Gallery and Gadgets
Figure 5-8: The Picture Puzzle gadget
Figure 5-9: The Picture Puzzle dialog box
Play with Puzzles
1. Add the Picture Puzzle gadget to the desktop. (See the earlier task, “Open the Gadget Gallery and Add Gadgets to the Desktop.”)
2. Click one of the tools along the top of the puzzle (see Figure 5-8) to do the following:
• Pause Timer stops the automatic count of seconds of play.
• Show Picture displays the completed picture; release it and you go back to where you were in the game.
• Solve ends the game and displays the completed picture.
3. To play the game, click any piece adjacent to a blank square. The piece moves into the blank space. Keep clicking and moving pieces until you get the picture pieces arranged to form a picture.
4. Click the Settings button to the right of the puzzle to display its settings in the Picture Puzzle dialog box (see Figure 5-9).
5. Click the Previous or Next button to scroll through available pictures for the puzzle.
➟
51Convert Currency
Figure 5-10: The Currency Conversion gadget connected to the Internet
Figure 5-11: Pick which currency you’re converting
Convert Currency
1. Add the Currency Conversion gadget to the desktop. (See the earlier task, “Open the Gadget Gallery and Add Gadgets to the Desktop.”)
2. Connect to the Internet to access the latest currency rates (as shown in Figure 5-10) and do any of the following.
• Enter the number of dollars; the number of equiva-lent euros is displayed.
• Click one of the currency names, and a list of available currencies appears (see Figure 5-11). Click another currency to change which currencies to convert from and to.
To view the online source for the latest currency conversion rates, click the Data Providers link. The MoneyCentral page on MSN opens. Click the Banking tab and then click the Currency Exchange Rates link to view current rates.