Flash CS6
Flash CS6: The Missing Manual
by Chris GroverCopyright © 2012 Chris Grover. All rights reserved. Printed in the United States of America.
Published by O’Reilly Media, Inc.,
1005 Gravenstein Highway North, Sebastopol, CA 95472.
O’Reilly books may be purchased for educational, business, or sales promotional use. Online editions are also available for most titles (http://my.safaribooksonline.com). For more information, contact our corporate/institutional sales department: (800) 998-9938 or [email protected].
June 2012: First Edition.
Revision History for the 1st Edition: 2012-06-11 First release
See http://oreilly.com/catalog/errata.csp?isbn=0636920022787 for release details.
The Missing Manual is a registered trademark of O’Reilly Media, Inc. Flash CS6: The Missing Manual, the Missing Manual logo, and “The book that should have been in the box” are trademarks of O’Reilly Media, Inc. Many of the designations used by manufacturers and sellers to distinguish their products are claimed as trademarks. Where those designations appear in this book, and O’Reilly Media is aware of a trademark claim, the designations are capitalized.
While every precaution has been taken in the preparation of this book, the publisher assumes no responsibility for errors or omissions, or for damages resulting from the use of the information contained in it.
Contents
The Missing Credits
. . .ix
Introduction
. . .1
Part One:
Creating a Flash Animation
CHAPTER 1:Getting Around Flash
. . . .15
Starting Flash . . . 15
A Tour of the Flash Workspace . . . .20
Panels and Toolbars . . . 25
The Flash CS6 Test Drive. . . 35
CHAPTER 2:
Creating Simple Drawings
. . .43
Plan Before You Draw . . . .43
Preparing to Draw . . . 47
Drawing a Shape . . . 53
Choosing a Drawing Mode . . . 55
Creating Original Artwork . . . .65
Copying and Pasting Drawn Objects . . . 82
Adding Color . . . .84
CHAPTER 3:
Animate Your Art
. . .91
Frame-by-Frame Animation . . . 91
Editing Your Frame-by-Frame Animation . . . .99
Making It Move with Motion Tweens . . . 103
Editing the Motion Path . . . 110
Copying and Pasting Properties . . . .115
Shape Tweening (Morphing) . . . .117
Part Two:
Advanced Drawing and Animation
CHAPTER 4:Organizing Frames and Layers
. . .127
Working with Frames . . . 127
Working with Multiple Layers . . . 135
CHAPTER 5:
Advanced Drawing and Coloring
. . .157
Selecting Graphic Elements . . . 157
Manipulating Graphic Elements . . . 170
Spray Painting Symbols . . . 195
Drawing with the Deco Tool . . . 196
Advanced Color and Fills . . . 198
CHAPTER 6:
Choosing and Formatting Text
. . .215
Text Questions . . . 216
Choosing TLF or Classic Text . . . 216
About Typefaces and Fonts . . . 219
Adding Text to Your Document . . . 220
Choosing and Using Text Containers . . . .228
Animating Text Without ActionScript . . . .233
Text Properties by Subpanel . . . .239
CHAPTER 7:
Reusable Flash: Symbols and Templates
. . .247
Symbols and Instances . . . .248
Templates . . . 280
CHAPTER 8:
Advanced Tweens with the Motion Editor
. . . .295
Applying Motion Presets . . . .295
Modifying a Motion Preset . . . .299
Editing a Tween Span. . . .307
A Tour of the Motion Editor . . . .311
Easing Tweens . . . .320
CHAPTER 9:
Realistic Animation with IK Bones
. . .325
Linking Symbols with Bones . . . .326
Perfect Posing with Control Handles . . . .339
Baby Steps with Pins . . . 341
Making Shapes Move with Bones . . . .342
Apply Spring to a Motion . . . 346
Animating an Armature with ActionScript . . . 349
CHAPTER 10:
Incorporating Non-Flash Media Files
. . .351
Importing Graphics . . . 351
Importing Illustrator Graphics Files . . . .354
Importing Photoshop Graphic Files . . . .359
Importing Fireworks Graphics . . . 361
Editing Bitmaps . . . 364
Editing Bitmaps with Photoshop . . . .366
Importing a Series of Graphics Files . . . .368
CHAPTER 11:
Incorporating Sound and Video
. . .373
Incorporating Sound . . . 374
Incorporating Video . . . 384
Importing Video Files . . . .396
Part Three:
Adding Interactivity
CHAPTER 12:Introduction to ActionScript 3.0
. . . .407
Getting to Know ActionScript 3.0 . . . 408
Beginning Your ActionScript Project . . . 413
Object-Oriented Thinking . . . 419
Using Data Types, Variables, and Constants . . . .429
Conditionals and Loops . . . .436
Combining ActionScript’s Building Blocks . . . 440
CHAPTER 13:
Controlling Actions with Events
. . . .443
How Events Work . . . 443
Mouse Events . . . 445
Getting Help for Events and Event Listeners . . . 448
Keyboard Events and Text Events . . . 471
Keeping Time with TimerEvent . . . .476
Removing Event Listeners . . . .477
In Case of Other Events . . . .478
CHAPTER 14:
Organizing Objects with the Display List
. . .481
The Display List: Everything in Its Place . . . 481
Adding Objects to the Display List . . . 483
Managing the Stacking Order . . . 500
Summary of Properties and Methods . . . .507
CHAPTER 15:
Controlling the Timeline and Animation
. . .513
Slowing Down (or Speeding Up) Animation . . . 514
Timeline Stop and Go . . . 519
Organizing Your Animation . . . .522
Looping a Series of Frames . . . .536
Reversing a Series of Frames . . . 541
CHAPTER 16:
Components for Interactivity
. . .543
Adding Components . . . 544
The Built-In Components . . . .558
CHAPTER 17:
Choosing, Using, and Animating Text
. . .581
What Font Does Your Audience Have? . . . 581
Controlling Text with ActionScript . . . .585
Creating Text Fields with ActionScript . . . 591
Formatting Characters and Paragraphs . . . .596
Formatting with HTML and CSS . . . 600
Choosing the Right Text Formatting System . . . 608
CHAPTER 18:
Drawing with ActionScript
. . . .611
What’s the Point? . . . 611
Beginning with the Graphics Class . . . 615
Drawing Lines . . . 616
Drawing Curves . . . 619
Drawing Built-In Shapes . . . .622
Drawing Irregular Shapes . . . .625
Making Drawings Move . . . .626
Removing Lines and Shapes . . . .632
Part Four:
Debugging and Delivering Your
Animation
CHAPTER 19:Testing and Debugging Your Animation
. . .637
Testing Strategies . . . .637
Testing on the Stage . . . 641
Using the Test Movie Commands . . . .642
Testing Inside a Web Page . . . 644
Testing Download Time . . . 646
The Art of Debugging . . . .652
Analyzing Code with the Debugger . . . .662
CHAPTER 20:
Publishing and Exporting
. . . .669
Optimizing Flash Documents . . . 669
Publishing Your Animations . . . .677
Exporting Flash to Other Formats . . . 699
CHAPTER 21:
Introducing Adobe AIR
. . .705
Meet Adobe AIR . . . .705
Creating Your First AIR Application . . . .707
Create a Code Signing Certificate . . . 710
Convert a Flash Animation to AIR . . . 713
Publish Your AIR Application . . . 715
CHAPTER 22:
Making iPhone Apps
. . .721
Your First “Hello iPad” App . . . .722
Joining the iOS Developer Program . . . .723
Air for iOS App Settings . . . .738
Building a Tap-Ready App . . . 745
Tips for iOS App Development . . . .749
CHAPTER 23:
Building Android Apps
. . .751
Meet AIR for Android . . . 752
Building Apps for Both iOS and Android . . . 760
Tips for Android App Development . . . .763
Part Five:
Appendixes
APPENDIx A:Installation and Help
. . .767
Flash CS6 Minimum System Requirements . . . .767
Getting Help from Flash . . . .770
Getting Help from Adobe . . . 771
More Flash Books . . . .772
Finding Flash Gurus . . . .773
APPENDIx B:
Flash Professional CS6, Menu by Menu
. . .775
File . . . .775
Edit . . . .779
View . . . .784
Insert . . . .788
Modify . . . 790
Text . . . .798
Commands . . . .799
Control . . . 800
Debug . . . 802
Window . . . 804
Help . . . 809
The Missing Credits
ABOUT THE AUTHOR
Chris Grover is a veteran of the San Francisco Bay Area advertising and design community, having worked for over 25 years in print, video, and electronic media. He has been using and writing about computers from the day he first fired up his Kaypro II. Chris is the owner of Bolinas Road Creative (www.BolinasRoad.com), an agency that helps small businesses promote their products and services. His writing has appeared in a range of media from Fine Homebuilding to Macworld.com. He’s also the author of Office 2011 for Macintosh: The Missing Manual, Adobe Edge Preview 5: The Missing Manual, and several other books in the Missing Manual series.
ABOUT THE CREATIVE TEAM
Nan Barber (editor) has been working on the Missing Manual series since its incep-tion. She lives in Massachusetts with her husband and various Apple products. Email:
Rachel Steely (production editor) is an avid lover of books in all their forms, and can typeset, illustrate, and bind a book by hand. She enjoys traveling and speaks fluent Spanish. In her spare time, she draws Celtic knotwork, reads, and plays the violin.
Julie Van Keuren (proofreader) quit her newspaper job in 2006 to move to Montana and live the freelancing dream. She and her husband, M.H. (who is living the novel-writing dream), have two sons, Dexter and Michael. Email: [email protected]. Ron Strauss (indexer) specializes in the indexing of information technology publica-tions of all kinds. Ron is also an accomplished classical violist and lives in northern California with his wife and fellow indexer, Annie, and his miniature pinscher, Kanga. Email: [email protected].
Chris Deely (tech reviewer) is a software developer living in Philadelphia with his wife, Nichole, and their son, Christopher Jr. He has been working with the Flash platform since 2004, building applications with ActionScript, Flex, and AIR. Chris currently leads a User Interface development team responsible for building enter-prise application front-ends.
ACKNOWLEDGMENTS
I’m always amazed at the number of pros it takes to create a book like Flash CS6: The Missing Manual. My thanks go out to everyone who worked on this book. Nan Barber has worked with me on several books and her skill and grace under fire is always appreciated. I’d also like to thank Rachel Steely for coordinating the produc-tion and Ron Strauss for writing the index. Rebecca Demarest managed to take my screenshots and crude charts and make them suitable for publication. A special thanks to the people who catch the errors that always try to sneak onto the pages: technical reviewers Chris Deely and Tina Spargo and proofreader Julie Van Keuren. And of course, thanks to Joyce, my wife, who helps me in everything I do.
—Chris Grover
THE MISSING MANUAL SERIES
Missing Manuals are witty, superbly written guides to computer products that don’t come with printed manuals (which is just about all of them). Each book features a handcrafted index; cross-references to specific pages (not just chapters); and RepKover, a detached-spine binding that lets the book lie perfectly flat without the assistance of weights or cinder blocks.
Recent and upcoming titles include:
• Access 2010: The Missing Manual by Matthew MacDonald • Buying a Home: The Missing Manual by Nancy Conner
• CSS: The Missing Manual, Second Edition, by David Sawyer McFarland • Creating a Website: The Missing Manual, Third Edition, by Matthew MacDonald • David Pogue’s Digital Photography: The Missing Manual by David Pogue • Dreamweaver CS5.5: The Missing Manual by David Sawyer McFarland • Dreamweaver CS6: The Missing Manual by David Sawyer McFarland • Droid x: The Missing Manual by Preston Gralla
• Droid 2: The Missing Manual by Preston Gralla • Droid x2: The Missing Manual by Preston Gralla • Excel 2010: The Missing Manual by Matthew MacDonald
• Facebook: The Missing Manual, Third Edition by E.A. Vander Veer
• FileMaker Pro 11: The Missing Manual by Susan Prosser and Stuart Gripman • Flash CS5.5: The Missing Manual by Chris Grover
• Galaxy Tab: The Missing Manual by Preston Gralla • Google+: The Missing Manual by Kevin Purdy • Google Apps: The Missing Manual by Nancy Conner • Google SketchUp: The Missing Manual by Chris Grover • HTML5: The Missing Manual by Matthew MacDonald
• iMovie ’11 & iDVD: The Missing Manual by David Pogue and Aaron Miller • iPad 2: The Missing Manual, Third Edition by J.D. Biersdorfer
• iPhone: The Missing Manual, Fifth Edition by David Pogue
• iPhone App Development: The Missing Manual by Craig Hockenberry • iPhoto ’11: The Missing Manual by David Pogue and Lesa Snider
• iPod: The Missing Manual, Tenth Edition by J.D. Biersdorfer and David Pogue • JavaScript & jQuery: The Missing Manual, Second Edition by David Sawyer
McFarland
• Kindle Fire: The Missing Manual by Peter Meyers • Living Green: The Missing Manual by Nancy Conner • Mac OS x Lion: The Missing Manual by David Pogue
• Mac OS x Mountain Lion: The Missing Manual by David Pogue • Microsoft Project 2010: The Missing Manual by Bonnie Biafore • Motorola xoom: The Missing Manual by Preston Gralla • Netbooks: The Missing Manual by J.D. Biersdorfer • NOOK Tablet: The Missing Manual by Preston Gralla
• Office 2010: The Missing Manual by Nancy Connor, Chris Grover, and Matthew MacDonald
• Office 2011 for Macintosh: The Missing Manual by Chris Grover • Palm Pre: The Missing Manual by Ed Baig
• Personal Investing: The Missing Manual by Bonnie Biafore • Photoshop CS5: The Missing Manual by Lesa Snider • Photoshop CS6: The Missing Manual by Lesa Snider
• Photoshop Elements 10: The Missing Manual by Barbara Brundage • PHP & MySQL: The Missing Manual by Brett McLaughlin
• Premiere Elements 8: The Missing Manual by Chris Grover • QuickBase: The Missing Manual by Nancy Conner • QuickBooks 2012: The Missing Manual by Bonnie Biafore • QuickBooks 2013: The Missing Manual by Bonnie Biafore • Quicken 2009: The Missing Manual by Bonnie Biafore
• Switching to the Mac: The Missing Manual, Lion Edition by David Pogue
• Switching to the Mac: The Missing Manual, Mountain Lion Edition by David Pogue • Wikipedia: The Missing Manual by John Broughton
• Windows xP Home Edition: The Missing Manual, Second Edition, by David Pogue • Windows xP Pro: The Missing Manual, Second Edition, by David Pogue, Craig
Zacker, and Linda Zacker
• Windows Vista: The Missing Manual by David Pogue • Windows 7: The Missing Manual by David Pogue • Word 2007: The Missing Manual by Chris Grover • Your Body: The Missing Manual by Matthew MacDonald • Your Brain: The Missing Manual by Matthew MacDonald • Your Money: The Missing Manual by J.D. Roth
F
lash’s evolution is unique, even for the fast-changing computer software world. First released in 1996 under the name FutureSplash, it was a tool for creating web-based animations. It’s still the go-to application for that job; however, along the way it’s acquired new capabilities. Today, Flash powers video websites like YouTube and Hulu (Figure I-1). It’s used to develop desktop applications like eBay Desktop. As you read this, Flash/ActionScript pros are developing the next generation of apps for handheld devices like the Droid RAZR and the iPhone. Flash has grown up with the World Wide Web and managed to carve out an important niche. In fact, there are a whole slew of programs that make use of Flash technol-ogy. They include Flex, Flash Builder, and Flash Catalyst. Still, if you want to learn Flash’s design and animation features as well as its programming and development features, then Flash Professional CS6 is the place to start.Here are just some of the things you can do with Flash:
• Animate. You can create original artwork using Flash’s tools, or you can add images from your other favorite programs. Flash recognizes the most common image, video, and sound file formats. Once your artwork is in Flash, you can add motion, sound, and dazzling effects. Surely you’ve spent some quality time watching JibJab cartoons (Figure I-2).
• Multimedia websites. Today’s websites include motion, video, background music, and above all, interactive objects. Flash’s built-in programming language, ActionScript, was designed to create interactive objects. You can create eye-catching, attention-grabbing websites with Flash. It’s your choice whether you sprinkle Flash bits on various pages or go whole-hog and develop a 100 percent Flash site.
IN FLASH PROFESSIONAL
CS6 • Tutorials.text, drawings, animations, video clips, and voice-overs, are a natural fit for Web-based training courses, which often include a combination of
Flash. By hooking Flash up to a server on the back end, you can even present your audience with graded tests and up-to-the-minute product information. You don’t have to deliver your tutorials over the web, though; you can publish them as standalone projector files (Chapter 20) or AIR applications (Chapter 21) and deliver them to your students via CDs, DVDs, or mobile apps.
FIGURE I-1 Sites like Hulu and YouTube have made great use of Flash’s video abilities. You can check any site to see whether it’s using Flash behind the scenes. Just right-click (or Control-click) an image that you think might be Flash. If it says “About Flash Player” at the bot-tom of the pop-up menu, you guessed right.
• Presentations. PowerPoint presentations are fine…up to a point. With Flash, you can create self-running presentations that are more creative and have a higher degree of interactivity.
• Customer service kiosks. Many of the kiosks you see in stores and building lobbies use Flash to help customers find what they need. For example, photo kiosks walk customers through the process of transferring images from their digital cameras and ordering prints; kiosks in banks let customers withdraw funds, check interest rates, and make deposits.
IN FLASH PROFESSIONAL
CS6 shows to present powerful trailers, interactive tours of movie and show sets,
and teasers.
• Games and other programs. With support for runtime scripting, back-end data transfers, and interactive controls like buttons and text boxes, Flash has every-thing a programmer needs to create entertaining, professional-looking games.
• Mobile apps. With Flash CS6, the biggest change is the ease with which you can develop apps for mobile devices, from iPads to Androids.
FIGURE I-2 With a little creativity, your Flash animations can capture the public’s attention. Just ask the folks at JibJab.
What’s New in Flash Professional CS6
Flash has been evolving and adding features at a breakneck pace since Adobe acquired Macromedia at the end of 2005. There are many benefits to being part of Adobe’s Creative Suite, primarily the smooth interaction with applications such as Photoshop, Illustrator, and Dreamweaver. If you’ve used other Adobe programs, you’ll also welcome the consistency in drawing, text, and color-choosing tools. By the same token, if you’re new to the Adobe family, the skills you learn in Flash will come in handy if you move on to other Adobe products.
IN FLASH PROFESSIONAL
CS6 with Motion Editor. New 3-D capabilities opened up the world of motion, and IK Bones (inverse kinematics) made it easy for animators to link objects for realistic movement. Flash CS5 added a new text engine called Text Layout Framework (TLF), which provides the kind of text control that you’d find in Adobe Illustrator or InDesign, and Adobe simplified the mysterious process of font embedding. IK bones were enhanced with a new Spring property. ActionScript coding was made easier with code snippets—cut and paste bits of code that are easy to drop into your document. Code hinting provides an instant reference and tips on what to do next. Flash CS5 also made it easier to build Adobe AIR projects that run as standalone programs on Windows, Mac, and Linux computers. An interim release, Flash CS5.5 added the ability to develop apps for iOS (iPhones and iPads) and Android devices.
Of course, all those features are covered in this book, along with the latest batch of enhancements. Flash CS6 comes quickly on the heels of the incremental release CS5.5 and refines many of the features added then. The development of mobile apps heads the list:
• App development for multiple devices. It’s easier than ever to develop an application that works on desktops (Windows, Mac, and Linux) and mobile devices like smartphones and tablets. Flash enhancements make it easier to share files and scale projects for a variety of screen sizes.
• Built-in iPhone and iPad App Packager. The much-publicized squabble be-tween Apple and Adobe is at least partially resolved. Using Flash, you can build apps for all of Apple’s iDevices.
• Built-in Android app packager. Use your Flash skills to build apps for Android smartphones and tablets. Test your apps immediately on devices connected by USB cables.
• The Simulator is a new tool used when you’re debugging mobile apps. It gives you the ability to test mobile features, such as touchscreen gestures, on your desktop computer.
• Bundle AIR runtime with apps. If you’re publishing apps, now you can include the AIR runtime with your apps, saving your audience the extra step of down-loading the runtime.
• Templates and code snippets for mobile devices. Adobe has added to the library of templates and code snippets, making it easier to develop apps for iPhones, iPads, and Android mobile devices. You’ll find snippets that show how to interact with touchscreen gestures such as swipes and pinches. Templates show how to use built-in accelerometers and geo-location features.
• Pin IK bones.Pinning locks IK bones to a specific position on the stage, making it much easier to create poses and control your models.
ABCS • Symbol rasterization. The cache as bitmap feature converts vector art to
bitmaps, increasing mobile device performance, CPU efficiency, and improving battery life.
• Auto-save and file recovery. Like your favorite word processor, Flash now has a feature that automatically saves your documents. Should disaster strike, you’re less likely to lose your work.
• Incremental compilation. Flash is smarter when compiling (publishing) your document for testing. As a result, there’s a shorter wait when you repeatedly make changes and test your work.
• Conversion to HTML and JavaScript. Some web animation features that were almost exclusively the domain of Flash are now possible with HTML (hypertext markup language), JavaScript, and jQuery. Flash CS6 has the ability to export part or all of an animation for use in HTML or JavaScript projects.
Animation ABCs
Animators used to draw each and every frame by hand. Sure, they developed some shortcuts, but that’s still hundreds or thousands of images depending on the length of the animation. Major animation houses employed whole armies of graphic art-ists, each charged with producing hundreds of drawings that represented a mere fraction of the finished work. What we chuckled at for a scant few minutes took weeks and dozens of tired, cramped hands to produce. One mistake, one spilled drop of coffee, and these patient-as-Job types would have to grab fresh paper and start all over again. When everything was done, the animation would have to be put together—much like one of those flip books where you flip pages real fast to see a story play out—while it was being filmed by special cameras.
With Flash on your computer, you have the equivalent of a design studio at your fingertips. You provide the inspiration, and Flash can help you generate pro-quality animations and full-blown interactive applications.
An Animation by Any Other Name
You may occasionally hear Flash animations referred to (by books, websites, and even Flash’s own documentation) as
movies. Perhaps that’s technically accurate, but it sure can be confusing.
QuickTime’s .mov files are also called movies, and some people refer to video clips as movies; but to Flash, these are two very different animals. In addition, Flash lets you create and work with movie clips, which are something else entirely. And movie,
with its connotations of quietly sitting in a theater balcony eating popcorn, doesn’t convey one of the most important features Flash offers: interactivity.
Here’s the most accurate way to describe what you create using Flash: a website, program, or app with a really cool, animated interface. Unfortunately, that description is a bit long and unwieldy, so in this book, what you create using Flash is called an animation or an app.
NUTSHELL It’s pretty incredible, when you think about it. A few hundred bucks and a few hours spent working with Flash, and you’ve got an animation that, just a few years ago, you’d have had to pay a swarm of professionals union scale to produce. Sweet! Naturally, if you’re new to animation, it will go easier if you learn the basic terms, tricks, and techniques used by Flash animators.
Flash in a Nutshell
Say you work for a company that does custom auto refinishing. First assignment: Design an intro page for the company’s new website. You have the following idea for an animation:
The first thing you want your audience to see is a beat-up jalopy limping along a city street toward the center of the screen, where it stops and morphs into a shiny, like-new car as your company’s jingle plays in the background. A voice-over informs your audience that your company has been in business for 20 years and offers the best prices in town.
Across the top of the screen, you’d like to display the company logo, as well as a navigation bar with buttons—labeled Location, Services, Prices, and Contact—that your audience can click to get more information about your company. But you also want each part of the car to be a clickable hotspot. That way, when someone clicks one of the car’s tires, he’s whisked off to a page describing custom wheels and hubcaps; when he clicks the car’s body, he sees prices for dent repair and repaint-ing; and so on.
Here’s how you might go about creating this animation in Flash:
• Using Flash’s drawing tools, you draw the artwork for every keyframe of the animation—that is, every important image. For example, you’ll need to create a keyframe showing the beat-up junker and a second keyframe showing the gleaming, expertly refurbished result. (Chapter 2 shows you how to draw artwork in Flash; Chapter 3 tells you everything you need to know about keyframes.)
• Within each keyframe, you might choose to separate your artwork into different
layers. Like the see-through plastic cels that professional animators used in the old days, layers let you create images separately and then stack them on top of one another to make a single composite image. For example, you might choose to put the car on one layer, your company logo on a second layer, and your city-street background on a third layer. That way, you can edit and animate each layer independently, but when the animation plays, all three elements appear to be on one seamless layer. (Chapter 4 shows you how to work with layers.)
• Through a process called tweening, you tell Flash to fill in each and every frame
BASICS or—if Flash gets it all wrong—redraw yourself. (Chapter 3 introduces tweens,
and Chapter 8 gives you the lowdown on advanced techniques.)
• As you go along, you might decide to save a few of the elements you create (for example, your company logo) so you can reuse them later. There’s no sense in reinventing the wheel, and in addition to saving you time, reusing elements actually helps keep your animation files as small and efficient as possible. (See Chapter 7 for details on creating and managing reusable elements.)
• Add the background music and voice-over audio clips, which you’ve created in other programs (Chapter 11).
• Create the navigation bar buttons, hotspots, and other ways for your audience to interact with your animation (Chapters 12–18).
• Test your animation (Chapter 19) and tweak it to perfection.
• Finally, when your animation is just the way you want it, you’re ready to publish
it. Without leaving the comfort of Flash, you can convert the editable .fla file you’ve been working with into a noneditable .swf file and either embed it into an HTML file or create a standalone projector file that your audience can run without having to use a browser. Chapter 20 tells you everything you need to know about publishing.
The scenario described above is pretty simple, but it covers the basic steps you need to take when creating any Flash animation.
The Very Basics
You’ll find very little jargon or nerd terminology in this book. You will, however, en-counter a few terms and concepts that you’ll use frequently in your computing life:
• Clicking. This book gives you three kinds of instructions that require you to use your computer’s mouse or trackpad. To click means to point the arrow cur-sor at something on the screen and then—without moving the curcur-sor at all—to press and release the left clicker button on the mouse (or laptop trackpad). To
double-click, of course, means to click twice in rapid succession, again without moving the cursor at all. And to drag means to move the cursor while pressing the left button continuously.
• Keyboard shortcuts. Every time you take your hand off the keyboard to move the mouse, you lose time and potentially disrupt your creative flow. That’s why many experienced computer fans use keystroke combinations instead of menu commands wherever possible. Ctrl+B (⌘-B), for example, is a keyboard shortcut for boldface type in Flash (and most other programs).
BOOK • Choice is good.command—by choosing a menu command, Flash frequently gives you several ways to trigger a particular or by clicking a toolbar button, or by pressing a key combination, for example. Some people prefer the speed of keyboard shortcuts; others like the satisfaction of a visual command array avail-able in menus or toolbars. This book lists all the alternatives, but by no means are you expected to memorize all of them.
About This Book
Despite the many improvements in software over the years, one feature has grown consistently worse: documentation. With the purchase of most software programs these days, you don’t get a single page of printed instructions. To learn about the hundreds of features in a program, you’re expected to use online electronic help.
But even if you’re comfortable reading a help screen in one window as you try to work in another, something is still missing. At times, the terse electronic help screens assume you already understand the discussion at hand and hurriedly skip over important topics that require an in-depth presentation. In addition, you don’t always get an objective evaluation of the program’s features. (Engineers often add technically sophisticated features to a program because they can, not because you need them.) You shouldn’t have to waste your time learning features that don’t help you get your work done.
The purpose of this book, then, is to serve as the manual that should have been in the box. In this book’s pages, you’ll find step-by-step instructions for using every Flash feature, including those you may not have quite understood, let alone mastered, such as working with video or drawing objects with ActionScript. In addition, you’ll find clear evaluations of each feature that help you determine which ones are useful to you, as well as how and when to use them.
NOTE This book periodically recommends other books, covering topics that might interest Flash designers
and developers. Careful readers may notice that not every one of these titles is published by Missing Manual parent company O’Reilly Media. While we’re happy to mention other Missing Manuals and books in the O’Reilly family, if there’s a great book out there that doesn’t happen to be published by O’Reilly, we’ll still let you know about it.
BOOK tricks, and shortcuts for the experienced Flash fan. The Design Time boxes explain
the art of effective multimedia design.
The ActionScript programming language is a broad, complex subject. This book isn’t an exhaustive reference manual, but it gives you a great introduction to ActionScript programming, providing working examples and clear explanations of ActionScript principles.
Macintosh and Windows
Flash Professional CS6 works almost precisely the same in its Macintosh and Windows versions. You’ll find the same buttons in almost every dialog box. Occasionally, they’ll be dressed up differently. In this book, the illustrations have been given even-handed treatment, rotating between Windows 7 and Mac OS x.
Shortcut keys are probably the area where the Mac and Windows versions differ the most. Often where Windows uses the Ctrl key, Macs use the ⌘ key. You’ll find some other relatively minor differences, too.
Whenever this book refers to a key combination, you’ll see the Windows keystroke listed first (with + symbols, as is customary in Windows documentation); the Macintosh keystroke follows in parentheses (with - symbols, in time-honored Mac fashion). In other words, you might read, “The keyboard shortcut for saving a file is Ctrl+S (⌘-S).”
About the Outline
Flash CS6: The Missing Manual is divided into five parts, each containing several chapters:
• Part 1, Creating a Flash Animation guides you through the creation of your very first Flash animation, from the first glimmer of an idea to drawing images, animating those images, and testing your work.
• Part 2, Advanced Drawing and Animation is the designer’s feast. Here you’ll see how to manipulate your drawings by rotating, skewing, stacking, and align-ing them; how to add color, special effects, and multimedia files like audio and video clips; how to slash file size by turning bits and pieces of your drawings into special elements called symbols; and how to create composite drawings using layers. Text is an increasingly important part of Flash animations and applications, so this section introduces important text topics. In Part 3, you’ll learn how ActionScript works with text. In this section, you’ll learn about the Motion Editor and how to use the IK Bones feature (Chapter 9).
ONLINE
RESOURCES copy and modify some of the practical examples for your own projects. You’ll see how to loop frames and how to let your audience choose which section of an animation to play, and how to customize the prebuilt interactive components that come with Flash. You’ll find specific chapters on using ActionScript with text and using ActionScript to draw.
• Part 4, Debugging and Delivering Your Animation focuses on testing, de-bugging, and optimizing your animation. You’ll also find out how to publish your animation so that your audience can see and enjoy it, and how to export an editable version of your animation so that you can rework it using another graphics, video editing, or web development program. The last three chapters focus on Adobe AIR, a system for creating standalone apps using Flash. You’ll learn how to deliver these apps to Windows, Mac, and Linux desktops, as well as iPhones, iPads, and Android mobile devices.
• Part 5 has two Appendixes: Appendix A: Installation and Help, explains how to install Flash and where to turn for help. Appendix B: Flash Professional CS6, Menu by Menu, provides a menu-by-menu description of the commands you’ll find in Flash CS6.
About
→
These
→
Arrows
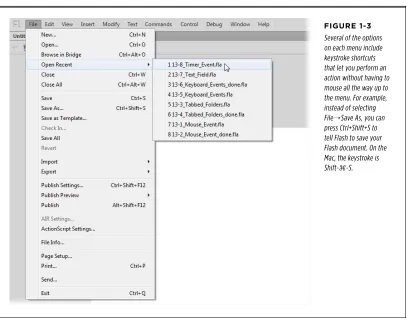
Throughout this book, you’ll find instructions like, “Open your Program Files→Adobe→ Adobe Flash CS6 folder.” That’s Missing Manual shorthand for much longer sentences like “Double-click your Program Files folder to open it. Inside, you’ll find a folder called Adobe; double-click to open it. Inside that folder is a folder called Adobe Flash CS6; open it, too.” This arrow shorthand also simplifies the business of choosing menu commands, as you can see in Figure I-3.
FIGURE I-3 When you see instructions like “Choose Text→Style→Italic,” think, “Click to pull down the Text menu, and then move your mouse down to the Style command. When its submenu opens, choose the Italic option.”
About the Online Resources
ONLINE Missing Manual team and tell us what you love (or hate) about the book. Head over
to www.missingmanuals.com, or go directly to one of the following sections.
Missing CD
This book doesn’t have a CD pasted inside the back cover, but you’re not missing out on anything. Go to www.missingmanuals.com/cds/flashcs6tmm to download. And so you don’t wear down your fingers typing long web addresses, the Missing CD page also offers a list of clickable links to the websites mentioned in this book.
Registration
If you register this book at www.oreilly.com, you’ll be eligible for special offers—like discounts on future editions of Flash CS6: The Missing Manual. If you buy an ebook from oreilly.com and register your purchase, you get free lifetime updates for that edition of the ebook; we’ll notify you by email when updates become available. Registering takes only a few clicks. Type www.oreilly.com/register into your browser to hop directly to the registration page.
Feedback
Got questions? Need more information? Fancy yourself a book reviewer? On our Feedback page, you can get expert answers to questions that come to you while read-ing, share your thoughts on this Missing Manual, and find groups for folks who share your interest in Flash. To have your say, go to www.missingmanuals.com/feedback.
Errata
To keep this book as up to date and accurate as possible, each time we print more copies, we’ll make any confirmed corrections you suggest in both the print book and the ebook. We note such changes on the book’s website so you can mark important corrections into your own copy of the book, if you like. And if you bought the ebook from us and registered your purchase, you’ll get an email notifying you that you can download an updated version of that edition of the ebook. Go to http://tinyurl.com/ flashcs6-mm to report an error and view existing corrections.
Safari®Books Online
is an on-demand digital library that lets you easily search over 7,500 technology and creative reference books and videos to find the answers you need quickly.
Creating a Flash
Animation
PART
1
CHAPTER 1:
Getting Around Flash
CHAPTER 2:
Creating Simple Drawings
CHAPTER 3:
CHAPTER
1
A
s mentioned in this book’s introduction, Flash performs several feats of audio-visual magic. You use it to create animations, to display video on a website, to create handheld apps, or to build a complete web-based application. So it’s not surprising that the Flash workspace is crammed full of tools, panels, and windows (Figure 1-1). But don’t be intimidated—you don’t have to conquer these tools all at once. This chapter introduces you to Flash’s main work areas and often-used toolbars and panels, so you can start creating Flash projects right away. You’ll experiment with Flash’s stage and timeline, and see how Flash lets you animate graphics so that they move along a path and change shape.TIP To get further acquainted with Flash, you can check out the built-in help screens by selecting Help →Flash Help. Once the help panel opens, click Using Flash Professional. It’s on the left side of the somewhat busy window. You can read more about Flash’s help system in Appendix A.
Starting Flash
You start Flash just as you would any other program—which means you can do it in a few different ways, depending on whether you have a PC or a Mac. Installing the program puts Flash CS6 and its related files in the folder with your other programs, and you can start it by double-clicking its icon. Here’s where it’s usually installed:
• Windows. Go to C:\Program Files\Adobe\Adobe Flash CS6\Flash.exe. You can create a shortcut or drag the file to the taskbar for quicker starting.
FLASH • Mac.can make an alias or drag the file to the Dock for quicker starting. Go to Macintosh HD\Applications\Adobe Flash CS6\Adobe Flash CS6. You
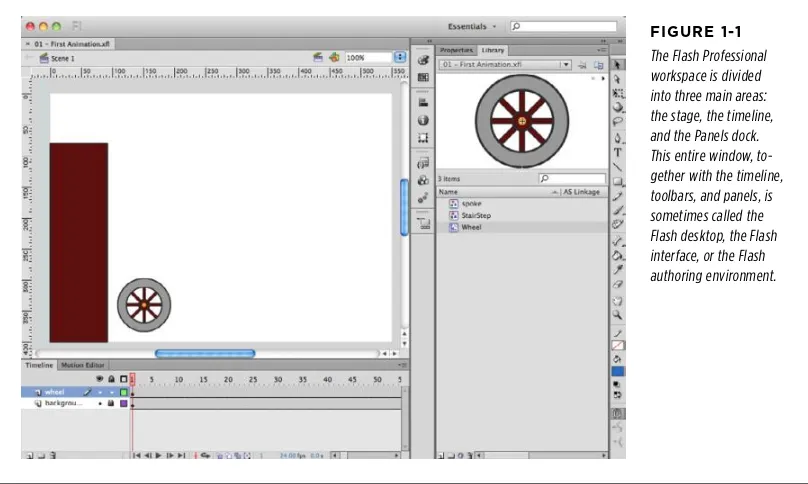
FIGURE 1-1 The Flash Professional workspace is divided into three main areas: the stage, the timeline, and the Panels dock. This entire window, to-gether with the timeline, toolbars, and panels, is sometimes called the Flash desktop, the Flash interface, or the Flash authoring environment.
Here are some other Windows ways to start the program:
• From the Vista or Windows 7 Start menu, choose All Programs→Adobe Flash Professional CS6.
• For Windows xP, go to Start→All Programs→Adobe→Adobe Flash Professional CS6.
• If you’re a keyboard enthusiast, press the Windows key and begin to type flash. As you type, Windows searches for a match and displays a list with programs at the top. Most likely, the Flash program is at the top of the list and already selected, so just press Enter. Otherwise, use your mouse or arrow keys to select and start the program.
Here are some Mac launching options:
• Even if you haven’t added the Flash icon to the Dock, you can still find it in the Dock’s Applications folder. Click and hold the Applications folder icon and choose Adobe Flash CS6→Adobe Flash CS6.
FLASH • If you’d rather type than hunt, use Spotlight. Press ⌘-space and then begin to
type flash. As you type, Spotlight displays a list of programs and files that match. Most likely, the Flash program is at the top of the list and already selected, so just press Return. Otherwise, use the mouse or arrow keys to select and start the program.
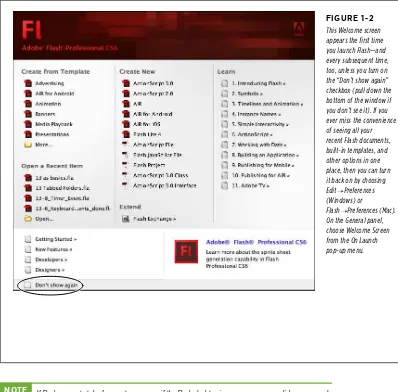
When you first start Flash, up pops the Welcome screen, shown in Figure 1-2. This screen puts all your options—like starting a new document or returning to a work in progress—in one handy place. For good measure, Adobe includes some links to help references and resources on its website.
FIGURE 1-2 This Welcome screen appears the first time you launch Flash—and every subsequent time, too, unless you turn on the “Don’t show again” checkbox (pull down the bottom of the window if you don’t see it). If you ever miss the convenience of seeing all your recent Flash documents, built-in templates, and other options in one place, then you can turn it back on by choosing Edit→Preferences (Windows) or Flash→Preferences (Mac). On the General panel, choose Welcome Screen from the On Launch pop-up menu.
NOTE If Flash seems to take forever to open—or if the Flash desktop ignores your mouse clicks or responds
FLASH When you choose one of the options, the Welcome screen disappears and your document takes its place. Here are your choices:
• Create from Template. Clicking one of the little icons under this option lets you create a Flash document using a predesigned form called a template. A template helps you create an animation more quickly, since a Flash developer has already done part of the work for you. You can find out more about tem-plates in Chapter 7.
• Open a Recent Item. As you create new documents, Flash adds them to this list. Clicking one of the filenames listed here tells Flash to open that file. Clicking the folder icon lets you browse for and open any other Flash file on your computer.
TIP The options for creating new Flash documents and opening recent documents also appear on the File
menu, as shown in Figure 1-3.
FIGURE 1-3 Several of the options on each menu include keystroke shortcuts that let you perform an action without having to mouse all the way up to the menu. For example, instead of selecting File→Save As, you can press Ctrl+Shift+S to tell Flash to save your Flash document. On the Mac, the keystroke is Shift-⌘-S.
FLASH which is a garden-variety animation file. ActionScript is the underlying
pro-gramming language for Flash animations. The current version of ActionScript is 3.0, and it’s the version used for the projects in this book. You can use the ActionScript 2.0 option if you need to work with a Flash project that was created several years ago. For details on the file formats for different Flash projects, see the box below.
NOTE Old programming pros—you know who you are—may have reasons to prefer ActionScript 2.0. For
example, you might choose this option if you’re continuing work on a project created using ActionScript 2.0, or if you’re working with a team using ActionScript 2.0.
Understanding Flash File Formats
Why are there so many different options under Create New on the Welcome screen? What are they all for?
There seem to be a bewildering number of options when you create a new Flash document. As explained above, if you’re just learning Flash, you probably want to use the first option: ActionScript 3.0. The other options are for special Flash projects targeted to specific devices, like iPhones, iPads, or Android devices. Some options are for specific programming needs, like creating an ActionScript class. The details are in the appropriate sections of this book, but here’s a quick rundown:
• Use AIR to create desktop applications using the Adobe Integrated Runtime tools (page 705). Instead of using Flash Player, these applications use AIR.
• Use AIR for Android if you’re creating apps for Android handhelds like the Droid Razr or Samsung Galaxy.
• Creating an iPhone or iPad app? Use the Air for iOS option. Flash creates a document that’s just the right size and
has the programming options and support for making iOS apps.
• Flash Lite 4 is similar to the iPhone format but works for several other handheld devices.
• You can also create an ActionScript File (a file containing nothing but ActionScript, for use with a Flash animation); a Flash JavaScript File (used to create custom tools, panels, commands, and other features that extend Flash); or a Flash Project (useful if you’re planning a complex, multifile, multideveloper Flash production and need version control).
• The last two options, ActionScript 3.0 Class and ActionScript 3.0 Interface, help programmers create reusable objects that can be used in multiple Flash projects.
FREqUENTLY ASKED qUESTION
• Extend. Clicking the Flash Exchange link under this option tells Flash to open your web browser and load the Flash Exchange website. There,you can down-load Flash components, sound files, and other goodies that you can add to your Flash animations. Some are free, some are fee-based, and all of them are created by Flashionados just like you.
THE FLASH
WORKSPACE bottom of the Welcome screen, “Getting Started” covers the very, very basics. “New Features” explains (and celebrates) some of Flash CS6’s new bells and whistles. “Developers” leads to an online magazine with articles and videos with an ActionScript programming slant. “Designers” leads to a similar resource for the Flash graphics and design community.
A Tour of the Flash Workspace
The best way to master the Flash CS6 Professional workspace is to divide and conquer. First, focus on the three main work areas: the stage, the timeline, and the Panels dock. Then you can gradually learn how to use all the tools in those areas.
One big source of confusion for Flash newbies is that the workspace is so easy to customize. You can open bunches of panels, windows, and toolbars. You can move the timeline above the stage, or you can have it floating in a window all its own. Once you’re a seasoned Flash veteran, you’ll have strong opinions about how you want to set up your workspace so the tools you use most are at hand. If you’re just learning Flash with the help of this book, though, it’s probably best if you set up your workspace so that it matches the pictures in these pages.
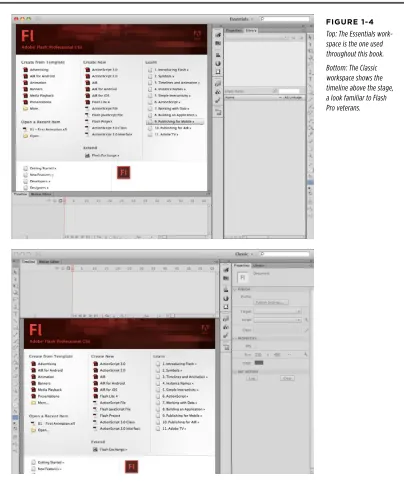
Fortunately, there’s an easy way to do that. Adobe, in its wisdom, created the Work-space Switcher—a tool that lets you rearrange the entire workWork-space with the click of a menu. The thinking is that an ideal workspace for a cartoon animator is different from the ideal workspace for, say, a rich internet application (RIA) developer. The Workspace Switcher is a menu in the upper-right corner of the Flash window, next to the search box. The menu displays the name of the currently selected workspace; when you first start Flash, it probably says Essentials. That’s a great workspace that displays some of the most frequently used tools. In fact, it’s the workspace used throughout most of this book.
Here’s a quick little exercise that shows you how to switch among the different workspaces and how to reset a workspace after you’ve mangled it by dragging panels out of place and opening new windows.
1. Start Flash.
Flash opens, displaying the Welcome screen. Unless you’ve made changes, the Essentials workspace is used. See Figure 1-4, top.
2. From the Workspace menu near the upper-right corner of the Flash window, choose Classic.
The Classic arrangement harkens back to earlier versions of Flash, when the timeline resided above the stage (Figure 1-4, bottom). If you wish, go ahead and check out some of the other layouts.
THE FLASH WORKSPACE Back where you began, the Essentials workspace shows the timeline at the
bottom. The stage takes up most of the main window. On the right, the Panels dock holds toolbars and panels. Now’s the time to cause a little havoc.
FIGURE 1-4 Top: The Essentials work-space is the one used throughout this book.
THE FLASH
WORKSPACE 4. In the Panels dock, click the Properties tab and drag it to a new location on the screen.
Panels can float, or they can dock to one of the edges of the window. For this experiment, it doesn’t matter what you choose to do.
5. Drag the Color and Swatches toolbars to new locations.
The Color toolbar has an icon that looks like an artist’s palette at the top. Like the larger panels, toolbars can either dock or float. You can drag them anywhere on your monitor, and you can expand and collapse them by clicking the double-triangle button in their top-right corners.
6. Go to Window→Other Panels→History.
Flash has dozens of windows. Only a few are available now, because you haven’t even created a document yet.
TIP As you work on a project, the History panel keeps track of all your commands, operations, and changes.
It’s a great tool for undoing mistakes. For more details, see page 34.
7. From the Workspace menu, choose Reset Essentials.
The workspace changes back to the original Essentials layout, even though you did your best to mess it up.
Anytime you want your workspace to match the one used throughout most of this book, do the “Essentials two-step”: Choose Essentials from the Workspace Switcher (if you’re not already there), and then choose Reset Essentials. As shown in Figure 1-4, when you use the Essentials workspace, the Flash window is divvied up into three main work areas: the stage (upper left), the timeline (lower left), and the panels dock (right). Before exploring each of these areas in detail, here are a few words about Flash’s menu bar.
Menu Bar
Like most computer programs, Flash gives you menus to interact with your docu-ments. In traditional fashion, Windows menus appear at the top of the program window, while Mac menus are always at the very top of the screen. The commands on these menus list every way you can interact with your Flash file, from creating a new file—as shown on page 18—to editing it, saving it, and controlling how it appears on your screen.
THE FLASH WORKSPACE To view a menu, simply click the menu’s name to open it, and then click a menu
option. If you prefer, you can also drag down to the option you want. Let go of the mouse button to activate the option. Figure 1-3 shows you what the File menu looks like. Most of the time, you see the same menus at the top of the screen, but oc-casionally they change. For example, when you use the Debugger to troubleshoot ActionScript programs, Flash hides some of the menus not related to debugging.
TIP You’ll learn about specific commands and menu options in their related chapters. For a quick reference
to all the menu options, see Appendix B.
The Stage
As the name implies, the stage is usually the center of attention. It’s your virtual canvas. Here’s where you draw the pictures, display text, and make objects move across the screen. The stage is also your playback arena; when you run a com-pleted animation—to see if it needs tweaking—the animation appears on the stage. Figure 1-5 shows a project with an animation under construction.
FIGURE 1-5 The stage is where you draw the pictures that will eventually become your animation. The work area (light gray) gives you a handy place to put graphic elements while you figure out how you want to arrange them on the stage. Here a text box is being dragged from the work area back to center stage.
Stage Work area (backstage)
The work area is the technical name for the gray area surrounding the stage, al-though many Flashionados call it the backstage. This work area serves as a prep zone where you can place graphic elements before you move them to the stage, and as a temporary holding pen for elements you want to move off the stage briefly as you reposition things. For example, let’s say you draw three circles and one box containing text on your stage. If you decide you need to rearrange these elements, you can temporarily drag one of the circles off the stage.
NOTE The stage always starts out with a white background, which becomes the background color for your
THE FLASH
WORKSPACE You’ll almost always change the starting size and shape of the stage depending on where people will see your finished animation—in other words, your target platform. If your target platform is a smartphone, for example, you’re going to want a smaller stage. If, on the other hand, you’re creating an animation for a ballpark’s JumboTron, you’re going to want a giant stage. You’ll get to try your hand at modifying the size and background color of the stage later in this chapter.
The Timeline
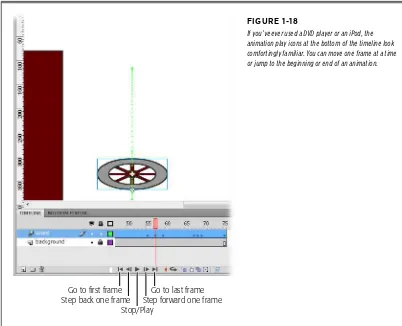
When you go to the theater, the stage changes over time—actors come and go, songs are sung, scenery changes, and the lights shine and fade. In Flash, you’re the director, and you get to control what appears on the stage at any given moment. The timeline is the tool used to specify what’s seen or heard at a particular moment. The concept is pretty simple, and if you’ve ever used video editing software, it will be familiar. Flash animations (or movies) are organized into chunks of time called
frames. Each little box in the timeline represents a frame or a point in time. You use the playhead, shown in Figure 1-6, to select a specific frame. So when the playhead is positioned at Frame 10, the stage shows what the audience sees at that point in time.
FIGURE 1-6
The playhead is a red box that appears in the timeline; here the playhead is set to Frame 10. You can drag the playhead to any point in the timeline to select a single frame. The Flash stage shows exactly what’s in your animation at that point in time.
Playhead
Keyframes
TOOLBARS TIP The first time you run Flash, the timeline appears automatically, but occasionally you want to hide the
timeline—perhaps to reduce screen clutter while you concentrate on your artwork. You can show and hide the timeline by selecting Window→Timeline or pressing Ctrl+Alt+T (or for the Mac, Option-⌘-T).
Panels and Toolbars
If you followed the little exercise on page 20, you know you can put panels and toolbars almost anywhere onscreen. However, if you use the Essentials workspace, you start off with a few frequently used panels and toolbars docked neatly on the right side of the program window.
It’s easy to get confused by the Flash nomenclature. Flash has toolbars, panels, palettes, and windows. Sometimes collapsed panels look like toolbars and open up when clicked—like the frequently used Tools panel. Toolbars and panels pack the most commonly used options together in a nice compact space, so you don’t have to do a hunt-and-peck through the main menu every time you want to do something. Panels are great, but they take up precious real estate. As you work, you can hide certain tools to get a better view of your artwork. (You can always get them back by choosing their names from the Window menu.)
Toolbars and panels are such an integral part of working with Flash that it’s helpful to learn some of their tricks early on:
• Move a panel. Just click and drag the tab or top of the panel to a new location. Panels can float anywhere on your monitor, or dock on an edge of the Flash program window (as in the Essentials workspace). For more details on docking and floating, see the box on page 26.
• Expand or collapse a panel. Click the double-triangle button at the top of a panel to expand or collapse it. Collapsed panels look like toolbars, showing a few icons that hint at the tools’ purposes. Expanded panels take up more real estate, but they also give you more details and often have word labels for the tools and settings.
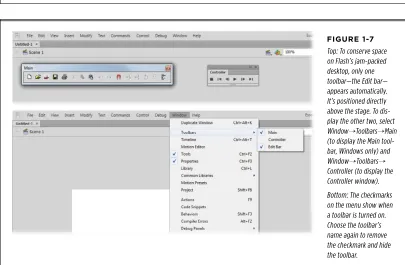
• Show or hide a panel. Use the Window menu to show and hide individual panels. Checkmarks appear next to the panels that are shown.
• Close a floating panel. In Windows, click the small x in the panel’s upper-right corner. On the Mac, click the x in the upper-left corner.
• Show or hide all panels. The F4 key works like a toggle, hiding or showing all the panels and toolbars. Use it when you want to quickly reduce screen clutter and focus on your artwork.
TOOLBARS • Reset the panel workspace.space Switcher. Instead of <workspace name>, you see the name of the current Choose Reset <workspace name> from the Work-workspace—something like Essentials or Classic. You can also do a reset using the menus; choose Window→Workspace→Reset <workspace name>.
Docked vs. Floating
A docked toolbar or panel appears attached to some part of the workspace window, while a floating toolbar or panel is one you can reposition by dragging.
Whether you want to display toolbars and panels as docked or floating is a matter of personal choice. If you constantly need to click something on a toolbar—which means it needs to be in full view at all times—docked works best. But if you usually just need a toolbar or a panel for a brief time and want to be able to move it around on the screen (so it doesn’t cover up something else), then floating is the ticket.
To turn a docked panel into a floating panel:
1. Click any blank spot on the panel’s top bar and hold down the mouse button. You may notice a color change
(Figure 1-7), especially as you begin to move the panel. The actual visual effect is different on Mac and Windows computers, but the mechanics work the same. 2. Drag the panel away from the edge of the workspace
TOOLBARS NOTE When you reposition a floating toolbar, Flash remembers where you put it. If, later on, you hide the
toolbar—or exit Flash and run it again—your toolbars appear exactly as you left them. If this isn’t what you want, use the Workspace Switcher to choose a new workspace layout or to reset the current workspace.
Toolbars
Strictly speaking, Flash has only three toolbars: Main, Controller, and Edit. (Every-thing else is a panel, even if it looks suspiciously like a toolbar.) Figure 1-7 shows all three toolbars.
• Main (Windows only). The Main toolbar gives you one-click basic operations, like opening an existing Flash file, creating a new file, and cutting and pasting sections of your drawing.
• Controller. If you’ve ever used a DVD player or an iPod, you’ll recognize the Stop, Rewind, and Play buttons on the Controller toolbar, which lets you control how you want Flash to run your finished animation. (Not surprisingly, the Controller options appear grayed out—meaning you can’t select them—if you haven’t yet constructed an animation.) With Flash Professional CS6, the Controller is a little obsolete, because now the same buttons appear below the timeline.
• Edit bar. Using the options here, you can change your view of the stage, zoom-ing in and out, as well as edit scenes (named groups of frames) and symbols
(reusable drawings).
NOTE The Edit bar is a little different from the other toolbars in that it remains fixed to the stage. You can’t
reposition it.
Tools Panel
The Tools panel is unique. For designers, it’s probably the most used of all the panels and toolbars. In the Essentials workspace, the Tools panel appears along the right side of the Flash program window. There are no text labels, just a series of icons. However, if you need a hint, just hold your mouse over one of the tools, and a tooltip shows the name of the tool. So, for example, mouse over the arrow at the top of the Tools panel, and the tooltip says “Selection tool (V).” The letter in parentheses is the shortcut key for that tool. Press the letter V while you’re working in Flash, and your cursor changes to the Selection tool.
TOOLBARS At the top of the Tools panel are the tools you need to create and modify a Flash SELECTION AND DRAWING TOOLS drawing. For example, you might use the Pen tool to start a sketch, the Paint Bucket or Ink Bottle to apply color, and the Eraser to clean up mistakes.
FIGURE 1-8
The Tools panel groups tools by different drawing chores. Selection and Transform tools are at the top, followed by Drawing tools. Next are the IK Bones tool and the Color tools. The View tools are for zooming and panning. The Color tools include two swatches, one for strokes and one for fills. At the bottom you find the Options buttons, which change depending on the drawing tool you’ve selected. If you like, you can drag the docked Tools panel away from the edge of the workspace and turn it into a floating panel.
Selection tools
Drawing and painting tools
Color and IK Bones
Zooming and panning
Stroke and fill
Tool options
VIEW TOOLS
TOOLBARS NOTE The term pixel is short for “picture element.” Images on a computer screen are made up of lots of
tiny dots emitting different colors. Each dot is a pixel.
COLOR TOOLS
When you’re creating in Flash, you’re drawing one of two things: a stroke, which is a plain line or outline, or a fill, which is the area within an outline. You can use these tools to choose a color from the Color palette before you click one of the drawing icons to begin drawing (or afterward to change the colors, as discussed in Chapter 2). Flash applies that color to the stage as you draw.
OPTIONS TOOLS
Which icons appear in the Options section at any given time depends on which tool you’ve selected. For example, when you select the Zoom tool from the View section of the Tools panel, the Options section displays an Enlarge icon and a Reduce icon that you can use to change the way the Zoom tool works (Figure 1-9).
FIGURE 1-9
On the Tools panel, when you click each tool, the Options section shows you buttons that let you modify that particular tool. In the Tools panel’s View section, for example, when you click the Zoom tool, the Options section changes to show you only zooming options: Enlarge (with the + sign) and Reduce (with the – sign). Zoom tool
Zoom in option Zoom out option
Properties Panel
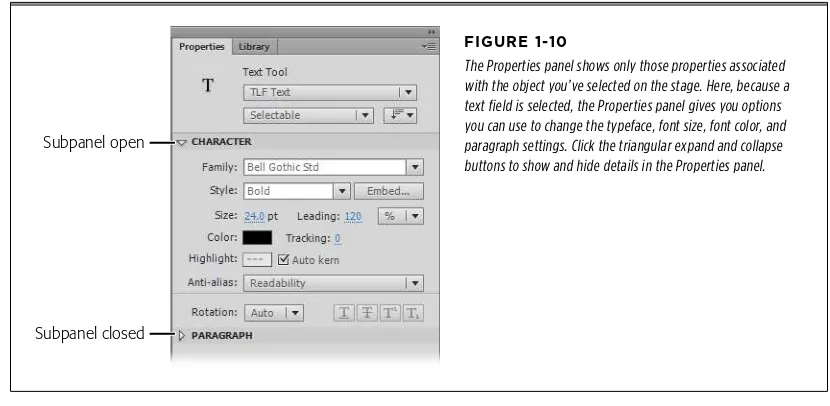
In many ways, the Properties panel is Command Central as you work with your animation, because it gathers all the pertinent details for the objects you work with and displays them in one place. Select an object, and the Properties panel displays all of its properties and settings. It’s not just an information provider; you also use the Properties panel to change settings and tweak the elements in your animation. When there’s fine-tuning to be done, select an object and adjust the settings in the Properties panel. (You can learn more in the “Test Drive” section on page 35.)
TOOLBARS information on the paragraph settings, like the margins and line spacing. Because the Properties panel crams so many details into one place, you’ll find yourself using the collapse and expand buttons to show and hide some of the information in its subpanels, as shown in Figure 1-10.
FIGURE 1-10
The Properties panel shows only those properties associated with the object you’ve selected on the stage. Here, because a text field is selected, the Properties panel gives you options you can use to change the typeface, font size, font color, and paragraph settings. Click the triangular expand and collapse buttons to show and hide details in the Properties panel. Subpanel open
Subpanel closed
NOTE If you don’t see the Properties panel, you can display it by selecting Window
→Properties or by pressing Ctrl+F3 (⌘-F3 on a Mac).
PROPERTIES SUBPANELS
On the Properties panel, you see different subpanels depending on the object you’ve selected. Some objects have a lot of settings, and subpanels are Flash’s way of giving you access to all of them. Fortunately, the various panels and tools work consistently. For example, many objects have settings that determine their onscreen positions and define their width and height dimensions. These common settings usually appear at the top of the Properties panel, and you set them the same way for most kinds of objects. If you want to change colors or add special effects like filters or blends, you’ll find that the tools work the same way throughout Flash.
Library Panel
TOOLBARS it on page 248. To show the Library panel, click Window→Library, or press Ctrl+L
(Windows) or ⌘-L (Mac).
TIP In the upper-right corner of most panels is an Options menu button. When you click this button, a menu
of options appears—different options for each panel. For example, the Color Swatch panel lets you add and delete color swatches. You’ll find many indispensable tools and commands on the Options menus, so it’s worth checking them out. You’ll learn about different options throughout this book.
FIGURE 1-11
Storing simple images as reusable symbols in the Library panel does more than just save you time: It saves you file size, too. (You’ll learn a lot more about symbols and file size in Chapter 7.) Using the Library panel you see here, you can preview symbols, add them to the stage, and easily add symbols you created in one Flash document to another.
Other Flash Panels
As you can see from the examples on the preceding pages, each Flash panel performs specific functions, and most of them deserve several pages to describe them fully, as you’ll find throughout this book. For now, Table 1-1 gives a thumbnail description and notes the page where the panel is described in detail. If you’re eager to get started actually using Flash, jump to page 35 to start the Flash CS6 Test Drive.
TABLE 1-1 Flash Panels and their uses (in order as they appear on the Window menu)
PANEL NAME
KEYBOARD
SHORTCUT PURPOSE
Timeline Windows: Ctrl+Alt+K Mac: Option-⌘-T
Technically, the timeline is just another panel. You can move, hide, expand, and collapse the timeline just as you would any other panel. See page 91 for more.