Photoshop CC
Photoshop CC: The Missing Manual
by Lesa SniderCopyright © 2013 Lesa Snider. All rights reserved. Printed in the United States of America.
Published by O’Reilly Media, Inc.,
1005 Gravenstein Highway North, Sebastopol, CA 95472.
O’Reilly books may be purchased for educational, business, or sales promotional use. Online editions are also available for most titles (http://my.safaribooksonline.com). For more information, contact our corporate/institutional sales department: (800) 998-9938 or [email protected].
June 2013: First Edition.
Revision History for the First Edition: 2013-05-31 First release
See http://oreilly.com/catalog/errata.csp?isbn=0636920027591 for release details.
The Missing Manual is a registered trademark of O’Reilly Media, Inc. The Missing Manual logo, and “The book that should have been in the box” are trademarks of O’Reilly Media, Inc. Many of the designations used by manufacturers and sellers to distinguish their products are claimed as trademarks. Where those designations appear in this book, and O’Reilly Media is aware of a trademark claim, the designations are capitalized.
While every precaution has been taken in the preparation of this book, the publisher assumes no responsibility for errors or omissions, or for damages resulting from the use of the information contained in it.
Contents
The Missing Credits
. . .xvii
Foreword
. . . .xxi
Introduction
. . .xxiii
What’s New in Photoshop CC. . . xxiii
About This Book . . . xxvi
About the Outline . . . xxix
For Photographers . . . xxx
The Very Basics . . . xxxi
About→These→Arrows . . . xxxii
About MissingManuals.com . . . xxxiii
Safari® Books Online . . . xxxiii
CHAPTER 1:
Photoshop CC Guided Tour
. . .1
Meet the Application Frame . . . 1
The Almighty Options Bar . . . 3
Swapping Screen Modes . . . 4
Changing Photoshop’s Appearance . . . 6
Working with Panels . . . 7
Customizing Your Workspace . . . 10
The Tools Panel . . . .11
Common Panels . . . 13
The Power of Undo . . . 14
Changing How Far Back You Can Go . . . 15
Turning Back Time with the History Panel . . . 15
The History Brush . . . 17
The Revert Command . . . 19
Tweaking Photoshop’s Preferences. . . 19
General . . . 19
Interface . . . 21
Sync Settings . . . 21
File Handling . . . 22
Performance . . . 22
Cursors . . . 24
Transparency and Gamut . . . 24
Guides, Grid, and Slices . . . 25
Plug-ins . . . .26
Type . . . .26
3D . . . .26
Working with Presets . . . 28
Sharing Presets . . . .29
CHAPTER 2:
Opening, Viewing, and Saving Files
. . . .31
Creating a New Document . . . 31
Photoshop’s Ready-Made Documents . . . 32
Setting Size and Resolution . . . .34
Choosing a Color Mode . . . 35
Choosing a Background . . . 37
Advanced Options . . . 37
Saving Files . . . 38
File Formats . . . 39
Opening an Existing Document . . . 40
The Open Dialog Box . . . 42
Opening Multiple Files within a Single Document . . . .44
Opening Files as Smart Objects . . . .45
Opening Recent Files . . . .46
Working with PDFs . . . .46
Working with Scanned Images . . . 47
Working with Raw Files . . . .48
Duplicating Files . . . .49
Changing Your View . . . .50
Zooming In and Out . . . .50
Moving Around in an Image . . . 53
Getting Oriented with the Navigator Panel . . . 55
Rotating Your Canvas . . . 55
Arranging Open Images . . . .56
Guides, Grids, and Rulers . . . .60
Rulers and Guiding Lines . . . .60
The Ruler Tool . . . 62
CHAPTER 3:
Layers: The Key to Nondestructive Editing
. . .65
Layer Basics . . . 67
The Layers Panel . . . .68
Activating Layers . . . .68
Adding New Layers . . . 74
Hiding and Showing Layers . . . 74
Restacking Layers . . . 76
Duplicating and Deleting Layers . . . .80
Copying and Pasting Layers . . . 83
Tweaking a Layer’s Opacity and Fill . . . .90
Resizing and Rotating Layers . . . 91
Moving and Aligning Layers . . . 93
Managing Layers . . . .98
Naming and Color-Coding Layers . . . .98
Linking and Locking Layers . . . .98
Grouping Layers into Folders . . . .100
Layer Comps: Capturing Different Document Versions . . . 102
Rasterizing Layers . . . 105
Merging Layers . . . 106
Layer Blending . . . 108
Layer Masks: Digital Masking Tape . . . 108
Adding Layer Masks . . . 109
Using Layer Masks . . . 110
Editing a Mask . . . .115
Using Smart Objects . . . 118
Creating Smart Objects . . . 120
Managing Smart Objects . . . 122
Layer Styles . . . 124
Managing Layer Styles . . . 128
The Styles Panel . . . 129
CHAPTER 4:
Selections: Choosing What to Edit
. . .133
Selection Basics . . . 133
Meet the Marching Ants . . . 134
Selecting by Shape . . . 136
The Rectangular and Elliptical Marquee Tools . . . 136
The Single Row and Column Marquee Tools . . . 142
The Vector Shape Tools . . . 143
Selecting by Color . . . 146
The Quick Selection Tool . . . 146
The Magic Wand Tool . . . 148
The Color Range Command . . . .151
The Background and Magic Erasers . . . 156
Selecting Irregular Areas . . . 160
The Lasso Tools . . . 161
Selecting with the Pen Tool . . . 164
Creating Selections with Channels . . . 165
Using the Selection Tools Together . . . 165
Modifying Selections . . . 165
Refining Edges . . . 165
Fixing Edge Halos . . . 173
Creating a Border Selection . . . 174
Transforming a Selection . . . 174
Using Quick Mask Mode . . . 176
Saving a Selection . . . 179
Filling a Selection with Color . . . 181
Stroking (Outlining) a Selection. . . 181
CHAPTER 5:
Understanding Channels
. . .183
How Color Works . . . 184
RGB Mode vs. CMYK Mode . . . 185
The Channels Panel and You . . . 186
Meet the Color Channels . . . 190
RGB Channels . . . 191
CMYK Channels . . . 191
Spot Channels . . . 195
Lab Channels . . . 195
Multichannel Mode . . . 196
Single-Channel Modes . . . 196
The Mighty Alpha Channel . . . 198
Creating an Alpha Channel . . . 198
Editing Alpha Channels . . . 200
Loading an Alpha Channel as a Selection . . . .202
Deleting Alpha Channels . . . .202
Basic Channel Stunts . . . .202
Selecting Objects with Channels . . . .202
Creating a Silhouette Effect . . . 206
Lightening and Darkening Channels . . . 209
Combining Channels . . . 210
Sharpening Individual Channels . . . .211
CHAPTER 6:
Cropping, Resizing, and Rotating
. . .215
Cropping Images . . . 216
The Rule of Thirds . . . 216
Creative Cropping. . . 217
The Crop Tool . . . 218
Cropping with Selection Tools . . . .226
Trimming Photos Down to Size . . . .226
Cropping and Straightening Photos . . . .227
Cropping and Straightening in Camera Raw . . . .229
Resizing Images . . . .232
Pixels and Resolution . . . .233
The Mighty Image Size Dialog Box . . . .234
Resizing Images for Print . . . 240
Resizing for Email and the Web . . . .242
Resizing Web Images for Print . . . 244
Resizing Images for Presentations . . . .245
Resizing Smart Objects . . . .246
Resizing the Canvas . . . .249
Content-Aware Scaling . . . 251
Rotating and Distorting . . . .254
Simple Rotations . . . .255
The Transformers . . . .255
CHAPTER 7:
Combining Images
. . . .263
Cut It Out . . . .263
Pasting into a Selection . . . .265
Sky Swapping . . . .270
Fading Images Together . . . 271
Soft Erasers . . . 272
Soft Brushes and Layer Masks . . . 272
Gradient Masks . . . 274
Layer Blend Modes . . . .276
Normal and Dissolve Blend Modes . . . .278
Darken Blend Modes . . . .279
Lighten Blend Modes . . . .282
Lighting (Contrast) Blend Modes . . . .284
Comparative Blend Modes . . . .287
Composite Blend Modes . . . .288
Zapping Backgrounds with Blending Sliders . . . .289
Auto-Aligning Layers and Photomerge . . . 291
Building Panoramas with Photomerge . . . 294
Auto-Blending Layers . . . 294
Cloning Between Documents . . . 296
Combining Vectors and Rasters . . . 300
Mapping One Image onto Another . . . .303
CHAPTER 8:
Draining, Changing, and Adding Color
. . . .307
Draining Color . . . .307
Black & White Adjustment Layers . . . 308
Gradient Map Adjustment Layers . . . .311
The Lightness Channel . . . 313
Going Grayscale in Camera Raw . . . 315
Partial-Color Effect . . . 316
Fading Color to Black and White . . . 318
High-Contrast Black and White . . . .320
The High-Key Effect . . . .322
Delicious Duotones. . . .323
Changing Color . . . .325
Hue/Saturation Adjustment Layers . . . .325
Hue Blend Mode . . . .332
Replacing Color . . . .332
Matching Colors . . . .335
Photo Filter Adjustment Layers . . . .336
Posterizing: Your Ticket to Cartoon Art . . . .338
Inverting Colors . . . .338
Adding Color . . . .339
Colorizing Images . . . .339
Adding Solid Blocks of Color . . . .343
Building a Better Sunrise (or Sunset) . . . 344
Adding Color to a Semi-Transparent Layer . . . .347
CHAPTER 9:
Correcting Color and Lighting
. . . .349
Quick Fixer-Uppers . . . 350
Fixing Color . . . 350
Fixing Lighting . . . .353
Correcting Images in Camera Raw . . . 361
Changing White Balance . . . .363
Fixing Exposure . . . 364
Making Colors Pop . . . .367
Camera Raw’s Adjustment Brush . . . .368
Camera Raw’s Graduated Filters . . . 371
More Fun with Camera Raw . . . .372
Using Levels . . . .372
Histograms: Mountains of Information . . . .373
The Levels Sliders . . . .376
The Levels Eyedroppers . . . .379
Correcting by the Numbers . . . .383
Color-Correcting Skin . . . .386
Working with Curves . . . .387
Changing Contrast . . . .393
Creating High Dynamic Range Images . . . .395
Making Colors Pop . . . .399
Intensifying Colors . . . .399
Adjusting Hue/Saturation . . . 400
Adding Lab Pop . . . 401
Rescuing the Unfixables . . . 402
CHAPTER 10:
Changing Reality: Removing and Repositioning
. . . .405
The Great Healers . . . 406
The Spot Healing Brush . . . 407
Using Content-Aware Fill. . . 408
The Healing Brush . . . 411
The Patch Tool . . . 415
Zapping Shines and Shadows . . . 418
Whitening Teeth . . . 420
Fixing Flabby Chins . . . .422
Liquifying Bulges . . . .422
Slimming with Free Transform . . . .428
Skin Softeners . . . 430
Selective Blur . . . 431
Easy Glamour Glow . . . .432
Softening Wrinkles with Faux Dodge and Burn . . . .432
Show-Stopping Eyes . . . .436
Enhancing Eyes . . . .436
Fixing Red-Eye . . . .438
Fixing Animal White-Eye . . . 440
Other Creative Madness . . . 443
Repositioning and Recomposing with Content-Aware Move . . . 443
Reshaping Objects with Puppet Warp . . . 445
CHAPTER 11:
The Art of Sharpening
. . .451
What Is Sharpening? . . . .452
Basic Sharpening . . . .453
Sharpening with Unsharp Mask . . . 456
The Smart Sharpen Filter . . . .459
Sharpening with the High Pass Filter . . . .462
The Shake Reduction Filter . . . .462
Sharpening Layered Files . . . 466
Sharpening Part of an Image . . . 468
Advanced Sharpening Techniques . . . 471
Creating an Edge Mask . . . .472
Sharpening in Camera Raw . . . .475
Global Sharpening . . . .476
Local Sharpening . . . .479
CHAPTER 12:
Painting in Photoshop
. . .481
Color Theory: The Basics . . . .482
Choosing a Color Scheme . . . 484
Using a Color Wheel. . . 484
Using the Kuler Panel . . . .487
Other Color Scheme–Generating Tools . . . 489
Choosing Individual Colors . . . 489
The Color Picker . . . 489
The Eyedropper Tool . . . 491
Loading Color Libraries . . . .492
The Swatches Panel . . . .492
The Color Panel . . . 494
(Re)Introducing the Brush Tool . . . 494
Controlling the Brush Cursor’s Appearance . . . .497
Painting from Scratch . . . .502
Loading More Built-in Brushes . . . 509
Customizing Brushes . . . 514
Brush Tip Shape . . . 515
Shape Dynamics . . . 516
Scattering . . . 518
Texture . . . .520
Dual Brush . . . 521
Color Dynamics . . . .522
Transfer . . . .523
Brush Pose . . . .524
Noise . . . .525
Wet Edges . . . .525
Build-up . . . .525
Smoothing . . . .525
Protect Texture . . . .525
Suggested Brush Customizations . . . .525
Defining a New Brush . . . .526
Installing New Brushes . . . 530
CHAPTER 13:
Drawing with the Vector Tools
. . .533
Photoshop’s Drawing Modes . . . .535
Drawing Paths with the Pen Tool . . . .536
Drawing Straight Paths . . . .538
Drawing Curved Paths . . . .539
Converting Anchor Points . . . 541
Path Drawing Tips . . . .543
Saving Paths . . . 546
Drawing with the Shape Tools . . . .547
Using the Shape Tools . . . 548
Drawing Multiple Shapes on One Layer . . . .555
Using Custom Shapes . . . .555
Editing Paths . . . .557
Adding, Deleting, and Converting Points . . . .557
Activating and Moving Paths . . . .558
Making Paths Intersect . . . 560
Adding a Stroke to a Path . . . .562
Filling a Path . . . .563
Making Selections and Masks with Paths . . . .565
Making a Path from a Selection . . . .568
Making a Clipping Path . . . .568
Using Vector Masks . . . 571
CHAPTER 14:
Creating Artistic Text
. . .575
Typography 101 . . . .575
Creating and Editing Text . . . .582
Point Text vs. Paragraph Text . . . .583
Moving Text . . . .585
Highlighting Text . . . .585
Resizing Text . . . .587
Creating a Hollow Text Selection . . . .589
Creating Text on a Path . . . .593
Filling a Shape with Text . . . .595
Warping Text . . . .596
Using Find and Replace . . . .597
Formatting Text . . . .598
Formatting with the Options Bar . . . .598
The Character Panel . . . 601
The Paragraph Panel . . . 611
Special Text Effects . . . 616
Faded Text . . . 617
Stroked Text. . . 618
Texturizing Text . . . .622
Placing a Photo Inside Text . . . .626
Converting Text to a Shape . . . .627
More Typographic Resources . . . 630
CHAPTER 15:
The Wide World of Filters
. . .631
The Joy of Smart Filters . . . .632
A Filters Tour . . . 634
Adaptive Wide Angle . . . .636
Camera Raw Filter . . . .639
Lens Correction . . . .639
Liquify . . . 640
Oil Paint . . . 640
Vanishing Point . . . .642
Artistic . . . 648
Blur . . . 648
Brush Strokes . . . .659
Distort . . . 661
Noise . . . 661
Pixelate . . . .662
Render . . . .662
Sharpen . . . 664
Sketch . . . 664
Stylize . . . 666
Texture . . . 669
Video . . . .670
Other . . . .670
Digimarc . . . .672
CHAPTER 16:
Photoshop and Print
. . .673
The Challenge of WYSIWYG Printing . . . .673
Understanding Color Gamuts and Profiles . . . .674
Calibrating Your Display . . . .675
Resizing and Formatting Files . . . .678
Printer-Friendly File Formats . . . .678
Resizing and Saving as a TIFF . . . .679
Resizing and Saving as a PDF . . . 680
Printing on an Inkjet Printer . . . .685
Printing on a Commercial Offset Press. . . .693
Converting RGB Images to CMYK Using Built-In Profiles . . . 694
Custom RGB to CMYK Profile Conversions . . . .695
Using Spot Color . . . .697
Printing Duotone (Multitonal) Images . . . .703
Printing Color Separations . . . 706
Proofing Images Onscreen . . . .707
Printing Proofs . . . 709
Printing on a Digital Press . . . .711
Printing RGB Images on a Digital Press . . . 712
Printing CMYK Images on a Digital Press . . . 712
Printing Spot Colors on a Digital Press . . . 712
Printing Multiple Images . . . 713
PDF Presentation . . . 713
Contact Sheet II . . . 713
Recap: Stress-Free Printing Tips . . . 715
CHAPTER 17:
Photoshop and the Web
. . .717
Creating Web- and Email-Friendly Images . . . 718
Resizing an Image . . . 718
Choosing the Best File Format. . . 721
Saving and Compressing Files . . . .723
Animating a GIF . . . .732
Editing Your Animation . . . .733
Saving Your Animation . . . .734
Designing a Website Favicon . . . .736
Creating Web Page Mockups and Image Maps . . . .738
Slicing an Existing Image . . . .738
Modifying Slices . . . .740
Saving Slices . . . 745
Protecting Your Images Online . . . .746
Embedding Copyright Info . . . .746
Watermarking Images . . . 747
CHAPTER 18:
Working Smarter with Actions
. . .755
The Actions Panel . . . .756
Using Actions . . . .758
Recording Actions . . . .759
Running Actions on a Folder . . . .763
Managing Actions . . . .766
Editing Actions . . . .769
Creating Droplets . . . .770
Sharing Actions . . . 771
Loading Actions . . . 771
Saving Actions as a Set . . . .772
CHAPTER 19:
Beyond Photoshop: Plug-Ins
. . .775
Adding and Removing Plug-Ins . . . .776
Managing Plug-Ins . . . .777
Noise Reducers . . . .778
Noiseware . . . .779
Dfine . . . .779
Photo Ninja (previously Noise Ninja) . . . 780
Making Selections and Masking . . . 780
Fluid Mask . . . 780
Perfect Mask . . . .782
Color Correction and Enhancement . . . .782
Viveza . . . .782
Color Efex Pro . . . .783
Perfect Portrait . . . .783
Miscellaneous Plug-Ins . . . .784
Silver Efex Pro . . . .785
Perfect Resize . . . .785
HDR Efex Pro . . . .786
Eye Candy . . . .786
SiteGrinder . . . .786
Dashboard Pro . . . .786
CHAPTER 20:
Photoshop and Video
. . .787
Creating Your First Video Project . . . .788
Using Video Document Presets . . . .788
Opening and Importing Video Clips . . . 790
Meet the Timeline Panel . . . .793
Editing Video . . . .794
Changing Clip Length . . . .794
Adding Transitions . . . .796
Adding Text, Logos, and Still Images . . . .799
Adding and Controlling Audio . . . 803
Animating Objects and Effects . . . 806
Adding and Deleting Keyframes . . . 806
Editing and Copying Keyframes . . . 808
Choosing an Interpolation Method . . . 809
Warping Text . . . 809
Animating Masks. . . 809
Rotoscoping and Onion Skins . . . 809
Global Lighting . . . 811
Adding Comments . . . 812
Adding Fill and Adjustment Layers . . . 813
Adding a Color Tint . . . 814
Changing Fill and Adjustment Layers’ Duration . . . 814
Adding Layer Styles . . . 816
Using Smart Filters with Video . . . 816
Cloning and Healing . . . 817
Exporting Videos . . . 818
Using Your Project in Other Video Editors . . . 821
Additional Video Resources . . . 821
CHAPTER 21:
Photoshop and 3D
. . .823
3D Basics . . . .824
Photoshop’s 3D Environment . . . .825
Creating a 3D Postcard . . . .825
Moving Objects in 3D Space . . . .827
Working with the Camera . . . 831
Creating Other 3D Objects . . . .833
Making 3D Text . . . .833
Making 3D Shapes . . . 834
Wrapping Art around Basic Shapes . . . .835
Making a Plane, Cylinder, or Sphere from Scratch . . . .836
Making a 3D Object from a Medical Scan . . . .836
Importing a 3D Model . . . .836
Rendering . . . .837
Saving and Exporting 3D Objects . . . .838
Editing 3D Objects . . . .839
Working with Materials . . . .839
Painting on a 3D Object . . . 841
Lighting Your 3D Scene . . . 841
Instances . . . 844
Combining Objects . . . 844
Running Filters on a 3D Layer . . . 844
Changing a 3D Layer’s Blend Mode and Opacity . . . 844
Creating 3D Animations . . . .845
Additional 3D Resources . . . .845
CHAPTER 22:
Using Adobe Bridge
. . .847
Installing Bridge . . . 848
Browsing through Photos . . . 849
Importing and Managing Photos . . . 851
Review Mode . . . 854
Sorting and Filtering Images . . . .856
Grouping Images into Collections . . . .857
Grouping Images into Stacks . . . .858
Opening Images in Camera Raw . . . .859
Showing Off Your Work . . . .862
Making a Slideshow . . . .863
Bridge CS6’s Export Panel . . . .863
Exporting Images from Bridge CS6 as PDFs . . . 864
Making a Web Gallery . . . 866
Using Mini Bridge . . . 866
Index
. . .871
NOTE You can download four online-only appendixes from this book’s Missing CD page at www.missingmanuals.com/
The Missing Credits
ABOUT THE AUTHOR
Lesa Snider is on a mission to teach the world to create—and use!—better graphics. She’s an internationally acclaimed speaker, a stock photographer, and the founder of the creative tutorial site PhotoLesa.com. Lesa is the author of many video-training workshops (www.lesa.in/clvideos) and the coauthor of iPhoto ’11: The Missing Manual. She writes a regular column for Photoshop User and Macworld magazines, and contributes frequently to Design-Tools.com and PlanetPhotoshop.com. Lesa is also a long-time member of the Photoshop World Dream Team of instructors and can be spotted teaching at many other conferences around the globe. You can connect with her online on Facebook (www.facebook.com/PhotoLesa), YouTube (www.lesa.in/ytvideochannel), Twitter (@PhotoLesa), and PhotoLesa.com.
During her free time, you’ll find Lesa carving the twisties on her sportbike, dressed up in her Star Trek best at a sci-fi convention with her husband, or hanging with fellow Apple Mac enthusiasts. Lesa is a proud member of the BMWMOA and the First Lady of the Colorado Mac User Group (CoMUG.com), a.k.a. the Boulder Mac Maniacs. Email: [email protected].
ABOUT THE CREATivE TEAM
Dawn Mann (editor) is associate editor for the Missing Manual series. When not working, she plays soccer, beads, and causes trouble. Email: [email protected].
Kara Ebrahim (production editor) lives, works, and plays in Cambridge, MA. She loves graphic design and all things outdoors. Email: [email protected].
Carla Spoon (proofreader) is a freelance writer and copy editor. An avid runner, she works and feeds her tech gadget addiction from her home office in the shadow of Mount Rainier. Email: [email protected].
Ron Strauss (indexer) specializes in the indexing of information technology publica-tions of all kinds. Ron is also an accomplished classical violist and lives in northern California with his wife and fellow indexer, Annie, and his miniature pinscher, Kanga. Email: [email protected].
David Creamer (technical reviewer) is an Adobe Certified Instructor for over 10 pro-grams, and has been an Adobe Certified Expert in Photoshop since 1995. Creamer is owner of IDEAS Training (IDEAStraining.com), a training and consultation company.
ACKNOWLEDGEMENTS
This book is dedicated to my husband, Jay Nelson, for making everyday life incredibly fun and for learning to appreciate heavy metal music, namely Ozzy Osbourne. J
I’d like to express galactic thanks to iStockphoto.com for providing some of the imagery in this book: An image really is worth a thousand words (if you ever need high-quality, affordable graphics, visit www.lesa.in/istockdeal). (Full disclosure: I was their chief evangelist for over six years.) A big hug and thanks to David Pogue who so graciously wrote the foreword for this book. To Jeff and Scott Kelby for believing in me and nurturing my career in immeasurable ways. To Derrick Story for his wisdom before I got started on this project, and a great big jug of Umbrian vino rosso to Dawn Mann for editing this book and keeping me on track. Her input makes me a better writer and I’m lucky to have her on our team. To my brilliant and long-time tech editor, Shangara Singh, whose expertise has helped create the best Photoshop book yet and whose humorous comments always made me giggle.
Special thanks to Marcus Conge (digitalmanipulation.com) and Jay Nelson for writing the new 3D chapter, to Rod Harlan for consulting on video editing, to Richard Harrington (photoshopforvideo.com) for helping with actions, to Taz Tally (taztallyphotography. com) for helping with the print chapter, as well as Bert Monroy (bertmonroy.com) and Veronica Hanley for guidance on all things vector-related. To Deborah Fox (deborahfoxart. com) for the beautiful art in the painting chapter, to Tanya and Richard Horie for their expert advice on the painting chapter and brush customization options (as well as creating my logo), to Karen Nace Willmore (karennace.com) for her HDR and wide-angle photography, and to Jeff Gamet (macobserver.com) for keeping me sane and helping with the first edition of this book.
To my esteemed colleagues—and good friends—Jack Davis, Ben Willmore, Eddie Tapp, Judy Host, Peter Cohen, Gary-Paul Prince, Larry Becker, Kevin Ames, Terry White, Dave Moser, and Andy Ihnatko, who all expressed their pride and confidence in me. I’d also like to thank our creativeLIVE.com family for promoting this book and for being so fun to play with, as well as LensProToGo.com for supplying me with incred-ible Canon gear to shoot with (if you need to rent camera gear, they’re the best!).
Last but not least, buckets of appreciation to my friends who gave their support—or a cocktail!—when I needed it most: Carol Morphew, Kathryn Kroll, Leslie Fishlock, Lorene Romero, and most importantly, Fran Snider, the best mama a girl could have (wish Daddy could’ve held this book!). To our beautiful kitties, Samantha and Baby Sherlock, who forced me to get out of my pretty purple Aeron chair and play The Laser Pointer Game with them at exactly 5:15 pm each day.
May the creative force be with you all!
THE MiSSiNG MANUAL SERiES
Missing Manuals are witty, superbly written guides to computer products that don’t come with printed manuals (which is just about all of them). Each book features a handcrafted index and cross-references to specific pages (not just chapters). Recent and upcoming titles include:
Excel 2013: The Missing Manual by Matthew MacDonald
Microsoft Project 2013: The Missing Manual by Bonnie Biafore
Access 2013: The Missing Manual by Matthew MacDonald
Windows 8: The Missing Manual by David Pogue
NOOK HD: The Missing Manual, Second Edition by Preston Gralla
Kindle Fire HD: The Missing Manual, Second Edition by Peter Meyers
iPod: The Missing Manual, Eleventh Edition by J.D. Biersdorfer
CSS3: The Missing Manual, Third Edition by David Sawyer McFarland
iPad: The Missing Manual, Fifth Edition by J.D. Biersdorfer
PHP & MySQL: The Missing Manual, Second Edition by Brett McLaughlin
Adobe Edge Animate: The Missing Manual by Chris Grover
iPhone: The Missing Manual, Sixth Edition by David Pogue
QuickBooks 2013: The Missing Manual by Bonnie Biafore
WordPress: The Missing Manual by Matthew MacDonald
Photoshop Elements 11: The Missing Manual by Barbara Brundage
I
n the short but crowded history of consumer technology, only two products ever became so common, influential, and powerful that their names become verbs.Google is one.
Photoshop is the other.
(“Did you Google that guy who asked you out?” “Yeah—he’s crazy. He Photoshopped his last girlfriend out of all his pictures!”)
It’s safe to say that these days, not a single photograph gets published, in print or online, without having been processed in Photoshop first. It’s usually perfectly in-nocent stuff: a little color adjustment, contrast boosting, or cropping.
But not always. Sometimes, the editing actually changes the photo so that it no longer represents the original, and all kinds of ethical questions arise. Remember when TV Guide Photoshopped Oprah’s head onto Ann-Margaret’s body? When Time magazine darkened O.J. Simpson’s skin to make him look more menacing on the cover? Or when National Geographic moved two of the pyramids closer together to improve the composition?
Well, you get the point: Photoshop is magic. Thanks to Photoshop, photography is no longer a reliable record of reality.
And now, all that magic is in your hands. Use it wisely.
Trouble is, Photoshop is a monster. It’s huge. Just opening it is like watching a slumbering beast heave into consciousness. Dudes: Photoshop has over 500 menu commands.
In short, installing Photoshop is like being told that you’ve just won a 747 jumbo jet. You sit down in the cockpit and survey the endless panels of controls and switches. Now what?
You don’t even get a printed manual anymore.
If there were ever a piece of software that needed the Missing Manual treatment, it was Photoshop.
In 2009, the beast was tamed at last by its new master, Lesa Snider: a natural-born Missing Manual author with Photoshop credentials as long as your arm.
She had worked on Missing Manuals, side by side with me in my office, for four years, in all kinds of editorial and production capacities. Today, when she’s not writing the bestselling Photoshop book (you’re reading it), she’s out in the real world, teaching Photoshop seminars, writing Photoshop articles, reviewing Photoshop for magazines, and generally serving as Photoshop guru to the masses.
The Missing Manual mantra runs through her blood: Make it clear, make it entertain-ing, make it complete (hence the thickness of this book). And above all, don’t just identify a feature: Tell us what it’s for. Tell us when to use it. (And if the answer is, “You’ll never use it,” tell us that, too.)
Now, I’ll be the first to admit that this book isn’t for everybody. In fact, it’s aimed primarily at two kinds of people: people who have never used Photoshop, and people who have.
But seriously, folks. If you’re new to Photoshop, you’ll find patient, friendly intro-ductions to all those nutty Photoshoppy concepts like layers, color spaces, image resolution, and so on. And, mercifully, you’ll find a lot of loving attention to a time-honored Missing Manual specialty—tips and shortcuts. As Photoshop pros can tell you, you pretty much have to learn some of Photoshop’s shortcuts or it will crush you like a bug.
On the other hand, if you already have some Photoshop experience, you’ll appreci-ate this book’s coverage of Photoshop CC’s new features. Some of them are pretty sweet indeed. For example, all the 3D features are built into the standard version of Photoshop; you don’t need some expensive Extended Edition to get them. The Camera Raw plug-in is available as a filter, and the Image Size dialog box sports a preview and new techniques for enlargements. And Shake Reduction—unbelievable. Its ability to de-blur a picture you took with an unsteady hand is nearly miraculous.
In any case, get psyched. You now have both the most famous, powerful, magical piece of software on earth—and a 900+-page treasure map to help you find your way.
The only missing ingredients are time, some photos to work on, and a little good taste. You’ll have to supply those yourself.
Good luck!
—David Pogue
C
ongratulations on buying one of the most complicated pieces of software ever created. Fortunately, it’s also one of the most rewarding. No other program on the market lets you massage, beautify, and transform images like Photoshop. It’s so popular that people use its name as a verb: “Dude, you Photoshopped the heck out of her!” You’d be hard-pressed to find a published image that hasn’t spent some quality time in this program, and those that didn’t probably should have.The bad news is that it’s a tough program to learn; you won’t become a Photoshop guru overnight. Luckily, you hold in your hot little hands a book that covers the program from a practical standpoint, so you’ll learn the kinds of techniques you can use every day. It’s written in plain English for normal people, so you don’t have to be any kind of expert to understand it. You’ll also learn just enough theory (where appropriate) to help you understand why you’re doing what you’re doing.
NOTE Adobe used to offer two versions of the program: Photoshop Standard and Photoshop Extended,
which included extra features such as 3D tools. However, they combined the two versions in CC.
What’s New in Photoshop CC
Adobe has added some nice new features to Photoshop CC and, as noted above, they rolled all of the features that used to be in Photoshop Extended into the CC version. The inclusion of 3D tools aside, Photoshop CC isn’t the most feature-packed upgrade the program has seen, but it’s still got some good stuff in it, especially in the realm of actions and filters. Here’s an overview of the new goodies (don’t worry
WHAT’S NEW IN PHOTOSHOP
CC if you don’t yet understand some of the terms used here—you’ll learn what they mean as you read through this book):
• Retina ready. Both Photoshop and Bridge now support Retina displays, Apple’s super-high resolution monitors (called HiDPI on PCs) and as such, you’ll spot a new 200 percent option in the View menu (which lets you see web graphics at the size they’ll appear in a browser). Several plug-ins also support these mind-bogglingly crystal-clear displays including Liquify, “Save for Web,” “Merge to HDR,” Vanishing Point, Adaptive Wide Angle, Lens Correction, and the Filter Gallery. While the new Adobe Camera Raw 8 isn’t yet Retina-happy, it should be soon (probably in version 8.1).
• Conditional actions. This super useful new feature lets you record a conditional action (see Chapter 18) that chooses among several previously recorded ac-tions in order to meet criteria that you set. You’ll learn all about it on page 768.
• Field Blur, Iris Blur, and Tilt-Shift filters now work with Smart Filters. Some of the most useful new features in Photoshop CS6 were the Field Blur, Iris Blur, and Tilt-Shift filters, which make creating blurry backgrounds easier than ever. Here in CC, those filters now work with Smart Filters, so you can run ’em non-destructively without having to duplicate your Image layer. These filters also take advantage of OpenCL, a technology found in newer graphics cards that lets Photoshop tap into the card’s processing power. As a result, previewing and applying these filters to your images is noticeably faster.
• Camera Raw filter and other Camera Raw enhancements. One of the most useful changes in Photoshop CC is that the Camera Raw plug-in is available as a Photoshop filter (it works as a Smart Filter, too). Camera Raw also has a new Radial filter that lets you apply adjustments in a circular fashion either from the inside of your image to its edges or vice-versa (it’s like a circular Gradient Filter). You can now heal areas that aren’t round using Camera Raw’s Spot Re-moval tool, and the new Upright feature lets you correct perspective problems. Last but not least, when merging multiple 32-bit image exposures using the “Merge to HDR Pro” dialog box, you can have Photoshop automatically create a Smart Object out of the result and then open it in the Camera Raw filter for fine-tuning. (Camera Raw is discussed throughout this book, but the bulk of the coverage is in Chapter 9.)
• Shake Reduction filter. In previous versions of Photoshop, there wasn’t much hope of making a blurry image look sharp (aside from using the Emboss filter). However, Photoshop CC’s new Shake Reduction filter analyzes your image and traces the pattern of the blurry parts in order to eradicate it. It does an incred-ible job on images that are slightly blurry due to camera shake. You’ll learn all about it starting on page 462.
simpli-WHAT’S NEW IN PHOTOSHOP
CC
• Faster Liquify filter that works with Smart Filters. The Liquify filter also takes advantage of your graphics card’s processing power, so it runs up to 16 times faster than it used to (especially when you’re working with big files). It now works with Smart Filters (page 632), too, which lets you use it nondestructively on any kind of layer including Shape, Type, and Video layers. Its masking controls were also simplified, it sports a new Smooth tool, and the new Load Last Mesh button lets you summon the last mesh you made.
• Minimum and Maximum filter improvements. Both of these filters were notori-ous for making round things appear square, though by choosing Roundness from the new Preserve drop-down menu, that won’t happen. And when you choose Roundness, you can enter decimals into the filters’ Radius fields, letting you be a lot more precise when you’re using ’em to fine-tune a layer mask.
• Brand-new Image Size dialog box and interpolation method. The Image Size dialog box has been simplified and redesigned to include a resizable image preview that helps you see the results of your settings before applying ’em, which is incredibly helpful in choosing the right interpolation method. The new Preserve Details interpolation method sharpens areas of fine detail in your image in order to produce higher quality enlargements (this new method includes a noise-reduction slider, too). All interpolation methods now have keyboard short-cuts , and there’s a handy list of size presets in the new Fit To drop-down menu.
• Rounded Rectangle tool has editable properties. One of the problems with using the Rounded Rectangle tool was that you had to guess at the Radius set-ting in order to produce the corner roundness that you want. That’s all changed now. When you use the Rounded Rectangle tool (or the plain ol’ Rectangle tool) in Photoshop CC, the Properties panel that opens includes four fields that you can use to alter the roundness of each corner individually, after you’ve drawn the shape.
• Path improvements. You can now activate multiple paths in the Paths panel by Shift- or ⌘-clicking (Ctrl-clicking on a PC) them, which lets you delete, duplicate, and change their stacking order en masse (you can also Shift-click to activate ’em in your document). And speaking of paths, Photoshop CC also lets you use the space bar to reposition an anchor point while you’re drawing a path.
• Selective layer filtering. This option lets you view only the layers that are currently active in the Layers panel. It’s really handy when your Layers panel is long and you’re editing layers that don’t necessarily match any of the other layer-filtering criteria, as well as when you’re editing vector shapes. Page 73 has details.
ABOUT THIS
BOOK • CSS supportcommand lets you copy color and formatting info into your computer’s memory . To the delight of web designers worldwide, the new Copy CSS as fully functional CSS code, so you can then paste it into your favorite HTML editor. You’ll spot the new command in the shortcut menus you get when you Control-click (right click) Type and Shape layers. Also new is the ability to point the Swatches panel to an HTML, CSS, or SVG file and have it automatically generate swatches from the color info inside those files (the Tip on page 494 tells you how to accomplish this).
• 3D. The experience of painting 3D objects in Photoshop has been improved and live previews are up to a hundred times faster than in previous versions of the program. To help you get a grip on 3D, this book sports a brand-new chapter (Chapter 21) that shows you how to start creating and working with 3D text and objects.
There are also tons of little changes in Photoshop CC, too, that are the direct result of Adobe’s customer feedback initiative called Just Do It (JDI). Here’s a partial list: the Crop tool now includes a setting that brings back the resolution field in the Options bar, you can save more than one Photoshop document at the same time, the Color Range command is better at detecting faces, a new anti-aliasing option makes text look like it will in popular web browsers, the Type tool new supports Indic languages, the Migrate Presets feature now copies over presets that aren’t currently loaded in Photoshop and doesn’t require a restart, metadata and ICC profiles are now saved with PNG files, Shape layer thumbnails now accurately preview the whole document, the Color Picker’s hex field is automatically highlighted when you open the dialog box, and last but not least, the Brush Preset picker now includes a brush tip preview as well as angle and roundness controls (which are also accessible from the Brush tool’s shortcut menu).
About This Book
Adobe has pulled together an amazing amount of information in its online help system (see online Appendix B, available from this book’s Missing CD page at www. missingmanuals.com/cds), but despite all these efforts, it’s geared toward seasoned Photoshop jockeys and assumes a level of skill that you may not have. The explana-tions are very clipped and to the point, which makes it difficult to get a real feel for the tool or technique you need help with.
ABOUT THIS BOOK
FREQUENTLY ASKED QUESTION
Meet the Creative Cloud
Dude, what the heck happened to Photoshop CS7? What on earth does “CC” mean?
Great question. For the first time ever, Adobe isn’t shipping perpetually licensed, boxed versions of their products; instead, your only option is to subscribe to—and then download—the software.
Using a service called the Adobe Creative Cloud, you can sub-scribe on an annual or monthly basis to one or all of Adobe’s products. For example, a Single App Creative Cloud subscription for Photoshop CC costs about $20 a month and gives you access to both Mac and PC versions of the program that you can install on up to two machines (say, a desktop and laptop). If you use two or more Adobe programs (say, Photoshop and InDesign), you might want to subscribe to all of their products which, as of this writing, includes 24 programs and services (both Mac and PC versions)—including the entire Adobe web font collection and the ability to share your projects with the collaborative Behance community (see the Note on page 2)—for about $50 a month. (Of course, these prices could change; check with Adobe for current pricing.)
Whichever option you choose, you simply download the software to your machine and install it, just like you normally would. However, once a month your Adobe software phones home via the Internet to validate your Creative Cloud account; if Adobe can’t validate your account, your software stops working (along with your fonts). In other words, if you don’t pay, you don’t get to play with the software (though there is a 30-day grace period if, for whatever reason, your computer can’t connect to the Internet).
Once you’re a Creative Cloud subscriber, you get 20 GB of storage space, which you can use to hosts websites and sync documents between computers and tablets (think iPads), and to back up documents or share them with others (regardless of whether or not those folks have Creative Cloud subscriptions). You also get the ability to sync custom settings to the Cloud so they’re accessible on other machines, such as actions,
prefer-ences, brushes, styles, and so on. For example, when you subscribe to the Creative Cloud (even if it’s just for Photoshop) and then install the program, your Adobe ID appears in the Photoshop menu (the Edit menu on a PC) with a submenu that contains Sync Settings Now and Manage Sync Settings options. Choosing the latter opens the Sync Settings preferences (page 21) so you can decide which presets to sync. You’ll also see a new sync icon near the status bar at the bottom left of an open document (it’s labeled in Figure 1-1 on page 2); give it a click to sync your goodies.
You can also sync documents between devices. For example, you can designate a folder on your hard drive for syncing, and then any items you put into it automatically sync to the Creative Cloud for access elsewhere (say, home or work). Subscribers also get their hands on new features as soon as Adobe rolls ’em out. (To learn the current version number of your copy of Photoshop CC, choose Help→System Info.)
You might ask, “Is this a good deal?” Well, if you typically upgrade your copy of Photoshop every other year, then sub-scribing to it costs more than twice as much as you’d pay to upgrade it over that period of time (though doing so is no longer an option). However, if you upgrade yearly, then you’ll pay a mere $40 more per year for Creative Cloud but gain access to new features as soon as they’re released, as well as the syncing and sharing services mentioned above. The bottom line is that now the only way to get Photoshop CC is to subscribe to it. Adobe will continue to sell and support Photoshop CS6 for a while; however, that’s the last licensed copy you’ll ever get (and there’s nothing wrong with keeping it on your machine if you already own it). Like it or not, we’re in the realm of rental software now.
ABOUT THIS
BOOK Some of the tutorials in this book refer to files you can download from this book’s Missing CD page on the Missing Manuals website (www.missingmanuals.com/cds) so you can practice the techniques you’re reading about. And throughout the book, you’ll find several kinds of sidebar articles. The ones labeled “Up to Speed” help newcomers to Photoshop do things or explain concepts that veterans are probably already familiar with. Those labeled “Power Users’ Clinic” cover more advanced topics for the brave of heart.
NOTE Photoshop CC functions almost identically on Mac and Windows computers, but the screenshots in this
book were all taken on a Mac for the sake of consistency. However, the keyboard shortcuts for the two operating systems are different, so you’ll find both included here—Mac shortcuts first, followed by Windows shortcuts in parentheses. In a few instances, the locations of certain folders differ, and in those cases, you get the directions for both operating systems.
UP TO SPEED
What Does “64-bit” Mean?
The cool phrase in computing circles for the past few years has been “64-bit.” While that term may sound pretty geeky, it’s actually not that intimidating. 64-bit programs (a.k.a. “applications” or “apps”) simply know how to count higher than 32-bit programs.
So what does that mean in practice? 32-bit programs can open and work with files that are up to 4 gigabytes in size—which is already huge. 64-bit programs, on the other hand, can open files that are way bigger than that, as long as your computer’s operating system can handle 64-bit apps. (Mac OS X 10.5 [Leop-ard] and Microsoft Windows Vista [the 64-bit version, anyway] and later are up to the task.) 64-bit programs can also make use of more memory than their 32-bit counterparts, which is crucial when you’re working with big honkin’ files. For example, the 64-bit version of Photoshop lets you use more than 4 gigs of RAM, which makes it run faster. (You can change how your
machine’s memory is allotted by tweaking Photoshop’s prefer-ences as described on pages 22–23.)
The bottom line is that, if you work with gigantic files, you’ll want to use the 64-bit version of Photoshop. And since most third-party plug-ins (Chapter 19) and filters (Chapter 15) have now been upgraded to work in 64-bit mode, there’s little reason to cast a single glance backward. In Photoshop CC, the 64-bit version is all you get on a Mac; however, when you install Photoshop on a PC, you get two full versions of the program in two separate folders: one for 32-bit mode and another for 64-bit mode (located in Program Files\Adobe\Photoshop CC
ABOUT THIS BOOK
About the Outline
This hefty book is divided into six parts, each devoted to the type of things you’ll do in Photoshop CC:
• Part One: The Basics. Here’s where you’ll learn the essential skills you need to know before moving forward. Chapter 1 gives you the lay of the land and teaches you how to work with panels and make the Photoshop workspace your own. You’ll also find out the many ways of undoing what you’ve done, which is crucial when you’re still learning. Chapter 2 covers how to open and view documents efficiently, and how to set up new documents so you have a solid foundation on which to build your masterpieces.
Chapter 3 dives into the most powerful Photoshop feature of all: layers. You’ll learn about the different kinds of layers and how to manage them, the power of layer masks, and how to use layer styles for special effects. Chapter 4 explains how to select part of an image so you can edit just that area. In Chapter 5, you’ll dive headfirst into the science of color as you explore channels (Photoshop’s way of storing the colors that make up your image) and learn how to use chan-nels to create selections; you’ll also pick up some channel-specific editing tips along the way.
NOTE In this book, the word “select” is used only to refer to the act of creating selections. In most other
instances, the word “activate” is used instead, as in “activate the layer” or “activate the Crop tool.”
• Part Two: Editing Images. Chapter 6 starts off by explaining a variety of ways you can crop images, both in Photoshop and in Camera Raw. The chapter then demystifies resolution once and for all so you’ll understand how to resize images without reducing their quality. In Chapter 7, you’ll learn how to combine images in a variety of ways, from simple techniques to more complex ones. Chapter 8 covers draining, changing, and adding color, arming you with several techniques for creating gorgeous black-and-white images, delicious duotones, partial-color effects, and more. You’ll also learn how to change the color of almost anything.
ABOUT THIS
BOOK • Part Three: The Artistic Side of Photoshop. creativity. Chapter 12 explains the many ways of choosing colors for your docu-This part of the book is all about ments, and teaches you how to create a painting from scratch. Chapter 13 focuses on using the mighty Pen tool to create complex illustrations and selections, along with how to use Photoshop’s various shape tools. Chapter 14 teaches you the basics of typography and then moves on to creating and formatting text in Photoshop. You’ll find out how to outline, texturize, and place photos inside text, among other fun yet practical techniques. Chapter 15 covers the wide world of filters including how to use Smart Filters; you’ll come away with at least one practical use for one or more of the filters in every category.
• Part Four: Printing and the Web. In Chapter 16, you’ll learn about printing images, beginning with why it’s so darn hard to make what comes out of your printer match what you see onscreen. You’ll learn about the different color modes and how to prepare images for printing, whether you’re using an inkjet printer or sending your files to a commercial printing press. Chapter 17 focuses on preparing images for the Web, walks you through the various file formats you can use, explains how to protect your images online, and shows you how to use Bridge to create web galleries. Rounding out the chapter is info on using the Slice tool on a web page design, and step-by-step instructions for creating an animated GIF.
• Part Five: Photoshop Power. This part is all about working smarter and faster. It starts with an entire chapter devoted to using actions (Chapter 18), which help you automate tasks you perform regularly. Chapter 19 covers installing and using plug-ins (small programs you can add on to Photoshop) and recom-mends some of the best on the market. Chapter 20 teaches you how to edit videos in Photoshop, Chapter 21 gets you started creating and working with 3D objects and text, and Chapter 22 explains how to use both Adobe Bridge and Photoshop’s Mini Bridge panel.
• Part Six: Appendixes. Appendix A covers installing and uninstalling Photo-shop. Appendix B gives you some troubleshooting tips, explains Photoshop’s help system, and points you to resources other than this book. Appendix C gives you a tour of the mighty Tools panel. And finally, Appendix D walks you through Photoshop CC’s 200+ menu items. All the appendixes are available on this book’s Missing CD page at www.missingmanuals.com/cds.
For Photographers
If you’re relatively new to digital-image editing or you’ve always shot film and are taking your first brave steps into the world of digital cameras, you’ll be amazed at what you can do in Photoshop, but there’s a lot to learn. By breaking Photoshop down into digestible chunks that are most important to you, the learning process will feel less overwhelming. (There’s no sense in tackling the whole program when you’ll only use a quarter of it—if that much.)
ABOUT THIS BOOK your job better. And with the help of this book, you’ll conquer everything faster
than you might think. As you gain confidence, you can start branching out into other parts of the program to broaden your skills. Here’s a suggested roadmap for quickly learning the most useful aspects of the program:
1. Read all of Chapters 1 and 2 (or at the very least skim them).
These two chapters show you where to find all of Photoshop’s tools and features, and explain how the program is organized. You’ll learn how to open, view, and save images, which is vital stuff to know.
2. If your photos aren’t on your computer already, read Chapter 22 about Adobe Bridge.
Bridge is an amazingly powerful image organizer and browser that can help get your images onto your computer. It takes care of importing, renaming, and even backing up your precious photos.
3. If you shoot in raw format (see the box on page 366) and need to color-correct your images in a hurry, skip ahead to the section on editing in Camera Raw in Chapter 9 (page 361).
This chapter includes an entire section on practical editing techniques you can use in Camera Raw, and a quick reference that points you to where you’ll find other Camera-Raw techniques throughout this book.
4. If you don’t shoot in raw and you need to resize your images before editing them, read Chapter 6.
This chapter explains resolution and how to resize images without reducing their quality.
5. Proceed with Chapters 8, 9, and 10 to learn about color effects, color-correcting, and retouching people, respectively.
6. When you’re ready to sharpen your images, read Chapter 11.
7. Finally, when you want to print your photos, read the section on printing with an inkjet printer in Chapter 16 (page 685).
This chapter walks you through printing photos and includes advice on how to print borderless images.
That’s all you need to get started. When you’re ready to dive more fully into Pho-toshop, pick back up at Chapter 3, which covers layers, and then move on through the book as time permits.
The Very Basics
This book assumes that you know how to use a computer and that, to some extent, you’re an expert double-clicker and menu opener. If not, here’s a quick refresher:
ABOUT THIS
BOOK mouse button once, which produces a menu of special features called a shortcut menu. (If you’re on a Mac and have a mouse with only one button, hold down the Control key while you click to simulate right-clicking.) To double-click means to press the left button twice, quickly, without moving the cursor between clicks. To drag means to click an object and then use the mouse to move it while still holding down the left mouse button.
Most selection buttons onscreen are pretty obvious, but you may not be familiar with radio buttons: To choose an option, you click one of these little empty circles that are arranged in a list.
You’ll find tons of keyboard shortcuts throughout this book, and they’re huge time-savers. If you see a sentence like, “Press ⌘-S (Ctrl+S) to save your file,” that means to hold down the ⌘ key (or Ctrl key, if you’re using a PC), and then press the S key, too; then let go of both keys. (This book lists Mac keyboard shortcuts first, followed by Windows shortcuts in parentheses.) Other keyboard shortcuts are so complex that you’ll need to use multiple fingers, both hands, and a well-placed elbow.
If you’re comfortable with basic concepts like these, you’re ready to get started with this book.
About
→
These
→
Arrows
In Photoshop CC: The Missing Manual (and in all Missing Manuals, for that matter), you’ll see arrows sprinkled throughout each chapter in sentences like this: “Choose Filter→Blur→Tilt-Shift.” This is a shorthand way of helping you find files, folders, and menu items without having to read through painfully long and boring instructions. For example, the sentence quoted above is a short way of saying: “At the top of the Photoshop window, locate the Filter menu. Click it and, in the list that appears, look for the Blur category. Point to the word Blur without clicking and, in the resulting submenu, click Tilt-Shift” (see Figure I-1).
FiGURE i-1
ABOUT THIS BOOK
About MissingManuals.com
On the Missing Manuals website (www.missingmanuals.com), you’ll find this book’s Missing CD page, which includes links to downloadable images mentioned in this book’s tutorials, in case you want to practice techniques without using your own photos.
A word about the image files for the tutorials: To make life easier for people with dial-up Internet connections, the file sizes have been kept pretty small. This means you probably won’t want to print the results of what you create (you’ll end up with a print about the size of a matchbook). But that doesn’t really matter because the files are only meant for onscreen use. You’ll see notes throughout the book about which practice images are available for any given chapter.
On the website, you can also find articles, tips, and updates to this book. If you click the Errata link, you’ll see any corrections we’ve made to the book, too; if you find something in these pages that you think is wrong, feel free to report it by clicking that link. Each time the book is printed, we’ll update it with any confirmed corrections. If you want to be certain that your own copy is up to the minute, this is where to check for any changes. And thanks for reporting any errors or suggesting corrections.
We’d love to hear your suggestions for new books in the Missing Manual line. There’s a place for that on www.missingmanuals.com, too. And while you’re online, you can also register this book at www.oreilly.com/register. Registering means we can send you updates about this book, and you’ll be eligible for special offers like discounts on future editions.
Safari® Books Online
Safari® Books Online is an on-demand digital library that lets you easily search over 7,500 technology and creative reference books and videos to find the answers you need quickly.
CHAPTER
1
P
hotoshop CC is bursting with fabulous features that’ll help you edit and cre-ate your very own digital masterpieces. If this is your first foray into the world of Photoshop, all these features will be new to you. If you’re an experienced pixel pusher, there are some surprises waiting for you, too. If you’re upgrading from Photoshop CS5 or earlier, Adobe introduced major changes to the work environ-ment back in CS6—like a brand-new color theme—and while these changes make Photoshop easier to use, they take some getting used to.This chapter gives you a solid foundation on which to build your Photoshop skills. You’ll learn how to work with the Application Frame and how to wrangle document windows and panels. Once you’ve gotten them placed just right, you’ll learn how to save your setup as a custom workspace. If you’re a beginner, the section on using Undo commands and history states will teach you how to fix mistakes and back out of almost anything you’ve done. Finally, you’ll learn how to fine-tune Photoshop’s behavior through preferences and built-in tools (called presets) that let you person-alize your experience even more. Let’s dive in!
Meet the Application Frame
When you launch Photoshop CC for the first time, you’re greeted by the Applica-tion Frame shown in Figure 1-1. This frame confines all things Photoshop to a single resizable and movable window. You can grab the whole mess—documents, panels, and all—and drag it to one side of your screen (or better yet, to another monitor) so it’s out of the way. And if you open more than one document, they’re displayed in handy tabs that you can rearrange by dragging.
Photoshop CC
MEET THE APPLICATION
FRAME Chances are, you’ll either love the Application Frame or hate it. If you’re on a computer running Windows, you’re used to programs looking and behaving this way. But if
you’re on a Mac and you’re coming from an older version of Photoshop (like CS3), this arrangement may feel a little odd; in that case, you can turn off the frame by choos-ing Window→Application Frame to make Photoshop switch to the floating-window view used in older versions of the program. (PC folks are stuck with the frame.)
NOTE In Photoshop CC, you may spot two new icons at the bottom of each document window, to the right
of the zoom-level indicator. The first icon, which looks like a tiny gear with two arrows to its right (labeled in
Figure 1-1) lets Creative Cloud subscribers sync their preferences and presets to the Creative Cloud so they can access ’em on another machine (see the box on page xxvii for more on the Creative Cloud). The second icon, which looks like a rectangle with a curved arrow inside it, lets you upload an image to the portfolio-sharing website Behance. (To learn more about Behance, visit www.lesa.in/adobebehance.)
FiGURE 1-1
You can open several images at the same time; just click a document’s tab to summon it front and center for editing. Photoshop stores the tools and adjustments you’ll use most in the panels on the left and right sides of the Application Frame; a full introduction to panels starts on page 7. (See page 12 to learn how to make your Tools panel have two columns like the one shown here.) The upside to using the Application Frame is that all of Photoshop’s bits and pieces stay together as you move things around (as long as the panels are still docked—see page 7).
NOTE Adobe reduced clutter back in Photoshop CS6 by removing the Application bar. Introduced in CS4, it
housed extras like guides, grids, and rulers, as well as several menus. As you’ll learn in the next few pages, those items are now sprinkled throughout the Tools panel, the View menu, and the Window menu. Also, if you use Photoshop alongside other programs, the box on page 4 explains how to get Photoshop out of the way without
MEET THE APPLICATION
FRAME
The Almighty Options Bar
Lording over the document window is the Options bar (Figure 1-2, top), which lets you customize the behavior of nearly every item in the Tools panel. This bar automatically changes to include settings related to the tool you’re currently using. Unfortunately, the Options bar’s labels are fairly cryptic, so it can be hard to figure out what the heck all those settings do. Luckily, you can point your cursor at any setting to see a little yellow pop-up description called a tooltip (you don’t need to click—just don’t move your mouse for a couple seconds).
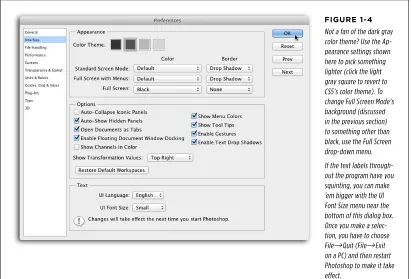
TIP If the tooltips drive you crazy, you can hide ’em by choosing Photoshop→Preferences→Interface
[Edit→Preferences→Interface on a PC] and turning off Show Tool Tips.
When you first install Photoshop, the Options bar is perched at the top of the screen, but it doesn’t have to stay there. If you’d rather put it somewhere else, grab its left end and drag it wherever you want, as shown in Figure 1-2, middle. If you decide to put it back later (also called docking), just drag it to the top of the screen and, when you see a thin blue line appear (Figure 1-2, bottom), release your mouse button.
TIP If a tool seems to be misbehaving, it’s likely because you changed one of the Options bar’s settings and forgot to change it back. These settings are sticky: Once you change them, they stay that way until you change them back.
FiGURE 1-2
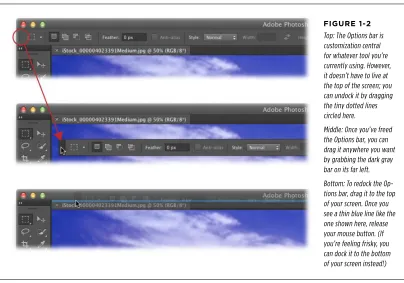
Top: The Options bar is customization central for whatever tool you’re currently using. However, it doesn’t have to live at the top of the screen; you can undock it by dragging the tiny dotted lines circled here.
Middle: Once you’ve freed the Options bar, you can drag it anywhere you want by grabbing the dark gray bar on its far left.
MEET THE APPLICATION
FRAME NOTE The Options bar also includes the workspace menu, which lets you change the way your Photoshop environment is set up. You’ll learn all about workspaces on page 10.
Swapping Screen Modes
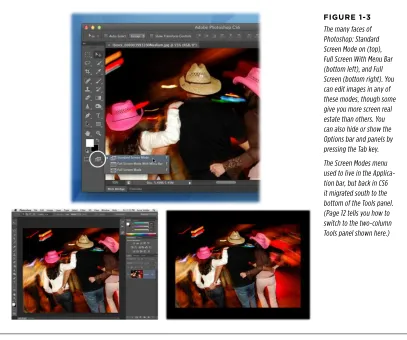
Photoshop includes three different screen modes for your document-viewing plea-sure. Depending on what you’re doing, one will suit you better than the others. For example, you can make an image take up your whole screen (with or without the menus and Options bar), hide Photoshop’s panels, and so on (see Figure 1-3). To give each mode a spin, you first need to open an image file: Choose File→Open, navigate to where the image lives, and then click Open.
TIP You can free up precious screen real estate by pressing the Tab key to hide Photoshop’s Options bar
and panels (pressing Shift-Tab hides all the panels except the Tools panel). This trick is a great way to get rid of distractions when you’re editing images, especially if you have a small monitor. To bring the panels back, press Tab again or mouse over to the edge of the Photoshop window where the panels should be; when you move your cursor away from the panels, they’ll disappear again. (If you mouse too far away from Photoshop’s edge, nothing happens.)
It’s a snap to jump between modes. Just press the F key repeatedly (unless you’re in the middle of cropping an image or using the Type tool—if you are, you’ll type a bunch of Fs) or use the Screen Modes menu at the bottom of the Tools panel (circled in Figure 1-3, top). These are your choices:
UP TO SPEED
Hiding vs. Quitting
If you need to do some work on your desktop or in another program, you can temporarily hide Photoshop, saving you the time and toe-tapping of quitting it and then restarting it again later.
On a Mac, press ⌘-Control-H or click the yellow dot at the top left of the Application Frame to minimize the window. Your workspace disappears, but Photoshop keeps running in the background. To bring it back to the forefront, click its icon in the Dock. You can also make Photoshop temporarily disappear by pressing ⌘-H; the first time you do, a dialog box appears asking if you’d like to assign that keyboard shortcut to make it hide Photoshop instead of hiding text highlighting, guides,
and so on. (To change it back, edit your keyboard shortcuts as explained in the box on page 27, or delete Photoshop’s prefer-ences as described in the first Note on page 21.)
On a PC, you can hide (minimize) the program by clicking the minus button in Photoshop’s upper right; Windows tucks the program down into your taskbar. To get it back, click its taskbar icon.
MEET THE APPLICATION
FRAME
FiGURE 1-3
The many faces of Photoshop: Standard Screen Mode on (top), Full Screen With Menu Bar (bottom left), and Full Screen (bottom right). You can edit images in any of these modes, though some give you more screen real estate than others. You can also hide or show the Options bar and panels by pressing the Tab key.
The Screen Modes menu used to live in the Applica-tion bar, but back in CS6 it migrated south to the bottom of the Tools panel. (Page 12 tells you how to switch to the two-column Tools panel shown here.)
• Standard Screen Mode is the view you see when you launch Photoshop for the first time. This mode includes menus, the Application Frame, the Options bar, panels, and document windows. Use this mode when the Application Frame is active and you need to scoot the whole of Photoshop—windows and all—around on your monitor (except for undocked panels or free-floating windows).