The Official Guide
Gary David Bouton
The material in this eBook also appears in the print version of this title: 0-07-154570-0.
All trademarks are trademarks of their respective owners. Rather than put a trademark symbol after every occurrence of a trademarked name, we use names in an editorial fashion only, and to the benefit of the trademark owner, with no intention of infringement of the trademark. Where such designations appear in this book, they have been printed with initial caps.
McGraw-Hill eBooks are available at special quantity discounts to use as premiums and sales promotions, or for use in corporate training programs. For more information, please contact George Hoare, Special Sales, at [email protected] or (212) 904-4069.
TERMS OF USE
This is a copyrighted work and The McGraw-Hill Companies, Inc. (“McGraw-Hill”) and its licensors reserve all rights in and to the work. Use of this work is subject to these terms. Except as permitted under the Copyright Act of 1976 and the right to store and retrieve one copy of the work, you may not decompile, disassemble, reverse engineer, reproduce, modify, create derivative works based upon, transmit, distrib-ute, disseminate, sell, publish or sublicense the work or any part of it without McGraw-Hill’s prior consent. You may use the work for your own noncommercial and personal use; any other use of the work is strictly prohibited. Your right to use the work may be terminated if you fail to comply with these terms.
THE WORK IS PROVIDED “AS IS.” McGRAW-HILL AND ITS LICENSORS MAKE NO GUARANTEES OR WARRANTIES AS TO THE ACCURACY, ADEQUACY OR COMPLETENESS OF OR RESULTS TO BE OBTAINED FROM USING THE WORK, INCLUD-ING ANY INFORMATION THAT CAN BE ACCESSED THROUGH THE WORK VIA HYPERLINK OR OTHERWISE, AND EXPRESS-LY DISCLAIM ANY WARRANTY, EXPRESS OR IMPLIED, INCLUDING BUT NOT LIMITED TO IMPLIED WARRANTIES OF MERCHANTABILITY OR FITNESS FOR A PARTICULAR PURPOSE. McGraw-Hill and its licensors do not warrant or guarantee that the functions contained in the work will meet your requirements or that its operation will be uninterrupted or error free. Neither McGraw-Hill nor its licensors shall be liable to you or anyone else for any inaccuracy, error or omission, regardless of cause, in the work or for any damages resulting therefrom. McGraw-Hill has no responsibility for the content of any information accessed through the work. Under no circumstances shall McGraw-Hill and/or its licensors be liable for any indirect, incidental, special, punitive, consequential or similar damages that result from the use of or inability to use the work, even if any of them has been advised of the possibility of such damages. This limitation of liability shall apply to any claim or cause whatsoever whether such claim or cause arises in contract, tort or otherwise.
video editing, content creation for the Web, and 3D modeling. Gary has been drawing and painting both traditionally and electronically for close to 40 years and has been writing books and articles on art since 1992. He has received four international awards for design and desktop publishing and was a finalist in the CorelDRAW World Design Contest. In his spare time, Gary composes and records music and works on CGI special effects for music videos.
About the Technical Editor
Peter W. Cooperhas served as technical editor beginning withCorelDRAW 10: The Official
Guide. Having earned a BS in Chemistry and an MS in Systems Engineering, he has been
employed as a water systems chemist and a process engineer. His various endeavors over the years include software development for computer-aided mammography. Peter has been published in theJWPCFand is co-inventor of the U.S. Patent titledVisual environment
simulator for mobile viewer. He knows firsthand how the misplaced jot or title in a technical
exposition can be a most unwelcome source of headache.
PART I
CorelDRAW X4 Quick Start Guide1
What’s New in CorelDRAW X4? . . . 32
Exploring Your Workspace . . . 173
Examining the Palettes, Cruising the Menus . . . 374
The X4 Test Drive . . . 71PART II
Getting Started with CorelDRAW X45
Working with Single- and Multi-Page Documents . . . 976
Measuring and Drawing Helpers . . . 1177
Views, Zooming, Navigating Your Work . . . 1498
Moving, Scaling, Rotating: Basic Transformations . . . 167PART III
Working with Object Tools9
Creating Basic Shapes . . . 19110
Using the Pen Tools . . . 21711
Editing Objects . . . 25112
Arranging and Organizing Objects . . . 275PART IV
Working with Text13
Typography Rules and Conventions . . . 32114
Working with Text . . . 34515
Creating Your Own Font . . . 38116
Getting Your Words Perfect . . . 407PART V
Attributes for Objects and Lines17
Filling Objects . . . 43718
Outline Attributes . . . 47119
Digital Color Theory Put to Practice . . . 491PART VI
Creating Special Effects20
Envelope and Distortion Effects . . . 52521
Blends and Contours . . . 55122
Lens Effects and Transparency . . . 58923
Embellishments: Bevels, PowerClips, and Shadows . . . 623PART VII
Creating the Illusion of 3D Objects24
Working with Perspective . . . 65325
Extruding Objects . . . 667PART VIII
Thinking Outside the (Tool)Box26
Bitmap Boot Camp: Working with Photographs . . . 69727
Image-ination: Advanced Photography Techniques . . . 72328
Printing: Professional Output . . . 75329
Basic HTML Page Layout and Publishing . . . 79530
Automating Tasks and Visual Basic for Applications . . . 827Appendix
Shortcut Keys . . . 855CONTENTS
Foreword . . . xxv
Acknowledgments . . . xxvii
Introduction . . . xxix
PART I CorelDRAW X4 Quick Start Guide CHAPTER 1 What’s New in CorelDRAW X4? . . . 3
Page Layout Enhancements . . . 4
Independent Layers . . . 4
Interactive Tables . . . 5
Live Text Preview . . . 6
Easy Font Identification . . . 6
Mirroring Paragraph Text . . . 7
Quotation Marks Support for Different Languages . . . 7
New Fonts . . . 7
Camera Raw and Third-Party Application Support . . . 7
Camera Raw File Support . . . 7
Enhanced Color Management Support . . . 8
Compatibility with Today’s Applications . . . 8
Simplified Searches and Print Merging . . . 10
Extended Search Functions . . . 10
Search Capability When Saving and Opening Files . . . 10
Improved Print Merging . . . 10
Templates and Extras . . . 11
Templates and Search Capability for Templates . . . 11
Extras . . . 11
New Corel PowerTRACE Features . . . 11
CorelDRAW ConceptShare: Collaborating Online . . . 12
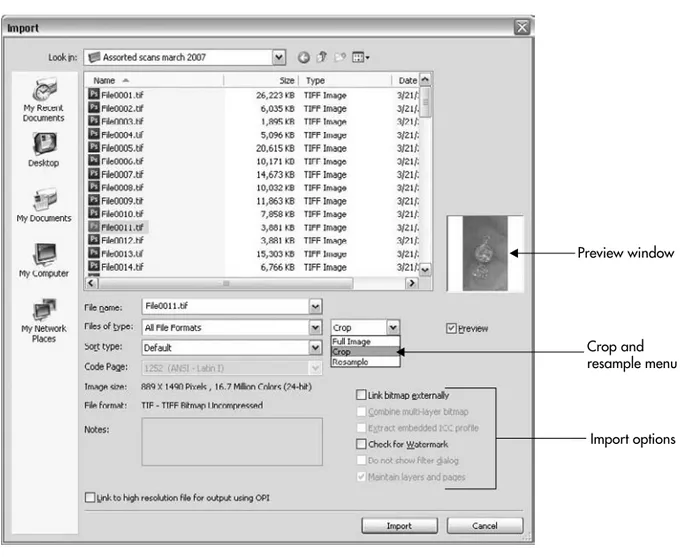
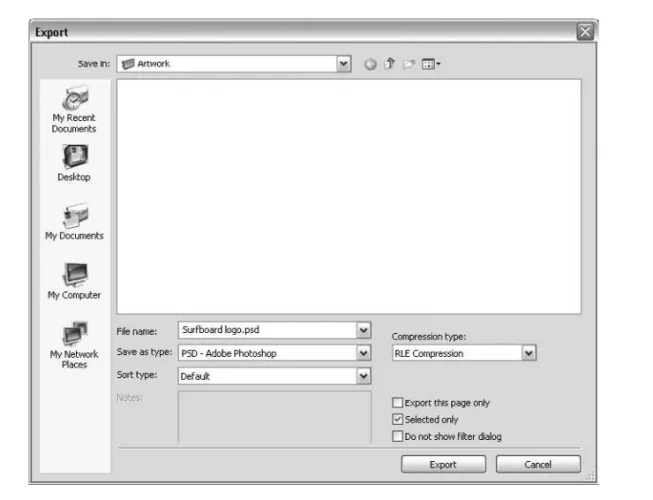
Exporting Files and Choosing Options . . . 61
PART II Getting Started with CorelDRAW X4 CHAPTER 5 Working with Single- and Multi-Page Documents . . . 97
Setting Up Your Document Page . . . 98
Page Viewing Options . . . 98
Page Commands . . . 112
Working with Guidelines, Dynamic Guides, and Guide Layers . . . 136
Using the View Navigator . . . 163
CHAPTER 16 Getting Your Words Perfect . . . 407
PART V Attributes for Objects and Lines CHAPTER 17 Filling Objects . . . 437
Examining the Fill Types . . . 438
Clearing an Envelope Shape . . . 539
CHAPTER 22 Lens Effects and Transparency . . . 589
Creating a Dimensional Drawing Through Transparency . . . 608
Setting Transparency Properties . . . 610
Using the Interactive Drop Shadow Tool and Property Bar . . . 634
Working the Property Bar and Shadow-Making Interactive Markers . . . 635
Manually Adjusting a Drop Shadow Effect . . . 637
Using Flat Drop Shadow Options . . . 637
PowerClipping Your Way to Advanced Design Work . . . 641
PART VII Creating the Illusion of 3D Objects
PART VIII Thinking Outside the (Tool)Box Saving a Bitmap Copy of Your CorelDRAW Composition . . . 721
Over the years, CorelDRAW has developed into a full-featured, professional suite of graphics applications for users of all skill levels to create illustrations, design professional layouts, and work seamlessly between pixel-based and vector graphics, with powerful editing tools in a completely integrated, easy-to-use bundle. The team at Corel continues to strive to provide products that both delight and inspire users around the world with the release of CorelDRAW Graphics Suite X4 and this newOfficial Guide.
With a redesigned look and feel,CorelDRAW Graphics Suite X4fuels the creative process by making it simple to manage project elements through integration with desktop search engines. Professionals and aspiring designers alike will appreciate our latest product offering, a redefined standard for creating exceptional designs. New to X4 is support for camera Raw file formats, MS Publisher, and Adobe CS3 applications, creating an optimized workflow for both individual and workgroup designers. With powerful text and layout enhancements such as Live Text Preview, Tables, and Layers per Page, comprehensive file compatibility, and updated high-quality content,CorelDRAW Graphics Suite X4gives the user the confidence to tackle a wide range of projects, from attention-getting logos and slick commercial signage to multi-page brochures and other business-driven collateral needs. With integration into online services such as CorelDRAWConceptShare.com, there is now a top-to-bottom collaboration solution throughout the design process and robust communication opportunities with other members of the CorelDRAW.com online community. The route from a white page to a finalized and approved creation has never been easier or faster.
CorelDRAW X4: The Official Guideis the product of a valued partnership between
Corel Corporation and McGraw-Hill. The author and contributors have worked closely with the product team at Corel to ensure that every user who owns our product has the information needed to turn inspiration into stunning results.
We’re exceptionally pleased to welcome veteran computer graphics author Gary David Bouton to this edition of theOfficial Guide,for providing documentation,
real-world tutorials, example files, and bonus content to make your adventures in
xxv
CorelDRAW X4 stimulating and artistically rewarding. Gary has been a CorelDRAW user since 1991. He has worked with Corel engineers on previous builds, and he has written several other CorelDRAW books throughout the years. As you work through each chapter, I’m sure theOfficial Guidewill be an invaluable resource for users of every skill level and style of personal and professional expression.
usefulness you.
■ To Megg Morin for her ready acceptance of my ideas for this new edition of
The Official Guide,for her unflagging encouragement while reviewing the chapters,
and for being a good sport and letting me get silly here and there in the tutorials.
■ To Carly Stapleton, Organizational Wizardess Supreme, who made it simple for me to domypart of this book. Thank you, Carly, for your patience and guidance through the process, which at times seemed to me like the warehouse scene inIndiana Jones.
■ Project Editor LeeAnn Pickrell. A good developmental and copy editor is going to fix things an author broke, but also has the insight to leave “what ain’t broken” as it
is. LeeAnn, you’re indeed a good editor and I thank you from the bottom of my non-parallisms!
■ Copy Editor Jan Jue for flagging me when I went out to the ozone with a few of my explanations and for catching and correcting some gaffs that the rest of us didn’t notice.
■ Technical Editor Peter Cooper. Thanks to Peter, we’re all confident that this book is technically accurate down to the punctuation in the tutorials! A lot of time and diligence went into Peter’s review of my work, and it’s all for the benefit of our readers. Thanks, Peter!
■ Steve Bain and Nick Wilkinson for portions of their original manuscript. ■ Lyssa Wald for her outstanding work on the color signature. I never thought
my work could look as good in CMYK! Thanks, Lyssa.
xxvii
■ Production Supervisor George Anderson. Thanks to George and his expert team for the crisp layout of this book’s interior and for the hours spent working with me on getting the figures and illustrations looking their best.
■ Gérard Métrailler at Corel Corporation. Thank you for your support of the
Official Guide and for creating the fine subject of this book!
■ Kelly Manuel at Corel Corporation. Without your help, I wouldn’t have been able to pore through the beta versions of X4; my deepest thanks.
■ John Falsetto at Corel Corporation. Thanks, John, for your timely feedback during the writing of this book. When I had a question, the answer was in my mailbox, usually before my daily spam!
■ Tony Severenuk at Corel Corporation. Thanks to Tony, this book is as accurate as Peter and I tried to make it. Thanks in particular for all the advice on CorelDRAW’s handling of camera Raw, Tony.
CorelDRAW X4: The Official Guideis your handbook to the most feature-filled drawing
application you could hope for, and as you’d rightly expect, the chapters contain comprehensive explanations of what tools, pop-up menus, commands, dockers, and other elements do. But the
prizein this book is that you’ll learn not only thevalueof the features, but also what they’re good for—how each tool, command, option, and feature can be used to best serve a design problem you want to solve. Knowledge is fine—you can get facts from Wikipedia and around every corner on the Web, the bookstore, and your friends and family. When you put facts touse,
however, you eventually gain skill you can tap into in the future, build upon, and eventually your knowledge becomeswisdom—something an ambitious, expressive designer has an affinity for—
right up there with water and oxygen.
This book is divided into eight parts plus an appendix listing keyboard shortcuts that’ll speed up your work in CorelDRAW. As you might expect, the parts follow a progression, from a very basic introduction to later chapters that delve into special effects and even photo editing. If you’re the type of reader who likes to begin at the beginning and make a linear voyage to finish at the appendix, you won’t be surprised. However, the chapters are structured and fairly compartmentalized to address a specific topic; if you want fast solutions for specific areas within CorelDRAW, you can also “pick and choose.” One of the wonderful things about books is that you can skip ahead and rewind—just as you do with DVD movies!
■ Part I starts you off with the new features in CorelDRAW X4, a must-read for users who’ve made the upgrade. Also in this part you’ll be guided through CorelDRAW options, thoroughly pore through the menus and palettes (including CorelDRAW dockers), and you’ll learn how to set up the workspace to make you feel right at home. New users are encouraged to set aside some quality time for this part—you’ll save a lot of time later when you want to get to the Fun Stuff.
xxix
■ Part II focuses on navigating and measuring the workspace and your document, and on how to size things up, from measuring objects to moving and rotating them. You’ll also learn how to set up a multi-page document, create brochures and flyers, and you’ll see that each page can be a unique size and orientation.
■ Part III gets you up and running with two of the most important tools used in designing original artwork, the Pen Tools and the Shape Tool. You’ll also get a handle on creating shapes using various presets CorelDRAW has to offer. Once you have your object created and edited to your liking, it’s only natural to make more of them; this part shows you how to arrange, group, duplicate, clone, and perform other tasks in your document to make laying out what you’ve created an inspired effort.
■ Part IV dives into typography, working with Artistic and Paragraph Text, spelling and other CorelDRAW proofing tools, and some special effects you can create for fancy headlines. Sometimes it’s better to just say it instead of show it; CorelDRAW has the ideal tools for both the text and graphic message, and this part of the book also shows how to blend the two vehicles artistically for what you want to communicate.
■ Part V puts the meat on the bones of the objects you design; in these chapters you’ll learn everything you need to know about object fills, outline properties, and most importantly, about digital color. Learn how to define and apply uniform fills, bitmap fills, and colors from different colormodelsto your work so they’ll print exactly as
you intend them to. And if you need a map or schematic drawing, check out this part for the lowdown on creating dashed lines, lines with arrowheads, and more.
■ Part VI is a truly special part; CorelDRAW comes with a boatload of special effect features, and these chapters take you through the steps to distorting, blending, and creating photorealistic effects such as object transparency and soft, life-like shadows. If you’ve ever been stuck at a point where your design needs that “special something,” look into this special part of the book. Learn how to create shading as you’ve seen in airbrush illustrations, design chrome and glass-like objects, and create a seamless integration between what you draw and the digital photos you can place in your document.
■ Part VIII (that’s “8” if you’re tired of reading Roman numerals) is truly an advanced section of the book, but it’s accessible to readers of all skill levels, and its contents take you through working with photographs, getting your prints looking their best, and more. See how to work with CorelDRAW’s extensive host of print options and features, learn the techniques for output to paper, film, transfer materials, and get to know CorelDRAW’s pre-flight options so your time and the expense of professional printing are on your side. You’ll also see how to get the best look out of imported bitmaps, beginning right with CorelDRAW’s Raw Lab. Learn how to work with image resolutions, and see how to export your vector drawings to bitmap file format. You’ll also want to pore through CorelDRAW’s HTML publishing features—make that print ad you’ve designed into a Web banner with only a few clicks. Finally, Visual Basic for Applications (VBA) is documented. See how to write simple scripts without actually writing a line of code (it’s visual; you record cursor movements), and speed up your work by automating common tasks with VBA.
■ The Appendix to the book is full of shortcuts you can use in CorelDRAW. Find a task you need to perform faster and the Appendix lists the combinations of keys you can press to get you where you need to go.
Tutorial and Bonus Content: Where to Find It
One of the new things about this edition ofCorelDRAW Official Guideis that there are formal tutorials, laid out in steps, along with explanations as to why you’re asked to do something. You can’t miss a Tutorial section: it’s marked with the Educated Lightbulb icon shown here. Many of these Tutorials will go better and smoother, and better demonstrate a technique or principal if you have a working file loaded in the drawing window, so we’ve provided you with several. Before many Tutorials, you’ll see a Download icon in the margin (a down-arrow icon); that’s your clue to go to the following URL and download the content before starting the related Tutorial.
The Tutorial files can be found at www.mhprofessional.com. From this page, click the Downloads link and locate this book’s title to get to the tutorial files.
logo on a layer on top of the image of the truck, use the Effects | Perspective command (see Chapter 24) on the logo to match the camera angle, and you can then show your design to clients and coworkers before you go through the expense of commercial printing.
The Boutons also offer original typefaces and some content that we want to remain a surprise. Just visit TheBoutons.com, and then click the CBT button (Corel Bonus Things) on the navigation bar.
I know I speak for the entire group who helped make this book happen that we’re excited about this new version of CorelDRAW. So much so that we were highly motivated to make thisOfficial Guidereflect all the creative possibilities you’ll truly have a fun time learning, exploring, and building upon. Soenoughwith Introductions! Turn the page and get to the Good Stuff!
CorelDRAW X4 Quick
Start Guide
What’s New in
CorelDRAW X4?
3
F
rom the features you work with, to thewayyou work, CorelDRAW X4 offers significant enhancements over previous versions. Page layouts can be refined and redefined more quickly, revised interface buttons make finding the tools you need a snap, you can import camera Raw images after correcting for exposure and color temperature—all in all, current users offered advice and Corel engineers did some serious listening.Whether you’re new to CorelDRAW or an old hand, you should take a few moments and review the new features covered in this chapter. You’ll discover that “working smart” can also be a lot offun.
Page Layout Enhancements
Many users have grown comfortable using CorelDRAW for page layouts; it handles text formatting as well as desktop publishing programs such as Ventura and Adobe InDesign, with the added advantage of CorelDRAW’s sophisticated drawing tools. The good news in version X4 is that you now have control over layers on a page-by-page basis, the creation of tables in a document can almost be performed in your sleep, font previewing—as applied within the document—is new, and there are other DTP features worthy of exploration here. Chapter 14 is packed from column width to column width on page layout details.
Independent Layers
Pages in a multi-page document can be any size and orientation you like in CorelDRAW, but the big news is that drawing layers can be defined on a page-by-page basis, as can guidelines. This means that you can create abundle—letterhead stationery, envelopes, and other promotional
material for a project all within one CorelDRAW document, as shown in Figure 1-1. You’ll most certainly have your own use in mind for independent layers; projects are just one creative use of this new feature.
Interactive Tables
You’ll find a new Table Tool on the Toolbox in version X4. Not only can you import tables, but for simple, neat additions to a design, you can enter and format data right after you’ve defined a table with this tool. Once you’ve built a table, it’s easy to align, resize, and edit the tables and table cells so your tables are visually compatible with the overall design. Figure 1-2 shows an example of a table that uses reversed coloring for the cells, individual cells have custom color applied, and the border width is thickened from the default table border using the options on the Property Bar. You can use any font you like for table entries, so your design can look like a formal spreadsheet or an elegant indexed list. Part IV in this book takes you through table creation and the ins and outs of good typography.
1
FIGURE 1-1 You can create different layers for different pages in X4.
Live Text Preview
If you’ve ever needed to experiment with a choice of fonts for size, appeal, and page color, the new Live Text Preview can display how your Paragraph and Artistic Text will look
beforeyou apply the change. In Figure 1-3 you can see a split screen: at left the text is hard
to read because script fonts are intended for headline and not paragraph text, while at right, a new, cleaner typeface is previewed by choosing from the selector on the Property Bar. Finally, without applying the text change, you can see the text as itmightappear in the
drawing window in the document. If you like what you’ve previewed, all you do is click the font name in the selector and you’re done.
Easy Font Identification
If you haven’t been there yet, MyFonts.com is one of the largest clearing houses for commercial and independent digital typefaces, a terrific place to start when you have a new assignment that demands a distinctive font or two. MyFonts also hosts WhatTheFont—a site that can identify a screen capture of a typeface sample with surprising accuracy. You can access the WhatTheFont page directly within CorelDRAW, using the built-in screen capture utility. See lucky Chapter 13 for the details and instructions on this feature.
Mirroring Paragraph Text
If you need to reverse Paragraph Text for output to a T-shirt transfer or have a special printing job that requires a reversed plate, Paragraph Text can now be mirrored horizontally and vertically. To do this, you just drag a bottom or side bounding box handle using the Pick Tool and the Paragraph Text flows to the width of your needs. You also have the option to automatically mirror Paragraph Text using the buttons on the Property Bar.
Quotation Marks Support for Different Languages
You can now edit the quotation mark styles within the text and choose the styles that are automatically inserted when you type in different languages.
New Fonts
Enhanced language support for Latin, Greek, and Cyrillic now comes with an extended selection of new fonts in the CorelDRAW CDs (the boxed set only, not the downloadable version) and includes single-line engraving fonts and OpenType cross-platform fonts.
Camera Raw and Third-Party Application Support
Whether you’re working in an enterprise or a small collaborative group, you’ll need to process high-fidelity camera Raw images and, occasionally, open a graphics file that wasn’t created using CorelDRAW. With version X4 you have a camera Raw processing lab you can access from right within the application. Additionally, CorelDRAW now imports media from many Adobe CS3 products, Microsoft Word 2007 documents, and a host of other applications.
Camera Raw File Support
CorelDRAW X4 has a top-to-bottom solution for camera Raw images that you need to use in a page layout or other design. When you choose to open a Raw image directly from your camera’s memory or from hard disk, CorelDRAW’s Camera Raw Lab loads the image before placing it in your document. Then, within this applet, you can process the photo for exposure, color temperature, shadow recovery, white balance, and all other aspects to make your photograph flawless. CorelDRAW sports a comprehensive list of Raw file formats from over 80 models and from 20 different manufacturers, including Hasselblad, Contax, Canon, Leica, Kodak, Nikon, and Minolta. You’d be hard-pressed not to find your camera in the list of supported cameras. CorelDRAW also supports Adobe’s DNG Raw exchange file format.
Figure 1-4 shows the Camera Raw Lab; unprocessed, this image was terribly underexposed.
Enhanced Color Management Support
Color accuracy is a mandate in today’s commercial world, and support has been added to CorelDRAW for the Adobe Color Management Module (CMM). On the Windows Vista operating system, you can also use the Windows Color System CMM. You can specify a color profile for exported bitmaps (this is calledcolor-taggingan image) and the tagged
image will appear on everyone else’s calibrated monitors the way you see it on yours.
Compatibility with Today’s Applications
CorelDRAW can now import (and in most cases export) the following commercial applications:
■ Adobe Illustrator CS3 (AI) files ■ Photoshop CS3 (PSD) images
■ Acrobat 8 (PDF 1.7 and PDF/A, including PDF comments) Portable Document Format
■ AutoCAD (DXF and DWG) files
■ Microsoft Word 2007 (DOC or RTF, import only)
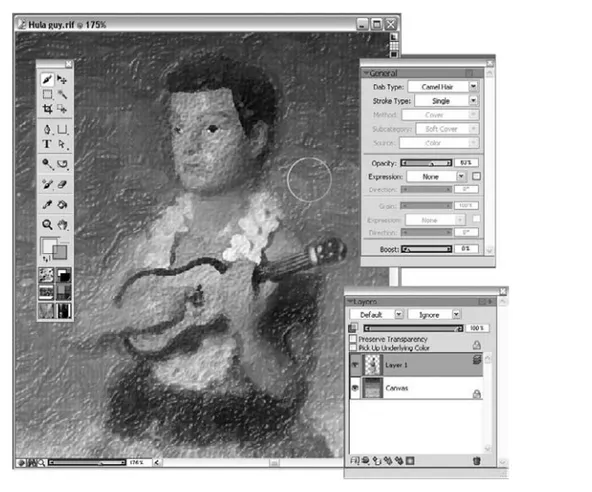
■ Microsoft Publisher 2002, 2003, and 2007 (PUB, import only) ■ Corel Painter X RIF files with layers intact
Corel Painter X is a natural choice for artists who want to simulate the look of traditional media such as oils, pastels, chalks, and textured artistic canvases. In Figure 1-5 you can see the creation of a multi-layer painting—the background is a separate layer from the foreground fellow. This is called preplanning; let’s suppose the coworker who receives this file doesn’t own Painter X and needs a replacement for the background layer, visually striking as it might be.
The user who owns X4 has absolutely no problem opening the Painter RIF file. It imports as a group, which can then be ungrouped, and in this example, the foreground character is on a layer with transparency, as shown in Figure 1-6. CorelDRAW reads the transparent regions accurately and in no time, a substitute background can be drawn and perfectly integrated with the Painter layer.
1
Simplified Searches and Print Merging
If you use CorelDRAW as a workhorse, you’ll find the new search capabilities to be invaluable, and the Print Merging feature makes mass mailings a thing that even a user without any spreadsheet knowledge (or interest) can do with speed and style.
Extended Search Functions
Now you can use keywords, notes, file type, date, and specific text when you search for CorelDRAW X4 files from Windows Explorer. You can also add or edit file properties within the application, or from Windows Explorer, Windows Search, Windows Desktop Search, or Windows Vista Search.
Search Capability When Saving and Opening Files
You can organize your projects with ease and a little preplanning by adding keywords and notes when saving your files. When opening and saving files, Windows Vista users can search by author, subject, file type, date, keywords, and other file properties.
Improved Print Merging
Easily create scores of personalized invitations, labels, envelopes, you name it, all using the same CorelDRAW design. Create and edit merged data in a record editor that operates much like a spreadsheet, but without the hassles. See Chapter 28 to learn the mercifully few steps it takes to gain mastery of this powerful new feature.
Templates and Extras
For those who purchased the X4 boxed set, there’s a wealth of new goodies. In particular, the templates now are fully searchable.
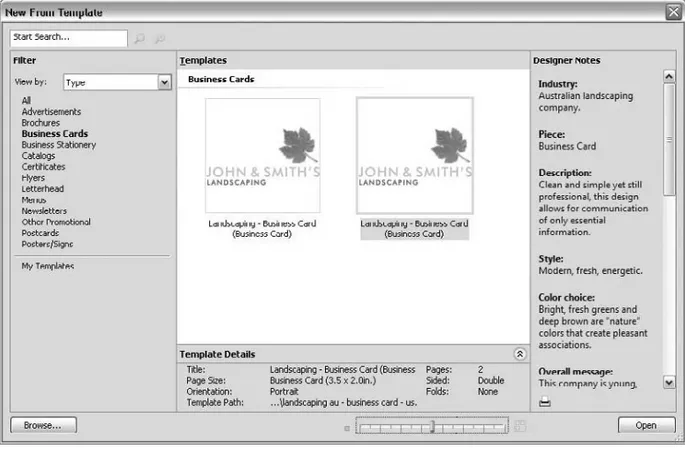
Templates and Search Capability for Templates
Get a head start on a project with professionally laid out templates. You can easily find the template that’s best suited for an assignment, including templates you’ve created and saved on your computer or removable media. You can browse, preview, and search for templates by name, category, keywords, and notes. The new templates that ship with X4 are
conveniently arranged by category and style.
Extras
The CorelDRAW Graphics Suite X4 disc contains 4,000 new clipart designs. Saved in CorelDRAW’s CDR file format, the clip art is simple to customize and the collection is fully searchable by keyword and category.
New Corel PowerTRACE Features
New within CorelDRAW is centerline tracing—this feature is ideal for architectural illustrations, tracing signatures (yourownsignature, hopefully; this thing isaccurate), and any time you need a path instead of an object traced from an image. Here you can see PowerTRACE in action; in this example the toy yo-yo’s string would make an excellent path for running text along.
Ill 1-1
Naturally, object tracing is still supported, with options for varying degrees of object smoothness and level of detail depending on the source material you need to trace. In Figure 1-7, the Text|Fit Text to Path command has been used after two sessions of PowerTRACE; once for the string, and a second time to accurately trace the yo-yo.
CorelDRAW ConceptShare: Collaborating Online
With CorelDRAW’s new partnership with ConceptShare you can create an online workspace where you and those you invite can review, mark up, and comment on a CorelDRAW document in real time. It’s sort of a dedicated chat room; imagine your surprised and delighted clients who can see their job as a work in progress and can mark up and comment on the piece. Your guests don’t have to own CorelDRAW to view a CorelDRAW file, smooth as vector art, at any degree of magnification. Communicate visually with clients on different continents and get feedback on your work as fast as the Internet.
Included with your purchase of CorelDRAW is a forever-free account that gives you 5mb of file storage space and the capacity to set up two workspaces, each containing three files that can be viewed, commented on, and marked up. If you need more storage space or workspaces, you can purchase an upgrade to your account.
To get set up with your free account, first make sure you have an active Internet
connection open. Then choose Window | Dockers | Concept Share and click on the Sign Up Now! Button. As you can see here, the free account is in the left column.
Ill 1-2
Follow the prompts and enter the information required to create your account. The CorelDRAW ConceptShare site will send you email with a link you must click to confirm your registration. Clicking on the link will take you to a thank-you screen, followed by your private workspace management screen.
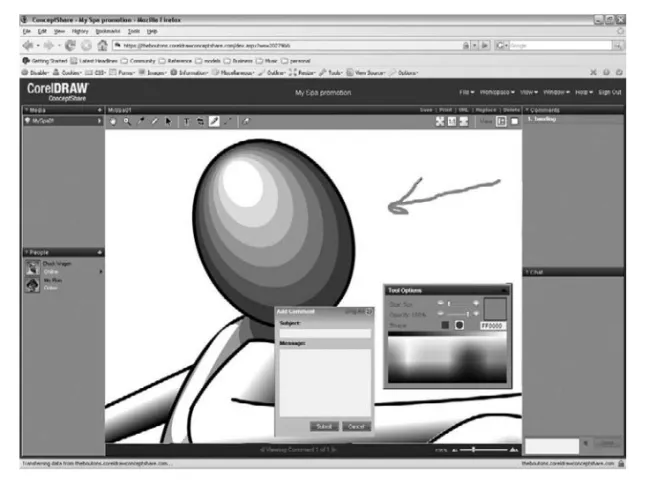
To set up a WorkSpace, click on the Add WorkSpace icon in your browser window. This launches a wizard that takes you through the process of adding a workspace and inviting participants. Once you have a workspace set up, you can go back to CorelDRAW and add the files you want to exchange comments on. Here’s a mini-tour of ConceptShare: in Figure 1-8 you can see a fictitious health spa’s logo. To share the piece, click Publish Page on the docker, and then click Launch. By default, ConceptShare launches Windows Internet Explorer; you can copy and paste (and then save) the URL from Explorer to the web browser of your preference.
In Figure 1-9 you can see the workspace. Two fictitious clients are online (their avatars are at left) and one of the clients feels there aren’t enough Blend steps in the illustration when he zooms in. The Markup Tool lets you and your guests highlight areas of interest and a message box pops up so you can explain your markups among the invited group. The tools are fairly self-explanatory and as owner of the workspace you can erase comments and restore the project to an untouched state if you like. Guests can edit their own comments, but can’t edit yours or comments from other guests.
FIGURE 1-8 Take a graphic you want to share with guests to your ConceptShare workspace by clicking Publish Page. Then click Launch to load the workspace in your web browser.
Here you can see what a completed comment looks like; you can hide comments, increase the font size in case you’re running a high screen resolution, and as the proprietor of your workspace, you can certainlydeletecomments!
Ill 1-3
Navigation around a document can be performed with the Zoom Tool or by using the slider, shown here at the bottom right. When a graphic is zoomed in larger than the extent of the page, you can use the Hand Tool to pan the window and you can also use the navigation control near the zoom slider at bottom right. Remember, this workspace is displaying bitmap
versions of your vector artwork that is updated on-the-fly, so when you or a guest zoom, all the details in your work are crisp, but smooth and legible.
Ill 1-4
Exploring Your
Workspace
17
W
hen working in CorelDRAW X4, you’ll find yourself using an assortment of interface elements that offer control over everything you do. There are many areas that make up the interface because the program offers an abundance of creative tools to use so that you can create compelling graphics and documents. Certain areas of the interface such as the Property Bar are context sensitive: your available options change as you choose different Toolbox tools. Other interface areas, like the Toolbox, are always visible in the workspace. And then there are Dockers, which are displayed only if you specifically open them. Exactly which elements—and where these elements appear in the program interface— is not a set piece; you have to have ultimate flexibility and customization control so you canpersonalizeCorelDRAW. You can choose between a predesigned workspace, CorelDRAW’s default, add, remove, and rearrange options to suit your work needs and even make the interface look like Adobe Illustrator. The important thing is that you should feel at home working in CorelDRAW; this chapter shows you where everything is, and how you can make it suit your work style.
The CorelDRAW X4 Workspace
CorelDRAW X4 sports a sleek and handsome new look—past users will notice new icons, new menus, and other interface elements. This makeover isnotjust eye candy; it has been carefully revamped to make it easier for you to find and work with the tools you need to use, when you need to use them.
CorelDRAW workspace elements can be divided into two categories:
■ Global and program control elements, such as measurement scales, backup files, and memory use.
■ Design or complete document features, such as Guidelines, Styles, and nudge distances.
If you’re new to CorelDRAW or just new to this version, youwillwant to take a look at this detailed roadmap to the new CorelDRAW interface herein.
CorelDRAW X4’s Application Window
The application window is mainly what you see when CorelDRAW X4 is open. It is the stage that surrounds and contains the drawing windows.Drawing windows(sometimes called document windows) contain the drawing page or pages that hold the graphics and other content you create. Even if no drawing windows are open, the application window provides access to certain command menus, toolbars, the Toolbox, dockers, Status Bar, and the Color Palette. Figure 2-1 identifies the application window parts.
application windows interface elements are those that are assigned to the currently active drawing window. They change if you make another drawing window active, by clicking on the desired drawing window.
As in all standard Windows applications, clicking the Close button at the top right side of the application window’s title bar closes CorelDRAW X4; clicking the Minimize or Maximize/Restore button shows or hides CorelDRAW X4, and changes the size of the application window itself quickly. Clicking on a drawing window’s Close button closes the drawing window, removing it from the application window while clicking on a drawing window’s Minimize or Maximize/Restore button minimizes it to a document title bar near the bottom of the application window or restores it to size within the application window.
With CorelDRAW open and all documents closed, you can still perform many necessary tasks. You can use File commands and open suite applications such as Corel CAPTURE, Corel BARCODE WIZARD, Corel PHOTO-PAINT, and even another copy of CorelDRAW with the Application Launcher. You can also use some of Corel’s tool managers, work with macros, view Help Topics, and access Corel’s online Web resources through the Welcome screen.
2
FIGURE 2-1 CorelDRAW X4’s application window features these interface areas. Program title bar Minimize Maximize/Restore
Close Menu Bar
Toolbar
Property Bar Toolbox
Docker
Status Bar Document
title bar
Minimized drawing window
The Application Launcher on the application window’s toolbar allows you to open another, unique copy of CorelDRAW, but simply because you can doesn’t mean you
should. Depending on how your memory preferences are set up in Tools | Options | Workspace | Memory, you could potentially throttle your computer’s system RAM and lose valuable work; the only reason you’d do this would be to copy objects between documents. You can achieve the same result much more simply and with less chance of a system halt by copying and moving objects between drawing
windows in asinglesession of CorelDRAW.
Drawing Windows
When a drawing window is fully maximized it fills the dark gray space in the center of the application window and looks as if it ispartof the application window. When a drawing window is open butnotfully maximized, it is easy to see that it’s a separate window element with its own interface elements that are unique to that drawing window.
Unlike the Menu Bar, Property Bar, Toolbar, Toolbox, Color Palette, and dockers, a drawing window cannot be dragged outside of the application window and onto the desktop or a second monitor’s desktop.
Not surprisingly, the interface elements that are contained within a drawing window report on or control that specific drawing window. Like the application window, a drawing window also has standard window controls such as a title bar that identifies the document’s file path and name, as well as Minimize, Maximize/ Restore, and Close buttons. Drawing windows also have page borders, which like other windows can be dragged on to change the size of the window. They also have scroll bars that are used to change your view of the document’s contents.
Interface elements special to drawing windows include Rulers, the Document Navigator, which is used to add, delete, and move between pages in a multi-page drawing window (see Chapter 6), the Drawing page, which contains what can be printed, and the Navigator which helps you move around a drawing without having to zoom out.
Parent and Child Window Buttons
A document’s Minimize, Maximize/ Restore, and Close buttons are not located in the drawing window frame when a drawing window is maximized in the application window. The Minimize, Maximize/ Restore, and Close buttons for the current drawing window are grayscale, smaller in size, and placed just below the Minimize, Maximize/ Restore, and Close buttons that belong to the application window.
If you want to close a document window, but your attention is wandering a bit and you are running on autopilot, it’s easy to make a mistake and click on the larger, more colorful Close button that belongs to the entire CorelDRAW application.
CorelDRAW X4 is compliant with the Microsoft Windows standard for Multiple Document Interfaces, meaning you can have more than one document (drawing) window open at a time. To switch between drawing windows, choose Window |document name
(wheredocument nameis the actual name of your CorelDRAW X4 document). In Figure 2-2, you can see a basic and very useful drawing window technique: Suppose you have an object in one document window and want a copy of it in a different one. You choose Window | Tile Horizontally (you can do this manually if you’re skilled manipulating Windows windows), and then move the object by just dragging it into the other window using the Pick Tool. To copy the object, hold the modifier key CTRL as you drag from one window to the other.
CorelDRAW uses a default naming system of Graphic1, Graphic2 and so on, incrementing the number for each new document you open in the current CorelDRAW session. You are
2
FIGURE 2-2 Working between drawing windows is accomplished by click-dragging, using the Pick Tool.
given the chance (and you should take it) to give your drawing a more meaningful name when you save the document by choosing File | Save or pressingCTRL+S.
You can also open more than one document window showing thesamedocument, enabling you to work on one document in multiple windows. This is a particularly useful feature when you need to zoom in close to work on a small area of a graphic, but you also need to be able to see how your work on that area affects the whole composition.
Both windows are “live,” so that you can edit in either of them and all the changes you make editing in one window will also appear in both windows because these windows represent differentviewsof the same documentnottwo independent files that can be saved as different versions.
To open another view of the active drawing window, choose Window | New Window. To make one of the open views the active window, you can click on that window or you can also use the menu, Window |document name:N(whereNis the automatically applied view number) Open as many windows as you need—this feature is limited only by your available system resources.
Ill 2-1
Specifying Toolbar and Dialog Values
When working in CorelDRAW there are many times when you need to enter measurements or numeric values, choose options and states, and control the behavior of interface elements on toolbars, in dialogs, and so on. CorelDRAW uses a wide variety of standard input fields and controls to make the specific kind of data you need to enter or tweak easy to accomplish. This section guides you through the ways data can be entered and alerts you to some of the extra power and usability Corel engineers have endowed upon these interface work horses.
■ Num boxes To specify values, you’ll findnumboxes—short fornumericboxes. Usually there is already a value in the box, such as the page width in the following illustration. Just highlight the existing value using a click-drag action and then retype a new value. Alternatively, you can double-click to select the entire value in the num box before typing the value you want. If you insert the cursor at any point in the existing value, you can use your keyboard arrow keys to move within the value and then Backspace to remove, finally adding the value you need. Finally, you need to confirm the value you entered by pressing…ENTER. PressTABto quickly move your cursor from one num box to the next in the group, or pressSHIFT+TAB, to move to the previous box. In dialogs, clicking the Apply button applies the new options and leaves the dialog box open; OK closes
the dialog and applies the new values or options. On toolbars, pressingENTERafter typing the value does the same thing, as shown here.
Here’s an unexpected convenience: you can perform calculations in num boxes using simple math equations to arrive at a value you need. Type symbols between values to create the equation sequences. Use your plus (+) and minus ( ) keys for adding and subtracting, and your asterisk (*) and forward slash (/) keys for
multiplying and dividing. PressingENTERperforms the calculation. Naturally, you
can’t enter invalid keystrokes in a value box, such as alphabetical letters—you’ll
just get a system beep after pressingENTERand the previous, proper, numerical
value will reappear.
■ Combo boxes Combo(short forcombination) is
a num box with a clickable selection button for access to preset values. You can either enter a specific value in a combo box by typing, or by choosing a preset value from the selector. Toolbar and docker combo boxes often require pressing the ENTERkey to apply the new value you type in, while clicking Apply or OK in dialogs does the same thing.
2
Highlight existing value, then type in the value you need
■ Flyout option menus and popouts On certain toolbars and dockers you’re going to find flyout and popout menus, which are often accessed by clicking a button that has a small, triangular-shaped, flyout arrow pointing to the right.Popoutsare usually selectors in which you can choose a nonnumeric option, and they can contain text and even mini-controls, depending on the operation or tool that is chosen. You can spot a tool on the Toolbox, for example, that has extended options you access straight from the tool button by a tick mark on the button’s lower right.Flyoutsoften contain ways to change behavior states, apply commands, and access options. Some apply options immediately, while others require that they be closed first using the small X symbol usually found at the upper-right corner. Examples of each are shown in the following:
Ill 2-4
Ill 2-5
Flyout arrow Flyout menu
Popout menus
■ Color selectors Color selectorsoften appear in dialogs or toolbars as a clickable button that has the secondary function of
displaying the currently selected color, as shown here. Clicking opens a selector to display the current color palette and requires that you to click once to specify a color. Most color selectors also include the Other button, which is a shortcut to Color models, mixers and palettes (covered in Chapter 19).
■ List selectors List selectorsdiffer from combo boxes in that you cannot enter a value, but instead pick from a predefined list of values or graphic samples that show the way that a style or arrow (or similar) will be applied or created. Clicking on one of the entries in the list chooses and applies a value, size, state, mode, or style to the currently selected object. These lists are occasionally called drop-down lists in other applications and pull-down lists on the Macintosh.
■ Radio buttons and option boxes These two interface devices are slightly different,
not just in shape, but also in the choices they offer, as shown next.Radiobuttons are round, come in groups, and only allow you to select one of the options in the group.
Optionboxes are square and let you choose an option or state to be either on (with a
check mark) or off (without a check mark). You’ll find in many areas of the Options pages, you can choose more than one option (more than one box can be checked).
■ Buttons Buttons appear throughout CorelDRAW and can do one of several things.
Commandbuttons perform commands instantaneously, buttogglebuttons control
(and indicate) a specific feature’s On and Off states, using a pressed or not pressed appearance. Generally, apressedstate indicates On, while thenot pressedstate indicates Off.Shortcutbuttons open
dialogs to further options, while
selectorbuttons open lists of preset
selections.
■ Spinners Spinners(also known asspin boxes) are similar to combo boxes, in that they can be used to specify values by typingorusing mouse actions. Single clicks
on the up and down arrow buttons increase or decrease the values incrementally, but you can also click-drag on the divider between the two arrow buttons, up to increase or down to decrease the value.
Ill 2-10
■ Sliders These enable you to specify values within a given range—often between 0 and 100 and often based on percent—by entering values, or by dragging a control slider, which is intuitive and provides the anticipated results. To manipulate a slider value, use a click-drag action to move the slider either right (to increase) or left (to decrease), as shown here on the Property Bar after the interactive Transparency Tool has been used.
Ill 2-11
■ Pop-up menus To access pop-up menu commands and options, click your right mouse button (instead of the typical left-click) on any given point. The pop-up menu appears at the tip of your cursor and closes automatically after a selection is made or by clicking elsewhere in the interface. Pop-up menus are sometimes called contextual menus, and a right-facing arrow next to a pop-up menu item indicates that there’s a submenu with still more options, usually relating to the main menu option. Highlight existing value,
then type value in box Click to increase/decrease
Left-handed artists are not uncommon; if you’re a southpaw, the order of your mouse buttons is not defined in CorelDRAW, but instead in the operating system’s Control Panel | Mouse. Just mirror the instructions in this chapter: if a step tells you to left-click, it’s the right mouse button, and vice versa.
Working with Dockers
Dockers are panels or palettes, where many different commands and controls that relate to specific tasks are grouped together in one handy location. Dockers put more of Corel’s power right at the tip of your cursor without forcing you to dig through lots of dialog boxes or flit between various toolbars and menus.
What’s great about dockers is that these controls can be anchored to the edge of the screen and reduced to tabs or title bars, allowing you to tear them off and float them right next to where you are working in the interface. You can resize them to make your own groups of commonly-used dockers. And, if you have a multimonitor setup, you can even drag them out of the application window and stick them on a different monitor so that you have the maximum amount of space for your drawing windows.
If you don’t find a docker that fills your needs after looking through the list of 26 dockers on Window | Dockers menu, dust off your programming skills and make your own
customdocker. If you’re not a programmer, check the Internet for any third-party developers
who are taking advantage of CorelDraw X4’s capability to use third-party dockers.
Opening, Moving, and Closing Dockers
Dockers can be opened using shortcut keys, menu commands, or through toolbars. Most dockers are found on the Window | Dockers menu, but some such as dockers dealing with text formatting are found on the Text menu and the text-related Property Bar. For example, to open the Contour Docker, choose Window | Dockers | Contour, or pressCTRL +F9. To open the Character Formatting docker you can choose Text | Character Formatting from the menu, or pressCTRL+T; additionally you can click on the Character Formatting button on the Property
Barafteryou’ve chosen the Text Tool on the Toolbox. Again, the Property Bar is contextual.
Dockers open to their last-used screen position and state, either docked or undocked, open or rolled up. Whiledocked,they are by default attached to the right side of your application window. Alternatively, dockers can be positioned on the left side of the screen or anchored on both sides of the screen with your document window in the middle, if that suits you best.
Whileundocked,dockers float above the document window and can be positioned anywhere on your monitor screen(s). Docked or floating isnotan all or nothing choice; you
can have some dockers docked and some floating—at the same time. The only situation you
can’thave is more than one copy of a specific docker open at one time. Figure 2-3 shows
examples of docked and floating dockers.
Floating or not, dockers feature a common look. Each has a title bar, a Close Docker group button which closes only that specific docker, and a Roll-up/Roll-down Docker button, which is used to toggle the display between the title bar-only state and a fully
open one. While undocked, floating dockers can be resized by click-dragging at the sides or bottom edges.
To move a floating docker, click-drag anywhere on its title bar. Rolled-up (minimized) floating dockers appear only as floating title bars on your screen. Minimized, docked dockers appear as vertical title tabs on the right side of the docker area.
Nested (Grouped) Dockers
When more than one docker is open, they often appearnested,meaning that multiple dockers overlay each other on the right side of your application window. While dockers are nested, clicking their individual title bars or name tabs brings them to the front of the interface.
FIGURE 2-3 Examples of floating docker and anchored docker group. Title bar
Roll-up/Roll-down
Docker button Close DockerGroup button Collapse docker
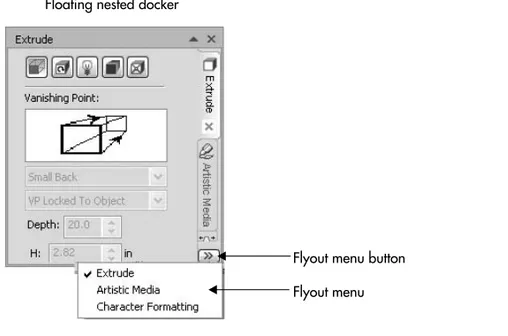
Floating nested dockers, depending on how you’ve sized the group, might or might not feature a flyout button at bottom right (see Figure 2-4); if you’ve sized the group so that the tabs cannot show, you can easily access the docker you need through the flyout menu. It’s fairly intuitive stuff.
Although nesting dockers (anchored or floating) are likely the best way to work with multiple dockers, you can quickly separate them (sort of kicking themoutof the nest if you prefer). To do this, click-drag the name tab identifying the docker (or anywhere within the fully open docker pane) and then drag away from the nested docker arrangement. As you do this, you see an outline preview of the frame of your selected docker as you drag, indicating its new screen position when the mouse button is released. You can also float single-anchored dockers by dragging them from their docked position by their title bars. Tonest
multiple dockers together, click-drag on the title bar (while floating) or on the name tab of the docker and then drag it to a position inside the boundaries of another floating docker.
To set whether title bars in floating dockers are visible, open the Options dialog
(pressCTRL+J) to the General page of the Workspace section, where you’ll find an
option called Show Titles on Floating Dockers.
Finally, if you want to maximize your drawing window area but still keep docked and nested dockers handy, you can click on the Collapse Docker arrow on the title bar of the
2
FIGURE 2-4 Nested dockers can float and you can resize them and access individual dockers from the flyout menu.
Floating nested docker
Flyout menu button
docker group. Collapsing the docker reduces the nested dockers to a thin vertical set of tabs that correspond to the currently open dockers, as shown here in the collapsed state:
Ill 2-13
Using the Toolbox
All dockers and virtually everything that’s a sub-window of an interface, by Microsoft Windows convention, is called achild window. Corel leverages this definition of the user interface to make just about everything detachable and capable of floating (if not flying!). The Toolbox is a component of the application window and is where you’ll find all the tools in CorelDRAW X4; there are tons of features in CorelDRAW, buttoolsare found only on the Toolbox. The Toolbox itself may be altered in different
ways. By default, the Toolbox is docked, but you can
undock it to float over your document window, which is often a handy way to quickly choose tools if you haven’t memorized the shortcut keys for tools. To detach the Toolbox from its docked position, click-drag just above the “no skid” design at the top of the docked Toolbox and away from the edge of your screen, as shown here:
An undocked Toolbox, shown next, includes a title bar and a Close button. When floating, you can move it around by click-dragging on its title bar. Double-clicking the title bar redocks the Toolbox. Clicking the Close button hides the Toolbox from view. Right-click anywhere in your document window and choose View | Toolbox from the pop-up menu to bring it back.
Click-drag here to float the Toolbox
Ill 2-15
The Toolbox can feature larger icons, text labels (which are useful when just learning any program), and the orientation of the Toolbox can be vertical or horizontal (as
shown in the previous illustration). To customize the Toolbox, pressCTRL+Jto open
the Options dialog and then open the Workspace | Customize | Command bars section in the tree on the left. Individual tools on the Toolbox can be customized by opening the Workspace | Toolbox section and then clicking on the tools listed.
You can access groups of tools by clicking buttons that feature flyout buttons. A single click selects the visible, “top” tool from the group, while a click-and-hold action opens the tool flyout. You can also separate individual flyouts from the Toolbox and have them float independently. To do this, click-hold to open any group of tools, and then when your cursor turns into a four-headed arrow, use a click-drag action by clicking the top of the flyout and dragging away from the Toolbox. The result is aduplicateof the tool flyout (there’s still the original flyout group on the Toolbox) as a floating Toolbox group that can be treated as any floating toolbar, as shown here. To hide the duplicate mini-Toolbox group from view, click the Close button. This hides the duplicate toolbar group without affecting the Toolbox version of the same group.
Ill 2-16
Working with Toolbars
Like other interface devices, toolbars can also appear docked or floating. This doesn’t just include standard and custom toolbars, but also the Menu Toolbar, the Standard Toolbar, and the Property Bar. While docked, you’ll see a small marking on the toolbars themselves. To undock any docked toolbar, click-drag the area outside of the tiny “no skid” divider away
2
Click-hold to reveal group, then click-drag to detach from Toolbox
Floating tool group Double-click to dock
Click-drag title
from the edge of the window. Undocked toolbars each feature their own title bar and Close button, as shown next. Usually, it’s not a good idea to close the toolbars, but to return them instead. However, if you’ve closed a toolbar you need, such as the Property Bar, you can easily retrieve it by right-clicking over any other toolbar, and then choosing the toolbar from the pop-up menu, with any tool chosen.
Ill 2-17
Using the Color Palette
TheColor Paletteis by default, the vertical strip docked to the right of the workspace, and is
the most convenient place to get colors for filling in your document’s objects. By default, a single column of colors is shown, you can change this, and it has scroll buttons to advance and rewind the colors visible in one row. Like all Windows child windows, the Color Palette comes undocked, you can resize the floating palette, and you can dock it to any side of the application window, in any toolbar location, above or below the Status bar and to either side of the Toolbox or a docked docker.
Viewing Palette Colors
The tiny squares of color you see in this palette are referred to aswells.Hover over a color
well to display a tooltip containing that color’s name (by default, Tooltips are enabled; if you turned them off, go to Tools | Options | Workspace | Display). To scroll the Color Palette color well collection, click the Up or Down arrow buttons at the top and bottom of the palette. Single clicks using your left mouse button on these arrow buttons fast-forwards and rewinds the palette, one color well at a time. Single clicks with your right mouse button produce a Page Up and Page Down effect, scrolling the visible color selection a complete row up or down. Clicking the bottom button expands the palette to show all the color wells
Close Click-drag here
(it retracts after you click to make a color selection), and at top is the options flyout button for loading different color palettes, saving, renaming, and so on.
Ill 2-18
You can rearrange the order of colors on any Color Palette by click-dragging up or down on any color well.
You float the Color Palette exactly as you do with other interface child windows: by dragging above the little markers, into the drawing window. While the Color Palette is floating (shown next), click-drag its title bar to move it around your window or click the Close button to hide it from view. Choose View | Color Palettes and select a palette to display any palette in its last used state. Double-click the title bar to return the floating Color Palette to its original docked location in the workspace.
Ill 2-19
2
Scroll up Scroll down
Click to expand palette Options flyout
Click-drag to move
Double-click to return the Color Palette to its default docked location
As with other day-to-day child windows, it’s best not to close the Color Palette, particularly if you’re new to the program, because it’s a hassle to restore it. If you’ve by chance closed the Color Palette, the quickest way to restore it to the workspace is by right-clicking in the drawing window to get a pop-up menu. Choose View | Color Palettes, choose any palette you like from the submenu, and life is good again.
Hovering over any of the Color Palette’s scroll buttons or the Expand button produces a tooltip that displays the name of the Color Palette collection you are using, for example, Default: Default CMYK palette.
Changing Palette Options
The Options flyout button (shown next) on the Color Palette features several important commands, enabling you to apply fill and outline colors (as opposed to using left and right mouse button clicks to apply colors to objects) and control how the palette itself is viewed.
Ill 2-20
Using the Options flyout provides some, but not all, of the options available to you for getting and using colors. CorelDRAW has an extensive color library including PANTONE and TRUEMATCH from onscreen simulations of printing press colors, as well as others for Web work. However, as mentioned at the beginning of this chapter, some workspace elements in CorelDRAW are tool-specific, while others belong to global elements—and the color library that appears on the Color Palette is a global resource. Therefore, with the Pick Tool and nothing selected in the drawing window, you right-click to display the pop-up menu,
and then choose View | Color Palettes; then choose from the submenu, which also features the Color Editor dialog (see the following illustration). Displaying the child window called Color Palette and choosing a collection with which you populate the Color Palette are two different things and require different commands.
Ill 2-21
When an artist creates art, the most successful pieces are drawn from a generalization to the specifics, from a coarse outline to filling in the details. Similarly, CorelDRAW deserves a coarse examination, as covered in this chapter, but as you progress to later chapters, the details are filled in. You’ve got a general idea of how to navigate in this chapter; it’s time to move from interface-centric coverage, to the more important document-centric coverage! Chapter 3 starts you out in a very good and wise place—how to work with files, different file types, and getting the stuff you need in and out of CorelDRAW.
2
1
Examining the Palettes,
Cruising the Menus
37
O
ne of the very first things you learn as a new computer user is how to open and close files and how to use the Clipboard to copy data from one document window to another. There is nothing new or exotic you have to do when working with CorelDRAW X4 to accomplish these basic tasks. But CorelDRAW X4 hasadditionalfunctions and options, related to file handling and data import and export, to handle your graphics workload efficiently and professionally. In this chapter you’ll learn about file-saving options that ensure that your work can be used by coworkers who are using previous versions of CorelDRAW and about how to use timesaving specialty files such as templates. You’ll also see how to protect your work with CorelDRAW’s automatic backup feature, how to make the Clipboard work overtime for you, as well as how to store and retrieve scrapbook items and symbols and how to import and export graphics, text, and data into and out of CorelDRAW X4.CorelDRAW X4’s Welcome Dialog
When CorelDRAW opens, the Welcome/Quick Start tabbed dialog appears, where you can quickly open a new or existing drawing file, access learning tools, check for program updates, and set automatic checks for program updates. You can also find inspiration in a gallery of art created by fellow CorelDRAW customers. This launch pad is shown in Figure 3-1.
The first tab along the right edge, Quick Start, is your jumping-off point for opening a file. Here you are presented with a list of the last five files you opened and closed in