LIMIT OF LIABILITY/DISCLAIMER OF WARRANTY: THE PUBLISHER AND THE AUTHOR MAKE NO REPRESENTATIONS OR WARRANTIES WITH RESPECT TO THE ACCURACY OR COMPLETENESS OF THE CONTENTS OF THIS WORK AND SPECIFICALLY DISCLAIM ALL WARRANTIES, INCLUDING WITHOUT LIMITATION WARRANTIES OF FITNESS FOR A PARTICULAR PURPOSE. NO WARRANTY MAY BE CREATED OR EXTENDED BY SALES OR PROMOTIONAL MATERIALS. THE ADVICE AND STRATEGIES CONTAINED HEREIN MAY NOT BE SUITABLE FOR EVERY SITUATION. THIS WORK IS SOLD WITH THE UNDERSTANDING THAT THE PUBLISHER IS NOT ENGAGED IN RENDERING LEGAL, ACCOUNTING, OR OTHER PROFESSIONAL SERVICES. IF PROFESSIONAL ASSISTANCE IS REQUIRED, THE SERVICES OF A COMPETENT PROFESSIONAL PERSON SHOULD BE SOUGHT. NEITHER THE PUBLISHER NOR THE AUTHOR SHALL BE LIABLE FOR DAMAGES ARISING HEREFROM. THE FACT THAT AN ORGANIZATION OR WEBSITE IS REFERRED TO IN THIS WORK AS A
The Roman Theater of Aspendos
Built when Marcus Aurelius was Emperor of Rome (161–180 A.D.), this magnificent theater, faithful to the Greek tradition, nestles into the side of a hill. It is among the best preserved of its era, and concerts and operas are still performed upon its stage today. Its acoustics are quite literally legendary. A favorite story tells how the architect, Zeno, won the king’s daughter by creating this masterpiece in which a word murmured from the stage could be heard throughout the arena.
Learn more about Aspendos and its artifacts in Frommer’s Turkey, available wherever books are sold or at www.frommers.com. Microsoft®Office Excel®2007 Programming: Your
visual blueprint™for creating interactive spreadsheets
Published by
Wiley Publishing, Inc.
111 River Street Hoboken, NJ 07030-5774
Published simultaneously in Canada
Copyright © 2007 by Wiley Publishing, Inc., Indianapolis, Indiana
No part of this publication may be reproduced, stored in a retrieval system or transmitted in any form or by any means, electronic, mechanical, photocopying, recording, scanning or otherwise, except as permitted under Sections 107 or 108 of the 1976 United States Copyright Act, without either the prior written permission of the Publisher, or authorization through payment of the appropriate per-copy fee to the Copyright Clearance Center, 222 Rosewood Drive, Danvers, MA 01923, (978) 750-8400, fax (978) 646-8600. Requests to the Publisher for permission should be addressed to the Legal Department, Wiley Publishing, Inc., 10475 Crosspoint Blvd., Indianapolis, IN 46256, (317) 572-3447, fax (317) 572-4355, Online: www.wiley.com/go/permissions.
Library of Congress Control Number: 2007933273 ISBN: 978-0-470-13230-2
Manufactured in the United States of America
10 9 8 7 6 5 4 3 2 1
Trademark Acknowledgments
Wiley, the Wiley Publishing logo, Visual, the Visual logo, Simplified, Master VISUALLY, Teach Yourself VISUALLY, Visual Blueprint, Read Less -Learn More and related trade dress are trademarks or registered trademarks of John Wiley & Sons, Inc. and/or its affiliates. Microsoft and Excel are registered trademarks of Microsoft Corporation in the United States and/or other countries. All other trademarks are the property of their respective owners. Wiley Publishing, Inc. is not associated with any product or vendor mentioned in this book.
FOR PURPOSES OF ILLUSTRATING THE CONCEPTS AND TECHNIQUES DESCRIBED IN THIS BOOK, THE AUTHOR HAS CREATED VARIOUS NAMES, COMPANY NAMES, MAILING, E-MAIL AND INTERNET ADDRESSES, PHONE AND FAX NUMBERS AND SIMILAR INFORMATION, ALL OF WHICH ARE FICTITIOUS. ANY RESEMBLANCE OF THESE FICTITIOUS NAMES, ADDRESSES, PHONE AND FAX NUMBERS AND SIMILAR INFORMATION TO ANY ACTUAL PERSON, COMPANY AND/OR ORGANIZATION IS UNINTENTIONAL AND PURELY COINCIDENTAL.
Contact Us
For general information on our other products and services, please contact our Customer Care Department within the U.S. at 800-762-2974, outside the U.S. at 317-572-3993 or fax 317-572-4002.
“ This is absolutely the best computer-related book
I have ever bought. Thank you so much for this
fantastic text. Simply the best computer book
series I have ever seen. I will look for, recommend,
and purchase more of the same.”
—David E. Prince (NeoNome.com)
“I have several of your Visual books and they are
the best I have ever used.”
—Stanley Clark (Crawfordville, FL)
“I just want to let you know that I really enjoy all
your books. I’m a strong visual learner. You really
know how to get people addicted to learning! I’m
a very satisfied Visual customer. Keep up the
excellent work!”
—Helen Lee (Calgar y, Alberta, Canada)
“I have several books from the Visual series and
have always found them to be valuable resources.”
—Stephen P. Miller (Ballston Spa, NY)
“ This book is PERFECT for me
—
it’s highly visual
and gets right to the point. W hat I like most about
it is that each page presents a new task that you
can try verbatim or, alternatively, take the ideas
and build your own examples. Also, this book isn’t
bogged down with trying to ‘tell all’ – it gets right
to the point. This is an EXCELLEN T, EXCELLEN T,
EXCELLENT book and I look forward to purchasing
other books in the series.”
—Tom Dierickx (Malta, IL)
“I have quite a few of your Visual books and have
been very pleased with all of them. I love the way
the lessons are presented!”
—Mary Jane Newman (Yorba Linda, CA )
—Illona Bergstrom (Aventura, FL)
“I just had to let you and your company know how
great I think your books are. I just purchased my
third Visual book (my first two are dog-eared
now!) and, once again, your product has surpassed
my expectations. The expertise, thought, and effort
that go into each book are obvious, and I sincerely
appreciate your efforts.”
—Tracey Moore (Memphis, TN)
“Compliments to the chef!! Your books are
extraordinary! Or, simply put, extra-ordinary,
meaning way above the rest! THANK YOU THANK
YOU THANK YOU! I buy them for friends, family,
and colleagues.”
—Christine J. Manfrin (Castle Rock, CO)
—Seward Kollie (Dakar , Senegal)
P
RAISE
F
OR
V
ISUAL
B
OOKS
…
“I am an avid purchaser and reader of the Visual
series, and they are the greatest computer books
I’ve seen. Thank you very much for the hard work,
effort, and dedication that you put into this series.”
“I write to extend my thanks and appreciation for
your books. They are clear, easy to follow, and
straight to the point. Keep up the good work! I
bought several of your books and they are just
right! No regrets! I will always buy your books
because they are the best.”
—Alex Diaz (Las Vegas, NV)
Project Editor
Infodex Indexing Services, Inc.
Vice President and Executive
Group Publisher
Richard Swadley
Vice President and Publisher
Denise Etheridgeis a certified public accountant as well as the president and founder of Baycon Group, Inc. She publishes Web sites, provides consulting services on accounting-related software, and authors computer-related books. You can visit www.baycongroup.com to view her online tutorials.
I would like to thank all of the people at Wiley who assisted me in writing this book. I would also like to thank Malinda McCain for her assistance. I have said it before and I will say it again, “Malinda, you are the best!”
Author’s Acknowledgments
About the Author
TABLE OF CONTENTS
HOW TO USE THIS BOOK . . . .xii
1 USING MACROS AND FORM CONTROLS . . . .2
Introducing Excel Programming ...2
Introducing Macros...4
Set Macro Security ...6
Create a Digital Signature ...7
Record a Macro...8
Assign a Digital Signature to a Macro ...10
Run a Macro ...12
Create and Launch a Keyboard Shortcut ...14
Assign a Macro to the Quick Access Toolbar ...16
Delete a Macro ...18
Add a Form Control to a Worksheet ...20
Assign Values to a Form Control ...22
Add a Macro to a Form Control...24
2 USING THE VISUAL BASIC EDITOR . . . .26
Introducing the Visual Basic Editor...26
Activate the Visual Basic Editor ...28
Open Visual Basic Editor Windows...30
Set Properties for a Project ...32
Set Display Options for the Code Window...34
Add a New Module ...36
Remove a Module ...38
Hide a Macro ...40
Update a Macro...42
3 INTRODUCING VISUAL BASIC
FOR APPLICATIONS . . . .44
Work with Numbers ...56
Work with Strings...58
Create a Constant ...60
4 INTRODUCING THE EXCEL OBJECT MODEL . . . .62
Discover the Excel Object Model ...62
Access the Excel Object Model Reference ...64
Create an Object Variable ...66
Change the Properties of an Object ...68
Compare Object Variables ...70
Using an Object Method ...72
Display a Built-in Dialog Box ...74
5 UNDERSTANDING ARRAYS . . . .76
Declare an Array...76
Declare a Multidimensional Array...78
Convert a List to an Array ...80
Redimension an Array ...82
Create a User-Defined Data Type ...84
6 CONTROLLING PROGRAM FLOW . . . .86
Create Comparisons ...86
Make Use of Logical Operators ...87
Employ Do While Loops ...88
Create Do Until Loops ...90
Create For Next Loops ...92
Execute For Each In Loops ...94
Create If Then Else Statements ...96
Construct Select Case Statements ...98
GoTo a Named Location ...100
Call a Procedure ...102
7 USING EXCEL WORKSHEET FUNCTIONS . . . .104
Work with Excel Worksheet Functions ...104
Work with a MsgBox Function ...106
Using the InputBox Function ...108
Perform Date and Time Calculations ...112
Format a Date Expression...114
Format a Numeric Expression...116
Change the Case of a String ...118
Return a Portion of a String ...120
8 DEBUGGING MACROS . . . .122
Debug a Procedure with Inserted Break Points ...122
Using the Watches Window to Debug a Procedure ...124
Step through a Procedure ...126
Use the Immediate Window ...128
Resume Execution When an Error Is Encountered ...130
Process a Run-Time Error ...132
9 WORKING WITH WORKBOOKS AND FILES . . . .134
Open a Workbook...134
Open a Text File as a Workbook ...136
Open a File Requested by the User ...138
Save a Workbook ...140
Save a Workbook in a Format Specified by the User ...142
Determine if a Workbook Is Open...144
Close a Workbook...146
Create a New Workbook ...148
Delete a File ...150
10 WORKING WITH WORKSHEETS . . . .152
Add a Sheet ...152
Delete a Sheet ...154
Move a Sheet ...156
Copy and Paste a Sheet...158
Hide a Sheet ...160
11 DEFINING RANGES . . . .174
Using the Range Property ...174
Using the Cells Property ...176
Combine Multiple Ranges ...178
Using the Offset Property ...180
Delete a Range of Cells ...182
Hide a Range of Cells ...184
Create a Range Name ...186
Resize a Range ...188
Insert a Range ...190
Set the Width of Columns in a Range ...192
Set the Height of Rows in a Range ...194
Convert a Column of Text into Multiple Columns ...196
Find the Intersection of Two Ranges...198
12 WORKING WITH CELLS . . . .200
Cut and Paste Ranges of Cells...200
Copy and Paste Ranges of Cells ...202
Using Paste Special Options When Pasting...204
Add Comments to a Cell ...206
Automatically Fill a Range of Cells ...208
Copy a Range to Multiple Sheets ...210
Place a Border Around a Range of Cells ...212
Find Specific Cell Values ...214
Find and Replace Values in Cells ...216
13 CREATING DIALOG BOXES AND CUSTOMIZING
THE RIBBON . . . .218
UserForm Basics...218
Create a Custom Dialog Box ...220
Call a Custom Dialog Box from a Procedure ...222
Capture Input from a Custom Dialog Box ...224
Validate Input from a Dialog Box ...228
Create Custom UserForm Controls...230
Create a UserForm Template ...232
Customize the Ribbon...236
Add Additional Options to the Ribbon ...238
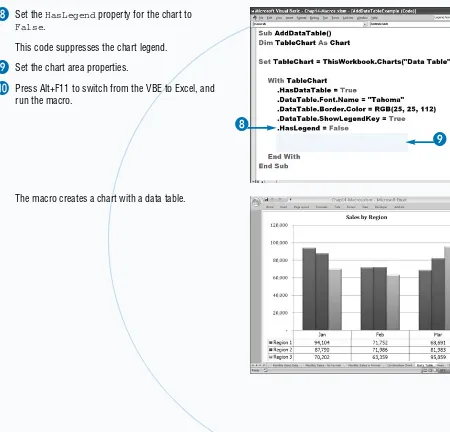
14 WORKING WITH CHARTS . . . .242
Create a Chart Sheet ...242
Embed a Chart in a Worksheet ...244
Apply Chart Wizard Settings to a Chart ...246
Add a New Data Series to a Chart...248
Format Chart Text ...250
Create Charts with Multiple Chart Types ...252
Add a Data Table to the Chart...254
Customize a Chart Axis ...256
15 AUTOMATING PROCEDURES WITH
EXCEL EVENTS . . . .258
Understanding Excel Events ...258
Run a Procedure as a Workbook Opens ...262
Run a Procedure before Closing a Workbook ...264
Run a Procedure before Saving a Workbook...266
Run a Procedure When Excel Creates a Workbook ...268
Execute a Procedure at a Specific Time ...272
Execute a Procedure When You Press Keys ...274
16 BUILDING ADD-INS . . . .276
Create an Add-In ...276
Set Add-in Properties ...278
Install Add-Ins ...280
Using VBA to Load Add-Ins ...282
17 UNDERSTANDING XML . . . .284
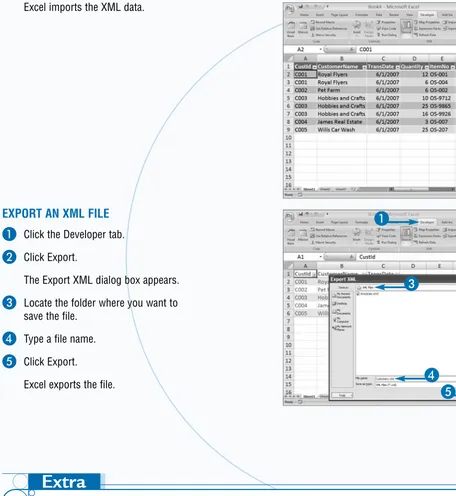
Import and Export XML Files Using Excel ...294
Load XML Files Using VBA ...296
Import XML Files Using VBA ...298
APPENDIX A: VBA QUICK REFERENCE . . . .300
APPENDIX B: RIBBON CONTROLS QUICK
REFERENCE . . . .320
Microsoft Office Excel 2007 Programming: Your visual blueprint for creating interactive spreadsheetsuses clear, descriptive examples to show you how to use powerful Excel macros. If you are already familiar with Excel macros, you can use this book as a quick reference.
Who Needs This Book
This book is for the experienced computer user who wants to find out more about Excel programming. It is also for more experienced Excel users who want to expand their knowledge of the different features that Excel has to offer.
Book Organization
Microsoft Office Excel 2007 Programming: Your visual blueprint for creating interactive spreadsheetshas 17 chapters and 2 appendices.
Chapter 1, “Using Macros and Form Controls,” shows you how to work with macros in Excel, how to record a simple macro, how to assign macros to the Quick Access toolbar, how to launch a macro, and how to remove a macro from a workbook.
Chapter 2, “Using the Visual Basic Editor,” is about the Visual Basic Editor (VBE) that comes with Microsoft Office applications. This chapter shows you how to set up your Visual Basic Editor window to quickly create and modify code modules.
Chapter 3, “Introducing Visual Basic for Applications,” introduces you to the essentials of Visual Basic for Applications (VBA). This chapter also covers some VBA programming fundamentals that enable you to use the material in the chapters that follow to create your own Excel macros.
Chapter 4, “Introducing the Excel Object Model,”
Chapters 5 to 7 build on the VBA programming language by showing you how to work with variables and create arrays. You also learn how to use the various control statements to specify the code that executes when you run a macro. You create dialog boxes using the MsgBox and InputBox functions.
Chapter 8, “Debugging Macros,” shows you how to use the various features of the Visual Basic Editor to find programming and logical errors within your VBA code. Chapters 9 to 12 illustrate how you can use the Workbook, Worksheet, and Range objects to create custom macros. You also learn how to use the
corresponding properties and methods associated with these objects.
Chapter 13, “Creating Dialog Boxes and Customizing the Ribbon,” shows you how to create a graphical interface for your macros by creating custom dialog boxes and adding items to the Ribbon.
Chapter 14, “Working with Charts,” shows you how to create and modify charts from within your macro. Chapter 15, “Automating Procedures with Excel Events,” shows you how to capture user events and use those events to trigger procedures. You also learn how to execute a procedure at a specific time, or how to determine when a specific key sequence is pressed. Chapter 16, “Building Add-Ins,” shows you how to create and load add-ins.
Chapter 17, “Understanding XML,” introduces you to Extensible Markup Language (XML). You learn how to open an XML file, create an XML map, import an XML file, and export an XML file.
The appendices are reference sections. After you become familiar with the contents of this book, you can use the appendices to obtain at-a-glance information about VBA statements, functions, constants, and
What You Need to Use This Book
Windows Requirements
•
256 megabyte (MB) RAM or higher•
500 megahertz (MHz) processor or higher•
2 GB of available hard disk space•
CD-ROM or DVD drive•
Keyboard and pointing device, such as a mouse•
1024x768 or higher resolution monitor Microsoft Windows XP with Service Pack (SP) 2, Windows Server 2003 with SP1 or later operating system.The Conventions in This Book
A number of styles have been used throughout
Microsoft Office Excel 2007 Programming: Your visual blueprint for creating interactive spreadsheetsto designate different types of information.
Courier Font
Indicates the use of VBA and scripting language code, such as tags, attributes, statements, operators, functions, objects, methods, or properties.
Bold
Indicates information that you must type. Italics
Indicates a new term.
An Apply It section takes the code from the preceding task one-step further. Apply It sections allow you to take full advantage of VBA code.
An Extra section provides additional information about the preceding task. Extra sections contain the inside information to make working with Excel easier and more efficient.
What’s on the Web Site
The Web site accompanying this book contains the sample files for the book that you can use to work with
Introducing
Excel Programming
A
s you probably know, Microsoft Excel is an electronic worksheet you can use for a variety of purposes, including the following: maintain lists; perform mathematical, financial, and statisticalcalculations; create charts; and analyze your data with a PivotTable. Excel can also help you locate data, find trends in your data, and present your data to others. This book is about automating the tasks you perform in Excel by using Visual Basic for Applications (VBA). You can use VBA to automate those repetitive tasks you perform frequently. For example, if the layout of your monthly report rarely changes, you can use VBA to set up your report each month.
VBA is a programming language; however, you do not have to be a programmer to automate the tasks you perform in Excel. You can also automate a task by using the macro recorder to create a macro. A macrois a
recording of the steps you want to automate. You just click a button to turn on the macro recorder and begin
performing the steps as you normally would. Excel records each step and creates the VBA code. When you finish, you click the Stop Record button. When you select your macro in the Macro dialog box and click the Run button, Excel plays back the steps you recorded. For example, if you record the steps necessary to create your monthly report, all you have to do each month thereafter is click a button and Excel automatically sets up your report.
With VBA, you can do more that just create macros. You can use VBA to edit macros, create new functions, create custom applications, and create add-ins. For these tasks, you must learn the VBA programming language. This book teaches VBA. It is based on Office 2007; code you write for Office 2007 may not be compatible with earlier versions of Excel.
1
Click the Developer tab.Note:See the section, “Introducing Macros,” to learn how to
display the Developer tab.
Use the options in the Code group to automate your tasks.
2
Click either of these Record Macro buttons to record a macro.Note:See the section, “Record a Macro,” for more details.
3
Click Macros to run a macro.Note:See the section, “Run a Macro,” for more details.
1
3
2
2
Introducing Excel Programming
•
Use the options in the Controls group to add check boxes, fields, and other form controls to your worksheet.Chapter 1: Using Macros and Form Controls
You can also use Microsoft Visual Studio Tools for the Microsoft Office System (Visual Studio) to develop programs for Microsoft Office products. With Visual Studio, you can write in languages such as Visual Basic .NET, Visual C#, and Managed Extensions for C++. Visual Studio is not part of Microsoft Office; you must purchase it. Microsoft supports both VBA and Visual Studio.
Visual Studio is more difficult to learn than VBA and setting up and using Visual Studio is much more difficult than setting up and using VBA. However, Visual Studio offers better security, a more sophisticated development environment, and built-in Web services.
5
6
Use the VBE to write and edit code.Note:See Chapter 2 to learn more about the VBE.
5
Click the proper module to access your macros or the VBA code you have written.6
Type or edit your code here.7
Press Alt+F11 to return to Excel.Introducing
Macros
Y
ou can use macros to automate many of the tasks you perform in Excel. For example, if you frequently format your data in a particular way, you can use Excel’s macro recorder to record the steps you use to format your data. You can then play back the recorded steps whenever you want to apply your format. Any series of commands you can execute in Excel, you can also record and play back.The commands you use to create and execute macros are located on the Developer tab. By default, the Developer tab does not display in Excel. To display it, you must choose the Show Developer Tab in the Ribbon option in the Excel Options dialog box.
You begin recording macros by clicking Record Macro on the Developer tab or by clicking the Record Macro button on the status bar. Both commands open the Record Macro dialog box. For detailed instructions on how to use the
Record Macro dialog box, see the section, “Record a Macro.”
When you record a macro, you can record it using an absolute reference or a relative reference. If you record using an absolute reference, when Excel plays back your macro, it plays back the exact cells you clicked when you recorded the macro. If you record using a relative reference, Excel plays back the relative location of the cells you used when you recorded your macro. Click the Use Relative References button on the Developer tab to record using a relative reference. To learn more about absolute and relative references, see the section, “Record a Macro.”
When you save a workbook that has macros, you must save it as a enabled workbook. Excel gives macro-enabled workbooks an .xlsm file extension.
SHOW THE DEVELOPER TAB
1
Click Customize Quick Access Toolbar and then click More Commands.The Excel Options dialog box appears.
2
Click Popular.3
Click Show Developer Tab in the Ribbon ( changes to ).4
Click OK.The Developer tab appears in the Ribbon.
•
Click to record a macro.•
Click to record with a relative reference.•
Click to change macro security.•
Click to run macros.1
1
Chapter 1: Using Macros and Form Controls
1
Click the Microsoft Office button.A menu appears.
2
Click Save As ➔Excel Macro-Enabled Workbook.The Save As dialog box appears.
3
Click here and then select the folder in which you want to save your workbook.4
Type the name you want to give your workbook.5
Click Save.Excel saves your workbook as a macro-enabled workbook.
Because of problems with macro viruses, Excel disables all macros by default when you open a workbook. You can click the Macro Security button on the Developer tab to change the default setting. To learn more about macro security, see the sections, “Set Macro Security,” “Create a Digital Signature,” and “Assign a Digital Signature to a Macro.”
If you have programming experience or aptitude, you can edit Excel macros by using the Visual Basic Editor, which is available by pressing the Visual Basic button on the Developer tab.
You can use the Macro dialog box to run a macro. To open the Macro dialog box, click the Macro button on the Developer tab, press Alt+F8, or place the View Macros button on the Quick Access toolbar.
Set Macro
Security
B
ecause of increasing problems with computer viruses, specifically macro viruses, the default Excel macro security setting disables all macros when you open a workbook, and allows you to decide on a case-by-case basis whether you want to enable them. This is true whether you created the macros or someone else created them.You can change the Excel macro security setting. Excel provides four options:
•
Disable all macros without notification:This option disables all macros and does not provide you with any security alerts to let you know macros exist.•
Disable all macros with notification:This is thedefault setting. It notifies you if macros are present so you can enable them on a case-by-case basis.
•
Disable all macros except digitally signedmacros:This option disables all macros except those digitally signed by a trusted publisher. If the
publisher has digitally signed the macro but you have not opted to trust the publisher, you can enable the macro or trust the publisher. See the “Extra” information in the section, “Run a Macro,” to learn how to trust a publisher.
•
Enable all macros (not recommended; potentially dangerous code can run):This option allows you to run all macros. Because potentially dangerous code can run, Microsoft does not recommend this option.Changes you make to macro security in Excel do not change the macro security in other Office programs. Macro creators use digital signatures to verify the safety of the macros they create. You can create your own digital signature by using the Microsoft Selfcert.exe tool, or you can obtain a digital certificate from a commercial certificate of authority vendor. For more information on the Microsoft Selfcert.exe tool, see the next section, “Create a Digital Signature.”
1
Click the Developer tab.Note:See the section, “Introducing Macros,” to learn how to
display the Developer tab.
2
Click Macro Security in the Code group.1
2
3
Set Macro Security
The Trust Center dialog box appears.
Create a
Digital Signature
Chapter 1: Using Macros and Form Controls
I
f you create a workbook that contains macros, you should consider using a digital signature. A digital signature provides assurance that the workbook file is valid and no one has altered it. You can create a personal digital signature by using the Microsoft Selfcert.exe tool. Projects signed with digital signatures created with the Selfcert.exe tool only work on computers that have the certificate in their Personal Certificates store.Digital signatures that you create with the
SelfCert.exe tool work well for personal workbooks; however, if you plan to distribute your workbook to users outside your workgroup, you should consider acquiring a commercial digital signature file. When you use a commercial digital signature file, the digital ID attaches to the macro and remains with it; if anyone alters the macro, Excel notifies the user that
someone has changed the macro and therefore the macro should not be trusted.
The most common provider of commercial digital certification is VeriSign, Inc. You can find out more about obtaining a commercial certification from VeriSign at www.verisign.com.
Create a Digital Signature
1
Click Start.2
Click All Programs ➔Microsoft Office ➔ Microsoft Office Tools ➔Digital Certificate for VBA Projects.2
1
3
The Create Digital Certificate dialog boxappears.
3
Type the name you want to give your certificate.4
Click OK.Excel creates a Personal Digital Certificate.
Record a
Macro
A
macro enables you to automate common tasks. You can use a macro to record any series of commands you can execute in Excel. For example, if you frequently apply a certain format to your worksheet, you can record the steps for creating the format and then play them back each time you want to apply the format.Clicking the Macro Recorder button opens the Record Macro dialog box in which you can name your macro, assign your macro to a shortcut key, and tell Excel where you want to store your macro. You can name your macro anything you want, with the following limitations: the name must start with a letter; it can only contain letters, numbers, and underscores; and it cannot contain any spaces. You can assign any uppercase or lowercase letter to act as the shortcut key.
In the Record Macro dialog box, the Store Macro In field tells Excel where to store your macro. You can choose to store your macro in the Personal Macro Workbook, a New Workbook, or This Workbook. Use the Personal Macro Workbook option if you want to make your macro available to all Excel files. After you have stored a least one macro in the Personal Macro Workbook, the workbook opens whenever you open an Excel file. Use the New Workbook option if you have specialized macros that you want to use with multiple files. If you store your macro in a new workbook, you can use the macros whenever that workbook is open. Use the This Workbook option if you want your macro to be in the workbook in which you are currently working.
1
Click the Developer tab.Note:See the section, “Introducing Macros,” to learn how to
display the Developer tab.
•
Alternatively, click the Record Macro button on the status bar and skip step 2.2
Click Record Macro in the Code group.1
2
Record a Macro
The Record Macro dialog box appears.
3
Type the name you want to give your macro.4
Type the shortcut key you want to assign to your macro.Chapter 1: Using Macros and Form Controls
A macro you create in Excel can have a relative, absolute, or mixed reference. If you use a relative reference, Excel performs the macro based on a relative location. For example, suppose you move up two cells from cell A3 to A1 when creating your macro. When you run your macro, if you are in cell C3, Excel moves up two cells from cell C3 to C1. However, if you use an absolute reference, Excel performs the macro based on the exact cell addresses. For example, suppose again that you move up two cells from cell A3 to A1. When you run your macro, if you are in cell C3, Excel moves from there to the cells you used when you recorded your macro. That is, Excel moves from cell A3 to cell A1.
By default, Excel creates macros with an absolute reference. To create a macro with a relative reference, click the Use Relative Reference button on the Developer tab to toggle the relative reference option on. To create a macro with both a relative and an absolute reference — a mixed reference — toggle the Use Relative Reference on and off as needed as you create your macro.
8
9
0
You are now ready to record your macro.8
Perform the steps you want to record.This example changes the number format.
9
Click the Developer tab.•
Alternatively, click the Stop Recording button on the status bar and skip step 10.0
Click Stop Recording in the Code group.Excel stops recording your macro.
Your macro is ready for you to use.
Note:See the section, “Run a Macro,” to learn how
Assign a Digital
Signature to a Macro
A
digital signature provides assurance that a workbook file is valid and no one has altered it. There are two types of digital signatures: personal digital signatures and commercial digital signatures. You can create a personal digital signature by using the Microsoft Selfcert.exe tool, or you can purchase a digital signature. Refer to the section, “Create a Digital Signature,” to learn how to create digital signatures. After you create a digital signature, you must attach it to your workbook. Attaching a digital signature is similar to sealing an envelope. If an envelope arrives sealed, you have some level of assurance that no one has tampered with its contents.Use the Digital Signature dialog box to attach a digital signature. The Visual Basic Editor is a separate Excel
module that you can use to edit your macro. You access the Digital Signature dialog box by opening the Visual Basic Editor. The Digital Signature dialog box lists valid certificates. You can use the Digital Signature dialog box to view certificates and to select the one you want to use. Unless you have on your computer a valid digital signature certificate for the signature used to sign a macro, Excel removes the digital signature if you modify a macro in a workbook, and you must reattach it. If you are not sure if a workbook has a digital signature, you can check the signature by reviewing the Digital Signature dialog box. If a workbook has a digital signature, the name of the signature appears in the Certificate Name field. If you click the Remove button in the Digital Signature dialog box, Excel removes the digital signature.
1
Click the Developer tab.Note:See the section, “Introducing Macros,” to learn how to
display the Developer tab.
2
Click Visual Basic in the Code group.1
2
3
4
Assign a Digital Signature to a Macro
The Visual Basic Editor appears.
Chapter 1: Using Macros and Form Controls
If you have macro security enabled, Excel displays a warning just below the Ribbon when you open a workbook containing a signed macro. You can click the Options button located next to the warning to open the Microsoft Office Security Options dialog box, where you can indicate that you trust the publisher. Excel then saves the name of the publisher in the Trusted Publishers section of the Trust Center.
If you click the Macro Security button on the Developer tab, the Trust Center dialog box appears. Click Trusted Publisher to display a list of your trusted publishers. If you no longer want to trust macros from a publisher listed on the Trusted Publishers page, click the name of the publisher and then click Remove. The next time you open a workbook with a macro from a removed publisher, Excel again warns you about its macros.
Unless you have your macro settings set to enable all macros, Excel checks all documents you open for macros. See the section, “Set Macro Security,” for more information. If you have a file that you do not want Excel to check, you can store it in a trusted location. In the Trust Center dialog box, click Trusted Locations to define a trusted location.
4
5
6
7
Denise E...Denise Eth...Code SigningNone 1/1/2012 The Digital Signature dialog box appears.
4
Click Choose.The Select Certificate dialog box appears.
Note:See the section, “Create a Digital Signature,” to
learn how to create a digital signature.
5
Click the signature you want to apply.6
Click OK to close the Select Certificate dialog box.7
Click OK to close the Digital Signature dialog box.Run a
Macro
M
acros enable you to perform quickly tasks that would normally take multiple steps. When you run a macro, Excel replays the steps you recorded when you created the macro. You can run any macro located in any workbook as long as the workbook in which the macro is located is open. To run a macro, you can press the shortcut key you assigned when you created the macro or you can select the macro from the Macro dialog box.When you create a macro, you can choose to store it in one of three locations: the current workbook, a new workbook, or the Personal Macro Workbook. By default, the Macro dialog box lists all of the macros in open workbooks. If a macro is stored in the Personal Macro Workbook, the workbook opens as a hidden file each
time you open a file. By default, the macros in the Personal Macro Workbook always appear in the Macro dialog box.
You can use the Macros In field to limit the number of macros listed in the Macro dialog box. To see the macros in any open workbook, including the Personal Macro Workbook, select the All Open Workbooks option. To see the macros from a specific workbook, select the name of the workbook from the Macros In drop-down list. To see global macros stored in the Personal Macro Workbook, select the Personal.xlsb option.
To run a macro from another workbook, the macro must be from a signed source or you must enable all macros. You can set the security setting for macros. See the section, “Set Macro Security,” for more information.
1
Select the cells to which you want to apply your macro.2
Click the Developer tab.Note:See the section, “Introducing
Macros,” to learn how to display the Developer tab.
3
Click Macros in the Code group.Alternatively, click Alt+F8.
1
2
3
Run a Macro
The Macro dialog box appears.
Chapter 1: Using Macros and Form Controls
Excel differentiates between macros listed in the Macro dialog box by placing the name of the workbook that contains the macros in front of the macro name. For example, Excel lists a macro named Sum_Expenses in the Personal Macro Workbook as PERSONAL.XLSB!Sum_Expenses. If the macro Sum_Cells exists in both the Budget.xlsm and Expenses.xlsm workbooks, Excel treats them as two different macros. The Macro dialog box lists them as Budget.xlsm!Sum_Cells and
Expenses.xlsm!Sum_Cells.
If you have macro security enabled, the Trust Center checks the macros when you open a workbook to see if the macros are valid. If there are any problems, Excel displays a warning just below the Ribbon. You can click the Options button located next to the warning to open the Microsoft Office Security Options dialog box.
In the Microsoft Office Security Options dialog box, click Help Protect Me from Unknown Content (Recommended) to disable the macros, click Enable the Content to enable the macros, or click Trust All Documents from this Publisher to add the macro publisher to the Trusted Publisher list. Excel does not display a warning when you open workbooks with macros if the publisher is on the Trusted
5
Dollar_Money_Format6
5
Click the name of the macro you want to run.6
Click Run.Excel runs the macro.
•
In this example, the macro adds dollar signs and removes the decimal places.Create and Launch a
Keyboard Shortcut
A
keyboard shortcut is a combination of keys you press to execute a command. You can use a keyboard shortcut to launch an Excel macro command. You can assign an uppercase or lowercase key to a macro when you create it, or assign one later by using the Macro Options dialog box. You execute a macro keyboard shortcut by pressing the Ctrl key along with that uppercase or lowercase key. Refer to the section, “Record a Macro,” to learn how to create a macro. Keyboard shortcuts are case sensitive. For example, Excel interprets a lowercase mand an uppercase Mas two different keys. To execute a macro you have assigned to a lowercase letter, press Ctrl plus the letter, such as Ctrl+m. To execute a macro you have assigned to an uppercase letter, press Ctrl and Shift plus the letter, such as Ctrl+Shift+M.If you assign the same keyboard shortcut to macros in two different workbooks, you may execute the wrong macro if you use the shortcut while you have both workbooks open. Excel cannot discern from which workbook you want the macro. You can use the Macro Options dialog box to reassign one of the conflicting macros to a new key.
You should also be careful not to assign the macro to a keyboard shortcut that Excel uses. If you do, Excel executes your macro instead of the command it created. For example, by default, Ctrl+o opens the Open dialog box. If you assign oto a macro, your macro overrides Excel’s assignment.
CREATE A KEYBOARD SHORTCUT
1
Click the Developer tab.2
Click Macros in the Code group.The Macro dialog box appears.
3
Click the desired macro.4
Click Options.Create and Launch a Keyboard Shortcut
The Macro Options dialog box appears.
5
Type the desired shortcut key.Press Shift as you type to assign an uppercase key.
Chapter 1: Using Macros and Form Controls
If you do not use a macro shortcut frequently, it is easy to forget the keyboard shortcut you assigned to your macro. If you forget your keyboard shortcut, you can view it in the Macro Options dialog box.
You can execute a macro by assigning the macro to a picture, clip art, shape, or SmartArt. For example, if you want to assign a macro to a picture, you start by inserting the picture into your worksheet by clicking the Insert tab and then clicking Picture. The Insert Picture dialog box appears. In the Look In field, select the folder in which you stored the picture you want to insert. The pictures in that folder appear. Click the picture you want to insert and then click the Insert button. The picture appears in the worksheet. Click and drag the picture to place it where you want it and then double right-click the picture. A menu appears. Click Assign Macro. The Assign Macro dialog box appears. Click the macro you want to assign to the picture and then click OK. Excel assigns the macro to the picture. Click the picture when you want to execute the macro.
1
LAUNCH WITH A KEYBOARD SHORTCUT
1
Select the cells in which you want the macro to execute.2
Press Ctrl and the shortcut key.•
The macro executes.Assign a Macro to the
Quick Access Toolbar
Y
ou can assign a macro to the Excel Quick Access toolbar. You can execute macros assigned to the Quick Access toolbar using a shortcut key or the Macro dialog box; however, using the Quick Access toolbar means you can access the macros by clicking the appropriate button.When you add a button to the Quick Access toolbar, you can specify whether it should appear on the toolbar of all Excel workbooks or only on the Quick Access toolbar in the workbook you specify. By default, the button appears in all workbooks. If you have placed your macro in the Personal Macro Workbook, you will probably want your macro button to appear in all workbooks. If your macro is only available to a single workbook, your macro button should only appear on the Quick Access toolbar for that workbook.
You can use the Customize the Quick Access Toolbar pane of the Excel Options dialog box to add a macro button to the Quick Access toolbar. The Customize the Quick Access Toolbar pane has a number of options you can set. You can use the Modify button to specify the button you want to use to represent your macro. You can specify where on the Quick Access toolbar your button appears and whether the Quick Access toolbar appears above or below the Ribbon. You can click the Reset button to return the Quick Access toolbar to its default state.
Deleting a macro does not remove the macro button from the Quick Access toolbar. You use the Remove button on the Customize the Quick Access Toolbar pane of the Excel Options dialog box to remove a macro button.
1
Click Customize Quick Access Toolbar and then click More Commands.The Excel Options dialog box appears.
2
Click here and then click Macros.3
Click here and then click the workbook in which the button should appear.4
Click the macro you want to assign to the Quick Access toolbar.5
Click Add.•
The macro appears in the box on the right. Macros display on the Quick Access toolbar in the order shown here.•
Click to move the macro up.•
Click to move the macro down.1
1
3
2
Chapter 1: Using Macros and Form Controls
You can add commands you frequently use to the Quick Access toolbar. Click the Microsoft Office button. A menu appears. Click the Excel Options button located in the bottom-right corner. The Excel Options dialog box appears. Click Customize. The Customize the Quick Access Toolbar page appears. Click the down arrow next to the Choose Commands From field and select All Commands. Click the command you want to add to the Quick Access toolbar and then click the Add button. Click OK. Excel returns you to your workbook, and the command you chose appears on the Quick Access toolbar.
You can add commands you cannot find in the Ribbon by choosing Commands Not in Ribbon in the Choose Commands From field. If a command from a previous version of Excel is not in the Ribbon, you may find it listed under Commands Not in the Ribbon. For example, in previous versions you could format your documents quickly by using AutoFormat. Excel 2007 uses styles, but you can still access AutoFormat through the Commands Not in Ribbon feature.
7
8
9
0
The Modify Button dialog box appears.7
Click the button you want to use to represent your macro.8
Click OK to close the Modify Button dialog box.9
Click OK to close the Excel Options dialog box.•
Click to return the Quick Access toolbar to its default state.•
Click the macro and then click the Remove button to remove a macro.The button appears on the Quick Access toolbar.
Delete a
Macro
Y
ou can delete macros you no longer need by clicking the Delete button in the Macro dialog box. Because the Macro dialog box only displays macros in open workbooks, the workbook that contains the macro must be open before you can delete it.The Personal Macro Workbook stores macros you want to make available to all workbooks. Excel creates the Personal Macro Workbook when you choose to store your first macro in it. After Excel creates the Personal Macro Workbook, the workbook opens as a hidden file every time you open Excel. To learn more about storing macros in the Personal Macro Workbook, see the section, “Record a Macro.”
If your macro is in a hidden workbook such as the Personal Macro Workbook, you must unhide the workbook before you can delete the macro. If you try to
delete a macro from the Personal Macro Workbook prior to unhiding it, Excel displays the following message: “Cannot edit a macro on a hidden workbook, Unhide the workbook using the Unhide command.” You can unhide the Personal Macro Workbook and other hidden workbooks by executing the Unhide command on the View tab.
If you unhide the Personal Macro Workbook, make sure you hide it again using the Hide command on the View tab after you delete the macros. Hiding the workbook prevents you from making inadvertent changes to it. You cannot undo the deletion process, but if you delete a macro by mistake, you can close the workbook without saving. Of course, if you close without saving, you will lose all of the work you have done since saving. Your only other alternative is to re-create the macro.
UNHIDE A WORKBOOK
1
Click the View tab.2
Click Unhide in the Window group.1
2
Delete a Macro
The Unhide dialog box appears.
3
Click the workbook you want to unhide.4
Click OK.Chapter 1: Using Macros and Form Controls
Typically, you do not share the Personal Macro Workbook with other users. Excel creates a different Personal Macro Workbook for each username on a computer. If you have multiple users on your computer with different usernames, Excel creates a different Personal Macro Workbook for each of them. You can copy a Personal Macro Workbook from one user to another. The Personal Macro Workbook is stored in the XLStart folder and is named PERSONAL.XLSB. In Windows XP, you can usually find the XLStart folder by following this path: C:\Documents and Settings\username\ Application Data\Microsoft\Excel\XLStart. In Windows Vista, you can usually find the XLStart folder by following this path: C:\Users\username\
Each user can only have one PERSONAL.XLSB file. If a user already has a Personal Macro Workbook, you should rename the old PERSONAL.XLSB file and place the new PERSONAL.XLSB file in the user’s XLStart folder. All files stored in the XLStart folder open when you open Excel, and so both files become available each time the user opens Excel. If you have other files you want to open when you open Excel, place them in the XLStart folder.
3
4
1
2
5
Plain Money FormatDELETE A MACRO
1
Click the Developer tab.2
Click Macros in the Code group.The Macro dialog box appears.
3
Click the macro you want to delete.4
Click Delete.A message box appears, asking you to confirm that you want to delete the macro.
5
Click Yes.Add a Form Control
to a Worksheet
Y
ou can add controls to a worksheet to make it easier to enter data into a cell. Form controls can help users who are not familiar with Excel and can increase the accuracy of data entry by limiting a user’s options. For example, you can add check boxes to your worksheet so it looks like a paper form. You can also add a list box from which users can select an entry. Excel provides nine controls you can add to a worksheet. You add controls by selecting the control you want from the Forms Control menu. After you add a control, you can adjust its size by dragging the side or corner handles. When you add a control or right-click a control to edit, you are in design mode. In design mode, you can modify the properties and size of the control, but you cannot test its functionality.When you place a control on a worksheet, it sits on top of the worksheet. You can size it so it appears to be located in a cell, but controls are separate from cells and you can place them anywhere on the worksheet. A control can cover any portion of a cell or range of cells. After you add controls to a worksheet, you can assign them values. See the section, “Assign Values to a Form Control,” for more information on assigning control values. Form control options are located on the Developer tab. See the section, “Introducing Macros,” to learn how to display the Developer tab.
1
Click the Developer tab.Note:See the section, “Introducing Macros,” to learn how to
display the Developer tab.
2
Click Insert in the Controls group.The Forms Control menu appears.
3
Click to select the control you want to add.3
1
2
Add a Form Control to a Worksheet
4
Drag the cursor to create the control.Chapter 1: Using Macros and Form Controls
You can add the controls listed in the following table to your worksheets.
CONTROL CONTROL NAME DESCRIPTION
Button Runs an associated macro when the user clicks it. Combo box Displays a list of items as a menu.
Check box Selects or deselects an option.
Spinner Scrolls up and down through a list of numeric values. List box Displays a list of items for selection.
Radio button Selects one of a group of items when the user clicks it. Group box Places related controls together.
Label Provides information about an associated control.
Scroll bar Increases or decreases a value when the user clicks the arrows or drags the bar.
6
6
Place your pointer on the border of a control anddrag the control to change its location.
The control appears on the worksheet.
•
Right-click the control to place it in design mode.•
To cancel design mode, click any cell in the worksheet.Assign Values to
a Form Control
A
fter you add a control to a form, you can assign it the values you want associated with the control. For example, if your worksheet contains a list box, you can assign the list of values that you want to appear when users access the list box. Some controls enable you to define a range of valid numeric values for the control. For example, if you use a spinner, you define the starting value and the maximum value for the control. For combo boxes and list boxes, you can place the options associated with the control in a range of cells. For example, if you use a combo box, you tell Excel the list of values used by the control by entering the range of cells containing the values. The values can be located on another worksheet or even in another workbook, as long as Excel can access the workbook when users view the worksheet that contains the control.You can link a cell to a control. If you link a cell to a control, the value associated with a user selection becomes the value of the linked cell. If you use a combo box control or list box control, the value in the linked cell is a number that represents the user’s selection. Excel assigns the number based on the position of the selected value in your list. If the list contains the values
Computer, Monitor, and Keyboard, and the user selects Monitor, the linked cell receives the value 2, because Monitor is second in the list.
With a control such as a check box, you can tell Excel whether you want the option to be initially selected or unselected. Each option — selected or unselected — has a value associated with it.
1
Right-click the selected control.A menu appears.
2
Click Format Control.The Format Object dialog box appears.
3
Click the Control tab.The available fields are different, depending on the control type.
This example uses a list box.
4
Drag to select a range, or type the range that lists the valid values.5
Click a cell to assign a linked cell.The value associated with your selection appears in the linked cell.
6
1
2
4
Chapter 1: Using Macros and Form Controls
8
Monitor8
Select the desired control value.•
Excel places a numeric value representing the control selection in the linked cell.When working with a value selected from a list box or combo box control, you may want to use that selection to set the value of another cell. For example, assume you have the following Excel list in cells H2:I4.
Example:
Computer $1295
Monitor $995
Keyboard $55
You can use the Indexfunction to determine the price, based on the equipment selection. For example,
if the user selects Monitor from the control, Excel places a value of 2 in the linked cell. If you want users to find the cost of the selection, you type a formula similar to the following, assuming that C2 is the linked cell:
Example:
=INDEX($H$2:$1$4, C2, 2)
Add a Macro to
a Form Control
Y
ou can assign a macro to any form control on a worksheet. For example, if a user clicks a radio button control, you can have Excel add a postage amount to an invoice.You can create one macro for each control on a worksheet. You create a macro either by recording a series of keystrokes or by writing a VBA procedure in the Visual Basic Editor. When you select the Assign Macro menu option, Excel automatically creates a new macro with the name of the control followed by an underscore and an event name, such as _Click. Excel assigns the control name to the control when you add it to your worksheet. For example, the first OptionButton control you add to a worksheet is named OptionButton1. If you
create a macro for the option button, Excel gives the macro the name OptionButton1_Click.
The portion of the macro name following the underscore character corresponds to an action, commonly referred to as an event. For example, with an OptionButton control, the user clicks the radio button to select the option, and so the event is Click. If you create a macro for a combo box control, Excel assigns Change to the name of the event because you want to execute the macro when the value of the control changes. The event extension tells Excel to monitor the control and execute the macro whenever a user clicks the control.
No matter which option you select — recording or writing VBA — Excel assigns the same name to the macro.
1
Right-click your control.A menu appears.
2
Click Assign Macro.1
2
Add a Macro to a Form Control
The Assign Macro dialog box appears.
Excel assigns a default macro name for the selected control.
Chapter 1: Using Macros and Form Controls
The macros you assign to a control only execute when the corresponding event occurs for the control. For example, you may have a macro assigned to a control that computes the total amount to be paid when the user clicks the control. If you change the values needed to compute the total amount after a user clicks the control, Excel does not update the total until the user clicks the control again.
If you no longer want a macro to be assigned to a control, right-click the control and then click the Assign Macro option. In the Assign Macro dialog box, clear the macro name from the Macro Name field and then click OK. Excel removes the macro assignment from the control, but the macro remains as part of the workbook. To remove the macro from the workbook, click the View tab and then click Macros in the Macros group to display the Macro dialog box. Select the macro you want to delete and then click Delete.
4
4
Click the control with the assigned macro.Excel executes the associated macro.
Introducing the
Visual Basic Editor
View of the Visual Basic Editor
A
Project Explorer
The Project Explorer lists all projects. The VBE considers each open workbook and each add-in a project. Microsoft Office arranges projects in the Project Explorer in a tree-like structure. Click plus (+) to show more information. Click minus (–) to show less information. To display the Project Explorer, click View ➔Project Explorer.
B
Code Window
Use the Code window to write, edit, and display VBA code. Every VBA object has a Code window that stores the code associated with the object. In the Project Explorer, double-click an object’s name to see the associated code. To display the Code window, click View ➔Code.
C
Object List Box
The Object List box lists the objects associated with a form.
D
Procedure List Box
The Procedure List box lists the procedures associated with the selected object.
Use the Locals window to monitor
G
Watches Window
Use the Watches window to monitor
H
Immediate Window
The Immediate window returns the
E
Properties Window
Chapter 2: Using the V
isual Basic Editor
The Project Explorer Window
The Project Explorer resembles the treelike structure used by the Windows Explorer folders pane. When you open the VBE, the VBE opens a VBA project for each open Excel workbook. The VBE names each project VBAProject (workbook name). Under the project name, the VBE lists the workbook and each worksheet in the workbook.
When you record a macro, you can choose to store it in the Personal Macro Workbook. Once you have stored a macro in the Personal Macro Workbook, the Personal Macro Workbook opens as a hidden file whenever you run Excel. If the Personal Macro Workbook is open, you can see it listed as a project in the Project Explorer window.
Properties Window
You use VBA code to manipulate objects. Workbooks and worksheets are examples of objects. A property is an attribute of an object. VBA uses attributes to define such things as the name, color, location, or size of an object. The Properties window displays the properties associated with the selected object. To select an object, you click the object name in the Project Explorer window. A module has only one property: its name. Hence, if you select a module, the only property that you see in the Properties window is the module name. Sheets have many properties, and if you select a sheet, you can view and modify the many sheet properties.
To change the properties associated with an object, you simply click the field beside the property and make the desired changes. Some property fields, such as Name, require you to type a value. Other fields have drop-down lists from which you can select the appropriate value. Some properties are only. You cannot change read-only properties.
Modules
VBA executes procedures in response to a system action or an action performed by a user. A module is a set of procedures that Excel can execute. The VBE stores each macro you create or record as a procedure in a module. The Project Explorer lists each module a project contains. You can add modules by using the steps outlined later in this chapter. When you double-click a module name in the Project Explorer, the contents of the module appear in the Code window. Use the Procedure List box to select the procedure you want to view.
The Visual Basic Editor
Excel provides two ways to create a macro: You can record a macro or you can type Visual Basic for Applications (VBA) code into the Visual Basic Editor (VBE). The VBE is a separate application you use to write and edit VBA code. You can access the VBE through all Microsoft Office applications, including Excel.
Activate the
Visual Basic Editor
T
here are two ways to create a macro. One way is to use the macro recorder to record the steps needed to perform the action. The other way is to create the steps by typing the VBA code into the Code window of the VBE. When you use the macro recorder, Excel automatically creates the VBA code for you. You can use the VBE to edit macros you have created with the macro recorder. Often, it is convenient to use a combination of the two methods to create your VBA code: You record part of the VBA code and then you use the VBE to augment or modify your code.You can use several methods to activate the VBE: You can press Alt+F11 while in Excel; click the Visual Basic button in the Code group on the Developer tab; or click
the Edit button in the Macro dialog box. When the VBE is open, you can open the Code window by pressing Ctrl+R. If you create your macros using the macro recorder, Excel defines each macro you create as a procedure and stores each procedure in a module. The VBE lists modules in the Project Explorer under the workbook in which they are located.
If the Personal Macro Workbook, Personal.xlsm, contains macros, the project for the Personal.xlsm workbook opens when you access the VBE. You can view and modify all of the macros in the Personal Macro Workbook. See Chapter 1 to learn more about the Personal Macro Workbook.
OPEN THE VBE BY USING THE RIBBON
1
Click the Developer tab.Note:See Chapter 1 to learn how to display the Developer tab.
2
Click Visual Basic in the Code group.1
2
Activate the Visual Basic Editor
The VBE appears, with the Window layout you last used.
3
Double-click a module name.Chapter 2: Using the V
isual Basic Editor
To make the VBE easier to navigate, Microsoft provides shortcut keys. These shortcuts work when the VBE window is open.
SHORTCUT KEY DESCRIPTION
F1 When you select an item in the Code window and then press F1, the VBE displays online help for the item you selected.
F4 Press F4 to switch to the Property window and display the properties for the selected object. If the Property window is not open, the VBE opens it in the location where you last viewed it. F7 You select an object by clicking it in the Project Explorer. When you press F7, the Code
window for the selected object appears on top of all other Code windows. Ctrl+G When you press Ctrl+G, the VBE displays the Immediate window.
Ctrl+R When you press Ctrl+R, you switch to the Project Explorer. If the Project Explorer window is not open, the VBE opens it in the location where you last viewed it.
Alt+F11 When you press Alt+F11, you toggle between the VBE and Excel.
3
1
4
2
MyProc
OPEN THE VBE FROM THE MACRO
DIALOG BOX
1
Click the Developer tab.2
Click Macros in the Code group.The Macro dialog box appears.
3
Click the macro you want to edit.4
Click Edit.Open Visual Basic
Editor Windows
T
he VBE contains several windows you can use when developing macros. Microsoft provides a basic window setup; however, you can rearrange, resize, remove, and add windows. The most commonly used windows are the Project Explorer, the Properties window, and the Code window. You may also find the Immediate window useful for quickly testing a statement before adding it to your code.You can select which windows to display and where to display them. The View menu lists the available VBE windows. When you select a window from the menu, that window appears in the location where you last placed it. For example, if you placed the Project Explorer window in the upper-left corner during your previous session, the Project Explorer window reopens in the upper-left corner.
You can move windows by using the standard drag-and-drop feature found in all Windows applications. You can resize a window by dragging its edges.
You can also attach windows to specific locations in the VBE by using the docking feature. When you dock a window, it becomes part of another window attached at the specified location. If you set a window to dock, Excel docks it in the location you specified each time it opens. You can only dock windows on the top, bottom, left edge, or right edge of the screen, application window, or another dockable window. Docking a window does not mean that the window always appears in the VBE. You can have multiple Code windows open at the same time. You can view multiple Code windows
simultaneously by tiling or cascading them.
DISPLAY A WINDOW
1
Click View.2
Click the window you want to display.You can choose from the Immediate Window, Locals Window, Watch Window, Project Explorer, or Properties Window.
The selected window appears in the last viewed location.
You can click and drag the window to a new location.
You can close a window by clicking the Close box or by right-clicking and selecting Hide.
1
1
2
1
VBAProjectUnderstanding the Visual Basic Editor Windows
DOCK INDIVIDUAL WINDOWS
Chapter 2: Using the V
isual Basic Editor
You can move windows around in the VBE by using the same techniques you use with all Microsoft Windows programs. To move a window, click the title bar and drag it to the desired location. To resize a window, click a corner of the window and drag it to the desired size.
To free up space, you can hide any of the VBE windows. To hide a window, right-click anywhere in the window. In the menu that appears, click Hide.
When you have many lines of code, you may not be able to see all of it at the same time. If you click Window ➔Split, the VBE splits the Code window so you can view different parts of your code
simultaneously. When you split your window, the VBE creates two windows with the same code. You can manipulate each window independent of the other so you can see different parts of your code at the same time.
4
2
3
1
1
5
The Options dialog box appears.
2
Click the Docking tab.3
Click the windows you want to dock ( changes to ).4
Click OK.5
Dock the window by clicking and dragging it to an edge.Excel moves the window to its new location.
DISPLAY CODE WINDOWS
1
Click Window and then click a tiling option.You can select Tile Horizontally, Tile Vertically, or Cascade.