Canon
EOS Rebel
XSi/450D Digital
Field Guide
Canon
EOS Rebel
XSi/450D Digital
Field Guide
Wiley Publishing, Inc. 10475 Crosspoint Boulevard Indianapolis, IN 46256 www.wiley.com
Copyright © 2008 by Wiley Publishing, Inc., Indianapolis, Indiana
Published simultaneously in Canada
ISBN: 978-0-470-38087-1
Manufactured in the United States of America
10 9 8 7 6 5 4 3 2 1
No part of this publication may be reproduced, stored in a retrieval system or transmitted in any form or by any means, electronic, mechanical, photocopying, recording, scanning or otherwise, except as permitted under Sections 107 or 108 of the 1976 United States Copyright Act, without either the prior written permission of the Publisher, or authorization through payment of the appropriate per-copy fee to the Copyright Clearance Center, 222 Rosewood Drive, Danvers, MA 01923, (978) 750-8400, fax (978) 646-8600. Requests to the Publisher for permission should be addressed to the Legal Department, Wiley Publishing, Inc., 10475 Crosspoint Blvd., Indianapolis, IN 46256, (317) 572-3447, fax (317) 572-4355, or online at http://www.wiley.com/go/permissions.
Limit of Liability/Disclaimer of Warranty:The publisher and the author make no representations or warranties with respect to the accuracy or completeness of the contents of this work and specifically disclaim all warranties, including without limitation warranties of fitness for a particular purpose. No warranty may be created or extended by sales or promotional materials. The advice and strategies contained herein may not be suitable for every situation. This work is sold with the understanding that the publisher is not engaged in rendering legal, accounting, or other
professional services. If professional assistance is required, the services of a competent professional person should be sought. Neither the publisher nor the author shall be liable for damages arising herefrom. The fact that an organization or Web site is referred to in this work as a citation and/or a potential source of further information does not mean that the author or the publisher endorses the information the organization of Web site may provide or recommendations it may make. Further, readers should be aware that Internet Web sites listed in this work may have changed or disappeared between when this work was written and when it is read.
For general information on our other products and services or to obtain technical support, please contact our Customer Care Department within the U.S. at (800) 762-2974, outside the U.S. at (317) 572-3993 or fax (317) 572-4002.
Wiley also publishes its books in a variety of electronic formats. Some content that appears in print may not be available in electronic books.
Library of Congress Control Number:2008930522
Charlotte K. Lowrie is a professional editorial, portrait, and stock photographer and an award-winning writer based in the Seattle, Washington area. Her writing and photography have appeared in newsstand magazines and Web sites. She is the author of nine books including the best-seller Canon EOS Digital Rebel XTi Digital Field Guide, the Canon EOS 40D Digital Field Guide, theCanon EOS 5D Digital Field Guide, theCanon EOS 30D Digital Field Guide, and she is co-author of Exposure and Lighting for Digital Photographers Only. Charlotte also teaches two photography classes at BetterPhoto.com every month. Her images have appeared on the Canon Digital Learning Center, and she is a featured pho-tographer on www.takegreatpictures.com.
Acquisitions Editor
Ryan Spence
Senior Project Editor
Cricket Krengel
Copy Editor
Lauren Kennedy
Editorial Manager
Robyn B. Siesky
Vice President & Group Executive Publisher
Richard Swadley
Vice President & Publisher
Barry Pruett
Business Manager
Amy Knies
Senior Marketing Manager
Sandy Smith
Project Coordinator
Lynsey Stanford
Graphics and Production Specialists
Alissa D. Ellet Andrea Hornberger
Quality Control Technician
Jessica Kramer
Proofreading
Laura L. Bowman
Indexing
Acknowledgments
Contents at a Glance
Acknowledgments . . . vii
Introduction . . . xvii
Part I: Using the Rebel XSi/450D . . . 1
Chapter 1: Exploring and Setting Up the Rebel XSi/450D . . . 3
Chapter 2: Using the Rebel XSi/450D . . . 21
Chapter 3: Using White Balance and Picture Styles . . . 61
Chapter 4: Using Live View . . . 83
Chapter 5: Customizing the Rebel XSi/450D . . . 95
Part II: Creating Great Photographs with the
Rebel XSi/450D . . . 109
Chapter 6: The Fundamentals of Light and Exposure . . . 111
Chapter 7: Using Flash . . . 133
Chapter 8: Exploring Canon Lenses . . . 145
Chapter 9: In the Field with the Rebel XSi/450D . . . 165
Part III: Appendixes . . . 231
Appendix A: Downloading Images and Updating Firmware . . . 233
Appendix B: Exploring RAW Capture . . . 239
Glossary . . . 249
Contents
Acknowledgments
vii
Introduction
xvii
Part I: Using the Rebel
XSi/450D 1
Chapter 1: Exploring and
Setting Up the Digital
Rebel XSi/450D 3
Anatomy of the Digital Rebel
XSi/450D 1
Front camera controls 4
Top camera controls 5
Rear camera controls 7
Camera terminals 10
The LCD 10
Viewfinder display 11
Lens controls 12
Setting Up the Rebel
XSi/450D 13
Formatting an SD/SDHC card 14 Setting the date and time 15 Choosing the file format and
quality 16
JPEG format 17
RAW format 17
Changing file numbering 19
Chapter 2: Using the
Rebel XSi/450D 21
Choosing a Shooting Mode 22 How shooting modes relate to
exposure 22
Basic Zone shooting modes 23
Full Auto mode 24
Portrait mode 25
Landscape mode 26
Close-up mode 27
Sports mode 27
Night Portrait mode 29
Flash-off mode 29
Creative Zone shooting modes 30
P mode 30
Tv mode 31
Av mode 32
M mode 33
Partial metering 36
Spot metering 37
Center-weighted Average
metering 38
Modifying Exposure 38
Auto Lighting Optimization 39 Highlight Tone Priority 39 Exposure Compensation 40 Auto Exposure Bracketing 41 Auto Exposure Lock 42
Evaluating Exposure 44
Brightness histogram 45
RGB histogram 45
Setting the ISO Sensitivity 47
Getting Sharp Focus 49
Selecting an Autofocus point 51 Selecting an AF point 51 Verifying sharp focus 52
Choosing a Drive Mode 52
Single-shot mode 53
Continuous mode 53
Self-timer modes 53
Viewing and Playing Back Images 54 Single-image playback 54
Index Display 55
Auto Play 55
Using the Display Button 56
Erasing Images 56
Protecting Images 56
Using the EOS Integrated Cleaning
System 57
Automatic sensor cleaning 57 Obtaining Dust Delete Data 58 Applying Dust Delete Data 59
Balance and Picture Styles 61
About Color Spaces 61
Choosing a Color Space 64 Choosing White Balance Options 65
Approaches to using various white balance options 67 Set a custom white balance 69 Use White Balance Auto
Bracketing 71
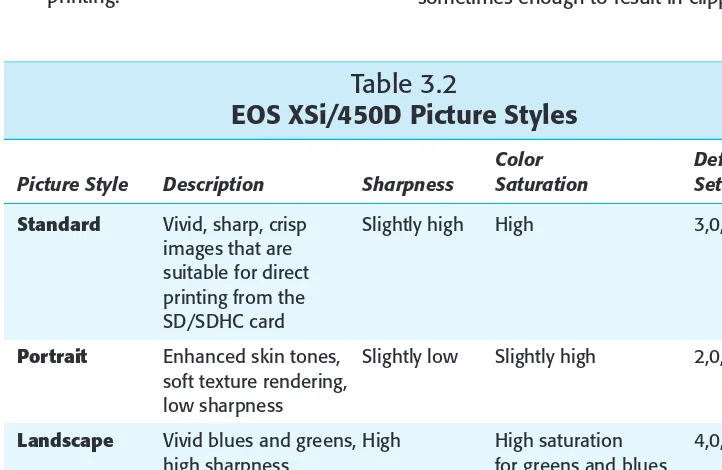
Set White Balance Correction 72 Choosing and Customizing a Picture
Style 73
Registering a User Defined Picture
Style 79
Using the Picture Style Editor 80
Live View focusing 84 Exposure simulation and
metering 84
Using a flash 85
Setting Up for Live View 85 Setting Live View Custom
Functions 86
C.Fn-8 86
C.Fn-6 87
Live View function settings 87 Shooting in Live View 88
Focusing with Quick or
Live mode 88
Quick mode focusing 88 Live mode focusing 89
Manual focusing 90
Using Live View with tethered
shooting 91
Chapter 5: Customizing the
Rebel XSi/450D 95
Custom Function specifics 96 C.Fn I: Exposure 96
C.Fn II: Image 98
C.Fn III: Autofocus/Drive 101 C.Fn IV: Operation/
Others 102
Setting Custom Functions 105
Customizing My Menu 106
Changing the Screen Color 108
Part II: Creating Great
Photographs with
the Rebel XSi/450D 109
Sensitivity: The role of ISO 113 Intensity: The role of
the aperture 115
Wide aperture 115
Narrow aperture 116 Choosing an aperture 116 What is depth of field? 117 Time: The role of
Shutter Speed 119
Equivalent Exposures 120
Putting It All Together 120
Let There Be Light 121
Understanding color
temperature 121
The colors of light 123 Sunrise 123 Midday 123 Sunset 124 Diffused light 124 Electronic flash 125 Tungsten light 125 Fluorescent and
other light 126
Metering light 127
Additional characteristics
of light 128
Hard light 128
Soft light 129
Directional light 129
Chapter 7: Using Flash 133
Disabling the flash but enabling the flash’s
autofocus-assist beam 137
Red-eye reduction 137
Modifying Flash Exposure 138 Flash Exposure Lock 138 Flash Exposure
Compensation 139
Using Flash Control Options 141 Using One or More Accessory
Speedlites 143
Chapter 8: Exploring
Canon Lenses 145
Understanding the Focal Length Multiplication Factor 145
Lens Choices 147
Wide angle 147
Normal 148 Telephoto 148 Macro 148 Zoom Versus Prime Lenses 149
About zoom lenses 149
Zoom lens advantages 149 Zoom lens disadvantages 150 About prime lenses 151 Prime lens advantages 151 Prime lens disadvantages 151 Canon Lens Terminology 151 Using Wide-Angle Lenses 154 Using Telephoto Lenses 156
Using Normal Lenses 157
Exploring Lens Accessories 161
Lens extenders 162
Extension tubes and
close-up lenses 162
Chapter 9: In the Field with
the Rebel XSi/450D 165
Approaches to Composition 165 Subdividing the
photographic frame 166 Balance and symmetry 167
Tone and color 168
Lines and direction 170
Fill the frame 171
Check the background 171
Frame the subject 171
Control the focus and
depth of field 171
Defining space and
perspective 172
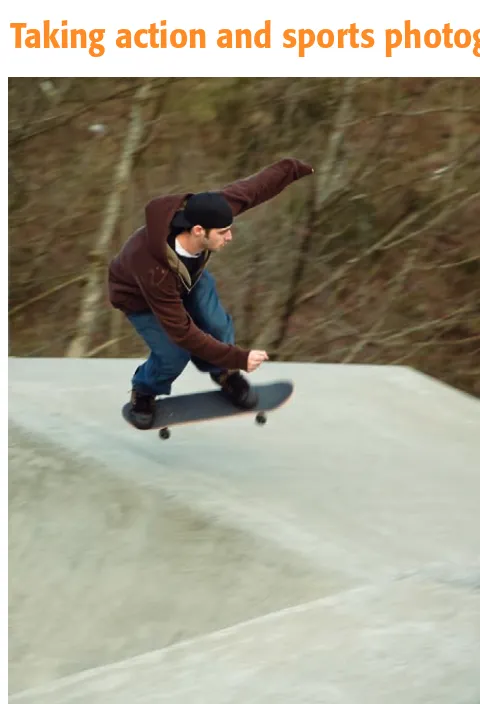
Action and Sports Photography 173
Inspiration 175
Taking action and sports
photographs 176
Action and sports
photography tips 178
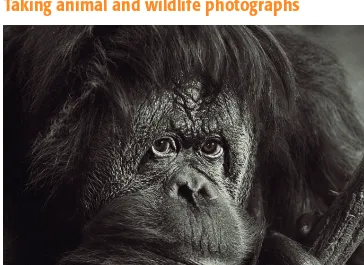
Animal and Wildlife Photography 179
Inspiration 180
Taking animal and wildlife
photographs 181
Animal and wildlife
photography tips 183
Inspiration 186
Taking architectural and
interior photographs 188 Architectural and interior
photography tips 190
Child Photography 191
Inspiration 192
Taking child photographs 193 Child photography tips 195
Macro Photography 196
Inspiration 197
Taking macro photographs 198 Macro photography tips 200 Nature and Landscape
Photography 200
Inspiration 202
Taking nature and landscape
photographs 203
Nature and landscape
photography tips 205
Night and Low-Light Photography 205
Inspiration 208
Taking night and low-light
photographs 208
Night and low-light
photography tips 210
Portrait Photography 210
Lens choices 211
Backgrounds and props 211
Lighting 211
Taking portrait photographs 214 Portrait photography tips 216 Still-Life Photography 216
Inspiration 218
Taking stock photographs 223 Stock photography tips 224
Travel Photography 225
Inspiration 227
Taking travel photographs 228 Travel photography tips 229
Part III: Appendixes 231
Appendix A: Downloading
Images and Updating
Firmware 233
Downloading with a USB Cable 233 Downloading with a Card Reader 235 Updating the XSi/450D Firmware 236
RAW Capture 239
Learning about RAW Capture 239 Canon’s RAW Conversion
Program 242
Sample RAW Image Conversion 243 Creating an Efficient Workflow 247
Glossary
249
Introduction
Welcome to the Canon EOS XSi/450D Digital Field Guide. With the introduction of the XSi/450D, Canon combined the best of its recent technologies into an affordable, digital SLR that is fast, reliable, and produces outstanding image quality. This book is designed to help you master using the camera and to help you get the best images possible from it. From my experience, it’s safe to say that this camera is a very capable tool that enables you to express your creative vision.
The XSi/450D features the best of Canon’s latest technology that gives this camera speedy response and performance, and a suite of powerful features that give you more control dur-ing shootdur-ing. The camera is approachable with a small and lightweight footprint, and it fea-tures Live View shooting for new creative opportunities, good customizability, 14-bit conversion for fine gradation and more colors, highlight tone priority, in-camera Canon EX SpeedLite control, large-text, intuitive, full-feature menus, a personalized menu, a big, bright, wide-angle view LCD, and automatic image-sensor cleaning with the option of recording and applying Dust-Delete Data after image capture in Canon’s Digital Photo Professional program.
The XSi/450D is the latest in Canon’s new generation of cameras that opens the door to greater creative expression for photographers. This book is designed to help you go deep into the XSi/450D and use its full potential.
You’ll find that this book is a mix of how-to-use the camera information together with in-field of specific photographic subjects. Regardless of your shooting specialty preference, when the day is done, most photographers know that all of life is a photographic stage. In his book The Mind’s Eye: Writings on Photography and Photographers, Henri Cartier-Bresson said, “There is subject in all that takes place in the world, as well as in our personal universe. We cannot negate subject. It is everywhere. So we must be lucid toward what is going on in the world, and honest about what we feel . . . In photography, the smallest thing can be a great subject. The little human detail can become a leitmotiv. We see and show the world around us, but it is an event itself which provokes the organic rhythm of forms.”
Getting the Most from This Book
Throughout the book, the goal is to make your workflow more efficient by setting up the camera for routine shooting so that you get the highest image quality and the color settings that fit best within your workflow. The first half of the book is devoted to not only setting the camera controls, but also to the effect of using different controls and settings during shooting. It is essential to know the camera controls well, and to set up functions so that they best suit your routine shooting preferences. The XSi/450D is customizable giving you ample opportunity to setup the camera so that it works well for you. Further, Canon pro-vided a full complement of features that give you control over exposure, color, and drive modes. Knowing the extent of these features will go a long way toward making your pho-tography efficient and successful.
While you may or may not be drawn to the Picture Styles, offered on Canon EOS digital cameras, Chapter 3 explains why you need to carefully evaluate and consider modifying Picture Styles. The more you know about Picture Styles, the better your chances of getting the best color and quality both from the camera and subsequently from the prints you make. The XSi/450D also offers many opportunities to customize the functions and use of the camera. All the customization features translate into saving you time during shooting and later as you process your XSi/450D images.
In Chapter 6, those who are new to photography can get an overview on the basics of photographic exposure including an introduction to ISO, aperture, shutter speed, and the types and characteristics of light, and how these elements work together to create a good exposure.
You’ll also find discussions of Canon SpeedLites and lenses in Chapters 7 and 8. In Chapter 7, you’ll learn about both the onboard flash as well as using one and more accessory SpeedLites. Chapter 8 introduces the range of lenses that Canon offers as well as providing example images taken using some of the lenses. These chapters are designed as a quick ref-erence, not an exhaustive compendium of lens test results and flash shooting techniques — both of which are book-length topics on their own. The next part of the book concentrates on the photographic areas where the EOS XSi/450D is a stand-out performer. Each section offers discussions about each photographic area; field notes on using the XSi/450D; lenses, flash, and accessories; shooting tips and experiences; and, workflow notes.
This part of the book is designed to discuss camera performance and capability in various venues and to provide suggestions and comments to make your shooting more efficient and successful. As with any area of photography, there are as many options, preferences, and opinions as there are photographers. The information provided in this part of the book reflects one photographer’s experience — use it as a springboard for your work with the XSi/450D.
Digital images aren’t finished, of course, until they are edited, and, in the case of RAW capture, until they are converted to TIFF or JEPG format. Canon provides a suite of programs that allow you to view and edit XSi/450D images. In addition, if you are interested in get-ting started with RAW capture, Appendix B provides the basics for shooget-ting and converget-ting RAW images using Canon’s Digital Photo Professional program.
I hope that during your journey through this book, you will be inspired and challenged to the XSi/450D to capture stunning, personal-best images. Regardless, I am confident that you will find that the EOS XSi/450D is an exceptional tool to help you achieve your photo-graphic vision.
Using the
Rebel
XSi/450D
I
I
✦
✦
✦
✦
In This Part
Chapter 1
Exploring and Setting Up the Rebel XSi/450D
Chapter 2 Using the Rebel XSi/450D
Chapter 3
Using White Balance and Picture Styles
Chapter 4 Using Live View
Chapter 5
Customizing the Rebel XSi/450D
1
1
C H A P T E RExploring and
Setting Up
the Rebel
XSi/450D
P
rofessional photographers know that an important first step in photography is learning the camera so thoroughly that they can operate the camera without hesitat-ing or hunthesitat-ing for controls. By knowhesitat-ing the camera and lens controls well, you can make adjustments instinctively and confidently without missing a shot.The simple design of the Rebel XSi/450D makes mastering it both easy and fun; yet despite the simplicity, the camera offers full-function features for exceptional creative control. Internally, Canon’s 12.2-megapixel CMOS (complementary metal-oxide semiconductor) sensor, DIGIC III Image Processor, and 14-bit analog-to-digital conversion deliver dependably vivid, crisp images, especially at the highest image-quality settings.
Anatomy of the Rebel
XSi/450D
Many of the Rebel XSi/450D’s controls are within a finger’s reach for quick adjustment as you’re shooting. Less frequently used functions are accessible only via the menus. The follow-ing sections help you to explore and master the XSi/450D controls.
✦
✦
✦
✦
In This Chapter
Anatomy of the Rebel XSi/450D
Setting up the Rebel XSi/450D
Front camera controls
The front of the camera is a view photogra-phers seldom see. But there are controls and connections on the front of the camera that you’ll use often, such as the Lens release but-ton and the Depth of field preview butbut-ton. If you use EF-S lenses, you should note the location of the white EF-S lens mount index mark. This is the mark you use to line up the lens when you mount it on the camera.
The front camera controls, from left to right, include the following:
✦ Shutter button.This button sets
focus, initiates metering and expo-sure calculation, and fires the shut-ter to make an exposure. To set the focus for the image, press the Shutter button halfway. To make the picture, press the Shutter but-ton completely.
Shutter button
Red-eye reduction/Self-timer lamp
EF lens mount index
EF-S lens mount index
Flash pop-up button Built-in flash
Grip/battery compartment Lens mount
Mirror Contacts
Depth of field preview button
Lens release button
✦ Red-eye reduction/Self-timer lamp. This red lamp flashes to count down the seconds to shutter release when the camera is set to one of the Self-timer modes.
✦ EF and EF-S lens mount index markers.Use these markers on the lens mount to line up the lens when you mount it on the camera. Use the EF lens mount index for all EF lenses that have a red marker on the lens, and the EF-S lens mount index for EF-S lenses that have a white marker on the lens.
✦ Built-in flash and Flash pop-up button. The flash provides illumina-tion either as the main light source or as a fill flash. In Basic Zone modes such as Full Auto, Portrait, Landscape, and so on, the flash fires automatically. In Creative Zone shooting modes such as P, Tv, Av, and so on, pressing the Flash pop-up button raises the flash for use.
✦ Depth of field preview button.
Press this button to stop down, or adjust, the lens diaphragm to the current aperture to preview the depth of field in the viewfinder. The larger the area of darkness in the viewfinder, the more extensive the depth of field will be. At the lens’s maximum aperture, the Depth of field preview button can-not be depressed because the diaphragm is fully open. The aper-ture cannot be changed as long as the Depth of field preview button is depressed. You can also preview depth of field when using the Live View function.
✦ Lens release button.Press and
hold this button to disengage the lens from the lens mount by turning the lens to the right to remove it.
Top camera controls
Controls on the top of the camera enable you to use your thumb and index finger on your right hand to control common adjustments quickly. Here is a look at the top camera controls:
✦ Mode dial. This dial enables you to
switch among shooting modes by lining up the mode you want with the white mark beside the dial.
✦ ISO speed button.Press this
✦ Main dial. This dial selects a
vari-ety of settings and options. Turn the Main dial to manually select an AF (autofocus) point after pressing the AF-point selection/Magnify but-ton, and to set the aperture in Av mode, the shutter speed in Tv and Manual modes, and to shift the exposure program in P mode. Additionally, you can use the Main dial to scroll among Menu tabs.
✦ Shutter button. Pressing the
Shutter button halfway sets the point of sharpest focus at the selected AF point in manual AF-point selection mode, and it simul-taneously sets the exposure based on the ISO and selected shooting mode. Pressing the Shutter com-pletely makes the exposure. In any mode except Direct Printing, you can also half-press the Shutter but-ton and dismiss camera menus and image playback.
Shutter button Main dial
ISO speed button
Power switch Mode dial
Rear camera controls
The rear camera controls are handy for mak-ing quick adjustments while you’re shootmak-ing. In particular, you’ll likely use the WB (white balance), Menu, Playback, and AF-point selection/Magnify (Autofocus) buttons often.
Your ability to use some of the rear camera controls depends on the shooting mode you’re using. In automatic modes such as Portrait, Landscape, and Sports, pressing the AV, WB, and Drive mode selection buttons has no effect because these functions are set automatically by the camera. But in the Creative Zone modes such as P, Tv, Av, M, and A-DEP, these buttons function as described next.
If you press the WB (White Balance), AF (AutoFocus), or other buttons on the camera and nothing happens, check the Mode dial first to see if you’re using an automatic mode such as Full Auto, Portrait, Landscape, and so on. If you want to use these buttons to make changes, then switch to P, Tv, Av, M, or A-DEP mode.
✦ Menu button.Press the Menu
button to display camera menus. To move among Menu tabs, turn the Main dial or press the left or right cross key on the back of the camera.
✦ Disp. (Display) button. Press this
button to turn off the LCD display. If you’re using the camera menus, you can press this button to dis-play the current camera settings, available space on the SD/SDHC card, and other camera settings. Then press the button again to return to the menu. Or if you are in single-image playback, pressing this button cycles through the vari-ous playback display modes to show shooting information and
one or more histograms with an image preview. You can also use this button when you’re printing directly from the SD/SDHC card to change the image between hori-zontal and vertical orientations. The LCD display is on by default when you turn the camera on. But you can set Custom Function (C.Fn) 12 to change the power sta-tus when you turn on the camera.
See Chapter 5 for details on using Custom Functions.
✦ Av button.Press and hold this
but-ton and turn the Main dial to set exposure compensation in P, Tv, Av, and A-DEP. In Manual mode, press and hold this button and turn the Main dial to set the aperture.
✦ Print share/WB (White Balance) button.Pressing the Print
share/WB button enables you to transfer all or selected images from the SD/SDHC card to your com-puter. Press this button when you want to print images on the SD/SDHC card directly to a com-patible printer. When you’re shoot-ing, pressing the button enables you to set a white balance that matches the light in the scene for accurate, natural-looking colors.
✦ Playback button.Press this
but-ton to display the last captured image on the LCD. The default single-image Playback display includes a ribbon of shooting infor-mation at the top. Pressing the Index/Reduce button on the top-right back of the camera during playback displays a grid of images you can scroll through using the Main dial. Press the AF point selection/Magnify button one or more times to return to single-image display.
Menu button
Display off sensor
Viewfinder
Dioptric adjustment Focal plane mark
Display button (camera setting/display on/off)
Aperture/Exposure compensation button
AE Lock/FE Lock/ Index/Reduce button
AF-point selection/ Magnify button
Playback button Drive mode selection button
Picture style button Erase button
Set button
AF (Autofocus) mode selection button Metering mode
selection button Print share/WB
(White Balance) button LCD display
✦ Erase button.Press this button to
delete the current image during image playback.
Within the circle at the back right of the Rebel XSi/450D are four buttons, collectively referred to as cross keys. The cross key func-tions change depending on whether you’re playing back images, navigating camera menus, or changing exposure settings.
For example, when you play back images, the left and right cross keys move backward and forward through the images stored on the SD/SDHC card; and when you navigate through menu options, the cross keys move to the option you want.
✦ Drive mode selection. Press the
left cross key to set the Rebel XSi/450D to shoot one picture at a time, or to shoot continuously at 3.5 frames per second (fps). The maximum burst during continuous shooting is approximately 53 Large/Fine JPEG frames, six RAW frames, or four RAW +Large/Fine JPEG frames. You can also use this button to select one of the Self-timer/remote control modes. During image playback, press this button to move to a previous image.
✦ Picture Style.Press the down
cross key to display the Picture Style screen where you can choose a style or “look” that varies the image contrast, color rendition, sat-uration, and sharpness. You can choose the Standard, Portrait, Landscape, Neutral, Faithful, or Monochrome Picture style and customize up to three User Defined Picture Styles.
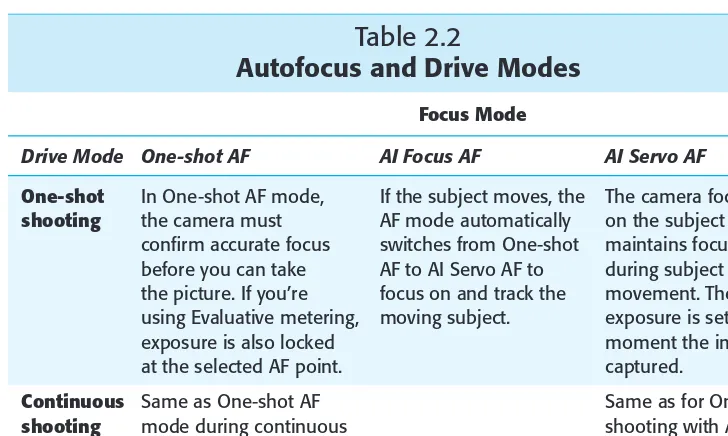
✦ AF (Autofocus) mode.Press the
right cross key (labeled as AF) to choose among three autofocus
modes: One-shot for still subjects, AI Focus for subjects that may start to move or move unpredictably such as kids and wildlife, or AI Servo, which tracks focus of mov-ing subjects. Durmov-ing image play-back, press this button to move to the next image.
✦ Metering mode selection. Press
the up cross key to choose a metering mode that determines how much of the scene that the camera uses to meter subject brightness. The default Evaluative metering system takes into account the entire scene and is accurate for even backlit subjects. Spot meter-ing uses the center four percent of the viewfinder, indicated by the cir-cle etched in the viewfinder, to measure subject brightness. Partial metering weights the metering at the center of the viewfinder, and Center-weighted Average weights metering throughout the scene but gives more weight to the center.
✦ Set button.Press this button to
confirm changes you make on the camera menus, and to display sub-menus. You can also customize this button using C.Fn-11 for use while you’re shooting.
At the top-right corner of the Rebel XSi/450D are two buttons that you’ll use often to select AF points manually and to check focus as you enlarge images during playback.
✦ AF-point selection/Magnify but-ton. Press this button to activate the AF points in the viewfinder to select an AF point manually or to select automatic AF-point selection. Press and hold the button and turn the Main dial to select one AF point or all AF points. During image playback, you can press this button to enlarge the displayed image to check focus.
Camera terminals
On the side of the XSi/450D are a set of ter-minals under a cover and embossed with icons that identify the terminals, which include:
✦ Video Out terminal.The Video
Out terminal enables you to con-nect the camera to a television set using the video cable supplied in the camera box.
✦ Remote control terminal.Use the
Remote control terminal to con-nect the optional Remote Switch RS-60E3 to the camera. With this switch, you can control the Shutter button from up to 2 feet away.
✦ Digital terminal.The Digital
ter-minal, together with a USB cable provided in the box, can be used to connect the camera to a com-puter to download images, to shoot with the camera connected to the computer, or to connect to a compatible printer to print images from the SD/SDHC card.
The LCD
With the XSi/450D, the 3-inch LCD not only displays captured images, camera settings, and menus, but it also provides a continu-ous view of the scene during Live View shooting. The LCD displays approximately 100 percent coverage of the scene.
F5.6
Exposure level also shows Exposure compensation amount and AEB level)
Aperture
ISO sensitivity setting
White balance setting
Autofocus mode
Shots remaining, shots remaining during
Viewfinder display
On the Rebel XSi/450D, the optical, high magnification viewfinder displays approxi-mately 95 percent of the scene that the sen-sor captures. In addition, the viewfinder displays the AF points, a four-percent Spot metering circle that is etched into the center of the viewfinder, as well as information at the bottom that displays the shutter speed and aperture settings, the Exposure Level meter, space remaining on the card, the
current image number, a focus confirmation light, and other settings depending on the functions in use.
AF points are etched in the focusing screen. When you manually select AF points by pressing the AF-point selection/Magnify but-ton, the AF points are highlighted as you rotate the Main dial. If the camera automat-ically selects an AF point, the selected point displays in red on the focusing screen when you press the Shutter button halfway down.
WB
Exposure compensation amount AEB range
Built-in flash recycling ( buSY) Card full warning (FuLL) Card error warning (Err) No card warning (Card)
H
WB < >
To ensure that the viewfinder image and focusing screen elements are adjusted for your vision, you can adjust the diopter set-ting from –3 to +1 dpt. Simply turn the diopter switch — located to the right of the viewfinder eyecup — up or down until the image in the viewfinder is sharp. If you wear eyeglasses during shooting, be sure to wear them as you set the dioptric adjustment. To set the dioptric adjustment, focus the lens by pressing the Shutter button halfway, and then turn the knob until the image in the viewfinder is sharp.
Lens controls
All Canon lenses provide both automatic and manual focusing functionality via the AF/MF (Autofocus/Manual Focus) switch on the side of the lens. If you choose MF, the XSi/450D provides focus assist, shown in the viewfinder, to confirm sharp focus. When sharp focus is achieved, the Focus confirmation light in the viewfinder burns steadily and the camera emits a focus con-firmation beep if the beep is turned on.
Depending on the lens, additional controls may include the following:
Focusing ring
Zoom setting Zoom ring
Distance scale Filter mounting thread
Focus mode switch
✦ Focusing distance range selec-tion switch.This switch deter-mines and limits the range that the lens uses when seeking focus to speed up autofocusing. The focus-ing distance range options vary by lens.
✦ Image stabilizer switch.This
switch turns optical image stabi-lization on or off. Optical Image Stabilization (IS) corrects vibrations at any angle when handholding the camera and lens. IS lenses typi-cally allow sharp handheld images up to two or more f-stops over the lens’s maximum aperture.
✦ Stabilizer mode switch. Offered
on some telephoto lenses, this switch has two modes: one mode for standard shooting and one mode for vibration correction when panning at right angles to the cam-era’s panning movement.
✦ Focusing ring and zoom ring.
The focusing ring can be used at any time regardless of focusing mode. On zoom lenses, the zoom ring zooms the lens in or out to the focal lengths marked on the ring.
✦ Distance scale and infinity com-pensation mark.This shows the lens’s minimum focusing distance to infinity. The infinity compensation mark compensates for shifting the infinity focus point resulting from changes in temperature. You can set the distance scale slightly past the infinity mark to compensate.
Setting Up the Rebel
XSi/450D
Setting up the Rebel XSi/450D is the first step in getting pictures from the camera that you’ll treasure for years to come. Although this chapter offers important pointers on setting up your camera, ultimately the best way to get great pictures from the Rebel XSi/450D is to use the settings and evaluate the images. Unlike paying for film and prints, the pictures that you take with the Rebel XSi/450D are at no additional charge, so to speak. This gives you the freedom to explore different camera settings until you get pictures with a combination of color, sat-uration, and contrast that creates great prints.
If You Need to Start Over
If you’re new to digital SLR cameras, you may avoid changing camera settings for fear that it will “mess up” the pictures you’re getting, or that you’ll forget how to reset the camera if you don’t like the changes you’ve made. Canon provides a reset option, which means that you can revert to the original camera settings to have a fresh start at any time.
You may have already completed some of the setup tasks. If you have, then you can skim through the chapter and look for tips that you may have missed in your initial setup.
Formatting an SD/SDHC
card
The Rebel XSi/450D accepts SD and SDHC, or Secure Digital High Capacity, media cards.
Not all media cards are created equal, and the type and speed of media that you use affects the Rebel XSi/450D’s response times, including the ability to write images to the media card and to continue shooting quickly, the speed at which images display on the LCD, and how quickly you can zoom images on the LCD.
The type of file format that you choose also affects the speed of certain tasks. For exam-ple, when writing images to the media card, JPEG image files write to the card faster than RAW or RAW + Large JPEG files. JPEG and RAW file formats are discussed in detail later in this chapter.
For performance results of vari-ous media cards, visit Rob Galbraith’s Web site at www.robgalbraith.com.
As you take pictures, the LCD on the Rebel XSi/450D shows the approximate number of images that remain on the media card. The number is approximate because each image varies slightly, depending on the ISO setting, the file format and resolution, the Picture Style chosen on the camera, and the
image itself (different images compress differently).
You insert the card into the card slot on the camera, with the front of the card facing the back of the camera. When you buy a new card, always format it in the camera and never on your computer. However, be sure that you off-load all images to the computer before you format the card because format-ting erases images. Formatformat-ting a media card in the camera also sets the data structure on the card for the Rebel XSi/450D.
To format a card in the camera be sure that you’ve downloaded all images to your com-puter first, and then follow these steps:
1. Press the Menu button, and then turn the Main dial to select the Setup 1 (yellow) menu.
2. Press the down cross key to select Format, and then press the Set button.The Format screen appears asking you to confirm that you want to format the card and lose all images on the card.
3. Press the right cross key to select OK.
4. Press the Set button.The camera formats the card, and then displays the Setup 1 (yellow) menu. Lightly press the Shutter button to return to shooting.
It is generally a good idea to format media cards every few weeks to keep them clean. If you’ve used a media card in another cam-era, be sure to format it in the XSi/450D to ensure that proper data structure is set, and to clean up the card.
It is possible to take pictures when no memory card is in the camera, which is useful when you’re capturing Dust Delete Data. Otherwise, this option can cause you to lose images when you mistakenly think that an SD/SDHC card is in the camera. You can turn off the option to shoot without a card. Just press the Menu button, turn the Main dial to select the Shooting 1 (red) menu, and then press the down cross key to select Shoot w/o card. Press the Set button, press the down cross key to select Off, and press the Set but-ton again.
Setting the date and time
Setting the date and time on the Rebel XSi/450D ensures that the data that travels with each image file has the correct date and time stamp. This data is stored with the image metadata. Metadata is a collection of all the information about an image, includ-ing the filename, date created, size, resolu-tion, color mode, camera make and model, exposure time, ISO, f-stop, shutter speed, lens data, and white balance setting. EXIF, used interchangeably with the term meta-data, is a particular form of metadata. It is very helpful to have the date and time information for the image when you want to organize your image collection. In fact, the
XSi/450D’s Direct Image Transfer function stores images in dated folders when you download them to your computer’s hard drive.
To set the date and time on your XSi/450D, follow these steps:
1. Press the Menu button, and then turn the Main dial to select the Setup 2 (yellow) menu tab.
2. Press the down cross key to select Date/Time, and then press the Set button.The Date/Time screen appears.
3. Press the Set button.The month field is activated.
4. Press the up or down cross key to change the Month field, and then press the Set button.
5. Press the right cross key to move to the Day field.
6. Repeat Steps 3 through 5 to change the remaining fields.
7. When all options are set, press the Set button.The Setup 2 menu appears. Lightly press the Shutter button to return to shooting.
You may want to reset the date and time to adjust for daylight saving time and when you change time zones when traveling.
Note Note
Avoid Losing Images
Choosing the file format
and quality
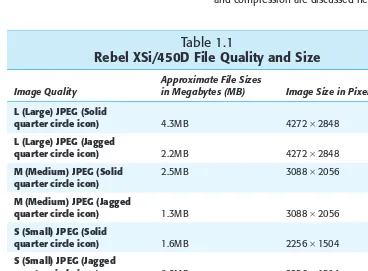
The file format and quality level that you use to take your pictures are two of the most important decisions that you make. These settings determine not only the number of images that you can store on the media card, but also the sizes at which you can later enlarge and print images from the Rebel XSi/450D. Table 1.1 explains the options that you can choose from.
With the high-quality images that the XSi/450D delivers, you can make beautiful enlargements from these images. Even if you don’t foresee printing images any larger
than 4 ×5 inches, you may get a once-in-a-lifetime shot and want to print it as large as possible. For this reason, and to take advan-tage of the XSi/450D’s fine image detail and high resolution, it pays to shoot at the high-est quality setting for all your shooting.
The JPEG quality options on the XSi/450D are shown with two icons that indicate the compression level of the files and the recording size. A solid quarter circle icon indicates a low compression level. A jagged quarter circle icon indicates a higher com-pression level. High comcom-pression levels reduce the file size more than low compres-sion levels so that you can store more images on the SD/SDHC card. File formats and compression are discussed next.
Table 1.1
Rebel XSi/450D File Quality and Size
Approximate File Sizes
Image Quality in Megabytes (MB) Image Size in Pixels
L (Large) JPEG (Solid
quarter circle icon) 4.3MB 4272 ×2848
L (Large) JPEG (Jagged
quarter circle icon) 2.2MB 4272 ×2848
M (Medium) JPEG (Solid 2.5MB 3088 ×2056
quarter circle icon) M (Medium) JPEG (Jagged
quarter circle icon) 1.3MB 3088 ×2056
S (Small) JPEG (Solid
quarter circle icon) 1.6MB 2256 ×1504
S (Small) JPEG (Jagged
quarter circle icon) 0.8MB 2256 ×1504
RAW 15.3MB 4272 ×2848
RAW + L (Large) (Solid
JPEG format
JPEG, which stands for Joint Photographic Experts Group, is a popular file format that enjoys not only smaller file sizes than the RAW format, but also offers the advantage of being able to display your images straight from the camera on any computer, on the Web, and in e-mail messages. To achieve the small file size, JPEG discards some data from the image — usually data that you would not easily see anyway. This character-istic gains JPEG its lossymoniker because it “loses” image data during compression. There are different levels of JPEG compres-sion. High compression levels discard more image data than low ratios. The higher the compression level, the smaller the file and the more images that you can put on the media card.
If you edit JPEG images in an editing program, image data continues to be discarded each time you save the file. I recom-mend downloading JPEG files to the computer, and then saving them as TIFF (Tagged Image File Format) or PSD (Photoshop’s file format) files. TIFF is a lossless file format that does not discard image data. PSD, available in Adobe’s Photoshop image-edit-ing program, is also a lossless file format.
As the compression ratio increases, more of the original image data is discarded, and the image quality degrades. Compression also introduces defects, referred to as artifacts,
that can create a blocky, jagged look, blur-ring, and diminished color fidelity in the image. At low compression ratios, artifacts are minimal, but as the ratio increases, they become more noticeable and objectionable. You’ll see the effects of high compression ratios when you enlarge the image to 100 percent in an image-editing program on the computer.
To get the highest-quality images, use the lowest compression and the highest quality settings. If space on the card is tight, then use the next lower setting. If you use lower qual-ity settings and high compression, beware that the image quality diminishes accord-ingly. Also, when you shoot JPEG images, the camera’s internal software processes, or edits, the images before storing them on the media card. This image pre-processing is an advantage, especially if you routinely print images directly from the SD/SDHC card. And because the XSi/450D offers a variety of Picture Styles that change the way that image contrast, saturation, sharpness, and color are rendered, you can get very nice prints with no editing on the computer.
Picture Styles are detailed in Chapter 3.
RAW format
RAW files store image data directly from the camera’s sensor to the media card with a minimum of in-camera processing. Unlike JPEG images, which you can view in any image-editing program, you must view and convert RAW files using Canon’s Digital Photo Professional program or another pro-gram such as Adobe Lightroom or Adobe Camera Raw.
You may wonder why you’d choose RAW shooting. RAW files offer the ultimate flexi-bility and control over the image because you can change key camera settings after you take the picture. For example, if you didn’t set the correct white balance or expo-sure, you can change it in a RAW conversion program on the computer. You can also adjust the exposure, contrast, and saturation — in effect, you have a second chance to cor-rect underexposed or overexposed images, and to correct the color balance, contrast, and saturation after you take the picture. The only camera settings that the Rebel
XSi/450D applies to RAW files are aperture, ISO, and shutter speed. Other settings such as White Balance, Picture Style, and so on are “noted,” but not applied to the file. As a result, you have control over how image data is rendered during image conversion. The RAW conversion process takes only a few additional minutes, and then you can save the image in a lossless file format.
RAW files are denoted with a .CR2 filename extension. After converting the RAW data, you save the image in a standard file format such as TIFF or JPEG and work with it as you do with other image files.
On the XSi/450D, you can choose to shoot either RAW images or RAW+JPEG, which records the RAW file and Large JPEG image. The RAW+JPEG option is handy when you want the advantages of having the flexibility that you get with a RAW file, and you also want a JPEG image to quickly post on a Web site or to send in an e-mail.
Because RAW is a lossless format (no loss of image data), image quality is not degraded by compression. However, you can store fewer RAW images than JPEG images on the media card.
With this overview of the differences between image quality settings and file for-mat, you’re in a better position to choose the setting that best suits your needs. The image quality settings depend on the shooting mode you choose.
In Basic Zone shooting modes such as Portrait, Landscape, and so on, the camera automatically sets the file format to JPEG, but you can set image size and compression level. In Basic Zone modes, you can’t select the RAW format.
In Creative Zone modes — P, Tv, Av, M, and A-DEP — you can select any of the JPEG options as well as RAW or RAW+JPEG.
To set the image quality in both Basic and Creative Zone modes, follow these steps:
1. Turn the Mode dial to a Basic Zone mode. Basic Zone modes are indicated by icons such as a per-son’s head for Portrait mode, mountains for Landscape mode, and so on.
2. Press the Menu button, and then turn the Main dial to select the Shooting 1 (red) menu, if necessary.
3. Press the down cross key to select Quality if it isn’t already selected.
4. Press the Set button. The Quality screen appears with the currently selected quality setting displayed along with the image dimensions in pixels.
5. Press the down cross key to select the size and quality that you want.In Basic Zone modes, you can choose only JPEG options at different levels of compression. A solid quarter circle icon indicates a low compression level. A jagged quarter circle icon indicates a higher compression level.
6. Press the Set button.
7. Turn the Mode dial to a Creative Zone mode.
Changing file numbering
With the Rebel XSi/450D, you can set the camera to number images using one of three options: Continuous, Auto reset, and Manual reset. These options allow you to number your images sequentially, to restart numbering each time you change the media card, or to choose to manually reset num-bering. Here is how the options work:
✦ Continuous file numbering.This
is the default option for file num-bering on the XSi/450D where the camera stores the last highest image number internally to con-tinue a sequential numbering sys-tem. Images are numbered sequentially with a unique, four-digit number from 0001 to 9999. The camera automatically creates a folder on the SD/SDHC card named 101. It stores images in the folder until you shoot image num-ber 9999. At that point, the camera creates a new folder named 102, and images you shoot restart with number 0001.
This works great until you insert an SD/SDHC card that has images on it. When you take another picture, the new image file number contin-ues from the highest numbered image that’s already stored on the card if it is higher than the highest image number stored in the cam-era’s memory. In other words, the camera uses the highest number whether that high number is stored in internal memory or is stored on the card. If you want to continue continuous numbering, insert only formatted/empty SD/SDHC cards into the camera.
With unique filenames, managing and organizing images on the com-puter are easy, because up to image number 9999, you don’t have to worry about having images with the filename on your
computer.
✦ Auto reset.With this option, file
numbering restarts at 0001 each time you insert a different SD/ SDHC card. If the SD/SDHC card has images stored on it, then num-bering continues from the highest image number stored on the card. So if you want the images to always begin at 0001 on each SD/SDHC card, then be sure to insert freshly formatted SD/SDHC cards each time you replace the card. If you like to organize images by media card, this is a useful option. However, if you use this option, be aware that multiple images that you store on the com-puter will have the same number or filename. This means that you should create separate folders on the computer and follow scrupu-lous folder organization to avoid filename conflicts and potential overwriting of images that have the same filename.
✦ Manual reset.With this option,
On the XSi/450D, up to 999 folders can be created with up to 9,999 images stored in each folder. If you reach these capacities, a message appears telling you to change the SD/SDHC card even if there is room remain-ing on the card. Until you change the SD/SDHC card, you can’t continue shooting.
To change the file-numbering method on the XSi/450D, follow these steps:
1. Press the Menu button, and then turn the Main dial to select the Setup 1 (yellow) menu.
2. Press the down cross key to select File numbering, and then press the Set button. Three file-numbering options, Continuous, Auto reset, and Manual reset, appear with the current setting highlighted.
2
2
C H A P T E RUsing the
Rebel
XSi/450D
O
nce the Rebel XSi/450D is set up, you’re ready to begin a satisfying journey into the creative world of digital photography. If you haven’t used a digital Single Lens Reflex (SLR) camera before, then using one of the automated shooting modes of the camera is a good place to begin.The automatic modes of the Rebel XSi/450D are collectively referred to as Basic Zone modes. In these modes, all the exposure elements are set automatically so that you can con-centrate on capturing the moment. These modes enable you to use the XSi/450D as you would use a point-and-shoot camera, but with the ability to change lenses to bring the sub-ject closer or to get a wide, sweeping view of a scene. Each mode is designed for specific scenes or subjects. For example, if you’re shooting fast action, the XSi/450D’s Sports mode automatically sets the camera to shoot in rapid-fire sequence, and it tracks the subject movement to maintain subject focus.
However, if you are an experienced photographer or you’re anxious to move beyond the automated modes to exercise your creativity by having more control over the exposure, then the Creative Zone modes give you creative control by enabling you to have partial or full control over some or all of the expo-sure settings. For example, in Aperture-Priority (Av) mode, you can set the aperture, or f-stop, that you want, and the camera automatically sets the appropriate shutter speed. In addition, you can control the focus point, the white balance, the drive mode, and much more. The possibilities are endless and exciting.
Because you can choose among different shooting modes, you may find that you enjoy using the automated Sports mode, but for other shots, you may prefer using Aperture-priority (Av)
✦
✦
✦
✦
In This Chapter
Choosing a shooting mode
Selecting a metering mode
Modifying exposure
Evaluating exposure
Setting the ISO sensitivity
Getting sharp focus
Choosing a Drive mode
Viewing and playing back images
Erasing images
Protecting images
Using the EOS Integrated Cleaning System
mode. With the XSi/450D, you can switch between modes and be assured of getting great shots regardless of the mode you use.
This chapter explains each of the shooting modes on the Rebel XSi/450D to help you get the most out of them.
Choosing a Shooting
Mode
A shooting mode determines how and what kinds of exposure settings are set. In addi-tion, these modes determine whether you or the camera sets all or part of the expo-sure settings and other controls, including the autofocus (AF), white balance, shooting speed, and metering mode. Some modes function fully automatically, much like a point-and-shoot camera, while others are semiautomatic, giving you control over key exposure settings; there is a manual mode that gives you control over all the exposure and other camera settings.
The Mode dial is divided into two sections: the Basic Zone, and the Creative Zone. The Basic Zone section of the Mode dial identi-fies different modes using icons such as a person’s head to designate Portrait mode, a running person to designate Sports mode, and so on. The
exception is Full Auto mode, which is designated by a green rectangle. The Mode dial is shown in figure 2.1. Setting a shooting mode is as easy as turning the Mode dial to the mode you want.
The other half of the dial groups the Creative Zone modes, which are designated by letter abbreviations such as P for Program AE (Auto Exposure), Tv for Shutter-priority, Av for Aperture-Shutter-priority, M for Manual, and A-DEP for Automatic Depth of Field. These modes give you either partial or full control over the camera settings. As a result, you can control depth of field, how subject motion appears in the image, white balance, AF-point selection, and more. Creative Zone modes range from matic and manual modes to a semiauto-matic but “shiftable” Program mode.
How shooting modes
relate to exposure
With the Rebel XSi/450D, you can choose to control none, all, or part of the exposure set-tings, and you do that by choosing a shoot-ing mode. If you’re new to photographic exposure, the brief discussion here will help you understand the descriptions of the shooting modes later in this chapter.
To make a good exposure, the camera requires that the ISO (International Organization for Standardization), aperture, or f-stop, and shutter speed be set correctly based on the amount of light in the scene or from the flash. When the ISO, f-stop, and shutter speed are set correctly, you get a well-exposed picture. Here is a brief overview of these elements.
If you are new to photography, be sure to read Chapter 6 which gives much more detail about each exposure element.
✦ ISO. The ISO setting determines
how sensitive the image sensor is to light. A high ISO such as 400 or higher means that the sensor is more sensitive to light and needs less light to make the exposure. A low ISO such as 100 means that the sensor is less sensitive to light and needs more light to make the exposure.
On digital cameras, high ISO sensitivity settings amplify the output of the sensor so that less light is needed. However, the amplification also increases digital noise, which has a grainy appearance, as well as unwanted color flecks particu-larly in the shadow areas of an image. High ambient tempera-tures and high ISO settings increase the incidence of digital noise.
✦ Aperture.The aperture determines
how much the lens diaphragm expands or contracts to let more or less light into the camera. The diameter of the lens diaphragm opening is determined by the aper-ture, or f-stop, you select. Aperture is the main factor that controls depth of field, or how much of the scene is in acceptably sharp focus from front to back from the plane of sharp focus. Each aperture, or “stop,” doubles or halves the exposure.
✦ Shutter speed. The shutter speed
determines how long the shutter remains open to let light into the sensor. Shutter speeds are
expressed as fractions of a second, such a 1/60, 1/125, 1/250 second, and so on. Shutter speed is most
commonly associated with the ability to control how motion is shown in an image and the ability to handhold the camera in low-light scenes. As with aperture, each shutter speed change either dou-bles or halves the exposure.
All the exposure elements work together. If one changes, then the others change pro-portionally. Many different combinations of f-stop and shutter speed produce an “equiv-alent” exposure — in other words, they pro-vide the same amount of light into the camera to make the exposure. For example, given the same ISO setting, f/11 at 1/15 second is equivalent to f/4 at 1/125 second.
The following sections summarize the shooting modes on the Rebel XSi/450D. As you read about them, keep the exposure summary here in mind because it will help you understand what you can control or expect with each mode.
Basic Zone shooting
modes
The Basic Zone shooting modes are grouped together on one side of the Mode dial. They are the modes denoted by picto-rial icons and by a green rectangle. The icons depict commonly photographed scenes or subjects. For example, the moun-tain icon denotes Landscape mode and gives exposure settings that provide accept-able sharpness from back to front in the image. To do this, the XSi/450D sets a nar-row aperture (large f-stop number) based on the light to provide an extensive depth of field. Each of the other settings makes
lar adjustments to give you a predictable photographic result.
In Basic Zone modes, the camera automati-cally sets all the exposure settings of ISO, aperture, and shutter speed as well as the focus, drive mode, white balance, and other settings. With the exception of Full Auto mode (denoted by the green rectangle), the only control you have is to specify the type of scene that you’re shooting by setting the Mode dial.
Basic Zone modes are a good choice for quick shots. For example, if you’re making a portrait, select Portrait mode, which sets a wide aperture (f-stop) to blur the back-ground. Conversely, if you are shooting a football game and you want the motion of the players to be crisp and without blur, then choose Sports mode, which sets as fast a shutter speed as possible given the light in the scene. In short, Basic Zone modes are programmed to render the subject that its mode name represents in predictable ways.
In addition to setting the exposure ele-ments, the Rebel XSi/450D automatically sets other aspects of the image.
In all Basic Zone modes, the camera also automatically sets the following:
✦ JPEG recording format, although
you can select the quality level
✦ Auto white balance ✦ Evaluative metering
✦ The sRGB (standard Red, Green,
Blue) color space
✦ Auto Lighting Optimizer, which
automatically corrects underex-posed (dark) and low-contrast images
In addition, the camera also sets the AF mode and AF point or points, drive mode, and Picture Style, and it determines whether to use the built-in flash. In Basic Zone modes, you cannot change the camera settings.
Full Auto mode
In Full Auto mode, the Rebel XSi/450D auto-matically selects all the exposure and cam-era settings. This can be a good mode to use for quick snapshots. However, keep in mind that the camera defaults to using the built-in flash built-in low-light scenes, although you may not want or need to use the flash. Also remember that in all modes, the lens that you choose enhances your creative control.
In Full Auto mode, the camera is set to AI Focus AF mode, which means that if the subject begins moving, the camera auto-matically switches to AI Servo AF mode to track the subject’s movement and maintain focus. Autofocus modes are detailed later in this chapter.
The camera also automatically selects the AF point or points. It may choose one or multiple AF points that are typically deter-mined by what is closest to the lens and/or what has the most readable contrast in the scene. The camera displays the selected AF points in red in the viewfinder so that you can see where the camera will set the point of sharpest focus.
In Full Auto mode, the camera automatically sets the following:
✦ Standard Picture Style
✦ Single-shot (one-image-at-a-time)
drive mode with the option to set 10-second Self-timer/Remote con-trol mode
✦ Automatic flash, but you can
choose to turn on Red-eye reduction
Picture Styles are detailed in Chapter 3.
Portrait mode
In Portrait mode, the Rebel XSi/450D sets a wide aperture (small f-stop number) provid-ing a shallow depth of field, which blurs background details to prevent them from distracting from the subject. The Rebel also switches to Portrait Picture Style, which is designed to enhance the skin tones. Obviously, Portrait mode is great for people
portraits, but it’s also a great mode for tak-ing pet portraits, indoor and outdoor still-life shots, and nature shots such as flowers that you photograph from a moderate distance. However, if you use Portrait mode for nature shoots, the Portrait Picture Style may render the color less vivid than if you use other modes that use other Picture Styles.
In Portrait mode, the camera automatically sets the following:
✦ Portrait Picture Style
✦ One-shot autofocus mode and
automatic AF-point selection
✦ Continuous drive mode so that you
can take as many as 53 large JPEG images in a burst sequence with the option to set 10-second Self-timer/Remote control mode
✦ Automatic flash, but you can turn
on Red-eye reduction
To enhance the effect that Portrait mode provides of blur-ring the background, you can use a telephoto lens or move the subject farther from the background.
In Portrait mode, the camera automatically selects the AF point or points. When the camera chooses the AF point, it looks for points in the scene where lines are well defined, for the object that is closest to the lens, and for points of strong contrast. What should be the point of sharpest focus, such as the eyes of a portrait subject, may not fit
the camera’s criteria for setting focus. As a result, the camera often focuses on the sub-ject’s nose, mouth, or clothing. You can see which AF points the camera chooses when you half-press the Shutter button. If it isn’t focusing on the eyes, then you can shift your shooting position slightly to try to force it to focus on the eyes. If you can’t force the cam-era to refocus on the eyes, then you can switch to Av mode, set a wide aperture such as f/5.6, and then manually select the AF point that is over the subject’s eyes.
Landscape mode
In Landscape mode, the Rebel XSi/450D chooses a narrow aperture (large f-stop number) to ensure that both background and foreground elements are acceptably sharp to provide extensive depth of field. It also chooses the fastest shutter speed pos-sible given the amount of light in the scene.
In lower light, the camera sets slower shut-ter speeds to maintain as narrow an aper-ture as possible for extensive depth of field. As the light fades, watch the viewfinder or LCD to monitor the shutter speed. If the shutter speed is 1/30 second or slower, or if you’re using a telephoto lens, then steady the camera on a solid surface or use a tri-pod. As it does in all Basic Zone modes, the camera uses Evaluative metering to meas-ure the light in the scene to determine the exposure settings.
This mode works well not only for land-scapes but also for cityland-scapes and portraits of large groups of people. In Landscape mode, the camera automatically sets the following:
✦ Landscape Picture Style ✦ One-shot autofocus mode and
automatic AF-point selection
Tip
✦ Single-shot drive mode with the
option to set 10-second Self-timer/Remote control mode
✦ The flash does not fire
Close-up mode
In Close-up mode, the Rebel XSi/450D allows a close focusing distance, and it sets a wide aperture to provide a shallow depth of field that blurs background details. It also sets as fast a shutter speed as possible given the light. This mode produces much the same type of rendering as Portrait mode, but it uses the Standard Picture Style. You can further enhance the close-up effect by using a macro lens. If you’re using a zoom lens, zoom to the telephoto end of the lens.
In Close-up mode, the camera automatically sets the following:
✦ Standard Picture Style
✦ One-shot autofocus mode with
automatic AF-point selection
✦ Single-shot drive mode with the
option to set 10-second Self-timer/Remote control mode
✦ Automatic flash with the option to
turn on Red-eye reduction
All lenses have a minimum focusing distance that varies by lens. To ensure sharpness, never focus closer than the min-imum focusing distance of the lens. You know that the camera has achieved good focus when you hear the autofocus beep from the camera.
Sports mode
In Sports mode, the Rebel XSi/450D sets a fast shutter speed to freeze subject motion. This mode is good for capturing athletes in mid-air, a player sliding toward a base, or the antics of pets and children.
Tip
In this mode, when you focus by half-press-ing the Shutter button, the camera automat-ically tracks focus on the moving subject and locks the focus at the moment you fully press the Shutter button. And if you continue to hold the Shutter button down, the camera maintains focus for continuous shooting. In Sports mode, the camera automatically sets the following:
✦ Standard Picture Style
✦ AI Servo AF autofocus mode with
automatic AF-point selection
✦ Continuous drive mode, which
enables a maximum burst rate of 53 large JPEG images and gives you the option to use the 10-second Self-timer/Remote control mode
✦ Flash-off mode
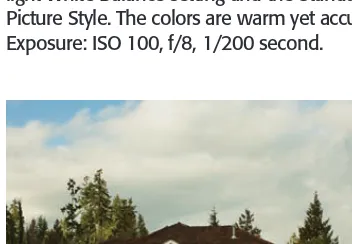
2.5 This image was taken in Close-up mode, where the camera also sets a wide aperture and automatically chooses the autofocus point. Exposure: ISO 400, f/4, 1/60 second.