by Dee-Ann LeBlanc and Richard Blum
FOR
DUMmIES
‰by Dee-Ann LeBlanc and Richard Blum
FOR
DUMmIES
‰Hoboken, NJ 07030-5774 www.wiley.com
Copyright © 2007 by Wiley Publishing, Inc., Indianapolis, Indiana
Published by Wiley Publishing, Inc., Indianapolis, Indiana Published simultaneously in Canada
No part of this publication may be reproduced, stored in a retrieval system or transmitted in any form or by any means, electronic, mechanical, photocopying, recording, scanning or otherwise, except as permit-ted under Sections 107 or 108 of the 1976 Unipermit-ted States Copyright Act, without either the prior written permission of the Publisher, or authorization through payment of the appropriate per-copy fee to the Copyright Clearance Center, 222 Rosewood Drive, Danvers, MA 01923, (978) 750-8400, fax (978) 646-8600. Requests to the Publisher for permission should be addressed to the Legal Department, Wiley Publishing, Inc., 10475 Crosspoint Blvd., Indianapolis, IN 46256, (317) 572-3447, fax (317) 572-4355, or online at http://www.wiley.com/go/permissions.
Trademarks:Wiley, the Wiley Publishing logo, For Dummies, the Dummies Man logo, A Reference for the Rest of Us!, The Dummies Way, Dummies Daily, The Fun and Easy Way, Dummies.com, and related trade dress are trademarks or registered trademarks of John Wiley & Sons, Inc. and/or its affiliates in the United States and other countries, and may not be used without written permission. Linux is a registered trade-mark of Linus Torvalds. All other tradetrade-marks are the property of their respective owners. Wiley Publishing, Inc., is not associated with any product or vendor mentioned in this book.
LIMIT OF LIABILITY/DISCLAIMER OF WARRANTY: THE PUBLISHER AND THE AUTHOR MAKE NO REP-RESENTATIONS OR WARRANTIES WITH RESPECT TO THE ACCURACY OR COMPLETENESS OF THE CONTENTS OF THIS WORK AND SPECIFICALLY DISCLAIM ALL WARRANTIES, INCLUDING WITHOUT LIMITATION WARRANTIES OF FITNESS FOR A PARTICULAR PURPOSE. NO WARRANTY MAY BE CREATED OR EXTENDED BY SALES OR PROMOTIONAL MATERIALS. THE ADVICE AND STRATEGIES CONTAINED HEREIN MAY NOT BE SUITABLE FOR EVERY SITUATION. THIS WORK IS SOLD WITH THE UNDER-STANDING THAT THE PUBLISHER IS NOT ENGAGED IN RENDERING LEGAL, ACCOUNTING, OR OTHER PROFESSIONAL SERVICES. IF PROFESSIONAL ASSISTANCE IS REQUIRED, THE SERVICES OF A COM-PETENT PROFESSIONAL PERSON SHOULD BE SOUGHT. NEITHER THE PUBLISHER NOR THE AUTHOR SHALL BE LIABLE FOR DAMAGES ARISING HEREFROM. THE FACT THAT AN ORGANIZATION OR WEBSITE IS REFERRED TO IN THIS WORK AS A CITATION AND/OR A POTENTIAL SOURCE OF FURTHER INFORMATION DOES NOT MEAN THAT THE AUTHOR OR THE PUBLISHER ENDORSES THE INFORMA-TION THE ORGANIZAINFORMA-TION OR WEBSITE MAY PROVIDE OR RECOMMENDAINFORMA-TIONS IT MAY MAKE. FURTHER, READERS SHOULD BE AWARE THAT INTERNET WEBSITES LISTED IN THIS WORK MAY HAVE CHANGED OR DISAPPEARED BETWEEN WHEN THIS WORK WAS WRITTEN AND WHEN IT IS READ.
For general information on our other products and services, please contact our Customer Care Department within the U.S. at 800-762-2974, outside the U.S. at 317-572-3993, or fax 317-572-4002. For technical support, please visit www.wiley.com/techsupport.
Wiley also publishes its books in a variety of electronic formats. Some content that appears in print may not be available in electronic books.
Library of Congress Control Number: 2007926389 ISBN: 978-0-470-11649-4
Manufactured in the United States of America
Dee-Ann LeBlanc, RHCE (Red Hat Certified Engineer), is a writer, course developer, journalist, and trainer who specializes in Linux. Although these various professions may sound scattered, they in fact reinforce one another by allowing her to see what people are doing with Linux in the real world and where they need help. In the past, she has been the Linux Games editor for the Linux Journal, the Desktop editor for LinuxToday.com, and has written and held positions with a number of other Linux and technology publications such as Computer Power User magazine. She has also written numerous books about Linux. Today, she is the SplunkBase Knowledge Manager for Splunk (www.splunk.com), an IT search company. It is her job to build a community around SplunkBase (www.splunkbase.com) that fills this IT troubleshooting resource with world-class content.
When Dee-Ann isn’t managing, teaching, developing course materials, writing technical nonfiction, writing fantasy and science fiction, interviewing interest-ing people, chattinterest-ing about Linux online or at conferences, or tryinterest-ing in one way or another to save the world, she hikes with her dogs and tries out new recipes on her husband Rob. See what Dee-Ann is up to and join her readers’ mailing list at www.Dee-AnnLeBlanc.com and http://dee-ann.blog-city. com/. (Contact Dee-Ann at [email protected].)
Richard Blumhas worked in the IT industry for more than 20 years as a net-work and systems administrator. During that time, he’s had the opportunity to work with lots of different computer products, including Windows, Netware, Cisco, Avaya, different flavors of UNIX, and of course, Linux. Over the years, he’s also volunteered for several non-profit organizations to help support small networks that had little financial support. Rich is the author of several Linux-based books for total Linux geeks, and a couple of Windows-based books for programmers.
Dee-Ann wishes to dedicate this book to all of the people she occasionally (okay, often) frustrates or drives crazy during the writing process.
Richard would like to dedicate this book to his daughters. Remember: It’s always a good time to learn new things (even when you’re not in school).
Authors’ Acknowledgments
Dee-Ann, as usual, has lots of people to thank. First off, she thanks the folks without whom the earlier editions of this book would have never existed. For one, there’s John “maddog” Hall for giving her the opportunity to take over this book’s evolution. He was too busy leading Compaq’s UNIX Software Group, acting as Executive Director for Linux International, and sitting on the board of advisors for Sair Linux/GNU certification to continue handling this project. There’s also the editors and staff at Wiley Publishing, Inc. Without them and their guidance, this book would not exist or continue to improve over time. Thanks as well go to Richard Blum for stepping up to the plate when Dee-Ann realized that she had completely overdone it this time.
Most of all, she’d like to thank the readers who contacted her with their questions, suggestions, and concerns. She apologizes to anyone who got lost in the great deluges of e-mail and didn’t get an answer, but please trust that, at the very least, when she dug out your e-mail from the pile three months later, she filed it away as one more thing to consider in the next edition. It’s reader participation that keeps books like this improving over the years, and it’s her goal to continue refining Linux For Dummiesto keep it the best desktop Linux book available.
Rich would like to thank Dee-Ann for giving him the opportunity to tag along on this edition. Also, many thanks to the great people at Wiley Publishing for their help and guidance in writing this. He especially thanks Kyle Looper, the acquisitions editor, and Linda Morris, the project editor, for helping keep him on track. Thanks also goes to Carole McClendon at Waterside Productions for arranging this gig.
Some of the people who helped bring this book to market include the following:
Acquisitions, Editorial, and Media Development
Project Editor:Linda Morris
Acquisitions Editor:Kyle Looper
Copy Editor:Linda Morris
Technical Editor:John Kennedy
Editorial Manager:Jodi Jensen
Media Development Manager:Laura VanWinkle
Editorial Assistant:Amanda Foxworth
Sr. Editorial Assistant:Cherie Case
Cartoons:Rich Tennant (www.the5thwave.com)
Composition Services
Project Coordinator: Heather Kolter
Layout and Graphics: Claudia Bell, Stacie Brooks, Carl Byers, Denny Hager, Joyce Haughey, Heather Ryan
Proofreaders: Aptara, John Greenough, Todd Lothery
Indexer: Aptara
Anniversary Logo Design:Richard J. Pacifico Special Help
Christine Williams
Publishing and Editorial for Technology Dummies
Richard Swadley,Vice President and Executive Group Publisher
Andy Cummings,Vice President and Publisher
Mary Bednarek,Executive Acquisitions Director
Mary C. Corder,Editorial Director
Publishing for Consumer Dummies
Diane Graves Steele,Vice President and Publisher
Joyce Pepple,Acquisitions Director
Composition Services
Gerry Fahey,Vice President of Production Services
Introduction ...1
Part I: Getting Your Feet Wet ...7
Chapter 1: Getting Acquainted with Linux ...9
Chapter 2: Prepping Your Computer for Linux...19
Chapter 3: Installing Fedora ...41
Chapter 4: Booting and Stopping Fedora ...57
Chapter 5: Checking Out the Desktops...65
Part II: Getting Up to Speed with Linux...81
Chapter 6: Working without the GUI ...83
Chapter 7: Getting to Know the Linux Filesystem...99
Chapter 8: Using the Filesystem in GNOME and Nautilus...117
Chapter 9: Connecting to the Internet ...135
Part III: Getting Things Done...155
Chapter 10: Using the Internet...157
Chapter 11: Putting the X in Text ...185
Chapter 12: Word Processing and More with OpenOffice.org ...191
Chapter 13: Messing with Audio...225
Chapter 14: Messing with Video and Graphics...239
Chapter 15: Windows-Only Media Formats and Programs ...257
Part IV: Junior Administrator Boot Camp ...265
Chapter 16: Adding Software to Linux ...267
Chapter 17: Basic System Administration...279
Chapter 18: A Secure Linux Box Is a Happy Linux Box...301
Part V: The Part of Tens ...315
Chapter 19: Ten Steps to Making Your Own Wireless Access Point ...317
Chapter 20: Ten Steps to Setting Up a Samba Print Server...335
Chapter 21: Ten Steps to Setting Up a File Server...349
Appendix B: About the DVD-ROM ...387
Introduction...1
About This Book...1
How to Use This Book ...2
Three Presumptuous Assumptions ...3
How This Book Is Organized...4
Part I: Getting Your Feet Wet...4
Part II: Getting Up to Speed with Linux ...4
Part III: Getting Things Done...5
Part IV: Junior Administrator Boot Camp ...5
Part V: The Part of Tens...5
Part VI: Appendixes...5
Icons Used in This Book...6
Where to Go from Here...6
Part I: Getting Your Feet Wet...7
Chapter 1: Getting Acquainted with Linux . . . .9
Is Free Really Free?...9
Linux: Revolution or Just Another Operating System? ...10
Anatomy of an Open Source Software Project ...13
GNU who? ...13
Who’s in charge of Linux anyway? ...15
Einstein was a volunteer ...15
Packaging Linux: The Distribution...16
Chapter 2: Prepping Your Computer for Linux . . . .19
Preparing to Use Linux and Microsoft Windows Together ...20
Partitioning from scratch for a dual boot ...21
Peeking at your partitions from Windows...22
Peeking at your partitions in Windows Vista...22
Peeking at your partitions in Windows 2000 and Windows XP ...23
Peeking at your partitions in Windows 98 ...25
Making space ...27
Working with Disk Partitions ...29
Choosing a partitioning tool ...29
Making and resizing partitions with GParted ...29
Double-Checking Hardware Compatibility...34
Chapter 3: Installing Fedora . . . .41
Things to Consider Before You Begin Installation ...41
Getting Started with the Installation Process...42
Your First Boot ...53
Chapter 4: Booting and Stopping Fedora . . . .57
Giving Linux the Boot ...58
Step 1: Power-On Self-Test (POST) leads to BIOS...58
Step 2: The BIOS passes the baton to the boot loader ...59
Step 3: The boot loader (LILO or GRUB) loads the system kernel into memory...60
Step 4: Control is handed over to init...61
Entering Rescue Mode...62
Don’t Just Turn Off the Machine! ...63
Removing Linux from Your System...64
Chapter 5: Checking Out the Desktops . . . .65
Making the Best of the Command Line...65
The GNOME Desktop ...66
The menus...67
The Lock Screen tool ...70
The panels ...71
Changing your panels ...73
Playing with GNOME desktop icons...76
Adding themes...77
Part II: Getting Up to Speed with Linux ...81
Chapter 6: Working without the GUI . . . .83
Playing the Shell Game ...84
Understanding bash Command Syntax and Structure ...86
Starting Programs from the Shell ...87
Putting Wildcard Expansion to Good Use ...88
Working with Long Commands...88
Asking Linux to complete a command or filename for you ...89
Accessing your command history ...90
Working with Variables...90
Variables versus environment variables ...91
Checking out commonly used environment variables ...91
Storing and retrieving variables’ values...92
Using Redirection and Pipes...95
Redirecting command output ...96
Laying pipes ...97
“Help!” ...97
Chapter 7: Getting to Know the Linux Filesystem . . . .99
Pieces of the Puzzle ...100
Touring the Linux Filesystem ...100
The root of the tree ...100
The importance of being/etc ...102
Where temporary media lives ...103
Where the computer is the /usr ...103
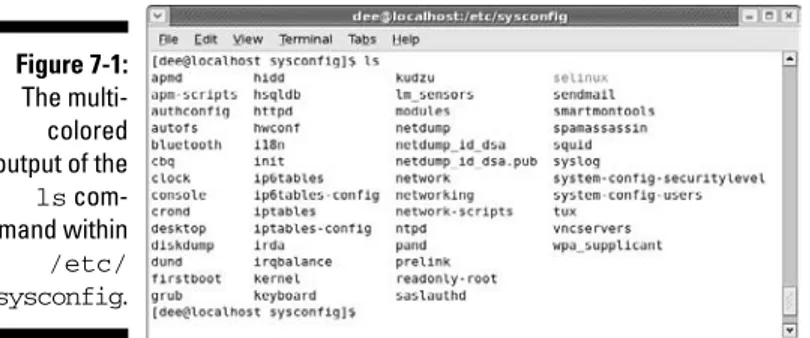
Managing Your Filesystem without a Net (Or Mouse) ...104
Viewing information about files on the command line...104
Understanding file listing information...107
A permissions primer ...108
Comprehending file types ...110
Navigating the filesystem in Fedora...111
Partitions versus Directories...113
Chapter 8: Using the Filesystem in GNOME and Nautilus . . . .117
Sailin’ through Folders ...117
Setting how much you see in a folder...119
Creating files and folders...120
Opening files and running programs ...121
Copying and moving files ...121
Deleting files and folders...122
Taking out the trash ...123
Viewing and changing permissions...123
Using CDs and Other Removable Media ...124
Accessing Windows Drives on This Computer ...127
Accessing Network Drives ...128
Formatting Disks ...129
Burning Data CDs and DVDs ...129
Finding Things ...131
Chapter 9: Connecting to the Internet . . . .135
Internet Connectivity 101...135
Setting Up the Hardware ...139
Selecting an Internet Service Provider (ISP) ...140
Getting Information You Need from Your ISP ...140
Configuring Your Connection ...141
Dialin’ out ...142
Playing with cards ...146
Look Ma, no cables!...148
It’s All Fun and Games Until Something Doesn’t Work ...151
Part III: Getting Things Done ...155
Chapter 10: Using the Internet . . . .157
Browse the Web with Firefox ...157
Configuring Firefox ...158
Taking Advantage of Instant Messaging ...173
Using the Pidgin Instant Messenger...174
Troubleshooting your IM connections ...176
Downloading with BitTorrent ...176
Ol’ Fashion File Transfers ...178
Talkin’ on the Phone ...179
Using the default: Ekiga ...180
Talking with Skype...181
Working with Other Internet Tools ...183
Chapter 11: Putting the X in Text . . . .185
Viewing the Contents of a Text File...185
Editing Text Files with nano...186
Saving your work as you go ...186
Saving and moving on with your life...187
Going with gedit ...188
Entering and editing text in gedit ...188
Saving your work...189
Chapter 12: Word Processing and More with OpenOffice.org . . . . .191
Installing the OpenOffice.org Suite ...192
Word Processing with OpenOffice.Org Writer...193
Taking a tour of OpenOffice.org Writer ...193
Working with Writer files ...196
Spreadsheets with OpenOffice.Org Calc ...197
Taking a tour of OpenOffice.org Calc ...197
Working with Calc files ...201
Presentations with OpenOffice.Org Impress ...202
Using the Presentation Wizard ...202
Taking a tour of OpenOffice.org Impress...204
Working with Impress files ...208
Fine Art with OpenOffice.Org Draw ...208
Taking a tour of OpenOffice.org Draw ...209
Working with Draw files...212
Managing Data with OpenOffice.org Base...212
Getting Help from the Wizard ...213
Taking a tour of OpenOffice.org base ...215
Layout with OpenOffice.Org Math ...218
Menu bar ...219
Standard toolbar...220
Document section ...222
Chapter 13: Messing with Audio . . . .225
What Sound? I Don’t Hear a Thing! ...225
Listening to CDs ...228
Listening to Downloaded Music ...230
Listening to Internet Radio ...233
Ripping Music Tracks from CDs ...234
Burning Data CDs and DVDs ...236
Chapter 14: Messing with Video and Graphics . . . .239
Watchin’ Those Silly Web Clips ...239
Checking your plug-ins ...240
Adding plug-ins ...241
Getting even more video support ...242
Viewing Movie Files ...243
Watchin’ DVDs ...246
Creating and Modifying Graphics ...247
GIMP basic tools...248
Capturing screenshots...249
Editing an image file ...250
Using GIMP scripts ...252
Part IV: Junior Administrator Boot Camp...265
Chapter 16: Adding Software to Linux . . . .267
Opening Downloaded Files ...267
Compressing and Packaging Files to Share ...269
Chapter 17: Basic System Administration . . . .279
Users and Groups...280
Adding new users ...281
Modifying existing users...283
Deleting a user ...284
Adding new groups ...284
Modifying groups...285
Printing ...286
Printer server settings ...288
Adding a new printer ...288
Modifying printer properties ...291
System Monitor ...295
Processes...296
Resources ...298
File Systems...299
Chapter 18: A Secure Linux Box Is a Happy Linux Box . . . .301
Choosing Secure Passwords ...302
Updating Software...302
Network holes...303
The Secure Shell game (SSH) ...307
Software holes...311
Keeping an Eye on Your Log Files with the System Log Viewer...311
Locating Security Resources ...314
Part V: The Part of Tens ...315
Chapter 19: Ten Steps to Making Your
Own Wireless Access Point . . . .317
Hello, Master!...318
Step 1: Plan Your Network...319
Step 2: Configure Your Network Card ...320
Step 3: Install Your Wireless Card ...321
Step 4: Install Bridging...325
Step 5: Build a Bridge...326
Step 6: Save Your Hard Work ...328
Step 7: Test Connectivity...329
Step 8: Configure Security ...330
Step 9: Configure Remote Devices ...331
Step 10: Test Remote Devices...333
Chapter 20: Ten Steps to Setting Up a Samba Print Server . . . .335
Dancing the Samba ...336
Step 1: Plan Your Sharing ...336
Step 2: Connect a Local Printer ...337
Step 3: Manually Add a Local Printer ...337
Step 4: Set the Printer Configuration ...339
Step 5: Install Samba ...341
Step 6: Configure Samba...341
Step 7: Start Samba ...342
Step 8: Open the Firewall Port...344
Step 9: Let Guests Print ...345
Step 10: Map a Network Printer...346
Troubleshooting ...346
Chapter 21: Ten Steps to Setting Up a File Server . . . .349
Reintroducing Samba...350
Step 1: Plan a Sharing Policy...350
Step 2: Create Linux Groups ...351
Step 3: Create Folders to Share ...352
Step 4: Set Advanced Folder Permissions...353
Step 5: Install and Start Samba ...355
Step 6: Configure Samba...356
Step 7: Create UNIX User Accounts ...358
Step 8: Create Samba User Accounts...359
Step 9: Create Shared Folders in Samba...361
Step 10: Map to Shared Folders...362
Troubleshooting ...362
Chapter 22: Ten Troubleshooting Tips . . . .365
Tip #1: “The Linux Installer Froze” ...366
Tip #2: Checking Your Distribution Burns ...367
Tip #3: “I Told the Installer to Test My Graphics, and They Failed”...368
Tip #4: “The Installer Tested My Graphics Fine, but My GUI Won’t Start” ...369
Tip #5: “I Think I’m in Linux, but I Don’t Know What to Do!” ...369
Tip #6: “I Don’t Want to Boot into This!” ...370
Tip #7: Changing Your Boot Environment “Permanently” ...371
Changing your boot environment just for now ...372
Tip #8: “I Want to Change Screen Resolutions”...372
Tip #9: “My GUI Is Hung, and I’m Stuck!”...373
Tip #10: “Help, My Machine Hangs During Boot!”...373
Part VI: Appendixes...375
Appendix A: Common Linux Commands . . . .377
Linux Commands by Function...377
Getting Help ...378
Archiving and compressing ...378
Built-in bash commands ...379
Files and Filesystem...380
File organization ...380
File attributes...381
File locators...381
File viewers ...382
File-system commands ...382
mtools ...383
System Control ...384
Administration...384
Kernel module handling ...385
Processes...385
Appendix B: About the DVD-ROM . . . .387
System Requirements ...388
Using the DVD-ROM ...389
Booting from the DVD-ROM ...389
What You Find in Fedora 7 ...390
If You’ve Got Problems (Of the DVD-ROM Kind)...391
W
elcome to the fascinating world of open source software that is Linux. In this book, we introduce you to the wonders of the Linux operating system, originally created as a labor of love by Linus Torvalds in the early 1990s. Our goal is to initiate you into the rapidly growing ranks of Linux users and enthusiasts busily rewriting the rules for the operating system marketplace.If you’ve contemplated switching to Linux but find the prospect too forbid-ding, you can relax. If you can boil water or set your alarm clock, you too can become a Linux user. (No kidding!)
When this book appeared in its first edition, Linux was an emerging phenom-enon that was neither terribly well known nor understood. In this edition — for a new generation of Linux users — so much material is available that we have steered this particular title toward what Linux is and how you can make the best use of it on your desktop. To that end, these pages contain various online resources, tips, and tricks, as well as more general instruction. If you’re looking for material on servers, Linux All-In-One Desk Reference For Dummies
by Naba Barkakati (Wiley Publishing, Inc.) can serve your needs.
In this book, we keep the amount of technobabble to a minimum and stick with plain English as much as possible. Besides plain talk about Linux instal-lation, boot up, configuration, and software, we include many examples, plus lots of detailed instructions to help you set up and use your very own Linux machine with a minimum of stress or confusion.
We also include with this book a handy DVD-ROM that contains Fedora Core 7, a project sponsored by Red Hat, the leading Linux vendor. (To find out what exactly is included on the DVD-ROM, see Appendix B.) If you have no idea of what we’re talking about, don’t worry. You’ll know soon enough!
About This Book
Think of this book as a friendly, approachable guide to tackling terminology and the Linux collection of tools, utilities, and widgets. Although Linux isn’t terribly hard to figure out, it does pack a boatload of details, parameters, and
Linux-based computer. Some sample topics you find in this book include the following:
⻬Understanding where Linux comes from and what it can do for you
⻬Installing the Linux operating system
⻬Working with a Linux system to manage files and add software
⻬Setting up Internet access and surfing the Web
⻬Customizing your Linux desktop
⻬Managing Linux system security and resources
Although it may seem, at first glance, that working with Linux requires years of hands-on experience, tons of trial and error, advanced computer science training, and intense dedication, take heart! It’s not true! If you can tell some-body how to find your office, you can certainly build a Linux system that does what you want. The purpose of this book isn’t to turn you into a full-blown Linux geek (that’s the ultimate state of Linux enlightenment, of course); it’s to show you the ins and outs that you need to master in order to build a smoothly functioning Linux system and to give you the know-how and confi-dence to use it.
How to Use This Book
This book tells you how to install, configure, and customize a Linux desktop system. Although you can do most things in Linux these days by pointing and clicking, you still may want to try using Linux at the command prompt — where you type detailed instructions to load or configure software, access files, and do other tasks. In this book, input appears in monospace type like this:
rmdir /etc/bin/devone
When you type Linux commands or other related information, be sure to copy the information exactly as you see it in the book, including uppercase and lowercase letters, because that’s part of the magic that makes Linux behave properly.
A failure to follow instructions exactly can have all kinds of unfortunate, unseemly, or unexpected side effects.
the command prompt may appear wrapped to the next line. Remember that your computer sees these wrapped lines as a single set of instructions,or as a single URL — so if you’re typing a hunk of text, keep it on a single line. Don’t insert a hard return if you see one of these wrapped lines. We clue you in that it’s supposed to be all one line by breaking the line at a slash mark or a nat-ural word break (to imply “Wait — there’s more!”) and slightly indenting the overage, as in the following silly example:
www.infocadabra.transylvania.com/nexus/plexus/lexus/
praxis/okay/this/is/a/make-believe/URL/but/some/real/ones/ are/SERIOUSLY/long.html
Note that as you dig your way into and through this book — and other sources of Linux wit, wisdom, and inspiration that you’re likely to encounter — you may find some terms used interchangeably. For example, you may see the same piece of software called a program, a command,a utility,a script,an
application,or a tool,depending on the source, the context, and the author of the information you’re consulting. To a large extent, you can treat these terms as interchangeable, and when an important distinction needs to be made among them, we point it out. Similarly, when you’re working with vari-ous commands or configuration controls, you may also encounter terms such as flag, switch, option,or parameterused more or less interchangeably. In this case, all these terms refer to ways in which you can control, refine, or modify basic commands or programs to make them do what you want. Again, wher-ever distinctions and clarifications may be needed, we provide them.
Three Presumptuous Assumptions
They say that making assumptions makes a fool of the person who makes them and of the person about whom those assumptions are made. (And just who are they,anyway? We assumethat we know, but — never mind.) Even so, practicality demands that we make a few assumptions about you, gentle reader:
⻬You can turn your computer on and off.
⻬You know how to use a mouse and a keyboard.
⻬You want to install, configure, and/or use a desktop Linux system because you’re curious or interested or it’s your job to do so.
If you have an active imagination and the ability to solve rudimentary prob-lems, that’s even better — you have already mastered the key ingredients necessary to making Linux work for you. The rest are mere details and a bit of patience. We can help you with the details, but the patience is up to you!
How This Book Is Organized
This book contains six major parts, arranged in an order to take you from Linux installation and configuration through keeping a Linux desktop system up and running, if not purring like a cat in the sun! Most parts contain three or more chapters or appendixes, and each chapter or appendix contains modular sections. Whenever you need help or information, pick up this book and start anywhere you like, or use the Table of Contents and the index to locate specific topics or key words.
Following is a breakdown of the book’s six parts and what you find in each one.
Part I: Getting Your Feet Wet
This part sets the stage and includes an overview of and introduction to the terms, techniques, and software components that make Linux the raging soft-ware tiger that’s so ready, willing, and able to do its thing. To be a little more specific, we start out with a Linux overview that explains what Linux is, where it came from, and how it works. Next, we tackle the various tasks and activities involved in preparing for and installing Linux on a PC. After that, we tell you how to give Linux the boot — not to get rid of it by any means, but rather, to fire up your brand-new system to reach the heights of computing ecstasy (at least, we hope it’s as good for you as it usually is for me). Finally, we help you find your way around the desktop and tweak it some to your liking.
Part III: Getting Things Done
Linux includes a great many facilities and capabilities, so after you get past the initial installation and configuration, you probably want to use your system to do something. Here’s where the doing begins! In this part of the book, you find out how to use Internet tools like Web browsers (Firefox!), e-mail, instant messaging, and more. Then you discover how to edit text files, and then go whole hog with word processors and other office suite programs thanks to OpenOffice.org. The fun stuff is in this part too, like how to use audio and video in the Linux world, and how to access software and formats that you’re told are only available to Windows users.
Part IV: Junior Administrator Boot Camp
In this part of the book, you discover how to take care of your system. You see how to handle various file formats, how to install new software, and most important, how to keep your system updated so it’s not vulnerable. You also find out about basic system administration tasks like creating and managing user accounts, caring for your filesystem, setting up printing, and more. Then you find out a bit about keeping your Linux system secure. Hint: As with any operating system, the most important thing is keeping it up-to-date!Part V: The Part of Tens
In this book’s grand climax, we sum up and distill the essence of what you now know about Linux and its inner workings. Here, you have a chance to revisit some key troubleshooting tips and tricks for Linux systems, along with some really fun kinda geeky stuff: setting up your own wireless access point, setting up a print server that all of your computers can print to, and setting up a file server that all of your computers can use.
Part VI: Appendixes
Icons Used in This Book
Within each chapter, we use icons to highlight particularly important or useful information. You find the following icons in this book:
The Tip icon flags useful information that makes living with your Linux system even less complicated than you feared that it might be.
We sometimes use this icon to point out information you just shouldn’t pass by — don’t overlook these gentle reminders. (The life, sanity, or page you save may be your own.)
Be cautious when you see this icon — it warns you of things you shouldn’t do. This icon is meant to emphasize that the consequences of ignoring these bits of wisdom can be severe.
This icon signals technical details that are informative and interesting but not critical to understanding and using Linux. Skip these paragraphs if you want (but please come back and read them later).
Where to Go from Here
This is where you pick a direction and hit the road! Linux For Dummies,
8th Edition, is much like 1001 Nightsbecause it almost doesn’t matter where you start out. You look at lots of different scenes and stories as you prepare yourself to build your own Linux system. Although each story has its own distinctive characters and plot, the whole is surely something to marvel at. Don’t worry — you can handle it. Who cares whether anybody else thinks that you’re just goofing around? We know that you’re getting ready to have the time of your life.
Getting Acquainted with Linux
In This Chapter
䊳Diving into Linux origins and features
䊳Telling Linux apart from the rest of the operating system pack
䊳Depending on GNU and the GPL
䊳Marveling at the Linux Company (or lack thereof)
䊳Checking out popular Linux distributions
Ford, you’re turning into a penguin. Stop it!
— Arthur Dent
W
elcome to the world of Linux, the operating system developed by more than a thousand people around the world! In this chapter, you find out about Linux itself — what it is, where it comes from, and why it gets so much attention in the news these days. Prepare to have your assumptions challenged about how software mustbe developed and sold, and your mind opened to new possibilities.Is Free Really Free?
Don’t scratch your head too hard; these concepts are tough to grasp initially, especially when you consider the conditioning you’ve received from the com-mercial software industry’s marketing departments. Perhaps you don’t know that when you purchase most proprietary, shrink-wrapped software, you don’t actually ownthe software. Rather, you’re granted permission to use the software within the bounds dictated by the licensor.
Linux also has a license. However, the motives and purpose of the license are much different from those of most commercial software. Instead of using a license to restrict use of the software, the GNU General Public License (GPL) that Linux uses ensures that the software will always be open to anyone. No company can ever own or dictate the way in which you use or modify Linux — although they can have their own individual copyrights and trade-marks on their various brands of it, like Red Hat and Novell. In essence, you already own Linux, and you can use it for anything you like, as long as you propagate the GPL freedoms to any further recipients of the software.
Linux: Revolution or Just Another
Operating System?
Contrary to popular belief, penguins are not the salvation of modern technology. Neither do they throw parties for the urban proletariat.
— Anonymous
Author note:Cute quote . . . obviously Anonymous has never been to a Linux convention!
Before going any farther into Linux, I need to get some terminology out of the way.
Tux is the formal name of the mascot penguin that represents Linux. Rumor has it that Linux’s creator, Linus Torvalds, is rather fond of these well-dressed inhabitants of the Antarctic.
In recent technological history, Linux has evolved from water-cooler techie chatter to a rock-solid solution for the business enterprise. The same software that was once dismissed as rogue is now being adopted and promoted by industry leaders such as IBM, Hewlett-Packard, Motorola, Microsoft, and Intel. Each of these computer manufacturers has, in some way, determined that Linux provides value for their customers (as well as for their own operations).
Linux has been accused of being “just another operating system.” On the sur-face, it may appear so, but if you look deeper, you can see that this isn’t so. The Linux project is a flagship leading the current trend toward open source and free (as in freedom, not free beer) software within the computing indus-try. A rock-solid operating system because of the model under which it was (and continues to be) developed, Linux represents much that is good in soft-ware development.
Two fundamental distinctions separate Linux from the rest of the operating-system pack:
⻬Linux is licensed under the unique and ingenious GNU General Public License,which you can read about in the next section.
⻬Linux is developed and maintained by a worldwide team of volunteer and paid programmers, working together over the Internet.
Linux is great for many reasons, including the fact that the folks who built it from the ground up wanted it to be
⻬Multiuser:More than one user can be logged in to a single computer at one time.
⻬Multiprocess:True preemptive multitaskingenables the operating system core to efficiently juggle several programs running at once. This is important for providing multiple services on one computer.
⻬Multiplatform:Linux currently runs on more than 24 platforms (hard-ware types), including 32- and 64-bit Intel-based PCs, Digital/Compaq Alpha, all variants of the Apple Macintosh, Sun SPARC, the Apple iPod, and even the Microsoft XBox.
⻬Interoperable: Linux plays nice with most network protocols (languages) and operating systems, allowing you to interact with users and computers running Microsoft Windows, UNIX, Novell Netware, Apple Macintosh com-puters, and other, more niche groups.
⻬Portable: Linux is mostly written in the C programming language. Cis a language created specifically for writing operating system–level software and can be readily ported(translated) to run on new computer hardware. ⻬Flexible:You can configure the Linux operating system as a network
host, router, graphical workstation, office productivity PC, home enter-tainment computer, file server, Web server, cluster, or just about any other computing appliance that you can think of.
⻬Stable:The Linux kernel(the operating system) has achieved a level of maturity that makes most software developers envious. It’s not uncom-mon to hear reports of Linux servers running for years without crashing.
⻬Efficient: The modular design of Linux enables you to include only the components needed to run your desired services. Even older Pentium computers can utilize Linux and become useful again.
⻬Free!:To most people, the most intriguing aspect of Linux is the fact that it’s often available free of charge. How (the capitalists murmur) can anyone build a better mousetrap with no incentive of direct monetary return?
So where did Linux come from?
The quickest way to understand Linux is to takea peek at its rich heritage. Although program-ming of the Linux core started in 1991, the design concepts were based on the time-tested UNIX operating system.
UNIX was developed at Bell Telephone Labora-tories in the late 1960s. The original architects of UNIX, working back when there were few operating systems, wanted to create one that shared data, programs, and resources both effi-ciently and securely — something that wasn’t available then (and is still sought after now). From there, UNIX evolved into many different versions; its current family tree is so compli-cated that it looks like a kudzu infestation!
In 1991, Linus Torvalds was a computer science student at the University of Helsinki in Finland. He wanted an operating system that was like the UNIX system that he’d grown fond of at the
university, but both UNIX and the hardware it ran on were prohibitively expensive. A UNIX version called Minix was available for free, but it didn’t quite meet his needs. So, as a computer science student, Torvalds studied Minix and then set out to write a new version himself. In his own words (recorded for posterity on the Internet because this was in an early version of an online chat room), his work was “just a hobby, won’t be big and professional like GNU.”
In this chapter, I intend to answer that last question for you. I also hope to paint a picture of the open source software development model that created Linux.
Anatomy of an Open Source
Software Project
Linux isn’t a product. Linux is an organic part of a software ecosystem.
— Michael Robinson, Netrinsics
To the casual observer (and some corporate IT decision makers), Linux appears to be a freak mutation — a rogue creature randomly generated by anarchy. How, after all, can something so complex and discipline dependent as a computer operating system be developed by a loosely knit band of vol-unteer computer geeks from around the world?
Just as science is constantly attempting to classify and explain everything in existence, technology commentators are still trying to understand how the open source approach can create superior software, especially in cases where there is no charge. Often the reasons have much to do with the usual human desire to fill a need with a solution. When a programmer in the Linux world wants a tool, the programmer simply writes one — or bands together with other people who want a similar package, and they write it together.
GNU who?
Imagine — software created out of need rather than projected profit. Even though UNIX ultimately became expensive proprietary software, the ideas and motives for its creation were originally based on practical needs. What people usually refer to (in the singular) as the Linux operating systemis actu-ally a collection of software tools that were created with the express purpose of solving specific computing problems.
The speed of Linux’s popularity also wouldn’t be possible without the vision of a man whom Steven Levy (author of the book Hackers) refers to as “The Last of the Great MIT AI-LAB Hackers” — in the original sense of the word
The Massachusetts Institute of Technology (MIT) has long held a reputation for nurturing the greatest minds in the technological disciplines. In 1984, Stallman, a gifted student and brilliant programmer at MIT, was faced with a dilemma — sell his talent to a company for a tidy sum of money or donate his gifts to the world. He did what we’d all do . . . right?
Stallman set out on a journey to create a completely free operating system that he would donate to the world. He understands — and continues to live — the original hacker ethic, which declares that information wants to be free. This concept wasn’t new in his time. In the early days of the computing industry, many advancements were made by freely sharing ideas and pro-gramming code. Manufacturer-sponsored user groups brought the best minds together to solve complicated problems. This ethic, Stallman felt, was lost when companies began to hoard software as their own intellectual prop-erty with the single purpose of profit.
As you may or may not have gathered by this point, widespread and acces-sible source code is paramount to successful software development. Source code is the term for the human-readable text (as opposed to the unreadable cyber-hieroglyphics in an “executable” file) that a programmer types to com-municate instructions to the computer.
Writing computer programs in binary is an extremely arduous task. Modern computer software is usually written in a human-friendly language and then
compiled,or translated, into the computer’s native instruction set. To make changes to this software, a programmer needs access to a program’s source code. Most proprietary software comes only as a precompiled product; the soft-ware developer keeps the source code for those programs under lock and key.
After determining that his operating system would be built around the con-ceptual framework of UNIX, Stallman wanted the project name to distinguish his system from UNIX. So, he chose the recursive acronym GNU(pronounced ga-new), which means GNU’s not Unix.
To finance the GNU project, Stallman organized the Free Software Foundation (FSF), which sold free (open source) software to help feed the programmers who worked on its continuing development. (Remember, we’re talking freeas in free speech, not free beer.) Although this organization and goal of creating a complete operating system was necessary and important, a much more important piece of the puzzle had to be put into place to protect this new software from big-business pirates — a concern still all too relevant today as a former Linux company tries to hijack ownership of decades of volunteer work from thousands of people around the world.
recipients are bound by copyright law to respect the freedom of anyone else to use the software in any way they choose. Software licensed with the GPL is also known as copyleftsoftware (the reverse of right, get it?). Another way to remember the GPL is through its ultimate result: Guaranteed Public for Life.
While Stallman’s work set the stage for Linux’s rapid climb to popularity, the operating system he and his crew were working on took longer than expected. If you’re interested in the completed version, go to www.gnu.org/software/ hurd/hurd.html.
Who’s in charge of Linux anyway?
As an open source project evolves, various people emerge as leaders. This leader is often known as the project’s benevolent dictator.A person who becomes benevolent dictator has probably spent more time than anyone else on a particular problem and often has some unique insight. Normally, the words democraticand dictatorare never paired in the same sentence, but the open source model is a very democratic process that endorses the reign of a benevolent dictator.
Linus Torvalds is still considered the benevolent dictator of the Linux kernel
(the operating system’s core). He ultimately determines what features are added to the kernel and what features aren’t. The community trusts his vision and discretion. In the event that he loses interest in the project, or the community decides that he has gone senile, a new leader will emerge from amongst the very competent people working with him.
Einstein was a volunteer
Someone who is a volunteer or donates time to a project isn’t necessarily providing a second-rate effort (or only working on weekends and holidays). In fact, any human resources expert will tell you that people who choose to do a job of their own free will produce the highest quality products.
The volunteers who contribute to open source projects are often leaders in their fields who depend on community collaboration to get useful work done. The open source concept is no stranger to the scientific community. The impartial peer-review process that open source projects foster is critical in validating some new feature or capability as being technically correct.
greatest respect for copyright. Bandits who claim that they’re “just being open source” when they steal other people’s hard work are grossly misusing the term to soothe their own consciences.
Many have also pointed out that if copyright is violated in open source, it’s easy to tell. Watch the news and notice how often large software corporations are convicted of stealing other people’s code and incorporating it into their own work. If the final product is open source, it’s easy for anyone to look and make sure nothing stolen is in it. As you might imagine, tracking down such copyright violations is much more difficult in a closed source scheme.
Packaging Linux: The Distribution
What people call a Linux distributionis actually the culmination of the GNU project’s tools, the Linux kernel, and any number of other open source (and closed source) software projects that sprang up along the way.
Robert Young, cofounder and current chairman of Red Hat, has coined an analogy comparing Linux to ketchup. Essentially, the operating system called Linux — including the GNU tools, Linux kernel, and other software — is a freely available commodity that, like ketchup, different distributors can pack-age and label in different containers. Anyone is encourpack-aged to packpack-age and market the stuff, even though the ingredients are fundamentally the same.
Linux is a complex, malleable operating system, and thus it can take on many appearances. The greatest Linux advancement in recent years has been easier installation. After all, the tools that today enable the casual PC user to install Linux weren’t originally available. Companies such as Red Hat saw this as an opportunity to add value to an existing product, and the concept took off like gangbusters.
To draw again on the ketchup analogy, various distributions of Linux have a slightly different flavoror texture; your distribution preference may be spicy, mild, thick and gooey, or runny. However, you can rest assured that any of the following distributions have the same Linux and GNU heart and soul. Each short description in this list includes a Web address where you can find more information about each project:
distributions — though each has a free version you can try — created for those who really are most comfortable in Windows and don’t want to have to master the nitty-gritty of using Linux.
Knoppix is particularly interesting as it’s a live distribution, meaning that you take a Knoppix CD-ROM or DVD-ROM, place it in the drive, and reboot the machine into a fully operational Linux desktop. This book contains another live distribution option for those who don’t want to install Linux on their hard drive. See Chapter 3 for more information. Knoppix, Linspire, Ubuntu, and Xandros are covered on the DVD-ROM that comes with this book.
www.debian.org www.xandros.com www.ubuntulinux.org www.knoppix.org www.linspire.com
⻬Mandriva:This distribution demonstrates the power of the GPL by allowing this competing company to stand on the shoulders of giants. Mandriva (formerly known as Mandrake) was originally based on Red Hat Linux (something that simply could not happen in a closed source environment), but has since become an excellent solution in its own right. Mandriva offers a wide range of commercial products and services as well as its free version.
www.mandrivalinux.com
⻬Red Hat and Fedora:Red Hat claims the prize for successfully mass marketing the Linux operating system. Red Hat has validated Linux by packaging the GNU and Linux tools in a familiar method of distribution (shrink-wrapped) and has included value-added features to its product, such as telephone support, training, and consulting services. The commer-cial version of this distribution is Red Hat Enterprise Linux, and the free version is called Fedora. Fedora is the distribution covered in this book.
www.redhat.com
www.fedoraproject.org
⻬Slackware:Of all the more widely recognized surviving Linux distribu-tions, Slackware has been around the longest (in fact, its installation interface remained unchanged until about a year ago). Slackware has a very loyal following, but isn’t well known outside of the Linux commu-nity. Like Debian in terms of spirit, the Slackware crowd is as respected in Linux circles as the weathered old-timers who share stories of carry-ing around a shoebox full of diskettes. This distribution is also free.
www.slackware.com
offers both a commercial distribution in SuSE Enterprise Linux, and a free distribution with openSuSE, an effort similar effort to that of Fedora.
www.opensuse.org www.novell.com/linux/
As you can see, many paths (in the form of distributions) lead to Linux. It’s important to note that regardless of which distribution you choose, you’re using the same basic ingredients: the GNU tools and the Linux kernel. The major differences you’ll encounter among distributions are
⻬Installation programs:Each distribution has developed its own installa-tion program to help you achieve a running computer system. Some installation programs are designed for the casual computer user (hiding the technical details); others are designed with the seasoned system administrator in mind. Some of the simpler ones offer an “expert mode” for those who want to have more control right from the beginning.
⻬Software versions:Different distributions may use different versions of the kernel(the core of the operating system) and other supporting soft-ware packages — which makes for a plethora of versions. Open source projects are dynamic and release new versions regularly, as opposed to the often-sluggish development cycle of traditional commercial software.
⻬Package managers:Even though one Linux program should be able to run on any distribution, tools called package managerskeep track of the software on your system and ensure that you have all the required supporting software as well. Distributions are usually dependent on one particular package manager. More recent in the grand scheme of things, package management has also come to involve adding easy-to-use update routines, as well as an easy way to add software without the need of a computer science degree. Chapter 16 provides more information about package management.
It would be impossible to account for everypossible installation of every Linux distribution. Okay, maybe not literally impossible, but you’d need a forklift to bring your Linux For Dummiesbook home from the bookstore if I did. Consequently, I try to summarize the concepts needed to install any Linux distribution into this one book with enough detail to get you through the process. (As you can imagine, that’s a bit of a challenge!)
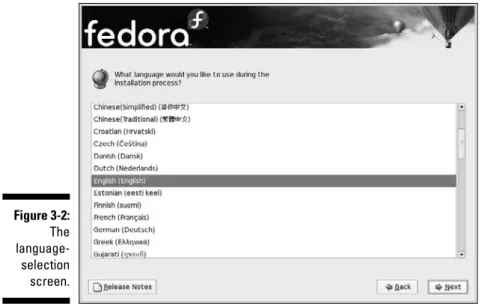
I chose Fedora as the sample distribution because Red Hat has become a rec-ognized Linux standard, and its Fedora project is specifically aimed at home and small business users who cannot afford (or have no need) to purchase higher-level products. Even better, if you do use Red Hat Enterprise Linux (RHEL) in your office or organization, Fedora is a proving ground for the tech-nologies that will make their way into RHEL.
Prepping Your Computer for Linux
In This Chapter
䊳Taking basic preinstallation steps
䊳Using Linux and Windows on the same computer
䊳Customizing disk partitions before installation
䊳Knowing (and finding) your hardware information
䊳Preparing for DVD or CD installation
You got to be careful if you don’t know where you are going, because you might not get there.
— Yogi Berra
B
ecause there are three major approaches for installing Linux, look at this chapter introduction as a quick road map that tells you which sections are important for your particular situation. If you have a spare computer that’s only going to run Linux and nothing else, you’re in luck! You can skip the “Preparing to Use Linux and Microsoft Windows Together” section. In fact, if you’re feeling brave, you may want to skip right to Chapter 3 and start your installation. There’s troubleshooting information in Chapter 22 as well.If you are removing information from a hard drive so you can erase it, be sure that you have moved everything before installing Linux, because Linux is going to completely wipe the drive.
Those who can’t spare an entire hard drive for Linux and already have Microsoft Windows installed will have to resize their current Windows instal-lation. If this is your situation, you need to work through this entire chapter. AbsolutelyDO NOT PROCEED TO CHAPTER 3without at least reading the next section, “Preparing to Use Linux and Microsoft Windows Together.” Sorry for yelling, but you can wipe out your whole Windows installation if you don’t take precautions!
If you are using Microsoft Windows Vista and plan to purchase a product to help you do things like resize partitions, make sure and read the product’s box and see if Vista is supported. Partition Magic, for example, has an upgrade you can download to add Vista support. See www.symantec. com/windowsvistasupport.
If you absolutely don’t want to dual boot, you have three other options — I know I said that there were four approaches in total and adding three here brings us up to six, so give me a moment to explain. You can use VMware (see Chapter 15) to install a “virtual” Linux machine that lives in a window inside your Windows installation. You can install only Linux on the computer and then use VMware or Win4Lin (see Chapter 15) to install a virtual Windows machine that lives in a window within your Linux installation. Or, if the thought of changing anything on your computer gives you hives, you can use a live distribution(see Chapter 3) to boot your computer into Linux without installing anything.
So give some thought to which of the options detailed here you prefer, and then read on.
Preparing to Use Linux and Microsoft
Windows Together
On the off-chance that you actually don’t have Windows installed yet and still want that dual-boot capability, you should install Windows beforeyou install Linux. Otherwise, during installation, Windows overwrites the part of your hard drive that Linux uses to store its boot menu. (This factor can create a mess later when you want to boot back into Linux!) Those who need to install Windows should skip down to the section “Working with Disk Partitions” to find out how to set up your Windows installation so it causes the least fuss when it’s time to add Linux. Then after you have Windows installed, return here.
The majority of you, however, want to dual-boot because you’ve got one machine and it’s already running a Windows installation that you really don’t want to redo. If you intend to put Linux on a brand-new hard drive that has nothing on it already (or that you are 100 percent confident that you can erase), skip down to the section “Working with Disk Partitions.” However, if you need Linux and Windows to share the same hard drive and you already have Windows installed, you have some extra work to do in order to make sure that everything goes smoothly. The rest of this chapter focuses on get-ting you through this process.
Partitioning from scratch for a dual boot
Again, if you plan to take a fresh hard drive (or erase an existing one) and install both Windows and Linux on it, be sure to install Windows first. While you’re going through the Windows installation, you are asked to partitionyour drives, which refers to using software to break them into smaller virtual drives. There are three types of partitions available: primary, extended, and logical. A hard drive can have three primarypartitions and one extended
partition. Inside that extended partition, you can have up to 12 logical
partitions — think of an extended partition as just a cardboard box that contains the logical partitions. Logical partitions hold data; extended parti-tions just hold logical partiparti-tions. Because I can’t predict what software you want to install, I recommend having at least 10GB of space available for your Linux installation. More is always better because it gives you more room for downloads and even more programs, and, at the very least, you can install everything from this book’s companion DVD-ROM into that 10GB.
Make a note of the partition you dedicate to Windows and the one you dedicate to Linux. In the note, jot down which hard drive each partition is on (the first, second, third, and so on) and the partition number each is on the disk (again, first, second, and so on). You’ll need this information when installing Linux.
You are not limited to a dual boot. You can have three or more operating sys-tems on the computer if you want — and if you have room.
Peeking at your partitions from Windows
Before you change anything, you must collect some important information about your current setup. You need to know two major things about your hard drives before proceeding. The first is to know whether you have any unpartitioned space left on your hard drive(s) — and, if so, how much space you have. If you discover at least 10GB of unpartitioned space, you can skip straight to the “Double-Checking Hardware Compatibility” section later in this chapter.If you find using the tools in this chapter awkward, you can purchase a com-mercial program called Partition Magic (www.powerquest.com) to make the process easier. I’ve chosen to cover a free alternative in this chapter instead.
Peeking at your partitions
in Windows Vista
The Vista operating system has security more on its mind than previous ver-sions of Microsoft Windows did. As such, to use the instructions that follow, you need to be using an account with administrative privileges. After you have logged into such an account, do the following:
1. Open the Control Panel by choosing Start➪Control Panel.
The Vista Control Panel opens.
2. Select Classic View if necessary. 3. Double-click Administrative Tools.
The window displays the various administrative tools available in Vista.
4. Double-click Computer Management.
The window displays the various tools available in Vista to manage your computer. You may need to click Continue to proceed to this dialog box.
5. Within the left pane, select Disk Management.
If you look through the Disk 0, Disk 1, and Disk 2 listings, you see that one of the boxes says Vista (C:). That’s the Vista installation. You also see some boxes that say Unallocated. They are free space that isn’t being used for any-thing. The EFI items you see are for an Apple Intel Macintosh installation.
Those who find an unallocated partition that is 10GB or larger (refer to Figure 2-1), make a note of which disk this partition is on and what numbered partition it is on that disk, and skip ahead to the section “Working with Disk Partitions.” If you don’t have any (or enough) unallocated space, keep this window open and jump to the section “Making space” later in this chapter.
Peeking at your partitions in Windows
2000 and Windows XP
The Windows 2000 and XP operating systems only allow certain accounts to control and secure the files and folders; to get information about the com-puter’s disk-space usage, first you have to be logged on as the Administrator (or use an account that has administrative permissions). After you log on, you use the Computer Management application in the Administrative Tools collec-tion to find the details of the computer’s hard-drive usage. Follow these steps:
Figure 2-1:
1. Open the Control Panel by choosing Start➪Settings➪Control Panel. 2. Open the Administrative Tools folder and double-click the Computer
Management icon.
3. In the left pane of the Computer Management application, click the Disk Management folder icon.
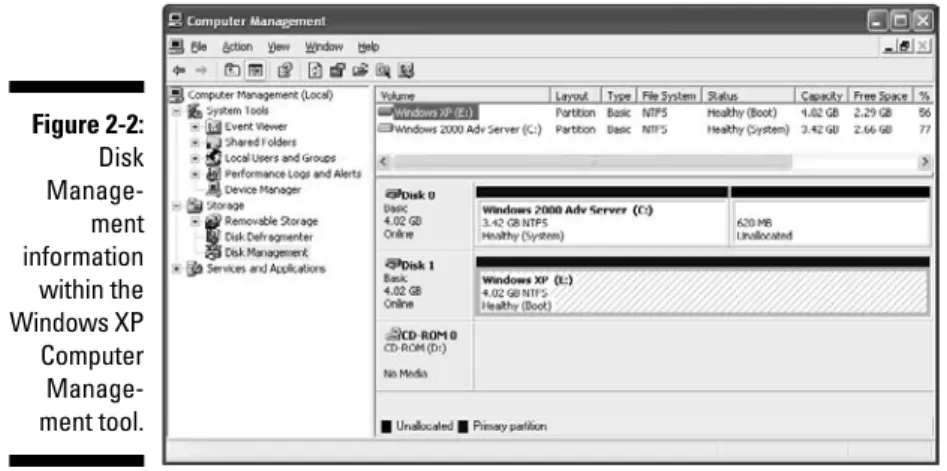
Within a few seconds, the right pane displays the current status of the storage devices on your computer, such as the hard drive(s), CD drive(s), DVD/CD drive(s), and so on. Figure 2-2 is an example of the Windows XP Disk Management display, and Windows 2000 users see a nearly identical view.
Figure 2-2 reflects a computer that has two hard drives and one CD drive. The important thing to look for here is the word Unallocatedin the Disk listing — an example is shown in this figure. Unallocated partitions are not assigned to any operating system and are free to use for your Linux installation.
If you do find an unallocated partition (refer to Figure 2-2), you’re all set if it’s 10GB or larger. Make a note of which disk this partition is on and what num-bered partition it is on that disk, and skip ahead to the section “Working with Disk Partitions.” For example, in Figure 2-2, the partition is on disk 1, and it’s partition 2.
If you don’t have any (or enough) unallocated space, keep this window open and jump to the section “Making space,” later in this chapter.
Figure 2-2:
Peeking at your partitions in Windows 98
Windows 98 unfortunately does not provide a graphical tool like Computer Management for Windows 2000 and XP. Instead it uses FDISK, a command-line tool that indicates the partitions on your hard drive. To find out the details about a computer’s hard drive in Windows 98, follow these steps.Be careful in FDISK: You can wipe out your data if you make any changes with it. When you are exiting the program, be sure not to save any changes.
1. Open an MS-DOS prompt window by choosing Start➪Programs➪
MS-DOS Prompt.
2. Type FDISKand press Enter.
In Windows 98, you can enter FDISKin uppercase, lowercase, or any mixed case you like as long as you spell FDISKcorrectly!
You will very likely be prompted to display large “disk” (drive) information — “large” is relative to what was a big hard drive in the time of Windows 98, which means a drive larger than 512MB. If you don’t see the prompt, skip to Step 4, and the FDISKmenu options will be similar to Figure 2-3.
3. If you see the large disk prompt, choose Y at this prompt and then press Enter.
The FDISKmenu options appear.
4. Display the current drive-partition information.
If you have more than one hard drive in your computer, FDISKdisplays a fifth menu choice so you can change between disks.
Figure 2-3:
FDISK
Here’s how to use the fifth menu choice to change to another disk:
a. Type 5and press Enter.
The FDISKscreen displays all the hard drives in your system.
b. Type the number of the disk you want and then press Enter.
The top of the FDISKmenu screen displays the number of the drive that FDISKis working with.
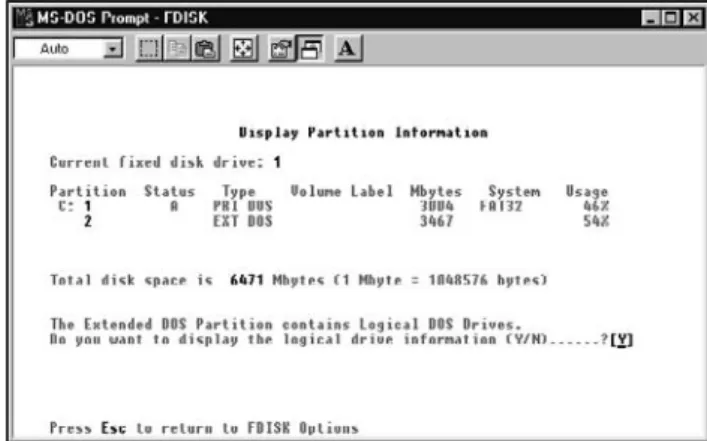
5. To display partition information for the disk number displayed, type
4and press Enter.
Figure 2-4 shows an example of the Display Partition Information screen within FDISK.
Figure 2-4 indicates that no free, unallocated disk space is on the drive. If the disk had unpartitioned space, FDISKwould display the amount of space available.
However, in Figure 2-4, you see that a portion of the disk space is config-ured as an extended partition EXT DOS(see the section “Partitioning from scratch for a dual boot” earlier in this chapter for a breakdown of the partition types). Unfortunately, FDISKdoesn’t tell you anything about what’s inside this extended partition within this screen. You have to dig deeper.
6. To view the logical partitions within the extended partition, select the
EXT DOSentry and press Enter.
Figure 2-5 is an example of a logical-partition setup. In this case, all space within the extended partition is currently assigned. You can tell whether there’s free space by totaling the Usage percentages for the drive. That total determines what you do next:
Figure 2-4:
• If the total is 100 percent, no space is available. If this is the case (or if you have less than 10GB available), leave this tool open and go to the next section, “Making space.”
• If you have 10GB or more available, skip to the section “Working with Disk Partitions.”
Making space
You may need to ultimately resize your partitions for a number of reasons. You may have some unallocated space, but less than 10GB of it. You may have 10GB of unallocated space, but it’s broken up into numerous pieces across your drives and needs to be consolidated. Or (most commonly), you may not have any unallocated space at all. In all these situations, you need to move data around so that you have room to install Linux and store any files you want to keep in your Linux filesystem.
You probably want morethan 10GB of space. For example, if you download lots of multimedia, you’ll quickly eat up whatever was left after you installed your software! So, 20GB might be a better amount to shoot for — at minimum. The key to making your space is (first) to determine how much of your drive space you’re really using and jot this information down for use later.
⻬Remember, do not try to resize Windows Vista partitions unless a tool specifically states that it can safely do so.
⻬In Windows XP and 2000, return to the Computer Management tool dis-cussed in the earlier section “Peeking at your partitions in Windows 2000 and Windows XP” and look in the Capacity, Free Space, and %
Figure 2-5:
columns. Here you can see how much space you have already used in each partition, and how much you have available.
⻬If you’re bringing a venerable Windows 98 and 95 machine back to dual-boot life, use the Computer Management tool this way:
1. Double-click My Computer to open the Computer Management tool.
2. Choose View➪Web Page. 3. Highlight your first drive.
You see something like what is shown in Figure 2-6.
Determining how much space is enough for your Windows setup — you don’t want to shrink it so much that you run out of space in Windows — also involves taking a look at how you use your machine. Again, if you download and save a lot of multimedia stuff, it’s wise to keep enough room around to accommodate your downloading habit.
If you find that your Windows drives are all too full and you have no room to spare (or you download and save too many audio, video, or graphics files), it may be time to burn some of your files off onto CDs or DVDs so you can delete them from your hard drive. The other option is to add a second drive to the computer — if you’re not comfortable doing this yourself, many stores will install a drive for you for a fee.
When you’ve decided which partition(s) you want to resize, make a note of which hard drive each is on and which partition each is on that hard drive.
Figure 2-6: