by Greg Harvey, PhD
Windows Vista
™FOR
DUMmIES
‰111 River Street Hoboken, NJ 07030-5774
www.wiley.com
Copyright © 2007 by Wiley Publishing, Inc., Indianapolis, Indiana Published by Wiley Publishing, Inc., Indianapolis, Indiana Published simultaneously in Canada
No part of this publication may be reproduced, stored in a retrieval system or transmitted in any form or by any means, electronic, mechanical, photocopying, recording, scanning or otherwise, except as permitted under Sections 107 or 108 of the 1976 United States Copyright Act, without either the prior written permission of the Publisher, or authorization through payment of the appropriate per-copy fee to the Copyright Clearance Center, 222 Rosewood Drive, Danvers, MA 01923, (978) 750-8400, fax (978) 646-8600. Requests to the Publisher for permission should be addressed to the Legal Department, Wiley Publishing, Inc., 10475 Crosspoint Blvd., Indianapolis, IN 46256, (317) 572-3447, fax (317) 572-4355, or online at
http://www.wiley.com/go/permissions.
Trademarks:Wiley, the Wiley Publishing logo, For Dummies, the Dummies Man logo, A Reference for the Rest of Us!, The Dummies Way, Dummies Daily, The Fun and Easy Way, Dummies.com, and related trade dress are trademarks or registered trademarks of John Wiley & Sons, Inc. and/or its affiliates in the United States and other countries, and may not be used without written permission. Windows Vista is a trademark of Microsoft Corporation in the United States and/or other coun-tries. All other trademarks are the property of their respective owners. Wiley Publishing, Inc., is not associated with any product or vendor mentioned in this book.
LIMIT OF LIABILITY/DISCLAIMER OF WARRANTY: THE PUBLISHER AND THE AUTHOR MAKE NO REPRESENTATIONS OR WARRANTIES WITH RESPECT TO THE ACCURACY OR COMPLETENESS OF THE CONTENTS OF THIS WORK AND SPECIFICALLY DISCLAIM ALL WARRANTIES, INCLUDING WITHOUT LIMITATION WARRANTIES OF FITNESS FOR A PARTICULAR PURPOSE. NO WARRANTY MAY BE CREATED OR EXTENDED BY SALES OR PROMOTIONAL MATERIALS. THE ADVICE AND STRATEGIES CONTAINED HEREIN MAY NOT BE SUITABLE FOR EVERY SITUATION. THIS WORK IS SOLD WITH THE UNDERSTANDING THAT THE PUBLISHER IS NOT ENGAGED IN RENDERING LEGAL, ACCOUNTING, OR OTHER PROFESSIONAL SERVICES. IF PROFESSIONAL ASSISTANCE IS REQUIRED, THE SERVICES OF A COMPE-TENT PROFESSIONAL PERSON SHOULD BE SOUGHT. NEITHER THE PUBLISHER NOR THE AUTHOR SHALL BE LIABLE FOR DAMAGES ARISING HEREFROM. THE FACT THAT AN ORGANIZATION OR WEBSITE IS REFERRED TO IN THIS WORK AS A CITATION AND/OR A POTENTIAL SOURCE OF FURTHER INFORMATION DOES NOT MEAN THAT THE AUTHOR OR THE PUBLISHER ENDORSES THE INFORMATION THE ORGANIZATION OR WEBSITE MAY PROVIDE OR RECOMMENDATIONS IT MAY MAKE. FURTHER, READERS SHOULD BE AWARE THAT INTERNET WEBSITES LISTED IN THIS WORK MAY HAVE CHANGED OR DISAPPEARED BETWEEN WHEN THIS WORK WAS WRITTEN AND WHEN IT IS READ.
For general information on our other products and services, please contact our Customer Care Department within the U.S. at 800-762-2974, outside the U.S. at 317-572-3993, or fax 317-572-4002.
For technical support, please visit www.wiley.com/techsupport.
Wiley also publishes its books in a variety of electronic formats. Some content that appears in print may not be available in electronic books.
Library of Congress Control Number: 2006934813 ISBN-13: 978-0-471-78326-8
ISBN-10: 0-471-78326-9
Manufactured in the United States of America 10 9 8 7 6 5 4 3 2 1
About the Author
Greg Harvey,the author of a slew of For Dummiesbooks running the gamut from
Dedication
To my alma mater, the University of Illinois at Urbana-Champaign, Illinois, birthplace of NCSA (National Center for Supercomputing Applications) Mosaic, the great-grand-daddy of Microsoft Internet Explorer 7.
Thanks for helping me gain the analytical, language, and writing skills that all came into play in the creation of this work.
Author’s Acknowledgments
Many thanks to Christopher Aiken at Mind over Media, Inc. for all his help and support with this revision of Windows Quick Reference.
I want to thank the following people at Wiley Publishing, Inc. who have worked so hard to make this book a reality: Katie Feltman for her consistent and inspiring help in getting this revision off the ground; Linda Morris for her dedicated editorial assis-tance; and the amazing layout folks in Production. Thanks, too, to Joyce Nielsen for the technical review.
Last, but never least, I want to acknowledge my indebtedness to Dan Gookin, whose vision, sardonic wit, and (sometimes) good humor produced DOS For Dummies,the “Mother” of all For Dummiesbooks. Thanks for the inspiration and the book that made it all possible, Dan.
Greg Harvey
www.dummies.com/register/.
Some of the people who helped bring this book to market include the following:
Acquisitions, Editorial, and Media Development
Project Editor: Linda Morris
Acquisitions Editor: Katie Feltman
Copy Editor: Linda Morris
Technical Editor: Joyce Nielsen
Editorial Manager: Jodi Jensen
Media Development Manager:Laura VanWinkle
Editorial Assistant: Amanda Foxworth
Composition Services
Project Coordinator: Adrienne Martinez
Layout and Graphics: Denny Hager, Joyce Haughey, Stephanie D. Jumper, Barbara Moore, Barry Offringa, Lynsey Osborn, Erin Zeltner
Proofreaders: Laura Albert, Techbooks
Indexer: Techbooks
Publishing and Editorial for Technology Dummies
Richard Swadley,Vice President and Executive Group Publisher
Andy Cummings,Vice President and Publisher
Mary Bednarek,Executive Acquisitions Director
Mary C. Corder,Editorial Director
Publishing for Consumer Dummies
Diane Graves Steele,Vice President and Publisher
Joyce Pepple,Acquisitions Director
Composition Services
Gerry Fahey,Vice President of Production Services
Contents at a Glance
Part 1: The Vista User Experience ...1
Part 2: Computer Management ...49
Part 3: Networking ...81
Part 4: Communications ...95
Part 5: System Maintenance ...139
Part 6: Security ...163
Part 7: Entertainment ...173
Glossary: Tech Talk...205
Table of Contents
Part 1: The Vista User Experience ...1
Aero Glass Interface ...2
Ah, That’s What They Did with It! ...6
Start is a very good place to begin ...6
Using the All Programs item ...8
The role of Start Search ...8
Looking at virtual folders with Windows Explorer ...10
Notable differences in the Vista Windows Explorer ...10
The Navigation pane ...11
The standard buttons on the toolbar ...12
Taking a good look at the Views...14
Using the address bar ...15
Making the most of the Details pane ...16
Displaying the Search pane and Preview pane ...18
Restoring the Classic pull-down menus to Windows Explorer ...19
Restoring the Classic Windows Start menu ...19
Getting rid of the Vista glassiness ...20
Adopting a Classic view of the Control Panel ...21
Things that haven’t changed a bit ...21
Flip and Flip 3D ...22
Personalize...23
Search ...25
Adding tags for searches ...27
Doing advanced searches with the Search pane ...27
Saving search results in a search folder ...28
Sidebar and Gadgets...29
Changing where and how the Sidebar appears ...30
Hiding or eliminating the Sidebar ...31
Adding new gadgets to your Sidebar ...31
Customizing the contents of a gadget ...32
Changing the opacity of a gadget...33
Detaching a gadget from the Sidebar and freely moving it around the desktop...33
Vista Desktop...34
Displaying additional desktop icons ...34
Creating desktop shortcuts ...35
Vista Taskbar ...36
The Start menu...37
Customizing the taskbar ...38
Customizing the Start menu ...38
Using the Quick Launch toolbar ...40
Creating new toolbars ...41
The Notification area...42
Customizing the Notification area ...42
Switching between open windows...43
Arranging windows on the desktop...43
Using the Task Manager ...44
Welcome Center ...45
Windows Help and Support ...46
Part 2: Computer Management ...49
Disk Management ...50
Opening folders on drives in the Computer window ...51
Formatting a disk ...51
Mapping a network folder as a local drive ...52
File and Folder Management ...53
Assigning filenames ...54
Creating new files and folders ...55
Customizing a window’s Folder Options ...56
Changing how you select and open items ...57
Changing how items are displayed in a folder ...57
Creating compressed (zipped) folders ...58
Extracting files from a compressed folder ...59
Selecting files and folders ...60
Copying (and moving) files and folders ...61
Deleting files and folders ...65
Renaming files and folders ...66
Sharing files ...67
Program Management ...72
Removing or repairing a program ...72
Changing the program defaults ...72
Restart, Sleep/Hibernate, Lock, Log Off, and Shut Down...74
Windows Explorer...75
Changing the display of an Explorer window...76
Sorting and filtering items in an Explorer window ...77
Part 3: Networking ...81
Connect to a Network...82
Manage Network Connections ...83
Manage Wireless Networks ...84
Modifying the order in which Vista automatically connects to wireless networks ...85
Manually adding a new wireless network ...85
Removing an unused network from the list ...86
Network Access...87
Turning on File Sharing or Discovery and Sharing ...87
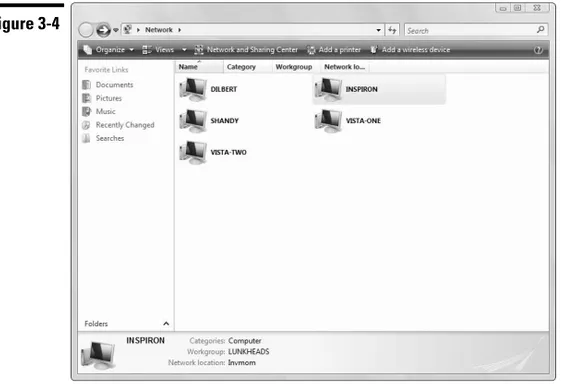
Network and Sharing Center ...90
Network Map ...91
Set Up a Connection or Network...92
Part 4: Communications ...95
Internet Explorer 7 ...96
Connecting to the Internet ...96
Launching Internet Explorer 7 ...96
Adding and changing home pages...97
Navigating the Web ...98
Zooming in on page ...99
Using the Panning Hand to scroll the Web page ...100
Address AutoComplete ...101
Adding Web Favorites ...101
Opening Favorites ...102
Organizing Favorites ...103
Using Internet Explorer 7 tabs ...105
Saving Web graphics ...106
Saving Web pages...107
Printing Web pages ...108
Working offline ...111
Searching from the Live Search text box ...112
Autosearching from the address bar...113
Adding a search provider to Internet Explorer 7...113
No phishing allowed ...115
Pop-ups anyone? ...116
Subscribing to RSS feeds...116
Speech Recognition ...118
Setting up Speech Recognition...119
Changing Speech Recognition settings ...120
Windows Fax and Scan ...122
Sending and receiving faxes ...122
Scanning documents ...123
Windows Mail ...123
Creating a new e-mail account ...124
Composing and sending messages ...125
Adding recipients to the Contact List ...128
Reading e-mail ...130
Organizing e-mail ...132
Deleting e-mail ...133
Windows Meeting Space ...134
Setting up Windows Meeting Space...134
People Near Me ...135
Inviting participants to the session...136
Sharing computer resources ...137
Sharing programs, files, or your Vista desktop ...137
Presenting a document as a handout ...138
Part 5: System Maintenance ...139
Backup and Restore Center ...140
File and Folder Backup ...140
CompletePC Backup ...141
Restoring files to your computer...142
Control Panel ...143
System and Maintenance ...146
Hardware and Sound ...147
Printers ...148
AutoPlay ...151
Manage Audio Devices and Sound Themes ...152
Mouse ...152
Scanners and Cameras ...152
Clock, Language, and Region ...153
Date and Time ...153
Regional and Language Options...155
Ease of Access Center ...156
System Restore ...158
Managing your own account ...168
Managing other user accounts...169
Changing the User Account Control status ...170
Windows Defender ...170
Viewing your preferred photos and videos ...180
Windows DVD Maker ...181
Windows Media Player 11 ...183
Now Playing ...186
Using the Media Library ...187
Ripping and burning CDs ...188
When you get the URGE for music...189
Using the Media Guide ...190
Windows Movie Maker ...192
Importing media files and capturing video clips ...193
Assembling media files in your movie ...193
Adding special effects to clips ...194
Adding transitions ...195
Adding movie titles and credits ...195
Publishing the final movie ...196
Windows Photo Gallery ...197
Playing a slide show ...200
Adding ratings, tags, and captions ...201
Fixing a photo...202
Glossary: Tech Talk...205
Index ...209
The Vista User Experience
If such a thing as a beautifuluser interface for a personal computer operating system exists, Microsoft’s Windows Vista, shown in the following figure, is surely at the top of this list. However, as you find out in this part, the Windows Vista desktop is much more than just a pretty face. Indeed, Vista is also Microsoft’s most powerful and usable personal computer interface to date (and this is coming from someone who really liked Windows XP).In this part . . .
⻬ Meet the Aero Glass Interface
⻬ Guide for displaced Windows XP Users migrating to Windows Vista
⻬ Personalizing your copy of Windows Vista ⻬ Using the Start Search and Search features
⻬ Using the Vista taskbar
Aero Glass Interface
In Windows Vista, A is for Aero Glass, the name given to the operating system’s graphical user interface (GUI). The name is a combination of the acronym AERO — Authentic, Energetic, Reflective, and Open — which describes the original design goals for the new operating system, and glass (the stuff of which actual windows are made), this stunning new user interface is all about clarity, in the sense of both brightness and simplicity.
The first thing to note about the Aero Glass desktop when first installed (and after you close the Welcome Center window that automatically appears) is the overall openness of the screen (due to a decided lack of program icons) and a rather mini-malist Start button and taskbar, as shown in Figure 1-1. This open screen makes the most of your screen space, whatever the size of your monitor, by accommo-dating more open windows and more information within each open window.
The second thing to notice is the relative transparency and high degree of reflec-tiveness displayed by the various Vista screen elements, especially the taskbar, Start menu, and title bars of open windows (depending upon the graphics capa-bility of your computer). You notice the transparency most in the title bars of windows and in the right column of the Start menu (especially when the menu is on top of another open window, as in Figure 1-2). You notice the reflectiveness most when you position the mouse pointer over buttons and desktop icons — they actually appear to glow. This effect is accomplished by backlighting the graphic with various contrasting colors — blue for most buttons and icons and bright red for a window’s Close button.
The third thing to notice about the Aero Glass interface is the extremely smooth way in which screen elements change and the high degree to which this version of the operating system supports live visual previews.
You notice the screen smoothness whenever you open or close a new window and resize or move it on the Windows desktop. When Vista opens a window, it does so in a much more fluid manner than previous Windows versions. So too, when you drag an open window around the Vista desktop (even one playing a video or showing a music visualization), the graphics don’t break up and become pixilated as they pass over other screen elements.
Figure 1-2
The live visual previews in Vista show up in several really cool desktop features: live taskbar thumbnails, Flip, and Flip 3D, which are used to switch between open windows. The live taskbar thumbnails feature enables you to see a thumb-nail version and name of any window that is currently minimized on the Vista taskbar simply by positioning the mouse pointer over its icon. That way, you can get tell whether a particular window icon on the taskbar contains the partic-ular application or Vista window you want to restore to its previous position and size on the Vista desktop.
Note that the Flip feature is a more graphic version of a switching feature first introduced in Windows XP (and still activated by pressing Alt+Tab). This feature enables you to activate a particular open window from among those currently minimized on the Windows taskbar by selecting its icon and window name in a band that appears in the middle of the desktop. In the Vista version of the Flip feature, however, rather than just a generic window icon, you see an actual live thumbnail of the contents of the window along with its window name (see Figure 1-3). This live preview helps you immediately identify the window you want to open on the desktop.
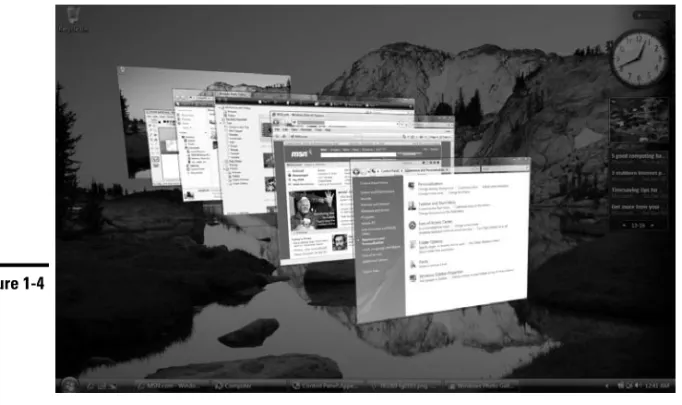
The Flip 3D offers an even faster visual method for activating an open window among those you have open. It accomplishes this by showing a stack of live 3-D representations for all the windows you have open in Vista (see Figure 1-4). You can then quickly flip through this stack until the thumbnail of the window you want to activate is displayed at the front of the stack. See“Flip and Flip 3D” later in this part for details on how to use Flip and Flip 3D to select a window.
Visual previews also show up in windows that contain file folders when using the Extra Large Icons viewing option. Figure 1-5 illustrates such a situation. Here, you see the contents of a few of the folders inside an Excel Wrkbk folder on my computer’s hard drive after selecting Extra Large Icons on the window’s Views pop-up slider. When any size between Large Icons and Extra Large Icons are selected, Vista actually shows a live preview of the first few documents within that folder so that you see a thumbnail of an actual graphic image, if the folder contains photos, and a worksheet, if it contains spreadsheets.
As you can begin to see from this brief overview, the Aero Glass interface in Windows Vista offers you an extremely visual and highly dynamic environment in which to work. All around, when coupled with the many less glitzy enhance-ments that the Microsoft software stuck under the hood, Windows Vista makes for a very satisfying user experience.
Figure 1-5 Figure 1-4
Ah, That’s What They Did with It!
If you’re coming to Windows Vista as a user of Windows XP who was completely comfortable with its tried and true ways of doing business, the new Windows Aero Glass desktop may appear to you initially as less open and simple than originally promised. In fact, if your first few minutes with the new and improved Windows graphical user interface are anything like mine, you may feel just a wee bit lost when you first start doing the everyday tasks you seemingly did so effortlessly in the past with Windows XP.
Never fear! You have absolutely no reason to panic: In no time at all, I can set you straight on the new, more efficientways of finding all the stuff on your com-puter system that you used in the past, while at the same time pointing out what they did with some of your more familiar Windows elements such as the much-beloved My Documents and the underrated Run command.
Start is a very good place to begin
The first thing to note is that the Start button on the Vista taskbar is no longer a rectangular green button that says Start and sports the four-color Microsoft Office banner. Instead, it’s now a real circular button sporting only the four-color Microsoft Office banner icon.
Clicking the Start button on the Vista taskbar (or pressing the Start key on your keyboard, if it’s so equipped) still opens the Start menu in a two-column format. However, as shown in Figure 1-6, this Start menu has some new buttons and a whole new way of displaying the information about the stuff on your computer.
The new elements located along the bottom of the Vista Start menu include
⻬ Start Searchtext box, where you can enter search text to find any folder or document on your computer or any topic on the Internet by typing the first few characters of its name. Note that Vista immediately starts matching the characters in the Start Search text box against the contents on your com-puter (displaying the results in left-hand column of the Start menu) as you type them.
⻬ Sleepbutton to save your work session and put your computer into a low power mode so that you can quickly resume working with the current desktop arrangement simply by pressing a key (such as Shift or Enter) or by clicking the mouse button.
⻬ Shut Down Optionsbutton to open a pop-up menu containing the follow-ing options: Switch User to enable you to log onto the computer with a dif-ferent user account, Log Off to close down your work session and select a different user account, Lock to lock your computer (see the previous bullet “Lock This Computer”), Restart to completely reboot the computer, Sleep to put the computer into a low-power state (see “Sleep” earlier in this list), Hibernate (if you’re running Vista on a laptop computer) to save any work in memory to your hard drive and shut your machine down, and Shut Down to close all windows and shut down all power to the computer.
The left-hand column of the Start menu still contains the icons for Windows pro-grams you recently used (which you can fix to this part of the Start menu by right-clicking it and then right-clicking Pin to Start on the shortcut menu). The right-hand column, although vaguely familiar, lacks all of your accustomed “My” windows (from My Document to My Network Places). All of its items (from Documents to Help and Support) are arranged under the icon you selected for your user account and your username (see the dog icon above Admin in Figure 1-6). As you mouse over the items in this column, you’ll notice that a new icon representing the type of item replaces your user account picture at the top of the right-hand column.
Start Power
Lock This Computer
Shut Down Options
Figure 1-6
Documents, Pictures, Music, Computer, and Network on the Windows Vista Start menu respectively take the place of My Documents, My Pictures, My Music, My Computer, and My Network Places on the Windows XP Start menu.
Using the All Programs item
The All Programs item on the Windows Vista Start menu performs the exact same function as it did in Windows XP — opening menus that you can use to launch Windows utilities and applications programs installed on your computer. Here, however, Vista has it all over XP because it performs this in a much tidier and more efficient manner.
Instead of opening sprawling menus and submenus that can take over pretty much your entire desktop (depending upon how many programs you’ve installed), Vista keeps all the All Programs menu action restricted to the left-hand column of the Start menu. When you click its All Programs button, Vista displays a list of all the application programs and Windows utilities on your computer (with a vertical scroll bar if there are too many items to display on the left-hand column) and the button changes from an All Programs to Back.
To launch a program or utility, simply click its item in the left-hand column. If the item sports a folder icon (such as Microsoft Office or Accessories), clicking the icon causes an indented submenu to appear (still within the left-hand column of the Start menu) and you can then click the icon for the program you want to launch.
The role of Start Search
You may have noticed the Search item that appeared on the right side of the Windows XP Start menu has changed into a Start Search text box at the very bottom of the Start menu in Windows Vista. This Start Search text box is part of the Search feature that permeates the Vista operating system (you find a similar Search text box in most of the utility windows such as Documents, Pictures, Music, and so on).
Unlike the old clunky search feature in Windows XP that simply opened a dialog box where you had to specify the type of search before you entered the search text and then started the search operation, Quick Search in Vista is always ready to go. All you have to do to initiate a search is to start typing the first few char-acters of the item you’re looking for. Vista starts displaying matching items in the open window (or on the left-hand side of the Start menu when using Start Search) as you type.
For example, if I want to open Microsoft Word to create a new document on my computer, I simply type woin the Start Search text box. Doing this almost imme-diately displays Microsoft Office Word 2007 (among other items such as
their names) above the Start Search text box in the left-hand column of the Start menu (see Figure 1-7). Then all I have to do is click this Microsoft Office Word 2007 link to launch this application in its own program window. (Note that to dis-play the link for launching Excel, I only have to type e, which also gives me access to Windows and Internet Explorer.)
In the same vein, on the rare occasion that I need to open the Run dialog box to do something like enter a setup command to install a new program, I only type r in the Start Search text box (no need even to type the u to display the Run icon) and then click the Run item. To display the Command Prompt link to open the Command Prompt window where I can access the system directly by typing weird old DOS commands, I only have to type cin the Start Search text box (of course, doing this also enables me to open the Media Center, the Calculator util-ity, and my personal contact list).
The key to living happily ever after with Windows Vista is to stop worrying about where the items you want to use are actually located on your computer system and just start finding them with Search. Use Start Search on the Start menu to find application programs, Windows components, folders, and files just by entering a few characters in their names.
Figure 1-7
Looking at virtual folders with Windows Explorer
Windows Vista, like all versions of Windows before it, relies on a structure of Explorer windows that display all the document files and subfolders stored within it. The big difference in Windows Vista is the appearance of an entirely new type of folder called a virtual folderthat can appear in these windows. Virtual folders are quite a bit different from the ones you create manually by actually moving and copying particular document files and subfolders into them. Instead, virtual folders are created from some type of search. Because of this, they can contain files that are not actually stored in the same folder (direc-tory) and their contents are dynamically updated (as you add new files that fit a virtual folder’s search criteria, they automatically appear in that virtual folder).
The best examples of virtual folders are found in the Documents window (opened by clicking the Documents link in the right-hand column of the Start menu). When this window opens, you see a list of Favorite Links in the Navigation pane on the left side of the window that includes links to two virtual folders: Recently Changed and Searches.
If you click the Recently Changed link, Windows displays the Recently Changed virtual folder containing a listing of all the various files on your computer that you’ve modified during the current day’s work session (including files you’ve created, edited, or copied or moved onto your computer’s hard drive).
You can then filter this list of folders and files by clicking Organize 䉴Layout 䉴
Search Pane to display the Search pane at the top of the Recently Changed window, where you can click the particular type of files you want listed. Note that the Search pane contains the filtering buttons E-mail, Document, Picture, Music, and Other to the right of the already selected All button.
If you click the Searches link, Vista displays a number of virtual folders from Attachments through Unread E-mail in the Name column to the immediate right of the Navigation pane. To open the contents of one of these virtual folders such as the Recent E-mail or Unread E-mail, double-click its folder icon. Note that you can also use the Search pane to filter the contents of any of these virtual folders by selecting the button representing just the kinds of file you want listed.
Notable differences in the Vista Windows Explorer
Finally, in Vista, Windows Explorer contains a fourth pane, the Details pane, that appears at the very bottom of the window.
Pressing the Alt key when one of these windows is open acts like a toggle switch: The first time you press it, Vista displays the menu bar; the second time you press it, Vista hides the menu bar display.
In addition, you have the option to display two more new panes in Vista: a Search pane, which appears immediately below the address bar and enables you to quickly filter the contents of any open folder, and a Reader pane, which appears on the right side of the Explorer window and shows you a large thumb-nail of the currently selected folder or file.
Don’t forget that you can manipulate the size of the Navigation pane and Details pane (when this pane is displayed) in the Vista Windows Explorer by positioning the mouse pointer anywhere on the edge of the pane that abuts the central dis-play of the subfolders and files in the open folder. When the pointer becomes a two-headed arrow, drag the mouse to the left or right (or up and down in the case of the Details pane) to make the pane smaller or larger.
The Navigation pane
When you first open Windows Explorer, the Navigation pane contains only the Favorite Links Documents, Pictures, and Music along with the Recently Changed and Searches links to its virtual folders. To display the contents of any of the three main folders — Documents, Pictures, or Music — you simply click its link in the Favorite Links area. Vista then displays a complete listing of all the folders and files this folder contains to the right of the Navigation pane in the main part of Windows Explorer.
When, however, you need to display the contents of a folder other than the three main and two virtual listed in Favorite Links section of the Navigation pane, you have to remember to click the Folders button, the one with the triangle pointing upward at the bottom of this pane.
Clicking the Folders button displays a hierarchical listing of all the different com-ponents and folders on your computer (see Figure 1-8). You can then switch to a new component on your system such as the Desktop, Control Panel, or Recycle Bin or to open a new folder such as Downloads, Favorites, or Searches by clicking its icon on this list. When you do, Vista displays the contents of the component or folder you selected in the main part of Windows Explorer.
You can easily expand or collapse this hierarchical list of folders in the Navigation pane. To expand a folder by displaying its subfolders indented and underneath it, click the open triangle pointing to the right in front of the folder’s icon and name. To contract a folder by removing the display of all its subfolders, click the black triangle pointing downward to the right at a 45-degree angle.
The standard buttons on the toolbar
When you open Windows Explorer either by clicking the Windows Explorer or Documents link on the Start menu, the toolbar may contain a variety of buttons, depending on whether you’ve selected individual folder or file icons that are dis-played in the open Windows Explorer window. These buttons can include
⻬ Organizebutton opens a drop-down menu with options that perform common folder and file tasks including New Folder, Cut, Copy, or Paste, Select All (to select the items in the current window), Delete, and Rename along with a Layout option that enables you to display the Classic pull-down menus and to control which panes are displayed and hidden in the Explorer. A Properties option opens the Properties dialog box (to turn on and off sharing, revert to earlier versions, and to customize the default appearance of its icons) and a Close item that closes the window (just like clicking the red Close button in the window’s upper-right corner).
⻬ Viewsbutton changes the way that the file and folders in the current window are displayed by selecting the next view option (Extra Large Icons, Large Icons, Medium Icons, Small Icons, List, Details, and Tiles) — click its drop-down button to display a slider that enables you to try out different sizes in each of these views before selecting the one you want.
⻬ Openbutton to open the currently selected file with the XPS (XML Paper Specification) Document Viewer or the application program that created it.
⻬ Explorebutton to open the currently selected folder and display its contents.
⻬ E-mailbutton to open a new mail message in the default e-mail program with the selected file or files (if a folder icon is selected) as attachments to the new message.
⻬ Sharebutton to open the File Sharing dialog box, where you can designate the people on the network with whom you want to share the computer’s files.
⻬ Burnbutton to copy the items selected in the Explorer to a temporary folder from which you can then burn them to a CD or DVD disc.
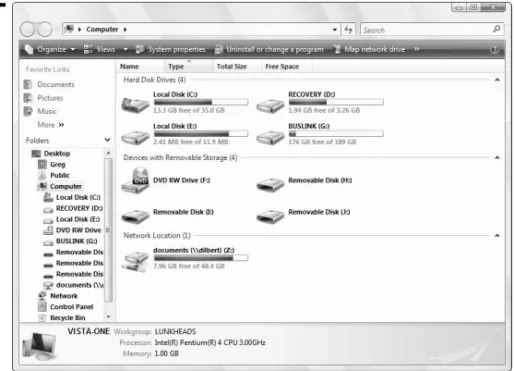
When you open Windows Explorer by clicking the Computer link in the Start menu or by clicking Computer in the Folders section of the Navigation pane after opening the Documents Explorer, the toolbar contains the standard Organize and Views buttons. In addition, this toolbar also includes the following buttons when one of the hard drives or a network drive on your system is selected:
⻬ Propertiesbutton to open the General tab of a Properties dialog box for the selected drive. The General tab enables you to change the drive’s name, view the amount of used and free space on the drive, compress it, and index the folders and files on it for faster searching. In addition, this dialog box contains tabs with options for customizing and sharing the drive on a network, among other things.
⻬ System Propertiesbutton to open a new System window that displays basic system information about your computer including its microproces-sor, the amount of memory, version of Windows Vista installed as well as the computer’s name, and its domain or workgroup on a network and the Vista product ID.
⻬ Uninstall or Change a Programbutton to replace the Computer Explorer window with the Programs and Features Control Panel window, where you can remove a program you’ve installed or modify its installation (either by adding components or reinstalling them).
⻬ Map Network Drivebutton to open the Map Network Drive dialog box, where you can assign a drive letter to a folder located on a physical drive of a network computer (to which you have access). You can then use the mapped drive letter to open that network folder from the Computer window in Windows Vista.
If you click the icon for a removable storage drive such as a CD or DVD disc drive installed on your computer system, the following three additional buttons appear on the toolbar:
⻬ AutoPlaybutton to begin playing the setup or multimedia files on the CD or DVD disc you’ve inserted into the selected removable drive (on the odd occasion when Vista doesn’t automatically start playing them right after inserting the disc).
⻬ Eject This Diskbutton to have Vista open the CD or DVD disc drive so that you can either remove the current disc or insert a new disc to play or record to.
⻬ Burn to Discbutton to open the Burn to Disc Wizard, which takes you through the steps of burning selected folders and files to the CD or DVD disc. Note that for this to work, your computer must be equipped with a drive that is capable not only of reading but also of burning files, and a disc of the correct type that is either blank or is re-recordable and has sufficient room for all the files and folders you select.
Remember that a continuation button (>>) automatically appears on the toolbar if the screen resolution is too large and the current size of the Windows Explorer window too small to display all the buttons on the toolbar. In that case, click the continuation button to display a drop-down menu with the missing options that don’t currently fit.
Taking a good look at the Views
You have to admit that earlier versions of Windows such as XP did an excellent job of hiding the Views button that you use to change the appearance of the icons of the subfolders and files contained in the folder currently open in Windows Explorer (this unmarked button at the right end of the Standard Buttons toolbar uses a static icon with a dialog box with rows of tiny colored rectangles that just doesn’t do a very good job of indicating its function). Contrast this to the Views button in the Vista Windows Explorer that always appears as the second button right after Organize on the toolbar, is clearly marked Views, and dynamically changes its icon to reflect the currently selected view.
In addition, clicking the drop-down button attached to the Vista Views button displays a slider rather than a static drop-down menu of options in XP. You can then use this slider not only to select a new look for your folders and files (in Vista, you have a choice between Extra Large Icons, Large Icons, Medium Icons, Small Icons, List, Details, and Tiles), but also, when settling on one of the Icons selections, you can use the slider to dynamically opt for sizes in between the actual preset Extra Large Icons, Large Icons, Medium Icons, and Small Icons sizes.
Keep in mind that you can cycle through four of the seven preset views (Extra Large Icons, List, Details, and Tiles) by repeatedly clicking the Views button without having to even open the slider. Each time you click the Views button to select the next preset, Vista also updates the icon on the Views button itself to reflect the new view you’ve selected.
only line up with these column headings). To reorder the icons, click the column heading or field. Click one time to sort the folders and files in ascending order (from A to Z alphabetically, smallest to largest, or least recent to most recent) and a second time to sort them in descending order (Z to A, largest to smallest, or most recent to least recent).
Using the address bar
In Windows Vista, the address bar that keeps you abreast of the path of the folder whose contents is currently displayed in Windows Explorer is not only at the top of the window above the toolbar (in XP, it’s located immediately below the Standard Buttons toolbar), but this bar is also flanked on the right by a Search text box with its own More Search Options button and with Back, Forward, and Recent Pages buttons on the left.
In Windows XP, the Back and Forward buttons are part of Standard Buttons tool-bar along with an Up button, which is totally absent in Vista. Rather than the Up button (to move up a level in the navigation hierarchy), Vista gives you a Recent Pages drop-down button (the blue triangle pointing downward). When you click this button, Vista displays a drop-down menu showing you all the fold-ers you opened both before and after opening the current folder. To redisplay the contents of a particular you folder you visited, just click its name on this drop-down menu.
One really big difference between the address bar in Vista and that in Windows XP is the way in which the current folder path is displayed on the bar. In place of the backslash (\) separators and the all-squished-together-with-no-spaces path-name, Vista employs black right-pointing triangles (䉴) with plenty of space in between the different folder names that make up the path. Moreover, the Vista pathname begins with your username rather than the drive letter.
If you select the wrong folder as you’re building the path by opening subfolders at lower levels in the file hierarchy, you can back up a level and select another folder on that level by clicking the right-pointing triangle immediately in front of the folder you selected by mistake. Vista then displays a drop-down menu with the names of all the folders at that level and you can select the correct one by clicking its name on this list.
If the path is too long to display all its components on the address bar, a << button appears at the beginning of the pathname. Click this button to display a drop-down menu that lists all individual folders and subfolders in the hierarchi-cal path in the top portion of the menu from the folder immediately above to the Windows desktop. The bottom portion of this drop-down menu lists other fold-ers (from your pfold-ersonal folder to the Recycle Bin) on your computer that you can open by clicking their names.
Just like the address bar in the Windows XP Explorer Window, the one in the Vista Explorer Window contains a drop-down button that that enables you to
select the paths of previously opened folders from a drop-down menu. Surprise of surprises, clicking this drop-down button immediately converts the Vista path separated by black triangles into the old backslash-separated and mushed-together pathname of Windows XP. That’s the way that all the paths to all the previously opened folders on the drop-down menu appear as well!
However, the moment that you click one of the old-fashioned mushed-together pathnames on this drop-down menu, Vista immediately converts it back into the new-fangled path separated by right-pointing black triangles.
For example, suppose earlier in my work session, I opened the Program Files folder on my computer’s local hard drive, given the designation Local Disk (C:), and I now want to reopen it in Windows Explorer. When I click the address bar’s drop-down button, this path appears on the drop-down menu:
C:\Program Files
However, as soon I click the C:\Program Files item on this pull-down menu, Vista opens this folder and displays the following path on Windows Explorer’s
address bar following an initial folder icon:
䉴 Computer 䉴 Local Disk (C:) 䉴 Program Files 䉴
Note how the new Vista pathname designations with the right-pointing triangles are more accurate than the old ones in describing the actual process you fol-lowed to open the current folder. In the previous example, I actually selected the Computer link on the Start menu followed by double-clicking the Local Disk (C:) icon in the Computer window and the Program Files folder icon. The older desig-nations with the backslashes are, however, more accurate in describing the actual location of the folder in the computer’s hierarchy of directories and files.
Making the most of the Details pane
The Details pane at the bottom of the window gives you extra information about the folder or file that’s currently selected in the main section of Windows Explorer. When a folder is selected, the categories of this information can include the folder name, number of files, and the date the folder was last modi-fied. When a file is selected, the categories of the information can include the filename, size, type, date created, date last modified, and date last accessed, as well as any keywords that you’ve assigned to the file such as title, authors, and rating. In the case of graphic files and Excel workbook files, Vista also automati-cally displays a tiny thumbnail of the image or initial worksheet on the left side of the Details pane (see Figure 1-9).
The information displayed in the Details pane can be quite helpful in identifying a folder or file for use. Moreover, the tags, ratings, and keywords assigned to particular files can be used in doing searches for the file. (See“Search” later in this part).
Vista enables you to add tags and edit keywords that you can assign to a file directly from the Details pane. After clicking the file icon in Windows Explorer to select it, you then position the mouse pointer over the category in the Details pane and then, when an outline appears around the current entry and the pointer becomes an I-beam shape, click the insertion point in the field and type the new tag or keyword or edit its contents. Depending upon the type of file (text, graphic image, audio, or video), you are able to edit various fields on this tab.
After you add or edit a tag, you then need to click the Save button that appears the moment you set the insertion point in one of the fields to save the new data as part of the file. Click the Cancel button if you decide not to add the tag or save the editing change.
When you select a music or graphics file, you can give the file a rating between one and five stars by clicking the star (from left to the right) that represents the highest star you want to give it.
Figure 1-9
Displaying the Search pane and Preview pane
Vista’s version of Windows Explorer offers you the use of two extra panes that aren’t normally displayed in the window. These are the Search pane (see “Search” later in this part), which appears immediately beneath the address bar when displayed (by clicking Organize 䉴Layout 䉴Search Pane) and the Preview pane, which appears on the right side of the window when displayed (by click-ing Organize 䉴Layout 䉴Preview Pane).
Figure 1-10 shows Windows Explorer with all its auxiliary panes — Navigation, Search, Details, and Preview — displayed. Because I selected one of the chapter files created in Microsoft Word in an open folder, the Preview pane in this figure displays the first part of the actual document text.
Note that when you select a Microsoft Excel workbook file, the Preview pane dis-plays the first part of the initial worksheet. So too, when you select a graphics file, the Preview pane displays a larger version of the graphic image. When you select a folder rather than a file icon, the Preview pane displays a large semi-open folder on its side with its best representation of the types of documents it contains (assuming the folder’s not empty).
Moreover, when you select a video clip or a movie file (perhaps created with Windows Movie Maker — seePart 7) in Windows Explorer, the Preview pane displays the first frame of the video file with a video controller beneath com-plete with Stop, Play/Pause, and Switch to Full Mode buttons that you can use to actually preview the video from start to finish if you so desire.
Likewise, when you select an audio file in Windows Explorer, the Preview pane displays a stock image of a multimedia file (including a music file above the same controller with its Stop, Play/Pause, and Switch to Full Mode buttons). You can then use the Play/Pause button to play the selected audio file from the Preview pane.
Click the Switch to Full Mode button in the Preview pane if you want to listen to the selected video or audio file in a separate Windows Media Player window. Doing this gives you access to the full array of playback features of this much-improved media player application (see“Windows Media Player 11” in Part 7 for details).
Restoring the Classic pull-down menus to Windows Explorer
If you’re anything like me, in your time working with earlier versions of Windows such as 98, ME, and XP, you’ve come to rely upon the so-called Classic pull-down menus in the Explorer Window and, to a lesser extent, the ordering and arrange-ment of items on the Start menu that you now know so well. Fortunately, you can easily restore some of the good old classic look and feel of bygone Windows versions to Vista anytime you want to.
By far the most important classic element to know how to restore to Vista is the display of the Classic pull-down menus (File, Edit, View, Tools, and Help) in the Windows Explorer windows. To bring back these very valuable (and in rare cases indispensable) menus to all your Explorer windows, click Organize 䉴
Folder and Search Options to open the Folder Options dialog box. There, click the View tab and then select the Always Show Menus check box at the top of the Advanced Settings list box before you click OK. After this check box is selected, these pull-down menus automatically appear on their own row between the address bar and the toolbar in every Windows Explorer window you open (including windows opened by clicking the Computer, Network, and Control Panel links on the Start menu).
You can also restore the Classic pull-down menus to your Explorer windows by pressing the Alt key one time. Press the Alt key a second time to once again hide the menus.
Restoring the Classic Windows Start menu
Although I personally do not prefer the rather sloppy cascading submenu arrangement of the Start menu in older Windows versions, preferring instead the tidy new self-contained Start menu of Vista, you can, if you want, return
quite readily to the tried-and-true Start menu of your mother’s Windows. (After all, the Classic Start menu does include a Run option immediately above the old familiar Shut Down option.)
To make the switch back, right-click the Start button and then click Properties on its shortcut menu to open the Taskbar and Start Menu Properties dialog box with its Start Menu tab selected. On this tab, you click the Classic Start Menu option button and then click OK.
Note, however, that when you first switch back to the Classic Start menu in Vista, this menu does not resemble so much the Windows XP Start menu as it hearkens back to an even earlier vintage, more like the Start menu of Windows 98 (now that takes me back a bit).
You can however, customize the look and feel of the Classic Start menu. One way to do this is to click the Default Programs option that now appears at the very top of the Start menu and then click the Set Your Default Programs link in the Default Programs Control Panel window. You can then select the programs such as Internet Explorer, Windows Mail, and the like that you always want to appear on the Start menu.
The other way to customize the Classic Start menu is to reopen its Properties dialog box and then click its Customize button on the Start Menu tab to open the Customize Classic Start Menu dialog box. There, you can use Add, Remove, and Sort buttons as well as the check boxes in the Advanced Start Menu Options list box to customize what items do and don’t appear on the menu and in what order.
Getting rid of the Vista glassiness
Let’s face it: You either love the shiny new Aero Glass look of Windows Vista or you find it to be totally distracting and a big waste of your precious computer resources. If you happen to hold the latter opinion, follow these steps to get rid of the ritzy glassy look and go back to the old clunky opaque view of yesteryear:
1. Right-click anywhere on the Vista desktop and then click the Personalize item on its shortcut menu.
2. Click the Window Color and Appearance link in the Personalization Control Panel window.
3. Click the Open Classic Appearance Properties for More Color Options link at the bottom of the Window Color and Appearance Control Panel window.
4. Click the Windows Classic selection in the Color Scheme list box and then click OK.
Just click the Enable Transparency check box in the Window Color and Appearance Control Panel window to remove its check mark if you’re happy with the default Windows Vista color scheme and only want to get rid of the transparency effects.
Adopting a Classic view of the Control Panel
Finally, you may find the default look of the Vista Control Panel (which is, fortu-nately a little less sparse than the Category View of the Windows XP Control Panel) not to your liking. Switching back to the display of rows of individual Control Panel icons (in alphabetical order from Add Hardware through Windows Update) is really simple.
Click the Control Panel link on the Start menu and then click the Classic View link in its Navigation pane immediately beneath Control Panel Home. Just remember that when the Control Panel is in Classic View, you must double-click the Control Panel icon whose settings you want to modify in order to open its dialog box.
Click the Control Panel Home link in the Navigation pane to return to the default category display.
Things that haven’t changed a bit
Although it may seem as though quite a bit of the user interface is radically dif-ferent, you’ll be glad to know that many, many of the ways of doing things in Windows Vista have remained the same. Here’s a short list of such things to give you an idea of just how much you already know how to do:
⻬ You still move a window by dragging it by its title bar (which is a bit easier given the larger size in Vista) and minimize, maximize, and close windows with these buttons in the upper-right corner.
⻬ You still resize windows by dragging one of their side borders or corners.
⻬ All items still have shortcut menus associated with them that are opened by right-clicking them.
⻬ All your common shortcut keystrokes such as Ctrl+C (for Copy), Ctrl+X (for Cut), Ctrl+V (for Paste), Ctrl+Z (Undo) as well as Alt+←for Back, Alt+→for
Forward, Alt+F4 for Close Current Window (or shut down Vista if all win-dows are closed) still work just as before.
⻬ You can still modify the desktop by selecting a new desktop background image, screen saver, as well as add standard desktop icons (such as Documents, Computer, and Internet Explorer) if you don’t like having to choose them from the Start menu — right-click the desktop and then click Personalize on its shortcut menu to open the Personalization Control Panel window.
⻬ You can still map folders located on your network to virtual drive letters (up to Z just as long as they don’t duplicate drive letters already assigned to physical devices connected to the machine) that appear each time you log on to the computer — just choose Tools➪Map Network Drive when the Classic menus are displayed in Windows.
⻬ You can still add desktop shortcuts for any item (drive, program, folder, or file) on your computer, network, or the Internet that you can then open by double-clicking — see“Displaying additional desktop icons” later in this part for details.
Flip and Flip 3D
When you have many windows open in Vista, the Flip and Flip 3D (also known as the Window Switcher) features provide you with two quick methods for activat-ing the window you want to work by displayactivat-ing it on the top of the others.
To use the Flip feature, hold down Alt+Tab. Vista displays a band in the middle of the desktop showing thumbnails of each open window in the order in which they were opened (refer to Figure 1-3). To activate a new window, press Alt+Tab (or hold down the Alt key as you press →or ←) until the thumbnail of that window
is highlighted and its name appears centered above in the band. Then release the Alt key along with Tab or the left or right arrow key. To minimize all the open win-dows as buttons on the Vista taskbar, highlight the Desktop, Winwin-dows Explorer thumbnail that appears as the last image on the right of the group.
To use the Flip 3D feature (refer to Figure 1-4), click the Switch between Windows button (shown in left margin) on the Quick Launch toolbar. Vista then dims the background of the desktop and displays all open windows in 3-D cascading arrangement. If your mouse is equipped with a center wheel, you can then zip (and I mean zip) through the 3-D stack by turning the wheel (forward to flip backward through the stack and backward to flip forward).
As soon as you’ve brought the image of the window you want to activate to the front of the 3-D stack, click anywhere on the image. Vista then returns the desk-top to normal, collapsing the 3-D stack while at the same time activating the window you clicked by placing it on top. If your mouse doesn’t have a center wheel, you can still select a window to activate by clicking the part of it that is exposed in the 3-D stack.
Personalize
Vista makes it easy for you to personalize your computer by selecting a new desktop background image, a color scheme for the various Windows elements, a screen saver to use when the computer has been idle for a certain period, as well as the sound effects to play when different events take place.
The easiest way to open the Personalization window (see Figure 1-11) for chang-ing these settchang-ings is by right-clickchang-ing anywhere on the desktop background and then clicking Personalize at the bottom of the desktop’s shortcut menu.
Note that you can also open this dialog box through the Control Panel (Start 䉴
Control Panel) by first selecting the Appearance and Personalization link fol-lowed by the Personalization link, but this method requires a whole lot more steps to do the same thing.
The options for customizing Vista in the Personalization window include
⻬ Window Color and Appearanceto replace the Personalization window with the Window Color and Appearance window (see Figure 1-12), where you can select a new color and the amount of glassiness for the title bars of windows, the Start menu, and taskbar. To select a Windows XP color scheme, click the Open Classic Appearance Properties for More Options link to open the Appearance Settings dialog box, where you then select or customize one of its ready-made schemes.
Figure 1-11
⻬ Desktop Backgroundto replace the Personalization window with the Desktop Background window (see Figure 1-13), where you can select a new ready-made wallpaper image, select your own photo image as the wallpaper (with the Browse button), change how the wallpaper image is displayed on the desktop (Fit to Screen, Tile, or Center), or select a new solid color for the background by clicking Solid Colors on the Picture Location drop-down list.
⻬ Screen Saverto open the Screen Saver Settings dialog box, where you can select a new screen saver to use, customize the amount of idle time before the screen saver kicks in, and adjust your monitor and hard drive power settings (by clicking the Change Power Settings link).
⻬ Soundsto open the Sounds dialog box, where you can assign new sounds to different program events and save your new choices as a custom sound scheme to reuse.
⻬ Mouse Pointersto open the Mouse Properties dialog box with the Pointers tab selected, where you can select a new mouse pointer scheme (very helpful if you suffer a vision impairment that makes it difficult to track the normal mouse pointer), as well as customize what icons are used in vari-ous pointing situations.
⻬ Themeto open the Theme Settings dialog box, where you can select a new ready-made theme to use or save the changes you’ve made to the color scheme, desktop background, screen saver, and sound effects (as described below) as a new theme to reuse.
⻬ Display Settingsto open the Display Settings dialog box, where you can select a new monitor (if you have more than one connected to your com-puter) as well as new screen resolution and color-depth settings for the monitor or monitors you have attached to your computer. Note that the range of the resolution and color settings you have to choose from depends on the capabilities of the monitor or monitors you have.
Search
The Search feature provides you an extremely efficient way to locate any pro-gram, folder, or file on your computer system. A Search text box appears in the Figure 1-13
upper-right corner of all the major Explorer windows — Computer, Documents, Network, Control Panel, Pictures, Music, and the like — where it’s labeled
Search,and at the bottom of the Start menu, where it’s labeled Start Search. Search immediately starts searching your computer system for matches to any characters you enter into one of its search text boxes the moment you type them. The feature not only automatically searches for matches in the names of programs, drives, folders, files, and so on on your computer, but in the metadata in files (that is, keywords you assign and statistics such as author, date modi-fied, and so on that Windows and other programs automatically assign), and even in text contained in document files.
Keep in mind that Search automatically searches all the indexed files on your computer system for the characters you type into a search text box. If you only want to search a particular drive or folder on your computer system, you need to perform an advanced search by using the Search pane (see“Doing advanced searches with the Search pane” later in this part).
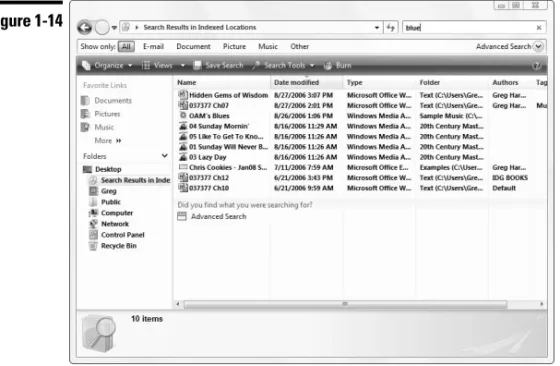
Figure 1-14 illustrates this point. This figure shows the results in a Search Results in Indexed Locations window (opened by clicking Search on the Start menu) after conducting a search for the term blue. Note that Vista not only finds all the files whose filenames contain the word blue,but also several Excel work-book files whose spreadsheets contain references to blueberry muffins. It even finds a Word document named Hidden Gems of Wisdom whose text contains a reference to a precious blue gem.
Adding tags for searches
Because Search automatically searches the metadata added to your files, you can make these searches much more effective by adding your own tags, including key-words and other types of search data, whenever possible.
When creating documents with application programs such as Microsoft Word or Excel, you can add all kind of your own metadata tags including subject, category, keywords, and comments by opening the document in the program and then selecting the Summary tab of its Properties dialog box (File➪Properties). In a program such as Adobe Reader 7, you can add keywords by opening the PDF file and then selecting the Description tab of the Document Properties dialog box (File➪Document Properties).
For media files on your computer (music, video, and photos and other graphic images), Vista actually enables you to add tags in the Preview pane that appears along the bottom of Music, Videos, and Pictures Explorer windows. To add tags to one of these media files, all you have to do is select the file in its Explorer window, and then add the desired tags to the appropriate fields on the Details tab pane.
Music, video, and graphic media files also enable you to specify other metadata tags on the Details tab of their Properties dialog boxes such as titles, dates and time taken, and a rating between one and five stars (by clicking the appropriate star).
Doing advanced searches with the Search pane
Most of the time, you only need to perform simple searches in order to find the item you’re looking for. Vista does, however, provide an Advanced Search button on the right side of the Search pane that you can display in any Windows Explorer window (Organize 䉴Layout 䉴Search pane). When you click the Advanced Search button, Vista expands the Search pane (see Figure 1-15) by adding the following options you can use in a search:
⻬ Locationdrop-down list box to select a particular drive on your computer to search
⻬ Datedrop-down list box to search for documents by the Date Modified, Date Created, or Date Accessed (selected on the Date drop-down list) that you specify in its text box, using the criteria you select on its Any drop-down list box (Is, Is Before, or Is After)
⻬ Size (KB)drop-down list box to search for documents by the file size that you enter in the text box, using the criteria you select on its Any drop-down list box (Equals, Is Less Than, or Is Greater Than)
⻬ Nametext box to search for a document by its filename by entering all or part of the filename in this text box — you can use the asterisk (*) to stand for one or more wild-card characters in the filename and a question mark (?) to stand for individual wild-card characters
⻬ Tagstext box to search for a document by the tags assigned to it by enter-ing one or more of them into this text box
⻬ Authorstext box to search for documents by a particular author whose name is entered in this text box
When creating searches in the Advanced Search pane, keep in mind that all the conditions you specify with the Location, Date, Size (KB), Filename, Tags, and Authors options are inclusive so that all their conditions must be met in order for the types of files you’ve specified to be returned to your Search Results window.
Saving search results in a search folder
Instead of having to go through the whole rigmarole of reentering the same search criteria each time you want to find the same types of items on your com-puter, you can save the results of your search as a search folder. That way, you have access to the items simply by opening the search folder after selecting the Searches link in a Windows Explorer window.
To save your search results as search folder, follow these steps:
1. Click the Save Search button on Windows Explorer or Search window’s toolbar.
Vista opens a Save As dialog box where you specify the name and descrip-tion for your new virtual folder.
2. (Optional) Add additional author names to the folder by clicking Authors and entering them, or add tags that identify the search folder and can be used in searching for it by clicking the Add a Tag text in the Tags field.
3. Click the Save button to create your search folder and close the Save As dialog box.
After saving your search results as a search folder, Vista automatically re-creates the search criteria, performs the Search, and then displays the same results each time you select the folder in a Windows Explorer window.
Vista automatically saves your search folder as part of the Searches virtual folder so that all you have to do to find your search folder and open up it up again is to click the Searches link near the top of the Navigation pane in your Windows Explorer window and then double-click its search folder icon.
Sidebar and Gadgets
Sidebar and gadgets are the names given to a new Vista’s desktop feature that gives you instant access to volatile information such as the current time, weather, stock quotes, and the like. The Sidebaris the name of the pane — appearing either on the right or left side of your computer’s desktop — that con-tains the gadgets, the name given to the specialized miniapplications that give you the up-to-date information.
Figure 1-16 shows you my desktop with the Search All Gadgets window dis-played (see“Adding new gadgets to your Sidebar” later in this part) and the Sidebar itself appearing on the right side of the computer’s desktop (its default position). This Sidebar is running the three default gadgets that automatically install with Windows Vista:
⻬ Clock, which shows an analog clock with the current time for any time zone you select.
⻬ Slide Show,which displays a continuous slideshow of the images that you have stored in your Pictures folder.
⻬ Feed Headlines, which shows you headlines for the RSS you select. (See “Internet Explorer 7” in Part 4 for details on RSS feeds and how to subscribe to them.)
Changing where and how the Sidebar appears
To display the Sidebar on the left side of your computer’s desktop or to make sure that it always appears on the top of other windows you have open on the desktop, you need to open the Windows Sidebar Properties dialog box. The easi-est way to do this is by right-clicking somewhere in the Sidebar area on the right side of the screen (but outside any of the gadgets) and then clicking Properties on the Sidebar’s shortcut menu.
To have Vista display the Sidebar on the left side of the screen, click the Left option button — just keep in mind that opening of the Start menu may overlap some of the gadgets when the Sidebar is displayed on the left side of the screen.
Note that when you do elect to have Vista display the Sidebar on the left side of the screen anddisplay the Sidebar on top of all other windows, Vista makes sure that none of its gadgets obscure the Recycle Bin (and any other desktop icons you add) by automatically offsetting such desktop icons to the right, out of the way of the Sidebar. Vista also ensures that none of its gadgets obscure any items on the Start menu by always displaying the Start menu on top of the Sidebar when the Sidebar appears on the left side of the screen.
If you have more than one monitor connected to your computer, you can select the monitor on which the Sidebar is displayed as well. To switch the Sidebar to a new monitor, open the Windows Sidebar Properties dialog box and then select the number of the monitor in the Display Sidebar on Monitor drop-down list box.
If you don’t know the number of the monitor on which you want the Sidebar displayed, right-click the desktop. On the shortcut menu that appears, click Personalize, followed by the Display Settings link in the Personalization Control Panel window to open the Display Settings dialog box. Then click the Identify Monitors button to find out the number of each monitor connected to your computer.
Hiding or eliminating the Sidebar
If you want to temporarily hide the Sidebar and all its gadgets, right-click any-where on the Sidebar outside of its gadgets and then click Close Sidebar on the shortcut menu.
To redisplay the hidden Sidebar, click the Windows Sidebar icon (the blue icon that at first glance looks like an old TV set) in the Notification area of the Windows taskbar.
If you want to get rid of the Sidebar on a more-or-less permanent basis, open the Windows Sidebar Properties dialog box by right-clicking somewhere on the Sidebar (outside of the gadgets) and then click Properties on its shortcut menu. Then click the Start Sidebar When Windows Starts check box to remove its check mark before you click OK. Doing this prevents Vista from starting up the hidden Sidebar the next time you boot up your computer.
You can also open the Windows Sidebar Properties dialog box by clicking Start
䉴Control Panel 䉴Appearance and Personalization 䉴Windows Sidebar Properties.
Adding new gadgets to your Sidebar
You can easily add gadgets to the few that are initially displayed on the Sidebar when you first install Windows Vista. Not only can you select new gadgets from among those that are automatically shipped with the Vista operating system (but just not displayed on the Sidebar), but you can always download gadgets from an ever-expanding online library.