Smart Homes
FOR
DUMmIES
‰Smart Homes
FOR
Smart Homes
FOR
DUMmIES
‰111 River Street Hoboken, NJ 07030-5774
www.wiley.com
Copyright © 2006 by Wiley Publishing, Inc., Indianapolis, Indiana Published by Wiley Publishing, Inc., Indianapolis, Indiana Published simultaneously in Canada
No part of this publication may be reproduced, stored in a retrieval system or transmitted in any form or by any means, electronic, mechanical, photocopying, recording, scanning or otherwise, except as permit-ted under Sections 107 or 108 of the 1976 Unipermit-ted States Copyright Act, without either the prior written permission of the Publisher, or authorization through payment of the appropriate per-copy fee to the Copyright Clearance Center, 222 Rosewood Drive, Danvers, MA 01923, (978) 750-8400, fax (978) 646-8600. Requests to the Publisher for permission should be addressed to the Legal Department, Wiley Publishing, Inc., 10475 Crosspoint Blvd., Indianapolis, IN 46256, (317) 572-3447, fax (317) 572-4355, or online at
http://www.wiley.com/go/permissions.
Trademarks:Wiley, the Wiley Publishing logo, For Dummies, the Dummies Man logo, A Reference for the Rest of Us!, The Dummies Way, Dummies Daily, The Fun and Easy Way, Dummies.com, and related trade dress are trademarks or registered trademarks of John Wiley & Sons, Inc. and/or its affiliates in the United States and other countries, and may not be used without written permission. Linux is a registered trade-mark of Linus Torvalds. All other tradetrade-marks are the property of their respective owners. Wiley Publishing, Inc., is not associated with any product or vendor mentioned in this book.
LIMIT OF LIABILITY/DISCLAIMER OF WARRANTY: THE PUBLISHER AND THE AUTHOR MAKE NO REP-RESENTATIONS OR WARRANTIES WITH RESPECT TO THE ACCURACY OR COMPLETENESS OF THE CON-TENTS OF THIS WORK AND SPECIFICALLY DISCLAIM ALL WARRANTIES, INCLUDING WITHOUT LIMITATION WARRANTIES OF FITNESS FOR A PARTICULAR PURPOSE. NO WARRANTY MAY BE CRE-ATED OR EXTENDED BY SALES OR PROMOTIONAL MATERIALS. THE ADVICE AND STRATEGIES CON-TAINED HEREIN MAY NOT BE SUITABLE FOR EVERY SITUATION. THIS WORK IS SOLD WITH THE UNDERSTANDING THAT THE PUBLISHER IS NOT ENGAGED IN RENDERING LEGAL, ACCOUNTING, OR OTHER PROFESSIONAL SERVICES. IF PROFESSIONAL ASSISTANCE IS REQUIRED, THE SERVICES OF A COMPETENT PROFESSIONAL PERSON SHOULD BE SOUGHT. NEITHER THE PUBLISHER NOR THE AUTHOR SHALL BE LIABLE FOR DAMAGES ARISING HEREFROM. THE FACT THAT AN ORGANIZATION OR WEBSITE IS REFERRED TO IN THIS WORK AS A CITATION AND/OR A POTENTIAL SOURCE OF FUR-THER INFORMATION DOES NOT MEAN THAT THE AUTHOR OR THE PUBLISHER ENDORSES THE INFOR-MATION THE ORGANIZATION OR WEBSITE MAY PROVIDE OR RECOMMENDATIONS IT MAY MAKE. FURTHER, READERS SHOULD BE AWARE THAT INTERNET WEBSITES LISTED IN THIS WORK MAY HAVE CHANGED OR DISAPPEARED BETWEEN WHEN THIS WORK WAS WRITTEN AND WHEN IT IS READ.
For general information on our other products and services, please contact our Customer Care Department within the U.S. at 800-762-2974, outside the U.S. at 317-572-3993, or fax 317-572-4002. For technical support, please visit www.wiley.com/techsupport.
Wiley also publishes its books in a variety of electronic formats. Some content that appears in print may not be available in electronic books.
Library of Congress Control Number: 2006923951 ISBN-13: 978-0-7645-9823-4
ISBN-10: 0-7645-9823-6
Manufactured in the United States of America 10 9 8 7 6 5 4 3 2 1
Neil Cherryhas been working with computers, computer electronics, and software since 1978. He has been playing with X10 since 1982. He began automating his home in 1992 when a friend gave him an X10 computer interface, and he started the Linux Home Automation Web site (www.linuxha.com) in 1996. When he’s not riding his bicycle or playing with home automation, he works for AT&T Research Lab South, Middletown, NJ, as a Test Engineer. You can reach him by e-mail at [email protected].
About the Contributors
Terry Collingsis the owner of TAC Technology, located in eastern Pennsylvania. He provides Linux consulting and training services to a variety of clients. Terry has been an adjunct faculty member at several colleges in his area where he taught A + and Network + certification courses. He also taught courses on UNIX, Linux, TCP/IP, and Novell Netware. Terry is the author of
Red Hat Enterprise Linux 4 For Dummies,has co-authored three editions of Red Hat Networking and System Administration and contributed to several other Linux books. He was the technical editor for the following books: KDE Bible, The Samba Book, UNIX Weekend Crash Course, Red Hat Linux 9 For Dummies, Solaris 9 For Dummies, Fedora Linux 2 For Dummies, andLinux Timesaving Techniques For Dummies.
Gurdy Leeteis a co-author of OpenOffice.org For Dummies,a technical editor for Free Software For Dummies,and the co-author of five other popular com-puter books. He’s also an award-winning software engineer and a co-author of the Multitile plug-in for the GNU Image Manipulation Program (GIMP). Gurdy teaches digital imaging, graphic design, Web design, video, and animation at Maharishi University of Management in Fairfield, Iowa, where he has been a pioneer in using GNU/Linux applications in undergraduate art and design classes. His blog, titled Free Software for Art, Music and Personal Creativity,is at www.peaceloveandhappiness.org.
I wish to thank my wife, Diane, for putting up with my years of experiments and for not allowing me to kludge together anything. She’s kept me honest and helped make our home automation work better. Honey, I love you and I’ll take you out to dinner but first just one more compile.
Thanks to Terry Collings and Gurdy and Mary Leete who helped by writing various chapters that I was unable to. They really helped to make this book possible.
Thanks to Nicole Sholly and Virginia Sanders, the editors who worked with me on this book. I doubt most people know the amount of work a book takes to get written and how much help the editors give to make a book successful. I really appreciate all the help — thank you very much and I hope I get itnow. I’d also like to thank the rest of the folks at Wiley who are too numerous to mention. They do a lot of the work to help get a book put together and to the stores but seldom get mentioned.
Thanks to Deepak Dube for his kind words of encouragement, without which I wouldn’t have thought I could write a book.
Some of the people who helped bring this book to market include the following:
Acquisitions, Editorial, and Media Development
Project Editor:Nicole Sholly
Acquisitions Editors:Kyle Looper, Tiffany Ma
Copy Editor:Virginia Sanders
Technical Editor:Dan DiNicolo
Editorial Manager:Kevin Kirschner
Media Development Specialists:Angela Denny, Kate Jenkins, Steven Kudirka, Kit Malone
Media Development Coordinator:
Laura Atkinson
Media Project Supervisor:Laura Moss
Media Development Manager:
Laura VanWinkle
Editorial Assistant:Amanda Foxworth
Sr. Editorial Assistant:Cherie Case
Cartoons:Rich Tennant (www.the5thwave.com)
Composition Services
Associate Project Coordinator: Tera Knapp
Layout and Graphics: Carl Byers, Andrea Dahl, Denny Hager, Joyce Haughey,
Stephanie D. Jumper, Barbara Moore, Heather Ryan, Alicia B. South
Proofreaders: Leeann Harney, Heidi Unger
Indexer: Techbooks
Special Help: Andy Hollandbeck, Pat O’Brien
Publishing and Editorial for Technology Dummies
Richard Swadley,Vice President and Executive Group Publisher
Andy Cummings,Vice President and Publisher
Mary Bednarek,Executive Acquisitions Director
Mary C. Corder,Editorial Director
Publishing for Consumer Dummies
Diane Graves Steele,Vice President and Publisher
Joyce Pepple,Acquisitions Director
Composition Services
Gerry Fahey,Vice President of Production Services
Introduction ...1
Part I: Bringing the Future Home...7
Chapter 1: Exploring the Possibilities of Home Automation ...9
Chapter 2: Filling Your Home Automation Toolkit with Linux Software...23
Part II: Connecting Multiple Computers
without the Wires ...37
Chapter 3: Going Wireless ...39
Chapter 4: Creating a Wireless Access Point ...67
Chapter 5: Routing Network Traffic for Free...89
Part III: Entertaining Your Brain
with a Little Help from Linux...111
Chapter 6: Building a Personal Video Recorder with MythTV ...113
Chapter 7: Streaming Music without the Wires ...129
Chapter 8: Having Fun with a Webcam ...141
Chapter 9: Setting Up a Smart Phone System ...157
Part IV: Keeping a Linux Eye on the Sky...185
Chapter 10: Letting Linux Watch the Weather For You...187
Chapter 11: Getting Online Weather Information...199
Chapter 12: Staying Comfortable with Thermostat Controls ...211
Part V: X10-ding Your Environment with
Home Automation ...225
Chapter 13: Introducing X10 Home Automation ...227
Chapter 14: Going Wireless with X10 ...249
Part VI: Controlling and Securing Your
Automation Network ...259
Chapter 15: Controlling Your House with MisterHouse ...261
Chapter 16: Controlling X10 from MisterHouse...281
Chapter 17: Using the Web Interface for Remote Control ...297
Chapter 20: Ten Gadgets Worth Checking Out ...339
Introduction...1
About This Book...1
Foolish Assumptions ...2
Conventions Used in This Book ...3
What You Don’t Have to Read ...3
How This Book Is Organized...4
Part I: Bringing the Future Home...4
Part II: Connecting Multiple Computers without the Wires...4
Part III: Entertaining Your Brain with a Little Help from Linux...4
Part IV: Keeping a Linux Eye on the Sky ...4
Part V: X10-ding Your Environment with Home Automation ...5
Part VI: Controlling and Securing Your Automation Network ...5
Part VII: The Part of Tens ...5
The CD appendix ...5
About the CD-ROM ...5
Icons Used in This Book...6
Where to Go from Here...6
Part I: Bringing the Future Home ...7
Chapter 1: Exploring the Possibilities of Home Automation . . . .9
Functional and Fun: Home Automation Applications ...9
Controlling your environment ...10
Taking your entertainment wherever you go ...15
Watching the weather ...18
Creating a sophisticated phone system ...20
Using Linux to Your Advantage ...21
Chapter 2: Filling Your Home Automation Toolkit with
Linux Software . . . .23
Using New Software on Old Hardware...23
Choosing a Linux distribution ...23
Choosing computer hardware ...24
Finding Linux-Based Home Automation Software...25
About X10 ...25
Software for ActiveHome, HomeDirector, and Firecracker devices...26
Software for X10 Firecracker devices (CM17A) ...29
Digital video recorder and media center...32
Motion detection ...33
Remote control ...33
Smart telephone system...33
Weather...34
Webcams, home security, and videoconferencing...34
Finding even more software...35
Doing the Tough Work with Low-Level Software ...35
Dressing Up the Rough Stuff ...36
Part II: Connecting Multiple Computers
without the Wires...37
Chapter 3: Going Wireless . . . .39
Wireless Networking 101 ...39
Wireless hardware components ...41
Wireless network standards: 802.11...42
Linux wireless support ...43
Getting Started with NdisWrapper...45
Before you start ...46
Hardware setup ...46
NdisWrapper drivers...48
Configuring NdisWrapper...49
Compiling a Custom Kernel ...50
Backing up your current kernel...51
The compiling ...52
Configuring LILO...58
Configuring GRUB...60
Getting Started with WPA-Supplicant ...61
Compiling WPA-Supplicant...62
Configuring WPA-Supplicant ...62
Installing the startup script ...64
Chapter 4: Creating a Wireless Access Point . . . .67
Discovering the Linksys WRT54GL ...67
Discovering OpenWrt ...69
Preparing to Install and Configure Your WAP ...71
LAN information ...73
WAN information ...75
Wireless information...77
Upgrading Your WAP to OpenWrt ...78
Configuring Your WAP ...81
Chapter 5: Routing Network Traffic for Free . . . .89
A Brief Introduction to IP Routing...89
Getting Acquainted with Quagga ...92
Installing Quagga via a Package Manager ...93
Compiling and Installing Quagga...96
Installing Quagga on Your WRT54GL ...98
Routing with Quagga...99
Configuring Quagga...100
Routing About...103
Part III: Entertaining Your Brain
with a Little Help from Linux ...111
Chapter 6: Building a Personal Video Recorder with MythTV . . . . .113
Building Your MythTV PVR...114
Selecting the hardware ...114
Installing MythTV ...115
Configuring MySQL ...117
Configuring the MythTV backend server ...117
Configuring the MythTV frontend server...122
Watching TV...125
Managing Your Recordings ...125
Scheduling your recordings ...125
Watching your recordings ...126
Deleting a recording ...126
Managing Your Media ...127
Playing music with MythTV ...127
Playing videos with MythTV ...128
Viewing image slide shows with MythTV...128
Chapter 7: Streaming Music without the Wires . . . .129
Selecting the Hardware and Software...129
Configuring Your System...132
Installing and configuring the media server ...132
Connecting and configuring the D-Link media client...134
Choosing Your Music Format ...137
Ripping CDs and Encoding Music Files with Grip...137
Streaming Your Audio...139
Chapter 8: Having Fun with a Webcam . . . .141
Sharing the Fun with a Webcam ...141
Installing CamStream ...142
Having Fun with Videoconferencing ...151
Installing Ekiga...152
Configuring Ekiga...152
Making calls...153
Looking Around with Pan and Tilt ...155
Putting Your Webcam to Work...156
Chapter 9: Setting Up a Smart Phone System . . . .157
Asterisk 101...158
Dial plans ...159
Context...161
Gathering the Ingredients ...165
Fitting the hardware pieces together...166
Configuring the SPA-3000...167
How the other half lives: The software...176
Making a Smart Call ...182
Part IV: Keeping a Linux Eye on the Sky ...185
Chapter 10: Letting Linux Watch the Weather For You . . . .187
Choosing the Weather Station Hardware and Software ...187
Building the Weather Station ...188
Installing the Weather Station Software ...189
Configuring the weather station program...191
Making the weather station cable ...193
Configuring additional weather station settings ...193
Mounting the Weather Station...197
Putting Your Weather Data on the Web...198
Chapter 11: Getting Online Weather Information . . . .199
Getting Weather Data on Your Desktop...199
Getting Weather Data from Your Browser...203
Using MythTV to Get Weather Data...207
Setting up MythWeather ...207
Viewing your MythWeather information ...209
Chapter 12: Staying Comfortable with Thermostat Controls . . . .211
Installing Thermostat Controls ...212
Installing the TXB16 thermostat...212
Installing a two-thermostat X10 control system...216
Installing a Thermostat Set-back Controller ...218
Waking Up to a Warm House...219
Saving Money with Controlled Heating ...219
Saving money by using X10 thermostat systems ...220
Part V: X10-ding Your Environment with
Home Automation...225
Chapter 13: Introducing X10 Home Automation . . . .227
Introducing X10 Power Line Carrier ...228
X10 PC interfaces...230
A (very short) list of X10 modules ...231
Purchasing X10 devices ...232
Building a Starter Kit ...233
The software: Compiling Heyu...234
The hardware...235
Module setup ...236
Cool Things to Do with X10 ...237
Egg timer...238
Sunrise, Sunset ...240
X10-powered printer ...242
Troubleshooting X10 Problems...244
Common problems...245
Isolating a problem...247
Chapter 14: Going Wireless with X10 . . . .249
Getting Familiar with the X10 Interfaces ...250
Gathering the Tools ...251
Software ...252
Hardware ...253
Setting Up the X10 Wireless Network ...253
Setting up the X10 transceiver...253
Starting the Apache http server (httpd) ...254
Installing BlueLava ...255
Installing BottleRocket...255
Configuring BlueLava...256
Using your wireless X10 network ...258
Part VI: Controlling and Securing
Your Automation Network ...259
Chapter 15: Controlling Your House with MisterHouse . . . .261
Introducing MisterHouse ...262
The MisterHouse interfaces...263
So what can MisterHouse do?...263
Installing MisterHouse...265
Logging in as root ...266
Preparing MisterHouse for Setup...268
Setting Up MisterHouse...272
Starting MisterHouse ...272
Modifying the parameters ...274
Restarting MisterHouse...275
Using MisterHouse to Retrieve Your Favorite Comics ...276
A Maze of Twisty Little Passages ...279
Chapter 16: Controlling X10 from MisterHouse . . . .281
Getting What You Need ...281
Setting Up X10 for MisterHouse ...282
Creating MisterHouse Tables...284
Sending and Receiving X10 Commands ...287
Creating X10 macros ...289
x10_test.pl ...290
Disabling user code...291
x10.pl...292
x10_II.pl...294
Chapter 17: Using the Web Interface for Remote Control . . . .297
Exploring the MisterHouse Main Web Page...297
Accessing and Controlling X10...300
Using the HTML Template...302
A brief history of the Web and HTML ...303
Creating Web pages with an HTML template...304
Introducing the My MH Web Page...305
Installing a weather report page...306
Adding the Weather Report button...308
Chapter 18: Remotely Accessing Your MisterHouse Controls . . . . .313
Securing Your Home Network ...315
Administering Linux...316
Replacing telnet and FTP with ssh and sftp ...316
Understanding public and private keys ...317
Accessing an ssh system ...318
Setting up encryption keys ...319
Locking Up with iptables...321
Understanding the iptables.sh script ...321
Installing the iptables.sh script ...323
Connecting with PuTTY ...324
Installing PuTTY ...324
Generating ssh keys with PuTTYgen ...326
Part VII: The Part of Tens...331
Chapter 19: (Nearly) Ten Cool Chores You Can Automate . . . .333
Controlling a Greenhouse ...333
Watering Your Lawn with Your Computer ...334
Checking for Snail Mail ...334
Hacking Your Bass (You Know, Billy the Bigmouth Bass)...335
Opening and Closing the Window Shades ...335
Letting Fido Out When You Aren’t Home ...336
Watching Your Kids from the Internet...336
Losing Weight with Home Automation...337
Heating Your Car Seat on Cold Mornings...338
Chapter 20: Ten Gadgets Worth Checking Out . . . .339
Streaming Music Clients...339
Streaming Media Clients and Servers...340
Standalone Print Servers...340
Ninja Camera Mounts ...341
Remote Control Your Devices...341
Socket Rockets ...342
Universal Remote Controls ...342
Motion Detectors ...343
Nokia 770 Internet Tablet ...344
INSTEON System ...344
Appendix ...345
System Requirements ...345
Using the CD with Linux ...345
What You’ll Find ...346
If You Have Problems (Of the CD Kind)...350
W
elcome to Linux Smart Homes For Dummies.To own and operate a Linux smart home means to control and monitor devices and informa-tion around your home by using a standard personal computer, Linux, and its vast array of open source tools. Having a Linux smart home is also about doing it yourself and getting your hands dirty — with the code, the hardware, and everything else in between. Don’t worry if you aren’t a hardware person; I don’t make you break out a soldering iron to whip up a new interface. Also, don’t worry if you aren’t a software person; I don’t hand out programming assignments. Your limits are your imagination, your pocketbook, and how much your spouse will let you get away with. You can start out small and build your way up to a larger system. This is not about spending big bucks, though I do try to keep it as professional looking as possible. Some home automation work looks like a cheap hack (wires hanging everywhere) or something that looks like it was slapped together at the last minute. My wife won’t stand for that.Home automation has high geek value and a lot of neat toys. In the past, basic home automation included turning on and off lights and some appliances. Later, things like security systems, fire alarms, sprinkler controls, and climate control (HVAC, or heating, ventilation and cooling) were added to be con-trolled by the system. With the advent of the Internet, it’s now also about information and communications (data and voice networks). Although this book doesn’t cover everything there is to know about home automation — after all, that’s a huge topic and this is just one book — it gives you a sturdy base to start with.
About This Book
Here are some of the things you can do with this book:
⻬Build a wireless network and connect it to the Internet. Part II covers installing a wireless network card in your computer, setting up a wireless access point, and routing and connecting to the Internet.
⻬Control your TV and music by adding servers to record and play back TV programs at your leisure and listen to music anywhere in your home.
⻬Monitor the weather with your own weather station and software to col-lect and display local and Internet weather predictions.
⻬Control lights and appliances with X10 and X10 wireless modules from Linux.
⻬Use MisterHouse, the home automation server. It can control and moni-tor a number of interfaces, such as an Infrared Remote(IR) and X10, and newer interfaces are being added. In addition, you can
moni-tor and manually control MisterHouse from the comfort of any Web browser.
⻬Use IR to control your entertainment and home automation system from the comfort of your remote control.
⻬Securely access your home automation from anywhere on the Internet.
Foolish Assumptions
This book is not for everyone because it’s for Linux users. It might be useful to other UNIX users, such as the BSD folks and Sun users, if they’re clever enough to figure out the differences. However, I describe everything from the perspective of Linux. If you’re a Windows user, you’re really out of luck with this book (but you can check out Smart Homes For Dummies,2nd Edition, by Danny Briere and Pat Hurley, from Wiley). To use this book, I expect that you
⻬Know a little bit about the Linux OS, the distribution you have installed and the version of the Linux kernel that is installed and run-ning.There are many distributions, such as Fedora, Debian, Red Hat, SUSE, Unbuntu, and Slackware. You’ll also see many versions of the Linux kernel, but if you have a recent distribution, then it’s either ver-sion 2.4 or 2.6.
⻬Have at least installed these development tools:
• GNU C compiler • Development libraries • Perl programming language • Perl modules and libraries •bashshell
If you’ve installed everything or at least the entire development environ-ment, you’ll be fine.
⻬Know how to log in as a normal user and as the user rootand also how to bring up a shell or terminal (if you’re using the GUI [X Window] ).
⻬Have a favorite editor and know how to use the basic editing com-mands, such as Add, Delete, Search, and Save. (You cannotuse a Windows editor on Linux files. Windows doesn’t know how to deal with the Linux line endings. So don’t do it!)
⻬Are willing to purchase some hardware.For instance, you must have extra serial and/or USB ports and hardware such as the X10 modules. It would have been nice if the hardware were free, but that isn’t always possible. Most of it isn’t too expensive.
I can’t tell you where to purchase most of these items, with the excep-tion of the X10-compatible products, which you can purchase from
www.smarthome.com, which offers excellent selection, service, and prices. (I don’t work for them; I’m just a satisfied customer.) Most items are also available from online stores or online auctions. If you’re good at bidding or searching, you can often save some money on used equip-ment. Either way, you can use a search engine with a few keywords to find various bits of information about where you can purchase or bid on various items.
⻬Have a thirst for knowledge and a Do It Yourself (DIY) attitude.
Though Linux and the available packages are becoming easier to use and install, you do have to tinker with the hardware and software to get home automation properly running. The amazing thing is that after you have it running, you can ignore it until you want to add something else. Linux is a very stable OS and seldom crashes — even on my develop-ment machine where I tinker with lots of kernel settings.
Conventions Used in This Book
I use a few conventions in this book. By conventions,I simply mean a set of rules I’ve employed in this book to present information to you consistently. When you see a term italicized,look for its definition, which I include so that you know what things mean in the context of Linux home automation. Sometimes, I give you information to enter on-screen; in this case, you need to type the boldtext. Web site addresses and e-mail addresses are in
monofontso that they stand out from regular text.
What You Don’t Have to Read
How This Book Is Organized
Linux Smart Homes For Dummiesis split into seven parts. You don’t have to read it sequentially, and you don’t even have to read all the sections in any particular chapter. You can use the Table of Contents and the index to find the information you need and quickly get your answer. In this section, I briefly describe what you can find in each part.
Part I: Bringing the Future Home
Part I explores the possibilities of home automation, the fun and function of automated applications. Find out about controlling your environment, enter-taining yourself, and watching the weather. You find out how to fill your toolkit with some great software that you can run on older hardware (and newer hardware, of course). This part helps you to find HA (home automation) soft-ware, get drivers, daemons, and dress up the rough stuff with a GUI front end.
Part II: Connecting Multiple Computers
without the Wires
Wires, wires, everywhere, but not if my wife has her say! Part II is all about the network but without the wires. You delve into adding a wireless network card, the drivers, and the Linux wireless support tools. Next, you add a wire-less access point that can even support that other operating system (cough, Windows, cough). Finally, routing with the big boys: You find out how to add dynamic routing to your network.
Part III: Entertaining Your Brain
with a Little Help from Linux
The hills are alive with the . . . okay, okay, I’ll stop singing. Part III delves into how to use a particular digital video recorder (MythTV); share music
throughout your home with a media server (TwonkyMedia); install, view, and post pictures with a Web camera (USB Webcam); and take advantage of a smart phone system (Asterisk).
Part IV: Keeping a Linux Eye on the Sky
weather station, or Oww) and get Internet weather reports. And you learn how to control your home’s thermostat. No more excuses for not having an umbrella.
Part V: X10-ding Your Environment
with Home Automation
It’s all part of my plan to control the world with the veteran X10 protocol, using lights, appliances, computer interfaces, and wireless modules as the building blocks of many home automation projects. Part V introduces you to some of the hardware to control lights and appliances and the software needed to allow Linux to control, monitor, and schedule device events. Prepare to control the world!
Part VI: Controlling and Securing
Your Automation Network
MisterHouse does it all! Part VI is all about MisterHouse, an open source home automation program written in Perl. It’s extremely customizable because you can add your own Perl code. Additionally, you extend your con-trol of X10, discover how to use the Web interface, and add a bit of Linux security so that you can access MisterHouse from anywhere you can access the Internet. I love it when a plan comes together.
Part VII: The Part of Tens
Goodies! Every good For Dummiesbook has a Part of Tens, and this one is no exception. So here you find ten tasks you can automate (Chapter 19) and ten snappy home automation gadgets (Chapter 20). More toys for the tinkerin’.
The CD appendix
The appendix is a quick-and-dirty guide to using this book’s CD. It also lists and briefly explains the products and software included on the CD.
About the CD-ROM
scripts from the various chapters. If you’re wondering about system require-ments necessary to use the CD and run the software contained on it, check out the appendix.
Icons Used in This Book
What’s a For Dummiesbook without icons pointing you in the direction of really great information that’s sure to help you along your way? In this sec-tion, I briefly describe each icon I use in this book.
The Tip icon points out helpful information that is likely to make your job easier.
This icon marks a general interesting and useful fact — something that you might want to remember for later use.
The Warning icon highlights lurking danger. With this icon, I’m telling you to pay attention and proceed with caution.
When you see this icon, you know that there’s techie stuff nearby. If you aren’t feeling very techie, you can skip this info.
This icon highlights the products and software you can find on the CD included with this book.
Where to Go from Here
M
aking your home a smart home is the ultimate upgrade. But before you do anything with home automation, you need to find out what your options are and what tools you need.Exploring the Possibilities
of Home Automation
In This Chapter
䊳Exploring X10 and what it can do with Linux software
䊳Watching your Linux MythTV system or a Linux video player on TV
䊳Hearing and controlling your Linux MP3 player remotely
䊳Getting online weather information on your Linux computer
䊳Exploring storm warning alerts for your cell phone, pager, or e-mail
䊳Using a Linux smart phone system for your home or business
H
ome automation offers time-saving opportunities that can make your life more organized, more efficient, safer, and more fun. Dozens of free Linux software packages are available for home automation. These programs are often at the cutting edge of the field because Linux is often the platform of choice for programmers around the world in the field of home automation. Many of these programs are published under the GNU General Public License, which means they can be used by anyone freely, and because the source code is available, anyone can add new features to it. That is what pro-grammers everywhere are doing at a fast rate, which makes this field exciting to be a part of. The practical uses for home automation are endless. This chapter covers an overview of how it works and its possibilities, and I get you started automating right away.Functional and Fun: Home Automation
Applications
at home. But there are plenty of other uses. Here are some of the most popu-lar and most exciting:
⻬Automate choressuch as watering your lawn, opening and closing drapes, controlling your lights and appliances — even controlling your electric water heater.
⻬Use motion sensorsto turn on floodlights and cameras outside your home. Or turn on lights indoors as you walk from room to room, create an automatic doorbell, and more.
⻬Use water sensorsto inform you of leaking plumbing, both minor or major, while you’re at home or away for the day or on vacation. (Why not have your computer call you to let you know?)
⻬Control your lights and appliances remotelyvia the Internet or a telephone.
⻬Remotely adjust your thermostatso you can warm up your home before you get there.
⻬Zone your heat and automatically adjust itto make your home comfort-able in the areas that you’re using, and energy efficient in those areas that you aren’t.
⻬Wirelessly beam your entertainment around your home. For instance, be your own DJ and send your MP3 songs playing on your computer to any stereo or TV in your house. Or use the plasma TV in your den to view videos playing on your computer.
⻬Use a smart phonefor your home communications with a digital recep-tionist, voice mail, call forwarding, call waiting, and more.
⻬Videoconference with your friends, family, and co-workers by using the Linux Ekiga application; see Chapter 8 for more about Ekiga.
⻬Set up a home surveillance systemby using webcams.
⻬Keep your eye on your home remotelyvia webcams and the Internet.
⻬Set up your computer to alert you to stormsin your area or any area you specify by e-mailing you or calling your cell phone or pager.
Controlling your environment
An X10 overview
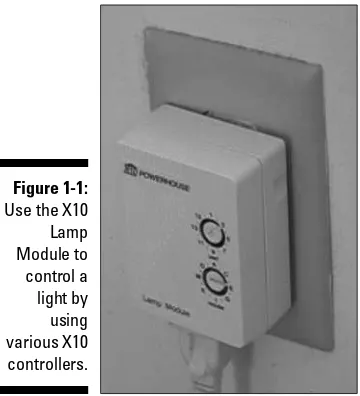
X10 signals are sent and received via the powerlines of your home and inter-preted by specially made X10 modules. The two basic types of X10 modules are lamp modules for incandescent lights, which can enable your light to dim, and appliance modules, which don’t dim. (You don’t want to dim your coffee maker.) These modules come in various shapes and sizes. They might look like little white boxes, like the Lamp Module shown in Figure 1-1; they can look like a normal wall outlet; or they can look similar to a lamp socket, like the Socket Rocket.
To use an X10 module, you plug in the lamp (or appliance) or screw a light bulb into it, and then you plug (or wire) the module into the wall or screw it into a lamp socket. These X10 modules interpret the X10 signal and deter-mine whether the signal is meant for it, and if so, it can turn itself on or off or dim the light accordingly, based on the signal.
Using X10 technology, every appliance and every light in your home can be automated and controlled. X10 signals do not interfere with any electrical system because A/C current alternates its phases at 60 times per second, and X10 signals operate during the spare time between the phases!
To send the signals to control your X10 modules, you can use any one of the following or combinations of the following:
⻬Remote control:This works in conjunction with a transceiver that is plugged into the wall. Press the proper controls on your remote to tell the transceiver what appliances to turn on or off and what lights to dim or brighten.
Figure 1-1:
⻬Motion sensors:Motion sensors can signal when motion is detected, and you can set a motion sensor’s transceiver to send X10 signals to X10 modules (for instance, to turn on lights) or to an appliance (such as a camera).
⻬Other sensors:Water sensors can detect leaks and cause a chime to sound, for example, and rain sensors can delay the watering of your lawn. They operate similarly to motion sensors.
⻬Touchtone controller:This item controls X10 modules through touch-tone signals, so you can control your system via your phone.
⻬Desktop controller:This inexpensive controller plugs into the wall and can control 8 to 16 X10 modules without a transceiver.
⻬Computer:You can control your X10 modules via your computer soft-ware in the following ways:
•Send and receive X10 signals over the powerlines from your com-puter.For example, the CM11A computer interface, as shown in Figure 1-2, can control your modules by using Linux home automa-tion software. A starter kit is available from www.x10.comfor $49.99.
•Enable your computer to function as a remote control.The
Firecracker computer interface, also called CM17A, is compatible with Linux home automation software. This is one-way communica-tion only. A starter kit is available from www.x10.comfor $39.99.
Figure 1-2:
Controlling X10 modules with Linux software
By computerizing your X10 system, you gain the power to create sophisti-cated macros that can operate based on the input of more than one X10 device, such as opening the garage door if motion is sensed by the hall closet (where you keep your coat) between the time of 8:00 and 8:15 a.m. Or you can connect your system to the Internet so you can operate it from anywhere in the world without having to pay for a phone call.
With your computer controlling your system, you can also use features that might not be available with other controllers, such as using the Internet to control your X10 system from anywhere in the world or using your computer to operate a smart phone system that can call you if, for example, your base-ment floods.
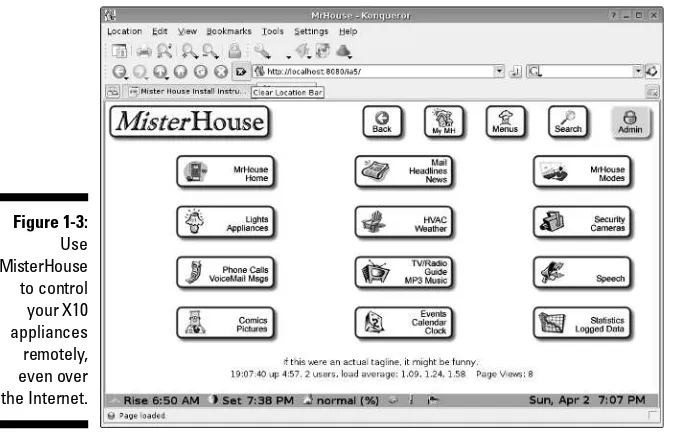
The CM11A interface can be controlled by several programs, such as MisterHouse, as shown in Figure 1-3, or Heyu. For more information on how to set up your computer to control X10 modules, refer to Chapter 13.
Fun and functional ways to use X10
The uses of X10 are many and limited only by the imagination. For informa-tion on how to start building a simple X10 system, check out Chapter 13. After you get to know the basics, filling your home with all kinds of X10 sys-tems is easy.
Figure 1-3:
Some practical or just plain fun uses for X10 automation include these:
⻬Use a motion detector to switch on Robo-Dog, an X10 dog barking device to scare intruders, or hook up your motion detector to floodlights.
⻬Create an automatic doorbell with a motion detector and chime. Place the motion detector at your front door, front gate, or sidewalk to alert you of guests.
⻬Dim all the lights with the touch of a single button in your living room for a home-theater effect.
⻬Set up a motion detector to work in a bedroom during the night to turn on the bathroom lights as well as a lighted hallway path when your child needs to go to the potty.
⻬Automate your security by aiming X10 cameras outside your home so that they will turn on when tripped by motion detectors. If you want to get fancy, have your computer call you to alert you and watch your cam-eras from the Internet.
⻬Use sprinklers attached to motion detectors to scare off neighborhood dogs or deer. (However, this might be a magnet to every child in town!)
⻬Use X10 to start your coffee in the morning and open your window shades.
⻬Turn off all your lights with one click of a remote.
⻬Water your lawn automatically on schedule.
⻬Check the state of your car’s muffler and exhaust system with an auto-mated pan-and-tilt camera base.
⻬Decorate with X10-controlled Christmas lights that turn on and off to the beat of your music or other cues.
Best places to find X10 products
X10 products are generally inexpensive. For example, you can buy a CM11A computer interface, a two-way transceiver module, a remote, a lamp module, and a credit card controller all bundled into one package for $49.99 at
www.x10.com— plus free shipping!
X10.com is a great place to shop for home automation devices. Their prices are generally low and their sales are often incredible. (No, I don’t get a com-mission.) However, don’t get excited by their Sale Ending Soon banners or Buy Now — Only 4 Left! Don’t feel like you need to rush. New sales start every day.
Here’s an interesting statistic: Roughly 95 percent of all X10 products are sold online. Maybe this will change as X10 rises in popularity — or maybe not.
Taking your entertainment
wherever you go
Here’s the problem. Your favorite music is on your computer and you want to play it on your stereo in the den. Or you have MythTV (a Linux-based TiVo knock-off I describe in detail in Chapter 6) on your computer, but you want to watch it from your couch — not your swivel chair. Or, another problem: You set up your MP3 files on your computer to play in your den, but you want to control them with a remote — and your computer is 50 feet away on the other side of the house. This section covers a wide variety of incredibly easy (and cheap) entertainment solutions. And if you want information on stream-ing your music through the Internet, check out Chapter 7.
Wirelessly sending TV and stereo signals
from any TV, stereo, or CD player
For about $50, you can get an X10 wireless video sender from www.x10.com. The entire package consists of a video sender and video receiver, both of which look like small boxes with regular antennas and tiny dish-like antennas protruding from them, which can communicate with each other wirelessly throughout your home. The video sender also sends and receives stereo sound from your TV, CD player, or stereo — whatever takes standard RCA Audio In and Audio Out jacks — or coaxial cable.
The following steps show you how to hook up your wireless video sender to your DVD, VCR, stereo, TiVo, satellite receiver, or cable box to play on a TV or stereo:
1. Connect the RCA jacks to the Audio and Video inputs and outputs of your video sender and video receiver, and connect them to the Video Out and/or Audio Out of your DVD player, VCR, TiVo, satellite
receiver, CD player, stereo, or cable box and the Video In and/or Audio In of your stereo or TV.
If RCA connections are not available, coaxial cable inputs and outputs will do as well.
2. Set the channel on the wireless video sender to either three or four, whatever channel the TV that is normally connected to the DVD player, VCR, or other device uses to receive the signal.
4. Angle the flat antennas of the wireless video sender and receiver so they are facing each other.
It’s okay if there are walls between them. Just pretend the walls are not there.
5. Turn on whatever your wireless video sender and receiver are con-nected to and enjoy!
If the signal isn’t as strong as you like, try adjusting the angles of the antennas or changing the channel numbers on both the sender and receiver. They need to be the same numbers.
Wirelessly transmitting MP3 files
Using the wireless video sender, you can easily transmit your MP3 tunes wire-lessly from your computer to any stereo or TV in your home — or by the poolside. The wireless video sender is also an audio sender. To hook up your computer to play your audio from your computer remotely on any TV or stereo, follow these steps:
1. Plug the white and red RCA connectors of the video receiver into the RCA Audio In jacks of any stereo or TV equipped with them.
You can use coaxial cable if you need to.
2. If your computer has RCA jacks for Audio Out, plug your red and white RCA cables into them; if it has a Video Out card with a place to screw on a coaxial cable, hook up a coaxial cable to it. Then skip to Step 5.
3. If your computer has no Audio Out jack that is compatible with RCA plugs or coaxial cable, find or buy a stereo tuner with Audio In and Audio Out RCA jacks on it and place it near your computer.
4. Buy a cable that has an earphone jack on one end and two RCA jacks on the other end and plug the headphone jack into your computer and the two RCA jacks into the Audio In jack on the back of the stereo. 5. Plug the white and red RCA cables into Audio Out jacks in the back of
the stereo and plug the other end of the white and red RCA cables into the wireless video sender.
6. Set the channel number on your video sender and receiver to the same number — whatever number you want — or whatever works best.
7. Follow Steps 4 to 5 in the preceding section “Wirelessly sending TV and stereo signals from any TV, stereo, or CD player.”
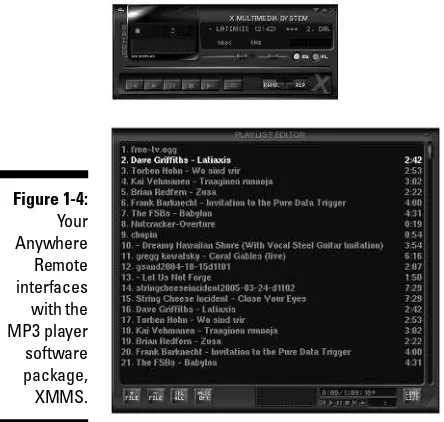
Controlling your Linux MP3 player with an X10 remote control
It is possible to control your XMMS MP3 player running on your computer from a handheld remote up to 50–100 feet away (and through walls). This remote, called the Anywhere Remote, can control the following:
⻬Song selection
⻬Play/stop/fast forward/pause
⻬Volume/mute
⻬Balance
The Anywhere Remote is a universal remote that can do the following:
⻬Control your TV, CD player, DVD, cable box, and satellite receiver.
⻬Control your X10 modules up to 50–100 feet away and through walls (if you use it with a TM751 or RR501 transceiver, which is available at
www.x10.comfor about $13).
⻬Control your MP3 player on your computer remotely up to 50–100 feet away and through walls if you have the following:
• A TM751 or RR501 transceiver, which costs about $13 from
www.x10.com.
• XMMS audio software comes with most Linux desktop distribu-tions, as shown in Figure 1-4.
• A computer capable of sending and receiving X10 signals. Refer to the “Controlling X10 modules with Linux software” section. • A program called x10mp3.
x10mp3 is free software that runs in Linux and is available for download at
http://x10mp3.sourceforge.net. This software is the Linux version of the Windows program, Boom 2000, which controls the Anywhere Remote. When you use the Anywhere Remote along with a video sender, you can send your MP3 music to any stereo or CD player in the house from your computer and control it remotely from up to 50–100 feet away. You can find the
Anywhere Remote on www.ebay.comfor about $10.
Wirelessly viewing Linux applications and videos on any TV
If you like to download videos to your computer (from Google Video, or MythTV, for example) and want to see them on a TV elsewhere in your house, you can easily do it. After all, your computer lives in your home office, and your plasma TV is in your living room (you wish). Your home office is
crowded, and your living room can seat more people. Your desk chair is hard, and your couch is soft (or maybe not). So, if you have video on your puter that you want to enjoy in more comfort, you can hook up your com-puter to the wireless video sender. The only requirement to using the wireless video sender with your Linux computer is that you need to have a
Video Out card— that means you need to have a coaxial cable connection or RCA Audio and Video outputs.
Watching the weather
Whether or not you or someone in your family is a budding meteorologist, it is still handy to know what the weather conditions are — without having to get frozen or fried checking it out. A wide variety of home weather stations are available on the market, and they can give you accurate information con-cerning weather conditions. Some of these weather stations can interface with Linux software, so you can gather and store your information on your computer. Or you can create your own weather station by using information from the Internet. Having weather information right on your desktop or browser or being alerted by a text message on your cell phone can be handy.
Figure 1-4:
Getting weather reports from your own weather station
Weather stations come in all sizes and price ranges. For about $25, you can get a display that tells the temperature indoors and out and tells time. For about $50 to $100, you can get a display that tells temperature and gives you the local forecast via a wireless connection. These weather stations come with their own displays that are updated wirelessly every couple of minutes from the sensors outside your home. A good place to find a large variety of weather stations for sale is www.weatherbarn.com.
If you want to read the weather conditions outside your home on your PC by means of sensors for temperature, wind speed, wind direction, humidity, barometric pressure, rainfall, wind chill, and more, you can get this kind of weather station for around $200 to $500. Connecting your weather station with your computer can also enable you to share and manipulate your weather data. For more information on installing your own weather station, see Chapter 10.
Getting weather reports from the Internet
Another way to get weather information is to have your computer automati-cally gather the information from the Internet. This allows you to have instant access to the following:
⻬The current weather conditions for your area
⻬The current weather conditions for any other area you designate, which might be useful if you want to keep track of your family around the coun-try or around the world.
⻬The weather report for the next few days
⻬Severe storm warnings
Four popular means of having access to up-to-date and continuous weather information are as follows:
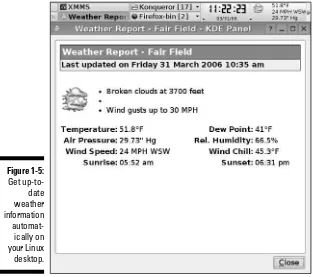
⻬Installing and using a weather applet with your Linux desktop:This is a tiny application that lives on your desktop and tells you the tempera-ture, wind speed, and direction and uses an icon representing general weather conditions. If you double-click the applet, it brings up a window with more information, as shown in Figure 1-5.
⻬Getting weather updates from MythWeather:A primary function of MythTV is to fulfill your need for a personal video recorder (PVR), but MythTV also has a program called MythWeather that you can use to get your current weather conditions and extended forecast. Access
MythWeather by choosing the Weather option from the MythTV main menu; see Chapters 6 and 11 for more information.
⻬Using StormSiren to alert you of storms by e-mail or text messages to your cell phone or pager:This program automatically checks the National Weather Service for information on storms in the county or counties that you specify. If a severe weather alert exists, it e-mails you and sends instant messages to your cell phone or pager. For more information on StormSiren, see its homepage at http://stormsiren.sourceforge.net.
Creating a sophisticated phone system
Sophisticated phone systems, like the kind large stores have that can direct calls automatically, can now be used in the home! These systems usually cost about $40,000 to install, but an enterprising businessman/programmer who needed one and did not have the cash to buy one just programmed one
Figure 1-5:
himself. He offered it to others as an open source program, named Asterisk, and since then over 300 programmers have contributed to it.
Asterisk is one of the best phone systems for businesses around, and it’s free! Because Asterisk needs someone savvy with Linux to install it, another system based on Asterisk was created for home use: Asterisk@Home. Asterisk@Home has the following features:
⻬Digital receptionist to direct calls automatically. For example, the call can be directed to your phone, your spouse’s phone, or the kids’ phones.
⻬Queue calls on hold and play music.
⻬Forward calls.
⻬E-mail voice mail messages.
⻬Send voice mail with Web access or phone access and more. Running Asterisk at home requires the following items to work:
⻬Dedicated computer. (Old hardware is fine for this.)
⻬Broadband connection — the faster the better.
⻬VoIP (Voice over IP) phone lines, which are phones that work over the Internet, such as VoicePulse or BroadVoice. This costs about $10 a month per phone.
⻬Phones that are compatible with VoIP, which you can buy for as little as $60, but most cost from $100 to $150.
Asterisk can also be used in conjunction with MisterHouse, a free software application that controls X10 modules and more. For more information about running Asterisk, see Chapter 9.
Using Linux to Your Advantage
Linux is on the cutting edge of home automation. Using Linux home automa-tion enables you to
⻬Save money:Most Linux software is free to use, free to give away, free to modify, and even free to sell.
⻬Explore lots of possibilities:Lots of home automation software exists, but you can’t usually try out the proprietary software without paying money — so that limits your exploration of it. With Linux, you can explore and try whatever you want without feeling a financial pinch. You are not locked into a single program.
⻬Contribute to the growth of free software:You can contribute to improving the home automation field by programming new features (if you are a programmer), by helping newbies on the forums, by suggest-ing new features, and more.
Linux home automation software published under popular licenses such as the GNU General Public License has the source code available for everyone to improve and add features to. This way, it can be advanced by professionals and amateurs alike. And the new features, which are added by programmers around the world, cause the software to grow, sometimes as effectively as if it were designed by a business plan and paid programmers spent every day working on it — maybe even more effectively. And its setup and maintenance costs are a fraction of what similar proprietary software costs.
To some people, Linux is a hobby, but it can be a career as well. Money-making opportunities are available for savvy entrepreneurs. Here are just a few possibilities:
⻬Setting up Asterisk phone systems for clients
⻬Creating Internet-accessible, home-surveillance systems
⻬Offering clients high-performance video streaming
Linux software offers a large range of home automation possibilities, which are fast becoming very powerful and have lots of mainstream applications. Because the source code is freely available, bugs in the program are swiftly fixed by programmers all around the world. This factor often makes free soft-ware more robust than proprietary softsoft-ware. Also, it is much less vulnerable to viral attacks and other malicious software because Linux is inspired by the UNIX operating system, which had security built into it since ancient times — not added on after the system was already established.
Filling Your Home Automation
Toolkit with Linux Software
In This Chapter
䊳Putting old hardware to work with new software
䊳Checking out the best Linux-based smart home software
䊳Controlling software from the command line
䊳Dressing up software with a graphical user interface
A
tremendous amount of free Linux software is available for almost every aspect of home automation. In this chapter, I point out some of the best software you can use to turn your house into a really smart home, and I show you where to get the software.Using New Software on Old Hardware
One great feature of Linux is that you can pick and choose the parts of it that you want and mold it to work the way you want it. If you want to use it to control some simple task, you might find that you can use a stripped-down or lightweight version of Linux (such as Damn Small Linux), so that old clunker computer in your basement has plenty of power to do what you need. In this way, you can give new life to old computers that formerly seemed worthless. It’s time to resurrect them from your computer graveyard and put them to work on highly useful tasks.
Choosing a Linux distribution
⻬Ubuntu Linux(www.ubuntu.com): Ubuntu is currently one of the most popular Linux distributions. Like the other Linux distributions listed here, Ubuntu is available as a free download and offers thousands of free software applications and a big community of users you can consult for support. Ubuntu offers new versions of the distribution every six months, and it’s easy to maintain and upgrade.
⻬Gentoo Linux(www.gentoo.org): Gentoo is a source-based distribu-tion, which means that, rather than simply installing precompiled binary code, you typically compile every aspect of the system from source code. Your computer can take a long time to do that, but this process can give you much more control over your Linux software environment and makes it easy to always have the most current software packages.
⻬Fedora Core(http://fedora.redhat.com): Fedora Core is a widely used, well-tested, and stable distribution sponsored by Red Hat, one of the most prominent Linux software companies. Fedora Core offers an interesting mixture of stable and cutting-edge software.
⻬SUSE Linux(www.opensuse.org): SUSE Linux is a high-quality Linux distribution that originated in Germany and is now sponsored by Novell. SUSE Linux is distinguished by its polish, its attention to detail, and its easy-to-use YaST configuration tools.
⻬Damn Small Linux(www.damnsmalllinux.org): Damn Small Linux is a versatile, powerful, and very small Linux distribution that fits on a 50MB business card CD. It can be a great choice when you’re looking for a lightweight version of Linux to install on older computer hardware.
Choosing computer hardware
For the personal video recorder, MythTV, a faster computer is definitely better, and you need a TV tuner card. (The Hauppauge WinTV model 401 with dbx works well.) For recording one show at a time and playing it back later, you could probably live with a Duron 800 CPU and 256MB of RAM. To record a show while watching another show, you probably need a 1.4 GHz CPU and 384MB of RAM. To record two shows simultaneously, you probably need at least a 1.8 GHz CPU and 512MB of RAM. You probably want at least an 80GB hard drive.
Finding Linux-Based Home
Automation Software
Many free, Linux-based, home automation, software packages are out there, which is great, but so much is available in so many varying stages of com-pleteness and usefulness that picking out what you need can be challenging. Furthermore, the world of home automation is a big world of diverse func-tionalities that includes software packages for
⻬Automated device control for lights, home appliances, and so on.
⻬Automated digital video recording and streaming.
⻬Motion detection.
⻬Remote control.
⻬Weather data measurement and thermostat control.
⻬Smart telephone systems.
⻬Webcams for home security and videoconferencing.
That’s a lot of ground to cover, but putting it all together isn’t hard if you know what to choose. So here I give you recommendations on some of the best software choices and tips to get you started quickly. In the rest of the book, I show you in more detail how to set up, configure, and customize everything to your liking.
About X10
X10 is a standard that uses the electrical wiring in your home to communi-cate with and control lights, appliances, and other compatible devices. X10 signals are short, radio-frequency bursts that represent digital information and are carried over your power lines. Because X10 uses your existing electri-cal wiring, you don’t need to rewire your home to automate your devices — you can simply plug X10 modules into your existing power outlets and then plug your lamp, appliance, or other device into the X10 module.
X10 devices come in a variety of flavors. The most widely supported by Linux currently are
CM12U. The serial port in your computer connects via a serial cable to a CM11A device that plugs into your wall socket and controls other X10 devices via your home’s power lines.
⻬CM17A:This small X10 computer interface is roughly the size of a Fig Newton. It’s also known as the X10 Firecracker. It transmits radio fre-quency (RF) signals from your computer’s serial port to a wireless trans-ceiver that controls your X10 devices via your home’s power lines. The Firecracker is available from www.x10.com.
You have lots of choices of free Linux software packages to automate the con-trol of X10 devices in your home. In the following sections, I list some of the most popular and mature packages. With these packages, it’s sometimes useful to customize the programming code, so I also list the computer lan-guages in which they’re written.
Software for ActiveHome, HomeDirector,
and Firecracker devices
If you’re starting out automating your home, you might want to buy either the ActiveHome kit or HomeDirector kit, which includes the CM11A device that can enable your computer to send and receive X10 signals. Or you might want to use the Firecracker device, which can enable your computer to oper-ate like an X10 remote. Both the Firecracker device and the ActiveHome kit are available at www.x10.com. (At the site, search for Firecracker or ActiveHome kit.) You can probably find the HomeDirector kit on eBay. Many programs are available to interface with the CM11A and CM17A. MisterHouse is probably the most amazing, as I demonstrate here. For more information about MisterHouse, see Chapters 15 and 16.
The New ActiveHome Starter kit that is sold at www.x10.comuses the CM15A, which currently has almost no Linux-compatible software written for it yet.
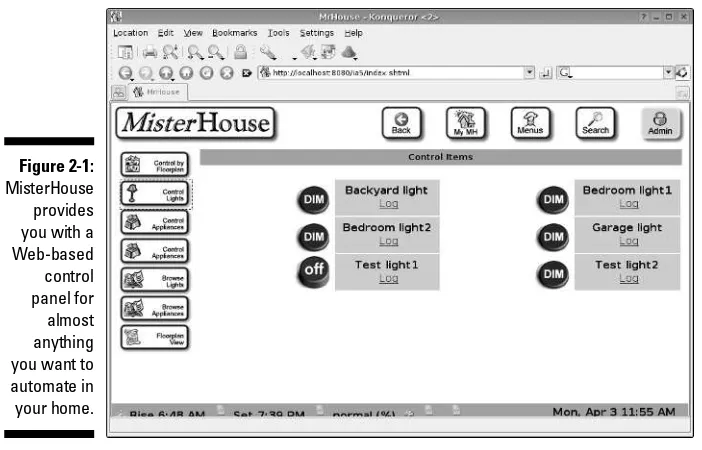
MisterHouse
MisterHouse (http://misterhouse.sourceforge.net) is a very compre-hensive home automation program. It features a nice Web interface, as shown in Figure 2-1, and you may control and monitor it from any Web browser. MisterHouse is a fun program that can do the following:
⻬Respond to input from X10 sensors, such as motion sensors or tempera-ture sensors.
⻬Work as a timer (and calendar) to send X10 commands at the proper time to turn X10 devices on and off.
⻬Use free, text-to-speech software to make announcements.
⻬Respond to your verbal commands by using IBM’s free ViaVoice voice-recognition engine.
⻬Read and write e-mail files and Web pages unattended.
⻬Send and receive instant messages via AIM, MSN, or Jabber.
⻬Read Web pages of TV schedules to program your VCR and show you reminders about upcoming shows.
⻬Control your RoboSapien, ESRA, and ER1 home robots, and lots more. MisterHouse is written in Perl, which makes it fairly easy to customize if you want to do so.
Project WiSH and x10Web
Project WiSH (http://wish.sourceforge.net) implements a universal device driver for the X10 protocol and currently supports CM11A, Firecracker, and some other X10 devices. The advantage of this approach is that you can use a single application with this device driver to talk to your X10 network without worrying about the type of X10 transceivers that are attached.
Figure 2-1:
Project WiSH is available in two versions:
⻬x10dev (Version 1.X), a driver for Linux kernel 2.4.
⻬x10dev-2 (Version 2.X), a less mature driver for Linux kernel 2.6.7+ and kernel 2.4. This version works on the more recent Linux kernels, but it’s more likely to contain bugs and doesn’t support Firecracker.
The Project WiSH drivers are written in the C computer language. As shown in Figure 2-2, Project WiSH can be used with its x10Web package, which pro-vides you with three graphical user interfaces (GUIs) that run in a Web browser: two depicting your X10 home network and one that displays tem-perature events reported by the SmartHome TempLinc, a sensor that trans-mits X10 signals based on temperature data that it collects. These GUIs are written in the Java programming language.
Heyu
Heyu (www.heyu.org) is a command-line-based program that you can use to control your home’s lights and appliances via X10 devices. It’s written in the C computer language. You can, among other things, use Heyu to store a schedule of events and macros in the CM11A’s memory, which it can execute even when not connected to the computer. In Chapter 13, you build a starter X10 kit by using Heyu.
Figure 2-2:
BlueLava
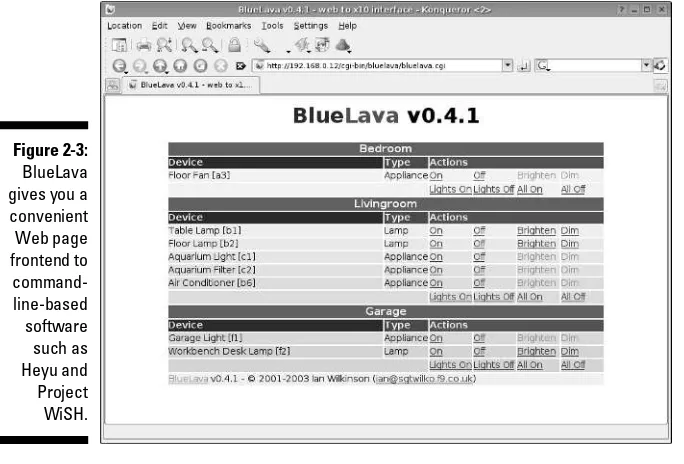
BlueLava (www.sgtwilko.f9.co.uk/bluelava) is a CGI script written in Perl that lets you control your X10 devices via a Web page, as shown in Fig-ure 2-3. The script acts as a frontend for several command-line-based pro-grams, including Heyu, BottleRocket, Flipit, and Project WiSH.
CGI stands for Common Gateway Interface. CGI scripts are usually small pro-grams written in a computer language such as Python, Perl, Tcl, C, or C++. You upload a CGI script to a Web server where it is used by the HTML code in Web pages to run other programs on the server that are too complicated to be controlled directly by the HTML code. In other words, it acts as glue between HTML pages and other programs on the server.
Software for X10 Firecracker
devices (CM17A)
The tiny Firecracker is a cool, inexpensive device that can turn your com-puter into an X10 remote, and there are many good free software packages to control it via Linux. Here are some of the best.
Figure 2-3:
BottleRocket
BottleRocket (www.linuxha.com/bottlerocket) is a command line inter-face to Firecracker devices, and it’s written in the C language. If you like, you may use BlueLava, WMX10, or CGI-x10 as a Web-based frontend to
BottleRocket.
CGI-x10
CGI-x10 (http://bubba.org/?option=cgi-x10) is a CGI interface to BottleRocket. It’s written in Perl. Figure 2-4 shows the Web interface it creates.
Flipit
Flipit (www.lickey.com/flipit) is a simple, command-line-based program for controlling Firecracker devices. It’s written in the C programming lan-guage. If you don’t want to run Flipit from the command line, you can use BlueLava as a Web page frontend to Flipit.
TK10
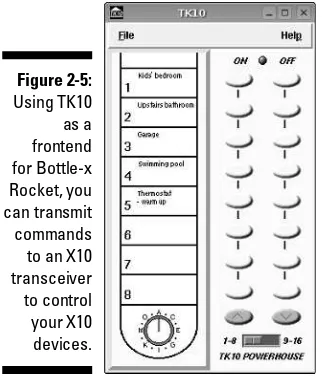
TK10 (http://mywebpages.comcast.net/jfilerunner/tk10.html) is a graphical user interface frontend for BottleRocket, shown in Figure 2-5. It looks like the HR12A controller that’s part of the Firecracker kit from
www.x10.com. TK10 is written in Tcl/Tk.
Figure 2-4:
CGI-x10 provides a simple Web interface to
wmx10
wmx10 (www.cs.uml.edu/~jhawkins/wmx10) is a WindowMaker/ AfterStep applet. It’s a very small application that runs in a thumbnail-sized window that runs on the desktop, and it allows you to control X10 modules via BottleRocket. It’s a nice graphical interface for BottleRocket, which is a command line program. (WindowMaker and AfterStep are window managers which are commonly available with many Linux distributions.) wmx10 is writ-ten in the C programming language.
Home networking
Your home computer network is important for home automation because if you set up your network with the right software, your whole network turns into something like one big computer, with all the resources of every com-puter available at any comcom-puter in your home. Then you can quickly transfer files to and from any computer, surf the Web from any computer, stream media from any computer in your home to any other computer, remotely con-trol devices hooked up to your computer, and more. GNU Zebra is a good choice for turning your home network into an automated powerhouse.
GNU Zebra
GNU Zebra (www.zebra.org) is free, high-performance software for routing information on your computer network. It carries out routing of information packets at higher speed than with traditional networking software. It’s also highly modular, using a separate computer process for each routing protocol. This makes it easy to maintain and upgrade because each protocol can be
Figure 2-5: