PC Recording
Studios
FOR
by Jeff Strong
PC Recording
Studios
FOR
Hoboken, NJ 07030-5774
www.wiley.com
Copyright © 2005 by Wiley Publishing, Inc., Indianapolis, Indiana Published by Wiley Publishing, Inc., Indianapolis, Indiana Published simultaneously in Canada
No part of this publication may be reproduced, stored in a retrieval system or transmitted in any form or by any means, electronic, mechanical, photocopying, recording, scanning or otherwise, except as permitted under Sections 107 or 108 of the 1976 United States Copyright Act, without either the prior written permis-sion of the Publisher, or authorization through payment of the appropriate per-copy fee to the Copyright Clearance Center, 222 Rosewood Drive, Danvers, MA 01923, (978) 750-8400, fax (978) 646-8600. Requests to the Publisher for permission should be addressed to the Legal Department, Wiley Publishing, Inc., 10475 Crosspoint Blvd., Indianapolis, IN 46256, (317) 572-3447, fax (317) 572-4355, e-mail: brandreview@ wiley.com.
Trademarks:Wiley, the Wiley Publishing logo, For Dummies, the Dummies Man logo, A Reference for the Rest of Us!, The Dummies Way, Dummies Daily, The Fun and Easy Way, Dummies.com, and related trade dress are trademarks or registered trademarks of John Wiley & Sons, Inc. and/or its affiliates in the United States and other countries, and may not be used without written permission. All other trademarks are the property of their respective owners. Wiley Publishing, Inc., is not associated with any product or vendor mentioned in this book.
LIMIT OF LIABILITY/DISCLAIMER OF WARRANTY: THE PUBLISHER AND THE AUTHOR MAKE NO REP-RESENTATIONS OR WARRANTIES WITH RESPECT TO THE ACCURACY OR COMPLETENESS OF THE CON-TENTS OF THIS WORK AND SPECIFICALLY DISCLAIM ALL WARRANTIES, INCLUDING WITHOUT LIMITATION WARRANTIES OF FITNESS FOR A PARTICULAR PURPOSE. NO WARRANTY MAY BE CRE-ATED OR EXTENDED BY SALES OR PROMOTIONAL MATERIALS. THE ADVICE AND STRATEGIES CON-TAINED HEREIN MAY NOT BE SUITABLE FOR EVERY SITUATION. THIS WORK IS SOLD WITH THE UNDERSTANDING THAT THE PUBLISHER IS NOT ENGAGED IN RENDERING LEGAL, ACCOUNTING, OR OTHER PROFESSIONAL SERVICES. IF PROFESSIONAL ASSISTANCE IS REQUIRED, THE SERVICES OF A COMPETENT PROFESSIONAL PERSON SHOULD BE SOUGHT. NEITHER THE PUBLISHER NOR THE AUTHOR SHALL BE LIABLE FOR DAMAGES ARISING HEREFROM. THE FACT THAT AN ORGANIZATION OR WEBSITE IS REFERRED TO IN THIS WORK AS A CITATION AND/OR A POTENTIAL SOURCE OF FUR-THER INFORMATION DOES NOT MEAN THAT THE AUTHOR OR THE PUBLISHER ENDORSES THE INFOR-MATION THE ORGANIZATION OR WEBSITE MAY PROVIDE OR RECOMMENDATIONS IT MAY MAKE. FURTHER, READERS SHOULD BE AWARE THAT INTERNET WEBSITES LISTED IN THIS WORK MAY HAVE CHANGED OR DISAPPEARED BETWEEN WHEN THIS WORK WAS WRITTEN AND WHEN IT IS READ.
For general information on our other products and services, please contact our Customer Care Department within the U.S. at 800-762-2974, outside the U.S. at 317-572-3993, or fax 317-572-4002. For technical support, please visit www.wiley.com/techsupport.
Wiley also publishes its books in a variety of electronic formats. Some content that appears in print may not be available in electronic books.
Library of Congress Control Number Is Available from the Publisher. ISBN: 0-7645-7707-7
Manufactured in the United States of America 10 9 8 7 6 5 4 3 2 1
This book wouldn’t have happened without the inspiration and vision of Senior Acquisitions Editor Steve Hayes. This is my third book with Steve; this one was just as much fun to do as the first. A hearty thanks to my agent Carol Susan Roth for making sure I get what’s coming to me.
Books, by nature, are a team effort — and this book is the result of an extremely talented and dedicated team of professionals: Project Editor Paul Levesque (my partner in crime for the third time), who reminded me what a great editor can do for a writer; Technical Editor Erik Scull, who kept me on the straight and narrow; and Copy Editor Virginia Sanders, whose dry sense of humor put a smile on my face more than once during this process.
Some of the people who helped bring this book to market include the following:
Acquisitions, Editorial, and Media Development
Senior Project Editor:Paul Levesque
Acquisitions Editor:Steve Hayes
Copy Editor:Virginia Sanders
Technical Editor:Erik Scull
Editorial Manager:Leah Cameron
Permissions Editor:Laura Moss
Media Development Manager:
Laura VanWinkle
Media Development Supervisor:
Richard Graves
Editorial Assistant:Amanda Fox
Cartoons:Rich Tennant (www.the5thwave.com)
Composition Services
Project Coordinator: Adrienne Martinez
Layout and Graphics: Carl Byers, Lauren Goddard, Heather Ryan, Julie Trippetti
Proofreaders: Leeann Harney, Jessica Kramer, Joe Niesen, Carl Pierce, TECHBOOKS Production Services
Indexer: TECHBOOKS Production Services
Publishing and Editorial for Technology Dummies
Richard Swadley,Vice President and Executive Group Publisher
Andy Cummings,Vice President and Publisher
Mary Bednarek,Executive Acquisitions Director
Mary C. Corder,Editorial Director
Publishing for Consumer Dummies
Diane Graves Steele,Vice President and Publisher
Joyce Pepple,Acquisitions Director
Composition Services
Gerry Fahey,Vice President of Production Services
Introduction ...1
Part I: Computer Recording Basics ...7
Chapter 1: Discovering What You Need ...9
Chapter 2: Setting Up Your Recording Space ...35
Part II: Choosing and Installing Computer Hardware ....51
Chapter 3: Choosing Computer Components ...53
Chapter 4: Examining Audio Components ...65
Chapter 5: Connecting Your Hardware ...97
Part III: Choosing and Installing Recording Software ...113
Chapter 6: Understanding Computer Recording Software ...115
Chapter 7: Finding the Right Software for You ...127
Chapter 8: Installing Your Software ...149
Part IV: Revving Up the Recording Process ...173
Chapter 9: Getting a Great Source Sound ...175
Chapter 10: Recording and Editing Audio ...191
Chapter 11: Using MIDI ...227
Chapter 12: Using Loops ...249
Chapter 13: Exploring Software Synthesizers ...259
Chapter 14: Mixing and Mastering Your Music ...267
Part V: Playing with Plug-Ins ...297
Chapter 15: Understanding Plug-Ins ...299
Chapter 16: Using Equalization ...309
Chapter 17: Using Effects Effectively ...323
Chapter 18: Digging into Dynamics Processors ...335
Part VI: The Part of Tens ...350
Chapter 19: Ten Tips for Improving the Performance of Your System ...351
Chapter 20: Ten Great Internet Recording Resources ...357
Chapter 21: Ten (Or So) Free or Really Cheap Software Programs ...361
Introduction...1
About This Book ...1
Not-So-Foolish Assumptions ...2
How This Book Is Organized ...2
Part I: Computer Recording Basics ...3
Part II: Choosing and Installing Computer Hardware ...3
Part III: Choosing and Installing Recording Software ...3
Part IV: Revving Up the Recording Process ...3
Part V: Playing with Plug-Ins ...4
Part VI: The Part of Tens ...4
Icons Used in This Book ...4
Where to Go from Here ...5
Part I: Computer Recording Basics ...7
Chapter 1: Discovering What You Need . . . .9
Looking at the Larger Picture ...9
Interpreting Input Devices ...11
Instruments ...11
Microphone ...11
Sound modules and soft-synths ...12
Examining the Audio Interface ...13
Singling out a sound card ...15
Examining AD and DA converters ...15
Deciphering direct boxes ...15
Perusing the preamp ...16
Clueing In to the Computer ...18
Signing On to Software ...19
Meeting the mixer ...20
Accessing the arranger ...22
Exploring the editor ...22
Managing the MIDI sequencer ...24
Digging into digital signal processors (DSPs) ...24
Monitors ...30
Headphones ...30
Speakers ...31
Mastering Media ...32
CD ...33
Chapter 2: Setting Up Your Recording Space . . . .35
Preparing Your Room ...35
Creating an efficient working environment ...36
Taming heat and dust ...39
Quieting your computer ...39
Optimizing Sounds in Your Room ...40
Keeping the sound in or out of your room ...41
Getting the sound in your room under control ...42
Part II: Choosing and Installing Computer Hardware ...51
Chapter 3: Choosing Computer Components . . . .53
Selecting a Windows PC ...54
Understanding minimum requirements ...54
Opting on the operating system ...55
Viewing internal components ...56
Making your choice ...57
Choosing a Mac ...58
Making sense of minimum requirements ...59
Opting on an operating system ...59
Understanding Mac configurations ...60
Making your choice ...62
Getting a Handle on Hard Drives ...62
Recognizing Your RAM Needs ...63
Opting for Optical Drives ...64
Viewing Video Monitors ...64
Chapter 4: Examining Audio Components . . . .65
Examining the Audio Interface ...65
Understanding the interface ...66
Exploring digital audio specifications ...67
Taking a look at interface types ...69
Finding the right interface for you ...76
Making Use of MIDI ...79
Understanding MIDI ...80
Gearing up ...81
Adding Microphones to Your Studio ...89
Making sense of microphone types ...89
Polarity patterns ...92
Choosing mics ...93
Monitors ...93
Headphones ...94
Chapter 5: Connecting Your Hardware . . . .97
Making Connections ...97
Analog ...97
Digital ...102
USB ...105
FireWire ...106
Getting Hooked Up ...107
Connecting your computer ...107
Interface ...108
Input devices ...110
Monitors ...111
Part III: Choosing and Installing Recording Software ...113
Chapter 6: Understanding Computer Recording Software . . . .115
Audio Recording and Editing Basics ...116
Track counts ...116
Recording ...116
Editing ...117
Making Sense of MIDI Capabilities ...120
Looking at Looping ...121
Making Use of Mixing ...124
Digging Into Digital Signal Processing ...125
Finishing Up with Mastering ...126
Chapter 7: Finding the Right Software for You . . . .127
Determining Your Needs ...128
Examining Popular Programs ...130
Pro Tools ...130
ACID ...134
Cubase ...136
Cakewalk ...138
SONAR ...139
Logic ...141
Digital Performer ...144
Nuendo ...146
Chapter 8: Installing Your Software . . . .149
Getting Ready to Install ...149
Putting Software on a Windows XP PC ...150
Configuring the Windows XP operating system ...150
Connecting your hardware ...158
Installing Software on a Mac ...160
Setting system settings ...160
Installing your software ...162
Configuring Your Hardware ...163
Setting up your interface ...163
Configuring your audio application hardware settings ...169
Part IV: Revving Up the Recording Process ...173
Chapter 9: Getting a Great Source Sound . . . .175
Making Sense of the Signal Chain ...175
Getting a Great Guitar Sound ...177
Creating a Killer Keyboard Sound ...178
Making the Most of Microphones ...178
Tracing typical microphone techniques ...179
Taming transients ...180
Setting Up Your Mics: Some Suggestions ...181
Vocals ...181
Electric guitar ...183
Electric bass ...184
Acoustic guitars and such ...185
Drum set ...185
Chapter 10: Recording and Editing Audio . . . .191
Setting Up a Song to Record ...192
Creating a new song file ...192
Taking a look at tracks ...194
Routing your input and output signals ...198
Preparing to Record ...200
Enabling recording ...200
Setting recording levels ...202
Monitoring your inputs ...203
Creating a click track ...206
Getting your click track to play ...209
Hitting the Record Button ...212
Recording your first take ...212
Listening to your take ...213
Punching in and out ...213
Doing overdubs ...218
Editing Audio ...219
Selecting audio to edit ...219
Editing regions ...222
Chapter 11: Using MIDI . . . .227
Making Sense of MIDI ...227
Perusing MIDI ports ...228
Understanding MIDI channels ...228
Setting Up MIDI in Your Computer ...229
Enabling MIDI devices in Mac OS X ...229
Enabling MIDI devices in Windows XP ...231
Getting Ready to Record ...232
Creating MIDI tracks ...232
Setting inputs, outputs, and MIDI channels ...233
Recording MIDI Performances ...235
Enabling recording for MIDI tracks ...236
Monitoring MIDI inputs ...236
Recording MIDI tracks ...237
Playing Back Your Tracks ...238
Overdubbing MIDI Performances ...238
Using MIDI Merge/Replace ...239
Punching in and out ...241
Editing MIDI Data ...241
Manual MIDI editing ...241
Performing MIDI operations/editing functions ...246
Chapter 12: Using Loops . . . .249
Understanding Loops ...249
Using Loops in Your Song ...250
Creating a loop track ...250
Choosing loops ...252
Assembling loops in your song ...254
Editing loops ...255
Creating Your Own Loops ...256
Finding Loop Libraries ...257
Chapter 13: Exploring Software Synthesizers . . . .259
Understanding Software Synthesizers ...259
Using Soft-Synths ...260
Installing soft-synths ...260
Recording soft-synths in your song ...261
Changing sounds ...265
Finding Soft-Synths ...266
Chapter 14: Mixing and Mastering Your Music . . . .267
Understanding Mixing ...268
Mixing with Automation ...269
Knowing what you can automate ...269
Getting to know automation modes ...270
Making Your Mix ...273
Mixing in-the-box ...273
Mixing to an external recorder ...277
Mastering Your Music ...279
Demystifying mastering ...279
Setting up a mastering session ...280
Optimizing dynamics ...283
Perfecting tonal balance ...285
Balancing levels ...287
Mastering your mix ...288
Burning Your CD Master ...291
Getting what you need ...292
Sequencing your songs ...292
Making a CD for mass production ...293
Protecting your rights ...295
Burning the CD ...295
Part V: Playing with Plug-Ins ...297
Chapter 15: Understanding Plug-Ins . . . .299
Recognizing the Role of Plug-Ins ...299
Taking a Look at Plug-In Types ...300
Figuring out formats ...300
Peeking into processing approaches ...302
Using Plug-Ins in Your Songs ...302
Installing plug-ins ...303
Plugging in plug-ins ...303
Processing your audio ...306
Finding Good Plug-Ins ...307
Inserting an EQ plug-in in a track ...311
Chapter 17: Using Effects Effectively . . . .323
Routing Your Effects ...324
Inserting effects ...324
Sending signals to effects ...326
Rolling Out the Reverb ...328
Seeing reverb settings ...328
Getting started using reverb ...330
Detailing Delay ...331
Digging into delay settings ...331
Getting started using delay ...332
Creating Chorus Effects ...333
Chapter 18: Digging into Dynamics Processors . . . .335
Connecting Dynamics Processors ...335
Introducing Compressors ...337
Getting to know compressor parameters ...337
Getting started using compression ...339
Looking into Limiters ...340
Understanding limiter settings ...340
Setting limits with the limiter ...341
Introducing Gates ...341
Getting to know gate parameters ...342
Getting started using gates ...343
Examining the Expander ...343
Playing with expander parameters ...344
Getting started using an expander ...345
Signing On to Side-Chains ...346
Setting up a side-chain ...346
A couple common side-chains ...347
Part VI: The Part of Tens ...350
Chapter 19: Ten Tips for Improving the Performance
of Your System . . . .351
Keep Your Drives Clean ...351
Keep Your Hard Drive Free of Unnecessary Applications ...353
Keep an Eye on Buffer Settings ...353
Use the Freeze Function ...354
Keep Other Programs Turned Off ...354
Exercise Some Discipline ...355
Use Submixes ...355
Clean Up Your Tracks ...355
Turn Off Unused Tracks ...356
Chapter 20: Ten Great Internet Recording Resources . . . .357
Checking Out Online Chats ...357
Gearing Up for GAS ...358
Getting Help with Mastering ...358
Finding Support for Setting Up Your Studio ...358
Discovering CD Duplicating ...359
Finding Industry Connections ...360
Discovering Inspiring Indie Music ...360
Chapter 21: Ten (Or So) Free or Really Cheap
Software Programs . . . .361
Recording Programs ...362
Audio Editing Programs ...362
MP3 Programs ...363
Plug-Ins ...363
MIDI Programs ...364
Software Synthesizers ...365
A
s computers have gotten more powerful, they’ve become the standard tools for recording, editing, and mixing audio. More and more profes-sional studios are using them because of their power — and more and more amateurs are using them because they’re also relatively inexpensive and easy to use.For many people — especially any technophobic musicians out there (you know who you are) — the thought of recording on a computer is daunting. You have to deal with hardware issue (what kind of computer do I get?) and software issue (how do I work this #@*% thing?). Add to this the sometimes-complicated workings of the non-audio computer software and you get a deer-in-the-headlights look from otherwise intelligent, articulate people.
Well, I hear ya. I don’t consider myself a techy (although I fear I might be turn-ing into one), and gettturn-ing up-to-speed when it came to recordturn-ing into a com-puter left me scratching my head a few times. Luckily for you, I’ve stopped scratching my head and have managed to make some semblance of sense out of the whole thing.
About This Book
PC Recording Studios For Dummiesis an introduction into the world of computer-based audio recording. This book takes the mystery (and frustra-tion) out of recording into a computer. You discover tips to help you make the process of recording music easy and the final product sound as good as possible.
PC Recording Studios For Dummiesgets you going quickly so that you can spend your valuable time recording music — not tweaking your computer settings.
Here’s a quick rundown of what you can find in this book:
⻬You discover the basic components of a computer-based recording studio.
⻬You get hands-on steps guiding you through the computer-based record-ing process.
⻬You explore the many powerful add-ons that you can use to take basic tracks and turn them into the music you hear in your head.
⻬You discover free (or really cheap) software that you can use to create your next masterpiece.
The best thing about this book is that you get all this information without the brain-numbing technical jargon and posturing that you find in so many computer-related books. After all, the computer should be a tool that you use to create your art, not an obstacle to it.
Not-So-Foolish Assumptions
As much as I hate to admit this, I made some assumptions about you, the reader, when I wrote this book. Actually, I think you’ll be glad I did. First, I assumed you want to record audio into a computer (hence the title: PC Recording Studios For Dummies) and I assumed that you aren’t a techy but you know the basics about using a computer, such as how to use a mouse, load software, and other rudimentary skills. I also assumed that you have some basic idea of how music is recorded. (If you don’t have any idea about what the music-recording process entails, you might want to check out one of my other recording books: Home Recording For Musicians For Dummies— that is, if you haven’t already read it.)
Aside from these very basic assumptions, I don’t assume that you’ve ever used a computer to record music before or that you even play any musical instrument. If you’re a musician, I don’t assume that you make a specific type of music. Whether you’re making music from the sounds of whales mating or you’re composing the next top-ten smash hit, the info in this book is equally relevant. I also assume that when I say “electric bass” you know I’m not refer-ring to a plastic fish singing “Take Me to the River.”
How This Book Is Organized
Part I: Computer Recording Basics
Part I covers the basics of computer-based recording. Chapter 1 introduces you to the individual components of a computer studio and explains what everything is for. Chapter 2 shows you how to set up a system so that it is easy to work with and sounds good. You also look into how you can set up your studio to sound as good as possible without having to spend a fortune on acoustical treatments.
Part II: Choosing and Installing
Computer Hardware
Part II gets into gear talk. Here I focus on the hardware you need to have around if you want to record into your computer. Chapter 3 explores the core of your system: the computer itself. This chapter covers both Mac and Windows sys-tems and shows you what to look for when buying or upgrading your computer. Chapter 4 examines the audio-based hardware you need, such as the audio and MIDI interface and other components that get the sound in and out of the digital domain. Chapter 5 walks you through the process of getting all this hardware hooked up and running properly.
Part III: Choosing and Installing
Recording Software
Part III digs into the software that you need if you want to record audio inside your computer. Chapter 6 explains the different functions of audio and MIDI recording programs so you can decide what features you need for your system. Chapter 7 gives you a look into some of the most popular programs used for recording, editing, and mixing your music. Chapter 8 guides you through the process of installing your software into your computer. I cover both Windows XP and Mac OS X. This chapter gives you the settings you need to get you up and running, and you find tips to keep your system stable.
Part IV: Revving Up the Recording Process
of recording and editing audio, and Chapter 11 keys into this same process with recording and editing MIDI (Musical Instrument Digital Interface). Chapter 12 looks at working with loops (short musical snippets that you can use to compose your songs), and Chapter 13 digs into recording with software instruments called soft-synths. Chapter 14 gives you information on mixing and mastering all your tracks within your computer.
Part V: Playing with Plug-Ins
Part V explores the role of plug-ins (software processors that you “plug in” to your instrument tracks) in computer-based recording. Plug-ins are one of the most versatile tools for recording in a computer, and you need to understand them so that you can use them effectively. So, Chapter 15 introduces you to these powerful tools and shows you the basics of using them in your songs. Chapter 16 looks at equalizer plug-ins, which you can use to sculpt the fre-quencies of your tracks. Chapter 17 examines the process of adding effects — such as reverb and delay — to your recordings. Chapter 18 demystifies dynamics processors and shows you how to use them to add that certain je ne sais quoito the sound of your music.
Part VI: The Part of Tens
A staple of every For Dummiesbook, this Part of Tens contains some chap-ters to help you along the way. This section contains three chapchap-ters: Chapter 19 offers tips to improve the performance of your system and keep it running smoothly. Chapter 20 points you to some Internet resources that I’ve found to be helpful for rounding out my computer recording knowledge. Chapter 21 lists free (or really cheap) software that you can use when you record.
Icons Used in This Book
As with all For Dummiesbooks, I use a few icons to highlight certain informa-tion that I feel is especially valuable.
Certain techniques are very important or can come in handy on a regular basis. This icon gives you gentle nudges to put these foremost in your mind.
This icon highlights expert advice and ideas that can help you to produce better recordings.
This icon lets you know when making a wrong move could damage your equipment, your ears, or your song.
Where to Go from Here
I set up this book so that you can either read it cover to cover or jump around and read only those parts that interest you at the time. For instance, if you’re getting ready to buy a computer to record on, check out Chapter 3. If you already have a computer and want to know what software to buy, jump to Chapters 6 and 7. If you’ve set up your hardware and software and you want to see how to add effects to your song, go to Chapter 18.
Computer
Discovering What You Need
In This Chapter
䊳Understanding the components of a computer-based studio
䊳Discovering how each component contributes to the final sound
W
hether you use a Windows or Macintosh computer for your home recording studio, your system of choice employs much of the same basic technology. In fact, your simple computer-based studio consists of the same basic components as a typical million-dollar professional studio complex — they’re just in a different physical format. For example, instead of the huge mixing board that you see in a commercial studio, you’re going to be working with a piece of software in your computer. It might not look as imposing, but it performs the same functions (and then some).In this chapter, you discover the purpose of each individual component of a computer-based recording studio — and you also discover how each of these components relates to the quality of sound that you ultimately get from your studio. This knowledge will definitely help you when it comes to spending the right amount of money on the right stuff. (See Chapters 3, 4, and 8 for more on purchasing gear.)
I use the term component pretty broadly in this chapter and include every-thing you may use in your studio from preamps and microphones that you need to capture the sound to the software you use for editing to the blank CDs you use to store your musical data on.
Looking at the Larger Picture
⻬Audio interface:The audio interface is a piece of hardware that allows you to get sound from the outside world into your computer. Most audio interfaces contain everything you need to accomplish this task, includ-ing preamps, direct boxes, AD and DA converters, and a sound card. Confused by all these components? You won’t be for long — as you read this chapter, all these items will start making sense to you. Many types of interfaces are available, each with different features. At least one option will surely meet your particular needs.
⻬Computer:This is an obvious one, but it’s an item that confuses a lot of people. Of course you know you need a computer to make music with a computer, but the question that always comes up is, “What kind of com-puter?” I describe the basics of an audio-recording computer later in this chapter and even dedicate an entire chapter to this seemingly innocent question (see Chapter 3).
⻬Input device:Input devices include instruments, mics, and any other device that lets you input sound into your computer.
⻬Mastering media:The mastering media is where you put your finished music. This can be CDs, or it can be in the form of computer files such as MP3, WAV, AIFF, and others.
⻬Monitors:Monitors consist of speakers or headphones. These are important because you need to hear what you’re recording or mixing.
⻬Software:Music software can vary considerably. You can find simple programs that let you assemble pieces of pre-recorded music (called loops) such as Apple’s GarageBand or basic recording programs such as Guitar Tracks Pro by Cakewalk. You can also find more sophisticated programs such as MOTU’s Digital Performer or Steinberg’s Cubase — ones that allow you to record and mix hundreds of audio and MIDI (Musical Instrument Digital Interface) tracks, software synthesizers, and limitless effects.
Software can also exist in the form of synthesizers, samplers, and digital signal processors (DSPs) such as effect plug-ins.
As you’re probably aware, a recording studio can have lots of gear — from a locker full of microphones and roomful of instruments to a pile of electronic gear such as preamps, compressors, mixers, and speakers. All this equipment is seductive, and you could spend all your time fussing with gear and not get any recording done. (In fact, this happens a lot.) Try not to focus too much on the equipment. Instead, put your energy into making music.
Interpreting Input Devices
All your expensive recording gear is useless if you have nothing to plug in to it. This is where the input device comes into play. An input deviceis, simply, any instrument, microphone, or sound module that produces or delivers a sound to the recorder.
Instruments
Your electric guitar, bass, synthesizer, and drum machines are typical of the instruments that plug in to the interface and represent most of the input devices that you use in your studio. The synthesizer and drum machine can plug directly into the Line In inputs of your interface, whereas your electric guitar and bass need a direct box (or its equivalent) to plug in to first. (Most audio interfaces allow you to plug directly into one of the preamps, so you don’t need a separate direct box.)
A direct boxis an intermediary device that allows you to plug your guitar directly into the mixer without going through your amp first. (For more on direct boxes, see the upcoming section “Deciphering direct boxes.”) Check out Figure 1-1 for an example of an instrument-input device.
Microphone
A microphone (abbreviated mic) enables you to record the sound of a voice or an acoustic instrument — sound sources that, last time I checked, couldn’t be plugged directly into the interface. A mic (shown in Figure 1-2) converts sound waves into electrical energy that can be amplified by the preamp and understood by the interface. As you find out in Chapter 3, a lot of different types of mics are available, and choosing the best one for a particular appli-Figure 1-1:
Sound modules and soft-synths
Sound modulesare special kinds of synthesizers and/or drum machines. What makes a sound module different from a regular synthesizer or drum machine is that these contain no triggers or keys that you can play. Instead, sound modules are controlled externally by another synthesizer’s keyboard or by a Musical Instrument Digital Interface (MIDI) controller (a specialized box designed to control MIDI instruments). Sound modules have MIDI ports (MIDI jacks) to enable you to connect them to other equipment.
Often sound modules are rack-mountable,meaning they have screw holes and mounting ears so that you can put them into an audio component rack. Some controllers, however, are not rack-mountable. Figure 1-3, for example, shows a drum module that rests on a stand or tabletop.
Soft-synthsare software versions of sound modules, housed in your computer as programs. These software programs have no need of external MIDI connec-tions because they’re virtual sound modules — they live on your computer’s hard drive. You just insert them into your recording program as plug-ins.
Examining the Audio Interface
In order to record into a computer, you need a device called an audio inter-face.The audio interface is a piece of hardware that acts as an intermediary between the analog world of your mics and instruments and the digital world of your computer. Traditionally (if there can be traditions in such a new tech-nology), you needed the following pieces of gear:
⻬Sound card:This card — also called a PCI cardbecause it fits in the Peripheral Component Interface (PCI) slot in your computer — allows your computer to read and understand the digital information coming from and going to the converters. Without a sound card, your computer doesn’t know what to do with the musical data that it receives (or that your hard drive stores).
⻬Analog-to-digital (AD) and digital-to-analog (DA) converters:These converters allow you to get the sound from your instrument, direct box, or preamp to the sound card (the AD converter’s job) and from your computer back out to your monitors (the DA converter’s job).
Nowadays, both the sound card and converters are usually part of the audio interface, so you don’t have to buy them separately.
MASTER LEVEL INPUT SENS.
INPUT SENS. INPUT SENS.
INPUT SENS.
KICK SNARE RIM HIGH LOW
SHIFT
SOUNDVARIATIONPITCH DECAYLEVEL ALEVEL B
SOUND SIZEMEM LEFTLISTENMARKDELETE
An audio interface also generally contains everything else you need to get your instruments and mic signals into your computer properly. These compo-nents include:
⻬Direct box:A direct box (technically called a Direct Induction Box or DI box for short) lets you plug your guitar directly into your recording device (in this case your computer) without having to go through your amp first.
⻬Microphone preamp:This is a requirement if you want to plug your mic into your recording device. The preamp amplifies the signal coming from your mic so that it can be recorded.
Audio interfaces have different ways of handling both these components. Some contain preamps that can act as both a microphone preamp and a direct box, but others also have instrument inputs that function like a direct box and allow you to plug guitars directly into them. Most audio interfaces have at least two and as many as eight inputs with preamps. (Chapter 3 shares more on instru-ment inputs and preamps.)
Audio interfaces come in many varieties — varieties that use one of the three following ways to connect to your computer:
⻬Through a PCI card connected to your computer’s PCI slot:This method is the old standard for getting audio in and out of a computer. PCI-based interfaces come in several varieties, which include the following:
• Separate sound cards with no analog inputs and outputs.
• Analog inputs and outputs within the card.
• Analog inputs and outputs housed in a separate box (called a break-out box).
If you want to go the PCI route, make sure that your computer has PCI slots that are compatible with the PCI interface that you’re considering. (Not all are; the Digidesign 001, for example, doesn’t work in Mac G5 computers.)
⻬Through an interface connected to the USB port:This method is handy because most computers have at least one USB port. The only problem with USB for recording audio is the relatively slow transfer speed. USB 1.1 generally limits you to two inputs (although you can find some interfaces with as many as six inputs) and two outputs. It also introduces more latency — the delay from the audio going in and coming back out of your computer — than the PCI or Firewire (see the next bullet) options. (Dealing with latency definitely adds some steps to the recording
USB 2.0–compatible interfaces are just beginning to hit the market. USB 2.0 offers a much faster transfer rate than USB 1.1, so the limited input and latency issues won’t be a problem in the not-too-distant future (assuming you have both a computer and USB audio interface that func-tion with USB 2.0).
⻬Through your FireWire port:FireWire is preferable to USB because the transfer speed is fast enough to keep latency down to a minimum. FireWire ports are inexpensive and available on laptop computers as well as desktop ones, which makes Firewire interfaces more versatile than PCI-based systems.
Because you have so many audio interface options to choose from, I detail what to look for in Chapter 3.
Singling out a sound card
A sound card is necessary for your computer to be able to record or play-back digital audio data. All computers come with a basic sound card, but for recording music you most likely need to get a better one. Keep in mind, though, that buying a soundcard separately isn’t your best option because you’ll still need to get the AD and DA converters and other components that are included in an audio interface. And all audio interfaces come with a (usu-ally pretty good) soundcard so a separate sound card isn’t necessary.
Examining AD and DA converters
When you play your instrument or sing into a mic, the signalthat you’re pro-ducing is an analog one. It consists of electrical impulses representing sound waves. In order for you to record, store, or playback these impulses in your computer, you need to convert these impulses into and out of digital bits. (You know, 1s and 0s.) You do this with AD and DA converters.
The quality of the sound of your recordings is hugely influenced by the quality of your sound card and converters. Because this is such an important part of the recording puzzle, I explain the intricacies of digital audio conversion, recording, and playback in Chapter 3. (I make it easy to understand, I promise.) Before you go out and buy an audio interface, I highly recommend that you read Chapter 3.
Deciphering direct boxes
through your amp first. A direct box’s purpose is twofold: to change the guitar’s impedance level (a guitar has a high impedance, and a mixer has a low impedance) so it matches your mixer to create the best sound possible, and to change the nature of the cord connection from unbalanced (quarter-inch) to balanced (XLR) so you can use a long cord without creating noise. (For more on cord types and balanced signals versus unbalanced signals, go to Chapter 5.)
Because you’re unlikely to need a long run of cords from your guitar to your mixer (the main reason for going from an unbalanced to a balanced connec-tion), your main purpose in using a direct box is to act as an impedance transformer (it changes your guitar’s signal from high to low impedance). Without a direct box changing your impedance levels, your guitar signal might sound thin or have excess noise.
Depending on how many mics and guitars you want to plug in to your audio interface (and depending on which interface you have), you might not need to buy a separate direct box. Most audio interfaces have inputs that can handle any and all impedance-transforming chores associated with the signal from your guitar or bass. These are usually the inputs with the preamps already built in. (See the next section.)
Perusing the preamp
Microphones produce a lower signal level than do line-level devices (synthe-sizers, for example); thus they need to have their signal level increased. For this purpose, you need a preamp,a device that boosts a mic’s output. Preamps can be internal or external, meaning they could reside within your audio interface or exist as a separate unit that you plug in between your mic and audio interface.
The preamp is one of the most crucial elements of a recording system. It can affect your instrument’s sound significantly. Most professional recording stu-dios have a variety of preamps to choose from, and engineers use a particu-lar preamp based on the type of sound they’re trying to capture.
The three basic types of preamps available are solid-state, tube, and hybrid.
Solid-state
preamp for acoustic or classical music or any situation when capturing a very natural sound is important. The preamps in your audio interface are solid-state — though certainly not as high a quality as many of the more expensive external preamps — and are usually designed to more on the “clean sound” side of the spectrum, rather than the “pleasingly distorted” side.
Tube
Since the beginning of the digital recording revolution, professionals have been complaining about the harshness of digital recording. As a result, many digital-recording pros prefer classic tubepreamps because they can add warmth to the recording. This warmth is actually a distortion, albeit a pleas-ing one. All-tube preamps are generally very expensive, but they’re highly sought after among digital recording aficionados because of their sound. Tube preamps work well with music when you want to add color to the sound (for example, adding some distortion to your sound source or enhanc-ing certain pleasenhanc-ing tones in your instrument). No wonder they show up a lot in rock and blues — and they’re great for recording drums. You can also find tube preamps that are clean and open, such as those made by Manley Labs.
Hybrid
A hybrid preamp contains both solid-state and tube components. Most of the inexpensive tube preamps that you find in the marketplace are actually hybrids. (These are also called starved-platedesigns, because the tubes don’t run the same level of voltage as expensive tube designs.) These types of pre-amps are usually designed to add the classic tube warmth to your instrument’s sound. How much the sound is colored by the tubes — and how pleasing that colored sound is to the listener’s ears — depends on the quality of the preamp. Most hybrid preamps allow you to dial in the amount of character(pleasing dis-tortion) that you want. You won’t find a hybrid preamp that sounds as good as a great (or even pretty decent) solid-state or tube preamp, but you might find one that works well enough for your needs.
Your audio interface comes with a limited number of solid-state preamps (usually two to four, but sometimes as many as eight). If you want to plug in more mics than the number of preamps you have or if you want to be able to produce different sounds from your preamps, you need to buy one or more external preamps, such as the one shown in Figure 1-4.
Clueing In to the Computer
No matter which platform of computer you choose, Mac or PC, the stuff you find inside your computer plays a major role in determining how smoothly (or how less-than-smoothly) your computer recording system runs. (Chapter 3 details the best computer setups for audio.)
To set up a computer to record audio properly, you need several things:
⻬A computer(Preferably with a speedy processor.)
⻬Bunches (BIG bunches) of memory(The words too muchdon’t apply.)
⻬Dual hard drives(One just won’t cut it.)
⻬An audio interface (See the “Examining the Audio Interface” section ear-lier in this chapter and also see Chapter 4.)
⻬The software (See the “Signing On to Software” section later in this chapter and also see Chapter 3.)
The following list clues you in on the various pieces of hardware that you find in your computer:
⻬The CPU:The CPU (processor) is the heart of your computer studio. The speed of your CPU ultimately dictates just how well any program runs on it. As a general rule, for audio, get the fastest processor that you can afford. For most audio software, you need at leasta Pentium III for the PC or a G3 for Mac. If you can afford it, get a dedicatedcomputer — one that you have specifically set aside for recording audio — because running other types of applications (such as home finance, word proces-sors, or video games) can cause problems with your audio applications and reduce the stability of your system.
⻬Memory: Computer-based audio programs and all their associated plug-ins are RAM (random access memory) hogs. My advice: Get a lot of RAM. Okay, that’s not very specific, but how much you really need depends on your recording style. If you do a lot of audio tracks and want reverb or some effect on each track, you need more RAM (and a faster processor).
Many recording software programs recommend a minimum of 384MB of RAM, but you should really get a lot more. And I mean a lotmore. At least a gigabyte, but you can never have too much. Also, don’t skimp on the quality of the RAM you use. Cheap RAM is worse than no RAM at all, so I recommend that you buy name brand RAM.
⻬Hard drives: To record audio, be sure you get the right type of hard drives. Notice how I said hard drives(plural). Yep, you should get more than one if you want to record more than a few tracks of audio. You want one hard drive to hold all the software and the operating system — and anotherdrive just for the audio data. Having two greatly increases the likelihood that your system remains stable and doesn’t crash on you, especially if you try to run 16 or more tracks.
As for the size of the hard drive, bigger is better, at least in the audio drive where you store your music. For the core system drive, you can get by with a 10GB (gigabyte) drive; for the audio, 20GB is still pretty conservative because audio data can take up a ton of space. For exam-ple, a 5-minute song that has 16 audio tracks recorded at a 24-bit resolu-tion and 44.1-kHz bandwidth would take up about 600MB of hard drive space (that’s about 7.5MB per track minute).
Choose your hard drives wisely. For the software hard drive, you can get away with a stock drive (usually the one that comes with your com-puter). But for the audio, you need a drive that can handle the demands of transferring audio data at high speed. The main things you want to look for are
•Spindle speed:Also called rotational speed,this is the rate at which the hard drive spins. For the most part, a 7,200 rpm (rotations per minute) drive works well for recording and playing back audio.
•Seek time: This is the amount of time the drive takes to find the data stored on it. You want an average seek time under 10 ms (milliseconds).
•Buffer size:Often called cache buffers,these memory units store data as it’s being transferred. You want a buffer size of at least 2MB.
The track count that your system can handle is directly related to the speed of your hard drive — the faster the drive, the more tracks you can record and play back at once. (Of course, the type of drive you get determines how large a role your processor plays.) My current choice for a drive is a Maxtor 7,200 rpm ATA IDE drive with an 8.5 ms seek time and 2MB cache buffer. A 100GB drive currently costs around $100.
Signing On to Software
audio software in detail in Chapters 7 and 8, here’s a quick rundown on the basic components of audio recording software:
⻬The mixer:The mixer lets you adjust the level (volume) of your instru-ments, route your signals where you want them, and add effects or other digital signal processing to your tracks. The mixer is one of the most important pieces of gear in a recording studio — even a computer-based one. All audio recording software contains a mixer.
⻬The arranger:The arranger is where you can organize your musical ideas. All audio recording software has some sort of arrange function.
⻬The editor:One of the best things about computer-based recording is that you can generally do sophisticated editing of the audio data. The editing capabilities of the many software programs vary considerably. Some — such as Pro Tools — have very powerful audio editing while others — can you say “Logic Pro” — have very powerful MIDI editing.
⻬MIDI sequencer:MIDI (short for Musical Instrument Digital Interface — a communication protocol for musical instruments) is often part of audio recording software and — like editing capabilities — the MIDI capabilities in the different programs vary. Pro Tools, for example, is known for having rudimentary MIDI capabilities, whereas SONAR and Logic Pro have powerful MIDI features.
⻬Digital signal processor:Digital signal processing (DSP) is anything you do to the sound of your audio data other than adjust the volume. This includes equalization, dynamics processing, and effects processing (and many other kinds of tweaks).
Meeting the mixer
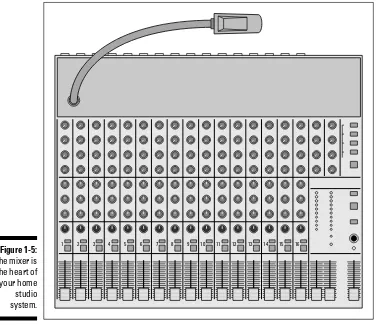
The mixer is the heart of any recording system. Although the mixer might seem daunting with all its knobs, buttons, sliders, and jacks — take a look at Figure 1-5 to see what I mean — it’s really one of the most interesting and ver-satile pieces of equipment in your studio. With the mixer, you can control the volume level of the incoming signal, adjust the tonal quality of an instrument, blend the signals of two or more instruments together, and a host of other things. And don’t worry; as you read through this book, you get the hang of all those knobs in no time.
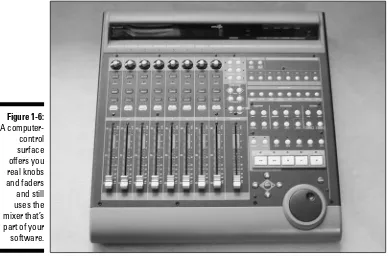
The mixer in all the audio recording software programs does the job well enough that you don’t need an external mixer, although some people prefer having physical faders and knobs to mess with. If you’re a knob-turner and like to physically touch the instrument you’re playing (or, for that matter, the gadget you’re tweaking), I heartily recommend that you get a dedicated computer-control surface, such as the Mackie Control (shown in Figure 1-6). A computer-control surfaceis a unit that lets you get your knobs and faders while still using the internal mixer in your recording software. This can be an advantage because it eliminates the need for lots of analog-to-digital conver-sions (ADCs) and digital-to-analog converconver-sions (DACs). (And that’s not count-ing the actual converters, which can cost a lot of money.) On the other hand, if you prefer clicking a mouse or typing on a keyboard (the kind with letters on the keys), choose a software version.
1 2 3 4 5 6 7 8 9 10 11 12 13 14 15 16 Figure 1-5:
Accessing the arranger
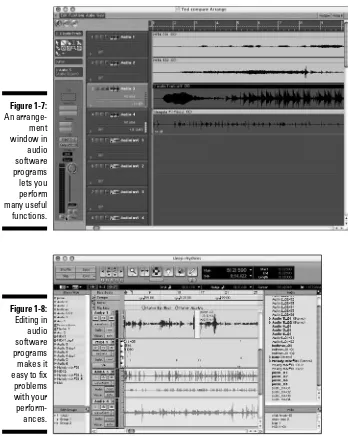
Audio software makes arranging your musical ideas very easy. Usually with just a click-drag of your mouse you can move sections of data around. Figure 1-7 shows a screen shot of a typical arrangement window. From this window you can perform any number of functions, including trying alternate arrangements for your song; taking the best parts of your performances and placing them exactly where you want them; and countless others.
Exploring the editor
Being able to make miniscule edits to your recorded performances is one of the reasons many people want to record on a computer. Between the usually large video monitor that most people have and the functions of most audio recording programs, editing is a breeze. Check out Figure 1-8 for a look at the editing window for a popular brand of software. From this window you can improve the quality of your music dramatically with the help of a few editing tricks — getting rid of unwanted noise (those darned chair squeaks, for Figure 1-6:
example) or fixing the occasional bad note in an otherwise inspiring perfor-mance, to name a few. Of course the downside is editing too much and sucking the life out of a performance, but you wouldn’t do that (would you?). Chapter 6 talks about editing capabilities in some of the more popular brands of software, and Chapter 11 explores how to use these capabilities with your music.
Managing the MIDI sequencer
A MIDI sequencer is where you can record MIDI performance data into your computer for playback and editing. MIDI sequencing allows you to record your performance and choose the sound that accompanies it later on. The MIDI data that you record is simply performance information, such as when a note is played, the velocity (volume) of the note, and when the note was released, to name a few.
MIDI (Music Instrument Digital Interface) is a protocol that musical instrument manufacturers (in a rare moment of cooperation) developed to allow one digi-tal instrument to communicate with another. MIDI uses binary digidigi-tal data, in the form of 1s and 0s, to tell an instrument to play or release a note, to change sounds, and a host of other messages. Chapter 4 explains more about the other gear you need to do MIDI in your studio, and Chapter 11 lays out how to use MIDI for your musical ideas.
Most audio recording software contains some sort of MIDI sequencing capa-bilities. Some are fairly simple and let you record, playback, and edit the data, but others offer much more advanced features that let you work with the data in intricate ways. Check out Figure 1-9 to see a couple MIDI windows in a MIDI powerhouse program.
Digging into digital signal
processors (DSPs)
Part of the recording process involves making adjustments to a sound either before or after it’s been recorded. This is the job of the signal processor. Signal processors come in three varieties — equalizers, dynamic processors, and effects processors. They can be incorporated into the system or work as separate, standalone units. For most home recordists, the signal processors Figure 1-9:
of choice are integrated into the software as plug-ins, although you can also use external processors by sending the audio out of your computer and back in again.
Equalization (EQ)
Equalizers enable you to adjust the frequencies of a sound in a variety of ways. In effect, you tell the frequencies to
⻬Go away:You can get rid of unwanted noise or an annoying ringing by reducing select frequencies.
⻬Come hither:Add lifeor presenceto an instrument by bringing the best characteristics of that instrument forward.
⻬Scoot over:You can make room within the frequency spectrum for each of the instruments in your mix by selectively boosting or cutting certain frequencies.
You can find out more about EQ (and discover some great EQ tips and tricks) in Chapter 16. The three main types of EQ are graphic, shelf, and parametric. Here’s the rundown:
Graphic EQ
Use graphic equalizersto choose a specific frequency to increase or decrease by a certain amount, generally up to 6 or 12 decibels (dB). Doing so enables you to eliminate an offending frequency from the signal or make other adjust-ments to the tonal quality of the source signal. The graphic EQ will have a certain number of frequency bands that you can adjust. You’re limited to only those frequency bands that your EQ has available. Figure 1-10 shows a typical graphic EQ.
Shelf EQ
A shelf equalizeraffects a range of frequencies above or below the target frequency. Shelf EQs are generally used to roll offthe top or bottom end of the frequency spectrum. For example, you can set a shelf EQ to roll off the
LO CUT HIGH CUT
LEVEL
LO CUT HIGH CUT
LEVEL
frequencies below 250 Hz (hertz) to reduce the amount of rumble (low-frequency noise) in a recording. You can see how this looks in Figure 1-11. Notice how the shelf EQ gradually reduces the amount of energy (sound) below the set point and then levels off: hence, the shelfin its name.
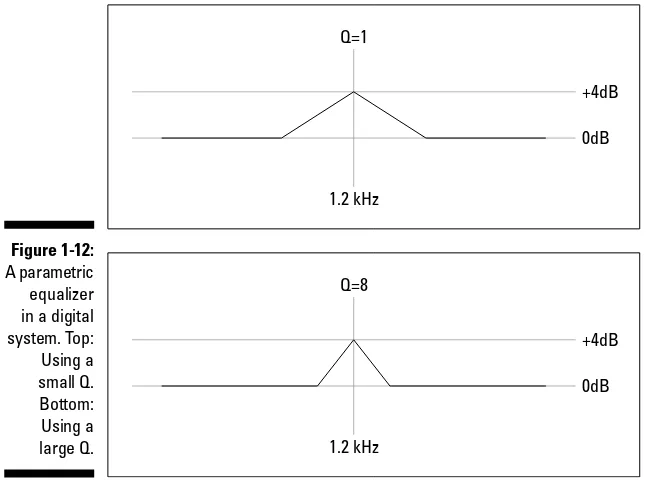
Parametric EQ
The parametric equalizerenables you to choose the specific frequency that you want to affect, as well as the range of frequencies to put around that fre-quency. With a parametric EQ, you dial in the frequency that you want to change, and then you set the range (referred to as the Q) — that is, the number of octaves that the EQ will affect. Check out Figure 1-12: The two diagrams show how the Q relates to the range of frequencies affected. (The higher the Q setting, the narrower the band of frequencies affected.)
The beauty of a parametric EQ is that you can take a small band (range) of frequencies and add or cut them. Doing this allows you to get the various instruments in a mix to fit in with one another (called carving out frequencies). For example, a lot of times the bass guitar gets lost behind the booming quencies of the kick drum (200–500 Hz). By setting the Q to cover this fre-quency range and setting the level at about –6dB (reducing by 6 decibels), you effectively make room for the bass guitar to be heard in the mix.
You’ll find that the parametric EQ is one of your most useful tools when mixing all your individual tracks into a stereo pair (part of the mixing process covered in Chapter 14). I describe this tool in detail in Chapter 16.
Dynamic processors
Dynamic processorsare devices that regulate the amount of sound (energy) that passes through them. This amount is defined as the dynamic range— the range between the softest sound and the loudest sound. Dynamic processors come in three varieties: compressors/limiters, gates, andexpanders.I explain each variety in the following sections.
−4dB
250Hz
0dB
Dynamic processors are useful in a variety of ways. Use them to
⻬Control the signal going into the mixer and recorder.
⻬Tame the levels and correct the effects of an erratic musical perfor-mance when mixing.
⻬Optimize the levels of the finished stereo tracks when mastering — the final step in making your music. (Chapter 14 covers mastering in greater detail.)
Dynamic processors are some of the most useful tools that you have in your home studio. See Chapter 18 for more on dynamic processors.
Compressors/limiters
The compressor’s job is to compress the dynamic range of the sound being affected. The purpose of the compressor is to eliminate transients(unusually loud notes) that can create clipping(digital distortion). The compressor limits not only how loud a note can be, but it also reduces the difference between the loudest and softest note (compressing the dynamic range).
Compressors are used extensively on vocals; the device keeps transients at bay by gently reducing the highest level that goes through it. Compressors
1.2 kHz Q=1
+4dB
0dB
1.2 kHz Q=8
+4dB
0dB Figure 1-12:
are also used in mastering to raise the overall volume of a song without creat-ing distortion. The device does this by reduccreat-ing the overall dynamic range, and as a result, a compressor effectively raises the volume of the softer notes without allowing the louder notes to be too loud and distorting.
A limiterworks much like the compressor, except that it severely limits the highest level of a sound source. The limiter is basically a compressor on steroids: It gives you beefed-up control over volume. Any signal above a cer-tain level, called the threshold,gets chopped off rather than compressed (as with the compressor). A limiter is a good choice in extreme situations, such as when you want a really in-your-face snare drum sound. In this instance, the limiter essentially eliminates any dynamic variation from the drummer’s snare drum hits and makes them all as loud as possible.
Gates
A gateis basically the opposite of the limiter. Rather than limiting how loud a note can get, the gate limits how softa note can get. The gate filters out any sound below a certain setting (the threshold) while allowing any note above that threshold to be heard.
Recordists often use gates on drums to keep unwanted sounds from the cym-bals from bleeding through to the tom-tom or snare drum mics, or on guitars by refusing to allow the noise generated by guitar effects to be heard when the instrument isn’t playing.
Expander
The expanderis basically the opposite of a compressor — instead of attenuat-ing(reducing the volume of) the loudest notes in a performance, an expander attenuates the softest notes. For example, if you have a singer whose breath you can hear in the mic and you want to get rid of that particular blemish, just set the expander to go on at a level just above the annoying breath sounds, and it will subtly drop out the offending noise.
Effects processors
Effects are historically used to mimic real-world situations. As a home recordist, you’ll likely discover a great affinity toward your effects processors because they enable you to create sonic environments without having to rent some great recording room. For example, imagine dragging your drums and all your recording equipment into a large cathedral, setting them up, and spending several hours getting the mics placed just right. Sounds like a lot of work, right? (I get tired just thinking about it.) Well, how about recording your drums in your modest home studio and simply choosing the “cathedral hall reverb” patch instead? Now that’s much easier.
In the world of effects processors, you have many choices, and many more show up every year. The most common effects processors are (in no particu-lar order) reverb, delay, chorus, flanger, and pitch correction. Read on for the lowdown on each type.
Reverb
Reverb is undoubtedly the most commonly used effects processor. With reverb, you can make any instrument sound as if it were recorded in almost any environment. Reverb, a natural part of every sound, is the result of the sound bouncing around inside a room. The larger the room, the more pro-nounced the reverb. The purpose of a reverb in audio production is to make an instrument sound more natural (especially because most instruments are recorded in small, non-reverberant rooms) or to add a special effect. Reverb can make almost any recorded instrument sound better — if used correctly.
Delay
Think of delays as the recording studio’s version of an echo. The delay can be set to happen immediately after the original sound or be delayed much longer. Delay can sound natural or be used as a spacey special effect. You can have a single echo or multiple delays (very common with the snare drum in reggae music, for instance). Delays are commonly used on vocals and guitar, although you can hear them on just about any instrument, depending on the style of music.
Chorus
A chorus effect can make one instrument sound like several. Chorus effects add very-slightly-off-tune versions of the unaffected sound, which results in a fuller sound. You find chorus effects used on vocals, guitars, and lots of other melodic instruments.
Flanger
A flanger (pronounced flanj-er) effect is similar to a chorus effect in sound except that the flanger gets its sound from delayingpart of the affected sound in relation to the original, rather than altering its pitch. Recordists sometimes use flangers on background vocals and solo instruments to add an interesting texture. This is a unique sound that you recognize almost immediately upon hearing it.
Nowadays, you can just choose the flanger patch (sound) on your effects processor to get this sound. Isn’t technology great?
Pitch correction
Pitch correction, like its name suggests, is used to correct an out-of-tune note. You can use this effect to help a singer or an instrument player sound better by fixing those notes that are slightly out of tune. Pitch correction (also called auto-tune) has gotten a bad rap lately (mainly from its overuse and potential for abuse with a singer who can’t sing in key). When used sparingly and appro-priately, pitch correction can make an otherwise decent vocal performance really shine. It can also be used to create some interesting effects, such as that robotic vocal sound that you hear on so many of the pop songs on the radio nowadays. An easily distinguished example would be the lead vocal on Cher’s “Believe.”
Monitors
To record and mix music, you need to be able to hear it. (Hey, obvious facts need love, too.) Monitors make this happen. You can use headphones or speakers as monitors; most home studios use both. Monitors are an essential part of a recording studio because you need to get what you’re recording and mixing into your ears for you to make sure that it sounds good.
Without good speakers, you won’t know what your mixes are going to sound like on other speakers. (Find out more about mixing in Chapter 14.)
Headphones
Speakers
For most home recordists, the first set of monitors consist of the home stereo system, but sooner or later you’re gonna want a real set of monitors. Studio monitors come in many varieties, but the home recordist’s best bet is a set of near-field monitors. Near-field monitorsare designed to be positioned close to you (which is often the case anyway because most home recordists have very little room in which to work).
Near-field monitors come with or without an amplifier. The amplified moni-tors are called active monimoni-tors,and the non-amplified monitors are referred to as passive monitors.Which type of monitor you choose depends on your budget and whether you like the idea of the amp coming with the speakers or prefer to purchase the amp separately. Figure 1-14 has a picture of an active near-field monitor. The amplifier is located inside the speaker cabinet. Figure 1-13:
If you end up getting passive monitors, you need to buy an amplifier to send power to the speakers. The amplifier connects to the outputs of the mixer and boosts the signal to the speakers. A good power amp should be matched in power to work well with whatever speakers you have.
Mastering Media
After you mix your music, you need to put your final music on something. The two most common media for home recordists are CDs and raw computer files. Which medium you choose depends on what your goals are. For instance, if you intend to send your finished mix out to a mastering house, you’re better off saving it as raw audio data in a computer file. On the other hand, if you master your music yourself and just want to have it duplicated (or you want to give copies for your friends to play), you would want to use a CD.
CD
With the cost of CD-R (write) and CD-RW (rewrite) drives plummeting, CD mastering is the only choice for most home recordists. With CDs, you can back up large amounts of data at a very low cost and burn audio CDs that can play in any CD player. You can even send out your mastered CD to be duplicated and packaged for retail sale. (Chapter 14 explains the process for burning CDs.)
Computer files
Sometimes you won’t want to master your music directly to CD. You might decide to have a professional mastering house do it, or maybe you want to put your music on the Internet. In those situations, store your recordings as computer files. The following sections describe the most commonly used file formats for storing recorded music.
WAV and AIFF
WAV and AIFF (Audio Interchange File Format) files are the formats for audio files found with most professional audio software. The advantage to saving your music to WAV or AIFF is that when you hand over a CD containing your WAV and/or AIFF files to a mastering house, the recorded sound is actually in a higher-quality format than that of the finished CD (provided your recorder records in 20 or 24 bit, which most do). You can also take your music files to any other studio that supports these file formats and work with them there.
MIDI
A MIDI file isn’t an audio file; rather, it’s a data file that contains MIDI informa-tion that can be transferred from one computer to another. An advantage to MIDI files is that they take up less room than an audio file. The disadvantage is that they contain only the MIDI information and no sound. To play a MIDI file, you have to have a sound module. And the sound you get from the file depends entirely on what sound source you use, such as the particular key-board or soft-synth.
MP3
Setting Up Your Recording Space
In This Chapter
䊳Creating an efficient space in which to work
䊳Making your room sound good
M
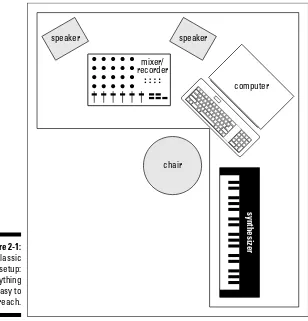
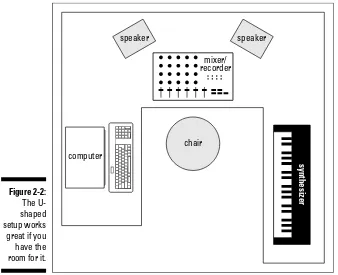
aking great-sounding recordings requires many things: good music and musicians, decent gear, solid engineering skills, and a room that sounds good. Let me repeat that last one because this is the most overlooked aspect of making great-sounding music for home recordists — a decent-sounding room. Although most professional studios spend tons of money on making their rooms sound great, you don’t have to (as if you could). With a little elbow grease, some rudimentary carpentry skills, and the tips contained in this very chapter, you can make whatever room you set up as your recording space sound pretty decent. In fact, the ideas and strategies I offer here can make your room sound as good as a professionally-designed studio (well, almost). Because it’s unlikely that your room is perfect for all your recording needs, I also offer some ideas to get great sounds without the big budget found in professional circles.Professional studios also take great care to create an environment that is con-ducive to working efficiently. Most home recordists, on the other hand, put their computer in the corner of a bedroom, hook up a mic or instrument, and call it a studio.
The “pile it up in a corner and call it a studio” approach isn’t the only way to go. In this chapter, I help you set up your space so that it has the ergonomic feel that’s needed to get a lot done (and get a lot done quicker). Regardless of whether you set up in your bedroom, in your basement, or in the corner of your living room, you’ll be able to work as efficiently as possible.