QuarkXPress 6 For Dummies
by Barbara Assadi and Galen
Gruman
ISBN:076452593x
John Wiley & Sons © 2003 (432 pages)
Written by designers for designers, this
friendly guide covers every quirk of Quark,
from panes and palettes to prepress and
production--all the major tools for layout, text
editing, special effects, Web page
development, and more.
Table of Contents
QuarkXPress 6 for Dummies
Introduction
Part I - Getting Started
Chapter 1
- Introducing QuarkXPress
Chapter 2
- Have It Your Way
Chapter 3
- Boxes and Text Unite!
Chapter 4
- A Picture Is Worth . . .
Chapter 5
- Getting Tricky with Boxes
Part II - Adding Style and Substance
Chapter 6
- You’ve Got Real Style
Chapter 7
- Working with Special Characters
Chapter 8
- Devil in the Details
Chapter 9
- A Touch of Color
Chapter 10
- Understanding XTensions
Chapter 11
- Outputting Projects
Chapter 12
- Using QuarkXPress as an Illustration Tool
Chapter 13
- Other Controls for Managing Items
Chapter 14
- Warped Images
Chapter 15
- Text as Art
Part IV - Going Long and Linking
Chapter 16
- Building Books and Standardized Layouts
Chapter 17
- Making Lists and Indexes
Part V - Taking QuarkXPress to the Web
Chapter 18
- Web Projects: An Overview
Chapter 19
- Getting Your Site Up and Running
Part VI - Guru in Training
Chapter 20
- Customizing QuarkXPress
Part VII - The Part of Tens
Chapter 21
- The Ten Most Common Mistakes
Chapter 22
- More Than Ten Terms to Know
Index
Back Cover
Discover synchronized text, full resolution previews,
PostScript 3 support, and more. If you have designs on
creating great pages, read these pages first! Design
pros walk you through every quirk of Quark, from
panes and palettes to prepress and production. Soon
you’ll be spicing things up with special effects,
converting print files to HTML, combining print and
Web layouts, and producing publications packed with
punch.
About the Authors
Barbara Assadi is cofounder and principal of
BayCreative, a San Francisco marketing services
agency.
QuarkXPress 6 for Dummies
Copyright © 2003 by Wiley Publishing, Inc., Indianapolis, Indiana Published by Wiley Publishing, Inc., Indianapolis, Indiana
Published simultaneously in Canada
No part of this publication may be reproduced, stored in a retrieval system or transmitted in any form or by any means, electronic,
mechanical, photocopying, recording, scanning or otherwise, except as permitted under Sections 107 or 108 of the 1976 United States Copyright Act, without either the prior written permission of the Publisher, or
authorization through payment of the appropriate per-copy fee to the Copyright Clearance Center, 222 Rosewood Drive, Danvers, MA 01923, (978) 750-8400, fax (978) 646-8700. Requests to the Publisher for
permission should be addressed to the Legal Department, Wiley
Publishing, Inc., 10475 Crosspoint Blvd., Indianapolis, IN 46256, (317) 572-3447, fax (317) 572-4447, e-mail: [email protected].
Trademarks: Wiley, the Wiley Publishing logo, For Dummies, the
Dummies Man logo, A Reference for the Rest of Us!, The Dummies Way, Dummies Daily, The Fun and Easy Way, Dummies.com, and related trade dress are trademarks or registered trademarks of John Wiley & Sons, Inc. and/or its affiliates. QuarkXPress is a registered trademark of Quark, Inc. All other trademarks are the property of their respective owners. Wiley Publishing, Inc., is not associated with any product or vendor mentioned in this book.
representations or warranties with respect to the accuracy or
completeness of the contents of this book and specifically disclaim any implied warranties of merchantability or fitness for a particular purpose. No warranty may be created or extended by sales representatives or written sales materials. The advice and strategies contained herein may not be suitable for your situation. You should consult with a professional where appropriate. Neither the publisher nor author shall be liable for any loss of profit or any other commercial damages, including but not limited to special, incidental, consequential, or other damages.
For general information on our other products and services or to obtain technical support, please contact our Customer Care Department within the U.S. at 800-762-2974, outside the U.S. at 572-3993, or fax 317-572-4002.
by Barbara Assadi and Galen Gruman
Wiley also publishes its books in a variety of electronic formats. Some content that appears in print may not be available in electronic books. Library of Congress Control Number: 2003105674
ISBN: 0-7645-2593-X
Manufactured in the United States of America 10 9 8 7 6 5 4 3 2 1
1O/RT/QY/QT/IN
About the Authors
(Wiley, Inc.) with Galen Gruman, and has edited several computer books, including The Macintosh iLife (Peachpit Press).
Galen Gruman is the editor at M-Business magazine, and previously was executive editor at both Upside and Macworld, as well as West Coast bureau chief of Computerworld. A pioneer user of desktop publishing in professional magazine production, Galen adopted the technology in 1986 for a national engineering magazine, IEEE Software. He covered desktop publishing technology for the trade weekly InfoWorld for 12 years, as well as for other publications. Galen is coauthor with Deke McClelland of several PageMaker For Dummies books, with Barbara Assadi the series of QuarkXPress For Dummies and
QuarkXPress Bible books, and with Kelly Anton and John Cruise the Adobe InDesign 1.0 Bible, all from Wiley Publishing, Inc.
Dedication
To my “mother” Monavar, with love and appreciation, Barbara To my brothers Stephen and Darius, Galen
Authors’ Acknowledgments
We want to thank Jonathan Woolson for his assistance in updating
Chapters 18 and 19 of this book. Special thanks to Pat O’Brien for editing this book and also to Bob Woerner and everyone on the Wiley Editorial and Production staffs for their contributions.
We also thank Arne Hurty for support and encouragement. Special thanks to Fred Ebrahimi and Glen Turpin of Quark, Inc.
Publisher’s Acknowledgments
We’re proud of this book; please send us your comments through our online registration form located at www.dummies.com/register/.
Some of the people who helped bring this book to market include the following:
Project Editor: Pat O’Brien
(Previous Edition: Christine Berman)
Acquisitions Editor: Bob Woerner
Copy Editors: Teresa Artman, Diana Conover, Barry Childs-Helton
Technical Editor: Jonathan Woolson
Editorial Manager: Kevin Kirschner
Media Development Manager: Laura VanWinkle
Media Development Supervisor: Richard Graves
Editorial Assistant: Amanda Foxworth
Cartoons: Rich Tennant (www.the5thwave.com)
Production
Project Coordinators: Maridee Ennis, Courtney MacIntyre
Layout and Graphics: Amanda Carter, Joyce Haughey, LeAndra Hosier, Lynsey Osborn, Jacque Schneider
Proofreaders: Laura Albert, TECHBOOKS Production Services, Brain H. Walls
Indexer: TECHBOOKS Production Services
Publishing and Editorial for Technology Dummies
Richard Swadley, Vice President and Executive Group Publisher
Andy Cummings, Vice President and Publisher
Mary C. Corder, Editorial Director
Diane Graves Steele, Vice President and Publisher
Joyce Pepple, Acquisitions Director
Composition Services
Gerry Fahey, Vice President of Production Services
Introduction
A man walks down the street when he comes upon a construction site where a group of three brick masons are busily at work. He stops to talk to the first brick mason and asks, “What are you doing?” The brick mason answers, “I’m putting bricks on top of other bricks.”
The man continues down the sidewalk until he comes to the second brick mason. Again he asks the same question, “What are you doing?” The second brick mason answers, “I’m putting some bricks together to make a wall.”
Is QuarkXPress Too High-End for Me?
Right now, you may be wondering why on earth we are telling this story as part of the introduction to a book on QuarkXPress. Good question. But, when you think about it, the people who use QuarkXPress are a lot like those brick masons, and QuarkXPress is a lot like the mortar and bricks used by those brick masons to do their work.
What we are saying is this: There are all kinds of users of QuarkXPress. Some do very simple, one-color layouts. Some do moderately
challenging layouts, which include photos, illustrations, and complex charts. Some even create Web pages. Still others — like the third brick mason who was building a cathedral — use QuarkXPress to create polished, highly designed and illustrated works of art.
QuarkXPress — like the mortar and bricks used by the brick masons in our story — is a tool. Nothing more, nothing less. It works for the world’s most-celebrated graphic designers. It also works for people who create simpler projects, such as school newsletters.
The point is, QuarkXPress can never be too high-end for you, or for anyone else, because you pick and choose which parts of this tool you need to use. Also, keep in mind that if you create any type of print or Web layout, you can
benefit from the program’s features. Sure, it’s true that if your layouts are simple, you won’t need to use all the sophisticated features in
How to Use This Book
Although this book has information that any level of publisher needs to know to use QuarkXPress, this book is also for those of you who are fairly new to the field, or who are just becoming familiar with the program. What we try to do is to take the mystery out of QuarkXPress and give you some guidance on how to create a bunch of different types of layouts. Here are some conventions used in this book:
Menu commands are listed like this: Style→Type Style→Bold. If we describe a situation in which you need to select one menu and then choose a command from a secondary menu or list box, we do it like this: Choose File→Get Picture (or press z+E on Mac or Ctrl+E in Windows). After the first mention, we drop the
platform reference. This shorthand method of indicating a sequence of commands is often followed by the keyboard shortcut, as shown in this example.
z: This is the Macintosh’s Command key — the most-used shortcut key. Its Windows equivalent is Ctrl.
Key combinations: If you’re supposed to press several keys together, we indicate that by placing plus signs (+) between them. Thus Shift+z+A means press and hold the Shift and z keys, and then press A. After you’ve pressed the A key, let go of the other keys. (The last letter in the sequence does not need to be held down.) We also use the plus sign to join keys to mouse
movements. For example, Option+drag means to hold the Option key when dragging the mouse.
Panes: QuarkXPress has an interface feature, tabbed panes, that you may have seen in other applications. This is a method of stuffing several dialog boxes into one dialog box. You see tabs, like those in file folders, and by clicking a tab, the options for that tab come to the front of the dialog box in what is called a pane.
move your mouse is a pointer (also called a cursor). The pointer takes on different shapes depending on the tool you select, the current location of the mouse, and the function you are
performing.
Click: This means to quickly press and release the mouse button once. On most Mac mice, there is only one button, but on some there are two or more. All PC mice have at least two buttons. If you have a multi-button mouse, click the leftmost button when we say to click the mouse.
Double-click: This means to quickly press and release the mouse button twice. On some multi-button mice, one of the buttons can function as a double-click. (You click it once; the mouse clicks twice.) If your mouse has this feature, use it; it saves strain on your hand.
Right-click: A Windows feature, this means to click the right-hand mouse button. On a Mac’s one-button mouse, hold the Control key when clicking the mouse button to do the equivalent of right-clicking in programs that support it. On multi-button Mac mice, assign one of the buttons to the Control+click combination.
How This Book Is Organized
We’ve divided QuarkXPress 6 For Dummies into seven parts, not counting this introduction. Each part has anywhere from two to six
chapters, so you don’t have to wade through too much explanation to get to the information you need. Note that the book covers QuarkXPress on both Macintosh and Windows platforms. Because the application is almost identical on both, we only point out platform-specific information when we need to, or when we remember to, or both.
Part I: Getting Started
Designing a layout is a combination of science and art. The science is in setting up the structure of the page: How many places will hold text and how many will hold graphics? How wide will the margins be? Where will the page numbers appear? And so on. The art is in coming up with creative ways of filling the structure to please your eyes and the eyes of the people who will be looking at your layout.
In this part, we tell you how to navigate your way around QuarkXPress using the program’s menus, dialog boxes, and tabbed panes. We also show you how to set up the basic structure of a layout and then how to begin filling the structure with words and pictures. We also tell you how to bring in text and graphics created in separate word processing and
graphics applications.
Part II: Adding Style and Substance
Good publishing technique is about more than just getting the words
Part III: The Picasso Factor
Let’s be honest. Pablo Picasso didn’t become famous for realistically portraying people. His claim to fame is based on how he took facial features and then skewed, slanted, stretched, and shrunk them into new forms. Some folks loved his work; others found it hard to figure out. But you had to admire the fact that it was unique.
We named this part of the book after the famous artist because it tells not only how to use QuarkXPress as an illustration tool, but also how to take normal-looking text and graphics and distort them. Why would you want to do this? Good question. The answer could be that, like Picasso, you want to present ideas in a visually interesting way. Either that, or you want to see how your relatives might look with their faces rearranged. QuarkXPress lets you manipulate text and art in interesting ways, and we show you how.
Part IV: Going Long and Linking
QuarkXPress includes features that help you keep track of figure
numbers, table numbers, index entries — well, you get the idea. In fact, crafting long projects with QuarkXPress is a piece of cake. In this section, we show you how to handle long projects of all flavors, including those that link together several smaller layouts into a whole.
Part V: Taking QuarkXPress to the Web
QuarkXPress now has features for building both print and Web pages — and when it comes to building Web pages, a lot of the regular
QuarkXPress rules don’t apply. We show you how to use the new Web features to make some snazzy pages for online use.
Part VI: Guru in Training
works on PCs that use Windows and on Macs.
Part VII: The Part of Tens
This part of the book is like the chips in the chocolate chip cookies; you could eat the cookies without them, but you’d be missing a really good part. It’s a part of extremes, of bests and worsts. It’s like a mystery novel that’s hard to put down until you read the very last word. In fact, you
Icons Used in This Book
So that you can pick out parts that you really need to pay attention to (or, depending on your taste, to avoid), we’ve used some symbols, or icons in this book.
New When you see this icon, it means we are pointing out a feature that’s new to Version 6 of QuarkXPress.
Platform
Differences This icon points out features that behave a bitdifferently on Windows machines and Macs.
Tip If you see this icon, it means that we’re mentioning some really nifty point or idea that you may want to keep in mind as you use the program.
Warning If you skip all the other icons, pay attention to this one. Why? Because ignoring it could cause something really, really bad or embarrassing to happen, like when you were sitting in your second-grade classroom waiting for the teacher to call on you to answer a question, and you noticed that you still had your pajama shirt on — backwards. We don’t want that to happen to you!
Technical
Stuff This icon tells you that we are about to pontificate onsome remote technical bit of information that might help explain a feature in QuarkXPress. The technical info will definitely make you sound impressive if you memorize it and recite it to your friends.
Where to Go from Here
Chapter List
Chapter 1: Introducing QuarkXPress
Chapter 2: Have It Your Way
Chapter 3: Boxes and Text Unite!
Chapter 4: A Picture Is Worth . . .
In this part . . .
In This Chapter
Discovering menus, dialog boxes, and keyboard shortcuts Using the Tool palette and Measurements palette
W hen desktop publishing arrived in the 1980s, anyone could be a
publisher. Anyone with a message could put it on paper and send it to the world, which revolutionized society in general (and business in
particular). If you’re about to use or are already using QuarkXPress, you, too, are taking up the cause.
QuarkXPress has become the most used desktop publishing software in the world. Professionals have made QuarkXPress the corporate standard for magazine, newspaper, and catalog publishing. It is also an effective book-publishing tool, thanks to its capability to index documents, and to create tables of contents and multichapter books.
New The folks at Quark have upped the ante again with the release of QuarkXPress 6. This latest version, for Mac OS X and
Windows 2000/XP, lets you
Combine print and Web layouts in the same project
Change your mind with the new multiple undo/redo capability Synchronize text so that a change in one text box automatically happens in corresponding text boxes elsewhere
Convert print files to HTML format
Create PDF files without using additional software See full-resolution previews of pictures in your projects
Make two-position rollovers and cascading menus for Web pages Gain more control over Web text display through CSS font
families
You may feel a little daunted by QuarkXPress. Relax. In this book, we walk you through the program to familiarize you with all it has to offer. You may be intimidated by projects and layouts or by the vast layers of panes, palettes, tools, and menus you see. Don’t be. Working with
The Big Picture
QuarkXPress is a page layout program. You can use it to compose, or lay out, print and Web pages. You don’t have to be a professional publisher to use QuarkXPress; it works for simple documents, such as letters and flyers that you print out by using your desktop printer. But it’s powerful enough to handle high-end projects, like annual reports, magazines, and ads, and is used for such projects by professional publishers and
designers around the world.
The paste-up method
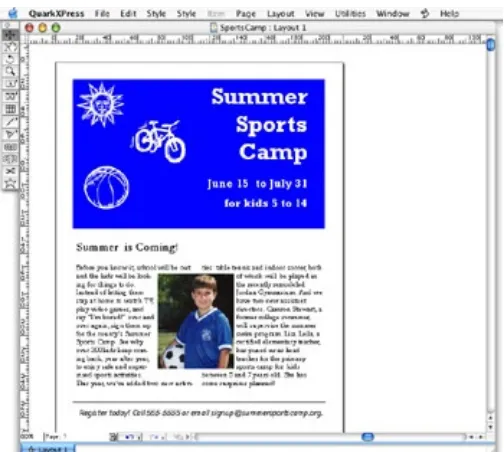
QuarkXPress uses a paste-up metaphor for page design. It’s ideal for creating text and graphic element blocks, placing them on a page, then resizing and positioning them until you’re happy. First, you set up the basic project framework, including the page size and orientation,
margins, and columns. You fill that framework with boxes that have text, boxes that contain pictures, and with lines. Figure 1-1 shows a simple page layout in QuarkXPress.
QuarkXPress makes a distinction between items and content.
Items are things you draw on a page — squares, circles, lines, and wavy shapes — and then modify by filling them with color, changing their size or position, and the like. The primary items in QuarkXPress are picture boxes and text boxes, but lines, text paths, and tables are also used. You can import text and graphical content into some of these items.
Content is text and pictures. (QuarkXPress calls any imported graphic a picture, whether the graphic is a logo, chart, line drawing, or photograph.) Content is always placed within an item. You can have items without content but you cannot have content without items.
Projects and layouts
New Before QuarkXPress 6, the program’s basic layout element was the document. Now document has been replaced by project, and the difference is significant. True, a QuarkXPress project can include a print document — such as a report or a book chapter — but it can also contain multiple print and Web documents. These documents are all stored in the same file, which is the project.
Inside each project are its layouts. A layout is a set of pages that have the same basic page setup (such as two-sided, 81⁄2 in-by-107⁄8 pages) and content type (print or Web).
Designers like the project/layout concept because it lets them group related components into one file rather than having separate files for a single project. Consider some applications: A print magazine that has a foldout table in an article no longer needs a separate document for the foldout, with its different page settings. A company that creates print and Web versions of its annual report now has both versions in the same file for consistency. A business report can combine two-sided pages with single-page chapter dividers.
Each project in QuarkXPress is made of pages. Depending on how you’ve set up the project, the pages may be side-by-side in spreads and may indicate margins and columns visually by blue lines. Usually, each page in a document is a page in a printed piece. You can also have multiple pages on a page, such as a page of business cards. Some pages in a project can be Web pages.
A Familiar Interface
When you first sit down at your computer to start using QuarkXPress, you’ll no doubt notice that its interface bears a strong resemblance to that used by other Windows and Macintosh programs. If you use other
programs, you already know how to use QuarkXPress components, such as file folders, document icons, and the menus at the top of the project window.
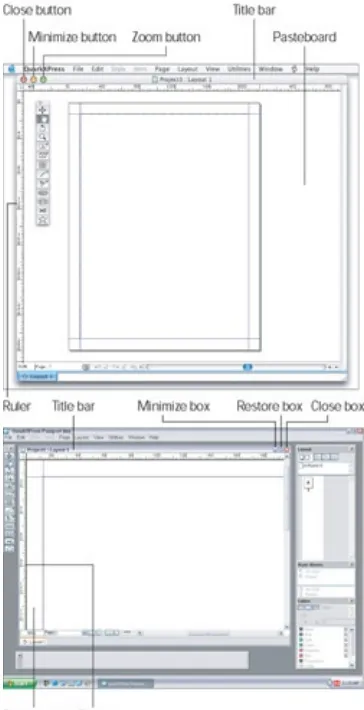
To create a project, choose File→New→Project. To open an existing
project, choose File→Open. The program displays a window similar to the ones shown in Figure 1-2.
Platform
Differences This book is for both Windows and Macintoshusers. We use Mac screen shots, except where the QuarkXPress versions have significant
differences. In those cases we show screens from both, as in Figure 1-2.
A project displayed in either Windows or Macintosh has these elements: The Ruler Origin box lets you reset and reposition the ruler origin, which is the point at which the side and top rulers are 0 (zero). The name of the open project and layout appears on the title bar, located below the menu bar on the Mac and above the menu bar in Windows. You can move the project window around in the screen display area by clicking and dragging the title bar. If you have reduced or enlarged a project, clicking the green
Zoom box on the Mac, at the top-left corner of the project window, returns to its previous size. In Windows, click the Restore box, at the top-right corner of the project window.
You can make a project all but disappear by minimizing it. To minimize a project, click the Minimize box in the document’s title bar. On the Mac, it’s the yellow button at top left: in Windows, it’s the box with a horizontal line in it at top right.
The vertical and horizontal rulers on the left and top of the window reflect the measurement system currently in use.
The pasteboard is an area around the page. You can store text boxes, picture boxes, or lines on the pasteboard. Pasteboard items do not print.
QuarkXPress displays a shadow around the page on the Mac, and a line around the page in Windows. These borders indicate the page edges.
Default Layout pop-up menu), the first page of the new project has a text box.
The View Percent field shows the magnification level of the page that’s currently displayed. Press Control+V on the Mac or
Ctrl+Alt+V in Windows to highlight the View Percent field. To change the magnification level, enter a value between 10 and 800 percent in the field; then press the Return key on a Mac or the Enter key on Windows (or just click elsewhere on the screen). Switch pages by using the page pop-up at the lower-left corner of the QuarkXPress project window. To use this pop-up, click the triangle.
Use the scroll bars, boxes, and arrows to shift the page around within the project window.
If you hold down the Option or Alt key while you drag the scroll box, the view of the page is refreshed as you scroll the page. Close a project by clicking its Close box (the red close button at the upper-left corner of your open project window on the Mac; in Windows, the box that contains an X in the upper-right corner of the open window).
Macs also have the shortcut z+W; in Windows, use Alt+F4.
Menus
The menu bar appears across the top of the project window. To display a menu, click the menu’s title. From the menu, you can choose any of the active menu commands. QuarkXPress displays inactive menu
commands with dimmed (grayed-out) letters. When commands are
dimmed, it means that these commands are not currently available to you — they’re inactive.
Keyboard equivalents are displayed to the right of the command names in the menu.)
Tip If an arrow appears to the right of a menu command,
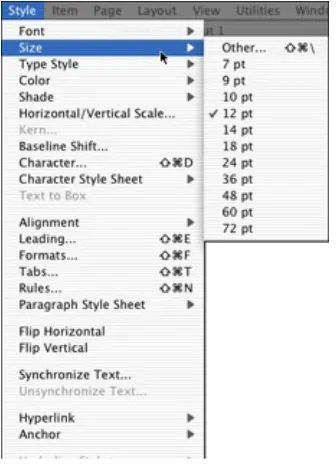
QuarkXPress displays a second, associated menu when you choose that command. Sometimes this secondary menu appears automatically when you highlight the first menu command. Just click the arrow to make the submenu appear. Figure 1-3 shows the Style menu and the secondary menu that appears when you choose the Size menu command.
Figure 1-3: Choosing menu and submenu options in QuarkXPress
Dialog boxes
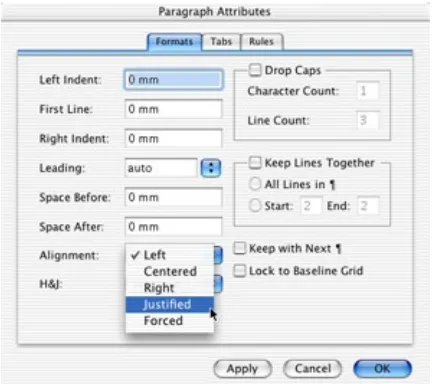
Some dialog boxes also contain submenus. If a menu has a submenu associated with it, an arrowhead appears to the right of the menu entry. In addition to submenus, pop-up menus appear when you make certain selections in a dialog box. Figure 1-4 shows a pop-up menu for text alignment.
Figure 1-4: The Paragraph Attributes dialog box, showing the Alignment pop-up menu on the Formats pane
QuarkXPress uses panes, a type of dialog box that merges several dialog boxes into one. In fact, you often see six or seven of these panes (similar to a file folder in an office cabinet) in a single dialog box. Like the file folders in an office cabinet, these panes organize a large amount of stuff in one tidy spot. Click a pane’s tab (it looks just like a paper folder’s tab), and the pane comes to the forefront, showing you the options for that pane. You see three tabs (Formats, Tabs, and Rules) on top of the dialog box shown in Figure 1-4.
Working with contextual menus
Windows and Macs use a technique called contextual menus to save you time. By right-clicking an object in Windows, or Control+ clicking on the Mac, you get a menu of options just for that item. This saves you time going through menus, dialog boxes, and palettes.
you can use in relation to virtually everything in and around a QuarkXPress project. To use a contextual menu, simply press and hold the appropriate keyboard command and then click on the object you want to modify.
On the Mac, the default keyboard command to launch a contextual menu is Control+click. You can, however, change this keyboard command to Control+Shift+click by clicking Zoom in the Control Key area of the Preferences pane
(QuarkXPress→Preferences→ Interactive). If you have a third-party multibutton mouse, Mac OS X automatically sets the right-hand mouse button to be the Control+click or
Control+Shift+click command.
To display a contextual menu in Windows, just right-click on the object you want to modify.
Because contextual menus require less mouse movement and menu searching and require less brain power (something we all want to conserve), contextual menus may soon replace keyboard shortcuts as the beeline of choice among
QuarkXPress users.
Keyboard shortcuts
You can select some QuarkXPress functions through pull-down menus, some through palettes, some through keyboard shortcuts, and some through all three options. Most new users use menus. As you become comfortable, you can save time by using the other options (particularly keyboard shortcuts).
keyboard shortcut: Press and hold the Command key (z) or Ctrl key while you press the J key. In this book, we write this combination like this: z+J or Ctrl+J. The Macintosh shortcut appears first, followed by the Windows shortcut. If the platforms use the same shortcut, we list the shortcut just once.
Platform
Differences In most cases, the Mac’s Ctrl key are the same, as are the Mac’s Optionz key and the Windows key and the Windows Alt key. Shift is the same on both, whereas the Control key exists only on the Mac and has no Windows equivalent. The Mac’s Return key is the same as the Windows Enter key. (Some Mac keyboards call this key Enter and some Windows keyboards call this key Return — no matter what it’s called on your keyboard, don’t confuse it with the keypad Enter key on the
The Tool and Measurements Palettes
One of the coolest features of the QuarkXPress interface is its set of palettes, which let you perform a wide range of functions on a layout without having to access pull-down menus. Like contextual menus and keyboard shortcuts, palettes are huge timesavers, and you’ll undoubtedly find yourself using them all the time. Without a doubt, the Tools palette (see Figure 1-5) and the Measurements palette are the most commonly used. In fact, you’ll probably keep these two palettes open all the time. You can find both palettes by choosing Window➯Show Tools and
Window➯Show Measurements. The following text describes the contents of the two palettes.
Figure 1-5: The QuarkXPress Tools palette
The Tools palette
To use a tool on the palette, you first need to activate the tool. To activate a tool, simply click it. Depending on which tool you select, the cursor takes on a different look to reflect the function the tool performs. When you click the Linking tool, for example, the cursor looks like links in a chain.
descriptions.
Item tool
The Item tool controls the size and positioning of items. In other words, when you want to change the shape, location, or presence of a text box, picture box, or line, you use the Item tool. (We discuss text boxes, picture boxes, and the like in detail later in this book.) For now, just keep in mind that the Item tool lets you create, select, move, group, ungroup, cut, copy, and paste text boxes, picture boxes, lines, and groups. When you select the Item tool and click on a box, the box becomes active, which means that you can change or move the box. Sizing handles appear on the
sides of the active box; you can click and drag these handles to make the box a different size.
Content tool
The Content tool controls the internal aspects of items on a page. Functions that you can perform with the Content tool include importing (putting text into a text box or putting a picture into a picture box), cutting, copying, pasting, and editing text.
To edit text in a text box, select the Content tool. Then select the areas of text you want to edit by clicking and dragging the mouse to highlight the text or by using different numbers of mouse button clicks, as follows:
To position the cursor: Use the mouse to move the I-beam pointer (it looks like a large capital I) to the desired location and click the mouse button once.
To select a single word: Use the mouse to position the pointer within the word and click the mouse button twice.
To select an entire paragraph: Use the mouse to move the pointer within the paragraph and click the mouse button four times.
To select the entire document: Use the mouse to move the cursor anywhere within the document and click the mouse button five times.
When the Content tool cursor changes to a hand shape, you can use the tool to move the contents of the picture box around the inside the picture box. You can also use it to manipulate the picture’s contents, such as applying shades, colors, or printing effects. Again, we discuss the ins and outs of text boxes and picture boxes in more detail in Chapter 5.
Rotation tool
Use the Rotation tool to rotate items on a page. Just click a text box, picture box, or line, and rotate it by dragging it to the angle you want. You also can rotate items on a page in other ways, such as entering rotation information in the Measurements palette and using the Modify command in the Item menu.
Zoom tool
Another way to change the magnification of the page is to enter a
percentage value in the bottom-left corner of the project window; when a page is displayed at actual size, the percentage is 100 (refer to the Mac screenshot in Figure 1-2, which shows 70 percent). QuarkXPress lets you select any viewing percentage, including those in fractions of a
percent (such as 49.5 percent), as long as you stay within the range of 10 to 800 percent.
Text Box tools
QuarkXPress needs to have a text box on the page before it lets you type text onto a layout or import text from a word processing file. You can
instruct QuarkXPress to create text boxes automatically on each page of the document, or you can create text boxes manually by using the Text Box tools. We discuss Text Box tools more in Chapter 3.
To create a text box, select the desired Text Box tool and place the cursor where you want the box to appear. Click the mouse button and hold it down as you drag the box to the desired size.
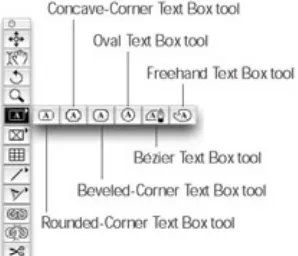
The arrow to the right of the Text Box tool’s icon indicates that if you click and hold down on the Text Box tool, a pop-up menu shows other Text Box tools. Select any of these other tools, and it becomes the default tool of the Tool palette. The Text Box tools (as shown in Figure 1-6) function as follows:
palette
Rectangle Text Box tool: Produces the standard rectangles in which most text is placed. The Rectangle Text Box tool should be the default tool for most users. To get a perfectly square text box, hold down the Shift key while drawing.
Rounded-Corner Text Box tool: Produces text boxes with rounded corners. You can adjust the degree of rounding (the corner radius) in the Modify section of the Tools section of the Preferences dialog box. (Choose
QuarkXPress→Preferences→Tools on the Mac or Edit→
Preferences→Tools in Windows, and then click Modify.) To get a perfectly square text box, hold down the Shift key while you draw it.
Oval Text Box tool: Produces a text box shaped as an ellipse. To create a perfect circle, hold down the Shift key while drawing your oval.
Concave-Corner Text Box tool: Produces text boxes that are notched out in the corners. You can adjust the degree of
notching, technically referred to as modifying the corner radius, in the Modify section of the Tools pane in the Preferences dialog box. (Choose QuarkXPress→ Preferences→Tools on the Mac or Edit→Preferences→Tools, and then click Modify.) To get a perfect square with concave corners, hold down the Shift key while drawing.
lines. You can adjust the degree of shearing, also referred to as the corner radius, in the Modify section of the Tool pane in the Preferences dialog box. (Choose
QuarkXPress→Preferences→Tools on the Mac or
Edit→Preferences→ Tools, and then click Modify.) For a perfectly square beveled text box, hold down the Shift key while drawing the box.
Bézier Text Box tool: Named after the renowned French engineer Pierre Bézier, this tool lets you produce polygons (shapes composed of a series of flat sides) and polycurves (shapes composed of a series of curves) as well as shapes that combine both sides and curves. This tool works differently than the other Text Box tools: Rather than holding down the mouse, you click and release at each corner (or node, in graphics-speak). To complete the box, return to your first node and click on it (the mouse pointer changes from the default cross to an oval).
Tip If you click and drag a little at each desired node, the Bézier control handles appear. These handles let you create a curve. You can have both straight and curved sides based on how you use the mouse at each node. The best way to learn to use Bézier curves (unless you are Bézier himself) is to experiment with them and get a feel for how they work.
point. Using this tool, too, requires practice and a steady hand.
Picture Box tools
Picture boxes hold graphics that you import from graphics programs. As with text, QuarkXPress needs a box (in this case a picture box) on the page before you can import and manipulate a graphic on a page. You can create a picture box manually, using one of the QuarkXPress Picture Box tools. You select the Picture Box tool to use from the Picture Box pop-up menu in the Tools palette, place the cursor where you want the box, click and hold the mouse button, and drag the box to size. (We talk more about this in Chapter 3.) The following Picture Box tools work like their Text Box tool equivalents:
Rectangle Picture Box tool
Rounded-Rectangle Picture Box tool
Oval Picture Box tool
Concave-Corner Picture Box tool.
Beveled-Corner Picture Box tool
Freehand Picture Box tool.
The Table tool
The Table tool lets you organize data into rows and columns (a table, if you will). Creating a table is much like creating a text or picture box. You select the Table tool in the Tools palette, place the cursor where you want the table, click and hold the mouse button, and drag it until the table is the approximate size you want. The Table Properties dialog box appears, asking you the number of rows and columns you want to include in your table and whether you want to fill the individual spaces of the table, called cells, with text or picture boxes. After you create your table, you can
adjust it by choosing Item→ Modify and selecting options in the Modify dialog box and/or choosing Item→ Table and selecting options in the Table pop-up menu that appears. Chapter 8 covers creating and modifying tables in more detail.
The Line tools
The four Line tools in the Line Tools pop-up palette let you draw — you guessed it — lines. After you draw a line, you can change its thickness (weight) and/or style (line style is, for example, a dotted line).
Orthogonal Line tool: Produces straight lines that are completely horizontal or vertical.
Bézier Line tool: Produces straight and curved lines, like edges created with the Bézier Text Box and Bézier Picture Box tools. A line section is straight or curved, depending on how you use the mouse at each node.
Freehand Line tool: Produces curved lines that follow the motion of your mouse, similar to drawing with a pen on paper.
As with the Text Box and Picture Box pop-up palettes, you can change the arrangement of the Tools palette’s Line tools to suit your style. To use any of the Line tools, click the tool to select it and position the cursor at the point where you want the line to begin.
For the Diagonal Line, Orthogonal Line, and Freehand Line tools, click and hold down the mouse button as you draw the line.
When the line is approximately the length you want, release the mouse button.
For the Bézier Line tool, click at each point, as described for the Bézier Picture Box and Bézier Text Box tools. If you click and drag for a little bit at each desired node, you see the Bézier
control handles appear that let you create a curve. You can have both straight and curved sides based on how you use the mouse at each node. Again, we suggest that you play around with this tool to get the hang of it. After you draw a line, use the
Measurements palette to select the line weight and line style.
Text Path tools
tools, they are in their own pop-up palette in the Tools palette. (Because they work like their Line tool equivalents, we won’t repeat the details.) They are:
Freehand Text Path tool
Orthogonal Text Path tool
Bézier Text Path tool
Line (or Diagonal) Text Path tool
Linking and Unlinking tools
Directly beneath the Tools palette are the Linking tool (above) and the Unlinking tool (below). The Linking tool lets you link text boxes together so that extra text flows from one text box into another. The Unlinking tool breaks the link between text boxes. Linking is very useful when you want to “jump” text; for example, when a story starts on page one and jumps to (continues on) page four. Chapter 3 covers linking and unlinking text boxes.
Scissors tool
you’ve created with the Freehand Text Box, Freehand Picture Box, or Freehand Line tool. You can cut lines made with the Text Path tools, too, although any text on the text path will remain linked, even if it is split into two entirely separate parts.
Starburst tool
The Starburst tool lets you create a picture box in a star shape. This is used as a graphical element to draw attention to something on the page. A starburst shouts “Look at me!” For example, if you are designing a flyer about a new product, you can put a starburst with the word New! at the top of the page.
The Measurements palette
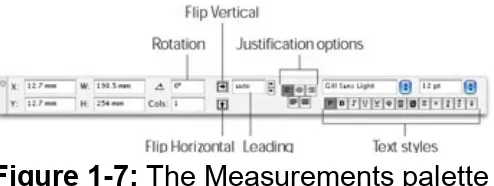
The Measurements palette is one of the most significant desktop publishing innovations; you’ll use it all the time. It shows the precise position and attributes of any selected page element; you can enter
values to change those specifications. To see the Measurements palette, you need a document open as you choose Window→Show
Measurements or press F9. Technical
Figure 1-7: The Measurements palette
Specify text alignment (left, center, right, justified, or force-justified) by using the alignment icons. In the type section of the palette, you can control the font, size, and type style of selected text.
For a picture box, the Measurements palette displays different
information. In Figure 1-8, the Measurements palette shows the box position of the (X and Y), its size (W and H), the amount it is rotated, its corner radius, its repositioning coordinates (X+ and Y+), the amount of picture rotation within the box, and the amount of slant.
Figure 1-8: The Measurements palette when a text box is selected
For a line or text path, the Measurements palette (as shown in Figure 1-9) displays the location coordinates (X and Y), line width, line style, and endpoint (line ending) style. The line style pop-up menu lets you select the style for the line. (If you use a freehand or Bézier line, an icon to control the line’s rotation replaces the Endpoints section of the
Measurements palette.)
Figure 1-9: The Measurements palette for a straight line or text path
In This Chapter
Creating a new project
Understanding the View and Window menus Controlling how a layout displays onscreen Working with palettes and pointers
Is sitting in front of a computer all those hours is affecting your eyesight? Do you find yourself nose to screen, trying to read the really small pri? Well, you’re not alone. And those nice people who brought you
QuarkXPress are doing their part to save your eyes by providing some nifty ways for you to change the way that layouts appear onscreen. For example, you can zoom in to make things larger or create thumbnail pages so you can see how well (or in some case, not so well) your layouts work together. Another set of timesaving features in the
program’s interface, palettes, lets you perform a wide range of functions without having to access pull-down menus.
Creating Your First Project
Think of a project as a big, fat file folder that holds all the layouts and individual items for one, well, project. A project can hold up to 25 layouts. Enough talk about projects. To really get a feel for how they work, you need to create a new project and get started. These steps create a new project:
1. Choose File→New→Project, or press z+N or Ctrl+N.
When you first choose File→New, a list appears, showing things like Web, Library, and XML. Don’t panic! Just select Project. We talk about that stuff later in this book.
The New Project dialog box appears (as shown in Figure 2-1), offering you a whole bunch of other options. You can choose the Layout Type, which will be either Web or Print. If this truly is your first project, we suggest you start with Print. You can also choose other attributes for your project, such as an automatic text box to hold the text, how many columns of text your pages must have, and how big your margins are.
2. After you have all those settings to your liking, click OK.
The View Menu
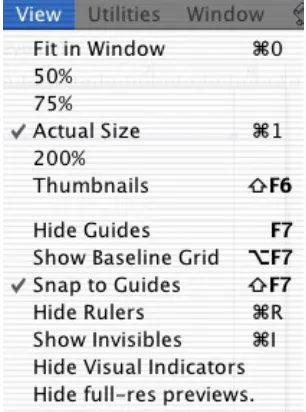
After you create a project, the View menu (as shown in Figure 2-2) lets you control the display of items onscreen.
Figure 2-2: The View menu
The View menu also provides commands that control the display of
positioning aids: guides, baseline grid, rulers, and invisibles (such as tabs and returns). It also lets you turn full-resolution previews off and on. You can toggle features on and off; if a command is active, its option changes from Show to Hide or a check mark appears next to its name.
Using the preset options
Menu commands in the View menu scale the project view to a set of sizes preset by QuarkXPress. The preset view options in the View menu are
Fit in Window (z+0 [zero] or Ctrl+0 [zero]): Fits the page into the area of the project window.
50%: Displays the page at half its actual size.
Actual Size (z+1 or Ctrl+1): Displays the page at actual size (100%). With this setting, depending on the physical size of your monitor, you may see only part of the page on-screen.
200%: Displays the page at twice its actual size.
Thumbnails (Shift+F6): Displays miniature versions of the pages. Figure 2-3 shows a thumbnail view of a layout.
View-changing tips and tricks
In addition to the view commands in the preceding section, QuarkXPress offers other ways of changing views. The following methods are very useful:
To increase the page view in 25-percent increments, select the Zoom tool. (It looks like a magnifying glass.) When you place the mouse pointer in the layout with the Zoom tool selected, the pointer changes to a magnifying glass. Each time you click the mouse button, the view increases in 25-percent increments up to a maximum of 800 percent. To decrease the page view in 25-percent increments, hold down the Option or Alt key as you click the mouse button.
To zoom in on a specific area, click the Zoom tool, select a corner of the area you want to zoom in on, hold down the mouse button, drag to the opposite corner of the specified area, and release the mouse button.
Another way to change your view is by using the View Percentage field in the bottom leftmost corner of the layout window. You can highlight the current value with the mouse and enter a new value in that field. A quicker way is to use the
keyboard shortcut (Control+V or Ctrl+Alt+V) to highlight the
current value, then enter a new view percentage (you don’t need to enter the % symbol) and press Enter or Return. For the
Tip You can change the increment for all these Zoom tool options from its default of 25 percent by making changes in the Preferences dialog box’s Tool pane.
1. To access the Preferences dialog box, choose
QuarkXPress→ Preferences on the Mac or Edit→Preferences in Windows.
The Preferences dialog box opens.
Figure 2-3: The thumbnail view gives you a high-level look at a layout’s structure.
2. In the Preferences dialog box, select Tools.
The Tool Defaults pane appears.
3. In the Tool Defaults pane, click the Zoom tool icon.
4. In the Preferences dialog box, click the Modify button to open a dialog box that lets you change the zoom
increment. Click OK to save the change.
Palettes: Here, There, and Everywhere!
In Chapter 1, we introduce you to the Tools and Measurements palettes, which are the palettes you use most often in QuarkXPress. But the
program comes with a slew of other palettes, including palettes for color management, page layout, style sheets, hyperlinks, and (with the
introduction of synchronized text in QuarkXPress 6) a palette for synchronizing text.
New In earlier versions of QuarkXPress, the following palettes were in the View menu; now they are in the Window menu.
The following sections give you the lowdown on these palettes and explain how they can help you with creating projects as you become more adept with the program. The palettes are listed in the Window menu.
Opening and closing palettes and panes
To open a palette or pane, choose its menu command (such as Window→ Show Colors). Some palettes or panes have keyboard shortcuts: If so, the shortcut is shown in the menu. To close a palette, click its Close box in the upper-left corner (Macintosh) or upper-right corner (Windows). You can also choose its menu command (such as Window→Hide Colors).
The Page Layout palette
New Earlier versions of QuarkXPress featured a Document Layout palette. This has been renamed the Page Layout palette, as shown in Figure 2-4. Use it to create, name, delete, move, and apply master pages, or to move layout pages. Master pages hold page elements (such as graphics and margins) that
Figure 2-4: The Page Layout palette shows a thumbnail view of the layout’s pages.
The Style Sheets palette
The Style Sheets palette, shown in Figure 2-5, lists the names of the style tags (names of styles) attached to currently selected paragraphs and characters, and it also lets you apply style sheets to paragraphs and characters. To display the Style Sheets palette, choose Window→Show Style Sheets or press F11. We cover Style sheets in depth in Chapter 6.
characters.
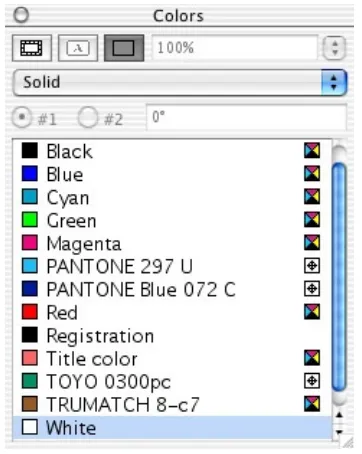
The Colors palette
The Colors palette lets you designate the color and shade (percentage of color) you want to apply to text, pictures, and backgrounds of text and picture boxes. You also can produce color blends, using one or two colors, to apply to box backgrounds. To display the Colors palette, as shown in Figure 2-6, choose Window→Show Colors or press F12.
Figure 2-6: The Colors palette
A spot color is a single color (or process color) applied at one or more places on a page. You can use more than one spot color per page.
Process color refers to any of the four primary colors used in publishing: cyan, magenta, yellow, and black (known as a group as CMYK).
side of the palette next to the color name. (A spot color will have a small printer’s registration mark — a crosshair. A process separation color will have a square with four triangles of color next to it.) This feature makes keeping your project’s color palette organized easy because you can view the colors in a list.
The Synchronized Text palette
New Synchronized text is used in multiple places. If text is
synchronized, changes in one place (a text box or a text path) are reflected everywhere that text is used. The Synchronized Text palette (shown in Figure 2-7) lets you identify text to be synchronized and place copies of the text elsewhere in your project. This handles boilerplate text (like the blurb that
describes your company and legal disclaimers) and text that may change (such as names of products under development) while you’re developing the project. To display the
Synchronized Text palette, choose Window➯Show Synchronized Text.
The Trap Information palette
A feature that makes QuarkXPress the program of choice among professional publishers is one that you never worry about: trapping. Trapping is the technique of extending a color so that it slightly overlaps an adjoining color, preventing gaps between two abutting colors that result from misalignment on a printing press. The Trap Information
palette, you can set or change trapping specifications for selected items. To display the palette, choose Window→ Show Trap Information or press Option+F12 or Ctrl+F12.
Warning Don’t use the Trap Information palette unless you know what you’re doing. This is an expert feature. As such, it is beyond the scope of this book. Using it inexpertly can produce uneven results when you print your document.
The Lists palette
You can create lists based on paragraph styles — styles that you can use to build tables of contents, tables of figures, and so on. In the Lists
palette, you can set or change list settings. To see the palette, choose Window→Show Lists or press Option+F11 or Ctrl+F11. Chapter 17 covers list creation.
The Layers palette
The Layers palette, shown in Figure 2-8, lets you create layers (tiers) of objects in layouts. You can use this feature to isolate items that otherwise might cause unnecessary clutter. Or you can use it to hold different
Figure 2-8: The Layers palette
The Profile Information palette
Another expert feature is the Profile Information palette, used to set or change color profiles for selected items. Color profiles make slight adjustments to an object’s colors to compensate for differences among color input and output devices. Most users don’t have to worry about this feature, and if they do, their service bureau will let them know when to worry about it. To display this palette, choose Window→Show Profile Information.
Warning Don’t use the Profile Information palette unless you know what you’re doing. The Profile Information palette is an expert feature of QuarkXPress that we don’t go into detail about in this book. Using it without knowing precisely why you use it can produce uneven results when you print your document.
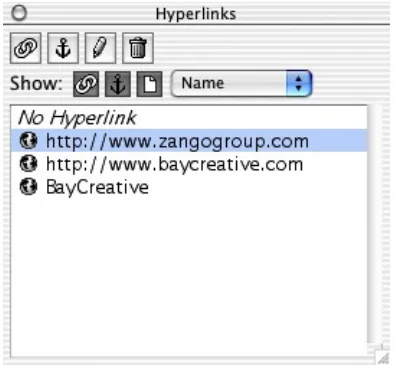
The Hyperlinks palette
You can think of hyperlinks as the things people click on in Web layouts. The Hyperlinks palette (as shown in Figure 2-9) contains a list of
hyperlinks to Web pages and to layout pages used in the current QuarkXPress Web layout. To display the Hyperlinks palette, choose
Figure 2-9: The Hyperlinks palette
The Index palette
QuarkXPress lets you mark words in a layout as you are creating it or reading it. The Index palette, shown in Figure 2-10, copies the marked text and makes an alphabetized, hierarchical index. When the Index palette has all the entries, build the index by choosing Utilities→Build
Index. To display the Index palette, choose Window→Show Index or press Option+z+I or Ctrl+Alt+I. You can find out more about indexes in Chapter 16.
The Web Tools palette
The Web Tools palette, shown in Figure 2-11, appears only when you are working in a Web layout. It has tools for creating and editing Web layouts, including form control and image map tools. You open the Web Tools palette by using Show Web Tools in the Tools pop-up menu
(Window→Tools→Show Web Tools). Chapter 18 covers the Web Tools palette.
Figure 2-11: The Web Tools palette
Sequences palette
The Sequences palette (as shown in Figure 2-12) builds a list of objects to be displayed or linked to in a Web page. The sequence created in this palette is essentially a miniprogram that displays certain items in a
certain order. To display the Sequences palette, choose Window→Show Sequences.
Library palettes
You can store layout elements (text or picture boxes, lines, or groups) in library palettes. To use this feature, select the element that you want to store from the layout or the pasteboard and drag it into an open library palette. You can have several library palettes (each library is in its own palette), so you can group items into libraries (such as one for each
project or one for logos and one for employee photos). You can use items from the library in other layouts. To create a library palette, choose
File→New→Library.
The Placeholders palette
The Placeholders palette is used in creating XML files. (XML is a
A Myriad of Mouse Pointers
In addition to the many palettes in QuarkXPress, you’ll find a bunch of mouse pointer icons as you begin working with the program’s features. These pointers are visual hints about what tool you’re using. For
example, when you choose the Rotation tool, you find that the pointer, or cursor, becomes the Rotation pointer. Expect to see these mouse
pointers in QuarkXPress:
Standard pointer: Appears as you move through dialog boxes, menus, and windows, and as you move over nonselected
elements. The standard pointer is the most common pointer.
Creation pointer: Appears if you have selected a box or line tool. Use this pointer to draw boxes and lines.
Sizing pointer: Appears if you select a handle on a text or picture box (with the Item or Content tool selected) or on a line. You can resize the item by holding down the mouse button and dragging the handle.
Item pointer: Appears if the Item tool is selected and you have selected a box or line. You can move the selected item by holding down the mouse button and dragging the item.
Lock pointer: Appears if the Item tool is selected and a locked text box, picture box, or line is selected. The Lock pointer
I-beam (text) pointer: Appears if the Content tool is selected and you select a text box. If the cursor is blinking, any text you type inserts where the cursor appears. If the cursor is not blinking, you must click at the location in the text box where you want to edit text.
Grabber pointer (also known as the page-grabber hand):
Appears if the Content tool is selected and you have selected a picture box containing a graphic. You can move the graphic within the box by holding down the mouse button and dragging the item.
Rotation pointer: Appears if you select the Rotation tool in the Tools palette. After you select the tool, hold down the mouse button and drag the pointer until the object is rotated to the angle you want. You can actually see the object rotating as you drag the pointer across the page.
Zoom-in pointer: Appears if you select the Zoom tool and click the mouse button. (Clicking the mouse button zooms in on the image by the predefined amount, which by default is 25 percent.) You can also select an area to zoom into by clicking one corner of the area of interest, holding down the mouse button, dragging the mouse to the opposite corner, and then releasing the button.
Zoom-out pointer: Appears if you select the Zoom tool and hold down the Option or Alt key while clicking the mouse button.
Link pointer: Appears if you select the Link tool. Click the pointer on the first text box and then on the second text box in the chain of boxes through which you want text to flow. If there are more boxes, repeat the process (for example, link box two to box three and then link box three to box four and so on). You can switch pages while this tool is active to flow text from one box to another across pages.
In This Chapter
Creating text boxes Getting text into boxes Synchronizing text
Importing text from your word-processing application Using XPress Tags: Your secret code
Let’s face it: When you think of a flat piece of paper or a Web page with words and pictures on it, you don’t intuitively know that those words and pictures are held in boxes, right? Not if you’re like most people we know. And the boxes that we’re talking about now are not your typical
supermarket boxes. In fact, they are unlike any three-dimensional boxes that you may be familiar with. About the only way in which QuarkXPress boxes are similar to those you’re familiar with is that they also hold stuff. But the stuff in QuarkXPress boxes is two-dimensional text and pictures. Surprised? You’re not alone. Brand-new QuarkXPress users are amazed that just about everything on a page produced in this program must be placed into a box. QuarkXPress boxes may not hold a great deal of
memorabilia, but they are pretty powerful just the same; they serve as the placeholders for the text and pictures that you use to build a page. These boxes not only define the layout of a page by controlling the size and placement of pictures, but they also delineate the white space between an illustration and its caption, and they identify the portion of a page’s real estate that is covered with words.
Revisiting Text Box Tools
Composing a page in QuarkXPress involves arranging and rearranging the program’s basic building blocks, among them text boxes. In Chapter 1, we show you the QuarkXPress Tools palette. That the Tools palette contains seven box-related tools (the Rectangle Text Box tool, the Rounded-Corner Text Box tool, the Oval Text Box tool, the Concave-Corner Text Box tool, the Beveled-Concave-Corner Text Box Tool, the Bézier Text Box tool, and the Freehand Text Box tool) reflects how important they are to page design in QuarkXPress.
You use these seven tools (as shown in Figure 3-1) to make text boxes. (You also can tell QuarkXPress to automatically create a single text box on each page, which we describe in the section “Using automatic text boxes” later in this chapter.) After you create a text box, you can enter text directly into it by either typing on your keyboard or importing text from a word processor file.
Building Text Boxes
To create a text box, you just choose a tool in the Text Box Tools palette and use the mouse to draw the box. Later, you can change things about the box, such as its size, its placement on the page, and the width of its margins. Creating a text box is easy. Just follow these steps:
1. Select the Rectangle Text Box tool from the Tools palette.
The Rectangle Text Box tool is a rectangle with a capital A in its center. When you move the mouse pointer into the layout page, the mouse pointer changes to look like a crosshair.
2. Hold down the mouse button and drag the mouse across your page until you’ve drawn a text box the size you want.
3. Release the mouse button.
Now step back and admire your work. It doesn’t get any easier than that.
Active and inactive boxes
If you draw a text box and decide that it’s too small and too high on the page, what can you do? Do you scrap the box and start over, hoping for better luck the next time you create it? No, because deleting the box and redrawing it takes too long, plus (to be honest about it) it means that you’re chickening out. Be brave! You can fix that box. We show you how in the “Taming the wild text box” section, later in this chapter. Before you can do anything to the box, you must activate it.
Selecting an item by using the Content tool or the Item tool is the same as activating it. Before you can make changes in a text box, or any item for that matter, you must select or activate it so that QuarkXPress knows what part of your layout to work on next.
Figure 3-2 shows two boxes. The box on the left is inactive, or
unselected. The box on the right is active, or selected. Activating the box lets you modify it in many ways. As shown, determining that a box is
its sides and corners.
Figure 3-2: The sizing handles on the box on the right show that it’s selected, or active.
Taming the wild text box
You probably know a control freak: A friend who goes berserk when a piece of paper on his desk is at an angle instead of being perfectly
aligned with the stapler, or a boss who insists on reading every word you write and knowing where you are each minute of the day. (It’s also called micromanaging.)
Generally, being a control freak isn’t a thing to be proud of. You won’t find it on many résumés (although you may run across micromanager from time to time). In desktop publishing, taking control is a necessary and valued trait. Striving for perfection takes over even if you aren’t a control freak. Soon you find yourself spending hours tweaking each little element on a layout.
So when you’re building a page, being a control freak is perfectly okay. Honestly, half the fun of using QuarkXPress is the unbelievable amount of control it gives you over everything in a page layout.
You have complete control over text boxes when you use QuarkXPress. After you create a text box, you can control it by using the Modify dialog box.
1. Make sure that the text box is active.
Look for the sizing handles around it. Activate it by either the Content tool or the Item tool and then clicking on the text box with your mouse.
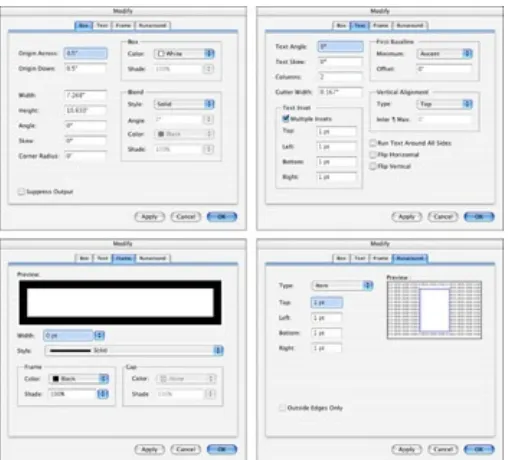
2. Choose Item→Modify to display the Modify dialog box for text boxes, as shown in Figure 3-3, or press z+M or Ctrl+M.
Figure 3-3: The four panes of the Modify dialog box for text boxes: Box, Text, Frame, and Runaround.
The four panes of the Modify dialog box let you tweak a text box. By entering values, choosing items from pop-up menus, and checking or unchecking boxes, you can modify the box’s appearance and set other box properties.
The Box pane lets you adjust the position and appearance of a text box, including the following:
The box’s size and position on the page The angle of the box’s rotation
The amount of roundness applied to the box’s corners
The color (or colors, in the case of a two-color blend) and shade applied to the box’s background
The Text pane lets you adjust the placement and appearance of the text in the box, including the following:
The number of columns and the space between columns The distance between the edge of the box and the text within The angle of the lines of text within the box
The skew angle of the text
The placement of the first line of text relative to the top of the box The vertical alignment of the text
How text flows within the box when an item is placed in front of the box
The option to flip the text in a box along a vertical and/or horizontal axis
The Frame pane lets you apply a frame around a text box and to specify the style, width, color, and shade of the frame, as well as the color and shade applied to the gap between dotted, dashed, and multiple-line frames.
The Runaround pane (covered in Chapter 5) controls the flow of text in a box in relation to another box. If you want text in a text box to flow around the edge of a picture, you go to the Runaround pane to do it. We explain many of these modifications in Chapter 5. For now, just be aware that they exist.