by Erik Guilfoyle
Quake 4
™
Mods
FOR
Quake 4
™
Mods
FOR
by Erik Guilfoyle
Quake 4
™
Mods
FOR
111 River Street Hoboken, NJ 07030-5774 www.wiley.com
Copyright © 2006 by Wiley Publishing, Inc., Indianapolis, Indiana Published by Wiley Publishing, Inc., Indianapolis, Indiana Published simultaneously in Canada
No part of this publication may be reproduced, stored in a retrieval system or transmitted in any form or by any means, electronic, mechanical, photocopying, recording, scanning or otherwise, except as permit-ted under Sections 107 or 108 of the 1976 Unipermit-ted States Copyright Act, without either the prior written permission of the Publisher, or authorization through payment of the appropriate per-copy fee to the Copyright Clearance Center, 222 Rosewood Drive, Danvers, MA 01923, (978) 750-8400, fax (978) 646-8600. Requests to the Publisher for permission should be addressed to the Legal Department, Wiley Publishing, Inc., 10475 Crosspoint Blvd., Indianapolis, IN 46256, (317) 572-3447, fax (317) 572-4355, or online at http://www.wiley.com/go/permissions.
Trademarks:Wiley, the Wiley Publishing logo, For Dummies, the Dummies Man logo, A Reference for the Rest of Us!, The Dummies Way, Dummies Daily, The Fun and Easy Way, Dummies.com, and related trade dress are trademarks or registered trademarks of John Wiley & Sons, Inc. and/or its affiliates in the United States and other countries, and may not be used without written permission. Quake 4 is a trademark of id Software, Inc. All other trademarks are the property of their respective owners. Wiley Publishing, Inc., is not associated with any product or vendor mentioned in this book.
LIMIT OF LIABILITY/DISCLAIMER OF WARRANTY: THE PUBLISHER AND THE AUTHOR MAKE NO REP-RESENTATIONS OR WARRANTIES WITH RESPECT TO THE ACCURACY OR COMPLETENESS OF THE CONTENTS OF THIS WORK AND SPECIFICALLY DISCLAIM ALL WARRANTIES, INCLUDING WITHOUT LIMITATION WARRANTIES OF FITNESS FOR A PARTICULAR PURPOSE. NO WARRANTY MAY BE CRE-ATED OR EXTENDED BY SALES OR PROMOTIONAL MATERIALS. THE ADVICE AND STRATEGIES CON-TAINED HEREIN MAY NOT BE SUITABLE FOR EVERY SITUATION. THIS WORK IS SOLD WITH THE UNDERSTANDING THAT THE PUBLISHER IS NOT ENGAGED IN RENDERING LEGAL, ACCOUNTING, OR OTHER PROFESSIONAL SERVICES. IF PROFESSIONAL ASSISTANCE IS REQUIRED, THE SERVICES OF A COMPETENT PROFESSIONAL PERSON SHOULD BE SOUGHT. NEITHER THE PUBLISHER NOR THE AUTHOR SHALL BE LIABLE FOR DAMAGES ARISING HEREFROM. THE FACT THAT AN ORGANIZATION OR WEBSITE IS REFERRED TO IN THIS WORK AS A CITATION AND/OR A POTENTIAL SOURCE OF FUR-THER INFORMATION DOES NOT MEAN THAT THE AUTHOR OR THE PUBLISHER ENDORSES THE INFORMATION THE ORGANIZATION OR WEBSITE MAY PROVIDE OR RECOMMENDATIONS IT MAY MAKE. FURTHER, READERS SHOULD BE AWARE THAT INTERNET WEBSITES LISTED IN THIS WORK MAY HAVE CHANGED OR DISAPPEARED BETWEEN WHEN THIS WORK WAS WRITTEN AND WHEN IT IS READ.
For general information on our other products and services, please contact our Customer Care Department within the U.S. at 800-762-2974, outside the U.S. at 317-572-3993, or fax 317-572-4002. For technical support, please visit www.wiley.com/techsupport.
Wiley also publishes its books in a variety of electronic formats. Some content that appears in print may not be available in electronic books.
Library of Congress Control Number: 2006926168 ISBN-13: 978-0-470-03746-1
ISBN-10: 0-470-03746-6
Manufactured in the United States of America 10 9 8 7 6 5 4 3 2 1
About the Author
Erik “foyleman” Guilfoylejoined the game-modding scene shortly after the release of Half Lifein early 2000 by creating a custom level and supporting material for the game. After that, Erik was hooked on modding games.
Two years and a lot of practice later, Soldier of Fortunewas released. Erik jumped at the opportunity to map a custom level for this game and was among the first to release a map for the game with custom textures. This led to a flurry of e-mails requesting advice for constructing custom material, and the beginning of a compendium of game modification tutorials.
Not much later, Erik started up his own Web site to host existing and new tutorials. The site grew until he had the largest collection of tutorials on the Internet for Call of Dutymapping. Now, Erik is running the www.modsonline. commodding community with the assistance of two other administrators and several friends, covering many games, including Quake 4.As new games are released, he starts off the tutorials section with beginner instruction and leads the member forums in preparation for the next up-and-coming game.
Dedication
This book is dedicated to the www.modsonline.commodding community.
Author’s Acknowledgments
I would like to express my thanks to those that have knowingly and unknow-ingly helped me to gain the knowledge that I now have in the field of game modding. David Gonzales helped to get me started in the world of modding and gave me time to continue even when we had real work to get done. Discussions with Turbo gave me revelations and insight into game levels that have stuck with me to this day. My wife Kate has allowed me to spend count-less hours on the computer rather than with her, without too much complain-ing, and I must thank her for that. John McNicol, Don McElyea, and Jeff Sale have been there to encourage me onward while offering advice when needed. Also, thanks to Peter and Cathy Guilfoyle, my parents.
What would this book be without the Quake 4game itself? id Software, Inc., and Raven Software, Inc., have built an awesome game and have allowed people like me to wreak havoc on the code that makes it all work. Activision, Inc., has helped to put it in the hands of you and me. For this game, the games before it, and the games to come, thank you for making the world that much more fun.
This book would not have been possible if it were not for the kind and tal-ented folks at Wiley. Melody Layne gave me the opportunity to work with Wiley and got me on track with an easy-to-follow format that anyone can read. Christopher Morris, Leah Cameron, Virginia Sanders, and Clint McCarty helped to keep me on that track with insightful and helpful suggestions during editing. As these are only the people I directly dealt with at Wiley; I know there were several others who had a part in helping me put this book together and I extend my thanks to them.
Some of the people who helped bring this book to market include the following:
Acquisitions, Editorial, and Media Development
Project Editor:Christopher Morris
Acquisitions Editor:Melody Layne
Copy Editor:Virginia Sanders
Technical Editor:Clint McCarty
Editorial Manager:Kevin Kirschner
Media Development Specialists:Angela Denny, Kate Jenkins, Steven Kudirka, Kit Malone
Media Development Coordinator:
Laura Atkinson
Media Project Supervisor:Laura Moss
Media Development Manager:
Laura VanWinkle
Editorial Assistant:Amanda Foxworth
Sr. Editorial Assistant:Cherie Case
Cartoons:Rich Tennant (www.the5thwave.com)
Composition Services
Project Coordinator: Tera Knapp
Layout and Graphics: Carl Byers, Joyce Haughey, Stephanie D. Jumper, Barbara Moore, Barry Offringa, Alicia South,
Proofreaders: Leeann Harney, Joe Niesen, Techbooks
Indexer: Techbooks
Publishing and Editorial for Technology Dummies
Richard Swadley,Vice President and Executive Group Publisher
Andy Cummings,Vice President and Publisher
Mary Bednarek,Executive Acquisitions Director
Mary C. Corder,Editorial Director
Publishing for Consumer Dummies
Diane Graves Steele,Vice President and Publisher
Joyce Pepple,Acquisitions Director
Composition Services
Gerry Fahey,Vice President of Production Services
Contents at a Glance
Introduction ...1
Part I: The ABCs of Modding ...7
Chapter 1: Modifying the Game ...9
Chapter 2: Getting Familiar with Modding Tools and Techniques...17
Chapter 3: Breaking Down the Game ...23
Part II: Making Your Own Maps...31
Chapter 4: Getting Set Up for Mapping...33
Chapter 5: Creating Your First Game Map...49
Chapter 6: Decorating the Scene ...67
Chapter 7: Adding Lights and a Player ...75
Chapter 8: Putting the Pieces Together...83
Part III: Expanding Your Creation ...91
Chapter 9: Expanding Your Map with Additions ...93
Chapter 10: Building with Optimization in Mind ...109
Chapter 11: Heading to the Great Outdoors ...125
Chapter 12: Adding a Few Details...151
Chapter 13: Playing Alone or with Someone Else...185
Part IV: Going Beyond the Basics ...219
Chapter 14: Scripting Advanced Actions...221
Chapter 15: Creating Custom Textures...245
Chapter 16: Gaming with GUIs ...285
Chapter 17: Separating Your Files ...311
Chapter 18: Re-Skinning the Models ...319
Chapter 19: Showing the World ...345
Part V: The Part of Tens ...355
Chapter 20: Ten Great Tips and Tricks ...357
Chapter 21:Ten Great Mods ...367
Appendix...379
Table of Contents
Introduction...1
About This Book...1
Conventions Used in This Book ...2
Foolish Assumptions ...2
How This Book Is Organized...3
Part I: The ABCs Of Modding ...4
Part II: Making Your Own Maps ...4
Part III: Expanding Your Creation ...4
Part IV: Going Beyond the Basics ...5
Part V: The Part of Tens...6
Icons Used in This Book...6
Part I: The ABCs of Modding ...7
Chapter 1: Modifying the Game . . . .9
Shoot First, Ask Questions Later...10
Checking Out Quake 4 ...11
Adding To or Changing the Game ...11
Finding out what you can mod ...12
Knowing what tools you need ...13
The Modding Process Goes Something Like This...14
Sharing the Game with Others ...15
Chapter 2: Getting Familiar with Modding Tools and Techniques . . .17
Gathering the Tools Involved ...17
Writing plain text ...18
Unpacking your luggage ...18
Drawing, painting, and taking pictures...19
Using Best Modding Practices...20
Following standard naming conventions ...20
Instructing the end user ...21
Including all the files required ...21
Avoiding the overwriting headache...22
Saving and saving again...22
Chapter 3: Breaking Down the Game . . . .23
Making Maps and Playing Levels ...23
Making Your Own Maps...24
Building blocks of a map ...25
Setting boundaries ...25
Seeing in three dimensions ...26
Measuring in units...27
Toying with Textures ...28
Painting the walls ...28
Building interest ...28
Evoking Entities...29
Sorting Out the Scripts ...30
Messing with User Interfaces...30
Part II: Making Your Own Maps ...31
Chapter 4: Getting Set Up for Mapping . . . .33
Firing Up the System...34
Creating a shortcut to Quake 4...34
Customizing your Quake shortcut ...35
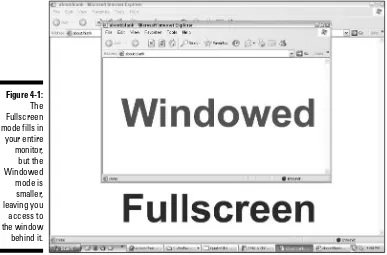
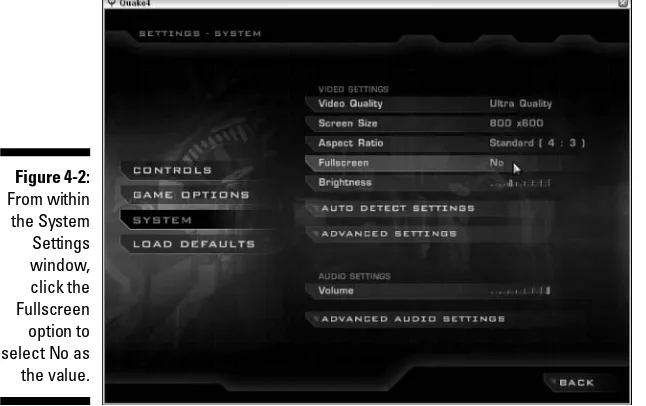
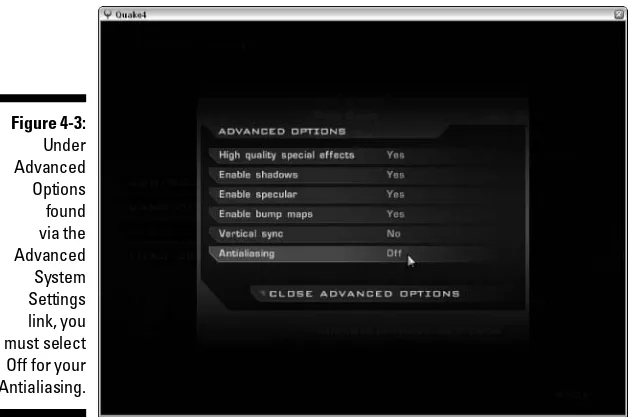
Adjusting Your Game’s Video Settings ...36
Changing from Fullscreen to Windowed mode...37
Turning off antialiasing ...38
Reducing the brightness...39
Launching the Editor ...41
Arranging Your Windows ...41
Adjusting your screen resolution ...42
Adjusting your work environment ...43
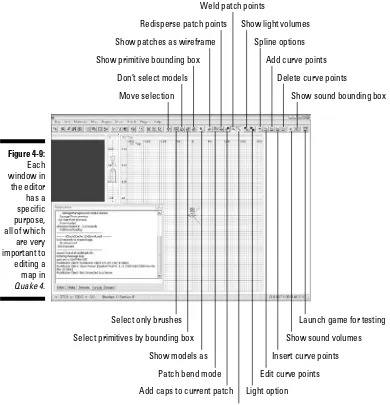
Working the Windows and Exploring the Interface ...45
Looking at windows ...45
Pressing buttons and working menus ...47
Using shortcuts for success...48
Drawing the First Brush ...53
Maneuvering the 2D Window...54
Counting in power of two ...55
Zooming and moving the view...55
Hollowing Out the Room ...58
Maneuvering the CAM Window ...60
Fixing Overlapping Issues ...60
Leaking Is Not an Option ...64
Saving Your Map...64
Chapter 6: Decorating the Scene . . . .67
Loading the Common Walls Texture Set ...67
Selecting and Painting Faces on the Walls ...68
Inspecting the Surface ...70
Painting the Remaining Faces...72
Chapter 7: Adding Lights and a Player . . . .75
Lighting the Way...75
Positioning the entity...78
Adding a bit of color ...78
Adding a Place to Start ...79
Positioning and providing some direction ...80
Playing with properties on the Entity tab ...81
Chapter 8: Putting the Pieces Together . . . .83
Leveling the Playing Field ...83
Building the BSP ...84
Seeing what can be seen...85
Lighting the scene ...86
Comparing the old with the new ...87
Processing the Pieces ...87
Listening to the console ...88
Building the puzzle...89
Playing the Result ...90
Exiting the game ...90
Part III: Expanding Your Creation ...91
Chapter 9: Expanding Your Map with Additions . . . .93
Making Copies ...93
Joining Rooms ...96
Drawing your halls ...96
Making room to play ...97
Retexturing the Hallway Walls...104
Lighting the Path ...105
Running in the Halls...106
xiii
Chapter 10: Building with Optimization in Mind . . . .109
Commanding as a developer...110
Outlining your world...111
Mitering for Mappers...112
Fixing those corners ...114
Mitering the floor and ceiling?...116
Automatic optimization...117
Filling in the useless corner ...129
Defining your boundaries...130
Making a Scene ...132
Throwing dirt on the ground ...132
Fitting the outer building...132
Climbing the roof...133
Walling in the yard and adding sky ...134
Getting Outside...136
Clipping out some doors ...136
Touching up the textures ...138
Fixing a Bottleneck...141
Sliding the Door Open ...142
Making that door move ...142
Sealing your area ...144
Lighting from Above ...145
Understanding your real environment ...145
Adding a virtual sun ...146
Simulating ambient light...149
Placing crates for strategy ...166
Picking Up on Pickups ...170
Placing a model to decorate the power-up ...179
Testing and Having Fun ...182
Chapter 13: Playing Alone or with Someone Else . . . .185
Making a custom loading screen ...206
Creating a thumbnail image ...211
Determining the level size ...212
Considering Other Game Types ...215
Playing the tourney ...215
Capturing the arena ...216
Part IV: Going Beyond the Basics ...219
Chapter 14: Scripting Advanced Actions . . . .221
Finding Tools You Already Had ...221
Breaking Apart the Script...226
Adding the final touches ...243
Chapter 15: Creating Custom Textures . . . .245
Slicing Up the Texture ...246
Installing Some Tools...247
Bricking Up the Joint ...247
xv
Finding the Right Size ...248
Tiling on Forever ...251
Shifting the image to expose the seam ...252
Stamping out your seams...255
Shifting back to ground zero ...258
Mapping Your Images ...260
Splashing on some color: The diffuse map ...260
Picking out the highlights: The specular map ...261
Bumping polygons in and out: The normal map ...267
Creating a normal map without the filter ...271
Defining the ups and downs: The height map ...272
Finding the texture: The editor image ...276
Making Everything Work Together ...281
Building a shader...281
Applying your material ...283
Chapter 16: Gaming with GUIs . . . .285
Opening Doors...286
Looking at the wall ...286
Interacting with an entity ...288
Controlling your doors ...290
Working on your own...292
Creating a Custom Interface ...293
Starting the GUI editor...294
Building your first GUI ...294
Saving your work ...307
Applying Your Custom Interface ...308
Exploring Deeper into the Game ...310
Chapter 17: Separating Your Files . . . .311
Understanding Game-Defined Mods ...313
Naming a Mod of Your Own ...315
Chapter 18: Re-Skinning the Models . . . .319
Locating the Models and Their Skins ...320
Hunting Down Your Mod Files ...325
Searching in materials ...325
Making changes ...331
Compressing to DDS...343
Chapter 19: Showing the World . . . .345
Creating the Package ...345
Packaging additions to the game ...346
Packaging mods that alter the game...351
Distributing the Goods ...354
Part V: The Part of Tens ...355
Chapter 20: Ten Great Tips and Tricks . . . .357
Come Up with Original Ideas ...357
Plan Your Build ...358
Design Minimally ...358
Avoid Errors...359
Subtracting with CSG ...360
Dragging out a triangle ...361
Super-sizing brushes...361
Follow Examples...362
Use Prefabs ...362
Mesh Objects ...363
Measure the Player ...363
Find More to Mod...364
Look for Help ...365
Chapter 21:Ten Great Mods . . . .367
Corpse Stay and Self Shadow ...367
Possible pitfalls...369
Drach-FPS-Mappack ...369
Possible pitfalls...370
Fleischhaus ...370
Possible pitfalls...371
Logo Crosshair ...371
Possible pitfalls...372
Q4GIB ...372
Possible pitfalls...373
Dark Matter Mayhem ...373
Possible pitfalls...374
Quake 4 WOD...374
Possible pitfalls...376
Q4 X-Battle Battlemod ...376
Possible pitfalls...377
xvii
Q4MAX...377
Possible pitfalls...377
SABot ...378
Possible pitfalls...378
Appendix ...379
System Requirements ...379
Using the CD with Microsoft Windows...380
What You’ll Find on the CD ...380
Author-created material ...381
WinZip...381
Adobe Photoshop Elements...381
The Compressonator ...381
Normal Map Generator ...381
Introduction
I
f this is your first time venturing into the world of game modding, let me post a warning now. You are entering into something that many people, including myself, have described as addicting, exciting, and frustrating all at the same time. I know of very few people who have started on the path of game modification and found it easy to stop working on their projects for even a few days. If you are experienced in game modification, you already know what you’re getting yourself into. Either way, I welcome you to Quake 4 Mods For Dummies.I’ve led many beginners along the path of game modification, and they all say the same thing. This is an addictive hobby, and it isn’t easy to put down even for the night. On several occasions, I’ve sat down in my computer chair to work on my game, planning to accomplish only a few things. The next thing I know, it’s 2 o’clock in the morning, I’m still working, and I have to get up for work in another four hours.
So, heed my warning, but also enjoy what is to come. This book gives you the knowledge and skill to mod on your own. You not only figure out how to create modifications for the Quake 4game, but also create content that will have you bragging to your friends and family. Although this book can’t tell you every aspect of modding Quake 4,it shows you how to continue on your and grow into a master of games.
About This Book
When the first version of Half-Lifecame out, a buddy of mine and I decided to create our own mod for the multiplayer version of the game. From that moment on, I was hooked on modding. There really was no turning back for me, and I just kept on creating more and more content.
Over the years, I furthered my exploration and tutelage of modding with other games, and here I am now with Quake 4.I really enjoy showing others how to make mods for games, and I can do the same for you. All you need to do is read on.
My goal in this book is to show you by example many aspects of modding
Quake 4.I provide you with an understanding of how things work so that you can take what I show you and further your newly found knowledge on your own. I leave you with not just information, but also something you can play in the game and show off to your friends and family.
Conventions Used in This Book
I lead you into the world of modding Quake 4by way of two methods, both of which I feel are equally important. The first and most obvious is by way of example. As I walk you through the different aspects of modding, I show you, step-by-step, the methods to use. I don’t leave you guessing as to what needs to be typed, clicked, or done.
For each chapter that has you creating something for the game, I have also supplied an example. On the media in the back of the book, you can find chapter-based files containing all the work that was reviewed. You can use this either for reference of the current chapter or as a starting point for the following chapter, which builds upon the previous.
The second method that I use is that of background. I provide you with all the necessary background for each subject in modding. A statement made to me once a long time ago that I have never forgotten is that “it’s easier to drive a car if you know how it works.” You can apply the same principle to games. The more you know about how a game works, the easier it is going to be to mod.
Background provides you with understanding. With understanding, you can do more than create. You can also better find out why something doesn’t work. There are going to be moments that something doesn’t turn out as you expected. With a background of how you got to your issue, you should be able to solve any problems that arise.
Foolish Assumptions
Because you purchased this book, I assume you know something about games. You should already have a copy of the Quake 4game, not just in your hands, but also installed on your computer. Hopefully you installed the game by using the default installation paths. After you installed the game, I assume you got it running and perhaps even played it a little bit. You bought the game, so you should spend a little time enjoying it.
Due to the requirements of the tools that you will be using, I assume that you have a three-button mouse. Although you can following along with a majority of this book without a three-button mouse, there are one or two operations that you won’t be able to do without this type of mouse.
Perhaps not so obvious, I assume that you’re working on a computer by using the Microsoft Windows operating system. At the time of writing this book, it is possible to modify the Quake 4game only on a Windows installation. If you are using a Linux or Mac operating system, I cannot be certain that the chap-ters contain proper examples.
Because you have a Microsoft Windows operating system, I have taken the liberty of making a few other assumptions. I figure that you know how to open and use Windows File Explorer for browsing folders and files on your computer. I also figure that you have the basic programs that come with Windows, such as Notepad, installed and accessible.
Now, if you don’t have a Windows operating system, the contents of this book can still be of great value. Through example and history, the information I provide you can be useful regardless of the game or platform on which you’re working. The discussions here help you to understand the modding process for most games out there. You will be ready to mod, even if you can’t actively follow my examples right now.
How This Book Is Organized
Although this book is written in a particular order and each chapter builds upon the next, this doesn’t mean you can’t skip around. If you want to know how to make your own textures, go for it. Head over to Chapter 15 and start on your custom textures. There I show you how to create your own texture from start to finish.
If you’d prefer to better optimize your map, Chapter 10 is the one for you. There you will figure out how to build your map and modify it for smoother play in the game. It will have better speed and rely less on your processor.
As for the chapters that build upon the previous chapters, those are fine to skip around as well. Just load the example files from the previous chapter as
3
found on the media in the back of the book. Then go on your way as if you’ve accomplished everything I’ve written about up to that point. If I feel you should reference a previous chapter for clarity, I make sure to mention it.
This book is broken into five parts as follows:
Part I: The ABCs of Modding
Allow me to introduce you the world of modding. In this part, I help you better understand what it means to modify a game. I point out specific aspects of the game and relate them to something you’re familiar with: real life. Then, I briefly walk you through the steps involved in modding a game.
After you’re familiar with the concept of modding, I introduce you to some of the tools you’ll be using and how you can use them. I acquaint you with some important things that you should remember while modding, and I explain why you want to remember them.
Then, I start breaking down the game. You’ve perhaps already played through
Quake 4,but I’ll bet you haven’t seen it the way I’m going to show it to you. I help you look at the game through different eyes.
Part II: Making Your Own Maps
In Part II, I ease you into the modding process of making your own levels. I start you off with the tools required and show you around. When you’re familiar with the popular map editor, I get you started on making your first level. It won’t be much, but by the end of this part, you will have a level that you can play in the game.
While making your own level, you get all the basics required. From creating a room and painting the walls to adding light, you build a place to start. From there, you convert your level from the editor and load it in the game for some fun.
Part III: Expanding Your Creation
Part III goes beyond the basics of building a simple level for the game. This is where you go from a single room to something you can enjoy with your friends online. This is arguably the best part of making a level for Quake 4.
optimization tricks. These advancements are some of the most valuable because they can perhaps help the novice and advanced alike.
With your small level in hand, you next turn it into a fun single-player and multiplayer level. You add on an outside area with a great sky. Then you intro-duce some monsters that won’t think twice about fighting back. From there, I show you how to set up your level for multiplayer fun by adding more play-ers for deathmatch, team deathmatch, and CTF excitement.
Part IV: Going Beyond the Basics
Making custom levels isn’t the only thing you can do to modify the game. In Part IV, I take you on a path that can not only help to improve the level you created in previous chapters, but also separately improve the game.
The trip starts with scripting, where you can discover how to command things in your level with just a few lines of code. You can rise above the rest by run-ning text-based commands from within the game.
Moving on from scripts, I show you the world of textures. Textures are what can take your player from the dunes of Mars to the beaches of Hawaii. From the confines of a dungeon to the vastness of space, you can create the images that line the walls of everything in the game. Not only are the walls covered in this part, but so are the faces and bodies of the players within the game. Textures cover it all.
On track with the visuals in the game, I show you the graphical user inter-faces. Not only do these wonderful creations allow you to create interactive screens in the game, but also don the face of the game menus themselves. This is what can turn your modification from simple add-on to a total conver-sion of the original game.
Closing off this part is what you need to know to get your mod out to the world. I show you what’s involved in packing up your level for distribution. Then I guide you through what should be done to get your mod onto the Web sites for all to see. Why not let the world have as much fun as you did with your awesome creation?
Part V: The Part of Tens
Part V puts everything else into perspective. Modding doesn’t stop where I left off. There are tons of other things that you can do to customize the game, and I provide you with ideas to get you started. At this point, you have the knowledge to further yourself in the world of modding or to find more help when needed.
5
I provide you with ideas and examples of modding tips and tricks and where to look for them. Then I provide examples of the different mods currently available online and why I think they’re a cut above the rest.
Icons Used in This Book
As you read through the book, you’ll find some fun little icons in the margins. These icons alert you to special content that often highlights the topic at hand. Here are the icons you might see and what they mean:
Tips provide helpful information about the subject. Although perhaps not immediately relevant to performing the task, these tips will come in handy at sometime in the future.
Remember icons remind you of an important idea or fact that you should keep in mind as you explore Quake 4mods. They might even point you to another chapter for more in-depth information about a topic.
Warnings point out specific actions that you want to keep your eye on. Read each of the warnings as you’re going through a chapter to make sure that problems do arise later.
Part I
G
ames can be a lot of fun to play. They allow your mind to explore a virtual world as someone or something that you’ve never been before. From your own home to the jungles and deserts of the world to the infi-nite possibilities of space, you can go anywhere you want. The only limitations you have are those of the people who created the game.Well, playing games is just where the adventure begins. You can be the one who tells the story of a faraway place. You can create lands and worlds that come from your own imagination. Then, you can be the one who takes your friends on the adventure that you created for them.
Chapter 1
Modifying the Game
In This Chapter
䊳Looking at the game through a modder’s eyes
䊳Finding modding tools that you had all along
䊳Walking through the making of a mod
䊳Going public with your creations
H
ave you ever been playing a video game and thought, “I would have done it differently” or “I could have done it better”? Perhaps you thought, “Wouldn’t it be cool if. . . . “ Well, you don’t have to just think it. You can make changes to games and you don’t have to be a software engineer to do it.Game modificationis the process of changing something in a game and has generally been associated with the first-person shooter and real-time strategy genres. The change could be very small, such as making a player’s outfit orange instead of blue, or the change could be very large, such as creating a whole new environment for the player to explore. You could change almost every aspect of a game and make it look and feel like something completely different, or instead of altering an existing part of the game, you could add new elements to it. Anything that in some way modifies a game from what it was when the publisher released it is termed a mod.
Shoot First, Ask Questions Later
The FPS game genre was created in early 1990. You play from the point of view of the in-game character just like that of Quake 4.Also, like Quake 4, it is id Software, Inc., with the creation of Doom,that made this genre popular. As far as staking claim to being the first FPS game, there is much controversy. It’s a toss up between Spasimand Maze War, which were first developed in 1973. Then, later that year, player versus player game-play was tested between two linked computers playing Spasim.The following year, both games were introduced to a network, and multiplayer gaming as you know it was invented. Because both games played from the first-person perspective with weapons, this marked the birth of the FPS.
In 1991, id Software released the game Hovertank 3D,which was a simple maze game from the first-person perspective. The environment was very flat, and the enemies were nothing more than 2D graphics. Later that year, Catacomb 3Dwas released as a modified version of this Hovertank 3D. Catacomb 3D dis-played textured walls and showed the player’s hand on-screen like you now see in Quake 4.
1992 offered the addition of VGA graphics with the release of Wolfenstein 3D.
This game was a huge hit and inspired more development in the genre. The following year, Doomadded even more graphical detail. This game offered rooms of various sizes, outdoor environments, and textures on what were previously flat surfaces. However, the most important upgrade to this rising game genre was the ability for anyone connected to a network to enjoy the multiplayer aspect.
The first version of Quakewas introduced by id Software in 1996. It had highly upgraded graphics as well as networking capabilities and was the first game in the genre to gain widespread fame as a multiplayer Internet game. It broke the bounds of its predecessor, Doom,by networking globally. To fur-ther its success, Quakewas the first game that offered developer support for user modifications. This was the beginning of mods created by the consumer rather than the industry.
From that point on, the FPS genre grew. Graphics greatly improved over time as innovations in computer hardware developed. The ability to process more information has increased the number of simultaneous events that can happen during a game. All the while, several new games emerged that attempted to copy the success that id Software started. Quakeand Doom
Checking Out Quake 4
Whether you purchase Quake 4with or without the intent to modify it, you should begin by playing around with it. Play through a few single-player mis-sions and then move on to the multiplayer games. If you don’t want to play online, start multiplayer games of your own. You might be the only one in the game, but you will still enjoy yourself.
After playing the game and enjoying what the developers were able to deliver, play the game again — but this time, instead of running around and shooting everything that moves, take some time to look around. Stop and look out win-dows and over railings. Walk around the other players in the game and see what they’re wearing. Take a closer look at the walls to see the details that were included, and then see what happens when you shoot them with differ-ent weapons. Listen to the sounds the weapons make as well as the sounds all around you.
By investigating the details of the game, you will start to see things differ-ently. It will be like looking at a room where you live and thinking about paint-ing the walls a different color or movpaint-ing the furniture around. It could also be like considering a different outfit for the day as opposed to the same green armor you wear every day. (You’re a Quake 4marine, remember?)
Adding To or Changing the Game
At first, it can be difficult to see which game elements you can change. However, as you begin to understand the different pieces that make up the game, you will start looking at all games a little differently. You will be able to relate the various elements you see to specific files within the game, and you’ll start to know which of those files you can modify.
For instance, look around the physical area in which you are now sitting. Within the area, you see objects like the book you are now holding; a table with some items on it; or if you are outdoors, maybe some trees. In the game world, each different item could be considered a separate object that the game would refer to as an asset.Each asset, because it may be used more than once in a game, is defined in files. If you change one of these files so that, say, the book you are holding is a different color, you have just made a modification.
So what does this have to do with mods and modding? Well, if you modify the game so that it’s in any way different from when you purchased it, you have
11
created a mod. Modis just a short way of saying modification.Then, it stands to reason that the act of modifying could be called modding.
The mods you make can be simple or complex. You can make them by adding something new to the game or by changing something that already exists. You could make your changes to provide an improvement to the game, or you could completely change everything and create what is called a total modificationof the game.
You might be surprised to know that many of the games on the shelves are total modifications of another game. Quake 4is essentially a total modifica-tion of Doom 3.There are quite a few additions to the code of the game, but Raven Software, Inc., based the Quake 4game on the Doom 3game developed by id Software.
Finding out what you can mod
Games are just groups of files that are read by one master program that dis-plays those files’ contents on the screen. When one or more of these files is changed, the change is reflected within the game. Official game updates and expansion kits can perform these changes, but you can, too. So why not include your own changes to the game to create something completely new?
Upon first glance, you might not realize just how much game content you can mod. Everything, all of what you see from the time you double-click the game icon to the moment you close down the game, can be changed. A short list of moddable things in a game would read like this:
⻬Loading screens: The loading screen for the game and the loading screens for each level of the game. You can change all these screens from their original designs. Right now the program’s loading screens show a lot of green and the primary Quake 4symbol, but you can turn these screens into something else if you want. In Chapter 13, you see how to create a custom loading screen that is displayed while loading your level.
⻬User interfaces: The selection windows before playing the game and the usable computer screens within the game can be modified. You can set up these screens to better meet your needs or to make things look any way you have dreamed. Chapter 16 shows you how you create your own user interface and use it within a level.
walls or the face on another player, these are all images that can be added. Chapters 15 and 18 show you how to do exactly this.
⻬Levels: From multiplayer to single player, you can build completely origi-nal levels for the game that you and your friends can play. What could be more fun than playing a multiplayer level together with your friends online?
The preceding is just a very short list of what you can mod in this game. As long as you have access to the files that make a game run and you have the tools to change them, you can modify that game as much as you like. You could even turn Quake 4into a new version of Donkey Kongif that’s what you want.
The reason Quake 4 can be modded so extensively is primarily due to the developers. Luckily, id Software has provided access to the files of the game so that you can modify them. Not all game companies do that.
Knowing what tools you need
There are tools for every job, and game modification is no exception. Some tools are provided for you by the game developers, but others you must obtain. However, you might be surprised to know that most of what you need, if not all, is already installed on your computer. You just need to know which programs you can use to modify each of the different files within the game.
As you dig deeper into modding, you will need to install additional tools that you might not yet have. However, these tools have been supplied for you on the CD-ROM located in the back of the book. For the most part, these tools are for editing images that are used in the game and will not require any fore-knowledge of their use. When it comes time to use these tools, you will be instructed on what to do and how to do it.
As modding became popular, game developers started to assist the modifica-tion community. They offered words of advice and eventually tools and docu-mentation to make more complicated changes. As the modifications became bigger and better, so did the sales of the original game because more and more people wanted to play the game with these new modifications installed. This inspired more participation from developers and publishers who offered even better tools and documentation.
13
The Modding Process Goes
Something Like This
The most common type of modification is to create a custom level for the game. The process of doing such goes like this:
1. Plan your custom level with notes and drawings.
Write down what you want to include in your custom level and maybe even sketch out how you want things to lay in the game.
2. Construct the level in a program by building walls.
This is a lot like playing with blocks. You create and place your different shaped blocks where you want them in order to create a room, several rooms, or any other structure for the player to roam.
3. Add some color to the surfaces in the level.
Adding color is a simple process of selecting an image and applying it to the wall, floor, or any other surface in the game.
4. Place additional elements in the game such as lights, monsters, weapons, or other objects.
Again, just select elements from a list and place them where you want them. Then you can fine-tune the way they work. (For instance, you can change the color of a light.)
5. Compile and play the level in the game.
Choose a compile command from the editor’s menu, and it creates all the files required so that you can play your finished level in the game. Then you just load the level and start having fun.
6. (Optional) Give your level to the world.
This optional step puts all the custom files together into a single file that you can place online for download or on a disc to hand to your friends. This way more people can enjoy the work you put into your custom modification.
Sharing the Game with Others
In the list in the preceding section, I mention that the last step of the modifi-cation process is optional; however, sharing your creation is most often the purpose of making a mod. I think that it’s perhaps the most exciting part. For my part, knowing that many other people out there are getting enjoyment from something that I built motivates me to do more.
In this book, I not only show you how to package all your files together for distribution, but I also show you where to go from there. I offer advice on where to send your files and how to get them out to the public for all to enjoy.
15
Chapter 2
Getting Familiar with Modding
Tools and Techniques
In This Chapter
䊳Exploring your modding tools
䊳Writing a README
䊳Backing up and saving your work
䊳Comparing Quakewith other games
E
very job requires the right tool. If you were working on the engine of your car, you would use a wrench or a screwdriver. Modding games is no different, but the necessary tools come in the form of programs.Gathering the Tools Involved
Some of the tools you will use to modify the game have already been pro-vided along with the game. These tools are integrated within the game and don’t require much additional effort on your part to access. They include:
⻬A mapping editor
⻬A graphical user interface (GUI) editor
⻬A model viewer
However, some tools that you will need don’t come with the game. Some tools you already have and just don’t know it yet. The remaining tools have been provided on the CD-ROM that accompanies this book. Those tools, dis-cussed in detail next, are
⻬A plain text editor
⻬An image editor
⻬An image compressor
Each of these additionally supplied tools serves a very specific purpose. You probably are already familiar with most of these tools in some way. However, even though you might have used them previously, you might not have real-ized how they can be related to modding Quake 4.
Writing plain text
The most common tool used in all forms of game modification is the plain text editor. Plain textis simply text that is stripped of all formatting. When you use a word-processing program such Microsoft Word, the software intro-duces unseen formatting to the text. This formatting could be as simple as bold or italics attributes to the more complex font selection. Plain text doesn’t have any of this hidden information. The hidden data would only confuse the game when it attempts to read what you’ve written.
Since you’re working with the Microsoft Windows operating system, you already have an excellent plain text editor installed. Notepad comes with your Windows installation and is the tool that I use throughout the chapters of this book. With Notepad, what you see is what you get, and there is no hidden formatting.
Unpacking your luggage
Many of the editable game files installed with the game are contained within compressed files. A compressed fileis a single file that contains a number of other files that are packed together. During the packing process, the data of the packed files is written in such a way that the size of this single com-pressed file is smaller than the total sum of the sizes of the packed files.
Now, it isn’t important to know that these files were compressed, but it is important to know that these single files contain many files within them. The game has been instructed to look inside these packed files and use the files within them. This means that just a few files can be installed on your com-puter in less space than would have been required by the many separate files by themselves. These packages of files are named with the file extension .pk4and are called pak filesfor short.
been renamed with the .pk4extension. So, if you have a compression utility like WinZip, you can use it to open and explore the contents of these files by simply telling WinZip that it can open these files. This is something that you do in Chapter 14.
You can use a number of possible compression utilities to access your pak files. Some people like to use WinRar, and some utilize the compression util-ity that comes with Windows, the Microsoft Zip utilutil-ity. However, I’ve found that WinZip is the simplest utility to use and also the one that results in the fewest complications.
If you don’t have WinZip installed, you should install the trial version now. It’s been provided on the CD media in the back of the book. You can also down-load it from the Web site, www.winzip.com.
Drawing, painting, and taking pictures
The Quake 4game consists of many images, large and small. Everything you see in the game has some sort of image applied to it. From the walls in a room to the face on a character, everything starts as a picture and is then applied to the corresponding piece in the game.All the images within the game are either provided in the Targa (.tga) image format or started as a Targa image. Those that began as Targas were eventu-ally converted to a different format called DDS. The DDS image is created by using The Compressonator, discussed next.
So, when choosing your image-editing software, it is important that you choose one that can work with Targa images. The .tgaimage format is the image format primarily used with this game.
The most widely used program for working with images is Adobe Photoshop, and a trial version has been supplied on the CD media in the back of the book. I use Photoshop in the examples in this book. Although you could use other software applications for editing images, I recommend that you install and use Adobe Photoshop while following this book. This will help to avoid miscommunication, and you might find that you really like this program.
Another image application that I use in this book is a DDS image converter called The Compressonator. The DDS (DirectDraw Surface) image is a special image used by Quake 4that helps to make the game run smoothly. With The Compressonator, you will be able to take your Targa image and convert it into the DDS image for use within the game.
19
What makes the DDS image so much more efficient for the game is that it’s really more than one image compressed into a single file. The DDS image con-tains several different sizes of the same image within its file. Based on differ-ent factors, such as your distance from the object displaying the image or the quality settings of your game, Quake 4decides which size to display on-screen. If you were far away from the image, the smaller version would be used because you wouldn’t see all the details that larger version provides. And, by displaying the smaller version, the game is saving your computer from the work required to show the highly detailed, bulkier version of that image.
The Compressonator has been supplied on the CD media located in the back of the book. It is freeware, meaning that it won’t cost you anything to use, and it is provided by ATI.
Using Best Modding Practices
Modding is still a fairly new activity. There aren’t many strict guidelines that you have to follow. However, some very advisable practices are in place. These practices are primarily to avoid conflict with other mods when sharing your final work with others as well as to prevent loss of work because your files weren’t properly saved to disk.
Following standard naming conventions
Whether you’re creating a single level or a complete modification of the game, naming your work is very important. You want to come up with an original name for your modification, be it a single file or a group of files, that most likely has not been used by someone else. Otherwise, when two mods with the same name are downloaded and installed, files will be overwritten and lost. Try doing a little research on similar mods that are already available on the Internet before coming up with the final name of your work to avoid such issues.Instructing the end user
Always include a README file with your final work. The README file is a text file that contains information about you and your mod. With it, the user knows who to contact for help or kudos, what your mod consists of, and how to properly install and use it with the game.
Don’t ever assume that the end-users know what to do with your files. Rather, assume they know nothing other than how to access your README file, and then instruct them with what to do from there. If your reader doesn’t know how to install the file and isn’t tempted enough to open the README text file and actually read it, at least you’ve done what you could to inform the end user to the best of your ability. This file is explained in more detail in Chapter 19.
Including all the files required
When making your mod, check to see whether any of the files you used are part of a mod that you previously installed. If you installed a level that comes with custom images, for example, make sure you’ve included those images with your mod. You don’t want to distribute a mod that doesn’t have all the required files.
If you do include files that were previously provided via another mod, make sure you give credit to the author of those images. Make mention of where those unoriginal files came from within your README. Then, make sure those files are also included with your distribution in case the user doesn’t have the same mods installed.
Avoiding the overwriting headache
In Chapter 17, I introduce you to creating your own mod folders within the game. Primarily, you do this so that you don’t overwrite the original game files, thereby destroying the original game. You don’t want to make any per-manent changes to the game. Instead, create a mod folder of your own and place your altered files in there. This prevents you from having to tell users that they have to reinstall their game to get it back to the way it was before they installed your mod.
21
Saving and saving again
Game modding is still a young hobby. As such, the available tools are not quite perfect. Errors can occur when using modding tools that can render your files useless. Although I mention ways to avoid the most common errors, some errors will occur seemingly without reason.
To avoid letting these errors ruin the effort you put into your mod, make sure that you save your work regularly. Save it often. Save it under different names for different versions. Then, when you’ve saved it a number of times after a week or more of work, back it up to another location. Put it on CD, DVD, or other removable media.
One day, you will think back to these few paragraphs about saving your work and you will be thankful. You will be thankful that you have a backup of your work that you can go to after a disaster, however minor your changes between backups may be.
Differences between Quake
and Other Games
Games from different developers are created differently. Although modding practices are relatively the same among the various games, some fundamen-tal differences can have a big impact on the way you plan your mod.
When it comes to level design, the Quakegame series is roughly the same from version I to version 4. You create a box and place all your buildings, rooms, halls, models, and everything else inside it. This big box must be made without any gaps because the box defines the boundaries of your level. Without boundaries, the game would crash because it would contain too much information for your computer to process.
You are presented with an empty area like the void of outer space. You create your level by adding to this space blocks such as the walls of your buildings. I like to refer to this process of level creation as adding to the void.
However, some other games (such as the Unrealseries by Epic Games) work this process in reverse. They present you with a giant block like a block of clay. You then carve out your level from this solid block.
Chapter 3
Breaking Down the Game
In This Chapter
䊳Making your own maps
䊳Placing textures in the game
䊳Adding interactive elements as entities
䊳Scripting your way to reactive elements
䊳Using graphical user interfaces to make a more interactive world
Q
uake 4consists of several elements that all come together to create what you see on the computer. There are sights, sounds, and interactive elements. All these pieces that make up the game can be found within one common location in the game: the game level. However, before it becomes a level, it starts as a map.Making Maps and Playing Levels
The levelis the virtual world in which you exist as the player. After you start the game and make a selection from the available menu, be it a single-player or multiplayer game, your player is released into the level. Here you can explore the game environment very much the same way you would explore a local park, school, or other environment in the real world.
Whether you are playing a single-player mission or a multiplayer battle, each environment between loading screens is called a level.
Before an environment becomes a playable level, it starts life as a map.The map is named such for a few important reasons:
⻬As you create a playable environment, you must map out the position of everything within your environment. Thankfully, the mapping editor takes the tediousness out of this task.
⻬You then save the map with the .mapextension.
Versions of Quakeprior to Quake 4had no use for the map file other than for the original creation of the level. The map, when completed, would be con-verted into a file that could be played by the game, and the map file was no longer of any use. The difference between the map and its compiled version has lessened since the development of Doom 3.The map file is now one of the files required by the game for play.
Making Your Own Maps
I find that one of the biggest thrills of modding is the ability to make my own maps and then play them in the game. I really enjoy being able to create a vir-tual environment, make it unique, and then offer it to others to enjoy.
Mapmaking requires more than just the placement of a few buildings. It’s more like creating a real building or small community, and then furnishing it. You must place all the walls, ceilings, floors, and other structural elements together to make up the buildings in your game. However, you must also paint the walls, add tables and chairs, and drop in enemies to fight. You must con-sider every object or feature that is to be represented while playing the game.
I could just jump right into the map-making process with you, but first I think you should have a good understanding of the game environment. To make a good map, you should understand how your placed objects and features are perceived within the game. Don’t worry, this doesn’t mean you need to go back to school and learn new theories and rules. Because you live in a
Leveling levels
The term level most likely came from theprede-cessor of the shooter gaming genre, the role-playing game. The goal of role-role-playing games is to increase the level of a player by progressing through the increasingly difficult environments
three-dimensional (3D) world, relating the real world with the virtual one is fairly easy.
Building blocks of a map
Adding walls, ceilings, and other structures to your map is much like playing with blocks or Legos. You lay out each block next to another to create a sealed room where the player can have fun. The blocks can be of various sizes and shapes and placed together in just about any orientation you can think of, allowing limitless possibilities for the construction of your map.
The blocks placed to make up the structures and constraints are called
brushes.Although brushes can be made into various shapes and sizes, they must be solid in form. This means that they must have at least four sides, like a three-sided pyramid with a floor.
With at least four sides, they can be defined as solid, structural blocks in the game, which is important. The game performs some optimization techniques to help it to run smoothly. Part of this optimization depends on the ability of the game to define what the player can and cannot see. Because the game assumes that the player cannot see through solid brushes, this helps with that optimization.
Another restriction that brushes have is that they must be convex in shape. This means that you can’t have a single brush with a concave or U-like shape. This limitation reduces the work required by your processor during game play and, because you can place multiple brushes together to create any shape imaginable, it is a fair compromise to make.
Setting boundaries
Within each map, you must create specific boundaries with the placement of brushes. When creating buildings and other things in your map, you are con-fined to a single space. You have a large area in which to build; it’s kind of like building in outer space. However, if your computer had to calculate a virtual world that went on without boundaries, it would quickly run out of free memory and processing power and crash.
To avoid crashing the game, you must set the boundaries of your map. By creating a large, sealed room around all your other structures and elements, you can define these boundaries. Then, when the game begins putting your 3D world together, it won’t lose its cool and crash on you. This game-creation process is known as rendering.Rendering is the process of making your data visible on the computer screen. Your computer takes the code that has been written to the map file and turns it into visual data that makes up your game.
25
Seeing in three dimensions
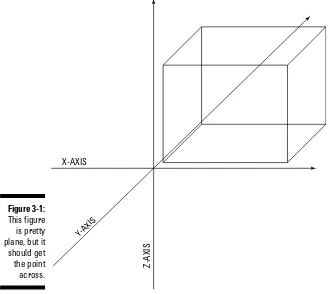
Earlier, I refer to the environment as a 3D world. What I mean by this is that, just like the world we live in, the game world also as three dimensions called the X, Y, and Z planes. One dimension runs from left to right and, in Quake 4,
this is called the X plane. Another plane, the Y plane, runs from back to front. Last, the plane that runs from bottom to top is the Z plane. Together, they make up the three planes of the 3D environment. Figure 3-1 helps to illustrate these three planes.
Those of you with a background in mathematics or modeling might be con-fused by this configuration of axes. You would be more familiar with a verti-cal Y axis and a horizontal Z axis. However, in the world of gaming, these axes are reversed. This is because many games such as Quake 4use the Cartesian coordinate system, which defines the third axis, the height, as the Z axis.
X-AXIS
Y-AX IS
Z-AXI
S
Figure 3-1:
If you were to measure a box, like the post office does before shipping, you would have to measure in these three dimensions. The width, length, and height of the box would relate to the X, Y, and Z planes respectively.
Measuring in units
The game world has its own way to express distance. Instead of using inches or centimeters, it uses units. Although it isn’t easy to picture how big a unit is in reference to real-world objects, it does relate to another digital medium of measurement: pixels. One unit in the game is equal to one pixel. This might be confusing at first, but after a week of being submersed in the mapping world, it will become second nature to you.
Measuring things this way makes it easy to create images for use within the game, but not everyone likes it. A large number of modders would rather this measurement relate directly to real-life measurements so they can more easily reproduce in the virtual world real-life environments such as their homes or offices. If you are one of these modders, the real-life conversion of units to inches is listed in Chapter 20. There you can also find other helpful measurements for reference when building your maps.
Toying with Textures
The virtual world of games is full of images. I don’t just mean the images invoked in your mind of the wonderful things you can do. Everything that you see in the game starts as unpainted objects. The walls begin as just plain boxes, and the players start out lacking in color, definition, and everything else that makes them look like players.
Painting the walls
When the game is being built, the person doing the building puts the color into the game. This is done by placing images on everything, but these are not the same kind of images you can get with your camera. These images have additional features specified within them. These features define how light will bounce off of the image, how the image can convey the appearance of little bumps or scratches and other similar things. Altogether, these images and features make up what is referred to as a texture.
27
Textures carry a very important role in the game. They provide the color and other features that would otherwise be missing. Without textures, everything you see in the game would look flat, colorless, and plain.
Building interest
Textures do a lot more than just add color to a scene. They also define bumps and scratches and other forms of dimension. Sure, color is the primary func-tion of a texture, but it also does quite a bit more.
While you’re playing a game, your computer has to render the 3D environ-ment. The more rendering that your computer has to do, the harder it has to work. So, if you had a wall with complex trimming mounted both near the floor and near the ceiling and if you also had wood paneling with more trim along the middle of the wall, all this would add up to a lot of dimension. All the trim would stick out from the surface in different ways and indentation would occur between each of the boards of wood paneling. This level of detail would cause a great deal of rendering.
With textures, you can fake most of this bumping so your computer doesn’t have to do it. The less work your computer has to do in creating its environ-ment, the faster it will be able to provide you with an exciting and fun game. This also means the structural part of your wall doesn’t have to be so com-plex. You can create a flat wall and make it look more complex simply with the use of textures.
I show you how to create these textures in Chapter 15. I show you how to go from simple color to the highly detailed bumping and shining that a texture can bring forth in the game.
Evoking Entities
Entities,in very basic terms, are the opposite of structural brushes. Brushes are the building blocks of a map. They help to define what the player can and cannot see within the game.
that door opens or moves as a result of something that you did, that door is an entity. If you walk up to a control panel or an elevator or anything else that reacts to your action, it is an entity within the game.
That door or control panel is a type of entity known as an active brush; how-ever, another type of entity is a point entity.A point entity has an effect on the environment in some way, but it isn’t quite as interactive. Point entities are small, single points that affect the game environment (for example, a light). A point entity is a non-solid object that exists in a single point (as opposed to the door, which is solid and consists of several points for each of its corners).
Sorting Out the Scripts
Scriptscarry a valuable role behind the scenes in the game. Scripts are lines of special text that instruct the game to perform an action or reaction. If you were to walk up to an elevator in the game and press a button to make it move, a script would tell the elevator how to move.
One script example details how an elevator will move when the player steps on it. This is an example that I cover later, in Chapter 14. When the player steps on the elevator, the script tells it to move up. When it reaches a certain height, it then turns to allow the player to exit. A few seconds later, the eleva-tor returns to where it started all by itself. These are just a few of the differ-ent steps you can tell the elevator to take during its trip.
Scripts use a lot of terms that you might not be familiar with. These terms sometimes read like words you use every day, but because you aren’t used to reading them in this fashion, they can be difficult to understand. In Chapter 14, I show you how to understand scripts. Then, you write your own scripts and create actions within your own games.
Messing with User Interfaces
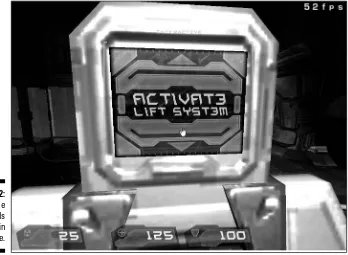
When you were playing Quake 4,you might have come across one of the sev-eral different computer-like screens that the player either can read, view, or interact with. These screens are called graphical user interfaces, or GUIs for short, and Figure 3-2 shows a GUI from the game.
29
GUIs allow the user to see fancy visuals that are either moving or static. The most exciting part about these interfaces is that you can make them interac-tive for the player. This means that you can create an interface that looks like a computer screen. Then you can make certain parts of this screen clickable. Each click can control a different script or entity in the game.
GUIs don’t stop at player interfaces. They also encompass the loading screens in the game, the user interfaces for selecting playable levels, and every other screen outside of the actual game play. You can change every single aspect of the game and make it your own modified version of the game for anyone to play. This means that you can make the GUIs interactive for both the player within the game and the player outside of the game.
Figure 3-2: