Mac
®mini
Hacks & Mods
FOR
DUMmIES
‰by John Rizzo
Mac
®mini
Hacks & Mods
FOR
DUMmIES
‰by John Rizzo
Mac®mini Hacks & Mods For Dummies®
Copyright © 2006 by Wiley Publishing, Inc., Indianapolis, Indiana Published by Wiley Publishing, Inc., Indianapolis, Indiana Published simultaneously in Canada
No part of this publication may be reproduced, stored in a retrieval system or transmitted in any form or by any means, electronic, mechanical, photocopying, recording, scanning or otherwise, except as permit-ted under Sections 107 or 108 of the 1976 Unipermit-ted States Copyright Act, without either the prior written permission of the Publisher, or authorization through payment of the appropriate per-copy fee to the Copyright Clearance Center, 222 Rosewood Drive, Danvers, MA 01923, (978) 750-8400, fax (978) 646-8600. Requests to the Publisher for permission should be addressed to the Legal Department, Wiley Publishing, Inc., 10475 Crosspoint Blvd., Indianapolis, IN 46256, (317) 572-3447, fax (317) 572-4355, or online at
http://www.wiley.com/go/permissions.
Trademarks:Wiley, the Wiley Publishing logo, For Dummies, the Dummies Man logo, A Reference for the Rest of Us!, The Dummies Way, Dummies Daily, The Fun and Easy Way, Dummies.com, and related trade dress are trademarks or registered trademarks of John Wiley & Sons, Inc. and/or its affiliates in the United States and other countries, and may not be used without written permission. Mac is a trademark of Apple Computer, Inc., registered in the U.S. and other countries. All other trademarks are the property of their respective owners. Wiley Publishing, Inc., is not associated with any product or vendor mentioned in this book.
LIMIT OF LIABILITY/DISCLAIMER OF WARRANTY: THE PUBLISHER AND THE AUTHOR MAKE NO REP-RESENTATIONS OR WARRANTIES WITH RESPECT TO THE ACCURACY OR COMPLETENESS OF THE CON-TENTS OF THIS WORK AND SPECIFICALLY DISCLAIM ALL WARRANTIES, INCLUDING WITHOUT LIMITATION WARRANTIES OF FITNESS FOR A PARTICULAR PURPOSE. NO WARRANTY MAY BE CRE-ATED OR EXTENDED BY SALES OR PROMOTIONAL MATERIALS. THE ADVICE AND STRATEGIES CON-TAINED HEREIN MAY NOT BE SUITABLE FOR EVERY SITUATION. THIS WORK IS SOLD WITH THE UNDERSTANDING THAT THE PUBLISHER IS NOT ENGAGED IN RENDERING LEGAL, ACCOUNTING, OR OTHER PROFESSIONAL SERVICES. IF PROFESSIONAL ASSISTANCE IS REQUIRED, THE SERVICES OF A COMPETENT PROFESSIONAL PERSON SHOULD BE SOUGHT. NEITHER THE PUBLISHER NOR THE AUTHOR SHALL BE LIABLE FOR DAMAGES ARISING HEREFROM. THE FACT THAT AN ORGANIZATION OR WEBSITE IS REFERRED TO IN THIS WORK AS A CITATION AND/OR A POTENTIAL SOURCE OF FUR-THER INFORMATION DOES NOT MEAN THAT THE AUTHOR OR THE PUBLISHER ENDORSES THE INFOR-MATION THE ORGANIZATION OR WEBSITE MAY PROVIDE OR RECOMMENDATIONS IT MAY MAKE. FURTHER, READERS SHOULD BE AWARE THAT INTERNET WEBSITES LISTED IN THIS WORK MAY HAVE CHANGED OR DISAPPEARED BETWEEN WHEN THIS WORK WAS WRITTEN AND WHEN IT IS READ.
For general information on our other products and services, please contact our Customer Care Department within the U.S. at 800-762-2974, outside the U.S. at 317-572-3993, or fax 317-572-4002. For technical support, please visit www.wiley.com/techsupport.
Wiley also publishes its books in a variety of electronic formats. Some content that appears in print may not be available in electronic books.
Library of Congress Control Number: 2005935166 ISBN-13: 978-0-471-74900-4
ISBN-10: 0-471-74900-1
Manufactured in the United States of America 10 9 8 7 6 5 4 3 2 1
About the Authors
John Rizzobought his first Mac in 1984, which came with 128 k of RAM and no hard drive. He soon began modding the Macintosh with a soldering iron to add RAM. Later, he cut some holes in the case and hacked in a new mother-board and a hard drive.
Since then, John has been writing about Macs (and Windows, too). His books include Mac Annoyances(O’Reilly), Mac Toys(with Scott Knaster; Wiley),
Customizing Windows XP(Peachpit Press), and the How the Mac Works
series (Que).
John writes about computer technology for Ziff Davis Online, which includes eWEEK.com and Publish.com. His columns, features, reviews, news, and analysis stories have appeared in every major Mac magazine, including
Macworld, MacAddict, MacHome, and the no-longer-published MacWeekand
MacUser. From 1988 to 1995, he was a staff editor and columnist for MacUser magazine. His stories have also appeared in the San Francisco Chronicle, CNET, and PC Magazine.
John is a leading authority on Mac and Windows integration issues. Since 1997, he has published MacWindows.com, the Web’s largest resource for helping people get their Macs and Windows PCs to play nice together. Before Apple invented the Mac, John worked as an engineer at Boeing in Seattle building aircraft electronics.
Arnold Reinholdhas been programming computers since they had fila-ments. His first introduction to the hype/so-what?/wow! cycle that governs computer industry evolution was the invention of the transistor. He has gotten to do cool stuff in spacecraft guidance, air traffic control, computer-aided design, robotics, and machine vision. Arnold has been on the Internet for over twenty-two years and has been a loyal Mac user for twenty. Recent writing includes “Commonsense and Cryptography” in Internet Secrets, E-Mail For Dummies, 2nd edition, and Internet For Dummies Quick Reference, 8th edi-tion (all by Wiley).
Arnold studied mathematics at CCNY and MIT, and management at Harvard. You can check out his home page at http://www.hayom.com/
Dedication
To creative modders everywhere, who refuse to settle for the commonplace, and who are not afraid to void warranties. They inspire the geek and the artist within us.
Author’s Acknowledgments
Thanks to Bob Woerner at Wiley for his understanding and accommodation during a time of unexpected obstacles. And to Nicole Sholly for bearing the brunt of the consequences with grace and acumen. Her guidance through the process was invaluable.
Thanks to my colleagues in the non-publishing world, who put up with my absences as I wrote this book.
Thanks to John Edwards for his suggestions about X10 hardware, and thanks to Pier Philipsen for streamlining some code for the Mac OS X hacks.
Thanks to Arnold Reinhold for writing the chapters on minis in your car (Part V) and the mini-in-your-kitchen, and for coming up with ten more things you can do with the mini.
Publisher’s Acknowledgments
We’re proud of this book; please send us your comments through our online registration form located at www.dummies.com/register/.
Some of the people who helped bring this book to market include the following:
Acquisitions, Editorial, and Media Development
Project Editor:Nicole Sholly
Senior Acquisitions Editor:Bob Woerner
Copy Editors:John Edwards, Jean Rogers
Technical Editor:Pier Philipsen
Editorial Manager:Kevin Kirschner
Media Development Manager:
Laura VanWinkle
Editorial Assistant:Amanda Foxworth
Cartoons:Rich Tennant (www.the5thwave.com)
Composition Services
Project Coordinator: Maridee Ennis
Layout and Graphics: Carl Byers, Andrea Dahl, Lauren Goddard, Joyce Haughey,
Barbara Moore, Heather Ryan
Proofreaders:Leeann Harney, Shannon Ramsey
Indexer: TECHBOOKS Production Services
Special Help: Rebecca Senninger
Publishing and Editorial for Technology Dummies
Richard Swadley,Vice President and Executive Group Publisher
Andy Cummings,Vice President and Publisher
Mary Bednarek,Executive Acquisitions Director
Mary C. Corder,Editorial Director
Publishing for Consumer Dummies
Diane Graves Steele,Vice President and Publisher
Joyce Pepple,Acquisitions Director
Composition Services
Gerry Fahey,Vice President of Production Services
Table of Contents
Introduction...1
About This Book...1
Foolish Assumptions ...2
What You Don’t Have to Read ...2
How This Book Is Organized...3
Part I: Owning a Mac mini ...3
Part II: Cracking Open the mini ...4
Part III: Upgrading the mini Yourself...4
Part IV: Mods for the Home...4
Part V: Modding Your Car for the Mac mini ...4
Part VI: Maxi mini Mods ...4
Part VII: The Part of Tens ...5
The appendix ...5
Conventions Used in This Book ...5
Icons Used in This Book...5
Where to Go from Here...6
Part I: Owning a Mac mini...7
Chapter 1: Modding a Mac mini: An Overview . . . .9
What’s a Mod? ...10
Why Mod a Perfectly Good Mac? ...10
Saving money by adding options yourself ...11
New tricks for a not-so-old mini ...14
Changing your mini’s look...15
What’s in Store...15
Plugging things in ...15
Adding software...16
Breaking open the box ...16
Replacing parts...16
Planning Your Mod...17
Sizing up the job ...17
Estimating time...18
Estimating costs ...18
Locating suppliers...19
Setting realistic expectations...19
Software Considerations ...19
When to upgrade Mac OS X ...20
Chapter 2: Completing Your Mac mini . . . .23
Using a Windows keyboard with the mini...29
Mousing around...32
Going wireless...32
Sharing your keyboard/monitor with another Mac or PC ...33
Adding a Display ...34
Types of video: Digital and analog ...34
Choosing a type of video adapter ...35
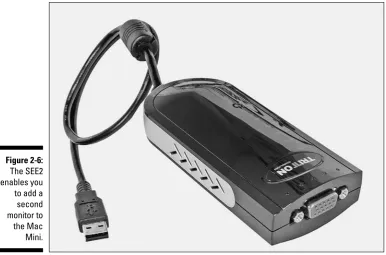
Adding a second monitor via USB...37
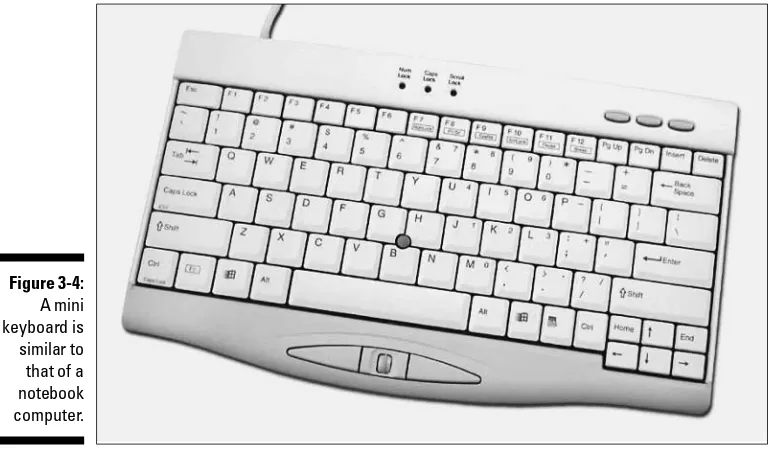
Chapter 3: The mini as a Portable Computer . . . .39
Building a Mac mini Travel Kit ...39
Oh Solo mini...40
Power adapter: To carry or not to carry...40
Cables...41
Carrying a mini ...41
Weighing in ...42
Toting the Keyboard with Your mini...43
Mobile keyboards ...43
Cables...45
Carrying the mini with a keyboard ...45
Weighing in ...46
Taking a Display with You ...46
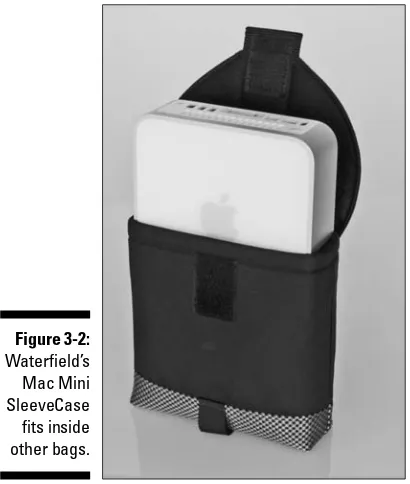
Displays you can carry ...46
Carrying cases ...47
Weighing in ...48
Part II: Cracking Open the mini...49
Chapter 4: Opening the Mac mini . . . .51
Going Where Apple Doesn’t Want You ...51
Keeping the warranty intact ...52
Minding your AppleCare contract...53
Mac mini Hacks & Mods For Dummies
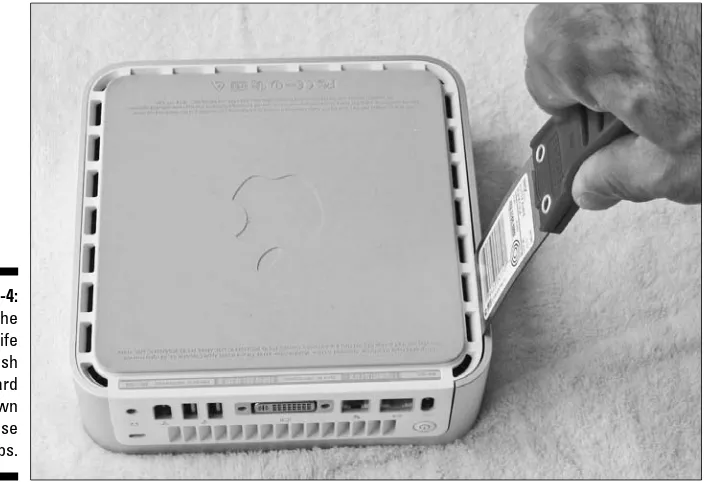
The Putty Knife: The Official mini-Cracking Tool...53
The best putty knife for the job...53
Modding your knife for cracking duty ...54
A Quick Reconnaissance ...55
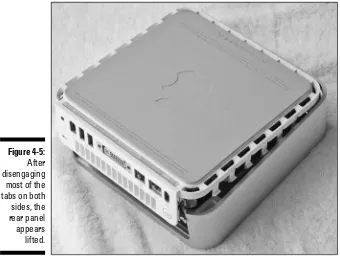
Removing the Outer Casing ...56
Discharging static electricity ...56
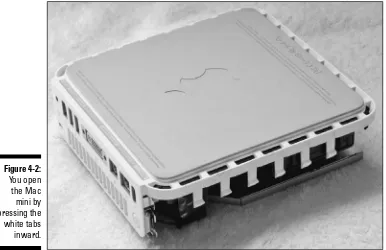
Popping the top ...57
Closing Up the Mac mini ...60
Chapter 5: First Mods Inside the Mac mini . . . .63
Amazing, Isn’t It? ...63
Anatomy of a Mac mini...64
Interconnect board...65
AirPort, Bluetooth, and mezzanine board...66
The DVD drive...67
The hard drive ...67
RAM ...67
The mother of all boards...67
Removing and Replacing the Internal Frame...69
Removing the antennas ...69
Tools for removing the internal frame...71
Removing the internal frame ...71
Replacing the internal frame...74
Changing the Battery...74
Part III: Upgrading the mini Yourself...77
Chapter 6: String Your Own Wireless . . . .79
What’s in a Name...79
Buying and Installing Internal Wireless...80
Installing if you don’t have wireless...80
Installing if you already have Bluetooth or AirPort ...86
The USB Approach to Wireless ...88
USB Bluetooth...88
External AirPort...89
Chapter 7: Upgrading the Hard Drive and RAM . . . .91
Upgrading RAM ...92
Mac OS X performance and RAM ...92
How much is enough?...92
Buying the right RAM...92
Installing a new RAM module...93
Buying a Replacement Hard Drive ...95
Buying a faster drive ...95
Buying the right form factor ...95
ix
Replacing the Hard Drive ...96
Saving your software and settings ...97
Tools for removing the hard drive ...99
Removing the drive ...100
Installing the new drive ...103
Turning Your Old Drive into an External Drive ...105
Installing Software...106
Installing Mac OS X and applications ...107
Installing Mac OS 9 (optional) ...108
Using the Migration Assistant with your external drive ...108
Manually adding your files and settings...111
Chapter 8: Installing a DVD Drive . . . .113
Reasons to Replace an Optical Drive...113
Buying the Right Drive...114
Determining what you already have ...115
Form factor...115
DVD formats ...116
Understanding the X factor: Drive speed ...118
Replacing the Old with the New...119
Tools...119
Removing the old optical drive ...120
Installing the new DVD drive ...123
Part IV: Mods for the Home...127
Chapter 9: The Mac mini Home Theater . . . .129
Planning a Mac mini Media Center ...129
What’s in a home theater ...130
What you need...131
Connecting the Mac mini ...133
Choosing an audio connection ...133
Choosing a video connection ...136
Finding a place to plug it all in...138
Controlling the Mac mini...140
Using a TV as a monitor ...140
Keyboard and mouse versus remote ...143
Creating a Video Jukebox...144
Keeping it legal: Copyright issues ...145
Ripping DVD movies ...146
Downloading free movies ...148
Playing ripped DVD movies ...148
Setting up a remote control ...150
Mac mini Hacks & Mods For Dummies
Adding DVR Functionality...152
Basic X10 hardware types ...162
Problem-solving devices...169
Setting Up Indigo X10 Software ...176
The Preferences dialog ...176
The main Indigo window ...177
Trigger Actions ...178
An example: Motion-triggered light ...179
Chapter 11: Mac mini in the Kitchen . . . .185
The New Kitchen Appliance ...185
Entertain yourself while cooking...186
Tap the kitchen database ...186
Organize your recipes...187
Finding a mini a Home in Your Kitchen ...191
Locating the mini...192
Displaying the display ...192
Waterproof keyboard ...192
Locating the Mac mini’s power brick...193
A Day in the Life of the Kitchen mini ...193
Part V: Modding Your Car for the Mac mini ...195
Chapter 12: Planning a Mac mini Car Mod . . . .197
What’s It Good For? Absolutely Everything!...197
Mini as a car stereo ...198
Playing movies for the kids ...198
Driving directions...199
xi
Taking (or listening to) a memo ...199
Mapping Out mini Locations ...207
Video display locations ...208
Facts about Your Car’s Electrical System ...211
Powering the mini with DC-to-AC Inverter...213
The catch: power draw...214
Inverters and space...214
Tapping in to the Electrical System ...215
Tapping into the fuse box...215
Other car wiring approaches ...217
Powering the mini with a DC-to-DC Converter ...217
Carnetix P1900 DC-to-DC supply ...218
Connecting the mini to the DC-to-DC converter...219
Chapter 14: Installing a Display and a mini in a Car . . . .227
Choosing a video connector type ...231
Touch screens in cars ...232
Mac mini Hacks & Mods For Dummies
Mounting Your Display ...232
The Mini Dock kit ...236
Under the dashboard ...237
Glove box...237
The trunk ...238
Wiring the Display and mini...238
Display power ...239
Connecting the display to the mini ...239
Chapter 15: Auto Audio and Peripherals . . . .241
Wiring Your Car for mini Audio ...241
On the cheap — FM transmitters and cassette adapters ...242
Plugging into your car stereo...242
Extreme makeover, car audio edition ...244
Gizmos and Gadgets ...245
Hub of the universe...245
Voice control ...246
Television tuner ...247
Connecting to the Internet...248
Long range: Mobile phones and satellite ...248
Short-range Internet access via WiFi ...248
Navigating with GPS...250
Part VI: Maxi mini Mods ...251
Chapter 16: Maxi mini Mod Techniques . . . .253
Soldering Electronics...253
Soldering tools...254
How to solder...255
Desoldering with a braid ...258
Practicing...259
Cutting ...259
What to wear when cutting ...259
Cutting tools...260
Gluing plastic to metal and other mixed materials ...265
Gluing plastics ...266
Acrylic (Plexiglas) ...267
xiii
Painting...267
Removing paint from plastic ...268
Sanding ...268
Masking...269
Where to paint ...270
Types of paint ...270
Applying paint with aerosol cans ...271
Chapter 17: Fun mini Case Mods . . . .273
Precautions ...273
Preventing overheating...274
Interference with wireless and optical ...274
Wrapping and Sticking Stuff to the mini...275
Adding prefab skins ...275
Gluing things to the mini’s case...277
Painting the mini ...278
Leaving it to the experts...278
Painting it yourself ...278
Maxi Modding the Outer Case ...280
Removing and replacing the plastic top...280
Adding a new top to the outer casing...284
Chapter 18: Mac OS X Hacks and Mods . . . .287
Hacking in Terminal ...287
Hacking the Finder and Dock...289
Adding a Quit command to the Finder menu ...289
Right and left justification of the Dock ...290
Top Dock, disappearing Dock ...291
Creating a desktop and sidebar Trash icon ...293
Making hidden apps look different in the Dock...295
Showing invisible folders ...296
An iTunes Mod...297
Utilities That Change the Look and Feel ...297
Adding files and folders to the Apple menu ...298
Getting rid of brushed metal...298
Macintosh Explorer...298
Chapter 19: Modding for Bigger Form Factor Hard Drives . . . .299
What’s Involved ...299
Size ...300
Power ...300
Converting between IDE connectors ...301
Gathering Parts ...302
Obtaining a 44-to-40-pin converter ...303
What doesn’t work ...303
Buying a converter that does work...304
Growing your own converter connector ...305
Mac mini Hacks & Mods For Dummies
Assembling the Mod ...307
Transferring data and settings ...307
Installing the cable and connectors in the Mac mini...309
Modding the hard drive enclosure...310
Chapter 20: Overclocking for a Faster Mac mini . . . .311
Determining the jumper configuration ...318
Desoldering a jumper...319
Soldering the jumpers in a new place...319
Reassembling the Mac mini ...320
Testing Your Pumped-Up Mac mini...323
Part VII: The Part of Tens...325
Chapter 21: Ten Web Sites to Go to for Ideas and Help . . . .327
MacInTouch ...327
Apple’s Macintosh Product Guide ...328
Version Tracker ...328
Safe Surfing Box for Window Users...333
Electronic Scoreboard ...334
Computer on a Rope ...334
Appendix: Keeping the Mac mini Running Smoothly...341
Troubleshooting Problems ...342
Troubleshooting Prefs and Other System Files: Fixing Spinning Beach Balls and Other Maladies...342
Identifying and locating preferences files ...343
Troubleshooting problem preferences files...344
Troubleshooting flaky fonts ...346
A printer problem-solver...346
Repairing Permissions...347
When to repair permissions...348
How to repair permissions...348
Repairing the Hard Disk with Disk Utility ...349
When to repair the hard disk ...349
Running the Repair Disk function ...350
A shortcut for repairing the disk...351
Reformatting the Drive and Reinstalling Mac OS X ...352
Backing up the hard drive ...352
Erasing your drive ...352
Restoring the hard drive ...353
Hardware Problems ...353
When the hard drive fixes don’t work ...353
RAM problems ...354
Running Apple Hardware Test ...355
Index...357
Mac mini Hacks & Mods For Dummies
Introduction
I
f you ever stumble into some of the geekier discussion forums around the Internet, you may come across a community of people who enjoy modify-ing, or modding,their PCs. They’re keen on showing off how they changed the look or function of their PC using cutting, painting, and soldering techniques, or by adding stuff — some of it pretty weird — that isn’t normally there. There is a software equivalent of modding: hacking.This is programming changes in software to make it look different or to make it do something it wasn’t designed to.There is also a third type of computer change: using your computer for a rad-ically different purpose, hacking your perception of what a computer is, or modding your noncomputer possessions to fit the computer.
The mini was tailor-made for all three of these types of changes. Oh sure, Apple wants you to think that the mini is perfect and complete the way it is. But then, this isn’t the book that Apple wanted me to write.
About This Book
Mac mini Hacks & Mods For Dummies gives you several different approaches to information about modding. Some chapters give you specific projects to work on. For these, I provide step-by-step directions on how to achieve a par-ticular objective, such as upgrading the internal hard drive or modifying the mini’s outer casing. I’ve peppered these sections with plenty of tips and tricks and lists of tools that you’ll need.
With some other mods, however, there are just too many options to give you a step-by-step procedure. For these, I present descriptions of what’s involved with a type of mod and show you the modding techniques for doing it. You also find lists of what you’ll need to acquire and where to get it.
In some parts of this book, I try to provide you with ideas for further mods, or to help you come up with your own ideas.
Foolish Assumptions
Unlike some other computer books, you won’t find much filler here — no lec-tures on what’s in the print dialog and no dissertations on obscure fealec-tures that have no bearing on the task at hand. That’s because I assume that you are already a computer user.
Don’t worry if you are new to the Mac. I explain any Apple-specific terms and techniques that you need to know. For instance, I describe how you can use your old Windows keyboard on the mini. Experienced Mac users can skip bits of Mac-specific material. But I don’t give you a test on your Mac savvy at the end of the book. The aim here is not to turn you into an expert Mac user, but to show you how to turn the Mac mini into something different than what you bought from Apple.
I also assume that you’ve already bought or are intending to buy a Mac mini. I assume that you’re running Mac OS X v. 4, Tiger or later on your mini. I don’t make any assumptions about what hardware options you bought with your mini.
Oh, yes, I make one more important assumption: You must have extensive knowledge of how to handle a screwdriver. If not, check out Screwdrivers For Dummies . . .
What You Don’t Have to Read
When it comes down to it, you really don’t have to read any of this book. Look at the pictures, hide a copy of Harry Potter inside of it to read on the subway, or use it as a prop under a kitchen table leg. As long as you buy it, I’m okay with it. (It makes a great gift, too, by the way.)
If you aregoing to read this book, however, you don’t need to read the whole thing, or read it in any particular order. The book is organized in a logical manner from beginning to end, but it’s not a narrative. Rather, it’s modular. You only need to read the portions that apply to a specific project or tech-nique that you may be interested in.
There are two exceptions. First, I tell you how to open the Mac mini in Chapter 4. Rather than repeat the procedure for every project that requires you to get inside the mini, I simply refer you to Chapter 4. The second excep-tion is Chapter 5, where I show you how to remove the internal assembly that houses the storage drives. Again, instead of repeating this over and over, I just refer you to Chapter 5.
Mac experts don’t need to read much of Chapter 2, which is a chapter on plugging different kinds of things into a mini. However, you may not want to skip it completely, because it includes information on some nonstandard ways of plugging things into the Mac mini. You may be surprised what you find there.
If you want, you can skip the text that’s next to the Technical Stuff icons. I won’t be insulted (well, not much), although I think you may enjoy some of the technical details.
You don’t have to read the appendix for any modding project. It’s there just in case your Mac mini starts acting sick and needs some help.
How This Book Is Organized
Mac mini Hacks & Mods For Dummies is split into seven parts, with a trou-bleshooting appendix tacked on at the end. You don’t have to read the book sequentially, and you don’t even have to read all the sections in any particu-lar chapter. You can use the table of contents and the index to find the infor-mation you need and quickly get your answer. If you’re going to open the mini, however, be sure to read Part II first.
Part I: Owning a Mac mini
I start the book with an introduction to Mac mini modding, describing what your modding options are, what your expectations should be, and what bene-fits you might get from different approaches. I also offer some recommenda-tions that might help you plan and choose a mod.
I then start you off with the simplest projects — modding by plugging things in. This includes what the ports do and how to convert between different types of connectors, as well as how to do some rather unusual things with the ports. I round off this trio of chapters with tips on how to take your mini on the road.
Part II: Cracking Open the mini
Turn the mini around in your hands, and the question comes to mind “Where are the screws?” Well, you won’t find any. Opening the Mac mini isn’t something
3
you can figure out by looking at it. That’s why I provide detailed instructions with photos, and I tell you exactly what tools work best.
Don’t let the title of Chapter 5 fool you. “First Mods Inside the Mac mini” includes hands-on instructions to help you begin disassembling the guts of the mini.
Part III: Upgrading the mini Yourself
This is where I debunk the myth that the mini is not upgradeable. Add more RAM; replace the internal hard drive with a bigger, faster model; swap out the internal Combo Drive for a DVD burner; and add wireless networking and Bluetooth. If that’s not upgrading, I don’t know what is.
Part IV: Mods for the Home
Here is home improvement, mini style. Expect to read about some very cool things that your mini can do in your house or apartment: the mini as a multi-purpose home appliance in the living room and in the kitchen. If that’s not enough, have the mini control all your other home appliances.
Part V: Modding Your Car
for the Mac mini
This part is Arnold’s baby. Here, he takes you through the joys of having a mini installed in your car. You find out where to put it, how to power it, and how to display it.
Part VI: Maxi mini Mods
Want to do some radical stuff to your mini? I’m talking about using rotary saws, soldering irons, and spray paint. Don’t worry if you’ve never handled these tools; I provide detailed instructions on the tools and techniques that you need. You’ll find some cool pictures, too. See the photos of how I destroy the top casing of the Mac mini. There’s no going back with these mods. I also show you some software hacks that let you do similar things to Mac OS X.
Part VII: The Part of Tens
Arnold and I describe ten places to visit on the Web to get more help and information, and ten more things you might want to do with a Mac mini.
The appendix
I couldn’t write this book without telling you how to get out of a jam. This appendix gives you the troubleshooting techniques you need to nurse a sick Mac mini back to health.
Conventions Used in This Book
Flip through this book, and you’ll find different uses of typeface to point out different things. Here’s what I do with the typefaces:
⻬I use a monospaced font to point out Web addresses, like this:
www.apple.com.
⻬To show you when to hack software, I also use a monospaced font to indicate codethat you need to type at a command line, as in fsck –fy.
⻬On a Mac keyboard, the Command key is the key that has an Apple icon (Ú) and the Clover icon (Ô). This book uses Ôto represent the
Command key. If you’re using a Windows keyboard with your Mac mini, the Ô key is the same as the Windows key.
⻬In the step-by-step directions, the actions you need to perform are in bold type, like this. The explanations of what you can expect to happen after the action are not bolded.
⻬A new term uses italics, like this, to show that this is the first time it’s being used and defined.
Icons Used in This Book
In addition to the typeface tricks, this book also uses four different types of icons to the left of the text. These icons are here to help you flip through the pages to browse for information. Think of them as signposts, each pointing to a different way to think about what’s being said.
5
Tips are the parts of the instructions or descriptions that are the best bits to remember to make the job easier or better. They aren’t always the only way to get something done, but they do point out the best way to accomplish a task. Sometimes you can reuse a tip for other tasks.
When you see this icon, it means that I’m flagging something that you shouldn’t forget to do — or you may mess up your mod. Or, it could mean that I’ve mentioned this item before, but I’m repeating it for emphasis. The Warning icon highlights lurking danger. With this icon, I’m telling you to pay attention to what you’re doing — or to what you shouldn’t do.
This icon marks a general interesting fact that is a techie explanation of what’s going on or why you need to do something. Because I don’t want to turn this book into one of my old college engineering textbooks, I keep the tech stuff short. Don’t worry; I don’t use any differential equations.
Where to Go from Here
The section “How This Book Is Organized,” earlier in this introduction, gives you a good idea of where to begin with this book. You might want to have a Mac mini with you as you go through the book so that you can see what I’m talking about. I couldn’t supply a mini with the book, unfortunately, so you’ll have to supply your own.
Part I
In this part . . .
T
he Mac mini offers so many modifying possibilities, it’s hard to know where to begin. Modding the mini can be a means to an end or a hobby in itself.Chapter 1
Modding a Mac mini:
An Overview
In This Chapter
䊳Discovering hacks and mods
䊳Knowing when to mod your Mac
䊳Finding out what you can do to your Mac
䊳Making a plan for your mod
䊳Thinking about software
Don’t worry if you aren’t daring enough to do the most radical mods described in this book. There are plenty of down-to-earth mods that won’t cost more than the mini did. But the maxed-out mods described in Part VI are interesting and entertaining, even if you just read about them.
In this chapter, I cover what you should know before you do anything rash with your Mac mini. This chapter is all about scope, and it shows you how to find out if your mini has what you need for your mod. It also lets you know what you’re in for, what you might need to investigate, and why you’d want to modify and hack your beautiful Mac mini.
What’s a Mod?
If you ever saw the movie Quadropheniaby The Who, you’d recognize the term modas the name of the trendily dressed, Vespa-driving, occasionally rioting British youth faction of the early ’60s. Hyper and with attitude, the mods were doing something different.
A modis also doing something different with your stylish Mac mini. Not just changing the look or feel, but using it for something that you — or even Apple — might not have thought about. And because your Mac is a tiny mini, it can go in places that you wouldn’t ordinarily take a Mac, such as in your TV’s entertainment center, in a cupboard, or in your car. I don’t recommend using a Mac mini on a Vespa, however.
A mod isn’t limited to working with the hardware. Changing or adding soft-ware can open up the mini to new uses just as changes to hardsoft-ware can. Then there are hacks,which usually describe unusual techniques for chang-ing software for good or for ill. I only talk about the good here.
Like the authorities facing an armada of mod-carrying scooters, some of the designers at Apple may cringe at the kind of mods and hacks you can do with and to your Mac mini. There’s your attitude for you.
Why Mod a Perfectly Good Mac?
Apple loaded up the Mac mini with plenty of goodies, both in hardware and software. It already lets you do cool things with music, photos, movies, video conferencing, e-mail — the list is long. And, as Figure 1-1 shows, it looks pretty cool. So why mess with it?
The answer is that there’s no reason to let the marketing gurus and engineers at Apple decide what you should do with your mini. Their job is done, because you’ve already decided to buy a Mac mini. It’s now time to Think Different, as Apple used to say.
This section looks at some of the big-picture reasons why you might want to mod your Mac mini:
⻬Save money
⻬Make it do something new
⻬Make it look different, on-screen and off
If you haven’t yet bought your Mac mini, you’re in luck. The following section shows you how to save some bucks when you order your mini.
Saving money by adding options yourself
Buying a Mac mini is a little like buying a car. The basic model has an afford-able sticker price. But as soon as you start adding options — power win-dows, sunroof, and cruise control — the price begins to climb like Lance Armstrong ascending the Pyrenees.
While you probably can’t add your own sunroof to your new car, you can
save substantial bucks by buying the basic Mac mini and adding some extras or options yourself. For instance:
Figure 1-1: Take your 2-inch high
Mac mini to places
where other Macs won’t fit.
11
⻬RAM:Depending on when you bought your Mac mini, you either have 256MB, 512MB, or 1GB. When you order a Mac mini, Apple offers to up your RAM memory from the basic configuration for a fee. It may seem tempting until you find out that you can find an upgrade RAM module for at least $15 cheaper than what Apple charges at purchase time. If you hunt around, you can find a 1GB RAM model for the mini for about $85. Chapter 7 shows you how to install RAM yourself.
For the best prices for RAM memory, check out www.ramseeker.com. This site isn’t a seller of RAM. Instead, it finds the cheapest prices at the moment from different sellers and displays links to those sellers’ Web sites. You don’t need to know the tech specs of the type of RAM that fits in the mini. Just choose Mac mini from the menu on the RamSeeker home page, and you get a list of Mac mini RAM prices from several dif-ferent RAM sellers. The price of RAM can change daily, so make sure you check back before you place your order.
⻬Keyboard and mouse:If you have a box of keyboards and mice in your garage from all of the Macs and PCs you’ve owned, there’s no need to buy another set. If you do need a keyboard or mouse, you can find them for less than what Apple charges. Chapter 2 describes what to look for in a keyboard and mouse for your mini.
⻬Wireless goodies:If you’re going to be adding wireless peripherals to the mini, you’ll need Bluetooth. An external Bluetooth adapter generally costs less than Apple’s internal Bluetooth upgrade. On the other hand, Apple’s price for AirPort wireless networking is on par with other ven-dors, and its bundle of both AirPort and Bluetooth upgrades is actually a good deal. If you already bought your Mac mini without wireless, read Chapter 6 to install it yourself.
⻬Hard drive:Apple can increase the basic 40GB hard drive to 80GB for $50, or to 100GB for $150, which isn’t bad. The problem is that 80GB or even 100GB isn’t a whole lot of storage if you plan on filling up a 60GB iPod or want to do a bit of video editing with iMovie. Over time, Apple increases the size of the biggest hard drive option, but it is never as big as what’s available. If you think you’ll need to go beyond 100GB of stor-age, order your mini with the basic 40GB and put your money toward a big hard drive. Chapter 7 describes replacing the internal drive.
⻬DVD burners:One upgrade from Apple that you just can’t beat is the SuperDrive DVD burner. You won’t be able to come near Apple’s price of $100 for the slot-loaded DVD-RW drive, so if you want to put your movies on disc or need over 4GB of storage per disc, the Apple upgrade is the way to go. If you missed out when you bought your mini, check out Chapter 8 to do your own upgrade.
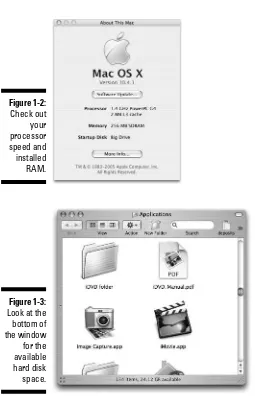
Even if you already own a Mac mini, you may still need to add some of these hardware options. But you may not know what hardware is already inside the mini. Fortunately, all you have to do is ask Mac OS X. Go to the menu and choose About This Mac. A window appears, as shown in Figure 1-2, showing
your mini’s processor speed and the amount of RAM. To find the amount of free hard disk space, go to the Finder and look at the bottom of a folder window. For instance, Figure 1-3 shows that my hard drive has 24.12GB of free space.
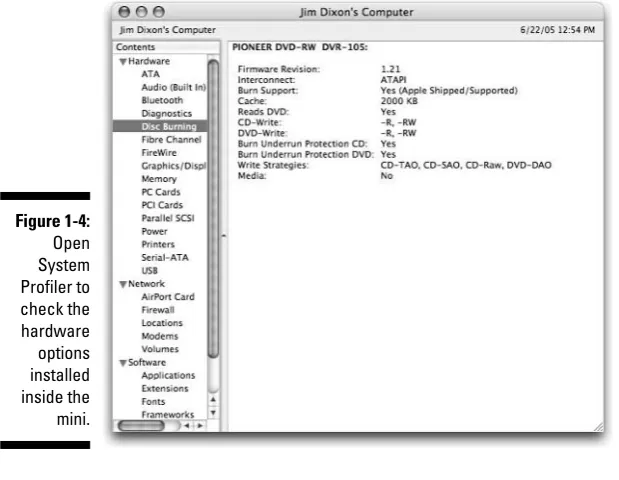
To find out if you have internal Bluetooth or AirPort, or to see if your DVD drive can burn DVDs, do the following:
1. In the About This Mac dialog (refer to Figure 1-2), click the More Info button.
2. The System Profiler utility opens, as shown in Figure 1-4. Figure 1-3:
Look at the bottom of the window for the available hard disk space. Figure 1-2: Check out your processor speed and installed RAM.
13
3. Click Disc Burning to find out if your optical drive can burn DVDs.
Figure 1-4 shows that this Mac mini can.
4. Click Bluetooth or AirPort Card to see if your mini has these wireless options installed.
New tricks for a not-so-old mini
Saving money is all well and good, but a more fun reason to mod your mini is to make it do something different. If you like to use iTunes to listen to music and watch movies, try a few modifications to have the mini control the enter-tainment center in your living room, as described in Chapter 9. Or have it control music and video in your car (check out Part V).
Try doing these things with an iMac. And do you really want to spend $1500 to dedicate a PowerBook to your car?
Speaking of going mobile, you can also use the mini in different places. If you don’t have a notebook computer to carry to different locations, the Mac mini can be the next best thing. Chapter 3 shows you how to take the mini on the road.
Figure 1-4: Open System Profiler to check the hardware options installed inside the mini.
Changing your mini’s look
Some modifications have no productivity value at all but are very high on the coolness meter. Making your mini look different is pure indulgence. Do some-thing easy, like turning the mini into one half of a pair of fuzzy dice. Or attempt something harder, like building a clear plastic case reminiscent of some of the older iMacs. Or amaze your friends by putting your modern Mac mini into a 15-year-old Mac Classic.
The chapters in Part VI describe these kinds of modifications and hacks. Part VI also describes the tools and techniques you can use to build your own mod designs.
What’s in Store
There are mods and there are mods. Some mods don’t require much effort or time to make, while with others, there is “some assembly required.” Finally, other mods can fall into the categories of hobbies, or with some people, obsession.
A good place to start out modding is to add peripheral hardware and new soft-ware. The next level is cracking open the case and exposing the guts of your mini, something that you’ll find yourself doing a lot in this book. When you start replacing parts yourself, you may venture into the realm of voiding your warranty if your mini is less than 90 days old. Part VI includes instructions on how to break out the ultimate hardware hacker’s tool: the soldering iron. The following subsections describe some of the things you can expect to do when mini modding.
Plugging things in
Okay, maybe you don’t think that plugging hardware into the Mac mini quali-fies as a mod. Fair enough, but you can do some interesting things by plug-ging hardware into your Mac mini.
Some chapters in this book use the Mac mini’s connection abilities to do all kinds of things. I’m not just talking about plugging in external hard drives and scanners, but plugging in things like stereos and TVs. If you’re new to the Mac or switching from Windows, read Chapter 2 for the basics. If you’ve been plugging into Macs for years, skip Chapter 2.
15
Adding software
Not all modifications are made completely with hardware. Some modifica-tions require you to install new software on the Mac mini. For instance, the description in Chapter 10 of controlling home appliances uses software that you may not have heard of before. It’s not difficult to install software, but it’s not something you should do blindly, either. The next step up from that is hacking the operating system, described in Chapter 18. Check out the sec-tion, “Software Considerations,” later in this chapter.
Adding software includes upgrading Mac OS X. Although Apple wants you to upgrade to the latest and greatest, the latest may not actually be the best for your purposes. Always be careful before changing a perfectly good OS instal-lation. For the details, check out the section, “When to upgrade Mac OS X,” later in this chapter.
Breaking open the box
Many of the mods and hacks require that you crack open the Mac mini to get to the guts. It’s not obvious how to open it, or that it can be opened at all. There are no screws, no visible tabs, and no holes in which to stick implements. The Mac mini looks like it appeared fully formed, just like Athena popping out of the head of Zeus (although without quite the same mythic proportions).
I will be honest with you: The first time you open the mini will be nerve– wracking. Don’t worry, though. It’s actually not that difficult — as long as you know what you’re doing.
Chapter 4 describes how to open the Mac mini.
Replacing parts
Some mods involve taking original parts out of the mini and replacing them with something else, either because you just want something better, or you want to make repairs yourself. Apple sanctions the replacement of a few parts, such as RAM. For other parts, such as the hard drive and the optical driver, you’re on your own. It’s not a good idea to remove these parts before the 90-day warranty expires, though.
The main thing to remember about replacing internal parts is to make sure you’re not carrying a static electricity charge that can damage the Mac’s cir-cuitry. Some parts will come with a wrist strap that you attach to a metal appliance, which has the effect of electrically grounding you. If you don’t
have a wrist strap, just be sure that before you touch any of the Mac mini’s internal parts, you touch a metal lamp or other metal object to discharge static electricity you may be holding.
Planning Your Mod
The most basic goal of any project is to finish it. Doing some planning before you start can prevent you from running out of money, time, parts, technical skill, or enthusiasm in the middle of a project. Planning is knowing what you’re getting into and how to get out of it.
The more complex a project is, the more planning will be helpful. Some mods, such as installing more RAM, require a minimum of planning. For others, such as installing a Mac mini in your car, you want to spend the time to do thor-ough planning before you touch or buy anything.
Here are the basic steps to take to plan for a complex modding project: 1. Estimate the scope of the project.
2. Estimate the time it will take. 3. Estimate the cost.
4. Locate potential suppliers of parts and tools. 5. Set realistic expectations.
Sizing up the job
The first step in planning a project is to estimate how big a job it will be and how much work you’ll need to put into it.
List all major steps involved in the project. Check to see if you’re missing anything. It’s easy to overlook something when you’re reading about it. I find that the act of writing things down gives me a better understanding of what’s involved. This makes it less likely that I’ll skip a step or hit a brick wall in the middle.
After you make your list, review each of the steps. Identify any steps that might stick out as particularly labor-intensive or that might require addi-tional research or understanding. You need to know what you’re doing at each step of the way.
17
Estimating time
Estimating how long it will take to complete a project is one of the more diffi-cult aspects of planning, but it is important to know if you want to finish the project. You can think of time estimation as the second, more detailed part of the estimating process you started in the preceding section.
Here’s a trick. Before you start your time estimation, decide how much time you want to spend on the project. You’ll find this handy to compare it to the estimate you come up with.
Look at the list of steps you created in the preceding section and assign a time estimate to each step. If the project requires a technique that you’ve never used before, try out some sample tasks to see how long it will take. Now add up the time estimates for each step. Then increase the sum by 25 percent. Like a lot of home improvement projects, a complex modification will almost always take longer than you initially thought it would.
Finally, compare this final number to the amount of time you were willing to spend on the project. I’m guessing that it will be larger. You’ll now need to reevaluate how much time you are willing to put into the project.
Estimating costs
Cost estimation is one of the easier planning tasks. That’s because it’s objec-tive: You find numbers and add them up. This doesn’t mean you can’t under-estimate costs, so it pays to be methodical.
⻬Create a parts list.Go through your list of steps again and list the parts that you’ll need. Don’t forget the smaller items. The cost of items such as cables can quickly add up when you aren’t looking.
⻬Create a tools list.First, list the tools that the project will require. Then inventory your own tools and note which tools you’ll need to buy.
⻬Use the Internet to estimate cost.Whether it’s cables, drives, or tools, you can use Google to search for what you need and come up with pric-ing information. If these are big-ticket items, include estimates for ship-ping and sales tax.
It’s annoying as all heck when Google returns 600,000 items that are mostly relevant to Windows PCs. To restrict Google to Mac items, try searching
www.google.com/mac. This will separate the Macs from the chaff.
Now add up the costs. If the total exceeds the amount you wanted to spend for the project, you may want to rethink your plan. But it’s better finding this out now than after you started to invest.
Locating suppliers
For some particularly adventurous modifications, be sure you can actually get the parts or tools you need before you start your modifications. You don’t want to get halfway through a project only to be stopped because you can’t find a particular and necessary item. If you have to rethink your plan, it’s best to do it before you start so you don’t waste your efforts.
Throughout this book, I give you suggestions as to where you will find parts. These are only jumping-off places, as are some of the mods described in this book. When you branch off on your own mods, you may need to find your own vendors. Of course, the Internet, and Google in particular, is a great way to find suppliers, no matter where they are located.
Setting realistic expectations
The final bit of planning is to estimate your own abilities and endurance. Before you start a modding project, make sure that you have a realistic idea of what you can accomplish. Part of this is knowing what kind of commitment you’re willing to give to the project.
Ask yourself some questions and see if you can give yourself some honest answers:
What do I really want out of this project?
Do I have the time and energy to devote to my goal?
If I don’t reach my goal, what would I be willing to settle for?
What you don’t want is to get stuck halfway through a project, with a par-tially assembled Mac mini gathering dust.
Software Considerations
Some Mac mini mods call for adding software or upgrading Mac OS X. Installing software may seem like an easy aspect of modding, but before you
19
buy the new software, you first need to find out if your Mac mini is up to snuff.
When to upgrade Mac OS X
Don’t be a Mac OS X pioneer when it comes to upgrading to major new “cat” versions of Mac OS X (Jaguar, Panther, Tiger, Leopard, and so on). A Mac OS X pioneeris someone who races out to buy the newest version of Mac OS X while the shrink-wrap on the box is still warm.
Bad idea.
The first “.0” releases of Jaguar, Panther, and Tiger contained bugs and incompatibilities with existing software and even with some hardware. It takes a little while for manufacturers to catch up to Mac OS X, and it takes Apple some time to create backwards compatibility with some software. The best practice is to hold off changing cats until Apple issues one or two “.1” upgrades. That’s a version such as 10.4.1 or 10.4.2 (or 10.5.1 or 10.5.2) that you can install using the Software Update utility in System Preferences. Let other people find the problems with brand new versions of Mac OS X for you. Read the problem reports at Web sites such as macintouch.comand
macfixit.com.
Researching your software’s needs
Before putting out any money for software, do a little research. If you don’t plan, your brand new software may run slowly, or it may not run at all.
Read the requirements
Before you install software, and even some hardware, read the requirements that the manufacturer recommends for a minimum Mac system. This will be the amount of RAM memory, the amount of free hard disk space, and the type of processor the software needs to run.
If you’re buying software in a retail store, the requirements section is listed on the box in ultra-small type. The manufacturer’s Web site should also list the software’s requirements.
Don’t squeak by
Software manufacturers always list the bare minimum hardware required to run their software. This is kind of like watching a big blockbuster movie on a tiny black and white TV with a 1-inch speaker. Yes, you can do it, but you’d be happier with beefier hardware.
So if the manufacturer says its software requires 256MB of RAM memory and you have 256MB, go out and buy some more RAM. Otherwise, you’re likely to get slower performance than you’d like.
If the requirement for free hard disk space is 3GB and you have 3.1GB, the soft-ware will install, but you aren’t going to have much space to do much else. If the required processor is a 1.2 GHz PowerPC and your Mac mini has a 1.2 GHz PowerPC processor, you’re squeaking by. (Chapter 19 describes how to use a soldering iron to push that 1.2 GHz to 1.4 GHz.)
21
Chapter 1: Modding a Mac mini: An Overview
Check for Intel processors
Starting in 2006, Apple will begin shipping cer-tain Mac models with Intel Pentium processors (the same processors that Windows PCs use). Eventually, Apple will retire the PowerPC, and all Macs will run Intel processors. (Perhaps Apple will change the name from Macintosh to Macintel, but I wouldn’t bet on it.) We don’t know when the Mac mini, or any other Mac model, will make the switch.
As far as requirements go, a lot of software will run on both Intel and PowerPC processors. Most of the software you already have (which is written for PowerPC software) will also run on Intel-based Macs. So if the processor requirement says “1 GHz G4,” it will likely run on an Intel Mac of some gigahertz rating. Newer software may only run on Intel Macs, so you will need to check your software carefully before purchasing.
The switch to Intel processors could also affect hardware. Most peripherals use driver soft-ware, sometimes built into Mac OS X, and sometimes provided by the manufacturer. Chances are good that some hardware just won’t work on the newer Macintel boxes, at least for a while.
Chapter 2
Completing Your Mac mini
In This Chapter
䊳Deciding what to plug into which port
䊳Using a Windows keyboard with a Mac
䊳Sharing a keyboard and monitor between two Macs
䊳Using video adapters
䊳Adding a second monitor to the mini
T
he expansion ports are the easiest way to expand the Mac mini’s func-tionality, so this is a good place to begin your mods. In this chapter, I start with a tour of the Mac mini’s ports, and then go on to describe the options for making your Mac mini complete and what you need to accomplish this. I even show you how to mod a Windows keyboard to act like a Mac key-board with the mini. This chapter is not just for newbies and switchers, how-ever, because I tell you about some tricks you may not have thought about even if you’re a mini modding master. If you are going to do something unusual with the ports, I direct you to other chapters that contain more detail.The Back Panel
The image of the Mac mini as a solid, sleek monolith falls away when you turn it around to face the back. The small package sports a full complement of connector ports, as shown in Figure 2-1. These are
⻬Audio out
⻬FireWire 400
⻬Two USB 2.0 ports
⻬Video output
⻬Modem
⻬Ethernet
Note the handy dandy icons above each port to help you remember which is which.
Audio
Use the audio-out port to plug in headphones or speakers. The port uses a 1⁄ 8
-inch mini stereo jack with a type of signal called audio line out, the same type used by iPods and portable CD players. This means you can connect your iPod earbuds into this port.
You can also use adapters to connect other sizes of cables and other types of audio devices.
FireWire
FireWire and USB are all-purpose ports. Older iPods, some printers, and cer-tain other devices can be plugged into either. Generally, FireWire is the better port to use when you are moving a lot of data in or out of the Mac.
Apple uses two types of FireWire ports in Macs, the 400 Mbps (megabits per second) port and the 800 Mbps. The Mac mini contains only the FireWire 400. Still, if FireWire 800 is the gold standard of connection ports, FireWire 400 is the silver.
Although the Mac mini has only one FireWire port, you can use multiple FireWire devices on your Mac by adding a FireWire hub or by stringing
Modem
Security slot
Power switch
USB 2.0
Ethernet DVI/VGA Audio
FireWire 400
Power Figure 2-1:
The Mac mini’s back panel has a full complement of ports.
devices together in a chain. To string up a FireWire chain, the devices must have two FireWire ports.
FireWire provides power to devices, so that iPods and hard drives don’t need their own power supplies. Some devices may not get all the power they need when used in a chain or in a hub. If that’s the case, plug the devices directly into the Mac mini’s FireWire port.
Common uses of FireWire
As an all-purpose port, FireWire can connect almost any device to your Mac mini. Here are the more common uses:
⻬External storage:FireWire is the best way to connect external hard drives, optical drives, and other storage devices. The performance is good and you can boot from a FireWire hard drive, which makes it a good backup medium.
⻬iPods: Older iPods only connect to a Mac using FireWire. More recent iPods work with both USB 2.0 and FireWire, or just USB 2.0 but no longer come with a FireWire cable. You can buy a FireWire cable for your iPod from Apple or other vendors.
⻬Digital movie camcorders:Sony refers to FireWire as “iLink” on its cam-corders. Sony’s version doesn’t accept power from the Mac to the camera, but is otherwise the same standard as FireWire.
⻬Internet movie cameras:Some cameras that you use for Internet video conferencing, such as Apple’s iSight, use FireWire for the connection to the Mac and for power.
Less frequent uses of FireWire
I haven’t yet seen a FireWire-enabled toaster, but you can find other types of devices with FireWire ports. The high-end models of some devices use FireWire. FireWire enabled devices include
⻬Printers:Higher-end models include a FireWire port as well as a USB 2.0 port.
⻬Scanners: Some of these devices include both FireWire and USB ports. There’s no particular reason to choose one or the other here.
⻬Digital still cameras:Some high-end digital still cameras use FireWire instead of USB.
⻬Professional audio capture/output:Want to build your own recording studio? Many of the high-end, pro audio interfaces use FireWire instead of USB.
⻬Video capture: A video capture device enables you to use iMovie to edit video from analog sources, including VCRs and analog camcorders. This
25
is possible because these devices convert the analog video into digital signals.
⻬TV tuners: Watch and record TV on your Mac. Check out Chapter 9 for more information.
Using FireWire to move data between two Macs
FireWire offers a feature not found in USB 2.0: target disk mode. This feature enables the mini to appear as a hard drive from another Mac when the two are connected together with a cable in their FireWire ports. (The other Mac needs to have been built in the year 2000 or later.) If you need to move a lot of data between the mini and another Mac, target disk mode is significantly faster than using Ethernet.
You can also use target disk mode to try to repair your mini’s hard drive if the mini isn’t booting properly. Just run Disk Utility from the other Mac with the mini in target disk mode.
To put the Mac mini into target disk mode, do the following:
1. Turn the Mac mini off.
The other Mac can stay on.
2. Connect a FireWire cable in the ports of the two Macs.
3. Start up the Mac mini while holding down the Tkey until the FireWire icon appears.
With Mac OS X 10.4 Tiger, an alternative method is to open System Preferences, click Startup Disk, click Target Disk Mode, and then restart. The Mac mini’s hard drive appears on the desktop of the other Mac.
4. When you’re done with it, drag the Mac mini’s icon to the Trash and press the mini’s power button to turn it off.
5. Unplug the FireWire cable from both Macs.
USB 2.0
USB 2.0 is similar to FireWire in several ways. Running at 480 Mbps, USB 2.0 sounds like it is similar to FireWire 400. However, for moving large amounts of data, USB 2.0 can be slower because of the way it sends information. USB 2.0 sends data in discrete bundles, while FireWire transmits data in continuous streams.
Like FireWire, USB 2.0 supplies power to devices. You can also use USB hubs to add more devices, though you can’t create chains of devices. You can also use older USB 1.1 devices in the Mac mini’s USB 2.0 ports.
Common uses of USB 2.0
More devices use USB 2.0 than use FireWire, which is why the mini has two USB ports. Here are the most common uses of USB:
⻬Input devices:These include your basic keyboard and mouse, as well as joysticks and game pads.
⻬Printers:Most inkjet printers connect via USB.
⻬Scanners:USB has long been a common interface on scanners.
⻬Digital still cameras:Most of these use USB to connect to computers.
⻬iPods:iPods sold today use USB to connect to computers. Older models had FireWire ports.
⻬Audio interfaces:Devices that add audio input or output ports often connect to USB ports. Audio interfaces are another way to add speakers.
⻬Bluetooth adapters:These small transmitters connect wireless periph-erals such as keyboards and handheld phones.
Less frequent uses of USB 2.0
Although less common, these two uses are possible with USB 2.0 as well:
⻬Storage:You can find USB storage devices, such as hard drives. I don’t recommend them because FireWire is a faster way to connect to drives. USB can be slowed by all of the other things going on over the USB bus.
⻬Graphics:Believe it or not, you can actually add a second monitor to the Mac mini through a special USB adapter. This is one unusual use of USB that I can recommend. To see how, read the “Adding a second monitor via USB” section, later in this chapter.
DVI video
The video port on the Mac mini is a type called digital video interface(DVI), which is found on Apple’s displays and on many displays made today. You also find DVI on some HDTVs, set top boxes, DVD players, and projectors. The Mac mini DVI port can display resolutions of up to 1920 x 1200 pixels. The Mac mini’s DVI port is of a type known as DVI-I, which has an analog component to it: 4 of the 29 pins are devoted to VGA video. This means that you can use a fairly simple converter cable to connect the Mac mini video port to analog displays, such as VGA and televisions. I describe this further in the “Adding a Display” section, later in this chapter.
27
Modem
These days, the modem port is used mostly for creating dialup Internet con-nections. Otherwise, the modem port is as archaic a method for connecting to the Internet as floppy disks are for storing data.
Ethernet
Use the Ethernet port to connect the Mac mini to a local network or to the Internet. You can also connect the Ethernet port to an AirPort Base Station to get your Mac on a wireless network if you don’t have a built-in AirPort. You can also connect the Ethernet port directly to a DSL modem or cable modem (which really aren’t modems at all, but the old name stuck when the new technology became available).
Power
Of course, this port is where you plug in the power adapter brick that comes with the mini. The power brick (also known as a transformer) takes AC cur-rent from the wall socket and turns it into DC curcur-rent.
If you want to replace the power brick because you’re locating the mini in an unusual location — such as in a car or in a PC case — the main thing to remember is that you need to provide 18.5 volt and 4.5 amps DC (85 watts max) to this port.
Most generic power bricks provide 12-volt DC, which won’t work to power a mini. The power port on the Mac mini is a non-standard shape to prevent you from accidentally plugging in the wrong brick.
What, No Keyboard?
A Mac mini without a keyboard and mouse is, well, a paperweight. It’s up to you to turn it into a computer. But there’s more to the keyboard and mouse story than plugging in a couple of cables. This section describes some of the keyboard and mouse options available to you, including how to mod a Windows keyboard for use with your Mac. I also show you how to make the Mac mini share a keyboard with your other Mac or even with a PC.
USB keyboards
If you already have a USB keyboard, plug it into your Mac mini. If you’re look-ing for somethlook-ing new, you have a wide range to choose from. At $29, the Apple Keyboard is near the bottom of the price range. You can find USB key-boards for $15, but at that price you don’t find the main two features of the Apple Keyboard: the audio volume keys and a built-in USB hub that gives you two more USB ports. Not all $30 keyboards have the built-in USB hub, and I wouldn’t buy a keyboard without it. The Apple Keyboard’s Achilles’ heel is the arctic white color of the keys, which can get dirty after some use. When you start going up the price hill, the ergonomic features emerge. First there’s the built-in wrist rest, one of technology’s greatest achievements. (Movable type wasn’t bad, either.) You also encounter the split keyboard, where the left and right halves are at angles to each other. Science says that split keyboards are better for your wrists, but you really need to get a split keyboard under your fingers before you commit to one. Having been typing on straight keyboards (and typewriters) since the 7th grade, I can barely type my name on the ergonomically correct split variety. But you may think it’s the best thing since wrist wrests after you try one.
Increasing the price tag further gets you into the keyboard-as-control-panel school of keyboard design. These models have programmable buttons to activate common functions and built-in scroll wheels like those found on higher-end mice.
If you’re going to spend a lot of time typing, get yourself into a real, non-virtual store to get a feel for it. Check out the Where to Buy section of your favorite keyboard manufacturer’s Web site to find a store. But if you’re just using the keyboard to enter a few commands for your hacked mini, go ahead and order the $15 special.
Using a Windows keyboard with the mini
One of the selling points of the Mac mini is the opportunity to plug your old PC Windows USB keyboard into the USB port, just as you would a Mac key-board. If your PC Windows keyboard uses a PS/2 connector instead of USB, just get an inexpensive converter cable. For instance, the Keyspan ($19,
www.keyspan.com) lets you plug both a PS/2 keyboard and PS/2 mouse into a single USB port.
While you’re typing text, a Windows keyboard seems pretty much the same as the Mac variety. But as soon as you try using key commands, you’ll notice
29
that some of your most trusted Mac keys have been replaced with strange, new keys. If you’re a Windows user switching to the Mac, you’ll find that your familiar keys are acting strangely. In the next few sections, I describe how to deal with the differences. First the easy stuff.
The Eject key
You’ll notice that the Eject key that Apple places in the upper-right corner of its keyboard is missing on Windows keyboards. No problem; just press the F12 key and hold it to eject a CD or DVD. (This also works on any Mac keyboard.)
Control versus Ctrl
As you can see in Figure 2-2, the Ctrl key in the lower-left of the Windows key-board is in the same position as the Mac Control key. Fortunately, the two are the samekey; Ctrl does everything that Control does.
Windows, Alt, Option, and
Ô
The most perturbing difference between Windows and Mac keyboards is that the Windows keyboard has no Option or Ô(Command) keys. Instead, there’s
an Alt key that works like the Mac Option key, and a Windows key that acts like the Mac Ôkey.
Not only that, but the layout is backwards. As you can see in Figure 2-2, the Windows key (with Ôfunctionality) is in the location of the Mac Option key, and the Alt key (with Option functionality) is in the location of the Mac Ôkey.
To put the things back where you expect them, you need to swap the func-tionality of the Windows and Alt keys. This is easy, although not obvious, with Mac OS X v.4, Tiger. With earlier versions of Mac OS X, you need to install a piece of software that adds the ability to remap the key functions.
Figure 2-2: The Windows keyboard (left) has different keys than a Mac keyboard (right).