Mac OS
®
X
™
Timesaving
FOR
DUMmIES
‰Panther
Techniques
Mac OS
®
X
™
Timesaving
FOR
DUMmIES
‰Panther
Techniques
Mac OS® X Panther™ Timesaving Techniques For Dummies® Published by
Wiley Publishing, Inc. 111 River Street Hoboken, NJ 07030-5774
Copyright © 2004 by Wiley Publishing, Inc., Indianapolis, Indiana Published by Wiley Publishing, Inc., Indianapolis, Indiana Published simultaneously in Canada
No part of this publication may be reproduced, stored in a retrieval system or transmitted in any form or by any means, electronic, mechanical, photocopying, recording, scanning or otherwise, except as permitted under Sections 107 or 108 of the 1976 United States Copyright Act, without either the prior written permission of the Publisher, or authorization through payment of the appropriate per-copy fee to the Copyright Clearance Center, 222 Rosewood Drive, Danvers, MA 01923, (978) 750-8400, fax (978) 646-8600. Requests to the Publisher for per-mission should be addressed to the Legal Department, Wiley Publishing, Inc., 10475 Crosspoint Blvd., Indianapolis, IN 46256, (317) 572-3447, fax (317) 572-4447, e-mail: [email protected].
Trademarks: Wiley, the Wiley Publishing logo, For Dummies, the Dummies Man logo, A Reference for the Rest of Us!, The Dummies Way, Dummies Daily, The Fun and Easy Way, Dummies.com, and related trade dress are trade-marks or registered tradetrade-marks of John Wiley & Sons, Inc. and/or its affiliates in the United States and other countries, and may not be used without written permission. Mac OS and Panther are trademarks or registered trademarks of Apple Computer, Inc. All other trademarks are the property of their respective owners. Wiley Publishing, Inc., is not associated with any product or vendor mentioned in this book.
LIMIT OF LIABILITY/DISCLAIMER OF WARRANTY: THE PUBLISHER AND THE AUTHOR MAKE NO REPRESENTA-TIONS OR WARRANTIES WITH RESPECT TO THE ACCURACY OR COMPLETENESS OF THE CONTENTS OF THIS WORK AND SPECIFICALLY DISCLAIM ALL WARRANTIES, INCLUDING WITHOUT LIMITATION WARRANTIES OF FIT- NESS FOR A PARTICULAR PURPOSE. NO WARRANTY MAY BE CREATED OR EXTENDED BY SALES OR PROMO-TIONAL MATERIALS. THE ADVICE AND STRATEGIES CONTAINED HEREIN MAY NOT BE SUITABLE FOR EVERY SITUATION. THIS WORK IS SOLD WITH THE UNDERSTANDING THAT THE PUBLISHER IS NOT ENGAGED IN REN-DERING LEGAL, ACCOUNTING, OR OTHER PROFESSIONAL SERVICES. IF PROFESSIONAL ASSISTANCE IS REQUIRED, THE SERVICES OF A COMPETENT PROFESSIONAL PERSON SHOULD BE SOUGHT. NEITHER THE PUB- LISHER NOR THE AUTHOR SHALL BE LIABLE FOR DAMAGES ARISING HEREFROM. THE FACT THAT AN ORGANI-ZATION OR WEBSITE IS REFERRED TO IN THIS WORK AS A CITATION AND/OR A POTENTIAL SOURCE OF FURTHER INFORMATION DOES NOT MEAN THAT THE AUTHOR OR THE PUBLISHER ENDORSES THE INFORMA- TION THE ORGANIZATION OR WEBSITE MAY PROVIDE OR RECOMMENDATIONS IT MAY MAKE. FURTHER, READ-ERS SHOULD BE AWARE THAT INTERNET WEBSITES LISTED IN THIS WORK MAY HAVE CHANGED OR DISAPPEARED BETWEEN WHEN THIS WORK WAS WRITTEN AND WHEN IT IS READ.
For general information on our other products and services or to obtain technical support, please contact our Customer Care Department within the U.S. at 800-762-2974, outside the U.S. at 317-572-3993, or fax 317-572-4002. Wiley also publishes its books in a variety of electronic formats. Some content that appears in print may not be available in electronic books.
Library of Congress Control Number: 2004101049 ISBN: 0-7645-5812-9
Manufactured in the United States of America 10 9 8 7 6 5 4 3 2 1
About the Authors
Larry Ullman is the Director of Digital Media Technologies at DMC Insights, Inc., a firm specializing in information technology. He is the author of four other computer books. In addition to writing, Larry develops dynamic Web applications, conducts training semi-nars, and is an Extension Instructor for the University of California at Berkeley. He’s been working with Apple computers for more than 20 years, starting with the Apple IIe back in the dark (or monochrome) ages.
When he’s not tinkering on his Mac, he spends his time reading, working on his fixer-upper of a house, and, given the time, napping in front of the fireplace. Larry currently lives outside of Washington, D.C., with his wife of eight years, Jessica.
Marc Liyanage is a senior software engineer at futureLAB AG, a research and development company focusing on emerging Internet, telecommunications, and wireless technologies.
He’s been using and programming Macintosh computers professionally for 15 years for desktop publishing, video and TV screen design, and software development. He’s been a UNIX user and software engineer for the past eight years in the Internet/ISP industry, doing commercial Web application work and large-scale ISP systems design and imple-mentation using open source software packages. He has also taught classes on XML and trained junior software engineers.
He’s been a Mac OS X user and developer since the first beta versions, and he’s very excited about the Panther OS because it brings together the elegance of the Macintosh with the power of UNIX. In his spare time, he runs the developer-oriented Mac OS X Web site www.entropy.ch, writes Cocoa software, and tinkers with his Mac.
His spare-time interests include graphic design, typography, and digital photography. He enjoys watching and reading science fiction movies and books. Marc lives in Zurich, Switzerland.
Dedication
We dedicate this book to the good people at Apple. Thanks for designing wicked hard-ware, putting out the best operating system we’ve ever used (that’d be Panther), giving away some top-notch software, and for demonstrating that there’s nothing wrong with a computer that’s cool, feature-rich, secure, and stable.
Authors’ Acknowledgments
Our thanks to Wiley and to Carole McClendon at Waterside.
As always, thanks to Jess for her support and willingness to listen to me complain.
A special shout-out to David S. just for being a swell guy.
Thanks to my excellent co-author, Marc, both for his much-needed assistance with this book as well as for the copious amount of work and support he has done for the Mac OS X platform over the years.
Last but not least, my sincerest gratitude goes out to you, the reader.
—Larry Ullman
First and foremost, big thanks to Larry Ullman for inviting me to join him on this book project and for being a great guy to work with. I enjoyed every minute and learned a lot on the way.
Thanks to my friends at futureLAB for making this the best work place in the world!
Finally, thanks to my brother Andy for being a great friend.
Publisher’s Acknowledgments
We’re proud of this book; please send us your comments through our online regis-tration form located at www.dummies.com/register/.
Some of the people who helped bring this book to market include the following:
Acquisitions, Editorial, and Media Development
Production
Project Editor: Linda Morris Acquisitions Editor: Bob Woerner Senior Copy Editor: Teresa Artman Technical Editor: Ilene Hoffman Editorial Manager: Leah Cameron
Media Development Supervisor: Richard Graves Editorial Assistant: Amanda Foxworth
Cartoons: Rich Tennant (www.the5thwave.com)
Project Coordinator: Courtney MacIntyre
Layout and Graphics: Beth Brooks, Joyce Haughey, Stephanie D. Jumper, Michael Kruzil, Kristin McMullan, Lynsey Osborn, Heather Ryan, Melanee Wolven Proofreaders: Laura L. Bowman, Carl Pierce Indexer: Tom Dinse
Publishing and Editorial for Technology Dummies
Richard Swadley, Vice President and Executive Group Publisher Andy Cummings, Vice President and Publisher
Mary C. Corder, Editorial Director
Publishing for Consumer Dummies
Diane Graves Steele, Vice President and Publisher Joyce Pepple, Acquisitions Director
Composition Services
Contents at a Glance
Introduction 1
Part I: Starting, Stopping, and
Running Your Mac Faster
7
Technique 1: Installing Panther without
the Hassle 9
Technique 2: Starting Up with Speed 19
Technique 3: Running Panther Faster 25
Technique 4: When Good Applications
Go Bad 32
Technique 5: Logging Out and
Shutting Down 36
Part II: Optimizing Your Interface
43
Technique 6: Working with Displays 45
Technique 7: Speedy Keyboard Navigation 53
Technique 8: Essential Keyboard Shortcuts 63
Technique 9: A Faster Finder 69
Technique 10: Customizing Windows
for Your Convenience 79
Technique 11: Establishing an
Efficient Dock 90
Technique 12: Saving Steps with
Contextual Menus 96
Technique 13: Easily Managing
Windows with Exposé 103
Part III: Handling Files (And
Other Stuff) Quickly
111
Technique 14: Organizing Your
Home Directory 113
Technique 15: Managing Aliases,
Favorites, and Icons 122
Technique 16: Managing Information
Effectively 130
Technique 17: Working with Files 141
Technique 18: Finding Files in the Finder 151
Technique 19: Slimming Down Your
Hard Drive 160
Part IV: Improving Application
Performance 165
Technique 20: Managing Applications 167Technique 21: Launching
Applications Fast 175
Technique 22: Switching, Hiding, and
Quitting Applications 183
Technique 23: Opening Files Faster 188
Technique 24: Saving and Printing Files 195
Technique 25: Cut, Copy, Paste 202
Technique 26: Managing Fonts 207
Technique 27: Getting to Know Services 214
Part V: Cranking Up Your
Internet Activities
219
Technique 28: Surfing with Safari 221
Technique 29: Surfing with Other
Browsers 232
Technique 30: Managing Bookmarks
Better 238
Technique 31: Speedy Searches
with Google 245
Technique 32: Searching the Internet
with Other Tools 252
Technique 34: Stopping Spam in Its Tracks
Technique 35: Innovative iChat
Part VI: Optimizing Your Network
Technique 36: Getting Your Mac OnlineTechnique 37: The Wonderful World of Wireless Networking
Technique 38: Sharing the Wealth
with Rendezvous
Technique 39: Share the Love: Sharing Files, Printers, and More
Technique 40: Network Security
Technique 41: Your Guide to .Mac: $100 Well Spent
Part VII: Fast and Furious
Multimedia
Technique 42: iTunes: Rockin’ in the (Partially) Free World
Technique 43: Working with iPhoto
Technique 44: Staying on Schedule with iCal
Technique 45: Snapping Screenshots Fast
Technique 46: Working with CDs and DVDs
Technique 47: Getting More Than Music out of Your iPod
271
Part VIII: Security and Maintenance
Technique 48: Better Backups with379
278 rsync and .Mac 381
287
Technique 49: Battling Viruses 389289 Technique 50: Keeping Your Software Up-to-Date 394
296 Technique 51: Securing Files 399
Technique 52: Proper Password Policy 405
303 Technique 53: Useful Utilities 410
309
Part IX: The Scary Or Fun Stuff
415
316 Technique 54: Controlling Cellphones with Bluetooth 417
321 Technique 55: The Terminal, the Finder, and You 428
Technique 56: Managing and Finding
329
Files Fast 438Technique 57: Piping and Redirecting
331 Output with the Terminal 444
342 Technique 58: Viewing and Editing
Text Files 451
349 Technique 59: Customizing Your Terminal 456
357 Technique 60: AppleScript and You 464 Technique 61: Entertaining Yourself
363 with Screen Savers 469
Table of Contents
Technique 1: Installing Panther
Faster Startups: Never Shut Down Booting into a Different Mac OS Speeding Up Login
Starting Applications Automatically
Introduction
Saving Time with This Book Foolish Assumptions How This Book Is Organized
Part I: Starting, Stopping, and Running Your Mac Faster
Part II: Optimizing Your Interface Part III: Handling Files (And Other Stuff)
Quickly Part IV: Improving Application Performance Part V: Cranking Up Your Internet Activities Part VI: Optimizing Your Network
Part VII: Fast and Furious Multimedia Part VIII: Security and Maintenance Part IX: The Scary Or Fun Stuff
Conventions Used in This Book Icons Used in This Book Comments and Questions
Part I: Starting, Stopping, and
Running Your Mac Faster
without the Hassle
What Panther Can Do for You Choosing an Installation Method Managing Your Disk Drives
Formatting a volume Partitioning a disk drive
Installing Panther
Working with Setup Assistant Transferring Files Flawlessly
Technique 2: Starting Up with Speed
Technique 3: Running Panther Faster
25
1
1 Optimizing Your System with Shareware 25 2 Disabling Unnecessary Features 27 2 Longer Battery Life 29 Improving Performance through Hardware 30
2
Technique 4: When Good Applications
2
Go Bad
32
3 Slaying Stalled Apps with the Dock 32
3 Gaining Better Performance through
3 Activity Monitoring 33
3
Technique 5: Logging Out and Shutting Down 36
3
3 Logging Out 36
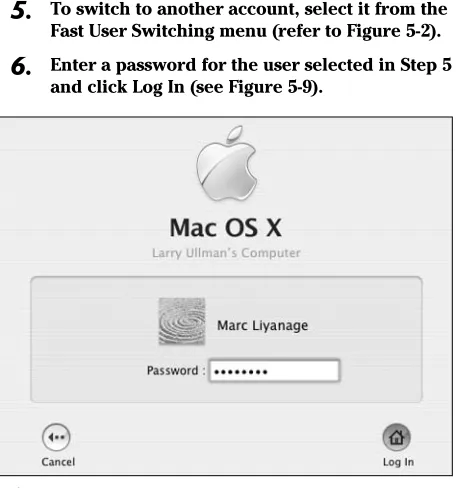
3 Securing Your System with a Screen Saver 39 3 Fast User Switching 40 4 Making the Quick Exit 41 4
Part II: Optimizing Your Interface
43
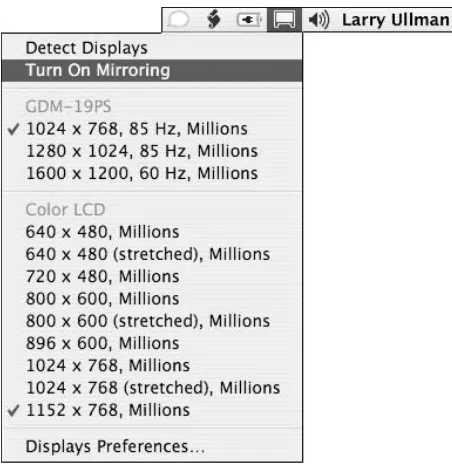
Technique 6: Working with Displays
45
7
Managing Your Display Resolution 45Adjusting the Colors 47
9
Handling Fonts 49 9 Using Multiple Displays 50 11Technique 7: Speedy Keyboard Navigation
53
11Keyboard Characters 53
12
Moving Around in a Finder Window 54
13
14 Navigating in any view mode 54
Navigating in icon view 55
17
Navigating in list view 56
18
Navigating in column view 57
19
Navigating the Desktop 58 19 Getting Places 59 21Technique 8: Essential Keyboard Shortcuts
63
21 The Most Essential of the Essentialx
Mac OS X Panther Timesaving Techniques For Dummies
Technique 9: A Faster Finder
Finder Preferences
General Labels Sidebar Advanced
Show View Options
Menus Using Your Input Device
Freeware and Shareware
TinkerTool wClock Menu tools
Technique 10: Customizing Windows
for Your Convenience
Understanding the Different View Modes
Icon view
Using Actions
Moving Windows Around
Technique 11: Establishing an
Efficient Dock
Customizing the Dock Organizing the Dock
Keyboard and Mouse Shortcuts for the Dock Shareware for the Dock
Technique 12: Saving Steps with
Contextual Menus
Grasping the Basics of Contextual Menus Using CMs with Third-Party Applications AppleScript, Contextual Menus, and You
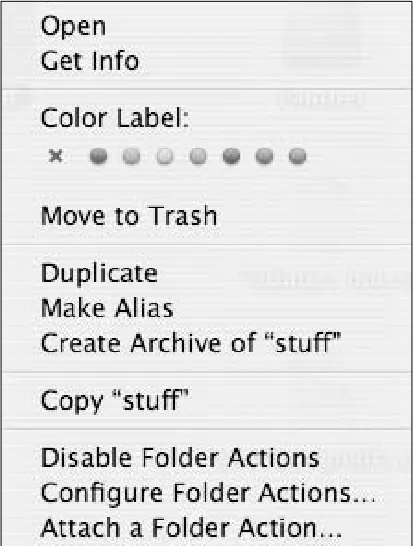
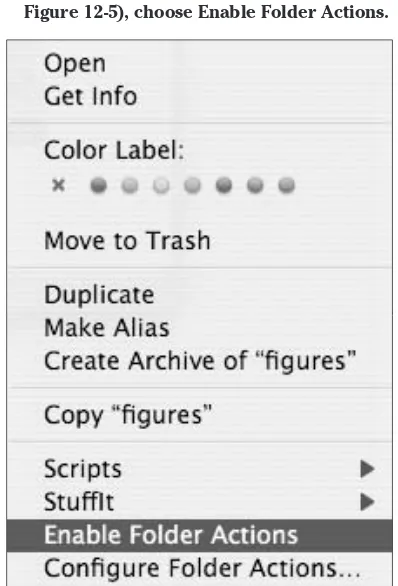
Folder Actions Big Cat
69
Technique 13: Easily Managing
69
Windows with Exposé
103
70 Introducing Exposé 103
70 How to Get the Most out of Exposé 106
71 Dragging and dropping with Exposé 107
72 Using Exposé without the mouse 109
73
74
Part III: Handling Files (And
76
Other Stuff) Quickly
111
76
Technique 14: Organizing Your
77
77
Home Directory
113
78 Your Stuff, Your Home Directory, and You 113 Checking Out Your Library 116
79
A Cluttered Desktop Is a Sign of a Cluttered Mind 11879 Revisiting Our Friend, the Dock 120
80
81
Technique 15: Managing Aliases,
83
Favorites, and Icons
122
84 Also Known As: Working with Aliases 122
84 These are a few of my Favorites things 125
86 If you can, icon 126
87
Technique 16: Managing Information
87
Effectively 130
Getting to Know the Address Book 88
130 Customizing the Template 131
90
Creating Your Own vCard 13390 Creating and Using Groups 135 92 Using the New Group From Selection tool 135
92 Creating a group manually 136
95 Duplicating an existing group 137
Other Cool Address Book Tricks 137
96
Organizing and Prioritizing Information 139Storing random bits of data as Stickies 139
96 Prioritizing with to-do lists 140
98 Getting organized with outlining applications 140 99
Technique 17: Working with Files
141
100
101 Understanding a File’s Properties 141
The General panel 142
xi
Table of Contents
The Open With panel 145
The Preview panel 145
The Ownership & Permissions panel 146
The Comments panel 147
Solving Common File Problems 148
Deleting locked files 148
Ejecting stuck disk images 148
Finding the original for an alias 149 Sharing files with another OS 149
Technique 18: Finding Files in the Finder
151
Finder Window Searches 151 Using the Find Window 153 Incorporating Better Search Techniques 157
Technique 19: Slimming Down Your
Hard Drive
160
Avoiding Unnecessary Installations 160 Weeding Your Hard Drive: Manually Deleting
Files 161
Pruning your Home directory 162
Thinning out no-longer-required applications 162 Cleaning out your System and Library folders 163
Cleaning other volumes 163
Diet Tools: Third-Party Applications 163 Hands-Off: What Not to Trash 164
Part IV: Improving Application
Performance 165
Technique 20: Managing Applications
167
Installing Applications 167 Tracking Installed Applications 169 Moving Installed Applications 171
Organizing the Applications folder 172
Uninstalling Applications 173
Technique 21: Launching
Applications Fast
175
Auto-launching with the Accounts Panel 175 Launching with the Finder 177
Launching with the Dock 178 Other Ways to Launch Applications 180
Favorites and aliases 180
Recent Items 180
Launching with Shareware Tools 181 Using LaunchBar 182
Technique 22: Switching, Hiding,
and Quitting Applications
183
Switching among Open Applications 183
Switching apps with Panther 183
Switching apps with shareware 185
Hiding Applications 185 Quitting Applications 187 Logging Out and Shutting Down 187
Technique 23: Opening Files Faster
188
Opening Files with the Finder 188 Opening Files with Specific Applications 189
Using the Window navigational bar
to open files 189
Using the Dock to open files 189 Using Favorites to open files 190 Opening files with a contextual menu 190
Using LaunchBar 191 Opening Files within an Application 191 Recalling Recent Items 192
Recalling files from the Apple menu 192 Recalling files from application menus 192
Setting the Default Application for Files 193
Technique 24: Saving and Printing Files
195
Saving Files 195
Marc’s cool trick for navigating in Save
dialogs 198
Overwriting existing files 198
Printing 198
Customizing print settings 199
Previewing your documents 199
Desktop printing 200
xii
Mac OS X Panther Timesaving Techniques For Dummies
Technique 25: Cut, Copy, Paste
202
Copying and Pasting with the Keyboard
and Mouse 202 Understanding the Clipboard 205 Copy and Paste Tips and Tricks 205
Clipboard shareware options 205
Copying items within the Finder 206
Using the Find Clipboard 206
Technique 26: Managing Fonts
207
Fonts Support in Panther 207 Installing Fonts 208 Viewing Fonts 209
Character Palette 209
Font panel 210
Font Book 212
Managing Fonts 213
Technique 27: Getting to Know Services
214
What Are Services? 214 Grasping the Best Services Techniques 216 Adding On Services 218
Part V: Cranking Up Your
Internet Activities
219
Technique 28: Surfing with Safari
221
Navigation Shortcuts 221 Standard Shortcuts 222 Other Shortcuts 223 Setting Preferences 224
Setting General preferences 224
Working with tabbed browsing 225
Blocking pop-up windows 227
Saving Time with AutoFill Forms 228 Managing Usernames and Passwords 229 Marking Pages with SnapBack 229 Customizing Safari 231
Technique 29: Surfing with Other
Browsers 232
Internet Explorer 232
Keyboard shortcuts 233
Favorites 233
Explorer bar 234
Other features 235
Netscape, Mozilla, and Camino 235 Commercial Web Browsers 236
Technique 30: Managing Bookmarks
Better 238
Managing Bookmarks in Safari 238
Bookmarking a page 240
Using the Bookmarks window 240
Using the Bookmarks menu 241
Working with the Bookmarks Bar 241 Setting bookmark preferences in Safari 242
Accessing Safari Bookmarks 243 Sharing Bookmarks across Browsers 243 Bookmark Tips and Tricks 244
Technique 31: Speedy Searches
with Google
245
Doing Basic Google Searches 245 Doing Advanced Google Searches 246 Doing Specialized Google Searches 247 Searching Google with Safari 248 Google Tips and Tricks 249
Google, the dictionary 249
Google, the mathematician 249
Google, the unit converter 250
Google, the linguist 250
Google, the investor 251
Google, the cartographer 251
Google, the (fill in the blank) 251
Technique 32: Searching the Internet
with Other Tools
252
Searching Swiftly with Sherlock 252 Searching with Watson 255 Other Search Tools 257
CleverKeys 257 iSeek 258 Huevos 258
Technique 33: Mastering Mail
259
Keyboard Shortcuts 259
Navigation shortcuts 260
Table of Contents
xiii
Customizing Mail’s Appearance and Behavior 260
General preferences 261
Composing 261 Customizing the Mail toolbar 262 Customizing the messages window 263
Organizing Your Mailboxes 265 Performing Searches 267 Creating and Using Signatures 268 The Best Mail Tips and Tricks 269
Using the Dock icon 269
Sending attachments 270
Technique 34: Stopping Spam
in Its Tracks
271
Fighting Spam with the Junk Mail Button 271 Creating and Using Rules 273 Stopping Spam before It Gets to You 275
Bouncing spam 275
Other spam tools 276
Technique 35: Innovative iChat
278
Keyboard and Mouse Shortcuts 278 Customizing iChat 280 Transferring Files with iChat 282 Using the Videoconference 283 Creating URLs 285 Chatting with Multiple People at Once 285 Other Instant Messenger Tools 286
Part VI: Optimizing Your Network
287
Technique 36: Getting Your Mac Online
289
Defining a Location 289 Using a Modem 292 Networking Tips and Tricks 294
Switching locations on the fly 294
Ordering connections 295
Dialing with a calling card 295
Using FireWire over IP 295
Technique 37: The Wonderful World
of Wireless Networking
296
What to Look for in a Wireless Network 296 Creating an AirPort Network 298
Understanding Encryption 299 Finding Networks 300
Technique 38: Sharing the Wealth
with Rendezvous
303
Why You Should Use Rendezvous 303 Setting Up Rendezvous 303 Using Rendezvous with Software 304
Using Rendezvous with iChat 305
Using Rendezvous with iTunes 306
Using Rendezvous with Hardware 308
Technique 39: Share the Love: Sharing
Files, Printers, and More
309
Safe Sharing 309 Sharing a Web Page 310 What’s in a Name (Or URL)? 311 Fun with File Sharing 312 Personal File Sharing 312 Print Sharing 313 Sharing Your Internet Connection 314
Technique 40: Network Security
316
Keeping Your Mac Secure 316 Using a Firewall 317
Software firewalls 317
Hardware firewalls 319
Checking for Security Problems 319
Technique 41: Your Guide to .Mac:
$100 Well Spent
321
Top Ten Reasons to Use .Mac 321 I Like My iDisk: Storing Stuff Online 322
Making your iDisk secure 324
Using another .Mac member’s iDisk 325
Working with Your .Mac Web Page 326 Using iSync with .Mac 326
Part VII: Fast and Furious
Multimedia
329
Technique 42: iTunes: Rockin’ in
the (Partially) Free World
331
xiv
Mac OS X Panther Timesaving Techniques For Dummies
Making the iTunes Window Look the Way
You Want 336 Managing Your Music 338
Editing song information 338
Searching for tracks 338
Creating playlists 339
Adding album covers 339
Blowing Your Paycheck at the iTunes
Music Store 340
Technique 43: Working with iPhoto
342
Best iPhoto Practices 342
Preferences 342 Creating a new Photo Album quickly 343
Editing images with ease 344
Working with Your Digital Library 345
Importing images 345
Managing your images more efficiently 345 Storing your images to save space and time 346
Creating an Online Photo Album 347
Technique 44: Staying on Schedule
with iCal
349
Creating Calendars and Events 349 iCal’s Main Keyboard Shortcuts 351 Best iCal Practices 352 Subscribing and Publishing 352
Where to find subscriptions 353
Publishing your Calendar with .Mac 353 Publish your Calendar without .Mac 354
iCal Tips and Tricks 354
iCal and Mail 354
AppleScript 355
Exploring Alternatives to iCal 356
Technique 45: Snapping Screenshots Fast
357
Taking Screenshots with Screen Capture 357 Taking Screenshots with Grab 359 Using Snapz Pro X 360 More Screenshot Utilities 362
Technique 46: Working with CDs
and DVDs
363
Setting Your System Preferences 363 Burning CDs 365
Making CDs in the Finder 365
Making an audio CD in iTunes 366 Making picture CDs in iPhoto 366 Making data CDs in Disk Utility 367
Making Labels and Covers 367 Managing a Disc Collection 368
Technique 47: Getting More Than
Music out of Your iPod
369
Using the iPod for Data Storage and Transfer 369 Secure, Encrypted Storage on the iPod 370 Backing Up Your Data to an iPod 371
Using .Mac and Backup 372
Using Carbon Copy Cloner 373
Emergency Rescue iPod 374 Synchronizing with iSync 374 Keeping Notes on Your iPod 375
Using Notes on older iPods 375
OmniOutliner 375
Driving directions 376
Housekeeping on the iPod 376 Useful Hardware You Might Consider 377
Part VIII: Security
and Maintenance
379
Technique 48: Better Backups
with rsync and .Mac
381
Smart Backups 381 rsync: Using the Command Line to Back Up 382
rsync syntax options 383
Backing up Home to an external hard drive 383
Backup for .Mac Users 385
Getting started with Backup 385
Deciding what to back up 386
Finalizing the backup 387
xv
Table of Contents
Technique 49: Battling Viruses
389
What You Should Know about Viruses 389 Things You Can Do to Limit Viruses 390 Using Virex 392 Other Antivirus Software 393
Technique 50: Keeping Your Software
Up-to-Date 394
Using Software Update 394 Updating Other Applications 396 Staying Informed about Updates 397
Technique 51: Securing Files
399
Making the Most of FileVault 399 Other Encryption Tools 401
Disk Utility 401
StuffIt 402
Mac GNU Privacy Guard 402
PGP 402 SubRosaSoft and CodeTek Studios 402
Using the Finder’s Secure Empty Trash 403
Technique 52: Proper Password Policy
405
Creating a Good Password 405 Working with Apple’s Keychain Access 406 Changing Login Passwords 408
Technique 53: Useful Utilities
410
Working with TinkerTool 410 Automating Tasks with cron 411 Other Useful Utilities 413
Part IX: The Scary Or Fun Stuff
415
Technique 54: Controlling Cellphones
with Bluetooth
417
What Is Bluetooth? 417 Getting Started with Bluetooth 418 Setting Up Your Connection 418 Working with Your Address Book 421
Dialing from within Address Book 421 Display incoming call alerts 421 Sending and receiving SMS messages 422
Dialing Your Phone from a Text Selection 423
Synchronizing with iSync 424
Setting up iSync 424
Your Cellphone as a Remote Control 425 Storing Notes and Pictures on a Cellphone 426
Technique 55: The Terminal,
the Finder, and You
428
Navigating within the Terminal 428
Getting around in the Terminal 429
Tab completion 430
Viewing directory contents 431
Navigating among open Terminal windows 431
Other commands 432
Terminal Tips and Tricks 432
Getting help 432
A command of history, or a history
of commands 433
Role playing: Executing commands as
another user 434
Making the Terminal and the Finder
Play Together Nicely 435
Using the open command 436
Drag and drop with the Finder 436
Editing between the Terminal and the Finder 437
Technique 56: Managing and Finding
Files Fast
438
Copying, Moving, Renaming, and Deleting Files 438 Creating and Listing Directories 440 Using Wildcards 441 Using the find Command 441 Using the locate Command 442
Technique 57: Piping and Redirecting
Output with the Terminal
444
Handy Commands to Use with Piping 444 Combining Commands with Pipes 446 Redirecting Output 449
Technique 58: Viewing and Editing
Text Files
451
Viewing Files 451
cat 451
more or less 452
Technique 59: Customizing Your Terminal
456
Adjusting Terminal’s Preferences 456 Creating Terminal Preferences Files 460 Choosing Your Shell 461 Customizing Your Shell 462 Shareware Tools for Working with the Terminal 463
Technique 60: AppleScript and You
464
The Easiest Way to Write Scripts 464 Four Fabulous Reasons to Use AppleScripts 467 AppleScript Resources 468
Technique 61: Entertaining Yourself
xvi
Mac OS X Panther Timesaving Techniques For Dummies
with Screen Savers
469
Configuring Screen Savers in Panther 469 Adding to Your Screen Saver Library 471 Using the Desktop as a Screen Saver 473
Introduction
W
e’re fairly smart people, and presumably you’re a really smart person (you are looking at the right book, after all), but it still seems like technology has eclipsed our ability to understand it. Even the magical Mac — the symbol of all things easy in computers — is overladen with features and gadgets and pretty lights. Make no mistake: We all like features and gadgets and pretty lights, but how are we supposed to make sense of it all and just do what we want to do, quickly and easily?By reading this book, of course!
But if that isn’t enough to convince you (and we can’t imagine why not; after all, we’ve never lied to you before), take a moment or two to read through this Introduction. You’ll see where we’re coming from, what this book offers, and how it’ll make you fall in love with your Mac all over again.
Saving Time with This Book
The Timesaving Techniques For Dummies books focus on high-payoff techniques that save you time, either on the spot or somewhere down the road. And these books get to the point in a hurry, with step-by-step instructions to pace you through the tasks you need to do, without any of the fluff you don’t want. We’ve identified more than 60 Techniques that Mac OS X Panther users need to know to make the most of their time. In addition, each Technique includes lots of figures that make following along a breeze. Decide for yourself how to use this book: Read it cover to cover if you like, or skip right to the Technique that interests you the most.
In Mac OS X Panther Timesaving Techniques For Dummies, you can find out how to
2
Introduction
⻬ Take your skills up a notch: You’re already familiar with the basics of using Mac OS X. Now this book takes you to the next level, helping you become an even savvier Mac user.
⻬ Customize Mac OS X to meet your needs: Spending some upfront time customizing Mac OS X so that it works faster, more reliably, and more like how you work on a daily basis can save you time (and aggravation) later.
Foolish Assumptions
Every book is written with certain assumptions about the reader, and this one is no exception. Don’t be alarmed: We’re not looking for an advanced degree in computer science or the ability to recall long lists of Mac trivia at parties. What we do expect of you are two things:
⻬ A Macintosh, running Panther (Mac OS X v.3): Well, to be perfectly frank, if you aren’t running Panther (but are running another version of Mac OS X), you’ll still be able to get a lot of things out of this book; you just won’t be able to do ever y-thing this book says you can do. This require-ment is more of a highly advisable suggestion.
⻬ Basic familiarity with your computer: In some ways, this is the same kind of For Dummies book you’ve come to know and love, but it’s not the kind that shows you how to plug in a printer or save a document. (It will show you how easy it is to share a printer on a network and how you can save documents faster, though.) We promise that you won’t be overwhelmed by anything in this book, but keep in mind that you won’t be spoon-fed, either.
Having a fast Internet connection will help you get the most out of this book, and so will a little extra spending money (but just a little). But neither of these are required as long as you have a Mac and a willingness — or a need — to discover how to use your computer better.
How This Book Is Organized
As devoted Mac users, we’ve amassed a gazillion pieces of useful knowledge. By sheer luck, it turned out that these little pieces could be organized into Techniques, which are chapter-like sections grouped by application or the general theory being dis-cussed. These Techniques, it turns out, are sorted into larger parts, which we’re calling (appropriately enough) parts (we’re clever that way). We give you the highlights as to what the parts are all about here, but remember that you can approach this book how you want to. Read a part straight through, skip from Technique to Technique, or just pick out the little pieces most relevant to the way you work. This book has a structure, but you can be a free thinker. You own a Mac, after all!
Part I: Starting, Stopping, and Running
Your Mac Faster
This first part of the book focuses exclusively on how to get the machine and operating system to load and run faster — in other words, how to speed up the process between pushing the power button and actually doing anything. While we’re at it, we also discuss some faster aspects of the installation process and the easiest ways to shut down and log out. These might be the basics of using your com-puter, but even here, you find ways to do things more efficiently.
Part II: Optimizing Your Interface
3
Conventions Used in This Book
Part III: Handling Files (And Other Stuff) Quickly
Like a teenager’s closet, your Mac is full of stuff. Who knows what it all is? Okay, we know, and we think you should, too. Although your hard drive might not yet be bursting, there’s always going to be a lot of junk in there. This third part of the book demon-strates how to best organize, manage, and find your (and your computer’s) stuff. You’ll also see how to save disk space and remove clutter by trashing unnecessary files.
Part IV: Improving Application Performance
Included on your computer (see Part III) are applications — software that does stuff with other stuff (not to be too technical about it). You won’t read about any one specific application here but rather pick up some useful knowledge for using any application more efficiently.
Part V: Cranking Up Your Internet Activities
As Homer Simpson says, “They have the Internet on computers now.” Well, the man’s never been more correct. Accessing e-mail and the World Wide Web are why many people have computers. Most folks spend a decent portion of their computing life in this realm. Part V covers Web browsers, performing searches, using e-mail, and other timesaving online techniques. Tips on managing spam and using Google effectively can save you minutes per day — minutes you could spend surfing the Internet.
Part VI: Optimizing Your Network
The networking section of the book is Part V’s counterpart. Although not every user has advanced networking needs, most could benefit from using locations, working with an iDisk, and knowing how to easily connect to other computers when the time comes.
Part VII: Fast and Furious Multimedia
Apple markets itself as the multimedia machine, and with good reason: The free software that comes with the operating system is exceptional. In the multi-media section of the book, we take a few of these applications and demonstrate how to more effi-ciently use them.
Part VIII: Security and Maintenance
Okay, so your Mac pretty much takes care of itself. Still, a little TLC couldn’t hurt. Part VIII (that’s eight to you and me) offers you all the motherly advice you can use on viruses, creating backups, keeping your software up-to-date, and the like. Think of this as the An ounce of prevention is worth a pound of cure section of the book.
Part IX: The Scary Or Fun Stuff
Whether you know it or not, your Mac is a powerful machine capable of some really, really cool things. The final part of the book strongly emphasizes our friend, the Terminal, with a nod given to AppleScript. If you’re looking for something more fun and less scary, check out the Technique on using your cell-phone with your Mac as well as the one on screen savers.
Conventions Used in This Book
This book, as you’ll soon see, has a lot of visual stuff in it to serve as your roadmap. You know . . . different fonts and icons, indentations, and a few funny char-acters. Here’s a Rosetta stone as to what they all mean:
4
Introduction
shortcut), you should press and hold Ô, press A once, and then release both. Something like Control+click means that you hold down the Control key while clicking the mouse button once.
⻬ Menu bar: The menu bar is the thing going across the entire top of your window. It has all the, you know, menus.
⻬ Menu sequences: Sequences of menus are refer-enced with an arrow. For example, Go➪Recent Folders means that you should click the Go menu (on the menu bar) and then choose the Recent Folders submenu from there.
⻬ Apple menu: The Apple menu, represented by the Ú symbol, is that blue Apple symbol in the upper-left corner of your window.
⻬ Application menus: When we refer to an applica-tion menu, we mean the menu that has the title of the application and appears between the Apple menu and the File menu. So in the Finder, it’s called Finder; in Microsoft Word, it’s called Word;
in iTunes, it’s called iTunes.
⻬ Monospace font: Web sites (URLs) and e-mail addresses are in their own special monospace font, which looks like www.apple.com. Onscreen messages and text in the Terminal also look like this.
⻬ User entry: Stuff you should type appears in bold, like this: Type How now, brown cow?.
Icons Used in This Book
This book is littered with lots of little tidbits and notes, set aside by different icons. In due time, you’ll probably identify the pattern for what each icon represents, but here’s a quick heads-up.
Tips are just extra ideas that we think you’ll appreciate. Although not life-altering, tips are our way of saying, “Hey, you know what else you could try?”
These icons reemphasize the timesaving point being made in a certain section. If you don’t feel like reading through all those pesky words and get tired of our trite jokes, look for these.
This icon means that you’ve seen this idea before, you’ll see this idea again, and you ought to keep it in mind. These are publish-ing’s version of sticky notes.
For crying out loud, don’t do anything marked with this icon! If you don’t believe anything else that we say, trust us on these warning icons. Think curiosity and cat here and how that went. You won’t see many warnings in this book, but when you do, understand that you might be about to take an irrevocable step.
Comments and Questions
We’d like to think that this book was everything you wanted or needed, and that you have no more com-ments, problems, questions, and the like. But writing can be a cruel mistress (we don’t know what that means, either, but it sounds bad), and no book is ever comprehensive. If you have something to say or ask, here are some places to turn:
⻬ Wiley (www.dummies.com): You can contact Wiley, the publisher of this book, at its For Dummies Web site. Feel free to leave all sorts of feedback, including praise (Woo-hoo!), complaints (D’oh!), and requests (that’s okay, too).
5
Comments and Questions
⻬ Mac OS X Panther Timesaving Techniques For Dummies, the support forum (www.entropy.ch/ mactst/): Marc has established a forum at his Web site where you can ask questions about the book, about us, and about your Mac. Not only will we reply (probably faster than we’ll get to an e-mail), but you’ll also hear what other readers have to say.
⻬ Email the authors: If you’d like to contact us directly, you can e-mail us at mactst@ dmcinsights.com. Although we do respond to
every e-mail we receive, there’s no guaranteeing how quickly that’ll happen. Don’t get us wrong: We absolutely appreciate the feedback, but there are only so many hours in the day.
Faster
Part I
1
Installing Panther
without the Hassle
Technique
⻬ Discovering the benefits of Panther
⻬ Selecting the appropriate installation method
⻬ Using Disk Utility
⻬ Installing Panther
⻬
Assistant
⻬
files to a new installation
Save Time By
Working with Setup Transferring your existing
B
efore you can discover the magic of Apple’s latest, greatest operat-ing system, you need a version of it runnoperat-ing on your Mac. You might even wonder whether Mac OS X Panther is right for you. Because you’re holding this book, the answer is presumably yes, but to explain why, we begin this Technique by discussing some of Panther’s benefits and new technologies.The installation process itself has a few variables, and comprehending the different choices can not only save you time during the installation process but also give you a more reliable operating system over the long haul. You should also be able to make knowledgeable decisions about formatting and partitioning your disk drive before you install the OS. Finally, we show you how to breeze through the Setup Assistant (Apple’s program for easing you through the startup process) and then wrap up with a discussion of foolproof file transfers.
What Panther Can Do for You
The benefits of using Panther break down into two broad categories: operating system improvements and better versions of Apple’s many wondrous applications. What you’ll find in Panther itself is
⻬ A new style of Finder windows with improved navigation, much better search capability, and built-in actions (which are kind of like contextual menus)
⻬ The return of Labels, the much maligned — but still used — Mac OS 9 feature that dropped off the radar in previous versions of OS X
⻬ Greatly improved Open and Save dialogs for applications
⻬ Exposé, which is a fantastic tool for immediate access to open windows and documents
⻬ Built-in fax software that allows you to send and receive faxes via your computer without third-party applications
10
Technique 1: Installing Panther without the Hassle
⻬ Surprisingly easy security provided by FileVault, which is an encryption tool for your folders and files
⻬ The ability to more readily access different user accounts thanks to Fast User Switching
Because the other Apple applications are critical to the functionality of the operating system as a whole, most of the applications that Apple provides with Panther have also had a makeover and some new ones have even been created. Specific benefits of these include
⻬ The introduction of Font Book, which is a font management application that can take the place of third-party tools for most users.
⻬ Even more reasons to use Mail, which is Apple’s aptly named e-mail client (see Technique 33).
⻬ A speedier and more useful version of Preview, which is Mac OS X’s default viewer for PDF docu-ments and images. More importantly, Preview now supports many common PDF features like hyperlinks, bookmarks, and full-text searching.
⻬ Modest changes to Address Book (personal infor-mation management software), giving it even more cause to be a regular resource for every Mac user.
⻬ A new version of the popular iChat messenger service, iChat AV. You can now save oodles of time and money doing video or audio conferenc-ing with your computer and a FireWire-enabled video camera. (This application is available to Jaguar users for $29.95.)
⻬ The advent of Xcode, which is a tool for creating applications. Xcode is a sophisticated new ver-sion of Project Builder, which developers will love and the general public can safely ignore. (This application is available to Jaguar users at no cost.)
All these improvements, new applications, and fea-tures can be yours for the low, low cost of . . . okay, the not-so-low cost of $129. But that’s a beauty of an operating system.
The price of Panther ($129) is the same whether you’re upgrading from Jaguar or buy-ing a version of OS X for the first time.
To further convince you, consider that an overriding benefit of installing Panther is that you’ll be using the most current version of Apple’s operating sys-tem. This means that you can take advantage of all of Apple’s future development of applications and patches, which will be designed with Panther in mind.
If you own more than one Macintosh, consider the Family Pack version of Panther, which gives you license to install the OS on up to five machines for the bargain price of $199. If time truly is money, this tip alone could save you hours!
Minimum System Requirements
In order to use Panther, Apple recommends that you have one of the following computers:⻬ Power Mac G5
⻬ Power Mac G4
⻬ Power Mac G3 (Blue and White)
⻬ PowerBook G4
⻬ PowerBook G3 with built-in USB
⻬ iMac
⻬ eMac
⻬ iBook
Managing Your Disk Drives
11
Choosing an Installation Method
If you just purchased a brand new Mac, making your-self the envy of the neighborhood, you should be sit-ting there with a fresh copy of Panther purring away. In that case, you can skip ahead a bit to the section “Working with Setup Assistant” to see how to whip through the Setup Assistant. If you don’t have Panther installed yet but are the proud owner of some shiny new installation discs, it’s time to put them to use.
Before you begin, take a minute to think about what type of installation you want. You have three options:
⻬ Upgrade a previous version of Mac OS X: Upgrading is the easiest and least time-consuming option to use — in the short run, that is. One drawback, however, to upgrading an existing OS is that your hard disk will be become bloated with deadwood files. The result-ing OS can be a little buggy, inheritresult-ing problems from its predecessor.
If you want to install Panther and get on with your life with a minimum of fuss, choose the upgrade option.
⻬ Erase and Install: This option is the most taxing and time-consuming (and drastic) of the three. On the bright side, you do end up with an untouched hard drive and a brand spankin’ new OS. On the other hand, you wipe out all your files and appli-cations in the process.
Absolutely, positively do not use the Erase and Install option unless you’ve got multiple back-ups of all your files, drivers, and software. This option does exactly what it says: erases the contents of your entire hard drive.
⻬ Archive and Install: This happy medium between your other two install choices creates a new system folder with new copies of all the OS stuff, but it also allows you to maintain all the
user files and non-Apple applications. Although Apple doesn’t promote this feature as the recom-mended type of installation, we’re quite fond of it ourselves. It gives you the benefit of a clean sys-tem folder (without the deadwood created by an upgrade) without the serious drawback of having to reinstall all your applications and files.
The Archive and Install option throws all the existing system files and Apple applications in a folder called Previous Systems. After you’re convinced that no valuable information has been overwritten by the recent installation, delete this folder to clear up space on your hard drive.
Managing Your Disk Drives
Along with deciding what type of installation you want to perform, another topic worth your consider-ation before you install Panther is the formatting and partitioning of your hard drive (or drives). To clarify:
⻬ Formatting a disk drive is the process of erasing its contents and telling the blank drive how to structure the files stored on it.
⻬ Partitioning a disk drive is the process of break-ing a sbreak-ingle drive into multiple volumes. Your computer still has the same number of physical hard drives, but the operating system behaves as if there were more. (Each volume appears as a separate drive in Finder and other software.)
Practically anything you do with the Disk Utility application requires erasing your entire hard drive. Although Disk Utility warns you before it does anything so drastic, we’d advise you not to use the application unless you’ve first backed up everything that you need.
12
Technique 1: Installing Panther without the Hassle
installation disc. If you have multiple drives or vol-umes, Disk Utility can format or partition any volume except for the one on which it resides (because it can’t erase itself). If you want to format or partition the drive that contains Disk Utility, you need to use the installation discs.
• Figure 1-1: The Disk Utility application manages your hard drives.
If you plan either an Upgrade or an Archive and Install installation, do not reformat or par-tition your hard drive because there will be nothing to upgrade or archive. If you’re per-forming an Erase and Install, the installer can handle basic formatting (but not partitioning) for you.
1.
Start your computer with the first Panther installation disc.2.
At the first screen that appears (for language selection), select Open Disk Utility from the Installer menu (see Figure 12).3.
Follow the appropriate steps in one of the next two sections to either format or partition your drives and volumes.• Figure 1-2: Click the Installer menu to access Disk Utility.
Formatting a volume
To format a volume with Disk Utility:
1.
Click the volume icon in the left column. (A disk’s volumes appear under the disk’s icon.)2.
Click Erase.3.
Select a Volume Format. The Volume Formats are䊳 Mac OS Extended
This used to be the default format and is the safest choice.
䊳 Mac OS Extended (Journaled)
Journaling support has just recently been added by Apple. You don’t really need to understand the details of what it does to appreciate that it allows you to more accu-rately recover your computer in the event of a disaster. Feel free to use this format because Apple now uses it as the default.
䊳 UFS (Unix File System)
Managing Your Disk Drives
13
4.
Enter the volume’s name (see Figure 13) in the Name box.• Figure 1-3: Reformatting a disk’s volume.
5.
Click Erase to reformat the volume.When reformatting a hard drive, you can choose to Zero All Data (available by clicking the Options button). Doing so will exponen-tially increase how long it takes to reformat the drive, but it’s the best way to both clean the drive and ensure that it’s working properly.
Partitioning a disk drive
To partition a disk drive into multiple volumes:
1.
Click the drive’s icon in the left column. The drive will have a strange name consisting of the size and model of the device.2.
Click the Partition tab.3.
Select a scheme from the Volume Scheme drop down menu (see Figure 14).A volume’s scheme refers to how many parti-tions you want to create. Hard drives 20GB or larger can be nicely divided into two partitions.
• Figure 1-4: Opting for two partitions as the volume’s scheme.
4.
One at a time, select every partition in the volume scheme window (named Untitled 1 and Untitled 2 in Figure 14). Type a name in the Name box and select a format type in the Format dropdown list for each.Disk Utility automatically partitions a disk into equally sized volumes. You can override this by clicking and dragging the bar that sepa-rates the volumes in the scheme window.
5.
Click the Partition button to enact the changes.Using RAIDs
If your computer has multiple hard drives, you can establish a RAID (Redundant Array of Inexpensive Disks or Redundant Array of Independent Disks, depending upon whom you ask) on them with Disk Utility. A RAID treats multiple drives as one single device, offering either better performance or better reliability (or sometimes both), depending upon how it’s defined.
14
Technique 1: Installing Panther without the Hassle
Installing Panther
The installation process is fairly obvious, particu-larly after you understand the options, but we’ll run through the steps and highlight a few important considerations nonetheless. To install Panther:
1.
Update your computer’s firmware.Apple always recommends that you do this, pointing you to www.apple.com/support/ downloads. Once there, click your computer model under Updates by Product in the right-hand column. This will take you to a results page where you probably won’t find an update for your firmware. We’re not suggesting that you skip this step, but don’t be surprised if it’s less than fruitful.
2.
Insert the first Panther disc into the disc drive (make sure that you have all three CDs), double click the Install Mac OS X icon, click Restart (see Figure 15), and wait for your Mac to reboot.• Figure 1-5: Restart your computer to begin installing Panther.
You can also begin installing Panther by hold-ing down the C key while your computer starts up or selecting Mac OS X Install Disc 1 in the Startup Disk preferences panel (assum-ing the CD is in the CD drive).
3.
Select the language that you want to use and then click Continue.4.
Read through the introductory text on the first two pages, clicking Continue to go on.The information presented on the second page is duplicated in the Read Before You Install PDF file found on the first installation disc. It mostly covers Panther’s compatibility issues.
5.
Accept the license agreement by clicking Continue in the main window and then Agree on the sheet that appears from the top of the window.You don’t have to accept the license agreement — unless you want to install Panther, that is. If you click Disagree, you exit the installer and are returned to your normal operating system world. One could argue, therefore, that to save time, you just skip reading the agreement (because you have to agree with it regardless). We’d never be so irresponsible as to suggest that you skip read-ing the agreement, though. (Cough, cough.)
Installing Panther
15
• Figure 1-6: The destination determines where Panther will be installed.
If you have a decent-sized hard drive (20GB or more), hopefully you partitioned it into two or more separate volumes. If so, you can do a clean install of an OS onto the second volume, maintaining all your files and applications on the original volume, just in case. See “Managing Your Disk Drives” for more information on partitioning.
7.
Before you leave the Select a Destination page, click Options at the bottom of the window.8.
In the Options dialog that appears (see Figure 17), select the appropriate installation method (see the earlier section “Choosing an Installation Method”). Click OK to close the Options dialog and then click Continue in the Select aDestination window. Your choices are
䊳 Upgrade
䊳 Archive and Install
䊳 Erase and Install
• Figure 1-7: The Options dialog is where you select your installation type.
If you select the Archive and Install option, you absolutely, positively want to select the Preserve Users and Network Settings check box; otherwise, you’ll need to recreate all your files from the archive, which is an unnecessary hassle.
If you select the Erase and Install option, you have the choice of formatting with either the Mac OS Extended (Journaled) or Unix File System (UFS) formats. You almost certainly want the for-mer, but read the “Managing Your Disk Drives” section for more information.
16
Technique 1: Installing Panther without the Hassle
• Figure 1-8: Customize your installation to fit your needs.
The most important timesaving consideration when installing Panther is to avoid installing features that you’ll never need. This will save you time now and disk space in perpetuity. The options that you can choose to forgo include
䊳 BSD Subsystem: The BSD Subsystem takes up about 222MB of space but is well worth it, particularly if you’re anything but the most basic Panther user. Don’t skimp on this one!
䊳 Additional Applications: The Additional Applications include Internet Explorer, StuffIt Expander, iTunes, iMovie, iPhoto, iCal, and iSync. You’ll probably want all of these, but go ahead and drop those you won’t use.
䊳 Printer Drivers: If you don’t have a printer, you won’t need these at all, so deselect this option and save a whopping 922MB of disk space. If you do have a printer, choose to install the drivers that correspond to the make and model of your printer.
䊳 Additional Speech Voices: The speech voices only require 29MB of space, but that’s 29 more megabytes than necessary if you never use them. We don’t. You probably won’t either.
䊳 Fonts: Although Apple’s been kind enough to include the fonts, an informal poll of ours concluded that most Panther users don’t read much text written in Inuktitut or Gujarati. If that accurately describes you, drop all the fonts, along with the standard Asian ones (Japanese, Chinese, and Korean). You’ll save yourself 172MB of room (possibly for MP3s) in the process.
䊳 Language Translations: If everyone using the computer primarily reads and writes English, deselect the 389MB of language translations that the OS will never use.
䊳 X11: This option is admittedly close to our hearts and requires a meager 82MB of space. Installing it will open up your Mac to a whole world of free (free!) software and make these geeky authors proud. X11 provides a graphi-cal user interface to UNIX applications, such as the GIMP image manipulation tool, games, various text-editing programs, and a wide array of scientific tools. Although these UNIX applications will not look or act as nice as native Mac OS X applications, the ability to run them is still very valuable, and the price is right.
Working with Setup Assistant
17
You can quit the installer any time up until you click the Install button. After you do that, get out a good book because you’ll have to wait out the installation (easily 15–30 minutes, depending upon your computer and the installation choices made).
13.
The first step that the installer takes is to check for problems on the destination volume. You have the option of skipping this step (click Skip in the lowerright corner), but you should let the installer do its thing.If the installer fails while checking the integrity of your disk, you need to use Disk Utility to perform repairs before attempting the installa-tion again.
After your computer reboots — and is therefore running off the new OS on your hard disk — the installation process might continue if you’ve elected to install some of the optional compo-nents listed in Step 10. For example, if you’re installing extra fonts and printer drivers, you’ll be prompted for disc 2; if you elected to install X11, disc 3 will be required.
The installer CDs can also be used for three administrative purposes: changing the Startup Disk, resetting a password, and accessing a version of Disk Utility not running on the main hard drive (see “Managing Your Disk Drives”). Each of these is accessible through the Installer menu.
Working with Setup Assistant
If you perform an Erase and Install installation of Panther, or if you’re using your computer for the very first time, you get the magic of the Setup
Assistant when your computer reboots. Like its Windows counterpart, Setup Assistant asks you a series of questions intended to make using the com-puter easier. Here are the highlights of the process so that you can whip through it more quickly:
1.
Select your language.2.
Select your keyboard layout.For both of the preceding steps, the defaults will most likely work. Apple’s kind enough not to display all the options, but you can get them by clicking the box at the bottom of the window.
3.
Decide what you want to do for an Apple ID. You have three options:䊳 Enter your existing ID, if you have one.
䊳 Create a new Apple ID.
䊳 None of the above.
You already have an Apple ID if you’ve registered for any of the special areas at www.apple.com or if you have a .Mac account (which will be the same as your Apple ID).
If you don’t already have an Apple ID or a .Mac account, we strongly recommend creating one, which will give you a 60-day trial .Mac account. If you like the trial, you can pay for a permanent account. We both have one and think it’s well worth the $99 yearly price.
You can get a free trial .Mac membership when you go through Setup Assistant. Because we refer to some .Mac stuff through-out this book, you really ought to consider signing up, even temporarily.