Dreamweaver
CS6
Dreamweaver CS6: The Missing Manual
by David Sawyer McFarlandCopyright © 2012 Sawyer McFarland Media, Inc. All rights reserved. Printed in the United States of America.
Published by O’Reilly Media, Inc.,
1005 Gravenstein Highway North, Sebastopol, CA 95472.
O’Reilly books may be purchased for educational, business, or sales promotional use. Online editions are also available for most titles (http://my.safaribooksonline.com). For more information, contact our corporate/institutional sales department: (800) 998-9938 or [email protected].
July 2012: First Edition.
Revision History for the 1st Edition: 2012-07-02 First release
See http://shop.oreilly.com/product/0636920022732.do for release details.
The Missing Manual is a registered trademark of O’Reilly Media, Inc. The Missing Manual logo, and “The book that should have been in the box” are trademarks of O’Reilly Media, Inc. Many of the designations used by manufacturers and sellers to distinguish their products are claimed as trademarks. Where those designations appear in this book, and O’Reilly Media is aware of a trademark claim, the designations are capitalized.
While every precaution has been taken in the preparation of this book, the publisher assumes no responsibility for errors or omissions, or for damages resulting from the use of the information contained in it.
Contents
The Missing Credits
. . .ix
Preface
. . .1
Part One:
Building a Web Page
CHAPTER 1:Dreamweaver CS6 Guided Tour
. . . .21
The Dreamweaver CS6 Interface . . . 21
Setting Up a Site . . . 40
Creating a Web Page . . . .44
Managing Files and Folders with the Files Panel . . . .49
The Dreamweaver Test Drive . . . 53
CHAPTER 2:
Adding and Formatting Text
. . .85
Adding Text in Dreamweaver . . . 85
Adding Special Characters . . . 92
Selecting Text . . . .98
HTML Formatting . . . 101
Paragraph Formatting . . . 102
Creating and Formatting Lists . . . 106
Text Styles . . . 114
Spell Checking . . . 116
CHAPTER 3:
Introducing Cascading Style Sheets
. . . .121
Cascading Style Sheet Basics . . . 122
Creating Styles . . . 125
Using Styles . . . 132
Manipulating Styles . . . 139
Text Formatting with CSS . . . 144
Cascading Style Sheets Tutorial . . . 168
CHAPTER 4:
Links
. . .185
Modifying a Link . . . .205
Styling Links . . . 206
Creating a Navigation Menu . . . 210
Link Tutorial . . . .223
CHAPTER 5:
Images
. . .241
Adding Images . . . .242
Inserting an Image from Photoshop . . . .247
Modifying an Image . . . .253
Controlling Images with CSS . . . .257
Editing Graphics . . . 264
Image Maps . . . .273
Rollover Images . . . .276
Tutorial: Inserting and Formatting Graphics . . . .278
CHAPTER 6:
Tables
. . .289
Table Basics . . . 290
Inserting a Table . . . 291
Selecting Parts of a Table . . . 294
Expanded Table Mode . . . 296
Formatting Tables . . . .297
Modifying Cell and Row Properties . . . 300
Adding and Removing Cells . . . 305
Merging and Splitting Cells . . . 308
Tabular Data . . . 310
Tables Tutorial . . . 314
CHAPTER 7:
HTML: Under the Hood
. . .331
Controlling How Dreamweaver Handles HTML . . . 331
Code View . . . .335
Live Code . . . .358
Quick Tag Editor . . . 361
The Tag Inspector . . . .362
Comparing Versions of a Web Page . . . .363
Reference Panel . . . .370
Inserting JavaScript . . . .370
Part two:
Building a Better Web Page
CHAPTER 8:Advanced CSS
. . .375
Compound Selectors . . . .375
Fast Style Editing with the Properties Pane . . . .382
Moving and Managing Styles . . . .385
Using the Code Navigator . . . .397
Styling for Print . . . .399
CSS Transitions . . . 405
Using CSS3 . . . 418
Advanced CSS Tutorial . . . .422
CHAPTER 9:
Page Layout
. . .433
Types of Web Page Layouts . . . .435
Float Layout Basics . . . .438
Understanding the Box Model . . . .447
Dreamweaver’s CSS Layouts . . . .452
Modifying Dreamweaver’s CSS Layouts . . . .459
Absolute Positioning . . . 465
Adding an AP Element to Your Page . . . .472
Modifying AP Element Properties . . . .475
CSS Layout Tutorial . . . .479
CHAPTER 10:
Troubleshooting CSS
. . .491
Analyzing CSS with Dreamweaver . . . 491
Overcoming Common CSS Problems . . . 498
CHAPTER 11:
Designing Websites for Mobile Devices
. . . .505
Previewing Pages at Different Resolutions . . . .507
Media Queries . . . 510
Strategies for Using Media Queries . . . 518
Fluid Grid Layouts . . . 521
jQuery Mobile . . . .537
Part three:
Bringing Your Pages to Life
CHAPTER 12:Forms
. . . .563
Form Basics . . . .563
Creating a Form . . . 566
Adding Form Elements . . . .569
Validating Forms . . . .588
Forms Tutorial . . . 612
CHAPTER 13:
Adding Interactivity with JavaScript
. . .637
Introducing Adobe’s Spry Framework . . . .638
Tabbed Panels . . . .639
Dreamweaver Behaviors . . . .679
Applying Dreamweaver Behaviors . . . 680
Events . . . 684
(Some of) the Actions, One by One . . . 684
The Widget Browser . . . 699
CHAPTER 14:
Add Flash and Other Multimedia
. . . .709
Flash: An Introduction . . . 709
Automate the Flash Download. . . 718
Add Flash Videos . . . .720
Other Video Options . . . .724
Part Four:
Managing a Website
CHAPTER 15:Introducing Site Management
. . .729
The Structure of a Website . . . .730
Setting Up a Site (in Depth) . . . .735
Managing Dreamweaver Sites . . . .740
Site Assets . . . .749
CHAPTER 16:
Testing Your Site
. . .757
Site Launch Checklist . . . 757
Previewing Web Pages in BrowserLab . . . 760
Find and Fix Broken Links . . . .765
Validating Web Pages . . . .773
Cleaning Up HTML (and XHTML) . . . .776
Site Reporting . . . .779
Download Statistics . . . .783
CHAPTER 17:
Moving Your Site to the Internet
. . .785
Adding a Remote Server . . . .785
Transferring Files . . . .798
Check In and Check Out . . . .807
Synchronizing Site Files . . . 813
Communicating with Design Notes . . . 817
Part Five:
Dreamweaver CS6 Power
CHAPTER 18:Snippets and Libraries
. . .829
Snippets Basics . . . .829
Using Snippets . . . 831
Creating Snippets . . . .832
Built-In Snippets . . . .835
Creating and Using Library Items . . . .838
Editing Library Items . . . 840
Snippets and Library Tutorial . . . .842
CHAPTER 19:
Templates
. . .851
Template Basics . . . 851
Creating a Template . . . 854
Defining Editable Regions . . . .857
Building Pages Based on a Template . . . .859
Updating a Template . . . 864
Using Repeating Regions . . . 866
Using Editable Tag Attributes . . . .872
Using Optional Regions . . . .876
Exporting a Template-Based Site . . . .882
Template Tutorial . . . .883
CHAPTER 20:
Find and Replace
. . .895
Find and Replace Basics . . . 896
Basic Text and HTML Searches . . . 896
Advanced Text Searches . . . 902
Advanced Tag Searches . . . 906
A Powerful Example: Adding Alt Text Fast . . . 908
CHAPTER 21:
Customizing Dreamweaver
. . . .911
Keyboard Shortcuts . . . 911
Dreamweaver Extensions . . . 916
CHAPTER 22:
Working with Server-Side Programming
. . .925
Pieces of the Puzzle . . . .927
Dynamic Websites: The Setup . . . .929
Creating a Dynamic Page . . . .936
Using Server-Side Includes . . . .937
Working with Related PHP Files . . . .939
PHP Code Hints . . . .942
APPENDIX A:
Getting Help
. . . .945
Getting Help from Dreamweaver. . . 945
Getting Help from Adobe . . . 946
APPENDIX B:
Dreamweaver CS6, Menu by Menu
. . . .949
File Menu . . . 949
Format Menu . . . 963
Commands Menu . . . 964
Site Menu . . . 966
Window Menu . . . 968
Help Menu . . . 971
The Missing Credits
ABOUT THE AUTHOR
David Sawyer McFarland is president of Sawyer McFarland Media, Inc., a web development and training company in Portland, Oregon. He’s been building websites since 1995, when he designed his first site, an online magazine for communication professionals. He’s served as the Webmaster at the University of California at Berkeley and the Berkeley Multimedia Research Center, and he has helped build, design, and program numerous websites for clients including Macworld .com, among others.
In addition to building websites, David is a writer, trainer, and instructor. He’s taught web design at the UC Berkeley Graduate School of Journalism, the Center for Elec-tronic Art, the Academy of Art College, and the Art Institute of Portland. He currently teaches in the Multimedia Program at Portland State University. He’s written articles about web design for Practical Web Design, Macworld, and CreativePro.com.
David is also the author of CSS: The Missing Manual and JavaScript & jQuery: The Missing Manual.
He welcomes feedback about this book by email at [email protected]. (If you need technical help, however, please refer to the sources listed in Appendix A.)
ABOUT THE CREATivE TEAM
Peter McKie (editor) has a master’s degree from Boston University’s School of Jour-nalism and lives in New York City, where he researches the history of old houses and, every once in a while, sneaks into abandoned buildings. Email: [email protected].
Holly Bauer (production editor) lives in Ye Olde Cambridge, MA, where she is an avid home cook, prolific DIYer, and mid-century modern furniture design enthusiast. Email: [email protected].
Nancy Wolfe Kotary (compositor) is a copyeditor, typesetter, and former O’Reilly production manager with more years of experience in publishing than she cares to count. She is from New Hampshire and lives in Massachusetts but does not worship squirrels or drive like a maniac.
Marcia Simmons (proofreader) is a writer and editor living in the San Francisco Bay Area. She’s author of the book DIY Cocktails. Blog: www.marciaisms.com.
Murray R. Summers (technical reviewer) is an Adobe Certified Dreamweaver Devel-oper and Community Professional. He has co-authored and contributed chapters to several books on Dreamweaver, been the technical editor for the last seven editions of the Dreamweaver Missing Manual, and presented at multiple national conferences. His company, Great Web Sights, has been active in web development since 1998. Murray lives in southern Delaware with his wife Suzanne. One daughter attends Clemson University, and the other is a skilled web developer (carolinawebcreations .biz). His two sons live and work in Virginia Beach.
Danilo Celic, Jr. (technical reviewer) has been using Dreamweaver since version 1.2. In the years since, he has contributed to the Dreamweaver community in a vari-ety of capacities. He has been a co-author, technical editor, and technical reviewer for a shelf full of Dreamweaver- and Web-related books. He loves sharing what he has learned over the years of the inner workings of Dreamweaver and various web technologies. Danilo lives in the suburbs of Chicago with his wife, Melissa, who pa-tiently forgives the late hours he puts in in front of a glowing screen. Email: danilo@ shimmerphase.com.
ACKNOWLEDGMENTS
Thanks to all those who have helped with this book (and all of my books over the years): my students, colleagues, and the wonderful people at O’Reilly. Thanks to Murray Summers and Danilo Celic for their careful scrutiny and erudite corrections to my writing; thanks also to Peter McKie, for making my writing more energetic and clearer.
—Dave McFarland
THE MiSSiNG MANUAL SERiES
Missing Manuals are witty, superbly written guides to computer products that don’t come with printed manuals (which is just about all of them). Each book features a handcrafted index.
Recent and upcoming titles include:
• Access 2010: The Missing Manual by Matthew MacDonald
• Abobe Edge Preview 5: The Missing Manual by Chris Grover
• Buying a Home: The Missing Manual by Nancy Conner
• CSS: The Missing Manual, Second Edition by David Sawyer McFarland
• Creating a Website: The Missing Manual, Third Edition by Matthew MacDonald
• David Pogue’s Digital Photography: The Missing Manual by David Pogue
• Dreamweaver CS5.5: The Missing Manual by David Sawyer McFarland
• Droid 2: The Missing Manual by Preston Gralla
• Excel 2010: The Missing Manual by Matthew MacDonald
• Facebook: The Missing Manual, Third Edition by E.A. Vander Veer
• FileMaker Pro 11: The Missing Manual by Susan Prosser and Stuart Gripman
• Flash CS6: The Missing Manual by Chris Grover
• Galaxy S II: The Missing Manual by Preston Gralla
• Galaxy Tab: The Missing Manual by Preston Gralla
• Google+: The Missing Manual by Kevin Purdy
• Google Apps: The Missing Manual by Nancy Conner
• Google SketchUp: The Missing Manual by Chris Grover
• HTML5: The Missing Manual by Matthew MacDonald
• iMovie ’11 & iDVD: The Missing Manual by David Pogue and Aaron Miller
• iPad: The Missing Manual, Fourth Edition by J.D. Biersdorfer
• iPhone: The Missing Manual, Fifth Edition by David Pogue
• iPhone App Development: The Missing Manual by Craig Hockenberry
• iPhoto ’11: The Missing Manual by David Pogue and Lesa Snider
• iPod: The Missing Manual, Tenth Edition by J.D. Biersdorfer and David Pogue
• JavaScript & jQuery: The Missing Manual, Second Edition by David Sawyer McFarland
• Kindle Fire: The Missing Manual by Peter Meyers
• Living Green: The Missing Manual by Nancy Conner
• Mac OS X Lion: The Missing Manual by David Pogue
• Mac OS X Snow Leopard: The Missing Manual by David Pogue
• Microsoft Project 2010: The Missing Manual by Bonnie Biafore
• Motorola Xoom: The Missing Manual by Preston Gralla
• Netbooks: The Missing Manual by J.D. Biersdorfer
• NOOK Tablet: The Missing Manual by Preston Gralla
• Office 2010: The Missing Manual by Nancy Conner, Chris Grover, and Matthew MacDonald
• Office 2011 for Macintosh: The Missing Manual by Chris Grover
• Photoshop CS6: The Missing Manual by Lesa Snider
• Photoshop Elements 10: The Missing Manual by Barbara Brundage
• PHP & MySQL: The Missing Manual by Brett McLaughlin
• PowerPoint 2007: The Missing Manual by E.A. Vander Veer
• Premiere Elements 8: The Missing Manual by Chris Grover
• QuickBase: The Missing Manual by Nancy Conner
• QuickBooks 2012: The Missing Manual by Bonnie Biafore
• Quicken 2009: The Missing Manual by Bonnie Biafore
• Switching to the Mac: The Missing Manual, Lion Edition by David Pogue
• Wikipedia: The Missing Manual by John Broughton
• Windows Vista: The Missing Manual by David Pogue
• Windows 7: The Missing Manual by David Pogue
• Word 2007: The Missing Manual by Chris Grover
• Your Body: The Missing Manual by Matthew MacDonald
• Your Brain: The Missing Manual by Matthew MacDonald
• Your Money: The Missing Manual by J.D. Roth
W
ebsites evolve every year, growing in scope and complexity, with new features popping up to make sites look and work ever better. Even people building personal sites use various programming languages and server technologies to dish up content.Throughout its history, Dreamweaver has managed to keep pace with the changing web-development landscape, and Dreamweaver CS6 is no exception; it’s capable of doing more than any previous version of the program. Whether you want to use Cascading Style Sheets (CSS) for cutting-edge design, dip into the world of JavaScript-powered dynamic pages, explore HTML5 and CSS3, build websites for mobile devices, use content management systems like WordPress or Drupal, or simply stick to straightforward HTML, Dreamweaver has just about all the tools you need.
Any enterprising designer can create web pages, Cascading Style Sheets, and even JavaScript programs with a simple text editor. In fact, Dreamweaver CS6’s powerful text editor lets you handcraft text files to create basic or complex database-driven pages. However, hand-typing HTML, CSS, and JavaScript is not only a recipe for carpal tunnel syndrome, it’s also a slow and typo-prone way to build web pages. Dreamweaver provides buttons, dialog boxes, and panels that let you add HTML, CSS, and JavaScript quickly, with fewer keystrokes. A simple button lets you insert the complex HTML required to build an HTML table in a matter of seconds, for ex-ample. And Dreamweaver is flexible enough to let you both hand-code and use its time-saving HTML shortcuts. The choice is yours.
WhaT DreaMWeaVer
IS aLL aBOUT
What Dreamweaver Is All About
Dreamweaver is a complete website development and site management program. It works with web technologies like HTML, XHTML, CSS, JavaScript, and PHP.
Its CSS support lets you create fast-loading, easily modified pages, while its unique “Spry” technology provides one-click access to complex, interactive layout options like drop-down menus.
Dreamweaver also includes plenty of tools for managing websites once you build them. You can check for broken links, use templates to streamline site-wide page changes, and reorganize your site in a flash with the program’s site management tools.
NOTE If you’re not already familiar with the acronym CSS, it stands for Cascading Style Sheets—a set of
rules you write that dictate the look of your pages. Dreamweaver includes advanced tools to create, test, and edit CSS in your pages.
If you’ve built one or more sites without Dreamweaver, you don’t have to start over again. The program happily opens web pages and websites created in other programs without destroying any of your carefully handcrafted code.
Why Dreamweaver?
You can find other web design programs on the market—dozens of them, in fact. But Dreamweaver is one of the leaders, thanks to key benefits like these:
• Visual page-building. If you’ve spent any time using a text editor to punch out HTML for your web pages, you know the tedium involved in adding even a simple photograph. When your boss asks you to add her photo to the company home page, you launch your trusty text editor and type in something like <img src=“images/staff/bigcheese.jpg” width=“100” height=“150” alt=“The Boss”>. Not only is this approach prone to typos, it also separates you from what you want the page to look like.
Dreamweaver, on the other hand, gives you a several ways to stay in touch with your page’s visual design. If your interest is in design and not HTML, you can work in the program’s Design view. Drag an image to your budding web page there, and Dreamweaver displays the picture on the page. Just as a word processor displays documents as they’ll look when you print them out, so Dreamweaver gives you a close approximation of what your page will look like in a web browser.
WhY DreaMWeaVer? Finally, because Dreamweaver’s Design view is only an approximation of what
a page looks like in a browser, the program offers “Live view”—a real-time look at your page in a web browser built right into Dreamweaver. That way, you can see what a page looks like and how it behaves without leaving Dreamweaver!
• Complex interactivity, simply. You’ve probably seen web pages where an im-age (on a navigation bar, for example) lights up or changes appearance when you mouse over it. Dynamic effects like this—mouse rollovers, alert boxes, and drop-down menus—usually require JavaScript programming, a language browsers understand. While JavaScript can do amazing things, it requires time and practice to learn.
Dreamweaver includes an easy-to-use JavaScript-based technology called the Spry Framework. With Spry, you can easily create interactive, drop-down menus (Chapter 4), add advanced layout elements like tabbed panels (Chapter 13), and include sophisticated validation to prevent site visitors from submitting incomplete forms (Chapter 12).
• Solid code. Every now and then, even in Dreamweaver, you may want to put aside the visual view and look at a page’s underlying HTML. You may want to tweak the code that Dreamweaver produces, for example, or you may wonder how Dreamweaver codes.
Adobe realizes that many professional web developers do a lot of work “in the trenches,” typing HTML, CSS, and JavaScript code by hand. In Dreamweaver, you can edit a page’s raw HTML to your heart’s content. Switching back and forth between Design view and Code view is seamless and, best of all, non-destructive. Unlike many visual web page programs, where making a change in the visual mode stomps all over the underlying HTML, Dreamweaver respects hand-typed code and doesn’t try to rewrite it (unless you ask it to). You can even use Dreamweaver’s Split view to see your HTML side-by-side with a repre-sentation of your final page, or you can switch between Code and Design view.
In addition, Dreamweaver can open many other types of files commonly used on websites, such as external JavaScript files (.js files), so you don’t have to switch to another program to work on them. Dreamweaver’s Related Files toolbar lists all JavaScript, CSS, or server-side files the current document uses. For hand-coders, this feature means that editing a page’s CSS or JavaScript is just a click away (instead of a time-draining File→Open hunt for that danged file). Chapter 7 has the full scoop on how Dreamweaver handles writing and editing code.
WhY
DreaMWeaVer? Either way, Dreamweaver’s site management tools make your job easier. They automate many of the routine tasks every webmaster faces, from managing links,
images, pages, and other media to working with a team of people and moving your site to a web server. Part Four of this book looks at how Dreamweaver helps you build and maintain websites.
Hand Coding vs. Visual Editors
At one time, creating web pages in a text editor was considered the best way to build websites. The precise control that hand-written code gave you over HTML was (and often still is) seen as the only way to assure quality web pages.
Professional site developers championed hand-coding because many early visual page-building programs added unneces-sary code—code that affects how a page appears and how quickly it downloads over the Internet. But hand-coding is time-consuming and error-prone. One typo can render a web page useless.
Fortunately, Dreamweaver creates solid code even in a visual environment. Since its earliest incarnation, Dreamweaver has prided itself on its ability to produce clean HTML and its tolerance for code created by other programs—including text editors. In fact, Dreamweaver includes a powerful built-in text-editing mode that lets you freely manipulate the HTML of a page—or any other code, including JavaScript, Visual Basic, XML, PHP, and ColdFusion Markup Language.
But the real story is that the code Dreamweaver produces when you work in Design mode is as solid and well-written as
hand-hewn code. Knowing this, feel free to take advantage of the increased productivity that Dreamweaver’s visual-editing mode brings to your day-to-day work with its one-click objects, instant JavaScript, and simplified layout tools. Doing so won’t compromise your code and will certainly let you finish your website in record time.
Honestly, no web design program is really WYSIWYG (“what you see is what you get”). Because every browser interprets the HTML language slightly differently, web design is more like WYSIRWYGOAGD: “what you see is roughly what you’ll get, on a good day.” That’s why Dreamweaver’s Live View and integrated Adobe BrowserLab (a browser-testing service) can help you make sure your pages look the way you really want them to. Finally, if you have experience hand-coding HTML and CSS, you’ll be pleasantly surprised by Dreamweaver’s powerful text-editing capabilities. In fact, even though Dreamweaver has a reputation as a visual web page editor, it’s also one of the best text-editing programs on the market.
UP TO SPEED
• Have it your way. As if Dreamweaver didn’t have enough going for it, the pro-gram’s engineers have created a completely customizable product, or, as they call it, an extensible program. Anyone can add to or change Dreamweaver’s menus, commands, objects, and windows.
WhaT’S NeW IN DreaMWeaVer
CS6
What’s New in Dreamweaver CS6
If you’ve never used Dreamweaver before, see Chapter 1 for the grand tour. If you’re upgrading from Dreamweaver CS3 or some other version of the program, you’ll find that Dreamweaver CS6 offers a host of new features:
• HTML5 is touted by everyone from AT&T to Google to Newsweek as the next big thing (described in more detail on page 10). It’s the first major change to HTML in years and promises to make building powerful website easier than ever. Dreamweaver CS6 provides basic support for HTML5. That means that it understands the new HTML5 tags and provides code hints as you type those tags in Code view (code-hinting lets you type a few letters of a tag and then select the tag you’re after from a pop-up menu—in other words, less typing, fewer typos, faster web page building). Unfortunately, code-hinting is only helpful if you type HTML by hand. If you prefer using Design view and clicking buttons on a user-friendly palette of HTML options, you’ll have to wait for the next version of Dreamweaver for Dreamweaver-produced HTML5 code.
• CSS3 is, like HTML5, a new (and evolving) standard for web designers. It prom-ises many new formatting controls to make web pages look beautiful, includ-ing drop shadows for text, rounded corners on boxes, background gradients, borders made of graphics, and even animated transitions from one set of CSS properties to another. Dreamweaver CS6 includes code-hinting for CSS3 and adds many CSS3 properties to the CSS Styles panel.
Dreamweaver CS6 also adds helpful tools for some of CSS3’s most exciting offerings: the new web fonts manager (page 146) frees you from the boredom of the same limited set of fonts (Arial, Helvetica, and Times New Roman, for example) that web designers have been using for years. Now, Dreamweaver provides an easy way to use any of hundreds of freely available fonts to enliven the typography on your pages. And the new CSS transitions panel (page 405) lets you easily add animations to mouse rollovers, so you can turn a navigation bar into an animated visual delight.
WhaT’S OLD IN DreaMWeaVer
CS6 • Mobile Application Development. Dreamweaver CS6 includes built-in sup-port for jQuery Mobile and PhoneGap—two programming technologies that
let you build mobile phone applications using just HTML, CSS, and JavaScript. The new PhoneGap Build service simplifies the headache-inducing hurdles usu-ally involved in creating native applications for iOS, Android, and Blackberry devices. With it, you can write an application using HTML, CSS, and JavaScript and turn it into standalone phone app you can sell in iTunes’ App Store or one of the many other smartphone marketplaces.
• Under the hood improvements. Of course, any new version of software in-cludes numerous bug fixes and performance improvements. Most notably, the Dreamweaver engineers have streamlined file transfers from your computer to your web server. In previous versions of the program, you had to transfer files one at a time; now you can move multiple files simultaneously.
What’s Old in Dreamweaver CS6
Unfortunately, not everything in Dreamweaver CS6 is shiny and new. Dreamweaver’s “Server Behaviors,” which let you save form information, retrieve information from databases, and password-protect web pages, have gotten old from neglect. This once-innovative feature was a boon to designers who needed complex features but didn’t know how to program. However, Adobe has basically ignored this feature for several versions of the program. The programming behind these behaviors is now old and unprofessional. While Adobe hasn’t yet removed the tools, this book no longer includes a section dedicated to teaching them. It’s not in your interest to learn how to use them, nor in our interest to lead you toward a tool that’s no good. (Having said that, there are some excellent Dreamweaver extensions from WebAssist [www .webassist.com] that let you tap into the power of database programming, bypassing the old Dreamweaver tools.)
HTML, XHTML, CSS, and JavaScript 101
Underneath the hood of any web page—whether it’s your uncle’s “Check out this summer’s fishin’” page or the front door of a billion-dollar online retailer—is nothing more than line after line of ordinary text. You embed simple commands, called tags, within this text. Web browsers know how to interpret the tags to properly display your pages.
DOCUMeNT TYPeS The HTML code that creates a web page can be as simple as this:
<!DOCTYPE HTML PUBLIC "-//W3C//DTD HTML 4.01 Transitional//EN" "http://www. w3.org/TR/html4/loose.dtd">
<html> <head>
<title>Hey, I am the title of this Web page.</title> </head>
<body>
<p>Hey, I am some body text on this Web page.</p> </body>
</html>
While it may not be exciting, this short bit of HTML is all you need to create an actual web page.
Document Types
The first line of the code above:<!DOCTYPE HTML PUBLIC "-//W3C//DTD HTML 4.01 Transitional//EN" "http://www. w3.org/TR/html4/loose.dtd">
is called a “doctype,” and it simply identifies what flavor of HTML you used to write the page. Developers have used two doctypes for years—HTML 4.01 and XHTML 1.0—and each has two styles: strict and transitional. Dreamweaver can create any of these types of HTML documents—you simply tell it which one you want when you create a new web page (see page 44) and Dreamweaver handles the rest.
Dreamweaver even lets you use the latest, greatest, and simplest doctype, HTML5. It replaces the extraneous code of earlier doctypes with much simpler and straight-forward code:
<!DOCTYPE HTML>
Yep, that’s it. HTML5 is intended to be much easier to use in many ways, and Dream-weaver CS6 provides limited support for this new version of HTML. This book uses the HTML5 doctype—it’s short, simple, and supported by every major browser (even back to Internet Explorer 6). And because HTML5 is the future of the Web, there’s no reason to use older doctypes any longer.
OF TaGS aND
PrOPerTIeS Different doctypes do require that you write your HTML in a particular way. For example, the line break tag looks like this in HTML 4.01:
<br>
But in XHTML, it’s written this way:
<br />
HTML5 lets you write it either way. Fortunately, you won’t have to worry about these subtle differences when you use Dreamweaver to insert your HTML—it automatically adjusts to the doctype and inserts the appropriate HTML.
Of Tags and Properties
In the preceding example—and, indeed, in the HTML of any web page you examine— you’ll notice that most commands appear in pairs surrounding a block of text or other commands.
These bracketed commands, like the <p> command that denotes the beginning of a paragraph, constitute the “markup” part of HTML (hypertext markup language) and are called tags. Sandwiched between brackets, tags are simply instructions that tell a web browser how to display a page.
The starting tag of each pair tells the browser where the instruction begins, and the closing tag tells it where the instruction ends. A closing tag always includes a forward slash (/) after the first bracket symbol (<), so the closing tag for the para-graph command above is </p>.
Fortunately, Dreamweaver can generate all these tags automatically. You don’t have to memorize or even type them in (although many programmers still enjoy doing so for greater control). Behind the scenes, Dreamweaver’s all-consuming mission is to convert your visual design into underlying code, like this:
• The <html> tag appears once at the beginning of a web page and again (with an added closing slash) at the end. This tells a browser that the information between these two tags is written in HTML, as opposed to some other language. All the contents of the page, including any other tags, appear between these opening and closing <html> tags.
If you were to think of a web page as a tree, the <html> tag would be its trunk. Springing from the trunk are two branches that represent the two main parts of any web page: the head of the page and the body.
OF TaGS aND PrOPerTIeS In addition, the head section can include information that browsers use to format
the page’s HTML and to add interactivity. You can store CSS styles and Java-Script code in the head, for example, or you can embed links to external CSS and JavaScript files there. In fact, the interactivity you’ll see in Dreamweaver’s Spry widgets (Chapter 13) work with the help of JavaScript code stored in sepa-rate files on a server; the link to these files resides in the page’s head section.
The body of a web page, identified by its beginning and ending <body> tags, contains all the information that appears inside a browser window—headlines, text, pictures, and so on. When you work in Dreamweaver’s Design view, the blank white portion of the document window represents the body area. It re-sembles the blank page of a word-processing program.
Most of your work with Dreamweaver involves inserting and formatting text, pictures, and other objects in the body portion of a document. Many tags commonly used in web pages appear within the <body> tag. Here are a few:
• You can tell a web browser where a paragraph of text begins with a <p> (open-ing paragraph) tag, and where it ends with a </p> (clos(open-ing paragraph) tag.
• The <strong> tag emphasizes text. The text between an opening and closing <strong> tag shows up as boldfaced type. The HTML snippet <strong>Warning!</ strong> tells a web browser to display the word “Warning!” in bold type on the screen.
• The <a> tag, or anchor tag, creates a link (hyperlink) on a web page. A link, of course, can lead anywhere on the Web. How do you tell a browser where the link should point? Simply give address instructions inside the <a> tags. For instance, you might type <a href=“http://www.missingmanuals.com”>Click here!</a>.
The browser knows that when your visitor clicks the words “Click here!”, it should go to the Missing Manuals website. The href part of the tag is called, in Dreamweaver, a property (you may also hear the term attribute), and the URL (the Uniform Resource Locator, or web address) is the value of that property. In this example, http://www.missingmanuals.com is the value of the href property.
Fortunately, Dreamweaver exempts you from having to type any of this code, let-ting you add properties to tags (and other page elements) through an easy-to-use window called the Property Inspector. To create links the Dreamweaver way (read: the easy way), turn to Chapter 4.
NOTE For a full-fledged introduction to HTML, check out Creating a Website: The Missing Manual, 3rd Edition.
XhTML
XHTML
Like any technology, HTML has evolved over time. Although standard HTML has served its purpose well, it’s always been a somewhat sloppy language. Among other things, it allows uppercase, lowercase, and mixed-case letters in tags (<body> and <BODY> are both correct, for example) and permits unclosed tags (so that you can use an opening <p> tag without a closing </p> tag to create a paragraph). While this flexibility may make page-writing easier, it also makes life more difficult for web browsers, smartphones, and other technologies that must interact with data on the Web. Additionally, HTML doesn’t work with one of the hottest Internet languages, XML, or Extensible Markup Language.
To keep pace with the times, an improved version of HTML, called XHTML, was introduced back in 2000, and you’ll find it used frequently on many sites (in fact, XHTML is just an “XML-ified” version of HTML). Dreamweaver CS6 can create and work with XHTML files as well as plain old HTML pages.
XHTML was seen as the future back in 2000, but HTML5 has since supplanted it. While web browsers still understand XHTML (and probably will for a long time), you won’t be using it in this book.
HTML5
HTML5 isn’t some radically new technology. In fact, unlike XHTML, which was in-tended to foster a new way to build web pages, HTML5 is about making sure the web continues to work as it always has. Most of the basics of HTML are still in place. HTML5 adds a few new elements, meant to support the way web designers currently build websites. In HTML5, for example, the <header> tag can contain the content you’d usually find at the top of a page, such as a logo and site-wide navigation links; the new <nav> tag encloses the set of links used to navigate a site; and the <footer> tag houses the stuff you usually put at the bottom of a page, like legal notices, email contacts, and so on.
In addition, HTML5 adds new tags that let you insert video and audio into a page, and new form tags that add sophisticated form elements, like sliders and drop-down date pickers, as well as built-in browser support for form validation to make sure visitors correctly fill out your forms. Unfortunately, browser support for these new features isn’t consistent and it’s therefore difficult to use the new tags without some pretty elaborate workarounds to ensure cross-browser support.
aDD STYLe WITh CaSCaDING STYLe SheeTS But new tags are just one small part of the HTML5 story. HTML5 started life as a
product of the Web Hypertext Application Technology Group (WHATG), which wanted to create a version of HTML that provided the tools needed to build powerful, browser-based applications like Gmail. So, much of HTML5 is devoted to powerful (and complicated) technologies like Canvas (for drawing pictures and diagrams on a web page), data storage (for storing information like game scores, preferences, and notes on a visitor’s computer), drag and drop functionality, “web workers” for making JavaScript programs run faster and more efficiently, and “web sockets” for streaming data from a web server. All these technologies are promising, but browser support for them varies. In addition, Dreamweaver doesn’t provide any easy-to-use tools to tap into these complicated technologies, so you’re a few years off from being able to easily include most HTML5 functionality on your sites.
Add Style with Cascading Style Sheets
HTML used to be the only language you needed to create web pages. You could build them with colorful text and graphics, and make words jump out using different fonts, font sizes, and font colors. But today, you can’t add much visual stimulation to a site without CSS. CSS is a formatting language that lets you design pages with sophisticated layouts and enhanced text. For example, it provides site-wide design consistency for headings and subheads, creates unique-looking sidebars, and adds special graphics treatment for quotations.
From now on, think of HTML as merely the scaffolding you use to organize a page. It helps identify and structure page elements. Tags like <h1> and <h2> denote headlines and reflect their relative importance: A Heading 1 is more important than a Heading 2, for example (and can affect how a search engine like Google adds a page to its search listings). The <p> tag indicates a basic paragraph of information. Other tags provide further structural clues: For example, a <ul> tag identifies a bulleted list (to, say, make a list of recipe ingredients more intelligible).
Cascading Style Sheets, on the other hand, add design flair to that highly structured content, making it more beautiful and easier to read. Take a look at the CSS Zen Garden site (www.csszengarden.com). Each of the striking, very different websites profiled there use the same underlying HTML. The only difference among them— and the sole reason they look so different—is that each uses a different style sheet. Essentially, a CSS style is just a rule that tells a browser how to display a particular element on a page—to make an <h1> tag appear orange, 36 pixels tall, and in the Verdana font, for example.
But CSS is more powerful than that. You use it to add borders, change margins, and even control the exact placement of an element on a page.
aDD INTeraCTIVITY
WITh
JaVaSCrIPT
Add Interactivity with JavaScript
A normal web page—just regular HTML and CSS—isn’t very responsive. About the only interaction visitors have with the page is clicking a link to load a new page. JavaScript is a programming language that lets you supercharge your HTML with animation, interactivity, and dynamic visual effects. It can also make a web page more responsive to visitors by supplying immediate feedback. For example, a JavaScript-powered shopping cart can instantly display the total cost of your purchase, with tax and shipping, the moment a visitor selects a product to buy; or JavaScript can produce an error message immediately after someone attempts to submit a web form that’s missing information.
JavaScript’s main selling point is immediacy. It lets web pages respond instantly to your visitors’ actions: clicking a link, filling out a form, or merely moving the mouse around the screen. JavaScript doesn’t suffer from the frustrating delay associated with “server-side” interactive programming languages like PHP, which require that a web browser communicate with a remote web server—in other words, JavaScript doesn’t rely on constantly loading and reloading pages. It lets you create pages that look like and respond with the immediacy of a desktop program.
If you’ve visited Google Maps (http://maps.google.com), you’ve seen JavaScript in action. Google Maps lets you zoom in on a map to get a detailed view of streets and zoom out to get a birds-eye view of how to get across town, the state, or the nation, all from the same web page. While there have been lots of map sites before Google, they always required loading a new web page every time you changed a view (a usually slow process).
The JavaScript programs you create can range from the really simple (such as pop-ping up a new browser window with a web page in it) to full-blown “web applications,” such as Google Docs (http://docs.google.com), which let you edit documents, build spreadsheets, and create presentations using your web browser—all as though the program were running on your computer.
JavaScript programming can be difficult, but Dreamweaver has plenty of tools that let you add sophisticated interactivity to your sites—from animations to drop-down navigation menus—with just a few clicks of your mouse.
Mobile Web Design
The VerY BaSICS OF reaDING ThIS
BOOK ways to make websites redraw themselves to fit the smaller sizes of mobile phone
screens. Dreamweaver CS6 includes several solutions: the new fluid grid layout tool (page 521) lets you design three different layouts (for phones, tablets, and desktop screens) using the same HTML. In other words, you only have a single web page, but using CSS, you can alter the design depending on the width of the viewing screen. You can also craft your own “media queries” (a CSS3 feature discussed on page 510) to create CSS styles that apply only to screens at particular widths or within a particular range of widths.
Dreamweaver CS6 also provides tools for creating mobile-only websites using jQuery Mobile (page 537), a JavaScript tool that makes traditional websites look and function more like mobile applications (and less like web pages).
The Very Basics of Reading This Book
You’ll find very little jargon or nerd terminology in this book. You will, however, encounter a few terms and concepts you’ll come across frequently in your comput-ing life:
• Clicking. This book gives you three kinds of instructions that require you to use your computer’s mouse or trackpad. To click means to point the arrow cursor at something on the screen and then—without moving the cursor—press and release the clicker button on the mouse (or laptop trackpad). To double-click, of course, means to click twice in rapid succession, again without moving the cursor. And to drag means to move the cursor while holding down the button.
• Keyboard shortcuts. Every time you take your hand off the keyboard to move the mouse, you lose time and potentially disrupt your creative flow. That’s why many experienced computer fans use keystroke combinations instead of menu commands wherever possible. Ctrl+B (c-B for Mac folks), for example, gives
you boldface type in Dreamweaver documents (and most other programs).
When you see a shortcut like Ctrl+S (c-S), it’s telling you to hold down the Ctrl
or c key and type the letter S, then release both keys. (This command, by the
way, saves changes to the current document.)
aBOUT ThIS
BOOK
About This Book
Despite the many improvements in software over the years, one feature has grown consistently worse: documentation. Until version 4, Dreamweaver came with a printed manual. In MX 2004, all you got was a Getting Started booklet. Now, you’re lucky just to get a cardboard box with a DVD in it. To get any real information, you need to delve into the program’s online help screens.
But even if you have no problem reading a help screen in one window as you work in another, something’s still missing. At times, the terse electronic help screens assume you already understand the discussion at hand and hurriedly skip over important topics that require an in-depth explanation. In addition, you don’t always get an objective evaluation of the program’s features. Engineers often add technically sophisticated capabilities to a program because they can, not because you need them. You shouldn’t have to waste your time learning tools that don’t help you get your work done.
The purpose of this book, then, is to serve as the Dreamweaver manual that should have been in the box. You’ll find step-by-step instructions for every Dreamweaver feature, including those you may not otherwise have understood, let alone mastered, such as Libraries, Design view, behaviors, and Dreamweaver’s Spry tools. In addi-tion, you’ll find honest evaluations of each tool to help you determine which ones are useful to you, as well as how and when to use them.
NOTE This book periodically recommends other books, covering topics that are too specialized or tangential
for a manual on Dreamweaver. Careful readers may notice that not every one of these titles is published by Missing Manual parent O’Reilly Media. While we’re happy to mention other Missing Manuals and books in the O’Reilly family, if there’s a great book out there that doesn’t happen to be published by O’Reilly, we’ll let you know about it.
Dreamweaver CS6: The Missing Manual is designed to accommodate readers at every technical level. The primary discussions are written for advanced-beginner or intermediate computer users. But if you’re new to building web pages, special sidebar articles called Up To Speed provide the introductory information you need to understand the topic at hand. If you’re a web veteran, on the other hand, keep your eye out for similar boxes called Power Users’ Clinic. They offer more technical tips, tricks, and shortcuts for the experienced computer fan.
About
→
These
→
Arrows
Throughout this book, and throughout the Missing Manual series, you’ll find sentences like this one: “Open the System→Library→Fonts folder.” That’s shorthand for a much
MaCINTOSh aND WINDOWS Similarly, this kind of arrow shorthand helps to simplify the business of choosing
commands in menus, as shown in Figure I-1.
FiGURE i-1 When you read “Choose Insert→Layout Objects→Div Tag” in a Missing Manual, that means, “From Dreamweaver’s menu bar, click the Insert command. From the drop-down menu that appears, select the Layout Objects command. That opens a list of elements you can add to the currently open document; select Div Tag from that list.”
Macintosh and Windows
Dreamweaver CS6 works almost precisely the same way on the Macintosh as it does in Windows. Every button in every dialog box is exactly the same; the software response to every command is identical. In this book, the illustrations have been given even-handed treatment, alternating between the various operating systems where Dreamweaver feels at home (Windows 7, Windows Vista, Windows XP, and Mac OS X).
One of the biggest differences between Windows and Mac software is the keystrokes, because the Ctrl key in Windows is equivalent to the Macintosh’s c key. And the
key labeled Alt on a Windows PC (and on non-U.S. Macs) is the equivalent of the Option key on American Mac keyboards.
aBOUT The
OUTLINe
About the Outline
Dreamweaver CS6: The Missing Manual is divided into six parts, each with several chapters:
• Part One explores Dreamweaver’s main screens and takes you through the basic steps of page-building. It explains how to add and format text, how to link from one page to another, how to spice up your designs with graphics, and introduces you to Cascading Style Sheets.
• Part Two takes you deeper into Dreamweaver and provides in-depth CSS cov-erage. In addition, you’ll get step-by-step instructions for creating advanced page layouts, as well as advice on how to view and work with the underlying HTML of a page.
NOTE Previous versions of this book contained a chapter on HTML frames—a method of displaying several
web pages in a single browser window. This technique is going the way of the dodo bird. Since Dreamweaver CS6 is full of so many useful and exciting features and this book’s already bursting at its seams (any more pages, and it would have to come with a medical warning to those with bad backs), the frames chapter has been removed.
• Part Three helps you add interactivity to your site. From forms that collect information from visitors to interactive page widgets like tabbed interfaces using the Spry Framework, this section guides you through adding animation, multimedia, and other interactive effects with ease.
• Part Four covers the big picture: managing the pages and files on your site, testing links and pages, and moving your site onto a web server connected to the Internet. And since you’re not always working solo, this section covers features that let you work with a team of web developers.
• Part Five shows you how to take full advantage of such timesaving features as Libraries, Templates, and History panel automation. It also covers Dreamweaver’s Extension Manager, a program that can add hundreds of free and commercial features to the program.
Living Examples
This book is designed to get your work onto the Web fast and professionally; it’s only natural, then, that part of the value of this book also lies on the Web.
As you read the book’s chapters, you’ll encounter a number of living examples— step-by-step tutorials you can build yourself, using raw materials (like graphics and half-completed web pages) you can download from either www.sawmac.com/dwcs6 or this book’s Missing CD page at http://missingmanuals.com/cds/dweaver6tmm.
ONLINe reSOUrCeS you’ll discover that they give you unprecedented insight into the way professional
designers build Web pages.
You’ll also find the URLs of the finished pages, so you can compare your Dream-weaver work with the final result. In other words, you won’t just see pictures of Dreamweaver’s output in the pages of the book; you’ll find the actual, working pages on the Internet.
Online Resources
As the owner of a Missing Manual, you’ve got more than just a book to read. Online, you’ll find example files, and you can also communicate with the Miss-ing Manual team to tell us what you love (or hate) about the book. Head over to www.missingmanuals.com, or go directly to one of the following sections.
The Missing CD
This book doesn’t have a CD pasted inside the back cover, but you’re not missing out on anything. Go to http://missingmanuals.com/cds/dreamweavercs6mm/ to download the tutorials and sample pages mentioned in this book. And so you don’t wear down your fingers typing long web addresses, the Missing CD page offers a list of clickable links to the websites mentioned in the book, too.
Registration
If you register this book at oreilly.com, you’ll be eligible for special offers—like dis-counts on future editions of this book. If you buy the ebook from oreilly.com and register your purchase, you get free lifetime updates for this edition of the ebook; we’ll notify you by email when updates become available. Registering takes only a few clicks. Type www.oreilly.com/register into your browser to hop directly to the Registration page.
Feedback
Got questions? Need more information? Fancy yourself a book reviewer? On our Feed-back page, you can get expert answers to questions that come to you while reading, share your thoughts on this Missing Manual, and find groups for folks who share your interest in Dreamweaver. To have your say, go to www.missingmanuals.com/feedback.
Errata
USING CODe
eXaMPLeS
Using Code Examples
This book is here to help you get your job done. In general, you may use the code in this book in your programs and documentation. You don’t need to contact us for permission unless you’re reproducing a significant portion of the code. For example, writing a program that uses several chunks of code from this book does not require permission. Selling or distributing a CD of examples from O’Reilly books does re-quire permission. Answering a question by citing this book and quoting example code does not require permission. Incorporating a significant amount of example code from this book into your product’s documentation does require permission.
We appreciate, but do not require, attribution. An attribution usually includes the source book’s title, author, publisher, and ISBN. For example: “Dreamweaver CS6: The Missing Manual by David Sawyer McFarland (O’Reilly). Copyright 2012 Sawyer McFarland Media, Inc., 978-1-449-31617-4.”
If you feel your use of code examples falls outside fair use or the permission given above, feel free to contact us at [email protected].
Safari® Books Online
Safari® Books Online is an on-demand digital library that lets you search over 7,500 technology books and videos.
With a subscription, you can read any page and watch any video from our library. Access new titles before they’re available in print. Copy and paste code samples, organize your favorites, download chapters, bookmark key sections, create notes, print out pages, and benefit from tons of other time-saving features.
Building a Web Page
PART
1
CHAPTER 1:
Dreamweaver CS6 Guided Tour
CHAPTER 2:
Adding and Formatting Text
CHAPTER 3:
Introducing Cascading Style Sheets
CHAPTER 4:
Links
CHAPTER 5:
Images
CHAPTER 6:
Tables
CHAPTER
1
D
reamweaver CS6 is a powerful program for designing and building websites. If you're brand-new to Dreamweaver, turn to page 2 for a quick look at what this program can do; if you're a longtime Dreamweaver fan, page 5 tells you what's new in this, its latest incarnation.This chapter gives you an overview of Dreamweaver—a guide to the windows, tool-bars, and menus you'll use every time you build a web page. It also shows you how to set up the program so you can begin building pages. And, because doing is often a better way to learn than just reading, you'll get a step-by-step tour of web page design—the Dreamweaver way—in the tutorial at the end of this chapter.
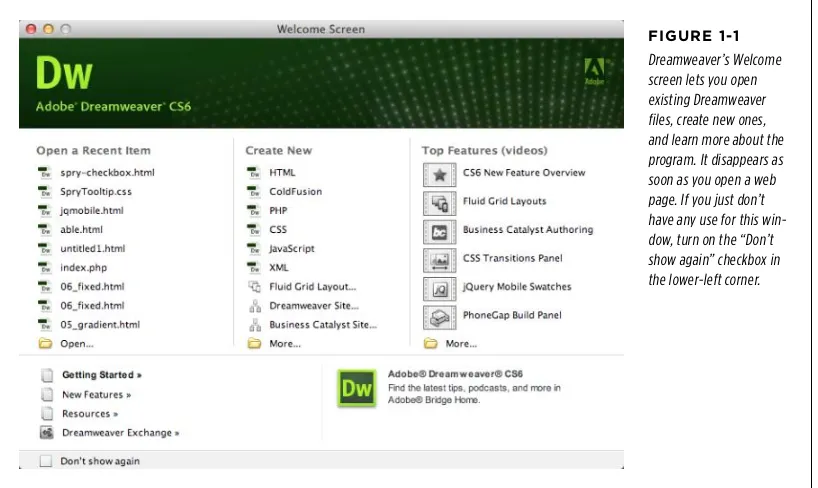
The Dreamweaver CS6 Interface
When you open Dreamweaver, you'll be greeted by the program's Welcome screen (Figure 1-1). This simple starting point lets you open any one of the nine most re-cently opened files, create a new web page, view instructional videos, and access online help.
The DreaMWeaVer CS6 INTerFaCe
FiGURE 1-1 Dreamweaver’s Welcome screen lets you open existing Dreamweaver files, create new ones, and learn more about the program. It disappears as soon as you open a web page. If you just don’t have any use for this win-dow, turn on the “Don’t show again” checkbox in the lower-left corner.
The DreaMWeaVer CS6 INTerFaCe
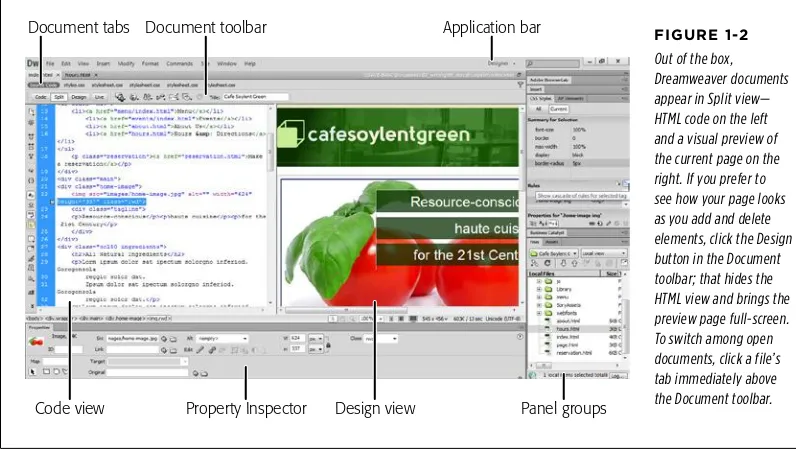
FiGURE 1-2 Out of the box, Dreamweaver documents appear in Split view— HTML code on the left and a visual preview of the current page on the right. If you prefer to see how your page looks as you add and delete elements, click the Design button in the Document toolbar; that hides the HTML view and brings the preview page full-screen. To switch among open documents, click a file’s tab immediately above the Document toolbar. Document tabs Document toolbar
Code view Property Inspector Design view Panel groups Application bar
Many of the program's individual windows help you handle specific tasks, like build-ing CSS styles. You'll read about each panel in relevant chapters later in the book, but you'll frequently interact with three main groups of windows: the document window, a set of “panels,” and the Property Inspector.
NOTE The look of Dreamweaver's windows depends on what kind of computer you use (Windows or
Mac-intosh) and what changes you make in the program's Preferences settings. Even so, the features and functions generally work the same way. In this book, where the program's operation differs dramatically in one operating system or the other, special boxes and illustrations (labeled “For Windows Only” or “For Macs Only”) will let you know.
The Document Window
The DreaMWeaVer
CS6 INTerFaCe Figure 1-2), and as it will appear in a web browser (Live view, which turns the docu-ment window into a real web browser). If your monitor is wide enough, Split view is
a great way to work: click into the Design view half of the document window to add HTML visually, and, when it's easier just to type HTML, click into the Code view part of the document window and type away. Split view even lets you see the code in one half, and turn on Live view in the other half so you can work on the HTML code and see the page as it will appear in a real web browser (you can't, however, edit any page content in Live view). In addition, if you're new to HTML, Split view is a great way to learn the language: add elements like paragraphs, headlines, and tables in Design view and see the relevant HTML in Code view. (You work in the document window's Design view much as you do in a word processor: To add text to a page, for example, you simply click inside the window and start typing.)
FiGURE 1-3 objects as you build the page. The status bar at the bottom of the window provides some useful information, like how quickly the page will download to a browser and the way the page encodes text. You can also instruct Dreamweaver to display the current document at different widths and heights so you can simulate what the page will look like when viewed in different
Document tabs Document toolbar Head content
Body Tag selector Status bar Window size Text encoding Document zoom
Mobile/Tablet/
Desktop sizes Downloadstats Related files
The DreaMWeaVer CS6 INTerFaCe Several other screen components provide useful information about your
docu-ment. They may appear in different locations on Windows and Mac computers (see Figure 1-2 and Figure 1-3, respectively), but they work the same way.
For example:
• Document tabs. When you have more than one web document open at a time, small tabs appear at the top of the document window—one for each open file. The name of the file appears in the tab; to switch to it, just click its tab.
TIP If you mouse over a document tab and pause, the location of the file appears in a small pop-up window
called a tooltip.
• Related Files bar. The Related Files bar lists all CSS (Cascading Style Sheets), JavaScript, and server-side programming pages (like PHP) the current web page uses. You'll learn more about these external files later in this book, but as a quick summary, it's common in current web design to have other files supply design and interactivity to a page of HTML. Web designers frequently work on these files in addition to the basic HTML file, so the Related Files bar lets you quickly jump to and work on these “helper” files.
• Document toolbar. The Document toolbar lets you change the title of a page, switch between Design and Code views, jump to Live view (to see how the page looks and works in a web browser), preview the page in different browsers, make sure your page is free of HTML errors, and change the look of the document window. (If you don't see the Document toolbar, choose View→Toolbars→Document.) You'll read about its various buttons and menus
in the relevant chapters of this book, but you'll want to be aware of the Code, Split, and Design buttons (circled in Figure 1-3). They let you see the page you're working on in the four views described above.
NOTE You may find two other toolbars, the Standard toolbar and Style Rendering toolbar, useful. The
Stan-dard toolbar is common on many Windows programs and includes buttons for frequent file and editing tasks, like creating a new page, opening a page, saving one or all open documents, canceling and repeating commands, and cutting, copying, and pasting page elements. (Dreamweaver hides this toolbar until you summon it by choosing View→Toolbars→Standard.) The Style Rendering toolbar comes in handy when you work with CSS. You'll learn
how to use it on page 401.
The DreaMWeaVer
CS6 INTerFaCe None of this information actually appears on your page when it's “live” on the Internet, but you can have a look at it in Dreamweaver by choosing View→Head Content. You'll see a row of icons representing the different bits of information in the head.
• Tag Selector. The Tag Selector is extremely useful. It provides a sneak peek at the HTML that composes your web page, behind the scenes. It indicates how Dreamweaver nests HTML tags in your document to create what you see on the page. In addition, it lets you isolate, with a single mouse click, an HTML tag and all the information inside it. That means you can cleanly remove a page element or set its properties (see page 31), and precisely control the application of styles to it (Chapter 4).
You'll make good use of the Tag Selector in the tutorials to come. For experienced Dreamweaver fans, it's one of the program's most useful tools.
NOTE In Design view, clicking the <body> tag in the Tag Selector is usually the same as pressing Ctrl+A
(c-A) or choosing Edit→Select All. It selects everything in the document window. However, if you click inside a table (Chapter 6) or a <div> tag (see page 438), choosing Edit→Select All selects only the contents of the table
cell or the <div> tag. In such a case, you need to press Ctrl+A (c-A) several times to select everything on the
page. After you do, you can press the delete key to instantly get rid of everything in your document.
Careful, though: Pressing Ctrl+A (c-A) or choosing Edit→Select All in Code view selects all the code, including the information in the head section of the page. Deleting all the code gives you an empty file—and an invalid web page.
The Insert Panel
Dreamweaver provides many windows for working with the various technologies required to build and maintain a website. It calls most of its windows panels, and they sit in tidy groups on the right edge of your screen. The various panels and their uses will come up in relevant sections of this book, and you'll learn how to organize the panels on page 34. But two are worth mentioning up front: the Insert panel and the Files panel.
The DreaMWeaVer CS6 INTerFaCe
FiGURE 1-4
The Insert panel has many faces; choose the one that works best for you. Normally, the panel displays page elements under each of its drop-down menus in a single list with an icon and a name—for example, the picture of an envelope and the label “Email Link” (top left). Unfortunately, this tall list takes up a lot of screen real estate. You can display the Insert panel’s buttons in a more compact way by hiding the labels. When you choose Hide Labels from the panel’s cat-egory drop-down menu (top-right image), Dreamweaver displays the icons side by side in rows, taking up a lot less space (middle-right image). Finally, you can turn the Insert panel into an Insert bar that appears above the document window instead of grouped with the right-hand panels; this space-saving option is a favorite among many web developers. To get the Insert toolbar, either drag the Insert panel under the Applica-tion bar or choose Window→Workspace Layout→Classic (see Figure 1-7).
NOTE Adding elements to your web page using the Insert panel may feel like magic, but it's really just a
quick way to add HTML to a page. Clicking the Images icon, for instance, simply inserts the <img> tag into the underlying HTML of your page. Of course, Dreamweaver's visual approach hides that code and cheerfully displays a picture on the page.
When you first start Dreamweaver, the Insert panel is open. If you ever close it by mistake, you can open it again by choosing Window→Insert or by pressing Ctrl+F2 (c-F2). On the other hand, if screen space is at a premium, you can close the Insert
The DreaMWeaVer
CS6 INTerFaCe The Insert panel offers nine sets of objects, each available from the drop-down menu at the top of the panel (see Figure 1-4, top right) or by clicking one of the tabs on
the Insert toolbar (bottom image in Figure 1-4):
• Common objects. In addition to images, tables, and email links—which you'll use frequently in everyday web design—this category of the Insert panel of-fers access to Dreamweaver's template features. Templates let you build basic web-page designs that you can use over and over again, speeding up page development and facilitating easy updates. See Chapter 19 for details.
• Layout objects. The objects in this category help you control the layout of a web page by organizing its contents using CSS or HTML tables. In addition, this panel includes some of Dreamweaver's Spry widgets, which let you add interactive elements like drop-down menus and animated, collapsible panels to a page so you can fit more information in less space (see Chapter 13).
• Form objects. Want to get some input from visitors to your website? Use forms to let them make comments, order products, or answer questions. The Forms category lets you add form elements like radio buttons, pull-down menus, and text boxes (see Chapter 12). Dreamweaver includes sophisticated form valida-tion so you can make sure visitors input the correct informavalida-tion before they submit a form.
NOTE In Web parlance, a form is a web page that lets visitors type in information that your web server
processes. For example, you might ask a guest to type in his email address when he signs up for a newsletter.
• Data. The Data category provides tools that help you build dynamic pages: con-trols that add records to your database, for example, or that update information already in a database. Unfortunately, these tools haven't been updated for years, and it appears that Adobe will phase these out in the future. You will, however, find several data tools here that aren't related to dynamic pages. Dreamweaver's Spry dataset feature lets you display interactive data in a table, so visitors can sort the data by column and even change the information displayed on the page by interacting with the data—all without having to reload an additional web page; you'll find Spry datasets discussed on page 661.
NOTE If you're a longtime Dreamweaver user, you know that versions of the program before Dreamweaver