H
OW
TO
W
IN
AT
T
ABLE
T
ENNIS
1
www.gregsttpages.com
I
NTRODUCTION
- W
INNERS
ARE
G
RINNERS
I love table tennis, and I like to win. A lot. How about you?
During my table tennis career, I have met a small handful of people who play table tennis purely for the love of the sport. For these players, the joy of playing the perfect forehand smash or the thrill in mastering a backhand loop is the ultimate reward.
For the rest of us, competition is where it's at.
And let's be honest - table tennis is brutal.
Ping-pong is the closest you'll get to hand to hand combat without actually having to touch your enemy. You're put into an enclosed space, only 9 feet away from your opponent, with just a paddle and your wits to help you get him before he gets you.
There's no judges holding up scores, no marks given for style, presentation or technique. You win the point by forcing a mistake from your opponent, via superior technique, skill, trickery, mind
games, luck, or brute force. It's direct, in your face and clearcut - you come off the court a winner or a loser.
Win or lose, it's fun to compete. But let's face it, it's more fun when you win!
The fact that you are reading this eBook tells me that you want to win. Perhaps you want to be the best player in your family, or it could be that you want bragging rights at work. Maybe you've got plans to be the number one player in your city, your country, or maybe the whole darn world!
But whatever your table tennis goals, you have to be able to win. I'll show you how to do that.
2
www.gregsttpages.com
W
HAT
Y
OU
N
EED
TO
W
IN
AT
T
ABLE
T
ENNIS
In this eBook, I'm going to explain everything you need to know to start winning at table tennis. You'll be beating your family and friends like a rug in just a few weeks, with a minimum of effort.
But why stop there? Once you are the family champion, or the top dog at work, is that enough?
If you are like most people, and you've been bitten by the table tennis bug, you'll need new challenges to test your table tennis skills.
Clubs and organized competitions are what you are looking for. You'll meet new people, make friends, and be able to enjoy the thrill of competition against worthy opponents. I've been playing table tennis for over 25 years and I still get a kick from competing against the top players in my club and country.
3
www.gregsttpages.com
S
TART
O
UT
THE
R
IGHT
W
AY
If you have plans to enter organized competitions someday, then a few simple tips and tricks that work against raw beginners won't cut it. You'll need something more to defeat experienced table tennis players - you need high quality equipment, the technique to use and control it, and the tactical ability to choose the right stroke at the right time. To achieve all that, you'll need some proper training.
If you really want to compete at a high level, you can't afford to waste precious time and effort trying to teach yourself table tennis. It's all too easy to pick up bad habits that will halt your progress and which are difficult to get rid of later - believe me, I know!. You need to be doing the right things at the right time, right from the start.
Thats where I come in. I've been there and done that, and I'll help you avoid the mistakes that will stop you from achieving your true potential. I'll explain what you need to do, why you need to do it, and how to learn to do it properly.
All it takes is a little time, a little effort, and a little
determination, and you can learn how to win at table tennis.
Shall we get started?
4
www.gregsttpages.com
H
OW
TO
U
SE
THIS
E
B
OOK
This is not your average How-To eBook. But that's OK, since I'm not your average eBook writer, and you're not the average eBook reader.
Most How-To eBooks use words and images to explain their subject. And for many topics, this works just fine. When you are trying to explain how to bake a cake, balance your checkbook, or clean your carpet, a simple text explanation and a photo or two will do the trick.
Table tennis is bit more complicated than that - there are many aspects of table tennis where a few words and a photograph just aren't enough, and a slight misunderstanding can cause you to develop bad habits (like a mistake in your grip or stance) that will slow down your progress and be hard to get rid of later on.
T
HE
P
OWER
OF
V
IDEO
Seeing is believing - and in this case, understanding.
For example, later on in this eBook I'm going to explain how you perform a forehand loop (the killer attacking shot in table tennis). I could use a thousand words and a hundred pictures, and that still wouldn't be a tenth as good as having you watch a 5 minute video showing correct and incorrect technique.
If only there was a way I could actually show you what to do, and explain it at the same time? Wouldn't that be great? Hmmm...
The chances are pretty high that you are reading this eBook on your computer, not in a hard copy. So I'm going to take advantage of that and include links in this eBook to videos that will explain and
demonstrate crucial concepts. I'll still outline the basics in the text, but I'll use the video to make it crystal clear to you exactly what I'm talking about.
These videos will be downloadable, so you can save them on your computer the first time and watch them over and over again at your leisure. I'll provide you with some smaller video file sizes for those of you on limited bandwidth.
5
www.gregsttpages.com
I
NSTRUCTIONS
FOR
W
ATCHING
THE
V
IDEOS
I have put copies of the videos on YouTube, so if you are connected to the Internet while reading this eBook, all you need to do is click on the appropriate link and you can watch the video via YouTube.
For those of you who would like to download the videos and watch them at your leisure, or when you are not connected to the Internet, I have also made the videos available through my website.
Click on the link to go to How To Win at Table Tennis - Video Downloads page on my website.
F
EEDBACK
I hope you will enjoy this eBook about How to Win at Table Tennis. But more important than just entertaining you, I hope you will put this advice into practice and start winning more matches.
This eBook is intended to be a living document which I will continue to improve and update in the future. So if you've got any constructive feedback to offer (positive or negative) that you think would make this eBook better, please feel free to visit my How to Win at Table Tennis web page and leave a comment. I'd love to hear from you.
D
ON
'
T
G
ET
R
IPPED
O
FF
!
While I've tried to pack this eBook full of valuable advice, How to Win at Table Tennis is completely free. So if you've paid money for your copy, demand a refund and pick up the free version from the above link.
D
EDICATION
To Nita, who has never once said "You can't do that!" to any of my ideas.
Thanks Lab.
6
www.gregsttpages.com
T
ABLE OFC
ONTENTSINTRODUCTION - WINNERS ARE GRINNERS...2
WHAT YOU NEEDTO WINAT TABLE TENNIS...3
START OUT THE RIGHT WAY...4
HOW TO USE THIS EBOOK...5
THE POWEROF VIDEO...5
INSTRUCTIONS FOR WATCHING THE VIDEOS...6
FEEDBACK...6
DON'T GET RIPPED OFF!...6
DEDICATION...6
CHAPTER 1- GET STARTED...11
FUNDAMENTAL #1 - GET THE RIGHT RACKET...12
Should You Buy a Premade or Custom Racket?...14
Your First Pro Racket - What To Look For...14
Testing for Touch and Comfort...15
Testing for Speed...15
Testing for Spin...16
Why More Power isn't Better...16
You Should Use Rubbers that are Legal for Competition...18
Rubber Types - Pips Out vs Inverted Rubber...19
Racket Recommendations...20
Shakehand Grip - Mistakes to Avoid...27
FUNDAMENTAL #3 - HOW TO STAND...28
How to Perform the Basic Ready Stance...30
FUNDAMENTAL #4 - HOW (AND WHERE) TO MOVE...32
Shuffle Step Footwork...32
One Step Footwork...33
Hopping Footwork...33
Crossover Footwork...34
Where to Move...36
Rule #1 - Every Shot has an Angle of Play...37
Rule #2 - Be in the Centre of the Angle of Play...38
Rule #3 - For Weak Shots Come Forward, for Strong Shots Move Back...39
Rule #4 - Move to Your Best Ready Location...40
Where to Move - Summary...41
CHAPTER 2: GET BETTER...42
UNDERSTANDING SPIN...42
How Does Spin Work?...42
How do you Create Spin?...43
Putting No Spin on the Ball...43
Putting Speed and Spin on the Ball...45
Heavy Spin in a Forward Direction...46
How do you Use Spin?...49
7
www.gregsttpages.com
How do you Read Spin?...50
Learning to Read Spin...50
How do you Handle Spin?...53
Creating and Handling Spin - Risk vs Reward...54
KEEPING YOUR EYE ON THE BALL...55
HOW TO PLAY THE BASIC STROKES...56
Advanced Strokes...56
Important Note...57
A Quick Note on Ball Timing...57
Hit the Ball Above the Net...58
Forehand Counterhit...59
When to Play the Forehand Counterhit...60
How to Play the Forehand Counterhit...60
Backhand Counterhit...61
When to Play the Backhand Counterhit...62
How to Play the Backhand Counterhit...62
Backhand Push...64
When to Play the Backhand Push...64
How to Play the Backhand Push...65
Forehand Push...66
When to Play the Forehand Push...67
How to Play the Forehand Push...67
Forehand / Backhand Block...69
When to Play the Forehand / Backhand Block...69
How to Play the Forehand Block...69
How to Play the Backhand Block...71
Serve...72
Double Bounce vs Long Serves...72
Forehand Pendulum Backspin/Sidespin Serve...75
Forehand Pendulum Topspin/Sidespin Serve...77
Learning Other Serves...78
Return of Serve...79
The Flick...79
When to Play the Flick...79
How to Play the Forehand Flick...80
How to Play the Backhand Flick...81
Time to Bring Out the Big Guns...83
Forehand Loop...84
Why Bother with the Forehand Loop?...84
Forehand Loop vs Backspin...86
When to Play the Forehand Loop vs Backspin...86
How to Play the Forehand Loop vs Backspin...86
Forehand Loop vs Topspin...88
When to Play the Forehand Loop vs Topspin...88
How to Play the Forehand Loop vs Topspin...89
Forehand Smash...90
When to Play the Forehand Smash...90
How to Play the Forehand Smash...90
TRAINING FOR TABLE TENNIS...94
Oh My God! I've Gotten Worse!...94
8
www.gregsttpages.com
Don't Swap Back and Forth...95
A Quick Word on Drills...96
A Recommended 1 Hour Training Routine...97
Explanation of the Training Outline...98
How Often Should You Train?...103
On Table Training...103
Training at Clubs...104
CHAPTER 3: GET IT ON!...105
KILLER TACTICS FOR COMPETITION...105
Tactic #1 - Avoid Silly Mistakes...106
Tactic #2 - Serve and Follow Up...108
Tactic #3 - Return of Serve...110
Tactic #4 - Rallying Tips...112
Tactic #5 - Remember the Rules for Handling Spin...115
Tactic #6 - Trust in Your Technique and Training...116
IMPORTANT RULES...117
Racket Rules...117
Rubber Colours...117
ITTF Approved Rubbers...117
Racket Inspection...118
Leaving Your Racket on the Table...119
How to Serve Legally...119
Winning A Point...120
Moving the Table, Touching the Net, Putting your Free Hand on the Playing Surface...120
Obstructing the Ball...121
The Toss...122
Change of Ends...122
Racket Hand and Free Hand...123
Hitting the Ball...123
How to Score in Table Tennis Singles...127
Calling a Let...128
Service Let...128
Interruptions and Disturbances...129
If You are Not Ready to Return Serve...129
EPILOGUE: NEXT STEPS...130
FINDING CLUBS AND COMPETITIONS...130
CONTINUED IMPROVEMENT...130
Get a Coach...130
Go To Greg's Table Tennis Pages...131
Serving...132
Order of Play...132
DOUBLES TACTICSAND TIPS...138
Doubles Serving Tips and Tactics...138
Returning Serve Tips and Tactics...140
Doubles - General Tips and Tactics...140
Doubles Footwork Patterns...142
Be Aware of Where Your Partner Is...142
Be Aware of Where Your Opponent is Likely to Hit the Ball...143
Circle Back and Around...143
10
www.gregsttpages.com
C
HAPTER
1- G
ET
S
TARTED
In order to start winning at table tennis, all you need are a few simple tips, tricks and techniques. But in order to keep winning at table tennis, you need to have mastered the basics so you can move on to more advanced techniques.
By the end of this chapter, you'll have a firm grasp of the four fundamentals of ping-pong, which are:
How to choose the right racket
How to grip your racket correctly
How to stand
How (and where) to move
This may sound all too simple, but trust me - this stuff is important.
Get the fundamentals wrong at the start of your career, and you'll struggle to get past an intermediate level of play. Table tennis is a sport where technique is just as important as athleticism, and these four fundamentals form the foundation of modern table tennis
technique. They are the building blocks from which we later
construct more advanced techniques and tactics. Master them and you'll find it easy to move on to more demanding strokes and
strategies - ignore any of them and you'll handicap your progress. Believe me, I know from bitter personal experience - I only started playing my best table tennis in my late thirties, after I spent 3 frustrating months changing my sub-standard grip to a technically correct grip.
Don't make the same mistake I made - get it right from the start.
11
www.gregsttpages.com
F
UNDAMENTAL
#1 - G
ET
THE
R
IGHT
R
ACKET
With the many thousands of table tennis rubbers and blades out there, there are an overwhelming number of options to choose from.
In this section, I'm going to explain what to look for in a quality table tennis racket, and make a few specific suggestions about what to buy for your first proper ping-pong paddle.
I strongly recommend that you spend a little money and buy a high quality ping-pong paddle with plenty of speed and spin. New players should not use exactly the same turbocharged equipment that
advanced level players use, but they definitely need a racket with good grip and decent speed. A slow, non-grippy racket (what I'm going to call a basement paddle) just won't do. Don't worry, I'll tell you what to look for.
But why can't you just keep using your trusty old Sportcraft $2 paddle?
I could give you a long, detailed explanation why, but it all boils down to this:
A match between a player using a basement paddle and a player using a high quality paddle is like somebody bringing a knife to a gun fight.
Want to guess which player has the gun?
And just like a gun, a high quality paddle is dangerous to the person using it until he learns to control it and create spin, at which point it's game over for the other guy.
Spin is the tactical nuke of table tennis. Spin is what allows
advanced players to hit the ball hard and fast, but still land the ball on the table. Without the ability to create and control spin, you won't
12
www.gregsttpages.com
Basement paddles
have rubbers with
very little grip, and
very little catapult
effect.
A blade is the
be able to keep up with your advanced opponents, and you won't win.
How do advanced players create that kind of spin? They use quality rackets with plenty of grip and power. These rackets use rubbers with sponge that are designed to allow the ball to sink into them at impact, allowing even more of the rubber to grip the ball, before the ball is catapulted off the racket towards their opponents loaded with spin and speed.
At the advanced level, make no mistake - spin is in.
If you are planning to play at your local club or take part in
competitions, then you need to start using a high quality racket as soon as possible. You need to be on a level playing field with your opponents, and many of the important stroke techniques required for using advanced rackets are radically different to basement racket techniques. Why spend any more time then you have to learning stuff you don't need?
Trust me on this - you need a pro quality racket.
13
www.gregsttpages.com
S
HOULDY
OUB
UYAP
REMADE ORC
USTOMR
ACKET?
Some table tennis players are snobs who would turn up their nose at the mere idea of suggesting that a new player could buy a premade racket (I know, I used to be one of them!).
But after testing a few premade rackets recently which I thought were great for new players, I've changed my mind. Nowadays I see no reason for new players to avoid premade paddles, if they know what to look for.
A custom racket is simply a table tennis racket that you put together yourself. Most intermediate and advanced players buy the rubbers individually, and attach
them to the blade with water based glue. It's not really a difficult process, and since table tennis rubbers only last around 3-6 months, it's handy to be able to change your worn-out rubbers yourself.
If you do decide to buy a premade paddle, plan to use it for around 6 months at most. By that time you'll be ready (and no doubt eager!) to move on to buying your blades and rubbers separately.
Racket Parts, Premade vs Custom Rackets video - YouTube
-Download Page
Y
OURF
IRSTP
ROR
ACKET- W
HATT
OL
OOKF
ORThere are 5 things to look for when choosing your first high quality racket:
The ability to produce speed
The ability to create spin
Good touch or feel
A comfortable handle
Same rubber on both sides
What you need is a racket that can produce good speed and spin (but not too much!), which gives a vibration that feels good to you when you hit the ball, and which is comfortable to hold in your hand while playing.
Testing for Touch and Comfort
If you are buying a paddle which is premade (i.e. a paddle that has already had the rubbers attached to the blade), then the only way to test its touch and handle comfort is to get the racket out of the
packaging and try it out for a few shots. An experienced player could also get a good idea of the speed and spin capability of the racket by doing this, but a new player will probably find it more difficult to judge speed and spin, since he doesn't know what he is looking for.
Testing for Speed
The simplest way for a new player test the ability of a racket to produce speed is to put the bat down on a hard, flat surface with the handle positioned off the edge, so that one side of the bat is lying completely flat. Then drop a ball on the racket from 30cm high (around 1 foot), and with a ruler measure the height of the first bounce. Check that all parts of the racket are fairly similar.
You should get a first bounce of at least 10 cm (4 inches) high - any lower and the racket might be too slow. The first bounce should also be less than 20 cm (8 inches) high - any higher and the racket is too fast. The ball should then continue to bounce several more times. Repeat the test for the other side. If the ball does not bounce within this range or is very uneven in bounce, then don't buy the racket.
While you do want a rubber with good speed, new players should not use a rubber with too much power. The easiest way to make sure that you don't get a bat with too much speed is to grab a ruler and measure the sponge on each rubber. If the sponge on either side is over 1.7mm thick, then the racket might be too fast. New players should look for rackets with sponges around 1.5mm - 1.7mm thick.
Testing for Spin
The simplest way for a new player to test the ability of a racket to produce spin is to simply grab a ball, hold it firmly (so that it can't rotate) and drag it lightly along the rubber surface, testing all parts of the rubber. It is important to drag the ball rather than push it, since pushing the ball tends to force the ball down into the rubber, which can make you think the rubber is more grippy than it really is. The ball should slide along the rubber, but with noticeable friction
providing resistance to the movement. All parts of the rubber should provide the same amount of resistance.
If the ball slides along the rubber with little or no resistance, the rubber will not grip the ball well, and you will not be able to spin the ball enough to play advanced strokes that require spin. On the other hand, if the ball sticks to the rubber and is very hard to move at all, the rubber is probably too grippy, and you will be affected by your opponent's spin too much.
W
HYM
OREP
OWER ISN'
TB
ETTERSome people recommend that new players should begin with exactly the same equipment that professional players use. Their line of
thought is that professional level equipment can be bought for quite reasonable prices, and once the student has learned to control the equipment, no further adjustments are needed.
I disagree with this approach, for one simple reason - human beings have a fear of failure, and using equipment that is too fast and spinny invokes this fear in new players, slowing their progress.
Some of the advanced table tennis stroke techniques I'm going to show you are not easy to perform. When I coach students, the biggest problem I face when students are learning a new technique is to get them to stop worrying about making mistakes.
For almost all my students, if their success ratio drops below a
certain amount (which differs from student to student, but is generally
16
www.gregsttpages.com
around 60-70%), then they invariably start choking up on their swing and trying to guide the ball, instead of simply taking note of the error and correcting it while performing another relaxed swing. The fear of failure gets in the way, and they start playing not to miss, instead of playing to win.
Now for my personal students, I can remind them to relax and focus on their technique. I'm not there when you are practicing, so I can't do that for you. So it's better for you to avoid using equipment that is too fast and spinny to control, so that you don't make too many mistakes and slow down your learning process.
17
www.gregsttpages.com
Y
OUS
HOULDU
SER
UBBERS THATAREL
EGAL FORC
OMPETITIONIf you are only going to play at home or in clubs, then you can use any racket you like. But if you intend to play in tournaments that use the ITTF rules (such as most USATT sanctioned tournaments), then you need to use ITTF approved rubbers on
your racket.
ITTF approved rubbers have the ITTF logo and the manufacturer's logo or trademark, which must be attached to the blade so that these identifying features are clearly visible near the handle.
18
www.gregsttpages.com
The ITTF
(International
Table Tennis
Federation) is the
governing body for
table tennis
around the world.
Air UpUpUpUp Rubber Logo - Note the ITTF Logo and Rubber ID Number on the left
The USATT (USA
Table Tennis) is
the national
R
UBBERT
YPES- P
IPSO
UT VSI
NVERTEDR
UBBERThe photograph on the previous page shows a typical pips out rubber, where the rubber is glued onto the blade so that the pips are outwards and will make contact with the ball.
Pips out rubbers can be used with or without a layer of sponge underneath the topsheet. Both varieties are legal to use.
However, I would recommend that new players start with what is called inverted rubber, or smooth rubber, where the topsheet rubber has the pips facing inwards and the pips are glued to the sponge layer. Inverted rubber must be used with a layer of sponge between the topsheet and the blade, otherwise it is illegal.
Inverted rubber is by far most commonly used rubber, since it provides a mix of speed and spin that suits the style of play preferred by most table tennis players - fast
speed with heavy topspin. It is easier to spin the ball heavily with inverted rubber than with pips out rubber, making it the better choice for most players. Inverted rubber is often just called rubber by most table tennis players.
In this eBook, the premade rackets that I recommend all use inverted rubbers. The custom rubbers that I suggest are all inverted rubbers as well.
19
www.gregsttpages.com
An inverted rubber on a custom blade. Note that although the pips of the red topsheet are facing inwards, they are still visible through the surface.
R
ACKETR
ECOMMENDATIONSWhile there are plenty of online table tennis distributors, I'm going to simply recommend one that has given me good service over the last few years - www.megaspin.net. I've been using them to buy my own equipment for quite a while and not had a problem with them in all that time.
Note: The above link and the links I provide to suggested equipment
below are affiliate links - I get a commission on any equipment you buy from Megaspin after following a link.
Premade Racket Recommendations
For any new player looking for a premade racket to start serious table tennis play, I would recommend one of three different rackets, all of which I have tested myself. All of these rackets make excellent starting rackets for different reasons, and none of them are more than $25 US, so they won't break the bank.
Killerspin Centric - an excellent premade racket, which is the closest in performance to a high level custom racket. This level of performance makes it a little harder to control, so I'd only recommend this racket to new players if they are going to get some coaching lessons to help them learn to control the bat quickly. Buy Killerspin Centric bat
Butterfly 201 FL - this racket has enough performance to do a decent forehand loop attack, but has a smaller sweet spot, which makes it obvious when you have hit the ball off centre. This actually makes it a bit better for learning
correct technique, since you'll know straight away when you have got it wrong. Buy Butterfly 201 FL bat
Yasaka Attack - a good choice for a new player who is looking to beat his family and friends, but who doesn't intend to get any personal coaching or dive into serious competition. It has enough performance to give you an
20
www.gregsttpages.com
edge, but is not too fast or spinny, so it is still fairly easy to control the ball. Buy Yasaka Attack bat
Just in case you are wondering about the other two rackets in the photograph,
the Killerspin Jet 100 is also a good racket that I would normally recommend for
new players, except for the green rubber which makes it illegal under ITTF rules.
The Donic Waldner 500 racket that I tested was terrible in my opinion, and I
wouldn't recommend it to anybody (well, anybody that I liked, that is!).
21
www.gregsttpages.com
Expect to get around 3-6 months of use out of these rackets, after which they can be thrown away and a new premade or custom racket purchased.
Custom Racket Recommendations
If you are looking to buy a high quality custom racket, then you need to select your rubbers and blade separately, and then glue them together.
Fortunately the folks at Megaspin.net offer a free racket assembly service, where they will attach the rubbers to the blade for you. If you do want to learn how to glue the rubbers on your blade by yourself, check out my website for more details.
There are literally thousands of rubbers and blades out there to choose from - far too many for me to cover in detail. So I'm going to stick to making a few tried and tested recommendations that I know will get you off to a good start.
Blade Recommendations
Butterfly Timo Boll All, Butterfly Andrzei Grubba
Stiga Allround Classic, Stiga Allround Classic WRB
Donic Appelgren Allplay
Yasaka Extra 3D
Rubber Recommendations
Butterfly Sriver, Butterfly Flextra , Yasaka Mark V, Friendship 729 Cream on Magic Red Sponge
Any of these rubbers in around 1.5mm-1.7mm sponge thickness would be an excellent choice. Remember that you need 2 rubbers, one for each side of your blade!
When you buy a custom racket, you are generally paying more
22
www.gregsttpages.com
money for the extra performance and quality of the materials. You can expect to use the blade for many years (although many players like to try new blades more often than that), while the rubbers will generally last from 3-6 months before they need replacing.
You can tell a rubber needs replacing by holding a table tennis ball firmly in your fingers, and dragging it over your rubber after the rubber has been cleaned. If the grip in the centre of the racket is significantly different to the grip around the edges of the racket, it's time to change! Also, if the bounce in the centre of the rubber
becomes significantly less than the bounce around the edges of the racket, you need a new rubber.
23
www.gregsttpages.com
F
UNDAMENTAL
#2 - G
ET
Y
OUR
G
RIP
R
IGHT
The most important thing about your table tennis grip is that it should allow you to easily perform all the strokes you need to play. The second most important thing is that it should be comfortable.
Now if this eBook was unlimited in size, I could explain every grip variation on the planet, along with its pros and cons. But it's not, so I'm going to restrict myself to talking about the one grip that allows you to play every shot in the book with minimal limitations - the shakehand grip. It's the grip that I recommend to most new table tennis players, since it is easy to learn and use, and you'll have no problem finding a coach that can teach players who use this grip.
While the shakehand grip is simple to learn and instantly familiar to most Westerners, it is still easy to make mistakes with your grip that will very hard to shift later on. So it's well worth taking the time to get in right in the first place.
24
www.gregsttpages.com
Other popular
grips include the
Chinese Penhold,
Japanese/Korean
Penhold, and
Reverse Penhold
Backhand grips.
WARNING: Comfortable is NOT the same as familiar. If you have already played some ping-pong with a different grip, or never held a racket before in your life, then the basic shakehand grip may feel a little strange or awkward at first. That's fine, as long as it isn't painful to use. If you continue to perform this grip correctly, you'll soon get used to it.
S
HAKEHANDG
RIPB
ASICSHere's how to perform the shakehand grip correctly.
Hold the racket around the edges with your free hand so that the edge is running vertically and the handle pointing towards you, then "shake hands" with the racket. Hold the racket in your playing hand so that your thumb is on one side of the racket, and your index finger is on the other side. For right handers, your thumb will be on the left side of the racket, and your index finger on the right side.
The thumb and index finger should both point down towards the
25
www.gregsttpages.com
ground. The thumb should be comfortably placed on the part of the handle that has been planed away, while the index finger should on the rubber, running along the bottom edge of the racket face.
Allow your other three fingers to wrap naturally around the handle.
Keep your wrist relaxed, so that the tip of the racket points horizontally out in front of you, not upwards to any degree.
The edge of the racket should still be vertical, and the line formed by the edge of the racket should run up the inside of your forearm.
Experiment with moving your grip a little further back towards the bottom of the handle, and further up towards where the handle meets the racket face. Don't change the angle of the racket while doing so. Holding the racket with your hand slightly further down the handle generally gives more power and spin since you can use your wrist more, but less control, while
holding the racket with your hand closer to the racket face gives more control, but less speed and spin.
Shakehand Grip video – YouTube- Download Page
Power Zones and the Playing Elbow video - YouTube- Download Page
When performed properly, the shakehand grip allows for easy stroking of balls on the forehand and backhand sides of the player, and is equally good for topspin or backspin strokes.
The main disadvantage of the shakehand grip is the existence of a crossover point or playing elbow, which is the area where you have to decide between using a forehand or backhand stroke.
26
www.gregsttpages.com
Playing elbow - the
area where a
player has to
decide between a
forehand or
S
HAKEHANDG
RIP- M
ISTAKES TOA
VOIDAlthough the shakehand grip is relatively simple to learn, there are several basic mistakes that you should avoid, since they will make it harder to reach an advanced level later on.
Keep the racket edge as close to vertical as you can. For a right handed player, turning the racket a little anti-clockwise will
make your forehand stroke more powerful, but make playing a strong backhand much harder to do. Similarly, turning the racket a little clockwise will make your backhand strokes stronger, but make your forehand strokes much more difficult.
Don't allow your thumb to point towards the tip of the blade, since this tends to make adjusting your racket angle and using your wrist more difficult.
Don't allow your index finger to creep too far away from the bottom edge of the racket - this will make your forehand stronger, but greatly weaken your backhand strokes. It also makes it more likely that you will accidentally hit the ball with your finger when playing a backhand.
Don't hold your racket too tightly - you will make your forearm muscles tense and rigid instead of relaxed and loose, and you will lose power and wrist flexibility.
Don't change your grip around much during a point. Small natural shifts of your grip are common for most players, but the same basic racket angle should be maintained. Any large grip changes that change your basic racket angle should be
avoided.
27
www.gregsttpages.com
F
UNDAMENTAL
#3 - H
OW
TO
S
TAND
This may seem a bit of a strange fundamental - after all, we all know how to stand up, don't we?
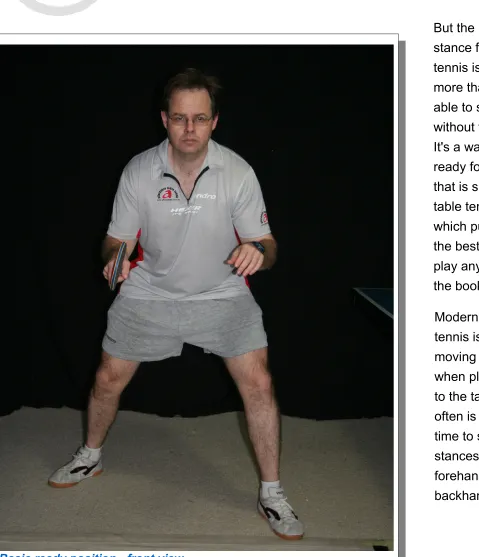
But the basic ready stance for table tennis is much more than being able to stand up without falling over. It's a way of being ready for action that is specific to table tennis, and which puts you in the best position to play any stroke in the book.
Modern table tennis is a fast moving game, and when played close to the table there often is not enough time to switch stances between forehand and backhand strokes.
28
www.gregsttpages.com
Fortunately, while the forehand attack requires a large body turn to play well, the backhand attack does not, so the modern stance has evolved to allow players to play both strokes from the same stance. In this stance, the right foot (for a right handed player) is placed some distance behind the left foot, to allow better weight shift and body rotation for forehand strokes while maintaining balance.
The Basic Ready Stance video - YouTube - Download Page
29
www.gregsttpages.com
In modern table
tennis, the
backhand is often
played from a
forehand stance.
H
OW TOP
ERFORM THEB
ASICR
EADYS
TANCEFace an imaginary (or real) ball, so that your shoulders and upper body, and legs are square on to the ball. Let your arms hang by your sides, and let your toes point naturally.
Place your feet shoulder width apart to begin with, and bend your knees slightly and lean forward slightly, so that your weight is mainly on the balls of your feet, and only fractionally on your heels. Again, your toes should be pointing in whatever direction is comfortable for you.
Bring your hands out in front of your body, with a roughly 90 degree angle at the elbow. The racket tip should be pointing out in front of you, and around 1 foot / 30cm to the right of the ball.
Now widen your stance until it begins to feel uncomfortable. Once this point is reached, narrow your stance a few inches / cms until you are once again comfortable, with no feeling of strain. For most new players, you should be looking for a stance that is at minimum a few inches wider than your shoulders, and at maximum around 1½ times your shoulder width. More
advanced players use stances that are wider than this, but it is difficult to maintain a stance that wide throughout a match without special training to improve your leg strength.
At this point, your center of gravity should be significantly lower than at the start.
While keeping your upper body and shoulders still, move your right foot backwards around 6 inches / 15cm. Continue to allow your toes to point in the natural direction they wish to go.
Allow your body to rock forwards and backwards, then right and left, and then in all directions. Try shifting your weight while rotating your hips and shoulders around 90 degrees at the same time. You should find that you are relatively stable in almost all directions, even while rotating your body.
30
www.gregsttpages.com
This is the basic ready position, but with the minimum amount of backwards positioning of the right foot. From this position, you will be able to play all the forehand and backhand strokes with a minimum of body adjustments.
Some players prefer to place their right foot further back, to allow them to use more body turn when playing a forehand, thus generating more power. It does require a little more flexibility in the hips and upper body when hitting a backhand, so not all players will move the right foot further back. Let's give it a try now, so you can see how it feels.
Move your right foot back another 6 inches / 15cm, keeping your upper body and shoulders facing the ball, and allowing your toes to point naturally. Try rocking your body and rotating in all directions again - how does it feel? In most cases, you should feel more stable, but you might feel more uncomfortable when turning to your left, if you do not have good flexibility.
Try different right foot positions between these two extremes, until you find one that gives you the best combination of stability and turning ability. This will be your basic ready position.
This basic ready position is the stance that has been adopted by almost all elite players, and with good reason - it allows you to perform powerful forehand
attacks while maintaining your balance and recovering quickly. There is only a minor reduction in backhand power, which is compensated for by the
removal of the need to switch between a forehand and backhand stance.
31
www.gregsttpages.com
F
UNDAMENTAL
#4 - H
OW
(
AND
W
HERE
)
TO
M
OVE
Table tennis is one of the fastest ball sports on the planet, and if you want to play the game at a high level, you need to know the quickest, most efficient and most effective ways to move around the court. And while not everybody possesses fantastic natural speed - I certainly don't! - you can make up for a lack of athleticism by mastering a small number of basic footwork techniques, which are:
Shuffle step footwork
One step footwork
Hopping footwork
Crossover footwork
S
HUFFLES
TEPF
OOTWORKOnce you are in your basic ready position, you will be able to cover most of the court by using a simple shuffle step to your left or right. It allows you to easily get to balls that would otherwise be well out of your reach, while remaining balanced.
You perform a shuffle step by moving the foot that is furtherest away from your destination towards your desired location, just far enough so that you can reach the ball without stretching. Just before putting that foot on the ground, lift your other foot and start to move it the same distance in the same direction. The first foot is then placed on the ground, followed by the second foot, and the stroke is played with both feet on the ground, when you are once again stationary.
That is the theory - but table tennis is a fast paced game, and in actual matches you will often find that you will be hitting the ball while you are in the middle of shuffle stepping. Don't worry about it, that is completely normal. Just remember to stay balanced throughout the stroke, and don't reach or lean over excessively.
Shuffle Step Footwork video – YouTube -Download Page
32
www.gregsttpages.com
O
NES
TEPF
OOTWORKOne step footwork is often used to get to balls that are only just outside your normal reach. It's a quicker technique than shuffle stepping, but it does have some drawbacks.
To use one step footwork, you move the foot nearest the ball to the left or right as appropriate, which will widen your stance and allow you to reach the ball and play your stroke. Once your shot is
completed, you push off that foot and return to your original position.
The benefit of this technique is that it is quick to execute, and when used properly, allows you to retain good balance throughout the stroke. It is also handy for playing balls that are only just a few inches out of reach, where a shuffle step would possibly be overkill.
One downside of this technique is that it requires good leg strength to perform, especially when used over and over again during a long match. Care must also be taken to keep your centre of gravity between your legs, and not to put all your weight on the leg that is moved, or else your recovery will be slowed down.
One Step Footwork video – YouTube - Download Page
H
OPPINGF
OOTWORKHopping footwork is most commonly used to quickly move
backwards while staying crouched and facing the ball. It is not often used to move left or right, since the amount of extra time spent in the air when hopping makes shuffle stepping or one stepping a better choice.
When hopping backwards you generally push off both feet at once (although there are times when one foot is used), and both feet are moved backwards and land at the same time, in the same relative positions that they started from.
Hopping Footwork video - YouTube - Download Page
33
www.gregsttpages.com
C
ROSSOVERF
OOTWORKCrossover footwork is usually used to reach balls that have been placed far away from the player, usually on the forehand side. When moving forwards and backwards, simple running footwork can be used to move into position. But when moving sideways or diagonally, players will use a special form of crossover footwork.
Crossover Footwork video - YouTube - Download Page
For a right handed playing moving to his forehand (right) side, the body is turned at roughly a 45 degree angle to the right, and the left foot is swung in front and over the right foot in the direction the player wishes to go. At the same time, the player takes his back swing. The player then pushes off his right foot and starts his forward swing at the ball, turning his body back to his left, and hitting the ball in midair, before landing with his left foot first, and then swinging his right foot back into position to land. The player will have generated a lot of speed during the process, and the right leg is used as a brace to halt the player.
34
www.gregsttpages.com
When moving to the backhand side, the same process is used in reverse, with one small (but important) change. Since most backhands are played with very little body turn, the body is only turned as far to the left as is necessary, usually much less than 45 degrees. A 45 degree turn would only be used if the player is
desperate to reach the ball, since the extra turn would give the player a little more reach. But the stroke would be played without attempting to turn the body back during the swing.
Note that the backhand crossover footwork is rarely used, since most players prefer to cover most of the table with their forehand, and relatively less with their backhand. This allows the player to use shuffle stepping for moving to the backhand side, and crossover footwork for any balls wide to the forehand.
35
www.gregsttpages.com
W
HERE TOM
OVEA lot what is involved in table tennis is being in the right place at the right time, so that you can perform the right stroke.
Learning where to position yourself during a table tennis rally is a skill that requires many years to develop fully, and is affected by many different factors, such as the direction of the ball travel, the spin and speed of the ball, the depth the ball lands on the table, your opponent's ability to perform different strokes with varying spins, and your own abilities.
While this is all a bit too complicated for a player that is new to the sport, fortunately there are a few simple rules that you can follow which will get you pretty close to the right location almost all the time.
This is a huge advantage to have over your opposition, if they don't know the same rules!
In essence, these rules can be summed up as follows:
Rule #1 - Understand your opponent's possible angles of play
Rule #2 - Work out your correct left/right position
Rule #3 - Work out your correct depth from the table
Rule #4 - Move to that location
Important Note: Please bear in mind that I do not expect you to consciously run through each rule in your head during a rally - you won't have time for that. The idea is that if you understand the reasoning behind the rules, your brain will soon learn to apply these concepts automatically, and you will find yourself moving to the right location without thinking about it.
But if you don't understand these basic rules, it's likely that you'll continue to end up in the wrong place on the court.
36
www.gregsttpages.com
Rule #1 - Every Shot has an Angle of Play
In theory, your opponent can put the ball anywhere on your side of the court when hitting the ball. However, his practical target area will always be smaller than this, unless he is lobbing the ball high in the air and making it come nearly straight down on the table.
Why is this? Because your opponent has to get the ball over the net first, before he can land the ball on your side of the table. That little six inch net can greatly affect the target area your opponent has to work with.
Wherever your opponent is hitting the ball from, he is limited to an certain range of angles that he can play and still have a decent chance of hitting the table.
Angle of Play video - YouTube -Download Page
37
www.gregsttpages.com
Court is another
As you get more experienced, you will get better at understanding what your opponent's possible angles of play are, depending on on the position of the ball and what stroke he is attempting.
But simply put:
More powerful shots reduce the angle of play, since the ball will go further over the net before hitting the table.
Using more topspin increases the angle of play, since the ball will drop faster after crossing the net.
Higher balls increase the angle of play, since your opponent can hit the ball shorter on the table.
Shorter balls increase the angle of play, since your opponent can hit the ball wider.
Rule #2 - Be in the Centre of the Angle of Play
Once you have figured out what your opponent's possible angle of play is, you have to move towards the centre of that angle, at the right distance from the table, so that you are best positioned to handle any stroke your opponent makes.
This involves two parts - moving to the centre of the angle of play, and moving to the right distance away from the table. I'll look at moving to the centre of the angle of play first.
Technically, moving to the centre of the angle of play is not quite correct - you should actually move so that your racket is positioned in the centre of the angle of play, not your body.
Why is this? Because you can actually reach much further to your forehand side than your backhand side, and your forehand is played out to the side of your body, while your backhand is played out in front of your body. It is also easier to use crossover footwork on your forehand side than your backhand side, which gives you even more reach on your forehand. If you put the middle of your body right in
the center of the angle of play, you are actually standing too far over to your forehand side.
Put simply, a right hander should stand a little to the left of the centre of angles available to his opponent.
One important note - when you move to your left or right, make sure that you keep facing the ball, not the endline of the table. If you keep facing the endline, you will end up with your body at the wrong angle when you move wide to your left or right.
Rule #3 - For Weak Shots Come Forward, for Strong Shots Move Back
The final piece of the puzzle is to know how far away from the table to be. There's not much point being at the centre of the angle of play if you are standing right up at the table while your opponent
smashes the ball, or 15 yards back from the table when your
39
www.gregsttpages.com
opponent plays a drop shot.
The easiest way to reach the right depth is to watch your opponent closely to judge the type of stroke he is playing, and also get a good idea of the size of his backswing.
If your opponent is preparing to push or block the ball, you should be relatively near the table, say within or around a yard / metre or so, a little nearer for pushes and a little further away for blocks against strong attacks.
If your opponent is preparing to counterhit the ball, you will probably want to be within the yard or metre mark for a standard counterhit, and a little deeper if he is taking a bigger swing.
If your opponent is preparing to loop the ball, then stick to around a metre or so away, so that you can block the ball just as it gets above net height. More advanced players who wish to counterloop the ball should retreat to a depth of a two to three yards or metres back from the table, so that they can take the ball near the peak of its bounce, when it is nice and high and it has lost a significant amount of speed and spin.
If your opponent is preparing to smash the ball, you can either be aggressive and stay fairly close to the table and attempt to block the ball, or you can be defensive, retreat well away from the table and lob the ball back, hitting the ball high and with plenty of topspin to make the ball kick when it lands on your opponent's court.
Rule #4 - Move to Your Best Ready Location
Once you have made your decision about the best place for you to wait for the ball, use one of the four basic footwork techniques to move to that location.
Move to the Best Ready Location video - YouTube - Download Page
40
www.gregsttpages.com
Where to Move - Summary
You will soon get used to instinctively judging where the opponent is hitting the ball from, and what type of stroke he is preparing to play. This information will allow you to automatically work out where the centre of his possible angles of play will be, and what depth you should choose.
As I mentioned earlier, don't try to apply these rules step by step during a point. Just make sure that you understand the concepts, and take note when you accidentally move to the wrong location. Within a few weeks you'll find yourself moving towards the right spot without even thinking about it.
Finally, remember that you are using these rules to help you to decide the best place to be while waiting for the ball to come to you. So once you decide on the location and move there, your job isn't finished! You still have to pay attention to where your opponent has actually hit the ball, and then use your footwork to move to the best place to reach the ball
comfortably and play your stroke.
41
www.gregsttpages.com
C
HAPTER
2: G
ET
B
ETTER
U
NDERSTANDING
S
PIN
Why is spin important when choosing your first real racket? Because spin is the difference between pat-a-cake ping-pong played in living rooms and basements around the world and true table tennis played in sports stadiums in front of ten thousand screaming fans.
Spin is what allows you to make a ball sit up and do tricks, by revving it at around 150rps. You can curve a ball around the net, make it dip, rise, or bend like a banana through the air. All at speed of up to 70mph (112.5kph)!
Without the ability to create and control spin, you won't be able to keep up with your advanced opponents, and you won't win.
H
OWD
OESS
PINW
ORK?
When spin is put on the ball when playing a stroke, it makes the ball curve through the air. There are three main spins to understand in table tennis:
Spin Types and their Effects video - YouTube -Download Page
Topspin - which makes the ball curve downwards, and bounce upwards off your opponent's racket. Topspin is what allows advanced players to hit a low ball hard and fast, but still land the ball on the table.
Backspin - which makes the ball want to curve upwards. However, since the spin is fighting gravity, this usually makes the ball fall more slowly, or "float" in the air until the amount of backspin drops. Backspin makes the ball jump downwards off your opponent's paddle and go into the net.
Sidespin - this makes the ball curve to the left or right, and jump sideways off your opponent's paddle. Sidespin
42
www.gregsttpages.com
makes it harder for your opponent to hit the ball, and much more difficult for your opponent to guess how much
backspin or topspin you have put on the ball.
H
OW DOYOUC
REATES
PIN?
To create spin, the ball is brushed or skimmed rather that hit flat. The easiest way to explain this is to get you to actually do it.
Learning to Create Spin video - YouTube -Download Page
Putting No Spin on the Ball
Stand to the side of a table tennis table, but near the endline, and drop a ball on the table so that it bounces back up to around 30cm (1 foot) above the table. Holding your racket so the edge is vertical, swing your bat quickly forward in a straight horizontal line. The line formed by your racket swing will go right through the centre of the ball, and you will put a lot of speed and very little spin on the ball.
43
www.gregsttpages.com
The ball should bounce quite quickly off your racket in a horizontal direction, and will probably fly well off the end of the table before being brought down by gravity.
Putting Heavy Topspin on the Ball
Still hold your racket so that the edge is vertical, but now when you drop a ball, swing your racket mainly upwards and just a little bit forwards.
The line of your racket swing will now be very close to the edge of the ball, and you will put a lot of spin on the ball.
If you are using a grippy racket, then the ball will also go mainly upwards and a little bit forwards, and you will have put a lot of topspin on the ball.
44
www.gregsttpages.com
Putting Speed and Spin on the Ball
Now let's try putting some speed and spin on the ball at the same time.
Once again, hold your racket vertically, and drop a ball near the endline of the table. But this time swing at a roughly 45 degree angle upwards and forwards.
The line of your racket swing will be around the middle of the centre of the ball and the edge of the ball, and you will now put a medium amount of speed and a medium amount of spin on the ball.
Provided you are using a grippy racket, the ball should go mainly forwards and a little upwards, but with a good amount of topspin that will will bring the ball down quickly towards the floor.
45
www.gregsttpages.com
Don't worry about whether the ball actually hits the table or not, it's not important at this stage.
Try varying the angle of your racket swing a little bit, while still
holding the racket vertically. You should notice that if you swing more horizontally, you generate more speed and less spin, while when you swing more vertically, you generate more spin and less speed.
You will also probably notice that the more horizontally you swing, the easier it is to actually make contact with the ball. When you swing mainly upwards, it's very easy to miss the ball completely, or hit it off the top edge of the racket.
Take special note of this - it is important and we will come back to this later in the eBook, when we use this knowledge to play the basic strokes of table tennis.
Heavy Spin in a Forward Direction
If you have ever watched high level players in action, you will have noticed that they can hit the ball hard and fast, but with plenty of topspin as well. Let's show you how that works.
Stand in the same place as before, but this time tilt your racket forward to about a 45 degree angle, so that the top of the racket is closer to the net than the bottom of the racket.
Drop the ball near the endline so that it bounces about 30cm high, and this time swing forward quickly at an angle slightly less than 45 degrees (be careful not to hit your racket on the end of the table).
If you make contact, the ball should travel quite fast and flat off your racket, before dipping quickly and landing on the table. If the ball goes up and off the end of the table, tilt your racket further forward, swing more forward, and the ball should go lower. If the ball goes into the net, tilt your racket a fraction backwards, swing a fraction more upwards, and the ball should go higher.
46
www.gregsttpages.com
Don't worry if you miss the ball - it is very easy to miss during this exercise, because the ball is not travelling horizontally towards your racket, but just going up and down.
You have just performed a fast forehand topspin, or what is better known by table tennis players as a forehand loop. Later on in this eBook I'll teach you the correct technique for this killer stroke.
For the moment, try tilting your racket at different angles, and watch the results. Try to keep the angle of your racket swing fairly close to the angle you are holding your racket. You'll soon notice that you only have a fairly small number of racket and swing angles that will land the ball on the table. However, since your racket angle and swing angle are similar, the amount of speed and spin will also be fairly similar for each shot - only the ball trajectory should change significantly.
47
www.gregsttpages.com
To finish our demonstration of creating spin, spend a few minutes holding the racket at one angle, while swinging the racket at a different angle. See what combination of angles still allows you to land the ball on the table, and take note of the different speed, spin and ball trajectories you produce.
Then try the same thing, but swing your racket at faster and slower speeds. Notice how hard it is to generate much spin with a slow swing. Also note how hard it is to land the ball on the table when hitting fast but without much spin, unless the ball is high. Notice that you can swing very, very quickly, but still produce a slow ball, provided you skim the ball enough.
Remember this stuff, because you'll need it later on when we start talking about reading spin, and risk vs reward when using spin.
48
www.gregsttpages.com
H
OW DOYOUU
SES
PIN?
Using spin correctly is in many ways the heart and soul of modern table tennis, and is something that takes years to truly master. Fortunately, it doesn't take long to learn a few simple basics that will put you head and shoulders above other new players.
When you want to hit hard and aggressively, use topspin. If the ball is well above the net, you can hit flatter and with less
topspin. If the ball is below the net, you will need to sacrifice some speed and put more topspin on the ball in order to hit the ball up over the net and still bring it down on the other side of the table. If the ball is at net height or a little higher, stick to a standard forehand topspin with your normal amount of spin and speed.
You can use sidespin to make it harder for the opponent to judge the flight of the ball, and more difficult for your opponent to work out how much topspin or backspin is on the ball. However, putting a lot of sidespin on the ball can increase the chances you will make a mistake yourself, and it also reduces the amount of topspin and backspin you can create, so be careful not to overdo it.
When the ball is low and over the playing surface, so you don't have a lot of room to swing upwards, use backspin or flatter strokes with less pace, to give the ball time to drop onto the other side of the table.
49
www.gregsttpages.com
The playing
H
OW DO YOUR
EADS
PIN?
While creating spin is no doubt one of the most fun aspects of table tennis, the flip side is that reading your opponent's spin is probably one of the most difficult things to do in ping-pong. While in most cases it isn't that hard to determine the type of spin on the ball, determining the amount of spin against a crafty opponent can be very, very difficult.
And while creating spin might be the heart and soul of table tennis, the ability to read what spin your opponent has put on the ball is where the rubber meets the road. If you can't read spin well, you'll never make past low intermediate ranks. It's just that important.
Reading Spin video - YouTube -Download Page
Learning to Read Spin
Nothing beats experience when it comes to reading spin. The more hours you spend out there on the table, the better you'll get at picking the spin on the ball.
And while you can't pack 20 years of experience into a few weeks, there are still a number of things you can do to greatly accelerate the learning process. Here's what I tell my beginner students to help get them up to speed (and spin!) faster:
The most important bit of advice is to PAY ATTENTION. Pay attention to what spin you put on the ball. Pay attention to how your opponent swings his bat, and what racket angle he is
using. Pay attention to how the ball moves off his racket after he makes contact. If you don't pay attention to these things, you'll never be able to use any of the other pieces of advice below. I know it sounds like a lot to keep track of, but pay attention consistently for a week or two, and you'll find it becoming second nature.
The faster your opponent's bat is moving, the more potential
50
www.gregsttpages.com
there is for him spin the ball. But it is his racket angle and swing angle that will determine exactly how much of his bat speed is turned into spin. Remember back to when you were practicing spinning the ball, and the difference it made when you changed the racket angle and swing angle?
A heavily spun ball makes a different, softer sound than a solidly hit ball, which makes more of a harsh, slapping sound. Pay attention to what your opponent's contact sounds like.
If your opponent's swing was fast, but the ball is travelling slowly, there is a lot of spin on the ball.
If your opponent's bat is tilted forwards and is going upwards and forwards at contact, he is putting topspin on the ball.
If your opponent's bat is tilted backwards and is going downwards and forwards at contact, he is putting backspin on the ball.
If your opponent's bat is moving from your right to your left at contact, the ball will curve to your right, and when it hits your bat, it will jump sideways to your left, away from where you are aiming.
If your opponent's bat is moving from your left to your right at contact, the ball will curve to your left, and when it hits your bat, it will jump sideways to your right, away from where you are aiming.
When your opponent uses sidespin, the amount of topspin or backspin he will produce will be less that what you would normally expect for the speed of his swing and the type of contact he makes, since some of the normal topspin or backspin will now be sidespin.
It's OK to make mistakes when trying to read your opponent's spin - it happens to everybody. But when you do make a
mistake, you must learn from it and try to use that information to do better the next time. Just a few seconds of thinking along the