TM
Your visual blueprint for
building .NET applications
by Eric Butow and Tommy Ryan
® From
Best-Selling Books • Digital Downloads • e-Books • Answer Networks • e-Newsletters • Branded Web Sites • e-Learning
New York, NY • Cleveland, OH • Indianapolis, IN
Certain designs, text, and illustrations Copyright © 1992-2002 maranGraphics, Inc., used with maranGraphics’ permission. All rights reserved. No part of this book, including interior design, cover design, and icons, may be reproduced or transmitted in any form, by any means (electronic, photocopying, recording, or otherwise) without the prior written permission of the publisher.
maranGraphics, Inc. 5755 Coopers Avenue Mississauga, Ontario, Canada L4Z 1R9
Library of Congress Control Number: 2001089361 ISBN: 0-7645-3601-X
Printed in the United States of America
10 9 8 7 6 5 4 3 2 1 1V/QW/RR/QR/IN
Distributed in the United States by Hungry Minds, Inc.
Distributed by CDG Books Canada Inc. for Canada; by Transworld Publishers Limited in the United Kingdom; by IDG Norge Books for Norway; by IDG Sweden Books for Sweden; by IDG Books Australia Publishing Corporation Pty. Ltd. for Australia and New Zealand; by TransQuest Publishers Pte Ltd. for Singapore, Malaysia, Thailand, Indonesia, and Hong Kong; by Gotop Information Inc. for Taiwan; by ICG Muse, Inc. for Japan; by Intersoft for South Africa; by Eyrolles for France; by International Thomson Publishing for Germany, Austria and Switzerland; by Distribuidora Cuspide for Argentina; by LR International for Brazil; by Galileo Libros for Chile; by Ediciones ZETA S.C.R. Ltda. for Peru; by WS Computer Publishing Corporation, Inc., for the Philippines; by Contemporanea de Ediciones for Venezuela; by Express Computer Distributors for the Caribbean and West Indies; by Micronesia Media Distributor, Inc. for Micronesia; by Chips Computadoras S.A. de C.V. for Mexico; by Editorial Norma de Panama S.A. for Panama; by American Bookshops for Finland.
For U.S. corporate orders, please call maranGraphics at 800-469-6616 or fax 905-890-9434.
For general information on Hungry Minds’ products and services please contact our Customer Care Department within the U.S. at 800-762-2974, outside the U.S. at 317-572-3993 or fax 317-572-4002.
For sales inquiries and reseller information, including discounts, premium and bulk quantity sales, and foreign-language translations, please contact our Customer Care Department at 800-434-3422, fax 317-572-4002, or write to Hungry Minds, Inc., Attn: Customer Care Department, 10475 Crosspoint Boulevard, Indianapolis, IN 46256. For information on licensing foreign or domestic rights, please contact our Sub-Rights Customer Care Department at 212-884-5000.
For information on using Hungry Minds’ products and services in the classroom or for ordering examination copies, please contact our Educational Sales Department at 800-434-2086 or fax 317-572-4005.
For press review copies, author interviews, or other publicity information, please contact our Public Relations department at 317-572-3168 or fax 317-572-4168.
For authorization to photocopy items for corporate, personal, or educational use, please contact Copyright Clearance Center, 222 Rosewood Drive, Danvers, MA 01923, or fax 978-750-4470.
Screen shots displayed in this book are based on pre-released software and are subject to change.
LIMIT OF LIABILITY/DISCLAIMER OF WARRANTY: THE PUBLISHER AND AUTHOR HAVE USED THEIR BEST EFFORTS IN PREPARING THIS BOOK. THE PUBLISHER AND AUTHOR MAKE NO REPRESENTATIONS OR WARRANTIES WITH RESPECT TO THE ACCURACY OR COMPLETENESS OF THE CONTENTS OF THIS BOOK AND SPECIFICALLY DISCLAIM ANY IMPLIED WARRANTIES OF MERCHANTABILITY OR FITNESS FOR A PARTICULAR PURPOSE. THERE ARE NO WARRANTIES WHICH EXTEND BEYOND THE DESCRIPTIONS CONTAINED IN THIS PARAGRAPH. NO WARRANTY MAY BE CREATED OR EXTENDED BY SALES REPRESENTATIVES OR WRITTEN SALES MATERIALS. THE ACCURACY AND COMPLETENESS OF THE INFORMATION PROVIDED HEREIN AND THE OPINIONS STATED HEREIN ARE NOT GUARANTEED OR WARRANTED TO PRODUCE ANY PARTICULAR RESULTS, AND THE ADVICE AND STRATEGIES CONTAINED HEREIN MAY NOT BE SUITABLE FOR EVERY INDIVIDUAL. NEITHER THE PUBLISHER NOR AUTHOR SHALL BE LIABLE FOR ANY LOSS OF PROFIT OR ANY OTHER COMMERCIAL DAMAGES, INCLUDING BUT NOT LIMITED TO SPECIAL, INCIDENTAL,
Permissions
Inc. Visual Studio is a a registered trademark of Microsoft Corporation. All other trademarks are the property of their respective owners. Hungry Minds, Inc. and maranGraphics, Inc. are not associated with any product or vendor
mentioned in this book.
FOR PURPOSES OF ILLUSTRATING THE CONCEPTS AND TECHNIQUES DESCRIBED IN THIS BOOK, THE AUTHOR HAS CREATED VARIOUS NAMES, COMPANY NAMES, MAILING, E-MAIL AND INTERNET
ADDRESSES, PHONE AND FAX NUMBERS AND SIMILAR INFORMATION, ALL OF WHICH ARE FICTITIOUS. ANY RESEMBLANCE OF THESE FICTITIOUS NAMES, ADDRESSES, PHONE AND FAX NUMBERS AND SIMILAR INFORMATION TO ANY ACTUAL PERSON, COMPANY AND/OR ORGANIZATION IS UNINTENTIONAL AND PURELY COINCIDENTAL.
maranGraphics
Certain text and illustrations by maranGraphics, Inc., used with maranGraphics’ permission.
is a trademark of Hungry Minds, Inc.
U.S. Trade Sales
Contact Hungry Minds at (800) 434-3422 or (317) 572-4002.
At maranGraphics, we believe in producing great computer books — one book at a time.
maranGraphics has been producing high-technology products for over 25 years, which enables us to offer the computer book community a unique communication process.
Our computer books use an integrated communication process, which is very different from the approach used in other computer books. Each spread is, in essence, a flow chart — the text and screen shots are totally incorporated into the layout of the spread. Introductory text and helpful tips complete the learning experience. maranGraphics’ approach encourages the left and right sides of the brain to work together — resulting in faster orientation and greater memory retention.
Above all, we are very proud of the handcrafted nature of our books. Our carefully-chosen writers are experts in their fields, and spend countless hours researching and organizing the content for each topic. Our artists
rebuild every screen shot to provide the best clarity possible, making our screen shots the most precise and easiest to read in the industry. We strive for perfection, and believe that the time spent handcrafting each element results in the best computer books money can buy.
Thank you for purchasing this book. We hope you enjoy it!
Sincerely, Robert Maran
President maranGraphics
www.maran.com
Hungry Minds Technology Publishing Group:Richard Swadley, Senior Vice President and Publisher; Mary Bednarek, Vice President and Publisher, Networking; Joseph Wikert, Vice President and Publisher, Web Development Group; Mary C. Corder, Editorial Director, Dummies Technology; Andy Cummings, Publishing Director, Dummies Technology; Barry Pruett, Publishing Director, Visual/Graphic Design
Hungry Minds Manufacturing:Ivor Parker, Vice President, Manufacturing
Hungry Minds Marketing:John Helmus, Assistant Vice President, Director of Marketing Hungry Minds Production for Branded Press:Debbie Stailey, Production Director Hungry Minds Sales:Michael Violano, Vice President, International Sales and Sub Rights
Project Editor
Jade L. Williams
Acquisitions Editor
Jen Dorsey
Product Development Supervisor
Lindsay Sandman
Copy Editor
Timothy Borek
Technical Editor
Namir Shammas
Editorial Manager
Rev Mengle
Media Development Manager
Laura Carpenter
Permissions Editor
Carmen Krikorian
Media Development Specialist
Megan Decraene
Media Development Coordinator
Marisa E. Pearman
maranGraphics
Production Coordinator
Nancee Reeves
Layout
LeAndra Johnson, Adam Mancilla, Kristin Pickett, Jill Piscitelli
Screen Artists
Ronda David-Burroughs, David E. Gregory, Mark Harris,
Jill A. Proll
Cover Illustration
Russ Marini
Proofreader
Laura Albert, Laura L. Bowman, John Greenough, Andy Hollandbeck, Carl Pierce,
Dwight Ramsey
Indexer
TECHBOOKS Production Services
Special Help
Microsoft Corporation, Richard Graves
Course.
Tommy Ryan
Tommy graduated from Clemson University with a degree in Chemical Engineering. Tommy has over twelve years of technical project experience and over four years of pure software consulting experience. Tommy’s area of focus is consulting for Microsoft Internet technologies, including Microsoft ASP.NET, C#, SQL Server 2000, BizTalk Server 2000, and Commerce Server 2000. Tommy has used several processes for software development, including variants of the Rational Unified Process, and the Microsoft Solutions Framework. On projects, Tommy normally plays the role of Technical Lead. His certifications include MCSE, MCSD, MCT, and MCP + Internet. Tommy is a recent instructor of MSF Design, Microsoft Site Server 3.0, Interdev 6.0, and several of the Visual Basic 6.0 classes. Tommy is the co-author of “ASP.NET: Your visual blueprint for creating Web applications on the .NET framework.” You can contact Tommy at [email protected] and learn more about him at
http://www.threewill.com/people/tryan.
Eric Butow
I would like to acknowledge all the people at Hungry Minds for their support and assistance in making this book possible, especially my editors, Jade Williams and Jennifer Dorsey.
Tommy Ryan
I would like to thank all of the hardworking people at Hungry Minds for helping produce this book – especially Jennifer Dorsey, Jade Williams, and other editors. Jennifer made sure that I was paid (very important) and Jade did an great job of explaining how to write with style.
To the clients that I have worked with during the past couple of years for challenging me to be a better consultant, including Nick Callivas, Brian Blinco, Jay Dalke, Bob Hughes, and Harwell Thrasher. To my previous employeer, Extreme Logic, and all of the exceptional people that helped me mature as a consultant and an educator. This company has taught me some valuable lessons.
To my colleagues at W.L. Gore and Associates that helped me start my professional career, including John Reaney, Mark Fundakowsi, Diccon Bancroft, John Pysczynski, Pamela Perdue, Erik Nightwine, Debra Raup, Ray Edmanson, Bob McCleary, Lawrence Anderson, Wolfgang Holma and Line 10 Production Team; the WinCC Team at Siemens that helped me in my transition to being a Microsoft geek, including Emilio Matt, Rob Bohm, Bob Meads, Rich Miceli, Charlie Moore, Jörg Allmendinger, and Rene Wolf; and my extended family and friends for the support in the things outside of work, including Joe and Rosemarie Markiewicz, Robert and Donna Philips, Joe and Jan Markiewicz, and Chuck and Mary Hanson, Rob and Gretchen Pfeiffer, and Reverend Joe Ciccone CSP.
A special thanks goes out to my brother, Danny Ryan. Without Danny, I would not have taken or completed my contribution to this book or the ASP.NET book. Danny is an excellent partner and I look forward to the great things that we will accomplish in our new endeavors.
HOW TO USE THIS BOOK
. . . .xiv1) GETTING STARTED WITH C#
Introduction to C# ...2Start Visual Studio .NET ...4
Open a New C# Project ...6
View .NET Framework Online Resources ...8
Open a C# Web Project ...10
Set JScript.NET as the Default Script Language ...12
2) EXPLORING THE C# INTERFACE
Explore the Class View Window ...14View the Contents Window ...16
Get Help Using the Index Window ...18
Search for Help ...20
Add Components from the Toolbox ...22
Add a Task to the Task List ...24
Change Form Properties in the Properties Window ...26
Add a Custom Toolbar ...28
Delete a Toolbar ...30
Change the Visual Studio Environment ...32
Manage Open Windows ...34
3) WORKING WITH VISUAL C# BASICS
Open a Project ...36View The Main Method ...38
Combine Program Types ...40
Add Reference Types ...42
Add Operators ...44
Insert Attributes ...46
Enter Classes ...50
Add Comments to Code ...54
Write Your First Program ...56
Enter XML Documentation ...58
Access Documentation ...60
4) PROGRAMMING C# BUILDING BLOCKS
View Information about C# Building Blocks ...64
Program Classes ...66
Add a Class ...68
Employ Class Inheritance ...72
Program Instance Constructors ...74
Insert Destructors ...78
Program Structs ...80
Display Heap and Stack Information ...84
5) WORKING WITH TYPES AND INTERFACES
Find Type Information ...86Program Constant Expressions ...88
Specify Value Types ...90
Program Numeric Types ...92
Program the Boolean Type ...96
Declare Reference Types ...98
Enter Reference Type Declarations ...100
Convert Value Types to Reference Types ...104
Program Pointer Types ...106
Insert The Void Type ...108
Add Interface Properties ...110
Add an Interface Index ...112
6) PROGRAMMING METHODS AND EVENTS
View Information about Methods ...116Add a Method ...118
Add Static Methods ...122
Include Non-Static Methods ...126
Enter Delegates ...130
Program Events ...132
7) USING ARRAYS
View Information About Arrays ...136
Enter Single-Dimensional Arrays ...138
Add Multidimensional Arrays ...140
Program Array-of-Arrays ...142
Iterate Through Array Elements ...144
Sort Arrays ...146
Search Arrays ...148
Implement a Collections Class ...150
Program Structs ...152
Add an Indexer ...154
Include Enumerations ...156
8) WORKING WITH STRINGS
Create String Literals and Variables ...158Assign Values to Strings ...160
Concatenate Strings ...162
Compare Strings ...164
Search for Substrings ...166
Replace Characters ...168
Extract Substrings ...170
Change the Character Case ...172
Trim Spaces ...174
Remove Characters ...176
Split a String ...178
Join Strings ...180
9) ACCESSING PROPERTIES
View Information About Properties ...184
Compare Properties and Indexers ...186
Program Property Accessors ...188
Declare Abstract Properties ...192
Include Properties on Interfaces ...194
10) BUILDING FORMS
View Information About Windows Forms ...196Add a Windows Form in the Windows Form Designer ...198
Set the Form Type ...200
Choose the Startup Windows Form ...202
Create a Modal Form ...204
Layout a Form ...206
Set a Form Location ...210
Change Form Properties ...212
Create a Transparent Form ...214
11) PROGRAMMING WEB APPLICATIONS
Introduction to Web Forms and Controls ...216Create an ASP.NET Web Site ...218
Create a Web Form ...220
Add Server Controls to a Web Form ...222
Respond to an Event in Server-Side Controls ...224
Read and Change Properties from Objects on a Web Form ...226
12) ACCESSING DATA WITH C# AND ADO.NET
Introducing Data Access with ADO.NET ...230
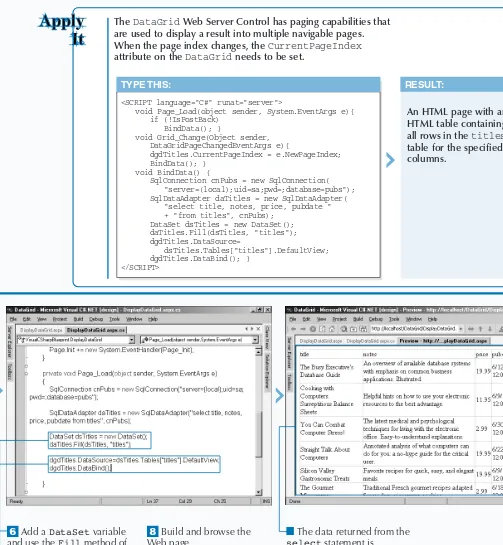
Display Data with the DataGrid Control ...232
Configure the DataGrid Control ...234
Insert Data into a SQL Database ...236
Update Data from a SQL Database ...238
Delete Data from a SQL Database ...240
Execute a Stored Procedure in a SQL Database ...242
13) USING THE XML FRAMEWORK CLASS
Read XML from a File ...244Save XML to a File ...246
Query XML with XPath ...248
Apply XSL to XML ...250
14) CREATING AND DEPLOYING
DISTRIBUTED APPLICATIONS
Introduction to Distributed Applications ...252Create an Application with Private Assemblies ...254
Create an Application with Shared Assemblies ...260
Version a Shared Assembly ...266
Configure a Client for a Versioned Assembly ...268
Create a Web Service ...270
15) WORKING WITH ERRORS
Introduction to Exception Handling ...274
Throwing an Exception ...276
Executing Code Using the Try/Catch Blocks ...278
Handling Exceptions with the Catch Block ...280
Using the Finally Block ...282
Write Errors to the Application Log ...284
APPENDIX A) C# QUICK REFERENCE
Basic Examples ...286APPENDIX B) ABOUT THE CD-ROM
What’s on the CD-ROM ...290Using the E-Version of This Book ...292
Hungry Minds, Inc. End-User License Agreement ...294
C#: Your visual blueprint for building .NET applications
uses simple, straightforward examples to teach you
how to create powerful and dynamic programs.
To get the most out of this book, you should read
each chapter in order, from beginning to end. Each
chapter introduces new ideas and builds on the
knowledge learned in previous chapters. Once you
become familiar with
C#: Your visual blueprint for
building .NET applications
, this book can be used as
an informative desktop reference.
Who This Book Is For
If you are interested in writing programs for the new
Microsoft C# programming language, then
C#: Your
visual blueprint for building .NET applications
is the
book for you.
This book will take you through the basics of using
the Visual Studio Microsoft Development Environment
(MDE) window and familiarize you with the essentials
of C# programming. The book even covers advanced
topics including creating forms, macros, and Web
applications.
No prior experience with programming is required,
but familiarity with the Microsoft Windows operating
system installed on your computer is an asset.
What You Need To Use This Book
To perform the tasks in this book, you need a
computer with Microsoft Windows NT 4.0 or 2000
installed as well as Microsoft Visual Studio.NET. You
do not require any special development tools since all
the tools are contained within Visual Studio .NET.
However, you do need a Web browser such as
Microsoft Internet Explorer.
The Conventions In This Book
A number of typographic and layout styles have been
used throughout
C#: Your visual blueprint for building
.NET applications
to distinguish different types of
information.
Courier Font
Indicates the use of C# code such as tags or attributes,
scripting language code such as statements, operators
or functions and ASP code such as objects, methods
or properties.
Bold
Indicates information that must be typed by you.
Italics
Indicates a new term being introduced.
An Apply It section usually contains a segment of
code that takes the lesson you just learned one step
further. Apply It sections offer inside information and
pointers that can be used to enhance the functionality
of your code.
The Organization Of This Book
C#: Your visual blueprint for building .NET applications
contains 15 chapters and two appendixes.
The first chapter, Getting Started with C#, introduces
you to C#, how to start Visual Studio .NET and open a
new C# project, how to learn about C# online and
how you can run C# with Web pages and Java.
Chapter 2, Exploring the C# Interface, shows you how
to navigate and work with the Visual Studio .NET MDE
window and receive online help. This chapter helps
you use the power of the MDE window to your
greatest advantage when you create C# programs.
Chapter 3, Working wiht Visual C# Basics, introduces
you to the essentials of C#. This chapter also covers
some C# programming fundamentals that enable you
to use the material in the following chapters to create
your own C# programs.
The fourth chapter, Programming C# Building Blocks,
gets you started with programming C# modules and
their two main building blocks, classes and structures.
Chapters 5 through 9 explore how you can add
different C# elements to your program — types and
interfaces, methods and events, arrays, strings, and
properties. You are shown in detail how to access and
utilize each of these fundamental elements of C#.
Chapter 10, Building Forms, shows you how to build
forms in C# so users can interact with your program.
Chapter 11, Programming Web Applications, shows
you how you can integrate forms, buttons, controls,
and other Web features into your program for
distribution and use on the Web.
Chapter 12, Accessing DATA with C# and ADO.NET,
shows you how you can design C# and XML
components and create and run C# macros.
Chapter 13, Using the XML Framework Class, shows
you how to distribute your program on one computer,
on the network, and on the Web. You will also learn
how to manage program changes and distribute those
changes.
Chapter 14, Creating and Deploying Distributed
Applications, shows you how to check the
performance of your program, manage the debugger
Chapter 15, Working with Errors, shows you how to
review common C# errors that you should avoid.
The first appendix contains a reference section. Once
you are familiar with the contents of this book, you
can use the C# references to obtain at-a-glance
information for some of the most commonly used
C# statements.
What Is On The CD-ROM
The CD-ROM disc included in this book contains the
sample code from each of the two-page lessons. This
saves you from having to type the code and helps you
quickly get started creating C# code. The CD-ROM
disc also contains several shareware and evaluation
versions of programs that can be used to work with
C#: Your visual blueprint for building .NET
C
Studio .NET (also known as Visual Studio .NET 7.0).The Birth of C#
As a recent birth in the programming language family, C# has two programming language parents: C++ and Java. C# contains many C++ features but also adds the object-oriented features from Java.
C# contains many different components, including:
• Versioning support, so that your base and derived classes — templates that define how an object performs — remain compatible as you develop them • Events, so that your program can notify clients of a
class about something that has happened to an object • Type safety and verification that increases reliability
and ensures code security
• Garbage collection, so that your program can identify objects that your program can no longer reach • Unsafe mode, where you can use pointers to
manipulate memory outside the garbage collector’s control, including methods and properties
Close Relations with C and C++
C# is built on the C++ language, so it behaves much like the language. Like C++, C# lets you write enterprise applications, and C# contains many C++ features, including statements and operators. C# also provides access to common Application Program Interface (API) styles including Component Object Model (COM) and C-style APIs.
Security
Computer networks let programmers share Visual Studio .NET code including C# programs across the network. This collaborative effort lets you and your programming team create C# programs much more quickly than one person alone. The problem with collaborating over a network is that unauthorized users from within or outside your network may try to gain access to your C# program code.
Visual Studio .NET provides built-in security features so you or the leader of your programming team can determine who on your network gets access to your C# program code and resources. You can also set different levels of security for different people in case you want only certain people to have access to certain program code.
Integration
The primary advantage of using Visual Studio .NET is that all of the programming languages have been designed to work together from the start. When you write a new C# program, Visual Studio .NET gives you tools that you can use to program links from your C# program into another program written in another Visual Studio .NET language.
For example, you can create a database in Visual FoxPro and then create a C# program that links into the Visual FoxPro database. If you have written or acquired completed programs in a Visual Studio language such as Visual C++ or Visual Basic, you can include links from your C# program into those programs. The end result is seamless integrated functionality between programs.
Differences Between C# and C++
Microsoft includes Visual C++ and C# in Visual Studio .NET. On the surface, C# has few differences from Visual C++. When you look carefully and start programming, you will notice that C# differs in several important respects from Visual C++:
• C# has an alternate method of accessing the C++ initialization list when constructing the base class. • A class can inherit implementation from only one
base class.
• You can call overridden base class members from derived classes.
• C# has a different syntax for declaring C# arrays. • There are differences in several different types
including bool,struct, and delegate. • The Mainmethod is declared differently. • Support of the new refand outmethod
parameters that are used instead of pointers for passing parameters by reference.
• New keywords including externand static. • New statements including switchand finally. • New operators including isand typeof. • Different functionality for some operators and for
COMPARE C#, VISUAL C++, AND JAVA
Many of the simple programming procedures that you use in C# are similar in both parent languages — Visual C++ and Java — and in some cases the procedures are
identical. The following are examples of simple programming procedures that illustrate the similarities and differences between C#, Visual C++, and Java.
Declaring Variables
C#: Visual C++: Java:
int x; int x; int x;
int x=3; int x=3; int x=3;
FOR Loops
C#:
for (int i = 1; i <= 10; i++)
Console.WriteLine("The number is {0}", i);
Visual C++:
for (int i = 1; i < 11; i++) printf("%d\n", i);
Java:
for (int i = 1; i < 11; i++)
System.out.println("The number is " + i);
Assignments
C#: Visual C++: Java:
xValue=7; xValue=7; xValue=7;
WHILE Loops
The advent of Windows brought dynamic link libraries
(DLLs) to programmers. DLLs are small, independent programs that contain executable routines that programs can use to produce a certain result in Windows. For example, if a program needs to open a file, you can write your C# program that uses the code in the DLL to open the file. Using DLLs frees up your time to work on your program without having to reprogram the same code in your C# program over and over again.
You can access DLLs from your C# program, and create DLLs in C# for your C# program to refer to when necessary. C# has full COM/Platform support, so you can integrate C# code with any programming language that can produce COM DLLs such as Visual C++.
XML
Extensible Markup Language (XML) is a more powerful version of HyperText Markup Language (HTML), the standard Web page language. Visual Studio .NET and C# let you document your program using XML and then extract the XML code into a separate file.
Visual Studio .NET supports XML so that you can integrate your C# programs with the World Wide Web. You can document your C# code using XML and then use XML for creating Web Services and Web controls that let you and your code interact with a Web site. For example, you may have an inventory system written in C# that interacts with the order-taking page on your company’s Web site.
If-Else Statements
C#:
if (nCount < nMax) {
nTotal += nCount; nCount++; }
else {
nTotal += nCount; nCount —; }
Visual C++:
if (nCount < nMax) { nTotal += nCount; nCount++; } else {
nTotal += nCount; nCount —; };
Java:
if (nCount < nMax) { nTotal += nCount; nCount++; }
else {
Programs Microsoft Visual Studio.NET 7.0 Microsoft Visual Studio.NET 7.0
⁄
Click Start.¤
Click Programs.‹
Click Microsoft Visual Studio .NET 7.0.›
Click Microsoft Visual Studio .NET 7.0.■
The MicrosoftDevelopment Environment window appears displaying the VS Start Page.
■
The Solution Explorer window lists C# program■
The Properties window lists property information for objects in your C# program.ˇ
Click the Open Project button to open an existing project.V
isual Studio .NET contains a graphical programmingenvironment called the Microsoft Development Environment (MDE). The MDE enables you to create programs in Visual C# and other Visual Studio .NET languages.
When you start Visual Studio .NET, the MDE window appears with several windows within the MDE window. In the largest area of the MDE window, which is called the parent window, the Visual Studio Start page appears. The Start page lists any recent projects and provides two buttons so that you can open a project file or create a new project.
The Start page lets you log into the Microsoft Developers Network (MSDN) Web site directly from the MDE, so you can receive the latest information from Microsoft about Visual Studio, get technical help from fellow Visual Studio users at Microsoft’s online forum, and search for
information online.
Visual Studio .NET also lets you create and change your profile so that you can view windows, enter keyboard commands, and receive help for the programming language in which you are working. For example, if you have used an older version of Visual Studio in the past and you prefer to use the old windows and keyboard commands, Visual Studio lets you use Visual Basic and C++ windows and menus.
START VISUAL STUDIO .NET
■
The Open Project window appears so you can open an existing C# project.Á
Click the New Projectbutton in step 5.
■
The New Project window appears so you can open a new C# project.
You can change what appears on the MDE when you start up — it does not have to be the Start page. You can start in an empty environment without the Start page by clicking the My Profile option and then clicking Show Empty
Environment from the At Startup drop-down list box. The next time you start Visual Studio .NET, the parent window will have nothing in it — it will display your default Windows background color.
If you want to start Visual Studio .NET from your desktop, you can create a shortcut that opens the MDE window when you double-click the desktop icon. Consult your Windows documentation for information about how to create a shortcut. No matter what parent directory you installed Visual Studio into, the MDE program appears in the \Common7\IDE\subdirectory with the devenv.exe filename. For example, if you installed Visual Studio .NET in its default location on your primary hard drive, the path would be C:\Program
⁄
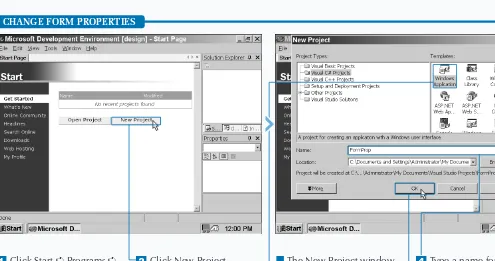
In the VS Start Page window, click the New Project button.¤
Click the Visual C# Projects folder.‹
Click a project template icon.■
The default name and file location for the project appear in the Name and Location fields.›
Type the name of the new project.ˇ
Click Browse to select a■
The Project Location window appears listing the project folders within your My Projects folder.Á
Type the name of the folder in which you want to place the project.‡
Click Open. Visual C# ProjectsConsole Applica...
A
fter you start the MDE window, you can open a new project. A project contains all the files related to your C# program. After you determine the type of C# program you want to write, Visual Studio creates all of the project files you need to start programming. Visual Studio contains project templates that let you create different types of programs. The MDE window lets you create eight different projects so you can tailor your C# program to the needs of your program users.You can create three different application types, each with a different user interface. First, you can create a Windows application that has a graphical, form-based interface. You can create a console application with a character-based interface. Finally, you can create a Web application that
resides on a Web server and uses Web pages for its interface.
You can create three types of programs that are not full-fledged but provide components that other programs can use. First, you can create a class library program so you can provide classes for other programs. Second, you can create a Windows control library for creating form controls such as buttons. Third, you can create a Web control library
program that provides Web controls for your Web-based C# programs.
You can also create two different types of programs for specific needs: a Windows service that is a long-running application that runs in its own Windows session and a Web service for integrating your Web site with a C# program.
OPEN A NEW C# PROJECT
Visual C# Projects
Console Applica...
Class1.cs Start Page
FirstProject.Class1 Main(string[] args)
Solution Explorer - Fi. . .
■
The New Project dialog box reappears with the name and location you selected in the Name and Location fields.Note: If you know the name of the path location where you want to store the project, you can type it directly into the Location field.
°
Click OK.■
The form or code that corresponds to the template you selected replaces the Start Page in the parent window.When the Open Project window appears, it shows all the projects in the default project folder, My Projects. By clicking one of the icons on the left side of the Project Location window, you can choose the folder from which a project is opened:
In the Project Location window, you can also select any folder on your hard drive(s) by clicking the Down Arrow ( ) next to the Look in field and then selecting your drive. The folders on the selected drive appear in the window.
You can view all the templates in the Templates area by clicking the small button above and to the right of the Templates area.
You can select from a folder that you used recently by clicking the History button.
You can select from a folder on your desktop by clicking the Desktop button.
You can select a folder within your Favorites folder by clicking the Favorites button.
⁄
Click the What’s New link in the Start Page.■
You can make more room for your Start page by closing the Solution Explorer and Properties windows. To close the panels, click at the right of the windows’ title bars.
■
The latest product information appears on the page.¤
Click the Online Community link in the Start Page.Visual Studio .NET contains minimal printed documentation. Most of the documentation for C# and Visual Studio .NET is contained within the MDE window itself. Having online documentation within the MDE window enables you to get the help you need quickly and conveniently.
The MDE window also contains links to help from both the Microsoft Web site and online newsgroups where you can leave and read messages from other C# programmers. You can also search the Microsoft Web site for help with specific topics.
Visual Studio .NET installs its self-contained help files when you install Visual Studio .NET. You can access self-contained help from the MDE menu bar, but you can only access
online help and resources from the Start menu. When you access help on the Web or newsgroups, the MDE parent window behaves as a window in your Internet browser would, so you can get your help directly from the MDE window without having to start an Internet browser.
If you have a continuous connection to the World Wide Web, such as a DSL or cable modem connection, then the Microsoft Web site help pages update automatically each time you access them. If you have a dial-up connection and you are not currently connected to the Web, then the MDE window will require you to connect before you can view the Microsoft Web site help pages.
VIEW .NET FRAMEWORK ONLINE RESOURCES
■
The Visual Studio .NET Web site and available newsgroups appear on the page.‹
Click the Headlines link.■
A list of headlines with the latest information about Visual Studio .NET and its languages appear in the parent window.If you want to see information just about C#, you can filter out information to see the information you want in the Filter drop-down list that appears at the top of the Start page.
The Filter drop-down list enables you to view Web information on the Microsoft Web site, view headlines, search for help, and view downloads that have information specific to the Visual Studio .NET language or topic that you want to view.
If you want to filter help results and information by topic, you have two options for doing so. You can limit your filter to topics that strictly mention C# or to C# topics and other topics that relate to C#.
Visual C# Projects
ASP.NET Web A...
⁄
In the VS Start Page window, click the New Project button.■
The New Project window appears.¤
Click the ASP.NET Web Application icon to create a Web application.‹
Type the name of the Web›
Type the location for the Web application.■
If you do not have a Web site, Visual Studio .NET places the project in a Web folder on your computer called MOBILE_1.C
# contains several templates for creating Web-basedprojects so that you can integrate your C# programs with a Web site and share the projects with other members of a programming team. Sharing projects on a Web site or a corporate intranet speeds development of your C# program. Integrating a C# program with a Web site lets you accept input from users on a Web site and
manipulate that data in the program.
A graphical user interface, GUI, is a window on the screen that lets users interact with the program. One key C# component for building a GUI program is the Web form.A Web form is a collection of tools that lets you create a
program GUI, and C# builds Web forms using Microsoft Active Server Pages (ASP) technology.
Active Server Pages are a Microsoft Web technology, and the latest ASP version, ASP .NET, integrates the Visual Studio .NET programming languages with Web browsers. C# lets you build two types of Web applications that use ASP.NET:
Applicationsthat use forms and servicesthat use Web-based technologies such as XML.
You can also create two other types of Web-related projects: button controls and new Web projects. You can create button controls for use in Web forms, and start a new Web project from scratch.
OPEN A C# WEB PROJECT
■
The Web form design grid appears.Á
Click the HTML button at the bottom of the parent window.■
The Web code appears in the parent window.Solution Explorer. . .
When you create a new Web project and place it on a Web directory, you should ensure that the directory where you place your Web program is secure so that only people with certain access can view it. If the Web directory your program resides in is not secure, others can access, alter, and outright steal your code from both inside and outside of your network. Discuss these issues with your Webmaster before posting your code on the Web or an intranet.
General
HTML Page New
File Ctrl+N
Web Form
⁄
Click File ➪ New ➪ Fileon the Web forms code page.
■
The New File window appears.
¤
Click the HTML Page icon.‹
Click Open to open the Web page design view.B
ecause Java is a progenitor of C# as well as aubiquitous Web programming language, Microsoft provides Java support for Visual Studio .NET and C#. This support lets you integrate existing Java programs with your C# program so both programs appear to work seamlessly — that is, as one program.
Microsoft implements this support not through Java itself, but through a derivative scripting language called JScript.
JScript is the Microsoft implementation of the JavaScript programming language, and it lets you link JavaScript in your Web page or XML document with your C# program and to other Java programs.
The only differences between JavaScript and JScript are minor, and there are no functionality differences with the JavaScript with which you may already be familiar. JScript .NET is not a full-fledged programming language. You can neither write standalone programs with it using ASP.NET nor view it with ASP-enabled Internet browsers.
Your C# program cannot automatically tell that your Web page has JScript or JavaScript code. Instead, you must create or edit a Web page from the MDE window and set the default client script for the HTML document. Then, you can enter JScript code into your HTML program and your C# program will be able to read the JScript-enabled HTML page.
SET JSCRIPT .NET AS THE DEFAULT
SCRIPT LANGUAGE
Internet Explorer 5.0
›
Click the HTML button at the bottom of the parent window.■
The HTML page appears in the parent window.ˇ
Press Shift+F4 to open the HTML property pages.■
The Document Property Pages window appears.
Á
Click to select a target schema from the drop-down list.■
The default scripting language becomes highlighted.‡
Click OK. You cannot take advantage of the MDE window’sediting tools when you edit an HTML or XML page. If you want a full-fledged script debugger, Microsoft offers the Microsoft Script Debugger, which is a dedicated debugger for JScript and VBScript scripts.
The Microsoft Script Debugger and its
companion Script Editor are separate programs that you can download from the Microsoft Developer Network Web site at http://msdn. microsoft.com/scripting.
If you are not certain about whether a program that you want to integrate into a C# program has JavaScript enabled, you can easily find out by opening your Web page in an HTML editor and checking for text that starts with
Form1.cs
Class View - Windo . . .
⁄
Open a new Windows application project.Note: See page 6 for information on starting a new C# project.
¤
Click the Class View tab.■
The Class View window appears with the project name in bold at the top of the window.‹
Click the plus sign beside the project name.■
The program name appears directly below the project name.›
Click the plus sign beside the program name.WindowsApplication3
W
hen you start a new C# project, C# creates default classes that define and categorize the elements in your new program. For example, if you start a new Windows application that has a form, C# creates default classes that define the form objects. The Class View window lets you view all your classes and their related components so you know exactly what is in your class code without having to search through the code.The Class View window gives you a convenient way to see with which class an object in your program is associated without having to close or minimize your program code or form. The Class View window appears in the same space in
the Microsoft Development Environment (MDE) window as the Solution Explorer window.
The class information appears in a tree format that you can expand to view all classes associated with a particular program component, such as a form. If you have more than one program in a project, the Class View window tree lets you access classes for all the programs in the project.
If you want to see classes that meet certain criteria, you can sort classes in the tree alphabetically, by type for viewing related classes in your program, or by access.
EXPLORE THE CLASS VIEW WINDOW
Form1.cs
■
The Windows form name appears below theprogram name.
ˇ
Click the plus sign beside the form name.■
The associated classes for the form appear below the form name.Á
Double-click a form class in the tree.■
The class location appears in the code displayed in the parent window.Class View - Windo . . .
When you click a class, the properties for that class appear in the Properties window; the Properties window appears below the Class View window.
If you do not have the Properties window open, you can right-click the class and then click Properties from the pop-up menu. See page 26 to learn more about the Properties window.
If the Class View window is not available as a tab at the bottom of the Solution Explorer window, you can access the Class View window from the menu bar.
Form1.cs
Visual Basic and Visual C#
⁄
Open a new Windows application project.Note: See page 6 for information on starting a new C# project.
¤
Click the Contents tab in the Solution Explorer window.■
The Contents window appears with the Visual Studio .NET and MSDN Library books.‹
Click the plus sign beside the Visual Studio .NET■
The major Visual Studio .NET topic books appear.›
Click the plus sign beside the Visual Basic and Visual C# book.T
he Microsoft Development Environment (MDE) window provides several different types of online Visual .NET documentation, including the Contents window. When you access the Contents window, the window appears in the same space as the Solution Explorer window. If you have used Windows online help before, then the Contents window will be very familiar to you. The MDE organizes Visual Studio .NET information into different subjects that display in the Contents window in a tree format.Microsoft has divided the Contents window into two main topic groups called books:Visual Studio .NET and MSDN Library. The online documentation displayed in each topic
contains subtopic groups. You can open each book in the tree that matches the subject you want more information about.
As you expand the tree, specific topics appear, enabling you to select your topic from this list. Many help pages also contain links to other help pages, in case you need related information.
The Filtered By drop-down list at the top of the Contents window lets you filter the type of information displayed in the tree. If you want to view only C# information, the Contents window tree will display those groups and topics that pertain only to C#.
VIEW THE CONTENTS WINDOW
Visual C# Language Visual C# Language
■
Topic books for Visual Basic and Visual C# appear.ˇ
Click the Visual C# Language book.■
The Visual C# Language help screen appears.Á
Click the C# Language Tour link on the page.■
The C# Language Tour help screen appears with links to other help pages. With some topics, the Contents window may notbe able to display the full names of the topics. The MDE window provides two ways to scroll through the entire topic name so you can determine if that is a topic you want more information about.
First, you can click the horizontal scrollbar at the bottom of the Contents window. This lets you view the entire window. Second, you can move the mouse pointer over the topic name and the full topic name will appear in a white box above the mouse pointer. The second option does not work if the name of the topic is too long.
Index. . . Ctrl+Alt+F2 Index
⁄
Open a new Windows application project.Note: See page 6 for information on starting a new C# project.
¤
Click Help.‹
Click Index.■
The Index window appears.›
Type C# in the Look for field.■
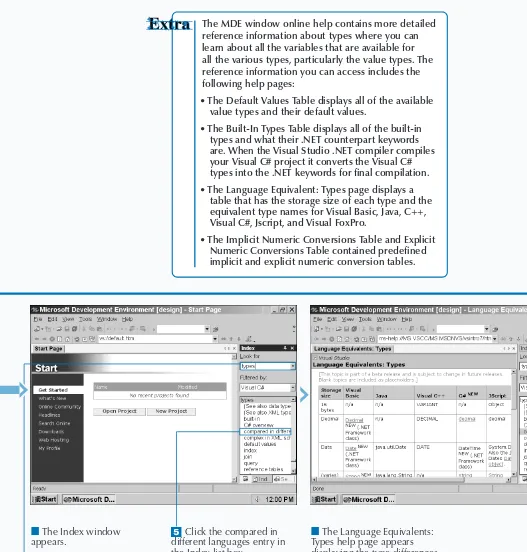
The C# topics andsubtopics appear in the Index topic field.
ˇ
Scroll down the topics list and click the compare C++ and C# topic in the topic list.compare C++ and C#
T
he Index window lets you search for specific topicinformation, instead of going through all the topics in the Contents window searching for what you need. The Index window lets you type in the topic that you are looking for and then finds the topic that best matches your description. Some topics contain subtopics that let you view different aspects of a topic. For example, if you want to learn more about properties, the Index window contains plenty of topics about how properties apply to different aspects of Visual Studio .NET, such as adding properties to forms.
As with the Contents window, you can filter the topics that appear in the Index window, according to different parts of Visual Studio .NET. If you want to view only C# information, you can set the filter so that the Index window presents only C# topics. You can also set the filter so the Index window presents topics about and related to C#.
You can view related information in any help topic page link and in the Index Results window directly below the help topic page. The filter that you set in the Index window does not affect these page and Index Results links.
GET HELP USING THE INDEX WINDOW
compare C++ and C# compare C++ and C#
■
The Comparison Between C++ and C# help page appears with links to related topics in the page.Á
Click the ItemManagement in Projects link in the help page.
■
The Item Management in Projects help page appears.Note: You can return to the Comparison Between C++ and C# help page by pressing Alt + the left arrow key.
You can view the last five searches that you made in the Index window by clicking the down arrow to the right of the Look For: field. When you click the down arrow, the last five search topics will appear with the latest search topic at the top of the list.
Moving back and forth between help topics is an effective way to search for help that you have already viewed. You can view help topics that you viewed previously in one of two ways.
First, you can move back and forth between help topics that you have already viewed by pressing the Alt key and the left or right arrow key on your keyboard. The left arrow displays one previously viewed help topic, and the right arrow displays the next help topic you can view. Second, you can click either the left or right arrow in the upper-right corner of the help topic.
Search. . . Ctrl+Alt+F3
Using SOAP Headers in ASP.NETWe. . . .NET Framework Developers Guide 1
⁄
Open a new Windows application project.Note: See page 6 for information on starting a new C# project.
¤
Click Help.‹
Click Search.■
The Search window appears.›
Type class.ˇ
Click the Search button.■
The Help Search in■
After a few moments, the Help Search in Progress window closes and the Search Results window appears. The default 500 topics that have the word inSearch Results for class - 500 topics found
T
he Search window lets you search by keyword in any help topic. If you need to find a particular word, such as classes, the Search window lets you narrow your search down to help pages that contain that word.After you search for a word, the Search Results window displays the topics that contain that word. You can narrow the search down even further by using one of the Search window’s nine filters and four search criteria check boxes.
The Search window has no preset filters when you search for a particular topic, which means that you automatically search through the entire Visual Studio .NET database. When you use filters, you search for words in help pages
that pertain to a specific topic. For example, you can look for the word classin all help pages that pertain to the C# topic.
You can limit the search even more by checking one of the four search criteria check boxes. These check boxes let you search words in specific locations, such as in a title, to speed your search.
Visual Studio .NET does not limit its search to its own database, but if you have an active Internet connection, Visual Studio .NET also accesses the Microsoft Developer Network (MSDN) Web site for information.
SEARCH FOR HELP
Visual C#
Title
Search Results for class - 500 topics found
Á
Click beside the Filtered by field.‡
Click to select Visual C# from the drop-down list.■
Your search appears in the Search Result window.
°
Click the Search button.■
A new set of topics about classes that pertain to C# appear in the Search Results window.·
Double-click the 10.1.2.1 Base classes (C#) topic at the top of the Search Results topic list.■
The 10.1.2.1 Base classes help page appears.Search
to your search. Going through 500 topics to find what you want is time consuming, so the Search window lets you limit your search even more (and save time) by checking one or more of its four search criteria check boxes.
When you click the Search in titles only check box, you can search for your keyword only in topic titles.
When you click the Match related words check box, you can display topic results with words and terms that are similar to the word that you are looking for. For example, if you search for topics with words related to C#, you will see topics that also relate to C++.
When you click the Search in previous results check box, you can search for the word in your previous search. For example, if you previously searched for the word class, and you want to search for the word C#in that previous search, you can do that.
Toolbox Ctrl+Alt+X
Form1.cs Form1.cs
Toolbox
Form1
Type Here
⁄
Open a new Windows application project.Note: See page 6 for information on starting a new C# project.
¤
Click View.‹
Click Toolbox.■
The Toolbox window appears displaying the Windows Forms component list.›
Click to select the MainMenu form component.ˇ
Move the cursor over the upper-left corner of the form and click.■
The MainMenucomponent appears at the top of the form.
A
fter you create a new Visual C# program in the MDE window, you can add functionality to the skeleton of your program in two ways: programmatically or by using the Toolbox. The Toolbox contains a variety of components so you can add them to your program and modify them.Toolbox components can include design-time controls, HTML code fragments, text files, and .NET components. The Toolbox places these components into different groups. For example, Web form components appear in the Web Forms group.
The type of C# program you create determines the components the Toolbox displays. For example, if you create a Windows application that has a form, then the
Toolbox will display the Windows Forms component group that contains all the form components, such as a check box and a button.
The Toolbox always contains two groups: General and Clipboard Ring. The General group contains components that apply to any object. You can cut or copy components to the Clipboard Ring and then paste those components from the Clipboard Ring to another object such as a button from one form to another.
You can open a new group in the Toolbox and copy objects from a program into that group or from another group. You can also add components from Visual Studio .NET or another location on your computer or network.
ADD COMPONENTS FROM THE TOOLBOX
Customize Toolbox. . .
Form1.cs
:-)VideoSoft FlexArray Control
Á
Right-click the Toolbox window.‡
Click to select Customize Toolbox from the pop-up menu that appears.■
The Customize Toolbox window appears.°
Add a COM component to the Windows Forms component list by clicking the check box beside VideoSoft FlexArray Control.·
Click OK.■
The vsFlexArrayCtrl COM control appears at the bottom of the Windows Forms list. ToolboxYou can delete any component from the Toolbox by right-clicking the component and then clicking Delete in the pop-up menu that appears. The only component you cannot delete is the Pointer component in the General group.
You can quickly cut, copy, and paste Toolbox objects by pressing the following keyboard combinations: Ctrl+X to cut, Ctrl+C to copy, and Ctrl+V to paste. When you access the Clipboard Ring, you can press Ctrl+Shift+V to move to the next item in the clipboard until you arrive at the object you want to cut, copy, or paste.
You can display all group tabs in the Toolbox window by right-clicking anywhere in the Toolbox window and selecting Show All Tabs from the pop-up menu that appears.
If you want to view only the object icons and not their descriptions, right-click anywhere in the Toolbox window and then select List View in the pop-up menu. Return to the list view by right-clicking in the Toolbox window and then selecting the List View option in the pop-up menu.
Show Tasks
All
Form1.cs Form1.cs
Task List
⁄
Open a new Windows application project.Note: See page 6 for information on starting a new C# project.
¤
Click View ➪ ShowTasks ➪ All.
■
The Task List window appears at the bottom of the parent window.
‹
Click the first line in the task list table.■
The first task highlights and the blinking cursor appears in›
Type the task description in the Description column field and then press Enter.ˇ
Set the priority for the task by clicking the exclamation box beside the new task entry.D
uring program construction, you probably write down errors and tasks on a piece of paper or on sticky notes. The Task List in the MDE eliminates the need for paper notes by letting you enter tasks that you need to complete within the MDE for easy reference.If Visual Studio .NET encounters an error in a program, it automatically adds the problem to the task list for your information. If you want to add any other tasks to your list, you can log the task by identifying the task to complete, what program the task applies to, and the line you must apply the task to, if any.
You can also identify which tasks have been completed or not, and what priority each task will take. The Task List window presents the tasks in table form for easy viewing. After you populate your task list, you can sort it by different criteria. For example, you can sort the list so the high-priority tasks appear at the top of the Task List window.
You can also view certain tasks that you may be
concentrating on. For example, if you have finished your program and you need only to add comments, you can have the Task View window display only the comment tasks.
ADD A TASK TO THE TASK LIST
Form1.cs
High
Form1.cs
Create form
Á
Click to select the task priority (low, normal, or high) from the drop-down menu.‡
To mark the task as completed, click the check box beside the task.■
A strikethrough line appears through the task description that denotes that the task has been completed.Task List - 1 task Task List - 1 task
When you have a large number of tasks, the Task List window lets you show tasks of a certain type so you can see only the tasks you want. You can show tasks by right-clicking a task and then clicking Show Tasks from the pop-up menu that appears. The default selection is All (that shows all tasks), but you can also view comment tasks, tasks that report build errors, user-inspired tasks, shortcut tasks, tasks in the current file, checked tasks (that is, completed), and unchecked tasks.
If you have used any word-processing program recently, you know about the benefit of having red squiggly underlines that appear under misspelled words so you can correct the misspellings quickly. Visual Studio .NET uses the same approach for code errors so you can fix those errors quickly; Microsoft calls this feature IntelliSense.
Form1.cs Form1.cs
Properties
Text
Properties
Text Form1
⁄
Open a new Windows application project.Note: See page 6 for information on starting a new C# project.
¤
Click the Properties window title bar.■
The Text field that contains the name for your form appears highlighted in the Properties window.■
If the Text field does not appear, scroll through the Properties window until you reach the Text attribute under the Attributes heading.‹
Double-click the Form1 name.T
he Properties window appears in the lower-right corner of the parent window. The Properties window contains the information that pertains to a specific object. For example, if you create a Windows application, the form appears in the parent window; a form lets a user input information so your C# program can manipulate it. The form properties, including the form name, appear in the Properties window. When you change the form name, that name will appear on the form when you run your program.The Properties window reflects information in the currently selected object. The Properties window contains a list of all objects in the program that you can alter in the properties window.
Many objects contain names or values that you can edit directly in the Properties window. Some object attributes have check boxes that you can click to enable or disable the object attribute. The Properties window also provides a description about a selected object attribute in case you are not familiar with what an attribute does.
Some object attributes in the Properties window contain more information than what the attribute value provides, such as font size, that you can edit in the Properties window. You can also sort the attributes in the Properties window if you want to see certain types of properties, such as events.
CHANGE FORM PROPERTIES
IN THE PROPERTIES WINDOW
Form1.cs
Text
Form1.cs
Text Properties Properties
›
Type in the new name for your form.ˇ
Press Enter.■
The name of the form changes in the Properties window and in the form title bar in the parent window. If you do not see the Properties window in theparent window, you can open it in one of three ways: you can click the folder in the Solution Explorer window, click View ➪ Properties, or press the F4 key.
The buttons in between the object name field and the properties table let you sort and view different properties. The two sort buttons at the left of the window let you sort properties alphabetically and by category. The Properties window automatically categorizes certain object attributes into their own groups. For example, a form has a Design category that includes such attributes as the form grid size.