Adding More Game Elements
In the previous chapter, we developed a framework for unit movement that combined pathfinding and steering. We used this framework to implement move and deploy orders for the vehicles. Finally, we made our unit movement look smoother by interpolating the movement steps during intermediate drawing cycles.
We now have a game where the player can select units and command them to move around the map.
In this chapter, we will build upon this code by adding some more game elements. We will start by implementing an economy where the player can earn money by harvesting and then spend the money on creating buildings and units.
We will then build a framework to create scripted events within a game level, which we can use to control the game story line. We will also add the ability to display messages and notifications to the user. We will then use these elements to handle the completion of a mission within a level.
Let’s get started. We will use the code from Chapter 7 as a starting point.
Implementing the Basic Economy
Our game will have a fairly simple economic system. Players will start each mission with an initial amount of money.
They can then earn more by deploying a harvester at an oil field. Player will be able to see their cash balance in the sidebar. Once players have sufficient money, they can use it to purchase buildings and units using the sidebar.
The first thing we will do is modify the game to provide money to the player when the level starts.
Setting the Starting Money
We will start by removing some of the extra items in the items array and specifying the starting cash for both players in the first map inside maps.js, as shown in Listing 8-1.
Listing 8-1. Setting the Starting Cash Amount for the Level (maps.js) /* Entities to be added */
"items":[
{"type":"buildings","name":"base","x":11,"y":14,"team":"blue"}, {"type":"buildings","name":"starport","x":18,"y":14,"team":"blue"},
{"type":"vehicles","name":"harvester","x":16,"y":12,"team":"blue","direction":3, "uid":-1}, {"type":"terrain","name":"oilfield","x":3,"y":5,"action":"hint"},
{"type":"terrain","name":"bigrocks","x":19,"y":6}, {"type":"terrain","name":"smallrocks","x":8,"y":3}
],
/* Economy Related*/
"cash":{
"blue":5000, "green":1000 },
We removed all the unnecessary items from the items list. We also added a cash object that sets the starting cash for the blue team to 5000 and for the green team to 1000.
You may have noticed that we have specified a UID for the harvester vehicle. We will use this later in the chapter when we handle triggers and scripted events.
Note
■ We use negative values when we specify Uids for an item so we can be sure that the Uid will never clash with autogenerated Uids, which are always positive.
Next, we will need to load these cash values inside the singleplayer object’s startCurrentLevel() method, as shown in Listing 8-2.
Listing 8-2. Loading Cash Amount When Starting Level (singleplayer.js) startCurrentLevel:function(){
// Load all the items for the level
var level = maps.singleplayer[singleplayer.currentLevel];
// Don't allow player to enter mission until all assets for the level are loaded $("#entermission").attr("disabled", true);
// Load all the assets for the level
game.currentMapImage = loader.loadImage(level.mapImage);
game.currentLevel = level;
game.offsetX = level.startX * game.gridSize;
game.offsetY = level.startY * game.gridSize;
// Load level Requirements game.resetArrays();
for (var type in level.requirements){
var requirementArray = level.requirements[type];
for (var i=0; i < requirementArray.length; i++) { var name = requirementArray[i];
if (window[type]){
window[type].load(name);
} else {
console.log('Could not load type :',type);
} };
};
for (var i = level.items.length - 1; i >= 0; i--){
var itemDetails = level.items[i];
game.add(itemDetails);
};
// Create a grid that stores all obstructed tiles as 1 and unobstructed as 0 game.currentMapTerrainGrid = [];
for (var y=0; y < level.mapGridHeight; y++) { game.currentMapTerrainGrid[y] = [];
for (var x=0; x< level.mapGridWidth; x++) { game.currentMapTerrainGrid[y][x] = 0;
} };
for (var i = level.mapObstructedTerrain.length - 1; i >= 0; i--){
var obstruction = level.mapObstructedTerrain[i];
game.currentMapTerrainGrid[obstruction[1]][obstruction[0]] = 1;
};
game.currentMapPassableGrid = undefined;
// Load Starting Cash For Game game.cash = $.extend([],level.cash);
// Enable the enter mission button once all assets are loaded if (loader.loaded){
$("#entermission").removeAttr("disabled");
} else {
loader.onload = function(){
$("#entermission").removeAttr("disabled");
} }
// Load the mission screen with the current briefing
$('#missonbriefing').html(level.briefing.replace(/\n/g,'<br><br>'));
$("#missionscreen").show();
},
At this point, the game should load the starting cash amount for both players when the level is loaded. However, before we can see the cash value, we need to implement the sidebar.
Implementing the Sidebar
We will implement the sidebar functionality within a sidebar object inside sidebar.js, as shown in Listing 8-3.
Listing 8-3. Creating the sidebar Object (sidebar.js) var sidebar = {
animate:function(){
// Display the current cash balance value $('#cash').html(game.cash[game.team]);
}, }
For now, the object has only the animate() method, which updates the sidebar cash value. We will call this method from within the game object’s animationLoop() method, as shown in Listing 8-4.
Listing 8-4. Calling sidebar.animate() from game.animationLoop() (game.js) animationLoop:function(){
// Animate the Sidebar sidebar.animate();
// Process orders for any item that handles it for (var i = game.items.length - 1; i >= 0; i--){
if(game.items[i].processOrders){
game.items[i].processOrders();
} };
// Animate each of the elements within the game for (var i = game.items.length - 1; i >= 0; i--){
game.items[i].animate();
};
// Sort game items into a sortedItems array based on their x,y coordinates game.sortedItems = $.extend([],game.items);
game.sortedItems.sort(function(a,b){
return b.y-a.y + ((b.y==a.y)?(a.x-b.x):0);
});
game.lastAnimationTime = (new Date()).getTime();
},
Next, we will add a reference to sidebar.js inside the <head> section of index.html, as shown in Listing 8-5.
Listing 8-5. Adding a Reference to sidebar.js (index.html)
<script src="js/sidebar.js" type="text/javascript" charset="utf-8"></script>
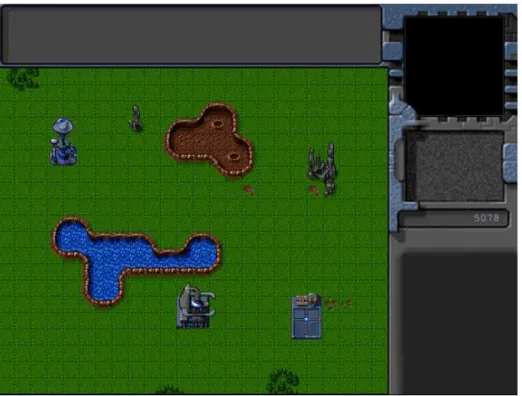
If we run the code so far, we should see the player’s cash balance in the sidebar area, as shown in Figure 8-1.
Now that we have a basic sidebar with a cash balance, we will implement a way for the player to generate more money by harvesting.
Generating Money
We already implemented the ability to deploy a harvester in the previous chapter. To start earning money when harvesting, we will modify the deploy animation state and implement a new harvest animation state in the default animate() method inside buildings.js, as shown in Listing 8-6.
Listing 8-6. Implementing a New Harvest Animation State Inside animate() (buildings.js) case "deploy":
this.imageList = this.spriteArray["deploy"];
this.imageOffset = this.imageList.offset + this.animationIndex;
this.animationIndex++;
// Once deploying is complete, go to harvest now if (this.animationIndex>=this.imageList.count){
this.animationIndex = 0;
this.action = "harvest";
} break;
case "harvest":
this.imageList = this.spriteArray[this.lifeCode];
this.imageOffset = this.imageList.offset + this.animationIndex;
this.animationIndex++;
Figure 8-1. Cash balance shown on sidebar
if (this.animationIndex>=this.imageList.count){
this.animationIndex = 0;
if (this.lifeCode == "healthy"){
// Harvesters mine 2 credits of cash per animation cycle game.cash[this.team] += 2;
} } break;
The harvest case is similar to the stand case. However, every time the animation runs through one complete cycle, we add two credits to the player’s cash balance. We do this only if the harvester building is not damaged.
We also modify the deploy state to roll over into the harvest state instead of the stand state. This way, once the harvester is deployed, it will automatically start earning money.
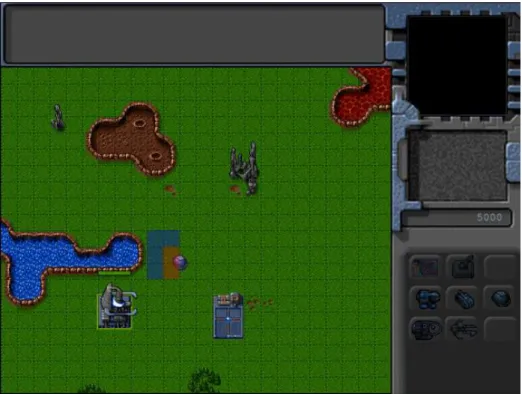
If we start the game and deploy the harvester into the oil field, we should see the cash balance slowly increasing, as shown in Figure 8-2.
We now have a basic game economy set up. We are ready to implement the purchase of buildings and units.
Purchasing Buildings and Units
In our game, the base building is used to construct buildings, and the starport is used to construct vehicles and aircraft. Players will purchase items by selecting the building they want to construct from and then clicking the appropriate purchase button on the sidebar.
Figure 8-2. Deployed harvester slowly earning money
Adding Sidebar Buttons
We will first add the HTML markup for the buttons to the gameinterfacescreen div inside index.html, as shown in Listing 8-7.
Listing 8-7. Adding the Sidebar Purchase Buttons to gameinterfacescreen (index.html)
<div id="gameinterfacescreen" class="gamelayer">
<div id="gamemessages"></div>
<div id="callerpicture"></div>
<div id="cash"></div>
<div id="sidebarbuttons">
<input type="button" id="starportbutton" title = "Starport">
<input type="button" id="turretbutton" title = "Turret">
<input type="button" id="placeholder1" disabled>
<input type="button" id="scouttankbutton" title = "Scout Tank">
<input type="button" id="heavytankbutton" title = "Heavy Tank">
<input type="button" id="harvesterbutton" title = "Harvester">
<input type="button" id="chopperbutton" title = "Copter">
<input type="button" id="wraithbutton" title = "Wraith">
<input type="button" id="placeholder2" disabled>
</div>
<canvas id="gamebackgroundcanvas" height="400" width="480"></canvas>
<canvas id="gameforegroundcanvas" height="400" width="480"></canvas>
</div>
Next we will add the appropriate CSS styles for these buttons to styles.css, as shown in Listing 8-8.
Listing 8-8. CSS Syles for Sidebar Buttons (styles.css) /* Sidebar Buttons */
#gameinterfacescreen #sidebarbuttons { position:absolute;
left:500px;
top:305px;
width:152px;
height:148px;
overflow:none;
}
#gameinterfacescreen #sidebarbuttons input[type="button"] { width:43px;
height:35px;
border-width:0px;
padding:0px;
background-image: url(images/buttons.png);
}
/* Grayed out state for buttons*/
#starportbutton:active, #starportbutton:disabled { background-position: -2px -305px;
}
#placeholder1:active, #placeholder1:disabled { background-position: -52px -305px;
}
#turretbutton:active, #turretbutton:disabled { background-position: -100px -305px;
}
#scouttankbutton:active, #scouttankbutton:disabled { background-position: -2px -346px;
}
#heavytankbutton:active, #heavytankbutton:disabled { background-position: -52px -346px;
}
#harvesterbutton:active, #harvesterbutton:disabled { background-position: -102px -346px;
}
#chopperbutton:active, #chopperbutton:disabled { background-position: -2px -387px;
}
#placeholder2:active, #placeholder2:disabled { background-position: -52px -387px;
}
#wraithbutton:active, #wraithbutton:disabled { background-position: -102px -387px;
}
/* Regular state for buttons*/
#starportbutton {
background-position: -167px -305px;
}
#placeholder1 {
background-position: -216px -305px;
}
#turretbutton {
background-position: -264px -305px;
}
#scouttankbutton {
background-position: -167px -346px;
}
#heavytankbutton {
background-position: -216px -346px;
}
#harvesterbutton {
background-position: -264px -346px;
}
#chopperbutton {
background-position: -167px -387px;
}
#placeholder2 {
background-position: -216px -387px;
}
#wraithbutton {
background-position: -264px -387px;
The HTML markup adds the buttons to the sidebar, while the CSS styles define images for these buttons using the buttons.png file.
If we run the game in the browser, we should see the purchase buttons in the sidebar, as shown in Figure 8-3.
At this point, all of the buttons look enabled and active; however, clicking the buttons does not do anything. The buttons need to be enabled or disabled depending on whether the player is allowed to construct the items.
Enabling and Disabling Sidebar Buttons
The next thing we will do is to ensure that sidebar buttons are enabled only if the appropriate building is selected and the player has enough money to construct the item. We will do this by adding an enableSidebarButtons() method to sidebar.js and calling it from inside the animate() method, as shown in Listing 8-9.
Listing 8-9. Enabling and Disabling Sidebar Buttons (sidebar.js) var sidebar = {
enableSidebarButtons:function(){
// Buttons only enabled when appropriate building is selected
$("#gameinterfacescreen #sidebarbuttons input[type='button'] ").attr("disabled", true);
// If no building selected, then no point checking below if (game.selectedItems.length==0){
return;
}
Figure 8-3. Purchase buttons in the sidebar
var baseSelected = false;
var starportSelected = false;
// Check if base or starport is selected
for (var i = game.selectedItems.length - 1; i >= 0; i--){
var item = game.selectedItems[i];
// Check If player selected a healthy,inactive building (damaged buildings can't produce) if (item.type == "buildings" && item.team == game.team && item.lifeCode == "healthy" && item.
action=="stand"){
if(item.name == "base"){
baseSelected = true;
} else if (item.name == "starport"){
starportSelected = true;
} } };
var cashBalance = game.cash[game.team];
/* Enable building buttons if base is selected,building has been loaded in requirements, not in deploy building mode and player has enough money*/
if (baseSelected && !game.deployBuilding){
if(game.currentLevel.requirements.buildings.indexOf('starport')>-1 &&
cashBalance>=buildings.list["starport"].cost){
$("#starportbutton").removeAttr("disabled");
}
if(game.currentLevel.requirements.buildings.indexOf('ground-turret')>-1 &&
cashBalance>=buildings.list["ground-turret"].cost){
$("#turretbutton").removeAttr("disabled");
} }
/* Enable unit buttons if starport is selected, unit has been loaded in requirements, and player has enough money*/
if (starportSelected){
if(game.currentLevel.requirements.vehicles.indexOf('scout-tank')>-1 &&
cashBalance>=vehicles.list["scout-tank"].cost){
$("#scouttankbutton").removeAttr("disabled");
}
if(game.currentLevel.requirements.vehicles.indexOf('heavy-tank')>-1 &&
cashBalance>=vehicles.list["heavy-tank"].cost){
$("#heavytankbutton").removeAttr("disabled");
}
if(game.currentLevel.requirements.vehicles.indexOf('harvester')>-1 &&
cashBalance>=vehicles.list["harvester"].cost){
$("#harvesterbutton").removeAttr("disabled");
}
if(game.currentLevel.requirements.aircraft.indexOf('chopper')>-1 &&
cashBalance>=aircraft.list["chopper"].cost){
$("#chopperbutton").removeAttr("disabled");
}
if(game.currentLevel.requirements.aircraft.indexOf('wraith')>-1 &&
cashBalance>=aircraft.list["wraith"].cost){
$("#wraithbutton").removeAttr("disabled");
} } },
animate:function(){
// Display the current cash balance value $('#cash').html(game.cash[game.team]);
// Enable or disable buttons as appropriate this.enableSidebarButtons();
}, }
Within the enableSidebarButton() method, we first disable all the buttons by default. We then check whether a valid base or starport has been selected. A valid base or starport belongs to the player, is healthy, and is currently in stand mode, which means it is not currently constructing anything else.
We enable the button for a building if the base has been selected, the building type has been loaded in the level requirements, and the player has enough cash to buy the building. We do the same thing for vehicles and aircraft if a valid starport has been selected.
If we run the game now, the sidebar buttons will get enabled once we select a base or starport, as shown in Figure 8-4.
Figure 8-4. Sidebar building construction buttons enabled by selecting base
As you can see in the figure, the building buttons have been enabled while the vehicle and aircraft buttons are disabled because the base has been selected. We can similarly activate the vehicle and aircraft construction buttons by selecting the starport.
Now it’s time to implement constructing vehicles and aircraft at the starport.
Constructing Vehicles and Aircraft at the Starport
The first thing we will do is modify the sidebar object to handle the click event for the buttons by adding the code in Listing 8-10.
Listing 8-10. Setting click Event for Sidebar Buttons (sidebar.js) init:function(){
$("#scouttankbutton").click(function(){
sidebar.constructAtStarport({type:"vehicles","name":"scout-tank"});
});
$("#heavytankbutton").click(function(){
sidebar.constructAtStarport({type:"vehicles","name":"heavy-tank"});
});
$("#harvesterbutton").click(function(){
sidebar.constructAtStarport({type:"vehicles","name":"harvester"});
});
$("#chopperbutton").click(function(){
sidebar.constructAtStarport({type:"aircraft","name":"chopper"});
});
$("#wraithbutton").click(function(){
sidebar.constructAtStarport({type:"aircraft","name":"wraith"});
});
},
constructAtStarport:function(unitDetails){
var starport;
// Find the first eligible starport among selected items for (var i = game.selectedItems.length - 1; i >= 0; i--){
var item = game.selectedItems[i];
if (item.type == "buildings" && item.name == "starport"
&& item.team == game.team && item.lifeCode == "healthy" && item.action=="stand"){
starport = item;
break;
} };
if (starport){
game.sendCommand([starport.uid],{type:"construct-unit",details:unitDetails});
} },
We first declare an init() method that sets the click event for each of the vehicle and aircraft buttons to call the constructAtStarport() method with the appropriate unit details.
Within the constructAtStarport() method, we get the first eligible starport among the selected items. We then use the game.sendCommand() method to send the starport a construct-unit command with details of the unit to construct.
Next, we will call the sidebar.init() method from inside the game.init() method when the game is initialized, as shown in Listing 8-11.
Listing 8-11. Initializing the Sidebar from Inside game.init() (game.js) // Start preloading assets
init: function(){
loader.init();
mouse.init();
sidebar.init();
$('.gamelayer').hide();
$('#gamestartscreen').show();
game.backgroundCanvas = document.getElementById('gamebackgroundcanvas');
game.backgroundContext = game.backgroundCanvas.getContext('2d');
game.foregroundCanvas = document.getElementById('gameforegroundcanvas');
game.foregroundContext = game.foregroundCanvas.getContext('2d');
game.canvasWidth = game.backgroundCanvas.width;
game.canvasHeight = game.backgroundCanvas.height;
},
Next, we will create a processOrder() method for the starport building that implements the construct-unit order. We will add this method inside the starport definition, as shown in Listing 8-12.
Listing 8-12. Implementing processOrder() Inside the Starport Definition (buildings.js)
"starport":{
name:"starport", pixelWidth:40, pixelHeight:60, baseWidth:40, baseHeight:55, pixelOffsetX:1, pixelOffsetY:5, buildableGrid:[
[1,1], [1,1], [1,1]
],
passableGrid:[
[1,1], [0,0], [0,0]
], sight:3, cost:2000, hitPoints:300, spriteImages:[
{name:"teleport",count:9},
{name:"closing",count:18}, {name:"healthy",count:4}, {name:"damaged",count:1}, ],
processOrders:function(){
switch (this.orders.type){
case "construct-unit":
if(this.lifeCode != "healthy"){
return;
}
// First make sure there is no unit standing on top of the building var unitOnTop = false;
for (var i = game.items.length - 1; i >= 0; i--){
var item = game.items[i];
if (item.type == "vehicles" || item.type == "aircraft"){
if (item.x > this.x && item.x < this.x+2 && item.y> this.y &&
item.y<this.y+3){
unitOnTop = true;
break;
} } };
var cost = window[this.orders.details.type].list[this.orders.details.name].cost;
if (unitOnTop){
if (this.team == game.team){
game.showMessage("system","Warning! Cannot teleport unit while landing bay is occupied.");
}
} else if(game.cash[this.team]<cost){
if (this.team == game.team){
game.showMessage("system","Warning! Insufficient Funds. Need "+cost+ "
credits.");
} } else {
this.action="open";
this.animationIndex = 0;
// Position new unit above center of starport var itemDetails = this.orders.details;
itemDetails.x = this.x+0.5*this.pixelWidth/game.gridSize;
itemDetails.y = this.y+0.5*this.pixelHeight/game.gridSize;
// Teleport in unit and subtract the cost from player cash itemDetails.action="teleport";
itemDetails.team = this.team;
game.cash[this.team] -= cost;
this.constructUnit = $.extend(true,[],itemDetails);
}
this.orders = {type:"stand"};
break;
} } },
We start by checking whether any unit is already positioned above the starport, and if so, we use the
game.showMessage() method to notify the player that a unit cannot be teleported while the landing bay is occupied.
Next we check whether we have sufficient funds and, if not, notify the user.
Finally, we implement the actual purchase of the unit. We first set the animation action of the building to open. We then set the position, action, and team properties for the item. We save the details of the new unit in the constructUnit variable and finally subtract the cost of the item from the player’s cash balance.
You may have noticed that we set a teleport action for the newly constructed unit. We will need to implement this for both vehicles and aircraft.
Next we will modify the open animation state inside the buildings object’s animate() method to add the unit to the game, as shown in Listing 8-13.
Listing 8-13. Adding the Unit Once the Starport Opens (buildings.js) case "open":
this.imageList = this.spriteArray["closing"];
// Opening is just the closing sprites running backwards
this.imageOffset = this.imageList.offset + this.imageList.count - this.animationIndex;
this.animationIndex++;
// Once opening is complete, go back to close if (this.animationIndex>=this.imageList.count){
this.animationIndex = 0;
this.action = "close";
// If constructUnit has been set, add the new unit to the game if(this.constructUnit){
game.add(this.constructUnit);
this.constructUnit = undefined;
} } break;
Once the open animation is complete, we check whether the constructUnit property has been set, and if it has, we add the unit to the game before unsetting the variable.
Next we will implement a showMessage() method inside the game object, as shown in Listing 8-14.
Listing 8-14. The game Object’s showMessage() Method // Functions for communicating with player characters: {
"system":{
"name":"System",
"image":"images/characters/system.png"
} },
showMessage:function(from,message){
var character = game.characters[from];
if (character){
from = character.name;
if (character.image){
$('#callerpicture').html('<img src="'+character.image+'"/>');
// hide the profile picture after six seconds setTimeout(function(){
$('#callerpicture').html("");
},6000) }
}
// Append message to messages pane and scroll to the bottom var existingMessage = $('#gamemessages').html();
var newMessage = existingMessage+'<span>'+from+': </span>'+message+'<br>';
$('#gamemessages').html(newMessage);
$('#gamemessages').animate({scrollTop:$('#gamemessages').prop('scrollHeight')});
}
We first define a characters object that contains the name and the image for the system character. Within the showMessage() method, we check whether we have a character image for the from parameter and, if so, display the image for four seconds. Next, we append the message to the gamemessages div and scroll to the bottom of the div.
Whenever the showMessage() method is called, it will display the message in the messages window and the picture in the sidebar, as shown in Figure 8-5.
We can use this mechanism to show the player dialogue from various game characters as we move the game story line forward. This will allow the single-player campaign to be more plot driven and make the game much more Figure 8-5. Displaying a system warning using showMessage()
Finally, we will modify the vehicles and aircraft objects to implement the new teleport action.
We will start by adding a case for the teleport action right below the stand action inside the vehicles object’s animate() method, as shown in Listing 8-15.
Listing 8-15. Adding a Case for the Teleport Action inside animate() (vehicles.js) case "teleport":
var direction = wrapDirection(Math.round(this.direction),this.directions);
this.imageList = this.spriteArray["stand-"+direction];
this.imageOffset = this.imageList.offset + this.animationIndex;
this.animationIndex++;
if (this.animationIndex>=this.imageList.count){
this.animationIndex = 0;
}
if (!this.brightness){
this.brightness = 1;
}
this.brightness -= 0.05;
if(this.brightness <= 0){
this.brightness = undefined;
this.action = "stand";
} break;
We first set the imageOffset and the animationIndex just like we did for the default stand action. We then set a brightness variable to 1 and gradually reduce it to 0, at which point we switch the action state back to stand.
Next, we will modify the vehicles object’s default draw() method to use the brightness property, as shown in Listing 8-16.
Listing 8-16. Modifying the draw() Method to Handle Teleport Brightness (vehicles.js) draw:function(){
var x = (this.x*game.gridSize)-game.offsetX-this.pixelOffsetX + this.lastMovementX*game.drawingInterpolationFactor*game.gridSize;
var y = (this.y*game.gridSize)-game.offsetY-this.pixelOffsetY + this.lastMovementY*game.drawingInterpolationFactor*game.gridSize;
this.drawingX = x;
this.drawingY = y;
if (this.selected){
this.drawSelection();
this.drawLifeBar();
}
var colorIndex = (this.team == "blue")?0:1;
var colorOffset = colorIndex*this.pixelHeight;
game.foregroundContext.drawImage(this.spriteSheet, this.imageOffset*this.pixelWidth,colorOffset, this.pixelWidth,this.pixelHeight,x,y,this.pixelWidth,this.pixelHeight);
// Draw glow while teleporting in if(this.brightness){
game.foregroundContext.beginPath();
game.foregroundContext.arc(x+ this.pixelOffsetX, y+this.pixelOffsetY, this.radius, 0 , Math.PI*2,false);
game.foregroundContext.fillStyle = 'rgba(255,255,255,'+this.brightness+')';
game.foregroundContext.fill();
} }
Within the newly added code, we check whether the vehicle has a brightness property set, and if so, we draw a filled white circle on top of the vehicle with a fill alpha value based on the brightness. Since the brightness property’s value drops from 1 to 0, the circle will gradually shift from being bright white to completely transparent.
Next we will add a case for the teleport action right below the fly action inside the aircraft object’s animate() method, as shown in Listing 8-17.
Listing 8-17. Adding a Case for the Teleport Action Inside animate() (aircraft.js) case "teleport":
var direction = wrapDirection(Math.round(this.direction),this.directions);
this.imageList = this.spriteArray["fly-"+direction];
this.imageOffset = this.imageList.offset + this.animationIndex;
this.animationIndex++;
if (this.animationIndex>=this.imageList.count){
this.animationIndex = 0;
}
if (!this.brightness){
this.brightness = 1;
}
this.brightness -= 0.05;
if(this.brightness <= 0){
this.brightness = undefined;
this.action = "fly";
} break;
Similar to what we did for vehicles, we set a brightness property, gradually drop it down to 0, and then set the action state to fly.
Finally, we will modify the aircraft object’s default draw() method to use the brightness property just like we did for vehicles, as shown in Listing 8-18.
Listing 8-18. Modifying the draw() Method to Handle Teleport Brightness (aircraft.js) draw:function(){
var x = (this.x*game.gridSize)-game.offsetX-this.pixelOffsetX + this.lastMovementX*game.drawingInterpolationFactor*game.gridSize;
var y = (this.y*game.gridSize)-game.offsetY-this.pixelOffsetY-this.pixelShadowHeight + this.lastMovementY*game.drawingInterpolationFactor*game.gridSize;
this.drawingX = x;
this.drawingY = y;
if (this.selected){
this.drawSelection();
this.drawLifeBar();
var colorIndex = (this.team == "blue")?0:1;
var colorOffset = colorIndex*this.pixelHeight;
var shadowOffset = this.pixelHeight*2; // The aircraft shadow is on the second row of the sprite sheet
game.foregroundContext.drawImage(this.spriteSheet, this.imageOffset*this.pixelWidth,colorOffset, this.pixelWidth, this.pixelHeight, x,y,this.pixelWidth,this.pixelHeight);
game.foregroundContext.drawImage(this.spriteSheet, this.imageOffset*this.pixelWidth,
shadowOffset,this.pixelWidth, this.pixelHeight, x, y+this.pixelShadowHeight, this.pixelWidth,this.
pixelHeight);
// Draw glow while teleporting in if(this.brightness){
game.foregroundContext.beginPath();
game.foregroundContext.arc(x+ this.pixelOffsetX,y+this.pixelOffsetY,this.radius,0, Math.PI*2,false);
game.foregroundContext.fillStyle = 'rgba(255,255,255,'+this.brightness+')';
game.foregroundContext.fill();
} }
If you run the game in the browser, you should now be able to select the starport and construct a vehicle or aircraft, as shown in Figure 8-6.
Figure 8-6. Aircraft teleporting in at the starport
The aircraft teleports right above the starport, inside a white glowing circle. You will notice that the sidebar buttons get disabled while the aircraft is being teleported in. Also, the cash balance decreases by the cost of the aircraft. When the player can no longer afford a unit, its button will automatically get disabled. Trying to construct a unit while the starport has another unit hovering over it will result in the system warning shown in Figure 8-5.
Now that we have implemented constructing vehicles and aircraft, it’s time to implement constructing buildings at the base.
Constructing Buildings at the Base
We will start by setting the click event for the two building construction buttons in the sidebar object’s init() method, as shown in Listing 8-19.
Listing 8-19. Setting click Event for the Building Buttons (sidebar.js) init:function(){
// Initialize unit construction buttons $("#scouttankbutton").click(function(){
sidebar.constructAtStarport({type:"vehicles","name":"scout-tank"});
});
$("#heavytankbutton").click(function(){
sidebar.constructAtStarport({type:"vehicles","name":"heavy-tank"});
});
$("#harvesterbutton").click(function(){
sidebar.constructAtStarport({type:"vehicles","name":"harvester"});
});
$("#chopperbutton").click(function(){
sidebar.constructAtStarport({type:"aircraft","name":"chopper"});
});
$("#wraithbutton").click(function(){
sidebar.constructAtStarport({type:"aircraft","name":"wraith"});
});
//Initialize building construction buttons $("#starportbutton").click(function(){
game.deployBuilding = "starport";
});
$("#turretbutton").click(function(){
game.deployBuilding = "ground-turret";
});
},
When either of the two building-construction buttons is clicked, we set the sidebar.deployBuilding property to the name of the building to be constructed.
Next, we will modify the sidebar animate() method to handle deploying a building, as shown in Listing 8-20.
Listing 8-20. Modifying the animate() Method to Handle Building Deployment (sidebar.js) animate:function(){
// Display the current cash balance value $('#cash').html(game.cash[game.team]);
// Enable or disable buttons as appropriate this.enableSidebarButtons();
if (game.deployBuilding){
// Create the buildable grid to see where building can be placed game.rebuildBuildableGrid();
// Compare with buildable grid to see where we need to place the building var placementGrid = buildings.list[game.deployBuilding].buildableGrid;
game.placementGrid = $.extend(true,[],placementGrid);
game.canDeployBuilding = true;
for (var i = game.placementGrid.length - 1; i >= 0; i--){
for (var j = game.placementGrid[i].length - 1; j >= 0; j--){
if(game.placementGrid[i][j] &&
(mouse.gridY+i>= game.currentLevel.mapGridHeight ||
mouse.gridX+j>=game.currentLevel.mapGridWidth ||
game.currentMapBuildableGrid[mouse.gridY+i][mouse.gridX+j]==1)){
game.canDeployBuilding = false;
game.placementGrid[i][j] = 0;
} };
};
} },
If the game.deployBuilding variable has been set, we call the game.rebuildBuildableGrid() method to create the game.currentMapBuildableGrid array and then set the game.placementGrid variable using the buildableGrid property of the building being deployed.
We then iterate through the placement grid to check whether it is possible to deploy the building at the current mouse location. If any of the squares on which the building will be placed are outside the map bounds or marked as unbuildable in the currentMapBuildableGrid array, we mark the corresponding square on the placementGrid array as unbuildable and set the canDeployBuilding flag to false.
Next we will implement the rebuildBuildableGrid() method inside the game object, as shown in Listing 8-21.
Listing 8-21. Creating the buildableGrid in the rebuildBuildableGrid() Method (game.js) rebuildBuildableGrid:function(){
game.currentMapBuildableGrid = $.extend(true,[],game.currentMapTerrainGrid);
for (var i = game.items.length - 1; i >= 0; i--){
var item = game.items[i];
if(item.type == "buildings" || item.type == "terrain"){
for (var y = item.buildableGrid.length - 1; y >= 0; y--){
for (var x = item.buildableGrid[y].length - 1; x >= 0; x--){
if(item.buildableGrid[y][x]){
game.currentMapBuildableGrid[item.y+y][item.x+x] = 1;
} };
};
} else if (item.type == "vehicles"){
// Mark all squares under or near the vehicle as unbuildable var radius = item.radius/game.gridSize;
var x1 = Math.max(Math.floor(item.x - radius),0);
var x2 = Math.min(Math.floor(item.x + radius),game.currentLevel.mapGridWidth-1);
var y1 = Math.max(Math.floor(item.y - radius),0);
var y2 = Math.min(Math.floor(item.y + radius),game.currentLevel.mapGridHeight-1);
for (var x=x1; x <= x2; x++) { for (var y=y1; y <= y2; y++) {
game.currentMapBuildableGrid[y][x] = 1;
};
};
} };
},
We start by initializing the currentMapBuildableGrid to the currentMapTerrainGrid. We then mark out all squares under a building or terrain entity as unbuildable, just as we did when creating the passable array. Finally, we mark all grid squares next to a vehicle as unbuildable.
Next we will modify the draw() method of the mouse object to mark the grid location where the building will be deployed, as shown in Listing 8-22.
Listing 8-22. Drawing the Building Deploy Grid under the Mouse Cursor (mouse.js) draw:function(){
if(this.dragSelect){
var x = Math.min(this.gameX,this.dragX);
var y = Math.min(this.gameY,this.dragY);
var width = Math.abs(this.gameX-this.dragX) var height = Math.abs(this.gameY-this.dragY) game.foregroundContext.strokeStyle = 'white';
game.foregroundContext.strokeRect(x-game.offsetX,y- game.offsetY, width, height);
}
if (game.deployBuilding && game.placementGrid){
var buildingType = buildings.list[game.deployBuilding];
var x = (this.gridX*game.gridSize)-game.offsetX;
var y = (this.gridY*game.gridSize)-game.offsetY;
for (var i = game.placementGrid.length - 1; i >= 0; i--){
for (var j = game.placementGrid[i].length - 1; j >= 0; j--){
if(game.placementGrid[i][j]){
game.foregroundContext.fillStyle = "rgba(0,0,255,0.3)";
} else {
game.foregroundContext.fillStyle = "rgba(255,0,0,0.3)";
}
game.foregroundContext.fillRect(x+j*game.gridSize, y+i*game.gridSize, game.gridSize, game.gridSize);
};
};
} },
We first check whether the deployBuilding and placementGrid variables have been set, and if so, we draw either blue or red squares depending on whether we can place the building at that grid location.
If you run the game now, select the main base, and try to create a building, you should see the building deploy grid at the mouse location, as shown in Figure 8-7.
Now that we can initiate building deploy mode, we will implement placing the building by left-clicking the mouse or canceling the mode by right-clicking the mouse. We will start by modifying the click() method of the mouse object, as shown in Listing 8-23.
Listing 8-23. Modifying mouse.click() to Complete or Cancel deploy Mode (mouse.js) click:function(ev,rightClick){
// Player clicked inside the canvas var clickedItem = this.itemUnderMouse();
var shiftPressed = ev.shiftKey;
if (!rightClick){ // Player left clicked
// If the game is in deployBuilding mode, left clicking will deploy the building if (game.deployBuilding){
if(game.canDeployBuilding){
sidebar.finishDeployingBuilding();
} else {
game.showMessage("system","Warning! Cannot deploy building here.");
} return;
}
Figure 8-7. Building deploy grid with red marking unbuildable squares
if (clickedItem){
// Pressing shift adds to existing selection. If shift is not pressed, clear existing selection
if(!shiftPressed){
game.clearSelection();
}
game.selectItem(clickedItem,shiftPressed);
}
} else { // Player right clicked
// If the game is in deployBuilding mode, right clicking will cancel deployBuilding mode if (game.deployBuilding){
sidebar.cancelDeployingBuilding();
return;
}
// Handle actions like attacking and movement of selected units var uids = [];
if (clickedItem){ // Player right clicked on something... Specific action if (clickedItem.type != "terrain"){
if (clickedItem.team != game.team){ // Player right clicked on an enemy item for (var i = game.selectedItems.length - 1; i >= 0; i--){
var item = game.selectedItems[i];
// if selected item is from players team and can attack if(item.team == game.team && item.canAttack){
uids.push(item.uid);
} };
if (uids.length>0){
game.sendCommand(uids,{type:"attack",toUid:clickedItem.uid});
}
} else { // Player right clicked on a friendly item
for (var i = game.selectedItems.length - 1; i >= 0; i--){
var item = game.selectedItems[i];
if(item.team == game.team && (item.type == "vehicles" ||
item.type == "aircraft")){
uids.push(item.uid);
} };
if (uids.length>0){
game.sendCommand(uids,{type:"guard",toUid:clickedItem.uid});
} }
} else if (clickedItem.name == "oilfield"){
// Oilfield means harvesters go and deploy there
for (var i = game.selectedItems.length - 1; i >= 0; i--){
var item = game.selectedItems[i];
// pick the first selected harvester since only one can deploy at a time if(item.team == game.team && (item.type == "vehicles" && item.name ==
"harvester")){
uids.push(item.uid);
break;
}
if (uids.length>0){
game.sendCommand(uids,{type:"deploy",toUid:clickedItem.uid});
} }
} else { // Just try to move there
// Get all UIDs that can be commanded to move
for (var i = game.selectedItems.length - 1; i >= 0; i--){
var item = game.selectedItems[i];
if(item.team == game.team && (item.type == "vehicles" || item.type == "aircraft")){
uids.push(item.uid);
} };
if (uids.length>0){
game.sendCommand(uids,{type:"move", to:{x:mouse.gameX/game.gridSize, y:mouse.gameY/game.gridSize}});
} } } },
If the player left-clicks when in deploy mode, we check the canDeployBuilding variable and call sidebar.finishDeployingBuilding() if we can deploy the building, and we show a warning message using game.showMessage() if we cannot.
If the player right-clicks when in deploy mode, we call the sidebar.cancelDeployingBuilding() method.
Next we will implement these two new methods, finishDeployBuilding() and cancelDeployBuilding(), inside the sidebar object, as shown in Listing 8-24.
Listing 8-24. finishDeployingBuilding() and cancelDeployingBuilding() (sidebar.js) cancelDeployingBuilding:function(){
game.deployBuilding = undefined;
},
finishDeployingBuilding:function(){
var buildingName= game.deployBuilding;
var base;
for (var i = game.selectedItems.length - 1; i >= 0; i--){
var item = game.selectedItems[i];
if (item.type == "buildings" && item.name == "base" && item.team == game.team &&
item.lifeCode == "healthy" && item.action=="stand"){
base = item;
break;
} };
if (base){
var buildingDetails = {type:"buildings",name:buildingName,x:mouse.gridX,y:mouse.gridY};
game.sendCommand([base.uid],{type:"construct-building",details:buildingDetails});
}
// Clear deployBuilding flag game.deployBuilding = undefined;
}
The cancelDeployingBuilding() method merely clears out the deployBuilding variable. The
finishDeployingBuilding() method first selects the base and then uses the game.sendCommand() method to send it the construct-building order.
Next, we will create a processOrder() method for the base building that implements the construct-building order. We will add this method inside the base definition, as shown in Listing 8-25.
Listing 8-25. Implementing processOrder() Inside the Base Definition (buildings.js) processOrders:function(){
switch (this.orders.type){
case "construct-building":
this.action="construct";
this.animationIndex = 0;
var itemDetails = this.orders.details;
// Teleport in building and subtract the cost from player cash itemDetails.team = this.team;
itemDetails.action = "teleport";
var item = game.add(itemDetails);
game.cash[this.team] -= item.cost;
this.orders = {type:"stand"};
break;
} }
We first set the base entity’s action state to construct. Next we add the building to the game with an action state of teleport. Finally, we subtract the cost of the building from the cash balance and set the base entity’s orders property back to stand.
If you run the game now and try to deploy the building by left-clicking at a valid location on the map, the building should get teleported in at that location, as shown in Figure 8-8.
You will notice that the cash balance decreases by the cost of the building. When the player can no longer afford a building, its button will automatically get disabled. Also, if you try to deploy the building at an invalid location, you will see a system warning message telling you that the building cannot be deployed at that location.
We can now construct both units and buildings in our game. The last thing we will implement in this chapter is ending levels based on triggered events.
Ending a Level
Whenever players complete the objectives for a level successfully, we will show them a message box notifying them and then load the next level. If a player fails a mission, we will give the player the option of replaying the current level or leaving the single-player campaign.
We will check for the success and failure criteria by implementing a system of triggered events within our game.
We will use this same event system to script story-based events in later chapters.
The first thing we will do is implement a message dialog box.
Implementing the Message Dialog Box
The message box will be a modal dialog box with only an OK button or with both OK and Cancel buttons.
We will start by adding the HTML markup for the message box screen to the body of index.html, as shown in Listing 8-26.
Figure 8-8. Deployed building gets teleported in
Listing 8-26. Adding HTML Markup for Message Box Inside the body Tag (index.html)
<body>
<div id="gamecontainer">
<div id="gamestartscreen" class="gamelayer">
<span id="singleplayer" onclick = "singleplayer.start();">Campaign</span><br>
<span id="multiplayer" onclick = "multiplayer.start();">Multiplayer</span><br>
</div>
<div id="missionscreen" class="gamelayer">
<input type="button" id="entermission" onclick = "singleplayer.play();">
<input type="button" id="exitmission" onclick = "singleplayer.exit();">
<div id="missonbriefing">Welcome to your first mission.
</div>
</div>
<div id="gameinterfacescreen" class="gamelayer">
<div id="gamemessages"></div>
<div id="callerpicture"></div>
<div id="cash"></div>
<div id="sidebarbuttons">
<input type="button" id="starportbutton" title = "Starport">
<input type="button" id="turretbutton" title = "Turret">
<input type="button" id="placeholder1" disabled>
<input type="button" id="scouttankbutton" title = "Scout Tank">
<input type="button" id="heavytankbutton" title = "Heavy Tank">
<input type="button" id="harvesterbutton" title = "Harvester">
<input type="button" id="chopperbutton" title = "Copter">
<input type="button" id="wraithbutton" title = "Wraith">
<input type="button" id="placeholder2" disabled>
</div>
<canvas id="gamebackgroundcanvas" height="400" width="480"></canvas>
<canvas id="gameforegroundcanvas" height="400" width="480"></canvas>
</div>
<div id="messageboxscreen" class="gamelayer">
<div id="messagebox">
<span id="messageboxtext"></span>
<input type="button" id="messageboxok" onclick="game.messageBoxOK();">
<input type="button" id="messageboxcancel" onclick="game.messageBoxCancel();">
</div>
</div>
<div id="loadingscreen" class="gamelayer">
<div id="loadingmessage"></div>
</div>
</div>
</body>
Next we will add the styles for the message box to styles.css, as shown in Listing 8-27.
Listing 8-27. Styles for Message Box (styles.css) /* Message Box Screen */
#messageboxscreen {
background:rgba(0,0,0,0.7);
z-index:20;
}
#messagebox {
position:absolute;
top:170px;
left:140px;
width:296px;
height:178px;
color:white;
background:url(images/messagebox.png) no-repeat center;
color:rgb(130,150,162);
overflow:hidden;
font-size: 13px;
font-family: 'Courier New', Courier, monospace;
}
#messagebox span { position:absolute;
top:30px;
left:50px;
width:200px;
height:100px;
}
#messagebox input[type="button"]{
background-image: url(images/buttons.png);
position:absolute;
border-width:0px;
padding:0px;
}
#messageboxok{
background-position: -2px -150px;
top:126px;
left:11px;
width:74px;
height:26px;
}
#messageboxok:active,#messageboxok:disabled{
background-position: -2px -186px;
}
#messageboxcancel{
background-position: -86px -150px;
left:197px;
top:129px;
width:73px;
height:24px;
}
#messageboxcancel:active,#messageboxcancel:disabled{
background-position: -86px -184px;
}
Finally, we add some methods to the game object, as shown in Listing 8-28.
Listing 8-28. Adding Message Box Methods to the game Object (game.js) /* Message Box related code*/
messageBoxOkCallback:undefined, messageBoxCancelCallback:undefined,
showMessageBox:function(message,onOK,onCancel){
// Set message box text
$('#messageboxtext').html(message);
// Set message box ok and cancel handlers and enable buttons if(!onOK){
game.messageBoxOkCallback = undefined;
} else {
game.messageBoxOkCallback = onOK;
}
if(!onCancel){
game.messageBoxCancelCallback = undefined;
$("#messageboxcancel").hide();
} else {
game.messageBoxCancelCallback = onCancel;
$("#messageboxcancel").show();
}
// Display the message box and wait for user to click a button $('#messageboxscreen').show();
},
messageBoxOK:function(){
$('#messageboxscreen').hide();
if(game.messageBoxOkCallback){
game.messageBoxOkCallback() }
},
messageBoxCancel:function(){
$('#messageboxscreen').hide();
if(game.messageBoxCancelCallback){
game.messageBoxCancelCallback();
} },
The showMessageBox() method first sets the message inside the messageboxtext element. Next it saves the onOK and onCancel callback method parameters into the messageBoxOkCallback and messageBoxCancelCallback variables. It shows or hides the Cancel button based on whether a cancel callback method parameter was passed.
Finally, it shows the messageboxscreen layer.
The messageBoxOK() and messageBoxCancel() methods hide the messageboxscreen layer and then call their respective callback methods if they have been set.
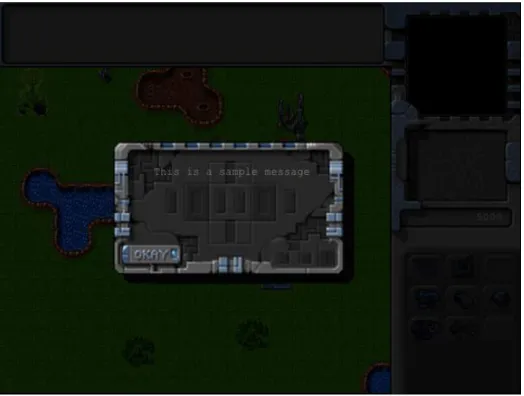
When the showMessageBox() is called without specifying any callback methods, it will display the message box on a darkened screen with only an OK button, as shown in Figure 8-9.
Now that the code for the message box is in place, we will implement our game triggers.
Implementing Triggers
Our game will use two types of triggers.
Timed triggers will execute an action after a specified time. They may also keep repeating at
•
regular intervals.
Conditional triggers will execute an action when a specified condition comes true.
•
We will start by adding a triggers array within our level inside the maps object, as shown in Listing 8-29.
Figure 8-9. A sample message shown in the message box
Listing 8-29. Adding Triggers into the Level (maps.js) /* Conditional and Timed Trigger Events */
"triggers":[
/* Timed Events*/
{"type":"timed","time":1000, "action":function(){
game.showMessage("system","You have 20 seconds left.\nGet the harvester near the oil field.");
} },
{"type":"timed","time":21000, "action":function(){
singleplayer.endLevel(false);
} },
/* Conditional Event */
{"type":"conditional", "condition":function(){
var transport = game.getItemByUid(-1);
return (transport.x <10 && transport.y <10);
},
"action":function(){
singleplayer.endLevel(true);
} } ],
All the triggers have a type and an action method. We have defined three triggers within the array.
The first trigger is a timed trigger with a time set to 1 second. In its action parameter, we call game.showMessage() and tell the player that he has 20 seconds to move the harvester near the oil field.
The second trigger, which is timed for 20 seconds later, calls the singleplayer.endLevel() method with a parameter of false, indicating the mission failed.
The final trigger is a conditional trigger. The condition method returns true when the transport is within the top-left quadrant of the map with x and y coordinates less than 10. When this condition is triggered, the action method calls the singleplayer.endLevel() method with a parameter of true indicating the mission was successfully completed.
Next we will implement the endLevel() method inside the singleplayer object, as shown in Listing 8-30.
Listing 8-30. Implementing the singleplayer endLevel() Method (singleplayer.js) endLevel:function(success){
clearInterval(game.animationInterval);
game.end();
if (success){
var moreLevels = (singleplayer.currentLevel < maps.singleplayer.length-1);
if (moreLevels){
game.showMessageBox("Mission Accomplished.",function(){
$('.gamelayer').hide();
singleplayer.currentLevel++;
singleplayer.startCurrentLevel();
});
} else {
game.showMessageBox("Mission Accomplished.<br><br>This was the last mission in the campaign.<br><br>Thank You for playing.",function(){
$('.gamelayer').hide();
$('#gamestartscreen').show();
});
} } else {
game.showMessageBox("Mission Failed.<br><br>Try again?",function(){
$('.gamelayer').hide();
singleplayer.startCurrentLevel();
}, function(){
$('.gamelayer').hide();
$('#gamestartscreen').show();
});
} }
We first clear the game.animationInterval timer that calls the game.animationLoop() method. Next we call the game.end() method.
If the level was completed successfully, we check whether there are more levels in the map. If so, we notify the player that the mission was successful in a message box and then start the next level when the player clicks the OK button. If there are no more levels, we notify the player but go back to the game starting menu when the player clicks OK.
If the level was not completed successfully, we ask the player if he wants to try again. If the player clicks OK, we restart the current level. If instead the player clicks Cancel, we return to the game starting menu.
Next we will add a few trigger-related methods to the game object, as shown in Listing 8-31.
Listing 8-31. Adding Trigger-Related Methods to the game Object (game.js) // Methods for handling triggered events within the game
initTrigger:function(trigger){
if(trigger.type == "timed"){
trigger.timeout = setTimeout (function(){
game.runTrigger(trigger);
},trigger.time)
} else if(trigger.type == "conditional"){
trigger.interval = setInterval (function(){
game.runTrigger(trigger);
},1000) }
},
runTrigger:function(trigger){
if(trigger.type == "timed"){
// Re initialize the trigger based on repeat settings if (trigger.repeat){
game.initTrigger(trigger);
}
// Call the trigger action trigger.action(trigger);
} else if (trigger.type == "conditional"){
//Check if the condition has been satisfied if(trigger.condition()){
// Clear the trigger game.clearTrigger(trigger);
// Call the trigger action trigger.action(trigger);
} } },
clearTrigger:function(trigger){
if(trigger.type == "timed"){
clearTimeout(trigger.timeout);
} else if (trigger.type == "conditional"){
clearInterval(trigger.interval);
} },
end:function(){
// Clear Any Game Triggers if (game.currentLevel.triggers){
for (var i = game.currentLevel.triggers.length - 1; i >= 0; i--){
game.clearTrigger(game.currentLevel.triggers[i]);
};
}
game.running = false;
}
The first method we implement is initTrigger(). We check whether the trigger is timed or conditional. For timed triggers, we call the runTrigger() method after the timeout specified in the time parameter. For conditional triggers, we call the runTrigger() method every second.
In the runTrigger() method, we check whether the trigger is timed or conditional. For timed triggers with the repeat parameter specified, we call initTrigger() again. We then execute the trigger action. For conditional triggers, we check whether the condition is true. If so, we clear the trigger and execute the action.
The clearTimeout() method just clears the timeout or interval for the triggers.
Finally, the end() method clears any triggers for a level and sets the game.running variable to false.
The last change we will make is to the game object’s start() method, as shown in Listing 8-32.
Listing 8-32. Initializing the Triggers Inside the start() Method (game.js) start:function(){
$('.gamelayer').hide();
$('#gameinterfacescreen').show();
game.running = true;
game.refreshBackground = true;
game.drawingLoop();
$('#gamemessages').html("");
// Initialize All Game Triggers
for (var i = game.currentLevel.triggers.length - 1; i >= 0; i--){
game.initTrigger(game.currentLevel.triggers[i]);
};
},
We initialize the gamemessages container when we start the level. Next we iterate through the current level’s triggers array and call initTrigger() for each trigger.
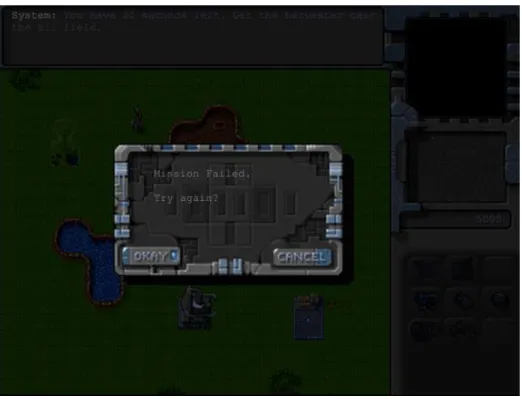
If we run the game now, we should get a message asking us to take the harvester near the oil field within 20 seconds.
If we do not do so in time, we will see a message box indicating that the mission failed, as shown in Figure 8-10.
If we click the Okay button, the level will restart, and we will be returned to the mission briefing screen. If we click the Cancel button instead, we will be taken back to the main menu.
If we move the harvester toward the oil field and reach there before the 20 seconds are up, we will see a message box indicating that the mission was accomplished, as shown in Figure 8-11.
Figure 8-10. Message shown when the mission fails
Figure 8-11. Message shown when the mission is accomplished
Since this is the only mission in our campaign, we will see the campaign ending message box. When we click Okay, we will be taken back to the main menu.
Summary
We accomplished a lot in this chapter. We started by creating a basic economy where we could earn cash by harvesting. We then implemented the ability to purchase units at the starport and buildings at the base using the buttons on the sidebar.
We developed a messaging system and a message dialog box to communicate with the player. We then built a system for trigger-based actions that handled both timed and conditional triggers. Finally, we used these triggers to create a simple mission objective and criteria for succeeding or failing the mission. Even though it was a fairly simple mission, we now have the infrastructure in place to build much more complex levels.
In the next chapter, we will handle another important component of our game: combat. We will implement different attack-based orders states for both units and turrets. We will use a combination of triggers and order states to make the units behave intelligently during combat. Finally, we will look at implementing a fog of war so that units cannot see or attack unexplored territory.