저작자표시-비영리-변경금지 2.0 대한민국 이용자는 아래의 조건을 따르는 경우에 한하여 자유롭게
l 이 저작물을 복제, 배포, 전송, 전시, 공연 및 방송할 수 있습니다. 다음과 같은 조건을 따라야 합니다:
l 귀하는, 이 저작물의 재이용이나 배포의 경우, 이 저작물에 적용된 이용허락조건 을 명확하게 나타내어야 합니다.
l 저작권자로부터 별도의 허가를 받으면 이러한 조건들은 적용되지 않습니다.
저작권법에 따른 이용자의 권리는 위의 내용에 의하여 영향을 받지 않습니다. 이것은 이용허락규약(Legal Code)을 이해하기 쉽게 요약한 것입니다.
Disclaimer
저작자표시. 귀하는 원저작자를 표시하여야 합니다.
비영리. 귀하는 이 저작물을 영리 목적으로 이용할 수 없습니다.
변경금지. 귀하는 이 저작물을 개작, 변형 또는 가공할 수 없습니다.
Master's Thesis
Origami-based Hybrid Actuating Modules for Upper Limb Support
Seongmin Seo
Department of Mechanical Engineering
Graduate School of UNIST
2020
Origami-based Hybrid Actuating Modules for Upper Limb Support
Seongmin Seo
Department of Mechanical Engineering
Graduate School of UNIST
2020
Abstract
This thesis presents an origami-based hybrid actuating module for the upper limb which has the potential to support workers in the industrial fields. Conventional wearable systems such as exoskeleton systems are difficult to fit with different body sizes due to link structures and joints made of rigid materials. To solve these issues, soft wearable systems which consist of soft materials like elastomers have been studied. However, soft pneumatic actuators (SPAs), which is usually used for soft wearable systems create weak force and slow actuation speed. Also, they require a bulky air pump for actuation.
In addition, most of them are fabricated manually so that it takes a long time to manufacture actuators, thus it is hard to modify the design of actuators.
The proposed actuating module which is driven pneumatically consists of rigid material and soft material to improve the force transmission and actuating speed while maintaining compliance at the same time. Among various origami patterns, Yoshimura pattern was applied for the pneumatic chamber to create the linear and bending motion in the desired direction. An additive manufacturing method using heat press and laser cutting machine was developed to shorten fabrication time and make easy to modify the design of the actuating module.
An analytical modeling which shows the relationship between design parameters of origami pattern and performances of the module was established, and the design parameters are optimized to satisfy requirements for upper limb support. Performances of the optimized actuating module were verified by experiments. Lastly, 3D-printed wearable structure was developed to connect a user with the actuating module, and supporting tests after wearing the module were conducted to ensure proper strength support.
Acknowledgement
I would like to appreciate Prof. Joonbum Bae for giving me a lot of advice and feedback on my research.
He taught me how to construct and proceed with the research logically. He instilled in me a passion for research. Although I graduated as a master of science because of the military problem, I would like to apply for the Ph.D. program and continue to study if I have a chance later.
In addition, I want to thank Wookeun Park who is my senior in soft robotics team. He taught me the basic elements of research. One of the best things during my master course was working with him. I learned a lot from him. I also thank Dongman Lee for helping me to assist my work.
Bio-Robotics and Control lab members: Inseong Jo, Yeongtae Jung, Jihoon Kim, Younkyu Park, Suin Kim, Jeongsoo Lee, Sungman Park, Bokeon Kwak, Hoyeon Yeom, Minhuyk Lee, Kyutaek Han, Junsoo Kim, Dahee Jeong, Dongyoung Lee, Heeyeop Kim, Jeongsoon Hong, Jinheok Oh, Sangyeop Lee, Jihye Oh, and Kyungtaek Kim. I was very honored to work with them. Thanks to them, I was able to finish my master's degree. Memories with them will never be forgotten.
Lastly, my parents. Thank you for your unconditional support to me.
Contents
Ⅰ. Introduction ---5
Ⅱ. Design and Fabrication of the Origami-based Hybrid Actuating Module
2.1 Origami Structures for a Soft Pneumatic Actuator---4
2.2 Fabrication Process---11
Ⅲ. Design Optimization of the Origami-based Hybrid Actuating Module for Upper Limb Support
3.1 Analytical Modeling of the Origami-based Actuating Module---16
3.2 Design Optimization---8
Ⅳ. Experimental Verification
4.1 Experimental Setup---3
4.2 Performance Verification---2
Ⅴ. Conclusion and Open Issues---2
List of Figures
Fig Ⅰ.1.1 Promising market of wearable systems
Fig Ⅰ.1.2 Issues of conventional wearable systems and the emergence of soft wearable systems Fig Ⅰ.1.3 Adding rigid materials for reinforcing a soft chamber
Fig Ⅱ.1.1 Introduction of origami
Fig Ⅱ.1.2 Characteristics of origami structures
Fig Ⅱ.1.3 Origami structures for a pneumatic chamber
Fig Ⅱ.1.4 Soft pneumatic actuators based on Origami structures Fig Ⅱ.2.1 Typical fabrication methods
Fig Ⅱ.2.2 A new type of fabrication methods Fig Ⅱ.2.3 Components of the actuating module Fig Ⅱ.2.4 Fabrication process
Fig Ⅱ.2.5 Fabrication process Fig Ⅱ.2.6 Fabrication process Fig Ⅱ.2.7 Fabrication process Fig Ⅱ.2.8 Fabrication process Fig Ⅱ.2.9 Fabrication process
Fig Ⅱ.2.10 Hybrid actuating modules based on origami structures Fig Ⅲ.1.1 Bones and muscles involved in overhead tasks
Fig Ⅲ.1.2 Various shoulder motions
Fig Ⅲ.1.3 Target motions assisted by the actuating module
Fig Ⅲ.1.5 Necessity of the analytical modeling of the actuating module Fig Ⅲ.1.6 Design parameters of the Yoshimura pattern
Fig Ⅲ.1.7 Constraints of design parameters to form a foldable airtight chamber Fig Ⅲ.1.8 The air volume and displacement of the actuating module
Fig Ⅲ.1.9 Analytical modeling of the blocked force of the actuating module Fig Ⅲ.1.10 Analytical modeling of the bending angle of the actuator Fig Ⅲ.1.11 Experimental setting
Fig Ⅲ.1.12 Relationship between the air pressure and the blocked force Fig Ⅲ.1.13 Relationship between the extension rate and the blocked force
Fig Ⅲ.1.14 Relationship between the air pressure and the blocked force of actuating modules with different 𝐴 values
Fig Ⅲ.1.15 Relationship between the extension rate and the blocked force of actuating modules with different 𝐴 values
Fig Ⅲ.1.16 RMSE of the experimental data and the theoretical values Fig Ⅲ.2.1 Purpose of the optimization
Fig Ⅲ.2.2 Constraints of the optimization process Fig Ⅲ.2.3 Settings of the optimization process
Fig Ⅲ.2.4 Constraints of the optimization process by design parameters Fig Ⅲ.2.5 Dominant design parameters which dominantly effect to 𝜙𝑚𝑖𝑛
Fig Ⅲ.2.6 Relationship between 𝑛1, t and 𝜙𝑚𝑖𝑛
Fig Ⅲ.2.7 Dominant design parameters which dominantly effect to 𝜙𝑚𝑎𝑥 Fig Ⅲ.2.8 Relationship between 𝐴, 𝑛2, and 𝜙𝑚𝑎𝑥
Fig Ⅲ.2.9 Dominant design parameters which dominantly effect to F Fig Ⅲ.2.10 Relationship between 𝐴, 𝑛2, and F
Fig Ⅳ.1.1 Planar figure of the actuation system
Fig Ⅳ.1.2 Experimental setting for performance verification Fig Ⅳ.1.3 Anchoring structures
Fig Ⅳ.2.1 Performance verification
Fig Ⅳ.2.2 Support tests: (a) Passive support test, (b) active support test
List of Tables
Table Ⅰ.1.1 Classification of soft actuators by their actuating principles
Table Ⅱ.2.1 Mechanical properties for selecting materials of the actuating module Table Ⅲ.1.1 RMSE of the experimental data and the theoretical values
1
Ⅰ. Introduction
Recently, wearable systems are in the spotlight in rehabilitation, virtual reality (VR), and industrial sites. As shown in Fig Ⅰ.1.1, the market of wearable systems is drastically expanding in every year [43, 44]. In particular, in the industrial fields, overheads tasks like painting, welding, and, cutting cause injuries and fatigues of workers and it leads to loss of productivity (Fig Ⅰ.1.1 (b)).
Fig Ⅰ.1.1 Promising market of wearable systems: (a) Wearable systems in various fields and expanding wearable systems market [43, 44], (b) Necessity of muscle support robots in industrial
fields.
Conventional exoskeletons are difficult to customize to different body sizes due to rigid linkages and they require complex linkage structures for multi-degree-of-freedom (DOF) movements [1]. It leads to the whole system heavy and bulky so that users feel uncomfortable when wearing the wearable systems (Fig Ⅰ.1.2).
In order to resolve these issues, soft wearable systems emerged and have been actively studied. Soft wearable systems are easy to customize to different body sizes due to compliance of materials and structures. They also can create multi DOF movements with simple operating principles. In addition,
2
they are compact and light because they consist of soft materials like elastomers, fabric, thin films, etc.
(Fig Ⅰ.1.2).
Fig Ⅰ.1.2 Issues of conventional wearable systems and the emergence of soft wearable systems [1~4]
3
Soft actuators are actuators which consist of compliant materials or structures to increase flexibility and adaptability. Soft actuators which widely used for soft wearable systems can be classified by their actuating principles. As shown in Table Ⅰ.1.1, there are many types of soft actuators, and the advantages and disadvantages of them are different. Among them, cable-driven types and pneumatic actuators are mostly used to support the muscle strength due to their strong exerting force. Cable-driven actuators of wearable systems commonly uses gravity compensation mechanism to support the upper limb of users passively [2]. However, systems are not durable due to the friction between the rigid cable and the soft pad, and their supporting force is not enough to sustain a heavy external load [5]. In addition, the length of the cable and the position of the pulley must be set differently depending on different body sizes of users.
Soft pneumatic actuators (SPAs) can create multi-degree-of-freedom motion by simply injecting or extracting the air into an airtight chamber [3, 4]. The actuators are easy to customize to different body sizes because the compliant soft material is in contact with the body and it passively follows the movement. However, SPAs have problems in that their force transmission and durability are weak, and the actuation speed is slow. To improve the force transmission and make directionality of the actuators, many researchers added rigid materials like fiber, fabric, and a thin plastic shell to reinforce the soft chamber [6~9]. However, reinforcements increase the pressure range for actuation so that a bulky actuation system is required for actuation. There can be an energy loss to the undesired direction because the structures of chambers are not the optimal design for the desired motion. In addition, the actuators are manually fabricated, which takes a long time to be fabricated, and it is not easy to modify the design of actuators.
4
Table Ⅰ.1.1 Classification of soft actuators by their actuating principles [5~8]
Fig Ⅰ.1.3 Adding rigid materials for reinforcing a soft chamber: (a) fiber [9], (b) fabric [10], (c) fiber [11], (d) rigid structures [12]
5
In the thesis, an origami-based hybrid actuating module is proposed. Origami structures were applied for the actuating module to improve actuation speed, and soft materials and rigid materials were combined to improve force transmission. A new fabrication method, an additive manufacturing method was developed to shorten fabrication time and make easy to modify the design of the actuating module.
The remainder of the thesis is organized as follows. In Section Ⅱ.1, the reason that origami structures should be applied for the soft pneumatic actuator will be proposed. In Section Ⅱ.2, the fabrication process of the actuating module will be introduced. In Section Ⅲ.1, an analytical modeling of the origami-based hybrid actuating modules will be proposed. In Section Ⅲ.2, the design optimization process of the actuating module for upper limb support will be explained and the result of the optimization will be discussed. In Section Ⅳ, experiments for verifying the performance of the actuating module will be proposed. Finally, the conclusion and open issues will be summarized in Section Ⅴ.
6
Ⅱ. Design and Fabrication of the Origami-based Hybrid Actuating Module
2.1 Origami Structures for a Soft Pneumatic Actuator
The word ‘origami’, which refers to the ancient art of paper folding, combines the Japanese roots ‘ori’, meaning ‘folded’, and ‘kami’, meaning ‘paper’ [13] (Fig Ⅱ.1.1 (a)). Nowadays, origami is actively applied for engineering fields such as optics, mechanical engineering, aerospace engineering, etc.
because of the following characteristics (Fig Ⅱ.1.1 (b)).
Fig Ⅱ.1.1 Introduction of origami: (a) Definition of origami [13], (b) Applications of origami to engineering
Firstly, origami can create three-dimensional geometry from the two-dimensional surface by a folding process. This research proposed a method to create the desired curvatures by designing Miura-ori pattern which is one of the most popular patterns applying for engineering fields [14] (Fig Ⅱ.1.2 (a)).
In addition, in [15], a methodology is introduced to determine the foldability of cylindrical structures of origami patterns. In order to build the desired geometry, a lot of research on mathematical methodology for setting design parameters of origami patterns have been actively studied.
Secondly, crease lines and panels emerged by a folding process can be considered a successive of links and joints. Therefore, geometries with origami patterns have structural compliance which can create flexible movement and passively follow the external motion. The degree of compliance can be manipulated by changing the arrangement and stiffness distribution of crease lines and panels. This research proposed the metric that can evaluate the degree of compliance of origami structures [16].
7
Lastly, there are many types of origami patterns, and each of them can create various motion by a folding and unfolding process. Yoshimura pattern is one of the most popular patterns which can create translational motion. Diagonal pattern can create twisting motion [17] (Fig Ⅱ.1.2 (b)). Miura-ori pattern and Waterbomb pattern can be extended and contracted in bi-directional so that they can create various motions depending on the fabrication process. In addition, various origami patterns can be integrated with each other or a new pattern can be created to exert desired motions. This research proposed gadgets that modify or create origami patterns to be foldable [18] (Fig Ⅱ.1.2 (c)).
Fig Ⅱ.1.2 Characteristics of origami structures: (a) Programmable curvatures [14], (b) various motions by folding and unfolding processes [17], (c) gadgets for creating foldable origami
structures [18]
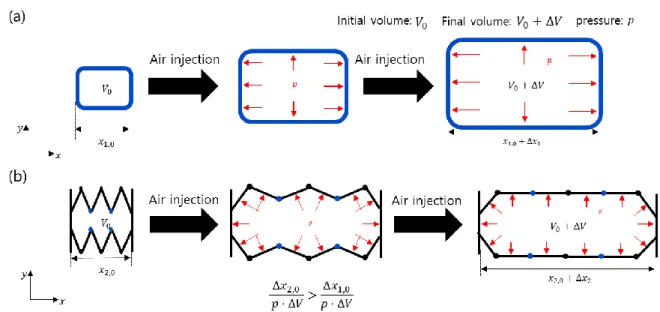
Recently, origami has been actively applied to soft robotics due to advantages above. Fig Ⅱ.1.3 shows why the origami structures should be applied for soft pneumatic actuators. Fig Ⅱ.1.3 (a) shows a cylindrical chamber made of elastomer and Fig Ⅱ.1.3 (b) shows a chamber based on origami structures.
Assuming that the same amount of the air volume (∆𝑉) is injected into two chambers and the same pressure (𝑝) is acting on the inner walls of chambers, the latter one can be extended more in 𝑥-direction than case 1). Although many researchers added rigid reinforcements like fiber, fabric and a thin plastic shell to induce the actuator to move in the desired direction, it cannot completely prevent the energy loss in another direction. Therefore, a soft pneumatic actuator based on origami structures can make the desired motion fast without any energy loss in undesired directions. The repetitive linkage structures are arranged in three-dimensional zigzag structures to enlarge the deformation in the desired direction.
8
Fig Ⅱ.1.3 Origami structures for a pneumatic chamber: (a) A cylindrical chamber made of elastomer, (b) A chamber based on origami structures
There are other studies which applied origami structures for soft pneumatic actuators. In [19], a paper is folded as an origami pattern and elastomers soaked the paper to make an airtight and elastic chamber (Fig Ⅱ.1.4 (a)). Using an array of papers and silicone, the stiffness distribution is formed to induce the actuator move in a certain direction.
In [20], an origami shell made of thick paper was used as a reinforcement of an elastomeric chamber (Fig Ⅱ.1.4 (b)). The origami shell can prevent the lateral strain and enlarge the longitudinal strain so that the elastomeric chamber can be extended more in the desired direction. However, the actuators in [19] and [20] cannot create enough force to support muscle strength and they are not durable against the external impacts because papers and elastomers were used as materials of actuators. In addition, the actuators were manually fabricated so that it takes a long time to be manufactured, and it is hard to modify the design.
In order to solve the fabrication issues, this research proposed a new manufacturing process of fluid- driven origami-inspired actuators [21] (Fig Ⅱ.1.4 (c)). They combined soft materials and rigid materials to improve force transmission, and rapid fabrication is available for numerous applications at multiple scales. However, the actuators are only available to actuate at a negative pressure because origami structures were not applied as a chamber of the actuator, but a rigid skeleton based on origami structures was inserted inside of the chamber. So the actuator can only exert a pulling force along origami structures by applying negative pressure.
9
Fig Ⅱ.1.4 Soft pneumatic actuators based on Origami structures: (a) Elastomeric origami [19], (b) soft pneumatic actuators with origami shell reinforcement [20], (c) fluid-driven origami-inspired
actuators [21]
By literature reviews, I set three development strategies to develop an origami-based hybrid actuating module. First of all, rigid materials and soft materials were combined to improve force transmission and durability. A new manufacturing method was developed to shorten fabrication time and make easy to modify the design of the actuator. Origami structures were applied for a pneumatic chamber so that the actuating module can operate at positive and negative pressure.
10
2.2 Fabrication process
The molding method and 3D-printing are widely used for fabricating soft pneumatic actuators. The molding method is one of the most basic manufacturing methods of the actuators, in which a curable silicone is poured into a rigid mold and an airtight chamber can be formed from the mold (Fig Ⅱ.2.1 (a)) [22]. The method has the advantage that anyone can easily fabricate an actuator, but a new mold should be manufactured to modify the design of actuators, and it takes a long time to fabricate because of the curing time for the silicone. In addition, the performances of each actuator are different depending on the proficiency of the manufacturer.
The 3D-printing method is easy to modify the design and the performance repeatability of actuators can be kept constant (Fig Ⅱ.2.1 (b)) [23]. However, the manufacturing time is directly dependent on the size of actuators, and an additional process are required for making an airtight chamber. In addition, only 3D-printable materials are available to make the actuator.
11
Fig Ⅱ.2.1 Typical fabrication methods: (a) A molding method [22], (b) A 3d-printing method [23]
Recently, new fabrication methods using a heat press and sewing have been proposed. This research below introduced the method of fabricating airtight structures by melting thermoplastic urethane (TPU) with a heat press [24] (Fig Ⅱ.2.2 (a)). In order to form an airtight chamber, they provide experimental information on the size and thickness of the materials, and the bonding method of interfaces. Other research designed and built a prototype exomuscle with fabrics reinforced inflatable bladders [25] (Fig
Ⅱ.2.2 (b)). The exomuscle consists of twin plastic bladders that have been reinforced by fabric bags sewn to the desired final shape of the device. The biggest benefit of the manufacturing process using heat press or heat sealing is that it can simply make an airtight chamber. In addition, it is easy to modify the design, and the performance of each actuator can be constant because machinery work takes place of manual work.
12
Fig Ⅱ.2.2 A new type of fabrication methods: (a) heat press [24], (b) heat sealing and sewing [25]
In this thesis, an additive manufacturing process with a heat press and laser cutting was developed to fabricate origami-based hybrid actuating modules. The manufacturing process makes easy to modify the design of the actuating module, and the rapid fabrication is available. Moreover, the performance of actuating modules can be consistent and reliable.
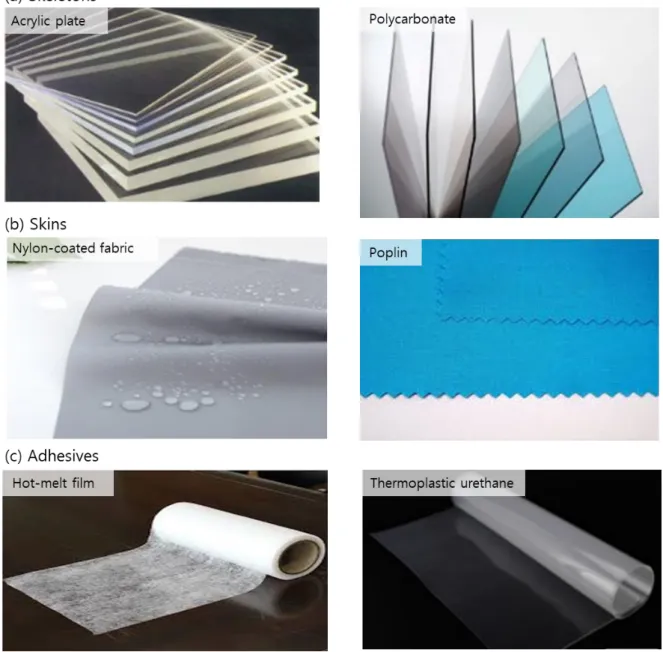
There are three components required consisting of the actuating module: skeletons, skins, and adhesive.
Skeletons are rigid materials that act like rigid panels of origami structures. They are cut along origami pattern with a laser cutting machine, and then placed in the center of the inner wall of the actuating module. They should be light and durable, and the melting point should be higher than that of adhesives.
Acrylic plate, polycarbonate (PC), and so on can be used as a kind of skeletons. By modifying the thickness and hardness of the skeleton, the durability and size of the actuating module can be manipulated.
Skins are the fabric-based materials that cover the outermost part of the actuating module. Nylon- coated fabric, poplin, etc. can be used as a kind of skins. When using coated fabric like nylon coated fabric and urethan coated fabric as a skin, the actuating module can be manufactured without adhesive materials because the skin already contains the adhesive, so it can be easily attached to the skeleton.
Moreover, the skins can form an airtight chamber by themselves. However, adhesives like TPU and hot melt film are essential for uncoated fabric such as poplin to bond with the skeleton.
The adhesive bonds the skeleton to the skin and they act as a ligament between pieces of skeletons. It seeps into tiny holes in the uncoated skin to create an airtight chamber. Hot melt film, TPU, etc. can be used as an adhesive. The stiffness of the actuating module can be manipulated by modifying the thickness of the adhesive. Fig Ⅱ.2.3 shows the three components of the actuating module.
13
Fig Ⅱ.2.3 Components of the actuating module: (a) skeletons, (b) skins, (c) adhesives
Mechanical properties of skeletons, skins, and adhesives should be considered to select materials.
There are various types of TPUs and the mechanical properties of each TPU are different. The melting point of the adhesive should be lower than that of the skin and the skeleton because only the adhesive should melt and attach the skeleton with the skin when heat pressing. Since the stiffness of the actuating module depends on the shore hardness and thickness of the adhesive, the shore hardness should be less than 80A and the thickness should not be over 0.2mm. The TPU [27] was selected in consideration of the melting point, adhesion, shore hardness and the thickness of the materials.
14
The skeleton should be durable and light because of the compactness and durability of the actuating module. Young’s modulus and impact strength are some of the most used evaluation indices for expressing durability. Lightness was considered by comparing the density of the materials.
Polycarbonate (PC) was selected in consideration of the melting point, Young’s modulus, impact strength, and the density of the materials.
The nylon-coated fabric was selected as a skin considering the melting point, airtightness and thickness of the materials. Table Ⅱ.1 shows information about comparing the mechanical properties of selected materials, and the red highlights show the selected materials.
Table Ⅱ.2.1 Mechanical properties for selecting materials of the actuating module
The additive manufacturing method using a laser cutting machine and heat press was developed to fabricate origami-based hybrid actuating modules. The fabrication process is as follows.
Step 1): Arrange a skeleton (PC), a non-stick paper and a thick acrylic plate in the array (Fig Ⅱ.2.4).
The non-stick paper prevents the skeleton and the acrylic plate from adhering to each other.
Step 2): Select an origami pattern considering the desired motion, design a CAD file with the selected pattern and cut the skeleton along the pattern using a laser cutting machine (Fig Ⅱ.2.4). It is easy to
15
manipulate the design of the actuating module by modifying the CAD file. In this thesis, Yoshimura pattern that can create linear and bending motion was applied to the actuating module. The thick acrylic plate is not cut, only the skeleton is cut into the pattern and the pieces of the skeleton is put on the acrylic plate. The laser cutting machine (C40; Coryart [32]) is used for cutting the skeleton with the setting (cutting power 17% and cutting speed 25%).
Fig Ⅱ.2.4 Fabrication process
Step 3): Paste a glue (Ddakpool; AMOS [33]) on the adhesive (TPU) in which size is bigger than the cut skeleton and cover the pieces of the skeleton with the adhesive and the skin (fabric) (Fig Ⅱ.2.5). The glue is used to temporarily fix the skeleton pieces to the adhesive. Flip the layers upside down so that the skin can be located at the bottom of the layers and remove the acrylic plate and non-stick paper.
Step 4): Cut the adhesive and the skin sticking out of the skeleton leaving 20mm (Fig Ⅱ.2.5). This
extra part is later used for attaching the end to the other to make a chamber.
16
Fig Ⅱ.2.5 Fabrication process
Step 5): Compress the layer using heat press [34] at 120℃ for 100 seconds and repeat the pressing process twice on each side (Fig Ⅱ.2.6). The adhesive melts into the skin and bonds the skin with the skeleton, then a monolithic layer can be formed.
Step 6): Make a trigonal prism by folding the layer along the red lines (Fig Ⅱ.2.6). Then, attach the two end with the adhesive. In order to create an airtight structure, it is important that the adhesive melts completely and bonds the two sides well.
17
Fig Ⅱ.2.6 Fabrication process
Step 7): Fold the triangular prism along origami pattern lines (Fig Ⅱ.2.7). The cylinder folds along Yoshimura pattern, in which the diagonal crease lines are folded as mountain folds and the vertical crease lines are folded as valley folds.
Step 8): Cut the skin and the adhesive into hexagonal shape to cover the top of the origami-based cylinder and attach them to the top of the cylinder with the heat press (Fig Ⅱ.2.7). A hole is drilled to put the air hose into the chamber.
18
Fig Ⅱ.2.7 Fabrication process
Step 9): Combine a hose coupling part with the top of the actuating module. The hose coupling part was manufactured by 3d-printing (Fig Ⅱ.2.8). In addition, many actuating modules that create different motions can be connected through this part so that the multi-dof motions can be achieved at once by simply injecting the air into the chamber.
Step 10): Cover the skin and the adhesive firstly and attach to the top of the cylinder with the heat press (Fig Ⅱ.2.8). Then, an acrylic cover is put on the top, and the skin and the adhesive warp the cover up to prevent the air leakage.
19
Fig Ⅱ.2.8 Fabrication process
The actuating module with the linear motion can be manufactured through this process. But, an additional process is required to create the bending motion. Bending motion is an asymmetric motion that one side should be extended and the other side should not be extended. So, the bending motion can be achieved by blocking the extension of one side of the linear actuating module.
Step 11): Attach the faces of one side using an instant glue (Super Glue Gel; Loctite [35]) and the adhesive (Fig Ⅱ.2.9). The maximum bending angle can be manipulated by selectively bonding the faces.
20
Fig Ⅱ.2.9 Fabrication process
Fig Ⅱ.2.10 shows that various motions can be achieved by using the proposed manufacturing method.
21
Fig Ⅱ.2.10 Hybrid actuating modules based on origami structures
22
Ⅲ. Design Optimization of the Origami-based Hybrid Actuating Module for Upper Limb Support
3.1 Analytical modeling of the origami-based actuating module
The proposed actuating modules applied to the soft wearable system for supporting the upper limb.
When workers are doing overhead tasks in industrial fields, the actuating module prevents injuries and fatigues. In order to develop the actuating module in which performance can support the muscle strength and fit with the average body sizes, understanding of the biomechanics of the shoulder structure is significant (Fig Ⅲ.1.1). Shoulder movements involve with a large number of bones, joints, and muscles, creating multi-dof motions. The glenohumeral joint, which is the most significant joint of the shoulder, is shaped as a ball-socket joint where the head of the humerus is in the glenoid fossa, and rotator cuff stabilizes the joint to prevent the ball from falling out of the socket [45].
Supraspinatus, teres minor, infraspinatus, and subscapularis are the components of the rotator cuff and each muscle is related to almost all the shoulder movements. Scapula, clavicle, and humerus are contacting with the rotator cuff and move together with it. Triceps, biceps, deltoids and trapezius hold the bones, and they are activated with shoulder movements.
Fig Ⅲ.1.1 Bones and muscles involved in overhead tasks [45]
23
As shown in Fig Ⅲ.1.2, there are many shoulder movements. When workers conduct overhead tasks, the angle between the sagittal plane and the upper arm, the coronal plane and the upper arm are always over 90°. Thus, workers take abduction/adduction and flexion/extension motions when doing overhead tasks [46].
Fig Ⅲ.1.2 Various shoulder motions [46]
The range of motion of abduction/adduction is from 0° to 180° and that of flexion/extension is from -45° to 180°. The developed actuating module in research is aimed at assisting flexion/extension and adduction/abduction from 0° to 120° (Fig Ⅲ.1.3). Although the center of rotation (COR) of the shoulder joint changes as the arm is raised, compliance of origami structures can cover the difference of the COR.
24
Fig Ⅲ.1.3 Target motions assisted by the actuating module
As a characteristic of soft robotics, the actuating module can be fitted to different body sizes due to compliance and adaptability, but some conditions like the position of the module, supporting force, range of motion, and approximate size should be satisfied to apply for wearable systems. To figure out the information, the average body sizes of Korea male adults are considered as shown in Fig Ⅲ.1.4 [37].
Considering the average body sizes of Korea male adults, the reference specification of the actuating module can be calculated. In order to design the actuating module which can satisfy the required performances, an analysis of origami patterns is necessary to determine the performance of the actuating module (Fig Ⅲ.1.5).
25
Fig Ⅲ.1.4 Average body sizes of Korea men
Fig Ⅲ.1.5 Necessity of the analytical modeling of the actuating module
Yoshimura pattern which is selected to create the linear motion and the bending motion was analyzed to manipulate the performance of the actuating module. The pattern consists of isosceles triangles, and a rectangular-shaped unit repeats linearly in rows and columns. Diagonal blue crease lines are folded into mountain folds, and vertical red crease lines are folded into valley folds. Four design parameters of Yoshimura pattern are defined. 𝐴 is the width of the rectangular unit, 𝑡 is the thickness of the sheet, 𝑛1 is the number of rows of the pattern, and 𝑛2 is the number of columns of the pattern. 𝐴 is mainly concerned with the width of the actuating module. The larger 𝐴 is, the larger the width of the actuator and the smaller the extension rate of the actuating module per module. 𝑡 involves with the stiffness
26
and thickness of the actuating module. As 𝑡 increases, the stiffness of the actuating module also increases, which improves the supporting force that the module can withstand. However, it also increases the air pressure input for actuation. The extension rate of the actuating module depends on the value of 𝑛1. As 𝑛1 increases, the range of motion of the module also increases. Depending on the value of 𝑛2 , the shape of the bottom of the actuating module is changed. The cross-section of the module is always a regular polygon. When 𝑛2 = 3, then the regular hexagon is the cross-sectional surface of the module and when 𝑛2 = 4, the regular octagon is the cross-sectional surface of the module.
Since 𝑛2 is proportional to the width of the bottom area of the module, it affects dominantly to the supporting force of the module. The figure below shows the Yoshimura pattern when 𝑛1 = 4 and 𝑛2
= 3 (Fig Ⅲ.1.6).
Fig Ⅲ.1.6 Design parameters of the Yoshimura pattern
27
Some constraints are required to apply origami structures for the actuating module. In order to form an airtight chamber, the origami structure should be folded into a cylindrical shape. As shown in FigⅢ.1.7, condition ① is required to form the origami pattern as a chamber shape. The angle of the isosceles triangles should be expressed with the equation below. Condition ② is necessary to make the all crease lines be foldable completely without interfering with each other. Also, the origami structure should not be interfered with each other while folding and unfolding. The gap between pieces of the skeleton should be 𝑡π to maximize the range of motion of the actuating module. When the two conditions are satisfied, angles of the mountain folds (𝜃1 ) and valley folds (𝜃2 ) always have the relationship (Ⅲ.1.1). It is assumed that the air is incompressible and all panels remain rigid, and deflection only occurs at the crease lines for analytical modeling.
𝜃1= 2𝑡𝑎𝑛−1{−0.866𝑡𝑎𝑛 (𝜃2
2)} (Ⅲ.1.1)
Fig Ⅲ.1.7 Constraints of design parameters to form a foldable airtight chamber
28
The quasi-static model is used to formulate the blocked force and the range of motion of the actuating module. 𝑉 is the air volume injected into the chamber, 𝜃 is the angle between each module, 𝐹 is the blocked force of the actuating module, 𝑝 is the air pressure of the internal chamber, and 𝑥 is the length of the actuating module. The displacement of the actuating module can be expressed with 𝑉, as shown in Fig Ⅲ.1.8.
Fig Ⅲ.1.8 The air volume and displacement of the actuating module
The width of the cylinder (𝑆𝑐 ) depends on 𝑛2 and 𝐴 . 𝑛2 involves with the shape of the cross- sectional area of the actuating module, and 𝐴 is proportional to the size of the module. The width of the cylinder can be expressed as follows (Ⅲ.1.2):
𝑆𝐶 = 𝑛2𝐴2
4 𝑠𝑖𝑛(𝜋
𝑛2) (Ⅲ.1.2)
The height of the cylinder (ℎ𝑐) is the extended length of the actuating module. The range of motion of the linear actuating module can be expressed with the following equation (Ⅲ.1.3):
ℎ𝐶 = 2 ⋅ (𝑛1− 1) ⋅ {𝐴
2tan ( 𝜋
2𝑛2) +𝑡𝜋
2)} ⋅ sin (𝜃
2) + 2𝑛1𝜋𝑡 sec ( 𝜋
2𝑛2) (Ⅲ.1.3) By multiplying 𝑆𝑐 with ℎ𝑐, the volume of the cylinder (𝑉𝑐) can be expressed as follows (Ⅲ.1.4):
29 𝑉𝐶 = n2𝐴2
2 sin(𝜋
𝑛2)⋅ {(𝑛1− 1) ⋅ (𝐴 tan ( 𝜋
2𝑛2) +𝑡𝜋
2) sin (𝜃
2) + 2𝑛1𝜋𝑡 sec ( 𝜋
2𝑛2)} (Ⅲ.1.4) By subtracting 2𝑛2(𝑛1− 1) tetrahedrons to the cylinder, the volume of the actuating module can be calculated. The width of the tetrahedron (𝑆𝑡) can be expressed with the following equation (Ⅲ.1.5):
𝑆𝑡 =𝐴
2⋅ {tan ( 𝜋
2𝑛2) +𝑡𝜋
2} (Ⅲ.1.5) The height of the tetrahedron (ℎ𝑡) can be expressed as follows (Ⅲ.1.6):
ℎ𝑡 = {𝐴
2tan ( 𝜋
2𝑛2) +𝑡𝜋
2} ⋅ sin(𝜃) (Ⅲ.1.6) The volume of the tetrahedron can be expressed by multiplying 𝑆𝑡 with ℎ𝑡 (Ⅲ.1.7):
𝑉𝑡 =𝐴
6⋅ {𝐴
2tan ( 𝜋
2𝑛2) +𝑡𝜋
2 ⋅}2sin(𝜃) (Ⅲ.1.7) The volume of the actuating module (𝑉) can be calculated by subtracting 2𝑛2(𝑛1− 1) ⋅ 𝑉𝑡 with 𝑉𝑐 (Ⅲ.1.8):
𝑉 = n2𝐴2
4 sin(𝜋
𝑛2)⋅ [(𝑛1− 1) ⋅ {𝐴 tan (𝜋
2𝑛2) +𝑡𝜋
2} sin[𝜃
2] + 2𝑛1𝜋𝑡 sec (𝜋
2𝑛2)] −n2⋅(𝑛1−1)𝐴
3 ⋅ {𝐴
2tan (𝜋
2𝑛2) +𝑡𝜋
2}2sin(𝜃) (Ⅲ.1.8) The displacement (𝑥) is the same with ℎ𝑐 (Ⅲ.1.9):
𝑥 = 2(𝑛1− 1) ⋅ {𝐴
2tan ( 𝜋
2𝑛2) +𝑡𝜋
2)} ⋅ sin (𝜃
2) + 2𝑛1𝜋𝑡 sec ( 𝜋
2𝑛2) (Ⅲ.1.9) The required air volume to create a certain displacement (𝑥) can be predicted with the equation above.
The blocked force of the actuating module can be established with the energy conservation equation.
As shown in Fig Ⅲ.1.9, the pneumatic energy with 𝑝 and 𝑉 is converted into work to the object. 𝜃 can be expressed as 𝑉 and 𝑥 , the energy conservation equation can be formulated by partially differentiating the 𝑉 and 𝑥.
30
Fig Ⅲ.1.9 Analytical modeling of the blocked force of the actuating module
As shown in Fig Ⅲ.1.9, the differential value of V with θ is required to calculate the blocked force.
The differential of V with θ can be expressed as follows (Ⅲ.1.10):
𝜕𝑉
𝜕𝜃= n2𝐴2
8 sin(𝜋
𝑛2)⋅ (𝑛1− 1) ⋅ {𝐴 tan ( 𝜋
2𝑛2) + 𝑡𝜋} cos (𝜃
2) −n2⋅(𝑛1−1)⋅𝐴
3 ⋅ {𝐴
2tan ( 𝜋
2𝑛2) +𝑡𝜋
2}2cos(𝜃) (Ⅲ.1.10) The differential of 𝑥 with θ can be expressed as follows (Ⅲ.1.11):
𝜕𝑥
𝜕𝜃=𝑛1−1
2 ⋅ {Atan ( 𝜋
2𝑛2) +𝑡𝜋
2} ⋅ cos (𝜃
2) (Ⅲ.1.11) By dividing 𝜕𝑉
𝜕𝜃 with 𝜕𝑥
𝜕𝜃, the blocked force can be calculated (Ⅲ.1.12):
𝐹 =𝜕𝑉
𝜕𝑥= 𝑝 ⋅ [
n2{2𝑡+ 𝐴 2 cos( 𝜋
2𝑛2)} 2
2 tan( 𝜋
2𝑛2) − 𝑛2𝐴
3tan2(𝜋
2𝑛2) cos(𝜃) 6{t 𝜋+tan(𝜋
2𝑛2)} cos(𝜃 2)
]
(Ⅲ.1.12)
The maximum bending angle of the actuating module can be formulated with design parameters (Fig
Ⅲ.1.10). In this case, a parameter, 𝑁, which is the number of faces is attached for the bending motion has to be considered. It is assumed that the faces are evenly attached starting from the center of the actuator to both sides. The bending angle (𝜙) of the bending module can be expressed with the equation (Ⅲ.1.13). 𝜙 has the minimum value when 𝜃 = 0° and 𝜙 has the maximum value when 𝜃 = 180°.
31 𝜙 = 2𝑁 sin−1[{1
2tan ( 𝜋
2𝑛2) + 𝑡𝜋
Acos( 𝜋 2𝑛2)+𝑡𝜋
2𝐴} ⋅ sin (𝜃
2)] (Ⅲ.1.13)
Fig Ⅲ.1.10 Analytical modeling of the bending angle of the actuator
32
To verify the validity of the modeling, experiments for identifying the relationship between the displacement (𝑥), air pressure (𝑝), and the blocked force (𝐹) were conducted. Fig Ⅲ.1.11 shows the experimental settings. The experiment process is as follows. Firstly, fix the displacement of the actuating module. Inject the air pressure from 0 kPa to 50 kPa, and measure the blocked force with a 6- axis force/torque sensor (Gamma Sensor; ATI). Change the extension rate in 20% increments, and repeat the test in the same process. 6
Fig Ⅲ.1.11 Experimental setting
An actuating module in which design parameters are that 𝐴 = 50mm, 𝑡 = 1mm, 𝑛1 = 3, and 𝑛2= 3 was manufactured to take the experiment. The blocked force was measured continuously, increasing the extension rate of the actuating module from 100% to 280%. As shown in Fig Ⅲ.1.12, the relationship between the air pressure and the blocked force is plotted with extension rates. In addition, the relationship between the extension rate and the blocked force is plotted with different air pressure (Fig Ⅲ.1.13). The red dotted line is experimental data and the blue solid line is the theoretical value that was expected by modeling equations. As the figures show that the experimental value and the theoretical value are fitted well in the small range of extension rate and air pressure, but the difference between the two data increases, when the extension rate is over 260%.
33
Fig Ⅲ.1.12 Relationship between the air pressure and the blocked force
34
Fig Ⅲ.1.13 Relationship between the extension rate and the blocked force
The same experiment was implemented by changing the value of the design parameter, 𝐴 because 𝐴 is a dominant factor that affects the blocked force and extension rate of the actuating module (Fig
Ⅲ.1.14). Three actuating modules were fabricated, in which values of 𝐴 of each actuating module are 40mm, 50mm, and 60mm. Other parameters except 𝐴 are fabricated with the same values (𝑡 = 1mm, 𝑛1 = 3, 𝑛2 = 3). Like the previous experiment, the relationship between the air pressure and the blocked force, and between the extension rate and the blocked force are plotted.
35
Fig Ⅲ.1.14 Relationship between the air pressure and the blocked force of actuating modules with different 𝐴 values
36
Fig Ⅲ.1.15 Relationship between the extension rate and the blocked force of actuating modules with different 𝐴 values
The experiments show that the differences between the experimental data and theoretical values are going to be large regardless of the value of 𝐴 . However, the larger 𝐴 is, the wider the range of extension rate and the force of the actuating module is predictable with the modeling equation. The figure shows that when the value of 𝐴 is small, the time that the differences start gets faster (Fig
Ⅲ.1.15). To find out the causes of the phenomenon, the root mean square error (RMSE) is calculated and compared (Fig Ⅲ.1.16 and Table Ⅲ.1.1). I can find the predictable range with the modeling regardless of the design of the actuating module. When 𝜃 < 72°, the RMSE of all modules does not exceed 2 N, but RMSE is going to be over than 3 N when 𝜃 > 72°. Although the exerting force should increase with 𝜃 in simulation, the force converges to a constant value when 𝜃 = 72° in the real world.
The cause of the error occurring between the two data is that the assumption is partially fitted with the real world. The compressibility of the air and deflection of the rigid panels are going to be influential when 𝜃 is over 72°.
37
Fig Ⅲ.1.16 RMSE of the experimental data and the theoretical values
Table Ⅲ.1.1 RMSE of the experimental data and the theoretical values 3.2 Design optimization
The design optimization of the actuating module was conducted to minimize the size of the module for a compact wearable system. The purpose of the optimization is to extract the design parameters of the actuating module that can create the required performances while minimizing the size of the module (Fig Ⅲ.2.1). 𝐹 is supporting force of the actuating module and 𝜙 is the bending angle of the actuating module. 𝐴, 𝑛1, 𝑛2 and 𝑡 in Fig Ⅲ.2.1 are the optimized design parameters of the actuating module which make the actuating module compact.
38
Fig Ⅲ.2.1 Purpose of the optimization
The interior-point method which is used in solving both linear and nonlinear optimization problems that contain inequalities as constraints is applied for the optimization process [23]. In the optimization process, four constraints are applied to satisfy the minimum conditions of the actuating modules. As shown in Fig Ⅲ.2.2, the constraints are the comfortness (𝜙𝑚𝑖𝑛), the range of motion of the actuating module (𝜙𝑚𝑎𝑥), supporting force against external force (F), and fitting the center of rotation between the arm and the actuating module.
𝜙𝑚𝑖𝑛 is the angle between the upper arm and torso when the actuating module is completely contracted (θ = 0°). 𝜙𝑚𝑖𝑛 can be considered as the comfortness because the smaller 𝜙𝑚𝑖𝑛 is, the more comfortable users feel. 𝜙𝑚𝑎𝑥 is the maximum bending angle when the actuating module is completed extended (θ = 180°). The predictable range of the performance of the actuating module is from θ = 0° to θ = 72°, and the quantitative goal of the supporting angle is 120°. Considering the range of the validity of the modeling (θ = 0°~72°), I set the angle of the actuating module (ϕ) should be over 120° when θ = 72°. The supporting force of the actuating module has to sustain 5 kg considering the weight of the arm and equipment. Lastly, in light of the biomechanics of body size, the center of rotation should be fitted. The objective function is the width of the module (𝑆𝑐) which needs to be minimized.
39
Fig Ⅲ.2.2 Constraints of the optimization process
Fig Ⅲ.2.3 Settings of the optimization process
40
Nonlinear optimization process was conducted in MATLAB, and the optimized design parameters are extracted (𝑛1 = 6, 𝑛2= 3, 𝐴 = 95.1mm, t = 1mm). The performances of the optimized actuating module are 𝜙𝑚𝑖𝑛 = 28.0°, 𝜙𝑚𝑎𝑥= 166.3°, and F(θ = 0°)= 221.3 N. To find out the design parameters which dominantly affect the performances of the module, the result of the optimization was discussed.
The optimized design parameters are put into equations of performances and the equations are plotted about each design parameter in 3-dimensionl (Fig Ⅲ.2.4). Colored surfaces are the performance equations and each axis is the design parameters. The yellow surface is where 𝜙𝑚𝑖𝑛− 28.0° = 0, the green surface is where 𝜙𝑚𝑎𝑥− 166.3° = 0, and the blue surface is where F(θ = 0°)−221.3 N = 0. The surfaces are overlapped only at a point, which is optimized design parameters.
Fig Ⅲ.2.4 Constraints of the optimization process by design parameters
41
In order to figure out which design parameters dominantly affect each performance, the above graphs are analyzed one by one. 𝜙𝑚𝑖𝑛 is the comfortness of the actuating module and it can be expressed with the equation below (Ⅲ.2.1):
𝜙𝑚𝑖𝑛 =2𝑛1𝜋𝑡∙𝑠𝑒𝑐(
𝜋 2𝑛2)+6
𝑑 (Ⅲ.2.1)
The equation consists of three parameters, 𝑛1, 𝑛2, and t, but 𝑛2 is in cosine function so it has little influence on the value. 𝑛1 and t are dominant parameters affecting 𝜙𝑚𝑖𝑛. As shown in Fig Ⅲ.2.5, the surface ‘𝜙𝑚𝑖𝑛=28.0°’ is projected on the plane 𝑛1t. It is obvious that 𝑛1 and t are proportional to 𝜙𝑚𝑖𝑛 because 𝑛1 is the number of the actuating module and t is the thickness of the sheet.
Fig Ⅲ.2.5 Dominant design parameters which dominantly effect to 𝜙𝑚𝑖𝑛
The figures below shows the relationships between 𝑛1 and t are proportional to 𝜙𝑚𝑖𝑛 . Other parameters except 𝑛1 and t are constant (Fig Ⅲ.2.6).
42
Fig Ⅲ.2.6 Relationship between 𝑛1, t and 𝜙𝑚𝑖𝑛
Maximum bending angle (𝜙𝑚𝑎𝑥) of the actuating module can be expressed as follows (Ⅲ.2.2):
𝜙𝑚𝑎𝑥= 2(𝑛1− 1)𝑠𝑖𝑛−1{1
2𝑡𝑎𝑛 ( 𝜋
2𝑛2) + 𝑡𝜋
𝐴𝑐𝑜𝑠( 𝜋 2𝑛2)+𝑡𝜋
2𝐴} (Ⅲ.2.2)
As shown in Ⅲ.2.2, it is obvious that the number of modules, 𝑛1 and thickness of the sheet, t are proportional to 𝜙𝑚𝑎𝑥. However, 𝑛2 and 𝐴 also affect the range of motion of the actuating module.
The green surface ‘𝜙𝑚𝑎𝑥 = 166.3°’ is projected on the plane 𝑛2 𝐴 (Fig Ⅲ.2.7). As shown in the figure, 𝐴 and 𝑛2 are inversely proportional to 𝜙𝑚𝑎𝑥. The reason is that the effect of θ on the entire bending angle (𝜙𝑚𝑎𝑥) decreases when 𝐴 or 𝑛2 increases.
43
Fig Ⅲ.2.7 Dominant design parameters which dominantly effect to 𝜙𝑚𝑎𝑥
The figures below shows the relationships between 𝑛1 and t are proportional to 𝜙𝑚𝑖𝑛 . Other parameters except 𝑛1 and t are constant (Fig Ⅲ.2.8).
Fig Ⅲ.2.8 Relationship between 𝐴, 𝑛2, and 𝜙𝑚𝑎𝑥
Supposing that the user holds a 2 kg welding torch, the actuating module should sustain 5 kg to support muscle strength. The required supporting force depends on the distance from the center of rotation to the actuating module. The blue surface ‘𝐹 = 221.3 N°’ is projected on the plane 𝐴𝑛2 (Fig Ⅲ.2.7).
Force can be expressed with area × pressure , so the cross-sectional area of the actuating module
44
dominantly affect the supporting force. The cross-sectional area of the module can be expressed as follows (Ⅲ.2.3):
Area: n2𝐴2
4 sin(𝜋
𝑛2) (Ⅲ.2.3)
The equation consist of 𝑛2 and 𝐴 so that they are mostly dominant factor affecting the supporting force of the actuating module.
Fig Ⅲ.2.9 Dominant design parameters which dominantly effect to F
The figures below shows the relationships between 𝑛2 and A are proportional to F . Other parameters except 𝑛2 and A are constant (Fig Ⅲ.2.10).
45
Fig Ⅲ.2.10 Relationship between 𝐴, 𝑛2, and F
46
Ⅳ. Experimental Verification
4.1 Experimental setupTo verify the performances of the optimized actuating module, the experimental setting was built up. Firstly, the pneumatic actuation system was required to control the air pressure and the airflow (Fig Ⅳ.1.1). An air pump motor (6391GP-DN3535P; MOTORMART [38]) supplies the air into the chamber, a 3-way valve controls (V114-6LZ; SMC[39]) the air route to inject or exhaust the air pressure, a motor driver (SABERTOOTH 2X12 R/C; DimensionEngineering [40]) is required to actuate the 3-way valve, a flow sensor (VEMD-L-6; FESTO [41]) measures how much the volume of air is injected into the actuating module, and a pressure sensor (XGZP6847-050KPG; CFSensor [42]) measures the internal pressure of the actuating module. A data acquisition board (USB-6353;
National Instruments [36]) used as a processor to control the actuation system. The weight of the actuation system except the processor is about 1.64kg.
Fig Ⅳ.1.1 Planar figure of the actuation system
47
In order to measure the range of motion and the supporting force of the actuating module, an experimental setting using profiles was built up (Fig Ⅳ.1.2). Two bearings were used to express the 1- axis shoulder joint. The location of the module can be adjustable with the size of the actuating module, and there is a fixed stand at the tip of the upper arm part so that some weight can be loaded. In addition, a linear guide is integrated with the upper arm to make the module move as the bending angle increases.
Fig Ⅳ.1.2 Experimental setting for performance verification
The anchoring structures for connecting the actuating module with the users’ bodies were developed (Fig Ⅳ.1.3). Humerus fixing part and body fixing part are separately bolted with the upper arm and torso of a welding vest. Adjustable webbing belts were used to make wearing on/off easily .
48
Fig Ⅳ.1.3 Anchoring structures
4.2 Performance verification
The predicted performances of the optimized actuating module is that 𝜙𝑚𝑖𝑛 = 28.0°, 𝜙𝑚𝑎𝑥 = 166.3°, and F = 221.3 N. The performances were verified with the experimental setting above. The air pressure is slowly injected into the actuating module, and the module lifts up loads. Fig Ⅳ.2.1 shows that the actuating module can support up to about 7.5kg under 60kPa, and it can lift up the loads more than 160°. Supporting force and the maximum bending angle of the actuating module almost matches with the values of the simulation.
49
Fig Ⅳ.2.1 Performance verification
50
The support tests were conducted after wearing the system (Fig Ⅳ.2.2). The process of the passive support test without the air pump motor is as follows. Raise the arm and let the air into the actuating module and close the air hose to seal the air. Then, check the module can create the sufficient supporting force, and move the arm forward and backward to check the module to follow the motion naturally. In addition, an active support test with the air pump motor was conducted. The air pressure was injected into the actuating module up to 10 psi. Like the passive support test, the supporting force and compliance of the actuating module were verified.
Fig Ⅳ.2.2 Support tests: (a) Passive support test, (b) active support test
51
Ⅴ. Conclusion and Open Issues
In the thesis, an origami-based hybrid actuating module for the upper limb support was proposed. The actuating module has three distinctions with existing soft pneumatic actuators. Firstly, in order to improve the actuation speed of existing soft pneumatic actuators, origami structures were applied for a pneumatic chamber. A chamber based on origami structures can enlarge the deformation in the desired direction with the same energy input, and successive crease lines and rigid panels of origami can be considered as linkages and joints so that the module can create a strong force while maintain compliance.
Secondly, rigid materials and soft materials are combined to enhance the force transmission of the actuating module. Skeletons, the rigid materials of the actuating module act as rigid panels of origami patterns, and skin and adhesive which are the soft materials of the actuating module take crease lines role of origami patterns.
Thirdly, a new fabrication method, an additive manufacturing method was developed to shorten fabrication time and make easy to modify the design of the actuating module. By designing CAD file of origami patterns, performances of the actuating module can be simply manipulated. In addition, a heat press and a laser cutting machine take place the manual fabrication process so that it takes a short time to manufacture the actuating module and the performance repeatability can be constant.
To apply the actuating module to a wearable system for supporting upper limb strength, there need some conditions of the actuating module. Considering the average body sizes of Korea male adults, the required performances of the actuating module were calculated. Analytical modeling of design parameters of Yoshimura pattern was formulated to predict performances of the actuating module by manipulating the origami pattern. The design parameters of Yoshimura pattern were defined, and the blocked force and the maximum bending angle of the actuating module were calculated using quasi- static model. The validity of the modeling equation was experimentally verified and the valid range of modeling values was determined.
The optimized design parameters of the actuating module were extracted to minimize the size of the actuating module. In order to figure out which design parameters dominantly affect each performance, the result of the optimization was discussed. The pneumatic actuation system was set up and the experimental setting using profile was built to verify the performance of the optimized actuating module.
As a result, the actuating module can sustain about 7.5kg up to 160°. The anchoring structures for linking the body with the actuating module were developed, and the passive support test and the active support test were conducted.
52
There needs some verification that the actuating module is not damaged by the embers from welding.
Investigation on other materials is needed to reduce weight as much as possible and make the system more durable against other factors like temperature, humidity, pressure, and so on. An analytical modeling is not perfectly fitted with the experimental data because of the compressibility of the air and deformation of the rigid panels. Considering the compressibility of the air, the relation between 𝑝 and 𝑉 should be determined and a new model is required to predict the performance of the actuating module.
In addition, the actuating module is operated by turning on/off a switch manually. However, it is not proper for workers who cannot uses their hands when working. Sensory feedback is required to react with users’ movements in real time.
![Fig Ⅰ.1.1 Promising market of wearable systems: (a) Wearable systems in various fields and expanding wearable systems market [43, 44], (b) Necessity of muscle support robots in industrial](https://thumb-ap.123doks.com/thumbv2/123dokinfo/10495944.0/13.892.116.768.304.738/promising-wearable-systems-wearable-expanding-wearable-necessity-industrial.webp)
![Fig Ⅰ.1.2 Issues of conventional wearable systems and the emergence of soft wearable systems [1~4]](https://thumb-ap.123doks.com/thumbv2/123dokinfo/10495944.0/14.892.162.740.201.455/fig-issues-conventional-wearable-systems-emergence-wearable-systems.webp)
![Fig Ⅰ.1.3 Adding rigid materials for reinforcing a soft chamber: (a) fiber [9], (b) fabric [10], (c) fiber [11], (d) rigid structures [12]](https://thumb-ap.123doks.com/thumbv2/123dokinfo/10495944.0/16.892.137.760.579.973/adding-rigid-materials-reinforcing-chamber-fiber-fabric-structures.webp)
![Fig Ⅱ.1.1 Introduction of origami: (a) Definition of origami [13], (b) Applications of origami to engineering](https://thumb-ap.123doks.com/thumbv2/123dokinfo/10495944.0/18.892.124.778.383.668/fig-introduction-origami-definition-origami-applications-origami-engineering.webp)
![Fig Ⅱ.1.2 Characteristics of origami structures: (a) Programmable curvatures [14], (b) various motions by folding and unfolding processes [17], (c) gadgets for creating foldable origami](https://thumb-ap.123doks.com/thumbv2/123dokinfo/10495944.0/19.892.118.784.351.662/characteristics-structures-programmable-curvatures-unfolding-processes-creating-foldable.webp)
![Fig Ⅱ.1.4 Soft pneumatic actuators based on Origami structures: (a) Elastomeric origami [19], (b) soft pneumatic actuators with origami shell reinforcement [20], (c) fluid-driven origami-inspired](https://thumb-ap.123doks.com/thumbv2/123dokinfo/10495944.0/21.892.128.777.119.785/pneumatic-actuators-origami-structures-elastomeric-pneumatic-actuators-reinforcement.webp)
![Fig Ⅱ.2.1 Typical fabrication methods: (a) A molding method [22], (b) A 3d-printing method [23]](https://thumb-ap.123doks.com/thumbv2/123dokinfo/10495944.0/23.892.117.788.132.691/fig-typical-fabrication-methods-molding-method-printing-method.webp)
![Fig Ⅱ.2.2 A new type of fabrication methods: (a) heat press [24], (b) heat sealing and sewing [25]](https://thumb-ap.123doks.com/thumbv2/123dokinfo/10495944.0/24.892.123.784.135.356/fig-type-fabrication-methods-heat-press-sealing-sewing.webp)