PAUL DEBONO
PAULOS F040
A CO-OPERATIVE RTOS
FOR THE SILICON LABS
C8051F040 µ C
© 2019 Paul Debono & bookboon.com ISBN 978-87-403-2863-9
CONTENTS
Preface 8
Acknowledgements 11
1 C8051F040 Basics 13
1.1 Introduction 14
1.2 Memory Types 15
1.3 Program/Data Memory (Flash) 16
1.4 External Data Address Space (XRAM) 17
1.5 Special Function Register (SFR) Memory 20
2 PaulOS_F040 – a co-operative RTOS 25
2.1 Description of the RTOS Operation 25
2.2 PaulOS_F040.C System Commands 29
2.3 Descriptions of the commands 31
2.4 PaulOS_F040 parameters header file 46
2.5 Example using PaulOS_F040 RTOS 49
Free eBook on
Learning & Development
By the Chief Learning Officer of McKinsey
Download Now
3 Master-Slave CAN bus RTOS 65
3.1 Multi-Controller RTOSs 65
3.2 CAN bus RTOS Example 65
4 Programming Tips and Pitfalls 133
4.1 RAM size 133
4.2 SFRs 134
4.3 Setup faults 135
4.4 Serial Port (UART0) 136
4.5 Interrupts 137
4.6 RTOSs pitfalls 137
4.7 C Tips 137
Appendix A PaulOS_F040.C Source Code Listing 139
Appendix B – Further Example 228
Bibliography 307
Index 309
End Notes 310
LIST OF FIGURES
Figure 1-1 C8051F040TB Board 13
Figure 1-2 C8051F040 IC Block Diagram 14
Figure 2-1 RTOS Task states diagram 26
Figure 2-2 Blinking LED example 50
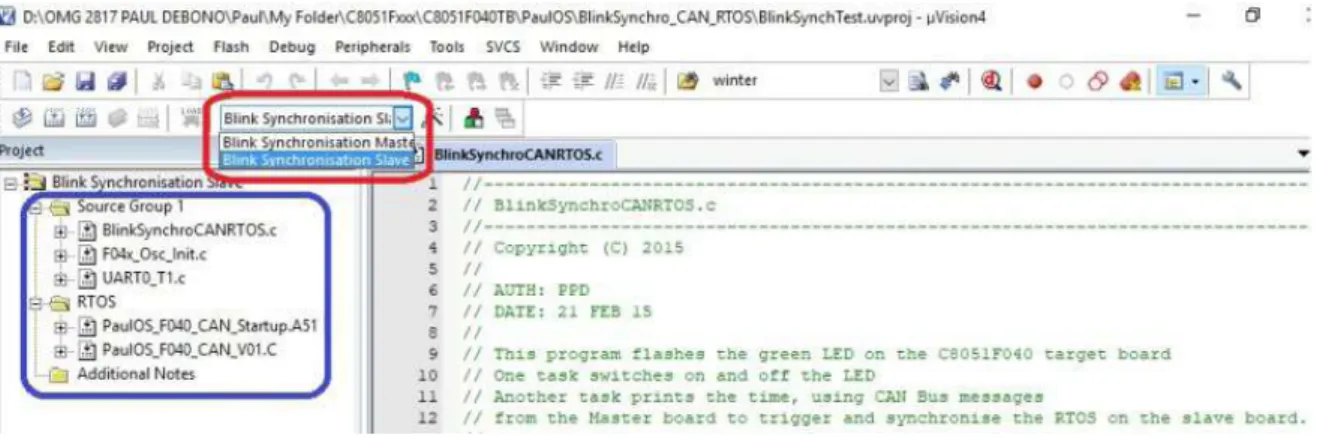
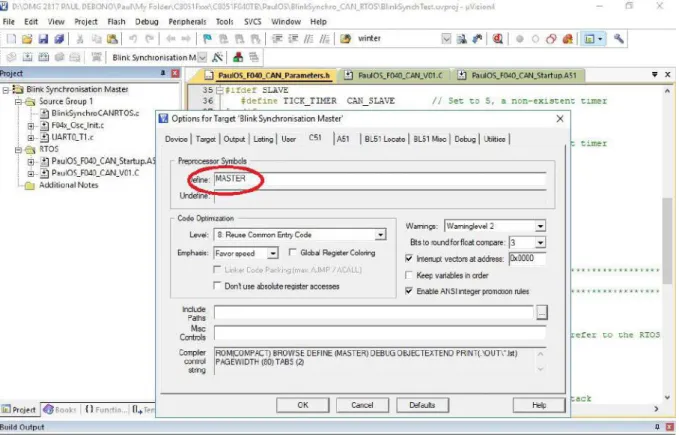
Figure 3-1 Screen shot with the CAN bus example 65 Figure 3-2 Screen shot showing the MASTER option 66
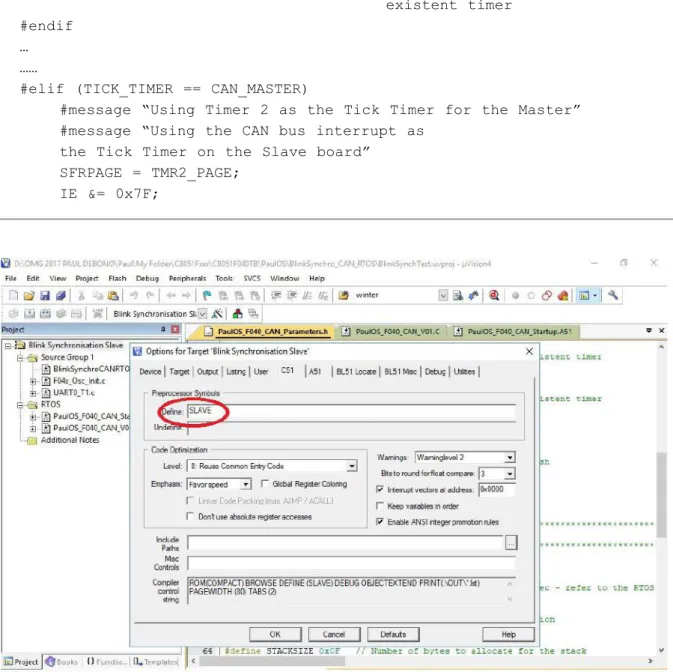
Figure 3-3 Screen showing the SLAVE option 67
Figure 4-1 Screenshot of the Keil Target setup 134
LIST OF TABLES
Table 1-1 C8051F040 on-chip memory map 16
Table 1-2 C8051F040 Internal Data Address Space 20 Table 1-3 C8051F040 Special Function Registers (SFRs)-DIRECT addressing ONLY 22
PREFACE
This text book is intended to be used as a reference book for those whose work or study requires familiarity with microcontrollers and real-time operating systems (RTOSs). It deals particularly with a modified version of the original PaulOS co-operative RTOS so as to be compatible with the Silicon Labs C8051F040 device, with its increased number of SFR pages, timers, Control Area Network (CAN bus) and interrupts. Ideally, in order for this book to make sense it should be used in conjunction with my previous books (Debono, 2013a) and (Debono, 2013b) where various simple RTOSs based on the basic 8051 microcontroller were fully explained. Another one of my books which would also be beneficial is (Debono, 2015) where a similar exercise was carried out for the C8051F020 device, also from Silicon Labs. Naturally one cannot do without reference to the C8051F040 data sheet/manual (Labs, 2004) in order to get the full benefits out of this powerful microprocessor and be able to better understand the examples found in this book.
It has basically the same format as the book for the C8051F020 device (Debono, 2015) but the software has obviously been modified to make full use of the architecture of the C8051F040. Namely the RTOS has the capability to make use of any one of the 5 timers available on the device as the source of its tick timer. Certain explanations for the essential SFRs are left out from this book and the reader is encouraged to read the book about the C8051F020 device to familiarise onseself with the SFRs, watchdog timer, system clock, crossbar registers etc. Moreover since this device has more than one SFR page, the RTOS had to be modified so as to switch over to the correct SFR page as and when needed. An explanation of the SFR paging requirement is given in this book, something which was not required in my earlier books simply because they do not have that capability/requirement.
The example programs have also been expressly adapted to the new device. For example the Master-Slave RTOS which previously relied on the serial RS-232 transmissions and interrupts between the boards, has been replaced with one which uses the CAN bus to connect and synchronise the two boards.
As it is normally expected, it would be helpful if the reader has already got some familiarity
with personal computers and has taken an introductory course in digital devices. Some
experience in assembly language programming would also be fruitful and it is also assumed
that the reader is familiar with binary and hexadecimal numbers.
This book is structured into 4 chapters and 2 apendices with full source code listings of the PaulOS RTOS and of the example programs. A brief outline of the contents of each chapter is given below:
Chapter 1:
This chapter describes the C8051F040 microcontroller and explains its internal organization and lists the internal special function registers (SFRs) used to set the mode of operation of the various peripherals which are present on this versatile mixed-signal (Analogue and Digital) microcontroller device. This device has so many peripherals that the need arose to have more than one SFR page, and hence SFR paging is used when programming this device so as to address the correct SFR.
Chapter 2:
The PaulOS co-operative RTOS is described in this chapter. This is the ‘flagship’ RTOS which we regularly use during the year with our students. It is heavily used also for their final year theses and it has been regularly refined to reflect the changes and upgrading requested by the students as they became more and more familiar with the performance and limitations of this co-operative RTOS. In this RTOS, each task is free to run for as long as it wishes. The task itself can control when to give up the processor time to allow other tasks to run. The modified version PaulOS_F040, running on the much faster C8051F040 at over 20MIPS, is ideally suited for small project applications and for getting the most out of the device.
Chapter 3:
We discuss a modification to the basic RTOS so that it can run on two separate boards connected together via the CAN bus. One board would be acting as a master and the other as a slave. The RTOS running on the slave would be synchronised to the one running on the master via messages using the CAN bus and its associated interrupts. A full listing of the modified CAN bus RTOS with an example program is also given in this chapter.
Chapter 4:
In this final chapter we discuss some programming tips and common pitfalls which should be avoided when programming such microcontrollers and when using the PaulOS RTOS.
This chapter is very similar to the one found on (Debono, 2015) and it would be a good
idea to read this chapter first before attempting to write the first program.
Appendix B:
A further example is given here with full program source listings in C language format. It is a program which displays time by means of a single LED, flashing the time and date using the Morse code. Time can also be optionally synchronised to a GPS signal by connecting a GPS source to the serial port.
Whilst hoping that you will find this book useful, please feel free to contact me if you have
any queries or suggestions. ( email: [email protected] )
ACKNOWLEDGEMENTS
I would like to acknowledge the assistance given by my students who helped me test some of the examples and pointed out some mistakes and omissions. I would also like to take this opportunity to thank all my students for the wonderful productive time we had together during my time at the University of Malta and wish them all the best success in their future carreers,
I am also very grateful for the contributions made by my son Luke who proof read the first draft, for his suggestions and constructive comments whilst formulating the structure of this book.
Finally I am deeply grateful to Prof. Ing. Victor Buttigieg who kindly reviewed the final
version of the book and put forward valuable and much appreciated suggestions.
To my wife Maria for being so supportive and patient with me, my two sons Neil and Luke for their continuous
encouragement, and to my lovely grand daughter Mila.
1 C8051F040 BASICS
This chapter briefly describes the C8051F040 microcontroller and explains its internal organization and the way its internal special function registers can be used to setup the various peripherals. Many web pages, books (see bibliography list) and tools are available for the 8051 developer, and many of them are free!. The use of the C8051F040 data sheet (Labs, 2004) and referring to (Debono, 2015), (Chew, et al., 2005), (Huang, 2009) and (Schultz, 2004) in conjunction with this book is highly recommended whilst following the code listed elsewhere throughout the book.
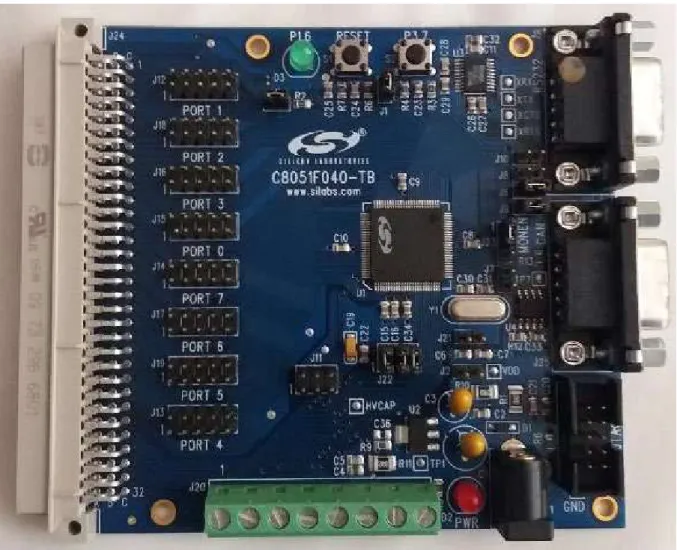
Figure 1-1 C8051F040TB Board
At the University we use the Silicon Labs development boards shown in Figure 1-1. At the time of writing, it is one of a series of super-charged versions of the 8051 family from Silicon Labs.
1.1 INTRODUCTION
Despite its relatively old age, the 8051 (developed by Intel Corporation in the early 1980’s) is one of the most popular microcontrollers in use today. Many derivative microcontrollers have since been developed that are based on and compatible with the 8051. Thus the ability to program an 8051 is an important skill for anyone who plans to develop products that will take advantage of most microcontrollers. My earlier books (Debono, 2013a, 2013b) did just that and introduced the reader to the RTOS, while (Debono,2015) extended the RTOS on the the C8051F020 microprocessor.
The sections in these chapters are simply a further extension to the (Debono, 2015) book so that the RTOS is able to cater for any changes introduced with the C8051F040, namely the SFR paging requirement, the availability of the CAN bus and different interrupts. All attempts were made so as not to repeat any explanations and examples given in my previous books unless absolutely necessary, since the C8051F040 is very similar to the C8051F020 device. Throughout this book, it is therefore assumed that the reader has got some amount of programming knowledge in C and that he has a basic understanding of the hardware.
The C8051F040 is a 64 or 100-pin IC as shown in Figure 1-2.
We shall now deal with the internal organisation of the C8051F040 microcontroller.
1.2 MEMORY TYPES
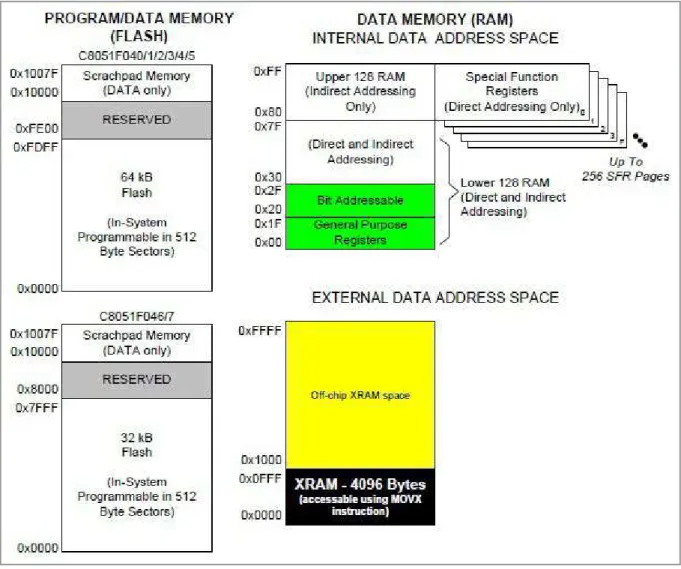
The C8051F040 has three types of memory and each type has to be addressed in a different way. To effectively program the device it is necessary to have a basic understanding of these memory types and how to address them, especially if and when programming directly in assembly language. The memory types found on the C8051F040 are illustrated in Table 11 and they are classified as the Data Memory (RAM) which is itself organised in two separate areas, namely the Internal Data Address Space which is identical with all the basic 8052/8032 devices, and External Data Address Space which has 4096 bytes present on-chip with the ability to have extra additional storage space added externally. Then there is the Program Code/Data Memory (Flash). Addresses throughout this book are shown suffixed either with a lower case h (i.e. 0Fh) or with a upper case H (i.e. 0FH) or pre-fixed with a
‘0x’ (i.e. 0xFF) to signify that they are hexadecimal numbers.
www.sylvania.com
We do not reinvent the wheel we reinvent light.
Fascinating lighting offers an infinite spectrum of possibilities: Innovative technologies and new markets provide both opportunities and challenges.
An environment in which your expertise is in high demand. Enjoy the supportive working atmosphere within our global group and benefit from international career paths. Implement sustainable ideas in close cooperation with other specialists and contribute to
Table 1-1 C8051F040 on-chip memory map
1.3 PROGRAM/DATA MEMORY (FLASH)
The flash memory is the part of memory that holds the actual code or program that is to be executed. This memory is limited to 64KB but being a flash memory, the code can be re-written to it many times so as to change/update the program.
Also because it is a flash memory, it can also be used to store data which needs to be updated
and stored for re-use. For example you might need to store some settings (variables), which
although they can be varied whilst running the program, you would still need to store their
17
1.4 EXTERNAL DATA ADDRESS SPACE (XRAM)
As an obvious opposite of Internal RAM, the C8051F040 also supports what is called External Data Address Space (XRAM). For the moment we shall make use of assembly language, we will use C language programming later. This is accessable using the MOVX assembly code instruction. For example, to increment an Internal RAM location (such as INC R1) by 1 requires only one instruction which is executed in one instruction cycle.
To increment a 1-byte value stored in External RAM requires four assembly language instructions as shown here
MOV DPTR, #ADDRESS (2 instruction cycles)
MOVX A, @DPTR (2 instruction cycles)
INC A (1 instruction cycle)
MOVX @DPTR, A (2 instruction cycles)
which are executed in seven instruction cycles. In this case, external memory is seven times slower!
What External RAM loses in speed and flexibility it gains in quantity. While the Internal RAM is limited 256 bytes, the C8051F040 has an on-chip External RAM of to 4KB.
Modern devices now also have this so-called external RAM, physically residing on the same chip, but it is still referred to as external (or XDATA) and all the information listed in this book still holds.
1.4.1 INTERNAL DATA ADDRESS SPACE (RAM)
As mentioned at the beginning of this chapter, the 8051 includes a certain amount of
on-chip memory. On-chip memory is really one of two types: Internal RAM usually used
to store variables and Special Function Register (SFR) memory used to store the system
registers which control the mode of operation of the built-in peripherals. The layout of the
C8051F040’s internal memory is presented in the memory map shown in Table 1-2 which
is identical with the basic 8051 except of course that it now has more SFRs since this device
is much more capable than the basic 8051, with a much larger list of peripherals. In fact
this device has more than one page for storing the SFRs with the result that SFR paging is
required. This is dealt with in section 1.5.1 where the procedure used for paging is discussed.
The C8051F040 has a bank of 256 bytes of Internal RAM. This Internal RAM is found on-chip on the device itself so it is the fastest RAM available, and it is also the most flexible in terms of reading, writing, and modifying its contents. Internal RAM is volatile, so that when the device is reset this memory is lost.
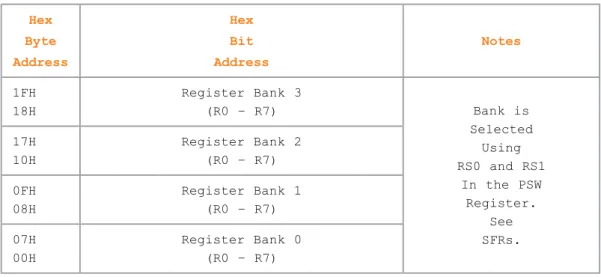
The 256 bytes of internal ram are subdivided as shown on the memory map in Table 1-2.
The first eight bytes (00h - 07h) are referred to as register bank 0. By manipulating certain SFR bits (in the PSW special function register), a program may choose to use register banks 1, 2, or 3. These alternative register banks are located in internal RAM, occupying addresses 08h through 1Fh. Register banks and bit memory mentioned below were fully discussed in my earlier books.
Bit Memory is also another part of the internal RAM, which as the name implies is able to store and manipulate bit variables. We will say more about the bit memory area later (see section 1.6), but for now we just have to keep in mind that the bit memory actually resides in internal RAM, ranging from address 20h through address 2Fh.
360° thinking .
360° thinking .
Discover the truth at www.deloitte.ca/careers
360° thinking .
360° thinking .
Discover the truth at www.deloitte.ca/careers
The 80 bytes that remain in Internal RAM, from address 30h through address 7Fh, may be used to store any user variables that need to be accessed frequently or at high-speed during the execution of the program. This area is also utilised by the microcontroller as a storage area for the operating stack.
Hex Byte Address
Hex Bit Address
Notes
FFH
Indirectly Addressable
General Purpose
RAM
Used as a STACK and to storeArea user variables 80H
7FH
Directly and Indirectly Addressable
General Purpose
RAM
Used as a STACK
Area and to store user variables 30H
2FH 7F 7E 7D 7C 7B 7A 79 78
Bit Addressable
Section (Bit Addresses
shown are in hex)
2EH 77 76 75 74 73 72 71 70
2DH 6F 6E 6D 6C 6B 6A 69 68
2CH 67 66 65 64 63 62 61 60
2BH 5F 5E 5D 5C 5B 5A 59 58
2AH 57 56 55 54 53 52 51 50
29H 4F 4E 4D 4C 4B 4A 49 48
28H 47 46 45 44 43 42 41 40
27H 3F 3E 3D 3C 3B 3A 39 38
26H 37 36 35 34 33 32 31 30
25H 2F 2E 2D 2C 2B 2A 29 28
24H 27 26 25 24 23 22 21 20
23H 1F 1E 1D 1C 1B 1A 19 18
Hex Byte Address
Hex Bit Address
Notes
1FH18H Register Bank 3
(R0 – R7) Bank is
Selected Using RS0 and RS1
In the PSW Register.
SFRs.See
17H10H Register Bank 2
(R0 – R7) 0FH
08H Register Bank 1
(R0 – R7) 07H
00H Register Bank 0
(R0 – R7)
Table 1-2 C8051F040 Internal Data Address Space
The stack is used to save return addresses when calling functions or subroutines. It is also used to store some values temporarily until they are retrieved again when needed. It should be noted, as illustrated in the memory map of Table 1-2, the area used for the stack is also shared with any user variables stored in ‘DATA’. If more stack space is required, the variables can bemoved to ‘XDATA’ area either when declaring the variable or by setting the global default in the ‘Target Option’ tab of the IDE as shown in Figure 4-1.
1.5 SPECIAL FUNCTION REGISTER (SFR) MEMORY
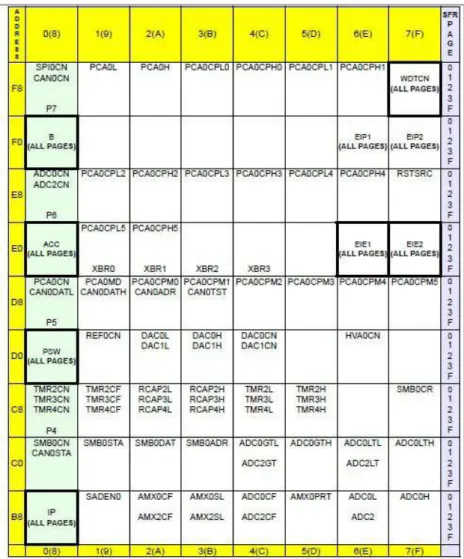
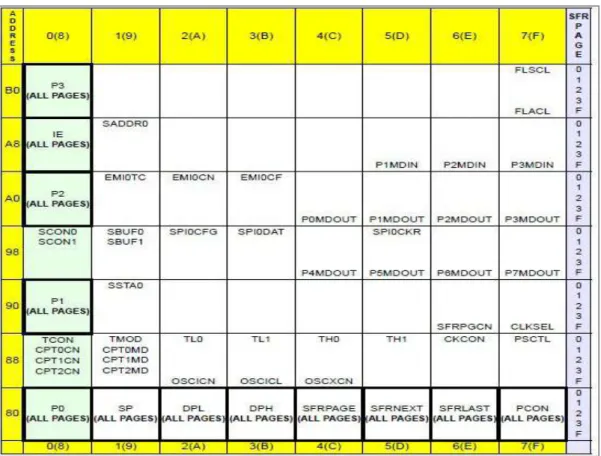
Special Function Registers (SFRs) reside in areas of internal memory that control specific functionality of the C8051F040 chip, as shown in Table 1-3. For example, eight SFRs permit access to the 8 I/O port P0-P7. Other SFRs (SBUF0, SBUF1) allows a program to read from or write to its serial ports which are called UART0 and UART1 (Universal Asynchronous Receiver/ Transmitter). Other SFRs allow the user to set the serial baud rates, control and access timers, ADC, DAC, CAN bus etc. and also configure the 8051’s interrupt system.
All the SFR names and bit names are already defined in the header file C8051F040.H
found in appendix A.
They are accessed just as if they were normal Internal RAM. The only difference is that Internal RAM for the 8051 resides from address 00h through 7Fh whereas the SFR registers exist in the address range of 80h through FFh. Each SFR has an address (80h through FFh) and a name.
Table 1-3 provides tabular representation of the C8051F040’s SFRs, their name, and their address in hexadecimal. Although the address range is from 80h through FFh, the device has 5 pages (0,1,2,3,4 and F) as shown in the on-chip memory map in Table 1-1 thus offering 128x5 possible addresses. Certain locations are not used and reading data from these empty addresses will in general return some meaningless random data while writing data to these addresses will have no effect at all. In fact the actual memory cell of these free locations might not be physically present on the chip. These free locations are reserved for future enhanced and upgraded versions of this family of microcontrollers, and certain versions have even more SFR pages. These devices which make use of more than one 128-byte page of SFRs have to switch pages in order to set the correct SFR as shown in Table 1-3.
It should be pointed out here once again that all the SFRs and control bits within the SFRs
are already pre-defined in the C8051F040.H header file (see Appendix A.5).
Table 1-3 C8051F040 Special Function Registers (SFRs)-DIRECT addressing ONLY
We will turn your CV into
an opportunity of a lifetime
We should therefore stick to the rule that any user developed software should not write anything to these unimplemented locations, since they may be used in future products to invoke new features. All unimplemented addresses in the SFR range (80h through FFh) are considered invalid and writing to or reading from these non-existent register locations may produce undefined values or behaviour.
1.5.2 SFR TYPES
In this section we shall only mention some special SFRs found in C8051F040 version which are appreciably different from the basic 8051 SFR. The standard 8051 SFRs are still available and work in exactly the same way even on this device, and details about these
‘old’ SFRs can be found in an earlier book (Debono, 2013a).
In general, as mentioned in Table 1-3 itself, some SFRs are used to control the operation or the configuration of some aspect of the 8051. For example, TCON and TMOD control the timers while SCON0 controls serial port (UART0) operations.
As already mentioned in section 1.7.2 the basic 8051 SFRs were all fully described in a previous book (Debono, 2013a) and will not be covered again here. Instead we shall mainly deal here with some important new SFRs specific to the C8051F040. For a full description of all the SFRs, such as those dealing with the ADC, DAC, CAN bus etc it would be best to consult the manual/data sheet (Silicon Labs, 2003b).
The most important registers found in nearly all the enhanced 8051 devices are:
System Clock (CLKSEL, OSCICL, OSCICN,OSCXCN) registers Watch Dog Timer (WDTCN) register
Crossbar registers (XBR0, XBR1, XBR2 and XBR3)
Entended Interrupt Enable and Priority registers (EIE1,EIE2,EIP1,EIP2)
These were explained in (Debono, 2015) and will not be coverered again here, although they are used in the examples given in other chapters and appendices.
Since this device features SFR paging, it allows the device to map many SFR’s into the 0x80
to 0xFF memory address space. Some of the new SFRs not available on the C8051F020
24
The procedure for reading from and writing to an SFR is as follows:
1. Save the current SFR page (stored in SFRPAGE register) in a temporary location/variable.
2. Select the appropriate SFR page number using the SFRPAGE register.
3. Use direct accessing mode to read from or write to the required SFR (MOV instruction).
4. Restore the original SFR from the temporary variable by writng it back to the SFRPAGE register .
In C programming language, this would be written as:
char SFRPAGE_SAVE;
SFRPAGE_SAVE = SFRPAGE;
SFRPAGE = 1;
…..
…..
…..
SFRPAGE = SFRPAGE_SAVE;
// temporary variable to store current SFR page
// Save Current SFR page // Switch to SFR page 1 // required program code // Restore SFR page when done
When an interrupt occurs, the SFR Page Register will automatically switch to the SFR
page containing the flag bit that caused the interrupt. The automatic SFR Page switching
function conveniently removes the burden of switching SFR pages from the interrupt service
routine. Upon execution of the RETI instruction, the SFR page is automatically restored to
the SFR Page in use prior to the interrupt. This is accomplished via a three-byte SFR Page
Stack and there is therefore no need to store/restore the SFR in software when handling
interrupts. This SFR paging technique is used throughout the PaulOS_F040 RTOS program
2 PAULOS_F040 – A CO- OPERATIVE RTOS
The PaulOS (Paul’s Operating System) co-operative RTOS, modified for the C8051F040 device is described here. This is the ‘flagship’ RTOS which we regularly use during the year with our students. It is heavily used also for their final year theses and it has been regularly refined to reflect the changes and upgrading requested by the students as they became more and more familiar with the performance and limitations of this co-operative RTOS. In this RTOS, each task is free to run for as long as it wishes. The task itself can control when to give up the processor time to allow other tasks to run.
The original idea for this RTOS came from the book “C and the 8051 – Building Efficient Applications – Volume II” by Thomas W. Schultz
i. This RTOS is a direct adaptation of my PaulOS assembly language program, re-written in C so as to make it more versatile and more easily portable to other microcontrollers. The main task of translating it from assembly to C was undertaken years ago as a final year engineering degree thesis (Blaut 2004), then a student under my supervision. It was further developed and improved throughout the years by myself, thanks also to input and suggestions from other students taking my study- units during their degree program, into the version shown here. I consider this RTOS as providing a good basis to the study of a real-time operating system for the 8051.
2.1 DESCRIPTION OF THE RTOS OPERATION
The PaulOS RTOS is a co-operative RTOS and hence each task has to take the initiative to give up its own time so as to allow other tasks to run. It has to be kept in mind that this OS is running on an 8051-based microcontroller which can only run one program at a time and hence this task swapping RTOS only gives the impression of having tasks running simultaneously. In actual fact we can only have one task actually running, and at the time that the RTOS is doing its own checks, no tasks at all would be running. This time ideally should be kept as short as possible.
The operation of the RTOS is as follows:
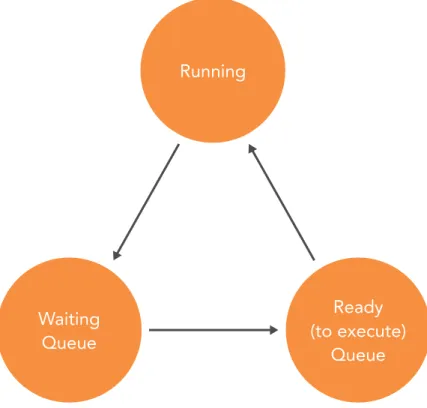
Running
Waiting Queue
Ready (to execute)
Queue
Figure 2-1 RTOS Task states diagram
The RTOS tick-timer can be chosen by the user who can select from the different timers available on the controller. Once set, at every timer overflow, an interrupt call is made to the main RTOS tick timer interrupt service routine. This is the most important routine in the program since at every interrupt the RTOS has to check the status of all the tasks so as to be able to decide whether a task can be moved from the Waiting queue to the Ready to execute queue (see Figure 2-1) or a task swap if the main() was running is required.
The RTOS achieves this by counting down the parameter variables holding the individual waiting time required for those tasks in the waiting queue. When anyone of these timeout parameters reaches 0, it means that the time to move on has arrived. Once again, being a co-operative RTOS, the scheduler cannot swap tasks on its own accord. Only the main() code can be forced to give up its time, so that if at any time whilst the main() code is running, there is a task which moves into the Ready to execute queue (or simply the Ready queue), then that task takes over.
On the other hand, when one of the OS commands which forces a task change is encountered in a task, then it is only at that instance that a task swap is implemented. The currently running task is marked as being in the Waiting queue and the first task in the Ready queue takes over, with the stack and registers being conveniently swapped.
The idea behind the PaulOS RTOS is that any task (a function or a routine in a program) can be in any ONE of three states, Running, Waiting (for some event or time delay) or Ready (to execute) state.
RUNNING
A task can be RUNNING, (obviously in the single 8051 environment, there can only be one task which is actually in the running state). If there are no tasks which are ready to execute, then the RTOS will set the main() as the running task. This will be interrupted at any time, as soon as a task becomes ready to run.
WAITING
A task can be in the WAITING (sometimes also referred to as SLEEPING) queue. Here a
• a specified amount of time delay, selected by the user with OS_WAITT command. OS_DEFER command is actually an OS_WAITT(2) – wait for 2 ticks.
• a specified amount of time delay, selected by the user with OS_PERIODIC command. The actual task is placed in the waiting queue when the OS_WAITP (wait for periodic interval) is encountered.
• a specified interrupt to occur within a specified time, selected by the user with the OS_WAITI command.
• a signal from some other task within a specified timeout, selected by the user with the OS_WAITS(timeout) command.
• a signal from some other task indefinitely, selected by the user with the OS_
WAITS(0) command.
• a never-ending waiting period. A task could be waiting here indefinitely, effectively behaving as if the task did not exist. This is specified by the OS_
KILL_IT command.
READY
It can also be in the READY QUEUE, waiting for its turn to execute. This can be visualised in Figure 2-1 which shows how the tasks can move from one state to another. The RTOS, when permitted to do so, will select the top task from this queue to execute instead of the currently running task, which would then be placed in the waiting queue.
The RTOS itself always resides in the background, and comes into play:
• At every RTOS TIMER interrupt (usually when Timer 2 or Timer 0 overflows, say every one millisecond) so as to update the waiting time left for any tasks.
• At any other interrupt from other timers or external inputs so as to check whether it needs to move to the ready queue any tasks which were waiting for such events or interrupts.
• Whenever an RTOS system command is issued by the main program or tasks, to perform that system command.
The RTOS which is effectively supervising and scheduling all the other tasks, then has to
make a decision whether it has to pause the current task and resume a new one or whether
registers, the ACC, B, PSW, and DPTR registers. The STACK too has to be saved since the task might have pushed some data on the stack ( apart from the address at the point that the task was interrupted, where it has to return to after the interrupt). This is the crux of the PaulOS RTOS.
2.2 PAULOS_F040.C SYSTEM COMMANDS
We now list and explain all the PaulOS RTOS system commands. These are first listed or grouped according to whether or not they take any parameters. The list is then repeated, this time sorted according to whether the command causes a task swap or not.
The following RTOS system calls do not receive any parameters :
• OS_DEFER (void);
// Stops current task and passes control to next task in queue
• OS_KILL_IT (void);
// Kills a task - sets it waiting forever
• OS_RUNNING_TASK_ID(void); // Returns the task number of the currently executing task
AXA Global
Graduate Program
• OS_SCHECK (void); // Checks if running task’s signal bit is set, returns a bit value // of 1 if signal is already present.
• OS_WAITP (void);
// Waits for end of task’s periodic interval, set by
// the OS_PERIODIC command.
The following RTOS system calls do receive parameters :
• OS_CREATE_TASK (uchar tasknum, uint taskadd); // Creates a task
• OS_INIT_RTOS (uchar iemask);
// Initialises all RTOS variables
• OS_PERIODIC (uint ticks);
// Tasks run periodically every number of ticks
• OS_RESUME_TASK (uchar tasknum); // Resumes a task which was previously KILLed
• OS_RTOS_GO (uchar prior);
// Starts the RTOS with priorities if required
• OS_SIGNAL_TASK (uchar tasknum);
// Signals a task
• OS_WAITI (uchar intnum);
// Waits for an event (interrupt) to occur
• OS_WAITS (uint ticks);
// Waits for a signal within a number of ticks
• OS_WAITT (uint ticks);
// Waits for a timeout defined by number of ticks
The list of commands can also be grouped as those which cause a change of task, might cause a change of task and those which do not cause a task swap.
The following RTOS system calls force a task change after executing this command:
• OS_DEFER (void);
// Stops current task and passes control to
next task in queue
The following RTOS system calls might force a task change after executing this command:
• OS_WAITS (uint ticks); // Waits for a signal within a number of ticks If the signal is already present when the command is issued, then no task swap is made, otherwise a task change is performed.
The following RTOS system calls do not force a task change, and the task using any of these commands would continue to run after executing the command:
• OS_CREATE_TASK (uchar tasknum, uint taskadd); // Creates a task
• OS_INIT_RTOS (uchar iemask);
// Initialises all RTOS variables
• OS_PERIODIC (uint ticks);
// run periodically every number of ticks
• OS_RESUME_TASK (uchar tasknum); // Resumes a task which was previously KILLed
• OS_RTOS_GO (uchar prior);
// Starts the RTOS with priorities if required
• OS_RUNNING_TASK_ID(void);
// Returns the task number of the
currently running task
• OS_SCHECK (void);
// Checks if running
task’s signal bit is set
• OS_SIGNAL_TASK (uchar tasknum);
// Signals a task
2.3 DESCRIPTIONS OF THE COMMANDS
The detailed description of the commands now follows, which would completely describe
the RTOS. The complete files for PaulOS_F040 RTOS source program can be found in
Appendix A and examples are given at the end of this chapter which should make it easier
to understand.
This system command must be the first command to be issued in the main program in order to initialise the RTOS variables. It is called from the main program and takes a one byte parameter which is actually not used in this RTOS. It is simply left here to make it compatible with previous versions of the RTOS. This implies that in order to change the tick timer (and also the interrupt number for the RTOS) we have to change the TICK_TIMER parameter in the PaulOS_F040_Parameters.h file.
This system command performs the following:
• Clears the external memory area which is going to be used to store the stack of each task.
• Sets up the IE register (location A8H in the SFR area).
• Selects edge triggering on the external interrupts. This can be amended if a different triggering is required by changing directly the default initialisation in the RTOS source code listing found in Appendix D or by re-setting the correct triggering mode after having initialised the RTOS so as to override the default value. This is done by setting the correct bit value for IT0 and IT1 residing in the TCON SFR.
Maersk.com/Mitas
�e Graduate Programme for Engineers and Geoscientists
Month 16 I was a construction supervisor in I was a
I wanted real responsibili�
I joined MITAS because
Maersk.com/Mitas�e Graduate Programme for Engineers and Geoscientists
Month 16 I was a construction supervisor in the North Sea I was a
I wanted real responsibili�
I joined MITAS because
Maersk.com/Mitas
�e Graduate Programme for Engineers and Geoscientists
Month 16 I was a construction supervisor in the North Sea I was a
I wanted real responsibili�
I joined MITAS because
Maersk.com/Mitas
�e Graduate Programme for Engineers and Geoscientists
Month 16 I was a construction supervisor in the North Sea I was a
I wanted real responsibili�
I joined MITAS because
www.discovermitas.com
33
• Loads the Ready Queue with the main idle task number, so that initially only the main task will execute.
• Initialises all tasks as being not waiting for a timeout.
• Sets up the Stack Pointer (SP) variable of each task to point to the correct location in the stack area of the particular task. The stack pointer, initially, is made to point to an offset of 14 bytes above the base of the stack [(MAIN_
STACK - 1) + NOOFPUSHES + 2] since NOOFPUSHES in this case is 13.
The first 13 locations would initially all contain a zero. This is done so as to ensure that when the first RET instruction is executed after transferring the stack from external RAM on to the 8032 RAM, the SP would be pointing correctly to the address of the task to be started. This is seen in the QSHFT routine, where before the last RET instruction, there is the Pop_Bank0_Reg macro which effectively pops 13 registers. The RET instruction would then read the correct address to jump to from the next 2 locations.
2.3.2 OS_CREATE_TASK(TASK NO:, TASK NAME)
This system command is used in the main program for each task to be created. It takes two parameters, namely the task number (the first task is normally numbered as task 0), and the task address, which in the C environment, would simply be the name of the procedure or function. An example of the syntax used for this command is:
OS_CREATE_TASK(0, MotorOn);
This would create a task, numbered 0 which would refer to the MorotOn() procedure or function.
This system command performs the following:
• Places the task number in the next available location in Ready Queue, meaning that this task is ready to execute. The location pointer in Ready Queue is
referred to as READYQTOP in the program, and is incremented every time this command is issued.
• Loads the address of the start of the task at the bottom of the stack area in
external ram allocated to this task. The SP for this task would have been already
saved, by the INIT_RTOS command, pointing to an offset 13 bytes above this,
to compensate for the pops.
34
This system command is used only ONCE in the main program, when the RTOS would be required to start supervising the processes. It takes one Priority bit parameter.
The Priority bit parameter (0 or 1) if set to 1, implies that those tasks placed in the Ready Queue (meaning ready to execute), would be sorted in descending order before the RTOS selects the next task to run. A task number of 0 is taken to mean by the RTOS as the highest priority task, and would obviously be given preference during the sorting. The main() task or function is automatically given the highest task number (thus meaning the lowest priority) by the RTOS, so as all the other tasks would be able to interrupt it.
An example of the syntax used for this command is:
OS_RTOS_GO(1);
This would start the RTOS ticking with priority enabled. The tick time interval is determined by the parameter TICKTIME set in the parameters header file (say 1ms, 5ms or 10ms).
This value would then become the basic reference unit for other system commands which use any timeout parameter.
The RTOS would also be required to execute “ready-tasks” sorting prior to any task change, since the priority parameter was set to 1.
Assuming Timer 2 is being used to generate the ticktime this system command performs the following :
• Loads the variable DELAY (LO and HI bytes), with the number of BASIC_
TICKS required to obtain the required ticktime delay.
• Sets the PRIORITY bit according to the priority parameter supplied.
• Loads RCAP2H and RCAP2L, the Timer 2 registers, with the required count in order to obtain the required delay between Timer 2 overflow interrupts.
The value used depends on the crystal frequency used on the board. The
clock registers count up at one twelfth the clock frequency, and using a
clock frequency of 11.0592 MHz, each count would involve a time delay
of 12/11.0592 µs or 1.08507 µs. Therefore to get a delay of 1ms (1000 µs),
1000/1.08507 or 921.6 counts would be needed. We would use integer 921 to
get this delay, hence the reload registers (RCAP2H,RCAP2L) would be loaded
with 65536 – 921 since the timers count up till they overflow.
35 35
• Stores the reference time signal parameter in GOPARAM and TICKCOUNT.
• Starts Timer 2 in 16-bit auto-reload mode.
• Enables interrupts.
• Sets TF2, which is the Timer 2 overflow interrupt flag, thus causing the 1st interrupt immediately.
2.3.4 OS_RUNNING_TASK_ID( )
This system command is used by a task to get the number of the task itself. It returns an unsigned character (1 byte) value and the same task continues to run after executing this system command.
An example of the syntax used for this command is:
X = OS_RUNNING_TASK_ID(); /* where X would be an unsigned character */
MASTER IN MANAGEMENT
[email protected] Follow us on IE MIM Experience www.ie.edu/master-management
#10 WORLDWIDE
MASTER IN MANAGEMENT FINANCIAL TIMES
55 Nationalities in class 5 Specializations
Personalize your program
Length: 1O MONTHS Av. Experience: 1 YEAR Language: ENGLISH / SPANISH Format: FULL-TIME Intakes: SEPT / FEB
• STUDY IN THE CENTER OF MADRID AND TAKE ADVANTAGE OF THE UNIQUE OPPORTUNITIES THAT THE CAPITAL OF SPAIN OFFERS
• PROPEL YOUR EDUCATION BY EARNING A DOUBLE DEGREE THAT BEST SUITS YOUR PROFESSIONAL GOALS
• STUDY A SEMESTER ABROAD AND BECOME A GLOBAL CITIZEN WITH THE BEYOND BORDERS EXPERIENCE
OF MIM STUDENTS ARE
93%
WORKING IN THEIR SECTOR 3 MONTHS FOLLOWING GRADUATION
36
This system command is used by a task to test whether there was any signal sent to it by some other task.
• It returns a bit value of:
○ 0 if Signal is not present
○ 1 if Signal is present
• If the signal was present, the signal flag (bit) is also cleared before returning to the calling task. The same task continues to run, irrespective of the returned value.
An example of the syntax used for this command is:
X = OS_SCHEK(); /* where X would be a bit-type variable */
or one may use it as in the following example to test the presence of the signal bit:
if (OS_SCHEK() == 1) {
/* do these instructions if a signal was present */
}
2.3.6 OS_SIGNAL_TASK(TASK NO:)
This system command is used by a task to send a signal to another task. If the other task was already waiting for a signal, then the other task is placed in the Ready Queue and its waiting for signal flag is cleared. The task issuing the OS_SIGNAL_TASK command continues to run, irrespective of whether the called task was waiting or not waiting for the signal. If we need to halt the task after the OS_SIGNAL_TASK command to give way to other tasks, we must use the OS_DEFER() system command after the OS_SIGNAL_TASK command.
This system command performs the following:
• It first checks whether the called task was already waiting for a signal.
• If the called (signaled) task was not waiting, it sets its waiting for signal (SIGW)
flag and exits to continue the same task.
37
• If the signaled task was already waiting, it places the called task in the Ready Queue and it clears both the waiting for signal (SIGW) and the signal present (SIGS) flags.
• It also sets a flag (TINQFLAG) to indicate that a new task has been placed in the Ready Queue. This flag is used by the RTOS_TIMER_INT routine (every half a millisecond) in order to be able to decide whether there has to be a task change. It then exits the routine to continue the same task.
An example of the syntax used for this command is:
OS_SIGNAL_TASK(1); // send a signal to task number 1
OS_DEFER(); // give cpu time to other tasks, if necessary
2.3.7 OS_PERIODIC (UINT TICKS)
This command initalises the task to repeat periodically, every certain number of ticks given as a parameter in the command. It is used at the beginning of a task, OUTSIDE of the endless loop, as shown in the next sub-section 2.3.8. An example of its usage is also given in that same sub-section.
We now deal with the commands that do perform a voluntary (co-operative) change of task:
2.3.8 OS_WAITP (VOID)
This command sets the task waiting for the preset periodic interval (set previously by the OS_PERIODIC(ticks) command. The task goes into a waiting state and the next ready task takes over.
If the interval has already passed when this command is executed, then the task would
continue to execute. This is not normally the case, and only happens when there is a
programming logic or algorithm mistake, since it would generally mean that the task is
actually taking longer to execute than the requested periodic interval between executions.
It performs the following:
• Saves task environment in preparation for the expected task swap.
• If the periodic interval has not yet passed, as is generally the case, it sets the periodic interval flag to indicate that it is waiting for the periodic interval and issues a voluntary task change.
• If however the periodic interval has already elapsed (this is usually due to bad programming, in cases where the code of the task itself takes a longer time to execute than the required periodic interval), then it clears the periodic interval flag and exits.
Such a command is used in a task, in conjunction with the OS_PERIODIC() command
and an example of its usage is shown below:
3911
OS_PERIODIC(50);
while(1) {
….
….
….
OS_WAITP();
}
// declare task as wishing to execute every 50 ticks
// repeat forever
// code to be executed every 50 ticks // which should not take longer than // 50 ticks to execute.
// wait for the periodic interval to pass
2.3.9 OS_WAITI(INTERRUPT NO:)
This system command is called by a task to sleep and wait for an interrupt to occur. Another task, next in line in the Ready Queue would then take over. If the interrupt never occurs, then the task will effectively sleep for ever. This is one way of writing Interrupt Service Routines under PaulOS RTOS control. ISRs can also be written in such a way as to run independently, as describe in section 2.3.15.
If required, this command can be modified to allow another timeout parameter to be passed, so that if the interrupt does not arrive within the specified timeout, the task would resume.
A timeout of 0 would still leave the task waiting for the interrupt forever. The modification required to the RTOS source listing would be similar to the OS_WAITS command, and the operation would then be as explained further down in sub-section 2.3.10.
This system command performs the following:
• It sets the bit which corresponds to the interrupt number passed on as a parameter.
• It then calls the QSHFT routine in order to start the task next in line.
An example of the syntax used for this command is:
OS_WAITI(0); // wait for an interrupt from external int 0
The task would then go into the sleep or waiting mode and a new task would take over.
40
This system command is called by a task to sleep and wait for a signal to arrive from some other task. If the signal is already present (previously set or signaled by some other task), then the signal is simply cleared and the task continues on. If the signal does not arrive within the specified timeout period, the task resumes just the same. However, a timeout number of 0 would imply that the task has to keep on waiting for a signal indefinitely. If the signal does not arrive, then the task never resumes to run and effectively the task is killed.
This system command performs the following:
• It first checks whether the signal is already present.
• If the signal is present, then it clears the signal flag, exits and continues running.
• If the signal is not present, then:
○ It sets its own waiting for signal (SIGW) flag.
○ It also sets the waiting for timeout variable according to the supplied parameter.
○ It then jumps to the QSHFT routine in order to start the task next in line.
An example of the syntax used for this command is:
13
OS_WAITS(50);
// wait for a signal within 50 units or ticks, the value of the unit depends on // the TICKTIME parameter used.
If for example, the TICKTIME was set to 10 milliseconds in the header file, an OS_
WAITS(50) would then imply waiting for a signal to arrive within 500 milliseconds.
or you can use:
OS_WAITS(0); // this would wait for a signal for ever
In both examples, if the signal is not already present, the task would then go into the sleep
or waiting mode and a new task would take over.
2.3.11 OS_WAITT(TIMEOUT)
This system command is called by a task to sleep and wait for a specified timeout period.
The timeout period is in units whose value depends on the TICKTIME parameter used.
Valid values for the timeout period are in the range 1 to 65535. A value of 0 is reserved for the OS_KILL_IT command, meaning permanent sleep, and therefore is not allowed for this command. The OS_WAITT system command therefore performs the required check on the parameter before accepting the value. If by mistake a value of 0 is given as a timeout parameter, then it is automatically changed to a 1. Once the timeout period passes, the task which had issued this command, would be moved from the waiting to the ready queue.
This system command performs the following:
• If the parameter is 0, then set it to 1, to avoid permanent sleep.
• Save the correct parameter in its correct place in the TTS table.
• Jump to the QSHFT routine in order to start the task next in line.
95,000 km
In the past 5 years we have drilled around
—that’s more than twice around the world.
Who are we?
We are the world’s leading provider of reservoir characterization, drilling, production, and processing technologies to the oil and gas industry.
Who are we looking for?
We offer countless opportunities in the following domains:
n Operations
n Research, Engineering, and Manufacturing
Geoscience and Petrotechnical
42
An example of the syntax used for this command is:
15
OS_WAITT(60);
// wait for a signal for 60 units, the value of the unit depends on // the TICKTIME parameter used.
If for example, the command TICKTIME was set to 10, the reference unit would be 10 milliseconds, and OS_WAITT(60) would then imply waiting or sleeping for 600 milliseconds.
The task would then go into the sleep or waiting mode for 600ms and a new task would take over. After 600ms it would move to the ready queue.
2.3.12 OS_KILL_IT( )
This system command is used by a task in order to stop or terminate the task. As explained earlier in OS_WAITT, this is simply the command OS_WAITT with an allowed timeout of 0. The task is then placed permanently waiting and never resumes execution.
This system command performs the following:
• First it clears any waiting for signal or waiting for interrupt flags, so that that task would definitely never restart.
• Then it sets its timeout period in the TTS table to 0, which is the magic number the RTOS uses to define any non-timing task.
• Then it sets the INTVLRLD and INTVLCNT to 0, again implying that it is not a periodic task.
• Finally it jumps to the QSHFT routine in order to start the task next in line.
An example of the syntax used for this command is:
OS_KILL_IT();
/* the task simply stops to execute and a new task would take over.*/
43
2.3.13 OS_DEFER( )
This system command is used by a task in order to hand over processor time to another task. The task is simply placed at the end of the Ready Queue, while a new task resumes execution.
This system command performs the following:
• It sets its timeout period in the TTS table to 0, which is the magic number the RTOS uses to describe any non-timing task.
• It places the task in the Ready Queue, by simply placing the task number in the next available location in Ready Queue area.
• It then flows on to the QSHFT routine in order to start the task next in line.
An example of the syntax used for this command is:
OS_DEFER();
/* the task simply stops execution and is placed in Ready Queue.*/
/* A new task would then take over. */
2.3.14 ENHANCED EVENT-WAITING AND OTHER ADD-ON MACROS
These macros (#define statements) perform the same functions of the OS_WAITT, OS_
WAITS and OS_PERIODIC calls but rather than ticks they accept absolute time values as parameters in terms of minutes, seconds and millisecs. This difference is denoted by the _A suffix (the A standing for Absolute) - eg. OS_WAITT_A(0,0,300) would cause a task to wait for 300ms and is the absolute-time version of OS_WAITT(x), where x would have to be calculated to give the required number of ticks equivalent to a 300ms delay.
Range of values (65535 TICKTIMES) accepted is listed below:
Using a minimum TICKTIME of 1ms :
Range from 1ms to 1m, 5s, 535ms in steps of 1ms.
Using a recommended TICKTIME of 10ms :
Range from 10ms to 10m, 55s, 350ms in steps of 10ms.
Using a maximum TICKTIME of 50 ms :
Range from 50ms - 54m, 36s, 750ms in steps of 50ms
If the conversion from absolute time to ticks results in 0 (all parameters being 0 or overflow) this result is only accepted by OS_WAITS() by virtue of how the OS_WAITT(), OS_WAITS() and OS_PERIODIC() calls were written. In the case of the OS_WAITT() and OS_PERIODIC() calls the tick count would automatically be changed to 1 meaning an interval of 1 ticktime.
OS_WAITT_A(M,S,ms) // Absolute OS_WAITT for minutes, seconds and milliseconds
OS_WAITS_A(M,S,ms) // Absolute OS_WAITS for minutes, seconds and milliseconds
OS_PERIODIC_A(M,S,ms) // Absolute OS_PERIODIC for minutes, seconds and milliseconds
OS_PAUSE_RTOS() // Disable the RTOS ticktimer interrupts, used in a stand-alone ISR
OS_RESUME_RTOS() // Re-enable the RTOS ticktimer interrupts, used in a stand-alone ISR
“The perfect start of a successful,
international career.”
Excellent Economics and Business programmes at:
45
OS_CPU_IDLE() // Sets the µC in idle mode in PCON SFR (section 1.8.10).
// This is usually used in the main program endless loop after
// initialising and starting the RTOS.
OS_CPU_DOWN() // Sets the µC in power-down mode in PCON SFR (section 1.8.10).
2.3.15 STAND-ALONE INTERRUPT SERVICE ROUTINES
In the C version of the RTOS, a simple method of having one or more stand-alone interrupt service routine (ISR) which would run whenever some interrupt is generated has been included.
All we have to do is to set to ‘1’ the correspond interrupt in the PaulOS_F040_Parameters.H file 2.4. For example if we intend to have an ISR running under the EXT 0 interrupt (and not under RTOS control), then we have to make sure to set to one the corresponding
#define statement in PaulOS.H file. In some examples or listings shown in this book these STAND_ALONE_ISR parameters were moved to the parameters.h header file so as to have all parameters which can be changed by the user in one file, but the effect is the same.
#define STAND_ALONE_ISR_00 1 // EXT0 - set to 1 if using this interrupt as a stand alone ISR
Then in the ISR itself we should also include the commands OS_PAUSE_RTOS() when starting the ISR and then OS_RESUME_RTOS() in order to resume the RTOS before exiting the ISR. This would ensure that the RTOS does not interfere with the stand-alone ISR.
It is best to use register banks 2 or 3 for these ISRs.
Example of a stand-alone ISR, interrupting the RTOS and executing immediately when
the interrupt occurs.
void ISR_EXT0 (void) interrupt 0 using 2 {
OS_PAUSE_RTOS() // Disable the RTOS, used in a stand-alone ISR /* Our service routine code goes in here */
/* Our service routine code goes in here */
/* Our service routine code goes in here */
OS_RESUME_RTOS() // Re-enable the RTOS, before exiting the stand- alone ISR
}
2.4 PAULOS_F040 PARAMETERS HEADER FILE
This is the RTOS parameters header file. We would mainly be needing to set the TICK_
TIMER, TICKTIME and NOOFTAKS parameters to reflect out particular application program.
American online LIGS University
▶ enroll by September 30th, 2014 and
▶ save up to 16% on the tuition!
▶ pay in 10 installments / 2 years
▶ Interactive Online education
▶ visit www.ligsuniversity.com to is currently enrolling in the Interactive Online BBA, MBA, MSc,
DBA and PhD programs:
/*
***********************************************************************
* RTOS KERNEL HEADER FILE
*
* PaulOS_F040_Parameters.H
*
* For use with PaulOS_F040.C - Co-Operative RTOS written in C based on PaulOS
* by Ing. Paul P. Debono
* for use with the C8051F040 family of microcontrollers
*
* File : PaulOS_F040_Parameters.H
* Revision : 10
* Date : Revised for C8051F040 February 2015
* By : Paul P. Debono
*
* B. Eng. (Hons.) Elec.
* University Of Malta
*
***********************************************************************
*/
#ifndef __PARAMETERS_H__
#define __PARAMETERS_H__
/*
***********************************************************************
* DATA TYPE DEFINITIONS
***********************************************************************
*/
/*
***********************************************************************
***********************************************************************
*/
#define TICK_TIMER 4
#define TICKTIME 1 // Length of RTOS basic tick in msec // refer to the RTOS timing definitions // suitable values are: 1, 2,
4, 5, 8, 10, 20, 25
#define NOOFTASKS 2 // Number of tasks used in application
#define STACKSIZE 0x0F // Number of bytes to allocate for the stack // Usually there is no need to
change this parameter /*
***********************************************************************
*/
#define STAND_ALONE_ISR_00 0 // set to 1 if using this interrupt as a stand alone ISR
#define STAND_ALONE_ISR_01 0 // set to 1 if using this interrupt as a stand alone ISR
#define STAND_ALONE_ISR_02 0 // set to 1 if using this interrupt as a stand alone ISR
#define STAND_ALONE_ISR_03 0 // set to 1 if using this interrupt as a stand alone ISR
#define STAND_ALONE_ISR_04 0 // set to 1 if using this interrupt as a stand alone ISR
#define STAND_ALONE_ISR_05 0 // set to 1 if using this interrupt as a stand alone ISR
#define STAND_ALONE_ISR_06 0 // set to 1 if using this interrupt as a stand alone ISR
#define STAND_ALONE_ISR_07 0 // set to 1 if using this interrupt as a stand alone ISR
#define STAND_ALONE_ISR_08 0 // set to 1 if using this interrupt as a stand alone ISR
#define STAND_ALONE_ISR_09 0 // set to 1 if using this interrupt as a stand alone ISR
#define STAND_ALONE_ISR_10 0 // set to 1 if using this interrupt as a stand alone ISR
#define STAND_ALONE_ISR_11 0 // set to 1 if using
this interrupt as a stand alone ISR
#define STAND_ALONE_ISR_12 0 // set to 1 if using this interrupt as a stand alone ISR
#define STAND_ALONE_ISR_14 0 // set to 1 if using this interrupt as a stand alone ISR
#define STAND_ALONE_ISR_15 0 // set to 1 if using this interrupt as a stand alone ISR
#define STAND_ALONE_ISR_16 0 // set to 1 if using this interrupt as a stand alone ISR
#define STAND_ALONE_ISR_17 0 // set to 1 if using this interrupt as a stand alone ISR
#define STAND_ALONE_ISR_18 0 // set to 1 if using this interrupt as a stand alone ISR
#define STAND_ALONE_ISR_19 0 // set to 1 if using this interrupt as a stand alone ISR
#define STAND_ALONE_ISR_20 0 // set to 1 if using this interrupt as a stand alone ISR
/*
***********************************************************************
*/
#endif
2.5 EXAMPLE USING PAULOS_F040 RTOS
This is an example using the PaulOS_F040 RTOS. It displays a clock via UART0 and it also blinks the LED every second.
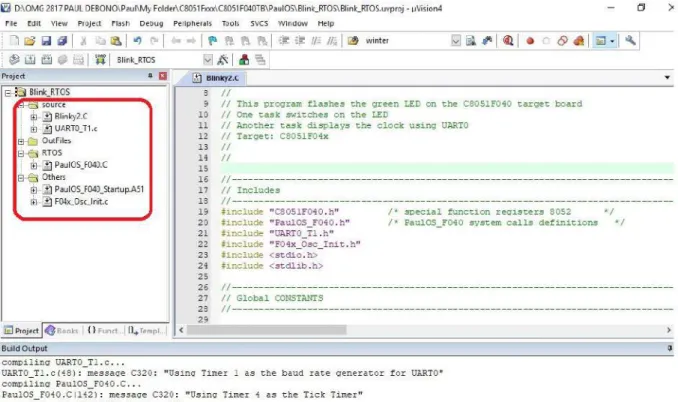
The files associated with this project are shown highlighted in the red rectangle in Figure
22. The files PaulOS_F040.h, PaulOS_F040.c although part of the clock project, are not
being included here since they are listed in Appendix A.
Figure 2-2 Blinking LED example
2.5.1 BLINKY2.C
//--- // Blinky2.c
//--- // Copyright (C) 2005
//
// AUTH: PD
// DATE: 21 FEB 05 //
// This program flashes the green LED on the C8051F040 target board // One task switches on LED P1.6 on the C8051F040-TB
// Another task displays the clock using the serial port UART0 // Target: C8051F04x
//
//
//--- // Includes
//---
#include “C8051F040.h” /* special function registers 8052 */
#include “PaulOS_F040.h” /* PaulOS_F040 system calls definitions */
#include “UART0_T1.h”
#include “F04x_Osc_Init.h”
#include <stdio.h>
#include <stdlib.h>
//--- // Global CONSTANTS
//--- sbit LED = P1^6; // green LED: ‘1’ = ON; ‘0’ = OFF
struct time {
/* structure of the time record
*/
unsigned char hour; /* hour */
unsigned char min; /* minute */
unsigned char sec; /* second */
};
struct time ctime = { 17, 45, 0 }; /* storage for clock time values */
//---
// Function PROTOTYPES
//--- void PORT_Init (void);
void DISABLE_Watchdog (void);
//--- // DISABLE_Watchdog
//--- //
// Disables the watchdog timer //
void DISABLE_Watchdog (void) {
char SFRPAGE_SAVE;
SFRPAGE_SAVE = SFRPAGE; // Save Current SFR page SFRPAGE = CONFIG_PAGE; // Switch to
configuration page EA = 0;
WDTCN = 0xDE;
WDTCN = 0xAD;
EA = 1;
SFRPAGE = SFRPAGE_SAVE; // Restore SFR page }
//--- // PORT_Init
//--- //
// Configure the Crossbar and GPIO ports //
void PORT_Init (void) {
char SFRPAGE_SAVE;
SFRPAGE_SAVE = SFRPAGE; // Save Current SFR page
SFRPAGE = CONFIG_PAGE; // Switch to configuration page XBR0 = 0x04; // Enable UART 0
XBR1 = 0x00;
XBR2 = 0x40; // Enable crossbar and weak pull-ups