A STUDY OF BASIC ISP NETWORKING WITH MIKROTIK ROUTER CONFIGURATION
BY
MD. BABU MIAH ID: 172-15-10035
This Report Presented in Partial Fulfillment of the Requirements for the Degree of Bachelor of Science in Computer Science and Engineering
Supervised By
Mr. Aniruddha Rakshit Senior Lecturer Department of CSE
Daffodil International University
DAFFODIL INTERNATIONAL UNIVERSITY DHAKA, BANGLADESH
JANURY 2020
APPROVAL
This Internship report titled “A Study of Basic ISP Networking with Mikrotik Router Configuration” submitted by “Md. Babu Miah” to the Department of Computer Science and Engineering, Daffodil International University, has been accepted as satisfactory for the partial fulfillment of the requirements for the degree of B.Sc. in Computer Science and Engineering and approved as to its style and contents. The presentation has been held on 08 July, 2020
BOARD OF EXAMINERS
Dr. Syed Akhter Hossain Chairman
Professor and Head
Department of Computer Science and Engineering Faculty of Science & Information Technology Daffodil International University
Gazi Zahirul Islam Internal Examiner
Assistant Professor
Department of Computer Science and Engineering Faculty of Science & Information Technology Daffodil International University
Abdus Sattar Internal Examiner
Assistant Professor
Department of Computer Science and Engineering Faculty of Science & Information Technology Daffodil International University
Dr. Md. Saddam Hossain External Examiner
DECLARATION
I hereby declare that, this internship report is prepared by me under the supervision of my honorable Mr. Aniruddha Rakshit, Senior Lecturer, Department of CSE, Daffodil International University. I also declare that, I collect information from my internship
organization Prisma Digital Network Limited, ISP based Corporation, Books, Internet and my friends also.
Supervised by:
Mr. Aniruddha Rakshit Senior Lecturer
Department of CSE
Daffodil International University
Submitted by:
Md. Babu Miah ID: 172-15-10035 Department of CSE
Daffodil International University
ACKNOWLEDGEMENT
Firstly, I express my heartiest thanks and gratefulness to almighty Allah for His divine blessing make me possible to complete the final year internship successfully.
I am really grateful and wish profound indebtedness to Mr. Aniruddha Rakshit, Senior Lecturer, Department of CSE, Daffodil International University, Dhaka. Who has Deep Knowledge & keen interest of supervision in the field of “A Study of Basic ISP Networking with Mikrotik Router Configuration” to carry out this internship. Her endless patience, scholarly guidance, continual encouragement, constant and energetic supervision, constructive criticism, valuable advice, reading many inferior draft and correcting them at all stage have made it possible to complete this internship.
I would like to express heartiest gratitude to Dr. Syed Akhter Hossain, Professor and Head, Department of CSE, for his kind help to finish my internship and also to other faculty member and the staff of CSE department of Daffodil International University.
I would like to thank entire course mate in Daffodil International University, who took part in this discuss while completing the course work.
Finally, I must acknowledge with due respect the constant support and patients of parents.
ABSTRACT
This internship is on a study of basic ISP networking with Mikrotik Router configuration.
Mainly I am working on Mikrotik OS based router configuration. Mikrotik has been established in 1996. This router is mainly easy to use for bandwidth management. Actually a Mikrotik Router is cost-efficient and easy access that can be used for small and big network management.
Our Internet Service Provider (ISP) Company especially uses Mikrotik Router in this sector.
These functions include IP addressing, IP distribution, Firewall, Nat, Routing, Bandwidth control, Point to Point Tunneling Protocol (PPTP), Domain Name System (DNS) server, Dynamic Host Configuration Protocol (DHCP) server, File Transfer Protocol (FTP) server, Point to Point Protocol Over Ethernet (PPPoE), Hotspot and many other features. In this sector we are using Cisco router, Cabling and Linux operating system etc. Nowadays, people of all over the world use the internet in daily life. A network provides the internet service from computer to computer and other networking devices. So, Networking is so much important fact right now.
Nowadays internet is using on Software based application, E-Commerce website, Robotic, Internet of things (IoT). Its use is increasing day by day. They provide various advantages, For example- instant messaging, Parallel computing, Video conference, Interaction with other users using dynamic web pages, Sharing information by using the internet or web.
TABLE OF CONTENTS
CONTENTS PAGE NO
Board of examiners i
Declaration ii
Acknowledgements iii
Abstract iv
Table of Contents v-vi
List of Figures vii-viii
CHAPTER 1: Introduction 1-2
1.1 Introductions 1
1.2 Motivation 1
1.3 Objectives 1-2
1.4 Introduction to the Company 2
1.5 Report Layout 2
CHAPTER 2: Organization 3-4
2.1 Introduction 3
2.2 Product for Marketing 3
2.3 Organizational Structure 4
CHAPTER 3: Internship Roles & Responsibilities 5-32
3.1 Daily Task and Activities 5
3.2 Events and Activities 6
3.3 Project Task and Activities 6
3.3.1 About IP Address 6
3.3.3 PC Based Installation of Mikrotik Router OS Using VMware 7-9
3.3.4 Mikrotik Router Configuration 9-13
3.3.5 Static-IP Configuration in Mikrotik Router 13-14
3.3.6 Queue Configuration 15-18
3.3.7 DHCP Server Configuration with Mikrotik Router: 18-20
3.3.8 Bridge Configuration with Mikrotik Router 20-22
3.3.9 Website Blocking Configuration 22-23
3.4.1 Hotspot Server Configuration 23-26
3.4.2 PPPoE Server Configuration in Mikrotik Router 27-31
3.4.3 Bind MAC Address 31-32
CHAPTER 4: Conclusion, Future Career &
Opportunities
33
4.1 Conclusion and Discussion 33
4.2 Future Career & Opportunities 33
REFERENCES 34
APPENDICES 35
LIST OF FIGURES
FIGURES PAGE NO
Figure 2.3. 1: Organization of Prisma Digital Network Limited 4 Figure 3.3.3.1: Software Icon for VMware, Mikrotik ISO, Winbox 7
Figure 3.3.3.2: VMware Workstation 8
Figure 3.3.3.3: Mikrotik OS Command-line interface (CLI) Mode 9
Figure 3.3.4.1: Network Topology of Mikrotik 9
Figure 3.3.4.2: Mikrotik Router Interfaces 10
Figure 3.3.4.3: IP Addressing 10
Figure 3.3.4.4: Domain Name System (DNS) Server 11
Figure 3.3.4.5: Network Address Translation from the firewall 11
Figure 3.3.4.6: Firewall of Action 12
Figure 3.3.4.7: IP Routing 12
Figure 3.3.4.8: IP Ping to WinBox Terminal 13
Figure 3.3.5.1: IP Addressing for Static IP 13
Figure 3.3.5.2: TCP/IPv4 Configuration 14
Figure 3.3.5.3: CMD mode of the user's PC 14
Figure 3.3.6.1: Network Topology of Queue Configuration 15
Figure 3.3.6.2: Add IP Address 15
Figure 3.3.6.3: Simple Queues 16
Figure 3.3.6.4: Address Resolution Protocol (ARP) 16
Figure 3.3.6.5: Network Connection Details 17
Figure 3.3.6.6: Network Topology of Parent Concept 17
Figure 3.3.7.2: ARP for DHCP Configuration 19
Figure 3.3.8.1: Interface List of Bridge 20
Figure 3.3.8.2: Create Bridge Name 20
Figure 3.3.8.3: LAN Configure of Bridge Port 21
Figure 3.3.8.4: Change Interface 21
Figure 3.3.9.1: Firewall L7 Protocol 22
Figure 3.3.9.2: Firewall Rule 22
Figure 3.4.1.1: IP Pool Configuration 23
Figure 3.4.1.2: Hotspot Interface 23
Figure 3.4.1.3: Hotspot User Profile 24
Figure 3.4.1.4: Add Hotspot Users 25
Figure 3.4.1.5: Hotspot Active User 25
Figure 3.4.1.6: Hotspot Log In Panel 26
Figure 3.4.1.7: Log in Success in Hotspot 26
Figure 3.4.2.1: Address List for PPPoE Server 27
Figure 3.4.2.2: PPPoE Server 27
Figure 3.4.2.3: IP Pool Configure for PPPoE Server 28
Figure 3.4.2.4: Point-to-Point Protocol (PPP) Profile 28 Figure 3.4.2.5: Point-to-Point Protocol (PPP) Secret 29
Figure 3.4.2.6: Queue Type for PPPoE Server 29
Figure 3.4.2.7: Simple Queue for PPPoE Server 30
Figure 3.4.2.8: Simple Queue of Advanced Option for PPPoE Server 31
Figure 3.4.3.1: Interface to General Setting 31
Figure 3.4.3.2: Add Media Access Control (MAC) Address 32
CHAPTER 1 Introduction
1.1 Introductions:
Now this time you can search any Resource through the Internet all over the World.
Nowadays a huge number of people use internet Resource and digital technology. We do nothing for internet communication servers. This is why Dynamic Host Configuration Protocol (DHCP) and Domain Name System (DNS) servers are very important for networking Technology. This day is currently working with Small or Large Organization, Bank services, etc. through the software to connect to the Internet. the internet huge use banking services on most of the internet such as Short message service (SMS), Banking online, Debit card service, Credit card Service, Online Transaction etc. When a Organization uses internet, you can easily Communicate and Maintain. This Report is about PC networking, server configuration, server Security, microtic OS based Routers, Firewalls, Bandwidth control, Backholes Links, Wireless access points, Hotspot gateways etc. We can learn to manage the network using simple microtic commands or Winbox graphically.
1.2 Motivation:
As a Mikrotik Routing system and network Administrator, there‟s a huge amount of Job post all over the world. I think, Mikrotik Operating system is very easy to use and when Internet Service provider (ISP) Organization use Mikrotik Operating system, then you can easily maintain user or Employ and control and share bandwidth. I think, I can successfully my experience on Mikrotik with the help of Prisma Digital Network Limited.
1.3 Objectives:
Opportunities all over the world and I gain practical experiences on prisma Digital Network Limited. I will try my level best to present my practical Knowledge
Mikrotik Router plays a role in a Data center because in Mikrotik Router Management bandwidth control is very easy. That‟s why I select this topic for an Internship.
• Install Mikrotik operating system OS base (OS)
• Configure ISP server with Win dox
• Maintain Bandwidth with Win dox
• Maintain user or Employ with Win dox
1.4 Introduction to the Company:
Prisma Digital Network Limited is the largest Internet Service Provider (ISP) in Bangladesh. At 2005, our company started internet service. We provide internet fix for home and business users according to the need of customer‟s objective. We have 14 years of support in our country. We are always one step ahead than others in this competitive field and will strive to stay. Our ISP company gives 24/7 customer services and high speed internet service in Bangladesh. Our internet users are always happy to use our services. We work with a variety of national challenge and global association and picked up the stable stage.
1.5 Report Layout:
The report is as follows
Chapter:-1 I Discus the internship, the Inspiration for the internship and the Acquaintance with the organization. Chapter:-2 I Discus IT services and what role Mikrotik has played in the job Market. Chapter:-3 I Discus the day-to-day work and Activities, events and Challenges. Chapter:-4 I have Discus d in detail about Skills, Smart Planning and Reflection. Chapter:-5 I have Discus d the Conclusion and future Opportunities.
CHAPTER 2 Organization
2.1 Introduction:
Prisma Digital Network Limited is one of the best, Largest and oldest ISP company in Bangladesh. The company provides internet service and solution since 2005. Our company uses fiber optic and wireless communication infrastructure and also using highly efficient networking device and technology. Our service team is highly trained and our users are always happy to use our service. Prisma Digital Network Ltd. has very strong security. Professional engineering and management teams are certified and associated. CISCO, JUNIPER, Mikrotik, BDCOM, FREEBSD. Prisma Digital Network Ltd. promotes 2 major platforms internship for education purpose and networking sector.
2.2 Product for Marketing:
Prisma Digital Network Limited is the largest internet service provider (ISP) in Bangladesh. This Organization is one of the most respected Organizations for internship, providing Broadband connections, Information Technology (IT), Relative services and solutions since 2005. The Prisma Digital Network Ltd. 24 hour‟s service and high-speed data service through the internet. Mostly it offers high-speed internet service to Residential and Corporate customer.
1. Network Installation.
2. Protected Ring Network.
3. Manage Hosting.
4. Multiple Upstream.
5. ISP Support.
6. Corporate level Internet Solution.
2.3 Organizational Structure of Prisma Digital Network Limited:
Figure 2.3.1: Organization of Prisma Digital Network Limited
CHAPTER 3
Internship Roles & Responsibilities
3.1 Daily Task and Activities:
●
Month - 1: In the first month of my internship at Prisma Digital Network Limited I have learned and performed the following tasks:es
to Mikrotik OS
Mikrotik Router OS using VMware.
router configuration
to configure your LAN Network
●
Month - 2: In this month I have learned and performed the following tasks:Firewall and NAT Configuration -IP Configuration
nfiguration
●
Month – 3: In this month of I have learned and performed the following tasks:ode Configuration Website Blocking Configuration
●
Month – 4: In this month of I have learned and performed the following tasks:t Configuration onfiguration Bind MAC Address
3.2 Events and Activities:
The main goal is to prepare for the temporary position, when some problems are encountered in the entry-level position; At this point, it is imperative to prepare to solve the problem. Identifying this problem and activators can address it. I have practically learned this internship program from Prism Digital Network Limited and have performed in real-life in the following tasks. es for all class of IP with Subnet
ik Router and Configuration
about Network Components
3.3 Project Task and Activities:
3.3.1 About IP Address
IP means internet protocol. The network defines an IP address in two elements: Part of the community and host range. The IP address contains 4 octets and each octet is eight- bit, it means the IP address's total bit is 32. For A class IP, the first octet is a network and the last 3 octets are the host. For 'B' class, the first 2 octets are network and the last 2 octets are hosts, and for 'C' class, first 3 octets are the network and the last octet is the host and D, E classes are multicast.
Class Range Private IP Public IP
A
0-12610.0.0.0 to 10.255.255.255
1.0.0.0 to 9.255.255.255 11.0.0.0 to 126.255.255.255
B
128-191172.16.0.0 to 172.31.255.255
128.0.0.0 to 171.255.255.255 172.0.0.0 to 172.15.255.255 173.0.0.0 to 191.255.255.255
C
192-223192.168.0.0 to 192.168.255.255
192.0.0.0 to 192.167.255.255 192.169.0.0 to 192.169.255.255
D
224-239 Multicast AddressE
240-255 Restricted3.3.2 Introduction of Mikrotik
Mikrotik is a Latvian company founded in 1996 to develop routers and wireless ISP systems. Mikrotik now provides hardware and software for Internet connection in most countries of the world.
3.3.3 PC Based Installation of Mikrotik Router OS Using VMware
Requirement Software:
• VMware Workstation Application
• MikroTikOS ISO File
• WinBox
Mainly, this software is used for Mikrotik Router management and maintenance.
Figure 3.3.3.1: Software Icon for VMware, Mikrotik ISO, Winbox
Here, I am showing the installationguideline step by step:
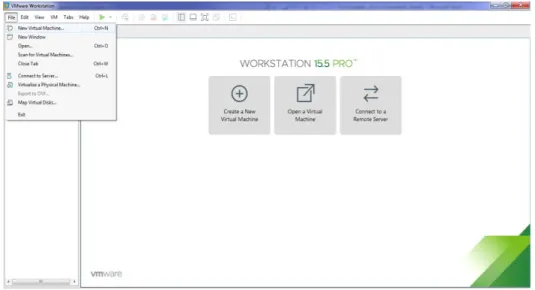
Step 1: First we need to install VMware> open it, then click File> New Virtual Machine> Next> Next> OK.
Step 2:Create a new virtual machine.
Figure 3.3.3.2: VMware Workstation
Open VMware Workstation and click file option and select a new virtual machine and apply.
Step 3:Select virtual machine hardware compatibility and next.Step 4:Guest operating system installation>Select, I will install the operating system later>Next.Step 5:Select a guest operating system>Select, Other>Version>other>next. Step 6:Give me a name for the virtual machine and select the file location.>Write a virtual machine name: Example of: Mikrotik>Location: Example of: C:\Users\MD BABU\Documents\Virtual Machines\Mikrotik>Next. Step 7:Select the processor's configuration as needed>Write a Number of processor: Example of: 1>Number of cores per processor: Example of:
1>Next.Step 8:
Let's select the range of memory for the virtual machine
>Write a Memory for this virtual machine: Example of: 1024 MB>Next. Step 9:Let's select the range of disk capacity for the virtual machine>
Write a Maximum disk size (GB): Example of: 10> select split virtual disk into multiple files>Next. Step 10:Specify disk file location>Write a disk file: Example of: Mikrotik.vmdk>Next.Step 11:Ready to create a virtual machine>If I verify the information, click on the Next option.Step 12:Select Virtual Machine settings>Double click, “Edit Virtual Machine settings”.Step 13:Edit Virtual Machine settings.>Click on, Add and ok.Step 14:Add hardware wizard>Click on, “Network Adapter>Finish>Ok”.Step 15:Now select ISO file and >virtual machine name and also choose a location, where the machine will be installed >.
Hardware requirement >Select all with, “press „a‟>press „n‟>press „y‟>Enter”.
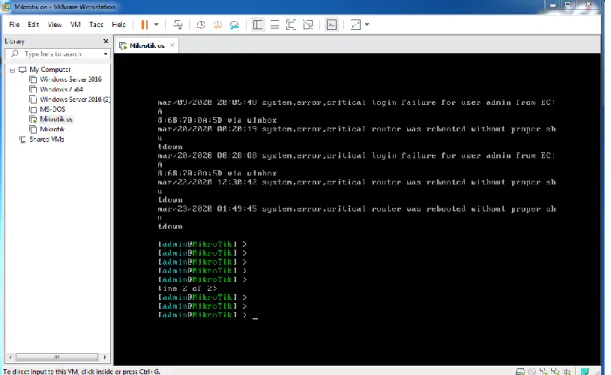
Step 15:Install successful Mikrotik OS.
Figure 3.3.3.3: Mikrotik OS Command-line interface (CLI) Mode
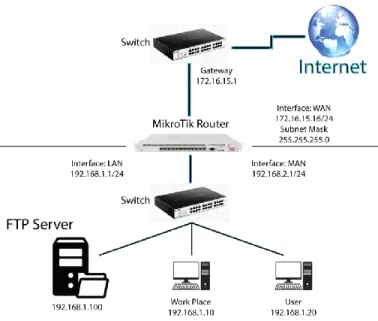
3.3.4 Mikrotik Router Configuration:
Figure 3.3.4.1: Network Topology of Mikrotik
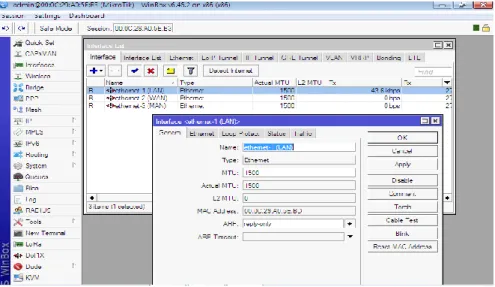
Figure 3.3.4.2: Mikrotik Router Interfaces
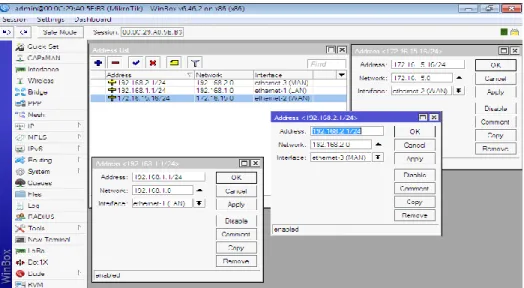
First we define the name of each interface. I type in the way the name is given in the picture above.
Step 2: To configure the Mikrotik Router, apply the IP address provided by the ISP cutter to the specified Ethernet port and apply IPs for the local area network and the
metropolitan area network.
Figure 3.3.4.3: IP Addressing
To create an IP address, first you have to go from IP to Address, then click on the Add button, input the data as shown in the picture above, and click OK.
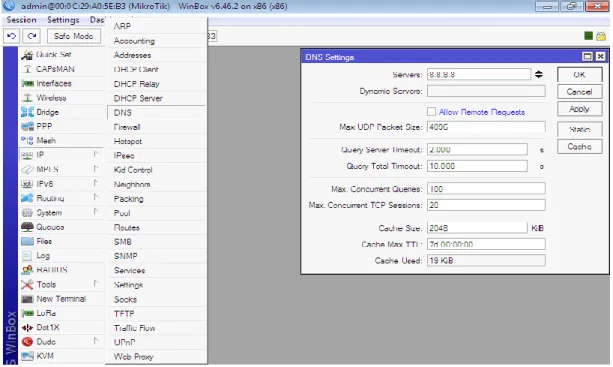
Step 3: Let's connect Domain Name System (DNS) server.
Figure 3.3.4.4: Domain Name System (DNS) Server
From IP to DNS, click on add button from here and click OK with the required server IP.
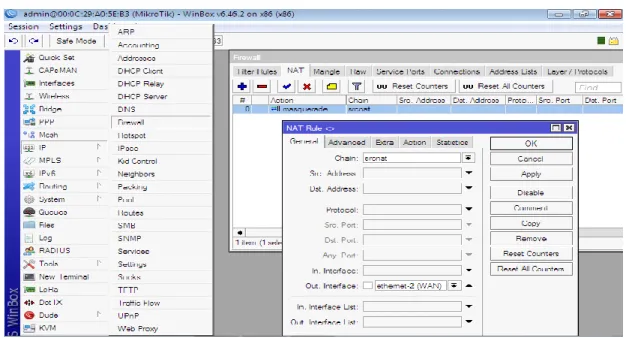
Step 4: Let's configure the Network Address Translation (NAT) from the firewall.
Figure 3.3.4.5: Network Address Translation from the firewall
To configure Nat, first go to IP, firewall, click on next Nat, select chain in general
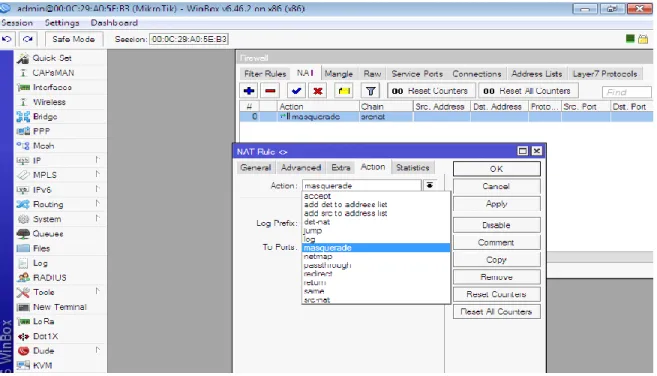
Figure 3.3.4.6: Firewall of Action
Next, click on, “Action>Select=masquerade>Apply>Ok”.
Step 6:Let's configure the IP address to routes.
Figure 3.3.4.7: IP Routing
Now, click on, “IP>Routes>Routes>Add>General>Gateway: Example of:
172.16.15.1>Apply>Ok”.
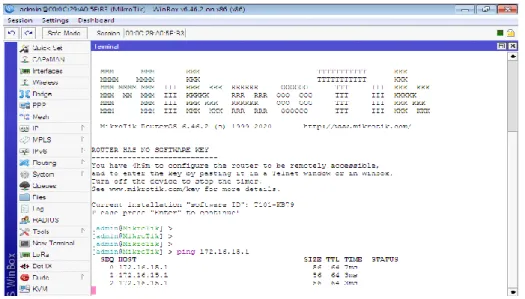
Step 7:Check whether the router has internet or Command-line interface (CLI) appliance on the terminal option of the router.
Figure 3.3.4.8: IP Ping to WinBox Terminal
Microtic Router Configuration Completed Now an IP Pink Marriage will see if the configuration is OK. First we have to go to the new terminal. Now type and enter as in the picture above.
3.3.5 Static-IP Configuration in Mikrotik Router:
Step 1: The LAN IP address is assigned first.
To create an IP address, first you have to go from IP to Address, then click on the Add button, input the data as shown in the picture above, and click OK.
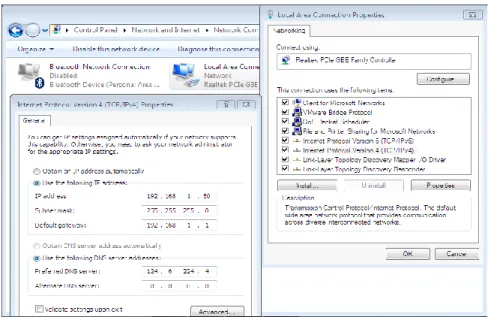
Step 2: Apply to a static IP user's personal computer.
Figure 3.3.5.2: TCP/IPv4 Configuration
To configure the static IP, first go to PC Settings Next Network Next Change Address Setting Next Local Area Connection Next Properties Next Double click on IPv4 and input data as shown above and click Apply OK.
Step 2: Let's check the user's Internet through the command prompt(Executable name: cmd.exe).
Figure 3.3.5.3: CMD mode of the user's PC
Press the PC start button> search> CMD and inter>ping 192.168.1.1 –t inter.
3.3.6 Queue Configuration:
The best way to manage the bandwidth of all types of IP allocation systemis to configure a queue.
Figure 3.3.6.1: Network Topology of Queue Configuration
User1: 5MB Upload and 5MB Download User2: 8MB Upload and 8MB Download
Step 1: Add IP address for Local Area Network (LAN).
To create an IP address, first you have to go from IP to Address, then click on the Add button, input the data as shown in the picture above, and click OK.
Step 2: Create a user and set the bandwidth limitation.
Figure 3.3.6.3: Simple Queues
To create a new user, first go to the Queue option. From Queue to Simple Queue then click on Add from General Options as required name target IP and target upload, target download bandwidth select and click OK
Step 3: Let‟s see the MAC address “User1”
Figure 3.3.6.4: Address Resolution Protocol (ARP)
Step 4:Let's check the user's internet through the command mode.
Figure 3.3.6.5: Network Connection Details
Press the PC start button> search>CMD and inter>ping 192.168.1.1 –t inter.
Queues of Parent Concept:
Step 1: Creates a parent concept's blog diagram
Figure 3.3.6.7: Simple Queues of Parent
At first Click on, "Queues>Simple Queues>General>Name: Example of: Management Blog>Target: Example of:10.20.20.0/24>Apply>Ok".
In the same way, we create the next blog and create a user of management blog.
Next Click on, “Queues>Simple Queues>General>Name: Example of: User1>Target:
Example of: 10.20.20.2>Advanced >Parent: select management blog>Apply>Ok".
3.3.7 DHCP Server Configuration with Mikrotik Router:
Step 1: Select the interface for the Dynamic Host Configuration Protocol(DHCP) server configuration.
Figure 3.3.7.1: DHCP Server Interface
Click on, IP>DHCP Server>DHCP>DHCP Setup>DHCP Server Interface: Select interface>Step 2: Input a DHCP address space for the Dynamic Host Configuration Protocol(DHCP) server.> DHCP Address Space: Example of 192.168.10.0/24>Step 3:
Input a gateway for Dynamic Host Configuration Protocol(DHCP) network.> Gateway for DHCP Network: 192.168.10.1>Step 4: Input an address to give out for the Dynamic Host Configuration Protocol(DHCP) server.>Addresses to Give Out: 192.168.10.100- 192.168.10.254>Step 5: Input a Domain Name System (DNS) server for the Dynamic Host Configuration Protocol(DHCP) Setup.> DNS Servers: Example of 8.8.8.8 and 124.6.224.4>Step 6: Input a lease time for the Dynamic Host Configuration Protocol(DHCP) Setup.>Lease Time: Example of 00:10:00>
Step 7:Let‟s see, if the Address Resolution Protocol (ARP) matches the user‟sMedia Access Control (MAC) address.
From PC setting click on network and go to local area connection from change adapter setting >Disable and enable>Double Click on Local Area Connection>Details>Show all information.
3.3.8 Bridge Configuration with Mikrotik Router:
Step 1:
Ethernet ports of Mikrotik Router:
Figure 3.3.8.1: Interface List of Bridge
Click on, Interfaces and show all Ethernet ports.
Step 2: Set up a bridge configuration.
Figure 3.3.8.2: Create Bridge Name
To create a bridge, first you have to go to the bridge, click on the add button, go to the general option, give the bridge a name as required and select the bridge by type, then click OK.
Step 3: Let‟s add ports of bridge connection.
Figure 3.3.8.3: LAN Configure of Bridge Port
Now click, "Bridge>Ports>Add>General>Interface: Select interface>Bridge: bridge 1>Apply>Ok".
Step 4: Finally,apply bridge configuration for address lists.
Final step, "Address list to select interface and apply> Ok"
3.3.9 Website Blocking Configuration:
Step 1: Create layer 7 protocols to block the website.
Figure 3.3.9.1: Firewall L7 Protocol
To create Layer Seven protocol, first go to IP from the firewall and then click on Layer Seven protocol. Now click on the plus username and input the data in the same way as given in the picture. Click on Apply.
Step 2: Create a filter rules to block the website.
Figure 3.3.9.2: Firewall Rule
Let's make a filter rolls. First let's click on firewall from IP. Click Add from Filter Rules. Now select Forward to Chain from General Options and type the source address and click Apply.
3.4.1Hotspot Server Configuration:
Step 1:
Create an IP pool for hotspot server.
Figure 3.4.1.1: IP Pool Configuration
Let's create a pool for the hotspot server. First we have to go from IP to pools and click on add as required.
Step 2: Select the interface for the hotspot server.
address pool of the network.> Address Pool of Network: Example: 192.168.15.2- 192.168.15.254>Step 5: Select a Hotspot Secure Sockets Layer (SSL) certificate.> Select Certificate: none>Step 6: Select a Simple Mail Transfer Protocol (SMTP) server.> IP Address of SMTP Server: Example of 0.0.0.0>Step 7: Setup a Domain Name System (DNS) configuration for the Hotspot server.> DNS Servers: Example of 8.8.8.8>Step 8: Input a Domain Name System (DNS) name of the local hotspot server.>DNS Name: Example of mdbabu.com>Ok.
Step 9: Create a user profile for hotspot server.
Figure 3.4.1.3: Hotspot User Profile
Let's create a profile for the hotspot server. First we have to go from IP to Hotspot then click on add button in user profile. Select the name and address pool as required and click OK
Step 10: Create a hotspot user.
Figure 3.4.1.4: Add Hotspot Users
To create a hotspot user, first go from IP to hotspot and then click on user, select server from general options, select name, password, and profile as required, click on Apply.
Step 11: Active user‟s details in hotspot connection
Figure 3.4.1.5: Show Hotspot User
Next on, “IP>Hotspot>Actives> Double-click on any one of the user's list and check this
Step 12: Connect user through hotspot.
Figure 3.4.1.6: Hotspot Log In Panel
Let's click OK with the username and password created in the Hotspot login panel Step 13: Hotspot connects successfully.
Figure 3.4.1.7: Log in Success in Hotspot
3.4.2 PPPoE Server Configuration in Mikrotik Router:
Step 1: Let's create an address list for Point-to-Point Protocol over Ethernet (PPPoE) server.
Figure 3.4.2.1: Address List for PPPoE Server
To create an address list, you must first go from IP to Address. Then click on add, address, network, interface as required and then click OK.
Step 2: Let's create a Point-to-Point Protocol over Ethernet (PPPoE) server.
Figure 3.4.2.2: PPPoE Server
Step 3: Here the IP pool is created in Point-to-Point Protocol over Ethernet (PPPoE) server.
Figure 3.4.2.3: Pool Configure for a PPPoE Server
To create an IP pool, first you have to go from IP to Pool, then click on plus, then click Apply with the name and address as required.
Step 4: Here the profile is created in Point-to-Point Protocol over Ethernet (PPPoE) method.
Figure 3.4.2.4: Point-to-Point Protocol (PPP) Profile
To create a profile, first click on profile, then from General Options, name, local address, remote address and DNS server as required and click Apply.
Step 5: Here,a user is created in Point-to-Point Protocol over Ethernet (PPPoE) method.
Figure 3.4.2.5: Point-to-Point Protocol (PPP) Secret
To create a user, click on secrets from ppp. Select the name, password, service and profile as required. Click on Apply.
Step 6: Here is the queue types created.
Let's create another queue type in the same way, select the destination address and click OK.
Step 7: Here, the name and the specific IP range are inputted.
Figure 3.4.2.7: Simple Queue for a PPPoE Server
Clock the, "Queues>Simple Queues>General>‟+‟>Name: Example: Five_MB>Target:
Example:192.168.100.0/25>Next step
Step 8: Some of the required "Queue Types" have been selected.
Figure 3.4.2.8: Simple Queue of Advanced Option for PPPoE Server
Next, "Queues>Simple Queues>Advanced>Queue Type: Five_MB_Q_UPl/
Five_MB_Q_Dow >Apply>Ok".
3.4.3 Bind MAC Address:
Step 1: Select the „reply-only‟ option for MAC binding.
Click on, "Interfaces>Select ether2 (LAN) and (Double click>General>ARP: reply- only>Apply>Ok".
Step 2: Enter Media Access Control (MAC) address in Address Resolution Protocol (ARP).
Figure 3.4.3.2: Add Media Access Control (MAC) Address
Click the, "IP>ARP> + >IP Address: 192.168.16.50> MAC Address: EC-A8-6B-70-0A- 5D>Interface: LAN Example: ether2>Apply>Ok".
CHAPTER 4
Conclusion and Future Career & Opportunities
4.1 Conclusion and Discussion:
I have learned every configuration of a microtic router to properly provide internet service to every employee of a company and wanted to know how to build this network. I have been IP class. The main learning of this project is that the link can be configured in any way, it includes bay bandwidth control, Network address (NAT) configuring, networks guide my internship all control work control system and improved my position for efficient calendar home. There are many types of information in this internship that will help me to move forward. Improving the security system to keep the server secure and controlling the quality tests with Chaitali Update Programming. The method of the microtic operating system has been kept steady, confident and in a wide range of patients.
Now, depending on the Internet network of several organizations it exists as a regular network design for an organization to talk about, Cannot manage Total Network.
4.2 Future Career & Opportunities:
Jobs are available in our country without skills. The reason why an internship can make a big difference in my life is that here I can develop my scale so I chose the internship.
So, this internship includes some of my previous experiences:
IT Support Specialist
IT Networking Specialist
Cyber security Specialist
Software & Web Developers
Data Specialist
REFERENCES
[1] IP Subnetting, available at <<https://www.cloudflare.com/learning/network- layer/what-is-a-subnet/>>, Access on 3 January‟2020 at 09:25pm.
[2] About Prisma Digital Network Limited,available at
<<http://www.prisma.net.bd/>> Access on 15 January‟2020 at 08:55pm.
[3] IP Addressing, available at <<https://www.geeksforgeeks.org/introduction-of- classful-ip-addressing/>> Access on 20 January‟2020 at 01:39pm.
[4] High CPU usage, available at <<
https://forum.mikrotik.com/viewtopic.php?t=132839>> Access on 25 January‟2020 at 09:38pm.
[5] Dynamic Host Configuration Protocol Configuration,available at
<<https://www.ccnablog.com/dhcp-dynamic-host-configuration-protocol/>>, access on 07 February‟2020 at 01:23pm.
[6] Static-IP Configuration,available at
<<https://docs.novatel.com/OEM7/Content/Ethernet_Configuration/Static_IP_Address _Config.htm/>> Access on 11 February‟2020 at 06:50pm.
[7] Bandwidth Management,available at <<https://www.miro.co.za/how-to-setup- bandwidth-limitation-by-using-mikrotik-router-board/>> Access on 16
February‟2020 at 10:20pm.
[8] PPPoE Server Configuration,available at
<<https://itmikrotik.blogspot.com/2016/07/blog-post.html >> Access on 21 February‟2020 at 08:29pm.
[9] ISP Bandwidth Management,available at <<https://systemzone.net/isp-
bandwidth-management-with-Mikrotik-pcq/>> Access on 19 February‟2020 at 11:53pm.
APPENDICES
Appendix:
Company InformationHead Office
Name Prisma Digital Network Limited
Address 34, Kemal Ataturk Avenue, Awal Center
Level-3,Banani, Dhaka-1213
Telephone 02-9857808, 9857811
Fax 8900780
Website www.prisma.net.bd
Type of Organization Nationwide Internet Service Provider (ISP)