For your convenience Apress has placed some of the front
matter material after the index. Please use the Bookmarks
Contents at a Glance
About the Author ...
xxiii
About the Technical Reviewers ...
xxv
Acknowledgments ...
xxvii
Chapter 1: Understanding Node.js
■
...
1
Chapter 2: Networking with Node.js
■
...
27
Chapter 3: Using the File System
■
...
51
Chapter 4: Building a Web Server
■
...
81
Chapter 5: Using Events and Child Processes
■
...
109
Chapter 6: Implementing Security and Cryptography
■
...
133
Chapter 7: Discovering Other Node.js Modules
■
...
161
Chapter 8: Creating a WebSocket Server
■
...
191
Chapter 9: Using Web Server Frameworks
■
...
221
Chapter 10: Connecting to a Data Store
■
...
253
Chapter 11: Testing in Node.js
■
...
281
Chapter 12: Debugging and Deploying Your Application
■
...
311
1
CHAPTER 1
Understanding Node.js
Node.js is a server-side framework useful for building highly scalable and fast applications. Node.js is a platform that is built on v8, the JavaScript runtime that powers the Chrome browser designed by Google. Node.js is designed to be great for intensive I/O applications utilizing the nonblocking event-driven architecture. While Node.js can serve functions in a synchronous way, it most commonly performs operations asynchronously. This means that as you develop an application, you call events with a callback registered for handling the return of the function. While awaiting the return, the next event or function in your application can be queued for execution. Once the first function completes, its callback event is executed and handled by the function call that invoked the callback. This event-driven processing is described in Node.js’s very own definition:
Node.js is a platform built on Chrome’s JavaScript runtime for easily building fast, scalable network
applications. Node.js uses an event-driven, non-blocking I/O model that makes it lightweight and
efficient, perfect for data-intensive real-time applications that run across distributed devices.
Applications written in Node.js are written in JavaScript, the ubiquitous language of the web platform. Because of the accessibility of JavaScript to many experienced developers and newcomers alike, the Node.js platform and community have taken off and have become critical parts of the development landscape for many companies and developers.
This book is about Node.js. In particular this book is designed as a recipe book, which aims to provide a large set of useful and high-quality examples of what Node.js is capable of accomplishing. This book is geared for a developer who has some experience with JavaScript and at least some exposure to Node.js. By reading this book, you will gain an understanding of many of the highly utilized modules, both those native to Node.js and those written by third-party contributors, that are the main targets for Node.js developers.
This first chapter is a departure from the recipe format that will follow in the rest of the book. It is broken down to get a developer up and running from scratch with installation and it gives an overview of how to function within the Node.js platform. You will get an idea of how to install Node.js and understand many of the common paradigms and the basic workflow to get a Node.js application running. As you will see, a considerable amount of time is spent covering how Node.js works. Once you have read this chapter, you should be well equipped to dive into the recipes in the chapters that follow.
1-1. Installing Node.js on Your Machine
There are several ways in which an install of Node.js can happen, and they vary slightly across different operating systems. The three primary methods to install Node.js are via a binary installer, via a package manager, or by compiling the source code.
To install Node.js on your machine via a binary installer, you first need the installer. Currently the only installers that are available for Node.js are for Windows and Macintosh OS X. To find these installers, you need to go to
CHAPTER 1 ■ UNDERSTANDING NODE.JS
Windows
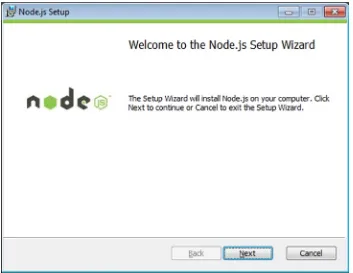
On Windows, first download the .msi installer package. When you open the file, you will begin your walkthrough with the Setup Wizard, shown in Figure 1-2.
Figure 1-1. Platform-specific installers available for download
CHAPTER 1 ■ UNDERSTANDING NODE.JS
3
As in most Windows applications, you will be presented with a default location to which you can install the application files. This destination, however, can be overwritten and is presented to you as in Figure 1-3.
CHAPTER 1 ■ UNDERSTANDING NODE.JS
OS X
The installer on a Macintosh is very similar to the Windows setup. First, download the .pkg file. When you open this, it will walk you through the standard installer that runs on OS X. This presents as you see in Figure 1-5.
CHAPTER 1 ■ UNDERSTANDING NODE.JS
5
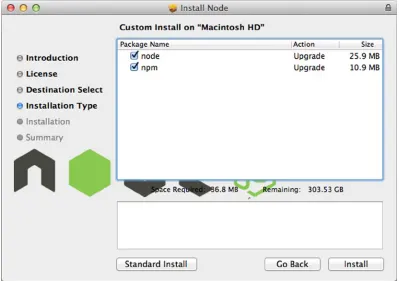
Sometimes when installing Node.js, you want only a subset of the potential users to be able to access it. This functionality is built into the OS X installer, presenting you with the option of how you would like Node.js installed, as shown in Figure 1-6.
CHAPTER 1 ■ UNDERSTANDING NODE.JS
Just as on Windows, you can customize the installation. Click the Custom Install button and then set your configuration accordingly as shown in Figure 1-7. For example, you may wish not to install npm, in favor of doing a more customized npm install, which we will outline in the next section.
CHAPTER 1 ■ UNDERSTANDING NODE.JS
7
There are, of course, many platforms that are not Macintosh or Windows, but you would still like to not have to download and compile Node.js from sources. The solution for this is to find a package manager that will install Node. js for you. There are several package management systems that vary across platforms, each with its own style for fetching new packages.
Ubuntu and Linux Mint
The package for Ubuntu and Linux Mint requires that a few components be installed onto your machine before you can install Node.js. To meet these prerequisites you must first run the code shown in Listing 1-1.
Listing 1-1. Ensuring Prerequisites Are Installed
sudo apt-get install python-software-properties python g++ make
You can then proceed with the installation by adding the repository that hosts Node.js, updating your sources, and installing with the commands shown in Listing 1-2.
Listing 1-2. Installing Node.js on Ubuntu and Linux Mint sudo add-apt-repository ppa:chris-lea/node.js sudo apt-get update
sudo apt-get install nodejs
CHAPTER 1 ■ UNDERSTANDING NODE.JS
Fedora
Fedora 18 has a simple Node.js install that is a single package manager directive, as shown in Listing 1-3.
Listing 1-3. Installing Node.js on Fedora
sudo yum --enablerepo=updates-testing install nodejs npm
In future versions of Fedora, Node.js should be integrated within the operating system by default.
Arch Linux
For Arch Linux, utilize the pacman package manager by targeting the “nodejs” package, as shown in Listing 1-4.
Listing 1-4. Installing via pacman on Arch Linux pacman -S nodejs
FreeBSD and OpenBSD
An installation on Berkeley Software Distribution (BSD) platforms utilizes the ports installer, as shown in Listing 1-5.
Listing 1-5. Installing on BSD /usr/ports/www/node
openSUSE
When using openSUSE you can install Node.js using the zypper command-line package management tool, as shown in Listing 1-6.
Listing 1-6. Using zypper to install Node.js on openSUSE
sudo zypper ar http://download.opensuse.org/repositories/devel:/languages:/nodejs/openSUSE_12.1/
NodeJSBuildService
sudo zypper in nodejs nodejs-devel
Many developers prefer utilizing package managers on OS X and even Windows as opposed to utilizing the installers. Node.js can also be installed via these package managers.
Windows
Using the Chocolatey package manager, simply install with the chocolatey command, as shown in Listing 1-7.
CHAPTER 1 ■ UNDERSTANDING NODE.JS
9
OS X
Whether you utilize MacPorts or Homebrew for your package manager on Macintosh, you can install Node.js in either case as shown in Listings 1-8 and 1-9.
Listing 1-8. MacPorts port install nodejs
Listing 1-9. Homebrew brew install node
At this point you should have Node.js installed on your machine by using the method of your choosing on your preferred platform. Next, you need to make sure you have a way to discover and manage Node.js packages.
1-2.
Installing the npm Package Manager
Many programming languages and platforms depend on the use of third-party modules to extend the utility of the platform. Node.js is no different in that it is greatly extended by the use of the package manager: npm. npm originated separately from Node.js itself and is still maintained as an independent project. However, due to its growing
popularity and acceptance, it has been built and deployed with the Node.js binary installs since Node.js version 0.6.3. This means that installing npm is as simple as grabbing the latest version of Node.js as outlined in the previous section. So if you have used one of the binary installers, npm is already available to you. You can, of course, as shown in the previous section, choose to omit npm from your install. If it appears npm is not available, you can run the make install command and you will soon have it.
There are, as you might expect, less simple ways to install npm. These would be useful if you want to debug npm or test a certain functionality that is not readily available in the default npm install. To get into the “fancy” installs, you must first locate the install.sh shell script, which is located at https://npmjs.org/install.sh.
This installation shell script contains many tools for invoking npm in a way that meets your specific needs. For instance, if you wish to create a debug mode instance of npm you could invoke install.sh, as shown in Listing 1-10.
Listing 1-10. npm debug Install npm_debug=1 sh install.sh
You could also set configuration parameters with the npm install script, shown in Listing 1-11.
Listing 1-11. Additional Configuration Parameters for npm npm_config_prefix=/my/path sh install.sh
Of course, you could build a patch for npm, in which case you will be best served to download from the GitHub source and build it yourself. This requires running the make command in the folder that you have downloaded the npm source to (see Listing 1-12).
Listing 1-12. Installing npm Manually make install
CHAPTER 1 ■ UNDERSTANDING NODE.JS
1-3. Understanding CommonJS Modules
Because Node.js is a framework in which programs are written in JavaScript, it carries with it some of the perceived limitations that JavaScript has as well. One of these items that is missing is the concept of a robust standard library, like one might find in a language like C++. Because of this, there are many variations and ways for including modules within a JavaScript application. In the browser world, for example, this could be anything from simple <script> tag ordering to script loaders to module loaders. For Node.js, a simple and robust module loading system is used quite heavily though is not required. This modular system is known as CommonJS and represents the methods utilized for sharing; it includes standard and third-party modules within your Node.js application.
CommonJS is a community-driven initiative that will bring a standard library-loading functionality to the JavaScript community as a whole. What CommonJS actually represents is a set of specification proposals that will aim to create a standardized system of module loaders. The concept of CommonJS modules is straightforward and involves two parts. First, a creator of a CommonJS module should come up with a reusable piece of JavaScript and export a specific objects or objects from this reusable JavaScript. Second, a consumer of the module will require the exported objects from the module, which will then load into the application. The basic module contract as outlined in the specification (http://commonjs.org/specs/modules/1.0/) is as follows:
Module Context
1. In a module, there is a free variable “require”, which is a function. a. The “require” function accepts a module identifier.
b. “require” returns the exported API of the foreign module.
c. If there is a dependency cycle, the foreign module may not have finished executing at the time it is required by one of its transitive dependencies; in this case, the object returned by “require” must contain at least the exports that the foreign module has prepared before the call to require that led to the current module’s execution. d. If the requested module cannot be returned, “require” must throw an error.
2. In a module, there is a free variable called “exports” that is an object that the module may add its API to as it executes.
3. Modules must use the “exports” object as the only means of exporting.
Module Identifiers
1. A module identifier is a string of “terms” delimited by forward slashes.
2. A term must be a CamelCase identifier: “ . ”, or “ . . ”.
3. Module identifiers may not have file-name extensions like “.js”.
4. Module identifiers may be “relative” or “top-level.” A module identifier is “relative” if the first term is “ . ” or “ . . ”.
5. Top-level identifiers are resolved off the conceptual module namespace root.
CHAPTER 1 ■ UNDERSTANDING NODE.JS
11
You can now examine what a simple implementation of a CommonJS module would look like. Assume you create a file called “describe.js,” which will export a string of text that responds with a description of the module shown in Listing 1-13.
Listing 1-13. describe.js Exporting a Description of Itself /**
* Describe module */
exports.describe = function() {
return 'I am a CommonJS Module'; };
This module does not require any other modules to function; all that it does is export the describe function, which returns a string description. But this is very uninteresting and if you wish to include this module within your applications elsewhere, you need to install that module in your code. To do this, use the CommonJS require( ) function, as shown in Listing 1-14.
Listing 1-14. Requiring the describe Module
var describeModule = require('./describe.js');
Now you have a reference to your describe module, but what does that mean? What happens when you call require( )? When you call require( ), Node.js will locate the resource and read and parse the file, granting you access to the exported API of the module. When Node.js loads the file into your application, it will automatically isolate the module into its own scoped namespace to prevent global names colliding in a disastrous thunder of crying. Because Node.js has loaded this resource for you, you can call exported functionality from this resource (see Listing 1-15).
Listing 1-15. Reference an Exported Function from a Required Module var describeModule = require('./describe.js');
console.log(describeModule.describe());
CommonJS modules are not entirely about exporting functionality either. They can be used to create an API that builds on functionality with the module’s file but leaves that functionality private to the module itself. Imagine you have a more robust module where only a certain portion of your module needs to be exposed; you can easily create a method for this “private” functionality and still see it in the exported solution, as in Listing 1-16.
Listing 1-16. “Private” Methods in Exported Modules /**
* Desc module with private method */
var _getType = function() { return 'CommonJS Module'; };
CHAPTER 1 ■ UNDERSTANDING NODE.JS
You will see more about authoring and consuming CommonJS modules later, but, for now, the important takeaway is how this all works. CommonJS modules export functionality, and only the explicitly exported functionality is exported. Other functions or methods may live with the CommonJS modules, but they are limited to the private scope of the module itself and not to the application that accesses the module. This can result in very clean APIs for your application if you are careful and structure your CommonJS modules appropriately.
Understanding how Node.js implements the CommonJS methodology for module loading helps you to think creatively about the structure and API of your application, allows for code sharing and reuse, and makes your application code cleaner and easier to follow.
1-4. Writing Modules for Your Application
Now that you understand what CommonJS is and how it pertains to Node.js as a module loader, you can begin to think about how you will build your own modules for your application. If you decide not to build modules for your application, you will quickly see your application code grow unwieldy and cause you maintenance nightmares, with heterogeneous data structures, objects, and callbacks strewn throughout what will become a monolithic Node.js application.
When you begin thinking about writing your modules, the first thing that should come to mind is a simple division of tasks. If your application requires a user to authenticate against a server in order to access content, you will likely want to create a module for your user data. This could hold the session state, user information, authentication protocols, and more. If you include this chunk of user-specific data at the heart of your Node.js application, you will regret having to navigate past or around this code every time you see it. Listing 1-17 shows how these data might look when your application lacks modules.
Listing 1-17. Messy Code with Exportable Features /**
* User authentication code not in its own module */
var db = require('./db.js');
app.on('/createUser', function(req, res) { var user = req.username,
pwd = req.password, email = req.email;
db.lookup('user', {username: user }, function(err, data) { if (err) {
return; }
// Didn't find a user by that name if (data.userid === null) {
createSalt(10, function(err, salt) { if (err) {
return; }
createHash(pwd, salt, function(err, hash) {
db.create('user', {username: user, password: pwd, email: email }, function(err, user) { if (err) {
CHAPTER 1 ■ UNDERSTANDING NODE.JS
13
} else {
user.isauthenticated = true; app.users.push[user]; res.send(user); }
}); });
}); } });
});
function createSalt(depth, callback) { // do salting here
if (err) {
return callback(err); };
callback(); };
function createHash(password, salt, callback) { // hashify
if (err) {
return callback(err); }
callback(); }
The code above is an example of a request from the client to create a new user. This has to pass through various parts of the application before you can create a user successfully. It must first check the database to ensure the username has not been claimed. Then it must create a salt and hash the password with that salt. Then it must store that user information in the database and transmit the new user object to the application. This by itself does not seem entirely unwieldy, but you can imagine as part of a large project you would like to move this outside of the main application into its own module. We can eliminate a large portion of the code by creating an authentication module to hold the createSalt and createHash methods. These new methods are shown in Listing 1-18.
Listing 1-18. Exporting the Salt and Hash Methods /**
* Authentication module */
exports.createSalt = function(depth, callback) { //do salty things
if (err) {
return callback(err); }
CHAPTER 1 ■ UNDERSTANDING NODE.JS
exports.createHash = function(password, salt, callback) { //hashification
if (err) {
return callback(err); }
callback(); }
We eliminated two large functions from our main code by placing them into a module. Next we create a user module that will handle all the user-related things in Listing 1-19.
Listing 1-19. User Module /**
* User module */
var db = require('./db.js'); var auth = require('./auth.js');
exports.create = function(req, res, callback) { var user = req.username,
pwd = req.password, email = req.email;
db.findOrCreate('user', {username: user});
db.lookup('user', {username: user }, function(err, data) { if (err) {
return callback(err); }
// Didn't find a user by that name if (data.userid === null) {
auth.createSalt(depth, function(err, salt) { if (err) {
return callback(err); }
auth.createHash(pwd, salt, function(err, hash) {
db.create('user', {username: user, password: pwd, email: email }, function(err, user) { if (err) {
return callback(err); } else {
user.isauthenticated = true; return callback(user); }
}); });
CHAPTER 1 ■ UNDERSTANDING NODE.JS
15
This is now outside of the application, so our original handler for createUser is now reduced to the concise information shown in Listing 1-20.
Listing 1-20. Main Application with Required User Module /**
* User Authentication code within its own module */
var user = require('./user.js');
app.on('/createUser', user.create(function(err, user){ if (err) {
return; }
app.users.push[user]; }));
This example outlines a generalist approach to reducing your code into manageable portions by using modularization. It is important to remember some of the basic rules of CommonJS modules when writing them. You can create your modules based on whatever guidelines you see fit, but you must use the exports variable in order to expose any methods of your module to whatever portion of code you wish to see it in. You will also need to design a logical place for your module in order to load it, since the require function needs an identifier to find the module. For many cases this can be a local relative path within the structure of your Node.js application, or a more globalized package if you use an npm module. Of course, use cases will vary, but as a rule of thumb, if the code is getting in your way, you should be able to extract it to its own module.
1-5. Requiring Modules in Your Application
As you build a Node.js application, you will almost inevitably need to utilize a set of modules, like those created in the previous section, in your application. To do this you will use the CommonJS module-loading require function. This function will find the module by name in the file system and load its exported API. This sounds very simple, but to really understand what happens when you load a module you must understand how the modules are retrieved.
Node.js utilizes a complex strategy when it attempts to load a module. The very first place that is checked when loading a module is the module cache, so if you have previously loaded a module, you will have access to it already. If Node.js cannot find a cached module, precedence is then given to the Node.js native modules, such as crypto, http, fs, etc. If a native module is not found by the identifier passed to require(), then Node.js will perform a file-system search for the identifier that was passed to it.
The file-system lookup for Node.js modules is a little bit more complex than looking for a native or cached module by name. When you require a module in Node.js the identifier can be in several forms, and the lookup performed can change accordingly.
CHAPTER 1 ■ UNDERSTANDING NODE.JS
Node.js either has a file that it can load (in which case it will add that module to the module cache) or it cannot find the module and will throw an error.
To visualize these scenarios, let’s create a hypothetical application with a folder structure that looks like the outline in Listing 1-21.
Listing 1-21. Outlining a Nested Application myApp/
-main.js -aModule.js -subfolder/ bModule.js index.js
You can assume that the application root is in the JavaScript file “main.js”, which loads all the dependencies needed for our application, shown in Listing 1-22.
Listing 1-22. Loading Dependencies /**
* main.js - module loading */
// First we require 'http' which is a native Node.js Module var http = require('http'),
// load a module with an extension Node.js has not trouble with this modA = require('./aModule.js'),
// Load ambiguous filename from subdirectory load bModule.js fine modB = require('./subfolder/bModule'),
// Load index.js from subdirectory sub = require('/subfolder/'),
// not a file or native module // Error: Cannot find Module 'cheese' missing = require('cheese');
When requiring modules in Node.js, you have a lot of freedom as to how you decide to structure your application and your file names. These rules apply not only to locally created files and native Node.js modules but also to the modules that are loaded into your application via npm, which you will discover in detail in the following section.
1-6. Using npm Modules
You installed Node.js and npm. You also know how you should include CommonJS modules in your Node.js applications, but you do not want to have to reinvent the wheel each time you create an application. Also, you may know of a Node.js package that exists for a task you want to accomplish in your code. Enter the npm modules.
CHAPTER 1 ■ UNDERSTANDING NODE.JS
17
according to the npm site at https://npmjs.org. With that many packages, it can easily become difficult to identify the packages that fit your needs. To find a package, use the search functionality, which is a Google site search, on https://npmjs.org/, shown in Figure 1-8.
Alternatively you can utilize the built-in search mechanism within npm itself. This is run on the command line of your terminal (see Listing 1-23).
Listing 1-23. Command-Line npm Search npm search <term(s) or package name>
When you perform the search command, npm will first cache a local index of all packages and will then search the package names, descriptions, authors, and keywords for the packages. The results are returned in a table that shows the package name, description, author, date of publication, version, and keywords. This can be useful for determining which package you want to use. To view detailed information about a package, run the npm view command, shown in Listing 1-24.
Listing 1-24. Detailed View of a Package npm view <package name>
Once you have discovered the package you wish to install and have viewed the details about the package, you can install it, also via the command line (see Listing 1-25).
Listing 1-25. Installing via the Command Line npm install <package name>
Running the npm install command will download the package and place it in a directory in your application. This directory is named “node_modules” and will usually reside in the same directory as your package definition file named package.json. This folder helps to define your npm package. This means that if you have a file that requires this npm module, it will look to this directory to find it. This is also the case for files within subdirectories as well, meaning that, within a package, npm-installed modules will be installed and referenced from this directory. This prevents too many subdirectories from containing a “node_modules” directory referencing a single module and cluttering your application structure.
Contrary to many package managers (i.e., Python’s easy_install) that download packages to a central shared directory, npm installs modules locally, relative to the package itself. However, there is also a global flag that can be set when you install a package from npm. By setting the package to install globally, it will be accessible by any application for that user, as it is installed in the $HOME directory ($USERPROFILE on Windows). To install globally, simply add the flag to your install command, as shown in Listing 1-26.
CHAPTER 1 ■ UNDERSTANDING NODE.JS
Listing 1-26. Globalizing a Package Install npm install –g <package name> # or
npm install –-global <package name>
The node_modules directory is a special case in Node.js’s module-lookup routine, which was outlined in the previous section. A module lookup does not jump directly from looking for a native Node.js module to then searching the directory structure for the file name. If Node.js does not recognize the module as a native module, it will then check the node_modules directory to see if the module is located there, before continuing through the loading waterfall.
Because this is part of the loading path for modules, there is not really any difference to requiring an npm module versus a module that you author yourself, which allows you to reference it in the same way.
1-7. Getting Started with npm and Dependency
Using npm has many advantages when you are developing a robust Node.js application. As you have seen, it is incredibly easy to discover, retrieve, and include any published npm package within your application. There are even simpler ways of determining how your application is structured and what npm modules are included with your application. This is done via the npm package management files that live within your application directory. These files are named package.json and include all of the details needed to completely manage the remote dependencies of your application.
Let us examine in detail precisely what package.json is and how it works in your Node.js application. First, package.json contains JavaScript Object Notation (JSON), which is what is parsed by Node.js and npm in order to read the details of your application. When this file is parsed it can help load dependencies, serve application metadata, start and stop your application, and list authors and contributors, code repositories, development dependencies, and much more. Let’s discover what all the various fields for package.json could be and what they tell npm and Node.js. Some of these fields should be included in all your package.json files, whereas others are really more useful when you are publishing your package to the npm registry, which will be covered in a later chapter.
name
The name field is required in package.json. Without it, your application cannot be installed. One rule for the name is that it needs to be a URL-safe name. If you publish your package, the name will become a part of a URL for locating the package and therefore must be capable of being parsed as a URL. It is also what other modules will utilize when they require your module. This means that utilizing a ridiculously long name is not recommended because it is highly unlikely anyone will want to type an extraordinarily long package name (like the one in Listing 1-27).
Listing 1-27. A Ridiculously Long Package Name
var poppins = require('supercalifragilisticexpialidocious');
However, you may need to craft a creatively particular name because the npm module names must be unique throughout the entire npm registry. Also do not include “js” or “node” in the name. It is assumed that the file is JavaScript and you can add the “node” as part of the “engines” directive, which you will see later.
version
CHAPTER 1 ■ UNDERSTANDING NODE.JS
19
numeric (0.0.1, or v0.0.1). Sometimes developers like to place a qualifier on the version number, such as 0.0.2-alpha, 0.0.2beta, or 0.0.2-42. These all denote different versions and fit into a hierarchy that is parsed by node-semver, the npm semantic versioner.
description
The description field is simply a text description of the package; terms in the description are searchable via the npm search.
keywords
Keywords are also used in an npm search; these help other developers target your package.
homepage
This field is where you can place the URL of your package or project’s homepage.
bugs
This points developers to a place (an issue tracker or e-mail address) to find or submit bugs so they can help you make your project even more amazing.
license
This field describes the license that your code will be under. This can be simple like MIT, BSD, or GPL, or you can use a custom license with a type and URL of the license file.
author, contributors
These sections hold the names, e-mails, and URLs for the persons who are responsible for the package.
files
This field can be vital to good dependency management in your package.json file. This field lists the files that you want to include with your package. This can also contain a list of the folders that need to be bundled with the package. You can load a directory of files and then exclude certain ones with an .npmignore file within the directory, which specifies which files to ignore.
main
CHAPTER 1 ■ UNDERSTANDING NODE.JS
bin
This field controls where npm will install any executable files that will either live in the node_modules/.bin/ directory or will be symbolically linked globally. This is precisely the way that npm itself installs the command-line interface for npm. The bin field takes a key field, which will be the linked command, and a value, which is the script that will be linked to that key. For example, the bin field looks like what is shown in Listing 1-28.
Listing 1-28. bin Field in package.json
{"bin": {"program": "./path/to/program"}}
repository
This field indicates where the central repository is located. The repository holds the code for your Node.js package. This field takes a type, denoting the version control type, such as git or svn, and a URL argument in order to locate your code.
config
This field can be utilized for configuration options that persist with your package. You could set a configured port number, tell the application to run in production mode, or set the username to associate in the npm registry.
dependencies
This is a very important field when you design your package.json file: it holds information vital to the success of your application. Because there are various versions of other packages available, this field will list those that you have presumably tested with your Node.js application and know will work correctly. Dependencies can not only outline what npm libraries your application depends on but also target the specific versions of those items. There are multiple methods for which you can specify the version you are targeting. This can be done either by explicit listing of the exact version number, defining a range explicitly, implicitly defining a range with comparison operators, listing a URL, a tilde versioning system, and “X version ranges” (see Listing 1-29).
Listing 1-29. Managing Dependencies in package.json files
Explicit Listing of Version Number for a Dependency
"package": "0.0.1" "package": "=0.0.1"
Dependencies can also be managed by providing a set of versions via a range
"package": "0.0.1 – 0.0.3" "package": ">=0.0.1
Package rangesare also listed in the dependency section of your file by comparison operators such as
CHAPTER 1 ■ UNDERSTANDING NODE.JS
21
Ranges can also be represented with an “x” placeholder that will allow any numeral in the place of the “x”"package": "0.1.x" "package": "0.0.x"
Packages as URLs must point to a tarball or a git endpoint that can be checked out (
tarball
"package": "https://example.com/package.tar.gz"
Git
"package": "git://github.com/organization/source.git"
Tilde rangesrepresent a subset of ranges that must be at least equal to the version listed with the tilde, but not greater than the next major version
"package": "~0.8.4" Is equivalent to:
"package": ">=0.8.4 <0.9.0"
There are variants of dependencies that can be a part of your package.json file as well. These are devDependencies, optionalDependencies, and bundledDependencies.
devDependencies
devDependencies, as you might expect, are dependencies that will be downloaded if npm install is called, utilizing the development flag --dev. This would be useful if the development branch utilizes a framework that is not needed when installing the production version.
bundledDependencies
The bundledDependencies flag denotes what items are to be bundled when publishing the package.
optionalDependencies
optionalDependencies are dependencies that need to be handled in your application if they are or are not present. If you have a section of code that would optionally rely on a certain package, you must account for that if the package is listed in the optionalDependencies hash, as in Listing 1-30.
Listing 1-30. optionalDependencies in Practice try {
var optional = require('optional'); } catch(err) {
optional = null; }
if (optional) {
optional.doThing(); } else {
CHAPTER 1 ■ UNDERSTANDING NODE.JS
Engines
You can specify engines within your package.json file as well. This means that if you know that your application will only work on Node.js or npm within a certain version range, set this here. The values for engines follow the same values as the dependencies (see Listing 1-31).
Listing 1-31. Defining Engines "engines": {
"node": "0.8.x", "npm": "*" }
OS and CPU
If you are aware that certain aspects of your application will only perform on a given operating system, or you are only targeting a specific operating system, then you can add the specific values within your package.json file as well. This also applies if you have a certain CPU you are targeting, such as 64-bit machines, which can be seen in Listing 1-32.
Listing 1-32. Defining Architectures for Your Application "os" : ["linux", "darwin", "!win32"],
"cpu": ["!arm", "x64" ]
preferGlobal
If the package that you are maintaining is best run as a global package, or you would prefer it to be installed as global, set this flag to true and it will set a console warning message if it is chosen to be installed locally by the user.
Putting together all the fields in your package.json file helps to dictate the configuration and dependencies required to run your Node.js application. This makes your package extremely portable, and setup on a new machine is usually straightforward. When you put together even a simple app, you will be able to gain valuable information about your application by examining the package.json file. Managing all of these settings can seem cumbersome when you are building an application. Fortunately, if you have already built an application in Node.js you can retroactively create a valid package.json file by running the command npm init, which will produce a file that may be similar to the package shown in Listing 1-33.
Listing 1-33. Initialized Application via npm init {
"name": "squirrel", "version": "0.0.1", "private": true, "scripts": {
"start": "node app" },
"dependencies": { "express": "3.0.0rc4", "ejs": "*",
CHAPTER 1 ■ UNDERSTANDING NODE.JS
23
"gitHead": "e122...",
"description": "A sample app to parse through your RSS feeds", "main": "app.js",
"devDependencies": {}, "repository": { "type": "git",
"url": "ssh://[email protected]/username/squirrel.git" },
"keywords": [ "rss" ],
"author": "cory gackenheimer", "license": "MIT"
}
When you examine the above package.json skeleton, generated by npm init, you notice that not every field available is included in the file. This is okay, but what this file does indicate is the name and version of your application. More important, however, it dictates dependencies, so when you execute npm install from the root of your application, npm will install the prescribed version of express, ejs, and feedparser, in order to resolve the dependencies listed in package.json.
1-8. Installing a Node.js Version Manager
If you are going to spend any amount of time developing Node.js applications, you will inevitably encounter a new version of Node.js. This is because the development of Node.js is moving at an incredible pace. As of this writing the current stable release version is 0.10.x. This release holds the stabilized APIs that are suitable for production environments. There is also a secondary, experimental build, which is currently at version 0.11.x. The experimental build is not suitable for production because it holds new features as they are being created for upcoming versions. It may be the case that you are developing a package for the current stable version, but you also would like to ensure it will continue to work with Node.js API changes in upcoming releases. If this is the case, you are going to need to install multiple versions of Node.js. There are two ways to accomplish this sort of version management. First, you can go to the Node.js web site, download Node.js, and install the version you are targeting. Second, and more elegant, you can use a version management tool.
Once you have decided to use a Node.js version management tool, you have a choice between different tools. There are currently three predominant variations of Node.js version management tools: nvm, n, and nave. Each of these tools is slightly different and may offer options that suit your particular use case better.
Node Version Manager, or nvm, created by Tim Caswell, is an installable shell script that will download and install multiple versions of Node.js that you specify. To install the nvm utility you need to get the install script, which is also a shell script. There are three ways to get and install this script: cURL, Wget, or a manual install.
To install manually, you first need to get the nvm.sh file that is located at the project’s repository on GitHub (https://github.com/creationix/nvm). It can be downloaded from that location directly, or fetched at git clone
git://github.com/creationix/nvm.git ~/nvm.
Then you need to run the shell script that was just downloaded to the nvm directory:
~/nvm/nvm.sh
CHAPTER 1 ■ UNDERSTANDING NODE.JS
Listing 1-34. Using cURL
curl https://raw.github.com/creationix/nvm/master/install.sh | sh
Listing 1-35. Using Wget
wget -qO- https://raw.github.com/creationix/nvm/master/install.sh | sh
Installing other Node.js version management tools is just as straightforward. A similar script to nvm is a tool called nave, which was developed by Isaac Schlueter, and is packaged as Virtual Environment for Node. Nave runs a shell script, just as nvm does; however, it is installable via npm.
npm install –g nave
The last version management utility that will be covered is also installed via npm, npm install –g n, and is also similar in functionality to the other tools.
These tools are built to make working with more than one version of node extremely easy and intuitive. They each have their own divergent features that set them apart, so that you as a developer may find the right tool for the job. In the next section you will see an in-depth look into the workflow and options available for each of these version management tools.
1-9. Using Multiple Versions of Node.js on Your Machine
As you might imagine, developing a Node.js application takes time. You might begin a project while Node.js is on a given version and all the packages work seamlessly with it. However, you may find that, for one reason or another, you need to upgrade (or downgrade) the version of Node.js that you are using with your application. To do this with your application and to utilize multiple Node.js instances on your machine, you can use one of the Node.js versioning tools. While each tool provides similar functionality, their APIs are slightly different and do contain certain features unique to each tool.
nvm
Installation for nvm follows the pattern nvm install <version>, as shown in Listing 1-36. The version that you specify can be written explicitly or as a shortened version that will install the latest provided version.
Listing 1-36. nvm Install $ nvm install v0.8.23 $ nvm install 0.8.23 $ nvm install 0.8
The install script finds the appropriate version number, goes to the appropriate location in the
https://nodejs.org/dist/ directory, and installs the specified version of Node.js on your machine. The script does not alter your path in order for it to be utilized globally. To do this, specify the version you wish to use with
the command use (see Listing 1-37).
CHAPTER 1 ■ UNDERSTANDING NODE.JS
25
If you do not know the specific version of Node.js that you would like to install or use, you can list the remote versions of Node.js that are available by executing the nvm ls-remote command. This will list all versions available for download. If you have multiple versions installed on your machine already, you can utilize the nvm ls command to show the list of Node.js versions that are currently available on your machine.
nvm allows you to specify a particular version, separate from the installed version you are using, to run your application with. For example, you could enter nvm run 0.6 server.js. This would run your application (server.js) with the latest installed version of Node.js 0.6.x, even if the version set with the use command is completely different. With nvm you can also set an alias for a version by running nvm alias <name> <version>. The use case for this could be similar to the run command, but if you want to test a build more than once against your application, you might find it cumbersome to type the run command. For this an alias is very useful, such as nvm alias dev 0.11.0, which would allow you to test out new features in Node.js version 0.11.0 with a simpler command (dev server.js, instead of nvm run 0.11.0 server.js).
Of course, by installing multiple versions via nvm, you may end up with a housekeeping nightmare. Too many versions could pose an issue when trying to maintain some order. These issues are resolved with the nvm uninstall <version> command and the nvm unalias <alias> command. These uninstall a specified version of Node.js and remove the specified alias from your machine, respectively.
nave
nave is not very dissimilar from nvm. In fact nave credits nvm for inspiration. There are a few differences with the implementations and underlying shell scripts that do vary enough to note. It is important to understand that nave is presented as a Node.js virtual environment provider, versus a version manager. First, nave install <version> expects the version parameter to be an exact version of Node.js, with the exception of fetching the latest, or latest stable version, which would look like nave install latest and nave install stable, respectively.
The virtual environment portion of nave is based around the use command. This command takes either a version number by itself, a version number followed by a Node.js program parameter, or a name followed by a version number, as shown in Listing 1-38.
Listing 1-38. Nave Use
Nave use version, this will open a subshell utilizing the version specified
$ nave use <version>
Providing a version with a program target, it will run the program in a subshell using the specified version
$ nave use <version> <program>
This will provide an alias based on the specified version
$ nave use <name> <version>
CHAPTER 1 ■ UNDERSTANDING NODE.JS
n
The Node.js versioning tool n is different in implementation and its API than nvm and nave, but it still serves the primary purpose of allowing you to install multiple versions of Node.js. With n, you can specify an exact version of Node.js by using the command n <version>. This is less lenient than nvm, which allows you to pick a major revision, and it will install the latest of that version. Where this does differ is that you can specify the latest (see Listing 1-39), or the latest stable release (see Listing 1-40), and n will fetch it for you.
Listing 1-39. Fetch the Latest Version $ n latest
Listing 1-40. Fetch the Latest Stable Version $ n stable
What these commands do is go to the https://nodejs.org/dist/ site and search for the latest version (the highest number available for retrieving the latest or the highest even-numbered release available for latest stable). To move to a previous version that you had installed, simply use the n prev command.
To view the locally installed versions of Node.js that are available, and to select one to use, simply type the command n. The n command by itself will list test versions, along with any flags you have specified to run with that version. In order to specify a flag, or configuration option, you simply provide it as a parameter after your n <version> command, as shown in Listing 1-41.
Listing 1-41. Pass the debug Parameter to This Version of node n latest --debug
The n bin <version> command will output the path to that binary installation that is on your machine. If the specified version is not present on your machine, n will let you know it is not installed. The bin command is very handy if you want to target a specific version directly without using the use command, which is run as n use <version> [args...]
To uninstall, or remove Node.js using n, the command is n rm <version list>. You will notice that this command takes a list of versions, meaning that you can remove multiple versions of Node.js from your system in a single bound.
Summary
27
CHAPTER 2
Networking with Node.js
Node.js is designed to function well in a networked environment. Its nonblocking, event-driven architecture allows for the use of highly scalable, networked applications. In this chapter you will discover many of the implementation details surrounding Node.js and its networking capabilities. In particular the recipes you will see will cover these topics:
Setting up a server
•
Creating connections to your server
•
Configuring server defaults
•
Creating a client
•
Using sockets to communicate between servers
•
Retrieving details about connected servers
•
Controlling socket details
•
Once you have read this chapter, you should have the capability not only to build a simple networked application but also perhaps to have a robust solution to incorporate into your workflow.
2-1. Setting Up a Server
Problem
You need to set up a server to provide a networked Node.js application.
Solution
In Node.js, the standard solution for building a networked application that serves data between endpoints is to utilize a built-in Node.js module called net. This module provides all you need to set up a Node.js TCP server. To set up a network server, you must first require the module (see Listing 2-1).
Listing 2-1. Requiring the net Module var net = require('net');
CHAPTER 2 ■ NETWORKING WITH NODE.JS
which port to listen. This is accomplished by a call to the listen() method that is provided by the net module. A fully operational server is shown in Listing 2-2.
Listing 2-2. A Simple TCP Server var net = require('net');
var server = net.createServer(function(connectionListener) { console.log('connected');
//Get the configured address for the server console.log(this.address());
//get connections takes callback function this.getConnections(function(err, count) { if (err) {
console.log('Error getting connections'); } else {
console.log('Connections count: ' + count); }
});
connectionListener.on('end', function() { console.log('disconnected');
});
//Write to the connected socket connectionListener.write('heyyo\r\n'); });
server.on('error', function(err) { console.log('Server error: ' + err); });
server.on('data', function(data) { console.log(data.toString()); });
/** * listen() */
server.listen(8181, function() { console.log('server is listening'); });
Now you have created a simple server. Assuming you have named your server file server.js, you can easily run it with node server.js.
How It Works
CHAPTER 2 ■ NETWORKING WITH NODE.JS
29
Listing 2-3. net Module createServer Method exports.createServer = function() {
return new Server(arguments[0], arguments[1]); };
This method takes two arguments, so it must be that within the server function, there is some sort of
determination as to which argument represents the options object that is optionally passed into the createServer() method, which is the connection listener. If you investigate a little further into this function, you see that what Node. js uses to determine these arguments is a simple check of their properties. If it is determined that the type of the first argument is a function, then it cannot be that the first argument is the options object, making the first argument the connection listener. Alternatively, if the first argument is not a function, it is assumed to be the options object, and the second argument—if it is a function—is used as the connection listener.
The connection listener, like many functions in Node.js programming, is a simple callback. Once the server object in the net module has identified it as a function, it is passed as the callback to a server connection listener, which takes the form similar to server.on('connection', connectionListener);. This will now pass any new connection back to your listener in your application. This logic is shown in Listing 2-4.
Listing 2-4. Determining the Server Options and Connection Listener var self = this;
var options;
if (typeof arguments[0] == 'function') { options = {};
self.on('connection', arguments[0]); } else {
options = arguments[0] || {};
if (typeof arguments[1] == 'function') { self.on('connection', arguments[1]); }
}
A new connection happens after the server you have created begins to listen on a port. The port is determined by the first argument that you pass to the listen() function of your server. The listen() function can also take a path, if your server is to listen on a UNIX path, or any connectable handle object. In the example server in Listing 2-2, the port was set as 8181. The second parameter was a callback, which is executed once the server successfully begins to listen to the port, or path, where it is defined. The listen() event also assumes a host. The host can be any IPv4 address, but if it is omitted, Node.js will assume you are targeting the localhost. You now have a simple server that will listen on a port of your choosing.
As you can see in the server you created in Listing 2-2, you can also gain some insight into the current
configuration of your server. First, you can retrieve the information about the address on which the server is listening. This information is fetched by calling the server.address() method. This will return an object that shows the address, family, and port of the server (see Listing 2-5).
Listing 2-5. server.address( ) {
CHAPTER 2 ■ NETWORKING WITH NODE.JS
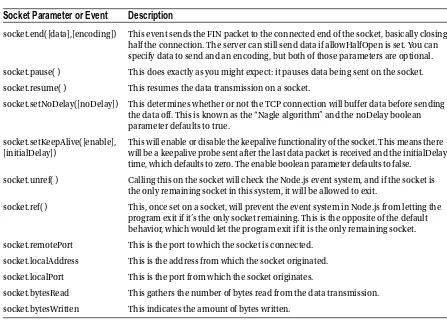
In addition to retrieving the server address, you can also get the count of the number of connections to your server. This is done by calling the getConnections() method within your code. The getConnections() function takes a callback function that should accept two arguments: an error argument and a count argument. This will allow you both to check for an error when getting connections and to get the current count of connections to the server. This is shown in the connectionListener callback within the server created in Listing 2-2.
The server object in the net module of Node.js is an event emitter, which is a common paradigm in Node.js programming. An event emitter provides a common language in which an object can register, remove, and listen for events that are either generated by the system or customized by the developer. The server object exposes several events, some of which you have already seen, such as the connection and listening events. The connection event happens each time a new socket connects to the server, whereas the listening event, as you have seen, is emitted once the server begins to listen. Two other events that are a base for the net.Server object are close and error. The error event is emitted when the server encounters an error. The error event also emits the close event immediately after the error is emitted. The close event simply shuts down the server; however, it will wait until each of the connected socket’s connections end.
2-2. Creating Connections to Your Server
Problem
You need to create a connection to a networked server.
Solution
In order to build a connection to your server, you need to know the port or UNIX path on which is it listening. Once you know this, you can create a connection via Node.js. For this you will once again use the Node.js native net module, which exposes a createConnection method for connecting to a remote (or local) instance.
To utilize the net module to connect to a server via Node.js, you, once again, must set the connection to the net module via a CommonJS require as shown in Listing 2-6.
Listing 2-6. Importing the net Module for Connections var net = require('net');
Then the next step is to call the createConnection method passing in the port or UNIX path on which to connect. Optionally, you can also pass the host if you need to specify an IP address. Now we can create a connectListener that logs the connection to the console, as shown in Listing 2-7.
Listing 2-7. Creating a Connection to Your Server var net = require('net');
// createConnection
var connection = net.createConnection({port: 8181, host:'127.0.0.1'}, // connectListener callback
function() {
CHAPTER 2 ■ NETWORKING WITH NODE.JS
31
How It Works
In this section you created a connection to a TCP server. This was done with Node.js’s net module. This contained the createConnection function, which is the same as the connect() function. The connect method first checks the arguments that you passed to it. It will evaluate which options are set.
Checking the arguments sent is done by first checking if the first argument is an object, then subsequently parsing that object if it is indeed an object. If the first argument is not an object, it is evaluated to see if it is a valid pipe name, in which case it will be set as the UNIX path option. If it is not the name of a pipe, it will default to a port number. The final check of the parameters is for the optional callback argument, which is evaluated by checking to see if the last parameter passed to the connect() function is a function itself. This whole process is run in a function called normalizeConnectArgs, shown in Listing 2-8.
Listing 2-8. Extracting createConnection Arguments function normalizeConnectArgs(args) {
var options = {};
if (typeof args[0] === 'object') { // connect(options, [cb]) options = args[0];
} else if (isPipeName(args[0])) { // connect(path, [cb]);
options.path = args[0]; } else {
// connect(port, [host], [cb]) options.port = args[0];
if (typeof args[1] === 'string') { options.host = args[1];
} }
var cb = args[args.length - 1];
return (typeof cb === 'function') ? [options, cb] : [options]; }
Next, the net module creates a new socket object, passing in the newly normalized connect arguments. This socket has a method on its prototype called connect.
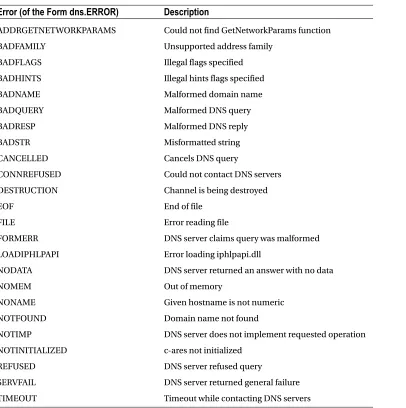
This connect method on the socket is called, passing to it the normalized arguments as well. The connect method will try to create a new socket handle and connect to the path or port and host combination that was specified in the arguments. If the host is not specified for a given port, then it is assumed that the host being targeted is the localhost, or 127.0.0.1. Where this gets interesting is that, if a hostname or IP address is provided in the arguments, Node.js will require the dns module and perform a DNS lookup to locate the host. This again will default to the localhost if the lookup returns null without an error, as shown in Listing 2-9.
Listing 2-9. Socket.prototype.connect’s Method to Resolve Path, Port, and Host /* ... */
if (pipe) {
connect(self, options.path);
} else if (!options.host) { debug('connect: missing host');
CHAPTER 2 ■ NETWORKING WITH NODE.JS
} else {
var host = options.host;
debug('connect: find host ' + host);
require('dns').lookup(host, function(err, ip, addressType) { // It's possible we were destroyed while looking this up.
// XXX it would be great if we could cancel the promise returned by // the lookup.
if (!self._connecting) return;
if (err) {
// net.createConnection() creates a net.Socket object and // immediately calls net.Socket.connect() on it (that's us). // There are no event listeners registered yet so defer the // error event to the next tick.
process.nextTick(function() { self.emit('error', err); self._destroy();
}); } else {
timers.active(self);
addressType = addressType || 4;
// node_net.cc handles null host names graciously but user land // expects remoteAddress to have a meaningful value
ip = ip || (addressType === 4 ? '127.0.0.1' : '0:0:0:0:0:0:0:1');
connect(self, ip, options.port, addressType, options.localAddress); }
}); } /* ... */
As can be seen in the listing, the result of discovering the path, port, or port and host is to call the function connect(). This function simply connects the socket handle to the path or port and host. Once the connection request has connected, the connectListener callback is called as the code for the connect function shown in Listing 2-10.
Listing 2-10. function connect( ) Implementation in the net Module
function connect(self, address, port, addressType, localAddress) {
assert.ok(self._connecting);
if (localAddress) { var r;
if (addressType == 6) {
r = self._handle.bind6(localAddress); } else {
r = self._handle.bind(localAddress); }
CHAPTER 2 ■ NETWORKING WITH NODE.JS
33
self._destroy(errnoException(process._errno, 'bind')); return;
} }
var connectReq;
if (addressType == 6) {
connectReq = self._handle.connect6(address, port); } else if (addressType == 4) {
connectReq = self._handle.connect(address, port); } else {
connectReq = self._handle.connect(address, afterConnect); }
if (connectReq !== null) {
connectReq.oncomplete = afterConnect; } else {
self._destroy(errnoException(process._errno, 'connect')); }
}
This was the function in Listing 2-8 where you logged “connection successful” to the console. As you will see in Section 2-4 there is much more to listening and connecting a client than simply logging a string to the console, but first you will examine the various ways in which to configure your server and the default settings that accompany the configuration options.
2-3. Configuring Server Defaults
Problem
You are creating a server in Node.js and you need to control the accessible defaults for the server.
Solution
When you create any type of networked server, you often find that the default configuration might need to be tweaked to meet your specific needs. Aside from setting the host and port for a TCP server, you might like to be able to set the maximum number of connections, or control what the system backlog queue length for pending connections is configured as in your server. Many of these settings have default values on your server.
Naturally, one of the simplest parts of your server that you can control is the port and host where the server will be listening. These are set when calling the listen() method on your server. The listen method (as seen in Section 2-1) also takes the listener callback, but a third parameter that is optionally placed before this callback is the backlog setting, which limits your server’s connection queue length. Putting these defaults into place, you can see what the listen() function will look like in Listing 2-11.
Listing 2-11. Setting the listen( ) Defaults
server.listen(8181, '127.0.0.1', 12, function() { // listen on 127.0.0.1:8181
CHAPTER 2 ■ NETWORKING WITH NODE.JS
Another default to consider is the option set when calling the createServer() method, which allows for a half-open connection and which defaults to false but is set in the method as shown in Listing 2-12.
Listing 2-12. allowHalfOpen: true
var server = net.createServer({ allowHalfOpen: true }, function(connectionListener) { /* connection Listener stuffs */
});
Setting a maximum number of connections to your server can also be quite useful in your Node.js application. If you wish to limit this, you must explicitly set the number, as it defaults to undefined. This is best set in the connectionListener callback, as shown in Listing 2-13.
Listing 2-13. Setting a Maximum Number of Connections to Your Server
var server = net.createServer({ allowHalfOpen: true }, function(connectionListener) { console.log('connected');
//get maxConnections - default undefined console.log(this.maxConnections);
// set maxConnections to 4 this.maxConnections = 4;
// check set maxConnections is 4 console.log(this.maxConnections); });
How It Works
Setting and overriding server defaults happens by checking them against the default settings; then they are
overwritten. What happens when you pass a backlog argument to the listen() method in Node.js? First, the default value that is passed into the backlog argument is 511. The value 511 is passed because of how the backlog size is determined by the operating system kernel.
// Use a backlog of 512 entries. We pass 511 to the listen( ) call because
// the kernel does: backlogsize = roundup_pow_of_two(backlogsize + 1);
// which will thus give us a backlog of 512 entries.
This is interesting to know. Because you set the backlog queue to be capped at 12 in the server.listen() example from Listing 2-11, you can now know that this will be calculated to be 16. This is because the value you set, 12, is incremented by one, then rounded up to the nearest power of 2, which is 16. It should be noted that in the example server.listen from Listing 2-11, you set the value of the host address as 127.0.0.1, which is IPv4. However, Node.js just as easily handles IPv6 connections, so you could change your default server listen to use IPv6, as shown in Listing 2-14.
Listing 2-14. Configuring a Server Using IPv6 server.listen(8181, '::1', 12, function() { console.log(server.address());
CHAPTER 2 ■ NETWORKING WITH NODE.JS
35
Subsequently the server.address() function will log the new host and also the family will now be IPv6 instead of IPv4.
{ address: '::1', family: 'IPv6', port: 8181 }
Allowing a half-open connection was an option you set in Listing 2-12, { allowHalfOpen: true }. This sets the connection to allow for what you may find to be a more finely grained control of your server’s connection. This will allow a connection to send the TCP FIN packet, the packet that requests a termination of the connection but does not automatically send the response FIN packet to the connection.
This means that you will leave one half of the TCP connection open, allowing the socket to remain writable but not readable. To officially close the connection, you must explicitly send the FIN packet by calling the .end( ) method on the connection.
You also saw how you could set a limit to the maximum number of connections to your server via Node.js and the net module’s maxConnections setting. This, by default, is undefined, but in Listing 2-13 it was set to a low number of 4. This means your connections are limited to 4, but what happens when you connect, or attempt to connect, to a server that has a maximum number of connections set? You can see what the Node.js source does to this setting in Listing 2-15.
Listing 2-15. Node.js Handles the maxConnections Setting
if (self.maxConnections && self._connections >= self.maxConnections) { clientHandle.close();
return; }
This gives you a little more insight into why maxConnections defaults to undefined. This is because if it isn’t set, there is no need for Node.js to bother with this section of code. However, if it is set, a simple check will see if the current number of connections on the server is greater than or equal to the maxConnections setting, and it will close the connection. If you have a Node.js client connection you wish to connect (which you will read more about in Section 2-4), but the number of connections exceeds this limit, you will see the connection’s close event emitted, and you can handle it appropriately, as shown in Listing 2-16.
Listing 2-16. Handling the close Event on a Connection Handle connection.on('close', function() {
console.log('connection closed'); });
If, on the other hand, you have simply hit the server endpoint via Telnet (telnet ::1 8181), the response will be “connection closed by foreign host,” as shown in Figure 2-1.
CHAPTER 2 ■ NETWORKING WITH NODE.JS
2-4. Creating a Client
Problem
You want to create a client that connects to a networked server by using Node.js.
Solution
Creating a functional Node.js client extends from the concepts you learned about in Section 2-2. That is to say that a client is simply a connection to a server endpoint. Earlier you saw how to initiate a connection; in this section you will learn how to take that connected socket and understand the events that can be associated with it.
Let us make an assumption that we will connect our client to a simple Node.js server, similar to that which you created in Section 2-1. However, this server will receive a message from the client and also write a message to the client. This message will be a simple text message that shows a count of the current connections to the server. This server is shown in Listing 2-17.
Listing 2-17. Simple Node.js Server to Echo Back to the Client var net