Microsoft
®ADO.NET 4
Step by Step
Published with the authorization of Microsoft Corporation by: O’Reilly Media, Inc.
1005 Gravenstein Highway North Sebastopol, California 95472
Copyright © 2010 Tim Patrick.
Complying with all applicable copyright laws is the responsibility of the user. All rights reserved. Without limiting the rights under copyright, no part of this document may be reproduced, stored in or introduced into a retrieval system, or transmitted in any form or by any means (electronic, mechanical, photocopying, recording, or otherwise), or for any purpose, without express written permission of O’Reilly Media, Inc.
Printed and bound in the United States of America.
1 2 3 4 5 6 7 8 9 WCT 5 4 3 2 1 0
Microsoft Press titles may be purchased for educational, business or sales promotional use. Online editions are also available for most titles (http://my.safaribooksonline.com). For more information, contact our corporate/institutional sales department: (800) 998-9938 or [email protected]. Visit our website at microsoftpress.oreilly.com. Send comments to [email protected].
Microsoft, Microsoft Press, ActiveX, Excel, FrontPage, Internet Explorer, PowerPoint, SharePoint, Webdings, Windows, and Windows 7 are either registered trademarks or trademarks of Microsoft Corporation in the United States and/or other countries. Other product and company names mentioned herein may be the trademarks of their respective owners.
Unless otherwise noted, the example companies, organizations, products, domain names, e-mail addresses, logos, people, places, and events depicted herein are fictitious, and no association with any real company, organization, prod-uct, domain name, e-mail address, logo, person, place, or event is intended or should be inferred.
This book expresses the author’s views and opinions. The information contained in this book is provided without any express, statutory, or implied warranties. Neither the author, O’Reilly Media, Inc., Microsoft Corporation, nor their respective resellers or distributors, will be held liable for any damages caused or alleged to be caused either directly or indirectly by such information.
Acquisitions and Development Editor: Russell Jones Production Editor: Kristen Borg
Production Services: Octal Publishing, Inc. Technical Reviewer: Sahil Malik
Indexing: Potomac Indexing, LLC Cover: Karen Montgomery Compositor: Susan Brown Illustrator: Robert Romano
v
Contents at a Glance
Part I
Getting to Know ADO.NET
Chapter 1
Introducing ADO.NET 4
. . . . 3
Chapter 2
Building Tables of Data
. . . . 17
Chapter 3
Storing Data in Memory
. . . . 37
Chapter 4
Accessing the Right Data Values
. . . . 59
Chapter 5
Bringing Related Data Together
. . . . 73
Chapter 6
Turning Data into Information
. . . . 89
Chapter 7
Saving and Restoring Data
. . . . 107
Part II
Connecting to External Data Sources
Chapter 8
Establishing External Connections
. . . . 121
Chapter 9
Querying Databases
. . . . 135
Chapter 10
Adding Standards to Queries
. . . . 153
Chapter 11
Making External Data Available Locally
. . . . 169
Chapter 12
vi Contents at a Glance
Part III
Entity Framework
Chapter 13
Introducing the Entity Framework
. . . . 213
Chapter 14
Visualizing Data Models
. . . . 225
Chapter 15
Querying Data in the Framework
. . . . 245
Chapter 16
Understanding Entities Through Objects
. . . . 267
Part IV
LINQ
Chapter 17
Introducing LINQ
. . . . 289
Chapter 18
Using LINQ to DataSet
. . . . 305
Chapter 19
Using LINQ to Entities
. . . . 315
Chapter 20
Using LINQ to SQL
. . . . 331
Part V
Providing RESTful Services with WCF Data Services
Chapter 21
Binding Data with ADO.NET
. . . . 347
Chapter 22
vii
Table of Contents
Acknowledgments . . . . xv
Introduction . . . . xvii
Part I
Getting to Know ADO.NET
1
Introducing ADO .NET 4 . . . . 3
What Is ADO.NET? . . . 3
Why ADO.NET?. . . 5
Major Components of ADO.NET . . . 5
Extensions to ADO.NET . . . 7
Connecting to External Data . . . 8
Summary . . . 15
Chapter 1 Quick Reference. . . 16
2
Building Tables of Data . . . . 17
Implementing Tables . . . 17
Logical and Physical Table Implementations. . . 17
The DataTable Class. . . 18
Adding Data Columns . . . 21
Dataset Designer . . . 27
Summary . . . 34
Chapter 2 Quick Reference. . . 35
3
Storing Data in Memory . . . . 37
Adding Data . . . 37
Creating New Rows . . . 37
Defining Row Values . . . 38
Storing Rows in a Table . . . 40
Microsoft is interested in hearing your feedback so we can continually improve our books and learning resources for you. To participate in a brief online survey, please visit:
www.microsoft.com/learning/booksurvey/
viii Table of Contents
Examining and Changing Data . . . 42
Removing Data . . . 45
Batch Processing. . . 46
Row State. . . 47
Row Versions. . . 48
Validating Changes . . . 49
Exception-Based Errors . . . 50
Validation-Based Errors. . . 51
Summary . . . 56
Chapter 3 Quick Reference. . . 57
4
Accessing the Right Data Values . . . . 59
Querying and Sorting Data . . . 59
Finding Rows by Primary Key. . . 60
Selecting Rows with a Search Criteria. . . 62
Sorting Search Results. . . 64
Performing Case-Sensitive Lookups . . . 67
Using Expression Columns . . . 67
Summary . . . 71
Chapter 4 Quick Reference. . . 71
5
Bringing Related Data Together . . . . 73
Collecting Tables into Sets . . . 73
Establishing Relationships Between Tables . . . 76
Understanding Table Relations . . . 76
Creating Data Relations . . . 78
Locating Parent and Child Records. . . 79
Defining Table Constraints . . . 81
Summary . . . 87
Chapter 5 Quick Reference. . . 88
6
Turning Data into Information . . . . 89
Aggregating Data. . . 89
Generating a Single Aggregate . . . 91
Adding an Aggregate Column. . . 94
Aggregating Data Across Related Tables. . . 95
Table of Contents ix
Setting Up Indexed Views. . . 98
Creating a DataView . . . 99
Using a DataView . . . 101
Summary . . . 106
Chapter 6 Quick Reference. . . 106
7
Saving and Restoring Data . . . . 107
Serializing DataSet and DataTable Objects . . . 107
Writing XML . . . 108
Reading XML. . . 110
Guiding XML Generation . . . 111
Identifying Namespaces . . . 111
Nesting Child Tables . . . 113
Managing and Positioning Columns . . . 113
Summary . . . 117
Chapter 7 Quick Reference. . . 118
Part II
Connecting to External Data Sources
8
Establishing External Connections . . . . 121
Using Connection Strings . . . 121
SQL Server Connection Strings . . . 122
OLE DB and ODBC Connection Strings . . . 124
Connection String Builders. . . 124
Storing Connection Strings . . . 126
Understanding Data Providers. . . 126
Connecting to SQL Server via a Data Provider . . . 127
Creating and Opening Connections . . . 128
Connection Pooling. . . 132
Summary . . . 133
Chapter 8 Quick Reference. . . 133
9
Querying Databases . . . . 135
Processing SQL Queries. . . 135
Creating Command Objects. . . 136
Processing Queries . . . 137
x Table of Contents
Returning Query Results . . . 140
Returning a Single Value. . . 141
Returning Data Rows. . . 142
Accessing Field Values. . . 144
Processing More Complicated Results . . . 146
Summary . . . 150
Chapter 9 Quick Reference. . . 151
10
Adding Standards to Queries . . . . 153
Developing Parameterized Queries . . . 153
Understanding the Need for Parameters . . . 154
Implementing Standard Queries . . . 155
Using Parameters with Other Providers. . . 160
Using Parameters in Stored Procedures . . . 161
Summary . . . 166
Chapter 10 Quick Reference. . . 167
11
Making External Data Available Locally . . . . 169
Understanding Data Adapters . . . 169
Moving Data from Source to Memory . . . 171
Moving Data into a DataTable . . . 171
Moving Data into a DataSet. . . 173
Moving Data from Memory to Source . . . 175
Configuring the Update Commands . . . 175
Performing the Update. . . 179
Generating Update Commands Automatically. . . 180
Table and Column Mapping. . . 186
Summary . . . 188
Chapter 11 Quick Reference. . . 189
12
Guaranteeing Data Integrity . . . . 191
Transactions and Concurrency. . . 191
Using Local Transactions. . . 195
Employing Savepoints. . . 202
Using Distributed Transactions . . . 204
Summary . . . 208
Table of Contents xi
Part III
Entity Framework
13
Introducing the Entity Framework . . . . 213
Understanding the Entity Framework. . . 213
Defining the Entity Framework’s Terms . . . 215
Understanding the Entity Framework’s Layers . . . 216
Understanding the Conceptual Model . . . 217
Understanding the Storage Model . . . 217
Understanding the Model Mappings . . . 218
Using the Entity Framework . . . 218
Building the Model . . . 218
Generating the Objects. . . 220
Instantiating the Context . . . 221
Running Framework Queries . . . 222
Summary . . . 223
Chapter 13 Quick Reference. . . 223
14
Visualizing Data Models . . . . 225
Designing an Entity Framework Model . . . 225
Using the Entity Data Model Wizard . . . 225
Entity Data Model Designer. . . 230
Working with the Mapping Details Panel . . . 235
Using the Model Browser . . . 240
Managing the Object Layer . . . 241
Summary . . . 242
Chapter 14 Quick Reference. . . 243
15
Querying Data in the Framework . . . . 245
Getting to Know Entity SQL . . . 246
Writing Basic Queries . . . 246
Using Literals, Operators, and Expressions . . . 249
Grouping and Aggregating Entity Data. . . 252
Using Features Unique to Entity SQL . . . 254
Running Entity SQL Queries . . . 256
Running Queries Using an ObjectQuery . . . 256
Running Queries Using a Provider . . . 260
Summary . . . 264
xii Table of Contents
16
Understanding Entities Through Objects . . . . 267
Managing Entity Data Through Objects . . . 267
Accessing Entity Data Through Objects. . . 268
Modifying Entity Data Through Objects . . . 271
Using Query Builder Methods . . . 278
Queryable Extension Methods . . . 283
Summary . . . 285
Chapter 16 Quick Reference. . . 285
Part IV
LINQ
17
Introducing LINQ . . . . 289
Getting to Know LINQ. . . 289
Using LINQ with .NET Objects . . . 291
Starting a Query with the From Clause . . . 293
Projecting Results with the Select Clause . . . 293
Filtering Results with the Where Clause. . . 295
Sorting Results with the Order By Clause . . . 296
Selecting Linked Results with the Join Keyword. . . 297
Limiting the Queried Content . . . 299
Summarizing Data Using Aggregates . . . 301
Applying Set Operations . . . 302
Summary . . . 303
Chapter 17 Quick Reference. . . 304
18
Using LINQ to DataSet . . . . 305
Understanding the LINQ to DataSet Provider. . . 305
Writing Queries with LINQ to DataSet . . . 306
Summary . . . 312
Chapter 18 Quick Reference. . . 313
19
Using LINQ to Entities . . . . 315
Understanding the LINQ to Entities Provider . . . 315
Writing Queries with LINQ to Entities. . . 316
Working with Entity and Database Functions. . . 321
Table of Contents xiii
20
Using LINQ to SQL . . . . 331
Understanding the LINQ to SQL Provider . . . 332
Comparing LINQ to SQL with LINQ to Entities . . . 332
Understanding the Components of LINQ to SQL. . . 333
Using the Object Relational Designer. . . 335
Using Custom Database Functions in Queries . . . 339
Summary . . . 343
Chapter 20 Quick Reference. . . 343
Part V
Presenting Data to the World
21
Binding Data with ADO .NET . . . . 347
Binding Data in Windows Forms . . . 347
Creating Complex-Bound Applications . . . 348
Creating Simple-Bound Applications . . . 351
Understanding Windows Forms Data Binding . . . 352
Binding Data in WPF . . . 354
Creating Data-Bound WPF Applications . . . 354
Understanding WPF Data Binding . . . 360
Binding Data in ASP.NET . . . 362
Creating Data-Bound ASP.NET Applications . . . 362
Understanding ASP.NET Data Binding . . . 364
Summary . . . 367
Chapter 21 Quick Reference. . . 367
22
Providing RESTful Services with WCF Data Services . . . . 369
Getting to Know the Service Layers . . . 369
Introducing WCF Data Services . . . 369
Introducing REST . . . 370
Setting Up a Data Service . . . 371
Defining Service Rights . . . 375
Accessing a Data Service using REST . . . 377
Querying Entities with REST . . . 377
Updating Entities with REST . . . 381
Summary . . . 384
Chapter 22 Quick Reference. . . 384
xv
Acknowledgments
An open-ended thank you goes to Microsoft, not only for developing some of the products that have kept me gainfully employed for nearly three decades, but for welcoming me into their book-writing fold. It was also a pleasure to work again with the team at O’Reilly Media, Microsoft’s publishing partner. Editors Russell Jones and Kristen Borg kept all the trains run-ning on time, which wasn’t easy given the busy technical and publishing traffic. Rounding out the group were Meghan Blanchette, Sumita Mukherji, and Adam Witwer. Thank you all. Sahil Malik, ADO.NET expert and fellow author, has the distinction of having read through every single word of this book looking for technical concerns. Nancy Sixsmith did the same for the mechanics of language, grammar, and consistency. The book is richer for their involvement.
Claudette Moore once again worked her agenting magic, somehow always managing to make everyone on both sides of a contract happy. This book would be nothing more than a series of discarded emails were it not for her hard work and dedication. Thank you, Claudette, for yet another adventure.
Thanks to all my friends at Harvest, especially fellow food and movie lovers Alice, Brenda, Andy, Suzy, Matt, Tiffany, Jeff, and Monica. Love and appreciation in heaps to my wife Maki and my son Spencer, both of whom exude patience and care. And thanks once again to God for making all these other acknowledgments possible in the first place.
Tim Patrick
xvii
Introduction
ADO.NET is Microsoft’s core data access library for .NET developers, and is the heart of many data-centric technologies on the Windows development platform. It works with C#, Visual Basic, and other .NET-enabled languages. If you are a .NET developer looking to interact with database content or other external data sources, then ADO.NET is the right tool for you.
Microsoft ADO.NET 4 Step by Step provides an organized walkthrough of the ADO.NET li-brary and its associated technologies. The text is decidedly introductory; it discusses the basics of each covered system, with examples that provide a great head start on adding data features to your applications. While the book does not provide exhaustive coverage of every ADO.NET feature, it does offer essential guidance in using the key ADO.NET components. In addition to its coverage of core ADO.NET library features, the book discusses the Entity Framework, the LINQ query system, and WCF Data Services. Beyond the explanatory content, each chapter includes step by step examples and downloadable sample projects that you can explore for yourself.
Who Is This Book For?
As part of Microsoft Press’s “Developer Step By Step” series of training resources, Microsoft ADO.NET 4 Step by Step makes it easy to learn about ADO.NET and the advanced data tools used with it.
This book exists to help existing Visual Basic and C# developers understand the core con-cepts of ADO.NET and related technologies. It is especially useful for programmers looking to manage database-hosted information in their new or existing .NET applications. Although most readers will have no prior experience with ADO.NET, the book is also useful for those familiar with earlier versions of either ADO or ADO.NET, and who are interested in getting filled in on the newest features.
Assumptions
As a reader, the book expects that you have at least a minimal understanding of .NET devel-opment and object-oriented programming concepts. Although ADO.NET is available to most, if not all, .NET language platforms, this book includes examples in C# and Visual Basic only. If you have not yet picked up one of those languages, you might consider reading John Sharp’s
Microsoft Visual C# 2010 Step by Step (Microsoft Press 2010) or Michael Halvorson’s Microsoft Visual Basic 2010 Step by Step (Microsoft Press 2010).
xviii Microsoft ADO .NET 4 Step by Step
exposure to one of the many flavors of the query tool known as SQL. To go beyond this book and expand your knowledge of SQL and Microsoft’s SQL Server database platform, other Microsoft Press books such as Mike Hotek’s Microsoft® SQL Server® 2008 Step by Step
(Microsoft Press, 2008) or Itzik Ben-gan’s Microsoft® SQL Server® 2008 T-SQL Fundamentals
(Microsoft Press, 2008) offer both complete introductions and comprehensive information on T-SQL and SQL Server.
Organization of This Book
This book is divided into five sections, each of which focuses on a different aspect or technol-ogy within the ADO.NET family. Part I, “Getting to Know ADO.NET,” provides a quick over-view of ADO.NET and its fundamental role in .NET applications, then delves into the details of the main ADO.NET library, focusing on using the technology without yet being concerned with external database connections. Part II, “Connecting to External Data Sources,” continues that core library focus, adding in the connectivity features. Part III, “Entity Framework,” in-troduces the Entity Framework, Microsoft’s model-based data service. Another service layer, LINQ, takes center stage in Part IV, “LINQ.” Finally, Part V, “Presenting Data to the World,” covers some miscellaneous topics that round out the full discussion of ADO.NET.
Finding Your Best Starting Point in This Book
The different sections of Microsoft ADO.NET 4 Step by Step cover a wide range of technolo-gies associated with the data library. Depending on your needs and your existing under-standing of Microsoft data tools, you may wish to focus on specific areas of the book. Use the following table to determine how best to proceed through the book.
If you are Follow these steps
New to ADO.NET development, or an existing ADO developer
Focus on Parts I and II and on Chapter 21 in Part V, or read through the entire book in order.
Familiar with earlier releases of ADO.NET
Briefly skim Parts I and II if you need a refresher on the core concepts.
Read up on the new technologies in Parts III and IV and be sure to read Chapter 22 in Part V.
Interested in the Entity Framework Read Part III. Chapter 22 in Part V discusses data services built on top of Entity Framework models.
Interested in LINQ data providers Read through the chapters in Part IV.
Introduction xix
Conventions and Features in This Book
This book presents information using conventions designed to make the information read-able and easy to follow.
■
■ In most cases, the book includes separate exercises for Visual Basic programmers and
Visual C# programmers. You can skip the exercises that do not apply to your selected language.
■
■ Each exercise consists of a series of tasks, presented as numbered steps (1, 2, and so on)
listing each action you must take to complete the exercise.
■
■ Boxed elements with labels such as “Note” provide additional information or alternative
methods for completing a step successfully.
■
■ Text that you type (apart from code blocks) appears in bold. ■
■ A plus sign (+) between two key names means that you must press those keys at the
same time. For example, “Press Alt+Tab” means that you hold down the Alt key while you press the Tab key.
■
■ A vertical bar between two or more menu items (e.g. File | Close), means that you
should select the first menu or menu item, then the next, and so on.
System Requirements
You will need the following hardware and software to complete the practice exercises in this book:
■
■ One of Windows XP with Service Pack 3 (except Starter Edition), Windows Vista with
Service Pack 2 (except Starter Edition), Windows 7, Windows Server 2003 with Service Pack 2, Windows Server 2003 R2, Windows Server 2008 with Service Pack 2, or Windows Server 2008 R2
■
■ Visual Studio 2010, any edition (multiple downloads may be required if using Express
Edition products)
■
■ SQL Server 2008 Express Edition or higher (2008 or R2 release), with SQL Server
Management Studio 2008 Express or higher (included with Visual Studio, Express Editions require separate download)
■
■ Computer that has a 1.6GHz or faster processor (2GHz recommended) ■
■ 1 GB (32 Bit) or 2 GB (64 Bit) RAM (add 512 MB if running in a virtual machine or SQL
Server Express Editions; more for advanced SQL Server editions)
■
■ 3.5GB of available hard disk space ■
xx Microsoft ADO .NET 4 Step by Step ■
■ DirectX 9 capable video card running at 1024 x 768 or higher-resolution display ■
■ DVD-ROM drive (if installing Visual Studio from DVD) ■
■ Internet connection to download software or chapter examples
Depending on your Windows configuration, you might need Local Administrator rights to install or configure Visual Studio 2010 and SQL Server 2008 products.
Code Samples
Most of the chapters in this book include exercises that let you interactively try out new material learned in the main text. All sample projects, in both their pre-exercise and post-exercise formats, are available for download from the book’s catalog page on the web site for Microsoft’s publishing partner, O’Reilly Media:
http://oreilly.com/catalog/0790145300034/
Click the Examples link on that page. When a list of files appears, locate and download the
ADO.NET 4 SBS Examples.zip file.
Note In addition to the code samples, your system should have Visual Studio 2010 and SQL Server 2008 installed. The instructions below use SQL Server Management Studio 2008 to set up the sample database used with the practice examples. If available, install the latest service packs for each product.
Installing the Code Samples
Follow these steps to install the code samples on your computer so that you can use them with the exercises in this book.
1. Open the ADO.NET 4 SBS Examples.zip file that you downloaded from the book’s web site.
Introduction xxi
Installing the Sample Database
Follow these steps to install the sample database used by many of the book’s practice examples.
Note You must first download and install the Code Samples using the instructions listed above. Also, you must have both SQL Server 2008 and SQL Server Management Studio 2008 installed, any edition.
1. Start SQL Server Management Studio 2008 and open a new Object Explorer connec-tion to the target database instance using the File | Connect Object Explorer menu command.
2. In the Object Explorer panel, right-click on the Databases branch of the connection tree, and select New Database from the shortcut menu.
xxii Microsoft ADO .NET 4 Step by Step
4. Select File | Open | File from the main SQL Server Management Studio menu, and locate the DB Script.sql file installed with the book’s sample projects. This file appears in the Sample Database folder within the main installation folder.
5. Click the Execute button on the SQL Editor toolbar to run the script. This will create the necessary tables and objects needed by the practice examples.
6. Close SQL Server Management Studio 2008.
Using the Code Samples
The main installation folder extracted from the ADO.NET 4 SBS Examples.zip file contains three subfolders.
■
■ Sample Database This folder contains the SQL script used to build the sample
data-base. The instructions for creating this database appear earlier in this Introduction.
■
■ Exercises The main example projects referenced in each chapter appear in this folder.
Many of these projects are incomplete, and will not run without following the steps in-dicated in the associated chapter. Separate folders indicate each chapter’s sample code, and there are distinct folders for the C# and Visual Basic versions of each example.
■
■ Completed Exercises This folder contains all content from the Exercises folder, but with
Introduction xxiii
To complete an exercise, access the appropriate chapter-and-language folder in the Exercises
folder, and open the project file. If your system is configured to display file extensions, Visual Basic project files use a .vbproj extension, while C# project files use .csproj as the file extension.
Uninstalling the Code Samples
To remove the code samples from your system, simply delete the installation folder that you extracted from the .zip file.
Software Release
This book was written for use with Visual Studio 2010, including the Express Editions prod-ucts. Much of the content will apply to other versions of Visual Studio, but the code samples may be not be fully compatible with earlier or later versions of Visual Studio.
The practice examples in the book use SQL Server 2008, including the Express Edition prod-ucts. Many of the examples may work with SQL Server 2005 or earlier versions, but neither the installation script nor the sample projects have been tested with those earlier releases.
Errata and Book Support
We’ve made every effort to ensure the accuracy of this book and its companion content. If you do find an error, please report it on our Microsoft Press site at oreilly.com:
1. Go to http://microsoftpress.oreilly.com.
2. In the Search box, enter the book’s ISBN or title.
3. Select your book from the search results.
4. On your book’s catalog page, under the cover image, you’ll see a list of links.
5. Click View/Submit Errata.
We Want to Hear from You
At Microsoft Press, your satisfaction is our top priority, and your feedback our most valuable asset. Please tell us what you think of this book at:
http://www.microsoft.com/learning/booksurvey
The survey is short, and we read every one of your comments and ideas. Thanks in advance for your input!
Stay in Touch
Microsoft ADO .NET 4 Step by Step
1
Part I
Getting to Know ADO .NET
Chapter 1: Introducing ADO.NET 4
Chapter 2: Building Tables of Data
Chapter 3: Storing Data in Memory
Chapter 4: Accessing the Right Data Values
Chapter 5: Bringing Related Data Together
Chapter 6: Turning Data into Information
3
Chapter 1
Introducing ADO .NET 4
After completing this chapter, you will be able to:
■
■ Identify what ADO.NET is ■
■ Explain ADO.NET’s role in an application ■
■ Identify the major components that make up ADO.NET ■
■ Create an ADO.NET link between a database and a .NET application
This chapter introduces you to ADO.NET and its purpose in the world of Microsoft .NET application development. ADO.NET has been included with the .NET Framework since its initial release in 2002, playing a central role in the development of both desktop and Internet-targeted applications for programmers using C#, Visual Basic, and other Framework languages.
What Is ADO.NET?
ADO.NET is a family of technologies that allows .NET developers to interact with data in stan-dard, structured, and primarily disconnected ways. If that sounds confusing, don’t worry. This book exists to remove the confusion and anxiety that many developers experience when they first learn of ADO.NET’s multiple object layers, its dozens of general and platform-specific classes, and its myriad options for interacting with actual data.
Applications written using the .NET Framework depend on .NET class libraries, which exist in special DLL files that encapsulate common programming functionality in an easy-to-access format. Most of the libraries supplied with the .NET Framework appear within the System
namespace. System.IO, for instance, includes classes that let you interact with standard disk files and related data streams. The System.Security library provides access to, among other things, data encryption features. ADO.NET, expressed through the System.Data namespace, implements a small set of libraries that makes consuming and manipulating large amounts of data simple and straightforward.
4 Microsoft ADO .NET 4 Step by Step
Note Although ADO.NET manipulates data in tabular form, you can also use ADO.NET to access nontabular data. For instance, an ADO.NET provider (discussed later in the chapter, on page 7) could supply access to hierarchical data such as that found in the Windows Registry, as long as that provider expressed the data in a tabular structure for ADO.NET’s use. Accessing such non-tabular data is beyond the scope of this book.
If you are already familiar with relational databases such as Microsoft SQL Server, you will encounter many familiar terms in ADO.NET. Tables, rows, columns, relations, views; these ADO.NET concepts are based loosely on their relational database counterparts. Despite these similarities, ADO.NET is not a relational database because it doesn’t include key “relational algebra” features typically found in robust database systems. It also lacks many of the com-mon support features of such databases, including indexes, stored procedures, and triggers. Still, if you limit yourself to basic create, read, update, and delete (CRUD) operations, ADO.NET can act like a miniature yet powerful in-memory database.
As an acronym, “ADO.NET” stands for—nothing. Just like the words “scuba,” “laser,” and “NT” in Windows NT, the capital letters in ADO.NET used to mean something, but now it is just a standalone term. Before Microsoft released the .NET Framework, one of the primary data access tools Windows developers used in their programs was known as ADO, which did stand for something: ActiveX Data Objects. After .NET arrived on the scene, ADO.NET became the natural successor to ADO. Although conceptual parallels exist between ADO.NET and ADO, the technologies are distinct and incompatible.
Note ADO is based on Microsoft’s older COM technology. The .NET Framework provides sup-port for COM components, and therefore enables .NET programs to use ADO. This is especially useful for development teams transitioning legacy applications to .NET. Although ADO and ADO.NET components can appear in the same application, they can interact only indirectly because their object libraries are unrelated.
Chapter 1 Introducing ADO .NET 4 5
Why ADO.NET?
In the early days of computer programming, the need for a data library like ADO.NET didn’t exist. Programmers had only a single method of accessing data: direct interaction with the values in memory. Permanently stored data existed on tape reels in fire-resistant, climate-controlled, raised-floor rooms. Data queries could take hours, especially if someone with more clout had a higher-priority processing need.
Over time, computers increased in complexity, and (as if to fill some eternal maxim) data processing needs also expanded to consume all available computing resources. Businesses sought easier ways to manage entire records of numeric, text, and date-time values on their mainframe systems. Flat-file and relational database systems sprang up to establish propri-etary management of millions of data values. As personal computers arrived and matured, developers soon had several database systems at their disposal.
This was great news for data consumers. Businesses and individuals now had powerful tools to transform data bits into usable information, to endow seemingly unrelated values with meaning and purpose. But it was bad news for developers. As technology marched on, com-panies purchased one proprietary system after another. Programming against such systems meant a reinvention of the proverbial wheel each time a middle manager asked for yet another one-time report. Even the standard SQL language brought little relief because each database vendor provided its own spin on the meaning of “standard.”
What programmers needed was a way to generalize different data systems in a standard, consistent, and powerful way. In the world of .NET application development, Microsoft ADO.NET meets that need. Instead of worrying about the minutiae associated with the different data-base systems, programmers using ADO.NET focus on the data content itself.
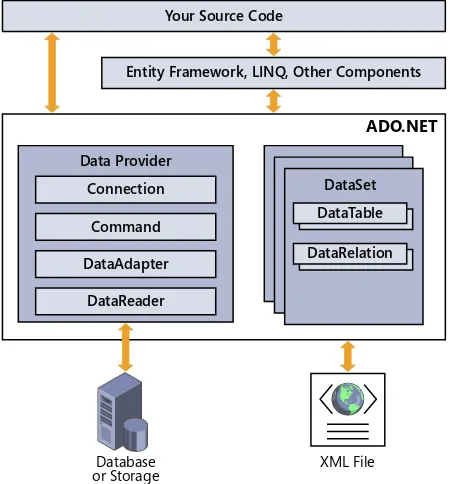
Major Components of ADO.NET
6 Microsoft ADO .NET 4 Step by Step
Your Source Code
ADO.NET
Entity Framework, LINQ, Other Components
Data Provider
Connection DataSet
Command
DataAdapter
DataReader
Database
or Storage XML File
DataTable
DataRelation
FIGURE 1-1 Key ADO.NET elements.
At the data-shaped heart of the library is the DataTable. Similar in purpose to tables in a database, the DataTable manages all the actual data values that you and your source code ultimately care about. Each DataTable contains zero or more rows of data, with the individual data values of each row identified by the table’s column definitions.
■
■ Each table defines DataColumn items, each representing the individual data values that
appear in the table’s records. DataColumn definitions include a data type declaration based on the kind of data destined for each column. For instance, a CustomerLastName
column might be defined to use data of type System.String, whereas an OrderSalesTax
column could be crafted for use with System.Decimal content.
■
■ One DataRow entry exists for each record of data stored within a table, providing access
to the distinct columnar data values. ADO.NET includes methods that let you add to, delete from, modify, and query each DataTable object’s rows. For tables connected to an external data storage area, any changes made can be propagated back to the source.
■
Chapter 1 Introducing ADO .NET 4 7
■
■ Programmatic limitations can be placed on tables and their data values using Constraint
instances.
■
■ DataView instances provide a limited or modified view of the rows in a DataTable. ■
■ Tables can be grouped together into a DataSet. Some tools that interact with ADO.NET
data require that any tables be bound within a DataSet, but if you plan to do some lim-ited work with only a single table, it’s fine to work with just the DataTable instance.
DataTable instances and their associated objects are sufficient for working with internal data. To connect with external data from a database, ADO.NET features multiple data providers, including a custom provider for Microsoft SQL Server. Database platforms without a specific provider use the more generic ODBC and OLE DB providers, both included with ADO.NET. Several third-party providers can be purchased or obtained free of charge, which target spe-cific platforms, including Oracle.
■
■ All communication with the external data source occurs through a Connection object.
ADO.NET supports connection pooling for increased efficiency between queries.
■
■ SQL queries and data management statements get wrapped in a Command object
before being sent to the data source. Commands can include optional Parameter
instances that let you call stored procedures or create fill-in-the-blank queries.
■
■ The DataAdapter object stores standard query definitions for interacting with a
data-base, removing the tedium of constantly needing to build SQL statements for each record you want to read or write, and helping to automate some ADO.NET-related tasks.
■
■ The DataReader object provides fast, read-only access to the results of a query for
those times when you just need to get your data quickly.
ADO.NET also includes features that let you save an entire DataSet as an XML file and load it back in later. And that’s just the start. You’ll learn how to use all these elements—and more— throughout the upcoming chapters.
Extensions to ADO.NET
8 Microsoft ADO .NET 4 Step by Step
Because ADO.NET values exist as true .NET objects and collections, Microsoft has enhanced the core ADO.NET feature set with new tools. Two of these technologies, the Entity Framework and LINQ, are not formally part of ADO.NET. But their capability to interact with and enhance the ADO.NET experience makes them essential topics for study.
The Entity Framework, the focus of Part III of this book, emphasizes the conceptual view of your data. Although the data classes in ADO.NET are programmer-friendly, you still need to keep track of primary keys and relationships between tables and fields. The Entity Framework attempts to hide that messiness, and restores the promise of what object-oriented program-ming was supposed to be all about. In the Entity Framework, a customer object includes its orders; each order includes line item details. Instead of working with the raw table data, you interact with logically designed entities that mimic their real-world counterparts, and let the Framework worry about translating it all into SQL statements.
LINQ, introduced in Part IV, brings the joy of English-like queries to your favorite program-ming language. Microsoft enhanced both Visual Basic and C# with new LINQ-specific language features. Now, instead of building string-based SQL statements to query data, the syntax of each programming language becomes the query language. LINQ is a generic data tool, enabling you to easily mix ADO.NET data and other content sources together into a single set of results.
Connecting to External Data
Chapter 8, “Establishing External Connections,” introduces the code elements that support communications between ADO.NET and external sources of data. Although using only code to establish these connections is quite common, Visual Studio also includes the Data Source Connection Wizard, a mouse-friendly tool that guides you through the creation of a ready-to-use DataSet. Here’s an example of using the Connection Wizard.
Creating a Data Source Using the Connection Wizard
1. Start Visual Studio 2010. Select File | New | Project from the main menu.
ADO.NET is supported in most common project types. To keep things simple for now, create a Windows Forms application using either C# or Visual Basic as the language. The following figures show the process using a Visual Basic Windows Forms application, although the steps are identical in C#.
2. In the New Project dialog box, provide a name for the project.
Chapter 1 Introducing ADO .NET 4 9
4. Select Data | Add New Data Source from the menu.
Visual Studio displays the Data Source Configuration Wizard.
10 Microsoft ADO .NET 4 Step by Step
5. Click Next.
6. In the Choose a Database Model panel, choose Dataset.
7. Click Next.
The Wizard displays the Choose Your Data Connection panel. If you previously con-figured data sources, they will appear in the Which Data Connection Should Your Application Use To Connect To The Database? list.
Chapter 1 Introducing ADO .NET 4 11
9. When the Choose Data Source dialog box appears, select Microsoft SQL Server from the Data Source list.
The Data Provider field will automatically choose the SQL Server data provider. For maximum flexibility, clear the Always Use This Selection field.
12 Microsoft ADO .NET 4 Step by Step
10. Click Continue to accept the data source.
11. In the Add Connection dialog box, select the server from the Server Name field. For SQL Server 2008 Express Edition instances, this is typically the name of the local computer with \SQLEXPRESS appended to the name. If you are using the full SQL Server product, leave off the \SQLEXPRESS suffix. For SQL Server instances hosted on the same system as your Visual Studio installation, you can use (local) as the server name.
For SQL Server instances configured with database-managed authentication, select Use SQL Server Authentication and supply the appropriate user name and password. For databases managed with Windows authentication (the likely choice for the test data-base), select Use Windows Authentication instead.
The Select Or Enter a Database Name field should now include the available databases within the test database file. (If not, confirm that you have supplied the right server name and authentication values and that SQL Server is running on your system.)
Chapter 1 Introducing ADO .NET 4 13
Note ADO.NET uses connection strings, short, semicolon-delimited definition strings, to iden-tify the data source. As you develop new applications, you will probably forgo the Data Source Configuration Wizard as a means of building connection strings. If you are curious about what appears in a connection string, expand the Connection String field in the Choose Your Data Connection panel.
13. Click the Next button to continue.
The next wizard panel asks if the connection string should be stored in the application’s configuration file. The field should already be selected, which is good, although you might want to give it a more programmer-friendly name.
Note .NET applications use two types of configuration files (although it varies by project type):
application configuration files and user configuration files. Although your application has access to the settings in both files, if you plan to include a feature in your program that modifies these saved settings, make sure that you place such settings in the user configuration file. Application configuration files can’t be modified from within the associated application.
14. Click the Next button once more to continue.
14 Microsoft ADO .NET 4 Step by Step
15. For this test, include the Customer table in the DataSet by expanding the Tables section and marking the Customer table with a check mark.
You can optionally modify the DataSet Name field to something that will be easier to repeatedly type in your source code. Click Finish to exit the wizard and create the data source. The data source is now available for use in your application.
16. Select Data | Show Data Sources from the Visual Studio menu to see the data source. The wizard also added a new .xsd file to your project; it appears in the Solution Explorer with your other project files. This XML file contains the actual definition of the data source. Removing this file from the project removes the Wizard-created data source.
Data Source New .xsd File
Visual Studio also lets you preview the data records within the data source.
17. Select Data | Preview Data from the Visual Studio menu to open the Preview Data dialog box.
Chapter 1 Introducing ADO .NET 4 15
Summary
Chapter 1 Quick Reference
To Do This
Create a new data source Create or open a project in Visual Studio. Select Data | Add New Data Source. Follow the steps in the Connection Wizard. Preview data in an existing data source Select Data | Preview Data.
Select the target data source from the Select An Object To Preview list.
Click the Preview button.
Remove a data source from a project Select the .xsd file in the Solution Explorer.
Chap
ter 2
Building Tables of Data
After completing this chapter, you will be able to:
■
■ Understand the ADO.NET classes used to create tables ■
■ Create strongly typed columns within a table ■
■ Indicate the primary key for a table ■
■ Design a table graphically or in code
The focus of all data in ADO.NET is the table—or more correctly, the DataTable. This class, located at System.Data.DataTable, defines a single table in which strongly typed column definitions and runtime data rows appear. By itself, a DataTable isn’t very interesting; it’s just a memory-based repository for data. It becomes useful only when you start employing ADO.NET and standard .NET Framework methods and tools to process the data stored in each table and data row.
Note Some of the exercises in this chapter use the same sample project, a tool that exposes the structure of a DataTable. Although you can run the application after each exercise, the expected results for the full application might not appear until you complete all related exercises in the chapter.
Implementing Tables
As with everything else in .NET, tables in ADO.NET exist as instantiated objects. Whether hand-written by you, produced by dragging and dropping items in the development envi-ronment, or generated by one of the Visual Studio tools, the ADO.NET code you include in your application exists to create and manage DataTable objects and other related objects.
Logical and Physical Table Implementations
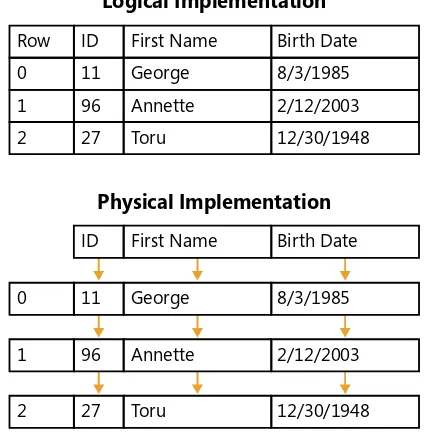
The physical implementation of a DataTable object is somewhat different. Instead of one large grid layout, ADO.NET maintains tabular data as a collection of collections. Each
DataTable object contains a collection of ordered rows, each existing as an instance of a
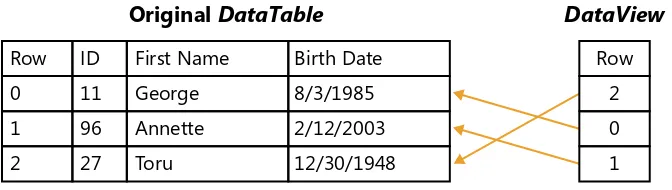
DataRow object. Each row contains its own collection of items that holds the row’s (and ulti-mately the table’s) actual data values. A set of column definitions exists separately from the actual column values, although the definitions influence the values. Figure 2-1 shows the difference between the logical and physical structures of a data table.
Logical Implementation
Physical Implementation
ID First Name Birth Date
0 11 George 8/3/1985
1 96 Annette 2/12/2003 Row
0 1 2
ID 11 96 27
First Name George Annette Toru
Birth Date 8/3/1985 2/12/2003 12/30/1948
2 27 Toru 12/30/1948
FIGURE 2-1 Logical and physical table layouts.
The DataTable Class
The three main classes that make up a data table are DataTable, DataColumn, and DataRow. As expected, these classes define a table, its columns, and its data rows, respectively. The main discussion for the DataRow class appears in Chapter 3, “Storing Data in Memory.”
To define a table, create a new DataTable object, optionally supplying a table name.
C#
Chapter 2 Building Tables of Data 19
After you create a DataTable, you can modify its TableName property and other relevant properties as needed.
Note Both Visual Basic and C# include features that let you use namespace elements as if they were globally named elements. Visual Basic accomplishes this on a file-by-file basis with the Imports keyword; C# includes the Using keyword for the same purpose. Visual Basic also includes a project-specific setting that automatically applies an Imports-like rule to each indi-cated namespace. (To use this feature, modify the items in the Imported Namespaces list on the References panel of Project Properties.) From this point forward, all code will assume that the System.Data and System.Data.SqlClient namespaces have been globalized in this way.
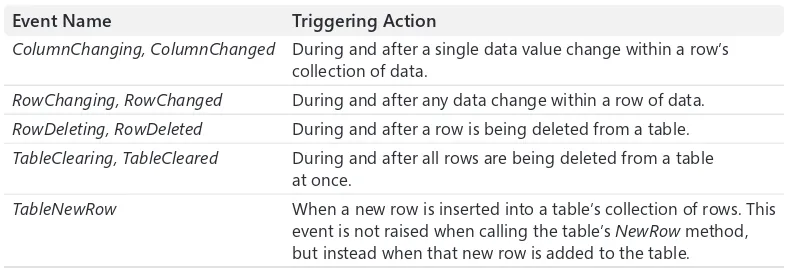
The DataTable class implements several useful events that it fires whenever data is added to, removed from, or modified in the table. Table 2-1 shows the data-related events you can plug into your code.
TABLE 2-1 Data-Related Events in the DataTable Class
Event Name Triggering Action
ColumnChanging, ColumnChanged During and after a single data value change within a row’s collection of data.
RowChanging, RowChanged During and after any data change within a row of data.
RowDeleting, RowDeleted During and after a row is being deleted from a table.
TableClearing, TableCleared During and after all rows are being deleted from a table at once.
TableNewRow When a new row is inserted into a table’s collection of rows. This event is not raised when calling the table’s NewRow method, but instead when that new row is added to the table.
Creating a DataTable: C#
1. Open the “Chapter 2 CSharp” project from the installed samples folder. The project includes two Windows.Forms classes: Switchboard and TableDetails.
2. Open the source code view for the Switchboard form. Locate the GetNoColumnTable
function. Add the following statement to that function to create a new DataTable:
return new DataTable("BoringTable");
3. Open the source code view for the TableDetails form. Locate the TableDetails_Load
routine. Just below the comment, “Show the table name,” add the following statement to access the TableName property of the DataTable:
20 Microsoft ADO .NET 4 Step by Step
4. Run the application. When the switchboard appears, click the Show Table with No Columns button. The TableDetails form opens with a structural view of the columnless table.
Creating a DataTable: Visual Basic
1. Open the “Chapter 2 VB” project from the installed samples folder. The project includes two Windows.Forms classes: Switchboard and TableDetails.
2. Open the source code view for the Switchboard form. Locate the GetNoColumnTable
function. Add the following statement to that function to create a new DataTable:
Return New DataTable("BoringTable")
3. Open the source code view for the TableDetails form. Locate the TableDetails_Load
routine. Just below the comment, “Show the table name,” add the following statement to access the TableName property of the DataTable:
Me.TableName.Text = ActiveTable.TableName
Chapter 2 Building Tables of Data 21
Adding Data Columns
Creating a DataTable instance is an essential first step in using ADO.NET, but a table that contains no columns is rarely useful. The next task in table building is in populating the
DataTable object’s Columns collection with one or more DataColumn instances that represent the table’s columnar values.
Database Normalization
Before rushing into the task of adding columns, it is important to think about the nature of the columns being added. If you are creating a standalone table that won’t interact with other DataTable objects or some of the more abstract data tools that work with ADO.NET, it is fine to throw any columns you need into the table. However, if you are trying to replicate the types of table interactions frequently found in traditional re-lational databases, you should ensure that your tables are optimized to take advantage of key ADO.NET features.
Normalization is the process of crafting tables that ensure data integrity and take advantage of the processing power of relational database systems. E.F. Codd, inventor of the relational database model, proposed normalization as a method of eliminating data anomalies that infect data during certain types of insert, update, and delete op-erations. A discussion of normalization is beyond the scope of this book. If you’re not familiar with the normalization process or the various “normal forms,” a few moments spent reading about this essential craft will help support your data management needs.
The DataColumn class, found in the same System.Data namespace as the DataTable class, defines a single column in your table’s schema. DataColumn objects can be created as independent instances for inclusion in a DataTable object’s Columns collection, one for each column in the table. At a useful minimum, you must provide at least the name and data type of each column. The following code block creates a table with a single long-integer field:
C#
DataTable customer = new DataTable("Customer");
DataColumn keyField = new DataColumn("ID", typeof(long)); customer.Columns.Add(keyField);
Visual Basic
Dim customer As New DataTable("Customer")
22 Microsoft ADO .NET 4 Step by Step
The following System types are officially supported by DataColumn instances:
■
■ Arrays of Byte (although there are some limitations)
You can also use the equivalent Visual Basic and C# data types.
Note You can use any other data types as the column type, but ADO.NET will place limita-tions—sometimes significant limitations—on a column if you don’t use one of the supported types. Also, nonsupported types are likely to be incompatible with the available data types found in any connected database. See the Visual Studio 2010 online documentation entry for “DataColumn.DataType Property” for full details on these and other limitations.
The DataTable object’s Columns collection includes an Add overload that simplifies the cre-ation of columns. In this syntax, you pass the standard DataColumn arguments directly to the
Chapter 2 Building Tables of Data 23 C#
DataTable customer = new DataTable("Customer"); customer.Columns.Add("ID", typeof(long)); customer.Columns.Add("FullName", typeof(string)); customer.Columns.Add("LastOrderDate", typeof(DateTime));
Visual Basic
Dim customer As New DataTable("Customer") customer.Columns.Add("ID", GetType(Long)) customer.Columns.Add("FullName", GetType(String)) customer.Columns.Add("LastOrderDate", GetType(Date))
The DataColumn class includes several useful properties that let you customize each column to suit your processing needs. Many of these properties enable features that parallel those common in relational database tables. Table 2-2 documents these helpful properties.
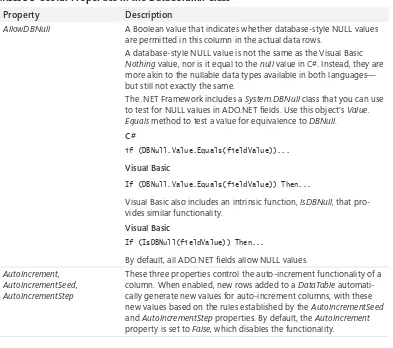
TABLE 2-2 Useful Properties in the DataColumn Class
Property Description
AllowDBNull A Boolean value that indicates whether database-style NULL values are permitted in this column in the actual data rows.
A database-style NULL value is not the same as the Visual Basic
Nothing value, nor is it equal to the null value in C#. Instead, they are more akin to the nullable data types available in both languages— but still not exactly the same.
The .NET Framework includes a System.DBNull class that you can use to test for NULL values in ADO.NET fields. Use this object’s Value. Equals method to test a value for equivalence to DBNull.
C#
if (DBNull.Value.Equals(fieldValue))...
Visual Basic
If (DBNull.Value.Equals(fieldValue)) Then...
Visual Basic also includes an intrinsic function, IsDBNull, that pro-vides similar functionality.
Visual Basic
If (IsDBNull(fieldValue)) Then...
By default, all ADO.NET fields allow NULL values.
AutoIncrement, AutoIncrementSeed, AutoIncrementStep
These three properties control the auto-increment functionality of a column. When enabled, new rows added to a DataTable automati-cally generate new values for auto-increment columns, with these new values based on the rules established by the AutoIncrementSeed
and AutoIncrementStep properties. By default, the AutoIncrement
24 Microsoft ADO .NET 4 Step by Step
Property Description
Caption Provides a place to store a user-friendly title or description for the column. If unassigned, this property returns the value of the
ColumnName property. Not all database platforms support the idea of a column caption. When connecting an ADO.NET DataTable in-stance to a database, this property might or might not be supported.
ColumnName This is the name of the column, which is typically assigned through the DataColumn class’s constructor.
DataType This property identifies the data type of the column, which is also normally assigned through the DataColumn class’s constructor. After data has been added to a DataTable, the data type for each column is set and can’t be modified.
DateTimeMode For columns that track date and time information, this property defines the rules for storing the time and its related time-zone information.
DefaultValue Any column in a DataTable can include a default value. This value is assigned to the relevant column any time a new row is created. You can replace the default value in a specific data row as needed.
MaxLength For columns that store text data, this property indicates the maxi-mum length of the text. By default, the maximaxi-mum length is set to -1, which indicates no maximum length.
ReadOnly Read-only columns cannot be modified in any data row that has already been added to a table. By default, columns can be updated as needed.
Unique This Boolean property, when set to True, establishes a “unique value” constraint on the field. No two rows within the table will be allowed to have the same value. Also, NULL values aren’t allowed in columns marked as unique.
In addition to these column-level properties, the containing DataTable class includes a
PrimaryKey property that lets you indicate the column (or multiple columns) that make up the table’s primary key. This property hosts an array of DataColumn objects taken directly from the Columns collection of the same DataTable.
C#
DataTable customer = new DataTable("Customer"); customer.Columns.Add("ID", typeof(long)); customer.Columns.Add("FullName", typeof(string)); // --- Use ID for the primary key.
Chapter 2 Building Tables of Data 25 Visual Basic
Dim customer As New DataTable("Customer") customer.Columns.Add("ID", GetType(Long)) customer.Columns.Add("FullName", GetType(String) ' --- Use ID for the primary key.
customer.PrimaryKey = {customer.Columns("ID")}
Note The table-level PrimaryKey setting, the column-specific Unique property, and other similar limitations on the table’s data are known as constraints. ADO.NET includes a Constraint class that works in tandem with these property settings. Constraints are discussed in Chapter 5, “Bringing Related Data Together.”
Although each DataColumn added to the Columns collection of a DataTable defines the columns that appear in a table, they don’t hold any actual row data. The individual column-specific data values for each row are added through the DataTable object’s Rows collection. Chapter 3 contains details on adding data to a table.
Adding Columns to a DataTable: C#
Note This exercise uses the “Chapter 2 CSharp” sample project and continues the previous exer-cise in this chapter.
1. Open the source code view for the Switchboard form. Locate the GetColumnTable
function. This routine already contains a single statement.
return null;
2. Replace that line with the following statements to create a new DataTable with columns and a primary key:
// --- Return a table that has columns. DataTable theTable = new DataTable("Customer");
// --- Add some basic columns.
theTable.Columns.Add("ID", typeof(long)); theTable.Columns.Add("FullName", typeof(string)); theTable.Columns.Add("LastOrderDate", typeof(DateTime));
// --- Create a primary key for the table.
theTable.PrimaryKey = new DataColumn[] {theTable.Columns["ID"]};
26 Microsoft ADO .NET 4 Step by Step
3. Open the source code view for the TableDetails form. Locate the TableDetails_Load rou-tine. Just below the comment, “Add the columns to the display list,” add the following statements to access individual columns of the DataTable:
foreach (DataColumn oneColumn in ActiveTable.Columns) this.AllColumns.Items.Add(oneColumn);
if (this.AllColumns.Items.Count == 0)
this.AllColumns.Items.Add("No columns available");
4. Locate the AllColumns_DrawItem event handler. Just below the comment, “Extract the column details,” add the following statements to access members of the DataColumn:
columnName = itemDetail.ColumnName;
dataTypeName = itemDetail.DataType.ToString(); isPrimaryKey = ((ActiveTable.PrimaryKey != null) && (ActiveTable.PrimaryKey.Contains(itemDetail) == true));
5. Run the application. When the switchboard appears, click the Show Table with Columns button. The TableDetails form opens with a structural view of the table and its column details.
Adding Columns to a DataTable: Visual Basic
Note This exercise uses the “Chapter 2 VB” sample project and continues the previous exercise in this chapter.
1. Open the source code view for the Switchboard form. Locate the GetColumnTable
function. This routine already contains a single statement.
Return Nothing
2. Replace that line with the following statements to create a new DataTable with columns and a primary key:
Chapter 2 Building Tables of Data 27 ' --- Add some basic columns.
theTable.Columns.Add("ID", GetType(Long)) theTable.Columns.Add("FullName", GetType(String)) theTable.Columns.Add("LastOrderDate", GetType(Date))
' --- Create a primary key for the table. theTable.PrimaryKey = {theTable.Columns("ID")}
' --- Finished. Return theTable
3. Open the source code view for the TableDetails form. Locate the TableDetails_Load
routine. Just below the comment that says “Add the columns to the display list,” add the following statements to access individual columns of the DataTable:
For Each oneColumn In ActiveTable.Columns AllColumns.Items.Add(oneColumn) Next oneColumn
If (AllColumns.Items.Count = 0) Then _
AllColumns.Items.Add("No columns available")
4. Locate the AllColumns_DrawItem event handler. Just below the comment that says “Extract the column details,” add the following statements to access members of the
DataColumn:
columnName = itemDetail.ColumnName
dataTypeName = itemDetail.DataType.ToString()
isPrimaryKey = ((ActiveTable.PrimaryKey IsNot Nothing) AndAlso (ActiveTable.PrimaryKey.Contains(itemDetail) = True))
5. Run the application. When the switchboard appears, click the Show Table with Columns button. The TableDetails form opens with a structural view of the table and its column details.
Dataset Designer
28 Microsoft ADO .NET 4 Step by Step
You can use DataTable objects created with the Dataset Designer in your code just like the
DataTable objects you built using code earlier in this chapter. However, rather than being built with C# or Visual Basic source code, you create the tables with your mouse. These tables are stored as XML, in a file with an .xsd extension. (Visual Studio will also add a few other files that it requires to support the Dataset Designer environment. Visual Studio generates these files automatically, and you shouldn’t change them manually.)
Using the Dataset Designer is straightforward. You add a DataSet item to your project, which induces Visual Studio to display the designer. Using designer-specific toolbox items, you cre-ate your data tables and the relationships between them. You can also drag existing database tables from the Solution Explorer onto the design surface and customize them to meet your application’s needs. The following two examples take you through the process of building a
DataTable using the Dataset Designer.
Creating a Custom Table in the Dataset Designer
1. Start a new Visual Basic or C# project. A Windows Forms application might be the most convenient for this demonstration, but most other project types will work as well. (The images shown in this example use a C# project, but the process is identical for Visual Basic.)