•Createanappthatisdynamic,adaptive,andresponsive
•Effectivelyusetheextensiveasynchronousprogrammingsupportthatruns •Adaptyourapplayouttothecapabilitiesandconfigurationofthedevice •Prepareanappandgothroughtheprocessforpublishingitonthe
youcanbuildonyourexistingknowledgeofJavaScript,HTML,andCSStocreate
matter material after the index. Please use the Bookmarks
and Contents at a Glance links to access them.
Contents at a Glance
n
About the Author ...xxiv
n
About the Technical Reviewers ...xxv
n
Acknowledgments ...xxvi
Part I
n
Getting Started ...1
n
Chapter 1: Putting Windows 8 in Context ...3
n
Chapter 2: Getting Started ...11
n
Chapter 3: Your First Windows 8 App ...33
n
Chapter 4: Completing the App ...53
Part II
n
Core Development ...79
n
Chapter 5: The Single-Page Model ...81
n
Chapter 6: Creating an Adaptive Layout ...107
n
Chapter 7: Commands & Navigation ...135
n
Chapter 8: View Models & Data Binding ...161
n
Chapter 9: Using Promises ...193
Part III
n
UI Development ...229
n
Chapter 10: Creating the UI Controls Example Framework ...231
n
Chapter 11: Using the ToggleSwitch, Rating and Tooltip Controls ...259
n
Chapter 12: Using the Time/Date Pickers & Flyouts ...281
n
Chapter 13: Using Menus & Dialogs ...303
n
Chapter 14: Using the FlipView Control ...325
n
Chapter 15: Using the ListView Control ...351
n
Chapter 16: Using Semantic Zoom ...381
n
Chapter 17: Using Pointers & Gestures ...405
n
Chapter 18: Using Animations & Utilities ...437
Part IV
n
Platform Integration ...467
n
Chapter 20: Working with Settings & App Data ...505
n
Chapter 21: The Search Contract ...537
n
Chapter 22: Working with Files ...565
n
Chapter 23: Integrating File Services ...595
n
Chapter 24: The File Activation & Picker Contracts ...623
n
Chapter 25: The Sharing Contract ...653
n
Chapter 26: The AutoPlay, Protocol Activation and Print Contracts ...683
n
Chapter 27: Working with App Tiles ...713
n
Chapter 28: Using Toast and the System Launcher ...747
n
Chapter 29: Working with Sensors ...775
Part V
n
Selling Apps ...801
n
Chapter 30: Creating an App to Publish ...803
n
Chapter 31: Windows Store Integration ...821
n
Chapter 32: Selling Upgrades ...843
n
Chapter 33: Publishing to the Windows Store ...875
n n n
P a r t 1
Getting Started
n n n
Putting Windows 8 in Context
Windows 8 represents Microsoft’s desire to break out of the traditional desktop computing market and make an impact in the mobile world, which has been dominated by Android devices and, of course, Apple products.
Microsoft’s plan is to offer the user consistency across devices, allowing the same apps to operate on the user’s data irrespective of which device, or which kind of device, the user has at hand. This is attractive to many users and it leverages Microsoft’s greatest asset—the leading position in the desktop computing market—to drive sales, acceptance, and credibility in the tablet and smart-phone markets.
The traditional Windows desktop isn’t a good model for consistency across different types of devices, and attempts to add touch support and rework the interface for smaller screens have not ended well. Trying to extend the old Windows model to small devices is part of the reason Microsoft’s previous forays into the mobile world have fared so badly.
And that’s where Windows apps come in. Rather than perpetuate its existing application model, Microsoft has decided to create a new one. Windows Store applications, more commonly known as apps, are available on every device that can run Windows 8 and its derivatives (Windows Phone 8, Windows RT, etc.). More important, Windows apps run as well on large-screen desktop machines with a mouse and keyboard as they do on a moderately sized touch-screen tablet. Windows Store apps are a big departure from regular Windows desktop apps: they fill the screen, don’t have title bars and buttons, and have a completely different look and feel.
Another big departure for Microsoft is that you can use web technologies to create apps, which is the reason I have written this book and, most likely, the reason you are reading it. By embracing HTML, CSS, and JavaScript, Microsoft has embraced a completely new community of developers, who can take their knowledge of web app development and apply it to Windows app development.
n
Note
Microsoft uses the term Windows Store App, which I find awkward and I can’t bring myself to use it
throughout this book. Instead, I’ll refer to
Windows apps
and, often, just plain
apps
. I’ll leave you to mentally insert
the official Microsoft names as you see fit.
Putting App Development in Context
CHAPTER 1 nPUTTING WINDOWS 8 IN CONTEXT
fast and fluid user interactions, support touch and keyboard/mouse input, and integrate tightly into Microsoft’s cloud services, allowing users to replicate their data everywhere they work and on every device they use.
Apps are very different from traditional Windows desktop applications. Windows 8 apps fill the screen by default, are chromeless (which means there is no surrounding window, title bar, or buttons), and can’t be resized or overlapped the way desktop apps can. Users don’t close apps and there are no Close or Exit buttons. Only one app is displayed at a time, so there is no need for windows or title bars.
Key dialogs that require input from the user, such as file pickers, are also full screen and are like mini-apps in their own right. In fact, they look and feel a lot like mini-apps you might see on an iPhone, iPad, or Android device—which is, of course, no accident. With Windows 8, Microsoft aims to gain some of the lucrative smart-phone and tablet market and hopes to leverage its dominance in the desktop world by making apps available across a wide range of platforms, including regular PCs.
Apps benefit from a range of integration services, known as contracts, which make it easy to create apps that are tightly integrated into the Windows platform and can share data with other apps. If you have just installed Windows 8 and have been wondering what some of the icons on Charm Bar are for, then wonder no more. Apps use contracts to provide services to the user through the Charm Bar. It may seem like an awkward tool when you are new to Windows, but it becomes second nature pretty quickly.
Developing Windows Apps with JavaScript and HTML
One of the biggest departures for Microsoft with Windows 8 has been making JavaScript and HTML first-class citizens for app development. This is a big deal for two reasons: the first is that Microsoft has invested heavily in the .NET platform over the years and has been reluctant to open up Windows development for tools and languages that are not part of the .NET family, such as C#. That has changed completely with Windows 8.
The second reason is that Microsoft has stuck to the standards. The JavaScript and HTML that you have used to write web apps is the same JavaScript and HTML that you use to write Windows apps. There are still new libraries and techniques to learn—hence this book—but if you have developed a web app, then you already have a big chunk of the knowledge and experience you will need for app development. I demonstrate this in Chapter 3, where I show you how to create your first app using little more than regular JavaScript and HTML. This web-driven theme runs deep: apps written in JavaScript/HTML are executed using Internet Explorer 10 (although this isn’t evident to the user, who won’t be able to tell which technology family you have used to create your app). You don’t get to change which browser is used to execute your app, but after a while, you won’t really want to—IE10 turns out to be pretty good and has some good support for the new HTML5 and CSS3 features. (There are some Microsoft-specific extensions, but they occur when the W3C standard is still being developed or where the feature is very app-specific.)
Developing Apps with Visual Studio
Unlike with regular web development, you can’t choose your own development tools when writing apps using JavaScript and HTML: you must use Visual Studio 2012, which is the same tool required for development targeting any Microsoft platform. So, the bad news is that you have to learn a new
Publishing Windows Apps
Most Windows apps are sold through the Windows Store. The exception is apps written for the enterprise, which can be installed like traditional desktop apps (although this is available only in the Windows 8 versions targeted at corporations). The Windows Store is much like any other app store—users can search for apps, see rankings of successful apps, and get updates for their apps. And, like any other app store, the Windows Store operates by taking a cut from your app sales. I’ll explain how you use the Windows Store as a developer in Part IV of this book, but it will be helpful if you bear in mind that publishing via the Windows Store is the ultimate goal of app development.
What Is in This Book?
In this book, I show you how to use your knowledge of web app technologies and techniques and apply them to create rich, fluid, and dynamic Windows apps. I start by showing you these web technologies can be used to create a simple app using the same approach that you would encounter in regular web app deployment and then show you the different techniques, libraries, and features available to take advantage of Windows 8 and the app environment.
Who Is This Book For?
You are an experienced web developer who already knows the basics of JavaScript, HTML, and CSS and who wants to develop apps for Windows 8. You want to build on your web experience to create apps that go beyond the browser and take advantage of the Windows platform features in a way that regular web apps can’t offer.
What Do I Need to Know Before I Read This Book?
You need to know how to write a simple web app, using HTML, CSS, and JavaScript. You need to understand HTML elements and attributes, CSS styles, and JavaScript concepts such as functions and events. You don’t have to be an expert in any of these technologies, but you do need some experience. I don’t provide an introduction to web development in this book, and you will struggle to follow the examples if you are new to the world of web technologies.
Windows app development uses HTML5 and CSS3, but it isn’t critical if you are up to speed with the latest drafts of the HTML5 specifications. The new features in HTML5 and CSS3 are largely evolutionary, and a good understanding of HTML4 will give you enough of a foundation to figure out what you don’t know.
n
Tip
The HTML5-related features I use most often in this book are actually the new CSS3 layout features, which
make it easy to create fluid interfaces. You
can
use the new elements and APIs, but for the most part you don’t need
to, and some key features are exposed more conveniently through the app-specific APIs.
What If I Don’t Have That Experience?
CHAPTER 1 nPUTTING WINDOWS 8 IN CONTEXT
other books you might find useful. If you are new to HTML, read The Definitive Guide to HTML5. This explains everything you need to create regular web content and basic web apps. I explain how to use HTML markup and CSS3 (including the new HTML5 elements) and how to use the DOM API and the HTML5 APIs (including a JavaScript primer if you are new to the language). If you want to learn more about practical web app development, then read Pro jQuery. jQuery is a very popular JavaScript library that simplifies web app development. I don’t use jQuery in this book, but you will improve your
understanding of all aspects of web development by learning how to use jQuery effectively (and since you can use jQuery for Windows app development, the time you spend will stand you in good stead later). For more advanced topics, read Pro JavaScript for Web Apps, in which I describe the development tricks and techniques I use in my own web development projects. All three of these books are published by Apress.
What Don’t I Need to Know?
You don’t need to have any experience in Windows desktop development or other Microsoft technologies (such as C#, XAML, or the .NET framework). Developing apps with web technologies builds on what you already use for web app development, and while there is a lot to learn, you don’t have to worry about other programming languages or markups.
But Don’t I Have to Know C# for the Advanced Features?
No, honestly. Microsoft has done a pretty good job of putting JavaScript on a par with C# and the other . NET languages and making HTML a good alternative to XAML (which is the way user interfaces are defined in most .NET apps). When you get deep into app development, you will become aware that you are using libraries of JavaScript objects that are shared with the .NET languages. This is evident only because some of the object and property names are a bit odd—in all other respects you won’t even know that other languages are supported.
I have been writing Windows apps in both HTML/JavaScript and XAML/C# for a while and I have yet to find any feature available to .NET programmers that is unavailable to web technology programmers. HTML and JavaScript are first-class technologies in the world of app development.
What Tools and Technologies Do I Need?
You need two things for app development: a PC running Windows 8 and Visual Studio 2012. If you get serious about app development, you’ll need to buy a copy of Windows 8, but if you are just curious, you can get a 90-day trial from Microsoft—I’ll explain how later in Chapter 2.
Visual Studio 2012 is Microsoft’s development environment. The good news is that Microsoft makes a basic version of Visual Studio, available free of charge, and that’s the version I’ll be using throughout this book. It has the catchy name of Visual Studio 2012 Express for Windows 8 and I’ll tell you how to get it later in this chapter.
What Is the Structure of This Book?
In this chapter, I introduce you to Visual Studio and show you how to create a simple project. I give you a quick tour of the key parts of the Visual Studio interface, explain what each of the files in a Windows app development project looks like, and show you how to run and test an app using the app simulator tool, which is included with Visual Studio.
In Chapter 3, I show you how to build your first app. I focus on using basic HTML, CSS, and JavaScript features to demonstrate how much of your existing web app development knowledge can be applied directly to Windows app development. You’ll be pleasantly surprised by just how much you can do. Of course, you didn’t buy a Pro-level book for the basics, and most of the rest of the book shows you the different techniques and features that transform a basic app into one that provides a first-class app experience. In the sections that follow, I briefly describe what you will learn in the other parts of the book.
Part II: Core Development
There are some core features that almost all apps benefit from using. In this part of the book, I explain these fundamentals techniques, showing you how to let the user navigate through your app’s content, how to adapt your app layout to the capabilities and configuration of the device it is running on, and how to make best use of the extensive asynchronous programming support that runs through pretty much all of the Windows app development libraries. By the time you finish this part of the book, you’ll know how to create an app that is dynamic, adaptive, and responsive.
Part III: UI Development
You can create the UI for a app, known as the layout, using the standard HTML elements, such as button
and input, but you also have access to the WinJS UI library, which contains the interface controls that give Windows apps their distinctive look and feel. In this part of the book, I take you on a tour of the controls, explain when they should be used and how they are applied to regular HTML elements, and give you many, many examples so you can see them in operation. By the time you have finished this part of the book, you will know how to apply the distinctive Windows look and feel to create pretty, pretty apps.
Part IV: Platform Integration
Once you have your application structure and layout in place, you can start to integrate your app into the features and services that Windows provides. This includes making your app part of the file and data search process, working with the file system, telling Windows that your app supports different types of file and protocol, printing, and sharing data between apps. I cover all of these topics in this part of the book and also show you how to create different kinds of notifications for your apps, including low-key live tiles and more intrusive toast notifications. By the time you finish this part of the book, you will know how to make your app a first-class Windows citizen that is fully integrated into the wider platform and your user’s workflow.
Part V: Selling Apps
CHAPTER 1 nPUTTING WINDOWS 8 IN CONTEXT
Are There Lots of Examples in This Book?
There are loads of examples in this book and I demonstrate every key feature you’ll need to create first-rate apps. In some cases, I go back and combine different features to show you how they work together, the benefits of these combinations, and on occasion, the problems that can arise. There are so many examples in this book that I had trouble fitting all of the code into the chapters. To help fit everything in, I list JavaScript code and HTML markup in two ways. The first time I introduce a new file, I show you the complete contents. You can see an example of this in Listing 1-1, which is code taken from Chapter 6.
Listing 1-1. A complete listing of a new file
(function () { "use strict";
WinJS.Namespace.define("ViewModel.State", { appBarElement: null,
navBarContainerElement: null, navBarControlElement: null });
WinJS.Namespace.define("ViewModel.UserData", {
}); })();
When I make a change to a file, I tend to show only the part that is being changed, similar to Listing 1-2. The code in bold shows the changes I have made that are relevant to the technique or feature I am demonstrating.
Listing 1-2. A partial listing of a modified file
...
WinJS.Namespace.define("ViewModel.UserData", {
word: null, wordLength: {
get: function() {
return this.word ? this.word.length : null; }
} }); ...
What If I Want to Follow the Examples Myself?
Image Attribution
n n n
chaPter 2
Getting Started
Before you can start developing an app, you need to get Windows 8 and the development tools up and running.
In this chapter, I’ll take you through the process of getting set up with the right software and take you through the process of creating a Visual Studio project for a Windows 8 app, giving you a tour of the files it contains and the tools that Visual Studio provides to work with then.
Getting Set Up
You don’t need an especially high-end PC for app development—anything that meets the minimum Windows 8 spec will do. As ever in development, a faster machine makes development a little more pleasant, but you don’t need anything overwhelmingly powerful.
n
Tip
If you are buying a PC for Windows 8 app development, I suggest spending most of your money on getting
the biggest screen you can find. No screen is too big when it comes to writing apps—the sweet spot for me is to be
able to edit a JavaScript file, an HTML file, and a CSS file side by side and still have enough room for the rest of the
Visual Studio interface (which I’ll show you shortly). Your next priority should be memory. The least important
component is the CPU: today’s CPUs are all supremely capable, and even the cheaper models are more than able to
cope with Visual Studio for app development.
You can get a free 90-day trial of Windows 8 if you want to see what app development is like before committing yourself. You can get the Windows 8 evaluation copy here: http://msdn.microsoft.com/en-us/ evalcenter. You’ll find what you need by clicking on the Release link in the Windows and Platform Development section.
n
Tip
Microsoft offers some pretty good discounts if you are upgrading from an earlier version of Windows. You
may also be able to get a cheap copy if you are a student or if you work for a company that has a deal with
Microsoft. Very few people need to pay full retail price for Windows, and it is always worth asking around to see if
you are covered by one of Microsoft’s myriad schemes.
Getting Visual Studio Ready
You will also need a copy of Visual Studio 2012. As I mentioned in the previous chapter, Microsoft makes an edition of Visual Studio completely free. It doesn’t have all of the testing and integration features that some of the paid-for versions contain, but you don’t need those to create apps. In all other respects, the free version of Visual Studio is fully featured and does everything you will need. Don’t worry if you have a different version of Visual Studio 2012. You won’t need all the features in your edition, but all the
instructions and examples in this book will work without any problems or modification.
You can download the Visual Studio installer from www.microsoft.com/visualstudio/11/en-us/ products/express. There are several different flavors available, each of which can be used to develop a specific kind of application. For app development, you will need Visual Studio Express 2012 for Windows 8. The names of the flavors are confusingly similar, so be sure to download the right one.
Install Visual Studio as you would any other app. Although the software is free to use, you will need to activate it, which requires the Microsoft account you created earlier. After you have gone through the process, you’ll end up with an activation code for Visual Studio. You will also need a developer license, which is free as well. When you first start Visual Studio 2012, you will be prompted to obtain a license—it takes only a second and, once again, it requires the Microsoft account you created earlier.
Optional Equipment
A Windows 8 PC and Visual Studio are all you need to write apps, but some app features are more readily understood if you have a device with orientation sensors. As you’ll learn in Part 2 of this book, responding to the way the user has oriented the device is an important Windows 8 feature, and while you can simulate the effect using Visual Studio, there is no substitute for a real device. Equally, a device with a touch screen will let you develop and test touch-screen interactions—another key app feature. This is something else you can simulate, but simulation is no substitute for the real thing.
n
Tip
I use a Dell Latitude Duo, which is an odd hybrid between a tablet and a laptop. You can pick them up
cheaply secondhand, and they have a decent touch screen and an orientation sensor (although the driver for this has
to be hunted down from the sensor manufacturer, rather than from Dell). I wouldn’t suggest coding on the Duo,
which is a little too slow for comfort and lacks RAM, but it makes a pretty decent test machine and I wouldn’t be
without it.
Getting Started
CHAPTER 2 nGETTING STARTED
Creating the Visual Studio Project
To create a new app project, you can either click on the New Project link on the Visual Studio Start page (which is displayed when you first start Visual Studio 2012) or select New Project from the File menu.
n
Note
Actually, it is the
FILE
menu, because Microsoft has decided to display the menus in Visual Studio in
capital letters, even though this gives the impression that your development tool is shouting at you. I will just refer to
the menus in regular case.
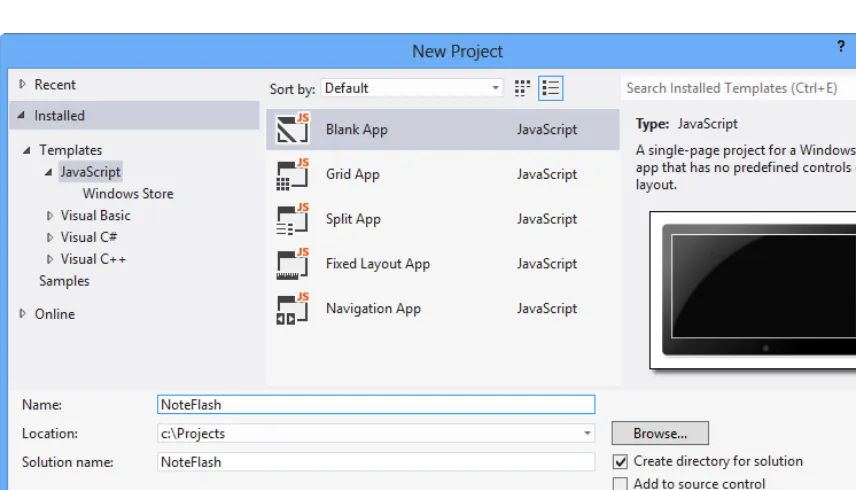
You will see the New Project dialog windows, as shown in Figure 2-1. Visual Studio includes templates to get you started on different kinds of projects, and these are displayed on the left side of the dialog. The set of available templates differs based on the Visual Studio edition you are using. The figure shows the templates available for Visual Studio Express 2012 for Windows, which supports four programming languages for creating apps. For each language there are templates that are prepopulated to some extent, for creating different projects.
I understand why Microsoft includes these templates, but they are pretty useless. It can be a bit alarming for new programmers to be faced with an empty project and a blinking cursor, but the code they put into these templates isn’t very good and is rarely the kind of thing you will want for anything but the simplest and most trivial projects.
n
Tip
Visual Studio supports colored themes. The default for most Visual Studio editions is the dark theme, which
is predominantly black and doesn’t show up well in screen shots. I have switched to the light theme, which is why
the
New Project
dialog in the figure looks different from what you can see on your screen. I changed the theme by
selecting
Options
from the
Tools
menu and changing the
Color Theme
setting in the
Environment
section.
Navigate to the Blank App template in the Templates > JavaScript section. The Blank Template creates an almost empty project with just the files that are required to let you run an app without generating any errors. This is the template I will use throughout the book, and when I say I created a new project, this will always be the template I have used.
Enter NoteFlash in the name field. This is the name of the first app you will create in Chapter 3. I am not going to do any serious development at this point, but by the end of the chapter you’ll understand what the moving parts in a Windows 8 app project are and then you can see how they are used in
Chapter 3.
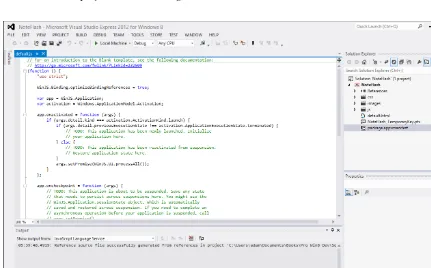
Next, click the Browse button to select a location for your project. It doesn’t matter where you save the files, as long as you can find them again later. Finally, click the OK button to create the project. Visual Studio will grind away for a moment as it generates the files and configures the content, and then you’ll see the initial view of the project, as shown in Figure 2-2.
CHAPTER 2 nGETTING STARTED
In the sections that follow, I’ll show you the most important Visual Studio features that you’ll use in app development. Some of this will be a little obvious, but stick with me, because Visual Studio offers a tightly integrated development environment and it is useful to know how the parts all work together.
Running the Project
The best place to start with a new project is to run it and see how it looks. You have three choices when it comes to running your apps during development. The first is to run the app on the same PC you are using to write the code, the local machine. The second is to run the app in a simulator that is included with Visual Studio. The final option is to run the app on another device.
Of the three options, the simulator is most useful. The problem with running the app on the device you are working on is that Windows 8 apps are full-screen and they cover Visual Studio and the rest of the desktop. You can toggle between your app and the desktop, but it is a clumsy process, especially when you are trying to debug some kind of problem or error.
Running the app on another device can be very useful. You’ll need to download and install the Remote Tools for Visual Studio 2012 on the device, which you can get from Microsoft at http://msdn.microsoft. com/en-gb/windows/apps/br229516. I find the ability to run an app remotely to be useful when I want to test how a feature or problem relates to a hardware capability that my development machine doesn’t have—a touch screen, for example. I don’t use it for regular development because it takes a few seconds for Visual Studio to package up and transmit the app to the remote device, and this becomes tiresome after a while.
n
Tip
You can’t just copy an app onto another device as you would with a traditional Windows desktop application.
Microsoft is very keen on the use of the Windows Store to deploy apps, and until you are ready to publish, the easiest
way to test on a device is with the remote tools.
This leaves the third option: the Visual Studio simulator. This is how I test my apps during
development, and I recommend you do the same. The simulator is a reasonably faithful re-creation of a real Windows 8 device, and you can use it to simulate some important device characteristics, including device orientation, GPS locations, touch-and-gesture input, and different screen sizes and resolutions. It isn’t perfect, however, and there are some app features that you can’t properly test in the simulator. I’ll point out these features in the appropriate chapters so you will know to use one of the other ways to run the app.
Pick the Simulator option from the drop-down menu, as highlighted in the figure. Once you have made your choice, click on the green arrow or the button text to start the app. Visual Studio will launch the simulator, install your app, and start running it. The Blank App Visual Studio template you used to create the project really does generate just the basic structure of an app, so there isn’t a lot to see at the moment— just a black screen with small text in the top left corner that says Content goes here. Ignore the app for the moment and look at the buttons on the right edge of the simulator window, which I have shown in Figure 2-4. You can also start the app by selecting Start Debugging from the Visual Studio Debug menu—the effect is the same. I’ll come back to the Visual Studio debugger later in this chapter.
n
Note
When I tell you to start the app, I mean that you should select the
Start Debugging
menu item or click
the button on the toolbar so the debugger is used. There are a couple of features that need to be tested without the
debugger, but I’ll make this clear when you get to them. In all other cases, you should make sure the debugger is
running.
Figure 2-3. Selecting the way Visual Studio will run the app
CHAPTER 2 nGETTING STARTED
I have shown the buttons enlarged alongside the simulator. These buttons allow you to use the simulator to interact with the app in different ways and to change the orientation of the simulated device.
The simulator buttons are grouped in sections of related functionality. The first group changes the input method, allowing you to use a mouse to simulate touch input. You’ll see how these buttons work in Chapter 17, when I show you how to deal with touch gestures.
The second group allows you to simulate rotating the device clockwise and counterclockwise. I use these buttons in Chapter 6 to show you how to create layouts that adapt when the device orientation changes.
The sole button in the third group changes the screen resolution and pixel density, which I also explore in Chapter 6. There is only one button in the fourth group as well and it is used to simulate GPS data. You’ll see how this is used in Chapter 29, when I show you how to create apps that are location aware. The final button group lets you take screenshots of whatever is shown by the simulator. I don’t use these buttons in this book.
tiPS for USinG the SimUlator
The simulator works by creating a second desktop session on your development machine and displaying it in
a window. This is a neat trick, but it has some side effects that it are worth knowing about. Some can be
useful and others are worth being aware of if you have any problems.
First, when you start an app using Visual Studio, the app package is installed and executed on the local
machine and displayed in the simulator. This means that you can navigate to the Start screen of the
simulator or real Start screen on the local machine and start the app without Visual Studio if you wish. If you
have problems running an app—which will happen from time to time—you usually can fix things by going to
the Start screen, locating the app you are developing, and uninstalling it (right-click on the app’s tile and
select
Uninstall
).
Second, some app features that provide integration with Windows features are easiest to test from the
desktop, such as file activation, which I describe in Chapter 24. Because the Visual Studio simulator is
running a regular Windows session, all of the applications you have set up to run automatically are started
when you first activate the desktop in the simulator. I find that this causes some problems, especially with
applications that expect to have sole access to a storage location or that manage hardware. The most
annoying example for me is the software that let me remap the buttons on my mouse—when I switch to the
desktop in the simulator, a second instance of this software is started automatically and it renders my mouse
unusable until I kill one of the processes (a job made more complex by the lack of a working mouse). These
are not usually terminal problems, but if you start seeing odd issues when you are using the simulator,
remember that it runs a full Windows session, with all the good and bad this entails.
Finally, the way the simulator creates and displays the Windows session means that it doesn’t work if you
are connected to a VPN when the simulator is started. You can activate the VPN
after
the simulator has
started and everything will be OK.
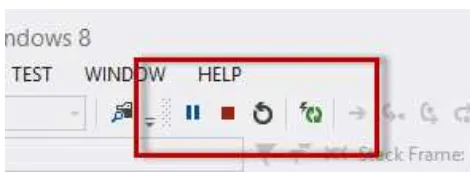
Controlling App Execution
These buttons pause, stop, and restart the app. If you have made any changes to the project, the Restart button will ensure that the app is updated before execution is started. The fourth button (whose icon is a lightning strike with two arrows forming a circle) is the Reload button. This button quickly reloads any changed files without completely stopping and restarting the app. This feature is useful during development, and I find it most useful when I am fine-tuning CSS layouts, for example. Reloading isn’t possible if you add or remove files from the project or make changes that require the app to be reinstalled (such as changing the manifest, which I’ll introduce shortly)—in these situations, Visual Studio will prompt you to perform a reload instead.
n
Tip
The buttons are complemented by items on the Visual Studio
Debug
menu that perform the same functions.
I tend to use the toolbar buttons, but there is no difference between them.
Exploring the Project
The Solution Explorer is at the top right of the Visual Studio window by default, although you can move it or even detach it entirely. In Visual Studio parlance, a solution is a wrapper around one or more projects. All of the example apps in this book are contained in single projects and, for the most part, solutions are a holdover from development practices that predate Windows 8 apps.
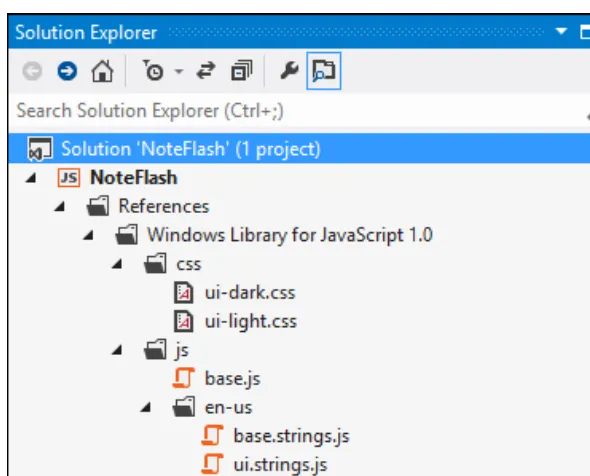
The Solution Explorer provides you with access to all of the files that are in the project. Most of the entries the Solution Explorer shows are folders and files that Visual Studio generated when you created the project, and others are references to files your app relies on. You can see all of the files in more detail in Figure 2-6, and I’ll explain what each of them does and their initial contents in the sections that follow.
CHAPTER 2 nGETTING STARTED
To edit a file in your project, simply double-click on its entry in the Solution Explorer window. You can also search for files by name in the Solution Explorer using the search bar just below the row of icons—this can be useful in large and complex projects. (The icons themselves allow you to navigate and configure the Solution Explorer).
n
Tip
Below the
Solution Explorer
window is the
Properties
window. This window is important in other
kinds of development projects, but it doesn’t have any value at all for JavaScript app development, and you can
safely close it to make more room for the
Solution Explorer
window, which is useful for large and complex
projects. You can reopen any window you have closed through the
View
menu (some less-used windows are
available through the
Other Windows
menu item).
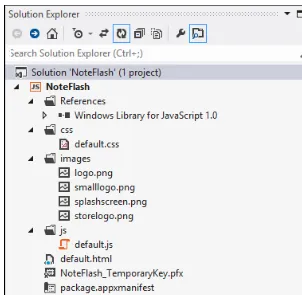
Exploring the Project References
The first entries shown in the Solution Explorer are the project references. There are six reference files, and you can see the fully expanded References item shown in the Solution Explorer in Figure 2-7.
The references consist of JavaScript and CSS files. This is an important point because it demonstrates how the support for web technologies in Windows 8 apps runs very deep—so much so that apps written with JavaScript and HTML are executed using Internet Explorer 10. The user isn’t aware that the browser is being used to run the app, but it is the engine that executes your app.
Understanding the CSS References
The CSS files in the References section contain the default styles used for JavaScript apps. There are two themes you can apply to your apps. The ui-dark.css file contains styles for an app that has light text on a dark background. The ui-light.css file contains styles for an app that has dark text on a light background. The dark theme is used by default by most of the Visual Studio editions and is selected in the default.html
file, which I’ll introduce shortly.
Most apps start with one of these themes and then override selected styles for customization or branding purposes, but you don’t have to use either file—you yourself can create all of the styles used in your app. Doing so is a lot of work, however, and by using one of the predefined themes as a starting point, you benefit from consistency with other Windows 8 apps and the default app look and feel.
Understanding the JavaScript References
The base.js and ui.js files contain part of the API for creating apps. They form the WinJS API, which contains objects and functions specific to JavaScript app development. There is also the Windows API, which contains objects and functions that are shared between all of the programming languages that can be used for app development.
The WinJS API contains a lot of useful functionality, which I explain and demonstrate in Parts 2 and 3 of this book. Since these are JavaScript files, you can open them, see their contents, set debugger
CHAPTER 2 nGETTING STARTED
breakpoints, and generally have a good look at how Microsoft has implemented different features. (The Windows API isn’t written in JavaScript and isn’t available in source code form.)
In rough terms, the ui.js file contains the code for the WinJS UI Controls, which are the topic of Part 3 of this book and which you use to create complex user interface controls from standard HTML elements, much as you would with a library like jQuery UI (albeit with UI controls that are specific to JavaScript app development). The base.js file contains objects you use to create the basic structure of your app. I introduce you to these objects in Part 2 of this book, as I cover topics such as navigation and data binding.
The other two files, base.strings.js and ui.strings.js, contain the text displayed to the user, localized for different languages and regions. You don’t need to deal with these files directly, since their contents are consumed automatically through the base.js and ui.js files.
Exploring the Default Files
Three default files are generated when you create a Visual Studio project using the Blank App template, and they form the basic structure and initial content of the app. These files are default.html (which is in the root folder of the project), default.css (which is in the css folder), and default.js (which is in the js
folder). These files also describe the basic organization of a JavaScript Windows 8 app project—HTML files in the root folder, CSS files in the css folder, and JavaScript files in the js folder. This structure is a
suggestion and is not enforced, and you are free to organize your files in any way you like—something you’ll see me do throughout this book to make example apps easier to follow. I’ll show you the initial contents of each of the files in the following sections and explain the key characteristics point out the chapter in which I go into detail later in the book. I am not going to modify these files in this chapter, but in Chapter 3, you’ll use them to build out your first real app.
n
Note
You can rename or replace these files, but I use them throughout this book for the example apps so you
know which files are created by Visual Studio and which files I have added.
Understanding the Default HTML File
The default.html file is loaded when the app is started and is responsible for importing the default.css
and default.js files, which is done using the standard HTML link and script elements. These elements are also used to import the References files, providing your app with access to the WinJS API and the light- or dark-theme CSS styles. You can see these elements in Listing 2-1, which shows the content of the
default.html file as it is generated by Visual Studio.
Listing 2-1. The initial contents of the default.html file as created by Visual Studio
<!DOCTYPE html> <html>
<head>
<meta charset="utf-8" /> <title>NoteFlash</title>
<!-- WinJS references -->
<link href="//Microsoft.WinJS.1.0/css/ui-dark.css" rel="stylesheet" /> <script src="//Microsoft.WinJS.1.0/js/base.js"></script>
<!-- NoteFlash references -->
<link href="/css/default.css" rel="stylesheet" /> <script src="/js/default.js"></script>
</head> <body>
<p>Content goes here</p> </body>
</html>
I have highlighted the elements that import the project and reference files. As you build out an app, you’ll want to create new JavaScript and CSS files, and you bring them into scope using the link and
script elements in just the same way you would in a web app. The files are loaded in the order in which they are specified, which means that you can’t call a function in a different JavaScript file unless the script
element for that file has already been processed, and styles defined in one CSS file can be overridden by styles in files that are subsequently imported. If you want to change the theme for your app, you change the first link element in the document so that it imports the ui-light.css file.
n
Tip
For most apps, the
default.html
file is usually a placeholder into which other content is imported, which
means that this file tends to remain quite short and simple. I’ll explain in Chapter 5 how content is imported and how
this approach fits into app development.
Understanding the Default CSS File
When it is first created, the default.css file contains some placeholders, which you can see in Listing 2-2. There aren’t actual styles defined in this file, but remember that the ui-dark.css or ui-dark.css file provides a lot of default styles. Even when you start to define custom styles for your app, you’ll find that you end up with less CSS than you would for a comparable web app, because the theme files cover the basics.
Listing 2-2. The initial content of the default.css file as created by Visual Studio
body { }
@media screen and (-ms-view-state: fullscreen-landscape) { }
@media screen and (-ms-view-state: filled) { }
@media screen and (-ms-view-state: snapped) { }
@media screen and (-ms-view-state: fullscreen-portrait) { }
CHAPTER 2 nGETTING STARTED
Understanding the Default JavaScript File
The default.js file brings life to an app, using the standard HTML DOM and the various app-specific APIs to manage the layout and integrate with Windows. The code that Visual Studio creates, shown in Listing 2-3, doesn’t do very much and, as I explain in Chapter 19, needs modifications to be truly useful. I’ll use a simplified version of this file for my example app projects until Chapter 19, at which point I’ll explain the life cycle of an app in detail and show you how to respond to system events sent by Windows in a useful and meaningful way.
Listing 2-3. The initial content of the default.js file as created by Visual Studio
// For an introduction to the Blank template, see the following documentation: // http://go.microsoft.com/fwlink/?LinkId=232509
(function () { "use strict";
WinJS.Binding.optimizeBindingReferences = true;
var app = WinJS.Application;
var activation = Windows.ApplicationModel.Activation;
app.onactivated = function (args) {
if (args.detail.kind === activation.ActivationKind.launch) { if (args.detail.previousExecutionState !==
app.oncheckpoint = function (args) {
// TODO: This application is about to be suspended. Save any state // that needs to persist across suspensions here. You might use the // WinJS.Application.sessionState object, which is automatically // saved and restored across suspension. If you need to complete an // asynchronous operation before your application is suspended, call // args.setPromise().
};
app.start(); })();
API, which you can use to locate HTML elements in your app markup and register event handlers, for example. You’ll see countless examples in the chapters that follow.
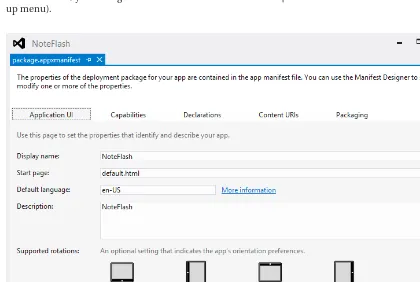
Understanding the Manifest
The last file of interest in the Solution Explorer is package.appxmanifest, which is the app’s manifest file. The manifest describes your app to the Windows Store and to Windows. Some of the information in the manifest provides basic information, such as the images that are used to display the app on the Start menu. I’ll show you these settings in Chapter 4.
Other information in the manifest is more complex. For example, you use the manifest to indicate the file system locations your app requires access to and which Windows services your app integrates with. Some of this information is used by Windows to activate and launch your app in response to user actions, and some is presented to the user in the Windows Store so he or she can assess the security risk your app poses. I explain the more complex settings throughout the book, but you can learn about the examples I give in Chapter 22 (where I show you how to declare the file system locations you want to use) and in Chapters 23-26, where I show you how to implement the Windows integration contracts.
The manifest is an XML file, but you don’t have to deal with the XML directly. If you double-click on the package.appxmanifest file, Visual Studio will open a visual editor that presents the manifest as a series of forms to fill in, organized by a series of tabs. You can see one of these tabs in Figure 2-8. (If you do want to see the XML, you can right-click on the file in the Solution Explorer and select View Code from the pop-up menu).
CHAPTER 2 nGETTING STARTED
n
Tip
There is one file shown by the
Solution Explorer
that I haven’t mentioned: the
NoteFlash_
TemporaryKey.pfx
file. This file contains a digital certificate used to automatically sign the app package during
development. You replace this file with a real certificate during the publishing process, which I describe in Part 5 of
this book.
The Visual Studio Tools
In this section, I’ll give a brief tour of the different parts of Visual Studio you will use to develop apps. I don’t go into detail, because Visual Studio is like any other IDE and you will have used a text editor and debugger countless times before. This section of the chapter shows you how to find the major IDE building blocks and points out the useful features that you may not have readily discovered on your own.
The Visual Studio Editor
You open the editor by double-clicking on a file in the Solution Explorer window. The editor does all of the things you would expect. The editor adapts to the file format so you can edit HTML, CSS, and JavaScript files seamlessly, and it does autocomplete for all three types. It color codes the syntax and it knows that you can embed CSS and JavaScript inside HTML files and responds accordingly. It is a very good programmer’s editor, and it does everything that every other programmer’s editor does.
You can configure how each language is handled in the editor by selecting Tools from the Visual Studio Options menu. Expand the Text Editor section and you will see a General item that applies to all languages and a set of per-language items. You can control color coding, indentation, autocomplete, and many other features to tailor the editor to your preferences.
One feature worth pointing out is the Visual Studio editor’s excellent text search capabilities. Typing
Control+F opens an in-editor search box you can use to locate items in the current file. Each editor window can be searched independently with its own search box or you can click the down arrow to expand the scope of a search. I use the search feature a lot and I miss it when I am using other IDEs or editors.
The JavaScript Console
The Visual Studio interface changes when you start the app. One of the changes is that the JavaScript Console window will appear. (If it isn’t visible or if you inadvertently close it, you can manually open this window from the Windows item on the Visual Studio Debug menu, but only while the app is running with the debugger.)
The JavaScript Console window is one of the most useful Visual Studio features for tracking down problems in your app and performs several different roles. If you make calls to the console.log method from your JavaScript code, the strings you specify will be displayed in the JavaScript Console window, just as you would expect.
You can also execute arbitrary JavaScript code and explore the variables and functions that your app defines. As a simple example, I am going to change the default.html file so that the p element has an id
attribute, as shown in Listing 2-4.
Listing 2-4. Adding an id attribute to the p element
<head>
<meta charset="utf-8" /> <title>NoteFlash</title>
<!-- WinJS references -->
<link href="//Microsoft.WinJS.1.0/css/ui-dark.css" rel="stylesheet" /> <script src="//Microsoft.WinJS.1.0/js/base.js"></script>
<script src="//Microsoft.WinJS.1.0/js/ui.js"></script>
<!-- NoteFlash references -->
<link href="/css/default.css" rel="stylesheet" /> <script src="/js/default.js"></script>
</head> <body>
<p id="paraElem">Content goes here</p>
</body> </html>
I have highlighted the element I modified. Start the app and find the JavaScript Console window and type the following into the text box at the bottom of the window:
paraElem.style.fontSize = "40pt"
If you hit return, you will see that what is displayed in the simulator window is resized to 40 points, as shown in Figure 2-9.
Figure 2-9. Using the JavaScript Console window to locate and configure an HTML element
There are a couple of key points to note in this simple example. The first is that the JavaScript Console provides you with access to the live state of your app. You can call any function, read or modify any variable, and change any style. The only limitation is that JavaScript variables and functions need to be part of the global namespace—a topic I return to in Chapter 3.
The second point is that Internet Explorer allows you to locate HTML elements by treating the value of their id attributes as global variables. This is not a standard feature, although some other browsers do similar things. I use this feature a lot in this book and it means that I don’t have to use the verbose DOM API (although to be clear, you can use the DOM API if you prefer, both in your app code and in the
JavaScript Console window). The paraElem variable returns the DOM object that represents the p element in the HTML document, and I am able to use the standard HTMLElement objects and properties to
CHAPTER 2 nGETTING STARTED
USinG BrowSer QUirkS in aPP DeveloPment
Being able to locate HTML elements by their
id
attribute values is very useful, but it is not a standard DOM
feature and so it is classified as a
browser quirk
. In web app development, you will have learned to avoid
browser quirks because you need to support a wide array of browsers and you don’t want to tie your app to
browser-specific features.
Things are different in the world of app development. The only browser that will be used to run a JavaScript
Windows 8 app is Internet Explorer, and installing a new browser, such as Chrome or Firefox, will have no
effect on Windows 8 apps.
This means that you can use Internet Explorer’s quirks without fear, although you may question whether
doing so is good practice. I have gone back and forth on this issue for some months. Initially I stuck to the
standard DOM API, even though I find it verbose and annoying. I made life easier for myself by using the
WinJS.Utilities
feature, which is like a simplified version of jQuery. (You can use jQuery in app projects,
but I don’t in this book—and I must admit, I don’t tend to use it in my Windows 8 app projects in general.
There just isn’t much of a need, even though I am a huge jQuery fan—see my Pro jQuery book, published by
Apress, if you have any doubts about my jQuery fan-boy status.)
In the end, though, I decided I was missing an important point: Windows 8 app development
isn’t
web app
development, even though it shares common roots and technologies. I was avoiding the convenient and
time-saving quirks out of habit, rather than because they cause problems. In fact, some quirks help avoid
problems—for example, I find locating elements using global variables to be less error-prone than using the
DOM API.
You are free to choose whichever approach suits you best—but I suggest that you examine your decision to
make sure you are not being needlessly dogmatic, as I was when I began Windows 8 app development.
Throughout this book, I locate elements by their global properties—with two exceptions. I use the DOM API
when I want to make it very clear that I am locating an HTML element in an example, and I use the
jQuery-like
WinJS.Utilities
feature (which I introduce in Chapter 3 and describe fully in Chapter 18) when I
want to select multiple elements with a CSS selector so I can perform an operation on all of them in a single
step.
The DOM Explorer
One of the other windows that appear when you start the app is the DOM Explorer. This allows you to explore the HTML structure of the app, look at the box layout properties of individual elements, and trace how CSS precedence rules have been applied to determine style for elements. The DOM Explorer window appears as a tab in the editor area of Visual Studio. I find myself inadvertently closing the DOM Explorer
window quite often—if you do the same, you can reopen it from the Windows item of the Visual Studio
Debug menu.
The feature I find most useful is being able to locate an element in the HTML document by clicking on it in the app. This is something that is pretty standard in web app development tools, and it is nice to be able to use in app development as well. At the top of the DOM Explorer window is the Select Element
Click this button and switch to the simulator window. You will see elements highlighted as you move over them, and their details are displayed in the DOM Explorer window. Click on the element you are interested in and use the DOM Explorer to see all of its characteristics, layout details, and CSS styles.
The Debugger
Visual Studio contains my favorite debugger. I find it faster and more reliable than any other debugger I have used, and I like the way it integrates so nicely into the rest of Visual Studio. I am not going to give you a detailed tutorial on debugging, because you already know how to use a debugger from your web app projects, but in the sections that follow I’ll show you the useful additions Visual Studio provides.
Setting Breakpoints in Your Own Code
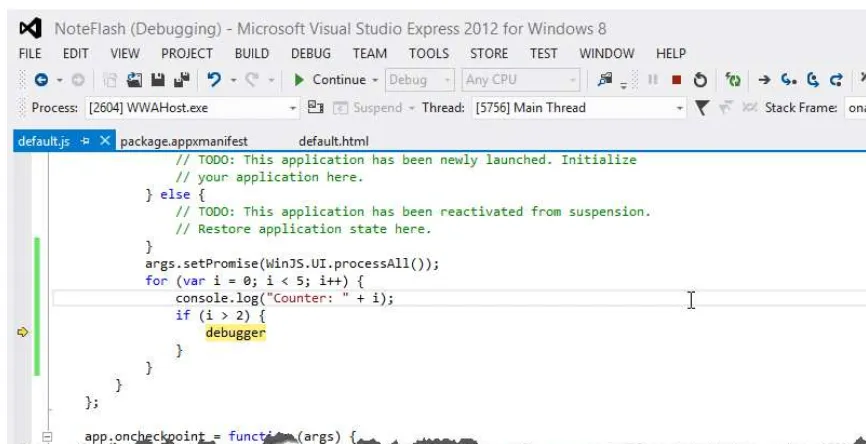
If you want to set a breakpoint in code that you can modify (as opposed to one of the Microsoft JavaScript files), the simplest way is to use the JavaScript debugger keyword, as shown in Listing 2-5, where I have added this kind of breakpoint to the default.js file.
Listing 2-5. Using the debugger keyword to create a breakpoint
// For an introduction to the Blank template, see the following documentation: // http://go.microsoft.com/fwlink/?LinkId=232509
(function () { "use strict";
WinJS.Binding.optimizeBindingReferences = true;
var app = WinJS.Application;
var activation = Windows.ApplicationModel.Activation;
app.onactivated = function (args) {
if (args.detail.kind === activation.ActivationKind.launch) { if (args.detail.previousExecutionState !==
CHAPTER 2 nGETTING STARTED
activation.ApplicationExecutionState.terminated) {
// TODO: This application has been newly launched. Initialize // your application here.
} else {
// TODO: This application has been reactivated from suspension. // Restore application state here.
}
args.setPromise(WinJS.UI.processAll());
for (var i = 0; i < 5; i++) { console.log("Counter: " + i); if (i > 2) {
debugger }
}
} };
app.oncheckpoint = function (args) {
// TODO: This application is about to be suspended. Save any state // that needs to persist across suspensions here. You might use the // WinJS.Application.sessionState object, which is automatically // saved and restored across suspension. If you need to complete an // asynchronous operation before your application is suspended, call // args.setPromise().
};
app.start(); })();
I have added a simple for loop to the file so that in a moment I can demonstrate another feature. When the value of the counter is greater than 2, the breakpoint is triggered and control of the app
You control the execution of the debugger using the standard Step Into, Step Over, and Step Out
commands. Visual Studio makes these available as buttons on the toolbar and as items in the Debug menu. You can resume normal execution of the app by typing F5 or by clicking the Continue button on the toolbar.
Setting Breakpoints in Other Code
Using the debugger keyword requires that you be able to modify the file, which isn’t the case with the JavaScript files displayed in the References section of the Solution Explorer window. For this kind of file, you have to use the Visual Studio support for breakpoints. You create a breakpoint by right-clicking the statement where you want the debugger to break and selecting Insert Breakpoint from the Breakpoint
menu on the pop-up. The breakpoint is shown as a red circle in the margin of the file. Right-click on the statement and select Delete Breakpoint from the Breakpoint menu when you want to remove the breakpoint.
The Visual Studio breakpoints are pretty sophisticated and you can create conditional breakpoints that are triggered only in certain situations. As good as this feature can be, I find myself using the debugger
keyword whenever possible and relying on the Visual Studio breakpoints when I am trying to figure out how Microsoft has implemented a feature in the base.js or ui.js files.
Monitoring a Variable
The reason I put the for loop into the code in Listing 2-5 is to demonstrate the way in which Visual Studio lets you see how variables change—a feature that works in exactly the same way when you use the
debugger keyword or the Visual Studio breakpoints.
Start the app and when the debugger takes control, hover your mouse over the variable i in the source code. You will see the current value displayed. To the right of the value is a small pushpin icon—click this
CHAPTER 2 nGETTING STARTED
and Visual Studio will create a small window that displays the current value. Type F5 to resume execution and wait until the next loop iteration triggers the debugger again. You’ll see that the value window is updated to show you the current value of the variable, as illustrated by Figure 2-12.
Figure 2-12. Monitoring the value of a variable using Visual Studio
If you click on the value in the window, a text box will appear that will let you change the value assigned to the variable. When you type F5 to resume execution, the new value will be used.
Using the JavaScript Console
The JavaScript Console window is also very useful when debugging. While the execution of the app is halted, the scope for the JavaScript Console is the context of the breakpoint. This means that you can refer to variables and call functions that are defined locally and not just globally. As an example, start the app, wait for the debugger to take control, and type the letter i into the text box at the bottom of the
JavaScript Console window and press Enter. You’ll see the current value displayed. If you assign a value to the variable using the console (e.g., entering i = 5 and pressing Enter), your value will be used when the execution of the app is resumed.
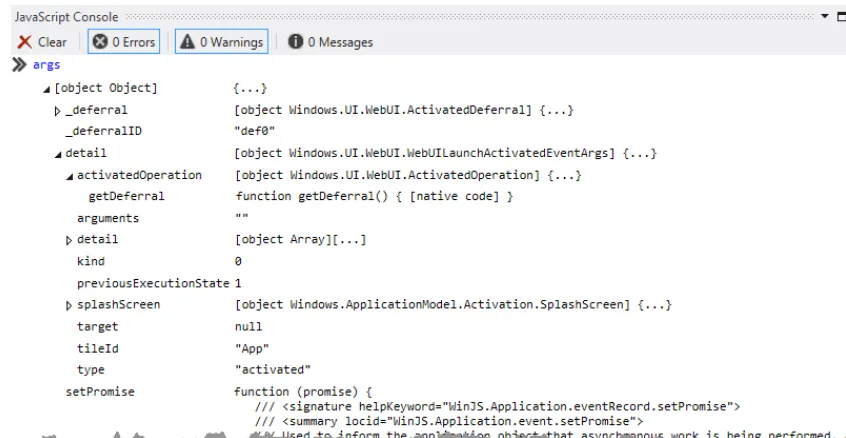
The JavaScript Console can also be used to explore complex objects. As an example, type args into the textbox and press Enter. Click on the arrow to the left of the response and you will see the properties and functions defined by the args object, which is passed to the function in which I placed the debugger
I use this feature a lot. It doesn’t allow you to modify values by clicking on them, but you can enter in JavaScript statements that assign new values to the object or its properties—and you can execute its functions as well.
Summary
In this chapter, I created an initial Visual Studio project and used it to show you the structure of an app under development, highlighting the references to the Microsoft libraries and the default HTML, JavaScript, and CSS files. I also gave you a very quick tour of the key Visual Studio features you will use in app development. Visual Studio is a big and complex tool, but the parts I showed you will put you in good standing as you begin Windows 8 app development. In the next chapter, I build on the project I created to demonstrate how far you can get in app development with your existing web app development skills and knowledge.
n n n
chaPter 3
Your First Windows 8 App
In this chapter, I will start to build a real app using JavaScript and HTML. This isn’t an especially complex app, but it demonstrates a lot of the basic techniques you need to understand and it sets the foundation for later chapters.
The example app is called NoteFlash, which I built for my own use. I recently started learning to play the piano, and part of that process is learning to read music. I had been struggling to recognize notes by their positions, so I created a small app that works like a deck of flash cards. It has worked pretty well—I go through the notes a couple times a day and I am starting to get better at sight-reading music. (If only there were a software-based technique I could use to improve my actual playing, I’d be aces all the way to Carnegie Hall.)
Aside from giving you an introduction into the world of Windows 8, the NoteFlash app will
demonstrate just how much of your existing HTML and JavaScript knowledge is useful in Windows 8. I’ll teach you skills and techniques that are specific to Windows 8 apps, of course, but as you go through the process for creating the NoteFlash app, you will see just how much in common a basic Windows app has with a basic web app.
In this chapter, I’ll build out the basic functionality of the app and then I’ll add some polish and introduce some additional features in Chapter 4. Along the way, I’ll also use some app-specific features, which I return to in depth later in the book.
Understanding the App Structure
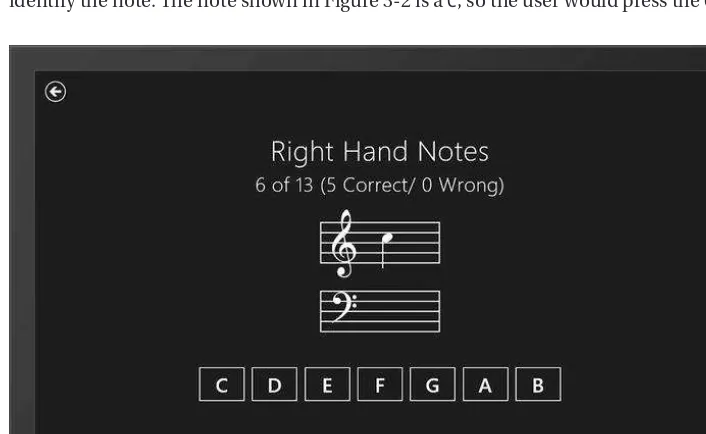
The user clicks on one of the three buttons shown in the figure, causing the second page to be shown, which you can see in Figure 3-2. Each note is presented on its stave and the user presses a button to identify the note. The note shown in Figure 3-2 is a C, so the user would press the C button, for example.
Figure 3-1. The note selection page
CHAPTER 3 nYOUR FIRST WINDOWS 8 APP
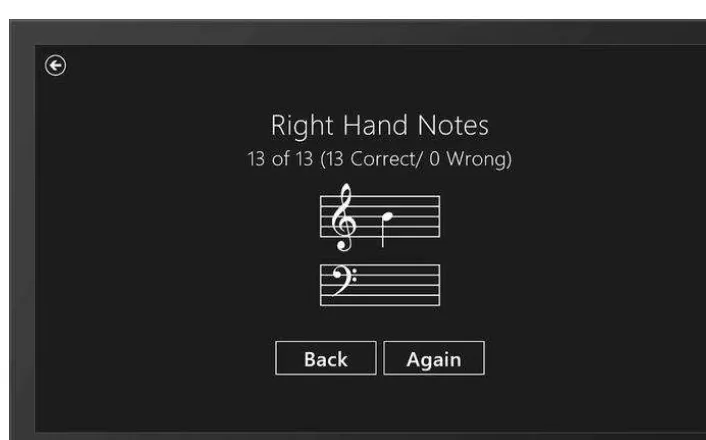
The page layout changes when the user has been presented with all of the notes. The note-name buttons are replaced with a couple of navigation buttons, as shown in Figure 3-3. The Again button tests the user on the same note selection, and the Back button returns to the selection page.
Figure 3-3. Presenting the user with navigation controls
As I said, this is a simple app. In the following sections, I’ll walk you through the process I used to create it. Along the way, I’ll introduce some key Windows 8 concepts, such as navigation, exception handling, and data binding. I’ll show you how to complete the app in Chapter 4.
Revisiting the Example App Project
The Visual Studio project I will use is the one I created in Chapter 2. This project was generated from the
Blank App template using the project name of NoteFlash and contains only the default HTML, JavaScript, and CSS files that Visual Studio adds by default. I made two modifications in this project: I added an id attribute to an HTML element in the default.html file and a for loop and the debugger keyword in the
default.js file. I’ll change the contents of both files shortly, replacing these additions.
Creating the Navigation Infrastructure
As you can see from the figures showing the finished product, the NoteFlash app has several distinct pages of content to display to the user. Most Windows apps rely on a single-page navigation model, similar to the approach many web apps take.