W
ARFARE
IN
THE
Brian Todd Carey
Joshua B. Allfree
Tactical Map Illustrator
John Cairns
First published in Great Britain in 2006 by Pen & Sword Military Digital Edition by Pen & Sword Digital 2011
Copyright © Brian Todd Carey, Joshua B. Allfree and John Cairns, 2006, 2011 ISBN 978 184884 632 6
The right of Brian Todd Carey, Joshua B. Allfree and John Cairns to be identified as Authors of the Work has been asserted by them in accordance with the Copyright, Designs and Patents Act 1988. A CIP catalogue record for this book is available from the British Library
All rights reserved. No part of this book may be reproduced or transmitted in any form or by any means, electronic or mechanical including photocopying, recording or by any information storage and retrieval system, without permission from the Publisher in writing.
Pen & Sword Books Ltd incorporates the Imprints of Pen & Sword Aviation, Pen & Sword Maritime, Pen & Sword Military, Wharncliffe Local History, Pen & Sword Select, Pen and Sword Military Classics and Leo Cooper.
For a complete list of Pen & Sword titles, please contact Pen & Sword Books Limited
47 Church Street, Barnsley, South Yorkshire, S70 2AS, England E-mail: [email protected]
P
REFACE
AND
A
CKNOWLEDGMENTS
Researching, writing and illustrating this book was a seven-year odyssey. The idea of writing a two-volume survey of warfare in western civilization – Warfare in the Ancient World and Warfare in the Medieval World – came to me while doing a book-search for two undergraduate courses at the American Military University. Unable to find a suitable text, I decided to write my own. I soon recognized that my narrative required a visual component, and computer-generated maps were not my forte. Luckily for me, I was exposed to some wonderful maps generated by two of my best and brightest students. US Army Master Sergeant Joshua Allfree joined me as tactical illustrator early on and his abilities as both cartographer and military historian were invaluable. Later on we were joined by John Cairns, a physics major and professional cartographer, who was taking my one-hundred level western civilization course at Front Range Community College-Larimer Campus. His computer-generated maps of the Persian Empire, Hellenic Greece, and Imperial Rome knocked my socks off and he graciously agreed to assist Josh and me in this undertaking. Both of these gentlemen believed in my vision and this project years before a publisher was found. For that I will be forever grateful.
We could not have completed the project without the collaboration and support from a few notable people. We would first and foremost like to thank Pen and Sword Books, especially our managing editor Rupert Harding and our copy-editor Merle Read. Without their generous support and guidance this endeavour would simply have been impossible. Colorado State University history professors Rosenberg, Jordan, Long and Knight each saw and commented on an early draft and their comments were greatly appreciated, as were the comments of Ken Danielson. Peter Glatz assisted with proofing the regional maps in a production environment, while Paul Wessel at the University of Hawaii and Walter H.F. Smith at NOAA provided the GMT mapping system. We would also like to thank Jona Lendering from http://www.livius.org for his assistance with plates. Finally, no labour of love is ever possible without the unwavering support from our family and friends. We robbed them of hours and hours of our time, and now they can see what it was all about.
I
NTRODUCTION
Military equipment and tactical organization in pre-modern western civilization underwent fundamental changes between the rise of civilization in Mesopotamia in the late fourth millennium bce and the revival of Europe in the seventeenth century of the Common Era. During this four and a half millennium span, the art of warfare reached a sophisticated level, with commanders fully realizing the tactical capabilities of shock and missile combat in large battlefield situations, situations where perhaps 150,000 men took the field at the same time along a narrow front. On a battlefield where the force-to-space ratio was so high, the ability to orchestrate tens of thousands of infantry and cavalry became necessary for ultimate victory. Modern principles of war, such as the primacy of the offensive, mass and economy of force, were understood by ancient, classical, medieval and early modern generals, and applied on battlefields throughout the period under study.
Warfare in the Medieval World is the second volume of a two-volume study. It covers the development of warfare from the rise of Byzantium in the early medieval period through to the Thirty Years War (c.500–1648 ce), following volume 1, Warfare in the Ancient World , which surveyed the evolution of warfare on the battlefields of the Near East and Europe between the beginning of the Bronze Age and the fall of the Western Roman Empire (c.3000 bce – c.500 ce). Through an exploration of fifty-four select battlefield engagements (thirty-three battles in volume two and twenty-one battles in volume twenty-one), it is this author’s intention to survey the changing tactical relationships between the four weapon systems – heavy and light infantry, and heavy and light cavalry – focusing on how shock and missile combat evolved on the battlefields of the Near East and Europe.
Overview of
Warfare in the Medieval World
In eastern Europe the torch of Roman imperialism was passed to Constantinople for another thousand years. The Byzantine Empire (337–1453) enjoyed its greatest territorial expansion in the century after the fall of the Western Roman Empire. Emperor Justinian shored up the eastern frontiers and briefly won back Italy and parts of north Africa and Spain, but, after his death in 565, later emperors would lose these lands to the expansion of Islam in the seventh century. Faced with a mounted and highly mobile foe, Byzantine emperors increased the percentage of cavalry to infantry in their armies, then fused heavy and light cavalry into one system by giving bows to some of their heavily armoured shock cavalry. In Byzantine warfare exclusive cavalry engagements often took place (Dara, Tricameron,
Manzikert) while combined arms also continued at a high level, with light infantry taking an important place beside cavalry in military operations, as seen at Taginae and Casilinum.
But centuries of defensive action against assaults from the Bulgars, Muslims and western Europeans took their toll, forcing the Byzantine emperors to rely increasingly on mercenaries. By the eleventh century Byzantium faced a new and dangerous threat from the east, the Seljuk Turks, who fought from horseback as lancers and archers. The Byzantine loss at the battle of Manzikert in 1071 robbed the Eastern Roman Empire of its prime conscription lands and precipitated a call for help to the west. In 1095 the First Crusade was born.
consolidated politically, with the Franks in Gaul emerging as the most powerful new kingdom in western Europe. Frankish rulers faced new threats as Muslim raiders crossed the Pyrenees and pillaged France. One such Muslim expeditionary force was soundly defeated in 732 at Tours by Charles Martel, laying the foundations for the Carolingian dynasty that would produce Charlemagne, the first holy Roman emperor in the West.
But at Charlemagne’s death in 814, Europe was besieged by a new wave of invasions that lasted over 200 years. Muslim, Magyar and Viking raiders and invaders struck the whole of Christian Europe. From their bases in north Africa, the Muslims attacked the southern coastline of Europe, while Magyar horsemen swept in from the east and settled in what is now Hungary, raiding deep into central and western Europe until their defeat in 955 at the hands of the German king Otto I at
Lechfeld. Of these new invasions, the Viking attacks were the most devastating and widespread. Masters of ship-to-ship battles such as the battle of Nisa, these fierce Scandinavian warriors rowed up the rivers and estuaries of Europe in their longships, raiding and then invading territories as far west as Ireland and as far east as Russia, creating cultural and martial synthesis along the way.
In response to this ‘Second Age of Invasions’, western European monarchies developed an art of war unique in world history in its reliance on heavy cavalry as the dominant weapon system. Needing the kind of strategic mobility only cavalry could provide, western European commanders initiated a gradual transformation in the composition of medieval armies. Consequently, heavy cavalry replaced infantry as the decisive arm. The mounted knight and lancer, with his stabilizing stirrup, expensive panoply and well-trained horse, gradually became the centrepiece of a combined-arms army where all other weapon systems were subordinated to heavy cavalry.
The decentralization of political authority in western Europe also had a profound effect on the character of medieval warfare. Insufficient resources meant large-scale battles such as those seen in the classical period did not take place, and when battle was joined, the participating armies rarely included more than a few thousand men. In these limited wars of attrition, battle was often avoided because the outcome was too unpredictable. Instead, medieval warfare revolved around the construction and control of castles and fortified towns or the destruction of the enemy’s economic resources. In fact, during this ‘Age of Castles’, warfare consisted of perhaps 1 per cent battles and 99 per cent sieges.
The Normans mastered this strategy of combining castle building and pitched battles in campaigns in Italy and England. In Italy, Duke Robert Guiscard of Apulia and his successors carved out a Norman state in southern Italy and Sicily, then set their sights on expanding, at the expense of Byzantium, in Albania. At Durazzo, Guiscard defeated an impressive Byzantine infantry host with his heavy cavalry supported by light infantry. In England in 1066, the Anglo-Saxon king Harold Godwinson successfully defeated the Norwegian king Harald Hardrada at Stamford Bridge, but proved unable to master William, duke of Normandy, at Hastings. The duke used these same sophisticated combined-arms tactics to secure the throne as William I. William’s victory initiated an Anglo-Norman dynasty and hundreds of years of soured Anglo-French relations. His successors would add to his conquests, bringing Wales under English hegemony and making war with Ireland and Scotland.
French victory over an English-sponsored imperialist army at the battle of Bouvines in 1214. But the tactical realities faced by the mounted aristocracy in the Near East and the British Isles showed the weaknesses of heavy cavalry. In the Holy Land, Latin knights faced a sophisticated Islamic combined-arms system and learned first-hand at Dorylaeum, Hattin and Arsuf the dangers in confronting composite-bow-wielding infantry and horse archers in open terrain. Similar lessons were learned in the Reconquista in Spain at the battles of Sagrajas in 1086 and Las Navas de Tolosa in 1212.
As western European crusaders were learning new tactical lessons in the Levant, eastern and central Europe was brutally attacked by the most successful wave of steppe warriors, the Mongols. Under the charismatic leadership of Genghis Khan, Mongol light and heavy cavalry swept out of Central Asia and conquered northern China and the Khwarizmian Empire in Transoxiana. After Genghis Khan’s death in 1227, his successors continued his conquests westward, pushing first into Russia, destroying the Kievan kingdom, and then into Poland and Hungary. The Mongols, who relied exclusively on cavalry, perfected shock and missile combat from horseback and vanquished numerically larger Christian armies at Liegnitz and Sajo River. European heavy cavalry tactics, always confrontational, fell prey to the traditional steppe-warrior game of luring an attacker with a retreat. Islamic armies suffered similar fates. But the Mamluks in Egypt fought fire with fire, using their own heavy and light cavalry arms to finally blunt Mongol westward expansion at Ain Jalut in 1260.
In the late Middle Ages (c.1300–c.1500) the 300-year domination of the mounted knight was challenged by the return of a more balanced combined-arms tactical mix, one which featured light infantry archers and heavy infantry battle squares against heavy cavalry. The Anglo-Norman campaigns against the Welsh, and later against the Scottish, showed the potential of light infantry archers against enemy infantry formations, and, more ominously, against heavy cavalry. King Edward I’s victory at Falkirk was similar to the earlier battles of Hastings and Durazzo, where heavy cavalry and archers worked together against dense heavy-infantry positions. But the unusual aspect of the battle of Falkirk is in the steadfastness of the Scottish infantry formations, a harbinger of things to come. One example of heavy infantry’s ability to meet and defeat enemy heavy cavalry and light infantry attacks can be seen in the later campaigns of the Anglo-Scottish Wars, most notably the Scottish victory over the English at Bannockburn in 1314.
Nineteen years later, the roles were reversed. The victory of the English monarch Edward III against the Scots at Halidon Hill in 1333 introduced the English defensive tactical system to medieval warfare, a system that relied heavily on infantry. Later English monarchs would perfect this tactical system in the Hundred Years War (1337–1453) and help break the back of the dominance of heavy cavalry. On the continent, two English kings, Edward III and Henry V, were victorious against the French during this war, utilizing light infantry archers and dismounted heavy cavalry in a defensive posture against the repeated charges of French lancers, with great success at Crécy in 1346 and Agincourt in 1415.
Meanwhile, in the Swiss Alps, farmer-militiamen were training with specially designed polearms to fight in close order against Habsburg and Burgundian heavy cavalry, winning a string of decisive victories in the fourteenth and fifteenth centuries at Morgarten, Laupen, Sempach, Murten
modern period (c.1500–c.1750), the four weapon systems were operating together again in a new combined-arms synthesis.
The addition of well-articulated heavy infantry, based on the Swiss model, to the armies of France, Germany and Italy in the sixteenth century marks the return of a balanced combined-arms tactical system to western Europe. But the integration of this superior heavy infantry into European doctrine coincided with the introduction of reliable hand-held gunpowder technologies. The sixteenth century witnessed the gradual replacement of longbows and crossbows with the muzzle-loading arquebus and musket. Although archers gave way to musketeers, pikemen persisted as a tactical entity until the invention of the ring bayonet in the eighteenth century fused heavy and light infantry together, eliminating the need for the defensive characteristics of the pike.
The interest in all things classical that was the hallmark of the Italian and northern European Renaissance spilled over to warfare as a renaissance in tactical doctrine took place. Commanders in the early modern period reread the classical texts and recognized the value of a balanced combined-arms tactical system, one that incorporated the new technology of gunpowder within a well-disciplined and professional rank and file. In the sixteenth century’s Italian Wars (1494–1559), France fought against the imperialist powers of Spain and the Holy Roman Empire for mastery of the Italian peninsula, and in the process, all parties experimented with the ratio of musketeers and arquebusiers to pikemen. This experimentation led to an imperialist victory at the battle of Pavia
against the French in 1525 and the gradual adoption of the Spanish tercio, which combined shock and missile units in the same formation. Tactically, Pavia showed the prowess of heavy infantry pikemen and light infantry arquebusiers working together in the open field against enemy cavalry and battle squares. In this engagement, artillery played little part. So one-sided was the battle of Pavia that the decisive engagement all but disappeared from European warfare for more than 100 years.
Wanting to maximize ‘shot over shock’, Prince Maurice of Nassau in the late sixteenth and Swedish king Gustavus Adolphus in the early seventeenth century explored the Roman art of war and experimented with linear formations, winning victories against the imperialists in the Thirty Years War (1618–1648) at Breitenfeld and Lützen. Consequently, new model armies emerged with the position of light infantry gunners ascending as the proportion of light infantry rose at the expense of heavy infantry, anticipating the role of firearms in modern warfare. With the addition of gunners to the tactical mix, a new age of warfare was dawning, one that drew on the contributions of the forty-eight centuries of western warfare under survey in these volumes.
Relevance of the Combined-Arms Tactical System
The history of combined-arms tactical systems in the western world witnessed a watershed event in the fourth century bce. Warfare before the conquest of Persia by King Alexander III of Macedon was characterized by the limited use of combined-arms forces. Bronze Age armies in Mesopotamia and Egypt and the early Iron Age empires of Assyria and Persia did utilize limited co-operation between farmer-militia infantry forces and their chariot-borne aristocratic masters. But for the most part, Near Eastern infantry levies were not trained to fully participate in effective offensive action against enemy chariots, and later, against cavalry. Their role remained primarily defensive on the battlefield.
cavalry of Asia to the heavy infantry of Europe, creating a new combined-arms synthesis. The conquest of the Greek city-states by Philip II of Macedon in the fourth century bce fused the conqueror’s strong tradition of heavy cavalry with the Greek world’s new tradition of limited combined-arms co-operation. The Macedonian king Alexander the Great’s victories at Granicus River (334 bce), Issus (333 bce) and Gaugamela (331 bce) represent a high point in pre-modern western warfare with the Macedonians fielding heavy and light infantry and heavy and light cavalry in a fully integrated and balanced combined-arms army.
Tactically, utilizing a combined-arms system meant bringing to the battlefield the capabilities of both shock and missile combat. In the periods under study, this meant the ability to kill in close proximity in hand-to-hand engagements using hand-held weapons (shock) or at a distance using slings, javelins, spears, bows and, later, handguns (missile). Modern military historians describe tactical systems with shock capabilities as heavy, while tactical systems that utilize missiles are described as light. Heavy weapon systems, both infantry and cavalry, are considered heavy because of their protective factor. Because they wore more armour, heavy infantry and heavy cavalry were better able to perform their shock role as well as being better protected against lance and arrow, even though this added protection sacrificed tactical mobility. Heavy weapon systems relied on collective effort to be effective, and collective effort required discipline and training. The degree of discipline and training determined the offensive capability or articulation of the units in combat.
Articulated tactical formations such as the Greek and Macedonian phalanx were capable of some offensive tactical mobility, keeping close order during an offensive march and then striking in a frontal attack. But the classical phalanx was not capable of attacking in all directions, nor could it protect its own flank and rear. Well-articulated tactical formations such as the Roman legion, medieval heavy cavalry bataille and Swiss battle square were capable of great tactical flexibility and responsiveness, wheeling and attacking or defending in many directions. Less articulated or unarticulated formations such as the Persian sparabara, Germanic hundred or Scottish schiltron, because of their lack of drill and discipline, performed poorly in offensive shock action, preferring to remain on the defensive in static formations. Hand-to-hand shock combat rarely lasted very long because of the enormous physical and emotional strain on combatants. Most engagements lasted only a few minutes, with total exhaustion setting in after only fifteen or twenty minutes of uninterrupted combat. If a battle lasted an afternoon or longer, then multiple engagements took place, compounding the emotional and physical strain of the event on the combatants.
Light infantry and light cavalry weapon systems relied on a missile weapon system that dealt out death at a distance. These lighter units were less armoured than their heavier counterparts, and consequently had greater tactical mobility. Archers and javelineers, whether mounted or not, did not have to fight in close order to be effective: instead they usually fought in open formation where they could best use their mobility. Because of this tactical mobility, light units were often used by ancient, classical, medieval and early modern commanders in guerrilla roles and as physical probes (skirmishers) against their less mobile but better protected heavy counterparts. But this mobility did little to protect them when shock combat ensued. Unable to withstand hand-to-hand combat with enemy infantry and mounted shock troops, these light units often retired through the ranks of their heavier companions to act as flank and rear protection during the engagement.
the weapon systems present and co-operating in a combined-arms synthesis, a general of the calibre of Alexander the Great, Hannibal Barca, William the Bastard, Batu Khan or Gustavus Adolphus proved irresistible on the battlefield.
Still, it should be remembered that the mere presence of a combined-arms army under the command of a general who had showed brilliance on the battlefield in the past did not guarantee victory. History is replete with examples of outstanding commanders who fell victim to what the Prussian military theorist Carl von Clausewitz called ‘friction’ in his seminal work On War, published in 1832. Although Clausewitz was a student of Napoleon and his campaigns, his appraisal of what has been called the ‘fog of war’ holds true in any era. Friction refers to the accidents, uncertainties, errors, technical difficulties or unknown factors on the battlefield, and to their effect on decisions, morale and actions in warfare. To Clausewitz, ‘Action in war is like movement in a resistant element. Just as the simplest and most natural of movements, walking, cannot easily be performed in water, so in war it is difficult from normal efforts to achieve even moderate results.’ Friction, Clausewitz tells us, ‘is the force that makes the apparently easy so difficult’.
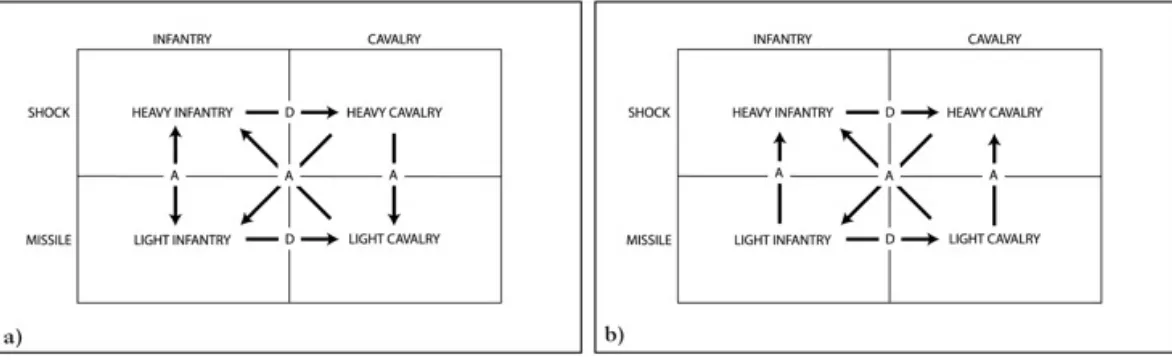
Figure 1. The Four Weapon Systems. (a) Ancient Weapon Systems. An illustration of general rules of dominance in conflicts between different ancient weapon systems: (1) heavy infantry is generally dominant when defending against heavy cavalry; (2) heavy cavalry is generally dominant when attacking light infantry or light cavalry; (3) light infantry is
generally dominant when defending against light cavalry; and (4) light cavalry is generally dominant when attacking heavy infantry. Dominance between heavy and light infantry varies according to the period and unit type involved in the
action. Based on Archer Jones, The Art of War in the Western World (Urbana and Chicago: University of Illinois Press, 1987), schematic 1.2. (b) Medieval Weapon Systems. An illustration of general rules of dominance in conflicts between different medieval weapon systems: (1) heavy infantry is generally dominant when defending against heavy cavalry; (2) heavy cavalry is generally dominant when attacking light infantry; (3) light infantry is generally dominant when defending
against light cavalry or attacking heavy infantry; and (4) light cavalry is generally dominant when attacking heavy infantry or heavy cavalry. Based on Archer Jones, The Art of War in the Western World (Urbana and Chicago: University
of Illinois Press, 1987), schematic 2.1.
some societies, the culture itself’. And in the period under study here, a period without the Geneva Conventions and formal rules of war, the distinction between how ‘civilized’ and ‘barbarian’ peoples fought was often blurred, with all sides routinely killing or maiming combatants and non-combatants alike, and enslaving or ethnically cleansing entire populations.
CHAPTER 1
T
HE
E
ARLY
M
IDDLE
A
GES:
T
HE
R
ISE
OF
C
AVALRY
IN
E
ASTERN
E
UROPE:
B
YZANTIUM
AT
W
AR
Rome’s Second Millennium: The Early Byzantine Army
Although the Western Roman Empire officially ended with the deposition of Romulus Augustulus in 476, the Eastern Roman or Byzantine Empire (337–1453) lasted a millennium longer. The Byzantines, who called themselves Rhomaioi (Greek for ‘Romans’), continued to be associated with the achievements of the Roman Empire, even though their capital was Constantinople and their court language was Greek. During this millennium, the Eastern Roman Empire faced numerous challenges from barbarian invasion and Islamic expansion, yet the Byzantine Empire was almost always ready to fight, and often for its very existence. The long Byzantine survival was due in part to the remarkable performance of a balanced combined-arms army.
The composition of the Byzantine army differed from that of its Roman predecessor in that cavalry, rather than infantry, would take a dominant position. This switch in emphasis probably arose as a result of prolonged martial contacts with the Near East. The most formidable threat to the eastern part of the Byzantine Empire came from the successors of the Parthians, the Sassanid Persians, who fought, like their forerunners, almost exclusively with light and heavy cavalry. The fate of the triumvir Marcus Licinius Crassus (c.112–53 bce) at Carrhae in 53 bce dramatically demonstrated the inadequacy of the Roman infantry-based tactical system for dealing with Parthian cavalry on its own terrain. For this reason, some Byzantine heavy cavalry, called clibanarii o r cataphracts, carried bows. Introduced in the second century by the Roman emperor Trajan (r. 98–117) and widely used in the east in the last years of the Roman Empire, the cataphract functioned as a heavily armoured lancer or as a mounted archer, fusing heavy and light cavalry into one weapon system. With the adoption of the stirrup some time in the late sixth century, the cataphract became for the first time a true lancer because he could now use the synergy of the horse and rider and aim through his target, instead of jabbing down or loosening his spear with every pass as classical heavy cavalry had done for centuries.
Second to cavalry in importance in Byzantine warfare was light infantry. Byzantine light infantry wore very little body armour and carried a composite bow with a quiver of forty arrows, a small shield and an axe for close combat. Infantry not skilled with the bow carried javelins. Warfare against mounted archers in the east illustrated the effectiveness of these foot bowmen over enemy horse archers because light infantry fired bows with a greater range from a more stable platform, the ground.
formation before following up, or in the centre with cavalry on the wings.
By the early sixth century the Byzantine army’s combat readiness had decayed significantly. The
palatini, comitatenses and limitanei were replaced by a new army organization comprising three categories of troops, the numeri, foederati and bucellarii. The numeri were the regular troops of the empire, consisting of both infantry and cavalry units, though their combat capabilities had severely eroded in the previous two centuries. The foederati were now a purely mercenary force made up of barbarian units, most notably the Huns. The bucellarii were armed retainers of Byzantine nobles who took an additional oath of fealty to the Byzantine emperor.
Cavalry versus Cavalry: The Battles of Dara and Tricameron
The height of Byzantine power and territorial expansion took place only a century after the fall of the Western Roman Empire during the reign of Justinian (r. 527–565). Justinian ordered Byzantine armies to beat off Persian attacks on the eastern frontiers of the empire while also regaining parts of Italy from the Ostrogoths and north Africa from the Vandals, briefly restoring a Greco-Roman empire in the Mediterranean basin (Map 1.1). Trained as a soldier, Justinian never took command in the field once he assumed the throne; instead he relied on the battlefield genius of his generals Belisarius and Narses to fulfil his territorial aspirations.
Map 1. The Conquests of Justinian.
When Belisarius arrived, he arrayed most of his heavy infantry behind a bridged trench just outside the walls of the city, with a screen of light infantry staff-slingers and archers supported by Hunnic horse in front of the earthworks. He then divided his Greek and allied heavy cavalry equally and placed them on the wings, ordering half of the horses to be barded and the other half not. Belisarius probably had the forward cavalry mounts armoured so that they could receive the enemy’s attack, and kept the rear horses unencumbered so that they might pursue the enemy more easily if given the chance. The right wing was commanded by Count John of Armenia, a man of considerable talent whose resolve would be instrumental in many of the young general’s victories. Finally, Belisarius held his bodyguard, a reserve of clibanarii, behind the infantry and kept a hidden contingent of Hunnic horse behind a nearby hill, ready to charge the Persian right wing once it engaged the Byzantine left wing.
position behind the trench, Kavadh decided to open the battle with a cavalry attack, ordering both of his wings forward against the Byzantine horse (Map 1.2(a)).
The king’s Immortal cavalry, backed by Persian and Arab horse, made progress on the Persian right, crossing the defenders’ ditch and pressing the Byzantine heavy horse backwards. But a co-ordinated counter-attack by 600 Hunnic cavalry from the left centre and the sudden appearance of the reserve barbarian horse from beyond the hill changed the tactical situation (Map 1.2(b)). Struck in the flank and rear by the once hidden Hunnic cavalry, the Immortals and their allies fell back in disarray. At the same time, the Immortal-led cavalry at first enjoyed similar success on the other flank, pushing the Byzantine heavy cavalry on the right wing back against the city gates before Count John could rally the defenders. It seemed as though the Persians were about to enjoy a double envelopment when Belisarius, noticing the Persian left was now detached from its centre, ordered 1,200 Huns to wheel and strike the flank of the victorious Persian left wing. Belisarius seized the moment and launched his elite cavalry reserve against the beleaguered Persian left who, attacked on three sides, broke and ran for their lives, swept from the battlefield by John and his reinvigorated cavalry (Map 1.2(c)).
Belisarius quickly recognized his fortunes had changed. The remaining Persian army in front of him was without a left wing to protect the mass of infantry in the centre. The Byzantine general ordered his mounted bodyguard and the Hunnic horse to attack the enemy’s unprotected left flank, shattering the infantry formation with repeated heavy cavalry charges and clibanarii and light cavalry missile fire (Map 1.2(d)). After a brief pursuit, Belisarius rallied his men. Persian casualties were high, with some 8,000 men dead on the battlefield. King Kavadh escaped the battle.
Map 1.2. The Battle of Dara, 530. (a) Phase I: King Kavadh opens the battle, launching his cavalry against the enemy horse stationed on the Byzantine wings (1). The Persians make headway on their left, pressing back Count John’s Byzantine cavalry (2). (b) Phase II: The Byzantines’ Hun cavalry from both the left centre and the concealed reserve counter-attack the Persians’ right wing (1), driving the Immortals and the allied cavalry back (2). On the opposite flank,
Belisarius realizes that the Persian horse are without support from their main body, and orders cavalry from the right centre and the elite reserve into action, supporting Count John’s beleaguered horsemen (3). The Persian horsemen break and flee (4). (c) Phase III: Belisarius orders his right-flank cavalry to wheel against the Persian main body’s left flank (1),
adding the weight of his elite bodyguard and remaining cavalry reserve to the effort (2). (d) Phase IV: Repeated charges by Byzantine clibanarii, accompanied by light cavalry missile fire (1) shatters the Persian main body, which breaks and flees in disarray (2). Belisarius rallies his force after a brief pursuit. King Kavadh eludes his would-be captors (3), leaving
some 8,000 dead on the field.
After Dara the Persians suffered several more defeats, and in 532 Kavadh’s successor agreed to a peace with Byzantium with no time limit, the poorly named ‘Perpetual Peace’. By the unusual terms of this agreement Justinian was to pay the Persians 11,000 pounds of gold toward the upkeep of the Caucasian defences, and in return Byzantium could keep the fortress at Dara, but not as its headquarters in Mesopotamia. Both sides would return strategic strongholds captured in the decades-old war. Finally, Persia swore eternal friendship and alliance with the Byzantine Empire. The treaty would last less than a decade.
appeal for aid from the Byzantine emperor became the pretext to launch an expedition to bring north Africa under direct Greek rule.
Sailing from Constantinople to a forward base in Sicily, Belisarius transported his expeditionary force on 500 ships manned by 20,000 sailors and escorted by 92 warships. In Sicily he waited for an intelligence report on the whereabouts of the Vandal fleet, learning that it was in Sardinia putting down a rebellion instigated by Justinian. With the formidable Vandal navy occupied, Belisarius set sail for north Africa in early September 533, landing his army of 10,000 infantry and 5,000 cavalry south of Caputvada (modern Ras Kapudia in Tunisia), 130 miles south of Cape Bon. After disembarking his army, Belisarius built a fortified camp and then sent heralds into the countryside explaining that the Greek expeditionary force was not there to punish the population, but bring the pretender Gelimer to justice. This must have worked, for Belisarius proceeded unmolested northward up the coast toward the ancient city of Carthage. He sent an advance guard of 300 horse commanded by Count John to screen his march. Six hundred Hunnic foederati cavalry covered the main army’s left flank, while the fleet shadowed on the right. On 13 September, John’s van reached the defile of Ad Decimum (the tenth milestone from Carthage).
When word of the Greek vanguard’s advance on Carthage reached Gelimer, he put Hilderic and his relatives to the sword, and prepared to attack the invaders. Gelimer’s strategy was a risky one, relying on the principles of manoeuvre and concentration. He instructed his brother Ammatus, the commander in Carthage, to sally forth and engage the Byzantine van, while he took the majority of the Vandal host and attacked the rear of Belisarius’ main force. The third element of Gelimer’s strategy was a simultaneous attack by his nephew Gibamund, who would move over the hills from the west and attack the invaders’ left flank. But success would require a careful co-ordination of not two but three columns, a difficult feat for any army in any age.
What took place next was a product of unfortunate timing. On 13 September, Ammatus left Carthage and struck the Byzantine van before Gelimer and Gibamund were in position. Ammatus was mortally wounded and his forces panicked and fled. Gibamund struck next and was routed by the Hunnic flank guard. The third Vandal column, confused by the trek through hilly terrain, missed the rear of the Byzantine main army altogether and instead struck the front of the Byzantine host, now unprotected by the absence of Count John and his vanguard, which was now making its way to sack Carthage. Gelimer’s sudden attack pushed the Byzantines back, and it looked as through the tide had turned in the favour of the Vandals when Gelimer discovered his brother’s dead body on the battlefield. Stopping his pursuit to bury Ammatus, Gelimer lost the momentum in the battle. Belisarius regrouped and counter-attacked, driving the Vandals from the battlefield.
Belisarius entered Carthage on 15 September and began to reconstruct its defences for his own use. Gelimer retreated west 100 miles and recalled his brother Tzazon from Sardinia, where he was putting down the rebellion. Once reinforced, Gelimer marched on Carthage, stopping 18 miles short of his target at the village of Tricameron. Gathering intelligence on his enemy, Gelimer realized that there were strains between Belisarius and his Hunnic allies. Vandal spies offered the Huns great rewards if they would turn against the Byzantines during the next engagement. But unknown to Gelimer, Belisarius learned of this intrigue and offered the Huns a larger bribe if they stayed true. The Huns accepted Belisarius’ offer, though the general realized that the loyalty of his foederati was now in question.
By this time he faced an enemy army of around 50,000 men (mostly cavalry), or about three times the size of his invading force. In mid-December he sent nearly all of his cavalry (4,500 horse) under Count John toward Tricameron, following the next day with his infantry and a 500-horse reserve, camping some distance from Gelimer’s position. The next morning the Vandal commander led his army out of their encampment and stumbled upon Count John and his cavalry preparing lunch (Map 1.3(a)). Instead of seizing the moment and attacking, Gelimer waited for the Byzantines to mount up. John deployed men in three divisions, taking command of the centre, then sent a messenger to the main Byzantine camp (Map 1.3(b)). Belisarius immediately led his 500 cavalry to reinforce John, leaving the Byzantine infantry to catch up at a steady march. Meanwhile, Gelimer ordered his own cavalry to mirror the enemy, deploying his horsemen into three divisions and giving command of the centre to his brother Tzazon. Gelimer ordered his troops to forsake the bow for the sword, in essence favouring shock over missile warfare in the upcoming fight.
Map 1.3. The Battle of Tricameron, 533. (a) Phase I: Gelimer’s Vandal cavalry advance from their fortified camp (1) and encounter a force of Byzantine horse under Count John dispersed while preparing their midday meal (2). Inexplicably,
Gelimer allows Count John’s forces to form for battle unhindered. Count John orders his troops to mount and sends a messenger to Belisarius in the main Byzantine camp requesting reinforcements (3). (b) Phase II: Count John deploys his outnumbered force into three divisions, a move mirrored by Gelimer, who orders his brother Tzazon to take command of the Vandal centre. Gelimer orders his troops to stow their bows and use their swords in preparation for the impending clash. (c) Phase III: Count John opens the battle by charging across the brook separating the two forces (1). The Vandals rebuff the attackers who retreat to their starting point (2). The Byzantines regroup and prepare to launch another assault.
Belisarius approaches the battlefield with a contingent of cavalry (3), having left the Byzantine infantry to follow as quickly as they can. (d) Phase IV: Gathering additional reinforcements, Count John launches a third attack (1). Tzazon is
killed in the mêlée (2) and the Vandal centre begins to give way (3).
(e) Phase V: Arriving at the scene of the action, Belisarius orders the two remaining divisions into the fray (1). The Vandal formation collapses from the centre and they flee to the relative safety of their fortified camp (2), closely pursued by the Hunnic cavalry (3). Belisarius orders a halt to the pursuit, not wishing to assault the Vandal position until the Byzantine infantry (4) arrives. (f) Phase VI: As the Byzantines begin to encircle the camp (1), Gelimer panics and abandons his
position (2). The Vandal cavalry follow suit (3), and the Byzantines enter the camp and begin to plunder, losing any semblance of cohesion. Fortunately for Belisarius, the collapse of the Vandal forces protects his now disorganized army
from counter-attack.
Knowing he could not storm the Vandal camp without his foot soldiers, Belisarius waited patiently for his infantry to arrive. Gelimer panicked as he watched the Greeks begin to surround his camp. Silently, he mounted his horse and slipped out of the noose, escaping to the mountains in the west. Leaderless, the Vandals soon followed, abandoning their camp to the Byzantines. Belisarius’ troops entered the camp and, breaking ranks, began to plunder. In moments, Belisarius’ victorious army disintegrated into a mass of thieves, illustrating the weakness of a mostly mercenary force. Had the Vandals managed a spirited counter-attack at this moment, there was little doubt in the mind of the Byzantine historian Procopius that the invaders would have suffered a defeat. It would take Count John another three months to hunt down and capture Gelimer.
the emperor, who dismissed him for plotting to seize the throne. It was 552 before the treasury had recovered enough to send a new army to reconquer Italy.
Byzantine Combined Arms in Action: The Battles of Taginae and Casilinum
Justinian replaced Belisarius with his most trusted court advisor, the septuagenarian eunuch Narses, a man with less than two years of actual military service. Narses would attempt to wrestle Italy away from the Ostrogoths, once and for all. A generation before, under the rule of Theodoric the Great (r. 493–526), the Ostrogoths had created a strong Germanic king-dom, one that subscribed to a heretical version of Christianity called Arianism. A year after Theodoric’s death, Justinian was raised to the Byzantine throne, succeeding his uncle Justin I (r. 518–527). For the next quarter of a century, he pursued his reconquest of the Mediterranean, paying special attention to Italy. The Byzantine emperor was convinced that he was divinely ordained to bring the wayward region back into the fold of Orthodoxy while imposing Greek hegemony on the peninsula.
For twenty years the armies of Byzantium fought the Goths throughout Italy, burning towns and cities and pillaging the countryside. But the composition of the Byzantine expeditionary force changed as time went on as mercenaries began to fill the ranks, replacing the numeri and bucellarii. By the summer of 552 Narses led an army of over 20,000 men, but only the core were Byzantine, the rest being barbarian foederati made up of Lombard, Hunnic, Armenian, Persian and Arab mercenaries. Keeping a large treasury in reserve to pay his troops if the pillaging dried up, Narses moved his multinational army from Ravenna toward the forces of the new Ostrogothic king, Totila, in central Italy. Hearing that Totila was advancing toward him, Narses made camp near modern Scheggia on the crest of a pass over the Apennines and waited.
Totila left Rome and marched to the village of Taginae (near modern Gubbio), only 13 miles from where Narses was camped. Because the Goths possessed such a small standing army, Totila was forced to pull his garrisons from nearby cities to swell his ranks, in the end creating a host somewhat smaller than the invading army. At Taginae, Narses dispatched a Greek herald to Totila demanding his surrender. In response, the Ostrogothic king broke camp the next morning and advanced to within two bowshots (perhaps 300 yards) of the Byzantine army.
Both commanders desired battle, forming their armies across a narrow, level valley. In typical Germanic fashion when cavalry was present in great numbers, Totila arrayed his horsemen some distance in front of his infantry, with the intent of relying on repeated cavalry charges to break the enemy lines (Gothic infantry rarely reached the front lines except to dispatch the enemy or assist in the pursuit). Narses arrayed his troops in a concave formation, placing his 8,000 foederati as heavy infantry in battle squares, then dismounting some of his Byzantine horse to strengthen his phalanxes. He then put some 8,000 light infantry archers on his flanks (4,000 on each side), protected by pointed stakes or perhaps on a ridge inaccessible from below. On the left and right, behind the archers, he located his 1,000 heavy cavalry cataphracts, armoured lancers also equipped with bows. His concave array created, in effect, a dangerous killing zone for any enemy trying to attack the Byzantine centre.
dispatched another 1,000 horsemen to the extreme left of his left wing just beyond the contested hill. This cavalry force would act as a reserve, and, according to Procopius in his Gothic War, ‘at the moment when the enemy infantry began action [the Byzantine cavalry would] get behind them immediately … and place them between two forces’.
As the morning wore on, Narses left the initiative to Totila, but the Gothic king refused to attack until the arrival of 2,000 cavalry reinforcements (Map 1.4(b)). As he waited, he entertained the troops on both sides with his outstanding equestrian skills, parading between the lines in his golden armour. Once the reinforcements arrived, Totila changed into the armour of a private soldier and joined the ranks of the Gothic cavalry.
After eating a small lunch, Totila finally ordered the cavalry to charge the Byzantine centre, ignoring the Greek archers on both sides. But the foederati heavy infantry, buttressed with dismounted heavy cavalry, held. The halted Gothic cavalry then received a rain of arrows from the 8,000 Byzantine archers on the flanks, horses and riders killed alike by the hundreds (Map 1.4(c)). To aggravate the situation, the attacking cavalry soon found themselves pressed between the Byzantine defenders and their own approaching infantry. As the coup de grâce, Narses ordered his heavy cavalry reserve from behind the hill to attack the flank of the approaching Gothic infantry, rolling up their line and driving them from the field (Map 1.4(d)). Surrounded and facing certain annihilation, the Gothic cavalry fled the battlefield, cutting their way through their own infantry. King Totila was mortally wounded leaving the battlefield, and died in a peasant’s hut nearby. Some 6,000 Ostrogoths perished in the battle, and those that were captured were massacred.
The battle of Taginae illustrated the power of a combined-arms tactical system working in concert against attacking shock cavalry and infantry. Unable to penetrate the defending Byzantine phalanxes, the Gothic cavalry found itself at the mercy of the Greek archers. Moreover, the failure (or perhaps inability) of the Ostrogoths to attack and scatter the Byzantine bowmen on the wings, either by cavalry charge or infantry attack, gave the Byzantines the ability to attack with missiles and wear down the Gothic cavalry. But the Ostrogoths’ mistake of leaving the light infantry archers unmolested was not unique in western military history. French heavy cavalry lancers would make the same mistake 800 years later against English longbowmen at the battle of Crécy. Finally, Narses’ order to use his cavalry reserve to attack the Gothic infantry at a propitious time shows a sophisticated grasp of tactics and a keen understanding of the tactical tendencies of his enemy.
After the battle of Taginae, Narses pursued the remaining Goths to Rome then farther south to Naples, killing their new king and continuing his campaign of extermination. Finally, a truce was called at Monte Lettere, and the few surviving Goths were allowed to leave Italy and settle in any other barbarian kingdom they wanted.
Map 1.4. The Battle of Taginae, 552. (a) Phase I: As Totila arrives on the field and deploys his forces (1), Narses dispatches a small contingent of archers to a detached hill to support the Byzantine left flank (2). A contingent of Gothic
cavalry attempts to seize the hill (3) but is rebuffed by the archers firing down from the heights (4). Narses dispatches a reserve force of cavalry to the threatened area (5) and stands fast. The initiative passes to Totila, but the Gothic commander decides to await the arrival of additional cavalry forces (6) before attempting a general assault. (b) Phase II:
His reinforcements having arrived, Totila launches an attack against the squares of Byzantine heavy infantry and dismounted cavalry in the centre (1). Unmolested by the Gothic horsemen, Narses’ archers begin to loose volleys of arrows
into the enemy’s tightly packed ranks (2) as the Ostrogoth infantry approach the fight (3). (c) Phase III: The Byzantine archers continue to shower the killing zone with arrows (1). This unrelenting fire inflicts hundreds of casualties, and the
situation grows worse as the Gothic infantry attempt to press ahead (2). Confronted by resolute Byzantine defenders to their front and crowded from behind by their own foot soldiers, the Ostrogoths’ mounted element begin to rapidly lose cohesion (3). (d) Phase IV: Narses launches his cavalry reserve against the Ostrogoth infantry’s right flank (1), which begins to roll up as the foot soldiers panic and begin to flee (2). The Byzantine archery continues to exact a heavy toll on the Gothic horse, which stampede through their own infantry (3) as they join the rout. King Totila is mortally wounded in
the final action, dying in a nearby hut.
Besides the spear, Frankish infantry also employed a francisc (sometimes francisca) or throwing axe which, according to Procopius, ‘at a given signal and at first encounter, was thrown at the enemy’. The Frankish infantry’s ability to use the spear and axe for either missile or shock combat created a fusion of light and heavy infantry not unlike the fusion seen in the classical period with the Roman legionary. The difference here was in the nature of battlefield articulation. The Roman legionary was a professional soldier who fought in a linear formation capable of great tactical flexibility, while the Franks in the early medieval period were a militia who continued to attack in unarticulated formations, with missile troops screening the battle square or firing overhead from the rear.
In the sixth century, the Franks did employ a small number of heavy cavalry lancers. The Gauls had a long tradition of fielding lancers, with the Romans often employing Gallic heavy cavalry as auxiliaries. But these lancers, devoid of stabilizing stirrups, were not the masters of the medieval battlefield yet. Diffusion of the stirrup from central Asia to medieval France would not take place until the mid-eighth century, with widespread use by the Franks only in the ninth century.
Except for the use of the francisc from horseback, light cavalry was almost non-existent in early Germanic warfare. When horses were employed, it was usually for reconnaissance or as mounted infantry. The tradition of light cavalry in medieval western civilization comes almost exclusively from contact with nomads from the Eurasian steppes, with the Magyars (Hungarians) perhaps the most famous example of Christianized light cavalry horse archers. Still, heavily forested western Europe proved less than ideal for light cavalry, a weapon system which requires a great deal of real estate and fodder to be successful. Also, mounted archery was a skill that took years in the saddle to perfect, a pastime more suited to Turkish and Mongol steppe warriors than Germanic agriculturalists west of the Alps.
At Casilinum the Frankish raiders formed up their battle squares opposite the Byzantines, then charged the Greek centre (Map 1.5(a)). The ferocious attack of the Germanic warriors broke the first two lines of Byzantine infantry, despite the presence of dismounted heavy cavalry. As the Franks engaged the third and final line, Narses ordered forward his cataphracts on the flanks (Map 1.5(b)). Threatened by this double flanking manoeuvre, the Franks halted their charge and formed into a defensive square against the heavily armoured Greek heavy infantry (Map 1.5(c)). But the cataphracts did not charge the Frankish battle square; instead, they employed their bows to shower the Franks with arrows. Unwilling to break formation for fear of being run down by those cataphracts with lances and swords, the Frankish square slowly withdrew to the rear. In their retreat, the Frankish formation lost cohesion, and the Greek heavy cavalry charged, completely outflanking and breaking up the square (Map 1.5(d)). A horrible carnage ensued. Agathias tells us that the Byzantines lost only eighty men. For the Franks, only five men survived.
Narses’ victory at Casilinum was absolute, and Italy emerged out of two decades of Byzantine occupation ruined by war, famine and plague. The largest cities, such as Milan, Rome and Naples, were nearly depopulated, and the countryside’s agricultural economy was devastated. Eastern Roman rule would only last another fourteen years before the final wave of Germanic invaders, the Lombards, occupied the northern two-thirds of the peninsula, ending forever Justinian’s dream of Greek rule over Italy.
The Byzantine Army in Transition:
Themes
and
Tagmata
Justinian’s reign was the high-water mark for the Byzantine Empire. After his death in 565, the Eastern Roman Empire faced crisis after crisis. Constantly besieged by the Slavs and Bulgars in southern Europe, Persians in Mesopotamia, and from the mid-seventh century onward, Islam from Africa and the Levant, the Byzantine Empire found its military and fiscal resources relentlessly stretched. Still, despite defeats that deprived it of all its African and Asian possessions except Asia Minor, the Byzantine Empire maintained itself for centuries as a formidable eastern Mediterranean power.
Map 1.5. The Battle of Casilinum, 554. (a) Phase I: Narses forms his infantry, reinforced by dismounted heavy cavalrymen, into a three-rank formation flanked by mounted heavy cavalry. These cataphracts use the bow as their primary weapon rather than the usual lance or sword. The Franks form opposite in several unarticulated battle squares. They open the action by charging the Byzantine centre. (b) Phase II: The Franks’ ferocious attack successfully penetrates the first two ranks of Byzantine foot (1). As they engage the last line of infantry, Narses orders his cataphracts into action.
The Byzantine horsemen press inward towards the enemy flanks (2). (c) Phase III: Fearing a charge by the Byzantine horsemen, the Frankish infantry press together into a large defensive square (1). Instead of charging, however, the cataphracts open a punishing fire into the flanks and rear of the tightly pressed Frankish square (2). Unable to reply to
slowly attempt to withdraw from the tightening noose (3). (d) Phase IV: The unarticulated Frankish formation loses cohesion as it retreats (1), an effect probably heightened by the presence of the Byzantine cataphracts on their flanks. Narses orders the cataphracts to exchange their bows for lances and swords, and the heavy cavalry charge into the flanks of the rapidly collapsing Frankish square (2). The ensuing slaughter results in the near annihilation of the Frankish force.
Unable to sustain a professional standing army, Emperor Constans II (r. 641–668) settled his mobile armies in specific districts called themes (from which the tactical unit thema gets its name). The new organization of themes introduced regionalized army groups under the command of a senior general or strategos. The themes now acted as both regional frontier troops and as mobile field armies. Outside of military organization, the themes were also an important part of imperial social structure. The soldiers of a particular theme were the legal holders of the land itself, a development that came in the form of imperial land grants within the particular region, similar to the land grants during the early Roman Empire. Although the soldiers did not work the fields or run farms on a full-time basis, their ownership brought about a personal stake in the defence of their respective theme. The theme became more than a military district; it was an economic and social entity as well.
Beginning in the mid-seventh century, soldiers of the themes supported themselves from land grants within their districts because the state’s only remaining means of supporting its soldiers seems to have been giving them land, most probably from imperial estates. For the most part, the themes
acted as a defensive force, but later emperors would take an interest in regaining lost territory. Emperor Constantine V (r. 741–775) created several elite cavalry units called tagmata, first as a reaction to a rebellious theme in north-west Anatolia, then for offensive campaigns against the Arabs and Bulgars.
The basic administrative and tactical unit of the Byzantine army from the seventh century was the
bandum, consisting of about 400 soldiers commanded by a tribune, and later by a count. The banda
were about equally divided into infantry and cavalry, with the dominant weapon system being heavy cavalry. Light infantry archers and javelineers usually accompanied the heavy infantry, acting as skirmishers and missile support. Five to eight banda (2,000–3,200 cavalry and infantry) formed a
turma, two or three turmae (4,000–9,600 soldiers) constituted a thema, and three or four themae
together became a Byzantine field army, usually numbering 25,000 to 30,000 men. The entire Byzantine army was not very large, probably never exceeding 150,000 men in total. For all practical purposes, the thema replaced the legion as the premier strategic unit of manoeuvre in Byzantine warfare.
The Byzantine army differed from its Roman predecessor in one significant way – the level of professionalism in its military. Although the soldiers of the thema became increasingly a defensive militia force, the core of the Byzantine army were professional soldiers organized in homogenized cavalry or infantry units called tagmata, equal to the size of the thema. These soldiers were the best-trained troops in the empire, serving as Constantinople’s garrison and as the chief expeditionary force for the emperor. When the emperor went on campaign, the tagmata and local themae combined to create a field army.
bodies of these mercenaries for expeditions as early as 911, with the Varangian Guard itself instituted by Emperor Basil II in 988. The Varangians lacked military lands and proved very loyal to Byzantine emperors who paid them well. By the beginning of the eleventh century, emperors added to their payrolls Normans, Germans and Turks, serving under their own officers in units with their own organization. As the themes declined in combat efficiency, these mercenaries began to replace the Byzantine army rather than merely complement it.
Heavy Cavalry versus Light Cavalry: The Battle of Manzikert
In the eleventh century, the Byzantine Empire faced a new crisis on its eastern frontiers with the emergence of a new and dangerous convert to Islam, the Seljuk Turks. The Seljuks, like the Parthians before them, relied on light cavalry horse archers as their primary weapon system. These Turks proved irresistible on the battlefield, conquering the Muslim states in what had been the north-west corner of the Sassanid Persian Empire and continuing their traditions of raids into and warfare with the Eastern Roman Empire. This conflict between the Byzantine army and Seljuk invaders culminated in one of the most important battles in western civilization, the battle of Manzikert in 1071, the results of which would forever weaken a great empire and become a casus belli for the crusades.
The Byzantines were very familiar with the tactics of steppe light cavalry. With very little or no body armour and carrying only a curved sabre and sometimes a javelin, the Turkish warrior relied on his short composite bow, a quiver of thirty to fifty arrows, and the mobility provided by his horse. His short powerful bow was recurved in shape and constructed in three parts: a thin central stave of wood (often maple, cornus or mulberry) laminated with sinew on the back and horn on the belly. This composite construction gave the Turkish bow a powerful draw weight, while the short recurve design allowed the steppe warrior to shoot the arrow quickly, in any direction and at great distance. Furthermore, his archery skill was assisted by his novel equipment and riding position. Central Asian warriors used a short stirrup or ‘forward seat’, putting the rider’s weight over the horse’s shoulder instead of square on its back. This riding stance was very comfortable over rough terrain and facilitated archery from horseback. Seljuk warriors rode a hardy breed of steppe ponies. These mounts possessed a combination of excellent qualities, including strength, stamina and the ability to subsist on very little food.
Like the Parthians before them, the Seljuk Turks relied on hit-and-run attacks from horseback, striking from a distance with their powerful bows, and seldom mixing with the enemy in hand-to-hand combat. The Turkish horse archers were adept at the tactic of hovering just within bowshot of their enemy, then taking flight when their enemy offered battle, twisting their torsos and firing arrows backward at their pursuers in what is now called the ‘Parthian shot’. If the pursuers seemed vulnerable in any way, the fleeing Turks would suddenly counter-attack, swarming their enemy and killing both men and horses. One Byzantine commentator and chronicler of the First Crusade, Princess Anna Comnena (the daughter of Emperor Alexius I Comnenus), described her father’s respect for Seljuk tactics:
that threw into confusion the accepted tradition of battle. As for weapons they use in war, unlike the Kelts [Franks] they do not fight with lances, but completely surround the enemy and shoot him with arrows; they also defend themselves with arrows from a distance. In hot pursuit the Turk makes prisoners by using his bow; in flight he overwhelms his pursuer with the same weapon and when he shoots, the arrow in its course strikes either rider or horse, fired with such a tremendous force that it passes clean through the body. So skilled are the Turkish archers.
The Seljuks excelled in the feigned retreat. Sometimes, their retreats lasted many days, designed both to wear down their enemies and draw them away from their bases and towards a larger body of steppe warriors. Once their enemy tired, the Turks would wheel and strike or spring the trap.
To cope with the mobility and firepower of steppe horse archers, Byzantine doctrine prescribed always keeping light infantry bowmen near the cavalry, never fighting with uncovered flanks or rear, and never permitting an army to disperse. ‘They were like flies that could be beaten off, but not driven away.’ The Byzantines long understood the importance of effective combined-arms co-operation when dealing with enemy light cavalry. But the overall decline of the Byzantine army also affected the quality of Byzantine generalship, leading to the military debacle in Armenia at the battle of Manzikert in 1071.
From the late 1050s, Seljuk nomadic parties were making raids deep into Byzantine Armenia. The Seljuk Turks, who took their name from a successful chieftain (Seljuk, sometimes Saljuk), separated from a larger Turkish tribe known as the Oghuz in what is today modern Kazakhstan and struck south-westward into eastern Persia in the 1040s, converting to Sunni Islam along the way. By 1055 the Seljuks had taken the Abbasid capital at Baghdad, forcing the Muslim caliph to bestow upon the Seljuk sultan, Tughril-bey, the title of ‘king of the East and the West’. The Seljuks now controlled Transoxiana and all of Persia, but continued to press westward where their presence alarmed both the Byzantine Empire, with interests in Armenia, and the powerful Muslim Fatimid dynasty (909–1171) centred in Egypt. The Fatimids, who practised the rival Shia form of Islam, possessed land in the Levant stretching from the Nile delta to Syria. To complicate things for the invading Turks, the Fatimids and Byzantines maintained an uneasy truce, allowing the Greeks to deal with threats in Italy and the Balkans, while the Egyptians became rich controlling the lucrative trade coming into the eastern Mediterranean. This balance of power would change with the arrival of the Turks.
Map 1.6. Approaches to Manzikert, 1071.
war.
The Byzantine emperor welcomed the prospect of war. Believing the Turkish sultan to be in Persia in the summer of 1071, Romanus, an able general who had already tasted victory against the Turks earlier in his reign (twice against Arslan), assembled an army of perhaps 30,000 men at Erzerum, some 80 miles from Manzikert in Armenia, with the intention of retaking the city and neighbouring Akhlat and using them as bases of operation for a campaign against Alp Arslan in Persia. Romanus used his infantry to reduce captured cities in the borderlands, while employing his cavalry to search for the sultan’s forces. Arslan learned of the Byzantine emperor’s advance on Armenia as the Turkish army encamped at Aleppo in northern Syria. The sultan immediately turned his army around and headed for the Armenian frontier.
In mid-August 1071 an advance portion of the Seljuk Turkish army met the main Byzantine army and skirmished near Lake Van. The Byzantine emperor retook Manzikert from the Turks, and hearing that the advance guard of Arslan’s army was in the area, dispatched an army of allied Cuman or Russian heavy cavalry to meet them. The Turkish commander, seeing that numbers were now on the side of the Byzantines, withdrew. Whether this withdrawal was a feigned flight will never be known for certain, but the pursuing Byzantines were caught in the signature horse nomad ambush, a sudden counter-attack by light cavalry horse archers that captured the Byzantine commander and forced the remaining Byzantine army to retreat in disarray.
By the time Romanus’ main army arrived on 18 August, the Turkish advance army, in true Seljuk fashion, was nowhere to be found. The main Byzantine army then returned to camp, where during the night the Seljuks, joined now by Alp Arslan’s main army, returned in force, setting up their own camp 3 miles away. Seeing that Romanus possessed the larger army, the following morning the sultan offered a peace embassy to the emperor, who bluntly rejected it. Romanus wanted to settle the Turkish problem with a decisive military victory, understanding that raising another army to meet the Seljuk threat would be both difficult and expensive.
After the failed parley between the two rulers, Romanus advanced against the Seljuk Turks at midday on 19 August with his armoured and mounted army arrayed in a single line on a broad front, backed by a strong rearguard (Map 1.7(a)). The front line consisted of heavy cavalry from the various
Map 1.7. The Battle of Manzikert, 1071. (a) Phase I: Romanus forms his army in two lines, the first under his personal control and the second under Andronicus Ducas (1). He orders his heavy cavalry force forward against the Seljuk horse
archers to his front (2). (b) Phase II: The pursuit continues for several hours, sweeping through and continuing beyond the abandoned Seljuk camp (1). Alp Arslan’s mounted bowmen easily keep the heavier Byzantine horsemen at a distance while continuously harassing Romanus’ flanks (2). (c) Phase III: His army tiring and nightfall approaching, Romanus
orders his army to break off the pursuit and return to camp; however, the order is late in reaching the wings, which continue to advance, separating them from the rest of the army (1). When they finally receive the order and begin to pull
back, their formations are loose and gaps are apparent in their lines (2). The Turks quickly seize this opportunity and intensify their attacks (3). (d) Phase IV: Recognizing the precarious position of his wings, Romanus orders his army to face
about and attack the enemy. The units under his immediate command obey (1), but the emperor is betrayed by Andronicus, who spreads a rumour that Romanus has been killed. The traitor leads the second line back to camp (2), abandoning his
erstwhile comrades to their fate.
(e) Phase V: Alp Arslan takes advantage of the sudden departure of half of his opponent’s forces and the approach of nightfall to surround the Byzantines (1). The right wing falls first, attempting to face two sides at once (2). The left wing, separated from Romanus and the units from the Byzantine centre, fights courageously, but finally breaks under the hail of
arrows arcing out of the deepening gloom (3). (f) Phase VI: The Turks press closer, encircling the remnants of the Byzantine centre. Romanus, surrounded by his Varangian Guard, is overpowered and captured. The survivors fleeing the