Visual Studio® 2008
Professional
Chapter 2: The Solution Explorer ,
Toolbox, and Proper ties... 13
Chapter 3: Options and
Customizations ... 31
Chapter 4: W orkspace Control ... 47
Chapter 5: F ind and Replace, and Help . 63
Part II: Getting Star ted
Chapter 6: Solutions, Projects,
and Items ...
83
Chapter 7: Source Control...
107
Chapter 8: F orms and Controls ... 117
Chapter 9: Documentation Using
Chapter 11: Generics, Nullable Types,
Partial Types,
Chapter 14: The My Namespace ... 211
Chapter 15: The Languages
Chapter 18: Modeling with the
Class Designer ... 275
Chapter 19: Ser ver Explorer ... 289
Chapter 20: Unit T esting ... 305
Part V: Data
Chapter 21: DataSets and
DataBinding ... 325
Chapter 22: V isual Database T ools .... 365
Chapter 23: Language Integrated
Chapter 27: Security in the
Chapter 31: Device Security
Manager ... 495
Part VII: Platfor ms
Chapter 32: ASP.NET W eb
Applications ... 505
Chapter 33: Office Applications ... 547
Chapter 34: Mobile Applications ... 567
Chapter 35: WPF Applications ... 595
Chapter 36: WCF and WF
Applications ... 609
Chapter 37: Next Generation W eb:
Silverlight and
ASP.NET MVC ... 625
Part VIII: Configuration and
Internationalization
Chapter 38: Configuration F iles ... 649
Chapter 39: Connection Strings ... 667
Chapter 40: Resource F iles ... 677
Part IX: Debugging
Chapter 41: Using the Debugging
Windows ...
697
Chapter 42: Debugging with
Breakpoints ... 711
Chapter 43: Creating Debug Proxies
and Visualizers ... 723
Chapter 44: Debugging Web
Applications ... 735
Part X: Build and Deplo yment
Chapter 46: Upgrading with V isual
Studio 2008 ... 769
Chapter 47: Build Customization ... 777
Chapter 48: Assembly V ersioning
and Signing ... 795
Chapter 49: ClickOnce and MSI
Deployment ... 803
Chapter 50: Web and Mobile
Application
Deployment ... 825
Part XI: Automation
Chapter 51: The Automation Model ... 839
Chapter 52: Add-Ins ...
849
Chapter 55: VSTS: De veloper
Edition ...
891
Chapter 56: VSTS: T ester Edition ... 903
Chapter 57: VSTS: Database
Edition ...
911
Professional
Professional
Visual Studio® 2008
By
Nick Randolph
David Gardner
Published by
Wiley Publishing, Inc.
10475 Crosspoint Boulevard Indianapolis, IN 46256
www.wiley.com
Copyright © 2008 by Wiley Publishing, Inc., Indianapolis, Indiana
ISBN: 978-0-470-229880
Manufactured in the United States of America
10 9 8 7 6 5 4 3 2 1
Library of Congress Cataloging-in-Publication Data is available from the publisher.
No part of this publication may be reproduced, stored in a retrieval system or transmitted in any form or by any means, electronic, mechanical, photocopying, recording, scanning or otherwise, except as permitted under Sections 107 or 108 of the 1976 United States Copyright Act, without either the prior written permission of the Publisher, or authorization through payment of the appropriate per-copy fee to the Copyright Clearance Center, 222 Rosewood Drive, Danvers, MA 01923, (978) 750-8400, fax (978) 646-8600. Requests to the Publisher for permission should be addressed to the Legal Department, Wiley Publishing, Inc., 10475 Crosspoint Blvd., Indianapolis, IN 46256, (317) 572-3447, fax (317) 572-4355, or online at
http://www.wiley.com/go/permissions.
Limit of Liability/Disclaimer of Warranty: The publisher and the author make no representations or warranties with respect to the accuracy or completeness of the contents of this work and specifically disclaim all warranties, including without limitation warranties of fitness for a particular purpose. No warranty may be created or extended by sales or promotional materials. The advice and strategies contained herein may not be suitable for every situation. This work is sold with the understanding that the publisher is not engaged in rendering legal, accounting, or other professional services. If professional assistance is required, the services of a competent professional person should be sought. Neither the publisher nor the author shall be liable for damages arising herefrom. The fact that an organization or Website is referred to in this work as a citation and/or a potential source of further information does not mean that the author or the publisher endorses the information the organization or Website may provide or recommendations it may make. Further, readers should be aware that Internet Websites listed in this work may have changed or disappeared between when this work was written and when it is read.
For general information on our other products and services please contact our Customer Care Department within the United States at (800) 762-2974, outside the United States at (317) 572-3993 or fax (317) 572-4002.
Trademarks: Wiley, the Wiley logo, Wrox, the Wrox logo, Wrox Programmer to Programmer, and related trade dress are trademarks or registered trademarks of John Wiley & Sons, Inc. and/or its affiliates, in the United States and other countries, and may not be used without written permission. Visual Studio is a registered trademark of Microsoft Corporation in the United States and/or other countries. All other trademarks are the property of their respective owners. Wiley Publishing, Inc., is not associated with any product or vendor mentioned in this book.
About the Author s
Nick Randolph is currently the Chief Development Officer for N Squared Solutions, having recently left his role as lead developer at Intilecta Corporation where he was integrally involved in designing and building that firm ’ s application framework.
After graduating with a combined Engineering (Information Technology)/Commerce degree, Nick went on to be nominated as a Microsoft MVP in recognition of his work with the Perth .NET user group and his focus on mobile devices. He is still an active contributor in the device application development space via his blog at http://community.softteq.com/blogs/nick/ and via the Professional Visual Studio web site, http://www.professionalvisualstudio.com/ .
Over the past two years, Nick has been invited to present at a variety of events including Tech Ed Australia, MEDC, and Code Camp. He has also authored articles for MSDN Magazine (ANZ edition) and a book entitled Professional Visual Studio 2005 , and has helped judge the 2004, 2005, and 2007 world finals for the Imagine Cup.
David Gardner is a seasoned.NET developer and the Chief Software Architect at Intilecta Corporation. David has an ongoing passion to produce well - designed, high - quality software products that engage and delight users. For the past decade and a bit, David has worked as a solutions architect, consultant, and developer, and has provided expertise to organizations in Australia, New Zealand, and Malaysia.
David is a regular speaker at the Perth .NET user group, and has presented at events including the .NET Framework Launch, TechEd Malaysia, and the Microsoft Executive Summit. He holds a Bachelor of Science (Computer Science) and is a Microsoft Certified Systems Engineer.
David regularly blogs about Visual Studio and .NET at http://www.professionalvisualstudio .com/ , and maintains a personal web site at http://peaksite.com/ .
Guest Author s
Miguel Madero
Miguel Madero is a Senior Developer with Readify Consulting in Australia. Miguel has architected different frameworks and solutions for disconnected mobile applications, ASP.NET, and Distributed Systems, worked with Software Factories, and trained other developers in the latest Microsoft
technologies. Miguel was also the founder of DotNetLaguna, the .NET User Group in Torre ó n, Coahuila, M é xico. In his spare time Miguel enjoys being with his beautiful fianc é e, Carina, practicing rollerblading, and trying to surf at Sydney ’ s beaches. You can find Miguel ’ s blog at http://www.miguelmadero.com/ .
Miguel wrote Chapters 54 through 58 of this book, covering Visual Studio Team Suite and Team Foundation Server.
Keyvan Nayyeri
Keyvan is the author of Professional Visual Studio Extensibility and co - authored Professional Community Server , also published by Wrox Press. You can find his thoughts on .NET, Community Server and Technology at http://www.nayyeri.net/ .
Keyvan was a guest author on this book, writing Chapters 51 through 53 on Visual Studio Automation.
Joel Pobar
Joel Pobar is a habituated software tinkerer originally from sunny Brisbane, Australia. Joel was a Program Manager on the .NET Common Language Runtime team, sharing his time between late - bound dynamic CLR features (Reflection, Code Generation), compiler teams, and the Shared Source CLI program (Rotor). These days, Joel is on sabbatical, exploring the machine learning and natural language processing worlds while consulting part - time for Microsoft Consulting Services. You can find Joel ’ s recent writings at http://callvirt.net/blog/ .
Acquisitions Editor Katie Mohr
Development Editor William Bridges
Technical Editor s Todd Meister Keyvan Nayyeri Doug Holland
Production Editor William A. Barton
Copy Editor s Kim Cofer S.D. Kleinman
Editorial Manager Mary Beth Wakefield
Credits
Production Manager Tim Tate
Vice President and Executive Group Publisher Richard Swadley
Vice President and Executive Publisher Joseph B. Wikert
Project Coordinator, Cover Lynsey Osborne
Proofreaders
David Fine, Corina Copp, Word One
Acknowledgments
I was expecting that writing the second edition of this book would be relatively straightforward — a little tweak here and a bit extra there — but no, the reality was that it was again one of the most time demanding exercises I ’ ve undertaken in recent years. I must thank my partner, Cynthia, who consistently encouraged me to “ get it done, ” so that we can once again have a life.
I would especially like to thank everyone at Wrox who has helped me re - learn the art of technical writing — in particular, Bill Bridges, whose attention to detail has resulted in consistency throughout the book despite there being five authors contributing to the process, and Katie Mohr (whose ability to get us back on track was a life - saver), who made the whole process possible.
I have to pass on a big thank you to my co - author, David Gardner, who agreed to work with me on the second edition of this book. I doubt that I really gave an accurate representation of exactly how much work would be involved, and I really appreciated having someone of such high caliber to bounce ideas off of and share the workload. As we approached the mid - point of this book, I really appreciated a number of guest authors stepping in to help ensure we were able to meet the deadline. So a big thanks to Keyvan Nayyeri, Miguel Madero, and Joel Pobar for their respective contributions.
Lastly, I would like to thank all of my fellow Australian MVP developers and the Microsoft staff (Dave Glover and Andrew Coates particularly), who were always able to answer any questions along the way.
— Nick Randolph
This book represents one of the most rewarding and challenging activities I ’ ve ever undertaken. Writing while maintaining a full - time job is certainly not for the fainthearted. However, in the process I have amassed a wealth of knowledge that I never would have found the time to learn otherwise.
The process of writing a book is very different from writing code, and I am especially thankful to the team at Wrox for helping guide me to the finish line. Without Katie Mohr and Bill Bridges working as hard as they did to cajole the next chapter out of us, we never would have gotten this finished. Katie put her trust in me as a first - time author, and fully supported our decisions regarding the content and structure of the book. Bill improved the clarity and quality of my writing and corrected my repeated grammatical transgressions and Aussie colloquialisms. It was a pleasure to be in such experienced hands, and I thank them both for their patience and professionalism.
A huge thank you goes to my co - author Nick Randolph, who invited me to join him in writing this book, and managed to get us organized early on when I had very little idea what I was doing. I enjoyed collaborating on such a big project and the ongoing conversations about the latest cool feature that we ’ d just discovered.
coffee drinkers and .NET developers, Mitch Wheat, Michael Minutillo, and Ola Karlsson, for their feedback and suggestions on how to improve various chapters.
Most of all I would like to thank my beautiful and supportive wife, Julie. She certainly didn ’ t know what she was getting herself into when I agreed to write this book, but had she known I ’ ve no doubt that she would still have been just as encouraging and supportive. Julie did more than her fair share for our family when I needed to drop almost everything else, and I am truly grateful for her love and friendship.
Finally, thanks to my daughters Jasmin and Emily, who gave up countless cuddles and tickles so that Daddy could find the time to write this book. I promise I ’ ll do my best to catch up on the tickles that I owe you, and pay them back with interest.
Contents
Introduction xxxvii
Part I: Integrated De velopment En vironment
1
Chapter 1: A Quick T our
3
Let’s Get Star ted
3
The V isual Studio IDE
5
Develop, Build, and Debug Your First Application
7
Summary
12
Chapter 2: The Solution Explorer , Toolbox, and Proper ties
13
The Solution Explorer
13
Common Tasks
15
The Toolbox
21
Arranging Components
23
Adding Components
24
Properties
25
Extending the Properties Window
27
Summary
30
Chapter 3: Options and Customizations
31
Window Layout
31
Viewing Windows and Toolbars
32
Navigating Open Items
32
Docking
33
The Editor Space
36
Fonts and Colors
36
Visual Guides
37
Full-Screen Mode
38
Other Options
39
Keyboard Shortcuts
39
Projects and Solutions
41
Build and Run
42
VB.NET Options
43
Importing and Expor ting Settings
43
Summary
45
Chapter 4: W orkspace Control
47
Command Window
47
Document Outline T ool Window
58
HTML Outlining
58
Control Outline
59
Summary
61
Chapter 5: F ind and Replace, and Help
63
Introducing Find and Replace
63
Quick Find
64
Quick Find and Replace Dialog Options
66
Contents
Part II: Getting Star ted
81
Chapter 6: Solutions, Projects, and Items
83
Solution Str ucture
83
My Extensions (Visual Basic only)
101
Security
102
Publish
103
Web (Web Application Projects only)
104
Web Site Projects
104
Summary 105
Chapter 7: Source Control
107
Selecting a Source Control Repositor y
108
Environment Settings
109
Accessing Source Control
109
Offline Support for Source Control
115
Summary 116
Chapter 8: F orms and Controls
117
The Windows F orm
117
Automatic Positioning of Multiple Controls
123
Locking Control Design
124
Chapter 9: Documentation Using Comments and Sandcastle
131
Contents
xvii
Task List Comments
147
Summary 149
Chapter 10: Project and Item T emplates
151
Creating Templates
151
Chapter 11: Generics, Nullable Types, Partial Types, and Methods
171
Generics
171
Why Static Methods Are Bad
183
Property Accessibility
184
Custom Events
185
Summary 186
Chapter 12: Anon ymous Types, Extension Methods,
and Lambda Expressions
187
Object and Ar ray Initialization
187
Implicit Typing
189
Extension Methods
193
Lambda Expressions
195
Summary 198
Chapter 13: Language-Specific F eatures
199
C#
199
Anonymous Methods
199
Iterators
201
Static Classes
202
Naming Conflicts
203
Pragma
206
Automatic Properties
207
VB.NET
207
IsNot
207
Global
208
TryCast
208
Ternary If Operator
209
Relaxed Delegates
209
Summary 210
Chapter 14: The My Namespace
211
What Is the My Namespace?
211
Using My in Code
213
Using My in C#
214
Contextual My
215
Default Instances
217
A Namespace Over view
218
My.Application
218
My.Computer
219
My.Forms and My.WebServices
223
My for the Web
223
My.Resources
223
Other My Classes
224
Your Turn
224
Methods and Properties
224
Extending the Hierarchy
225
Packaging and Deploying
226
Contents
xix
Chapter 15: The Languages Ecosystem
229
Hitting a Nail with the Right Hammer
229
Imperative
230
Chapter 16: IntelliSense and Bookmar ks
241
IntelliSense Explained
241
Bookmarks and the Bookmar k Window
251
Summary 253
Chapter 17: Code Snippets and Refactoring
255
Code Snippets Re vealed
256
Original Code Snippets
256
“Real” Code Snippets
256
Using Snippets in Visual Basic
257
Using Snippets in C# and J#
258
Code Snippets Manager
260
Chapter 18: Modeling with the Class Designer
275
Creating a Class Diagram
275
Refactoring with the Class Designer
284
PowerToys for the Class Designer
285
Visualization Enhancements
285
Functionality Enhancements
287
Summary 288
Chapter 19: Ser ver Explorer
289
The Ser vers Node
290
Event Logs
290
Contents
Chapter 20: Unit T esting
305
Your First Test Case
305
Managing Large Numbers of Tests
321
Summary 322
Part V: Data
323
Chapter 21: DataSets and DataBinding
325
Validation
346
DataGridView
353
Object Data Source
355
IDataErrorInfo
359
Working with Data Sources
359
Web Service Data Source
360
Browsing Data
361
Summary 363
Chapter 22: V isual Database T ools
365
Database Windows in V isual Studio 2008
365
Server Explorer
366
Table Editing
368
Relationship Editing
369
Views
370
Stored Procedures and Functions
371
Database Diagrams
373
Data Sources Window
374
Managing Test Data
379
Previewing Data
380
Summary 381
Chapter 23: Language Integrated Queries (LINQ)
383
LINQ Providers
383
Old-School Queries
384
Query Pieces
386
From
386
Select
387
Where
388
Group By
389
Custom Projections
389
Order By
390
Debugging and Execution
390
Summary 391
Chapter 24: LINQ to XML
393
XML Object Model
393
Contents
xxiii
Creating XML with LINQ
397
Expression Holes
397
Querying XML
398
Schema Suppor t
400
Summary 402
Chapter 25: LINQ to SQL and Entities
403
LINQ to SQL
403
Creating the Object Model
404
Querying with LINQ to SQL
407
Binding LINQ to SQL Objects
411
LINQ to Entities
414
Summary 416
Chapter 26: Synchronization Ser vices
417
Occasionally Connected Applications
417
Server Direct
418
Getting Started with Synchronization Services
420
Synchronization Services over N-Tiers
425
Background Synchronization
429
Client Changes
431
Summary 432
Part VI: Security
433
Chapter 27: Security in the .NET F ramework
435
Key Security Concepts
435
Code Access Security
437
Permission Sets
438
Evidence and Code Groups
438
Security Policy
439
Walkthrough of Code Access Security
440
Role-Based Security
442
User Identities
443
Walkthrough of Role-Based Security
444
Chapter 28: Cr yptography
447
General Principles
447
Techniques 448
Hashing
448
Symmetric (Secret) Keys
449
Asymmetric (Public/Private) Keys
450
Signing
450
Summary of Goals
451
Applying Cr yptography
451
Creating Asymmetric Key Pairs
451
Creating a Symmetric Key
453
Encrypting and Signing the Key
454
Verifying Key and Signature
457
Decrypting the Symmetric Key
458
Sending a Message
460
Receiving a Message
462
Miscellaneous 464
SecureString
464
Key Containers
467
Summary 468
Chapter 29: Obfuscation
469
MSIL Disassembler
469
Decompilers 471
Obfuscating Your Code
472
Dotfuscator
472
Words of Caution
475
Attributes 477
ObfuscationAssemblyAttribute 477
ObfuscationAttribute 478
Summary 479
Chapter 30: Client Application Ser vices
481
Client Ser vices
481
Role Authorization
484
User Authentication
485
Settings
487
Contents
xxv
Chapter 31: De vice Security Manager
495
Security Configurations
495
Chapter 32: ASP.NET W eb Applications
505
Web Application vs. W eb Site Projects
505
Creating Web Projects
506
Creating a Web Site Project
507
Creating a Web Application Project
510
Other Web Projects
511
Starter Kits, Community Projects, and Open-Source Applications
512
Designing Web Forms
513
The HTML Designer
513
Positioning Controls and HTML Elements
515
Formatting Controls and HTML Elements
518
CSS Tools
519
ASP.NET W eb Site Administration
542
Security
543
Application Settings
545
ASP.NET Configuration in IIS
545
Chapter 33: Office Applications
547
Choosing an Office Project T ype
548
Document-Level Customizations
549
Application-Level Add-In
549
SharePoint Workflow
550
InfoPath Form Template
551
Creating a Document-Le vel Customization
551
Your First VSTO Project
552
Protecting the Document Design
555
Adding an Actions Pane
555
Creating an Application Add-In
557
Some Outlook Concepts
557
Creating an Outlook Form Region
558
Contents
Chapter 36: WCF and WF Applications
609
Windows Communication F oundation
609
Consuming a WCF Service
615
Windows Workflow Foundation
617
Summary 623
Chapter 37: Next Generation W eb: Silver light and ASP.NET MVC
625
Silverlight 626
Getting Started with Silverlight 2
627
Interacting with Your Web Page
631
Hosting Silverlight Applications
633
ASP.NET MVC
634
Model-View-Controller 635
Getting Started with ASP.NET MVC
636
Controllers and Action Methods
638
Rendering a UI with Views
641
Custom URL Routing
644
Summary 645
Part VIII: Configuration and Inter nationalization
647
Chapter 38: Configuration F iles
649
Section: runtime
652
Chapter 40: Resource F iles
677
Contents
Chapter 41: Using the Debugging Windows
697
Code Window
697
Chapter 42: Debugging with Breakpoints
711
Breakpoints 711
Setting a Breakpoint
712
Adding Break Conditions
714
Tracepoints 717
Chapter 43: Creating Debug Proxies and V isualizers
723
Attributes 723
Saving Changes to Your Object
732
Summary 733
Chapter 44: Debugging W eb Applications
735
Debugging Ser ver-Side ASP.NET Code
735
Web-Application Exceptions
737
Edit and Continue
740
Error Handling
740
Debugging Client-Side Ja vaScript
741
Setting Breakpoints in JavaScript Code
741
Contents
Chapter 45: Advanced Debugging T echniques
751
Start Actions
751
Debugging with Code
753
The Debugger Class
754
The Debug and Trace Classes
754
Debugging Running Applications
756
Attaching to a Windows Process
757
Attaching to a Web Application
757
Remote Debugging
759
.NET Framework Reference Source
760
Multi-Threaded Debugging
763
Debugging SQL Ser ver Stored Procedures
764
Mixed-Mode Debugging
765
Summary 766
Part X: Build and Deplo yment
767
Chapter 46: Upgrading with V isual Studio 2008
769
Upgrading from V isual Studio 2005
769
Upgrading to .NET F ramework v3.5
773
Upgrading from V isual Basic 6
774
Summary 775
Chapter 47: Build Customization
777
General Build Options
777
Manual Dependencies
780
Visual Basic Compile P age
781
Advanced Compiler Settings
782
Build Events
783
C# Build P ages
785
MSBuild
787
How Visual Studio Uses MSBuild
787
MSBuild Schema
791
Chapter 48: Assembly V ersioning and Signing
795
Assembly Naming
795
Version Consistency
797
Strong-Named Assemblies
798
The Global Assembly Cache
799
Signing an Assembly
799
Summary 801
Chapter 49: ClickOnce and MSI Deplo yment
803
Installers 803
Building an Installer
803
Customizing the Installer
809
Adding Custom Actions
812
Service Installer
814
ClickOnce 817
Click to Deploy
817
Click to Update
822
Summary 824
Chapter 50: W eb and Mobile Application Deplo yment
825
Web Application Deplo yment
825
Publish Web Site
825
Copy Web Project
827
Web Deployment Projects
827
Web Project Installers
830
Mobile Application Deplo yment
831
CAB Files
831
MSI Installer
833
Summary 836
Part XI: Automation
837
Chapter 51: The Automation Model
839
Introduction to the Automation Model
840
The Automation Model and V isual Studio Extensibility
841
Development Tools Extensibility (DTE)
842
Contents
xxxiii
Commands
846
Debugger
847
Limitations of the Automation Model
847
Summary 848
Chapter 52: Add-Ins
849
Introduction 850
Add-In Wizard
851
The Anatom y of an Add-In
855
The Str ucture of .AddIn F iles
860
Develop an Add-In
861
Debugging 864
Deployment 864
Shared Add-Ins
865
Summary 866
Chapter 53: Macros
867
The Anatom y of a Macro
868
Macro Explorer
869
Macros IDE
869
How to Record a Macro
871
How to De velop a Macro
872
Running a Macro
876
Deployment 877
Summary 878
Part XII: V isual Studio T eam System
879
Chapter 54: VSTS: Architect Edition
881
Case Study
881
Application Designer
882
Logical Datacenter Designer
884
Deployment Designer
885
Settings and Constraints Editor
886
System Designer
887
Chapter 55: VSTS: De veloper Edition
891
Code Metrics
891
Lines of Code
892
Depth of Inheritance
893
Class Coupling
893
Cyclomatic Complexity
893
Maintainability Index
893
Excluded Code
893
Managed Code Analysis T ool
893
C/C++ Code Analysis T ool
895
Profiling Tools
895
Configuring Profiler Sessions
896
Reports
897
Stand-Alone Profiler
898
Application Verifier
898
Code Coverage
899
Summary 901
Chapter 56: VSTS: T ester Edition
903
Web Tests
903
Load Tests
906
Test Load Agent
908
Manual Tests
908
Generic Tests
908
Ordered Tests
908
Test Management
909
Summary 909
Chapter 57: VSTS: Database Edition
911
SQL-CLR Database Project
911
Offline Database Schema
912
Data Generation
914
Database Unit T esting
916
Database Refactoring
917
Schema Compare
918
Data Compare
919
T-SQL Editor
920
Contents
xxxv
Chapter 58: T eam Foundation Ser ver
923
Process T emplates
923
Work Item T racking
925
Initial Work Items
926
Work Item Queries
926
Work Item Types
928
Adding Work Items
929
Excel and Project Integration
929
Excel
929
Project
930
Version Control
932
Working from Solution Explorer
932
Check Out
933
Check In
934
History
935
Annotate
935
Resolve Conflicts
936
Working Offline
937
Label
937
Shelve
939
Branch
939
Team Foundation Build
939
Reporting and Business Intelligence
941
Team Portal
942
Documents
943
Process Guidance
943
SharePoint Lists
943
Team System W eb Access
943
TFS Automation and Process Customization
944
Work Item Types
944
Customizing the Process Template
945
Summary 946
Introduction
Visual Studio 2008 is an enormous product no matter which way you look at it. Incorporating the latest advances in Microsoft ’ s premier programming languages, Visual Basic and C#, along with a host of improvements and new features in the user interface, it can be intimidating to both newcomers and experienced .NET developers.
Professional Visual Studio 2008 looks at every major aspect of this developer tool, showing you how to harness each feature and offering advice about how best to utilize the various components effectively. It shows you the building blocks that make up Visual Studio 2008, breaking the user interface down into manageable chunks for you to understand.
It then expands on each of these components with additional details about exactly how it works both in isolation and in conjunction with other parts of Visual Studio to make your development efforts even more efficient.
Who This Book Is F or
Professional Visual Studio 2008 is for all developers new to Visual Studio as well as those programmers who have some experience but want to learn about features they may have previously overlooked.
If you are familiar with the way previous versions of Visual Studio worked, you may want to skip Part I, which deals with the basic constructs that make up the user interface, and move on to the remainder of the book where the new features found in Visual Studio 2008 are discussed in detail.
If you ’ re just starting out, you ’ ll greatly benefit from the first part, where basic concepts are explained and you ’ re introduced to the user interface and how to customize it to suit your own style.
This book does assume that you are familiar with the traditional programming model, and it uses both the C# and Visual Basic languages to illustrate features within Visual Studio 2008. In addition, it is assumed that you can understand the code listings without an explanation of basic programming concepts in either language. If you ’ re new to programming and want to learn Visual Basic, please take a look at Beginning Visual Basic 2008 by Thearon Willis and Bryan Newsome. Similarly, if you are after a great book on C#, track down Beginning Visual C# 2008, written collaboratively by a host of authors.
What This Book Co vers
The next few pages introduce you to Microsoft Visual Studio 2008, how it came about, and what it can do for you as a developer. If you ’ re already familiar with what Visual Studio is and how it came to be, you may want to skip ahead to the next chapter and dive into the various aspects of the integrated development environment itself.
A Brief History of Visual Studio
Microsoft has worked long and hard on its development tools. Actually, its first software product was a version of BASIC in 1975. Back then, programming languages were mainly interpretive languages in which the computer would process the code to be performed line by line. In the past three decades, programming has seen many advances, one of the biggest by far being development environments aimed at helping developers be efficient at producing applications in their chosen language and platform.
In the 32 - bit computing era, Microsoft started releasing comprehensive development tools, commonly called IDEs (short for integrated development environments), which contained not just a compiler but also a host of other features to supplement it, including a context - sensitive editor and rudimentary IntelliSense features that helped programmers determine what they could and couldn ’ t do in a given situation. Along with these features came intuitive visual user interface designers with drag - and - drop functionality and associated tool windows that gave developers access to a variety of properties for the various components on a given window or user control.
Initially, these IDEs were different for each language, with Visual Basic being the most advanced in terms of the graphical designer and ease of use, and Visual C++ having the most power and flexibility. Under the banner of Visual Studio 6, the latest versions of these languages were released in one large
development suite along with other “ Visual ” tools such as FoxPro and InterDev. However, it was obvious that each language still had a distinct environment in which to work, and as a result, development solutions had to be in a specific language.
One Comprehensive Environment
When Microsoft first released Visual Studio .NET in 2002, it inherited many features and attributes of the various, disparate development tools the company had previously offered. Visual Basic 6, Visual InterDev, Visual C++, and other tools such as FoxPro all contributed to a development effort that the Microsoft development team mostly created on its own. The team had some input from external groups, but Visual Studio .NET 2002 and .NET 1.0 were primarily founded on Microsoft ’ s own principles and goals.
Visual Studio .NET 2003 was the next version released, and it provided mostly small enhancements and big fixes. Two years later, Visual Studio 2005 and the .NET Framework 2.0 were released. This was a major new edition with new foundation framework classes that went far beyond anything Microsoft had released previously. However, the most significant part of this release was realized in the IDE where the various components fit together in a cohesive way to provide you with an efficient tool set where everything was easily accessible.
The latest release, Visual Studio 2008 and .NET Framework 3.5, builds on this strong foundation. LINQ promises to revolutionize the way you access data, and features that were previously separate
Introduction
xxxix
The Visual Studio 2008 development environment (see Figure I - 1 ) takes the evolution of Microsoft IDEs even further along the road to a comprehensive set of tools that can be used regardless of your purpose as a developer. A quick glance at Figure I - 1 shows the cohesive way in which the various components fit together to provide you with an efficient tool set with everything easily accessible.
Figure I - 1
How This Book Is Str uctured
This book ’ s first section is dedicated to familiarizing you with the core aspects of Visual Studio 2008. Everything you need is contained in the first five chapters, from the IDE structure and layout to the various options and settings you can change to make the user interface synchronize with your own way of doing things.
From there, the remainder of the book is broken into 11 parts:
Getting Started: In this part, you learn how to take control of your projects, how to organize them in ways that work with your own style, and how to edit application configuration and XML resource files.
Languages: The .NET languages continue to evolve to support new features that are added to the framework. In the latest version of the framework, enhancements were added to support the introduction of LINQ, namely implicit typing, object initialization, and lambda expressions. Add these to features introduced in earlier versions, such as generics and partial types, and you ’ ve got an extremely expressive and powerful framework for building applications. This part covers all these features and more.
Coding: Though the many graphical components of Visual Studio that make a programmer ’ s job easier are discussed in many places throughout this book, you often need help when you ’ re in the process of actually writing code. This part deals with features that support the coding of applications such as IntelliSense, code refactoring, and creating and running unit tests.
Data: A large proportion of applications use some form of data storage. Visual Studio 2008 and the .NET Framework include strong support for working with databases and other data sources. This part examines how to use DataSets, the Visual Database Tools, LINQ, and Synchronization Services to build applications that work with data.
Security: Application security is a consideration that is often put off until the end of a
development project or, in all too many cases, ignored completely. Rather than follow the trend and leave this topic to the end of the book, it is placed in a more appropriate place.
Platforms: For support building everything from Office add - ins to mobile applications, Visual Studio enables you to develop applications for a wide range of platforms. This part covers the application platforms that have always been supported, including ASP.NET, Office, and Mobile, as well as the application types that were introduced with .NET 3.0 (WPF, WCF, and WF). At the end of this part, you ’ ll find a chapter on building the next - generation web with Silverlight 2 and ASP.NET MVC.
Configuration and Internationalization: The built - in support for configuration files allows you to adjust the way an application functions on the fly without having to rebuild it. Furthermore, resource files can be used to both access static data and easily localize an application into foreign languages and cultures. This part of the book shows how to use .NET configuration and
resource files.
Debugging: Application debugging is one of the more challenging tasks developers have to tackle, but correct use of the Visual Studio 2008 debugging features will help you analyze the state of the application and determine the cause of any bugs. This part examines the rich debugging support provided by the IDE.
Introduction
xli
Build and Deployment: In addition to discussing how to build your solutions effectively and getting applications into the hands of your end users, this part also deals with the process of upgrading your projects from previous versions.
Automation: If the functionality found in the previous part isn ’ t enough to help you in your coding efforts, Microsoft has provided many other features related to the concept of automating your programming work. This part starts by looking at the automation model, and then discusses add - ins and macros.
Visual Studio Team System: Visual Studio Team System gives organizations a single tool that can be used to support the entire software lifecycle. The final part of the book examines the additional features only available in the Team System versions of Visual Studio 2008. In addition, you ’ ll also learn how the Team Foundation Server provides an essential tool for managing software projects.
Though this breakdown of the Visual Studio feature set provides the most logical and easily understood set of topics, you may need to look for specific functions that will aid you in a particular activity. To address this need, references to appropriate chapters are provided whenever a feature is covered in more detail elsewhere in the book.
What Y ou Need to Use This Book
To use this book effectively, you ’ ll need only one additional item — Microsoft Visual Studio 2008 Professional Edition. With this software installed and the information found in this book, you ’ ll be able to get a handle on how to use Visual Studio 2008 effectively in a very short period of time.
Some chapters discuss additional products and tools that work in conjunction with Visual Studio. The following are all available to download either on a trial basis, or for free:
Sandcastle: Using Sandcastle, you can generate comprehensive documentation for every member and class within your solutions from the XML comments in your code. XML comments and Sandcastle are discussed in Chapter 9 .
F#: A multi - paradigm functional language, F# was incubated out of Microsoft Research in Cambridge, England. Chapter 15 covers the F# programming language.
Code Snippet Editor: This is a third - party tool developed for creating code snippets in Visual Basic. The Snippet Editor tool is discussed in Chapter 17 .
SQL Server 2005: The installation of Visual Studio 2008 includes an install of SQL Server 2005 Express, enabling you to build applications that use database files. However, for more
comprehensive enterprise solutions, you can use SQL Server 2005 instead. Database connectivity is covered in Chapter 22 .
Silverlight 2: Silverlight 2 is a cross - platform, cross - browser runtime that includes a lightweight version of the .NET Framework and delivers advanced functionality such as vector graphics, animation, and streaming media. Silverlight 2 is discussed in Chapter 37 .
ASP.NET MVC: The ASP.NET MVC framework provides a way to cleanly separate your application into model, view, and controller parts, thus enabling better testability and giving you more control over the behavior and output produced by your web application. Chapter 37 explains how to build applications with the ASP.NET MVC framework.
Web Deployment Projects: Using a Web Deployment Project, you can effectively customize your application so that it can be deployed with a minimal set of files. Web Deployment Projects are covered in Chapter 50 .
Visual Studio 2008 Team System: A more powerful version of Visual Studio, Team System introduces tools for other parts of the development process such as testing and design. Team System is discussed in Chapters 54 – 58 .
Conventions
To help you get the most from the text and keep track of what ’ s happening, we ’ ve used a number of conventions throughout the book.
Tips, hints, tricks, and asides to the current discussion are offset and placed in italics like this.
As for styles in the text:
We highlight new terms and important words when we introduce them. We show keyboard strokes like this: Ctrl+A.
URLs and code that are referenced within the text use this format: persistence.properties .
We present code in two different ways:
Normal code examples are listed like this.
In code examples we highlight important code with a gray background.
Source Code
As you work through the examples in this book, you may choose either to type in all the code manually or to use the source code files that accompany the book. All of the source code used in this book is available for download at www.wrox.com . Once at the site, simply locate the book ’ s title (either by using the Search box or by using one of the title lists) and click the Download Code link on the book ’ s detail page to obtain all the source code for the book.
Because many books have similar titles, you may find it easiest to search by ISBN; this book ’ s ISBN is 978 - 0 - 470 - 22988 - 0.
Once you download the code, just decompress it with your favorite compression tool. Alternatively, you can go to the main Wrox code download page at www.wrox.com/dynamic/books/download.aspx to see the code available for this book and all other Wrox books.
Introduction
xliii
Errata
We make every effort to ensure that there are no errors in the text or in the code. However, no one is perfect, and mistakes do occur. If you find an error in one of our books, such as a spelling mistake or faulty piece of code, we would be very grateful for your feedback. By sending in errata you may save another reader hours of frustration, and at the same time you will be helping us provide even higher quality information.
To find the errata page for this book, go to www.wrox.com and locate the title using the Search box or one of the title lists. Then, on the book details page, click the Book Errata link. On this page you can view all errata that have been submitted for this book and posted by Wrox editors. A complete book list, including links to each book ’ s errata, is also available at www.wrox.com/misc - pages/booklist.shtml .
If you don ’ t spot “ your ” error on the Book Errata page, go to www.wrox.com/contact/techsupport .shtml and complete the form there to send us the error you have found. We ’ ll check the information and, if appropriate, post a message to the book ’ s errata page and fix the problem in subsequent editions of the book.
p2p.wrox.com
For author and peer discussion, join the P2P forums at http://p2p.wrox.com . The forums are a web - based system for you to post messages relating to Wrox books and related technologies, and to interact with other readers and technology users. The forums offer a subscription feature to e - mail you topics of interest of your choosing when new posts are made to the forums. Wrox authors, editors, other industry experts, and your fellow readers are present on these forums.
At http://p2p.wrox.com you will find a number of different forums that will help you not only as you read this book, but also as you develop your own applications. To join the forums, just follow these steps:
1.
Go to http://p2p.wrox.com and click the Register link.2.
Read the terms of use and click Agree.3.
Complete the required information to join as well as any optional information you wish to provide and click Submit.4.
You will receive an e - mail with information describing how to verify your account and complete the joining process.You can read messages in the forums without joining P2P, but in order to post your own messages, you must join.
Once you join, you can post new messages and respond to messages other users post. You can read messages at any time on the Web. If you would like new messages from a particular forum e - mailed to you, click the Subscribe to this Forum icon by the forum name in the forum listing.
Part I
Integrated
Development
Environment
Chapter 1:
A Quick Tour
Chapter 2:
The Solution Explorer, Toolbox, and Properties
Chapter 3:
Options and Customizations
Chapter 4:
Workspace Control
A Quick T our
Ever since we have been developing software, there has been a need for tools to help us write, compile, and debug our applications. Microsoft Visual Studio 2008 is the next iteration in the continual evolution of a best - of - breed integrated development environment (IDE). If this is your first time using Visual Studio, then you will find this chapter a useful starting point. Even if you have worked with a previous version of Visual Studio, you may want to quickly skim it.
This chapter introduces the Visual Studio 2008 user experience and will show you how to work with the various menus, toolbars, and windows. It serves as a quick tour of the IDE, and as such it won ’ t go into detail about what settings can be changed or how to go about customizing the layout, as these topics will be explored in the following chapters.
Let ’ s Get Star ted
Each time you launch Visual Studio you will notice the Microsoft Visual Studio 2008 splash screen appear. Like a lot of splash screens, it provides information about the version of the product and to whom it has been licensed, as shown in Figure 1 - 1 .
More importantly, the Visual Studio splash screen includes a list of the main components that have been installed. If you install third - party add - ins, you may see those products appear in this list.
The first time you run Visual Studio 2008, you will see the splash screen only for a short period before you are prompted to select the default environment settings. It may seem unusual to ask those who haven ’ t used a product before how they imagine themselves using it. As Microsoft has consolidated a number of languages and technologies into a single IDE, that IDE must account for the subtle (and sometimes not so subtle) differences in the way developers work.
If you take a moment to review the various options in this list, as shown in Figure 1 - 2 , you ’ ll find that the environment settings that will be affected include the position and visibility of various windows, menus, and toolbars, and even keyboard shortcuts. For example, if you select the General Development Settings option as your default preference, this screen describes the changes that will be applied.
Figure 1-2
A tip for Visual Basic .NET developers coming from previous versions of Visual Studio is that they
Chapter 1: A Quick Tour
5
The V isual Studio IDE
Depending on which set of environment settings you select, when you click the Start Visual Studio button you will most likely see a dialog indicating that Visual Studio is configuring the development environment. When this process is complete, Visual Studio 2008 will open, ready for you to start work, as shown in Figure 1 - 3 .
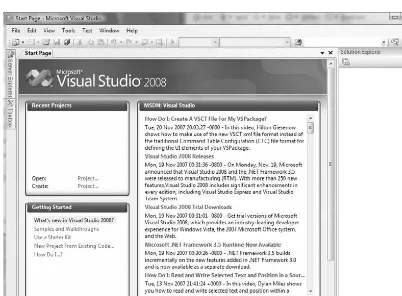
Figure 1-3
Regardless of the environment settings you selected, you will see the Start Page in the center of the screen. However, the contents of the Start Page and the surrounding toolbars and tool windows can vary. At this stage it is important to remember that your selection only determined the default settings, and that over time you can configure Visual Studio to suit your working style.
Before we launch into building our first application, it ’ s important that we take a step back and look at the components that make up the Visual Studio 2008 IDE. Menus and toolbars are positioned along the top of the environment (as in most Windows applications), and a selection of sub - windows, or panes, appears on the left and right of the main window area. In the center is the main editor space: Whenever you open a code file, an XML document, a form, or some other file, it will appear in this space for editing. With each file you open, a new tab is created so that you can toggle among opened files.
On either side of the editor space is a set of tool windows: These areas provide additional contextual information and functionality. In the case of the general developer settings, the default layout includes the Solution Explorer and Class View on the right, and the Server Explorer and Toolbox on the left. The tool windows on the left are in their collapsed, or unpinned, state. If you click on a tool window ’ s title, it will expand; it will collapse again when it no longer has focus or you move the cursor to another area of the screen. When a tool window is expanded you will see a series of three icons at the top right of the window, similar to those shown in the left image of Figure 1 - 4 .
Figure 1-4
If you want the tool window to remain in its expanded, or pinned, state, you can click the middle icon, which looks like a pin. The pin will rotate 90 degrees to indicate that the window is now pinned. Clicking the third icon, the X, will close the window. If later you want to reopen this or another tool window, you can select it from the View menu.
Some tool windows are not accessible via the View menu, for example those having to do with debugging, such as threads and watch windows. In most cases these windows are available via an alternative menu item: in the case of the debugging windows it is the Debug menu.
Chapter 1: A Quick Tour
7
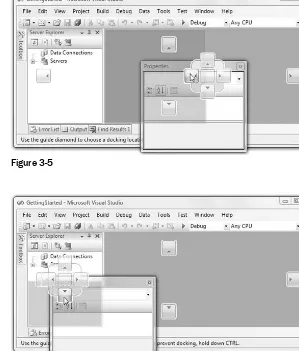
Figure 1-5
The other thing to note about the left image of Figure 1 - 5 is that the editor space has been divided into two horizontal regions. If you right - click an existing tab in the editor space, you can elect to move it to a new horizontal or vertical tab group. This can be particularly useful if you are working on multiple forms, or if you want to view the layout of a form while writing code in the code - behind file.
In the right image of Figure 1 - 5 the editor space is no longer rendered as a series of tabs. Instead, it is a series of child windows, in classic multiple - document - interface style. Unfortunately, this view is particularly limiting, because the child windows must remain within the bounds of the parent window, making it unusable across multiple monitors. To toggle between tabbed and multiple document window layouts, simply select the Environment General node from the Options dialog.
Develop, Build, and Debug Your First Application
Now that you have seen an overview of the Visual Studio 2008 IDE, let ’ s walk through creating a simple application that demonstrates working with some of these components. This is, of course, the mandatory “Hello World” sample that every developer needs to know, and it can be done in either Visual Basic .NET or C#, depending on what you feel more comfortable with.
Figure 1-6
Chapter 1: A Quick Tour
9
2.
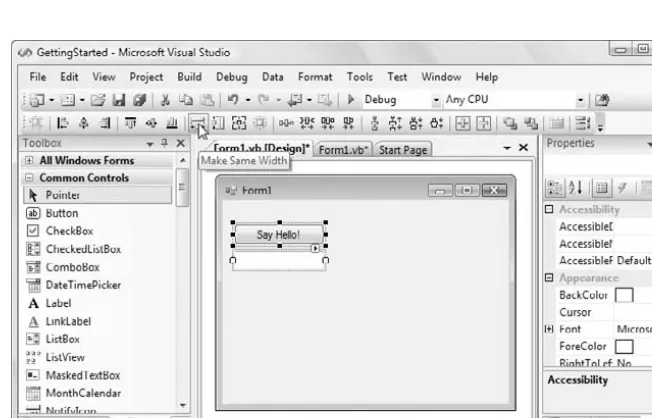
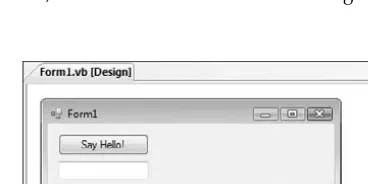
Click on the Toolbox tool window, which will cause the window to expand, followed by the pinicon, which will pin the tool window open. To add controls to the form, select the appropriate items from the Toolbox and drag them onto the form. In Figure 1 - 8, you can see how the Toolbar tool window appears after being pinned and the result of clicking and dragging a button onto the form visual designer.
Figure 1-8
3.
Add a button and textbox to the form so that the layout looks similar to the one shown in Figure 1 - 9 . Select the textbox and select the Properties tool window (you can press F4 to automatically open the Properties tool window). Use the scrollbar to locate the ( Name ) property and set it to txtToSay . Repeat for the button control, naming it btnSayHello and setting theText property to “ Say Hello! ”
4.
When a form is opened in the editor space, an additional command bar is added to the top of Visual Studio 2008. If you select both controls on the form, you will see that certain icons on this command bar are enabled. Selecting the Make Same Width icon will align the edges of the two controls, as illustrated in Figure 1 - 10 .You will also notice that after you add controls to the form the tab will be updated with an asterisk ( * ) after the text to indicate that there are unsaved changes to that particular item. If you attempt to close this item while changes are pending, you will be asked if you want to save the changes. When you build the application, any unsaved files will automatically be saved as part of the build process.
One thing to be aware of is that some files, such as the solution file, are modified when you make changes within Visual Studio 2008 without your being given any indication that they have changed. If you try to exit the application or close the solution, you will still be prompted to save these changes.
Figure 1-10
5.
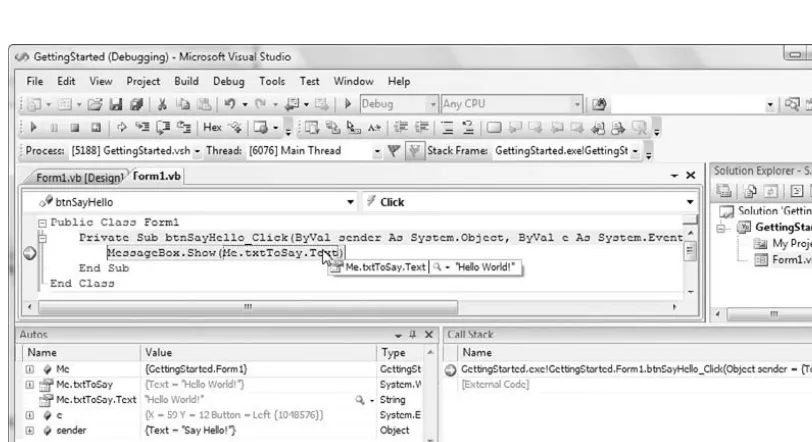
Deselect all controls and then double - click the button. This will not only open the code editor with the code - behind file for this form; it will also create and wire up an event handler for theChapter 1: A Quick Tour
11
Figure 1-11
6.
The last step in the process is to build and execute the application. Before doing so, place the cursor somewhere on the line containing Messagebox.Show and press F9. This will set a breakpoint — when you run the application by pressing F5 and then click the Say Hello! button, the execution will halt at this line. Figure 1 - 12 illustrates this breakpoint being reached. The data tip, which appears when the mouse hovers over the line, shows the contents of the txtToSay .ext property.Figure 1-12
The layout of Visual Studio in Figure 1 - 12 is significantly different from the previous
time and runtime. Menus, toolbars, and various windows have default layouts for when you are editing a project, whereas a different setup is defined for when a project is being executed and debugged. You can modify each of these layouts to suit your own style and Visual Studio 2008 will remember them.
It ’ s always a good idea to export your layout and settings (see Chapter 3 ) once you have them set up just the way you like them. That way you can take them to another PC or restore them if your PC gets rebuilt.
Summary
You ’ ve now seen how the various components of Visual Studio 2008 work together to build an application. As a review of the default layout for Visual Basic programs, the following list outlines the typical process of creating a solution:
1.
Use the File menu to create a solution.2.
Use the Solution Explorer to locate the form that needs editing and click the View Designer button to show it in the main workspace area.3.
Drag the necessary components onto the form from the Toolbox.4.
Select the form and each component in turn, and edit the properties in the Properties window.5.
Use the Solution Explorer to locate the form and click the View Code button to access the code behind the form ’ s graphical interface.6.
Use the main workspace area to write code and design the graphical interface, switching between the two via the tabs at the top of the area.7.
Use the toolbars to start the program.8.
If errors occur, review them in the Error List and Output windows.9.
Save the project using either toolbar or menu commands, and exit Visual Studio 2008.While many of these actions can be performed in other ways (for instance, right - click the design surface of a form and you ’ ll find the View Code command), this simplified process shows how the different sections of the IDE work in conjunction with each other to create a comprehensive application design environment.
The Solution Explorer ,
Toolbox, and Proper ties
In Chapter 1 you briefly saw and interacted with a number of the components that make up the Visual Studio 2008 IDE. Now you will get an opportunity to work with three of the most commonly used tool windows — the Solution Explorer, the Toolbox, and Properties.
Throughout this and other chapters you will see references to keyboard shortcuts, such as Ctrl+S. In these cases we assume the use of the general development settings, as shown in Chapter 1 . Other profiles may have different key combinations.
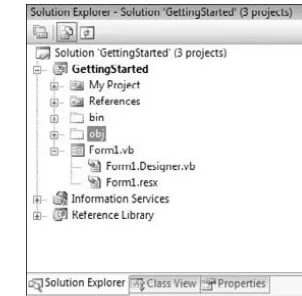
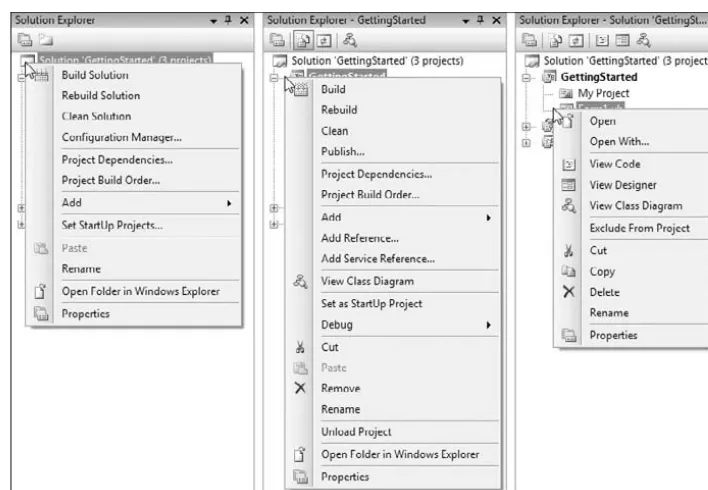
The Solution Explorer
Whenever you create or open an application, or for that matter just a single file, Visual Studio 2008 uses the concept of a solution to tie everything together. Typically, a solution is made up of one or more projects, each of which in turn can have multiple items associated with it. In the past these items were typically just files, but increasingly projects are made up of items that may consist of multiple files, or in some cases no files at all. Chapter 6 will go into more detail about projects, the structure of solutions, and how items are related.