Learning jQuery
Better Interaction Design and Web Development
with Simple JavaScript Techniques
Jonathan Chaffer
Karl Swedberg
Learning jQuery
Better Interaction Design and Web Development with Simple
JavaScript Techniques
Copyright © 2007 Packt Publishing
All rights reserved. No part of this book may be reproduced, stored in a retrieval system, or transmitted in any form or by any means, without the prior written permission of the publisher, except in the case of brief quotations embedded in critical articles or reviews.
Every effort has been made in the preparation of this book to ensure the accuracy of the information presented. However, the information contained in this book is sold without warranty, either express or implied. Neither the authors, Packt Publishing, nor its dealers or distributors will be held liable for any damages caused or alleged to be caused directly or indirectly by this book.
Packt Publishing has endeavored to provide trademark information about all the companies and products mentioned in this book by the appropriate use of capitals. However, Packt Publishing cannot guarantee the accuracy of this information.
First published: June 2007
Production Reference: 1220607
Published by Packt Publishing Ltd. 32 Lincoln Road
Olton
Birmingham, B27 6PA, UK.
ISBN 978-1-847192-50-9
www.packtpub.com
Credits
Authors
Jonathan Chaffer
Karl Swedberg
Reviewers Jörn Zaefferer
Dave Methvin
Paul Bakaus
Dan Bravender
Mike Alsup
Senior Acquisition Editor Douglas Paterson
Assistant Development Editor Nikhil Bangera
Technical Editor Bansari Barot
Editorial Manager Dipali Chittar
Project Manager Patricia Weir
Project Coordinator Abhijeet Deobhakta
Indexer
Bhushan Pangaonkar
Proofreader Chris Smith
Production Coordinator Shantanu Zagade
About the Authors
Jonathan
Chaffer
is the Chief Technology Officer of Structure Interactive,an interactive agency located in Grand Rapids, Michigan. There he oversees web development projects using a wide range of technologies, and continues to collaborate on day-to-day programming tasks as well.
In the open-source community, Jonathan has been very active in the Drupal CMS project, which has adopted jQuery as its JavaScript framework of choice. He is the creator of the Content Construction Kit, a popular module for managing structured content on Drupal sites. He is responsible for major overhauls of Drupal’s menu system and developer API reference.
Jonathan lives in Grand Rapids with his wife, Jennifer.
Karl Swedberg
is a web developer at Structure Interactive in Grand Rapids, Michigan, where he spends much of his time implementing design with a focus on web standards—semantic HTML, well-mannered CSS, and unobtrusive JavaScript.Before his current love affair with web development, Karl worked as a copy editor, a high-school English teacher, and a coffee house owner. His fascination with technology began in the early 1990s when he worked at Microsoft in Redmond, Washington, and it has continued unabated ever since.
Karl’s other obsessions include photography, karate, English grammar, and fatherhood. He lives in Grand Rapids with his wife, Sara, and his two children, Benjamin and Lucia.
About the Reviewers
Jörn
Zaefferer
is a software developer and a consultant from Köln, Germany. He is currently working at Maxence Integration Technologies GmbH. His work is centered on developing web-based applications as JSR-168 portlets in JEE environments, mostly Websphere Portal 5.1 based. He is currently working on a project based on JSF and Spring.Dave
Methvin
has more than 25 years of software development experience in both the Windows and UNIX environments. His early career focused on embedded software in the fields of robotics, telecommunications, and medicine. Later, he moved to PC-based software projects using C/C++ and web technologies.Dave also has more than 20 years of experience in computer journalism. He was Executive Editor at PC Tech Journal and Windows Magazine, covering PC and Internet issues; his how-to columns on JavaScript offered some of the first cut-and-paste solutions to common web page problems. He was also a co-author of the book
Networking Windows NT (John Wiley & Sons, 1997).
Currently, Dave is Chief Technology Officer at PC Pitstop, a website that helps users fix and optimize the performance of their computers. He is also active in the jQuery community.
Dan
Bravender
has been working with open-source software for over 10 years. His fondest memories are of staying up all night to install and compile Linux in college with his roommate. He has collected a massive collection of German board games. When not playing board games, he enjoys playing soccer and hockey and studying Korean and Chinese etymology. He misses working with Karl and Jon and is very proud of all the hard work that they put into this book.Mike
Alsup
is a Senior Software Developer at ePlus where he works on J2EE and web development projects. He is a graduate from Potsdam College and has been serving the software industry since 1989. Mike lives in Palmyra, NY with his wife, Diane, and their three sons.Table of Contents
Preface
1
Chapter 1: Getting Started
5
What jQuery Does 6
Why jQuery Works Well 7
Our First jQuery Document 8
Downloading jQuery 8
Setting Up the HTML Document 8
Writing the jQuery Code 11
Finding the Poem Text 12
Injecting the New Class 12
Executing the Code 12
The Finished Product 14
Summary 15
Chapter 2: Selectors—How to Get Anything You Want
17
The Document Object Model 17 The $() Factory Function 18
CSS Selectors 19
Styling List-Item Levels 20
XPath Selectors 22
Styling Links 22
Custom Selectors 24
Styling Alternate Rows 24
DOM Traversal Methods 27
Styling the Header Row 28
Styling Category Cells 28
Chaining 30
Accessing DOM Elements 31
Table of Contents
[ ii ]
Chapter 3: Events—How to Pull the Trigger
33
Performing Tasks on Page Load 33
Timing of Code Execution 33
Multiple Scripts on One Page 34
Shortcuts for Code Brevity 35
Simple Events 36
A Simple Style Switcher 36
Enabling the Other Buttons 38
Event Handler Context 40
Further Consolidation 42
Shorthand Events 44
Compound Events 44
Showing and Hiding Advanced Features 45
Highlighting Clickable Items 46
The Journey of an Event 48
Side Effects of Event Bubbling 49
Limiting and Ending Events 50
Preventing Event Bubbling 50
Event Targets 51
Stopping Event Propagation 51
Default Actions 52
Removing an Event Handler 53
Simulating User Interaction 55
Summary 56
Chapter 4: Effects—How to Add Flair to Your Actions
57
Inline CSS Modification 57
Basic Hide and Show 61
Effects and Speed 63
Speeding In 63
Fading In and Fading Out 64
Multiple Effects 64
Building an Animated show() 65
Creating a Custom Animation 66
Positioning with CSS 67
Making Sense of the Numbers 68
Improving the Custom Animation 69
Simultaneous versus Queued Effects 70
Working with a Single Set of Elements 70
Working with Multiple Sets of Elements 72
Callbacks 74
In a Nutshell 76
Table of Contents
[ iii ]
Chapter 5: DOM Manipulation—How to Change Your
Page on Command
79
Manipulating Attributes 79
Non-class Attributes 80
The $() Factory Function Revisited 82
Inserting New Elements 83
Moving Elements 85
Marking, Numbering, and Linking the Context 89
Appending Footnotes 90
Wrapping Elements 92
Copying Elements 92
Clone Depth 94
Cloning for Pull Quotes 94
A CSS Diversion 95
Back to the Code 95
Prettifying the Pull Quotes 98
DOM Manipulation Methods in a Nutshell 100
Summary 101
Chapter 6: AJAX—How to Make Your Site Buzzword-Compliant
103
Loading Data on Demand 104
Appending HTML 105
Working with JavaScript Objects 108
Retrieving a JavaScript Object 108
Global jQuery Functions 110
Executing a Script 113
Loading an XML Document 115
Choosing a Data Format 118 Passing Data to the Server 119
Performing a GET Request 120
Performing a POST Request 124
Serializing a Form 125
Keeping an Eye on the Request 128
AJAX and Events 130
Scoping an Event-Binding Function 132
Using Event Bubbling 132
Security Limitations 133
Summary 134
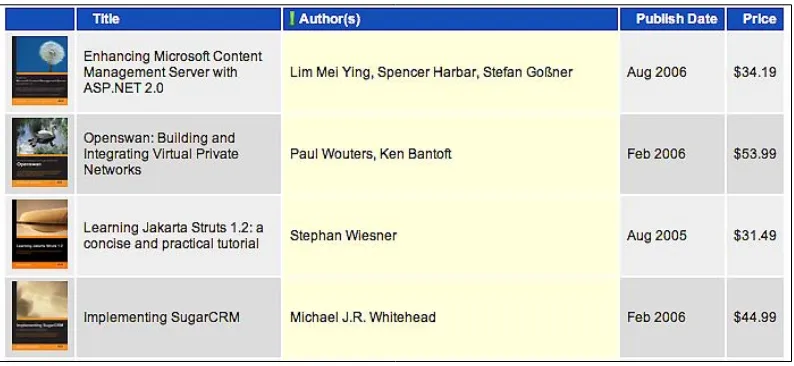
Chapter 7: Table Manipulation
135
Sorting 136
Server-Side Sorting 136
Preventing Page Refreshes 136
Table of Contents
[ iv ]
Row Grouping Tags 138
Basic Alphabetical Sorting 139
The Power of Plug-ins 143
Performance Concerns 143
Finessing the Sort Keys 145
Sorting Other Types of Data 146
Column Highlighting 149
Alternating Sort Directions 149
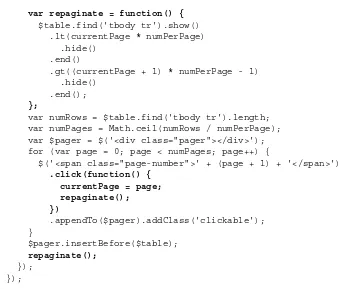
Pagination 152
Server-Side Pagination 152
Sorting and Paging Go Together 153
JavaScript Pagination 153
Displaying the Pager 154
Enabling the Pager Buttons 155
Marking the Current Page 157
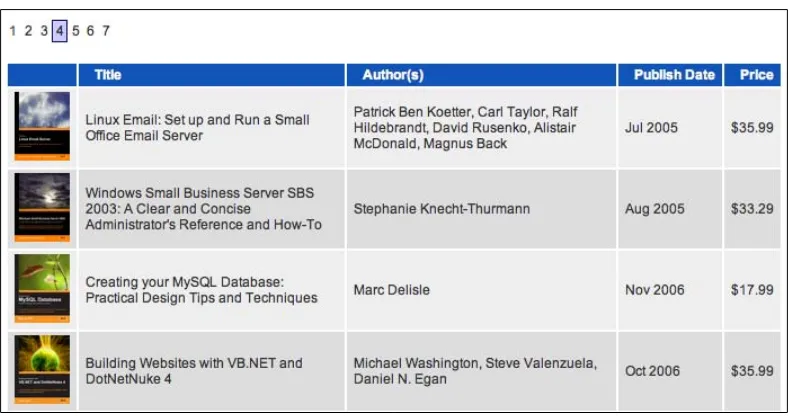
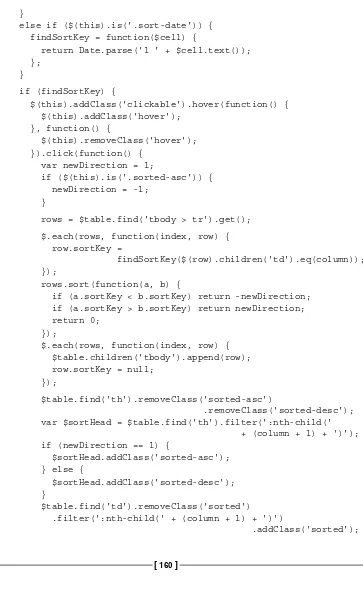
Paging with Sorting 158
The Finished Code 159
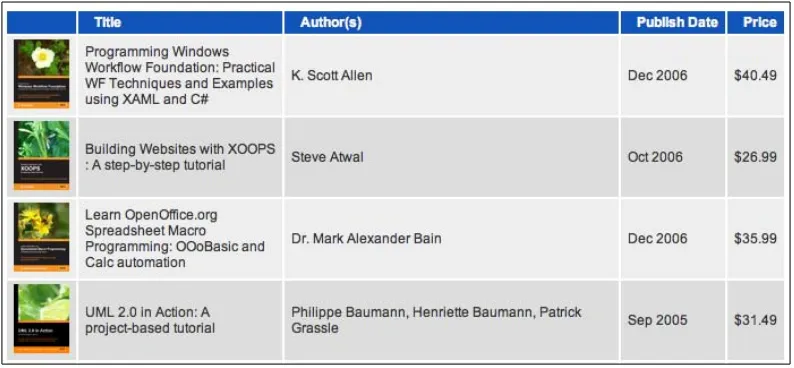
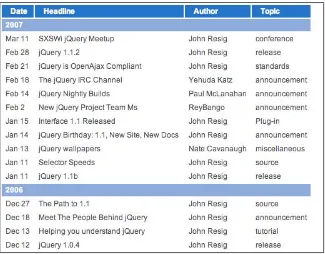
Advanced Row Striping 162
Three-color Alternating Pattern 165
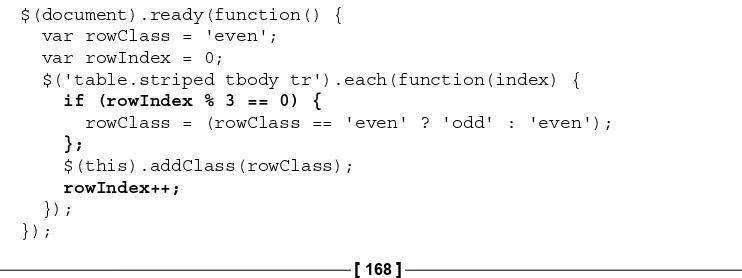
Alternating Triplets 168
Row Highlighting 172
Tooltips 174
Collapsing and Expanding 180
Filtering 182
Filter Options 183
Collecting Filter Options from Content 184
Reversing the Filters 185
Interacting with Other Code 185
Row Striping 185
Expanding and Collapsing 188
The Finished Code 188
Summary 192
Chapter 8: Forms with Function
193
Progressively Enhanced Form Styling 193
The Legend 195
Required Field Messages 197
A Regular Expression Digression 199
Inserting the Field-Message Legend 200
Conditionally Displayed Fields 201
Form Validation 203
Immediate Feedback 203
Required Fields 204
Required Formats 207
Table of Contents
[ v ]
Checkbox Manipulation 211
The Finished Code 213
Placeholder Text for Fields 217 AJAX Auto-Completion 219
On the Server 219
In the Browser 220
Populating the Search Field 222
Keyboard Navigation 222
Handling the Arrow Keys 224
Inserting Suggestions in the Field 225
Removing the Suggestion List 226
Auto-Completion versus Live Search 227
The Finished Code 227
Input Masking 230
Shopping Cart Table Structure 230
Rejecting Non-numeric Input 233
Numeric Calculations 234
Parsing and Formatting Currency 235
Dealing with Decimal Places 236
Other Calculations 238
Rounding Values 239
Finishing Touches 240
Deleting Items 241
Editing Shipping Information 246
The Finished Code 249
Summary 251
Chapter 9: Shufflers and Rotators
253
Headline Rotator 253
Setting Up the Page 253
Retrieving the Feed 255
Setting Up the Rotator 258
The Headline Rotate Function 259
Pause on Hover 261
Retrieving a Feed from a Different Domain 264
Gratuitous Inner-fade Effect 265
An Image Carousel 268
Setting Up the Page 268
Revising the Styles with JavaScript 271
Shuffling Images when Clicked 272
Adding Sliding Animation 274
Displaying Action Icons 275
Table of Contents
[ vi ]
Hiding the Enlarged Cover 280
Displaying a Close Button 281
More Fun with Badging 283
Animating the Cover Enlargement 285
Deferring Animations Until Image Load 288
Adding a Loading Indicator 290
The Finished Code 292
Summary 298
Chapter 10: Plug-ins
299
How to Use a Plug-in 299
Popular Plug-Ins 300
Dimensions 300
Height and Width 300
ScrollTop and ScrollLeft 302
Offset 302
Form 303
Tips & Tricks 304
Interface 305
Animate 305
Sortables 308
Finding Plug-in Documentation 309 Developing a Plug-in 311
Adding New Global Functions 311
Adding Multiple Functions 312
What's the Point? 313
Adding jQuery Object Methods 314
Object Method Context 314
Method Chaining 315
DOM Traversal Methods 315
Method Parameters 317
Adding New Shortcut Methods 319
Maintaining Multiple Event Logs 320
Adding a Selector Expression 322
Creating an Easing Style 324
Easing Function Parameters 325
Multi-Part Easing Styles 326
Table of Contents
[ vii ]
Appendix A: Online Resources
331
jQuery Documentation 331 JavaScript Reference 332 JavaScript Code Compressors 333
(X)HTML Reference 333
CSS Reference 333
XPath Reference 334
Useful Blogs 334
Web Development Frameworks Using jQuery 336
Appendix B: Development Tools
337
Tools for Firefox 337
Tools for Internet Explorer 338
Tools for Safari 339
Other Tools 339
Appendix C: JavaScript Closures
341
Inner Functions 341
The Great Escape 342
Variable Scoping 343
Interactions between Closures 345
Closures in jQuery 346
Arguments to $(document).ready() 346
Event Handlers 347
Memory Leak Hazards 349
Accidental Reference Loops 350
The Internet Explorer Memory Leak Problem 351
The Good News 351
Conclusion 352
Preface
jQuery is a powerful JavaScript library that can enhance your websites regardless of your background.
Created by John Resig, jQuery is an open-source project with a dedicated core team of top-notch JavaScript developers. It provides a wide range of features, an easy-to-learn syntax, and robust cross-platform compatibility in a single compact file. What's more, over a hundred plug-ins have been developed to extend jQuery's functionality, making it an essential tool for nearly every client-side scripting occasion.
Learning jQuery provides a gentle introduction to jQuery concepts, allowing you to add interactions and animations to your pages—even if previous attempts at writing JavaScript have left you baffled. This book guides you past the pitfalls associated with AJAX, events, effects, and advanced JavaScript language features.
A working demo of the examples in this book is available at: http://book.learningjquery.com
What This Book Covers
The first part of the book introduces jQuery and helps you to understand what the fuss is all about. Chapter1 covers downloading and setting up the jQuery library, as well as writing your first script.
Preface
[ 2 ]
In Chapter 3, you'll learn how to pull the trigger. You will use jQuery's event-handling mechanism to fire off behaviors when browser events occur. You'll also get the inside scoop on jQuery's secret sauce: attaching events unobtrusively, even before the page finishes loading.
In Chapter 4, you'll learn how to add flair to your actions. You'll be introduced to jQuery's animation techniques and see how to hide, show, and move page elements with the greatest of ease.
In Chapter 5, you'll learn how to change your page on command. This chapter will teach you how to alter the very structure an HTML document on the fly.
In Chapter 6, you'll learn how to make your site buzzword compliant. After reading
this chapter, you, too, will be able to access server-side functionality without resorting to clunky page refreshes.
The third part of the book takes a different approach. Here you'll work through several real-world examples, pulling together what you've learned in previous chapters and creating robust jQuery solutions to common problems. In Chapter 7, you'll sort, sift, and style information to create beautiful and functional data layouts. In Chapter 8, you'll master the finer points of client-side validation, design an
adaptive form layout, and implement interactive client-server form features such as auto-completion.
In Chapter 9, you'll enhance the beauty and utility of page elements by showing them in bite-size morsels. You'll make information fly in and out of view both on its own and under user control.
In Chapter 10 you'll learn about jQuery's impressive extension capabilities. You'll
examine three prominent jQuery plug-ins and how to use them, and proceed to develop your own from the ground up.
Appendix A provides a handful of informative websites on a wide range of topics related to jQuery, JavaScript, and web development in general.
Appendix B recommends a number of useful third-party programs and utilities for editing and debugging jQuery code within your personal development environment.
Appendix C discusses one of the common stumbling blocks with the JavaScript language. You'll come to rely on the power of closures, rather than fear their side effects.
Who This Book Is for
Preface
[ 3 ]
The reader will need the basics of HTML and CSS, and should be comfortable with the syntax of JavaScript. No knowledge of jQuery is assumed, nor is experience with any other JavaScript libraries required.
Conventions
In this book, you will find a number of styles of text that distinguish between different kinds of information. Here are some examples of these styles, and an explanation of their meaning.
There are three styles for code. Code words in text are shown as follows: "Taken together, $() and .addClass() are enough for us to accomplish our goal of changing the appearance of the poem text."
A block of code will be set as follows:
$(document).ready(function() {
$('span:contains(language)').addClass('emphasized'); });
When we wish to draw your attention to a particular part of a code block, the relevant lines or items will be made bold:
$(document).ready(function() {
$('a[@href$=".pdf"]').addClass('pdflink');
});
Newterms and importantwords are introduced in a bold-type font. Words that you see on the screen, in menus or dialog boxes for example, appear in our text like this: "The next step is to run those tests by clicking the All button."
Important notes appear in a box like this.
Tips and tricks appear like this.
Reader Feedback
Preface
[ 4 ]
To send us general feedback, simply drop an email to [email protected], making sure to mention the book title in the subject of your message.
If there is a book that you need and would like to see us publish, please send us a note in the SUGGEST A TITLE form on www.packtpub.com or
email [email protected].
If there is a topic that you have expertise in and you are interested in either writing or contributing to a book, see our author guide on www.packtpub.com/authors.
Customer Support
Now that you are the proud owner of a Packt book, we have a number of things to help you to get the most from your purchase.
Downloading the Example Code for the Book
Visit http://www.packtpub.com/support, and select this book from the list of titles to download any example code or extra resources for this book. The files available for download will then be displayed.
The downloadable files contain instructions on how to use them.
Errata
Although we have taken every care to ensure the accuracy of our contents, mistakes do happen. If you find a mistake in one of our books—maybe a mistake in text or code—we would be grateful if you would report this to us. By doing this you can save other readers from frustration, and help to improve subsequent versions of this book. If you find any errata, report them by visiting http://www.packtpub. com/support, selecting your book, clicking on the Submit Errata link, and entering the details of your errata. Once your errata are verified, your submission will be accepted and the errata added to the list of existing errata. The existing errata can be viewed by selecting your title from http://www.packtpub.com/support.
Questions
Getting Started
Up on the buzzer Quick on the start
Let's go! Let's go! Let's go! —Devo, "Let's Go"
Today's World Wide Web is a dynamic environment, and its users set a high bar for both style and function of sites. To build interesting, interactive sites, developers are turning to JavaScript libraries such as jQuery to automate common tasks and simplify complicated ones. One reason the jQuery library is a popular choice is its ability to assist in a wide range of tasks.
Because jQuery does perform so many different functions, it can seem challenging to know where to begin. Yet, there is a coherence and symmetry to the design of the library; most of its concepts are borrowed from the structure of HTML and
Cascading Style Sheets (CSS). Because many web developers have more experience with these technologies than with JavaScript, the library's design lends itself to a quick start for designers with little programming experience. In fact, in this opening chapter we'll write a functioning jQuery program in just three lines of code. On the other hand, experienced programmers will also be aided by this conceptual consistency, as we'll see in the later, more advanced chapters.
Getting Started
[ 6 ]
What jQuery Does
The jQuery library provides a general-purpose abstraction layer for common web scripting, and is therefore useful in almost every scripting situation. Its extensible nature means that we could never cover all possible uses and functions in a single book, as plug-ins are constantly being developed to add new abilities. The core features, though, address the following needs:
Access parts of a page. Without a JavaScript library, many lines of code must be written to traverse the Document Object Model (DOM) tree, and locate specific portions of an HTML document's structure. jQuery offers a robust and efficient selector mechanism for retrieving exactly the piece of the document that is to be inspected or manipulated.
Modify the appearance of a page. CSS offers a powerful method of influencing the way a document is rendered; but it falls short when web browsers do not all support the same standards. jQuery can bridge this gap, providing the same standards support across all browsers. In addition, jQuery can change the classes or individual style properties applied to a portion of the document even after the page has been rendered.
Alter the content of a page. Not limited to mere cosmetic changes, jQuery can modify the content of a document itself with a few keystrokes. Text can be changed, images can be inserted or swapped, lists can be reordered, or the entire structure of the HTML can be rewritten and extended—all with a single easy-to-use API.
Respond to a user's interaction with a page. Even the most elaborate and powerful behaviors are not useful if we can't control when they take place. The jQuery library offers an elegant way to intercept a wide variety of events, such as a user clicking on a link, without the need to clutter the HTML code itself with event handlers. At the same time, its event-handling API removes browser inconsistencies that often plague web developers.
Add animation to a page. To effectively implement such interactive behaviors, a designer must also provide visual feedback to the user. The jQuery library facilitates this by providing an array of effects such as fades and wipes, as well as a toolkit for crafting new ones.
Retrieve information from a server without refreshing a page. This code pattern has become known as Asynchronous JavaScript and XML (AJAX), and assists web developers in crafting a responsive, feature-rich site. The jQuery library removes the browser-specific complexity from this process, allowing developers to focus on the server-end functionality.
Simplify common JavaScript tasks. In addition to all of the
document-specific features of jQuery, the library provides enhancements to basic JavaScript constructs such as iteration and array manipulation.
Chapter 1
[ 7 ]
Why jQuery Works Well
With the recent resurgence of interest in dynamic HTML comes a proliferation of JavaScript frameworks. Some are specialized, focusing on just one or two of the above tasks. Others attempt to catalog every possible behavior and animation, and serve these all up pre-packaged. To maintain the wide range of features outlined above while remaining compact, jQuery employs several strategies:
Leverage knowledge of CSS. By basing the mechanism for locating page elements on CSS selectors, jQuery inherits a terse yet legible way of expressing a document's structure. Because a prerequisite for doing professional web development is knowledge of CSS syntax, jQuery becomes an entry point for designers who want to add behavior to their pages.
Support extensions. In order to avoid feature creep, jQuery relegates special-case uses to plug-ins. The method for creating new plug-ins is simple and well-documented, which has spurred the development of a wide variety of inventive and useful modules. Even most of the features in the basic jQuery download are internally realized through the plug-in architecture, and can be removed if desired, yielding an even smaller library.
Abstract away browser quirks. An unfortunate reality of web development is that each browser has its own set of deviations from published standards. A significant portion of any web application can be relegated to handling features differently on each platform. While the ever-evolving browser landscape makes a perfectly browser-neutral code base impossible for some advanced features, jQuery adds an abstraction layer that normalizes the common tasks, reducing the size of code, and tremendously simplifying it.
Always work with sets. When we instruct jQuery, Find all elements with the class 'collapsible' and hide them, there is no need to loop through each returned element. Instead, methods such as .hide() are designed to automatically work on sets of objects instead of individual ones. This technique, called
implicititeration, means that many looping constructs become unnecessary, shortening code considerably.
Allow multiple actions in one line. To avoid overuse of temporary variables or wasteful repetition, jQuery employs a programming pattern called
chaining for the majority of its methods. This means that the result of most operations on an object is the object itself, ready for the next action to be applied to it.
These strategies have kept the jQuery package slim—roughly 20KB compressed— while at the same time providing techniques for keeping our custom code that uses the library compact, as well.
•
•
•
•
Getting Started
[ 8 ]
The elegance of the library comes about partly by design, and partly due to the evolutionary process spurred by the vibrant community that has sprung up around the project. Users of jQuery gather to discuss not only the development of plug-ins, but also enhancements to the core library. Appendix A details many of the community resources available to jQuery developers.
Despite all of the efforts required to engineer such a flexible and robust system, the end product is free for all to use. This open-source project is dually licensed under the
GNU Public License (appropriate for inclusion in many other open-source projects) and the MIT License (to facilitate use of jQuery within proprietary software).
Our First jQuery Document
Now that we have covered the range of features available to us with jQuery, we can examine how to put the library into action.
Downloading jQuery
The official jQuery website (http://jquery.com/) is always the most up-to-date resource for code and news related to the library. To get started, we need a copy of jQuery, which can be downloaded right from the home page of the site. Several versions of jQuery may be available at any given moment; the most appropriate for us will be the latest uncompressed version of the library.
No installation is required. To use jQuery, we just need to place it on our site in a public location. Since JavaScript is an interpreted language, there is no compilation or build phase to worry about. Whenever we need a page to have jQuery available, we will simply refer to the file's location from the HTML document.
Setting Up the HTML Document
There are three pieces to most examples of jQuery usage: the HTML document itself, CSS files to style it, and JavaScript files to act on it. For our first example, we'll use a page with a book excerpt that has a number of classes applied to portions of it.
<?xml version="1.0" encoding="UTF-8" ?>
<!DOCTYPE html PUBLIC "-//W3C//DTD XHTML 1.0 Transitional//EN" "http://www.w3.org/TR/xhtml1/DTD/xhtml1-transitional.dtd"> <html xmlns="http://www.w3.org/1999/xhtml" xml:lang="en" lang="en"> <head>
<meta http-equiv="Content-Type" content="text/html;
Chapter 1
[ 9 ]
<link rel="stylesheet" href="alice.css" type="text/css"
media="screen" /> <script src="jquery.js" type="text/javascript"></script>
<script src="alice.js" type="text/javascript"></script> </head>
<body>
<div id="container">
<h1>Through the Looking-Glass</h1>
<div class="author">by Lewis Carroll</div> <div class="chapter" id="chapter-1">
<h2 class="chapter-title">1. Looking-Glass House</h2>
<p>There was a book lying near Alice on the table, and while
<h3 class="poem-title">YKCOWREBBAJ</h3> <div class="poem-stanza"> thought struck her. <span class="spoken">"Why, it's a
Looking-glass book, of course! And if I hold it up to a glass, the words will all go the right way again."</span></p> <p>This was the poem that Alice read.</p>
<div class="poem">
Getting Started
[ 10 ]
The actual layout of files on the server does not matter. References from one file to another just need to be adjusted to match the organization we
choose. In most examples in this book, we will use relative paths
to reference files (../images/foo.png) rather than absolute paths (/images/foo.png). This will allow the code to run locally without the need for a web server.
Immediately following the normal HTML preamble, the stylesheet is loaded. For this example, we'll use a spartan one.
body {
font: 62.5% Arial, Verdana, sans-serif; }
After the stylesheet is referenced, the JavaScript files are included. It is important that the script tag for the jQuery library be placed before the tag for our custom scripts; otherwise, the jQuery framework will not be available when our code attempts to reference it.
Throughout the rest of this book, only the relevant portions of HTML and
CSS files will be printed. The files in their entirety are available from the book's companion website http://book.learningjquery.com or
Chapter 1
[ 11 ] Now we have a page that looks like this:
We will use jQuery to apply a new style to the poem text.
This example is contrived, just to show a simple use of jQuery. In real-world situations, styling such as this could be performed purely with CSS.
Writing the jQuery Code
Our custom code will go in the second, currently empty, JavaScript file, which we included from the HTML using <scriptsrc="alice.js"type="text/ javascript"></script>. For this example, we only need three lines of code:
$(document).ready(function() {
Getting Started
[ 12 ]
Finding the Poem Text
The fundamental operation in jQuery is selecting a part of the document. This is done with the $() construct. Typically, it takes a string as a parameter, which can contain any CSS selector expression. In this case, we wish to find all parts of the document that have the poem-stanza class applied to them; so the selector is very simple, but we will cover much more sophisticated options through the course of the book. We will step through the different ways of locating parts of a document in Chapter 2.
The $() function is actually a factory for the jQuery object, which is the basic
building block we will be working with from now on. The jQuery object encapsulates zero or more DOM elements, and allows us to interact with them in many different ways. In this case, we wish to modify the appearance of these parts of the page, and we will accomplish this by changing the classes applied to the poem text.
Injecting the New Class
The .addClass() method is fairly self-explanatory; it applies a CSS class to the part of the page that we have selected. Its only parameter is the name of the class to add. This method, and its counterpart, .removeClass(), will allow us to easily observe jQuery in action as we explore the different selector expressions available to us. For now, our example simply adds the emphasized class, which our stylesheet has defined as italicized text with a border.
Note that no iteration is necessary to add the class to all the poem stanzas. As we discussed, jQuery uses implicit iteration within methods such as .addClass(), so a single function call is all it takes to alter all of the selected parts of the document.
Executing the Code
Taken together, $() and .addClass() are enough for us to accomplish our goal of changing the appearance of the poem text. However, if this line of code is inserted alone in the document header, it will have no effect. JavaScript code is generally run as soon as it is encountered in the browser, and at the time the header is being processed, no HTML is yet present to style. We need to delay the execution of the code until after the DOM is available for our use.
Chapter 1
[ 13 ]
function emphasizePoemStanzas() {
$('.poem-stanza').addClass('emphasized'); }
Then we would attach the function to the event by modifying the HTML <body> tag to reference it:
<body onload="emphasizePoemStanzas();">
This causes our code to run after the page is completely loaded.
There are drawbacks to this approach, though. We altered the HTML itself to effect this behavior change. This tight coupling of structure and function clutters the code, possibly requiring the same function calls to be repeated over many different pages, or in the case of other events such as mouse clicks, over every instance of an element on a page. Adding new behaviors would then require alterations in two different places, increasing the opportunity for error and complicating parallel workflows for designers and programmers.
To avoid this pitfall, jQuery allows us to schedule function calls for firing once the DOM is loaded—without waiting for images—with the $(document).ready() construct. With our function defined as above, we can write:
$(document).ready(emphasizePoemStanzas);
This technique does not require any HTML modifications. Instead, the behavior is attached entirely from within the JavaScript file. We will learn how to respond to other types of user actions, divorcing their effects from the HTML structure as well, in Chapter 3.
This incarnation is still slightly wasteful, though, because the function
emphasizePoemStanzas() is defined only to be used immediately, and exactly once. This means that we have used an identifier in the global namespace of functions that we have to remember not to use again, and for little gain. JavaScript, like some other programming languages, has a way around this inefficiency called anonymous functions (sometimes also called lambdafunctions). We arrive back at the code as originally presented:
$(document).ready(function() {
$('.poem-stanza').addClass('emphasized'); });
Getting Started
[ 14 ]
When this syntax is used to define an anonymous function within the body of another function, a closure can be created. This is an advanced and powerful concept, but should be understood when making extensive use of nested function definitions as it can have unintended consequences and ramifications on
memory use. This topic is discussed fully in Appendix C.
The Finished Product
Now that our JavaScript is in place, the page looks like this:
Chapter 1
[ 15 ]
Summary
We now have an idea of why a developer would choose to use a JavaScript
framework rather than writing all code from scratch, even for the most basic tasks. We also have seen some of the ways in which jQuery excels as a framework, and why we might choose it over other options. We also know in general which tasks jQuery makes easier.
In this chapter, we have learned how to make jQuery available to JavaScript code on our web page, use the $() factory function to locate a part of the page that has a given class, call .addClass() to apply additional styling to this part of the page, and invoke $(document).ready() to cause this code to execute upon the loading of the page.
Selectors—How to Get
Anything You Want
She's just the girl She's just the girl The girl you want —Devo, "Girl U Want"
jQuery harnesses the power of Cascading Style Sheets (CSS) and XPathselectors
to let us quickly and easily access elements or groups of elements in the Document Object Model (DOM). In this chapter, we will explore a few of these CSS and XPath selectors, as well as jQuery's own custom selectors. We'll also look at jQuery's DOM traversal methods that provide even greater flexibility for getting what we want.
The Document Object Model
One of the most powerful aspects of jQuery is its ability to make DOM traversal easy. The Document Object Model is a family-tree structure of sorts. HTML, like other markup languages, uses this model to describe the relationships of things on a page. When we refer to these relationships, we use the same terminology that we use when referring to family relationships—parents, children, and so on. A simple example can help us understand how the family tree metaphor applies to a document:
<html> <head>
<title>the title</title> </head>
<body> <div>
Selectors—How to Get Anything You Want
[ 18 ]
</div> </body> </html>
Here, <html> is the ancestor of all the other elements; in other words, all the other elements are descendants of <html>. The <head> and <body> elements are children
of <html>. Therefore, in addition to being the ancestor of <head> and <body>, <html> is also their parent. The <p> elements are children (and descendants) of <div>, descendants of <body> and <html>, and siblings of each other. For information on how to visualize the family-tree structure of the DOM using third-party software, see Appendix B.
An important point to note before we begin is that the resulting set of items from our various selectors and methods is actually a jQuery object. jQuery objects are very easy to work with when we want to actually do something with the things that we find on a page. We can easily bind events to these objects and add slick effects to them, as well as chain multiple modifications or effects together. Nevertheless,
jQuery objects are different from regular DOM elements, and as such do not necessarily provide the same methods and properties as plain DOM elements for some tasks. In the final part of this chapter, therefore, we will look at ways to access the DOM elements that are wrapped in a jQuery object.
The $() Factory Function
No matter which type of selector we want to use in jQuery—be it CSS, XPath, or custom—we always start with the dollar sign and parentheses: $()
As mentioned in Chapter 1, the $() function removes the need to do a for loop to access a group of elements since whatever we put inside the parentheses will be looped through automatically and stored as a jQuery object. We can put just about anything inside the parentheses of the $() function. A few of the more common examples include:
Atagname: $('p') gets all paragraphs in the document.
AnID: $('#some-id') gets the single element in the document that has the corresponding some-id ID.
Aclass: $('.some-class') gets all elements in the document that have a class of some-class.
Making jQuery Play Well with Other JavaScript Libraries
In jQuery, the dollar sign $ is simply shorthand for jQuery. Because a $()
function is very common in JavaScript libraries, conflicts could arise if more
than one of these libraries is being used in a given page. We can avoid such
conflicts by replacing every instance of $ with jQuery in our custom jQuery code. Additional solutions to this problem are addressed in Chapter 10. •
•
Chapter 2
[ 19 ]
Now that we have covered the basics, we're ready to start exploring some more powerful uses of selectors.
CSS Selectors
jQuery supports most of the selectors included in CSS specifications 1 through 3, as outlined on the World Wide Web Consortium's site: http://www.w3.org/Style/ CSS/#specs. This support allows developers to enhance their websites without worrying about which browsers (particularly Internet Explorer 6 and below) might not understand advanced selectors, as long as the browsers have JavaScript enabled.
Responsible jQuery developers should always apply the concepts of progressiveenhancement and gracefuldegradation to their code, ensuring that a page will render as accurately, even if not as beautifully, with JavaScript disabled as it does with JavaScript turned on. We will continue to explore these concepts throughout the book.
To begin learning how jQuery works with CSS selectors, we'll use a structure that appears on many websites, often for navigation—the nested, unordered list.
<ul id="selected-plays"> <li>Comedies
<ul>
<li><a href="http://www.mysite.com/asyoulikeit/">
As You Like It</a></li> <li>All's Well That Ends Well</li>
<li>A Midsummer Night's Dream</li> <li>Twelfth Night</li>
</ul> </li>
<li>Tragedies <ul>
<li><a href="hamlet.pdf">Hamlet</a></li> <li>Macbeth</li>
<li>Henry IV (<a href="mailto:[email protected]">email</a>) <ul>
Selectors—How to Get Anything You Want
[ 20 ]
</ul>
<li><a href="http://www.shakespeare.co.uk/henryv.htm">
Henry V</a></li> <li>Richard II</li>
</ul> </li> </ul>
Notice that the first <ul> has an ID of selected-plays, but none of the <li> tags have a class associated with them. Without any styles applied, the list looks like this:
The nested list appears as we would expect it to—a set of bulleted items arranged vertically and indented according to their level.
Styling List-Item Levels
Let's suppose that we want the top-level items, and only the top-level items, to be arranged horizontally. We can start by defining a horizontal class in the stylesheet:
.horizontal { float: left; list-style: none; margin: 10px; }
The horizontal class floats the element to the left of the one following it, removes the bullet from it if it's a list item, and adds a 10 pixel margin on all sides of it.
Rather than attaching the horizontal class directly in our HTML, we'll add it dynamically to the top-level list items only—Comedies, Tragedies, and
Chapter 2
[ 21 ]
$(document).ready(function() {
$('#selected-plays > li').addClass('horizontal');
});
As discussed in Chapter 1, we begin the jQuery code with the $(document).ready() wrapper, which makes everything inside of it available as soon as the DOM
has loaded.
The second line uses the child combinator (>) to add the horizontal class to all top-level items only. In effect, the selector inside the $() function is saying, find each list item (li) that is a child (>) of an element with an ID of selected-plays (#selected-plays).
With the class now applied, our nested list looks like this:
Styling all of the other items—those that are not in the top level—can be done in a number of ways. Since we have already applied the horizontal class to the top-level items, one way to get all sub-level items is to use a negationpseudo-class to identify all list items that do not have a class of horizontal. Note the addition of the third line of code:
$(document).ready(function() {
$('#selected-plays > li').addClass('horizontal');
$('#selected-plays li:not(.horizontal)').addClass('sub-level');
});
This time we are getting every list item (li) that:
1. Is a descendant of an element with an ID of selected-plays (#selected-plays), and
Selectors—How to Get Anything You Want
[ 22 ]
When we add the sub-level class to these items, they receive the pale yellow background color defined in the stylesheet: .sub-level{background-color: #ffc;}. Now the nested list looks like this:
XPath Selectors
XMLPathLanguage (XPath) is a type of language for identifying different elements or their values within XML documents, similar to the way CSS identifies elements in HTML documents. The jQuery library supports a basic set of XPath selectors that we can use alongside CSS selectors, if we so desire. And with jQuery, both XPath and CSS selectors can be used regardless of the document type.
When it comes to attributeselectors, jQuery uses the XPath convention of
identifying attributes by prefixing them with the @ symbol inside square brackets, rather than the less-flexible CSS equivalent. For example, to select all links that have a title attribute, we would write the following:
$('a[@title]')
This XPath syntax allows for another use of square brackets, without the @, to designate an element that is contained within another element. We can, for example, get all div elements that contain an ol element with the following selector expression:
$('div[ol]')
Styling Links
Attribute selectors accept regular-expression-like syntax for identifying the beginning (^) or ending ($) of a string. They also take an asterisk (*) to indicate an arbitrary position within a string.
Let's say we wanted to display different types of links with different text colors. We would first define the styles in our stylesheet:
a {
color: #00f; /* make plain links blue */ a.mailto {
Chapter 2
[ 23 ]
}
a.pdflink {
color: #090; /* make PDF links green */ }
a.mysite {
text-decoration: none; /* remove internal link underline */ border-bottom: 1px dotted #00f;
}
Then, we would add the three classes—mailto, pdflink, and mysite—to the appropriate links using jQuery.
To get all email links, we would construct a selector that looks for all anchor elements (a) with an href attribute ([@href]) that begins with mailto (^="mailto:"); as follows:
$(document).ready(function() {
$('a[@href^="mailto:"]').addClass('mailto');
});
To get all links to PDF files, we would use the dollar sign rather than the caret symbol; to get all links with an href attribute that ends with .pdf, the code would look as follows:
$(document).ready(function() {
$('a[@href^="mailto:"]').addClass('mailto');
$('a[@href$=".pdf"]').addClass('pdflink');
});
Finally, to get all internal links—i.e., links to other pages on mysite.com—we would use the asterisk:
$(document).ready(function() {
$('a[@href^="mailto:"]').addClass('mailto'); $('a[@href$=".pdf"]').addClass('pdflink');
$('a[@href*="mysite.com"]').addClass('mysite');
});
Here, mysite.com can appear anywhere within the href value. This is especially important if we want to include links to any sub-domain within mysite.com as well.
With the three classes applied to the three types of links, we should see the following styles applied:
Blue text with dotted underline:
<a href="http://www.mysite.com/asyoulikeit/">As You Like It</a>
Selectors—How to Get Anything You Want
[ 24 ]
Green text: <a href="hamlet.pdf">Hamlet</a>
Red text: <a href="mailto:[email protected]">email</a>
Following is a screenshot of the styled links:
Custom Selectors
To the wide variety of CSS and XPath selectors, jQuery adds its own custom selectors. Most of the custom selectors allow us to pick certain elements out of a line-up, so to speak. The syntax is the same as the CSS pseudo-class syntax, where the selector starts with a colon (:). For example, if we wanted to select the second item from a matched set of divs with a class of horizontal, we would write it like this:
$('div.horizontal:eq(1)')
Note that the eq(1) gets the second item from the set because JavaScript array numbering is zero-based, meaning that it starts with 0. In contrast, CSS is one-based, so a CSS selector such as $('div:nth-child(1)') gets any div that is the first child of its parent.
Styling Alternate Rows
Two very useful custom selectors in the jQuery library are :odd and :even. Let's take a look at how we can use these selectors for basic table striping, given the following table:
<table> <tr>
<td>As You Like It</td> <td>Comedy</td>
</tr> <tr>
<td>All's Well that Ends Well</td> <td>Comedy</td>
Chapter 2
[ 25 ]
</tr> <tr>
<td>Hamlet</td> <td>Tragedy</td> </tr>
<tr>
<td>Macbeth</td> <td>Tragedy</td> </tr>
<tr>
<td>Romeo and Juliet</td> <td>Tragedy</td>
</tr> <tr>
<td>Henry IV, Part I</td> <td>History</td>
</tr> <tr>
<td>Henry V</td> <td>History</td> </tr>
</table>
Now we can add two classes to the stylesheet—one for the odd rows and one for the even:
.odd {
background-color: #ffc; /* pale yellow for odd rows */ }
.even {
background-color: #cef; /* pale blue for even rows */ }
Finally, we write our jQuery code, attaching the classes to the table rows (<tr> tags):
Selectors—How to Get Anything You Want
[ 26 ]
That simple bit of code should produce a table that looks like this:
At first glance, the row coloring might appear the opposite of what it should be. However, just as with the :eq() selector, the :odd() and :even() selectors use JavaScript's native zero-based numbering. Therefore, the first row counts as 0 (even) and the second row counts as 1 (odd), and so on.
Note that we may see unintended results if there is more than one table on a page. For example, since the last row in this table has a pale-blue background, the first row in the next table would have the pale-yellow background. We will examine ways to avoid this type of problem in Chapter 7.
For one final custom-selector touch, let's suppose for some reason we wanted to highlight any table cell that referred to one of the Henry plays. All we'd have to
do is add a class to the stylesheet to make the text bold and red ( .highlight {font-weight:bold;color:#f00;} ) and add a line to our jQuery code, using the
:contains() selector.
$(document).ready(function() { $('tr:odd').addClass('odd'); $('tr:even').addClass('even');
$('td:contains("Henry")').addClass('highlight');
});
Chapter 2
[ 27 ]
Admittedly, there are ways to achieve the highlighting without jQuery—or any client-side programming, for that matter. Nevertheless, jQuery, along with CSS, is a great alternative for this type of styling, in cases when the content is generated dynamically and we don't have access to either the HTML or server-side code.
DOM Traversal Methods
The jQuery selectors that we have explored so far allow us to get a set of elements as we navigate across and down the DOM tree and filter the results. If this were the
only way to get elements, our options would be quite limited (although, frankly, the selector expressions on their own are robust in their own right, especially when compared to the regular DOM scripting). There are many occasions on which getting a parent or ancestor element is essential. And that is where jQuery's DOM traversal
methods come to play. With these methods at our disposal, we can go up, down, and all around the DOM tree with ease.
Some of the methods have a nearly identical counterpart among the selector expressions. For example, the line we used to add the odd class, $('tr:odd'). addClass('odd');, could be rewritten with the .filter() method as follows:
$('tr').filter(':odd').addClass('odd');
For the most part, however, the two ways of getting elements complement each other. Let's take a look at the striped table again, to see what is possible with these methods.
First, the table could use a heading row, so we'll add another <tr> element with two <th> elements inside it, rather than the <td> elements:
[…] <tr>
<th>Title</th> <th>Category</th> </tr>
[…]
This could also be done more semantically by wrapping the heading row in <thead></thead> and wrapping the rest of the rows in <tbody></tbody>, but for the sake of this example we’ll just go along without the extra explicit markup.
Selectors—How to Get Anything You Want
[ 28 ]
Second, our client has just looked at the site and loves the stripes, but wants the bold red text to appear in the category cells of the Henry rows, and not in the title cells.
Styling the Header Row
The task of styling the header row differently can be achieved by hooking into the <th> tags and getting their parent. The other rows can be selected for styling by combining CSS, XPath, and custom selectors to filter the <tr> elements as follows:
$(document).ready(function() {
$('th').parent().addClass('table-heading'); $('tr:not([th]):even').addClass('even');
$('tr:not([th]):odd').addClass('odd');
$('td:contains("Henry")').addClass('highlight'); });
With the heading row, we get a generic parent without anything in the
parentheses—parent()—because we know that it is a <tr> and that there is only one of them. Although we might expect this <tr> to have the table-heading class added to it twice because there are two <th> elements within it, jQuery intelligently avoids adding a class name to an element if the class is already there.
For the body rows, we begin by excluding any <tr> element that has a <th> as a descendant, after which we apply the :odd or :even filter. Note that the order of selectors is important. Our table would look quite different if we used, for example, $('tr:odd:not([th])') rather than $('tr:not([th]):odd').
Styling Category Cells
To style the cell next to each cell containing Henry, we can start with the selector that we have already written, and simply add the next() method to it:
$(document).ready(function() {
$('the').parent().addClass('table-heading'); $('tr:not([th]):even').addClass('even'); $('tr:not([th]):odd').addClass('odd');
$('td:contains("Henry")').next().addClass('highlight');
Chapter 2
[ 29 ]
With the added table-heading class and the highlight class now applied to cells in the category column, the table should look like this:
The .next() method gets only the very next sibling element. What would we do if there were more columns? If there were a Year Published column, for example, we might want the text in that column to be highlighted too, when its row contains
Henry in the Title column. In other words, for each row in which a cell contains
Henry, we want to get all of the other cells in that row. We can do this in a number of ways, using a combination of selector expressions and jQuery methods:
1. Get the cell containing Henry and then get its siblings (not just the next sibling). Add the class:
$('td:contains("Henry")').siblings().addClass('highlight');
2. Get the cell containing Henry, get its parent, and then find all cells inside it
that are greater than 0 (where 0 is the first cell). Add the class:
$('td:contains("Henry")').parent().find('td:gt(0)')
.addClass('highlight');
3. Get the cell containing Henry, get its parent, find all cells inside it, and then
filter those to exclude the one containing Henry. Add the class:
$('td:contains("Henry")').parent().find('td').not(':
contains("Henry")') ).addClass('highlight');
4. Get the cell containing Henry, get its parent, find the second cell among the
children, add the class, cancel the last .find(), find the third cell among the children, and add the class:
Selectors—How to Get Anything You Want
[ 30 ] All of these options will produce the same result:
Just to be clear, not all of these ways of combining selector expressions and methods are recommended. In fact, the fourth way is circuitous to the point of absurdity. They should, however, illustrate the incredible flexibility of jQuery's DOM traversal options.
Chaining
All four of those options also illustrate jQuery's chaining capability. It is possible with jQuery to get multiple sets of elements and do multiple things with them, all within a single line of code. And it is possible to break a single line of code into multiple lines for greater readability. For example, option 4 in the preceeding section can be rewritten in seven lines, with each line having its own comment, even though they are acting as a single line:
$('td:contains("Henry")') //get every cell containing "Henry"
.parent() //get its parent
.find('td:eq(1)') //find inside the parent the 2nd cell .addClass(highlight') //add the "highlight" class to that cell .end() //revert back to the parent of the cell containing "Henry" .find('td:eq(2)') //find inside the parent the 3rd cell .addClass('highlight'); //add the "highlight" class to that cell
Chaining can be like speaking a whole paragraph's worth of words in a single breath—it gets the job done quickly, but it can be hard for someone else to
Chapter 2
[ 31 ]
Accessing DOM Elements
Every selector expression and most jQuery methods return a jQuery object, which is almost always what we want, because of the implicit iteration and chaining capabilities that it affords.
Still, there may be points in our code when we need to access a DOM element directly. For example, we may need to make a resulting set of elements available to another JavaScript library. Or we might need to access an element's tag name. For these admittedly rare situations, jQuery provides the .get() method. To access the first DOM element referred to by a jQuery object, we would use .get(0). If the DOM element is needed within a loop, we would use .get(index). So, if we want to know the tag name of an element with id="my-element", we would write:
var myTag = $('#my-element').get(0).tagName;
For even greater convenience, jQuery provides a shorthand for .get(). Instead of writing $('#my-element').get(0), for example, we can use square brackets immediately following the selector: $('#my-element')[0]. It's no accident that this syntax looks like an array of DOM elements; using the square brackets is like peeling away the jQuery wrapper to get at these elements.
Summary
With the techniques that we have covered in this chapter, we should now be able to style top-level and sub-level items in a nested list by using CSS selectors, apply different styles to different types of links by using XPath attribute selectors, add rudimentary striping to a table by using the custom jQuery selectors :odd and :even, and highlight text within certain table cells by chaining jQuery methods.
Events—How to Pull
the Trigger
Getting bigger, pull the trigger —Devo, "Puppet Boy"
JavaScript has several built-in ways of reacting to user interaction and other events. To make a page dynamic and responsive, we need to harness this capability so that we can, at the appropriate times, use the jQuery techniques we have learned so far. While we could do this with vanilla JavaScript, jQuery enhances and extends the basic event handling mechanisms to give them a more elegant syntax while at the same time making them more powerful.
Performing Tasks on Page Load
We have already seen how to make jQuery react to the loading of a web page. The $(document).ready() event handler can be used to fire off a function's worth of code, but there's a bit more to be said about it.
Timing of Code Execution
In Chapter 1, we noted that $(document).ready() was jQuery's way to perform tasks that were typically triggered by JavaScript's built-in onload event. While the two have a similar effect, however, they trigger actions at subtly different times.
Events—How to Pull the Trigger
[ 34 ]
On the other hand, a handler registered using $(document).ready() is invoked when the DOM is completely ready for use. This also means that all elements are accessible by our scripts, but does not mean that every associated file has been downloaded. As soon as the HTML has been downloaded and parsed into a DOM tree, the code can run.
Consider, for example, a page that presents an image gallery; such a page may have many large images on it, which we can hide, show, move, and otherwise manipulate with jQuery. If we set up our interface using the onload event, user will have to wait until each and every image is completely downloaded before they can use the page. Or worse, if behaviors are not yet attached to elements that have default behaviors (such as links), user interactions could produce unintended outcomes. However, when we use $(document).ready() for the setup, the interface gets ready to use much earlier with the correct behavior.
Using $(document).ready() is almost always preferable to using an onload handler, but we need to keep in mind that because supporting
files may not have loaded, attributes such as image height and width are
not necessarily available at this time. If these are needed, we may at times also choose to implement an onload handler (or more likely, jQuery's .load() equivalent); the two mechanisms can coexist peacefully.
Multiple Scripts on One Page
The traditional mechanism for registering event handlers through JavaScript (rather than adding handler attributes right in the HTML) is to assign a function to the DOM element's corresponding attribute. For example, suppose we had defined the function:
function doStuff() { // Perform a task... }
We could then either assign it within our HTML markup:
<body onload="doStuff();">
Or, we could assign it from within JavaScript code:
window.onload = doStuff;
Both of these approaches will cause the function to execute when the page is loaded. The advantage of the second is that the behavior is more cleanly separated from the markup. However, suppose we have a second function:
Chapter 3
[ 35 ]
We could then attempt to assign this function to run on page load:
window.onload = doOtherStuff;
However, this assignment trumps the first one. The .onload attribute can only store one function reference at a time, so we can't add to the existing behavior.
The $(document).ready() mechanism handles this situation gracefully. Each call to the method adds the new function to an internal queue of behaviors; when the page is loaded all of the functions will execute. The functions will run in the order in which they were registered.
To be fair, jQuery doesn't have a monopoly on workarounds to this issue.
We can write a JavaScript function that forms a new function that calls the existing onload handler, then calls a passed-in handler. This approach,
used for example by Simon Willison's addLoadEvent(), avoids conflicts between rival handlers like $(document).ready() does, but lacks
some of the other benefits we have discussed.
Shortcuts for Code Brevity
The $(document).ready() construct is actually calling the .ready() method on a jQuery object we've constructed from the document DOM element. Because this is a common task, the $() function provides a shortcut for us. When called with no arguments, the function behaves as though document were passed in. This means that instead of:
$(document).ready(function() { // Our code here...
});
we can write:
$().ready(function() { // Our code here... });
In addition, the factory function can take another function as an argument. When we do this, jQuery performs an implicit call to .ready(), so for the same result we can write:
$(function() {