Exam 70-562: TS: Microsoft .NET Framework 3.5,
ASP.NET Application Development
OBJECTIVE CHAPTER LESSON
CONFIGURING AND DEPLOYING WEB APPLICATIONS (10 PERCENT)
Configure providers. 14 1,2
Configure authentication, authorization, and impersonation. 14 3 Configure projects, solutions, and reference assemblies. 1 3 Configure session state by using Microsoft SQL Server, State Server, or InProc. 4 2
Publish Web applications. 16 1
Configure application pools. 16 1
Compile an application by using Visual Studio or command-line tools. 16 1,2 CONSUMING AND CREATING SERVER CONTROLS (20 PERCENT)
Implement data-bound controls. 8 2
Load user controls dynamically. 10 1
Create and consume custom controls. 10 2
Implement client-side validation and server-side validation. 3 1
Consume standard controls. 2 1,2
WORKING WITH DATA AND SERVICES (17 PERCENT)
Read and write XML data. 7 3
Manipulate data by using DataSet and DataReader objects. 7 1,2 Call a Windows Communication Foundation (WCF) service or a Web service from an
ASP.NET Web page.
9 2
Implement a DataSource control. 8 1
Bind controls to data by using data binding syntax. 8 1,2
TROUBLESHOOTING AND DEBUGGING WEB APPLICATIONS (16 PERCENT)
Configure debugging and custom errors. 12 1
Set up an environment to perform remote debugging. 12 1,2
Debug unhandled exceptions when using ASP.NET AJAX. 12 1
Implement tracing of a Web application. 12 2
Debug deployment issues. 12 1,2
Monitor Web applications. 12 2
WORKING WITH ASP.NET AJAX AND CLIENT-SIDE SCRIPTING (15 PERCENT)
Implement Web Forms by using ASP.NET AJAX. 6 1
Interact with the ASP.NET AJAX client-side library. 6 2
Consume services from client scripts. 9 1,2
Create and register client script. 6 2
TARGETING MOBILE DEVICES (5 PERCENT)
Access device capabilities. 15 1
Add mobile Web controls to a Web page. 15 1
Implement control adapters. 15 1
PROGRAMMING WEB APPLICATIONS (17 PERCENT)
Customize the layout and appearance of a Web page. 5 1,2,3
Work with ASP.NET intrinsic objects. 11 2
Implement globalization and accessibility. 13 1,2
Implement business objects and utility classes. 1 2,3
Implement session state, view state, control state, cookies, cache, or application state. 2,4 Chapter 2: Lesson 1 Chapter 4: Lesson 1
Handle events and control page flow. 2,3 Chapter 2:
Lessons 1 and 3; Chapter 3: Lessons 1 and 2
Implement the Generic Handler. 11 1
PUBLISHED BY Microsoft Press
A Division of Microsoft Corporation One Microsoft Way
Redmond, Washington 98052-6399
Copyright © 2009 by Glenn Johnson, GrandMasters, and Microsoft Corporation
All rights reserved. No part of the contents of this book may be reproduced or transmitted in any form or by any means without the written permission of the publisher.
Library of Congress Control Number: 2009920804
Printed and bound in the United States of America.
1 2 3 4 5 6 7 8 9 QWT 4 3 2 1 0 9
Distributed in Canada by H.B. Fenn and Company Ltd.
A CIP catalogue record for this book is available from the British Library.
Microsoft Press books are available through booksellers and distributors worldwide. For further infor-mation about international editions, contact your local Microsoft Corporation office or contact Microsoft Press International directly at fax (425) 936-7329. Visit our Web site at www.microsoft.com/mspress. Send comments to [email protected].
Microsoft, Microsoft Press, Active Directory, ActiveX, Excel, IntelliSense, Internet Explorer, MS, MSDN, SharePoint, Silverlight, SQL Server, Visual Basic, Visual SourceSafe, Visual Studio, Win32, Windows, Windows Mobile, Windows NT, Windows Server, and Windows Vista are either registered trademarks or trademarks of Microsoft Corporation in the United States and/or other countries. Openwave and the Openwave logo are trademarks of Openwave Systems Inc. All rights reserved. Other product and company names mentioned herein may be the trademarks of their respective owners.
The example companies, organizations, products, domain names, e-mail addresses, logos, people, places, and events depicted herein are fictitious. No association with any real company, organization, product, domain name, e-mail address, logo, person, place, or event is intended or should be inferred.
This book expresses the author’s views and opinions. The information contained in this book is provided without any express, statutory, or implied warranties. Neither the authors, Microsoft Corporation, nor its resellers, or distributors will be held liable for any damages caused or alleged to be caused either directly or indirectly by this book.
Acquisitions Editor: Ken Jones
Developmental Editor: Laura Sackerman Project Editor: Maureen Zimmerman Editorial Production: nSight, Inc.
Technical Reviewer: Kurt Meyer; Technical Review services provided by Content Master, a member of CM Group, Ltd. Cover: Tom Draper Design
Dedication
For my mom, Tonya Snell.
—M
IKES
NELLAcknowledgments
I
would first like to thank the authors of the first edition of this book: Glenn Johnson and Tony Northrup. It has been a pleasure building on the foundation that you laid.I would also like to thank the hard-working people at Microsoft Press, including Ken Jones for getting me involved in another great project and Maureen Zimmerman for her guidance on this work.
Many thanks to Chris Norton and his team at nSight (www.nsightworks.com) for keeping the book on schedule. This includes Teresa Horton for her great editing work.
Thanks also to Richard Kobylka and the team at GrandMasters (www.grandmasters.biz) for their help shepherding this book through the process.
Also, thanks go to my technical editor, Kurt Meyer. Thanks for working through the labs, getting the CD right, and challenging various technical anomalies.
Thanks to Kristy Saunders for her wonderful work on the sample questions for the CD.
Finally, I would like to thank my wife, Carrie, and my children, Allie and Ben. Thanks for your patience and understanding during this process.
What do you think of this book? We want to hear from you!
Microsoft is interested in hearing your feedback so we can continually improve our books and learning resources for you. To participate in a brief online survey, please visit:
Contents
Introduction
xxi
System Requirements . . . xxi
Hardware Requirements xxi
Software Requirements . . . .xxii
Using the CD and DVD . . . .xxii
How to Install the Practice Tests xxiii
How to Use the Practice Tests xxiv
How to Uninstall the Practice Tests xxv
How to Install the Code xxv
Microsoft Certified Professional Program . . . .xxvi
Technical Support . . . .xxvi
Evaluation Edition Software Support . . . .xxvii
Chapter 1 Introducing ASP.NET 3.5
1
Before You Begin . . . .2
Lesson 1: Understanding the Players . . . .3
The Web Server’s Role 4
The Web Browser’s Role 5
Understanding the Role of Hypertext Transfer Protocol 6
Lesson Summary 15
Lesson 2: Creating a Web Site and Adding New Web Pages . . . .16
Creating Web Sites 16
Creating ASPX Pages 24
Web Site Compilation 28
Lesson Summary 30
Lesson Review 31
Lesson 3: Working with Web Configuration Files . . . .33
Understanding the Configuration File Hierarchy 33
Processing the Configuration Files 34
Editing Configuration Files 35
Lesson Summary 37
Lesson Review 38
Chapter Review . . . .39
Chapter Summary 39
Case Scenarios 39
Suggested Practices . . . .40
Create a New Web Site Using Visual Studio 2008 40
Add a Web Page to the Web Site 40
Program a Web Application 40
Configure Settings for a Web Application 41
Take a Practice Test . . . .41
Chapter 2 Adding and Configuring Server Controls
43
Before You Begin . . . .44
Lesson 1: Understanding and Using Server Controls . . . .45
Understanding the Life Cycle of an ASP.NET Web Page
and Its Controls 46
HTML vs. Web Server Controls 52
HTML Server Controls 53
Web Server Controls 58
Lesson Review 71
Lesson 2: Exploring Common Server Controls . . . .73
The Label Control 74
The TextBox Control 75
The Button Control 76
The CheckBox Control 78
The RadioButton Control 78
Lesson Summary 82
Lesson Review 82
Lesson 3: Exploring Specialized Server Controls . . . .84
The Literal Control 84
The Table, TableRow, and TableCell Controls 87
The Image Control 91
The ImageButton Control 94
The ImageMap Control 96
The Calendar Control 101
The FileUpload Control 108
The Panel Control 111
The MultiView and View Controls 114
The Wizard Control 118
The Xml Control 123
Lesson Summary 135
Lesson Review 136
Chapter Review . . . .138
Chapter Summary 138
Case Scenarios 138
Suggested Practices . . . .139
Create a New Web Page Using Server Controls 140
Create Event Handlers for Pages and Controls 140
Program a Web Application 140
Chapter 3 Input Validation and Site Navigation
141
Before You Begin . . . .142
Lesson 1: Performing Input Validation . . . .143
Understanding the Validation Framework 143
Understanding the BaseCompareValidator Class 147
Understanding the RequiredFieldValidator Control 148
Using the CompareValidator Control 149
Using the RangeValidator Control 150
Using the RegularExpressionValidator Control 151
The CustomValidator Control 152
Lesson Summary 163
Lesson Review 163
Lesson 2: Performing Site Navigation . . . .165
Is Page Navigation Necessary? 165
Choosing a Method to Navigate Pages 166
Client-Side Navigation 166
Cross-Page Posting 167
Client-Side Browser Redirect 169
Server-Side Transfer 170
Using the Site Map Web Server Control 171
Lesson Summary 178
Lesson Review 179
Chapter Review . . . .180
Chapter Summary 180
Case Scenarios 180
Suggested Practices . . . .181
Create a Web Site and Program Redirection 181
Create a Data Collection Page with Validation 181
Implement the HyperLink Web Server Control 181
Chapter 4 ASP.NET State Management
183
Before You Begin . . . .184
Lesson 1: Using Client-Side State Management . . . .185
Choosing Client-Side or Server-Side State Management 186
View State 187
Hidden Fields 192
Cookies 192
Query Strings 197
Lesson Summary 205
Lesson Review 206
Lesson 2: Using Server-Side State Management . . . .208
Application State 208
Session State 213
Profile Properties 218
Lesson Summary 222
Lesson Review 223
Chapter Review . . . .225
Chapter Summary 225
Case Scenarios 225
Suggested Practices . . . .227
Manage State by Using Client-Based State
Management Options 227
Manage State by Using Server-Based State
Management Options 227
Maintain State by Using Database Technology 227
Respond to Application and Session Events 228
Take a Practice Test . . . .228
Chapter 5 Customizing and Personalizing a Web Application
229
Before You Begin . . . .230
Overview of Master and Content Pages 232
Creating a Master Page 233
Creating Content Pages 234
Attaching Master Pages to Content Pages 236
Referencing Master Page Properties and Controls
from Content Pages 237
Handling Events When Working with Master Pages 239
Creating Nested Master Pages 240
Dynamically Changing Master Pages 240
Lesson Summary 246
Lesson Review 247
Lesson 2: Using Themes . . . .248
Themes Overview 248
Creating a Theme 249
Creating a Skin File 251
Adding a Cascading Style Sheet to Your Theme 253
Rules for Applying Themes 254
Applying a Theme Programmatically 255
Lesson Summary 262
Lesson Review 262
Lesson 3: Using Web Parts . . . .263
What Are Web Parts? 263
The WebParts Namespace 265
Defining Web Part Zones 266
Creating Web Parts 268
Enabling Users to Arrange and Edit Web Parts 269
Connecting Web Parts 271
Personalizing Web Parts 277
Lesson Summary 290
Lesson Review 290
Chapter Review . . . .292
Chapter Summary 292
Suggested Practices . . . .294
Implement a Consistent Page Design by Using Master Pages 294
Customize a Web Page by Using Themes and User Profiles 295
Implement Web Parts in a Web Application 295
Take a Practice Test . . . .295
Chapter 6 Working with ASP.NET AJAX
and Client-Side Scripting
297
Before You Begin . . . .298
Lesson 1: Creating AJAX-Enabled Web Forms . . . .299
Introducing ASP.NET AJAX 299
The AJAX Server Controls 301
Lesson Summary 313
Lesson Review 314
Lesson 2: Creating Client Scripts with the AJAX Client-Side Library . . . .316
Creating Your Own Client Scripts 316
Creating Your Own Client Callbacks 324
Working with the ASP.NET AJAX Library 328
Building Client Capabilities with AJAX 340
Lesson Summary 366
Lesson Review 366
Chapter Review . . . .368
Chapter Summary 368
Case Scenarios 368
Suggested Practices . . . .369
Add Partial-Page Update Support to a Page 370
Create Client Code Using the Microsoft AJAX Library 370
Take a Practice Test . . . .370
Chapter 7 Using ADO.NET, XML, and LINQ with ASP.NET
371
Before You Begin . . . .372
Getting Started with the DataTableObject 373
Using a DataSet Object 393
Using LINQ to DataSet to Query Data 413
Lesson Summary 419
Lesson Review 419
Lesson 2: Using the ADO.NET Connected Classes . . . .421
Using Provider Classes to Move Data 421
Asynchronous Data Access 461
Using LINQ to SQL to Work with Data 475
Lesson Summary 488
Lesson Review 488
Lesson 3: Working with XML Data . . . .490
The XML Classes 490
Working with XML Documents 494
Validating XML Documents 518
Using LINQ to XML 522
Lesson Summary 529
Lesson Review 529
Chapter Review . . . .531
Chapter Summary 531
Case Scenarios 531
Suggested Practices . . . .532
Create a Web Page for Updating Database Data 532
Create a Web Page for Editing Disconnected Data 532
Create a Web Page for Editing Connected Data 533
Create a Web Page for Working with XML Data 533
Create a Web Page for Reading, Modifying,
and Writing XML Data 533
Take a Practice Test . . . .534
Chapter 8 Working with Data Source and
Data-Bound Controls
535
Lesson 1: Connecting to Data with Data Source Controls . . . .537
Understanding the Data Source Controls 537
Using Objects as Data Sources with ObjectDataSource 539
Connecting to Relational Databases with SqlDataSource 548
Working with Microsoft Access Data Files
and AccessDataSourceControls 552
Connecting to XML Data Using XmlDataSource 553
Connecting to LINQ-Based Data with LinqDataSource 558
Connecting to Site Navigation Data with SiteMapDataSource 559
Lesson Summary 567
Lesson Review 567
Lesson 2: Working with Data-Bound Web Server Controls . . . .569
Introducing Data-Bound Controls 569
Simple Data-Bound Controls 572
Composite Data-Bound Controls 578
Hierarchical Data-Bound Controls 589
Lesson Summary 600
Lesson Review 601
Chapter Review . . . .602
Chapter Summary 602
Case Scenarios 602
Suggested Practices . . . .603
Create Pages Using Each of the Controls 603
Create a Master-Detail Solution Using the
Data-Bound Server Controls 604
Take a Practice Test . . . .604
Chapter 9 Writing and Working with Services
605
Before You Begin . . . .606
Lesson 1: Creating and Consuming XML Web Services . . . .607
Creating an ASP.NET Web Service 608
Consuming an ASP.NET Web Service 613
Lesson Summary 625
Lesson Review 626
Lesson 2: Creating and Consuming WCF Services . . . .628
Presenting Windows Communication Foundation (WCF) 628
Creating a WCF Service with ASP.NET 631
Consuming a WCF Service in an ASP.NET Page 635
Calling a WCF Service from Client Script Using
AJAX (REST and JSON) 639
Lesson Summary 652
Lesson Review 652
Chapter Review . . . .654
Chapter Summary 654
Case Scenario 654
Suggested Practices . . . .655
Working with XML Web Services 655
Working with WCF Services and ASP.NET 655
Take a Practice Test . . . .656
Chapter 10 Creating Custom Web Controls
657
Before You Begin . . . .658
Lesson 1: Working with User Controls . . . .659
Creating User Controls 659
Defining User Control Events 661
Defining Properties in User Controls 666
Adding a User Control to a Page 668
Dynamically Loading User Controls 668
Creating a Templated User Control 669
Lesson Summary 681
Lesson Review 681
Lesson 2: Working with Custom Web Server Controls . . . .683
Creating a Custom Web Server Control 683
Adding Toolbox Support for a Custom Web Server Control 689
Creating a Composite Control 695
Creating a Templated Custom Web Control 701
Lesson Summary 705
Lesson Review 705
Chapter Review . . . .707
Chapter Summary 707
Case Scenarios 707
Suggested Practices . . . .708
Create a New Custom User Control 708
Create a New Custom Web Server Control 708
Create a New Composite Web Server Control 709
Create a New Templated Control 709
Take a Practice Test . . . .709
Chapter 11 Programming the Web Application
711
Before You Begin . . . .712
Lesson 1: Using Web Site Programmability . . . .713
Page and Application Exception Handling 713
Programming the Web.config File Settings 715
Asynchronous Web Page Programming 719
Creating a Custom HTTP Handler 721
Lesson Summary 727
Lesson Review 728
Lesson 2: Using the ASP.NET Intrinsic Objects . . . .730
Page and Application Context Overview 730
Determining the Browser Type 735
Accessing Web Page Headers 738
Lesson Summary 742
Lesson Review 742
Chapter Review . . . .744
Chapter Summary 744
Case Scenarios 744
Using Web Site Programmability 745
Using the ASP.NET Intrinsic Objects 746
Take a Practice Test . . . .746
Chapter 12 Monitoring, Troubleshooting, and Debugging
747
Before You Begin . . . .748
Lesson 1: Debugging an ASP.NET Application . . . .749
Configuring ASP.NET for Debugging 749
Defining Custom Errors 751
Debugging Remotely 753
Debugging Client-Side Script 755
Lesson Summary 759
Lesson Review 760
Lesson 2: Troubleshooting a Running ASP.NET Application . . . .762
Implementing Tracing 762
Monitoring a Running Web Application 771
Lesson Summary 776
Lesson Review 776
Chapter Review . . . .778
Chapter Summary 778
Case Scenarios 778
Suggested Practices . . . .779
Debugging a Web Site 779
Troubleshooting a Web Site 780
Take a Practice Test . . . .780
Chapter 13 Globalization and Accessibility
781
Before You Begin . . . .781
Lesson 1: Configuring Globalization and Localization . . . .783
About ASP.NET Resources 783
Using Local Resource Files 783
HTML Layout Best Practices 792
Setting the Culture 793
Lesson Summary 798
Lesson Review 799
Lesson 2: Configuring Accessibility . . . .800
Public Accessibility Guidelines 800
How ASP.NET Controls Support Accessibility 801
Improving Visual Accessibility 801
Improving the Accessibility of Forms Requiring User Input 803
Testing Accessibility 805
Lesson Summary 809
Lesson Review 809
Chapter Review . . . .811
Chapter Summary 811
Case Scenarios 811
Suggested Practices . . . .812
Implement Globalization and Accessibility 813
Take a Practice Test . . . .813
Chapter 14 Implementing User Profiles, Authentication,
and Authorization
815
Before You Begin . . . .816
Lesson 1: Working with User Profiles . . . .817
User Profile Basics 817
Configuring a User Profile Provider 818
Defining the User Profile 820
Identifying Users 822
Set and Save a User Profile 823
Recognize a Returning Visitor 825
Lesson Summary 830
Lesson Review 831
Using WSAT to Configure Security 834
Login Controls 836
The Membership Class 843
The Roles Class 844
Lesson Summary 847
Lesson Review 847
Lesson 3: Securing Your Site . . . .849
Configuring Web Applications to Require
Windows Authentication 850
Creating Custom ASP.NET Forms to Authenticate
Web Users 851
Configuring Web Applications to Require Passport
Authentication 859
Configuring Web Applications for Anonymous Access Only 859
Configuring Impersonation by Using .config Files 860
Restricting Access to ASP.NET Web Applications,
Files, and Folders 860
Lesson Summary 865
Lesson Review 865
Chapter Review . . . .868
Chapter Summary 868
Case Scenarios 869
Suggested Practices . . . .871
Establish a User’s Identity by Using Forms Authentication 871
Use Authorization to Establish the Rights of an
Authenticated User 872
Implement Microsoft Windows Authentication
and Impersonation 872
Use Login Controls to Control Access to a Web Application 872
Take a Practice Test . . . .873
Chapter 15 Creating ASP.NET Mobile Web Applications
875
Before You Begin . . . .876
The ASP.NET Mobile Web Application Roadmap 877
Creating a Mobile Web Application 878
Creating Mobile Web Forms 878
Viewing and Testing Mobile Web Applications 880
Using Mobile Controls 884
Maintaining Session State 889
Control Grouping for User Input 890
Understanding Adaptive Rendering 891
Implementing Device-Specific Rendering 893
Applying Best Practices to Mobile Applications 895
Lesson Summary 906
Lesson Review 907
Chapter Review . . . .909
Chapter Summary 909
Case Scenarios 909
Suggested Practices . . . .910
Creating a Mobile Web Application 910
Implement Device-Specific Rendering 910
Create a Data-Collection Page with Validation 910
Take a Practice Test . . . .911
Chapter 16 Deploying, Configuring, and Caching Applications
913
Before You Begin . . . .914
Lesson 1: Deploying Web Applications . . . .915
About Web Setup Projects 915
Creating a Web Setup Project 916
Creating Launch Conditions 918
Writing to the Registry as Part of Deployment 924
Adding a Custom Setup Page 925
Adding Custom Actions to Your Deployment 928
Deploying Web Applications Using a Web Setup Project 929
Deploying Web Applications Using the Copy Web Tool 934
Lesson Summary 941
Lesson Review 941
Lesson 2: Using Caching to Improve Performance . . . .943
Application Caching 943
Page Output Caching 948
Programmatically Invalidating Cached Pages 952
Lesson Summary 957
Lesson Review 957
Chapter Review . . . .959
Chapter Summary 959
Case Scenarios 959
Suggested Practices . . . .961
Use a Web Setup Project 961
Using the Copy Web Tool 961
Precompile and Publish a Web Application 961
Optimize and Troubleshoot a Web Application 962
Take a Practice Test . . . .962
Answers 963
Index 1009
What do you think of this book? We want to hear from you!
Microsoft is interested in hearing your feedback so we can continually improve our books and learning resources for you. To participate in a brief online survey, please visit:
Introduction
T
his training kit is designed for developers who plan to take Microsoft Certified Techni-cal Specialist (MCTS) exam 70-562, as well as for developers who need to know how to develop applications using the Microsoft .NET Framework 3.5 and ASP.NET. We assume that before you begin using this kit, you have a working knowledge of Microsoft Windows and Microsoft Visual Basic or C#.By using this training kit, you’ll see how to do the following:
n Create a Web application using Web server controls, event handlers, application state, and session state.
n Create custom Web server controls.
n Develop accessible Web applications that can be used by a global audience.
n Write rich, Web-based user experiences using AJAX.
n Integrate a Web application with a back-end database.
n Create a Web application that stores user-specific information and preferences.
n Monitor, troubleshoot, and debug ASP.NET applications.
n Build service-oriented applications (SOAs) using Web services and Windows Communi-cation Foundation (WCF).
n Add authentication and authorization features to your application to improve security and add multiple access levels.
n Create Web applications that can be used from mobile phones and PDAs.
System Requirements
We recommend that you use a computer that is not your primary workstation to do the practice exercises in this book because you will make changes to the operating system and application configuration.
Hardware Requirements
n 1 GHz 32-bit (x86) or 64-bit (x64) processor (depending on the minimum requirements of the operating system)
n 1 GB of system memory (depending on the minimum requirements of the operating system)
n A hard disk with at least 700 MB of available space
n A monitor capable of at least 800 × 600 display resolution
n A keyboard
n A mouse or other pointing device
n An optical drive capable of reading CD-ROMs
n An optical drive capable of reading DVDs if you are installing the 90-day evaluation edition of Visual Studio 2008 Professional Edition included on the DVD with this book
Software Requirements
The computer used with the companion CD-ROM should also have the following software:
n A Web browser such as Microsoft Internet Explorer version 6 or later
n An application that can display PDF files, such as Adobe Acrobat Reader, which can be downloaded at www.adobe.com/reader
n Visual Studio 2008 (A 90-day evaluation edition of Visual Studio 2008 Professional Edi-tion is included on the DVD with this book.)
These requirements will support use of the companion CD-ROM.
Using the CD and DVD
A companion CD and an evaluation software DVD are included with this training kit. The evaluation software DVD contains a 90-day evaluation edition of Microsoft Visual Studio 2008 Professional Edition, in case you want to use it with this book. The companion CD contains the following:
PRACTICE TESTS
CODE
The chapters in this book include sample fi les associated with the lab exercises at the end of every lesson. For some exercises, you will be instructed to open a project prior to starting the exercise. For other exercises, you will create a project on your own and be able to reference a completed project in the event you experience a problem while following the exercise.
AN EBOOK
An electronic version (eBook) of this book is included for times when you don’t want to carry the printed book with you. The eBook is in Portable Document Format (PDF); you can view it by using Adobe Acrobat or Adobe Reader. You can use the eBook to cut and paste code as you work through the exercises.
GLOSSARY
Key terms used in the chapters are included in a glossary on the CD.
SAMPLE CHAPTERS
The CD also includes sample chapters from other MS Press books for your review.
MORE INFO DIGITAL CONTENT FOR DIGITAL BOOK READERS
If you bought a digital-only edition of this book, you can enjoy select content from the print edition’s companion CD. Visit http://go.microsoft.com/fwlink/?LinkId=144372 to get your downloadable content. This content is always up-to-date and available to all readers.
How to Install the Practice Tests
To install the practice test software from the companion CD to your hard disk, do the following:
1. Insert the companion CD into your CD drive, and accept the license agreement. A CD
menu appears.
NOTE IF THE CD MENU DOESN’T APPEAR
If the CD menu or the license agreement doesn’t appear, AutoRun might be disabled on your computer. Refer to the Readme.txt fi le on the CD-ROM for alternate installation instructions.
How to Use the Practice Tests
To start the practice test software, follow these steps:1. Click Start | All Programs | Microsoft Press Training Kit Exam Prep. A window appears
that shows all the Microsoft Press training kit exam prep suites installed on your computer.
2. Double-click the lesson review or practice test that you want to use.
NOTE LESSON REVIEWS VS. PRACTICE TESTS
Select the (70-562) Microsoft .NET Framework 3.5—Web-Based Client Development lesson review to use the questions from the “Lesson Review” sections of this book. Select the (70-562) Microsoft .NET Framework 3.5 — Web-Based Client Development practice test to use a pool of 200 questions similar to those in the 70-562 certifi cation exam.
Lesson Review Options
When you start a lesson review, the Custom Mode dialog box appears so that you can con-fi gure your test. You can click OK to accept the defaults, or you can customize the number of questions you want, how the practice test software works, which exam objectives you want the questions to relate to, and whether you want your lesson review to be timed. If you’re retaking a test, you can select whether you want to see all the questions again or only those questions you missed or didn’t answer.
After you click OK, your lesson review starts.
n To take the test, answer the questions and use the Next, Previous, and Go To buttons to move from question to question.
n After you answer an individual question, if you want to see which answers are cor-rect—along with an explanation of each correct answer—click Explanation.
n If you’d rather wait until the end of the test to see how you did, answer all the ques-tions, and then click Score Test. You’ll see a summary of the exam objectives you chose and the percentage of questions you got right overall and per objective. You can print a copy of your test, review your answers, or retake the test.
Practice Test Options
CERTIFICATION MODE
Closely resembles the experience of taking a certifi cation exam. The test has a set number of questions, it’s timed, and you can’t pause and restart the timer.
STUDY MODE
Creates an untimed test in which you can review the correct answers and the explanations after you answer each question.
CUSTOM MODE
Gives you full control over the test options so that you can customize them as you like.
In all modes, the user interface you see when taking the test is basically the same, but with different options enabled or disabled, depending on the mode. The main options are discussed in the previous section, “Lesson Review Options.”
When you review your answer to an individual practice test question, a “References” sec-tion is provided that lists where in the training kit you can fi nd the informasec-tion that relates to that question; it also provides links to other sources of information. After you click Test Results to score your entire practice test, you can click the Learning Plan tab to see a list of references for every objective.
How to Uninstall the Practice Tests
To uninstall the practice test software for a training kit, use the Add Or Remove Programs option in Windows Control Panel.
How to Install the Code
To install the sample fi les referenced in the book’s exercises from the companion CD to your hard disk, do the following:
1. Insert the companion CD into your CD drive, and accept the license agreement. A CD
menu appears.
NOTE IF THE CD MENU DOESN’T APPEAR
If the CD menu or the license agreement doesn’t appear, AutoRun might be disabled on your computer. Refer to the Readme.txt fi le on the CD-ROM for alternate installation instructions.
2. Click the Code item, and follow the instructions on the screen.
Microsoft Certifi ed Professional Program
The Microsoft certifi cations provide the best method to prove your command of cur-rent Microsoft products and technologies. The exams and corresponding certifi cations are developed to validate your mastery of critical competencies as you design and develop, or implement and support, solutions with Microsoft products and technologies. Computer professionals who become Microsoft-certifi ed are recognized as experts and are sought after industry-wide. Certifi cation brings a variety of benefi ts to the individual and to employers and organizations.
MORE INFO ALL THE MICROSOFT CERTIFICATIONS
For a full list of Microsoft certifi cations, go to www.microsoft.com/learning/mcp/default.asp.
Technical Support
Every effort has been made to ensure the accuracy of this book and the contents of the com-panion CD. If you have comments, questions, or ideas regarding this book or the comcom-panion CD, please send them to Microsoft Press by using either of the following methods:
Postal Mail:
• Microsoft Press
Attn: MCTS Self-Paced Training Kit (Exam 70-562): Microsoft .NET Framework 3.5—
Web-Based Client Development Editor
One Microsoft Way Redmond, WA 98052–6399
For additional support information regarding this book and the CD-ROM (including answers to commonly asked questions about installation and use), visit the Microsoft Press Technical Support Web site at www.microsoft.com/learning/support/books/. To connect directly to the Microsoft Knowledge Base and enter a query, visit http://support.microsoft .com/search/. For support information regarding Microsoft software, please connect to http://
Evaluation Edition Software Support
The 90-day evaluation edition provided with this training kit is not the full retail product and is provided only for the purposes of training and evaluation. Microsoft and Microsoft Techni-cal Support do not support this evaluation edition.
C H A P T E R 1
Introducing ASP.NET 3.5
T
he Web development experience continues to evolve with Microsoft Visual Studio 2008 and ASP.NET 3.5. These new tools enable you to build highly interactive, robust Web applications more efficiently than ever. This includes building sites that provide users with a high degree of interactivity with AJAX. There are also new and improved controls that both speed development and add to the user experience. Other enhancements include improvements in Web site security, integration with Microsoft Internet Information Services 7.0 (IIS 7.0), and a better Web service programming model. All of these enhancements were developed to give ASP.NET developers more control and increased confidence when build-ing and deploybuild-ing the next generation of Web sites.This chapter introduces the basics of Web site development with ASP.NET. It starts by describing the key players in any Web site: the server, the browser (or client), and Hypertext Transfer Protocol (HTTP). This serves as a basis for understanding the architecture of an ASP. NET Web site. In Lesson 2, “Creating a Web Site and Adding New Web Pages,” you will learn the key components that make up an ASP.NET development site. The chapter closes with a discussion on configuring the many aspects of an ASP.NET application.
Exam objectives in this chapter:
n Configuring and Deploying Web Applications
n Configure projects, solutions, and reference assemblies.
n Programming Web Applications
n Implement business objects and utility classes.
n Handle events and control page flow.
Lessons in this chapter:
n Understanding the Players 3
n Creating a Web Site and Adding New Web Pages 16
Before You Begin
To complete the lessons in the chapter, you should be familiar with developing applications in Microsoft Visual Studio using Visual Basic or C#. In addition, you should be comfortable with all of the following:
n The Visual Studio 2008 Integrated Development Environment (IDE)
n A basic understanding of Hypertext Markup Language (HTML) and client-side scripting
n How to make assemblies available to other applications
n Working with Visual Studio projects, fi les, classes, and designers
REAL WORLD
Mike Snell
A
good Web application developer needs to know a lot more than just his or her favorite development language to be effective. In fact, C# or Visual Basic is just the starting point. You also must know how to handle page layout with HTML. You need to know how to create, manage, and implement interface styling with Cascading Style Sheets (CSS). JavaScript will also be required if you intend to write your own client-side functionality for your Web pages. You might also need to understand Extensible Markup Language (XML), Web services, and database programming. Of course, you also need to know how all of these things work together to form a single solution. The modern Web developer needs to know more technologies (and be able to easily switch between them) than any other developer in history. I think this is one of the reasons Web development is such a challenging, fun, and rewarding experience.REAL WORLD
Mike Snell
Lesson 1:
Understanding the Players
A Web application is unlike a standard Windows application. It does not run in a single process on a single machine. Instead, it is typically hosted on a Web server and accessed via a Web browser on a client machine. The communication between the Web server and Web browser is sent using HTTP. It is imperative you have a basic understanding of how these items work and communicate together before you start writing much code. The typical com-munication process between browser and server can be generalized into the following steps:
1. A user uses his or her Web browser to initiate a request for a Web server resource. 2. HTTP is used to send a GET request to the Web server.
3. The Web server processes the GET request on the server (typically locating the
requested code and running it).
4. The Web server then sends a response back to the Web browser. The HTTP protocol is
used to send the HTTP response back to the Web browser.
5. The user’s Web browser then processes the response (typically HTML and JavaScript)
and renders the Web page for display to the user.
6. The user may then enter data and perform an action such as clicking a submit button
that causes his or her data to be sent back to the Web server for processing.
7. HTTP is used to POST the data back to the Web server.
8. The Web server then processes the POST request (again, calling your code in the
process).
9. The Web server then sends a response back to the Web browser. HTTP is used to send
the HTTP response to the Web browser.
10. The Web browser again processes the response and displays the Web page to the user.
This process is repeated over and over during a typical Web application session.
After this lesson, you will be able to:
n Describe the Web server’s role in responding to requests for resources.
n Describe the Web browser’s role in submitting requests and presenting the
response to the user.
n Describe the role of HTTP in communicating with the Web server.
n Describe how HTTP verbs are used to request resources from the Web server.
n Describe the status-code groups that are implemented in HTTP.
n Describe Distributed Authoring and Versioning.
n Describe PostBack, the common method of sending data to the Web server. n Describe methods for troubleshooting HTTP.
Estimated lesson time: 30 minutes
The Web Server’s Role
The fi rst Web servers were responsible for receiving and processing simple user requests from browsers via HTTP. The Web server handled its request and sent a response back to the Web browser. The Web server then closed any connection between it and the browser and released all resources that were involved with the request. These resources were easy to release as the Web server was fi nished processing the request. This type of Web application was considered to be stateless because no data was held by the Web server between requests and no connection was left open. These applications typically involved simple HTML pages and were therefore able to handle thousands of similar requests per minute. Figure 1-1 shows an example of this simple, stateless environment.
Browser initiates
FIGURE 1-1 A simple request and response between browser and server in a stateless environment
After this lesson, you will be able to:
n Describe the Web server’s role in responding to requests for resources.
n Describe the Web browser’s role in submitting requests and presenting the
response to the user.
n Describe the role of HTTP in communicating with the Web server.
n Describe how HTTP verbs are used to request resources from the Web server.
n Describe the status-code groups that are implemented in HTTP.
n Describe Distributed Authoring and Versioning.
n Describe PostBackck, the common method of sending data to the Web server. n Describe methods for troubleshooting HTTP.
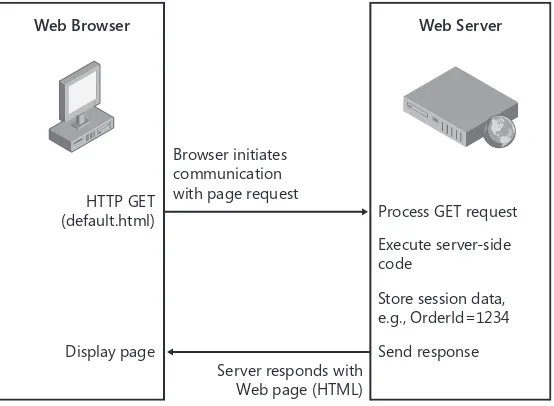
Today’s Web servers deliver services that go far beyond the original Web servers. In addi-tion to serving static HTML files, modern Web servers also handle requests for pages that contain code that executes on the server; the Web server executes this code on request and responds with the results. These Web servers also have the ability to store data between requests. This means that Web pages can be connected together to form a Web applica-tion that understands the current state of each individual user’s requests. These servers keep a connection open to the browser for a period of time in anticipation of additional page requests from the same user. This type of interaction is illustrated in Figure 1-2.
Browser initiates communication with page request HTTP GET
(default.html) Process GET request
Web Browser Web Server
Server responds with Web page (HTML)
Display page Send response Execute server-side code
Store session data, e.g., OrderId=1234
FIGURE 1-2Modern Web servers store state between page requests to enable more sophisticated Web applications
The Web Browser’s Role
The Web browser provides a platform-independent means of displaying Web pages that were written in HTML. HTML was designed to be able to render information on any operating system while placing no constraint on the window size. This is why Web pages are considered platform independent. HTML was designed to “flow,” wrapping text as necessary to fit into the browser window. The Web browser also displays images and responds to hyperlinks to other pages. Each Web page request to the Web server results in the Web browser updating the screen to display the new information.
Understanding the Role of Hypertext Transfer Protocol
HTTP is a text-based communication protocol that is used to request Web pages from the Web server and send responses back to the Web browser. HTTP messages are typically sent between the Web server and Web browser using port 80, or port 443 when using Secure HTTP (HTTPS).MORE INFO HTTP/1.1 SPECIFICATION
For more information on the current HTTP standard (HTTP/1.1), you can review the specifi -cation at the following Web address: http://www.w3.org/Protocols/rfc2616/rfc2616.html.
Pages are typically requested by a user entering information in his or her browser by click-ing on a favorite, conductclick-ing a search, or typclick-ing in a Uniform Resource Locator (URL). When a Web page is requested, a textual command is sent from the browser to the Web server. This command might look as follows:
GET /default.aspx HTTP/1.1 Host: www.northwindtraders.com
The fi rst line in this command contains what is called the method, also known as the verb or command. In this case the verb is GET. The verb is followed by the URL of the Web page to be retrieved (/default.aspx). Following that is the version of HTTP to be used to process the command (HTTP/1.1). In this way, the method indicates the action to be performed by the Web server, the URL that is the target of that method, and the communication protocol.
The second line of the command (Host: www.northwindtraders.com) identifi es the name of the host that should be used by the Web server. This is useful if a Web server is hosting more than one Web site. In this case, the Web server needs to pass on the request to the appro-priate site for processing. This process is known as using host headers to identify the Web site that will handle the given request. There are other methods defi ned by HTTP. Table 1-1 contains a list of some of the common HTTP methods with a description of their uses. Note that if Distributed Authoring and Versioning (DAV) is enabled on the Web site, many more verbs are available, such as LOCK and UNLOCK.
What Is Distributed Authoring and Versioning?
D
istributed Authoring and Versioning (DAV) is a set of extensions to HTTP/1.1 that simplifi es Web site development when working in a team scenario. DAV is an open standard and is available on numerous platforms. DAV provides the ability to lock and unlock fi les and the ability to designate versions.DAV is built directly on HTTP/1.1, so no other protocols, such as File Transfer Proto-col (FTP) or Server Message Block (SMB), are required. DAV also provides the ability to query the Web server for various resource properties such as fi le names,
What Is Distributed Authoring and Versioning?
D
istributed Authoring and Versioning (DAV) is a set of extensions to HTTP/1.1 that simplifi es Web site development when working in a team scenario. DAV is an open standard and is available on numerous platforms. DAV provides the ability to lock and unlock fi les and the ability to designate versions.time stamps, and sizes. DAV also gives developers the ability to perform server-side fi le copying and moving. For example, you can use the HTTP GET and PUT verbs to retrieve fi les from the Web servers and save them to different locations, or you can use the DAV’s COPY verb to simply tell a server to copy the fi le.
TABLE 1-1Common HTTP/1.1 Methods
HTTP METHOD DESCRIPTION
OPTIONS Used by client applications to request a list of all supported verbs. In this
way, you can check to see if a server allows a particular verb before wast-ing network bandwidth trywast-ing to send an unsupported request.
GET Gets a URL from the server. A GET request for a specifi c URL, say, /test. htm, retrieves the test.htm fi le. Data retrieved using this verb is typically cached by the browser. GET also works with collections, such as those in directories that contain collections of fi les. If you request a directory, the server can be confi gured to return a default fi le, such as index.html, that may be representative of the directory.
HEAD Retrieves the meta information for a resource. This information is typically identical to the meta information sent in response to a GET request, but the HEAD verb never returns the actual resource. The meta information is cacheable.
POST Sends data to the Web server for processing. This is typically the result of users entering data on a form and submitting that data as part of their request.
PUT Allows a client to directly create a resource at the indicated URL on the server. The server takes the body of the request, creates the fi le specifi ed in the URL, and copies the received data to the newly created fi le. If the fi le exists and is not locked, the content of the fi le will be overwritten.
DELETE Used to delete a resource at the Web server. Requires write permissions on the directory.
TRACE Used for testing or diagnostics; allows the client to see what is being received at the other end of the request chain. Responses to this method are never cached.
CONNECT Reserved for use with a proxy that can dynamically switch to being a
tun-nel, such as Secure Sockets Layer (SSL) protocol.
DEBUG Not defi ned in the HTTP/1.1 specifi cation, but used to start ASP.NET debugging. This method informs Visual Studio of the process to which the debugger will attach.
The communication from the Web browser to the Web server is referred to as a request. In ASP.NET, there is a Request object that is used to represent the Web browser’s communi-cations to the Web server. It wraps the resource request in an object that can be queried in code. This includes providing your code access to things like the cookies associated with your site, the query string parameters passed on the URL, the path to the request, and more.
The communication from the Web server back to the Web browser is commonly referred to as the response. In ASP.NET this information is wrapped in the Response object. You can use this object to set cookies, defi ne caching, set page expiration, and more. When the Web server responds to a request, it uses what it fi nds in the Response object to write the actual, text-based HTTP response. This communication might look as follows:
HTTP/1.1 200 OK
Server: Microsoft-IIS/6.0 Content-Type: text/html Content-Length: 38
<html><body>Hello, world.</body><html>
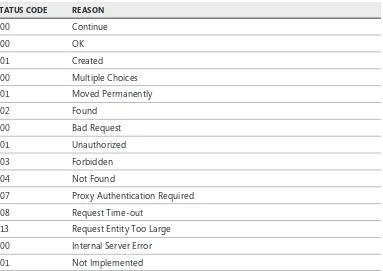
The fi rst line indicates the communication protocol and version information. It also includes the status code for the response and the reason that explains the status code. The status codes are three digits and grouped as shown in Table 1-2.
EXAM TIP
Even if you don’t memorize every status code, it is helpful to know the fi ve status code groupings in Table 1-2.
TABLE 1-2Status Code Groups
STATUS CODE
GROUP DESCRIPTION
1xx Informational: Request received, continuing to process.
2xx Success: The action was successfully received, understood, and accepted.
3xx Redirect Command: Further action must be taken to complete the request.
4xx Client Error: The request has a syntax error or the server does not know how to fulfi ll the request.
5xx Server Error: The server failed to fulfi ll a request that appears to be valid.
TABLE 1-3Common Status Codes and Their Reasons
STATUS CODE REASON
100 Continue
200 OK
201 Created
300 Multiple Choices
301 Moved Permanently
302 Found
400 Bad Request
401 Unauthorized
403 Forbidden
404 Not Found
407 Proxy Authentication Required
408 Request Time-out
413 Request Entity Too Large
500 Internal Server Error
501 Not Implemented
The second line of the response indicates the type of Web server (e.g., Server: Microsoft-IIS/6.0). The third line (Content-Type) indicates the type of resource that is being sent to the Web browser as part of the response. This indicator is in the form of a Multipurpose Internet Mail Extensions (MIME) type. In the case of this example (Content-Type: text/html), the file is a static HTML text file. The MIME type is a two-part designator type/subtype, in which the first part is the resource type (text in this example) and the second part is the resource subtype (html in this example). Some common MIME types are shown in Table 1-4.
TABLE 1-4 Common MIME Types
MIME TYPE DESCRIPTION
Text Textual information. No special software is required to get the full meaning of the text, aside from support for the indicated character set. One subtype is plain, which means that the text can be read without requiring additional software. Other subtypes are html and xml, which indicate the appropriate file type(s).
MIME TYPE DESCRIPTION
Audio Audio data. Requires an audio output device (such as a speaker or head-phones) to “hear” the contents. An initial subtype called basic is defi ned for this type.
Video Video data. Requires the capability to display moving images, typically including specialized hardware and software. An initial subtype called mpeg is defi ned for this type.
Application Other kinds of data, typically either uninterpreted binary data or information to be processed by an application. The subtype, called
octet-stream, is to be used in the case of uninterpreted binary data, in
which the simplest recommended action is to offer to write the informa-tion into a fi le for the user. The PostScript subtype is also defi ned for the transport of PostScript material.
MORE INFO MIME TYPES
The Windows registry contains a list of MIME types/subtypes at the following location:
HKEY_CLASSES_ROOT\MIME\Database\Content Type
The next line is content length (Content-Length: 38 in this example). This simply indicates the size of the content that follows. After the content-length line, the response message is returned. This message is based on the MIME type. The browser attempts to process the content based on its MIME type. For example, it interprets HTML for HTML MIME types and renders an image for image MIME types.
Submitting Form Data to the Web Server
The HTML <form> tag can be used to create a Web page that collects data from the user and sends the collected data back to the Web server. The form tag is nested inside the <HTML> tags. The form tags typically include information for the user in the form of text and input tags for defi ning things like buttons and text boxes. A typical use of the <form> tag might look like this:
<form method="POST" action="getCustomer.aspx"> Enter Customer ID:
<input type="text" name="Id">
<input type="submit" value="Get Customer"> </form>
when sending the request to the server. The action attribute is the relative URL of the page to which the request will be sent.
There are two HTTP methods that can be used to submit the form data back to the Web server: GET and POST. When the GET verb is used, the form data is appended to the URL as part of the query string. The query string is a collection of key–value pairs, separated by an ampersand (&) character. The start of the query string is indicated by a question mark (?). The following provides an example:
GET /getCustomer.aspx?Id=123&color=blue HTTP/1.1 Host: www.northwindtraders.com
In this example, a GET request is made to the Web server for a Web page called get-Customer.aspx on the root of the Web site (indicated by the forward slash). The query string contains the form data following the question mark (?).
When using the GET method to send data to the server, the complete URL and query string can be seen and modified in the address bar of the Web browser. Keep in mind that, depending on the scenario, this can be a disadvantage or even a security risk. You do not want people manipulating this data in the query string and thus potentially seeing things they should not be seeing or corrupting your data. You also might not want users bookmarking pages that include query string information sent to the server and thereby causing the same information to be sent to the server every time a user requests a page. Another disadvantage is that the query string is limited in size by the Web browser and Web server being used. For example, when using Microsoft Internet Explorer and IIS, the limit for a given query string is 1,024 characters.
The POST method is the preferred means of submitting data back to the server as part of an HTTP request. When the POST verb is used, the data is placed into the message body of the request as follows:
POST /getCustomer.aspx HTTP/1.1 Host: www.northwindtraders.com
Id=123&color=blue
Using the POST verb removes the size constraint on the data. (As a test more than 10 megabytes of data were posted to see if the Web server would accept the data. It worked, but sending that much data across the Internet can cause other problems, primarily related to bandwidth, such as timeout errors and performance problems.) Additionally, the POST method prevents users from manipulating the request in the address bar of their browser. Instead, the data is hidden in the message body. Therefore, in most scenarios, the POST method is the more desirable way to send data to the Web server.
called IsPostBack that is used to determine if data is being sent back to the Web server or if the Web page is simply being requested.
HTTP Troubleshooting
You can view the exchange of HTTP messages between browser and server by using a net-work sniffer application. The netnet-work sniffer captures all packets between the Web browser and the Web server, and you can simply view the packet data to read messages such as the requests and responses described in this section.
REAL WORLD
Glenn Johnson
I
always keep Microsoft Network Monitor, which is a network packet sniffer that is included with Microsoft Server operating systems and Microsoft Systems Manage-ment Server (SMS), installed on my computer so I can readily run this application to see the packet-by-packet conversation between my computer and other comput-ers on the network. This is probably the best way to undcomput-erstand what is happening because you see the raw data packets that were exchanged.Another tool that you can use for HTTP diagnostics is Telnet. Telnet is nothing more than a terminal emulator that sends and receives textual data on port 23, but you can specify port 80 to communicate to the Web server. With Telnet, you can type the HTTP commands and view the results.
There are also many applications you can download from the Internet to troubleshoot and analyze HTTP. Simply type HTTP as the keyword in a search on the site http://www.download .com to get a list of such applications.
Quick Check
1. What protocol is used to communicate between the Web browser and the Web
server?
2. In ASP.NET, what does the Request object represent? 3. In ASP.NET, what does the Response object represent?
Quick Check Answers
1. HTTP is used for Web browser and Web server communication.
2. The Request object in ASP.NET wraps the communication from the Web browser to the Web server.
3. The Response object in ASP.NET wraps the data bound for the Web browser and sent from the Web server.
REAL WORLD
Glenn Johnson
I
always keep Microsoft Network Monitor, which is a network packet sniffer that is included with Microsoft Server operating systems and Microsoft Systems Manage-ment Server (SMS), installed on my computer so I can readily run this application to see the packet-by-packet conversation between my computer and other comput-ers on the network. This is probably the best way to undcomput-erstand what is happening because you see the raw data packets that were exchanged.Quick Check
1. What protocol is used to communicate between the Web browser and the Web
server?
2. In ASP.NET, what does the Requestst object represent? 3. In ASP.NET, what does the Response object represent?
Quick Check Answers
1. HTTP is used for Web browser and Web server communication.
2. The Requestst object in ASP.NET wraps the communication from the Web browser to the Web server.
3. The Response object in ASP.NET wraps the data bound for the Web browser and sent from the Web server.
1 2
L A B
Exploring HTTP
In this lab, you explore HTTP by using Telnet, the terminal emulation application that is built into Microsoft Windows.
E X E R C I S E 1 Starting and Confi guring Telnet
In this exercise, you start the Telnet client and confi gure it to work with HTTP.
1. Open a command prompt. You can do so by selecting Start | All Programs | Accessories
| Command Prompt.
2. Clear the screen. Enter the following command to clear the screen:
CLS
3. Start Telnet. In the command prompt window, enter the following command to start
the Telnet client:
Telnet.exe
Note that you might get an error indicating that Telnet is not installed on your com-puter. It is not installed by default in Windows Vista. To install, navigate to Control Panel, Programs, Programs and Features. Click the Turn Windows Features On Or Off link. In the Windows Features dialog box, you should be able to select and install Telnet Client.
4. Confi gure Telnet to echo typed characters. Enter the following command into the
Telnet window, which will cause locally typed characters to be displayed as you type them:
set localecho
Telnet will respond with the following:
Local echo on
5. Set carriage return and line feed to On. Enter the following command to instruct Telnet
that it should treat the Enter key as a combination of carriage return and line feed.
set crlf
Telnet will respond with the following:
New line mode - Causes return key to send CR & LF CLS
Telnet.exe
set localecho
set crlf
E X E R C I S E 2 Communicating with a Web Site
In this exercise, you connect to a Web site, request the default page, and observe the result.
NOTE TAKE YOUR TIME
In this section, if you mistype a command, you will need to start over, so take your time entering each command.
1. Open a connection to a Web site. Enter the following command into the Telnet
com-mand window to open a connection to msn.com on port 80:
o msn.com 80
Telnet responds with the following:
Connecting To msn.com. . .
Note that Telnet will not indicate that you are indeed connected.
2. Press Enter multiple times until the cursor is positioned on the next line.
3. Attempt to GET the default page. Enter the following lines. After typing the second
line, press Enter two times, to indicate the end of message to the Web server.
GET / HTTP/1.1 Host: msn.com
After pressing Enter two times, you will see the result shown in Figure 1-3. Notice that the status code is 301 with a reason of Moved Permanently. The message body con-tains HTML with a hyperlink to the new location.
FIGURE 1-3The response is a result code that indicates a redirect
4. Try other sites. After pressing Enter, you will be back at the Telnet command prompt.
Repeat the steps in this exercise to connect to other Web sites. o msn.com 80
Connecting To msn.com. . .