in
10 Minutes
®
Sams
Teach Yourself
Sherry Kinkoph Gunter
Sams Teach Yourself Facebook® in 10 Minutes Copyright © 2010 by Pearson Education, Inc.
All rights reserved. No part of this book shall be reproduced, stored in a retrieval system, or transmitted by any means, elec-tronic, mechanical, photocopying, recording, or otherwise, with-out written permission from the publisher. No patent liability is assumed with respect to the use of the information contained herein. Although every precaution has been taken in the prepa-ration of this book, the publisher and author assume no responsibility for errors or omissions. Nor is any liability
assumed for damages resulting from the use of the information contained herein.
ISBN-13: 978-0-672-33087-2 ISBN-10: 0-672-33087-3
Library of Congress Cataloging-in-Publication data is on file. Printed in the United States of America
First Printing August 2009
Trademarks
All terms mentioned in this book that are known to be trade-marks or service trade-marks have been appropriately capitalized. Pearson Education, Inc. cannot attest to the accuracy of this information. Use of a term in this book should not be regarded as affecting the validity of any trademark or service mark.
Warning and Disclaimer
Every effort has been made to make this book as complete and as accurate as possible, but no warranty or fitness is implied. The information provided is on an “as is” basis. The author and the publisher shall have neither liability nor respon-sibility to any person or entity with respect to any loss or dam-ages arising from the information contained in this book.
Bulk Sales
Pearson Education, Inc. offers excellent discounts on this book when ordered in quantity for bulk purchases or special sales. For more information, please contact
U.S. Corporate and Government Sales 1-800-382-3419
For sales outside of the U.S., please contact
Contents
Introduction 1
About This Book. . . .1
Who This Book Is For. . . .2
What Do I Need to Use This Book?. . . .2
Conventions Used in This Book . . . .3
Screen Captures . . . .3
1 Introduction to Facebook 5 What Is Facebook? . . . .5
Facebook History . . . .6
Facebook Uses. . . .7
Looking at Facebook Pages . . . .8
Summary . . . .11
2 Setting Up a Profile 13 Signing Up for an Account . . . .13
Building Your Profile. . . .18
Viewing Your Wall . . . .25
Accessing Your Account Info. . . .27
Summary . . . .28
3 Connecting with Friends 29 Finding Friends. . . .29
Viewing and Editing Friends . . . .36
iv Sams Teach Yourself Facebook®in 10 Minutes
4 Finding Help with Facebook Services and Etiquette 41
Understanding Facebook’s Terms of Service . . . .41
Facebook Etiquette . . . .44
Finding Help with the Help Center. . . .46
Summary . . . .48
5 Guarding Your Privacy 49 Understanding Privacy and Security Settings on Facebook. .49
Controlling Account Access . . . .51
Customizing Your Privacy Settings . . . .52
Reporting Abuse . . . .63
Summary . . . .64
6 Tracking Wall Postings, News Feeds, and Notifications 65 Understanding Facebook Information Flow . . . .65
Managing Your Wall . . . .66
Tracking News Feeds. . . .73
Managing Notifications. . . .75
Summary . . . .77
7 Communicating Through Facebook 79 How to Communicate on Facebook . . . .79
Sending and Receiving Messages. . . .80
Sharing Links . . . .86
Sending Actions and Gifts. . . .88
Blogging with Notes . . . .90
Chatting with Friends. . . .92
vi Sams Teach Yourself Facebook®in 10 Minutes
12 Adding Applications 157
Applications Overview . . . .157
Finding Apps. . . .162
Managing Applications. . . .167
Summary. . . .170
13 The Professional Side of Facebook: Pages 171 Understanding Facebook Pages. . . .171
Finding and Following Pages. . . .176
Setting Up a Facebook Page. . . .178
Managing and Editing a Page . . . .185
Summary. . . .188
14 The Facebook Marketplace 189 What Is the Facebook Marketplace? . . . .189
Navigating Around the Marketplace. . . .191
Looking at Listings . . . .193
Adding Your Own Listing . . . .196
Summary. . . .198
15 Making Facebook Mobile 199 Facebook’s Mobile Features Overview. . . .199
Activating Facebook Mobile for Text Messages . . . .200
Sending Text Messages from a Mobile Device. . . .205
Surfing Facebook with a Mobile Browser. . . .205
Uploading Photos or Videos . . . .206
Summary. . . .206
About the Author
Sherry Kinkoph Gunter has written and edited oodles of books over the past 17 years covering a wide variety of computer topics, including Microsoft Office programs, digital photography, and Web applications. Her recent titles include Craigslist for Everyone,Teach Yourself VISUAL-LY Microsoft Office 2007,Microsoft Office 2008 for Mac Bible, and
Master VISUALLY Dreamweaver and Flash CS3. Sherry began writing computer books back in ‘92 for Macmillan, and her flexible writing style has allowed her to author for a varied assortment of imprints and formats. Sherry’s ongoing quest is to aid users of all levels in the mastering of ever-changing computer technologies, helping users make sense of it all and get the most out of their machines and online experiences. Sherry cur-rently resides in a swamp in the wilds of east central Indiana with a lov-able ogre and a menagerie of interesting creatures. Sherry is also hope-lessly addicted to Facebook.
Dedication
Special thanks go out to Michelle Newcomb for allowing me the opportu-nity to tackle this exciting project; to development editor Joyce Nielsen, for her dedication and patience in shepherding this project; to copy editor Sarah Kearns, for ensuring that all the i’s were dotted and t’s were
We Want to Hear from You!
As the reader of this book, youare our most important critic and commen-tator. We value your opinion and want to know what we’re doing right, what we could do better, what areas you’d like to see us publish in, and any other words of wisdom you’re willing to pass our way.
You can email or write me directly to let me know what you did or didn’t like about this book—as well as what we can do to make our books stronger.
Please note that I cannot help you with technical problems related to the topic of this book, and that due to the high volume of mail I receive, I might not be able to reply to every message.
When you write, please be sure to include this book’s title and author as well as your name and phone or email address. I will carefully review your comments and share them with the author and editors who worked on the book.
E-mail: [email protected] Mail: Greg Wiegand
Associate Publisher Sams Publishing 800 East 96th Street
Indianapolis, IN 46240 USA
Reader Services
Introduction
Anyone in the know has heard the buzz about Facebook. It’s a hot topic these days, and shows no signs of letting up. If you’re ready to get to the bottom of this Internet sensation and find out how to utilize this social networking phenomenon for yourself, this is the book for you. Social net-works are a bit daunting at first, but don’t worry. This book will show you how to navigate the site and make use of its various features in no time at all. By the end, you’ll feel like you can Facebook with the best of them!
About This Book
As part of the Sams Teach Yourself in 10 Minutesguides, this book aims to teach you the ins and outs of using Facebook without wasting a lot of precious time. Divided into easy-to-handle lessons that you can tackle in 10 minutes each, you learn the following Facebook tasks and topics:
. How to painlessly set up a Facebook account
. How to create and manage a profile page, including how to add a profile picture
. How to connect with friends and make new ones
. How to communicate by messaging, chatting, and posting status updates
. How to track what your friends are doing and what they’re up to on Facebook
. How to upload photos and videos to share with friends
. How to share your common interests and hobbies through groups
. How to add applications to get more out of your Facebook expe-rience
2 Sams Teach Yourself Facebook®in 10 Minutes
. How to use Facebook’s mobile features
. How to create pages for a professional business or organization
. How to keep yourself safe on Facebook
. How to conduct yourself on the site and follow Facebook’s terms of service and unspoken etiquette rules
After completing these lessons, you’ll know everything you need to know to get the most out of your time on Facebook.
Who This Book Is For
This book is geared toward anyone interested in learning their way around Facebook. Whether you’re a new user or a seasoned participant, or you’re just learning how to navigate the new and improved interface, this book shows you each major feature of the site and how to make use of it. For example, have you always wanted to start your own group? Have you ever wondered how to invite people to a party? Or perhaps you’ve always wanted to look for more applications to try but didn’t know how to find them? You’ll learn how to do these tasks, and more.
Each lesson focuses on a particular subject, such as communicating on Facebook or using the Photos application. You can skip around from topic to topic, or read the book from start to finish.
What Do I Need to Use This
Book?
Conventions Used in This Book
Whenever you need to click a particular button or link in Facebook, you’ll find the label or name for that item bolded in the text, such as “click the
Deletebutton.” In addition to the text and figures in this book, you’ll also encounter some special boxes labeled Tip, Note, or Caution.
Tip
Tips offer helpful shortcuts or easier ways to do something.
Note
Notes are extra bits of information related to the text that might help you expand your knowledge or understanding.
Caution
Cautions are warnings or other important information you need to know about consequences of using a feature or executing a task.
Screen Captures
The figures captured for this book are mainly from the Internet Explorer web browser (version 8.0). If you use a different browser, your screens may look slightly different.
Also keep in mind that the developers of Facebook are constantly working to improve the website. New features are added regularly, and old ones change or disappear. This means the pages change often, including the elements found on each, so your own screens may differ from the ones shown in this book. Don’t be too alarmed, however. The basics, though they are tweaked in appearance from time to time, stay mostly the same in principle and usage.
LESSON 1
Introduction to
In this lesson, you learn about the Facebook phenomenon, where it came from, and what you can do with it.
What Is Facebook?
Facebook is a social networking website. To flesh out this definition a bit more, it’s an online community—a place where people can meet and interact; swap photos, videos, and other information; and generally con-nect with friends, family, coworkers, fellow students, fellow hobbyists and enthusiasts, and numerous others in their social network. Facebook con-nects people within cities or regions, work or school, home or abroad, and so on. Built on an architecture of profile pages that allow individual users to share information about themselves and communicate with others, Facebook seeks to create an environment in which members log in regu-larly to keep track of what friends and colleagues are doing, share their own activities, interact about interests and hobbies, send messages, and join groups and networks—just to name a few things.
What started out as a college-based social network site, two-thirds of Facebook’s members are now outside of the college startup base and include users of all ages and walks of life. In other words, Facebook isn’t just for college kids anymore. One of the fastest-growing segments of users is the 35–54-year-old crowd.
Facebook is also a global phenomenon. Over 40 translations of the site are up and running, with more in development. 70% of users are outside the U.S., but those numbers are changing as Facebook rapidly catches on in the states.
At its heart, Facebook is all about connecting people with people. Facebook users do a variety of things with the site: track news about friends far and wide; make new friends centered around common inter-ests; share photos, music, links, and videos; organize and invite people to events; play games; spread the word about charities and causes; buy and sell stuff; market products; and much, much more.
As a website, Facebook is accessible to all Internet users, where permit-ted. In addition to connecting people, third-party developers are creating a wide variety of applications—programs that run within the Facebook framework—to entertain and inform. Applications range from the silly to the serious, and new ones are added each day. What makes Facebook such a huge hit is its features and tools, and the willingness of its users to net-work with each other in their communities locally and globally.
Facebook History
Social networks have been around for awhile now, and most are focused on connecting friends and colleagues. Bulletin Board Services (BBS) and Usenet groups were examples of early forms of social networks. As the concept evolved, generalized communities, like Geocities and Tripod (back in the mid-1990s), brought people together through chat rooms and forums. Today, social networks are flourishing all over the Web, including the ever-popular MySpace, Twitter, and LinkedIn. Some social sites, like Classmates.com, specialize in connecting former schoolmates, whereas other social sites, such as SixDegrees.com, focus on indirect ties between people. Some sites specialize in niche groups, whereas others aim for
more generalized populations of people. Internet business strategies are recognizing the opportunities inherent in social networks and are happy to cater to different groups of people and their networking needs.
So where does Facebook fit in? Facebook is quickly becoming a front runner in the social networking race. Originally called The Facebook, Facebook started out in 2004 as a network geared toward college students at Harvard University. Founded by a computer science major, Mark Zuckerberg, and his roommates, Dustin Moskovitz and Chris Hughes, the project quickly gained popularity among students. With financing assis-tance from Eduardo Saverin, the site grew seemingly overnight.
The original idea was based on paper face books commonly used to acquaint students with the campus community, including staff, faculty, and incoming students. Initially, the website was only available to Harvard students, but rapidly expanded to other universities in the Boston,
Massachusetts area. Eventually, the concept spread to other universities and high schools, and today, anyone with a valid email address can join the fray. Facebook swiftly became an Internet sensation, and in 2005, the facebook.com domain was purchased and the base of operations moved to California.
Although the site is free to join, it generates revenue through advertising, including banner ads. New features and updates are added regularly, and the Facebook folks are quick to heed the ideas, wants, and needs of its members. In 2007, the Facebook Platform was launched, allowing a framework for software developers to create applications for the site. Today, tens of thousands of applications are available for Facebook, with more added daily.
Facebook Uses
So what does a Facebook member do on the site? What exactly does the site have to offer? More importantly, what can I get out of the experience? Here’s a list of various activities and pursuits to get you started on the road to answers to those questions:
. Connect with people. Connect with friends, family, colleagues, and fellow students. Reconnect with old friends, acquaintances,
and family members scattered about the globe. Make new friends who share your interests.
. Keep track of your friends’ activities, while they keep track of yours.
. Share messages, links, photo albums, and video clips.
. Blog with the Facebook Notes feature.
. Organize events and invite friends to parties, concerts, band per-formances, meetings, and gatherings of all kinds.
. Play games with friends.
. Send virtual gifts, birthday greetings, and other digital objects.
. Join in groups and networks to connect with people sharing sim-ilar interests.
. Become a fan of a celebrity, politician, band, television show, or business.
. Buy and sell stuff in the Facebook Marketplace.
. Share a resume, or find an employer or an employee.
. Collaborate on project info at work or school.
. Market yourself, your products, or your company.
This list is just the tip of the iceberg. There’s plenty more to do and see, and plenty of people to meet. So what are you waiting for? Log on and start socializing!
Looking at Facebook Pages
The Facebook makers have kept the site fairly simple, which is a major part of its appeal. Naysayers complain that there’s not enough customiz-ing options, but truthfully, most customizcustomiz-ing that takes place on personal web pages these days usually ends up making the pages distracting and difficult to follow. Navigationally, Facebook includes a logon page as the
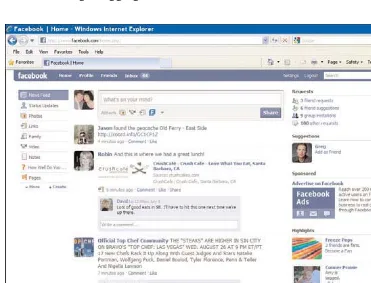
starting point for entering the website. After you pass that, you’re present-ed with a Home page, shown in Figure 1.1, and links to your other pages. Your other pages include your profile page, a Friends page, and your Inbox. You can easily move between pages by clicking the links at the top of the Facebook page located in the blue navigation bar. The left side of the bar has links to your pages, whereas the right side of the bar offers links to settings, logging out, and a search tool.
9 Looking at Facebook Pages
FIGURE 1.1 Here’s an example of a Home page on Facebook, where a scrolling news feed appears, along with advertisements and other bits of information.
If you scroll to the bottom of any Facebook page, you’ll find links for advertisers, developers, terms of service, help, and more. Also at the bot-tom of the Facebook page is an Applications Bar, which stocks shortcut links to your favorite Facebook apps.
they’ve joined, and so forth. All the activities come together on a scrol-lable page that’s constantly changing (if you refresh the page, that is). The Home page is where you go to see and be seen on Facebook.
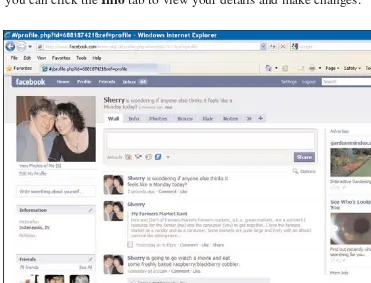
As mentioned previously, the focus in Facebook is on profile pages—the place where you add information about yourself to share with others. Figure 1.2 shows an example of a profile page. A typical profile page includes a picture, a status text box so you can let the rest of the Facebook world know what you’re up to or what you’re thinking, a Wall of activities you’re pursuing and communications from friends, and tabs for accessing other pages and features. For example, to add or edit profile information, you can click the Infotab to view your details and make changes.
10 LESSON 1: Introduction to Facebook
FIGURE 1.2 Here’s an example of a profile page on Facebook.
So far, I’ve only described a few of the pages you’ll encounter. There are lots more. Now that you’ve had a brief tour, you’re ready to jump in, right? If you haven’t created an account yet, Lesson 2, “Setting Up a Profile,” shows you how. If you’re already a Facebook member, move onto the other lessons detailing how to use the site and get the most out of your social networking experience. Enjoy!
Summary
In this lesson, you learned about social networking sites and how
Facebook got its start. You also learned about the various things you can do on the site and what to expect when you start viewing pages. In the next lesson, you learn how to sign up for a Facebook account and start building your profile page.
LESSON 2
Setting Up a Profile
In this lesson, you learn how to sign up for a Facebook account, create a profile, and specify a current status. This information covers everything you need to get started as a Facebook member.
Signing Up for an Account
If you’re new to Facebook, the first thing you need to do is sign up for an account. Joining Facebook is free, and the only requirements are that you have a working email address—in other words, a real email address—and you must be thirteen years of age or older. At the end of the registration process, Facebook sends you a confirmation email you must follow to fin-ish setting up your account. The process is relatively painless and fast.
Note
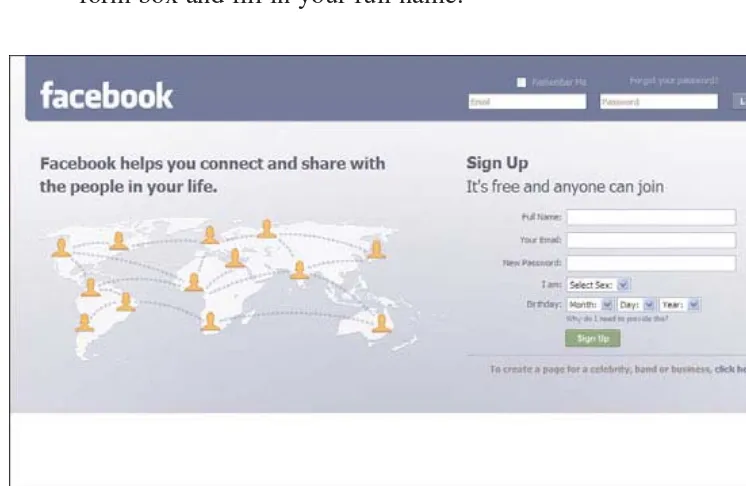
If you want to create a professional account, such as a profile page for a band or business, you can click the link “To create a page for a celebrity, band, or business,click here.” located on the Facebook Sign Up page (see Figure 2.1). Learn more about the professional and promotional sides of Facebook in Lesson 13, “The Professional Side of Facebook: Pages.”
When creating a Facebook account, you need to use your real name. The whole social networking architecture of the site is built on the authenticity of its users. Odd nicknames, pseudonyms, or aliases are simply not
it. If the name happens to be your real, honest-to-goodness name, you can appeal to Facebook by clicking the Helplink on the Sign Up page.
To sign up for an account, follow these steps:
1. Use your web browser to display the Facebook Welcome page,
www.facebook.com.
2. You can start the registration process rolling by filling out the initial sign-up form, shown in Figure 2.1. Click inside the first form box and fill in your full name.
14 LESSON 2: Setting Up a Profile
FIGURE 2.1 Facebook’s Welcome page is the place to start when you want to create a new account.
3. Type in your email address.
4. Establish a password. As with most passwords you use on the Internet, choose one that contains both numbers and letters for maximum security.
5. Click the I amfield and select your gender.
don’t want to. This information is a security measure to make sure you’re old enough to use the site.
7. Click the Sign Upbutton when you’re ready to continue.
8. The next phase of the registration process is the security check. Type in the words shown on the screen.
Tip
If you have difficulty reading the wavy words on the Security Check page, you can click the option for changing the words to a new set or listening to an audio file instead.
9. Click the Sign Upbutton to continue.
Note
It’s a fact that people rarely read the terms of service and privacy policy when signing up for things. In case you were wondering, Facebook’s policies basically say you’re not allowed to send spam or post pirated material, and you’re expected to be honest and nice to everyone online. They also say you cannot hold Facebook account-able if you get into trouble. See Lesson 4, “Finding Help with Facebook Services and Etiquette” to learn more about the terms of service.
Facebook tells you it’s going to confirm your address. This may happen quite quickly, and Facebook may continue on to a Getting Started page. If not, proceed to Step 10. If you’re
already viewing the Getting Started page, you can continue with the sign-up process.
10. Finally, Facebook sends you an email confirmation. When you open the email message, click the link or cut and paste it into your browser to finish up the registration process.
When you click the confirmation link Facebook sends you in an email, Facebook opens in a new browser window to a login page. Login using your new password and confirm your account, if needed, by clicking
Okay. Depending on your setup, you may now find yourself with two
open browser windows showing the same page. You can close one win-dow and keep going.
When you see a page similar to Figure 2.2 in your browser window you’re ready to proceed. This next page is the Getting Started section of register-ing and creatregister-ing your Facebook account. There are actually three pages you’ll jump through as the next phase of your registration. Each page asks you to do something, such as look up friends using your email contacts, specify profile info about your education or job, and join a network. You can choose to pursue each page’s options right then and there and add all the necessary details, or you can skip all three and fill in the information at a later time. We’ll opt for the latter in this lesson.
16 LESSON 2: Setting Up a Profile
FIGURE 2.2 The first Getting Started page allows you to search for exist-ing friends on Facebook usexist-ing your email contacts list.
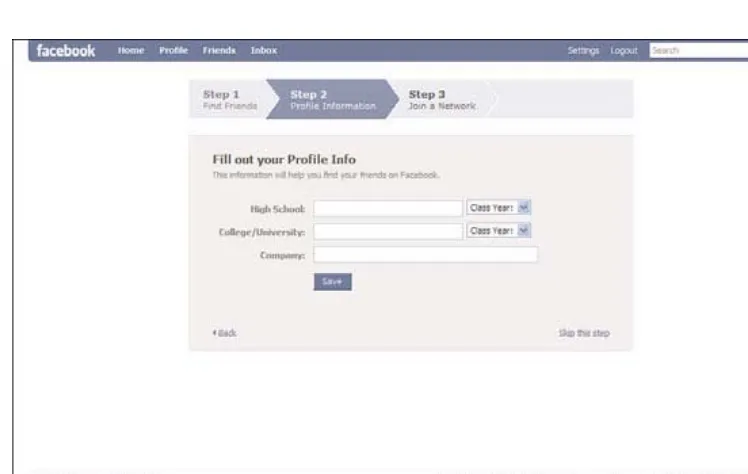
Figure 2.3 shows the second Getting Started page. This time, Facebook wants to get you started on your profile by adding high school, college or university, or company information. You can take the time to fill this out now, or you can do so later. Skip this by clicking the Skip this steplink and move on to page 3.
17 Signing Up for an Account
FIGURE 2.3 The second Getting Started page lets you specify your school or work associations.
The last Getting Started page, shown in Figure 2.4, offers to assign you to a network. A network is a community, such as your city or geographical area, your workplace, or your educational setting. Here again, you can fill out all of this now, or take care of it later. Click the Skip this steplink to keep on going.
After jumping through all the Getting Started hoops, Facebook finally shows you a customized Welcome page featuring your name. You can begin customizing your profile or search for people you know. Click the
FIGURE 2.4 The third Getting Started page lets you specify a network.
By the way, now that you’re officially a member, you can log off and on again using your email address and password at the main Facebook page. You’ll see boxes (form fields) at the top of the page to enter both these pertinent pieces of information. You can even tell the site to remember you so you don’t have to keep typing in the info each time. As for logging out, you can click the Logoutlink at the top of the window to exit the site at any time.
Building Your Profile
After you’ve registered on Facebook and navigated the Getting Started pages, you can start customizing your personal profile right away. A pro-fileis simply a collection of information about you, such as your hobbies and interests, where you go to school or work, favorite music or television shows, favorite quote, and so on. Your Facebook profile is visible to your friends and anyone on your network. After you complete the registration process, Facebook starts you out with a bare bones profile page. It’s up to you to add the meat.
In the land of Facebook,profilesare for individuals, but pagesare for bands, celebrities, politicians, businesses, and other groups. We’ll focus on your individual profile in this lesson. When you finish the Getting Started pages and click the View and edit your profilelink on the
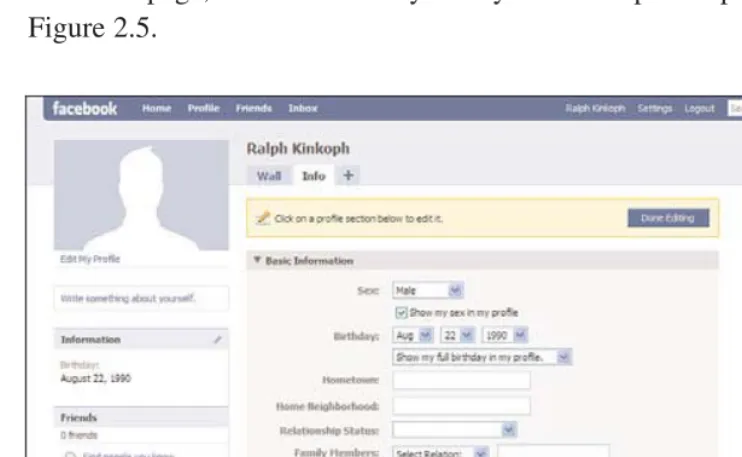
Welcome page, Facebook takes you to your actual profile page, similar to Figure 2.5.
19 Building Your Profile
FIGURE 2.5 The bare bones profile page.
You can also navigate to this page at any time during your Facebook ses-sion by clicking the Profilelink in the navigation bar at the top of your Facebook page.
You can change your profile information from the profile page. As you can see in Figure 2.5, the page starts out with several tabs: Wall, Info, and the giant plus sign (which is actually the Add a New Tab tab). There’s also an empty profile picture. Any information you added in the sign-up process already appears below the photo area or on the Info tab.
Adding to Your Info
choose to make a comprehensive profile, or just dole out little bits of information about yourself. As you can see in Figure 2.6, profile info is grouped into several categories:
Basic Information This group of info includes birthday, gender, hometown, relationship status, and political and religious views.
Personal Information This category has fields for entering activ-ities and interests, listing favorite things, and whipping up a para-graph about yourself.
Contact Information Use this category to input information about how to contact you, such as address, cell phone number, web-site, and so on.
Education and Work This category includes fields for listing your education and employment information, such as which school you attend, where you work, degrees earned, and so on.
20 LESSON 2: Setting Up a Profile
Each category can be expanded or collapsed to view the associated form. Just click a category name, or the gray bar containing the name, to expand or collapse the view. If the categories are not in view at all, you’ll need to click the Edit Informationlink in the upper-right corner of the Info tab to switch over to edit view. A pencil icon appears next to the link. Look for the pencil icon anytime you want to make edits to information in Facebook. This particular link toggles the category views on or off, depending on their current status.
To edit any field, click inside the box and start typing. Some fields are text boxes; others are drop-down menus with selections you make. You may notice as you type that Facebook tries to help you with common words and phrases in a pop-up box that appears. You can make selections from the pop-up box and insert them immediately, or you can just ignore the suggestions and keep on typing.
As you make changes to the data in each category, you must click the
Save Changes button at the bottom of the category to keep your changes. To forgo the edits, click the Cancelbutton instead.
When you save your input, Facebook immediately saves the information and refreshes the page in your browser window.
Tip
If you prefer not to show your full birth date in your profile, click the
Birthday status drop-down menu located in the Basic Information category group and choose an option, such as Show only month & day in my profile. This option is perfect if you want friends to send you birthday greetings on Facebook when your special day arrives.
You’ll notice in the Contact Information category that tiny lock icons appear to the far right of some of the form fields. When you click a lock icon, Facebook opens a mini-dialog box that lets you choose who you allow to view the specific contact information. Make your selection and click the Savebutton.
Tip
If you have an account with an instant messaging service, you can add your screen name or alias to your Facebook page using the Contact Information category options. This lets your friends look at your profile and determine if you’re logged into your instant message program—a green dot appears next to your screen name when you’re logged on.
When you’re all finished filling out the profile information, you can click the Done Editingbutton at the top of the page. This turns off the category edit displays and returns you to your profile view.
You can return to edit view at any time and make changes to your info or add new info. You can click the Edit Informationlink on the Info tab of your profile. You can also find a pencil icon in the upper-right corner of any info area box; click this icon to return to the category and make changes to the data.
Adding a Profile Picture
You can add a picture to your profile to help people recognize you or gen-erally add visual interest to your page. Facebook uses your picture as an
avatar, an image that represents you as you interact with other profiles, groups, and so forth.
If you have a digital image of yourself stored on your computer, you can quickly place it on your page for all to see. If you don’t have a portrait photo readily available, you can also insert another type of picture that represents you, such as your favorite hobby or sport. A profile picture can be up to 4MB in file size.
You can choose from several options when adding a picture:
Upload a Picture This lets you upload a picture you have stored on your computer.
Take a Picture If your computer has a built-in camera, you can use it to take a picture of yourself to place on your Facebook page. Just follow the directions.
Choose from Album Use this option if you want to grab a picture from an existing album you have already placed on Facebook.
Edit Thumbnail This option lets you crop your picture different-ly, as you see fit.
Remove Your Picture Choose this option to remove the existing profile picture.
Follow these steps to add a picture stored on your computer:
1. Move your mouse pointer over the picture area until you see the
Change Picture link; click the link.
2. Facebook displays a pop-up menu of options, as shown in Figure 2.7. Click Upload a Picture.
23 Building Your Profile
FIGURE 2.7 Use this menu to choose how you want to add a picture.
3. The Upload Your Profile Picture dialog box appears, shown in Figure 2.8. Click the Browsebutton.
4. The Choose File dialog box opens. Navigate to the image file you want to use and double-click the filename (or click it and clickOpen).
Facebook begins uploading the file. Depending on the file size and your connection speed, the process may take a few
moments.
When the upload is complete, Facebook displays your new pic-ture and adds a new Photos tab to the list of tabs on the page. You may need to refresh the page to view the new Photos tab.
Tip
You can add more than one profile picture to your account and switch between them as the mood strikes you. Facebook stores your profile pictures in the Profile Picture album. You can access the album by clicking the Photos tab and then clicking the Profile Picturesalbum. You can then click the Change Profile Picture link to swap with another image, upload a new image, or adjust the thumbnail version of the image.
Adding Something About Yourself
Directly below your profile picture is a link for adding something about yourself. You can use this feature to add a note about you, share a quip or motto, pontificate about a subject, or just advertise your latest project. To fill in this info, simply click the Write something about yourselflink. An empty text box appears. Type in your information (see Figure 2.9); then click anywhere outside the box. You can always change the info again by clicking the pencil icon in the upper-right corner of the box area.
24 LESSON 2: Setting Up a Profile
25 Viewing Your Wall
Note
You can now create your own personal URL to your Facebook profile page using a unique username. This new feature is handy if you want to direct people directly to your page. To create a Facebook URL, follow this link to set it up: www.facebook.com/username.
Viewing Your Wall
One more thing about your profile page as you’re setting things up—you need to check out your Wall. The Wall is a spot where direct social inter-action occurs, where you and your friends exchange public messages, and you and others can see your Facebook activities. You can view your Wall by clicking the Walltab on your profile page. New users to Facebook see a Wall similar to Figure 2.10. The Wall is relatively empty at first.
FIGURE 2.11 You can update your status to let people know what you’re thinking or what you’re doing.
2. Click the Sharebutton.
Facebook adds the status to the top of your profile page (see Figure 2.12), as well as on your Wall. Others can now respond with a comment.
The Wall is a dynamic, scrollable viewing area, keeping track of your activities and social exchanges. The top of the Wall has a special area for sharing your status, called “What’s on your mind?.” Below that are some tabs for filtering your view and the scrollable Wall area itself. As you do more with Facebook, more entries are added to the Wall. Others on your Friends list or networks can also view your Wall. You can learn more about using the Wall in Lesson 6, “ Tracking Wall Postings, News Feeds, and Notifications.” For now, let’s focus on changing your status.
Changing Your Status
One way to let others know what you’re up to is to post a status update. You can use your status to share a thought, tell people what you’re doing at the current moment, or mention other points of interest. Anything you post in the “What’s on your mind?” box appears in the newsfeeds of your friends, as well as on your own profile page at the top of your Wall. In the past, Facebook labeled this status box “What are you doing right now?” and automatically placed the verb “is” in the box for you to add a statement. Users complained about having to deal with the “is” verb, so the Facebook creators changed it. With the latest version of Facebook, the “is” verb is now gone, and you can type whatever you want into the spot. To change your status, follow these steps:
1. Click in the What’s on your mind? box and type an entry (see Figure 2.11).
27 Accessing Your Account Info
FIGURE 2.12 Facebook adds the new status to your page.
Notice that your status update on the Wall includes your profile picture or avatar. You can also add links, photos, and video clips to your status updates. You’ll learn more about using these features in Lesson 6.
Accessing Your Account Info
You can always access your Facebook account info to make changes to your email address, name (if you get married, for example), password, and other settings. To do so, move your mouse pointer over the Settings
link at the top of the Facebook page; then click Account Settingsfrom the drop-down menu. You can also click the Settingslink directly and then click the Account Settingstab.
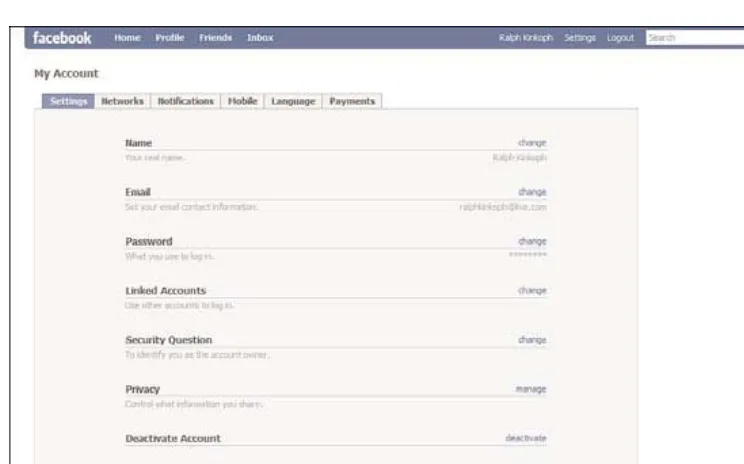
The My Account page appears, as shown in Figure 2.13. To change any account information in the Settings tab, click the Change link next to the area you want to edit and then make the appropriate changes.
To return to your profile page again, click Profile at the top of the Facebook page.
Tip
28 LESSON 2: Setting Up a Profile
FIGURE 2.13 The Settings tab lets you change basic account details.
Summary
LESSON 3
Connecting with
Friends
In this lesson, you learn how to use the Facebook Friends features to con-nect with friends online. You learn how to find friends, respond to friend requests, and view and organize friend lists.
Finding Friends
Because you can’t really have a social network without friends in some form or fashion, let’s get started with learning how to connect with people on Facebook. Many people find themselves invited to join Facebook by their friends who are already online. If this is the case for you, you already have some friend connections to get you started. If you’re brand-spanking new to Facebook, you’ll have to start finding friends from scratch.
Joining a Network
Depending on the network, such as a school or workplace, you may be required to have a working email address through the organization in order to sign up on their network. If you join a regional or city network, Facebook allows you to join only one area at a time. You cannot be a part of both the Chicago network and the New York City network, for exam-ple.
To join a network, follow these steps:
1. Click the Settingslink on the blue navigation bar; then click
Account Settings.
2. From the My Account page, click the Networks tab. Facebook displays any networks you’ve joined listed on the left and a field on the right for joining more, as shown in Figure 3.1.
30 LESSON 3: Connecting with Friends
FIGURE 3.1 Use the Networks tab on the My Account page to join net-works.
3. Under the Join a Network area, click in the Network namebox and start typing the workplace, city, region, or school name. If Facebook recognizes the entry, it displays a list of possible matches. Click one to join. If there are requirements for joining the network, Facebook alerts you.
Tip
If you don’t see a network for your area or company, you can contact Facebook and ask them to create one.
Looking Up Friends
It’s easy to look up people on Facebook and establish online connections. For example, if you want to find an old high school chum or look to see if a family member has a profile on the site, you can use the Facebook tools to perform a search. As of this writing, Facebook is revamping its search tools, so the steps and screens you see on your browser window may vary from what you see here. The principles, however, remain the same. You can search for friends to your heart’s content using features found on the Friends page, shown in Figure 3.2. Simply click the Friends link in the blue navigation bar at the top of the page to navigate to the page. You can also hover your mouse pointer over the Friends link in the navigation bar and directly click Find Friends to get to the page. The Friends page opens to the Find Friends tools automatically, however, you can always click the Find Friends link to view the tools again later.
31 Finding Friends
The Find Friends page is all set up to help you locate friends through your email account, offer friend suggestions if you already have some friends, or search for people by name. The top portion of the page focuses on find-ing friends based on your email client’s address book or contacts list. In other words, Facebook checks your email address book against users’ email addresses on the site and tells you about any matches. You’ll have to okay access to your email client to perform this task.
Note
To search through your contacts or address book, you must give Facebook the password for the email account. If you’re not comfort-able doing this, you may want to forgo this search method entirely. To learn more about Facebook’s privacy and security settings, see Chapter 5, “Guarding Your Privacy.”
The middle portion of the page lists suggestions based on people you’ve already added to your list. These are typically friends of friends. You can click the Add as Friendlink beneath a name to invite them to be your friend. This area of the page also lists pages you can become fans of, if interested, that your friends are already supporting.
The bottom portion of the page, shown in Figure 3.3, displays a search tool you can use to look for specific names on Facebook. There’s also a tool for looking for connections via your instant message (IM) names.
32 LESSON 3: Connecting with Friends
Tip
You can click the Invite Friendslink on the left side of the page to invite people you know to join Facebook. When you click the link, a message form appears that you can fill out and email to people you want to invite.
To search for someone on Facebook, just click in the text box under the Search for People area of the page and type in a name; then click the
Searchbutton or press the EnterorReturnkey. Facebook displays a results page with any matches, similar to Figure 3.4. Depending on how common the name is, you may have to scroll through and view each match to determine if it’s the right person or not. If in doubt, you can always send an email message inquiring whether it’s the person you think you know or not using the Send a Message link.
33 Finding Friends
FIGURE 3.4 When you conduct a search, Facebook displays a results page with possible matches. It’s up to you to figure out who exactly you’re look-ing for.
Tip
To search for AOL Instant Messenger or Windows Live Messenger buddies, choose a link under the Find People You IM area of the Friends page. You can look up people you contact using instant mes-saging.
You can also conduct a search for someone using the Searchfield at the top of the Facebook page on the blue navigation bar.
When you do finally find a friend on Facebook, you can send him or her a friend request by clicking the Add as Friend link. When you click the link, a box pops up, shown in Figure 3.5. Facebook lets you know that the person will have to confirm you as his or her friend first. You can use the box to add a personal message to the request. You can also choose to cate-gorize the friend if you have organized your friends into lists (learn more about this later in the chapter).
34 LESSON 3: Connecting with Friends
FIGURE 3.5 You have the option of sending a personal message along with your friend request.
Tip
Responding to Friends Who Find You
While you’re busy inviting people to be your friend, don’t forget to look for friend requests from other people. When you’re the lucky recipient of an invitation from another Facebook user, it appears on your Home page as a friend request up in the requests area. Facebook also alerts you with an email if you’ve turned on the requests feature. In the top-right corner of the Home page, shown in Figure 3.6, Facebook lists any notifi-cations you have waiting to deal with, such as friend requests or event invitations.
35 Finding Friends
FIGURE 3.6 Remember to check your requests area for requests and invi-tations.
Click the friend requestslink to open the Requests page, shown in Figure 3.7, which lists all kinds of requests, including invitations for joining groups, causes, responding to party invites, game challenges, and more.
FIGURE 3.7 The Requests page keeps a running list of all your requests, including friend requests.
If you’re having trouble remembering who the person is or how you might know him, you can click his picture to view his profile first, and then decide to add him as a friend or not. You can also click the mutual friends
If you decide you’d rather not befriend the person on Facebook, you can click the Ignorelink. This makes the request disappear without approval. To process a friend request and make it official, you can simply click the
Confirmlink next to the person’s picture, as shown in Figure 3.7. Facebook immediately adds the person to your friends list and gives you options for suggesting new friends, adding details about the friend, or writing on the person’s wall, as shown in Figure 3.8.
36 LESSON 3: Connecting with Friends
FIGURE 3.8 Facebook displays this information immediately after you con-firm a friend request.
Viewing and Editing Friends
After you start accumulating friends on Facebook, you’ll want to view their profiles from time to time and see what they’re up to online, or check out their latest photo or video postings. For starters, when you open your profile page, Facebook displays a random list of friends in a little Friends box area on the left side of the page. You can click a friend to view his or her profile. There are far more ways to view as well. The best place to begin is on the Friends page. The Friends page offers all kinds of ways to view, filter, and organize your friends on Facebook.
Tip
37 Viewing and Editing Friends
Viewing Friends
There are several routes you can take to the Friends page. You’ve already learned how to open the Friends page to the search options earlier in this lesson. Now you’ll learn how to view your friends list. You can click the
Friendslink on the Facebook navigation bar at the top of the page and then click All Friends. You can also hover the mouse pointer over the
Friendslink and click All Friends. In addition, you can also click the
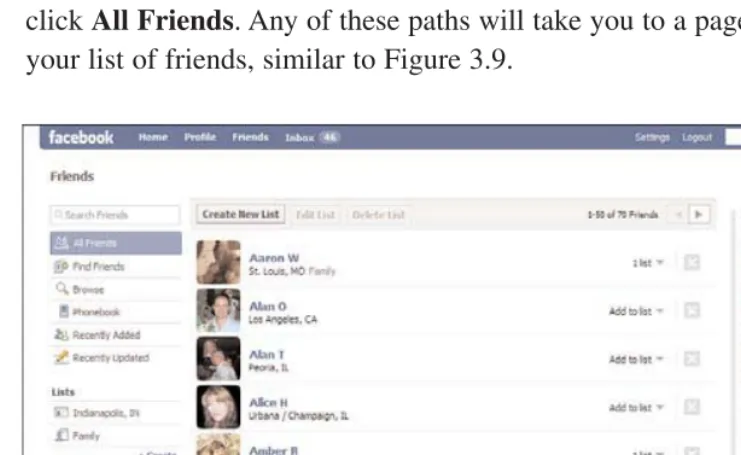
See Alllink found in the Friends box area on your profile page and then clickAll Friends. Any of these paths will take you to a page displaying your list of friends, similar to Figure 3.9.
FIGURE 3.9 The friends list is simply a page or pages listing all your Facebook friends.
To view any friend’s profile in the list, just click the person’s name or photo. There are a couple of filters you can use on the left side to filter the list and show recently added friends, or friends who have updated their status. You can click the Browselink, for example, to browse friends based on their network.
Organizing Friends into Lists
If you like organization, you’ll love Facebook’s friend lists. You can group your friends into lists, which is particularly useful if you have hundreds of them on Facebook. For example, you may have a list for family and another for close friends, and still another list filled with casual acquain-tances. Lists can help you keep track of different groups at different times, or send out messages to everyone in a group all at once.
If you’re like most people, you probably talk about some subjects with everybody and other subjects with only those who are close to you. For example, you may freely express your political or religious views, but not everyone on your friends list or network may want to share in those views. So you end up having private conversations with some, and more public conversations with others. You can make sure your separate worlds don’t collide on Facebook using friend lists as a tool for communicating and organizing.
To create a friend list, follow these steps:
1. Navigate to the Friends page and click All Friends.
2. Click the Create Listbutton at the top of the lists area.
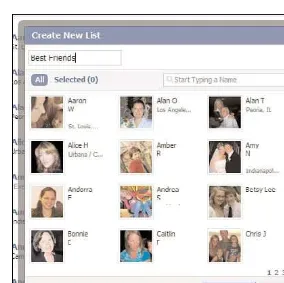
3. In the Create New List box (see Figure 3.10), type a name for the new list and press Enteror Return.
4. You can scroll through and click on people you want to add to the new list, or you can type their names in the field at the top of the box.
5. When you finish adding friends to the list, click the Create List
button.
After you create a new list, Facebook saves it and displays the Home page showing only the status updates and news feed of the people on the list you just made. To return to the normal news feed again that shows all your friends, just click the News Feedlink on the upper-left side of the Home page. Anytime you want to view the news feed with just the friends from the list you created, just click its name on the Home page. You can also click the list name from your Friends page.
FIGURE 3.10 You can use the Create New List box to whip up a special-ized list of Facebook friends.
You can easily add names to a list, or remove names. The list is just for you; no one else can see your lists. To edit your list, return to the Friends page and click the list. Click the Edit Listbutton and make your changes. When you finish, click the Save Listbutton.
To remove a list entirely, display the list and click the Delete Listbutton; then click Delete Listfrom the box that appears.
You can use Facebook’s emailing features to email everyone on a list all at once. To learn more about sending messages in Facebook, see Lesson 7, “Communicating Through Facebook.”
Un-Friending Friends
As your friends list grows, you may encounter an occasion in which you want to “un-friend” someone. For example, if the person turns out to be a notorious spammer or you have a falling out of some kind, you can
remove the person from your list, or perhaps you want to pare down your list to just people you actually know in some way. There’s no official dec-laration of this action; however, if your friend goes looking for you in her friend list, your name won’t appear anymore.
To remove a friend, display his or her profile page and click the Remove from Friendslink located near the bottom-left area of the page. You can also click the person’s name on your Friends page friends list (see Figure 3.9) and click the X button to the right of the person’s name. A prompt box appears, as shown in Figure 3.11. Click the Removebutton to finalize the removal.
40 LESSON 3: Connecting with Friends
FIGURE 3.11 A friend removal action is permanent.
There’s no undo button for a friend removal. If you do want to “re-friend” them again at a later time, you’ll have to beg them to be your friend again through a friend request.
Summary
LESSON 4
Finding Help with
Facebook Services and
Etiquette
In this lesson, you learn about Facebook’s terms of service, what to expect with the social do’s and don’ts of using Facebook, and how to find help with the website.
Understanding Facebook’s Terms
of Service
Facebook operates under the guidance of a set of values, goals, and rules for how the site works and how the users interact. These guidelines are important for the general well-being of its members, as well as the smooth and seamless function of the site. When you sign up for Facebook, you’re agreeing to uphold and follow their terms of service. If you’re like most people, however, you didn’t take time to read all the legalese and fine print. In a nutshell, the terms of service are broken down into several cate-gories, such as privacy, information sharing, safety, account security, and topics along those lines.
FIGURE 4.1 Facebook’s terms of service page.
You can certainly take time to read all the fine print, but if you just want a quick overview, here are a few details about the terms that you need to follow:
Privacy Facebook promises to do their best to keep your informa-tion private or at least disclose to you if they share it with others. It’s up to you to control your own privacy settings, however. (Learn more about changing privacy settings in Lesson 5.)
Sharing Content and Information You’re the owner of the con-tent and information you post on Facebook; however, by posting it, you’re giving Facebook permission to use any content covered by intellectual property rights, kind of a license to use the content until you cancel your account.
Note
Keep in mind that if you delete content or even your entire Facebook account, much of that content still resides somewhere on the
servers. For this reason, do not post content that you do not want others to access or control.
Safety Under this broad category, you cannot collect information from other users, send spam, upload viruses, solicit login informa-tion from others, bully other users, or use Facebook for illegal pur-poses. In other words, behave yourself.
Content You cannot post content that is hateful or threatening to others. You cannot post pornographic material, or nudity of any kind. You’re also not allowed to post anything featuring gratuitous violence. This terms of service category is basically about using common sense and being a good citizen, conducting yourself in a way that would make your parents proud.
Account Security You cannot supply Facebook with false or out-dated information, and it’s up to you to keep your password safe and prevent unauthorized access. You cannot use Facebook if you’re under 13 years of age. You cannot use Facebook if you’re in a coun-try that is currently under embargo. If you’re a convicted sex
offender, you’re not allowed on Facebook.
So what happens if you violate the terms of service? Facebook has the right to terminate your account for any misdeeds, misconduct, illegal activities, and so forth. They can remove questionable content you post if it violates the terms of service. Basically, you’ll get in trouble if you don’t play nicely with others. Most of us learned this concept early on; howev-er, there’s always someone out there looking for trouble. If you encounter such a person, you can report them on Facebook (see Lesson 5, “Guarding Your Privacy,” to learn more).
If you’re interested in reading more about Facebook’s privacy policies, such as exactly what information is collected from you and shared, click the Privacylink at the bottom of any Facebook page. You can also get to the page by clicking the Privacy Policy link found amidst the terms of service information.
Like many large-scale websites, Facebook’s terms and privacy policies change over time. You can always revisit the terms of service and princi-ples pages to read up about the most current rules and regulations.
Facebook Etiquette
As you can probably guess, anytime you throw together a bunch of people from diverse backgrounds, ages, experiences, political leanings, religions, and computer proficiency, things happen—expectations differ, assump-tions are made, worlds collide. Just like interacting in the real world, interacting in the online world takes some skill and diplomacy. Sure, you may have joined Facebook just to have fun with your friends, but maybe your version of fun differs from the people you have assembled on your Friends List. So what are the social do’s and don’ts of using Facebook? There’s no real guide to interacting other than your own common sense and intuition. As in real life, in online life, the golden rule still applies— treat others as you want to be treated. If you’re looking for a few tips any-way, here they are.
Facebook Do’s
Dobe tolerant of others, particularly when you get friend requests from people you don’t immediately recognize or know. They may be looking for someone with the same name. If you don’t want to respond, just ignore the request.
Doset your privacy settings to the levels in which you feel comfort-able and safe. By default, many of the privacy settings are set for everyone to see your profile information and other postings. It’s a good idea to adjust these settings to include just your friends. (See Lesson 5 to learn more about Facebook settings.)
Doreport threatening behavior or inappropriate postings. Facebook takes this sort of thing very seriously. You can visit the Help page to find a report feature.
Dobe considerate of other people’s feelings. Communicating elec-tronically is often a challenge because people can’t see your face or hear the tone of your voice. Remember this when posting on Walls and making comments.
Doreply to Wall comments and personal messages when applica-ble. It’s mannerly to at least acknowledge people who attempt to communicate with you.
Do keep your Wall postings civil and free of foul or questionable language. Remember, that person’s other friends see your com-ments, including the possibility of that person’s mother.
Do choose an appropriate profile picture. Tacky or questionable pic-tures are not the way to go unless that’s really the message you want to convey to friends, family, coworkers, or your boss.
Do use your head about what information you share on Facebook and how you conduct yourself. When it comes to the issue of say-ing too much online, let discretion be your first instinct. It’s always better to say too little than too much.
Facebook Don’ts
Don’tthink of your friends list as a competition to see who has the most. It’s not. Quality over quantity is the best approach. If you’re sending friend requests right and left to people you don’t intend to know, you’re in this for the wrong reasons.
Don’tgive out your personal information unless you really know the person, and rely on private email messages, not the public forum that is the Facebook Wall. Always be cautious about sharing personal or confidential information—never give out your informa-tion to someone you don’t know.
Don’tirritate people with your postings. Keep in mind that not everyone wants to hear about your pet rabbit every single hour of every single day.
Don’tannoy people with too many “pokes” or other application actions. It’s fun the first time, but over and over again all day is too much. (See Lesson 12, “Adding Applications,” to learn more about applications.)
Don’tuse Facebook as a tool for revenge, bullying, or threats. Such activities will get you kicked off faster than a speeding bullet.
Don’tfeel obligated to befriend everyone on Facebook. If you don’t want a particular person snooping around your profile, you can deny their friend request.
Don’tshare company information online—that’s a big no-no.
Don’tmake your romantic break-ups and get-togethers public knowledge. Save that sort of information for private forums.
Don’tlower your guard just because you’re with “friends” on Facebook. Accounts can be hijacked, and shared links can take you to questionable places or encourage you to download files that turn out to be viruses or malware.
Finding Help with the Help
Center
You may encounter times in which you need a little extra help with your Facebook experience—for example, if you’re having a technical issue with your account or want to know more about a particular feature. Check out the Facebook Help Center for answers. The Help Center, shown in Figure 4.2, is just a click away. To view the page, click the Helplink at the bottom of any Facebook page.
46 LESSON 4: Finding Help with Facebook Services and Etiquette
The Help Center page offers three tabs: Help Center, Getting Started, and Safety. By default, the Help Center tab is displayed, as shown in Figure 4.2. Help Center topics are grouped into sections on this page. To read more about a topic, just click it to open a page with more details. If you don’t find the answer you’re looking for, try clicking another topic. To look up a topic, click in the Searchbox at the top of the Help Center page, type in the word or phrase you want to look up, and press Enter. The Top Searches box in the upper-right corner keeps a running display of current top search topics conducted by Facebook users.
Click the Getting Started tab, shown in Figure 4.3, to view three tutorials you can read to learn more about finding friends, setting up a profile, and exploring the website.
47 Finding Help with the Help Center
Finally, the Safetytab has information about Facebook’s safety policies and how to keep yourself online. The info includes a list of frequently asked questions, tips for parents of children on Facebook, and links to other sites offering safety information.
Tip
If you’re still having trouble finding help, try one of the many blogs focused on Facebook, including http://blog.facebook.com or www.all-facebook.com. If you’re an advertiser on Facebook, the Inside
Facebook blog is worth checking out at www.insidefacebook.com. If you’re having a technical issue, try the People-powered Customer Service for Facebook board at http://getsatisfaction.com/facebook.
Summary
In this lesson, you learned about Facebook’s terms of service, a few tips for following proper social networking etiquette, and how to find help in times of trouble using Facebook’s Help Center pages. In the next lesson, you learn how to utilize the privacy settings to control who has access to your information.
LESSON 5
Guarding Your Privacy
In this lesson, you learn how to protect yourself on Facebook by logging on more smartly, changing your privacy settings, and learning how to keep yourself safe.
Understanding Privacy and
Security Settings on Facebook
Privacy and security are the number-one concerns on the Internet, and are particularly relevant in the world of social networking. Identity theft is growing daily and spammers lurk behind every website trying to nab your email address. It’s more important than ever to guard yourself online. Along with these dangers, a social networking site like Facebook also throws in the risks of humiliation, embarrassment, and criticism if you end up posting information you’re not supposed to or revealing far too much information to the wrong people. So how do you begin to protect yourself and still network freely?
Companies and third-party developers that partner with Facebook can also access your information when allowed. Per Facebook’s policy, advertisers who sell products on Facebook can access your information, so it’s up to those companies to also safeguard the info. There are hundreds of third-party applications available on Facebook, and to make use of them, you must allow them access to your information. In doing so, there is the potential for unscrupulous third-party developers to misuse your data. Because you’ve allowed them access to the info by adding the application to your account, there’s not much Facebook can do about it.
The bottom line is it’s up to you to take steps to protect yourself.
Thankfully, there are some strategies you can pursue to help battle privacy and security breaches, and stop them before they ever occur.
Pursuing Protection Strategies
Despite the possibilities for exposure and risk, don’t let the fear of privacy and security keep you from enjoying your Facebook experience. You can keep yourself relatively safe just by following a few simple practices:
. First and foremost—use common sense when participating in any online endeavor. If something seems risky, it probably is. If someone from your Facebook network emails you about a get-rich plan, you can be sure it’s a scam, so don’t take the bait.
. Never give out personal or sensitive information in a public forum. For example, don’t post your cell phone number so it can be read in everyone’s Facebook newsfeed. You’re just asking for trouble.
. If a Facebook user stalks you or harasses you, you can block their access to your profile and report them to Facebook.
. Although the profile information form (see Lesson 2, “Setting Up a Profile”) has places for it, you’re not required to place per-sonal information of any kind in your profile. For example, if you don’t feel comfortable adding your home or work address and phone numbers, don’t do it. You can share this type of infor-mation through a private email on a “need-to-know” basis.
. If you’re worried about spammers, consider using a free email address from a site like Google or Yahoo! for your Facebook account. This can help you protect your main email address from unwanted exposure.
. Always be leery of links to sites outside of Facebook that come to you via friends. Make sure the site is legitimate before giving out information. Phishing, the practice of tricking people into revealing sensitive data, is widespread, but you can usually spot these threats by their poor grammar and typos, so keep your eyes peeled.
. Even though Facebook advocates honesty, people aren’t always what or who they seem to be online. Be skeptical, cautious, and vigilant when it comes to meeting new people online.
. When it comes to deciding whether to post something or not, just ask yourself if your mom or your employer would be com-fortable with it. For example, do you really want your mom or your boss to see a picture of you at that wild party last weekend? Better to err on the side of good judgment when it comes to your personal information and pictures.
. Finally, make use of the controls Facebook offers to help you stay safe on the site. Why let useful privacy control settings go to waste?
The rest of this lesson shows you practical steps you can take to protect your privacy and security on Facebook.
Controlling Account Access
The best way to control your Facebook account is to use some smart logon practices. When you log onto your account from the top of the main Facebook page, shown in Figure 5.1, you have the option of checking the
Remember mecheck box. This feature tells Facebook to keep you
logged on until you decide to log out using the Logoutlink. Although this may seem like a handy way to avoid typing in your ID and password each
time you access your account, it’s actually a problem if you’re using Facebook on a shared computer. For example, if you’re using a computer at a public library, school, or workplace, other users access the computer after you. If you forget to log out, the next user at the computer can access your account. In other words, you’ve left the door to your informa-tion wide open.
52 LESSON 5: Guarding Your Privacy
FIGURE 5.1 Facebook’s logon page.
To prevent unwanted access, make sure the Remember mecheck box is deselected when you log onto your account. Secondly, always log off the site when you’re finished by clicking the Logoutlink at the top of the web page.
Customizing Your Privacy
Settings
the Facebook Privacy pages. Log onto Facebook and move your mouse pointer over the Settingslink at the top of the Facebook page; then click the Privacy Settingsoption from the pop-up menu that appears (see Figure 5.2).
53 Customizing Your Privacy Settings
FIGURE 5.2 Access privacy settings through the Settings menu.
Facebook displays the Privacy page, similar to Figure 5.3. The page fea-tures links to controlling privacy settings for your profile, how you appear to others in Facebook’s search tools, news feed and wall, applications, and a member block list.