FREE Mo n t h ly
Tech n o lo g y Up d at es
On e-year Ven d o r
Pro d u ct Up g rad e
Pro t ect io n Plan
FREE Membership to
Access.Globalknowledge
Brian M . Collins, M CNE, CNI, M CSE, M CT, CTTStace Cunningham, CCNA, M CSE, CLSE, COS/2E, CLSI, COS/21, CLSA, M CPS, A+
M artin Weiss, M CSE, M CP+ I, CCNA, CNA
TECHNICAL EDITOR: Paul Shields, M CSE
W I NDOW S 2 0 0 0
“
Window s 2000 takes forever to configure.
This book can save you days of trial and
error.
”
—
M elissa CraftSenior Consulting Engineer, M icroAge Technology Services
Wit h o ver 1,000,000 co p ies o f o u r MCSE, MCSD, Co m p TIA, an d Cisco
st u d y g u id es in p rin t , w e h ave co m e t o kn o w m an y o f yo u p erso n ally. By
list en in g , w e've learn ed w h at yo u like an d d islike ab o u t t yp ical co m p u t er
b o o ks. Th e m o st req u est ed it em h as b een fo r a w eb -b ased service t h at
keep s yo u cu rren t o n t h e t o p ic o f t h e b o o k an d relat ed t ech n o lo g ies. In
resp o n se, w e h ave creat ed
[email protected], a service t h at
in clu d es t h e fo llo w in g feat u res:
■
A o n e-year w arran t y ag ain st co n t en t o b so lescen ce t h at o ccu rs as
t h e resu lt o f ven d o r p ro d u ct u p g rad es. We w ill p ro vid e reg u lar w eb
u p d at es fo r affect ed ch ap t ers.
■
Mo n t h ly m ailin g s t h at resp o n d t o cu st o m er FAQs an d p ro vid e
d et ailed exp lan at io n s o f t h e m o st d ifficu lt t o p ics, w rit t en b y co n t en t
exp ert s exclu sively fo r
[email protected].
■
Reg u larly u p d at ed lin ks t o sit es t h at o u r ed it o rs h ave d et erm in ed
o ffer valu ab le ad d it io n al in fo rm at io n o n key t o p ics.
■
Access t o “Ask t h e Au t h o r”™ cu st o m er q u ery fo rm s t h at allo w
read ers t o p o st q u est io n s t o b e ad d ressed b y o u r au t h o rs an d
ed it o rs.
On ce yo u 've p u rch ased t h is b o o k, b ro w se t o
www.syngress.com/solutions
.
To reg ist er, yo u w ill n eed t o h ave t h e b o o k h an d y t o verify yo u r p u rch ase.
W I NDOW S 2 0 0 0
duction (collectively “Makers”) of this book (“the Work”) do not guarantee or warrant the results to be obtained from the Work.
There is no guarantee of any kind, expressed or implied, regarding the Work or its contents. The Work is sold AS IS and WITHOUT WARRANTY. You may have other legal rights, which vary from state to state.
In no event will Makers be liable to you for damages, including any loss of profits, lost savings, or other incidental or consequential damages arising out from the Work or its contents. Because some states do not allow the exclusion or limitation of liability for consequential or incidental damages, the above limitation may not apply to you.
You should always use reasonable case, including backup and other appropriate precautions, when working with computers, networks, data, and files.
Syngress Media® and Syngress® are registered trademarks of Syngress Media, Inc. “Career
Advancement Through Skill Enhancement™” is a trademark of Syngress Media, Inc. Brands and prod-uct names mentioned in this book are trademarks or service marks of their respective companies.
KEY SERIAL NUM BER
Window s 2000 Configuration Wizards
Copyright © 2000 by Syngress Media, Inc. All rights reserved. Printed in the United States of America. Except as permitted under the Copyright Act of 1976, no part of this publication may be reproduced or distributed in any form or by any means, or stored in a database or retrieval system, without the prior written permission of the publisher, with the exception that the program listings may be entered, stored, and executed in a computer system, but they may not be reproduced for publication.
Printed in the United States of America
1 2 3 4 5 6 7 8 9 0
ISBN: 1-928994-08-3
Copy edit by: Beth Roberts Proofreading by: Ben Chadwick
Technical edit by: Paul Shields Page Layout and Art by: Emily Eagar and Index by: Robert Saigh Vesna Williams
We would like to acknowledge the following people for their kindness and support in making this book possible.
Richard Kristof, Duncan Anderson, Jennifer Gould, Robert Woodruff, Kevin Murray, Dale Leatherwood, Shelley Everett, Laurie Hedrick, Rhonda
Harmon, Lisa Lavallee, and Robert Sanregret of Global Knowledge, for their generous access to the IT industry’s best courses, instructors and training facilities.
Ralph Troupe and the team at Rt. 1 Solutions for their invaluable insight into the challenges of designing, deploying and supporting world-class enterprise networks.
Karen Cross, Kim Wylie, Harry Kirchner, John Hays, Bill Richter, Michael Ruggiero, Kevin Votel, Brittin Clark, Sarah Schaffer, Luke Kreinberg, Ellen Lafferty and Sarah MacLachlan of Publishers Group West for sharing their incredible marketing experience and expertise.
Peter Hoenigsberg, Mary Ging, Caroline Hird, Simon Beale, Julia Oldknow, Kelly Burrows, Jonathan Bunkell, Catherine Anderson, Peet Kruger, Pia Rasmussen, Denelise L'Ecluse, Rosanna Ramacciotti, Marek Lewinson, Marc Appels, Paul Chrystal, Femi Otesanya, and Tracey Alcock of Harcourt International for making certain that our vision remains worldwide in scope.
Special thanks to the professionals at Osborne with whom we are proud to publish the best-selling Global Knowledge Certification Press series.
v
At Global Knowledge we strive to support the multiplicity of learning styles required by our students to achieve success as technical professionals. As the world's largest IT training company, Global Knowledge is uniquely positioned to offer these books. The expertise gained each year from pro-viding instructor-led training to hundreds of thousands of students world-wide has been captured in book form to enhance your learning experience. We hope that the quality of these books demonstrates our commitment to your lifelong learning success. Whether you choose to learn through the written word, computer based training, Web delivery, or instructor-led training, Global Knowledge is committed to providing you with the very best in each of these categories. For those of you who know Global Knowledge, or those of you who have just found us for the first time, our goal is to be your lifelong competency partner.
Thank your for the opportunity to serve you. We look forward to serving your needs again in the future.
Warmest regards,
Duncan Anderson
President and Chief Executive Officer, Global Knowledge
vii
Brian M . Collins (MCNE, CNI, MCSE, MCT, CTT) is a technical trainer for Network Appliance Inc., a premier provider of Network Attached Storage, as well as a consultant and trainer through his own company, Collins Network Engineering. Brian is an 18-year veteran of technology industries and has worked as a network engineer, trainer, software developer and consultant for government, Fortune 500 companies, and small business. His hobbies include hiking, golf, and operating systems. Brian lives in the redwood forest of Boulder Creek, California, 30 miles from California's Silicon Valley.
Stace Cunningham (CCNA, MCSE, CLSE, COS/2E, CLSI, COS/2I, CLSA, MCPS, A+) is a Systems Engineer with SDC Consulting located in Biloxi, MS. SDC Consulting specializes in the design, engineering, and installation of networks.
Stace has participated as a Technical Contributor for the IIS 3.0 exam, SMS 1.2 exam, Proxy Server 1.0 exam, Exchange Server 5.0 and 5.5 exams, Proxy Server 2.0 exam, IIS 4.0 exam, IEAK exam, and the revised Windows 95 exam. In addition, he has coauthored or technical edited 19 books published by Microsoft Press, Osborne/McGraw-Hill, and Syngress Media.
He was an instrumental force in the design and engineering of a 1700 node Windows NT network that is located in over 20 buildings at Keesler Air Force Base, Mississippi. He also assisted in the design and implemen-tation of a 10,000 node Windows NT network also located at Keesler Air Force Base and received a quality initiative award for his remarkable con-tribution to the project.
His wife Martha and daughter Marissa are very supportive of the time he spends on the network of computers and routers located in his house. Without their love and support he would not be able to accomplish the goals he has set for himself.
Senior Information Management Specialist with ACS Government Solutions Group, which is a recognized leading company in providing broad-based information technology solutions for client organizations. Marty lives in New England and can be contacted via e-mail at [email protected].
Technical Editor
Paul Shields (MCSE) currently works as a network engineer for a major telecommunications company. He has been working with, supporting, and writing about Windows NT for the last five years. His current projects revolve around the design and implementation of enterprise-class servers in a mixed platform environment. He is also working on the roll-out of Windows 2000 to the corporate desktop. Paul can be contacted at [email protected].
Contents
ix
Pa r t I I n st a l l i n g W i n d o w s 2 0 0 0
1
CHAPTER 1 Preinst allat ion
3
Introduction 4
Before You Begin 4
Upgrading versus New Installation 6 Hardware Requirements 7 Hardware and Software Compatibility 8 Hard Disk Partitioning 10 Choosing a File System 10 Licensing 11 Per Seat Licensing 11 Per Server Licensing 11 Determining Advanced Setup Needs 12 Domain or Workgroup? 12 Choosing Components 12 Before You Begin 20 The Purpose of this Wizard 20 Information Needed to Work with this Wizard 20 The Initial Installation Process 21 Windows 2000 Server Setup Wizard 23
Summary 26
PART 2 Co n f i g u r i n g W i n d o w s 2 0 0 0
2 7
CHAPTER 3 W ind ow s 2 0 0 0 Conf igure Your Server W izard
2 9
Introduction 30 Before You Begin 30 The Purpose of this Wizard 30 Information Needed to Work with this Wizard 31 Windows 2000 Configure Your Server Wizard 31 Configure Your Server Program Overview 37
CHAPTER 4 Act ive Direct ory Inst allat ion W izard
4 1
Introduction 42 Before You Begin 42 The Purpose of this Wizard 42 Information Needed to Work with this Wizard 43 The Active Directory Installation Wizard 43 Uninstalling Active Directory 54
Summary 58
CHAPTER 5 N et w ork Connect ion W izard
6 1
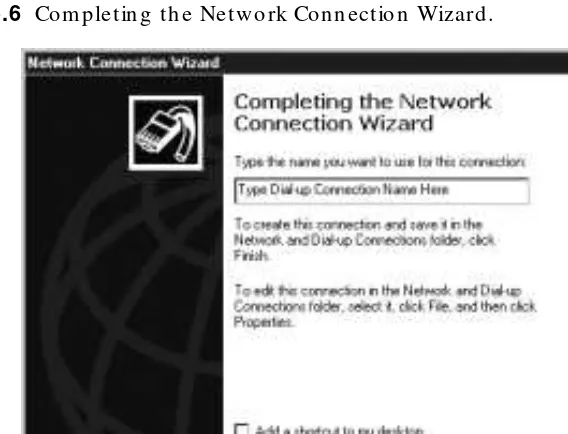
Introduction 62 Before You Begin 62 The Purpose of this Wizard 62 Information Needed to Work with this Wizard 62 The Network Connection Wizard 63 Launching the Network Connection Wizard 63 Dial-Up to a Private Network 64 Dial-Up to the Internet 68 Connect to a Private Network through the Internet 79 Accept Incoming Connections 81 Connect Directly to Another Computer 88
Summary 90
CHAPTER 6 M anag ing DHCP Servers
9 3
Introduction 94 Before You Begin 94 The Purpose of this Wizard 94 Information Needed to Work with this Wizard 94
Add DHCP Server 95
The Create Scope Wizard 95 The Create Superscope Wizard 105 The Create Multicast Scope Wizard 108 Summary 112
CHAPTER 7 Creat e A N ew Zone W izard (DN S)
1 1 3
CHAPTER 8 Rout ing and Rem ot e Access
Conf ig urat ion W izard
1 2 7
Introduction 128 Before You Begin 128 The Purpose of this Wizard 129 Information Needed to Work with this Wizard 129 The Routing and Remote Access Configuration Wizard 129 Configuring Routing and Remote Access 136 Summary 143
CHAPTER 9 Creat e Shared Fold er W izard
1 4 5
Introduction 146 Before You Begin 146 The Purpose of this Wizard 146 Information Needed to Work with this Wizard 146 The Create Shared Folder Wizard 147 Summary 153
CHAPTER 1 0 Ad d Print er W izard
1 5 5
Introduction 156 Before You Begin 156 The Purpose of this Wizard 156 Information Needed to Work with this Wizard 156 The Add Printer Wizard 157
CHAPTER 1 2 W ind ow s Com p onent W izard
1 9 3
Introduction 194 Before You Begin 194 The Purpose of this Wizard 195 Information Needed to Work with this Wizard 196 The Windows Component Wizard 196 Adding a Component 196 Removing a Component 201 Summary 204
CHAPTER 1 3 W ind ow s 2 0 0 0 Resource Kit Set up W izard 2 0 7
Introduction 208 Before You Begin 208 The Purpose of this Wizard 208 Information Needed to Work with this Wizard 208 The Windows 2000 Resource Kit Setup Wizard 209 Adding Resource Kit Support Tools 209 Removing, Adding, or Reinstalling Resource Kit Support Tools 214 Summary 219
CHAPTER 1 4 Ad d /Rem ove Hard w are W izard
2 2 1
Introduction 222 Before You Begin 222 The Purpose of this Wizard 222 Information Needed to Work with this Wizard 222 Add/Remove Hardware Wizard 222 Adding a Plug and Play Device 223 Adding a Non-Plug and Play Device 228 Removing Hardware 239 Summary 244
CHAPTER 1 5 Int ernet Connect ion W izard
2 4 5
Introduction 246 Before You Begin 246 The Purpose of this Wizard 246 Information Needed to Work with this Wizard 246 The Internet Connection Wizard 247 Optional Advanced Parameters 250 Summary 260
CHAPTER 1 6 Connect ion M anag er
Ad m inist rat ion Kit W izard
2 6 3
Information Needed to Work with this Wizard 264 The Connection Manager Administration Kit Wizard 265 Summary 289
CHAPTER 1 7 Creat e N ew Df s Root W izard
2 9 1
Introduction 292
Before You Begin 292 The Purpose of this Wizard 292 Information Needed to Work with this Wizard 293 Create New Dfs Root Wizard 293 Summary 298
CHAPTER 1 8 Deleg at ion of Cont rol W izard
2 9 9
Introduction 300 Before You Begin 300 The Purpose of this Wizard 300 Information Needed to Work with this Wizard 300 The Delegation of Control Wizard 300 Summary 308
CHAPTER 1 9 Creat e Part it ion W izard
3 1 1
Introduction 312 Before You Begin 312 The Purpose of this Wizard 312 Information Needed to Work with this Wizard 312 The Create Partition Wizard 312 Summary 320
CHAPTER 2 0 Syst em M aint enance W izard s
3 2 1
Introduction 322 Before You Begin 322 The Purposes of these Wizards 322 Information Needed to Work with these Wizards 323 The Scheduled Task Wizard 323 The Disk Cleanup Wizard 333 The Scheduled Synchronization Wizard 335 Summary 340
CHAPTER 2 1 Environm ent Conf ig urat ion W izard s
3 4 3
Information Needed to Work with these Wizards 344 The Create Shortcut Wizard 345 The Customize This Folders Wizard 348 New Taskpad View Wizard 355 Summary 360
CHAPTER 2 2 Accessib ilit y W izard
3 6 1
Introduction 362 Before You Begin 362 The Purpose of this Wizard 362 Information Needed to Work with this Wizard 362 The Accessibility Wizard 362 Summary 383
CHAPTER 2 3 Send Fax W izard
3 8 5
Introduction 386 Before You Begin 386 The Purpose of this Wizard 386 Information Needed to Work with this Wizard 386 The Send Fax Wizard 386 Summary 394
CHAPTER 2 4 Backup and Recovery W izard s
3 9 5
Introduction 396 Before You Begin 396 The Purposes of these Wizards 396 Information Needed to Work with these Wizards 396
Backup Wizard 396
Restore Wizard 409
Emergency Repair Disk Wizard 416 Summary 417
CHAPTER 2 5 M icrosof t W ind ow s 2 0 0 0
Reg ist rat ion W izard
4 1 9
Introduction 420 Before You Begin 420 The Purpose of this Wizard 420 Information Needed to Work with this Wizard 420 The Microsoft Windows 2000 Registration Wizard 421 Summary 427
Installing
Window s 2000
3
Preinstallation
Introduction
Before beginning the process of upgrading your current Windows NT servers and Workstations to Windows 2000, it is important to take some time and understand the system requirements and upgrade process. Many System Administrators may be surprised to find that the system requirements for Windows 2000 exceed many of their current system con-figurations.
Another important consideration is the introduction of Active Directories and their impact on network design. Administrators should take time to understand how Active Directories compare to the traditional Domain model. Before upgrading, you will need to decide how you will upgrade to Active Directories and, if necessary, how you will handle the interoperability issues. Since Windows 2000 represents a significant change in the design of Windows networks, System Administrators should plan upgrades carefully. These plans should include testing of upgrades on low-risk systems and ensuring that complete and reliable backups are available in case of a problem.
By the end of this chapter, System Administrators should have a basic understanding of the system requirements for Windows 2000, the funda-mental differences from Windows NT, and have a complete backup of sys-tems scheduled to be upgraded.
Before You Begin
It is important that you familiarize yourself with Active Directory before installing Windows 2000. Active Directory is without a doubt the biggest, most important, and most significant change to Windows 2000. One of the reasons Active Directory is capable of scaling so well is because of the
domain tree. While Windows 2000 still uses the term domain, as does Windows NT 4.0 and earlier, the concepts and structures are actually quite different. Active Directory is a set of one or more domain trees. A domain tree is composed of domains that share a common configuration and form a contiguous namespace. Each domain is further subdivided into organizational units (OUs) for administrative purposes. Unlike
Windows NT 4.0 and earlier, a Windows 2000 domain can grow to contain over 10 million objects! Figure 1.1 illustrates a domain tree with OUs.
recognition, they still want to maintain separate identities. Such a situa-tion is ideal for the creasitua-tion of a forest.
Figure 1.1 A Win d o w s 2000 d o m ain t ree co n t ain s d o m ain s, w h ich in t u rn
Because of the vast differences in domain models between Windows NT and Windows 2000, you may be wondering if the two can coexist—the answer is yes. Windows 2000 domains and pre-Windows 2000 domains operate in mixed mode. In mixed mode, all down-level servers and clients are unaware that the Primary Domain Controller (PDC) is now an Active Directory Server. When all of the Backup Domain Controllers (BDC) have been upgraded or removed, you can switch over to native mode and take advantage of additional Windows 2000 features. Native mode provides for added security group functionality. For example, Windows 2000 operating in native mode has the ability to nest groups. Figure 1.2 illustrates the stages of an upgrade from Windows NT domains to Windows 2000 native domains.
Once you have familiarized yourself with the key features of Windows 2000 and the changes Active Directory brings, you can begin preparing for the actual installation of Windows 2000. The key to a successful upgrade or installation of Windows 2000 is proper preparation. What fol-lows are various factors that must be taken into consideration before run-ning the setup procedures. Additionally, you should review the files
Up g rad in g versu s New In st allat io n
A decision that needs to be made before running the Windows 2000 Setup is to determine whether to upgrade your existing operating system (see Table 1.1 for supported upgrade paths) or perform a new installation. Generally, a new installation will require many more decisions to be made prior to the procedure, which are discussed later in this chapter. An upgrade, on the other hand, is usually straightforward and requires mostly that certain precautions be met, which are also discussed further on.
Upgrading simply means installing Windows 2000 on a system, in the same partition that already has an operating system that can be upgraded. Alternatively, a new installation will remove the previous operating system, or will install onto a partition without an already existing operating system.
Versio n s o f Win d o w s NT earlier t h an 3.51 can n o t b e d irect ly u p g rad ed t o PDC upgraded but not all BDCs
Mixed Mode Domain PDCs & BDCs upgraded
-Switch to native mode
Hard w are Req u irem en t s
Before deploying a new operating system, many are initially concerned with the minimum hardware requirements. This is one of the most fre-quently asked questions, yet it largely depends on the individual circum-stances. For example, if your only need is to become acquainted with the user interface of Windows 2000 Server on your computer at home, you can feasibly install the operating system on a Pentium 133 with the mini-mal amount of RAM. Although this may serve your needs, using this sys-tem in a production environment would only serve at best as a space heater.
The hardware requirements for Windows 2000 are rather steep, and it is highly recommended that you take into account your plans for the sys-tem. For example, if you plan to use a Windows 2000 Server as domain controller supporting several thousand users, you will likely want to exceed the listed requirements. Generally speaking, however, you should ensure that your system meets the recommended minimum hardware requirements shown in Table 1.2.
Table 1.1 Win d o w s 2000 Up g rad e Pat h s
Old Versions Can Be Upgraded To
Win d o w s 95/98 Win d o w s 200 Pro fessio n al Dat acen t er Server
BackOffice Sm all Bu sin ess Server
Hard w are an d So ft w are Co m p at ib ilit y
Before attempting to run Windows 2000 Setup, you should ensure that your hardware is compatible. Although a Hardware Compatibility List (Hcl.txt) is located in the Support directory on the Windows 2000 CD-ROM, it is recommended that your review the most current list, which can viewed at www.microsoft.com/hwtest/hcl (Figure 1.3). Before running setup, it is also probably a good idea to contact the vendors of your hard-ware devices and obtain the latest drivers. Be sure to pay special atten-tion if you have any mass storage controllers (e.g., SCSI, RAID). A
common problem with unsupported controllers is receiving an error after the initial Setup phase, indicating that there is an inaccessible boot device.
Also available from Microsoft’s Web site is an easy-to-search directory of applications that are known to work with Windows 2000. To help ensure third-party software reliability and performance with Windows 2000, Microsoft has created the following three classifications for applica-tions:
Table 1.2 Min im u m an d Reco m m en d ed Req u irem en t s fo r Win d o w s 2000
Component Professional Server
■ Certified. Microsoft provides a Windows 2000 Applications
Specification, which specifies uses of advanced Windows Technology. Any Independent Software Vendor (ISV) who uses these advanced specifications is eligible for this level of
classification.
■ Ready. This classification is provided to software that has been
tested for compatibility with Windows 2000.
■ Planned. This classification is assigned to software in which the
vendor is working on a compatible version to meet the Ready or Certified level.
During the installation, Windows 2000 Setup will check your hard-ware and softhard-ware, and identify any possible conflicts. Nevertheless, veri-fying the Hardware Compatibility List and software compatibility before running Setup may save you a lot of time later on. Additionally, verifying this list is critical if you will be purchasing new systems to install
Windows 2000 on. You would not want to spend thousands of dollars on new systems only to find out that they cannot run Windows 2000!
Hard Disk Part it io n in g
If you are performing a new installation of Windows 2000, you will need to consider how you will partition your hard disks; an upgrade will not require this because an upgrade will use your already existing partitions. Partitioning allows you to divide your hard disk into one or more isolated sections that can be formatted for a particular file system such as FAT, FAT32, or NTFS.
If you do not already have a partitioning plan, it may be a good idea to seek out further information relative to your specific needs before per-forming Setup. If you plan to use multiple partitions, it is important that you allow enough room for the data that will be grouped on the individual partitions. For example, the requirements in Table 1.2 indicate that you need at least 1GB of free disk space on the partition that will contain the system files. You should, however, plan for future growth and allow more space than what is needed at the time.
Ch o o sin g a File Syst em
Before installing Windows 2000, you should also determine the type of file system you require (e.g., NTFS, FAT, FAT32). If you are familiar with previ-ous versions of Windows NT, you may recall that NTFS is the preferred file system—even more so with Windows 2000. The following is a brief list of the many features that can only be used when installed on an NTFS partition:
Active Directory
For the most part, a file system other than NTFS should be considered when you have a need to run a dual-boot computer. Other operating
tems cannot gain local access to files located on a Windows 2000 system formatted with NTFS. A FAT partition allows local access through MS-DOS, Windows NT, Windows 2000, and OS/2. A FAT32 partition allows local access only through Windows 98 OSR2, Windows 98, and Windows 2000. Another consideration when determining the file system is possible disk sizes. For example, a FAT partition only supports volumes up to 4GB in size. Although FAT32 supports volumes up to 2TB, Windows 2000 will only allow you to format a FAT32 drive up to 32GB.
A Win d o w s NT 4.0 syst em w it h Service Pack 4 o r h ig h er t h at resid es o n a FAT p art it io n can access files lo cally o n an NTFS p art it io n b u t o n ly w it h lim it ed access.
Licen sin g
Licensing plays a critical role in the Windows 2000 Setup process. Determining your needs is critical before running Setup, as you will see shortly. When running a server operating system, each client connection to the server will require some type of license. This Client Access License (CAL) allows connections to the server to access network services, shared folders, and other resources. The Windows 2000 Server licensing options are the same as those in previous versions of the operating systems. From Setup, you will have the option of selecting either Per Seat or Per Server.
Per Seat Licensing
Per Seat licensing requires each connection to have a CAL. Per Seat allows any computer with a CAL to access any number of servers on the network, which is why this is the most common choice for larger compa-nies, or those with more than one server. On the other hand, for smaller organizations or those with only one server, Per Server licensing may be a better option.
Per Server Licensing
Per Server licensing assigns CALs to the individual server instead of the client connections. Therefore, each connection to the server will require the server to have a CAL for each concurrent connection. Assume you operate an organization with 20 employees and you have one server. If you purchase 15 CALs for the server, you can have 15 connections to the server; thus, your server has a fixed number of allowable connections. Of
your 20 employees, if you expect that not of all of them will need to be connected concurrently, purchasing fewer than 20 licenses might be a good idea. Keep in mind, however, that once you have reached your maxi-mum allowable connections, no other connections can be made until one or more connections terminate.
If yo u ch o o se Per Server, yo u are allo w ed t o ch an g e yo u r m in d at an y t im e an d sw it ch t o Per Seat w it h o u t in cu rrin g an y ad d it io n al ch arg es, b u t o n ly o n ce! Yo u w ill n o t b e allo w ed t o co n vert b ack t o Per Server.
Det erm in in g Ad van ced Set u p Need s
There are several concepts you will need to be conscious of when deter-mining your setup needs.
Domain or Workgroup?
You will be prompted during installation to select the type of security group your computer will join. The available options are joining a domain, which will require a domain name, a computer account, an available domain controller, and a DNS server; whereas, joining a workgroup only requires a name of a new or existing workgroup. It is common to join a workgroup only in a small network or if you plan to later join a domain. Joining a domain can also be done after Windows 2000 has been set up.
If yo u r co m p u t er is t h e first o n e in st alled o n t h e n et w o rk, yo u w ill h ave t o first jo in a w o rkg ro u p an d t h en creat e an d jo in t h e d o m ain aft er
in st allat io n .
Choosing Components
In addition to the components installed automatically by Windows 2000 Setup, there are a number of other components that you are given the option to install in order to further extend the functionality of Windows 2000. Keep in mind, however, that if you choose not to install any of these additional components, you can always install them later using the Add/Remove Programs option located in the Control Panel. It might be helpful to determine ahead of time which of these components you may
NOTE
require. Remember that components that are not needed will only take up extra disk space. Table 1.3 provides a list of the available options and a brief description of each.
Netw orking
Before installing Windows 2000, you may wish to give thought to various issues if you plan on being networked. TCP/IP is the most common proto-col in use today. It is the protoproto-col of the Internet, and the protoproto-col used on most servers. In addition, Windows 2000 uses TCP/IP natively and is optimized for this protocol.
TCP/IP uses an IP address as an identifier for a device on the net-work. Additionally, these addresses are used to route messages over the network. An IP address is a 32-bit numerical address, part of which iden-tifies the network, and the other part ideniden-tifies the specific node. In addi-tion, if you are connected to the Internet, you must use registered IP addresses, which are assigned by the InterNIC or acquired from your Internet Service Provider (ISP). Table 1.4 explains the three primary class-es of IP addrclass-essclass-es, and Figure 1.4 illustratclass-es a simple TCP/IP network with a network address of 198.168.0.0.
You have the option to configure TCP/IP during the installation process, or you may elect to configure it after installing Windows. Either way, you will need to think about and address the issues of IP addresses and name resolution. TCP/IP requires that an IP address is assigned to the system, and name resolution allows these IP addresses to be resolved to names that are easier to remember and more user friendly.
Depending upon your existing environment or future plans, there are numerous ways to approach IP addressing. The following list outlines these methods:
■ Automatic Private IP Addressing is a feature of Windows 2000
that will automatically assign an IP address for a limited number of systems. For example, if you have five networked systems, and each is given the same subnet mask, each will be assigned an IP address automatically and able to communicate.
■ Dynamic Host Configuration Protocol also allows for the
automatic assignment of IP addresses. The DHCP server, however, must be assigned a static IP address, and it will then assign IP addresses from a specified pool of available addresses. This is commonly found on networks where there are multiple subnets.
■ If you plan to provide access to users from the Internet, you will
St at ic IP ad d resses are req u ired fo r so m e t yp es o f servers t h at can n o t b e assig n ed d yn am ic ad d resses. Exam p les in clu d e Web , m ail, DNS, an d DHCP servers.
Windows 2000 Server uses the Domain Name System (DNS) to resolve numerical IP addresses to host names. If you elect not to install DNS, it will be automatically installed if your computer becomes a domain con-troller. In addition to using DNS, you may also need to install Windows
Internet Name Service (WINS) to support any clients running earlier ver-sions of Windows.
Fin al Prep arat io n s
After you have planned your installation and are ready to install the new operating system, you should take the time to perform some basic steps that will prepare your system for Setup. Additionally, if you are perform-ing an upgrade, be sure to also review the release notes on the CD-ROM and ensure that you have disabled or removed any applications specified before running Setup. The following tasks should be performed before running Setup to ensure a smooth installation of Windows 2000:
Perform backups.Unless your system does not have any files, you should always perform a backup of your existing files before any major changes. The importance of this simple task cannot be overstated. If for some reason, something goes wrong, you should then have an easy way to restore your previously existing data. Additionally, you may want to use a product such as Norton Ghost to make an exact copy of a critical server onto another system to serve as an additional fallback.
Disable disk mirroring. Before installing Windows 2000, be sure to disable disk mirroring if it is running on the computer. You may then reenable it after the upgrade or new installation is successful.
Disconnect UPS. Uninterruptible power supplies (UPS) oftentimes create problems during the detection phase. Because Windows will try to detect any devices connected to serial ports, be certain to disconnect the serial cable if you are using a UPS.
Wh ile ad d ed reliab ilit y an d st ab ilit y are t w o o f t h e key b en efit s o f Win d o w s 2000, yo u m ay w an t t o co n sid er ru n n in g t est in st allat io n s in a t est lab . If yo u are o p erat in g o n a larg e n et w o rk, t h is co u ld p ro ve crit ical t o en su re in t ero p erab ilit y w it h o t h er syst em s.
Summary
Before installing Windows 2000, it is important to consider the changes in the operating system and how they will apply to your organization. One of the biggest and most significant changes in Windows 2000 is the Active Directory directory structure. Because of the vast differences between
Windows 2000 and previous versions of the operating system, you will need to consider various factors before installing Windows 2000.
Windows 2000 requires significantly more powerful hardware than Windows NT. If you are planning to run Windows 2000 Server in a pro-duction environment, it is recommended that you consider a Pentium II system with at least 128–256MB of memory. Although this chapter pro-vides you with minimum and recommended guidelines, it is critical that you take into account your current and future needs.
In addition to ensuring you have enough power to run Windows 2000, you will also need to ensure that your hardware and software is compati-ble with Windows 2000. Microsoft provides an up-to-date and comprehen-sive database that you can search to ensure that your hardware and software is compatible.
Installing Windows 2000 will require that you make decisions such as which partition to install the operating system on, which file system to use, and which licensing method to use. Additionally, you will need to consider other issues that relate to your needs. For example, will you join a domain or a workgroup? It is also a good idea to determine your server needs, so that you can easily select the components to install that will be required by your organization. Finally, Windows 2000 offers you the option to customize your network configuration during a new installation; therefore, having a firm understanding and knowledge of your existing or proposed network is important.
19
Window s 2000
Setup Wizard
Introduction
The first step in working with Windows 2000 is the installation process. The process and wizards are similar to those in Windows NT 4.0, but offer a number of new features and options. On most systems, you can boot from the CD-ROM to begin the installation process. The first step is to select a partition and copy over the installation files. The interface used is not a traditional wizard, but does walk you through the process step by step.
The next phase begins after you reboot. Windows 2000 will load and run the initial Setup Wizard. This wizard contains the bulk of the basic Windows 2000 setup process and is very similar for both Server and Professional versions of Windows 2000. By the end of this chapter, you should have a fully functional Windows 2000 system.
Before You Begin
Before you install Windows 2000, ensure that you have considered the various factors discussed in Chapter 1, “Preinstallation.” Additionally, ensure that you have backed up your files and disabled disk mirroring and UPS devices before you begin. Although the installation is divided into two phases, there are actually four stages to the Setup routine. These include running the Setup program, running the Setup Wizard, installing Windows networking, and completing the Setup program.
Th e Pu rp o se o f t h is Wizard
Although the following steps are geared toward the installation of Windows 2000 Server, the installation process for Windows 2000 Professional is nearly identical. The initial installation process and the Server Setup Wizard provide a friendly and step-by-step method to install Windows 2000 on a computer system. Figure 2.1 illustrates the basic steps involved when installing Windows 2000 Server.
In fo rm at io n Need ed t o Wo rk w it h t h is Wizard
To perform the initial installation process and follow-on wizard, ensure that you have the following:
■ Windows 2000 CD-ROM
■ Networking information. If you prefer, you may use the default
The Initial Installation Process
➣
STEP 1
To initiate the Setup routine, you can use either the Setup boot disks or the CD-ROM, if your computer supports booting from a CD-ROM drive. To start from the CD-ROM, simply insert the CD and turn on or restart your computer. To start from the boot disks, insert Setup Disk 1 into Drive A and turn on or restart your computer.
If you are performing an upgrade, you cannot boot from the CD-ROM. To perform the upgrade on most systems, simply insert the CD-ROM while running your current operation system, and if the auto-run feature is enabled, Setup will display a dialog box to begin the installation (Figure 2.2). Alternatively, you can execute winnt.exe from the I386 directory on the Windows 2000 CD-ROM.
Figure 2.1Th ese st ep s are in vo lved fo r Win d o w s 2000 Set u p .
ABC
Welcome!
Next >
Load Setup program into memory
To m ake t h e Set u p b o o t d isks, ru n t h e m aked isk u t ilit y fro m t h e b o o t d isk d irect o ry o n t h e CD-ROM. Rem em b er t h at b o o t d isks creat ed fro m t h e Win d o w s 2000 Server CD can n o t b e u sed w it h Win d o w s 2000 Pro fessio n al an d vice versa.
➣
STEP 2
After booting from the CD-ROM or boot disk, enough of Windows 2000 is loaded into memory to start the text-based portion of Setup. Read the license agreement that appears. To accept the terms of the license agreement, press F8.
➣
STEP 3
This step allows you to create and delete partitions. You are prompted to select an installation partition. You may select an existing partition, or you can create a new partition by using unpartitioned space.
Figure 2.2 Th e Win d o w s 2000 Server set u p d ialo g b o x.
If yo u are p erfo rm in g a n ew in st allat io n o n a p art it io n t h at co n t ain s an o t h er o p erat in g syst em , t h is o p erat in g syst em w ill b e o verw rit t en . Ad d it io n ally, d elet in g a p art it io n w ill also d elet e an y exist in g d at a.
➣
STEP 4
Next, you need to select a file system for the partition, which Windows will then format using the specified file system. After for-matting the partition, Setup will copy files to the hard disk and then save the configuration information. Setup will then restart the com-puter and start the Windows 2000 Server Setup Wizard. This wizard is the graphical user interface (GUI) portion of Setup, which will con-tinue with the setup of Windows 2000.
Window s 2000 Server Setup Wizard
➣
STEP 1
The first step in the GUI portion of Setup is to select your regional settings. Here you can set your system up to use multiple languages and regional settings by customizing the language and locale settings.
➣
STEP 2
Next, you will personalize your copy of Windows 2000. Enter the name of the person and the company for which Windows 2000 is licensed for use.
➣
STEP 3
You will then be prompted to choose your licensing mode. If you are upgrading, the mode is already selected based on your existing con-figuration. As discussed in Chapter 1, you have the option of select-ing Per Server or Per Seat licensselect-ing. If you select Per Server, you will need to enter the number of Client Access Licenses (CALs) purchased for this server. If at the time of installation you are still unsure which mode to use, be sure to select Per Server, since you are allowed to change from Per Server to Per Seat for free.
➣
STEP 4
Next, enter your computer name. Keep in mind that Windows operat-ing systems earlier than Windows 2000 will only recognize the first 15 characters of the name. You are, however, able to enter a computer name up to 63 characters. Ensure that you enter a unique name.
➣
STEP 5
Windows 2000 creates a user account called Administrator, for which you are prompted to enter a password. The password you enter can contain up to 14 characters. After you have entered your password for the Administrator account, you will need to enter it again to con-firm the password.
Rem em b er t o alw ays ch o o se a co m p lex p assw o rd . It is reco m m en d ed t h at yo u ch o o se a p assw o rd t h at co n sist s o f n u m b ers, sym b o ls, an d u p p ercase an d lo w ercase let t ers.
➣
STEP 6
You are able to choose among many components that provide added functionality to Windows 2000. See Table 1.3 in Chapter 1 for a list of available components. In addition to the components discussed earlier, you will also find the Accessories and Utilities component, which provides accessory programs such as Calculator, WordPad, Games, and others.
➣
STEP 7
Next, select your corresponding time zone and adjust the current date and time. Finally, you have the option of specifying if you want Windows 2000 to automatically adjust for daylight savings time by clicking the check box.
➣
STEP 8
Setup will next begin installing the Windows networking components. First it will detect any network cards that may be installed. If it detects a network card, it will configure the card, and then Setup will next try to determine if a DHCP server is running on the network. You will be prompted to select networking components, which can use the
typical settings, or you may elect to customize them individually. If you select the typical settings, the following will be installed:
■ Client for Microsoft Networks
■ File and Printer Sharing for Microsoft Networks ■ TCP/IP
You may, depending on your existing network, elect to install other clients, services, and protocols such as NetBEUI, AppleTalk, and so forth. Keep in mind that there is no harm in keeping the typical settings. You may make any changes to your networking configuration after Windows 2000 is installed.
➣
STEP 9
Setup will display the Workgroup or Computer Domain page. Here you specify if you want the computer to join a workgroup or a domain.
Windows 2000 will automatically perform the following final installa-tion steps:
1. Copy remaining files to the system.
2. Apply and save the configuration settings.
3. Remove temporary files copied during installation.
4. Restart the computer (be sure to remove the Setup floppy disk or CD-ROM).
5. Windows 2000 Server will display the Configure Server Wizard after you log on, which allows you to easily perform further configuration of the system.
After logging on to the system for the first time, if any additional peripherals are detected, Windows may launch the Found New Hardware Wizard.
Summary
Installing Windows 2000 is comprised of a text-based initial installation and a graphical portion. Together there are four stages: running the Setup program, running the Setup Wizard, installing networking, and completing the Setup program.
To install a fresh copy of Windows 2000, you can use either the sup-plied startup disks or the CD-ROM, if your system supports booting from the CD-ROM drive. After booting the system from the CD-ROM or setup disk, Windows 2000 is copied into memory and the Setup program starts. Installing Windows is comprised of a series of steps, which include
accepting the licensing agreement, selecting a partition, and an appropri-ate file system. The Setup program then copies necessary files to the hard disk, saves the configuration information, restarts the computer, and then initializes the graphical Windows 2000 Setup Wizard.
After starting the Setup Wizard, Windows 2000 will prompt you to provide various bits of information. You will need to confirm your lan-guage and locale, and the name and organization for whom the software is licensed. Next, Windows Setup prompts you to select either a Per Seat or Per Server licensing mode, and then asks you to specify a name for the system and an Administrator account password. After providing the pass-word, you have the opportunity to specify a number of additional compo-nents that you wish to install.
After specifying additional components, the installation of Windows 2000 networking begins. Setup will determine and configure any network cards attached to the system, and you are then asked to use typical or customized networking settings. Finally, Windows Setup will configure the networking components you selected after specifying whether Windows will join a domain or a workgroup.
Finally, Setup will copy any remaining files, and then apply and save the configuration settings. After it deletes any temporary files used during the installation process, Setup will restart the computer. Assuming a smooth installation, the Windows 2000 logon prompt will appear. After entering the Administrator password and logging on to Windows 2000 Server, the Configure Your Server window will appear.
Configuring
Window s 2000
29
Window s 2000
Configure Your
Server Wizard
Introduction
Once the setup program has configured Windows 2000 for your specific hardware, the next step is configuring the server for the network. The Configure Your Server Wizard walks the Administrator through the process of configuring the machine either as a stand-alone server or as part of a domain.
One of the other things most new installations require is a series of passes through the Add New Hardware Wizard. For those Administrators familiar with Windows 95/98 plug-and-play technology, this wizard will seem familiar. Windows 2000 adds plug-and-play capabilities to the underlying Windows NT kernel. When installed, new hardware will be automatically detected, and the Add New Hardware Wizard will launch. By the end of this chapter, your server will be fully configured and func-tional on the network.
Before You Begin
Before using the Windows 2000 Configure Your Server Wizard, it is first important to understand the difference between a member server and a stand-alone server. A Windows 2000 member server is part of a domain, but it is not a domain controller. Although a member server does not store a copy of the directory database, as do domain controllers, member servers can still allow users to access resources located on the server. On the other hand, a Windows 2000 stand-alone server is not part of a domain at all; thus, it can only process requests using its own local user database.
Although later in this chapter, the various components of the
Configure Your Server utility will be discussed, the process of configuring the server demonstrated applies only to a stand-alone computer that is currently the only server in the network.
To perform the following tasks, ensure that you are logged on as an Administrator.
Th e Pu rp o se o f t h is Wizard
The Configure Your Server Wizard is a great launch point to configure the many components of Windows 2000. This chapter takes you through the steps of configuring the first server on your network, and introduces you to the many options available from Configure Your Server.
Domain Name Service (DNS), and Dynamic Host Configuration Protocol (DHCP) on the system. This process will create a new domain tree, domain, and make the server the first domain controller in the network.
In fo rm at io n Need ed t o Wo rk w it h t h is Wizard
Before beginning, you should ensure that you have the following:
■ Windows 2000 Server CD-ROM ■ A name for the new domain ■ Public domain name, if applicable
Window s 2000
Configure Your Server Wizard
➣
STEP 1
After completing the Windows 2000 installation and logging on to the system as an Administrator, the Configure Your Server program (Figure 3.1) appears. Choose from the following options, and click
NEXT:
■ This is the only server in my network.
■ One or more servers are already running in my network ■ I will configure this server later.
The first option is the basis of this walkthrough. If you select the second or third radio button and click Next, the window shown in Figure 3.2 will appear, instructing you to use the menu on the left-hand side to manually configure the server.
➣
STEP 2
Click NEXTto continue configuring your server (Figure 3.3). Windows
will install the server as a domain controller, and will also install the following components:
■ Active Directory. The Windows 2000 directory service. ■ DHCP. Provides for the dynamic assignment of IP addresses. ■ DNS. Provides TCP/IP name resolution.
Figure 3.1 Aft er co m p let in g t h e Win d o w s 2000 Set u p , yo u can easily co n fig u re yo u r server.
➣
STEP 3
If you did not previously configure TCP/IP with an IP address, you will see the screen show in Figure 3.4, indicating that Setup will con-figure your server with a private static IP address. This is acceptable for a private network; however, once you have an assigned IP network address, you will need to reconfigure your server.
A st at ic IP ad d ress is an assig n ed ad d ress t h at is asso ciat ed w it h a syst em , an d is n o t exp ect ed t o ch an g e. St at ic IP ad d resses are u su ally m an ag ed b y an Ad m in ist rat o r, w h ereas d yn am ic IP ad d resses are m an ag ed b y a DHCP server. Wh en u sin g t h e Co n fig u re Yo u r Server Wizard , t h e syst em w ill u se a st at ic IP ad d ress b ecau se DHCP is also b ein g in st alled an d req u ires a st at ic IP ad d ress, as it can n o t d yn am ically assig n it self an IP ad d ress.
Figure 3.3 Th e Co n fig u re Yo u r Server p ro g ram w ill in st all Act ive Direct o ry, DHCP, an d DNS.
➣
STEP 4
This step configures a domain name for the server.
■ Enter the name of the new domain you will be creating followed
by the domain name you have registered on the Internet, or you can enter localif you do not have a public domain name (Figure 3.5).
■ Click NEXTto continue.
A preview of the Active Directory domain name will automatically appear as well as the NetBios name for compatibility with
non–Windows 2000 systems.
➣
STEP 5
Configure Your Server informs you that the process is ready to begin and may take several minutes (Figure 3.6).
Click NEXTto continue.
Figure 3.5 Sp ecify yo u r n ew d o m ain an d d o m ain n am e.
➣
STEP 6
The system will begin to configure additional components, and may prompt you for the original media to be inserted.
■ If you are prompted to insert the original media, place the
Windows 2000 CD-ROM in the drive, and click NEXT.
The process will begin configuring Active Directory (Figure 3.7). The Active Directory Installation Wizard will then run in unattended mode, and when the process is complete, the computer will automati-cally restart and be a fully functional server on the network. To con-figure additional services, continue using the Concon-figure Your Server program.
Figure 3.7 Co n fig u rin g Act ive Direct o ry d ialo g b o x.
➣
STEP 7
To view the changes made to your system and designate a description for this system, do the following:
■ First, open Active Directory Users and Computers from the
Administrative Tools menu.
■ Notice the domain icon with the name of the new root domain
Configure Your Server Program Overview
If the Configure Your Server program does not automatically appear when you start your computer, it can be accessed from the Administrative Tools menu. To disable the utility from appearing when the computer starts, de-select the check box next to Show this screen at startup located on the Homepage of the utility (Figure 3.9).
The menu on the left provides an easy method to perform tasks and configure additional components on your server. Table 3.1 outlines the links available on the left-hand side, and presents a brief listing of the elements that can be accessed.
Figure 3.9 Yo u can cu st o m ize yo u r n et w o rk u sin g Co n fig u re Yo u r Server.
Link Elements
Reg ist er No w Reg ist rat io n Wizard
Act ive Direct o ry User acco u n t s, d o m ain s, server ro les, p erm issio n s, secu rit y
File Server Sh ared fo ld ers an d n et w o rk reso u rces Web /Med ia Server Web sit es, m u lt im ed ia sit es, FTP sit es Net w o rkin g DNS, DHCP, Ro u t in g an d Rem o t e Access Ap p licat io n Server
Table 3.1 Elem en t s o f t h e Co n fig u re Yo u r Server Pro g ram
Summary
After installing Windows 2000 Server, and logging on as an Administrator, the Windows 2000 Configure Your Server program loads. This utility pro-vides a convenient way to configure the many components of Windows 2000.
Ad van ced Messag e q u ein g , Reso u rce Kit , o t h er o p t io n al co m -p o n en t s
The initial page provides an option to quickly set up the core services if the server is the only server in the network. Selecting this option will install Active Directory, DHCP, and DNS, which will result in a fully con-figured and functional server.
To begin the process, you must provide a name for the new domain being created, such as “headquarters.” Next, provide a domain name reg-istered on the Internet, such as “Domain.com.” If you do not have a regis-tered name, or do not want to be connected with the Internet, you can enter local. After providing this information, Windows will begin the process of setting up the core services, and will restart automatically when completed. The Windows 2000 Server will then be configured as a domain controller in the new domain.
The Configure Your Server program will continue to load on startup until the Show this screen at startupcheck box is cleared. As an
Administrator, you may continue to configure additional components from this program by clicking on the appropriate links from the pane on the left side, which include the following:
■ Home
Additionally, these components can also be configured using the tools located in the Administrative Tools folder. Finally, you may always return to the Configure Your Server program by clicking Configure Your Server
41
The Active Directory
Installation Wizard
Introduction
In Windows 2000, Active Directories replace domains as the method for defining and managing Windows-based machines. Active Directories offer more scalability and better performance compared to their domain prede-cessors. Configuring Active Directories is one of the more complex tasks associated with Windows 2000 installation. Make sure that you take time to study and understand Active Directories before you begin the configu-ration process. By the end of this chapter, you will have established the domain controllers for your Active Directory and begun placing servers in the directory.
Before You Begin
Before you begin the Active Directory Installation Wizard, be sure that you are familiar with the concepts of Active Directory. Additionally, you will want to be familiar with the specific terms mentioned during the process, such as:
■ Additional domain controller. A peer domain controller
installed into an existing domain. Provides redundancy and reduces the load of other domain controllers.
■ Child domain. A domain located in the namespace tree directly
beneath another domain name, which is referred to as the
parentdomain.
■ Domain tree. The hierarchical tree structure that is used to
index domain names.
■ Forest. A set of one or more trees that do not form a contiguous
namespace.
To install Active Directory, you need a partition formatted with the version of NTFS used in Windows 2000. To convert your file system, open a Command Prompt window and enter
convert [drive:] /fs:ntfs
When the server is rebooted, the file system will be converted to NTFS.
Th e Pu rp o se o f t h is Wizard
In fo rm at io n Need ed t o Wo rk w it h t h is Wizard
To perform any of these functions, ensure that you have the sufficient network credentials needed to create or remove a domain. Specifically, you will need to log on as an Administrator.
Additionally, ensure you have the following information:
■ Full DNS name of any existing domains ■ Name that will be given to any new domain
■ Known location for storing the database and log files ■ Known location for storing the SYSVOL folder
Th e d at ab ase an d lo g files are st o red b y d efau lt in t h e n t d s fo ld er o f t h e syst em ro o t ; h o w ever, it is reco m m en d ed t h at t h ese b e p laced o n sep arat e h ard d isks w it h in t h e syst em . Th e SYSVOL fo ld er u ses t h e SYSVOL fo ld er o f t h e syst em ro o t as it s d efau lt lo cat io n . Yo u can , h o w ever, lo cat e t h is fo ld er an yw h ere in t h e co m p u t er as lo n g as it ’s o n a p art it io n o r vo lu m e
fo rm at t ed w it h NTFS.
The Active Directory Installation Wizard
➣
STEP 1
To start the Active Directory Installation Wizard, enter dcpromoat the command prompt, or the Run dialog box located in the Start menu (Figure 4.1). You can also click STARTfrom the Active Directory
pane of the Configure Your Server program.
NOTE
➣
STEP 2
The Active Directory Installation Wizard welcome page appears (Figure 4.2). Click NEXT to continue.
Figure 4.2 Th e Act ive Direct o ry In st allat io n Wizard w elco m e p ag e.
➣
STEP 3
Select the type of domain controller to install from the Domain Controller Type page (Figure 4.3). You may choose either of the fol-lowing options:
■ Domain controller for a new domain. This option allows you to
create a new child domain, new domain tree, or a new forest.
■ Click NEXTto continue.
■ Additional domain controller for existing domain. Select this
option if you have an existing domain and you want this server to become an additional domain controller. This is usually done to improve availability and reliability within the domain.
■ To create an additional domain controller in an existing
domain, you will need to provide an authorized username, password, and user domain.
■ Enter the full DNS name for your existing domain that you
want to add the additional domain to.
➣
STEP 4
By choosing to create a domain controller in a new domain, you can select from one of the following options listed on the Create Tree or Child Domain page (Figure 4.4):
■ Create a new domain tree. This will create a new domain tree,
which can be placed in an existing forest, or you can choose to create a new forest.
■ Click NEXTto Continue.
■ Create a new child domain in an existing domain tree. This
option will create a new child domain beneath an existing domain.
■ To create a new child domain in an existing domain tree, you
will need to provide an authorized username, password, and user domain.
■ You will need to enter the full DNS name of the existing
domain that will be the parent to this domain. For example, if you want to create a new child domain beneath “domain.com,” enter “domain.com.”
■ Now enter the name of the new child domain, such as
“childdomain.” The parent name will be added to this name to create the full DNS name, “childdomain.domain.com.”
■ Proceed to Step 8.
➣
STEP 5
When creating a new domain tree, you can select from one of the fol-lowing options listed on the Create or Join Forest page (Figure 4.5):
■ Create a new forest of domain trees. If this is your first
domain, you must select this option. If you want to create a new domain tree that is independent of your current forest, you would also select this option.
■ Click NEXTto continue.
■ Place this new domain tree in an existing forest. Select this
option to create a new domain tree that will be part of an existing forest. This allows access to resources within the other trees.
■ To place this new domain tree in an existing forest, you will
need to provide an authorized username, password, and user domain.
■ Enter the full DNS name of the forest root domain; for
example, “rootdomain.domain.com.”
■ Enter the full DNS name of the new tree; for example,
“newtree.domain.com.”
■ Proceed to Step 8.
➣
STEP 6
If you chose to create a new forest, enter the full DNS name for the new domain in the New Domain Name page, and click NEXTto continue
(Figure 4.6).
Figure 4.5 Th e Creat e o r Jo in Fo rest p ag e.
➣
STEP 7
The next step is to configure a NetBIOS name for compatibility with older versions of Windows. A default name will automatically appear in the
Domain NetBIOS namefield of the NetBIOS Domain Name page (Figure 4.7). Click NEXTto continue, or you may specify a different name.
Figure 4.7 Th e Net BIOS Do m ain Nam e p ag e.
➣
STEP 8
At the Database and Log Locations page, click NEXTto select the
default locations of the database and log files, or enter a location, or click BROWSE to identify a new location (Figure 4.8).
The database is the directory for the domain, and the log file is used to temporarily store changes that are made to the database. It is recommended that you place these on separate hard disks for
increased performance.
➣
STEP 9
Click NEXTon the Shared System Volume page to accept the default
locations of the SYSVOL folder, or enter a location, or click BROWSE to
identify a new location (Figure 4.9).
The shared system volume stores scripts and Group Policy
Figure 4.8 Th e Dat ab ase an d Lo g Lo cat io n s p ag e.
➣
STEP 10
If DNS is not already available on the network, you can choose to have the Active Directory Installation Wizard install and configure DNS on the computer (Figure 4.10). Then, click NEXT.
Alt h o u g h it is reco m m en d ed t h at yo u u se Micro so ft ’s DNS t o t ake
ad van t ag e o f ad d ed feat u res, yo u m ay u se an o t h er DNS syst em . Win d o w s 2000 DNS is sp ecifically d esig n ed t o t ake fu ll ad van t ag e o f Act ive Direct o ry. It u ses m u lt im ast er rep licat io n , w h ile n o n -Micro so ft DNS servers u se a sin g le-m ast er rep licat io n . Ad d it io n ally, Micro so ft ’s im p lem en t at io n o f DNS co m p lies co m p let ely w it h In t ern et st an d ard s; t h u s, it is co m p at ib le w it h an y o t h er o p erat in g syst em .
NOTE
Figure 4.10 Th e Co n fig u re DNS p ag e.
➣
STEP 11
From the Permissions page (Figure 4.11), select one of the following default permissions for user and group objects, and click NEXT:
■ Permissions compatible with pre-Windows 2000 servers. If
■ Permissions compatible only with Windows 2000 servers.
Select this option if you do not have any pre–Windows 2000 systems, or if you only run server programs on Windows 2000 servers.
Figure 4.11 Th e Perm issio n s p ag e.
➣
STEP 12
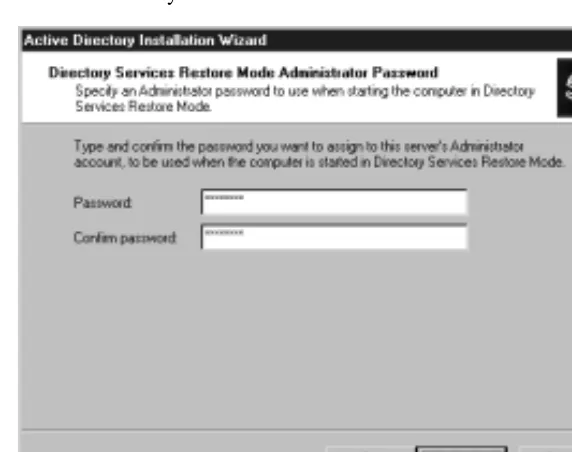
Enter and confirm a password, and click NEXT. This password will
allow access to the Directory Services Restore Mode (Figure 4.12). The Directory Services Restore Mode allows for the restoration and main-tenance of Active Directory and the SYSVOL folder.
➣
STEP 13
Click NEXTfrom the Summary page to begin installing Active
Directory (Figure 4.13). This page identifies the options you have selected. If you need to make changes, click BACK.
➣
STEP 14
Figure 4.12 Th e Direct o ry Services Rest o re Mo d e Ad m in ist rat o r Passw o rd p ag e.
➣
STEP 15
The Active Directory Installation Wizard completion page appears (Figure 4.15). Click FINISHto close the wizard.
Figure 4.14 Co n fig u rin g Act ive Direct o ry d ialo g b o x.