Foundation Rails 2
Lead Editor Copyright © 2008 by Eldon Alameda
All rights reserved. No part of this work may be reproduced or transmitted in any form or by any means, electronic or mechanical, including photocopying, recording, or by any information storage or retrieval system, without the prior written permission
of the copyright owner and the publisher. ISBN-13 (pbk): 978-1-4302-1039-9 ISBN-13 (electronic): 978-1-4302-1040-5
Printed and bound in the United States of America 9 8 7 6 5 4 3 2 1
Trademarked names may appear in this book. Rather than use a trademark symbol with every occurrence of a trademarked name, we use the names only in an editorial fashion and to the benefit of the trademark owner, with no intention of infringement
of the trademark.
Distributed to the book trade worldwide by Springer-Verlag New York, Inc., 233 Spring Street, 6th Floor, New York, NY 10013. Phone 1-800-SPRINGER, fax 201-348-4505, [email protected], or visitwww.springeronline.com. For information on translations, please contact Apress directly at 2855 Telegraph Avenue, Suite 600, Berkeley, CA 94705.
Phone 510-549-5930, fax 510-549-5939, [email protected], or visitwww.apress.com.
Apress and friends of ED books may be purchased in bulk for academic, corporate, or promotional use. eBook versions and licenses are also available for most titles. For more information, reference our Special Bulk Sales–eBook Licensing web page at
http://www.apress.com/info/bulksales.
The information in this book is distributed on an “as is” basis, without warranty. Although every precaution has been taken in the preparation of this work, neither the author(s) nor Apress shall have any liability to any person or entity with respect to any
loss or damage caused or alleged to be caused directly or indirectly by the information contained in this work. The source code for this book is freely available to readers atwww.friendsofed.comin the Downloads section.
Before we move into our main project for this book, we still have another very important topic to cover—testing.
There’s no way to deny that testing your code is considered a core value of the Ruby and the Ruby on Rails communities. For example, in order to even file a bug report for the Rails source, it’s required that you submit a test demonstrating the failure. Also if you ever attempt to obtain a full-time position developing in Ruby or Rails, you’d be hard-pressed to make it through a job interview without being asked about your commitment to testing, and finally there are even some extreme (and vocal) people within the community that claim that you’re not a real programmer unless you’re writing tests.
Yet even with such a solid emphasis on the importance of tests, many of the current books that teach Ruby or Rails forgo any discussion of the topic at all. Why? Well for one, testing can often be viewed as a more complex subject better suited to inter-mediate or advanced books than for beginning books. Second, covering tests typi-cally takes up a lot more room (after all, each line of code may require several lines of test code) thus it can disrupt the process of learning a language to keep inter-rupting the code to introduce a test (plus it could turn a 500-page book into a 1,500-page book pretty quickly).
But testing your Rails code is extremely important, so I wanted at the very least to provide you with a good introduction to testing that can help you to both see the value of testing and understand the basics of how to do it yourself, as I steer you down what I believe is the best possible path for you to learn testing.
What is testing?
Obviously, if you’re coming from a programming environment where testing wasn’t emphasized, the first question that we need to answer is just what does it mean to test our code? Isn’t it enough that it works once we type it in? Testing does sound like an awfully scary word, most likely bringing back memories from your educational days.
But would you be surprised to find out that you’ve already been doing a form of testing? In fact, every time we’ve booted up a web browser to see the effects of code that we’ve added or changed, we have in fact been testing our software. Yep, that would be considered testing our code, albeit in a purely manual and inefficient way. All a test does is provide some simple verification that our application yields the results that we expect. See? That’s not so scary.
When we talk about creating tests for our code, what we’re actually doing is working to automate that process for us. We write code that tests our application code. This test code pokes and prods at all the various levels of our application ensuring that it always provides us with the results that we expect.
Why should we test?
I’m sure at least some of you reading this are already thinking to yourself things like, “Why go through all that work when I can see that my application is working correctly?” Or, “I’m already on a deadline to get this code finished on time, wouldn’t writing tests slow me down even further (after all, we’re talking about potentially writing twice as much code)?”
At least I know those were the kinds of thoughts that I had in the past whenever I heard someone talk about writing test code. So let’s talk about those thoughts.
Is it enough to see that your application is working correctly?
I bet you expected me to come right in here and say “No” didn’t you? Well, a lot of Rails developers would say that and disagree with my next statement, but personally, I say, “It depends.”
That’s right; “it depends.” I think that it depends on the scope of the application that you’re creating, its complexity (or lack thereof), and it’s potential to change over time. If all you’re building is a simple web form that will be used only for a single event and will e-mail any data that’s submitted to it to a single e-mail address, perhaps you don’t need to go through the hassle of writing tests (of course, I would also add that using a full-featured web framework like Rails is a bit overkill for such a simple task).
As your application grows, it’s going to become harder and harder for you to simply click around the application and be sure that you have verified every part of it is working. Writing automated tests allows you to ensure that all parts of your application are working correctly, which is very important because often the most annoying bugs are the ones that crop up after a small change was made in one place that ended up having unintended consequences in a completely separate part of the appli-cation.
Also, any application that’s going to be used over a long period of time will almost certainly need to change and adapt at some point in its life cycle. I can’t even begin to count the applications that I’ve written where I said, “There’s no way that this application will ever need to change”—only to be on the receiving end of a series of change requests to it later down the road. People change; business needs change; and thus given a long enough period of time, even the simplest application will need to change as well. Writing tests for our applications not only helps protect us from unintended conse-quences as we implement new features and changes to the application later on, but they also serve as an ultimate form of documentation for the application. If you ever have to make changes to an appli-cation that you wrote three years earlier (or worse, that someone else wrote), you’re not going to be stuck simply digging through their application code trying to figure out how it works, nor will you be stuck reading through some sloppy documentation manual that was written to appease a manager. instead, you’ll have a complete set of concrete examples of how the application is supposed to func-tion. You can see from the tests that when method X is called the application expects to get a result Y, and that is an incredibly powerful advantage to have.
Won’t writing tests slow me down?
When you think about this question logically it makes perfect sense, doesn’t it? I’m writing more code, therefore it must take me longer to finish the application. Strangely, however, that is often not the case. Don’t get me wrong; as you first start learning, writing tests is going to take more effort and will slow you down. However, once you make it past that first hurdle and start to understand the syntax and the process of writing tests, you’ll often find that your applications are being completed in less time. How is that possible?
Well, for one, writing tests allows you to write better code. The time you’re spending writing tests allows you to reflect more about the quality of the code that you’ve written. Writing tests causes you to think more about your code and allows you to identify gaps in your logic that you might have missed otherwise. It also forces you to think more about catching invalid data in your application code that you might otherwise have missed.
Second, writing tests gives you a greater level of confidence about the code that you write. Because the code you write is known to pass the tests that define what the application is supposed to do, it removes lingering doubts about the code that you’ve written and allows you to move forward faster.
When do we need to write tests?
All those benefits sound good? Well, to gain all those benefits requires that we change our methodol-ogy for writing code. We’ll have to adopt a popular methodolmethodol-ogy called test-first development. This means that rather than simply creating our Rails application and then (hopefully) writing a series of test code once the application is completed, we work in reverse. We start by first writing a test for the feature or functionality that we want, which of course will fail, as there is no code in our application to support it. It’s only then that we write the code necessary to make that test pass.
According to test-first development, you should only write code that fixes a failing test.
An alternative expression that you’ll hear to describe this method of coding is Red-Green-Refactor, which is simply an expression that describes the colors that most test suites will use to display tests. We start by writing a test that will fail (commonly displayed in red). Next, we write enough code to make our test pass (commonly displayed as green). From there, we can continue to refactor (or refine) our code to optimize it.
Writing tests first sounds a little crazy, doesn’t it? Unfortunately, there’s not a single argument or point I can provide to help make it sound better. It’s one of those things that you have to do for a while yourself before it clicks. You’ll begin to see the benefits of this approach as we move through the chapter.
Introducing testing
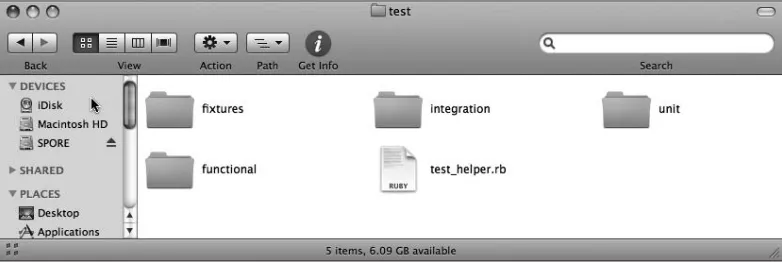
Rails makes getting started with automated testing incredibly easy, as it not only automatically creates a folder to hold your test suite (/test), but when you use the generators to create your components, Rails also creates empty test stubs within that /testdirectory for you. To see this in action, go ahead and reopen our plugins project from the last chapter, and let’s look at what was created for us in
/test, as shown in Figure 10-1.
Figure 10-1.The contents of our test directory
Without us doing a single thing, Rails created a number of things for us.
data.” Looking within this directory, you’ll see that it currently has two files: one for each model that we created for this project, each with a simple set of sample data in YAML format. The idea of fixtures in Rails is that you would edit these files with your own specific sample data, and then this data would be loaded into the test environment database before each test was executed.
Second, we were provided with a set of three folders for holding the three types of testing that Rails supports by default: unit, functional, and integration. Let’s take a (very) brief look at each of these:
Unit tests are the most basic of the built-in tests and are used for testing the code in our models. Using unit tests, we create a series of methods that will be run to test our models’ methods, valida-tions, and other logic using a series of assertions. For example, to test that a new model is invalid if its attributes are empty, we might write a test that looks like this:
def test_invalid_with_empty_attributes
Functional tests are the next type of test that is included with Rails, and they are used for testing our controller actions and their associated views. For example, a functional test that could be used to ensure that an indexaction redirects to a special page if the user is not logged in might look like this:
def test_show_without_logged_in_user get :show
assert_redirected_to :action => "signup"
assert_equal "Must create an account to view this page", ➥
flash[:notice] end
The final type of testing that’s built into Rails is called integration testing and is a way of combining both unit tests and multiple functional tests into a single test that is used to test an entire process flow or story. In integration tests, we can follow the flow of a user experience across multiple controllers and actions, ensuring that an entire process works rather than just each individual component.
def test_signing_up _new_user User.delete_all
get :show
assert_redirected_to :action => "signup"
assert_equal "Must create an account to view this page", ➥
:password => "EVE" } assert_redirected_to :action => "index" end
In this test, we ensure that the entire sign-up process is working the way that we would expect. We start by ensuring that our test database is completely empty of any previous users before making a request to view the showtemplate. Because we shouldn’t be able to see that page without a user account, we then verify that our request was redirected to the signuppage instead and verify that a flash message was set for our redirect. Next, we test that when a sign-up form was submitted with valid attributes that our request was then redirected to the indexaction. So you can see that we were able to test the entire spectrum of a Rails request, and in essence, we built a test around a small user experience.
These testing tools are powerful and well worth your time to learn, however, they all suffer from a couple of key issues. For one, the tests you create tend to be very tightly coupled with the implemen-tation code that you create—to the point that even a small change in your code will often also require a change to your test. A second issue is that these tests look and feel like code and are far removed from the way that our customers would write their requirements (at least, I’ve never met any cus-tomers that say things like “assert true”), so we’re forced to do a lot of interpretation and translation of business requirements into test code, which means that our interpretation of the requirements into a test may not always be correct. These two issues mean that any tests that we create tend to be fur-ther removed from the business requirements of the application.
Wouldn’t it be ideal if, instead of merely testing that our functions worked the way that we coded them, our tests were more focused on whether our application meets the business requirements? That way, how we implemented a solution would be less important than whether the implementation pro-vided the correct results. And wouldn’t it be even more ideal if our actual tests could be written using language that is similar to the language that’s used to provide us with our project requirements?
It was for these exact reasons that Behavior-Driven Development (BDD) was created. BDD is designed not to be a replacement to the test-first development model but to be an evolution from it. However in BDD, one of the primary emphases is on getting the words right, so that everyone involved with the project (e.g., business owners, developers, and testers) are not only on the same page but are also using the same language to minimize miscommunications and misinterpretations.
This emphasis is a lot more than simple verbiage though; it’s about getting the words right so that we can move the focus back onto what the application shouldbe doing, not simply what’s it’s been coded to do. If you’re interested in learning more of the philosophies behind BDD, you can read more about them at the official web site at http://behaviour-driven.org.
Introducing RSpec
RSpec is a BDD framework for Ruby that has taken the Ruby world by storm. Even though it’s not built into Rails (yet), a large and ever-growing number of Rails developers have converted to using RSpec as their test framework of choice. You can find documentation and more information about RSpec at
http://rspec.info/. Its current implementation (at the time of this writing) is composed of two dif-ferent testing systems: a story runner framework that allows you to craft plain-text user stories as your tests as a form of integration testing (i.e., tests that cover the full gamut of the request/response cycle: routes, controllers, models, and views) and a spec (or specification) testing framework that’s designed for testing each of the individual objects within our applications in isolation.
RSpec stories
RSpec stories tend to follow a narrative process of describing your desired actions. Let’s take a quick look at one from the RSpec story runner documentation:
Story: transfer from savings to checking account As a savings account holder
I want to transfer money from my savings account to my checking ➥
account
So that I can get cash easily from an ATM Scenario: savings account has sufficient funds
Given my savings account balance is $100 And my checking account balance is $10 When I transfer $20 from savings to checking Then my savings account balance should be $80 And my checking account balance should be $30 Scenario: savings account has insufficient funds
Given my savings account balance is $50 And my checking account balance is $10 When I transfer $60 from savings to checking Then my savings account balance should be $50 And my checking account balance should be $10
Believe it or not, that plain-text description right there is executed as a test within the story runner framework. Within these stories, we do a basic story set-up that always follows this format:
As a {ROLE}
I want {FEATURE or ACTION} So that {GOAL}
Well, the downside to all this power is that RSpec stories can be a bit complicated to set up correctly, and thus they are a topic that currently is intended for advanced developers. Setting up story runner tests is too complicated for our purposes in a foundation book, so we’ll focus instead on the other set of tests within RSpec—the spec framework, which will actually be a far more useful tool for you. However, if after learning the spec framework, you want to keep going and learn the story framework, I highly recommend getting the Peepcode screencast on “Rpsec User Stories” that’s available at
http://peepcode.com/products/rspec-user-stories.
RSpec specs
As we discussed earlier, if we were using the default Test::Unit framework that’s included with Rails, the natural flow of testing is that we tend to write tests for each method within our application. The downfall with this is that our tests then begin to simply represent our code and not the requirements of the application (i.e., our tests become focused on our implementation and not the purpose of our code).
Using RSpec, we move away from that temptation as our emphasis moves towards writing specifica-tions (or specs) rather than simply writing tests. These specs serve to replace the implementation spe-cific tests that we used to write and are much clearer, far more readable, and less coupled to our specific code. At its simplest definition, a spec can be thought of as merely a description of all the various behaviors that we can expect from an object given different conditions.
The best way to understand what I mean is to see some actual specs, so let’s look at a few sample ones. Imagine that we wanted to write a Pirate spec from our pirates application a few chapters back.
We might specify on a piece of paper (or traditionally on a note card) the following specification for a pirate:
A new pirate
should be required to provide a name
We could write that out as a pair of specs like so:
describe Pirate do
it "should be valid with a name" do
@pirate = Pirate.new(:name => 'Jack Sparrow') @pirate.should be_valid
end
it "should require a name" do @pirate = Pirate.new @pirate.should_not be_valid
@pirate.should have(1).error_on(:name) end
end
Let’s take a look at that specification’s code. At its top level, we create a description block using the keyword describe. A description can be stated as an object (as we did here listing the Pirateobject):
Alternatively, we could also have passed it a string like so:
describe "Captain Jack Sparrow" do
or even a combination of the two:
describe Pirate, "named Captain Jack Sparrow" do
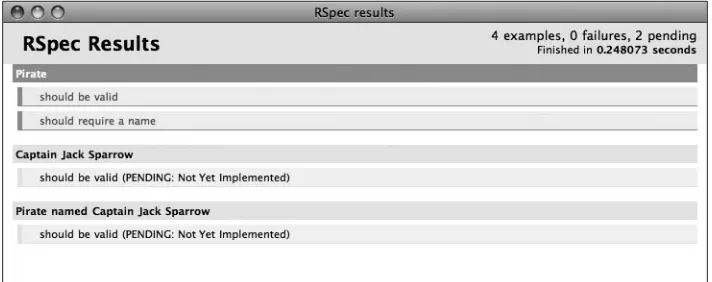
Just for kicks and grins (and to show you pending specs), if I were to combine those three descriptions into a single spec, it would look like this:
describe Pirate do it "should be valid" do
@pirate = Pirate.new(:name => 'Jack Sparrow') @pirate.should be_valid
end
it "should require a name" do @pirate = Pirate.new @pirate.should_not be_valid
@pirate.should have(1).error_on(:name) end
end
describe "Captain Jack Sparrow" do it "should be valid"
end
describe Pirate, " named Captain Jack Sparrow" do it "should be valid"
end
We could then run our specs from the command line with a rake speccommand, or if you’re using TextMate, you can run the specs from your editor and see HTML output, as shown in Figure 10-2.
You can see the various ways that those description blocks are displayed in that output. Now, once we’re in a describeblock, the tests that we write are called examples, each preceded with a special method named it(which simply represents the object we’re testing). Each call to the itmethod takes a string as an object that represents what we’re wanting to test in this example.
You saw in our earlier examples that we created a simple example to ensure that we were able to create a Piratewhen we provided a name like so:
it "should be valid" do
@pirate = Pirate.new(:name => 'Jack Sparrow') @pirate.should be_valid
end
But did you also notice the ubercoolness that happened when we created an example yet didn’t pass it a block in our extra describe examples? When those tests were executed, they came back as pend-ing or not yet implemented examples! How cool is that? That means we can easily create a whole list of specifications into our test files and get immediate feedback as to our progress at implementing each of them as we add code to make each pass.
Matchers
You probably also noticed that in order for us to test our pirate in our previous spec example, we used lines like @pirate.should be_valid. In fact, when we’re using RSpec, all of our expectations will typ-ically fall into the pattern of saying that some object or attribute shouldor should_notand then have some form of a matcher afterward. In that example, we’re using a matcher by the name of be_valid, which as the name implies, simply checks that our object is valid and has no errors. In addition to
be_valid, RSpec includes a fairly significant number of premade matchers for our use in testing, including these:
be_close: Matches if the actual value is within a specified range of the expected
have_at_least,have_at_most, and have_exactly: Matches using expressions like >=,<=, or == raise_error: Matches if any error is raised
respond_to: Matches if the object responds to the methods passed to it
be_true,be_false,be_nil: Matches on equality to true,false, or nil be_a_kind_of: Matches if the object class is equal to the specified class
We also have a nice set of matchers that are specific to Rails testing that includes these:
have_rjs: Matches if the response includes RJS statements that replace or update content
have_tag: Matches if the specified tag exists in the response
have_text: Matches if the specified text exists in the response
redirect_to: Matches if the response is a redirect to the URL, action, or controller/action
render_template: Matches if the specified template is rendered by the response
All right, enough theory—let’s move on to the basics of building a few specs of your own. The first step to doing that though is to install RSpec into your application.
As a simple example, let’s reopen our plugins application from the previous chapter and add a few RSpec tests to it.
Installing RSpec
RSpec is available in two flavors. There’s a version that we can install systemwide as a Ruby gem using a simple sudo gem install rspeccommand, but this version is really intended for more general-use Ruby programming and not for Rails. To use RSpec with Rails, the preferred method is to install RSpec as a plug-in. To install the plug-in, we’ll install both the RSpec plug-in (which provides our basic RSpec functionality, just like the gem) and the RSpec on Rails plug-in that adds a number of Rails-specific enhancements:
ruby script/plugin install http://rspec.rubyforge.org/svn/tags/➥
CURRENT/rspec
ruby script/plugin install http://rspec.rubyforge.org/svn/tags/➥
CURRENT/rspec_on_rails
Once these RSpec plug-ins are installed into our plugins application, we can use a generator that was added by the RSpec plug-ins to create our initial spec folders:
ruby script/generate rspec
create spec
create spec/spec_helper.rb create spec/spec.opts create previous_failures.txt create script/spec_server create script/spec
Besides this generator, those plug-ins also installed a number of other useful things into our applica-tion, including a number of other generators that we can use to create our models, controllers, and so forth, along with the necessary spec files for each of them. To view the installed generators, you can just run ruby script/generatewithout any additional parameters to see some help information and a list of all installed generators:
ruby script/generate
Usage: script/generate generator [options] [args]
Rails Info:
-v, --version Show the Rails version number and quit. -h, --help Show this help message and quit. General Options:
-p, --pretend Run but do not make any changes. -f, --force Overwrite files that already exist. -s, --skip Skip files that already exist. -q, --quiet Suppress normal output.
-t, --backtrace Debugging: show backtrace on errors. -c, --svn Modify files with subversion. Installed Generators
Plugins: rspec, rspec_controller, rspec_model, rspec_scaffold
User: extjs
Builtin: controller, integration_test, mailer, migration, model, observer, plugin, resource, scaffold, scaffold_resource, session_migration, web_service
You can see that in our list of installed generators, there are now generators installed by the plug-ins named rspec(which we just used) as well as rspec_controller,rspec_model, and rspec_scaffold. These new generators work the same as our normal model,controller, and scaffoldgenerators with the addition that they also build some basic spec files for the resource that’s being generated. When we’re working in a test-first manner, we would always use these rspec_*generators instead of the normal ones.
The RSpec plug-ins also added a large number of new raketasks to our plugins application; we can see just the RSpec tasks by running rake -T specat the command line:
rake -T spec
The most important task in that list is the rake spectask, which we use to run all of our existing specs. If you go ahead and run that task now, you’ll see that it reports, well, nothing because we haven’t cre-ated any specs yet.
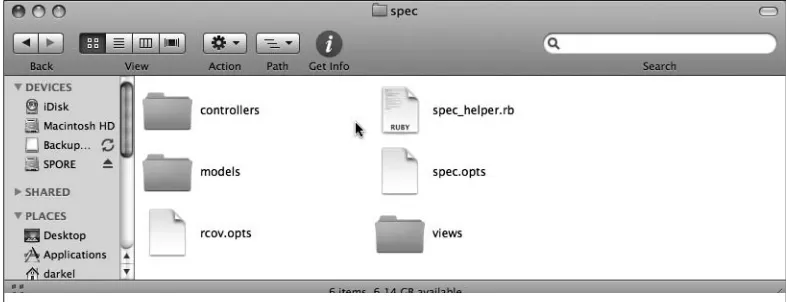
To fix that, we’ll first need to manually create a few subdirectories within the /specdirectory to hold our different specs. Normally, these directories would be created for us when we ran the rspec_* gen-erators, but since we’re trying to go back and add these specs onto an existing application, we’ll need to create the folders manually. Within /spec, create three new directories named controllers,
models, and views. Afterward, the content of your /specdirectory should look like Figure 10-3.
Figure 10-3.Our spec folder with our new subdirectories added
Now that we have RSpec installed into our application and we’ve created the appropriate places to add our specs, let’s add a few to get a feel for it.
Adding model specs
As you recall, the first model we created in our plugins application was the Categorymodel, which we used to build the categories that each plug-in could be associated to. Looking at /app/models/ category.rb, we can see that the current implementation of our model looks like this:
class Category < ActiveRecord::Base validates_presence_of :name
validates_length_of :name, :within => 2..30 has_many :plugins
end
If we were to try and put this into a specification, we might have written it out like this:
A category
should have a name
Let’s go through the process of creating some specs for this model and to make it slightly more inter-esting (and to get a feel for the test first process)—go ahead and comment out or remove the valida-tion and associavalida-tion methods from the Comment model—that way, we can actually see the Red-Green-Refactor process in action. To convert our specification into a test for RSpec, we’ll first need to create a file to hold our examples. Create a new file named category_spec.rbin /spec/mod-els, and place the following line of code in it:
require File.dirname(__FILE__) + '/../spec_helper'
This line simply includes the spec_helper.rbfile from /spec, which contains some basic configuration stuff for our tests. We won’t be making any modifications to that file in this book, but it wouldn’t hurt for you to read through that file to see the defaults that have been set for you. In fact, all of our spec tests will need to include this file.
Go ahead and save this file, and run rake specagain. You can see that it detects our new spec file (even though there aren’t any examples in it yet):
rake spec
Finished in 0.012287 seconds 0 examples, 0 failures
Now let’s define what we want to test in our category_spec.rbfile:
require File.dirname(__FILE__) + '/../spec_helper'
describe Category do end
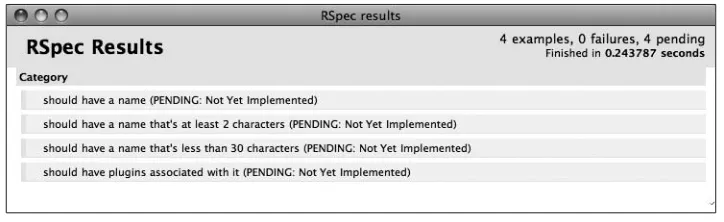
And then we’ll go back and add some pending examples to the description:
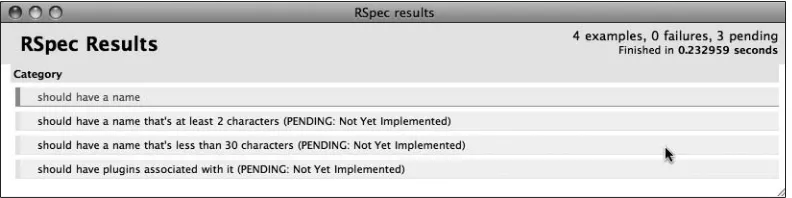
require File.dirname(__FILE__) + '/../spec_helper' describe Category do
it "should have a name"
it "should have a name that's at least 2 characters"
it "should have a name that's less than 30 characters"
it "should have plugins associated with it"
end
rake spec
PPPP Pending:
Category should have plugins associated with it (Not Yet Implemented) Category should have a name that's less than 30 characters (Not Yet ➥
Implemented)
Category should have a name that's at least 2 characters (Not Yet ➥
Implemented)
Category should have a name (Not Yet Implemented) Finished in 0.229728 seconds
4 examples, 0 failures, 4 pending
Or if your text editor will run the specs, you can run your specs from there and get a nice HTML-formatted version like the one I get from TextMate on the Mac (see Figure 10-4).
Figure 10-4.Pending examples for our Category model
For the rest of this chapter, I’ll be displaying the HTML-formatted test results, but the information will be the same as the ones you’re getting if you’re simply running the rake speccommand line task. Let’s go ahead and implement our first example for testing that a category must have a name. To do that, we simply need to create a new category without providing a name, and then test that the result-ing object is not valid (i.e., an error was raised on it). Our example code should look like this:
it "should have a name" do @category = Category.new @category.should_not be_valid end
Figure 10-5.Our first spec has gone red to indicate a failure.
The easiest way to make this pass is to simply add some code to our Category model that will raise an error if a name is not provided. Therefore, go ahead and uncomment the following line from
/app/models/category.rb:
validates_presence_of :name
Save your Comment model, and then rerun our specs again. You’ll see that our first example now passes, because we’ve added the relevant code back into our model (see Figure 10-6).
Figure 10-6.Our spec is back to green.
Now, let’s go on to our second and third examples (since they are just flip-sides of the same coin). For these, we want to create some categories that have names that are too short and too long and ensure that they are invalid as well:
it "should have a name that's at least 2 characters" do @category = Category.new(:name => "a")
it "should have a name that's less than 30 characters" do
@category = Category.new(:name => "I am a crazy long name that ➥
should fail")
@category.should_not be_valid end
Once you add these two specs, our tests should once again fail until we go back to our Category model and uncomment the validates_length_of :name, :within => 2..30line. Our model should now look like this:
class Category < ActiveRecord::Base validates_presence_of :name
validates_length_of :name, :within => 2..30
# has_many :plugins end
Once you uncomment that line and rerun the tests, you’ll see that we’re back to green once again. See, I told you that writing specs is pretty easy, didn’t I?
The last spec that we need to write for our Category model is the one to indicate that we have set up an association from this model to the Plugin model. The best approach for speccing this out is a sub-ject that is often debated. Some even argue that we shouldn’t write specs for association logic, since that’s a core part of the Rails framework and thus we should be able to simply trust that it will work as advertised.
I personally fall a bit more into the middle of the road in the discussion, preferring to write a bare minimum spec of the functionality, merely to ensure that it is there but avoid testing the specifics of how it should work:
it "should have plugins associated with it" do
@category = Category.new(:name => 'Sample Category') @category.should have(:no).plugins
@category.plugins.build(:name => 'Test', :description => 'Test', ➥
:url => 'www.test.com') @category.should have(1).plugin
end
For these purposes, I write a spec that first ensures that after we created a new Category, it had no plug-ins associated to it. Then I simply create a new plug-in on top of my new category with the build
Figure 10-7.Testing for our association methods with a failing test
We make this test pass by simply adding our association logic back to the Category model. Afterward, our Category model should look like this:
class Category < ActiveRecord::Base validates_presence_of :name
validates_length_of :name, :within => 2..30
has_many :plugins
end
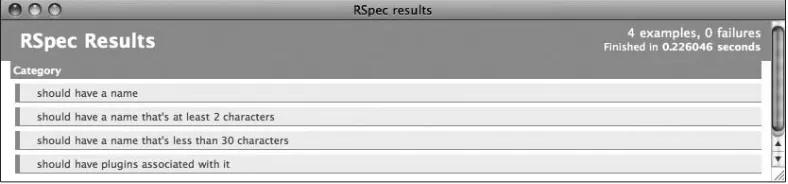
And running our tests again confirms that they are now passing once again (see Figure 10-8).
Figure 10-8.All our specs are passing.
We’re at a good point for our model specs, as we’ve now tested each line of code in our Category model. Our final category_spec.rblooks like this:
require File.dirname(__FILE__) + '/../spec_helper' describe Category do
it "should have a name" do @category = Category.new @category.should_not be_valid end
@category.should_not be_valid end
it "should have a name that's less than 30 characters" do
@category = Category.new(:name => "I am a crazy long name that ➥
should fail")
@category.should_not be_valid end
it "should have plugins associated with it" do
@category = Category.new(:name => 'Sample Category') @category.should have(:no).plugins
@category.plugins.build(:name => 'Test', :description => 'Test',➥
:url => 'www.test.com') @category.should have(1).plugins
end end
Things are good, but they could always be better. Before we move on to looking at how we can use RSpec to test our controllers and our views, let’s look at a couple of ways that we can improve our current model spec.
Adding a before block to DRY up our specs
The first thing we can do to improve our specs is to eliminate duplication from each of our examples. The easiest way to do that is to take advantage of a feature within our specs of creating a beforeblock that contains code that will be common to all tests. A beforeblock in our specs is much like a
before_filterin our controllers in that it allows us to define a block of code that will be executed before each example is run.
You’ll notice that in our current spec examples, we start out each one by first creating a category. Let’s add a beforeblock that sets up a standard @categoryvariable for all of our examples:
require File.dirname(__FILE__) + '/../spec_helper' describe Category do
before do
@category = Category.new(:name => 'Sample Category') end
it "should have a name" do
(excerpted)
If you’re really observant, you might have noticed that the @categorywe’ve created in our before
block is a valid Category, but many of the examples we created previously were dependent on having an invalid Category, such as having a Categorywith a name that was too long. To get around this, we’ll obviously need to modify each of those examples slightly, so our category_spec.rbwill look like this after our modifications:
require File.dirname(__FILE__) + '/../spec_helper' describe Category do
before(:each) do
@category = Category.new(:name => 'Sample Category') end
it "should have a name" do
@category.name = ''
@category.should_not be_valid end
it "should have a name that's at least 2 characters" do
@category.name = "a"
@category.should_not be_valid end
it "should have a name that's less than 30 characters" do
@category.name = "I am a crazy long name that should fail"
@category.should_not be_valid end
it "should have plugins associated with it" do @category.should have(:no).plugins
@category.plugins.build(:name => 'Test', :description => 'Test', :url => 'www.test.com') @category.should have(1).plugin
end end
In our preceding examples, we create a single @categoryvariable in the beforeblock. Then in each of our examples, you can see that we can simply adjust the values associated with that @categoryto make them suitable.
Removing redundancy
The next enhancement we want to perform here is actually more of a cleanup of our model than a modification to our spec tests. If you notice our current validation logic in the Category model, you can see that we have two sets of validations on the name attribute. We ensure that the nameattribute isn’t blank and that it’s lengthis between 2 and 30 characters. However, this introduces a minor prob-lem to our validations in that it’s possible for one error to trigger errors from two validation rules. To see that, let’s add some more specs to our examples:
describe Category do before(:each) do
@category = Category.new(:name => 'Sample Category') end
it "should have a name" do @category.name = ''
@category.should_not be_valid
@category.should have(1).error_on(:name)
end
it "should have a name that's at least 2 characters" do @category.name = "a"
@category.should_not be_valid
@category.should have(1).error_on(:name)
end
it "should have a name that's less than 30 characters" do @category.name = "I am a crazy long name that should fail" @category.should_not be_valid
@category.should have(1).error_on(:name)
end
it "should have plugins associated with it" do @category.should have(:no).plugins
@category.plugins.build(:name => 'Test', :description => 'Test', :url => 'www.test.com') @category.should have(1).plugin
end end
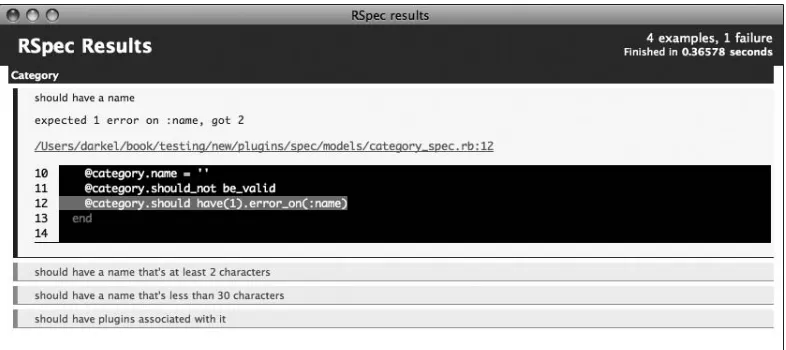
Figure 10-9.RSpec tests showing a problem with our validations
Here, our validation for the presence of a nameattribute is actually getting two errors, which makes sense when you really think about it—if a plug-in is submitted without a name, it’s also less than two characters. In fact, if we remove the validates_presence_ofmethod call from our model, we leave our model looking like this:
class Category < ActiveRecord::Base # validates_presence_of :name
validates_length_of :name, :within => 2..30 has_many :plugins
end
You’ll see that rerunning our tests gives us the passing result shown in Figure 10-10.
Figure 10-10.Specs pass after removing an unnecessary validation
Adding controller specs
The next area of testing with RSpec that we’ll look at is how to build RSpec tests for the code in our controllers. You’ll recall from our previous discussions of controllers and views that the two are very tightly bound together. So much so, in fact, that the standard Rails tests have no means for testing the two separately; instead, testing of both is done in the functional tests. However, using RSpec, the default is to test controllers in isolation from our views. Personally, I find it preferable to test con-trollers and views separately, so you don’t have to worry about your controller tests failing just because you make minor changes to your views. However, if you want to override this feature, you can by adding the method integrate_viewsto your controller specs.
Mocking models
In addition to isolating our view tests from our controller tests, we also want to ensure that when we’re writing specs for our controllers, we’re focused solely on testing the code in the controllers. Maintaining this focus can be difficult at times, though, because of the fact that controllers are also going to be constantly touching our models. The challenge, of course, is figuring out how to test the controller code to find or create the Plugins model, without actually touching the data in the data-base. The answer is to utilize RSpec’s mocking and stubbing features to bypass the need to touch the database.
Mocks are essentially imitation objects that we can use to simulate our models and validate what interactions they took part in. Anytime we want to test controller code that uses our Plugin or Category models, we create mocks of those models. Creating a mock is incredibly easy and is simply a matter of adding a method call to the mockmethod. So we could create a simple mock of our Plugin model like this:
@plugin = mock('Plugin')
Stubs are another form of imitation, but rather than imitating an object, they allow us to simulate methods by replacing them with canned responses. In the preceding example, we specified that the
@pluginvariable should be used to imitate the Plugin model. To use this mock within our application, we would need to stub the newmethod of the Plugin model so that when it’s called, it returns our mock object instead of a real Plugin object. Doing so looks like this:
Plugin.stub!(:new).and_return(@plugin)
With this stub in place, any calls to Plugin.newwould return our @pluginmock object instead of an ActiveRecord object.
Of course, since we’re using RSpec with Rails, most of our mocks and stubs are going to be of ActiveRecord objects. This could be a little burdensome, as there are a standard set of internal meth-ods in ActiveRecord objects that are often called implicitly as we interact with the object such as id
(to return the ID of the object), new_record?(to determine if it’s an existing record or a newly created one), and several others. In order for our mocks of an ActiveRecord object to work correctly, we would also need to stub out all these internal methods.
Or we could just use a specialized version of the mock that the RSpec on Rails plug-in gives us named
mock_model, which wraps our standard mock method with a predefined set of default stubs config-ured for ActiveRecord objects. Converting our previous mock to a mock_modelwould be as simple as changing its code to use mock_modelinstead:
@plugin = mock_model(Plugin)
You’ll be using the mock_modelmethod extensively as we test controller actions. In fact, let’s see how we use mocking as we build out some basic specs for our plugins controller.
To begin with, we’ll first need to create a new spec file in /spec/controllersthat has the same name as our controller and is appended with _spec.rb. Create a new file named plugins_controller_ spec.rbin /spec/controllers, and within it, place our requireto the spec_helper.rb(just as we did before with the model specs):
require File.dirname(__FILE__) + '/../spec_helper'
With this basic configuration in place, we can build specs for a pair of our controller actions.
Testing the index action
The first action we’ll spec out for our examples is the indexaction, which as you should recall simply pulls a list of all available plug-ins from the database and then renders the index.html.erbtemplate to display them (for our examples in this chapter, we’ll ignore testing the XML-formatted responses of our controller actions). The code for this action lives in /app/controllers/plugins_controller.rb
and looks like this:
def index
@plugins = Plugin.find(:all) respond_to do |format|
format.html # index.html.erb
format.xml { render :xml => @plugins } end
end
To write a spec for this action, we’ll first need to create a describe block that details what we’re testing for:
describe PluginsController, " GET to /plugins" do end
accessed. However, it’s important to remember that these descriptions are really for your own bene-fit, so if you prefer to describe the test as something like “testing index action,” that’s perfectly acceptable as well.
Now that we have our description block started, it’s simply a matter of creating a few examples that describe what we expect from this controller action:
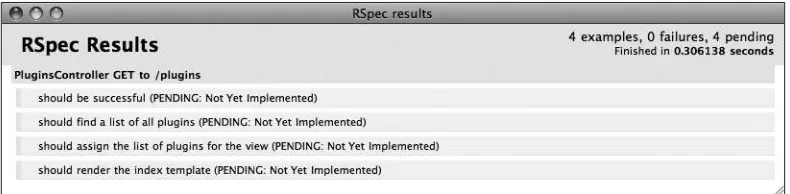
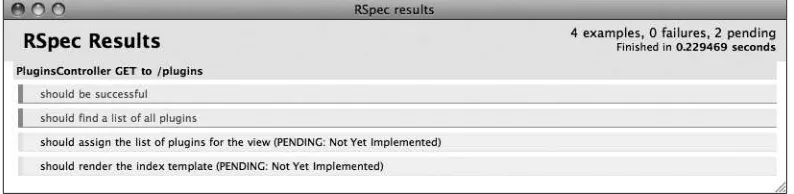
describe PluginsController, " GET to /plugins" do
it "should be successful"
it "should find a list of all plugins"
it "should assign the list of plugins for the view"
it "should render the index template"
end
For my examples, I broke down my expectations into a few key things that I want to test for. First, I expect that simply calling this action doesn’t return an error, so I created an expectation that it
"should be successful"to capture that. Next, I want to test that the code is going to gather a list of all plug-ins, so I created an expectation that it "should find a list of all plugins". Besides just gathering that collection of plug-ins, I want to ensure that the code has made that collection available to the view by assigning it to an instance variable, so I created an expectation that it "should assign the list of plugins for the view". Finally, I want to ensure that this code is rendering the correct display template, so I added an expectation that it "should render the index template". If you look through the code in our controller action, you should see that these expectations pretty much match up with what we can see the code doing.
Since we want to isolate these controller tests from touching our database, it makes sense that we’ll need to mock our Plugin model, and since we’re going to want this mocked object available to all of our examples, we’ll place the creation of this mock in a beforeblock. In addition, looking at the code in our controller, we can see that we’re calling the findmethod on the Plugin model, so we’ll also need to stub that method as well.
describe PluginsController, " GET to /plugins" do
before do
@plugin = mock_model(Plugin)
Plugin.stub!(:find).and_return([@plugin]) end
it "should be successful"
it "should find a list of all plugins"
it "should assign the list of plugins for the view" it "should render the index template"
In the code we added, we used the mock_modelmethod to mock out our Plugin ActiveRecord model, and we created a stub for the findmethod on the Plugin model and set it to return our Plugin mock instead. Running our specs now gives us the result that you can see in Figure 10-11.
Figure 10-11.Pending specification for our index action
We’ll start by fleshing out our most basic expectation—that calling our action should result in success and not error. To retrieve a controller action in RSpec, we have methods available to us named get
and postthat simulate an HTTP request. The getmethod is the one we want here, and we’d use it in this example like so:
it "should be successful" do get :index
response.should be_success end
Here, we simulated a GETrequest to the indexaction in our plugins controller and then set an expec-tation that the response of this action should return a success (technically, this equated to ensuring that the response returned an HTTP response of 200 OK). You can run our specs now and see that this example is now passing.
Our next expectation is to test that we are doing a database search for all available plug-ins within this action. In our beforeblock, we created a stub for this findmethod, but here in our test is where we actually ensure that it was called. We can also ensure that our findmethod was called in the way that we expected (with the :allparameter) and that it returns the response that we want:
it "should find a list of all plugins" do
Plugin.should_receive(:find).with(:all).and_return([@plugin]) get :index
end
Figure 10-12.Halfway done with the specs for our index action
Let’s see what it looks like to finish out the remainder of our examples for this action:
describe PluginsController, " GET to /plugins" do before do
@plugin = mock_model(Plugin)
Plugin.stub!(:find).and_return([@plugin]) end
it "should be successful" do get :index
response.should be_success end
it "should find a list of all plugins" do
Plugin.should_receive(:find).with(:all).and_return(@plugin) get :index
end
it "should assign the list of plugins for the view" do get :index
assigns[:plugins].should == [@plugin] end
it "should render the index template" do get :index
response.should render_template('index') end
end
Our final two examples followed the same pattern: in both we used our getmethod to once again retrieve the indexaction, and we set a simple expectation for each. For the first example, we checked that the @pluginobject that was mocked earlier had been assigned to the @pluginsinstance variable. In the second example, we simply tested that our action rendered the index template using the
Testing the create action
To round things out for our introduction to testing controller actions using RSpec, let’s also take a look at a different action that uses an HTTP POST to access it instead of a simple GET. The most obvi-ous example would be the createaction, as it’s an action that we expect to receive a number of parameters along with the request that would then be used to create a new plug-in object.
To do this we’ll create a new describeblock within our spec like so:
require File.dirname(__FILE__) + '/../spec_helper' describe PluginsController, " GET to /plugins" do
before do
@plugin = mock_model(Plugin)
Plugin.stub!(:find).and_return([@plugin]) end
it "should be successful" do get :index
response.should be_success end
it "should find a list of all plugins" do
Plugin.should_receive(:find).with(:all).and_return(@plugin) get :index
end
it "should assign the list of plugins for the view" do get :index
assigns[:plugins].should == [@plugin] end
it "should render the index template" do get :index
response.should render_template('index') end
end
describe PluginsController, " POST to /plugins " do end
def create
@plugin = Plugin.new(params[:plugin]) respond_to do |format|
if @plugin.save
flash[:notice] = 'Plugin was successfully created.' format.html { redirect_to(@plugin) }
format.xml { render :xml => @plugin, :status => :created,➥
:location => @plugin } else
format.html { render :action => "new" } format.xml { render :xml => @plugin.errors,
:status => :unprocessable_entity } end
end end
Once again, we’ll be concentrating only on the HTML format response for our introduction, yet even with that limitation, you can see that we have an interesting new problem with this action—multiple responses. In the action, we attempt to create a new pluginobject based on the parameters that we receive in the request. If we successfully create the pluginobject, we want to redirect the request to the showaction. However if the save fails, we want to redisplay the new template. The way I like to handle this type of situation is to describe both paths as subdescriptions like so:
describe PluginsController, " POST to /plugins " do
describe "success path" do end
describe "failure path" do end
end
This allows us to test both possible paths in a nice logical process. Let’s use our understanding of what we expect to occur in each of these paths to add some pending expectations to each:
describe PluginsController, " POST to /plugins " do describe "success path" do
it "should create a new plugin"
it "should redirect to the show template"
it "should populate the flash message"
end
describe "failure path" do
it "should redisplay the new template"
it "should not populate the flash message"
Running our controller specs at this point gives us the result that you can see in Figure 10-13.
Figure 10-13.Added pending examples to our create action specs
We can see that whichever path we go down, we’re going to need to have a mock of our Plugin model again, and since we’re creating a new plug-in this time, we’ll want to stub the newmethod this time. Let’s add that mocking code into a beforeblock that can be shared between both paths like so:
describe PluginsController, " POST to /plugins " do
before do
@plugin = mock_model(Plugin)
Plugin.stub!(:new).and_return(@plugin) end
describe "success path" do it "should create a new plugin"
it "should redirect to the show template" it "should populate the flash message" end
describe "failure path" do
it "should redisplay the new template" it "should not populate the flash message" end
end
The next thing that we want to tackle is setting up each of our individual paths to return trueor false
do this. For one, we could explicitly set some valid or invalid parameters that would be received into the action like so:
describe PluginsController, " POST to /plugins " do before do
In this way, we’re able to explicitly test the controller action in exactly the same way that it would be used in real life. However, I don’t like this approach, because it introduces more complexity into our tests and removes some of our isolation. Instead, I prefer to explicitly set the expectation for what should be returned in both paths. We can do that by adding an additional beforeblock to each path:
describe PluginsController, " POST to /plugins " do before do
it "should create a new plugin"
it "should redirect to the show template" it "should populate the flash message" end
describe "failure path" do
before do
@plugin.should_receive(:save).and_return(false) end
it "should redisplay the new template" it "should not populate the flash message" end
Here, we set the expectation for each of our paths to determine what the response should be when
saveis called. In this way, we’re able to test each path easily, cleanly, and most importantly in isolation. Let’s see what it looks like when we fill out our examples for the success path:
describe "success path" do before do
@plugin.should_receive(:save).and_return(true) end
it "should create a new plugin" do
Plugin.should_receive(:new).with(anything()).and_return(@plugin) post :create
end
it "should redirect to the show template" do post :create
response.should redirect_to(plugin_url(@plugin)) end
it "should populate the flash message" do post :create
flash[:notice].should == ('Plugin was successfully created.') end
end
After running our specs, you can see in Figure 10-14 that they are now passing.
To ensure in our example that our createaction should create a new pluginobject, we set the expec-tation on the new method to ensure that it would return our @plugin mock using the line
Plugin.should_receive(:new).with(anything()).and_return(@plugin). Next, to simulate a request, we used the post method to the createaction with the post :createmethod.
To test that we redirected to the showaction, we set the expectation on our response that it would redirect to the named path plugin_url using the line response.should redirect_to(plugin_ url(@plugin)).
Finally, we also set a quick test for our flash notice that it was populated with the correct message that we expected using the line flash[:notice].should eql('Plugin was successfully created.'). And with that, we’ve finished building our specs for the success path. From here, we can move onto testing the failure path, which should be just as easy. We’ll simply make a call to post :createin each example and set some basic expectations using the predefined matchers to test the result.
In fact, it’s so easy, we’ll just skip ahead again to the finished result:
describe "failure path" do before do
@plugin.should_receive(:save).and_return(false) end
it "should redisplay the new template" do post :create
response.should render_template(:new) end
it "should not populate the flash message" do post :create
flash[:notice].should be_nil end
end
We simply test that the new template was redisplayed by using the render_templatematcher in the line response.should render_template(:new). Our second example simply tested that the flash notice was never set by ensuring that it is equal to nil with a should be_nilmatcher.
Figure 10-15.Our controller specs are completed.
Adding view specs
The final elements that we’ll want to test from RSpec are our view templates themselves. Since we’re testing our views completely separately from our controllers, we don’t have to worry about things such as how the request was routed to the view or ensuring that the data was set properly. Instead, we can focus on view-specific items such as verifying that certain tags exist within the output.
In fact, our view specs will typically follow a common pattern of us setting up sample data elements for the template, calling the rendermethod, and passing that method the specific template that we want rendered, which will look like this:
render "plugins/index"
Afterward, we’ll set our view expectations, typically testing that the response from our render has cer-tain tags using commands like this:
response.should have_tag("div#welcome")
Believe it or not, that’s really all there is to testing your views. With view testing, focusing only on the most key elements in your layout that are critical to its success is usually best. If you try to get too granular and test every element in the page, you’ll find that your tests become too brittle and have to be updated with every minor change to the templates.
Let’s put together a simple test of the indexaction for our plug-ins as a good sample for testing views using RSpec. Our first step will be to create our spec file to hold our view specs. Within your /specs
this file should start with a require statement for our spec_helper that looks like this: require File.dirname(__FILE__) + '/../../spec_helper'.
Now that we’re within our spec, we can write a simple describeblock for our spec:
require File.dirname(__FILE__) + '/../../spec_helper'
describe "/plugins/index.html.erb" do end
Yeah, I know, it’s not the most creative of descriptions, but it gets the message across of what I’m test-ing. Now, this template has a fairly simple task—just display a list of plug-ins. To test it, all we really need to do is build up some sample data with at least two plug-in objects and test that the template displayed both.
As you might expect, our first task to create the sample data will use a pair of mock_modelcalls within abeforeblock:
You can see in this example that what we’ve done is create two mocks of the Plugin model, each with some sample expectations for what methods should be called and what they should return. You’ll notice that I’ve indicated that the ratingmethod should be called twice in the template. This is because, in the template, we call it once to set the CSS Star display value and once again to output the current rating as text. Other than possible confusion because that method is being called twice, you should be able to easily follow through the rest of the spec code—all the way down to the last line where we take our two mocks and use the assignsmethod to make them available in the examples as @plugins.
plugin_1.should_receive(:rating).twice.and_return("5") plugin_1.should_receive(:description).and_return("MyText") plugin_2 = mock_model(Plugin)
plugin_2.should_receive(:name).and_return("Test 2") plugin_2.should_receive(:rating).twice.and_return("5") plugin_2.should_receive(:description).and_return("MyText") assigns[:plugins] = [plugin_1, plugin_2]
end
it "should dispay our plugin names" do render "/plugins/index.html.erb"
response.should have_tag("dt", "Test 1") response.should have_tag("dt", "Test 2") end
end
Our example simply renders the template and uses the have_tagmatcher to verify that both of our plug-ins showed up in the response. Running this spec gives us the result shown in Figure 10-16.
Figure 10-16.The results of our view specs
Summary
Even in our short little introduction to testing with RSpec, I trust that you’ve been able to get a taste for the power that automated testing can provide us for ensuring that our applications are working the way they should. Not only that, you’ve gained a deep appreciation for the power that RSpec pro-vides in “getting the words right” for testing.
Figure 10-17.The complete output of all of our specs
Output like this helps us bridge the gap between our code and the business language of our clients: clients can read this and identify gaps in our specs or areas where we misunderstood the require-ments.